Notice de pose Velux GGL GGU Solar (Solaire)
Notice de pose Velux GGL GGU Solar (Solaire)
Notice de pose Velux GGL GGU Solar (Solaire)

You also want an ePaper? Increase the reach of your titles
YUMPU automatically turns print PDFs into web optimized ePapers that Google loves.
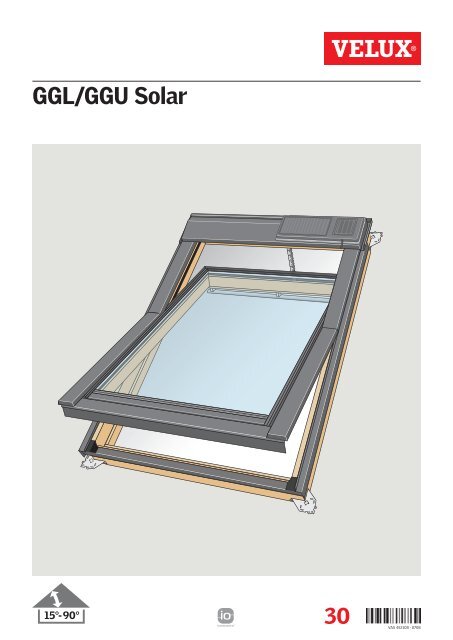
<strong>GGL</strong>/<strong>GGU</strong> <strong>Solar</strong><br />
15°-90°<br />
30<br />
VAS 452108 - 0708
<strong>GGL</strong>/<strong>GGU</strong><br />
E--<br />
BFX<br />
BDX<br />
BBX<br />
LS--<br />
185–220 cm<br />
2 VELUX
ENGLISH: Important information<br />
Read instructions carefully before installing and operating. Please keep<br />
instructions for future reference and hand them over to any new user.<br />
Safety<br />
• The product must not be put into operation until it has been fitted<br />
according to the instructions.<br />
• Before operating ensure that the window can be and is operated without<br />
risk of damage to property or injury to people or animals.<br />
• Prevent the window from opening or closing sud<strong>de</strong>nly and uncontrollably<br />
during installation.<br />
• The window does not meet requirements for emergency escape.<br />
• If flashing is not to be installed immediately, fit the covers supplied<br />
with the window.<br />
Product<br />
• The product is compatible with products with the io-homecontrol ®<br />
logo.<br />
• The window may be manually operated.<br />
• Electrical products must be dis<strong>pose</strong>d of in conformity with national<br />
regulations for electronic waste and not with usual household waste.<br />
• Used batteries have to be dis<strong>pose</strong>d of in conformity with the relevant<br />
environmental regulations.<br />
• Expected battery lifetime of the solar window operator: Approx 10<br />
years.<br />
• The packaging can be dis<strong>pose</strong>d of with usual household waste.<br />
• Noise level: Max 70 dB(A).<br />
• Protection <strong>de</strong>gree: IP 44.<br />
• If you have any technical questions, please contact VELUX.<br />
io-homecontrol ®<br />
provi<strong>de</strong>s advanced and secure radio technology that is easy to install.<br />
io-homecontrol ®<br />
labelled products communicate with each other, improving comfort,<br />
security and energy savings.<br />
www.io-homecontrol.com<br />
DEUTSCH: Wichtige Informationen<br />
Vor Montagebeginn und Gebrauch bitte sorgfältig die gesamte Anleitung<br />
lesen. Bitte bewahren Sie die Anleitung für späteren Gebrauch auf<br />
und geben Sie diese an <strong>de</strong>n jeweiligen neuen Benutzer weiter.<br />
Sicherheit<br />
• Das Produkt darf erst dann in Betrieb genommen wer<strong>de</strong>n, wenn es<br />
nach <strong>de</strong>n Anleitungen eingebaut ist.<br />
• Die Bedienung <strong>de</strong>s Fensters sollte nur dann erfolgen, wenn <strong>de</strong>r Benutzer<br />
sich vergewissert hat, dass das Fenster ohne Risiko für Personen,<br />
Tiere o<strong>de</strong>r Gegenstän<strong>de</strong> bedient wer<strong>de</strong>n kann.<br />
• Ein plötzliches, unkontrolliertes Öffnen o<strong>de</strong>r Schließen <strong>de</strong>s Fensters<br />
während <strong>de</strong>r Montage vermei<strong>de</strong>n.<br />
• Dieses Fenster erfüllt nicht die Anfor<strong>de</strong>rungen an Notausstiege.<br />
• Falls <strong>de</strong>r Ein<strong>de</strong>ckrahmen nicht sofort montiert wird, sind die mitgelieferten<br />
Ab<strong>de</strong>ckbleche anzubringen.<br />
Produkt<br />
• Das Produkt ist mit Produkten mit <strong>de</strong>m io-homecontrol ® Logo kompatibel.<br />
• Das Fenster kann manuell bedient wer<strong>de</strong>n.<br />
• Elektrische Produkte sind nach nationalen Bestimmungen als elektronischer<br />
Müll zu entsorgen und dürfen nicht in <strong>de</strong>n Hausmüll gelangen.<br />
• Gebrauchte Batterien müssen nach <strong>de</strong>n entsprechen<strong>de</strong>n umweltrechtlichen<br />
Bestimmungen entsorgt wer<strong>de</strong>n.<br />
• Erwartete Akkulebensdauer <strong>de</strong>s <strong>Solar</strong>zellen-Fenstermotors: Ca. 10<br />
Jahre.<br />
• Die Verpackung kann mit <strong>de</strong>m Hausmüll entsorgt wer<strong>de</strong>n.<br />
• Geräuschentwicklung: Max. 70 dB(A).<br />
• Schutzart: IP 44.<br />
• Bei eventuellen Fragen wen<strong>de</strong>n Sie sich bitte an VELUX.<br />
io-homecontrol ® bietet eine fortschrittliche und sichere Radio-Funktechnologie, die einfach<br />
zu installieren ist. io-homecontrol ® gekennzeichnete Produkte kommunizieren miteinan<strong>de</strong>r<br />
und verbessern somit Komfort, Sicherheit und Energieeinsparung.<br />
www.io-homecontrol.com<br />
FRANÇAIS : Information importante<br />
Lire attentivement la totalité <strong>de</strong> la notice avant l'installation et l'utilisation.<br />
Conserver cette notice pour vous y référer en cas <strong>de</strong> besoin et ne<br />
pas oublier <strong>de</strong> la transmettre à tout nouvel utilisateur.<br />
Sécurité<br />
• Le produit ne doit être mis en fonction qu'après l'avoir installé suivant<br />
les indications <strong>de</strong> sa propre notice.<br />
• Avant <strong>de</strong> manœuvrer la fenêtre, s'assurer que celle-ci peut-être<br />
actionnée sans risque <strong>de</strong> dommages matériels ou <strong>de</strong> blessures pour une<br />
personne ou un animal.<br />
• Faire en sorte que la fenêtre ne s'ouvre ni ne se ferme soudainement et<br />
sans contrôle pendant l'installation.<br />
• La fenêtre n'est pas prévue pour servir d'issue <strong>de</strong> secours.<br />
• Si le raccor<strong>de</strong>ment d'étanchéité n'est pas immédiatement installé,<br />
monter les profilés <strong>de</strong> recouvrement fournis avec la fenêtre.<br />
Produit<br />
• Ce produit est compatible avec <strong>de</strong>s produits portant le logo<br />
io-homecontrol ® .<br />
• La fenêtre peut être manœuvrée manuellement.<br />
• Les produits électriques/électroniques doivent être mis en décharge<br />
conformément à la réglementation sur les déchets électroniques en<br />
vigueur et ne doivent en aucun cas être jetés aux ordures ménagères.<br />
• Les piles usagées doivent être déposées dans un endroit approprié<br />
conformément à la réglementation sur l'environnement en vigueur.<br />
• Durée <strong>de</strong> vie estimée <strong>de</strong>s batteries du moteur <strong>de</strong> la fenêtre solaire :<br />
environ 10 ans.<br />
• L'emballage peut être jeté aux ordures ménagères.<br />
• Niveau sonore : maximum 70 dB(A).<br />
• Classe <strong>de</strong> protection : IP 44.<br />
• Pour toutes questions techniques, contacter VELUX.<br />
io-homecontrol ®<br />
re<strong>pose</strong> sur une technologie avancée, sécurisée et sans-fil, facile à<br />
installer. Les produits io-homecontrol ®<br />
communiquent entre eux pour offrir plus <strong>de</strong><br />
confort, <strong>de</strong> sécurité et d'économies d'énergie.<br />
www.io-homecontrol.com<br />
DANSK: Vigtig information<br />
Læs hele vejledningen grundigt igennem før montering og ibrugtagning.<br />
Vejledningen bør opbevares til senere brug og gives vi<strong>de</strong>re til en evt. ny<br />
bruger.<br />
Sikkerhed<br />
• Produktet må først tages i brug, når <strong>de</strong>t er monteret ifølge vejledningerne.<br />
• Vinduet bør kun betjenes, når brugeren har sikret sig, at <strong>de</strong>tte kan ske<br />
u<strong>de</strong>n risiko for personer, dyr eller genstan<strong>de</strong>.<br />
• Undgå, at vinduet pludselig åbner eller lukker ukontrolleret un<strong>de</strong>r<br />
montering.<br />
• Vinduet opfyl<strong>de</strong>r ikke forskrifter for nødudgang.<br />
• Såfremt inddækning ikke monteres med <strong>de</strong>t samme, skrues <strong>de</strong> medlevere<strong>de</strong><br />
beklædnings<strong>de</strong>le på.<br />
Produkt<br />
• Produktet er kompatibelt med produkter med io-homecontrol ® logoet.<br />
• Vinduet kan betjenes manuelt.<br />
• Elektriske produkter må ikke smi<strong>de</strong>s ud med almin<strong>de</strong>ligt husholdningsaffald,<br />
men skal bortskaffes i henhold til nationale regler for elektronisk<br />
affald.<br />
• De brugte batterier skal bortskaffes i overensstemmelse med gæl<strong>de</strong>n<strong>de</strong><br />
miljøforskrifter.<br />
• Forventet levetid for <strong>de</strong>n solcelledrevne vinduesåbners batteri: ca. 10<br />
år.<br />
• Emballagen kan bortskaffes sammen med almin<strong>de</strong>ligt husholdningsaffald.<br />
• Lydtryksniveau: maks. 70 dB(A).<br />
• Kapslingsklasse: IP 44.<br />
• Eventuelle tekniske spørgsmål rettes til VELUX.<br />
io-homecontrol ®<br />
er avanceret og sikker radioteknologi, som er nem at installere.<br />
Produkter, <strong>de</strong>r er mærket io-homecontrol ® , kommunikerer med hinan<strong>de</strong>n, hvilket giver<br />
øget komfort, sikkerhed og energibesparelser.<br />
www.io-homecontrol.com<br />
VELUX 3
NEDERLANDS: Belangrijke informatie<br />
Lees <strong>de</strong>ze inbouwinstructies voor installatie en gebruik zorgvuldig door.<br />
Bewaar <strong>de</strong>ze voor later gebruik en geef hem door aan ie<strong>de</strong>re nieuwe<br />
gebruiker.<br />
Veiligheid<br />
• Het product mag alleen in werking wor<strong>de</strong>n gesteld, wanneer het volgens<br />
<strong>de</strong> instructies geïnstalleerd is.<br />
• Bedien <strong>de</strong> dakvenster niet totdat het zeker is dat het product kan<br />
wor<strong>de</strong>n bediend zon<strong>de</strong>r risico op scha<strong>de</strong> aan eigendommen of letsel of<br />
aan mensen of dieren.<br />
• Vermijd tij<strong>de</strong>ns het inbouwen ongecontroleerd en plotseling openen of<br />
sluiten van het dakvenster.<br />
• Het dakvenster voldoet niet aan <strong>de</strong> voorschriften die gel<strong>de</strong>n voor<br />
nooduitgangen.<br />
• Als het gootstuk niet direct met <strong>de</strong> inbouw aangebracht wordt, breng<br />
dan <strong>de</strong> aluminium af<strong>de</strong>klijsten die bij het dakvenster horen weer aan.<br />
Product<br />
• Dit product is aan te sluiten op producten met het io-homecontrol ®<br />
logo.<br />
• Het dakvenster kan handmatig bediend wor<strong>de</strong>n.<br />
• Elektrische producten moeten wor<strong>de</strong>n afgevoerd in naleving van <strong>de</strong><br />
nationale regelgeving voor elektronisch afval en niet bij het gewone<br />
huisvuil.<br />
• Gebruikte batterijen vallen on<strong>de</strong>r chemisch afval en dienen weggegooid<br />
te wor<strong>de</strong>n in overeenstemming met <strong>de</strong> gel<strong>de</strong>n<strong>de</strong> milieureglementen.<br />
• De verwachte batterijlevensduur van het dakvensteropener op zonneenergie<br />
is ongeveer 10 jaar.<br />
• De verpakking kan samen met het huisvuil weggegooid wor<strong>de</strong>n.<br />
• Geluidsniveau: max. 70 dB(A).<br />
• Beschermingsgraad: IP 44.<br />
• Bij technische vragen kunt u contact opnemen met VELUX.<br />
ESPAÑOL: Información importante<br />
Lea estas instrucciones cuidadosamente antes <strong>de</strong> la instalación y puesta<br />
en marcha. Conserve las instrucciones para su uso posterior y entréguelas<br />
a cualquier nuevo usuario.<br />
Seguridad<br />
• No haga funcionar el producto hasta que esté completamente terminada<br />
la instalación siguiendo las instrucciones.<br />
• No haga funcionar la ventana sin asegurarse <strong>de</strong> que pue<strong>de</strong> manejarse<br />
sin riesgo <strong>de</strong> daños a bienes o <strong>de</strong> lesiones a personas o animales.<br />
• Evite que la ventana pueda abrirse o cerrarse <strong>de</strong> forma incontrolada<br />
durante la instalación.<br />
• La ventana no cumple las especificaciones <strong>de</strong> salida <strong>de</strong> emergencia.<br />
• Si el tapajuntas no va a ser instalado inmediatamente, coloque los<br />
perfiles <strong>de</strong> la ventana.<br />
Producto<br />
• El producto es compatible con los que tengan el logotipo<br />
io-homecontrol ® .<br />
• La ventana pue<strong>de</strong> accionarse manualmente.<br />
• Los productos eléctricos <strong>de</strong>ben eliminarse <strong>de</strong> acuerdo a la normativa<br />
para residuos <strong>de</strong> productos electrónicos y no con los residuos habituales<br />
<strong>de</strong>l hogar.<br />
• Las baterías usadas <strong>de</strong>ben eliminarse <strong>de</strong> acuerdo con la normativa <strong>de</strong><br />
medio ambiente y no con los residuos domésticos habituales.<br />
• Vida útil <strong>de</strong>l motor solar <strong>de</strong> la ventana: aproximadamente 10 años.<br />
• El embalaje pue<strong>de</strong> eliminarse como basura doméstica normal.<br />
• Nivel acústico: max. 70 dB(A).<br />
• Grado <strong>de</strong> protección: IP 44.<br />
• Para cualquier consulta técnica, contacte con VELUX.<br />
io-homecontrol ® proporciona tecnología avanzada <strong>de</strong> radio frecuencia, segura y fácil <strong>de</strong><br />
instalar. Los productos etiquetados io-homecontrol ®<br />
se comunican entre sí, mejorando<br />
el confort, la seguridad y el ahorro <strong>de</strong> energía.<br />
www.io-homecontrol.com<br />
io-homecontrol ®<br />
biedt een geavanceer<strong>de</strong> en veilige radiotechnologie die gemakkelijk te<br />
installeren is. Producten met het io-homecontrol ® -label communiceren met elkaar, wat het<br />
comfort, <strong>de</strong> veiligheid en <strong>de</strong> energiebesparing bevor<strong>de</strong>rt.<br />
www.io-homecontrol.com<br />
ITALIANO: Informazioni importanti<br />
Leggere attentamente le istruzioni prima di iniziare l'installazione. Conservare<br />
le istruzioni per un eventuale successivo utilizzo e consegnarle ad<br />
ogni nuovo utilizzatore.<br />
Sicurezza<br />
• Non azionare il prodotto prima che sia stato installato completamente,<br />
in conformità alle istruzioni.<br />
• Prima di azionare la finestra assicurarsi che non possa arrecare danni a<br />
persone, cose o animali.<br />
• Durante l'installazione evitare l'improvvisa apertura e/o chiusura <strong>de</strong>l<br />
battente <strong>de</strong>lla finestra.<br />
• La finestra non può essere consi<strong>de</strong>rata un'uscita di emergenza.<br />
• Se il raccordo non viene installato immediatamente, montare comunque<br />
i rivestimenti forniti.<br />
Prodotto<br />
• Il prodotto è compatibile con prodotti recanti il logo io-homecontrol ® .<br />
• La finestra può essere operata manualmente.<br />
• I prodotti elettrici <strong>de</strong>vono essere smaltiti in conformità a quanto<br />
previsto dai regolamenti <strong>de</strong>l proprio paese relativamente al materiale<br />
elettrico e non con i rifiuti comuni.<br />
• Le batterie usate <strong>de</strong>vono essere smaltite in conformità alle normative<br />
ambientali e non con i rifiuti comuni.<br />
• Durata prevista <strong>de</strong>lle batterie <strong>de</strong>l motore solare: 10 anni circa.<br />
• L'imballo può essere smaltito assieme ai normali rifiuti di casa.<br />
• Rumorosità massima: 70 dB(A).<br />
• Grado di protezione: IP 44.<br />
• Per qualsiasi ulteriore informazione tecnica, si prega di contattare<br />
direttamente la se<strong>de</strong> VELUX.<br />
io-homecontrol ®<br />
offre una avanzata tecnologia in radio frequenza sicura e facile da<br />
installare. Tutti i prodotti contraddistinti dal marchio io-homecontrol ®<br />
si interfacciano<br />
automaticamente tra loro per offrire maggiore comfort, sicurezza e risparmio energetico.<br />
www.io-homecontrol.com<br />
POLSKI: Ważne informacje<br />
Uważnie przeczytaj instrukcję przed rozpoczęciem montażu i<br />
użytkowania silnika. Zachowaj instrukcje do późniejszego użytku i<br />
przekaż ją każ<strong>de</strong>mu nowemu użytkownikowi.<br />
Bezpieczeństwo<br />
• Nie można rozpocząć użytkowania produktu jeżeli nie został zainstalowany<br />
zgodnie z instrukcją montażu.<br />
• Przed rozpoczęciem użytkowania okna upewnij się, iż operowanie nim<br />
nie zagraża bezpieczeństwu ludzi i zwierząt.<br />
• Zabezpiecz okno przed nagłym, niekontrolowanym otwarciem bądź<br />
zamknięciem w trakcie instalacji.<br />
• Okno nie spełnia wymagań wyjścia ewakuacyjnego.<br />
• Jeżeli kołnierz uszczelniający nie będzie od razu instalowany, zamontuj<br />
oblachowanie dostarczone wraz z oknem.<br />
Produkt<br />
• Ten produkt jest kompatybilny z innymi produktami oznaczonymi logo<br />
io-homecontrol ® .<br />
• Oknem można operować ręcznie.<br />
• Odpady elektroniczne nie mogą być wyrzucane razem z odpadami z<br />
gospodarstwa domowego, ale zgodnie z odpowiednimi przepisami.<br />
• Zużyte baterie muszą być wyrzucone zgodnie z obowiązującymi<br />
przepisami dotyczącymi ochrony środowiska naturalnego.<br />
• Zakładany, średni czas żywotności baterii silnika okna solarnego<br />
wynosi około 10 lat.<br />
• Opakowanie może być wyrzucone razem z innymi odpadami z gospodarstwa<br />
domowego.<br />
• Poziom hałasu: Max. 70 dB(A).<br />
• Stopień bezpieczeństwa: IP 44.<br />
• Jeżeli masz jakiekolwiek pytania techniczne skontaktuj się z firmą<br />
VELUX.<br />
io-homecontrol ®<br />
to zaawansowana i bezpieczna technologia bezprzewodowa, którą<br />
łatwo zainstalować. Produkty ze znakiem io-homecontrol ®<br />
komunikują się ze sobą<br />
podnosząc komfort i bezpieczeństwo oraz obniżając zużycie energii.<br />
www.io-homecontrol.com<br />
4 VELUX
1<br />
1<br />
4<br />
3<br />
3<br />
2<br />
<strong>GGL</strong>/<strong>GGU</strong> M06<br />
2<br />
ENGLISH:<br />
1 : Installation brackets and screws – see page 7.<br />
2 : Covers and screws – see page 18.<br />
3 : Remote control and directions for use<br />
– see pages 21-23.<br />
4 : Adaptor plate for window.<br />
<strong>Solar</strong> cell, screws, cleaning tissue, sponge<br />
and cable tie – see pages 19-20.<br />
DEUTSCH:<br />
1 : Montagewinkel und Schrauben – siehe<br />
Seite 7.<br />
2 : Ab<strong>de</strong>ckbleche und Schrauben – siehe<br />
Seite 18.<br />
3 : Fernbedienung und Bedienungsanleitung<br />
– siehe Seiten 21-23.<br />
4 : Adapterplatte für Fenster.<br />
<strong>Solar</strong>zellenfeld, Schrauben, Reinigungstuch,<br />
Schwamm und Kabelbin<strong>de</strong>r – siehe Seiten<br />
19-20.<br />
FRANÇAIS :<br />
1 : Installation <strong>de</strong>s pattes <strong>de</strong> fixation et<br />
vissage – voir page 7.<br />
2 : Profilés <strong>de</strong> recouvrement et vissage<br />
– voir page 18.<br />
3 : Télécomman<strong>de</strong> et notice d'utilisation<br />
– voir pages 21 à 23.<br />
4 : Platine d'adaptation pour fenêtre.<br />
Panneau <strong>de</strong> cellules solaires, vis, chiffon<br />
<strong>de</strong> nettoyage, éponge et languette attache<br />
câble – voir pages 19-20.<br />
DANSK:<br />
1 : Monteringsvinkler og skruer – se si<strong>de</strong> 7.<br />
2 : Beklædnings<strong>de</strong>le og skruer – se si<strong>de</strong> 18.<br />
3 : Fjernbetjening og brugsvejledning – se<br />
si<strong>de</strong> 21-23.<br />
4 : Adapterpla<strong>de</strong> til vindue.<br />
Solcellepanel, skruer, vaskeserviet, svamp<br />
og kabel bin<strong>de</strong>r – se si<strong>de</strong> 19-20.<br />
NEDERLANDS:<br />
1 : Bevestigingsbeugels en schroeven<br />
– zie pagina 7.<br />
2 : Lijstwerk en schroeven – zie pagina 18.<br />
3 : Afstandsbediening en gebruiksaanwijzing<br />
– zie pagina 21-23.<br />
4 : Adapterplaat voor dakvenster.<br />
Zonnepaneel, schroeven, schoonmaakdoek,<br />
spons en kabelbin<strong>de</strong>r – zie pagina 19-20.<br />
ITALIANO:<br />
1 : Staffe di fissaggio e viti – ve<strong>de</strong>re pag. 7.<br />
2 : Rivestimenti e viti – ve<strong>de</strong>re pag. 18.<br />
3 : Telecomando e istruzioni per l'uso – ve<strong>de</strong>re<br />
pag. 21-23.<br />
4 : Adattatore per finestra.<br />
Pannello solare, viti, panno per la pulizia,<br />
spugna e fascetta – ve<strong>de</strong>re pag. 19-20.<br />
ESPANÕL:<br />
1 : Soportes y tornillos para la instalación<br />
– vea la página 7.<br />
2 : Perfiles exteriores y tornillos – vea las<br />
página 18.<br />
3 : Mando a distancia y manual <strong>de</strong> usuario<br />
– vea las páginas 21-23.<br />
4 : Placa adaptadore para ventana.<br />
Panel solar, tornillos, pañuelo <strong>de</strong> limpieza,<br />
esponja y bridas – vea las páginas 19-20.<br />
POLSKI:<br />
1 : Kątowniki montażowe i wkręty – patrz<br />
strona 7.<br />
2 : Oblachowanie i wkręty – patrz strona 18.<br />
3 : Pilot zdalnego sterowania i wskazówki<br />
dotyczące użytkowania – patrz strony 21-23.<br />
4 : Płytka montażowa dla okna.<br />
Panel solarny, wkręty, ściereczka do czyszczenia,<br />
gąbka i wiązka przewodów – patrz<br />
strony 19-20.<br />
5 VELUX
X1<br />
2<br />
6 VELUX
EDW<br />
EDZ<br />
EDL<br />
EDS<br />
EDN<br />
EDE<br />
EDP<br />
EDB<br />
EB-<br />
EK-<br />
EF-<br />
GI-<br />
VF-<br />
EA-<br />
EU-<br />
ECX<br />
xxx<br />
XXX<br />
XXX<br />
XXX<br />
XXX<br />
XXX<br />
XXX<br />
3<br />
30 mm<br />
VELUX 7
4a<br />
100 mm<br />
80 mm<br />
Y + 45 mm<br />
X + 40-60 mm<br />
Y + 45 mm<br />
20-30 mm<br />
20-30 mm<br />
80 mm<br />
250 mm<br />
X<br />
4b<br />
Y + 45 mm<br />
80 mm<br />
X + 10-60 mm<br />
Y + 45 mm<br />
5-30 mm<br />
5-30 mm<br />
80 mm<br />
X<br />
8 VELUX
4c<br />
Y + 45 mm<br />
100 mm<br />
X + 40-60 mm<br />
Y + 45 mm<br />
20-30 mm<br />
20-30 mm<br />
X<br />
4d<br />
Y + 45 mm<br />
X + 40-60 mm<br />
Y + 45 mm<br />
20-30 mm<br />
20-30 mm<br />
105 mm<br />
X<br />
VELUX 9
5<br />
6<br />
BDX<br />
10 VELUX
7<br />
BDX<br />
8<br />
b<br />
BDX<br />
a<br />
80 mm<br />
30 mm<br />
a<br />
b<br />
10 mm<br />
30 mm<br />
VELUX 11
9<br />
10<br />
12 VELUX
11<br />
a<br />
b<br />
a<br />
b<br />
30 mm 80 mm<br />
12<br />
BDX<br />
VELUX 13
BFX<br />
13<br />
3<br />
2<br />
2<br />
1<br />
1<br />
3<br />
2<br />
2<br />
2<br />
1<br />
2<br />
21<br />
14 VELUX
13<br />
BFX<br />
max 500 mm<br />
14<br />
BFX<br />
15<br />
BFX<br />
VELUX 15
16<br />
BFX<br />
17<br />
BFX<br />
16 VELUX
18<br />
BFX<br />
19<br />
BFX<br />
20<br />
BFX<br />
VELUX 17
21<br />
7<br />
5<br />
6<br />
5<br />
4<br />
3<br />
4<br />
3<br />
2<br />
1<br />
<strong>GGL</strong>/<strong>GGU</strong> M06<br />
2<br />
EDW<br />
EDZ<br />
EDL<br />
EDS<br />
XXX<br />
XXX<br />
XXX<br />
XXX<br />
XXX<br />
XXX<br />
2 4 5 6 1 3 7<br />
18 VELUX
ENGLISH: Installation of solar cell<br />
DEUTSCH: Montage <strong>de</strong>s <strong>Solar</strong>zellenfelds<br />
FRANÇAIS : Installation du panneau <strong>de</strong> cellules solaires<br />
DANSK: Montering af solcellepanel<br />
NEDERLANDS: Montage van het zonnepaneel<br />
ITALIANO: Installazione <strong>de</strong>l pannello ad energia solare<br />
ESPAÑOL: Instalación <strong>de</strong> un panel solar<br />
POLSKI: Instalacja panela solarnego<br />
ENGLISH: Fitting to roof windows<br />
<strong>GGL</strong>/<strong>GGU</strong> <strong>Solar</strong> (without solar roller shutter):<br />
See ill. 22 .<br />
DEUTSCH: Montage auf einem Dachflächenfenster<br />
<strong>GGL</strong>/<strong>GGU</strong> <strong>Solar</strong> (ohne <strong>Solar</strong>-Rolla<strong>de</strong>n):<br />
Siehe Abb. 22 .<br />
FRANÇAIS : Adaptation pour fenêtres <strong>de</strong> toit<br />
<strong>GGL</strong>/<strong>GGU</strong> <strong>Solaire</strong> (sans volet roulant solaire):<br />
voir schéma 22 .<br />
ITALIANO: Installazione su finestra per tetti<br />
<strong>GGL</strong>/<strong>GGU</strong> <strong>Solar</strong> (senza persiana avvogibile solare):<br />
fare riferimento al punto fig. 22 .<br />
ESPAÑOL: Instalar ventana para tejado<br />
<strong>GGL</strong>/<strong>GGU</strong> <strong>Solar</strong> (sin persianas solares):<br />
Véase fig. 22 .<br />
POLSKI: Montaż w przypadku manualnie otwieranego<br />
okna do poddaszy (bez panela solarnego<br />
rolety zewnętrznej): Patrz pkt. 22 .<br />
DANSK: Montering på ovenlysvindue<br />
<strong>GGL</strong>/<strong>GGU</strong> <strong>Solar</strong> (u<strong>de</strong>n solcellerulleskod<strong>de</strong>): Se<br />
ill. 22 .<br />
NEDERLANDS: Montage op een dakvenster<br />
<strong>GGL</strong>/<strong>GGU</strong> <strong>Solar</strong> (zon<strong>de</strong>r een rolluik op zonneenergi):<br />
zie fig. 22 .<br />
22<br />
ENGLISH: Fitting to a solar roller shutter: Purchase<br />
adaptor plate ZOZ 213.<br />
Note: The solar cell can be fitted to roller shutters<br />
only if the window size co<strong>de</strong> is M--, P--,<br />
S-- or U--. The size co<strong>de</strong> appears on the data<br />
plate of the window.<br />
DEUTSCH: Montage auf einem <strong>Solar</strong>-Rollla<strong>de</strong>n:<br />
Zusätzliche Adapterplatte ZOZ 213.<br />
Hinweis: Das <strong>Solar</strong>zellenfeld lässt sich nur auf<br />
Rolllä<strong>de</strong>n montieren, wenn es sich um die Fenstergrößen<br />
bezeichnung M--, P--, S-- o<strong>de</strong>r<br />
U-- han<strong>de</strong>lt. Die Größenbezeichnung lässt sich<br />
auf <strong>de</strong>m Typenschild <strong>de</strong>s Fensters ablesen.<br />
FRANÇAIS : Adaptation pour un volet roulant<br />
solaire : Vous procurer la platine d'adaptation<br />
ZOZ 213.<br />
Nota: Le panneau <strong>de</strong> cellules solaires ne peut<br />
être monté qu'uniquement sur <strong>de</strong>s volets roulants<br />
dont le co<strong>de</strong> dimensionnel est M--, P--,<br />
S-- ou U--. Les co<strong>de</strong>s dimensionnels sont indiqués<br />
sur la plaque d'i<strong>de</strong>ntification <strong>de</strong> la fenêtre.<br />
ITALIANO: Installazione in presenza di una<br />
persiana avvolgibile solare: ordinare l’adattatore<br />
ZOZ 213.<br />
Nota: il pannello ad energia solare può essere<br />
installato su persiane avvolgibili solo qualora le<br />
misure <strong>de</strong>lla finestra presentino i seguenti codici:<br />
M--, P--, S-- o U--. La misura <strong>de</strong>lla finestra è presente<br />
sulla targhetta i<strong>de</strong>ntificativa <strong>de</strong>lla finestra.<br />
ESPAÑOL: Instalar en una persiana solar: adquiera<br />
la placa <strong>de</strong> montaje ZOZ 213.<br />
Nota: El panel solar pue<strong>de</strong> instalarse en persianas<br />
solo si el código <strong>de</strong> tamaño <strong>de</strong> la ventana es<br />
M--, P--, S-- o U--. El código <strong>de</strong> tamaño aparece<br />
en la placa <strong>de</strong> i<strong>de</strong>ntificación <strong>de</strong> la ventana.<br />
POLSKI: Montaż do solarnej rolety zewnętrznej:<br />
kup dodatkową płytkę montażową ZOZ 213.<br />
Uwaga: Panel solarny może zostać zamontowany<br />
do solarnej rolety zewnętrznej tylko do okien<br />
o rozmiarach M--, P--, S-- lub U--. Kod rozmiaru<br />
okna umieszczony jest na tabliczce znamionowej<br />
okna.<br />
DANSK: Montering på solcellerulleskod<strong>de</strong>:<br />
Adapterpla<strong>de</strong> ZOZ 213 anskaffes.<br />
Bemærk: Solcellepanelet kan kun monteres på<br />
rulleskod<strong>de</strong>r, hvis vinduets størrelsesko<strong>de</strong> er M--,<br />
P--, S-- eller U--. Størrelsesko<strong>de</strong>n aflæses på<br />
vinduets typeskilt.<br />
450710-0899<br />
XXX XXX XXXXXXXXXX<br />
XXXXXXXX<br />
www.VELUX.com<br />
NEDERLANDS: Montage op een rolluik op zonneenergie:<br />
Schaf adapterplaat ZOZ 213 aan.<br />
Opmerking: Het zonnepaneel kan alleen bevestigd<br />
wor<strong>de</strong>n op een rolluik als <strong>de</strong> maatco<strong>de</strong>ring<br />
M--, P--, S-- of U-- is. De maatco<strong>de</strong>ring vindt u op<br />
het typeplaatje rechtsboven op uw dakvenster.<br />
VELUX 19
Surface Cleaner Sachet<br />
Pochette <strong>de</strong> Nettoyage<br />
Oppervlaktereiniger<br />
Salvietta Detergente<br />
22<br />
1<br />
Reinigungstuch<br />
2 3<br />
4<br />
5<br />
a<br />
b<br />
450710-0899<br />
XXX XXX XXXX<br />
B04<br />
www.velux.com<br />
c d<br />
ENGLISH: Fitting solar cell to top cover of the<br />
window<br />
Fit the solar cell in dry weather and at temperatures<br />
between +10°C and +30°C. Clean the top cover with<br />
the sponge supplied and wipe with cleaning tissue.<br />
The surface must be completely dry and clean before<br />
fitting.<br />
1 : Remove the foil from the double-si<strong>de</strong>d adhesive<br />
tape.<br />
2 : Position adaptor plate as shown and press it<br />
hard against top cover.<br />
3 : Fit solar cell by pushing it into the adaptor plate<br />
from right to left.<br />
4 : Lead cable as shown.<br />
5 : Connect cable from solar cell to the cable from<br />
the battery box a . Connect cable from motor to<br />
the battery box b .<br />
Window size B04:<br />
Connect cable from solar cell to the battery box c .<br />
Connect cable from motor to the battery box d .<br />
DEUTSCH: <strong>Solar</strong>zellenfeld auf <strong>de</strong>m Markisenkasten<br />
<strong>de</strong>s Fensters montieren<br />
Das <strong>Solar</strong>zellenfeld bei trockenem Wetter und bei<br />
Temperaturen zwischen +10 °C und +30 °C montieren.<br />
Den Markisenkasten mit <strong>de</strong>m beiliegen<strong>de</strong>n<br />
Schwamm säubern und ihn mit <strong>de</strong>m Reinigungstuch<br />
abwischen. Vor <strong>de</strong>r Montage muss die Oberfläche<br />
vollständig trocken und sauber sein.<br />
1 : Die Folie <strong>de</strong>s doppelseitigen Klebebands entfernen.<br />
2 : Die Adapterplatte wie gezeigt positionieren und<br />
sie fest gegen <strong>de</strong>n Markisenkasten drücken.<br />
3 : Das <strong>Solar</strong>zellenfeld montieren, in<strong>de</strong>m die Einbauplatte<br />
von rechts nach links geschoben wird.<br />
4 : Die Leitung wie abgebil<strong>de</strong>t verlegen.<br />
5 : Die Leitung vom <strong>Solar</strong>zellenfeld mit <strong>de</strong>r Leitung<br />
<strong>de</strong>s Akkus verbin<strong>de</strong>n a . Die Leitung vom Motor<br />
an <strong>de</strong>n Akku anschließen b .<br />
Fenstergröße B04:<br />
Die Leitung vom <strong>Solar</strong>zellenfeld an <strong>de</strong>n Akku anschließen<br />
c . Die Leitung vom Motor an <strong>de</strong>n Akku<br />
anschließen d .<br />
FRANÇAIS : Adaptation du panneau <strong>de</strong> cellules<br />
solaires au capot <strong>de</strong> la fenêtre<br />
Installer le panneau <strong>de</strong> cellules solaires par temps<br />
sec et à <strong>de</strong>s températures entre +10°C et +30°C.<br />
Nettoyer le capot avec l'éponge fournie et essuyer<br />
avec le chiffon. La surface doit être complètement<br />
sèche et nettoyée avant installation.<br />
1 : Enlever le film <strong>de</strong> protection <strong>de</strong>s adhésifs double<br />
face.<br />
2 : Placer la platine d'adaptation comme indiqué et<br />
l'appuyer fortement sur le capot.<br />
3 : Installer le panneau <strong>de</strong> cellules solaires en le<br />
pressant dans la platine <strong>de</strong> la droite vers la<br />
gauche.<br />
4 : Passer le câble comme indiqué.<br />
5 : Brancher le câble <strong>de</strong> la cellule solaire sur le câble<br />
du boîtier batterie a . Brancher le câble du<br />
moteur sur le boîtier batterie b .<br />
Fenêtre <strong>de</strong> dimension B04 :<br />
Brancher le câble <strong>de</strong> la cellule solaire sur le boîtier<br />
batterie c . Brancher le câble du moteur sur la<br />
batterie d .<br />
DANSK: Solcellepanel monteres på vinduets<br />
topkasse<br />
Solcellepanelet skal monteres i tørvejr og ved<br />
temperaturer mellem +10 °C og +30 °C. Vinduets<br />
topkasse afrenses med <strong>de</strong>n medlevere<strong>de</strong> svamp og<br />
tørres efter med vaskeserviet. Overfla<strong>de</strong>n skal være<br />
helt ren og tør før montering.<br />
1 : Folien fjernes fra <strong>de</strong>n dobbeltklæben<strong>de</strong> tape.<br />
2 : Adapterpla<strong>de</strong>n placeres som vist og trykkes fast<br />
mod vinduets topkasse.<br />
3 : Solcellepanelet monteres ved at sky<strong>de</strong> <strong>de</strong>t ind<br />
over adapterpla<strong>de</strong>n fra højre mod venstre.<br />
4 : Ledningen føres som vist.<br />
5 : Ledningen fra solcellepanelet tilsluttes ledningen<br />
fra batteriboksen a . Ledningen fra motoren<br />
tilsluttes batteriboksen b .<br />
Vinduesstørrelse B04:<br />
Ledningen fra solcellepanelet tilsluttes batteriboksen<br />
c . Ledningen fra motoren tilsluttes batteriboksen d .<br />
NEDERLANDS: Plaats het zonnepaneel op <strong>de</strong><br />
bovenkap van het dakvenster<br />
Plaats het zonnepaneel met droog weer en een<br />
temperatuur tussen <strong>de</strong> +10°C en +30°C. Maak <strong>de</strong><br />
bovenkap schoon met <strong>de</strong> spons en <strong>de</strong> schoonmaakdoek.<br />
Het oppervlak dient voor plaatsing schoon en<br />
droog te zijn.<br />
1 : Verwij<strong>de</strong>r <strong>de</strong> folie van het dubbelzijdig tape.<br />
2 : Plaats <strong>de</strong> adapterplaat zoals afgebeeld en druk<br />
het krachtig tegen <strong>de</strong> bovenkap.<br />
3 : Bevestig het zonnepaneel door <strong>de</strong> adapterplaat<br />
van rechts naar links te drukken.<br />
4 : Bevestig <strong>de</strong> kabel zoals op <strong>de</strong> afbeelding.<br />
5 : Verbind <strong>de</strong> kabel van het zonnepaneel met <strong>de</strong><br />
kabel van <strong>de</strong> batterijbox a . Verbind <strong>de</strong> kabel van<br />
<strong>de</strong> motor met <strong>de</strong> batterijbox b .<br />
Dakvenster maat B04:<br />
Verbind <strong>de</strong> kabel van het zonnenpaneel met <strong>de</strong> batterijbox<br />
c . Verbind <strong>de</strong> kabel van <strong>de</strong> motor met <strong>de</strong><br />
batterijbox d .<br />
ITALIANO: Installazione <strong>de</strong>l pannello ad energia<br />
solare sul rivestimento superiore <strong>de</strong>lla finestra<br />
Installare il pannello ad energia solare in condizioni<br />
di asciutto e temperatura compresa tra i +10°C ed<br />
i +30°C. Pulire il rivestimento superiore con la spugna<br />
in dotazione e asciugare con un panno pulito.<br />
La superficie <strong>de</strong>ve essere completamente asciutta e<br />
pulita prima di proce<strong>de</strong>re con l'installazione.<br />
1 : Rimuovere il foglio protettivo sul nastro<br />
bia<strong>de</strong>sivo.<br />
2 : Posizionare l'adattatore come illustrato e premerlo<br />
con forza sul rivestimento superiore.<br />
3 : Fissare il pannello ad energia solare premendolo<br />
all'interno <strong>de</strong>ll'adattatore da <strong>de</strong>stra verso<br />
sinistra.<br />
4 : Far scorrere il cavo come illustrato.<br />
5 : Collegare il cavo dal pannello ad energia solare al<br />
cavo <strong>de</strong>lla scatola <strong>de</strong>lla batteria a . Collegare il<br />
cavo dal motore alla scatola <strong>de</strong>lla batteria b .<br />
Misura <strong>de</strong>lla finestra B04:<br />
Collegare il cavo dal pannello ad energia solare alla<br />
scatola <strong>de</strong>lla batteria c . Collegare il cavo dal motore<br />
alla scatola <strong>de</strong>lla batteria d .<br />
ESPAÑOL: Instalar el panel solar en el perfil<br />
superior <strong>de</strong>l marco <strong>de</strong> la ventana<br />
Instale el panel solar con tiempo seco y temperaturas<br />
entre +10°C y +30°C. Limpie el perfil superior<br />
<strong>de</strong>l marco con la esponja suministrada y seque con<br />
el pañuelo. La superficie <strong>de</strong>be estar totalmente seca<br />
y limpia antes <strong>de</strong> la instalación.<br />
1 : Quite el papel <strong>de</strong> la cinta adhesiva.<br />
2 : Coloque la placa como se indica y presiónela con<br />
fuerza contra el perfil superior <strong>de</strong>l marco.<br />
3 : Instale el panel solar empujándolo contra la<br />
placa adaptadora <strong>de</strong> <strong>de</strong>recha a izquierda.<br />
4 : Guíe el cable como se indica.<br />
5 : Conecte el cable <strong>de</strong>l panel solar al cable <strong>de</strong> la<br />
caja <strong>de</strong> baterías a . Conecte el cable <strong>de</strong>l motor a<br />
la caja <strong>de</strong> baterías b .<br />
Tamaño <strong>de</strong> ventana B04:<br />
Conecte el cable <strong>de</strong>l panel solar a la caja <strong>de</strong> baterías c .<br />
Conecte el cable <strong>de</strong>l motor a la caja <strong>de</strong> baterías d .<br />
POLSKI: Montaż panela solarnego do górnego<br />
oblachowania okna<br />
Montuj panel solarny przy bez<strong>de</strong>szczowej pogodzie<br />
i temperaturze powietrza pomiędzy +10°C i +30°C.<br />
Oczyść górne oblachowanie okna przy pomocy dostarczonej<br />
gąbki i wytrzyj je ściereczką. Powierzchnia<br />
montażowa musi być całkowicie sucha i czysta.<br />
1 : Usuń folię z taśmy dwustronnie klejącej.<br />
2 : Ustaw płytkę montażową tak jak pokazano na<br />
rysunku i mocno dociśnij do oblachowania okna.<br />
3 : Zamontuj panel solarny wsuwając go w płytkę<br />
montażową od strony prawej do lewej.<br />
4 : Poprowadź przewód tak jak pokazano na<br />
rysunku.<br />
5 : Podłącz przewód panela solarnego do gniazda<br />
baterii a . Podłącz przewód silnika do gniazda<br />
baterii b .<br />
W przypadku okna o rozmiarze B04:<br />
Podłącz przewód panela solarnego do gniazda baterii<br />
c . Podłącz przewód silnika do gniazda baterii d .<br />
20 VELUX
23<br />
1<br />
2<br />
3<br />
ENGLISH: Putting into operation<br />
Before the window operator can be put into<br />
operation, it must be registered in the remote<br />
control. Press the test button on the window<br />
operator for at least 10 seconds 1 . The window<br />
operator chain runs briefly back and forth.The<br />
registration must be completed within<br />
10 minutes, see directions for use for the remote<br />
control 2 .<br />
When the registration has been completed, the<br />
window operator is ready for use.<br />
DEUTSCH: Inbetriebnahme<br />
Bevor <strong>de</strong>r Fenstermotor in Betrieb genommen<br />
wer<strong>de</strong>n kann, muss dieser in <strong>de</strong>r Fernbedienung<br />
registriert wer<strong>de</strong>n. Den Test-Knopf <strong>de</strong>s Fenstermotors<br />
min<strong>de</strong>stens 10 Sekun<strong>de</strong>n eindrücken<br />
1 . Die Fenstermotor-Kette läuft kurzzeitig vor<br />
und zurück. Die Registrierung muss innerhalb<br />
10 Minuten erfolgen, siehe die Bedienungsanleitung<br />
für die Fernbedienung 2 .<br />
Nach <strong>de</strong>r Registrierung ist <strong>de</strong>r Fenstermotor<br />
betriebsbereit.<br />
FRANÇAIS : Mise en service<br />
Avant <strong>de</strong> mettre en service le moteur d'ouverture<br />
il doit être enregistré sur la télécomman<strong>de</strong>.<br />
Appuyer au moins 10 secon<strong>de</strong>s sur le bouton<br />
<strong>de</strong> test du moteur <strong>de</strong> la fenêtre 1 . La chaîne<br />
du moteur s'actionne brièvement d'avant en<br />
arrière. L'enregistrement doit être réalisé dans<br />
les 10 minutes, voir la notice d'utilisation <strong>de</strong> la<br />
télécomman<strong>de</strong> 2 .<br />
Quand l'enregistrement est achevé, le moteur<br />
d'ouverture est prêt pour l'utilisation.<br />
DANSK: Ibrugtagning<br />
Før vinduesåbneren kan tages i brug, skal <strong>de</strong>n<br />
registreres i fjernbetjeningen. Der trykkes på<br />
testknappen på vinduesåbneren i mindst<br />
10 sekun<strong>de</strong>r 1 . Kæ<strong>de</strong>n kører kortvarigt frem<br />
og tilbage. Registreringen skal nu gennemføres<br />
in<strong>de</strong>n for 10 minutter, se brugsvejledningen til<br />
fjernbetjeningen 2 .<br />
Når registreringen er gennemført, er vinduesåbneren<br />
klar til brug.<br />
NEDERLANDS: In gebruik nemen<br />
Voordat <strong>de</strong> dakvensteropener in gebruik kan<br />
wor<strong>de</strong>n genomen, moet het eerst in <strong>de</strong> afstandsbediening<br />
geregistreerd wor<strong>de</strong>n. Druk minimaal<br />
10 secon<strong>de</strong>n op <strong>de</strong> testknop van <strong>de</strong> dakvensteropener<br />
1 . De ketting van <strong>de</strong> dakvenster opener<br />
beweegt kort voor- en achteruit. De registratie<br />
moet binnen 10 minuten voltooid zijn. Zie <strong>de</strong><br />
gebruiksaanwijzing van <strong>de</strong> afstands bediening 2 .<br />
Als <strong>de</strong> registratie gereed is, kan <strong>de</strong> <strong>de</strong> dakvensteropener<br />
gebruikt wor<strong>de</strong>n.<br />
ITALIANO: Funzionamento<br />
Prima che il motore sia messo in funzione,<br />
occorre memorizzarlo nel telecomando. Premere<br />
il tasto di prova <strong>de</strong>l motore per più di 10 secondi<br />
1 . La catena <strong>de</strong>l motore scorrerà brevemente<br />
avanti e indietro. La memorizzazione <strong>de</strong>ve essere<br />
completata entro 10 minuti (fare riferimento alle<br />
istruzioni per l'uso <strong>de</strong>l telecomando) 2 .<br />
Una volta completata la registrazione, il motore è<br />
pronto per l'utilizzo.<br />
ESPAÑOL: Puesta en funcionamiento<br />
Antes <strong>de</strong> poner en funcionamiento el motor,<br />
<strong>de</strong>be registrarse en el mando a distancia. Pulse el<br />
botón <strong>de</strong> comprobación en el motor <strong>de</strong> apertura<br />
durante al menos 10 segundos 1 . La ca<strong>de</strong>na<br />
<strong>de</strong>l motor se <strong>de</strong>splaza brevemente hacia atrás y<br />
hacia <strong>de</strong>lante. El registro <strong>de</strong>be completarse en<br />
los siguientes 10 minutos, consulte el manual <strong>de</strong><br />
usario <strong>de</strong>l mando a distancia 2 .<br />
Cuando se haya completado el registro, el motor<br />
estará operativo.<br />
POLSKI: Przygotowanie do działania<br />
Przed rozpoczęciem użytkowania silnika, musi<br />
zostać on wprowadzony do pilota zdalnego sterowania.<br />
Naciśnij i przytrzymaj przycisk testowy<br />
w silniku okna, przez co najmniej 10 sekund 1 .<br />
Łańcuch silnika uruchomi się na krótko. Rejestracja<br />
musi zostać zakończona w ciągu 10 minut,<br />
patrz wskazówki dotyczące użytkowania pilota<br />
zdalnego sterowania 2 .<br />
Po zakończeniu rejestracji silnik jest gotowy do<br />
działania.<br />
VELUX 21
24<br />
ENGLISH: Function<br />
The product is battery-powered and can be operated<br />
as long as the battery is charged. In case<br />
of discharge, the battery will recharge over the<br />
course of a few days (<strong>de</strong>pen<strong>de</strong>nt on the amount<br />
of sunshine).<br />
Note: The use of the solar product can be limited<br />
if it is facing north, the solar cell has been placed<br />
in the sha<strong>de</strong>, or the daylight is blocked in other<br />
ways.If installed and used correctly, the product<br />
requires a minimal amount of maintenance only.<br />
In case of accumulation of dirt on the solar cell,<br />
this should be cleaned with water and ordinary<br />
household cleaners. To obtain maximum charging<br />
function, the solar cell should be kept free<br />
from snow and ice during the winter period.<br />
DEUTSCH: Funktion<br />
Das Produkt ist akkubetrieben und kann <strong>de</strong>shalb<br />
bedient wer<strong>de</strong>n, solange <strong>de</strong>r Akku gela<strong>de</strong>n ist.<br />
Bei einer Entladung wird sich dieser im Laufe<br />
einiger Tage wie<strong>de</strong>r aufla<strong>de</strong>n (abhängig von <strong>de</strong>r<br />
Menge <strong>de</strong>r Sonneneinstrahlung).<br />
Hinweis: Der Gebrauch <strong>de</strong>s <strong>Solar</strong>zellenprodukts<br />
kann eingegrenzt sein: z. B. bei einer Lage nach<br />
Nor<strong>de</strong>n, wenn die <strong>Solar</strong>zellen im Schatten liegen,<br />
o<strong>de</strong>r wenn <strong>de</strong>r Lichteinfall durch beson<strong>de</strong>re<br />
Umstän<strong>de</strong> stark eingeschränkt wird.<br />
Bei richtiger Montage und Bedienung ist das<br />
Produkt fast wartungsfrei. Bei starker Verschmutzung<br />
ist das <strong>Solar</strong>zellenfeld mit Wasser<br />
und haushaltsüblichen Reinigungsmitteln zu<br />
säubern. Um eine maximale La<strong>de</strong>funktion zu<br />
erhalten, ist das <strong>Solar</strong>zellenfeld in <strong>de</strong>n Wintermonaten<br />
möglichst schnee- und eisfrei zu halten.<br />
FRANÇAIS : Fonctionnement<br />
Le produit est équipé d'une batterie et peut donc<br />
être actionné aussi longtemps que la batterie<br />
reste chargée. En cas <strong>de</strong> décharge, la batterie se<br />
rechargera sous quelques jours (en fonction <strong>de</strong><br />
l'ensoleillement).<br />
Nota : L'usage du produit solaire est possible<br />
mais ne peut être intensif s'il est orienté au Nord,<br />
si les cellules solaires sont à l'ombre, ou si la lumière<br />
du jour est occultée pour d'autres raisons.<br />
Installé et utilisé correctement, le produit ne<br />
requiert qu'un minimum d'entretien. En cas<br />
d'accumulation <strong>de</strong> poussière sur le panneau <strong>de</strong><br />
cellules solaires, procé<strong>de</strong>r à son nettoyage avec<br />
<strong>de</strong> l'eau et un détergent ordinaire. Pour obtenir<br />
une charge maximale, le panneau <strong>de</strong> cellules<br />
solaires doit ne pas être recouvert <strong>de</strong> neige ni <strong>de</strong><br />
glace pendant la pério<strong>de</strong> hivernale.<br />
DANSK: Funktion<br />
Produktet er batteridrevet og kan <strong>de</strong>rfor betjenes,<br />
så længe batteriet er opla<strong>de</strong>t. Ved afladning<br />
la<strong>de</strong>s batteriet atter op i løbet af få dage<br />
(afhængigt af solmæng<strong>de</strong>n).<br />
Bemærk: Brugen af solcelleproduktet kan være<br />
begrænset, hvis <strong>de</strong>t er monteret nordvendt, hvis<br />
solcellepanelet er placeret i skygge, eller hvis <strong>de</strong>r<br />
på an<strong>de</strong>n må<strong>de</strong> er blokeret for lyspåvirkning.<br />
Ved korrekt installation og brug kræver produktet<br />
minimal vedligehol<strong>de</strong>lse. Ved kraftig tilsmudsning<br />
af solcellepanelet rengøres <strong>de</strong>tte med<br />
vand og almin<strong>de</strong>ligt opvaskemid<strong>de</strong>l. For at opnå<br />
maksimal opladningsfunktion bør solcellepanelet<br />
hol<strong>de</strong>s fri for sne og is i vinterperio<strong>de</strong>n.<br />
NEDERLANDS: Functies<br />
Het product wordt van stroom voorzien door een<br />
batterij, die kan wor<strong>de</strong>n gebruikt, zolang <strong>de</strong> batterij<br />
opgela<strong>de</strong>n is. Wanneer <strong>de</strong> batterij leeg is, zal<br />
<strong>de</strong> batterij binnen een paar dagen weer helemaal<br />
zijn opgela<strong>de</strong>n (afhankelijk van <strong>de</strong> hoeveelheid<br />
zon).<br />
Let op: Het gebruik van een zonne-energie<br />
produkt kan beperkt wor<strong>de</strong>n, doordat het product<br />
op het noor<strong>de</strong>n ligt, het zonnepaneel in <strong>de</strong><br />
schaduw is geplaatst of het daglicht op an<strong>de</strong>re<br />
manieren belemmerd wordt.<br />
Bij een juiste montage en gebruik, vergt het<br />
product een minimale hoeveelheid on<strong>de</strong>rhoud.<br />
Wanneer er een opeenhoping van vuil op het<br />
zonnepaneel zit, dient dit schoon gemaakt te<br />
wor<strong>de</strong>n met water en een alledaags reinigingsmid<strong>de</strong>l<br />
om <strong>de</strong> zonnecellen maximaal op te<br />
kunnen la<strong>de</strong>n. Het is belangrijk om het zonnepaneel<br />
tij<strong>de</strong>ns <strong>de</strong> winterperio<strong>de</strong> vrij te hou<strong>de</strong>n van<br />
sneeuw en ijs.<br />
ITALIANO: Funzionalità<br />
Il prodotto è alimentato tramite batteria e di<br />
conseguenza può essere utilizzato fino a che<br />
la batteria è carica. In caso di esaurimento, la<br />
batteria può essere ricaricata in un paio di giorni<br />
(dipen<strong>de</strong> dall'intensità <strong>de</strong>lla luce solare).<br />
Nota: La funzionalità <strong>de</strong>l prodotto può essere<br />
limitata qualora il pannello ad energia solare sia<br />
orientato a nord oppure posizionato all'ombra o,<br />
comunque, se la luce solare venga ostacolata in<br />
altro modo.<br />
Se installato e utilizzato correttamente, il<br />
prodotto richie<strong>de</strong> una manutenzione minima. In<br />
caso di accumulo di sporcizia sul pannello solare,<br />
pulire con acqua e un <strong>de</strong>tergente per ottenere il<br />
massimo <strong>de</strong>ll'efficienza nella ricarica. Il pannello<br />
ad energia solare <strong>de</strong>ve essere libero da <strong>de</strong>positi<br />
di neve o ghiaccio.<br />
ESPAÑOL: Funcionamiento<br />
El producto está alimentado con baterías y<br />
pue<strong>de</strong> funcionar mientras éstas estén cargadas.<br />
Si se <strong>de</strong>scargan, volverán a recargarse en unos<br />
pocos días (<strong>de</strong>pendiendo <strong>de</strong> la cantidad <strong>de</strong> luz<br />
solar).<br />
Nota: El uso <strong>de</strong> un producto solar pue<strong>de</strong> quedar<br />
limitado si está orientado al norte, la célula solar<br />
queda situada en la sombra, o la luz solar queda<br />
interrumpida <strong>de</strong> cualquier forma.<br />
Si la instalación y el uso son correctos, el producto<br />
sólo requiere un mantenimiento mínimo.<br />
En caso <strong>de</strong> acumulación <strong>de</strong> suciedad en la célula<br />
solar, <strong>de</strong>be limpiarse con agua y un <strong>de</strong>tergente<br />
común. Para aprovechar al máximo la función <strong>de</strong><br />
carga, el panel solar <strong>de</strong>be estar libre <strong>de</strong> nieve o<br />
hielo durante el periodo invernal.<br />
POLSKI: Działanie<br />
Produkt zasilany jest baterią słoneczną i może<br />
być użytkowany tak długo, jak bateria jest naładowana.<br />
W przypadku rozładowania, bateria<br />
całkowicie naładuje się ponownie w przeciągu<br />
kilku dni (w zależności od nasłonecznienia).<br />
Uwaga: Funkcjonowanie produktów może<br />
zostać ograniczone w przypadku umieszczenia<br />
panela słonecznego w miejscu zacienionym, gdy<br />
jest on skierowany na północ lub, gdy dostęp<br />
światła dziennego jest ograniczony w inny<br />
sposób.<br />
Jeżeli produkt jest zainstalowany i użytkowany<br />
prawidłowo nie wymaga konserwacji. W<br />
przypadku nagromadzenia się kurzu na panelu<br />
słonecznym, należy go umyć używając wody z<br />
dodatkiem powszechnie dostępnych środków<br />
czyszczących. W celu zapewnienia optymalnego<br />
ładowania beterii w zimie należy usuwać z<br />
panela słonecznego śnieg oraz lód.<br />
22 VELUX
25<br />
ENGLISH: Resetting<br />
Reset the window operator by pressing the test<br />
button for at least 10 seconds.<br />
For resetting the remote control, see directions<br />
for use for the remote control.<br />
DEUTSCH: Zurücksetzung<br />
Der Fenstermotor wird zurückgesetzt, in<strong>de</strong>m <strong>de</strong>r<br />
Test-Knopf min<strong>de</strong>stens 10 Sekun<strong>de</strong>n gedrückt<br />
wird.<br />
Für die Zurücksetzung <strong>de</strong>r Fernbedienung, siehe<br />
Bedienungsanleitung für die Fernbedienung.<br />
FRANÇAIS : Réinitialisation<br />
Réinitialiser le moteur <strong>de</strong> fenêtre en pressant le<br />
bouton test pendant au moins 10 secon<strong>de</strong>s.<br />
Pour réinitialiser la télécomman<strong>de</strong>, voir la notice<br />
d'utilisation <strong>de</strong> la télécomman<strong>de</strong>.<br />
DANSK: Nulstilling<br />
Vinduesåbneren nulstilles ved at trykke på testknappen<br />
i mindst 10 sekun<strong>de</strong>r.<br />
For nulstilling af fjernbetjening, se brugsvejledningen<br />
til fjernbetjeningen.<br />
NEDERLANDS: Resetten<br />
Reset <strong>de</strong> dakvensteropener door minimaal<br />
10 secon<strong>de</strong>n <strong>de</strong> testknop in te drukken.<br />
Zie <strong>de</strong> gebruiksaanwijzing voor het resetten van<br />
<strong>de</strong> afstandsbediening.<br />
ITALIANO: Reset<br />
Per effettuare il reset <strong>de</strong>l motore premere il<br />
tasto di prova per più di 10 secondi.<br />
Per effettuare il reset <strong>de</strong>l telecomando, fare<br />
riferimento alle istruzioni per l'uso per il telecomando.<br />
ESPAÑOL: Reinicio<br />
Reinicie el motor <strong>de</strong> apertura pulsando el botón<br />
<strong>de</strong> comprobación durante al menos 10 segundos.<br />
Reinicie el mando a distancia, consulte el manual<br />
<strong>de</strong> usuario.<br />
POLSKI: Resetowanie<br />
Resetowanie silnika następuje poprzez naciśnięcie<br />
przycisku testowego przez co najmniej<br />
10 sekund.<br />
Aby zresetować pilota zdalnego sterowania,<br />
patrz wskazówki dotyczące użytkowania pilota<br />
zdalnego sterowania.<br />
26<br />
3<br />
ENGLISH:<br />
Box 3 with remote control and directions for use<br />
Leave the small box, which contains the remote<br />
control and directions for use for the end-user,<br />
on the window control bar.<br />
DEUTSCH:<br />
Box 3 mit Fernbedienung und Bedienungsanleitung<br />
Die kleine Box für <strong>de</strong>n Benutzer an <strong>de</strong>r Griffleiste<br />
<strong>de</strong>s Fensters anbringen. Diese Box enthält die<br />
Fernbedienung und die Bedienungsanleitung.<br />
FRANÇAIS :<br />
Boîtier 3 avec télécomman<strong>de</strong> et notice d'utilisation<br />
Laisser la petite boîte pour l'utilisateur sur la<br />
barre <strong>de</strong> manœuvre <strong>de</strong> la fenêtre. Elle contient la<br />
télécomman<strong>de</strong> et la notice d'utilisation.<br />
DANSK:<br />
Æske 3 med fjernbetjening og brugsvejledning<br />
Den lille æske til brugeren anbringes på vinduets<br />
gribeliste. Denne æske in<strong>de</strong>hol<strong>de</strong>r fjernbetjening<br />
og brugsvejledning.<br />
NEDERLANDS:<br />
Doos 3 met afstandsbediening en gebruiksaanwijzing<br />
Laat <strong>de</strong> kleine doos zoals afgebeeld aan <strong>de</strong> ventilatieklep<br />
hangen voor <strong>de</strong> eindgebruiker. Deze<br />
doos bevat <strong>de</strong> afstandsbediening en gebruiksaanwijzing.<br />
ITALIANO:<br />
Scatola 3 con telecomando e istruzioni per l’uso<br />
Lasciare la scatola per l'utilizzatore sulla barra<br />
di manovra <strong>de</strong>lla finestra. La scatola contiene il<br />
telecomando e le istruzioni per l'uso.<br />
ESPANÕL:<br />
Caja 3 con mando a distancia y manual <strong>de</strong><br />
usuario<br />
Deje la caja pequeña, para el usuario final, enganchada<br />
en la barra <strong>de</strong> maniobra. La caja contiene<br />
el mando a distancia y el manual <strong>de</strong> usuario.<br />
POLSKI:<br />
Pu<strong>de</strong>łko 3 z pilotem zdalnego sterowania i<br />
wskazówkami dotyczącymi użytkowania<br />
Pozostaw na uchwycie do otwierania okna małe<br />
pu<strong>de</strong>łko zawierające pilota zdalnego sterowania<br />
i wskazówki dotyczące użytkowania dla przyszłego<br />
użytkownika.<br />
23 VELUX
AR:<br />
AT:<br />
AU:<br />
BA:<br />
BE:<br />
BG:<br />
BY:<br />
CA:<br />
CH:<br />
CL:<br />
CN:<br />
CZ:<br />
DE:<br />
DK:<br />
VELUX Argentina S.A.<br />
0 114 711 5666<br />
VELUX Österreich GmbH<br />
02245/32 3 50<br />
VELUX Australia Pty. Ltd.<br />
(02) 9550 3288<br />
VELUX Bosna i Hercegovina d.o.o.<br />
033/626 493, 626 494<br />
VELUX Belgium<br />
(010) 42.09.09<br />
VELUX Bulgaria EOOD<br />
02/955 95 26<br />
VELUX Roof Windows FE<br />
(017) 217 7385<br />
VELUX Canada Inc.<br />
1 800 88-VELUX (888-3589)<br />
VELUX Schweiz AG<br />
0848 945 549<br />
VELUX Chile Limitada<br />
2-231 18 24<br />
VELUX (CHINA) CO. LTD.<br />
0316-607 27 27<br />
VELUX Česká republika, s.r.o.<br />
531 015 511<br />
VELUX Deutschland GmbH<br />
0180-333 33 99<br />
VELUX Danmark A/S<br />
45 16 45 16<br />
EE:<br />
ES:<br />
FI:<br />
FR:<br />
GB:<br />
HR:<br />
HU:<br />
IE:<br />
IT:<br />
JP:<br />
LT:<br />
LV:<br />
NL:<br />
NO:<br />
VELUX Eesti OÜ<br />
621 7790<br />
VELUX Spain, S.A.<br />
91 509 71 00<br />
VELUX Suomi Oy<br />
0207 290 800<br />
VELUX France<br />
0821 02 15 15<br />
0,119€ TTC/min<br />
VELUX Company Ltd.<br />
0870 380 9593<br />
VELUX Hrvatska d.o.o.<br />
01/5555 444<br />
VELUX Magyarország Kft.<br />
(06/1) 436-0601<br />
VELUX Company Ltd.<br />
1800 409 750<br />
VELUX Italia s.p.a.<br />
045/6173666<br />
VELUX-Japan Ltd.<br />
0570-00-8145<br />
VELUX Lietuva, UAB<br />
(85) 270 91 01<br />
VELUX Latvia SIA<br />
67 27 77 33<br />
VELUX Ne<strong>de</strong>rland B.V.<br />
030 - 6 629 629<br />
VELUX Norge AS<br />
22 51 06 00<br />
NZ:<br />
PL:<br />
PT:<br />
RO:<br />
RS:<br />
RU:<br />
SE:<br />
SI:<br />
SK:<br />
TR:<br />
UA:<br />
US:<br />
VELUX New Zealand Ltd.<br />
09-6344 126<br />
VELUX Polska Sp. z o.o.<br />
(022) 33 77 000 / 33 77 070<br />
VELUX Portugal, Lda<br />
21 880 00 60<br />
VELUX România S.R.L.<br />
0-8008-83589<br />
VELUX Srbija d.o.o.<br />
011 3670 468<br />
VELUX Rossia ZAO<br />
(495) 737 75 20<br />
VELUX Svenska AB<br />
042/20 83 80<br />
VELUX Slovenija d.o.o.<br />
01 724 68 68<br />
VELUX Slovensko, s.r.o.<br />
(02) 33 000 555<br />
VELUX Çatı Pencereleri<br />
Ticaret Limited Şirketi<br />
0 216 302 54 10<br />
VELUX Ukraina TOV<br />
(044) 490 5703<br />
VELUX America Inc.<br />
1-800-88-VELUX<br />
www.velux.com<br />
INSTALLATION INSTRUCTIONS FOR <strong>GGL</strong>/<strong>GGU</strong> SOLAR ©2008 VELUX GROUP ® VELUX, THE VELUX LOGO, io-homecontrol AND THE io-homecontrol LOGO ARE REGISTERED TRADEMARKS