Manuale Installatore - Elco Ecoflam
Manuale Installatore - Elco Ecoflam
Manuale Installatore - Elco Ecoflam

Create successful ePaper yourself
Turn your PDF publications into a flip-book with our unique Google optimized e-Paper software.
2.10 Refrigerant recovery<br />
Procedure for returning all the refrigerant to the external unit.<br />
1. unscrew the caps from the cocks on the two-way and three-way valves.<br />
2. set the appliance to cooling mode (check whether the compressor works) and leave<br />
the appliance on for a few minutes.<br />
3. connect the pressure gauge.<br />
4. close the two-way valve.<br />
5. when the pressure gauge reads “0”, close the three-way valve and turn the air conditioning<br />
off immediately.<br />
6. shut the caps on the valves.<br />
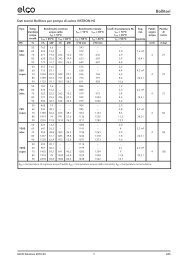
MODEL<br />
18000 24000 36000 48000<br />
Liquid pipe diameter<br />
Gas pipe diameter<br />
Maximum length of pipe with standard charge<br />
Maximum distance between internal and external unit*<br />
Extra gas recharge<br />
Maximum difference in height between int. and ext. unit**<br />
Type of refrigerant<br />
1/4” 3/8” 1/2” 1/2”<br />
1/2” 5/8” 3/4” 3/4”<br />
5 m 5 m 5 m 5 m<br />
30 m 30 m 30 m 30 m<br />
30 g/m 65 g/m 90 g/m 90 g/m<br />
20 m 20 m 20 m 20 m<br />
R410A R410A R410A R410A<br />
(*) at the maximum distance, the efficiency is approximately 90%.<br />
(**) with a difference in height of more than 3 m, we recommend you include a trap as illustrated in the figure.<br />
30<br />
ATTENTION:<br />
Recharge any refrigerant gas in accordance with the instructions provided on the product<br />
used, wearing protective clothing, avoiding violent outlets of gas from the tank or<br />
from the system’s connections.<br />
IMPORTANT CHECK FOR ANY REFRIGERANT LEAKS<br />
Once you have made the connections, open the cocks so that the gas fills the piping<br />
and always check all piping against leaks using a leak detector. (personal injury from<br />
cold burns)<br />
2.11 Charging the refrigerant gas<br />
Before proceeding with the refrigerant charging operations, check that all the valves and<br />
cocks are shut.<br />
N.B: the first time you install the appliance, perform the procedure described in<br />
paragraph 2.7 “Making a vacuum and checking the tightness”.<br />
1. Connect the service valve to the low pressure connection of the pressure gauge, and<br />
connect the refrigerant tank to the central inlet of the pressure gauge. Open the refrigerant<br />
tank and then open the cap on the central valve and act on the pin valve until you<br />
hear the refrigerant exiting, then release the pin and screw the cap back on.<br />
2. Open the three-way valve and the two-way valve.<br />
3. Turn on the air conditioning unit on cooling mode. Leave it on for a few minutes.<br />
4. Control the pressure shown on the pressure gauge.<br />
5. Open the “LOW” knob and allow the refrigerant to flow gradually.<br />
6. Once the pressure level is reached, shut the “LOW” knob.<br />
7. When the charging is complete, test the operation, measuring the temperature of the gas<br />
pipe with the special thermometer: the temperature should be between 5°C and 8°C<br />
more than the temperature read on the evaporation temperature section of the pressure<br />
gauge. Now check the stability of the pressure, connecting the pressure gauge assembly<br />
to the three-way service valve. Open the two-way and three-way valves fully, turn on the<br />
air conditioning unit and check there are no refrigerant leaks using the leak detector. (if<br />
there are any leaks, carry out the procedure described in paragraph 2.10 “refrigerant<br />
recovery”).<br />
8. Disconnect the pressure gauge from the valve and turn the air conditioning unit off.<br />
9. Disconnect the tank from the pressure gauge and close all caps.