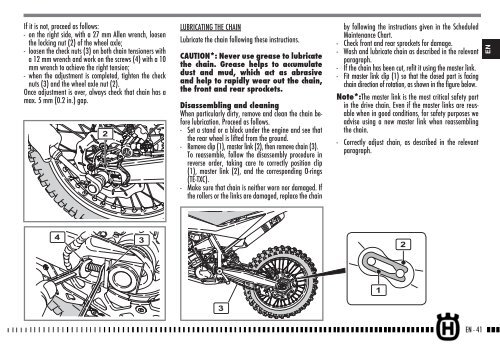
- Page 1:
TC - TE - TXC 449 2011 I.E. TE - TX
- Page 4 and 5:
SOMMARIO Pag. PRESENTAZIONE........
- Page 6 and 7:
IMPORTANTE Per mantenere la “Gara
- Page 8 and 9:
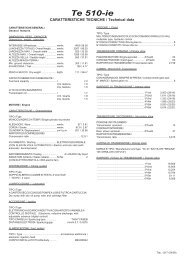
IT - 6 DATI TECNICI MOTORE Tipo ...
- Page 10 and 11:
VISTA GENERALE MOTO - TE 16 15 14 1
- Page 12 and 13:
VISTA GENERALE MOTO - TC - TXC 12 1
- Page 14 and 15:
RUBINETTI CARBURANTE COMANDI I due
- Page 16 and 17:
STRUMENTO DIGITALE, SPIE (TE) Il mo
- Page 18 and 19:
COMANDO GAS La manopola (1) del gas
- Page 20 and 21:
PULSANTE ARRESTO MOTORE (TC) Il pul
- Page 22 and 23:
INDIVIDUAZIONE DEGLI INCONVENIENTI
- Page 24 and 25:
AVVIAMENTO DEL MOTORE (TC) A motore
- Page 26 and 27:
ARRESTO DEL MOTORE IN EMERGENZA (TE
- Page 28 and 29:
CONTROLLO LIVELLO LIQUIDO DI RAFFRE
- Page 30 and 31:
REGOLAZIONE CAVO COMANDO GAS Per ve
- Page 32 and 33:
Per rimuovere la candela agire come
- Page 34 and 35:
- allargare le due linguette di fer
- Page 36 and 37:
REGISTRAZIONE POSIZIONE PEDALE FREN
- Page 38 and 39:
SOSPENSIONI Le indicazioni che segu
- Page 40 and 41:
LIVELLO OLIO FORCELLA Per il regola
- Page 42 and 43:
REGISTRAZIONE FRENO IDRAULICO AMMOR
- Page 44 and 45:
Lavaggio catena senza anelli OR (TC
- Page 46 and 47: RIMONTAGGIO RUOTA ANTERIORE - Monta
- Page 48 and 49: SMONTAGGIO PASTIGLIE FRENO - Rimuov
- Page 50 and 51: SOSTITUZIONE LAMPADINE PROIETTORE (
- Page 52 and 53: SOSTITUZIONE LAMPADA LUCE TARGA (TE
- Page 54 and 55: ❏ Freni / Frizione Controllo circ
- Page 57 and 58: ENGLISH EN EN - 1
- Page 59 and 60: PRESENTATION Welcome to the Husqvar
- Page 61 and 62: IDENTIFICATION DATA The engine iden
- Page 63 and 64: FRONT BRAKE Fixed disc type .......
- Page 65 and 66: LEGEND 1. Front wheel 2. Front brak
- Page 67 and 68: LEGEND 1. Front wheel 2. Front brak
- Page 69 and 70: SIDE STAND A side stand (1) is supp
- Page 71 and 72: 2- SPEED / CLOCK (figure 2) - SPEED
- Page 73 and 74: STEERING LOCK (TE) The motorcycle i
- Page 75 and 76: GEAR SHIFT CONTROL The lever (1) is
- Page 77 and 78: ENGINE STARTING (TE-TXC) With cold
- Page 79 and 80: STOPPING THE MOTORCYCLE AND THE ENG
- Page 81 and 82: ENGINE OIL REPLACEMENT AND MESH FIL
- Page 83 and 84: - Pour the necessary quantity of co
- Page 85 and 86: IDLE ADJUSTMENT Adjust the carburet
- Page 87 and 88: AIR FILTER CHECK - Turn pin (1) cou
- Page 89 and 90: ADJUSTMENT OF THE CONTROL LEVER AND
- Page 91 and 92: REAR BRAKE FLUID LEVEL CHECK Fluid
- Page 93 and 94: ADJUSTING THE FRONT FORK a) COMPRES
- Page 95: ADJUSTING THE SHOCK ABSORBER SPRING
- Page 99 and 100: REMOVING THE FRONT WHEEL Set a stan
- Page 101 and 102: TYRES BRAKES Care should be taken t
- Page 103 and 104: BATTERY The sealed battery does not
- Page 105 and 106: To replace the parking light bulb (
- Page 107 and 108: APPENDIX LONG PERIOD OF INACTIVITY
- Page 109: ALPHABETICAL INDEX Page A ADJUSTING
- Page 112 and 113: SOMMAIRE Page PRÉSENTATION........
- Page 114 and 115: IMPORTANT Pour maintenir la « Gara
- Page 116 and 117: FR - 6 DONNÉES TECHNIQUES MOTEUR T
- Page 118 and 119: VUE GÉNÉRALE DE LA MOTO - TE 16 1
- Page 120 and 121: VUE GÉNÉRALE DE LA MOTO - TC - TX
- Page 122 and 123: ROBINETS CARBURANT COMMANDES Les de
- Page 124 and 125: AFFICHEUR NUMÉRIQUE, VOYANTS (TE)
- Page 126 and 127: POIGNÉE DES GAZ La poignée (1) de
- Page 128 and 129: BOUTON D'ARRÊT MOTEUR (TC) Le bout
- Page 130 and 131: LOCALISATION DES PROBLÈMES DE FONC
- Page 132 and 133: DÉMARRAGE DU MOTEUR (TC) Le moteur
- Page 134 and 135: ARRÊT DU MOTEUR EN ÉTAT D'URGENCE
- Page 136 and 137: CONTRÔLE DU NIVEAU DU LIQUIDE DE R
- Page 138 and 139: RÉGLAGE DU CÂBLE DE COMMANDE DES
- Page 140 and 141: Pour déposer la bougie, agir comme
- Page 142 and 143: - écarter les deux languettes de b
- Page 144 and 145: RÉGLAGE DE LA POSITION PÉDALE DU
- Page 146 and 147:
SUSPENSIONS Les indications qui sui
- Page 148 and 149:
NIVEAU D’HUILE DE LA FOURCHE Pour
- Page 150 and 151:
RÉGLAGE DU FREIN HYDRAULIQUE AMORT
- Page 152 and 153:
Lavage de la chaîne sans joints to
- Page 154 and 155:
REPOSE DE LA ROUE AVANT - Monter l'
- Page 156 and 157:
DÉPOSE DES PLAQUETTES DE FREIN - E
- Page 158 and 159:
REMPLACEMENT DES AMPOULES DE PHARE
- Page 160 and 161:
REMPLACEMENT DE L’AMPOULE D’ÉC
- Page 162 and 163:
Freni / Frizione Controllo circuito
- Page 165 and 166:
DEUTSCH DE DE - 1
- Page 167 and 168:
EINFÜHRUNG Willkommen in der Famil
- Page 169 and 170:
IRAHMEN UND MOTORNUMMER Die Motor-I
- Page 171 and 172:
VORDERRADBREMSE Feststehende Scheib
- Page 173 and 174:
ZEICHENERKLÄRUNG 1. Vorderrad 2. B
- Page 175 and 176:
ZEICHENERKLÄRUNG 1. Vorderrad 2. B
- Page 177 and 178:
SEITENSTÄNDER Jedes Fahrzeug ist m
- Page 179 and 180:
2- SPEED / CLOCK (Abbildung 2) - SP
- Page 181 and 182:
LENKERSCHLOSS (TE) Das Motorrad ist
- Page 183 and 184:
SCHALTPEDAL Das Schaltpedal (1) bef
- Page 185 and 186:
STARTEN DES MOTORS (TE-TXC) Bei kal
- Page 187 and 188:
ANHALTEN DES MOTORRADS UND ABSTELLE
- Page 189 and 190:
MOTORÖLWECHSEL UND REINIGUNG - WEC
- Page 191 and 192:
- Die angegebene Flüssigkeitsmenge
- Page 193 and 194:
LEERLAUFEINSTELLUNG Die Leerlaufein
- Page 195 and 196:
KONTROLLE LUFTFILTER - Entgegen dem
- Page 197 and 198:
EINSTELLUNG BREMSHEBEL UND KONTROLL
- Page 199 and 200:
KONTROLLE BREMSFLÜSSIGKEITSSTAND H
- Page 201 and 202:
EINSTELLUNG GABEL a) DRUCKSTUFE (TC
- Page 203 and 204:
EINSTELLUNG FEDERVORSPANNUNG STOSSD
- Page 205 and 206:
Andernfalls wie folgt vorgehen: - A
- Page 207 and 208:
AUSBAU DES VORDERRADS Einen Block o
- Page 209 and 210:
REIFEN BREMSEN Darauf achten, dass
- Page 211 and 212:
BATTERIE Die Batterie ist versiegel
- Page 213 and 214:
Zum Auswechseln der Standlichtlampe
- Page 215 and 216:
ANHANG LÄNGERE NICHTBENUTZUNG Soll
- Page 217:
ALPHABETISCHES INHALTSVERZEICHNIS S
- Page 220 and 221:
SUMARIO Pág. PRESENTACIÓN........
- Page 222 and 223:
IMPORTANTE Para mantener la “Gara
- Page 224 and 225:
ES - 6 FICHA TÉCNICA MOTOR Tipo ..
- Page 226 and 227:
VISTA GENERAL MOTO - TE 16 15 14 13
- Page 228 and 229:
VISTA GENERAL MOTO - TC - TXC 12 11
- Page 230 and 231:
GRIFOS CARBURANTE MANDOS Los dos gr
- Page 232 and 233:
INSTRUMENTO DIGITAL, PILOTOS (TE) L
- Page 234 and 235:
MANDO DEL ACELERADOR El puño (1) d
- Page 236 and 237:
BOTÓN PARADA MOTOR (TC) El botón
- Page 238 and 239:
IDENTIFICACIÓN DE LOS INCONVENIENT
- Page 240 and 241:
ARRANQUE DEL MOTOR (TC) Con el moto
- Page 242 and 243:
PARADA DEL MOTOR EN EMERGENCIA (TE)
- Page 244 and 245:
COMPROBACIÓN DEL NIVEL DEL LÍQUID
- Page 246 and 247:
REGULACIÓN DEL CABLE DE MANDO DEL
- Page 248 and 249:
Para retirar la bujía, actuar de e
- Page 250 and 251:
- ensanchar las dos lengüetas de r
- Page 252 and 253:
AJUSTE DE POSICIÓN DEL PEDAL DEL F
- Page 254 and 255:
SUSPENSIONES Las indicaciones que s
- Page 256 and 257:
NIVEL DEL ACEITE DE LA HORQUILLA Pa
- Page 258 and 259:
REGULACIÓN FRENO HIDRÁULICO AMORT
- Page 260 and 261:
Lavado cadena sin juntas tóricas (
- Page 262 and 263:
REMONTAJE DE LA RUEDA DELANTERA - M
- Page 264 and 265:
DESMONTAJE PASTILLAS DEL FRENO - De
- Page 266 and 267:
SUSTITUCIÓN LÁMPARAS DEL FARO (TE
- Page 268 and 269:
SUSTITUCIÓN BOMBILLA LUCES MATRÍC
- Page 270 and 271:
-senza tabelle-2004-OK 28-09-2004 1
- Page 273 and 274:
A APPENDICE A APPENDIX A ANNEXE A A
- Page 275 and 276:
A TE -TXC 449 /511 SCHEMA DI MANUTE
- Page 277 and 278:
A TE -TXC 449 /511 WARTUNGSPLAN (DI
- Page 279 and 280:
A TE -TXC 449 /511 WARTUNGSPLAN (DI
- Page 281 and 282:
A TC 449 SCHEMA DI MANUTENZIONE PER
- Page 283 and 284:
A TC 449 WARTUNGSPLAN (DIESE ARBEIT
- Page 285 and 286:
A TC 449 WARTUNGSPLAN (DIESE ARBEIT
- Page 287 and 288:
A TC 449 _TE -TXC 449 /511 SCHEMA D
- Page 289 and 290:
A TC 449 _TE -TXC 449 /511 SCHEMA D
- Page 291 and 292:
A TC 449 _TE -TXC 449 /511 WARTUNGS
- Page 293 and 294:
A TE 449/511 SCHEMA DI MANUTENZIONE
- Page 295 and 296:
A TE 449/511 SCHEMA DI MANUTENZIONE
- Page 297 and 298:
A TE 449/511 WARTUNGSPLAN (DIESE AR
- Page 299 and 300:
A TE 449/511 SCHEMA DI MANUTENZIONE
- Page 301 and 302:
A TE 449/511 SCHEMA DI MANUTENZIONE
- Page 303 and 304:
A TE 449/511 WARTUNGSPLAN (DIESE AR
- Page 305 and 306:
A TE 449/511 WARTUNGSPLAN (DIESE AR
- Page 308:
Ed. 12/2010 - Rev. 02 Husqvarna rec


