Manuale utente_Owner's manual_Manuel d ... - Husqvarna
Manuale utente_Owner's manual_Manuel d ... - Husqvarna Manuale utente_Owner's manual_Manuel d ... - Husqvarna
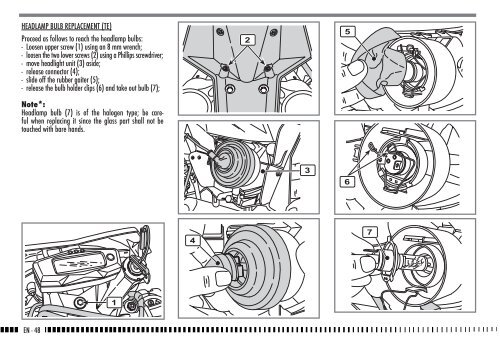
HEADLAMP BULB REPLACEMENT (TE) Proceed as follows to reach the headlamp bulbs: - Loosen upper screw (1) using an 8 mm wrench; - loosen the two lower screws (2) using a Phillips screwdriver; - move headlight unit (3) aside; - release connector (4); - slide off the rubber gaiter (5); - release the bulb holder clips (6) and take out bulb (7); Note*: Headlamp bulb (7) is of the halogen type; be careful when replacing it since the glass part shall not be touched with bare hands. 2 5 3 6 4 7 1 EN - 48
To replace the parking light bulb (8) extract it from the inside cover. Once the bulb has been replaced, reverse the above procedure to reassemble. TURNING INDICATOR BULB REPLACEMENT (TE) - Loosen screw (1) using a Phillips screwdriver; - remove lens (2) and replace bulb (3) pushing it inside, and turning it to remove it; Once the bulb has been replaced, reverse the above procedure to reassemble. TAIL LIGHT (TE) The tail light (1) is a LED light; Replace it when it does not function. EN 1 8 1 2 3 EN - 49
- Page 54 and 55: ❏ Freni / Frizione Controllo circ
- Page 57 and 58: ENGLISH EN EN - 1
- Page 59 and 60: PRESENTATION Welcome to the Husqvar
- Page 61 and 62: IDENTIFICATION DATA The engine iden
- Page 63 and 64: FRONT BRAKE Fixed disc type .......
- Page 65 and 66: LEGEND 1. Front wheel 2. Front brak
- Page 67 and 68: LEGEND 1. Front wheel 2. Front brak
- Page 69 and 70: SIDE STAND A side stand (1) is supp
- Page 71 and 72: 2- SPEED / CLOCK (figure 2) - SPEED
- Page 73 and 74: STEERING LOCK (TE) The motorcycle i
- Page 75 and 76: GEAR SHIFT CONTROL The lever (1) is
- Page 77 and 78: ENGINE STARTING (TE-TXC) With cold
- Page 79 and 80: STOPPING THE MOTORCYCLE AND THE ENG
- Page 81 and 82: ENGINE OIL REPLACEMENT AND MESH FIL
- Page 83 and 84: - Pour the necessary quantity of co
- Page 85 and 86: IDLE ADJUSTMENT Adjust the carburet
- Page 87 and 88: AIR FILTER CHECK - Turn pin (1) cou
- Page 89 and 90: ADJUSTMENT OF THE CONTROL LEVER AND
- Page 91 and 92: REAR BRAKE FLUID LEVEL CHECK Fluid
- Page 93 and 94: ADJUSTING THE FRONT FORK a) COMPRES
- Page 95 and 96: ADJUSTING THE SHOCK ABSORBER SPRING
- Page 97 and 98: If it is not, proceed as follows: -
- Page 99 and 100: REMOVING THE FRONT WHEEL Set a stan
- Page 101 and 102: TYRES BRAKES Care should be taken t
- Page 103: BATTERY The sealed battery does not
- Page 107 and 108: APPENDIX LONG PERIOD OF INACTIVITY
- Page 109: ALPHABETICAL INDEX Page A ADJUSTING
- Page 112 and 113: SOMMAIRE Page PRÉSENTATION........
- Page 114 and 115: IMPORTANT Pour maintenir la « Gara
- Page 116 and 117: FR - 6 DONNÉES TECHNIQUES MOTEUR T
- Page 118 and 119: VUE GÉNÉRALE DE LA MOTO - TE 16 1
- Page 120 and 121: VUE GÉNÉRALE DE LA MOTO - TC - TX
- Page 122 and 123: ROBINETS CARBURANT COMMANDES Les de
- Page 124 and 125: AFFICHEUR NUMÉRIQUE, VOYANTS (TE)
- Page 126 and 127: POIGNÉE DES GAZ La poignée (1) de
- Page 128 and 129: BOUTON D'ARRÊT MOTEUR (TC) Le bout
- Page 130 and 131: LOCALISATION DES PROBLÈMES DE FONC
- Page 132 and 133: DÉMARRAGE DU MOTEUR (TC) Le moteur
- Page 134 and 135: ARRÊT DU MOTEUR EN ÉTAT D'URGENCE
- Page 136 and 137: CONTRÔLE DU NIVEAU DU LIQUIDE DE R
- Page 138 and 139: RÉGLAGE DU CÂBLE DE COMMANDE DES
- Page 140 and 141: Pour déposer la bougie, agir comme
- Page 142 and 143: - écarter les deux languettes de b
- Page 144 and 145: RÉGLAGE DE LA POSITION PÉDALE DU
- Page 146 and 147: SUSPENSIONS Les indications qui sui
- Page 148 and 149: NIVEAU D’HUILE DE LA FOURCHE Pour
- Page 150 and 151: RÉGLAGE DU FREIN HYDRAULIQUE AMORT
- Page 152 and 153: Lavage de la chaîne sans joints to
HEADLAMP BULB REPLACEMENT (TE)<br />
Proceed as follows to reach the headlamp bulbs:<br />
- Loosen upper screw (1) using an 8 mm wrench;<br />
- loosen the two lower screws (2) using a Phillips screwdriver;<br />
- move headlight unit (3) aside;<br />
- release connector (4);<br />
- slide off the rubber gaiter (5);<br />
- release the bulb holder clips (6) and take out bulb (7);<br />
Note*:<br />
Headlamp bulb (7) is of the halogen type; be careful<br />
when replacing it since the glass part shall not be<br />
touched with bare hands.<br />
2<br />
5<br />
3<br />
6<br />
4<br />
7<br />
1<br />
EN - 48


