TXC 511 2013 IE - Husqvarna
TXC 511 2013 IE - Husqvarna
TXC 511 2013 IE - Husqvarna

You also want an ePaper? Increase the reach of your titles
YUMPU automatically turns print PDFs into web optimized ePapers that Google loves.
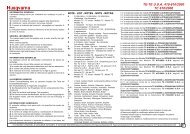
If it is not, proceed as follows:<br />
- on the right side, with a 27 mm Allen wrench, loosen<br />
the locking nut (2) of the wheel axle;<br />
- loosen the check nuts (3) on both chain tensioners with<br />
a 12 mm wrench and work on the screws (4) with a 10<br />
mm wrench to achieve the right tension;<br />
- when the adjustment is completed, tighten the check<br />
nuts (3) and the wheel axle nut (2).<br />
Once adjustment is over, always check that chain has a<br />
max. 5 mm (0.2 in.) gap.<br />
2<br />
LUBRICATING THE CHAIN<br />
Lubricate the chain following these instructions.<br />
CAUTION*: Never use grease to lubricate<br />
the chain. Grease helps to accumulate<br />
dust and mud, which act as abrasive<br />
and help to rapidly wear out the chain,<br />
the front and rear sprockets.<br />
Disassembling and cleaning<br />
When particularly dirty, remove and clean the chain before<br />
lubrication. Proceed as follows.<br />
- Set a stand or a block under the engine and see that<br />
the rear wheel is lifted from the ground.<br />
- Remove clip (1), master link (2), then remove chain (3).<br />
To reassemble, follow the disassembly procedure in<br />
reverse order, taking care to correctly position clip<br />
(1), master link (2), and the corresponding O-rings<br />
(TE-<strong>TXC</strong>).<br />
- Make sure that chain is neither worn nor damaged. If<br />
the rollers or the links are damaged, replace the chain<br />
by following the instructions given in the Scheduled<br />
Maintenance Chart.<br />
- Check front and rear sprockets for damage.<br />
- Wash and lubricate chain as described in the relevant<br />
paragraph.<br />
- If the chain has been cut, refit it using the master link.<br />
- Fit master link clip (1) so that the closed part is facing<br />
chain direction of rotation, as shown in the figure below.<br />
Note*:The master link is the most critical safety part<br />
in the drive chain. Even if the master links are reusable<br />
when in good conditions, for safety purposes we<br />
advise using a new master link when reassembling<br />
the chain.<br />
- Correctly adjust chain, as described in the relevant<br />
paragraph.<br />
EN<br />
4 3<br />
2<br />
3<br />
1<br />
SPECIFICATIONS - OPERATION - MAINTENANCE<br />
EN - 41