TXC 511 2013 IE - Husqvarna
TXC 511 2013 IE - Husqvarna
TXC 511 2013 IE - Husqvarna

You also want an ePaper? Increase the reach of your titles
YUMPU automatically turns print PDFs into web optimized ePapers that Google loves.
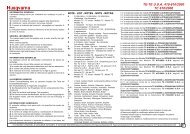
GEAR SHIFT CONTROL<br />
The lever (1) is placed on the left-hand side of the engine.<br />
The operator must release the lever after each gear<br />
change to allow it to return to its central position. Neutral<br />
position (N) is between the first and second gears.<br />
First gear is engaged by pushing the lever downwards;<br />
for other gears push it upwards.<br />
The position of the gear shift lever on the shaft can be<br />
varied as follows: loosen the screw, pull the lever out,<br />
and place the lever in a new position on the shaft.<br />
Tighten the screw once operation is completed.<br />
CAUTION*: Do not shift gears without<br />
disengaging the clutch and closing the<br />
throttle. The engine could be damaged<br />
by overspeed.<br />
WARNING*: Do not downshift when travelling<br />
at a speed that would force the engine<br />
to overrev in the next lower gear,<br />
or cause the rear wheel to lose grip.<br />
TE-<br />
<strong>TXC</strong><br />
N<br />
6<br />
5<br />
4<br />
3<br />
2<br />
1<br />
1<br />
TC<br />
INSTRUCTIONS FOR USING THE MOTORCYCLE<br />
NOTE*: If you are not familiar with the<br />
motorcycle operation, read paragraphs<br />
on “CONTROLS” before riding this motorcycle.<br />
PRE-RIDE CHECKS<br />
Any time you ride your motorcycle, make a general inspection<br />
first and proceed to check the following:<br />
- check fuel level and engine oil level;<br />
- check the brake and clutch fluids level;<br />
- check the steering by turning the handlebar both ways,<br />
fully home;<br />
- check the tyre pressure;<br />
- check the chain tension;<br />
- check the throttle twistgrip and adjust it, if necessary;<br />
- The two screw taps positioned on tanks left rear side,<br />
shall always be left in fully OPEN position.<br />
- TE: turn the key in the ignition switch to ON: check<br />
dashboard display lighting;<br />
- TE: check that parking lights, low beam, and high beam<br />
come on, as well as the relevant warning light;<br />
- TE: operate turning indicators, and check that the relevant<br />
warning light comes on;<br />
- TE: check that the rear stop light comes on.<br />
INSTRUCTIONS FOR RUNNING-IN<br />
The exclusivity of the design, coupled to the high quality<br />
of the materials used and the accuracy of the assembly,<br />
guarantee the higher comfort right from the start. Nevertheless,<br />
during the first 4 hours, you will have to THOR-<br />
OUGHLY respect the following rules. FAILURE TO COMPLY<br />
WITH THEM COULD SERIOUSLY AFFECT MOTORCYCLE LIFE<br />
AND PERFORMANCE.<br />
- warm up the engine by running at low revs before using<br />
the motorcycle;<br />
- avoid quick starts and never rev up the engine when in<br />
low gear;<br />
- ride at low speed until the engine is warmed up;<br />
- apply both brakes several times to settle the pads and<br />
the discs;<br />
- do not maintain the same speed for a long time;<br />
- do not ride for a long time without stopping;<br />
- NEVER drive downhill with GEARBOX IN NEUTRAL, but<br />
shift into gear to brake with the engine if necessary,<br />
thus preventing the fast wear of the brake pads.<br />
- Max. speed during running-in period: 80 Km/h in 5 th<br />
gear (TC) or 6 th gear (TE-<strong>TXC</strong>).<br />
- Have the first inspection be carried out after the first 4<br />
hours of operation.<br />
EN<br />
SPECIFICATIONS - OPERATION - MAINTENANCE<br />
EN - 19