Automazioni per cancelli scorrevoli Automation systems for ... - Tribpt
Automazioni per cancelli scorrevoli Automation systems for ... - Tribpt
Automazioni per cancelli scorrevoli Automation systems for ... - Tribpt

You also want an ePaper? Increase the reach of your titles
YUMPU automatically turns print PDFs into web optimized ePapers that Google loves.
ZBXE<br />
PROGRAMMAZIONE FINECORSA - LIMIT SWITCH PROGRAMMING - PROGRAMMATION FIN DE COURSE<br />
ENDAUSSCHALTER-PROGRAMMIER - PROGRAMMACION FINAL DE CARRERA<br />
ITALIANO<br />
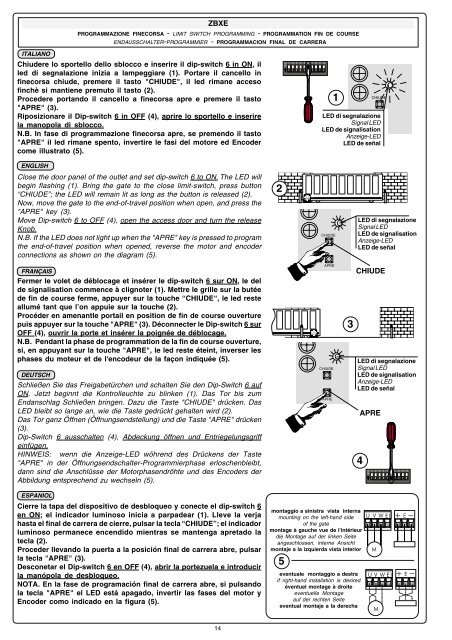
Chiudere lo sportello dello sblocco e inserire il dip-switch 6 in ON, il<br />
led di segnalazione inizia a lampeggiare (1). Portare il cancello in<br />
finecorsa chiude, premere il tasto "CHIUDE", il led rimane acceso<br />
finchè si mantiene premuto il tasto (2).<br />
Procedere portando il cancello a finecorsa apre e premere il tasto<br />
"APRE" (3).<br />
Riposizionare il Dip-switch 6 in OFF (4), aprire lo sportello e inserire<br />
la manopola di sblocco.<br />
N.B. In fase di programmazione finecorsa apre, se premendo il tasto<br />
"APRE" il led rimane spento, invertire le fasi del motore ed Encoder<br />
come illustrato (5).<br />
O<br />
N<br />
1 2 3 4 5 6 7 8 9 10<br />
1<br />
CHIUDE<br />
LED di segnalazione<br />
Signal LED<br />
LED de signalisation<br />
APRE<br />
Anzeige-LED<br />
LED de señal<br />
ENGLISH<br />
Close the door panel of the outlet and set dip-switch 6 to ON. The LED will<br />
begin flashing (1). Bring the gate to the close limit-switch, press button<br />
“CHIUDE”; the LED will remain lit as long as the button is released (2).<br />
Now, move the gate to the end-of-travel position when open, and press the<br />
"APRE" key (3).<br />
Move Dip-switch 6 to OFF (4), open the access door and turn the release<br />
Knob.<br />
N.B. If the LED does not light up when the "APRE" key is pressed to program<br />
the end-of-travel position when opened, reverse the motor and encoder<br />
connections as shown on the diagram (5).<br />
2<br />
CHIUDE<br />
LED di segnalazione<br />
Signal LED<br />
LED de signalisation<br />
Anzeige-LED<br />
LED de señal<br />
FRANÇAIS<br />
Fermer le volet de déblocage et insérer le dip-switch 6 sur ON, le del<br />
de signalisation commence à clignoter (1). Mettre le grille sur la butée<br />
de fin de course ferme, appuyer sur la touche “CHIUDE“, le led reste<br />
allumé tant que l’on appuie sur la touche (2).<br />
Procéder en amenantle portail en position de fin de course ouverture<br />
puis appuyer sur la touche "APRE" (3). Déconnecter le Dip-switch 6 sur<br />
OFF (4), ouvrir la porte et insérer la poignée de déblocage.<br />
N.B. Pendant la phase de programmation de la fin de course ouverture,<br />
si, en appuyant sur la touche "APRE", le led reste éteint, inverser les<br />
phases du moteur et de l'encodeur de la façon indiquée (5).<br />
DEUTSCH<br />
Schließen Sie das Freigabetürchen und schalten Sie den Dip-Switch 6 auf<br />
ON. Jetzt beginnt die Kontrolleuchte zu blinken (1). Das Tor bis zum<br />
Endanschlag Schließen bringen. Dazu die Taste "CHIUDE" drücken. Das<br />
LED bleibt so lange an, wie die Taste gedrückt gehalten wird (2).<br />
Das Tor ganz Öffnen (Öffnungsendstellung) und die Taste "APRE" drücken<br />
(3).<br />
Dip-Switch 6 ausschalten (4), Abdeckung öffnen und Entriegelungsgriff<br />
einfügen.<br />
HINWEIS: wenn die Anzeige-LED wõhrend des Drückens der Taste<br />
"APRE" in der Öffnungsendschalter-Programmierphase erloschenbleibt,<br />
dann sind die Anschlüsse der Motorphasendrõhte und des Encoders der<br />
Abbildung entsprechend zu wechseln (5).<br />
APRE<br />
CHIUDE<br />
APRE<br />
3<br />
CHIUDE<br />
LED di segnalazione<br />
Signal LED<br />
LED de signalisation<br />
Anzeige-LED<br />
LED de señal<br />
APRE<br />
4<br />
O<br />
N<br />
1 2 3 4 5 6 7 8 9 10<br />
ESPANIOL<br />
Cierre la tapa del dispositivo de desbloqueo y conecte el dip-switch 6<br />
en ON; el indicador luminoso inicia a parpadear (1). Lleve la verja<br />
hasta el final de carrera de cierre, pulsar la tecla “CHIUDE”; el indicador<br />
luminoso <strong>per</strong>manece encendido mientras se mantenga apretado la<br />
tecla (2).<br />
Proceder llevando la puerta a la posición final de carrera abre, pulsar<br />
la tecla "APRE" (3).<br />
Desconetar el Dip-switch 6 en OFF (4), abrir la portezuela e introducir<br />
la manópola de desbloqueo.<br />
NOTA. En la fase de programación final de carrera abre, si pulsando<br />
la tecla "APRE" el LED está apagado, invertir las fases del motor y<br />
Encoder como indicado en la figura (5).<br />
montaggio a sinistra vista interna<br />
mounting on the left-hand side<br />
of the gate<br />
montage à gauche vue de l'intérieur<br />
die Montage auf der linken Seite<br />
angeschlossen, interne Ansicht<br />
montaje a la izquierda vista interior<br />
5<br />
eventuale montaggio a destra<br />
if right-hand installation is desired<br />
éventuel montage à droite<br />
eventuelle Montage<br />
auf der rechten Seite<br />
eventual montaje a la derecha<br />
U V W E1<br />
M<br />
U V W E1<br />
M<br />
E<br />
E<br />
14