Instruction Sheet ZU4 Classic Torque Wrench Pump - Enerpac
Instruction Sheet ZU4 Classic Torque Wrench Pump - Enerpac
Instruction Sheet ZU4 Classic Torque Wrench Pump - Enerpac

Create successful ePaper yourself
Turn your PDF publications into a flip-book with our unique Google optimized e-Paper software.
WARNING: Only use hydraulic torque wrenches in a<br />
coupled system. Never use a torque wrench with<br />
unconnected couplers. If the torque wrench becomes<br />
extremely overloaded, components can fail catastrophically causing<br />
severe personal injury.<br />
IMPORTANT: Hydraulic equipment must only be serviced<br />
by a qualifi ed hydraulic technician. For repair service,<br />
contact the Authorized ENERPAC Service Center in your<br />
area. To protect your warranty, use only ENERPAC oil.<br />
WARNING: Immediately replace worn or damaged parts<br />
by genuine ENERPAC parts. Standard grade parts will<br />
break causing personal injury and property damage.<br />
ENERPAC parts are designed to fi t properly and withstand high<br />
loads.<br />
WARNING: Do not use electric pumps in an explosive<br />
atmosphere. Adhere to all local and national electrical<br />
codes. A qualifi ed electrician must do installation and<br />
modifi cation.<br />
Center.<br />
WARNING: Keep hands clear of moving parts and<br />
pressurized hoses.<br />
WARNING: These pumps have internal factory<br />
adjusted relief valves, which must not be repaired or<br />
adjusted except by an Authorized <strong>Enerpac</strong> Service<br />
WARNING: To prevent damage to pump electric<br />
motor, check specifi cations. Use of incorrect power<br />
source will damage the motor.<br />
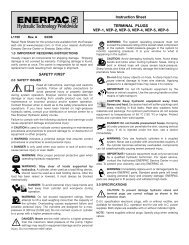
3.0 SPECIFICATIONS<br />
3.1 Performance Chart (see bottom of page)<br />
3.2 Flow Chart (see Figure 1):<br />
Flow (in 3/min)<br />
700<br />
600<br />
500<br />
400<br />
Flow and current vs. Pressure<br />
115V<br />
Current (Amps)<br />
Flow (in3/min) 300<br />
200<br />
100<br />
10<br />
5<br />
0<br />
0<br />
0 1000 2000 3000 4000 5000 6000 7000 8000 9000 10,000 11,600<br />
Pressure (psi)<br />
230V<br />
Figure 1, Flow Chart<br />
▼ <strong>ZU4</strong> PERFORMANCE CHART<br />
25<br />
20<br />
15<br />
Current (Amps)<br />
2<br />
4.0 INSTALLATION<br />
Install or position the pump to ensure that air fl ow around the<br />
motor and pump is unobstructed. Keep the motor clean to<br />
ensure maximum cooling during operation.<br />
4.1 Reservoir Breather Cap (See Figure 2)<br />
A shipping plug is installed in the breather port on the top of<br />
the reservoir. Before using the pump, replace the shipping plug<br />
(C) with the breather cap (A) and adapter fi tting (B). Note: The<br />
breather port is separate from the oil fi ll port. The oil fi ll port (D)<br />
uses an SAE #10 plug.<br />
Figure 2, <strong>ZU4</strong> Breather Installation<br />
4.2 <strong>Pump</strong> Mounting (See Figure 3)<br />
Refer to Figure 3 for mounting dimensions to secure the pump<br />
to a fi xed surface.<br />
1-2 Gal. (4-8 L)<br />
in. (mm)<br />
2.5 Gal. (10 L)<br />
in. (mm)<br />
5 Gal. (20 L)<br />
in. (mm)<br />
10 Gal. (40 L)<br />
in. (mm)<br />
A 3.75 (95) 11.0 (279) 15.6 (396) 18.9 (480)<br />
B 9.00 (229) 12.0 (305) 12.0 (305) 12.0 (305)<br />
C<br />
tapped holes,<br />
M8 x 1.25<br />
0.25 (6) deep<br />
Ø 0.34 (8.6) diameter through holes<br />
Figure 3, Mounting Dimensions<br />
Motor<br />
Output Flow Rate<br />
Size<br />
in3 Motor Electrical Sound Relief Valve<br />
/min<br />
Specifi cations Level Adjustment Range<br />
(hp) 100 psi 700 psi 5,000 psi 10,000 psi (Volts-Ph-Hz) (dBA) (psi)<br />
1.7* 700 535 76 60<br />
*Actual power consumption depends on the application. See Figure 1.<br />
115-1-50/60<br />
230-1-50/60<br />
85-90<br />
1,400-10,000 for “Q” version<br />
1,400-11,600 for “E” version