Creazioni in lana con il mulinetto per fare la maglia MAXI.pdf - Prym
Creazioni in lana con il mulinetto per fare la maglia MAXI.pdf - Prym
Creazioni in lana con il mulinetto per fare la maglia MAXI.pdf - Prym

Create successful ePaper yourself
Turn your PDF publications into a flip-book with our unique Google optimized e-Paper software.
ICK S<br />
K STRICK ST<br />
TRICK STRICK STRIC<br />
CK STRICK STRICK STRICK<br />
STRICK STRICK STRICK STRICK ST<br />
RICK STRICK STRICK STRICK STRICK STR<br />
STRICK STRICK STRICK STRICK STRICK STRICK<br />
TRICK STRICK STRICK STRICK STRICK STRICK STRICK<br />
K STRICK STRICK STRICK STRICK STRICK STRICK STRICK ST<br />
STRICK STRICK STRICK STRICK STRICK STRICK STRICK STRICK<br />
ICK STRICK STRICK STRICK STRICK STRICK STRICK STRICK STRICK<br />
K STRICK STRICK STRICK STRICK STRICK STRICK STRICK STRICK<br />
RICK STRICK STRICK STRICK STRICK STRICK STRICK STRICK STRICK<br />
CK STRICK STRICK STRICK STRICK STRICK STRICK STRICK STRICK<br />
STRICK STRICK STRICK STRICK STRICK STRICK STRICK STRICK STRICK<br />
ICK STRICK STRICK STRICK STRICK STRICK STRICK STRICK STRICK<br />
STRICK STRICK STRICK STRICK STRICK STRICK STRICK STRICK STRICK<br />
TRICK STRICK STRICK STRICK STRICK STRICK STRICK STRICK STRICK<br />
K STRICK STRICK STRICK STRICK STRICK STRICK STRICK STRICK STRICK<br />
STRICK STRICK STRICK STRICK STRICK STRICK STRICK STRICK STRICK<br />
ICK STRICK STRICK STRICK STRICK STRICK STRICK STRICK STRICK STRICK<br />
STRICK STRICK STRICK STRICK STRICK STRICK STRICK STRICK STRICK<br />
RICK STRICK STRICK STRICK STRICK STRICK STRICK STRICK STRICK STRICK<br />
K STRICK STRICK STRICK STRICK STRICK STRICK STRICK STRICK STRICK<br />
TRICK STRICK STRICK STRICK STRICK STRICK STRICK STRICK STRICK STRICK<br />
ICK STRICK STRICK STRICK STRICK STRICK STRICK STRICK STRICK STRICK<br />
STRICK STRICK STRICK STRICK STRICK STRICK STRICK STRICK STRICK STRICK<br />
RICK STRICK STRICK STRICK STRICK STRICK STRICK STRICK STRICK STRICK<br />
K STRICK STRICK STRICK STRICK STRICK STRICK STRICK STRICK STRICK STRICK<br />
STRICK STRICK STRICK STRICK STRICK STRICK STRICK STRICK STRICK STRICK<br />
CK STRICK STRICK STRICK STRICK STRICK STRICK STRICK STRICK STRICK STRICK<br />
STRICK STRICK STRICK STRICK STRICK STRICK STRICK STRICK STRICK STRICK<br />
RICK STRICK STRICK STRICK STRICK STRICK STRICK STRICK STRICK STRICK STRICK<br />
K STRICK STRICK STRICK STRICK STRICK STRICK STRICK STRICK STRICK STRICK<br />
TRICK STRICK STRICK STRICK STRICK STRICK STRICK STRICK STRICK STRICK STRICK<br />
ICK STRICK STRICK STRICK STRICK STRICK STRICK STRICK STRICK STRICK STRICK<br />
STRICK STRICK STRICK STRICK STRICK STRICK STRICK STRICK STRICK STRICK STRICK<br />
RICK STRICK STRICK STRICK STRICK STRICK STRICK STRICK STRICK STRICK STRICK<br />
K STRICK STRICK STRICK STRICK STRICK STRICK STRICK STRICK STRICK STRICK STRICK<br />
TRICK STRICK STRICK STRICK STRICK STRICK STRICK STRICK STRICK STRICK STRICK<br />
CK STRICK STRICK STRICK STRICK STRICK STRICK STRICK STRICK STRICK STRICK STRICK<br />
STRICK STRICK STRICK STRICK STRICK STRICK STRICK STRICK STRICK STRICK STRICK<br />
RICK STRICK STRICK STRICK STRICK STRICK STRICK STRICK STRICK STRICK STRICK STRICK<br />
K STRICK STRICK STRICK STRICK STRICK STRICK STRICK STRICK STRICK STRICK STRICK<br />
TRICK STRICK STRICK STRICK STRICK STRICK STRICK STRICK STRICK STRICK STRICK STRICK<br />
CK STRICK STRICK STRICK STRICK STRICK STRICK STRICK STRICK STRICK STRICK STRICK<br />
STRICK STRICK STRICK STRICK STRICK STRICK STRICK STRICK STRICK STRICK STRICK STRICK<br />
RICK STRICK STRICK STRICK STRICK STRICK STRICK STRICK STRICK STRICK STRICK STRICK<br />
K STRICK STRICK STRICK STRICK STRICK STRICK STRICK STRICK STRICK STRICK STRICK STRICK<br />
TRICK STRICK STRICK STRICK STRICK STRICK STRICK STRICK STRICK STRICK STRICK STRICK<br />
CK STRICK STRICK STRICK STRICK STRICK STRICK STRICK STRICK STRICK STRICK STRICK STRICK<br />
STRICK STRICK STRICK STRICK STRICK STRICK STRICK STRICK STRICK STRICK STRICK STRICK<br />
RICK STRICK STRICK STRICK STRICK STRICK STRICK STRICK STRICK STRICK STRICK STRICK<br />
CK STRICK STRICK STRICK STRICK STRICK STRICK STRICK STRICK STRICK STRICK<br />
STRICK STRICK STRICK STRICK STRICK STRICK STRICK STRICK STRICK STRICK<br />
STRICK STRICK STRICK STRICK STRICK STRICK STRICK STRICK STRICK<br />
ICK STRICK STRICK STRICK STRICK STRICK STRICK STRICK STRICK<br />
Sempre più creazioni <strong>per</strong> <strong>il</strong> fai da te<br />
Su www.prym-<strong>con</strong>sumer.com è possib<strong>il</strong>e scaricare delle<br />
istruzioni complete <strong>per</strong> realizzare <strong>la</strong>mpade, co<strong>per</strong>te o cusc<strong>in</strong>i fatti a<br />
<strong>maglia</strong>. Tutti i modelli sono stati creati <strong>con</strong> f<strong>il</strong>i del<strong>la</strong> marca Coats.<br />
Quality Brands of <strong>Prym</strong> Consumer.<br />
<strong>Prym</strong> Consumer GmbH, Postfach 1740, D-52220 Stolberg<br />
Tel. +49 (0) 2402/14 04, Fax +49 (0) 24 02/142902<br />
sales@prym-<strong>con</strong>sumer.com, http://www.prym-<strong>con</strong>sumer.com<br />
Artikel-Nr. 662 324<br />
Pr<strong>in</strong>t No. 678.07.07.10 I<br />
Mul<strong>in</strong>etto <strong>per</strong> <strong>fare</strong> <strong>la</strong> <strong>maglia</strong> <strong>MAXI</strong><br />
N. Codice: 624 170<br />
E gli altri pratici accessori <strong>per</strong> cucire<br />
<strong>per</strong> <strong>la</strong> <strong>la</strong>vorazione di questi modelli:<br />
N. Codice: 390 900<br />
N. Codice: 918 330<br />
N. Codice: 390 120<br />
N. Codice: 987 125<br />
No. 8<br />
<strong>Prym</strong> Liv<strong>in</strong>g<br />
<strong>Creazioni</strong> <strong>in</strong> <strong><strong>la</strong>na</strong> <strong>con</strong> <strong>il</strong> mul<strong>in</strong>etto<br />
<strong>per</strong> <strong>fare</strong> <strong>la</strong> <strong>maglia</strong> <strong>MAXI</strong>
Gli strumenti<br />
Mul<strong>in</strong>etto <strong>per</strong> <strong>fare</strong> <strong>la</strong> <strong>maglia</strong> “<strong>MAXI</strong>”<br />
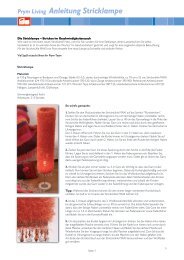
Perché non <strong>fare</strong> una <strong>la</strong>mpada moderna – fatta a <strong>maglia</strong> a mano, nel proprio<br />
colore preferito? E tutto questo senza fatica e <strong>in</strong> modo sorprendentemente<br />
veloce? Basta scegliere una soffice <strong><strong>la</strong>na</strong> che sia adatta e <strong>fare</strong> a <strong>maglia</strong> lo schermo<br />
<strong>per</strong> creare <strong>con</strong> <strong>la</strong> <strong>la</strong>mpada un’<strong>il</strong>lum<strong>in</strong>azione discreta – <strong>con</strong> <strong>il</strong> mul<strong>in</strong>etto <strong>per</strong> <strong>fare</strong><br />
<strong>la</strong> <strong>maglia</strong> <strong>MAXI</strong> si fa <strong>in</strong> un attimo.<br />
Per una <strong>la</strong>mpada fatta a <strong>maglia</strong> sono necessarie tre matasse di <strong><strong>la</strong>na</strong>, che potranno<br />
essere semplicemente annodate tra loro durante <strong>il</strong> <strong>la</strong>voro a <strong>maglia</strong>. Il <strong>la</strong>voro a<br />
<strong>maglia</strong> a forma tubo<strong>la</strong>re deve essere circa 20 cm più lungo del<strong>la</strong> pellico<strong>la</strong><br />
paravento e viene applicata sul corpo del paravento fatto da sé e fissato su di un<br />
supporto dello schermo del<strong>la</strong> <strong>la</strong>mpada.<br />
La speciale <strong>la</strong>mpada fatta a <strong>maglia</strong> è così pronta, <strong>con</strong> una luce partico<strong>la</strong>rmente<br />
bel<strong>la</strong>!<br />
Il team <strong>Prym</strong> vi augura un buon divertimento!<br />
Di una semplicità geniale<br />
E<br />
Il materiale Realizzazione Per <strong>la</strong> vostra casa<br />
1. 4.<br />
Portare <strong>il</strong> selettore di modo del mul<strong>in</strong>etto <strong>per</strong> <strong>fare</strong> <strong>la</strong> <strong>maglia</strong> <strong>MAXI</strong> sul<strong>la</strong> posizione<br />
<strong>in</strong>feriore <strong>per</strong> <strong>la</strong> “<strong>maglia</strong> tubo<strong>la</strong>re”. Disporre circa 40 cm dell’<strong>in</strong>izio del f<strong>il</strong>o nel<br />
mezzo del mul<strong>in</strong>etto <strong>per</strong> <strong>fare</strong> <strong>la</strong> <strong>maglia</strong> <strong>MAXI</strong> ed <strong>in</strong>f<strong>il</strong>are <strong>il</strong> f<strong>il</strong>o nell’unc<strong>in</strong>o colorato<br />
a destra del<strong>la</strong> scana<strong>la</strong>tura. Qu<strong>in</strong>di <strong>in</strong>f<strong>il</strong>are <strong>il</strong> f<strong>il</strong>o <strong>in</strong> ogni se<strong>con</strong>do unc<strong>in</strong>o. Nel farlo<br />
ruotare <strong>la</strong> manovel<strong>la</strong> <strong>in</strong> senso orario f<strong>in</strong>o a che non si raggiunge di nuovo l’unc<strong>in</strong>o<br />
colorato. Qu<strong>in</strong>di <strong>in</strong>f<strong>il</strong>are <strong>il</strong> f<strong>il</strong>o nei 5 unc<strong>in</strong>i successivi.<br />
2.<br />
Far passare <strong>il</strong> f<strong>il</strong>o <strong>per</strong> <strong>la</strong> fessura nel<strong>la</strong> scana<strong>la</strong>tura del guidaf<strong>il</strong>o ed <strong>in</strong>f<strong>il</strong>arlo nel<br />
tendif<strong>il</strong>o. Maggiore si vuole che sia <strong>la</strong> tensione, maggiori saranno gli avvolgimenti<br />
sul tendif<strong>il</strong>o.<br />
Per ca<strong>la</strong>re i punti dopo che <strong>la</strong> <strong>maglia</strong> tubo<strong>la</strong>re ha raggiunto i 90 cm circa, tagliare<br />
<strong>il</strong> f<strong>il</strong>o ad una lunghezza di 1,5 m. Togliere <strong>il</strong> f<strong>il</strong>o dal tendif<strong>il</strong>o e dal guidaf<strong>il</strong>o.<br />
Cucire le maglie <strong>con</strong> l’ago <strong>in</strong> p<strong>la</strong>stica. Inf<strong>in</strong>e, girare <strong>la</strong> manovel<strong>la</strong> <strong>in</strong> senso orario<br />
f<strong>in</strong>o a che <strong>la</strong> <strong>maglia</strong> tubo<strong>la</strong>re non è liberata da tutti gli unc<strong>in</strong>i.<br />
5.<br />
Segnare i 9 punti <strong>per</strong> i bottoni a pressione sul <strong>la</strong>to lungo del<strong>la</strong> pellico<strong>la</strong> <strong>in</strong> p<strong>la</strong>stica,<br />
ad una distanza di 8,5 cm uno dall’altro. La distanza dallo spigolo esterno deve<br />
essere di 1,5 cm. Applicare i bottoni a pressione <strong>con</strong> <strong>la</strong> p<strong>in</strong>za Vario. Fare<br />
attenzione ad accoppiare correttamente <strong>la</strong> parte su<strong>per</strong>iore e quel<strong>la</strong> <strong>in</strong>feriore.<br />
Applicare <strong>il</strong> nastro magico ad una distanza di 3 cm dallo spigolo su<strong>per</strong>iore del<strong>la</strong><br />
pellico<strong>la</strong>.<br />
Distanza<br />
1.5 cm<br />
Distanza<br />
8.5 cm<br />
C<br />
A<br />
Distanza<br />
3 cm<br />
B<br />
Fac<strong>il</strong>e da ut<strong>il</strong>izzare<br />
A: Manovel<strong>la</strong><br />
B: Selettore di modalità<br />
C: Guidaf<strong>il</strong>o<br />
D: Tendif<strong>il</strong>o<br />
F<br />
D<br />
G<br />
E: Impugnatura<br />
F: Ago <strong>in</strong> p<strong>la</strong>stica<br />
G: Piedi<br />
Lampada fatta a <strong>maglia</strong><br />
3 x 50 g di f<strong>il</strong>o soffice arancione, spessore 4,5–5,5; pellico<strong>la</strong> paravento<br />
sufficientemente spessa, trasparente, ca. 70 cm x 55 cm.<br />
50 g 50 g 50 g<br />
mul<strong>in</strong>etto <strong>per</strong> <strong>fare</strong> <strong>la</strong> <strong>maglia</strong> <strong>MAXI</strong> N. Codice. 624 170<br />
9 bottoni a pressione N. Codice. 390 120<br />
p<strong>in</strong>za Vario N. Codice. 390 900<br />
passamaneria <strong>con</strong> <strong>per</strong>le N. Codice. 918 330<br />
ago <strong>per</strong> cucire a mano N. Codice. 121 291<br />
nastro magico N. Codice. 987 125<br />
piede del<strong>la</strong> <strong>la</strong>mpada, <strong>la</strong>mpad<strong>in</strong>a <strong>in</strong>clusa<br />
3.<br />
Ora si può partire: <strong>fare</strong> <strong>la</strong> <strong>maglia</strong> tubo<strong>la</strong>re nel<strong>la</strong> lunghezza desiderata, che sarà <strong>in</strong><br />
tutto pari a circa 90 cm. Quando una matassa arriva al<strong>la</strong> f<strong>in</strong>e annodare <strong>il</strong> prossimo<br />
bandolo del<strong>la</strong> matassa. Mentre si <strong>la</strong>vora <strong>la</strong> <strong>maglia</strong> tubo<strong>la</strong>re avvolger<strong>la</strong> all’<strong>in</strong>terno<br />
del mul<strong>in</strong>etto <strong>per</strong> <strong>fare</strong> <strong>la</strong> <strong>maglia</strong> <strong>MAXI</strong> <strong>in</strong> modo che non sia d’impaccio nel girare<br />
<strong>la</strong> manovel<strong>la</strong>.<br />
6.<br />
Per <strong>il</strong> montaggio, chiudere <strong>la</strong> pellico<strong>la</strong> <strong>con</strong> i bottoni a pressione. Inserire attentamente<br />
<strong>la</strong> <strong>maglia</strong> tubo<strong>la</strong>re sul<strong>la</strong> pellico<strong>la</strong> tubo<strong>la</strong>re. Togliere <strong>la</strong> carta dal nastro<br />
magico ed <strong>in</strong>col<strong>la</strong>re <strong>la</strong> <strong>maglia</strong> tubo<strong>la</strong>re al<strong>la</strong> parte su<strong>per</strong>iore del<strong>la</strong> pellico<strong>la</strong>.<br />
Applicare <strong>il</strong> passamano sul bordo <strong>in</strong>feriore del<strong>la</strong> <strong>maglia</strong> <strong>con</strong> dei punti cuciti a<br />
mano. Inf<strong>in</strong>e montare lo schermo del<strong>la</strong> <strong>la</strong>mpada sul<strong>la</strong> <strong>la</strong>mpada stessa. E l’o<strong>per</strong>a<br />
è fatta!