Zweitakt-Benzinmotor RCGF 45 - RC-Toy
Zweitakt-Benzinmotor RCGF 45 - RC-Toy Zweitakt-Benzinmotor RCGF 45 - RC-Toy
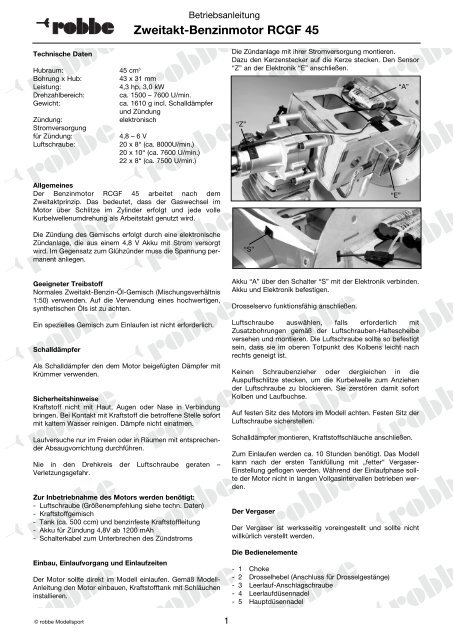
Betriebsanleitung Zweitakt-Benzinmotor RCGF 45 Technische Daten Hubraum: 45 cm 3 Bohrung x Hub: 43 x 31 mm Leistung: 4,3 hp, 3,0 kW Drehzahlbereich: ca. 1500 – 7600 U/min. Gewicht: ca. 1610 g incl. Schalldämpfer und Zündung Zündung: elektronisch Stromversorgung für Zündung: 4,8 – 6 V Luftschraube: 20 x 8“ (ca. 8000U/min.) 20 x 10“ (ca. 7600 U/min.) 22 x 8“ (ca. 7500 U/min.) Die Zündanlage mit ihrer Stromversorgung montieren. Dazu den Kerzenstecker auf die Kerze stecken. Den Sensor “Z” an der Elektronik “E” anschließen. “Z” “A” Allgemeines Der Benzinmotor RCGF 45 arbeitet nach dem Zweitaktprinzip. Das bedeutet, dass der Gaswechsel im Motor über Schlitze im Zylinder erfolgt und jede volle Kurbelwellenumdrehung als Arbeitstakt genutzt wird. Die Zündung des Gemischs erfolgt durch eine elektronische Zündanlage, die aus einem 4,8 V Akku mit Strom versorgt wird. Im Gegensatz zum Glühzünder muss die Spannung permanent anliegen. “S” “E” Geeigneter Treibstoff Normales Zweitakt-Benzin-Öl-Gemisch (Mischungsverhältnis 1:50) verwenden. Auf die Verwendung eines hochwertigen, synthetischen Öls ist zu achten. Ein spezielles Gemisch zum Einlaufen ist nicht erforderlich. Schalldämpfer Als Schalldämpfer den dem Motor beigefügten Dämpfer mit Krümmer verwenden. Sicherheitshinweise Kraftstoff nicht mit Haut, Augen oder Nase in Verbindung bringen. Bei Kontakt mit Kraftstoff die betroffene Stelle sofort mit kaltem Wasser reinigen. Dämpfe nicht einatmen. Laufversuche nur im Freien oder in Räumen mit entsprechender Absaugvorrichtung durchführen. Nie in den Drehkreis der Luftschraube geraten – Verletzungsgefahr. Zur Inbetriebnahme des Motors werden benötigt: - Luftschraube (Größenempfehlung siehe techn. Daten) - Kraftstoffgemisch - Tank (ca. 500 ccm) und benzinfeste Kraftstoffleitung - Akku für Zündung 4,8V ab 1200 mAh - Schalterkabel zum Unterbrechen des Zündstroms Einbau, Einlaufvorgang und Einlaufzeiten Der Motor sollte direkt im Modell einlaufen. Gemäß Modell- Anleitung den Motor einbauen, Kraftstofftank mit Schläuchen installieren. Akku “A” über den Schalter “S” mit der Elektronik verbinden. Akku und Elektronik befestigen. Drosselservo funktionsfähig anschließen. Luftschraube auswählen, falls erforderlich mit Zusatzbohrungen gemäß der Luftschrauben-Haltescheibe versehen und montieren. Die Luftschraube sollte so befestigt sein, dass sie im oberen Totpunkt des Kolbens leicht nach rechts geneigt ist. Keinen Schraubenzieher oder dergleichen in die Auspuffschlitze stecken, um die Kurbelwelle zum Anziehen der Luftschraube zu blockieren. Sie zerstören damit sofort Kolben und Laufbuchse. Auf festen Sitz des Motors im Modell achten. Festen Sitz der Luftschraube sicherstellen. Schalldämpfer montieren, Kraftstoffschläuche anschließen. Zum Einlaufen werden ca. 10 Stunden benötigt. Das Modell kann nach der ersten Tankfüllung mit „fetter“ Vergaser- Einstellung geflogen werden. Während der Einlaufphase sollte der Motor nicht in langen Vollgasintervallen betrieben werden. Der Vergaser Der Vergaser ist werksseitig voreingestellt und sollte nicht willkürlich verstellt werden. Die Bedienelemente - 1 Choke - 2 Drosselhebel (Anschluss für Drosselgestänge) - 3 Leerlauf-Anschlagschraube - 4 Leerlaufdüsennadel - 5 Hauptdüsennadel © robbe Modellsport 1
- Page 2 and 3: Betriebsanleitung Zweitakt-Benzinmo
- Page 4 and 5: Operating Instructions RCGF 45 two-
- Page 6 and 7: Notice de montage et instructions d
- Page 8 and 9: Istruzioni per l’uso Motore due t
- Page 10 and 11: Instrucciones de Uso Motor de gasol
- Page 12: Provozní návod Dvoutaktní benzí
Betriebsanleitung<br />
<strong>Zweitakt</strong>-<strong>Benzinmotor</strong> <strong><strong>RC</strong>GF</strong> <strong>45</strong><br />
Technische Daten<br />
Hubraum: <strong>45</strong> cm 3<br />
Bohrung x Hub:<br />
43 x 31 mm<br />
Leistung:<br />
4,3 hp, 3,0 kW<br />
Drehzahlbereich:<br />
ca. 1500 – 7600 U/min.<br />
Gewicht:<br />
ca. 1610 g incl. Schalldämpfer<br />
und Zündung<br />
Zündung:<br />
elektronisch<br />
Stromversorgung<br />
für Zündung:<br />
4,8 – 6 V<br />
Luftschraube:<br />
20 x 8“ (ca. 8000U/min.)<br />
20 x 10“ (ca. 7600 U/min.)<br />
22 x 8“ (ca. 7500 U/min.)<br />
Die Zündanlage mit ihrer Stromversorgung montieren.<br />
Dazu den Kerzenstecker auf die Kerze stecken. Den Sensor<br />
“Z” an der Elektronik “E” anschließen.<br />
“Z”<br />
“A”<br />
Allgemeines<br />
Der <strong>Benzinmotor</strong> <strong><strong>RC</strong>GF</strong> <strong>45</strong> arbeitet nach dem<br />
<strong>Zweitakt</strong>prinzip. Das bedeutet, dass der Gaswechsel im<br />
Motor über Schlitze im Zylinder erfolgt und jede volle<br />
Kurbelwellenumdrehung als Arbeitstakt genutzt wird.<br />
Die Zündung des Gemischs erfolgt durch eine elektronische<br />
Zündanlage, die aus einem 4,8 V Akku mit Strom versorgt<br />
wird. Im Gegensatz zum Glühzünder muss die Spannung permanent<br />
anliegen.<br />
“S”<br />
“E”<br />
Geeigneter Treibstoff<br />
Normales <strong>Zweitakt</strong>-Benzin-Öl-Gemisch (Mischungsverhältnis<br />
1:50) verwenden. Auf die Verwendung eines hochwertigen,<br />
synthetischen Öls ist zu achten.<br />
Ein spezielles Gemisch zum Einlaufen ist nicht erforderlich.<br />
Schalldämpfer<br />
Als Schalldämpfer den dem Motor beigefügten Dämpfer mit<br />
Krümmer verwenden.<br />
Sicherheitshinweise<br />
Kraftstoff nicht mit Haut, Augen oder Nase in Verbindung<br />
bringen. Bei Kontakt mit Kraftstoff die betroffene Stelle sofort<br />
mit kaltem Wasser reinigen. Dämpfe nicht einatmen.<br />
Laufversuche nur im Freien oder in Räumen mit entsprechender<br />
Absaugvorrichtung durchführen.<br />
Nie in den Drehkreis der Luftschraube geraten –<br />
Verletzungsgefahr.<br />
Zur Inbetriebnahme des Motors werden benötigt:<br />
- Luftschraube (Größenempfehlung siehe techn. Daten)<br />
- Kraftstoffgemisch<br />
- Tank (ca. 500 ccm) und benzinfeste Kraftstoffleitung<br />
- Akku für Zündung 4,8V ab 1200 mAh<br />
- Schalterkabel zum Unterbrechen des Zündstroms<br />
Einbau, Einlaufvorgang und Einlaufzeiten<br />
Der Motor sollte direkt im Modell einlaufen. Gemäß Modell-<br />
Anleitung den Motor einbauen, Kraftstofftank mit Schläuchen<br />
installieren.<br />
Akku “A” über den Schalter “S” mit der Elektronik verbinden.<br />
Akku und Elektronik befestigen.<br />
Drosselservo funktionsfähig anschließen.<br />
Luftschraube auswählen, falls erforderlich mit<br />
Zusatzbohrungen gemäß der Luftschrauben-Haltescheibe<br />
versehen und montieren. Die Luftschraube sollte so befestigt<br />
sein, dass sie im oberen Totpunkt des Kolbens leicht nach<br />
rechts geneigt ist.<br />
Keinen Schraubenzieher oder dergleichen in die<br />
Auspuffschlitze stecken, um die Kurbelwelle zum Anziehen<br />
der Luftschraube zu blockieren. Sie zerstören damit sofort<br />
Kolben und Laufbuchse.<br />
Auf festen Sitz des Motors im Modell achten. Festen Sitz der<br />
Luftschraube sicherstellen.<br />
Schalldämpfer montieren, Kraftstoffschläuche anschließen.<br />
Zum Einlaufen werden ca. 10 Stunden benötigt. Das Modell<br />
kann nach der ersten Tankfüllung mit „fetter“ Vergaser-<br />
Einstellung geflogen werden. Während der Einlaufphase sollte<br />
der Motor nicht in langen Vollgasintervallen betrieben werden.<br />
Der Vergaser<br />
Der Vergaser ist werksseitig voreingestellt und sollte nicht<br />
willkürlich verstellt werden.<br />
Die Bedienelemente<br />
- 1 Choke<br />
- 2 Drosselhebel (Anschluss für Drosselgestänge)<br />
- 3 Leerlauf-Anschlagschraube<br />
- 4 Leerlaufdüsennadel<br />
- 5 Hauptdüsennadel<br />
© robbe Modellsport<br />
1
Betriebsanleitung<br />
<strong>Zweitakt</strong>-<strong>Benzinmotor</strong> <strong><strong>RC</strong>GF</strong> <strong>45</strong><br />
Beim Gasgeben muss der Motor hochdrehen, ohne zu stottern<br />
oder stehenzubleiben. Bleibt der Motor stehen, die<br />
Leerlaufnadel etwas herausdrehen. Bei Stottern und widerwilliger<br />
Gasannahme die Leerlaufnadel hineindrehen.<br />
1<br />
2<br />
Durch schritt weises Hineindrehen der Hauptdüsennadel die<br />
Vollgas-Drehzahl langsam steigern.<br />
Der Motor muss im Leerlauf ruhig durchlaufen, im Übergang<br />
Gas annehmen und bei Vollgas seine höchste Drehzahl erreichen.<br />
Die Leerlauf-Anschlagschraube muss so justiert werden, dass<br />
der Motor bei Leerlaufstellung des Drosselservos nicht stehenbleibt.<br />
Alternativ kann die Schraube so eingestellt werden,<br />
dass der Motor mit der Trimmung senderseitig abgestellt werden<br />
kann.<br />
3 4<br />
Inbetriebnahme<br />
Achtung: Beim Starten des Motors von Hand ist ein dicker<br />
Handschuh zu verwenden, um Verletzungsgefahr vorzubeugen.<br />
Das Modell sichern, sodass es nicht unbeabsichtigt<br />
wegrollen kann.<br />
- Den Tank befüllen.<br />
- Vergaser mit der Fernsteuerung in Leerlaufstellung bringen.<br />
- Choke-Klappe von Hand schließen.<br />
- Zündung einschalten.<br />
- Motor von Hand mit Schwung durchdrehen.<br />
- Nach der ersten Zündung die Choke-Klappe öffnen.<br />
- Motor mit kräftigem Schwung an der Luftschraube anwerfen<br />
- Nach dem Anspringen langsam Gas geben.<br />
Hinweis: Nie zuviel Kraftstoff ansaugen. Falls der Zylinder zu<br />
sehr gefüllt ist und der Motor sich nur noch schwer durchdrehen<br />
lässt, die Zündkerze herausschrauben und den Kraftstoff<br />
durch mehrfaches Durchdrehen des Motors aus dem Zylinder<br />
ausblasen. Benzin könnte aus der Kerzenöffnung spritzen.<br />
Achten Sie dabei darauf, dass Sie sich nicht mit Gesicht oder<br />
Händen über dem Zylinderkopf befinden. Die Kerze trocknen.<br />
Der Motor muss bei Vollgas „fett“ laufen. Am Anfang ist es<br />
besser, die Hauptdüsennadel etwas zu weit herauszudrehen.<br />
Der Motor bekommt dann mehr Kraftstoff und damit auch<br />
mehr Öl und läuft schonender ein.<br />
Die Drehzahl kann nach einigen Tankfüllungen durch schritt<br />
weises Hereindrehen der Hauptdüsennadel langsam gesteigert<br />
werden. Fällt die Drehzahl ab, die Düsennadel sofort wieder<br />
herausdrehen.<br />
Die Vergaser-Einstellung<br />
Grundeinstellung: Düsennadeln ganz schließen.<br />
Leerlaufnadel: 1 ½ Umdrehungen öffnen.<br />
Hauptdüsennadel: 1 ¾ Umdrehungen öffnen.<br />
Hinweis: Veränderungen an den Düsennadel-Einstellungen<br />
immer in kleinen Schritten vornehmen.<br />
© robbe Modellsport<br />
5<br />
2<br />
Allgemeine Hinweise zum Betrieb<br />
- Vor jedem Starten des Motors die Befestigung im Modell,<br />
den Anschluss der Kraftstoffleitung und den festen Sitz der<br />
Luftschraube prüfen.<br />
- Festen Sitz von Krümmer und Schalldämpfer kontrollieren.<br />
- Gehäuseschrauben gelegentlich nachziehen.<br />
- Auf saubere Ansaugluft achten.<br />
- Der Akku für die Zündung sollte für jeden Flugtag frisch<br />
geladen werden, da ihm während der gesamten Motor-<br />
Betriebszeit Strom entnommen wird.<br />
- Nach Abstellen des Motors die Zündung ausschalten.<br />
Chokestellung zum Anlassen:<br />
- Bei kaltem Motor: Choke wie beschrieben zum Starten<br />
schließen.<br />
- Bei warmem Motor: Choke geöffnet lassen.<br />
- Nach einem evtl. Absturz, bei dem Schmutz in den Motor<br />
eingedrungen sein könnte, Kurbelwelle nicht durchdrehen,<br />
bevor der Motor zerlegt und gereinigt wurde.<br />
- Von Zeit zu Zeit den Elektrodenabstand der Zündkerze<br />
überprüfen. Abstand: 0,3 – 0,5 mm. Geeignete Lehren sind<br />
im KFZ-Zubehörhandel erhältlich.<br />
- Bei Tausch der Kerze auf gleichen Wärmewert achten.<br />
- Nach Reinigungs- oder Wartungsarbeiten muss der<br />
Vergaser neu grundeingestellt werden.<br />
Ersatzteile<br />
Bei Ersatzteilbestellungen immer die genaue Bestell- Nr. Und<br />
die Bezeichnung angeben.<br />
31380006 Zündung Yak 54<br />
31380007 Vergaser Yak 54<br />
31380008 Zylinder mit Dichtungen Yak 54<br />
31380009 Kurbelgehaeuse komplett Yak 54<br />
31380010 Kruemmer Yak 54<br />
31380011 Schalldaempfer Yak 54<br />
robbe Modellsport GmbH & Co. KG<br />
Technische Änderungen vorbehalten<br />
Hiermit erklärt die robbe Modellsport GmbH & Co. KG, dass sich dieses Gerät in Übereinstimmung<br />
mit den grundlegenden Anforderungen und anderen relevanten Vorschriften der<br />
entsprechenden CE Richtlinien befindet. Die Original-Konformitätserklärung finden Sie im<br />
Internet unter www.robbe.com, bei der jeweiligen Gerätebeschreibung durch Aufruf des<br />
Logo-Buttons "Conform".<br />
Dieses Symbol bedeutet, dass elektrische und elektronische Kleingeräte am<br />
Ende ihrer Nutzungsdauer, vom Hausmüll getrennt, entsorgt werden müssen.<br />
Entsorgen Sie das Gerät bei Ihrer örtlichen kommunalen Sammelstelle oder<br />
Recycling-Zentrum. Dies gilt für alle Länder der Europäischen Union sowie<br />
anderen Europäischen Ländern mit separatem Sammelsystem.<br />
robbe Form 40-5432 ABAJ
Operating Instructions<br />
<strong><strong>RC</strong>GF</strong> <strong>45</strong> two-stroke petrol engine<br />
Specification<br />
Capacity:<br />
Bore x stroke:<br />
Power:<br />
Speed range:<br />
Weight:<br />
Ignition:<br />
Ignition battery:<br />
Propeller:<br />
<strong>45</strong> cc<br />
43 x 31 mm<br />
4.3 bhp, 3.0 kW<br />
approx. 1500 – 7600 rpm<br />
approx. 1610 g incl. silencer<br />
and ignition unit<br />
electronic<br />
4.8 - 6 V<br />
20 x 8” (approx. 8000 rpm)<br />
20 x 10” (approx. 7600 rpm)<br />
22 x 8” (approx. 7500 rpm)<br />
Connect the throttle servo and check from the transmitter that<br />
it works correctly.<br />
“Z”<br />
“A”<br />
Introduction<br />
The <strong><strong>RC</strong>GF</strong> <strong>45</strong> petrol engine works on the two-stroke principle.<br />
This means that the gas exchange process within the engine<br />
occurs through slots, or ports, in the cylinder, and each full<br />
rotation of the crankshaft acts as a working stroke.<br />
The fuel mixture is ignited by an electronic ignition system<br />
powered by a 4.8 V battery. In contrast to glowplug motors, a<br />
constant voltage must be present for the engine to run.<br />
Suitable fuel<br />
Use normal two-stroke petrol / oil mixture (mix ratio 1 : 50). It<br />
is essential to use a high-quality synthetic lubricating oil.<br />
No special fuel mix is required for running-in.<br />
Silencer<br />
Use the silencer and exhaust manifold supplied with the engine.<br />
Safety notes<br />
Do not allow petrol to contact your skin, eyes or nose. If this<br />
should occur accidentally, wash the affected area immediately<br />
using plenty of cold water. Do not breathe in petrol fumes.<br />
The engine must only be run outdoors, or in a room with a suitable<br />
forced ventilation system.<br />
Keep well clear of the rotational plane of the propeller - injury<br />
hazard.<br />
You will need the following items to operate the petrol<br />
engine:<br />
- Propeller (see Specification for recommended sizes)<br />
- Fuel mixture<br />
- Fueltank (approx. 500 cc) and petrol-proof fuel tubing<br />
- 4.8 V ignition battery, min. capacity 1200 mAh<br />
- Switch harness for interrupting the ignition current<br />
Installation, running-in procedure, running-in time<br />
The engine should be run-in whilst mounted directly in the<br />
model. Install the power plant, fueltank and fuel tubing in<br />
accordance with the kit instructions.<br />
Install the ignition unit and its power supply: push the plug<br />
cap onto the sparkplug, and connect the sensor “Z” to the<br />
electronic unit “E”.<br />
Connect battery “A” to the electronics using the switch harness<br />
“S”. Secure the ignition battery and electronics.<br />
“S”<br />
Select the appropriate propeller, drill additional holes in the<br />
hub if necessary to match those in the prop washer, and fit it<br />
on the engine shaft. The propeller should be mounted in such<br />
a way that one tip is angled slightly to the right of vertical<br />
when the piston is at top dead centre (TDC).<br />
Never attempt to hold the crankshaft immobile by inserting a<br />
screwdriver or similar tool in the exhaust port while you tighten<br />
the propeller, as this would immediately ruin the piston<br />
and cylinder liner.<br />
Check that the engine is securely mounted in the model.<br />
Ensure that the propeller is firmly attached to the crankshaft.<br />
Install the silencer and connect the fuel lines.<br />
The engine requires about ten hours of running-in to free up<br />
completely. The first tankful of fuel should be run through the<br />
engine on the ground. The model can then be flown during<br />
the remainder of the running-in period, keeping the mixture<br />
rich all the time. During this initial period avoid operating the<br />
engine at full-throttle for long periods.<br />
The carburettor<br />
The carburettor is correctly set at the factory, and should not<br />
be adjusted unless absolutely necessary.<br />
The carburettor controls<br />
- 1 Choke<br />
- 2 Throttle lever (throttle pushrod connection point)<br />
- 3 Idle stop-screw<br />
- 4 Idle needle<br />
- 5 Main needle<br />
Running the engine for the first time<br />
“E”<br />
Caution: if you intend to start the engine by hand, a thick<br />
glove must be worn to reduce the risk of injury. Secure<br />
the model carefully, so that there is no chance of it rolling<br />
away accidentally.<br />
© robbe Modellsport<br />
3
Operating Instructions<br />
<strong><strong>RC</strong>GF</strong> <strong>45</strong> two-stroke petrol engine<br />
1<br />
2<br />
Once the engine is run-in, slowly increase the full-throttle<br />
speed by gradually closing (screwing in) the main needle.<br />
When set up correctly, the engine should run smoothly at idle,<br />
pick up speed steadily over the mid-range, and achieve maximum<br />
speed at full-throttle.<br />
The idle stop-screw should be adjusted to the point where the<br />
engine shows no tendency to stop when the throttle servo is<br />
at the idle end-point.<br />
Alternatively you may prefer to set the stop-screw so that the<br />
engine can be cut from the transmitter when the throttle trim<br />
is pulled fully back.<br />
3 4<br />
5<br />
- Fill the fueltank.<br />
- Use the radio control system to set the throttle to idle.<br />
- Close the choke flap manually.<br />
- Switch on the ignition system.<br />
- Swing the propeller strongly by hand.<br />
- Continue until the engine fires, then open the choke flap.<br />
- Now give the propeller a really strong swing, and the engine<br />
should start and run.<br />
- Slowly open the throttle once the engine is running.<br />
Note: take care never to suck in too much fuel, as the engine<br />
will not run if flooded. If too much fuel enters the cylinder,<br />
causing the engine to be difficult to turn over, unscrew and<br />
remove the sparkplug, then turn the propeller several times to<br />
eject the excess fuel from the cylinder. Note that this action<br />
will cause petrol to squirt out of the sparkplug opening, so<br />
keep your face and hands away from the cylinder head. Dry<br />
the sparkplug before re-fitting it.<br />
The engine must initially be set to run “rich” at full-throttle. At<br />
first it is better to unscrew the main needle slightly too far: this<br />
will allow the engine to receive more fuel and therefore more<br />
oil, and will avoid premature wear during the running-in period.<br />
After the engine has consumed several tankfuls of fuel, the<br />
propeller speed can be gradually increased by screwing the<br />
main needle in slowly. If the speed starts to decline when you<br />
do this, the mixture is too lean: immediately unscrew the main<br />
needle again slightly.<br />
General notes on running the engine<br />
- Every time you intend starting the engine, check that it is<br />
still securely attached to the model, that the propeller is<br />
firmly seated, and that the fuel lines are correctly connected.<br />
- Check that the exhaust manifold and silencer are securely<br />
mounted.<br />
- Check occasionally that the crankcase screws are still tight,<br />
and re-tighten them if necessary.<br />
- Ensure that clean air is available for the engine to “breathe”.<br />
- The ignition battery should be freshly charged for each<br />
day’s flying, as current is drawn from it constantly when the<br />
engine is running.<br />
- Switch off the ignition after the engine has stopped.<br />
Choke position for starting:<br />
- Cold engine: close the choke for starting, as described<br />
above.<br />
- Warm engine: leave choke open.<br />
- If the model crashes, and dirt might have entered the engine,<br />
dismantle the engine and clean it thoroughly before turning<br />
the crankshaft.<br />
- From time to time check the sparkplug electrode gap; it<br />
should be 0.3 to 0.5 mm. The gap can be measured using<br />
feeler gauges, which are available from any car accessory<br />
shop.<br />
- If you have to fit a new sparkplug, make sure it has the<br />
same heat value.<br />
- If you have to clean or otherwise maintain the engine or carburettor,<br />
you will need to re-adjust the carburettor settings.<br />
Replacement parts<br />
When ordering replacement parts always state the exact<br />
Order No. as well as a description of the part.<br />
31380006 Yak 54 ignition unit<br />
31380007 Yak 54 carburettor<br />
31380008 Yak 54 cylinder and gaskets<br />
31380009 Yak 54 crankcase, complete<br />
31380010 Yak 54 exhaust manifold<br />
31380011 Yak 54 silencer<br />
Carburettor settings<br />
Basic setting: close both needles fully.<br />
Idle needle: open by 1½ full turns.<br />
Main needle: open by 1¾ full turns.<br />
Note: any changes to the needle valve settings should always<br />
be made in small increments.<br />
When you advance the throttle, the engine should increase<br />
speed steadily without stuttering or tending to stop. If the<br />
engine stops when you open the throttle, open (unscrew) the<br />
idle needle slightly. If it stutters and is reluctant to pick up<br />
speed, close (screw in) the idle needle slightly.<br />
© robbe Modellsport<br />
4<br />
robbe Modellsport GmbH & Co. KG<br />
We reserve the right to alter technical specifications<br />
robbe Modellsport GmbH & Co. KG hereby declares that this product satisfies the fundamental<br />
requirements and other relevant regulations contained in the fundamental requirements<br />
and other relevant regulations of the appropriate CE directives. The original<br />
Conformity Declaration can be viewed on the Internet under www.robbe.com: click on the<br />
logo button marked “Conform” which is included in each device description.<br />
This symbol means that you must dispose of electrical and electronic equipment<br />
separately from the general household waste when it reaches the end of<br />
its useful life.<br />
Take your charger to your local waste collection point or recycling centre. This<br />
applies to all countries of the European Union, and to other European countries<br />
with a separate waste collection system.
Notice de montage et instructions de service<br />
Moteur deux-temps à essence <strong><strong>RC</strong>GF</strong> <strong>45</strong><br />
Caractéristiques techniques<br />
Cylindrée :<br />
Alésage x course :<br />
Puissance :<br />
Fourchette des régimes :<br />
Poids :<br />
Allumage :<br />
Alimentation électrique<br />
pour l'allumage :<br />
Hélice :<br />
<strong>45</strong> cm³<br />
43 x 31 mm<br />
4,3 CV, 3,0 kW<br />
approx. 1500 à 7600 tr/min.<br />
approx. 1610 g avec silencieux et<br />
allumage<br />
électronique<br />
4,8 à 6 volts<br />
20 x 8“ (approx. 8000 tr/min.)<br />
20 x 10“ (approx. 7600 tr/min.)<br />
22 x 8“ (approx. 7500 tr/min.)<br />
Monter l'installation d'allumage avec son alimentation électrique.<br />
Pour ce faire, planter le soquet à bougie sur la bougie.<br />
“Z”<br />
“A”<br />
Généralités<br />
Le moteur à essence <strong><strong>RC</strong>GF</strong> <strong>45</strong> travaille selon le principe des<br />
deux-temps. Cela signifie que l'échange gazeux dans le<br />
moteur intervient via des fentes dans le cylindre et que chaque<br />
révolution intégrale du vilebrequin est utilisée comme<br />
phase de travail.<br />
“E”<br />
L'allumage du mélange intervient via un dispositif d'allumage<br />
électronique alimenté électriquement par un accu 4,8 volts. À<br />
l'encontre de l'allumage à incandescence, il faut que la tension<br />
soit délivrée en permanence.<br />
Carburant approprié<br />
Utiliser un mélange normal deux-temps essence-huile (proportion<br />
1:50). Veiller à utiliser une huile synthétique de haute<br />
qualité.<br />
Il n'est pas nécessaire d'utiliser un mélange spécial pour le<br />
rodage.<br />
Silencieux<br />
Comme silencieux, utiliser le pot d'échappement et le coudecollecteur<br />
fournis avec le moteur.<br />
Consignes de sécurité<br />
Veiller à ce que le carburant n'entre pas en contact avec la<br />
peau, les yeux ou le nez. Si toutefois cela se produit, nettoyer<br />
immédiatement l'emplacement concerné avec de l'eau froide.<br />
Veiller à ne pas inhaler les vapeurs d'essence.<br />
N'effectuer les essais de fonctionnement qu'à l'air libre ou<br />
alors dans des locaux munis de dispositifs d'aspiration<br />
appropriés.<br />
Ne jamais engager la main dans le plan de rotation de<br />
l'hélice – Danger de blessure.<br />
Pour la mise en service du moteur, il faut :<br />
- une hélice (taille recommandée, Cf. les caractéristiques<br />
techniques) – un mélange de carburant<br />
- un réservoir (approx. 500 cm³) et un flexible résistant à<br />
l'essence<br />
- un accu de 4,8 volts à partir de 1200 mAh pour l'allumage<br />
- un cordon interrupteur pour couper le courant d'allumage<br />
Mise en place, procédure de rodage et durée du rodage<br />
Roder le moteur directement dans le modèle. Monter le<br />
moteur selon les instructions fournies dans la notice du<br />
modèle, installer le réservoir d'essence et les flexibles.<br />
“S”<br />
Raccorder le capteur “Z” à l'électronique “E”.<br />
Raccorder l'accu “A” à l'électronique via l'interrupteur “S”.<br />
Fixer l'accu et l'électronique.<br />
Raccorder le servo des gaz de telle manière qu'il fonctionne.<br />
Sélectionner une hélice, si nécessaire, la munir d'un alésage<br />
modifié en se servant de la bague de maintien de l'hélice<br />
comme gabarit et monter l'hélice. Fixer l'hélice de telle<br />
manière qu'elle soit légèrement inclinée vers la droite au point<br />
mort du haut du piston.<br />
Ne jamais engager de tournevis ou d'objet similaire dans les<br />
fentes de l'échappement pour bloquer le vilebrequin lorsque<br />
vous serrez la vis de l'hélice. Vous détruisez ainsi immédiatement<br />
le piston et la chemise.<br />
Veillez à ce que le moteur soit solidement ancré dans le<br />
modèle. S'assurer que l'hélice est parfaitement fixée.<br />
Monter le silencieux, raccorder le flexible de carburant.<br />
Pour le rodage, il faut compter approx. 10 heures. Après le<br />
premier remplissage du réservoir, il est possible de faire voler<br />
le modèle avec une mise au point „grasse“ du carburateur.<br />
Pendant la phase de rodage, il ne faut pas faire tourner le<br />
moteur avec des intervalles prolongés à plein régime.<br />
Le carburateur<br />
Le carburateur est mis au point dans nos ateliers et son réglage<br />
ne doit pas être modifié arbitrairement.<br />
Les éléments de commande<br />
- 1 papillon<br />
- 2 palonnier des gaz (raccord pour tringle des gaz)<br />
- 3 vis de butée du ralenti<br />
- 4 pointeau de ralenti<br />
- 5 pointeau principal<br />
© robbe Modellsport<br />
5
Notice de montage et instructions de service<br />
Moteur deux-temps à essence <strong><strong>RC</strong>GF</strong> <strong>45</strong><br />
1<br />
2<br />
Si vous donnez des gaz, il faut que le moteur accélère sans<br />
toussoter ni caler. Si le moteur cale, dévissez légèrement le<br />
pointeau de ralenti. Si le moteur toussote ou accélère ínopinément,<br />
serrer légèrement le pointeau de ralenti.<br />
Augmentez lentement le régime plein gaz en vissant par petites<br />
étapes le pointeau principal.<br />
Au ralenti le moteur doit tourner sainement et calmement,<br />
ensuite accélérer avant d'atteindre à plein gaz son régime le<br />
plus élevé.<br />
La vis de butée du ralenti doit être ajustée de manière que le<br />
moteur ne cale pas lorsque le servo des gaz est en position<br />
ralenti. Il est également possible, alternativement, de régler la<br />
vis de telle manière qu'il soit possible de couper le moteur à<br />
l'aide du trim sur l'émetteur.<br />
Mise en service<br />
3 4<br />
5<br />
Consignes générales de mise en œuvre<br />
- Avant de démarrer le moteur en vérifier l'assise et la fixation<br />
dans le modèle, le raccordement du flexible de carburant<br />
et l'assise de l'hélice.<br />
- Contrôlez l'assise du coude-collecteur et du silencieux.<br />
- Resserrer de temps en temps les vis du carter.<br />
- Veiller à ce que l'air aspiré soit propre.<br />
- Il est recommandé de recharger, avant chaque journée de<br />
vol, l'accu d'alimentation de l'allumage étant donné qu'il<br />
est sollicité en permanence lorsque le moteur tourne.<br />
- Couper l'allumage une fois que le moteur est à l'arrêt.<br />
Attention : Pour lancer le moteur à la main, enfilez un gant<br />
épais afin d'éviter toute blessure. Maintenir fermement le<br />
modèle afin qu'il ne puisse s'échapper en roulant.<br />
- Remplir le réservoir<br />
- Amener le carburateur en position ralenti à l'aide de<br />
l'ensemble de radiocommande.<br />
- Fermer le papillon à la main.<br />
- Mettre l'allumage en marche<br />
- Faire tourner le moteur à la main avec force<br />
- Après le premier allumage, ouvrir le papillon.<br />
- Lancez le moteur avec un bon effort appliqué sur l'hélice<br />
- Lorsque le moteur tourne, donnez lentement des gaz.<br />
À noter : Veillez à ne jamais aspirer trop de carburant. S'il<br />
arrivait que le cylindre soit excessivement rempli et que le<br />
moteur ne se laisse tourner qu'avec difficulté, dévissez la<br />
bougie et laissez le carburant s'échapper du cylindre en faisant<br />
tourner plusieurs fois le moteur sur lui-même. Il arrive<br />
que de l'essence soit projetée par l'ouverture de la bougie.<br />
Veillez à ne pas approcher la tête ou les mains du cylindre.<br />
Séchez la bougie. À plein régime, le moteur doit tourner<br />
„gras“. Au début il est préférable d'ouvrir un peu trop le pointeau<br />
principal.<br />
Le moteur reçoit alors plus de carburant et donc également<br />
plus d'huile ce qui le rode sans l'abîmer.<br />
Après quelques réservoir, il est possible d'augmenter légèrement<br />
le régime en vissant par étapes le pointeau principal. Si<br />
le régime choit, dévissez immédiatement le pointeau.<br />
Position du papillon au démarrage :<br />
- Lorsque le moteur est froid : Fermez le papillon comme<br />
décrit ci-dessus pour le démarrage.<br />
- Lorsque le moteur est chaud : laissez le papillon ouvert.<br />
- Après un crash éventuel, au cours duquel de la saleté a pu<br />
d'introduire dans le moteur, ne pas faire tourner le vilebrequin<br />
avant d'avoir désossé et nettoyé le moteur.<br />
- Contrôlez de temps en temps l'écart entre les électrodes de<br />
la bougie d'allumage. Écart : 0,3 à 0,5 mm. Dans le commerce<br />
spécialisé en outillage automobile on trouve les jauges<br />
appropriée.<br />
- Lorsque vous remplacez la bougie veillez à installer une<br />
bougie présentant les mêmes caractéristiques thermiques.<br />
- Après des travaux de nettoyage ou de maintenance il faut<br />
refaire un réglage initial du carburateur.<br />
Pièces de rechange<br />
Pour la commande de pièces détachées, en indiquer systématiquement<br />
la référence intégrale et la désignation.<br />
31380006 allumage Yak 54<br />
31380007 carburateur Yak 54<br />
31380008 culasse avec joints Yak 54<br />
31380009 carter de vilebrequin complet Yak 54<br />
31380010 coude-collecteur Yak 54<br />
31380011 silencieux Yak 54<br />
robbe Modellsport GmbH & Co. KG<br />
Sous réserve de modification technique<br />
Le réglage du carburateur<br />
Réglage initial : Fermez complètement le pointeau.<br />
Pointeau de ralenti : ouvrir d'un tour ½.<br />
Pointeau principal : ouvrir d'un tour ¾.<br />
À noter : exécutez les modifications du réglage des pointeaux<br />
toujours par petites étapes.<br />
© robbe Modellsport<br />
6<br />
Par la présente la Sté robbe Modellsport GmbH & Co. KG, déclare que cet appareil répond<br />
aux exigences fondamentales et à d’autres prescriptions significatives de la directive appropriée<br />
de la Communauté européenne. L’original de la déclaration de conformité se trouve<br />
dans l’Internet sur le site www.robbe.com associée à la description de l’appareil concerné<br />
et apparaît lorsqu’on clique le bouton portant le logo "Conform".<br />
Ce symbole signifie que les petits appareils électriques et électroniques irréparables<br />
ou en fin de cycle d’exploitation doivent être mis au rebut non pas<br />
avec les ordures ménagères mais dans les déchetteries spécialisées. Portezles<br />
dans les collecteurs communaux appropriés ou un centre de recyclage<br />
spécialisé. Cette remarque s’applique aux pays de la Communauté européenne<br />
et aux autres pays européens pourvus d’un système de collecte spécifique.
Istruzioni per l’uso<br />
Motore due tempi benzina <strong><strong>RC</strong>GF</strong> <strong>45</strong><br />
Dati tecnici<br />
Cilindrata: <strong>45</strong> cm 3<br />
Alesaggio x corsa:<br />
43 x 31 mm<br />
Potenza:<br />
4,3 hp, 3,0 kW<br />
Regime di rotazione:<br />
Peso:<br />
1500 – 7600 g/min ca.<br />
1610 g ca. inclusa marmitta<br />
ed unità di accensione<br />
Accensione:<br />
elettronica<br />
Alimentazione per accensione: 4,8 – 6 V<br />
Elica:<br />
20 x 8“ (ca. 8000 g/min.)<br />
20 x 10“ (ca. 7600 g/min.)<br />
22 x 8“ (ca. 7500 g/min.)<br />
Generalità<br />
L’ <strong><strong>RC</strong>GF</strong> <strong>45</strong> è un motore benzina con ciclo a due tempi: questo<br />
significa che lo scambio tra gas freschi ed esausti avviene<br />
in una unica luce del cilindro e ciascuna rotazione completa<br />
dell’albero motore viene trasformata in lavoro.<br />
L’accensione della miscela avviene per mezzo di un sistema<br />
elettronico, appositamente alimentato da una batteria da<br />
4,8V. Contrariamente alla tradizionale candela, questa tecnologia<br />
richiede una tensione permanente durante tutto il funzionamento.<br />
Miscele adatte<br />
Normali miscele benzina-olio per motori a due tempi (rapporto<br />
di miscelazione 1:50). Prestare particolare attenzione<br />
nell’utilizzo di oli sintetici ad alte prestazioni. Il rodaggio non<br />
richiede rapporti di miscelazione speciali.<br />
Marmitta<br />
Adoperare esclusivamente la marmitta ed il collettore forniti in<br />
dotazione.<br />
Norme per la sicurezza<br />
Tenere la miscela lontana da pelle, occhi o naso. In caso di<br />
contatto, pulire immediatamente la zona interessata mediante<br />
abbondante acqua fredda. Non inalare i vapori della miscela.<br />
Eseguire le prove di funzionamento del motore soltanto<br />
all’aperto, oppure in ambienti chiusi provvisti di sistemi di<br />
aspirazione per gas.<br />
Il funzionamento del motore richiede:<br />
- Elica (consultare la scheda tecnica per le dimensioni consigliate)<br />
- Miscela<br />
- Serbatoio (500 cm ca.) e tubi resistenti alla miscela<br />
- Batteria 4,8V 1200 mAh per il sistema di accensione<br />
- Cavo interruttore per l’interruzione della corrente di accensione<br />
Montaggio, modalità e durata del rodaggio<br />
Il motore dovrebbe essere rodato direttamente sul modello.<br />
Montare il motore sul modello seguendo le istruzioni di quest’ultimo<br />
e collegare i tubi miscela. Non sostare mai nel raggio<br />
d’azione dell’elica: pericolo di lesioni.<br />
Montare l’unità di accensione insieme all’alimentazione;<br />
inserire la pinza candela sulla candela. Collegare il sensore<br />
“Z” con l’elettronica “E”.<br />
Collegare la batteria „A“ con l’elettronica attraverso<br />
l’interruttore „S“. Fissare la batteria e l’elettronica sul modello<br />
per evitare spostamenti degli stessi.<br />
Collegare il servo di comando del gas.<br />
Scegliere l’elica da utilizzare e se necessario forarla per adattarla<br />
alla rondella di tenuta, quindi montarla sul modello.<br />
Fissare l’elica al motore in modo che quando il pistone si<br />
“Z”<br />
“S”<br />
trova al punto morto superiore, essa risulti leggermente diretta<br />
verso destra.<br />
Non infilare mai cacciaviti o altri utensili appuntiti nella luce di<br />
scarico, al fine di bloccare l’albero a gomito e stringere l’elica;<br />
tale operazione comporta il danneggiamento del pistone e<br />
della camicia.<br />
Verificare che il motore risulti saldamente fissato al modello e<br />
controllare parallelamente che l’elica sia ben salda in posizione.<br />
Montare la marmitta e collegare i tubi miscela.<br />
“E”<br />
“A”<br />
Il rodaggio del motore richiede 10 ore di funzionamento ca.<br />
Dopo il primo rifornimento, è possibile fare funzionare il motore<br />
con una carburazione “grassa”. Durante la fase di rodaggio<br />
è opportuno adoperare il motore al massimo soltanto per<br />
brevi intervalli di tempo.<br />
Il carburatore<br />
Il carburatore viene regolato in fabbrica: conseguentemente<br />
risulta opportuno non modificarlo .<br />
Elementi del carburatore<br />
- 1 Starter<br />
- 2 Leva di comando del gas ( collegamento per il tirante di<br />
comando)<br />
- 3 Vite di regolazione del minimo<br />
- 4 Spillo di regolazione del minimo<br />
- 5 Spillo di regolazione principale della carburazione<br />
Messa in moto<br />
Attenzione: se si intende avviare il motore a mano, è<br />
necessario indossare un paio di guanti sufficientemente<br />
spessi per evitare possibili rischi di lesioni.<br />
Assicurare inoltre il modello a terra in modo che non<br />
possa involontariamente muoversi.<br />
- Riempire il serbatoio<br />
- Portare il carburatore al minimo attraverso la trasmittente<br />
© robbe Modellsport<br />
7
Istruzioni per l’uso<br />
Motore due tempi benzina <strong><strong>RC</strong>GF</strong> <strong>45</strong><br />
Incrementare leggermente il regime di rotazione massimo chiudendo<br />
gradualmente lo spillo della carburazione principale.<br />
Al minimo, il motore deve funzionare normalmente; incrementare<br />
poi il gas per raggiungere il massimo numero di giri.<br />
3 4<br />
1<br />
5<br />
- Chiudere con la mano l’apertura sullo starter<br />
- Attivare l’unità di accensione<br />
- Ruotare a mano l’albero motore con una spinta decisa<br />
- Aprire l’apertura sullo starterdopo la prima accensione<br />
- Avviare il motore dando una spinta decisa all’elica<br />
- Una volta avviato il motore, incrementare lentamente il gas<br />
Avvertenza: non riempire mai eccessivamente il cilindro di<br />
miscela. In questo caso, infatti, risulta molto difficile ruotare<br />
l’albero motore ed occorre svitare la candela per consentire la<br />
rimozione della miscela in eccesso dal cilindro, facendo girare<br />
più volte l’albero motore. Attenzione: la miscela può schizzare<br />
fuori dall’apertura della candela; prestare pertanto<br />
attenzione a non trovarsi con il viso o le mani direttamente<br />
sopra la testa cilindro. Asciugare la candela al termine dell’operazione.<br />
Durante i primi utilizzi , è necessario fare girare il motore con<br />
una carburazione grassa in corrispondenza del massimo regime<br />
di giri. Risulta quindi opportuno aprire leggermente lo spillo<br />
principale della carburazione. Così facendo, viene immesso<br />
un quantitativo maggiore di miscela (e quindi di olio lubrificante)<br />
e si preserva il motore.<br />
Dopo alcuni rifornimenti, è possibile cominciare a chiudere<br />
gradualmente lo spillo della carburazione per incrementare il<br />
regime di rotazione. Qualora quest’ultimo dovesse invece<br />
repentinamente diminuire, riaprire immediatamente lo spillo.<br />
Regolazione del carburatore<br />
Impostazione base: chiudere completamente lo spillo principale<br />
Spillo del minimo: aprirlo di 1 giro e ½<br />
Spillo principale della carburazione: aprire di 1 giro e ¾<br />
Avvertenza: intraprendere le modifiche allo spillo della carburazione<br />
procedendo sempre per piccoli intervalli alla volta.<br />
Quando si incrementa il regime di rotazione, il motore deve<br />
prendere giri senza esitazioni. Qualora esso rimanga fermo,<br />
aprire leggermente lo spillo della carburazione. Se il motore<br />
tentenna, richiudere lo spillo.<br />
2<br />
Regolare la vite di impostazione del minimo in modo che il<br />
motore non si spenga quando il tirante di comando del servo<br />
è in posizione di minimo. In alternativa è possibile regolare la<br />
vite in modo da poter spegnere il motore direttamente dalla<br />
trasmittente, agendo sul trim di comando.<br />
Avvertenze generali per l’utilizzo<br />
- Verificare prima di ogni volo il corretto fissaggio del motore<br />
sul modello, il collegamento dei tubi miscela ed il fissaggio<br />
dell’elica.<br />
- Controllare che la marmitta ed il collettore siano saldamente<br />
fissati<br />
- Stringere se necessario le viti di fissaggio del carter motore<br />
- Controllare la pulizia dei condotti di aspirazione dell’aria<br />
- Risulta opportuno ricaricare prima di ogni giornata di volo la<br />
batteria di alimentazione del sistema di accensione . Il funzionamento<br />
del motore, infatti, assorbe corrente dalla batteria<br />
scaricandola.<br />
- Spegnere l’accensione una volta spento il motore.<br />
Regolazione dello starter per l’avviamento del motore<br />
- A motore freddo: chiudere lo starter come descritto in precedenza<br />
- A motore caldo: lasciare lo starter aperto<br />
- A seguito di un eventuale incidente del modello, in cui<br />
possa penetrare sporcizia nel motore, non ruotare l’albero<br />
a gomiti dall’esterno, ma smontare e pulire prima di componenti<br />
del motore.<br />
- Verificare di volta in volta la distanza tra gli elettrodi della<br />
candela: la luce corretta è di 0,3 – 0,5 mm. Gli appositi<br />
spessimetri per la misurazione sono disponibili presso i<br />
negozi di autoricambi.<br />
- Sostituire la candela sempre con una di medesima gradazione<br />
- A seguito di lavori di pulizia o manutenzione sul motore è<br />
necessario regolare dall’inizio il carburatore.<br />
Parti di ricambio<br />
Per l’ordine di un ricambio, riportare sempre il codice dell’articolo<br />
e la sua descrizione.<br />
31380006 Accensione Yak 54<br />
31380007 Carburatore Yak 54<br />
31380008 Cilindro con guranizioni Yak 54<br />
31380009 Carter completo per albero a gomiti Yak 54<br />
31380010 Collettore Yak 54<br />
31380011 Marmitta Yak 54<br />
robbe Modellsport GmbH & Co. KG<br />
Con riserva di modifiche tecniche<br />
La robbe Modellsport GmbH & Co. KG certifica che questo articolo è conforme ai requisiti<br />
fondamentali e alle altre disposizioni principali contenute nelle relative norme CE. La dichiarazione<br />
originale di conformità è consultabile all’indirizzo Internet www.robbe.com , premendo<br />
sul logo „Conform“ relativo alla descrizione del prodotto.<br />
Questo simbolo indica che le apparecchiature elettriche ed elettroniche<br />
devono essere smaltite separatamente dai rifiuti domestici al termine del loro<br />
utilizzo.<br />
Consegnate i dispositivi agli appositi punti di raccolta comunali oppure ai centri<br />
di riciclo. Tale disposizione è in vigore per tutti i paesi dell’Unione Europea<br />
e per gli altri paesi europei con centri di raccolta separati.<br />
© robbe Modellsport<br />
8
Instrucciones de Uso<br />
Motor de gasolina de dos tiempos <strong><strong>RC</strong>GF</strong> <strong>45</strong><br />
Características técnicas<br />
Cilindrada:<br />
Diámetro x carrera<br />
Potencia:<br />
Rango de revoluciones:<br />
Peso:<br />
Encendido:<br />
Alimentación para el<br />
encendido:<br />
Hélice avión:<br />
<strong>45</strong> cc<br />
43 x 31 mm.<br />
4,3 hp, 3,0 kW<br />
aprox. 1.500 – 7.600 rpm<br />
aprox. 1610 grs. incl. silenciador<br />
y encendido<br />
electrónico<br />
4,8 – 6 V<br />
20 x 8” (aprox. 8.000 rpm)<br />
20 x 10” (aprox. 7.600 rpm)<br />
22 x 8” (aprox. 7.500 rpm)<br />
Montar el equipo del encendido con su alimentación.<br />
Para ello enchufar el capuchón de bujías sobre las bujías.<br />
Conectar el sensor “Z· en la electrónica “E”.<br />
“Z”<br />
“A”<br />
General<br />
El motor de gasolina <strong><strong>RC</strong>GF</strong> <strong>45</strong> trabaja según el principio de<br />
dos tiempos. Esto significa que el cambio de gas en el motor,<br />
se efectúa a través de dos ranuras en el cilindro y que se<br />
aprovecha cada giro completo del cigüeñal como ciclo de<br />
trabajo.<br />
“E”<br />
El encendido de la mezcla se hace a través de un encendido<br />
electrónico, alimentado con corriente de una batería de 4,8 V.<br />
Al contrario del auto-encendido, siempre debe haber tensión.<br />
“S”<br />
Combustible adecuado<br />
Usar una mezcla normal de aceite – gasolina para motores de<br />
dos tiempos (relación de mezcla 1:50). Tener en cuenta de<br />
usar un aceite sintético de calidad alta.<br />
No hace falta ninguna mezcla especial para el rodaje.<br />
Silenciador<br />
Usar como silenciador, el amortiguador con colector de escape<br />
incluido en el motor.<br />
Consejos de Seguridad<br />
No dejar que el combustible entre en contacto con la piel, los<br />
ojos o la nariz. Si esto pasara, lavar enseguida con agua fría.<br />
No inhalar los vapores.<br />
Hacer las pruebas de rodaje solamente en el exterior o en<br />
salas con instalación de aspiración adecuada.<br />
No ponerse en el área de giro de la hélice – puede sufrir heridas.<br />
Para la puesta en marcha del motor, se requiere:<br />
- Hélice (para el tamaño ver características técnicas)<br />
- Mezcla de combustible<br />
- Depósito (aprox. 500 cc) y tubo de combustible resistente<br />
a la gasolina<br />
- Batería para el encendido 4,8 V a partir de 1.200 mAh<br />
- Cable conmutador para interrumpir la corriente del encendido<br />
Instalación, proceso de rodaje y tiempos del rodaje<br />
Hacer el rodaje del motor directamente en el modelo. Instalar<br />
el motor según las instrucciones del modelo e instalar el<br />
depósito de combustible con los tubos.<br />
Conectar la batería “A” con la electrónica a través del conmutador<br />
“S”. Fijar la batería y la electrónica.<br />
Conectar el servo del gas de forma funcional.<br />
Seleccionar la hélice del aeromodelo, si es necesario hacer<br />
taladros adicionales según el disco de sujeción de la hélice y<br />
montarla. Montar la hélice de tal manera, que se incline ligeramente<br />
hacía la derecha en el punto muerto superior del<br />
pistón.<br />
No introducir destornilladores o similares en las ranuras del<br />
escape para bloquear el cigüeñal para fijar la hélice, porque<br />
dañaría el pistón y el casquillo.<br />
Vigilar que el motor esté bien sujeto dentro del modelo.<br />
Asegurar que la hélice esté bien fijada.<br />
Montar el silenciador y conectar los tubos del combustible.<br />
Para el rodaje se requieren aprox. 10 horas. Después de<br />
llenar el depósito del combustible por primera vez, se puede<br />
volar el modelo con un ajuste “rico” del carburador. Durante<br />
la fase del rodaje no conviene usar el motor con largos intervalos<br />
de gas a fondo.<br />
El carburador<br />
El carburador viene preajustado de fábrica y no debería<br />
tocarse.<br />
Los elementos de mando<br />
- 1 starter<br />
- 2 palancas de gas (conexión para el varillaje del gas)<br />
- 3 tornillos de tope para el punto muerto<br />
- 4 agujas de inyector para punto muerto<br />
- 5 agujas de inyector principal<br />
© robbe Modellsport<br />
9
Instrucciones de Uso<br />
Motor de gasolina de dos tiempos <strong><strong>RC</strong>GF</strong> <strong>45</strong><br />
1<br />
2<br />
Al dar gas, el motor debe aumentar las revoluciones sin funcionar<br />
irregularmente o pararse. Si el motor se para, desenroscar<br />
un poco la aguja del punto muerto. Si funciona irregularmente<br />
o si le cuesta aceptar gas, enroscar la aguja del<br />
punto muerto.<br />
Aumentar lentamente las revoluciones del gas a fondo,<br />
enroscando la aguja del inyector principal paso a paso.<br />
El motor debe girar suavemente en punto muerto, en la transición<br />
debe aceptar gas y con gas a fondo debe alcanzar las<br />
máximas revoluciones.<br />
Ajustar el tornillo de tope del punto muerto de manera que el<br />
motor no se pare, cuando el servo del gas está en punto<br />
muerto. De forma alternativa se puede ajustar el tornillo de<br />
manera que se pueda parar el motor mediante el trim en la<br />
emisora.<br />
3 4<br />
Puesta en marcha<br />
5<br />
Atención: Para arrancar el motor con la mano, usar un guante<br />
grueso, para prevenir heridas. Asegurar que el modelo no<br />
pueda empezar a rodar sin querer.<br />
- Llenar el depósito.<br />
- Poner el carburador con la emisora en posición punto<br />
muerto.<br />
- Cerrar la tapa del starter con la mano.<br />
- Conectar el encendido.<br />
- Con la mano, girar el motor con fuerza.<br />
- Después de la primera explosión, abrir la tapa del starter.<br />
- Arrancar el motor con un empuje fuerte en la hélice.<br />
- Después de que el motor haya arrancado, dar gas lentamente.<br />
Nota: No aspirar demasiado combustible. Si el cilindro se ha<br />
llenado demasiado y el motor gira con problemas, desenroscar<br />
la bujía y soplar el combustible del cilindro, acelerando el<br />
motor varias veces. Es posible que salga gasolina de las<br />
aperturas de la bujía. Vigilar de no tener la cara o las manos<br />
encima de la culata. Secar la bujía.<br />
Con gas a fondo, el motor debe girar con mezcla rica. Al principio<br />
es mejor, desenroscar la aguja del inyector principal<br />
algo más. Así el motor recibe más combustible y por tanto<br />
también más aceite y hace el rodaje más cuidadosamente.<br />
Después de llenar el depósito varias veces, se pueden incrementar<br />
las revoluciones lentamente, enroscando paso a paso<br />
la aguja del inyector principal. Si caen las revoluciones, volver<br />
a desenroscar enseguida la aguja del inyector.<br />
Consejos generales para el uso<br />
- Antes de arrancar el motor cada vez, verificar su fijación<br />
dentro del modelo, la conexión de la tubería de combustible<br />
y que la hélice esté bien sujeta.<br />
- Controlar que el colector del escape y el silenciador estén<br />
bien fijados.<br />
- Si es necesario, reapretar los tornillos de la carcasa.<br />
- Vigilar que el aire de aspiración esté limpio.<br />
- Conviene cargar la batería para el encendido para cada día<br />
de vuelo, porque se consume corriente durante todo el<br />
tiempo de funcionamiento del motor.<br />
- Después de apagar el motor, desconectar el encendido.<br />
Posición del starter para el arranque:<br />
- Cuando el motor está frío: Cerrar el starter para arrancar, tal<br />
como descrito.<br />
- Cuando el motor está caliente: Dejar el starter abierto.<br />
- Después de una caída eventual, durante la cual suciedad<br />
puede haber penetrado dentro del motor, no girar el<br />
cigüeñal antes de desmontar y limpiar el motor.<br />
- Verificar de vez en cuando la distancia de los electrodos de<br />
la bujía. Distancia: 0,3 – 0,5 mm. Se pueden adquirir los<br />
calibres adecuados en el comercio de accesorios para<br />
vehículos.<br />
- Al cambiar la bujía, tener en cuenta que el valor térmico sea<br />
idéntico.<br />
- Después de trabajos de limpieza o de mantenimiento, es<br />
necesario volver a ajustar el carburador.<br />
Recambios<br />
Al pedir recambios, indicar siempre el nº de ref. exacto y la<br />
denominación.<br />
31380006 Encendido Yak 54<br />
31380007 Carburador Yak 54<br />
31380008 cilíndro con juntas Yak 54<br />
31380009 caja del cigüeñal completo Yak 54<br />
31380010 colector de escape Yak 54<br />
31380011 silenciador Yak 54<br />
robbe Modellsport GmbH & Co. KG<br />
Nos reservamos el derecho de modificaciones técnicas.<br />
El ajuste del carburador<br />
Ajuste básico: Cerrar del todo las agujas del inyector.<br />
Aguja del punto muerto: Abrir 1 ½ vueltas.<br />
Aguja del inyector principal: Abrir 1 ¾ vueltas.<br />
Nota: Siempre modificar los ajustes en las agujas del inyector<br />
en pasos pequeños.<br />
© robbe Modellsport<br />
10<br />
robbe Modellsport GmbH & Co. KG declara por la presente que este producto cumple con<br />
los requisitos básicos y demás preceptos relevantes de las siguientes directivas:<br />
La declaración de conformidad original se puede consultar vía Internet en la dirección<br />
www.robbe.com, haciendo clic en el botón-logo “conform” en la descripción del producto<br />
correspondiente<br />
Los aparatos electrónicos no se pueden tirar simplemente en el cubo de basura<br />
habitual.<br />
Este símbolo significa, que los aparatos eléctricos y electrónicos tienen que<br />
ser desechados de forma separada a la basura doméstica al final de su uso.<br />
Desechar el aparato en un sitio de recogida local o en un centro de reciclaje.<br />
Esto vale para todos los países de la Comunidad Europea, así como para<br />
otros países europeos con sistemas de recogida separados.
Provozní návod<br />
Dvoutaktní benzínový motor <strong><strong>RC</strong>GF</strong> <strong>45</strong><br />
Technická data<br />
Zdvihový objem: <strong>45</strong> cm 3<br />
Vrtání x zdvih: 43 x 31 mm<br />
Výkon:<br />
4,3 ks, 3,0 kW<br />
Rozsah otáček: ca. 1500 – 7600 ot/min.<br />
Hmotnost: ca. 1610 g vč. tlumiče a zapalování<br />
Zapalování: elektronické<br />
Zdroj napětí<br />
pro zapalování: 4,8 – 6 V<br />
Vrtule:<br />
20 x 8“ (ca. 8000 ot/min.)<br />
20 x 10“ (ca. 7600 ot/min.)<br />
22 x 8“ (ca. 7500 ot/min.)<br />
Namontovat zapalovací zařízení s napájecím zdrojem proudu.<br />
Nadále nasadit konektor svíčky na svíčku. Senzor “Z” připojit<br />
k elektronice “E”.<br />
“Z”<br />
“A”<br />
Všeobecně<br />
Benzínový motor <strong><strong>RC</strong>GF</strong> <strong>45</strong> pracuje na základě dvoutaktního<br />
principu. To znamená, že výměna plynů v motoru se děje<br />
štěrbinami ve válci a každá plná otáčka klikového hřídele je<br />
využita jako pracovní takt.<br />
“E”<br />
Směs je zapalována elektronickým zapalovacím zařízením,<br />
které je napájeno proudem z aku 4,8 V. V protikladu ke žhavíku<br />
musí být napětí permanentně zapojeno.<br />
“S”<br />
Vhodné palivo<br />
Použíjte normální dvoutaktní směsi benzínu s olejem (směšovací<br />
poměr 1:50). Je třeba dbát na použití vysoce kvalitního<br />
syntetického oleje.<br />
Speciální směs pro záběh není zapotřebí.<br />
Tlumič<br />
Jako tlumiče použijte k motoru přiloženého tlumiče s kolenem.<br />
Bezpečnostní pokyny<br />
Palivo nepřivádějte do styku s pokožkou, očima anebo<br />
nosem. Při kontaktu paliva s pokožkou postižené místo ihned<br />
umyjte studenou vodou. Nevdechujte výpary.<br />
Pokusné běhy provádějte jen venku anebo v místnostech s<br />
odpovídajícím odsáváním.<br />
Nikdy se nepohybujte v rovině otáčení vrtule – nebezpečí<br />
zranění.<br />
Aku “A” spojit přes vypínač “S” s elektronikou. Aku a elektroniku<br />
upevnit.<br />
Servo plynu zapojit ve funkčním stavu.<br />
Zvolit vrtuli, dle potřeby opatřit dodatečnými otvory dle přítlačné<br />
podložky vrtule a namontovat. Vrtule by měla být<br />
upevněna tak, aby v horní mrtvé poloze pístu byla lehce<br />
vychýlená doprava.<br />
Za účelem zablokování klikového hřídele při utahování vrtule<br />
v žádném případě nestrkat šroubováky anebo podobné předměty<br />
do výfukových výřezů. Tím se okamžitě zničí píst i vložka<br />
válce.<br />
Dbejte na dokonalé upevnění motoru v modelu. Zajistěte<br />
dobré utažení vrtule.<br />
Namontujte tlumič hluku, zapojte palivové hadice.<br />
Pro záběhnutí je zapotřebí ca. 10 hodin. S modelem lze již<br />
létat po spotřebování první náplně nádrže se zplynovačem<br />
nastaveným na „bohatou“ směs. Během fáze zabíhání by se<br />
motor neměl provozovat v dlouhých intervalech na plný plyn.<br />
K uvedení motoru do provozu je zapotřebí:<br />
- vrtule (doporučenou velikost viz techn. data)<br />
- palivovou směs<br />
- nádrž (ca. 500 ccm) a vůčí benzínu odolnou palivovou hadici<br />
- aku pro zapalování 4,8V od 1200 mAh<br />
- kabel se spínačem pro přerušení proudu zapalování<br />
Montáž, způsob záběhu a doba záběhu<br />
Motor by se měl zabíhat přímo na modelu. Motor zabudovat<br />
dle návodu, nainstalovat palivovou nádrž s hadicemi.<br />
Zplynovač<br />
Zplynovač je předběžně nastaven ve výrobním závodě a toto<br />
nastavení by se nemělo dle libosti měnit.<br />
Ovládací elementy<br />
- 1 Sytič<br />
- 2 Škrticí páka (přípoj pro táhlo serva plynu)<br />
- 3 Dorazový šroub volnoběhu<br />
- 4 Jehla volnoběžbé trysky<br />
- 5 Jehla hlavní trysky<br />
© robbe Modellsport<br />
11
Provozní návod<br />
Dvoutaktní benzínový motor <strong><strong>RC</strong>GF</strong> <strong>45</strong><br />
Při přidání plynu se motor musí roztočit bez škytnutí anebo<br />
zastavení. Zůstane-li motor stát, poněkud vyšroubovat volnoběžnou<br />
jehlu. V případě škytání a neochotném rozbíhání<br />
volnoběžnou jehlu zašroubovat.<br />
Postupným zašroubováváním jehly hlavní trysky pomalu<br />
zvýšovat otáčky při plném plynu. Motor musí ve volnoběhu<br />
klidně běžet, při přechodu příjímat plyn a při plném plynu<br />
docílit nejvyšších otáček.<br />
1<br />
2<br />
Dorazový šroub volnoběhu musí být nastaven tak, aby se<br />
motor při poloze serva plynu na volnoběhu nezastavil.<br />
Alternativně lze šroub nastavit tak, aby bylo možné motor<br />
zastavit trimem vysílače.<br />
Všeobecné pokyny k provozu<br />
3 4<br />
Uvedení do provozu<br />
5<br />
- Před každým nastartováním motoru zkontrolovat jeho<br />
upevnění v modelu, připojení palivových hadiček a<br />
upevnění vrtule.<br />
- Zkontrolovat upevnění kolena a tlumiče.<br />
- Příležitostně dotáhnout šrouby klikové skříně.<br />
- Dbát na čistotu nasávaného vzduchu.<br />
- Aku zapalování by měl být pro každý letový den čerstvě<br />
nabit, poněvadž během celé provozní doby motoru je z něj<br />
odebírán proud.<br />
- Po zastavení motoru vypnout zapalování.<br />
Pozor: Aby se předešlo zranění, je při ručním startu<br />
motoru třeba použít silných rukavic. Model zajistit tak,<br />
aby se neúmyslně nerozjel.<br />
- Naplnit nádrž.<br />
- Dálkovým řízením uvést zplynovač do polohy volnoběhu.<br />
- Klapku sytiče ručně uzavřít.<br />
- Zapnout zapalování.<br />
- Motorem rukou prudce protočit.<br />
- Po prvním zážehu klapku sytiče otevřít.<br />
- Motor prudkým pohybem vrtule nahodit<br />
- Po naskočení pomalu přidávat plyn.<br />
Pokyn: Nikdy nenasávat příliš mnoho paliva. Pokud se válec<br />
příliš naplní a motor lze jen těžko protočit, vyšroubovat svíčku<br />
a palivo několikanásobným protočením motoru z válce<br />
vyfouknout. Benzín při tom může vystříknout z otvoru svíčky.<br />
Dbejte na to, aby se Váš oblíčej anebo ruce nenacházely nad<br />
hlavou válce. Svíčku vysušit.<br />
Motor musí při plném plynu běžet s „bohatou“ směsí. Na<br />
počátku je lepší, vyšroubovat jehlu hlavní trysky poněkud více<br />
ven. Motor pak obdrží více paliva, tím i více oleje a je při<br />
záběhu lépe chráněn.<br />
Po proběhnutí několika nádrží lze otáčky postupným zašroubováváním<br />
jehly hlavní trysky pomalu zvýšovat. Poklesnou-li<br />
otáčky, jehlu trysky opět ihned vyšroubovat.<br />
Nastavení zplynovače<br />
Základní nastavení: Jehly trysek úplně uzavřít.<br />
Jehlu volnoběhu: Otevřít o 1 ½ otáčky.<br />
Jehlu hlavní trysky: Otevřít o 1 ¾ otáčky.<br />
Pokyn: Změny nastavení jehel trysek provádět vždy jen v<br />
malých krocích.<br />
Poloha sytiče při spouštění:<br />
- U studeného motoru: Jak bylo popsáno pro spouštění sytič<br />
uzavřít.<br />
- U teplého motoru: Ponechat sytič otevřený.<br />
- Po případné nehodě, při které mohla do motoru vniknout<br />
nečistota, neprotáčet klikovým hřídelem před rozebráním a<br />
vyčištěním motoru.<br />
- Čas od času zkontrolovat vzdálenost elektrod svíčky.<br />
Vzdálenost: 0,3 – 0,5 mm. Vhodné šablony lze obdržet v<br />
prodejnách automobilového příslušenství.<br />
- Při výměně svíčky dbát na stejnou tepelnou hodnotu.<br />
- Po čisticích a údržbážských pracích musí se u zplynovače<br />
opět provést základní nastavení.<br />
Náhradní díly<br />
Při objednávkách náhradních dílů vždy udat přesné objednací<br />
číslo a označení.<br />
31380006 Zapalování Yak 54<br />
31380007 Zplynovač Yak 54<br />
31380008 Válec s těsněními Yak 54<br />
31380009 Kompletní kliková skříň Yak 54<br />
31380010 Výfukové koleno Yak 54<br />
31380011 Výfukový tlumič Yak 54<br />
robbe Modellsport GmbH & Co. KG<br />
Technické změny vyhraženy<br />
Firma robbe Modellsport GmbH & Co. KG tímto prohlašuje, že tento přístroj je v souladu<br />
se základními požádavky a jinými relevantními předpisy odpovídajících směrnic CE.<br />
Originální prohlášení o konformitě naléznete v internetu pod adresou www.robbe.com u<br />
příslušného popisu přístroje použitím symbolu klávesy „Conform“.<br />
Symbol odpadové nádoby znamená, že malé elektrické a elektronické výrobky<br />
se na konci jejich užitné doby musí likvidovat odděleně od domácího odpadu.<br />
Zlikvidujte přístroj v místním ekodvoru anebo v recyklačním středisku. Toto<br />
platí pro všechny země Evropské unie jakož i pro jiné evropské země s<br />
odlišnými sběrnými systémy.<br />
© robbe Modellsport<br />
12


