BR 60/95 RS Bp BR 60/95 RS Bp Pack BD 60/95 RS Bp ... - Kärcher
BR 60/95 RS Bp BR 60/95 RS Bp Pack BD 60/95 RS Bp ... - Kärcher
BR 60/95 RS Bp BR 60/95 RS Bp Pack BD 60/95 RS Bp ... - Kärcher

Create successful ePaper yourself
Turn your PDF publications into a flip-book with our unique Google optimized e-Paper software.
Turn the vacuum lip or replace and insert<br />
it back into the vacuum bar and<br />
align.<br />
Replace pressure plate.<br />
First tighten the central wing bolt. Ensure<br />
that the pressure plate is lying firmly<br />
on the vacuum lip.<br />
Tighten the remaining wing bolts.<br />
Turn/ replace rear vacuum lip<br />
Dismantle the vacuum bar.<br />
Replacing the brush rollers<br />
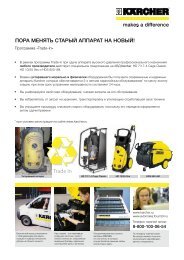
1 Splash guard<br />
2 Cross-handle for spray guard<br />
3 Bearing lid screw<br />
4 Bearing lid<br />
Hold the new brush under the cleaning<br />
head.<br />
Turn the unlocking lever of the sliding<br />
brush in clockwise direction and press<br />
the brush upward.<br />
Release the unlocking lever and check<br />
that the brush is sitting properly.<br />
Replace the spray-guard.<br />
Repeat process on the opposite side.<br />
Mount splash guard<br />
Lower the cleaning head.<br />
Turn key to "0" and remove it.<br />
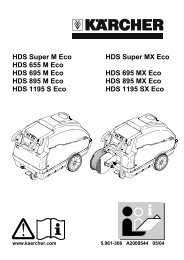
<strong>BR</strong> model:<br />
1 Clamping lock<br />
2 Strap<br />
3 Vacuum lip<br />
Open the clamping lock and remove the<br />
strap.<br />
Take out the vacuum lips.<br />
Note<br />
The vacuum lips can be turned thrice till all<br />
edges are worn off. After that you need a<br />
new vacuum lip.<br />
Turn the vacuum lip or replace and insert<br />
it back into the vacuum bar and<br />
align.<br />
Insert the strap and close the clamping<br />
lock. The tension must just be sufficient<br />
to hold the vacuum lip without wrinkling.<br />
Adjust the clamping lock, as required.<br />
Cleaning the floater<br />
Lift the cleaning head.<br />
Turn key to "0" and remove it.<br />
Loosen the cross-handle of the spray<br />
guard and tilt the spray guard to the<br />
side.<br />
Loosen the screw of bearing lid and pull<br />
the upper end of the bearing lid upwards.<br />
Press the bearing lid downwards and<br />
cross it.<br />
Pull the bearing lid from the brush.<br />
Pull out the brush.<br />
Insert new brush with the carrier in the<br />
front into the cleaning head and push it<br />
up to the end.<br />
Let the brush tilt downwards and insert<br />
the bearing lid.<br />
Hook in the lower end of the bearing lid<br />
at the cleaning head and push the bearing<br />
lid upwards.<br />
Press the upper end of the bearing lid at<br />
the cleaning head and tighten with<br />
screw.<br />
Tilt back the spray guard and tighten the<br />
cross-handle.<br />
Repeat process on the opposite side.<br />
Replacing the Disk Brushes<br />
Loosen the end and adjust it in such a<br />
way that the rubber lip is bent sidewards<br />
by approx. 9 to 10 mm.<br />
<strong>BD</strong> model:<br />
1 Stopper<br />
Loosen the end and adjust it in such a<br />
way that the lower edge of the spray<br />
guard is approx. 3 mm from the floor.<br />
Tighten the stopper.<br />
Checking the drive chain<br />
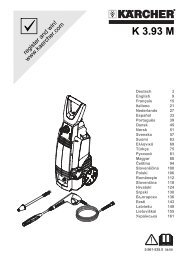
1 Pipe<br />
2 Sieve with floater ball<br />
Clean the sieve from the outside and<br />
rinse it.<br />
Check the mobility of the floater ball.<br />
If it is too dirty:<br />
Hold the pipe firmly and pull out the<br />
sieve from the pipe.<br />
Clean sieve and ball.<br />
Hold the pipe firmly and reinsert the<br />
sieve.<br />
1 side spray guard<br />
Lift the cleaning head.<br />
Turn key to "0" and remove it.<br />
Raise the side spray guard and remove<br />
it from the side.<br />
Turn the unlocking lever of the sliding<br />
brush in an anti-clockwise direction - the<br />
brushes will fall downward and can be<br />
pulled outward at the bottom of the device.<br />
1 Screw<br />
2 Front panel<br />
Loosen screws.<br />
Remove front panel.<br />
English 21