BR 60/95 RS Bp BR 60/95 RS Bp Pack BD 60/95 RS Bp ... - Kärcher
BR 60/95 RS Bp BR 60/95 RS Bp Pack BD 60/95 RS Bp ... - Kärcher
BR 60/95 RS Bp BR 60/95 RS Bp Pack BD 60/95 RS Bp ... - Kärcher

Create successful ePaper yourself
Turn your PDF publications into a flip-book with our unique Google optimized e-Paper software.
Note<br />
Suction turbine will continue to run for a<br />
while after switch-off. Carry out maintenance<br />
tasks only after the suction turbine<br />
has come to a halt.<br />
Drain and dispose of the dirt water and<br />
the residual fresh water.<br />
Maintenance schedule<br />
At start of a working week<br />
Check the lid of the dirt water tank for<br />
tightness.<br />
Check tyre status.<br />
Check if brushes are fitted properly.<br />
Check the inserts of the suction hose for<br />
leaks.<br />
Check fastening and setting of the vacuum<br />
bar (see "Maintenance tasks").<br />
Check lock of drain hoses to see that<br />
they are not leaking.<br />
Check whether the drain hoses are put<br />
away correctly.<br />
Check safety pedal, accelerator pedal<br />
and steering wheel for correct functioning.<br />
Check acid level in wet batteries; refill<br />
distilled water, if required.<br />
At the end of a working week<br />
Empty the dirt water reservoir.<br />
Rinse the dirt water tank with clear water.<br />
Clean the sieve in the lid of the dirt water<br />
tank.<br />
Clean the swimmer in the dirt water tank<br />
(see "Maintenance tasks").<br />
Clean fresh water tank and fresh water<br />
sieve.<br />
Check fresh water filter; clean if required.<br />
Switch on the suction for drying the system.<br />
Check brushes for wear and tear and<br />
clean them.<br />
Clean the spray guard at the cleaning<br />
head and check for wear.<br />
Clean vacuum lips in the vacuum bar<br />
and check for wear.<br />
Clean the outside of the appliance with<br />
a damp cloth which has been soaked in<br />
mild detergent.<br />
Check device externally for damage.<br />
Do not close the lids of the fresh water<br />
and dirt water tanks so that the tanks<br />
can dry up.<br />
Charge battery.<br />
Every 50 operating hours<br />
Clean upper side of the batteries.<br />
Check acid density in wet batteries.<br />
Check battery cable for correct positioning.<br />
Every 100 operating hours<br />
Clean battery room and battery casing.<br />
Check tension of the drive chain (see<br />
20 English<br />
"Maintenance tasks").<br />
Check drive belt for wear and tear.<br />
Every 200 operating hours<br />
Check immobilising brake. *<br />
Clean vacuum bar elevation.<br />
Clean the joints at the vacuum bar attachment<br />
and at the cleaning head.<br />
Check carbon brushes and commutators<br />
of all motors for wear and tear. *<br />
Check tightening device of steering<br />
chains. *<br />
* To be done by Customer Service.<br />
Maintenance Works<br />
Maintenance contract<br />
To ensure a reliable operation of the appliance<br />
maintenance contracts can be concluded<br />
with the competent Kärcher sales<br />
office.<br />
Setting the Vacuum Bar<br />
Drive the device on a smooth surface.<br />
Lower the vacuum bar.<br />
Drive at least <strong>60</strong> cm forward.<br />
Stop the device, turn key to "0" and remove<br />
it. Ensure that the device does<br />
not roll backward.<br />
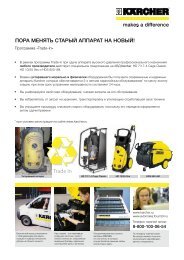
1 Levelling adjustment<br />
2 Cross-handle for height adjustment<br />
-<br />
Align the vacuum bar using the crosshandles<br />
in such a way that the rear vacuum<br />
lip is bent backward (symmetrical<br />
to the centre) on both sides of the vacuum<br />
bar.<br />
Adjust the levelling in such a way that<br />
the rear vacuum lip is bent much towards<br />
the back across the entire length.<br />
To check the setting, drive <strong>60</strong> cm forward<br />
and check the effect of the new<br />
setting.<br />
Adjust the vacuum bar by simultaneously<br />
turning both the cross-handles in<br />
such a way that the rear vacuum lip is<br />
bent almost 9 to 10 mm backward.<br />
In clock-wise direction: Bend is lesser.<br />
Anti-clockwise direction: Bend becomes<br />
larger.<br />
To check the setting, drive <strong>60</strong> cm forward<br />
and check the effect of the new<br />
setting.<br />
Dismantling the vacuum bar<br />
Raise the vacuum bar.<br />
Turn key to "0" and remove it.<br />
Pull out the suction hose from the vacuum<br />
bar.<br />
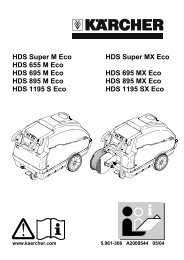
1 Cross handle for fastening of vacuum bar<br />
Loosen the cross-handles of the vacuum<br />
bar fastening and pull out the vacuum<br />
bar towards the side.<br />
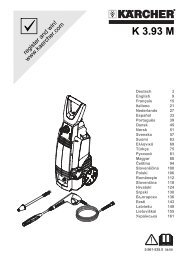
Turn/ replace front vacuum lip<br />
Dismantle the vacuum bar.<br />
1 Wing bolt<br />
2 Pressure plate<br />
3 Vacuum lip<br />
Loosen the wing nuts.<br />
Remove the pressure plate.<br />
Take out the vacuum lips.<br />
Note<br />
The vacuum lips can be turned thrice till all<br />
edges are worn off. After that you need a<br />
new vacuum lip.