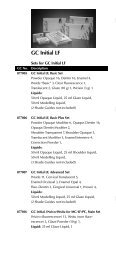
GRADIA - GC America
GRADIA - GC America
GRADIA - GC America

You also want an ePaper? Increase the reach of your titles
YUMPU automatically turns print PDFs into web optimized ePapers that Google loves.
<strong>GRADIA</strong><br />
LIGHT-CURED COMPOSITE FOR CROWN & BRIDGE, INLAYS AND VENEERS<br />
For use only by a dental professional in the recommended indications.<br />
Prior to use, carefully read the<br />
instructions for use. GB<br />
INDICATIONS<br />
1. Crown and Bridgework (with metal backing)<br />
2. Metal free restorations: Jacket Crowns, Inlays, Onlays, Laminated Veneers<br />
3. Implant superstructures<br />
CONTRAINIDICATIONS<br />
1. In rare cases the product may cause sensitivity to some persons. If such reactions are experienced, discontinue the use of the<br />
product and refer to a physician.<br />
2. In case of malocclusion, bruxism or clenching.<br />
DIRECTIONS FOR USE<br />
I. BUILDING UP PROCEDURE<br />
A. Anterior / Posterior Veneer Crown (with metal backing)<br />
1. Production of Metal Framework<br />
a) Wax-up framework conventionally, occlusal surface should have a minimum of 1 mm thickness. Areas being covered by resin<br />
should have <strong>GC</strong> RETENTION BEADS I SSS added.<br />
b) Sprue, invest, cast. Remove retainers in 0.5mm width around the marginal veneer surface.<br />
c) Clean and sandblast with 50 micron aluminum oxide.<br />
d) Dry and clean with air gun. Do not clean with steam.<br />
e) Immediately apply, with the brush, a coat of <strong>GC</strong> METALPRIMER I to retention areas. Allow to dry.<br />
2. Build up Veneer<br />
a) Using the flat brush, immediately apply a layer of FOUNDATION OPAQUE (FO) over retention area(s). Light cure for 1 minute with<br />
<strong>GC</strong> LABOLIGHT LV-I.<br />
Note: For irradiation time by the <strong>GC</strong> visible light curing unit, refer to the chart given below.<br />
b) Using the round brush, apply MARGIN OPAQUE (MO) in 1 mm width along the cervical line. Light cure for 1 minute.<br />
c) Using the flat brush, apply two thin layers of OPAQUE (O) to the entire surface. Light cure each layer for 1 minute.<br />
d) Progressively apply OPAQUS DENTIN (OD) as a cervical color in 2-3 mm width around the cervical area. Light cure for 30<br />
seconds.<br />
Note: In case of the crown with metal backing on the incisal edge, apply INTENSIVE COLOR (IC7, Lavender) along the incisal<br />
edge before applying OPAQUS DENTIN (OD). Light cure for 30 seconds.<br />
e) Apply DENTIN (D), building up to the desired thickness. Light cure for 30 seconds. Use MAMELON STAIN (MS) or INTENSIVE<br />
COLOR (IC7) as required, and light cure for 30 seconds.<br />
f) Apply ENAMEL (E) progressively from the incisal edge. Create a mamelon effect as required. Light cure for 30 seconds.<br />
Note: CERVICAL TRANSLUCENT (CT) can be applied to the cervical area, ENAMEL INTENSIVE (EI) to the incisal edge, HALO<br />
ENAMEL (HE) to the proximal surface. Light cure each layer for 30 seconds.<br />
g) Coat the resin surface with <strong>GRADIA</strong> AIR BARRIER to ensure full polymerization of the surface and to avoid the oxygen inhibited<br />
layer.<br />
h) Finally, light cure with the <strong>GC</strong> LABOLIGHT LV-II for 3 minutes. After light curing, remove the AIR BARRIER with water.<br />
i ) Grind & polish in usual manner. High-glaze finishing using <strong>GRADIA</strong> DIAPOLISHER on a felt wheel or leather buffing.<br />
Note: For details of layering technique, refer to the <strong>GRADIA</strong> User's Manual.<br />
B. Anterior or Posterior Jacket Crown (metal free)<br />
1. Preparation of the working stone model<br />
a) Prepare the stone die in usual manner.<br />
b) Apply <strong>GRADIA</strong> DIE-HARDNER to the die stone surface.<br />
c) Block out undercuts with wax.<br />
d) Apply a layer of paraffin wax as die spacer as required.<br />
e) Apply a thin layer of <strong>GRADIA</strong> SEPARATOR, a resin composite separator.<br />
2. Special pre-cure treatment<br />
a) In case of a metal core, apply first a thin layer of MARGIN OPAQUE (MO) or OPAQUE (O). Light cure for 1 minute.<br />
b) In case of a vital abutment tooth, apply first a thin layer of INTENSIVE COLOR (IC0). Light cure for 30 seconds.<br />
3.Build up of Crown<br />
a) Apply a layer of OPAQUE (O) to the labial surface of the die and MARGIN OPAQUE (MO) to the lingual surface. Light cure each<br />
layer for 1 minute.<br />
b) Apply SHOULDER DENTIN (SD) or DENTIN (one shade number just above the crown shade) in the cervical area. Light cure for<br />
30 seconds.<br />
c) For following build up on the labial surface, see instructions BUILDING UP PROCEDURE A.(Section 2. d-f) above.<br />
d) For building up on the lingual surface, apply MAMELON STAIN (MS) to prevent the die from shining through the resin surface.<br />
Light cure for 30 seconds.<br />
e) Apply OPAQUS DENTIN INTENSIVE (ODI) in the cervical area to cover 1/3 of the crown. Light cure for 30 seconds.<br />
f) Progressively apply HALO ENAMEL (HE) from the incisal edge toward the cervical area. Also apply HALO ENAMEL (HE) to the<br />
proximal surface.<br />
g) Continue BUILDING UP PROCEDURE A. (Section 2. g-i).<br />
Note: For details of layering technique, refer to the <strong>GRADIA</strong> User's Manual.<br />
C. Posterior Inlay<br />
1. Preparation of the working stone model<br />
Follow the instructions Preparation of the working stone model (B. Section 1. a-e) above.<br />
2. Special pre-cure treatment<br />
Apply first a thin layer of INTENSIVE COLOR (IC0) to the cavity floor. Light cure for 30 seconds.<br />
3. Build up of Inlay<br />
a) Build up CERVICAL TRANSLUCENT (CT) (highly translucent) as a dentin color in order to retain the natural tooth color. Light cure<br />
for 30 seconds.<br />
Note: In the case of a stained tooth, it is recommended to first apply OPAQUE (O), MARGIN OPAQUE (MO) or OPAQUS DENTIN<br />
(OD) to the cavity floor. Light cure for O and MO for 1minute or OD for 30 seconds.<br />
b) Build up ENAMEL INTENSIVE (EI) or ENAMEL (E), shape and contour. Light cure for 30 seconds.<br />
1