You also want an ePaper? Increase the reach of your titles
YUMPU automatically turns print PDFs into web optimized ePapers that Google loves.
Article 4.<br />
Charging instruction<br />
1. Make sure the battery is full-charged and charge each<br />
time after the use to insure the battery life.<br />
2. Please do not put the battery in a wet place when<br />
charge, the temperature should be 10°C – 40°C<br />
(50°F – 104°F).<br />
3. Do not cover the battery cartridge and charger with<br />
anything when charging and avoid letting liquid and<br />
metal powder inside.<br />
4. If the battery’s temperature exceeds 60°C (140°F), it<br />
may lead any trouble in the charger. Please cut off the<br />
power and sent for repair.<br />
5. Keep the battery and charger away from kids.<br />
6. The charger could only be used for this battery.<br />
Article 5.<br />
Repair and maintenance<br />
• Before use, please check if the battery is locked well<br />
and the display works well.<br />
• Please check the connector of the bicycle and battery<br />
box. Remove dirt to avoid any damage.<br />
• Check the tire regularly, otherwise it will affect the<br />
usage range or damage the tire.<br />
• Before use, check the mechanism and other accessory<br />
on time.<br />
• Do not put the bicycle in humidified atmosphere or<br />
some other place which might make the hardware rust.<br />
• Do not put the whole bicycle under rain or insolation for<br />
too long time so as to avoid the controller and<br />
accessory damaged.<br />
• If any problem in the motor, battery and controller,<br />
please sent to the exclusive agent for the maintenance.<br />
• If you feel it a bit heavy to move the backward, it’s a<br />
normal status.<br />
• Do not over load on the bicycle so as to avoid damage<br />
the motor and battery.<br />
• It’s important to lubricate the bicycle, the front, rear<br />
axle, BB set per year or half a year. Use a special<br />
lubricant for the hub (Recommend to use the clear<br />
gasoline and vesaline lube), if anything wrong, please<br />
send to our agency for the maintenance.<br />
Article 6.<br />
Using instruction for folding parts<br />
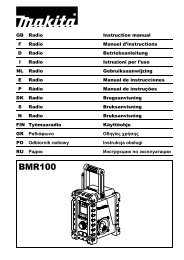
1. To assemble the seat<br />
Insert the seat into the support bar, and adjust the<br />
height according to the length of customer’s legs, then<br />
fix the bolt.<br />
Please note the insert depth should not see the safety<br />
line, and twisting force of the clamp lock can not be<br />
less than 18 N.m. (Fig. 11)<br />
2. Quick release use<br />
Fasten the screw tightly and push down the lever<br />
toward the pole to adjust the position correctly.<br />
(Fig. 11)<br />
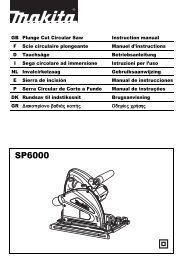
3. To fold the handlebar stem<br />
Push up the self-locking slider down as showed in the<br />
picture a, then push the handle down according to the<br />
picture b. (Fig. 12)<br />
8<br />
Fold the stem down when the hook is opened as<br />
showed in Fig. 12 & 13.<br />
4. To put pedal<br />
By putting the pedal inside, the desired manner for the<br />
bicycle can be achieved. Grip the lever inside the<br />
pedal and push it down to the body side. (Fig. 14)<br />
5. To fold the frame<br />
Stand on the left side of bicycle, and fold the<br />
handlebar stem first, then hold the frame with your left<br />
hand, hold the folding handle and move it to open.<br />
Turn the folding handle as showed in Fig. 13. When<br />
the folding locking buckle is opened, then hold the<br />
frame from two sides and fold the frame toward the left<br />
of frame, and stop folding until the front wheel and<br />
rear wheel is parallel, as showed in Fig. 15 – 17.<br />
Article 7.<br />
Accessories and adjustment<br />
1. The battery controller and motor cannot be removed.<br />
2. To change parts please come to the agency for<br />
change, we do not responsible for the problem which<br />
caused by customer who remove the parts by<br />
themselves.<br />
3. Please use the <strong>Makita</strong> battery BL1830 or BL1815.<br />
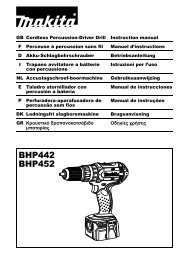
4. Brake adjustment.<br />
Check the brake regularly and check as below:<br />
(Fig. 18 – 20)<br />
4.1 Adjust front brake.<br />
4.1.1. As shown in Fig. 18, check the front brake. The<br />
brake will be fully triggered when the brake lever is<br />
gripped to the half-closed position.<br />
4.1.2. As shown in Fig. 19, loosen the screw to loosen or<br />
tighten the brake arms, and make the distance<br />
between the brake broad and the tire 1.5 – 2 mm.<br />
Tighten the screw. If the distance is different,<br />
please keep adjusting the spring until made the<br />
desired distance, is made which meets the 4.1.1<br />
request.<br />
4.2 Adjust the rear brake.<br />
4.2.1. As shown in Fig. 18, check the rear brake as<br />
4.1.1.<br />
4.2.2. See Fig. 20, to adjust brake, as described in 4.1.1<br />
showing adjustment of the front brake, loose the<br />
brake lever then adjust the screw till it touch the<br />
move board, enclasp the brake lever, adjust the<br />
move board and bolt (2 mm). Adjust some times till<br />
rearwheel turns well and brake function works<br />
well. When 1/3 of the brake is frayed, please<br />
change it.<br />
Attention:<br />
Please do not add lubricants on the rear brake. And<br />
please replace brake shoe in the front brake each year, to<br />
avoid shoe abrasion.<br />
Brake maintenance<br />
In order to maintain your bicycle’s braking performance, it<br />
is important to perform maintenance on the braking<br />
system.<br />
• Replacing brake cables and housings.<br />
5. Chain adjusting<br />
Adjust as below:<br />
Disassemble the plastic protecting cover of rear axle,<br />
and release two M12 nut. Turn the adjust nut