Create successful ePaper yourself
Turn your PDF publications into a flip-book with our unique Google optimized e-Paper software.
GB<br />
OPERATION<br />
FR DE ES IT NL PT DK SE FI NO RU PL CZ HU RO LV LT EE HR SI SK GR TR<br />
WARNING<br />
Always remove battery pack from your tool when<br />
you are assembling parts, making adjustments,<br />
cleaning, or when not in use. Removing battery<br />
pack will prevent accidental starting that could<br />
cause serious personal injury.<br />
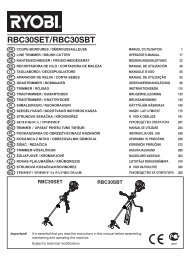
REMOVING THE BATTERY PACK<br />
See Figure 4.<br />
Locate the latches on the side of the battery pack<br />
and depress them to release the battery pack from<br />
the saw.<br />
Remove battery pack from the saw.<br />
CUTTING WHEELS<br />
The best of cutting wheels will not cut effi ciently if they are<br />
dull or badly worn. Using a dull wheel will place a heavy<br />
load on the saw. Keep extra wheels on hand, so that sharp<br />
wheels are always available.<br />
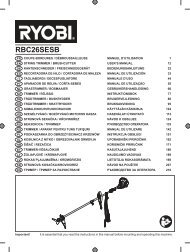
STARTING/STOPPING THE SAW<br />
See Figure 5.<br />
To start the saw:<br />
Depress the lock-off button.<br />
Depress the switch trigger.<br />
Always let the wheel reach full speed, then guide the saw<br />
into the workpiece.<br />
To stop the saw: Release the switch trigger.<br />
After you release the switch trigger, allow the wheel to<br />
come to a complete stop. DO NOT remove the saw from<br />
the workpiece while the wheel is moving.<br />
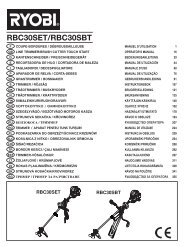
LOCK-OFF BUTTON<br />
See Figure 6.<br />
The lock-off button reduces the possibility of accidental<br />
starting. The lock-off button is located on the handle above<br />
the switch trigger. The lock-off button must be depressed<br />
before you pull the switch trigger. The lock resets each<br />
time the trigger is released.<br />
NOTE: You can depress the lock-off button from either the<br />
left or right side.<br />
ADJUSTING WHEEL DEPTH<br />
See Figure 7.<br />
Always keep correct wheel depth setting. The correct<br />
wheel depth setting for all cuts should not exceed 6.35<br />
mm below the material being cut. More wheel depth will<br />
increase the chance of kickback and cause the cut to be<br />
rough. For more depth of cut accuracy, a scale is located<br />
on the rear bracket.<br />
English<br />
4<br />
Loosen the depth adjustment knob.<br />
Determine the desired depth of cut.<br />
Locate the depth of cut scale on the rear bracket.<br />
Hold the base fl at against the workpiece and raise<br />
or lower the saw until the indicator mark on bracket<br />
aligns with the notch on the wheel guard.<br />
Tighten the depth adjustment knob securely.<br />
OPERATING THE SAW<br />
See Figure 8 - 9.<br />
It is important to understand the correct method for<br />
operating the saw. Refer to the fi gures in this section to<br />
learn the correct and incorrect ways for handling the saw.<br />
WARNING<br />
When lifting the saw from the workpiece, the<br />
wheel is exposed on the underside of the saw.<br />
To make the best possible cut:<br />
Hold the saw fi rmly with both hands.<br />
Avoid placing your hand on the workpiece while making<br />
a cut.<br />
Support the workpiece so that the cut (kerf) is always<br />
to your side.<br />
Support the workpiece near the cut.<br />
Clamp the workpiece securely so that the workpiece<br />
will not move during the cut.<br />
Always place the saw on the workpiece that is<br />
supported, not the “cut off” piece.<br />
Place the workpiece with the “good” side down.<br />
Draw a guideline along the desired line of cut before<br />
beginning your cut.<br />
MAKING CUTS<br />
Always draw the line to be cut on the tile using a marker or<br />
grease pencil. If the tile is shiny and hard-to-mark, place<br />
masking tape on the tile and mark the tape.<br />
A common problem when cutting tile is straying from the<br />
marked line. Once you’ve strayed from the mark, you<br />
can not force the wheel back to the line by twisting the<br />
tile. Instead, back up and recut the tile slicing off a small<br />
amount of tile until the wheel is back on track.<br />
To avoid this problem, use a straight edge guide whenever<br />
possible for making cross cuts and miter cuts.<br />
If wet cutting is desired, it should be performed outside.<br />
MAINTENANCE<br />
WARNING<br />
When servicing, use only identical RYOBI<br />
replacement parts. Use of any other parts may<br />
create a hazard or cause product damage.