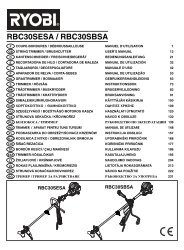

Create successful ePaper yourself
Turn your PDF publications into a flip-book with our unique Google optimized e-Paper software.
GB<br />
FR DE ES IT NL PT DK SE FI NO RU PL CZ HU RO LV LT EE HR SI SK GR TR<br />
SPECIFIC SAFETY RULES<br />
Always observe that the lower guard is covering<br />
the blade before placing saw down on bench or<br />
fl oor. An unprotected, coasting blade will cause the<br />
saw to walk backwards, cutting whatever is in its path.<br />
Be aware of the time it takes for the blade to stop after<br />
switch is released.<br />
DESCRIPTION<br />
1. Lock-off button<br />
2. Spindle lock<br />
3. Bevel scale<br />
4. Bevel lock knob<br />
5. Edge guide lock knob<br />
6. Cutting wheel<br />
7. Base<br />
8. Flow adjustment knob<br />
9. Water bottle release button<br />
10. Water bottle<br />
11. Depth lock knob<br />
12. Wheel wrench storage<br />
13. Battery pack (not included)<br />
14. Switch trigger<br />
15. Inner wheel washer<br />
16. Wheel<br />
17. Outer wheel washer<br />
18. Wheel screw<br />
19. Incorrect method of support<br />
20. Correct method of support<br />
ASSEMBLY<br />
ATTACHING GRAVITY FEED WATER BOTTLE<br />
See Figure 2.<br />
The gravity feed water bottle has a built in air vent that<br />
equalizes pressure and allows water to fl ow more freely.<br />
Remove the battery.<br />
Unscrew the nozzle assembly.<br />
Fill water bottle to desired level. Do not overfi ll.<br />
Replace nozzle assembly.<br />
Hold water bottle so that nozzle faces down.<br />
NOTE: Water will not escape the bottle unless the tip<br />
of the nozzle is depressed.<br />
Insert the water bottle as shown. Gently press down<br />
on the bottle until it clicks into place.<br />
To remove water bottle, depress the water bottle<br />
release button.<br />
NOTE: For dry cutting, leave water bottle installed to<br />
prevent dust and debris from clogging the water supply<br />
system.<br />
English<br />
2<br />
CAUTION<br />
Water bottle is designed for water only. Use of<br />
any other fluid may cause damage to the tool.<br />
WARNING<br />
A 101.6 mm wheel is the maximum wheel<br />
capacity of the saw. Also, never use a wheel<br />
that is too thick to allow outer wheel washer to<br />
engage with the flat on the spindle. Larger wheels<br />
will come in contact with the wheel guards,<br />
while thicker wheels will prevent wheel screw<br />
from securing wheel on spindle. Either of these<br />
situations could result in a serious accident.<br />
WARNING<br />
Do not use cutting wheels rated less than the<br />
no load speed of this tool. Failure to heed this<br />
warning could result in personal injury. Do not<br />
use wheel with cracks, gaps, or teeth.<br />
WARNING<br />
Do not use toothed or segmented wheels. Use<br />
only continuous rimmed diamond wheels suited<br />
for masonry materials.<br />
INSTALLING CUTTING WHEEL<br />
See Figure 3.<br />
Remove the battery pack from the saw.<br />
Remove the wheel wrench (5 mm hex key) from the<br />
storage area.<br />
Depress the spindle lock button and remove the wheel<br />
screw and outer wheel washer.<br />
NOTE: Turn the wheel screw clockwise to remove.<br />
CAUTION<br />
To prevent damage to the spindle or spindle lock,<br />
always allow motor to come to a complete stop<br />
before engaging spindle lock.<br />
NOTE: Do not run the saw with spindle lock engaged.<br />
Wipe a drop of oil onto the inner wheel washer and<br />
outer wheel washer where they contact the wheel.<br />
<br />
WARNING<br />
If inner wheel washer has been removed, replace<br />
it before placing cutting wheel on spindle. Failure<br />
to do so could cause an accident since wheel will<br />
not tighten properly.<br />
Replace the outer wheel washer.