Instruction and maintenance manual Livret d'instruction ... - Everlasting
Instruction and maintenance manual Livret d'instruction ... - Everlasting
Instruction and maintenance manual Livret d'instruction ... - Everlasting

Create successful ePaper yourself
Turn your PDF publications into a flip-book with our unique Google optimized e-Paper software.
1<br />
ITALIANO<br />
Manuale d'uso e manutenzione<br />
<strong>Instruction</strong> <strong>and</strong> <strong>maintenance</strong> <strong>manual</strong><br />
<strong>Livret</strong> <strong>d'instruction</strong> et entretien<br />
Bedienungs-und Wartungsanleitung<br />
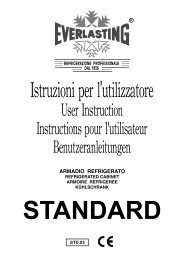
ABBATTITORI / SURGELATORI RAPIDI<br />
BLAST CHILLERS / SHOCK FREEZERS<br />
CELLULES DE REFROIDISSEMENT / SURGELATION RAPIDE<br />
SCHNELLKÜHLER / SCHOCKFROSTGERÄTE<br />
ABF 20P-40P-80P-120P<br />
RIV<br />
ABF 20-40-80-120
Capitolo 1 NORME ED AVVERTENZE GENERALI ITALIANO<br />
Section 1 STANDARDS AND GENERAL WARNINGS<br />
Chapitre 1 NORMES ET AVERTISSEMENTS GENERAUX<br />
Kap. 1 NORMEN UND ALLGEMEINE HINWEISE<br />
1.1 DICHIARAZIONE DI CONFORMITA' - 1.1 DECLARATION OF CONFORMITY<br />
1.1 DECLARATION DE CONFORMITE - 1.1 KONFORMITÄTSERKLÄRUNG<br />
DICHIARAZIONE CE DI CONFORMITA'<br />
CE DECLARATION OF CONFORMITY<br />
DECLARATION CE DE CONFORMITE<br />
KONFORMITÄTSERKLÄRUNG<br />
NOI - THE COMPANY - NOUS - DIE FIRMA<br />
EVERLASTING S.R.L. - Fabbrica Frigoriferi Industriali<br />
S.S. Cisa km. 161 - 46029 SUZZARA ( MN ) - ITALIA<br />
2<br />
ABF 20-40-80-120<br />
Dichiariamo sotto la nostra esclusiva responsabilità che il prodotto ABBATTITORE<br />
Declares, under its own sole responsibility, that the product designated BLAST CHILLER<br />
Déclarons sous notre responsabilité exclusive que le produit CELLULE DE REFROIDISSEMENT<br />
Erklärt unter der eigenen und ausschließlichen Verantwortung, daß das Produkt SCHNELLKÜHLER<br />
Suzzara ................................<br />
Numero di serie<br />
Serial number<br />
Numéro de série<br />
Seriennummer<br />
al quale questa dichiarazione si riferisce è conforme alle seguenti direttive europee:<br />
to which the present declaration refers, complies with the following european directives:<br />
auquel cette déclaration se rapporte, est conforme aux dispositions européennes suivantes:<br />
auf das sich diese Erklärung bezieht, den Bestimmung folgende europäische Richtlinien entsprechen:<br />
"Macchine" 2006/42/CE<br />
"Bassa tensione" 2006/95/CEE e sucessive modificazioni<br />
"Compatibilità elettromagnetica" 2004/108/CEE e sucessive modificazioni<br />
"Materiali ed oggetti destinati a venire in contatto con i prodotti alimentari" 89/109/CEE<br />
"Direttiva 97/23/CE" (PED - Pressure Equipment Directive) apparecchi in classe 1<br />
"Machines" 2006/42/CE<br />
"Low voltage" 2006/95/EEC <strong>and</strong> subsequent modifications<br />
"Electromagnetic Compatibility" 2004/108/EEC <strong>and</strong> subsequent modifications<br />
"Materials <strong>and</strong> objects designed to come into contact with foodstuff" 89/109/EEC<br />
"Directive 97/23/EC" (PED - Pressure Equipment Directive) appliances in class 1<br />
"Machines" 2006/42/CE<br />
"Basse Tensions" 2006/95/CEE et modifications successives<br />
"Compatibilité Electromagnétique" 2004/108/CEE et modifications successives<br />
"Matériels et objets destinés à entrer en contact avec des produits alimentaires" 89/109/CEE<br />
"Directive 97/23/CE" (PED - Pressure Equipment Directive) appareils en class 1<br />
"Maschinen" 2006/42/CE<br />
"Niaderspannung" 2006/95/EG und nachfolgende Änderungen<br />
"Elektromagnetische Verträglichkeit" 2004/108/EG und nachfolgende Änderungen<br />
"Zum Umgang mit Nahrungsmitteln bestimmte Materialien und Gegenstände" 89/109/EG<br />
"Richtlinie 97/23/EG" (PED - Pressure Equipment Directive) Geräte in Klasse 1<br />
La persona autorizzata a costituire il fascicolo tecnico è Paolo Guidetti, legale rappresentante della ditta<br />
EVERLASTING S.R.L. S.S. CISA KM 161 – 46029 SUZZARA (MN) – ITALIA, sede presso la quale è anche custodito.<br />
The person authorized to constitute the technical file is Paolo Guidetti, legal representative of the Company<br />
EVERLASTING S.R.L. S.S. CISA KM 161 – 46029 SUZZARA (MN) – ITALY, where the file is kept.<br />
La personne autorisée à constituer le dossier technique est Paolo Guidetti, représentant légal de la société<br />
EVERLASTING S.R.L. S.S. CISA KM 161 – 46029 SUZZARA (MN) – ITALIE, ou le dossier est conservé.<br />
Die Person die berechtigt ist die technische Unterlagen zusammenzustellen ist Paolo Guidetti, gesetzlicher Vertreter der Firma<br />
EVERLASTING S.R.L. S.S. CISA KM 161 – 46029 SUZZARA (MN) – ITALIEN, wo die Datei gehalten wird.<br />
.........................................
3<br />
ITALIANO<br />
ABF 20 P ABF 40 P<br />
ABF 80 P<br />
ABF 120 P<br />
on/off<br />
enter<br />
menù down<br />
ABF 20-40-80-120<br />
DESCRIZIONE GENERALE<br />
La scheda fornisce un controllo per Abbattitori/Surgelatori garantendo cicli di Abbattimento/Surgelazione con<br />
controllo sulla temperatura al cuore del prodotto e semplici cicli a tempo. Ogni ciclo di Abbattimento/Surgelazione è<br />
seguito da un ciclo di conservazione. E’ disponibile anche un ciclo di sbrinamento <strong>manual</strong>e e/o automatico.<br />
Se la configurazione scelta lo permette è possibile collegare un terminale di stampa per la stampa on-line dei valori<br />
di temperatura e degli allarmi.<br />
TASTO ON/OFF<br />
Premendo il tasto ON/OFF per 5 sec. il controllore si spegne e sul display compare la scritta OFF con il cursore<br />
lampegginate<br />
Premendo successivamente il tasto ON/OFF il controllore si riaccende e va in St<strong>and</strong>-by:<br />
TASTO ENTER<br />
Permette di accedere ad un menù o selezionare un parametro<br />
TASTO MENU’<br />
Permette di accedere al menù principale o di ritornare al menù precedente<br />
TASTI Up e Down<br />
Permettono di scorrere i vari menù o di variare i valori dei parametri<br />
TASTO Start/Stop<br />
Permette di iniziare un ciclo di abbattimento o di interromperlo.<br />
up<br />
start/stop
4<br />
ITALIANO<br />
Cicli di abbattimento<br />
Il compressore rimane disattivato finchè la temperatura della Cella è superiore alla temperatura di 90°C.<br />
La ventola evaporatore rimane disattivata finchè la temperatura della Cella è superiore alla temperatura 70°C.<br />
Si considera iniziato un abbattimento solo qu<strong>and</strong>o la Sonda Spillone rileva una temperatura inferiore a 70°C..<br />
ABF 20-40-80-120<br />
Abbattimento Positivo o Negativo a TEMPERATURA<br />
Per attivare questo ciclo di abbattimento, entrare nel Menu Set e selezionare un abbattimento positivo/negativo a<br />
temperatura, poi premere il tasto Start/Stop.<br />
In questa modalità operativa il compressore regola sul SetPoint impostato, riferito alla sonda cella. La durata<br />
normalmente ammessa per tale fase è quella impostata ed é espressa in minuti. Questa fase operativa termina qu<strong>and</strong>o<br />
la temperatura dello spillone raggiunge il valore impostato. Durante l’esecuzione di questa fase il display visualizza la<br />
temperatura della cella e dello spillone. La fase di abbattimento termina qu<strong>and</strong>o la temperatura rilevata dalla sonda<br />
a spillone raggiunge il set impostato e si ha il passaggio automatico in conservazione. Se l’abbattimento non si è<br />
concluso entro il tempo fissato l’operazione di abbattimento continua, ma sul display compare la scritta TimeOut<br />
lampeggiante; premendo il tasto Up si vede il tempo trascorso dall’inizio dell’abbattimento.<br />
Dopo l’abbattimento la fase di conservazione avviene regolarmente.<br />
Abbattimento Positivo o Negativo a TEMPO<br />
Per attivare questo ciclo di abbattimento, entrare nel Menu Set e selezionare un abbattimento positivo/negativo a<br />
tempo, il tempo di durata dell’abbattimento è quello impostato ed é espresso in minuti, modificare eventualmente<br />
tale valore, poi premere il tasto Start/Stop. In questa modalità operativa il compressore regola sul SetPoint impostato,<br />
riferito alla sonda cella. Questa fase di abbattimento termina allo scadere del tempo impostato in fase di settaggio.<br />
Durante l’esecuzione di questa fase il display visualizza la temperatura della cella e il tempo rimanente.<br />
Al termine della fase di abbattimento si ha il passaggio automatico in conservazione.<br />
Abbattimento Hard a temperatura<br />
Per attivare questo ciclo di abbattimento, entrare nel Menu Set e selezionare un abbattimento Hard a temperatura,<br />
poi premere il tasto Start/Stop. In questa modalità operativa l’abbattimento è diviso in due fasi: nella prima fase<br />
chiamata Hard il compressore regola sul Setpoint Hard, riferito alla sonda cella; questa fase Hard termina qu<strong>and</strong>o la<br />
temperatura dello spillone raggiunge il valore impostato. Durante l’esecuzione di questa fase il display visualizza la<br />
temperatura della cella e dello spillone.<br />
Nella seconda fase chiamata Soft il compressore regola sul Setpoint, riferito alla sonda cella. La durata normalmente<br />
ammessa per la fase di abbattimento Hard e Soft è espressa in minuti. Questa fase Soft termina qu<strong>and</strong>o la temperatura<br />
dello spillone raggiunge il valore impostato tramite il parametro. Durante l’esecuzione di questa fase il display<br />
visualizza la temperatura della cella e dello spillone.<br />
La fase di abbattimento termina qu<strong>and</strong>o la temperatura rilevata dalla sonda a spillone raggiunge il set impostato e si<br />
ha il passaggio automatico in conservazione. Se l’abbattimento non si è concluso entro il tempo fissato l’operazione<br />
di abbattimento continua, ma sul display compare la scritta TimeOut lampeggiante; premendo il tasto Up si vede il<br />
tempo trascorso dall’inizio dell’abbattimento. Dopo l’abbattimento la fase di conservazione avviene regolarmente.<br />
Abbattimento Hard a tempo<br />
Per attivare questo ciclo di abbattimento, entrare nel Menu Set e selezionare un abbattimento Hard a tempo, poi<br />
premere il tasto Start/Stop. In questa modalità operativa l’abbattimento è diviso in due fasi: nella prima fase chiamata<br />
Hard il compressore regola sul Setpoint , riferito alla sonda cella. La durata della fase Hard è la percentuale, impostata<br />
60%, del tempo totale. Durante l’esecuzione di questa fase il display visualizza la temperatura di cella e il tempo<br />
rimanente. Nella seconda fase chiamata Soft il compressore regola sul SetPoint, riferito alla sonda cella. La durata della<br />
fase Soft è il rimanente del tempo totale.<br />
Durante l’esecuzione di questa fase il display visualizza la temperatura di cella e il tempo rimanente<br />
Al termine della fase di abbattimento si ha il passaggio automatico in conservazione.
5<br />
ITALIANO<br />
ABF 20-40-80-120<br />
Conservazione positiva e negativa<br />
Durante la fase di conservazione positiva sul display viene visualizzato: Cell -5 Cons<br />
il compressore regola sul Setpoint, riferito alla sonda cella. Questa fase termina premendo il tasto Start/Stop e il<br />
dispositivo entra in St<strong>and</strong>-By.<br />
Tasto avvio rapido Abbattimento positivo a temperatura Con la scheda in Stop, premere 5 secondi il Tasto Up ed<br />
inizia immediatamente un ciclo di abbattimento positivo st<strong>and</strong>ard a temperatura. Il compressore regola sul SetPoint<br />
impostato, riferito alla sonda cella. La durata normalmente ammessa per tale fase è quella massima impostata tramite<br />
ed é espressa in minuti.<br />
La fase di abbattimento termina qu<strong>and</strong>o la temperatura rilevata dalla sonda a spillone raggiunge il set impostato e si<br />
ha il passaggio automatico in conservazione.<br />
Tasto avvio rapido Abbattimento negativo a temperatura<br />
Con la scheda in Stop, premere 5 secondi il Tasto Down ed inizia immediatamente un ciclo di abbattimento negativo<br />
st<strong>and</strong>ard a temperatura. Il compressore regola sul SetPoint impostato, riferito alla sonda cella. La durata<br />
normalmente ammessa per tale fase è quella massima impostata ed é espressa in minuti.<br />
La fase di abbattimento termina qu<strong>and</strong>o la temperatura rilevata dalla sonda a spillone raggiunge il set impostato e si<br />
ha il passaggio automatico in conservazione.<br />
Sbrinamento<br />
I cicli di sbrinamento vengono gestiti automaticamente dalla scheda elettronica al termine di ogni ciclo e <strong>manual</strong>mente<br />
dal Menù 04 Avvio Sbrinamento manaule<br />
Verifica inserimento spillone<br />
All’inizio di un ciclo di abbattimento a temperatura spillone, viene eseguito un test per verificare se la Sonda Spillone<br />
è correttamente inserita nel prodotto. Il test spillone è organizzato su due livelli: il primo denominato veloce o a soglia<br />
ed il secondo denominato lento o differenziale.<br />
Test a soglia<br />
Durante il test veloce vengono eseguiti cinque confronti tra le temperature della cella e dello spillone, se almeno in tre<br />
delle cinque verifiche i rilievi rispettano la seguente relazione: |TSpillone - Tcella| > 5°C<br />
lo spillone è considerato inserito nel prodotto da surgelare. In questo caso la successiva fase di test non viene<br />
eseguita.<br />
La durata di questa fase è di circa 50 secondi visto che ogni test è eseguito con una cadenza di 10 sec; teoricamente<br />
questo tipo di verifica dovrebbe risolvere la maggior parte dei casi che si possono presentare, infatti solo nell’ipotesi<br />
di prodotto alla stessa temperatura della cella, dovrebbe essere necessario eseguire il test differenziale. L’esecuzione<br />
di più verifiche consente di avere un test affidabile e versatile, ovvero che non vincoli l’utilizzatore ad una rigida<br />
procedura operativa.<br />
Test differenziale<br />
Il test differenziale si basa sul fatto che raffredd<strong>and</strong>o la cella, la temperatura di quest’ultima scende più rapidamente<br />
di quella all’interno del prodotto a causa dell’inerzia termica di quest’ultimo, questa situazione viene riassunta<br />
matematicamente dalla relazione riportata di seguito, in altre parole “Il test verifica quindi che il Δt tra l’esterno e<br />
l’interno del prodotto aumenti”. | Δt attuale - Dt precedente | > 1°C<br />
La durata di questo test è fissata a 56”, mentre il fattore di incremento è fisso e pari a 1°C. Anche in questo caso vengono<br />
eseguite otto misure; il test viene superato qu<strong>and</strong>o in almeno 6 casi si è riscontrato che la relazione è verificata.<br />
Menu di visualizzazione delle impostazioni<br />
Con il dispositivo in St<strong>and</strong>-By, premendo il tasto Enter, si entra nel menu di visualizzazione delle impostazioni e sul<br />
display compaiono le impostazioni del ciclo. Con i tasti Up e Down è possibile scorrere ulteriori informazioni come<br />
il SetPoint della cella in abbattimento, ed il SetPoint cella in conservazione il valore della Sonda Spillone, è possibile<br />
scorrere ulteriori informazioni il tempo massimo consentito nella fase Hard e Soft il SetPoint cella in abbattimento<br />
Hard e Soft. Premendo il tasto Enter si esce dal menu di visualizzazione delle impostazioni e il dispositivo ritorna nelle<br />
condizioni precedenti.<br />
Nota: Le impostazioni del ciclo di abbattimento non possono essere modificate da questo menu.
Descrizione Menu<br />
6<br />
ITALIANO<br />
Dalla finestra principale premere il tasto Menu e selezionare il menù desiderato con i tasti Up e Down<br />
Menu 01 Set Menu di impostazione del ciclo di abbattimento<br />
Menu 02 Conservazione Menu di impostazione di un ciclo di sola conservazione<br />
Menu 03 Programmi Menu di selezione di un programma memorizzato<br />
Menu 04 Sbrinamento Menu di attivazione di uno sbrinamento<br />
Menu 05 Impostazioni Menu di impostazione del dispositivo<br />
Menu 06 Set Orologio Menu di impostazione dell’orologio<br />
Menu 07 Memorizzazione Menu di memorizzazione di un programma impostato<br />
Menu 08 Allarmi Menu di visualizzazione degli allarmi memorizzati<br />
Menu 09 Stampa Menu di stampa dei cicli memorizzati<br />
Menu 10 Ingressi/Uscite Menu di visualizzazione dello stato degli ingressi e uscite<br />
Menu 11 Sterilizzazione Menu di attivazione di un ciclo di sterilizzazione<br />
ABF 20-40-80-120<br />
Menù 01 : Impostazione del ciclo<br />
Se viene premuto il tasto Enter si entra nella modalità di impostazione del ciclo di abbattimento e sul display viene<br />
visualizzato: Abbattimento Negativo/Positivo. Premendo Enter si entra in modifica e il tipo di impostazione diventa<br />
lampeggiante, con i tasti Up e Down sarà possibile modificarne il valore. La pressione del tasto Enter conferma il<br />
valore impostato e il dato non lampeggia più, con i tasti Up e Down sarà possibile passare alle successive impostazioni<br />
che sono: Abbattimento a tempo o Temperatura al cuore, Durata ciclo, e Temperature di Setpoint.<br />
Premere il tasto Menu per uscire dal Menu oppure Start/Stop per attivare immediatamente il ciclo di abbattimento.<br />
Nota: durante un ciclo di abbattimento è possibile accedere al Menu Set per vedere le impostazioni, ma non è<br />
possibile modificarle.<br />
Menù 02 : Conservazione<br />
Se viene premuto il tasto Enter si entra nella modalità per avviare un ciclo di sola conservazione e sul display viene<br />
visualizzato: Conservazione<br />
Premendo Enter si entra in modifica e il tipo di impostazione diventa lampeggiante, con i tasti Up e Down sarà<br />
possibile modificarne il valore: Negativa/Positiva la pressione del tasto Enter conferma il valore impostato e il dato<br />
non lampeggia più, con i tasti Up e Down sarà possibile passare all’impostazione del Set Camera in conservazione: la<br />
pressione del tasto Enter conferma il valore impostato e il dato non lampeggia più.<br />
Premere il tasto Menu per uscire dal Menu oppure Start/Stop per attivare immediatamente il ciclo di conservazione.<br />
Menù 03 : Programma in memoria<br />
Se viene premuto il tasto Enter si entra nella selezione dei programmi che sono suddivisi in due categorie: programmi<br />
memorizzati dall’utente e programmi presettati non modificabili e il programma; sul display compare:<br />
Programmi Utente<br />
Se viene premuto il tasto Enter per entrare nella selezione dei programmi Utente (1 - 20), sul display compare il<br />
numero del programma con l’indicazione del tipo di ciclo memorizzato, gli altri possono essere selezionati con i tasti<br />
Up e Down: Premere il tasto Menu per uscire dal Menu senza selezionare il programma oppure Start/Stop per attivare<br />
immediatamente il ciclo di abbattimento selezionato.<br />
Premendo Enter si seleziona il programma e il dispositivo attende in St<strong>and</strong>-By.<br />
Programmi Preset<br />
Se viene premuto il tasto Enter per entrare nella selezione dei programmi Preset (21 - 29), sul display compare il<br />
numero del programma con il nome, gli altri possono essere selezionati con i tasti Up e Down
I programmi preselezionati sono i seguenti:<br />
Prog Nome del programma Positivo o negativo<br />
7<br />
Tempo o<br />
temperatura<br />
Hard<br />
ITALIANO<br />
Set camera<br />
conservazione<br />
ABF 20-40-80-120<br />
tempo<br />
21 Abbattimento carni Positivo Temperatura Si +2°C 120 min<br />
22 Abbattimento creme Positivo Tempo No +2°C 90 min<br />
23 Abbattimento pasticci Positivo Tempo No +2°C 90 min<br />
24 Abbattimento preparati Positivo Tempo No +2°C 90 min<br />
25 Abbattimento prodotti ittici Positivo Tempo Si +2°C 90 min<br />
26 Abbattimento prodotti avicoli Positivo Tempo Si +2 90 min<br />
27 Abbattimento verdure Positivo Tempo No +2°C 90 min<br />
28 Cong temper prodotti generici Negativo Temperatura Si -22°C 240 min<br />
29 Cong tempo prodotti generici Negativo Tempo Si -22°C 240 min<br />
Menù 04 : Avvio sbrinamento<br />
Se viene premuto il tasto Enter si accede alla richiesta start sbrinamento.<br />
Premendo il tasto Enter si esce dal menu e lo sbrinamento non viene attivato. Premendo il tasto Up si attiva uno<br />
sbrinamento se è in corso una fase di conservazione.<br />
Premendo il tasto Start/Stop lo sbrinamento viene disattivato.<br />
Nota: dal menu principale è possibile attivare immediatamente uno sbrinamento, premendo per 5 secondi il tasto<br />
Enter.<br />
Menù 05 : Impostazioni<br />
Se viene premuto il tasto Enter, viene richiesta la password per accedere ai sottomenù di impostazione e di Service.<br />
Selezionare la password con i tasti Up e Down e premere Enter.<br />
La password impostata è -19.<br />
Menu 06: Regolazione orologio<br />
Se viene premuto il tasto Enter si entra nella modalità di impostazione orologio. La cifra lampeggiante può essere<br />
modificata tramite i tasti Up e Down . Premendo il tasto Enter si conferma il valore e si passa al dato successivo.<br />
Premere il tasto Menu per tornare al Menu Principale.<br />
Menu 07: Memorizzazione di un programma<br />
Se viene premuto il tasto Enter si entra nella modalità di memorizzazione di un programma di abbattimento<br />
precedentemente impostato. Sul display compare il numero del programma con l’indicazione se il programma è già<br />
stato memorizzato oppure è libero. Tramite i tasti Up e Down si scorrono tutti i programmi da 1 a 20, per salvare il<br />
programma al numero desiderato premere Enter. Con il tasto Menu si esce senza salvare il programma.<br />
Menù 08 : Lista allarmi<br />
Se viene premuto il tasto Enter di conferma, si entra nella modalità di visualizzazione allarmi. Possono venire registrati<br />
fino a 30 allarmi con le relative informazioni. La memoria è circolare e al raggiungimento di 30 allarmi, il nuovo allarme<br />
cancella il più vecchio. Se non ci sono allarmi registrati sul display viene visualizzato Se ci sono degli allarmi registrati,<br />
sul display viene visualizzato l’orario di inizio dell’ultimo allarme avvenuto con il numero progressivo di allarme da<br />
A01 ad A30. Premendo il tasto Enter vengono indicate ulteriori informazioni relative all’allarme: la temperatura di<br />
massima o di minima, la durata, chiamare il SERVICE, l’orario di fine allarme se l’allarme è terminato, oppure indica che<br />
è ancora in corso gli altri allarmi memorizzati possono essere selezionati con i tasti Up e Down.<br />
Premere il tasto Menu per tornare al Menu Principale.<br />
Sonda Cella<br />
In St<strong>and</strong>-By sul display viene visualizzato il valore della temperatura rilevata dalla sonda.<br />
Un guasto della sonda provoca un Allarme della Sonda Cella e si attivano il buzzer e il relè allarme e sul display<br />
lampeggia la scritta di errore. ALL Sonda Cella<br />
Un ciclo in fase di abbattimento viene interrotto immediatamente commut<strong>and</strong>o il dispositivo in St<strong>and</strong>-By e<br />
impedendo un nuovo Start; invece durante la fase di conservazione il compressore viene attivato ciclicamente con<br />
un Duty-Cycle.<br />
Il buzzer suona per 1 minuto, ma può essere tacitato premendo il tasto Enter, al termine del guasto l’allarme rientra<br />
automaticamente e il relè allarme si disattiva.
8<br />
ITALIANO<br />
ABF 20-40-80-120<br />
Allarme Alta Temperatura<br />
Durante la fase di conservazione positiva (negativa), se la temperatura rimane superiore al valore di soglia d’allarme,<br />
per un tempo superiore a 30 minuti, ed è scaduto il ritardo dall’inizio della fase di conservazione o dalla fine di uno<br />
sbrinamento, si attiva un Allarme di Alta Temperatura. Sul display lampeggia la scritta di allarme: Alta Temp Cella<br />
L’allarme viene memorizzato, si attivano il buzzer e il relè allarme. Il buzzer suona per 1 minuto, ma può essere tacitato<br />
premendo il tasto Enter e l’allarme rientra automaticamente qu<strong>and</strong>o la temperatura scende sotto il limite.<br />
Allarme Bassa Temperatura<br />
Durante la fase di conservazione positiva (negativa), se la temperatura rimane inferiore al valore, per un tempo<br />
superiore a 30 minuti, ed è scaduto il ritardo dall’inizio della fase di conservazione o dalla fine di uno sbrinamento, si<br />
attiva un Allarme di Bassa Temperatura. Sul display lampeggia la scritta di allarme: Bassa Temp Cella<br />
L’allarme viene memorizzato, si attivano il buzzer e il relè allarme. Il buzzer suona per 1 minuto, ma può essere tacitato<br />
premendo il tasto Enter e l’allarme rientra automaticamente qu<strong>and</strong>o la temperatura sale sopra il limite.<br />
Allarme Black Out<br />
Se manca l’alimentazione alla scheda durante la fase di conservazione positiva (negativa), e al rientro la temperatura<br />
è superiore al valore programmato, si attiva un Allarme di Black Out per mancanza di alimentazione.<br />
Sul display lampeggia la scritta di allarme: ALL BlackOut<br />
Viene memorizzato l’orario di qu<strong>and</strong>o è mancata l’alimentazione e l’orario del ritorno dell’alimentazione, si attivano<br />
il buzzer e il relè allarme. Il buzzer suona per 1 minuto, ma può essere tacitato premendo il tasto Enter e l’allarme<br />
scompare con una successiva pressione del tasto Enter.<br />
Sonda Evaporatore<br />
La sonda permette di terminare un defrost e di attivare le Ventole Evaporatore. Un guasto della sonda provoca un<br />
Allarme guasto della Sonda Evaporatore e si attivano il buzzer e il relè allarme.<br />
Sul display lampeggia la scritta di allarme: ALL Sonda Evap<br />
Gli sbrinamenti terminano a tempo e l’attivazione delle Ventole Evaporatore avviene indipendentemente dalla<br />
sonda evaporatore. Il buzzer suona per 1 minuto, ma può essere tacitato premendo il tasto Enter, l’allarme rientra<br />
automaticamente al termine del guasto e il relè allarme si disattiva.<br />
Sonda Spillone<br />
La Sonda Spillone è utilizzata per i cicli di abbattimento per temperatura al cuore. Un guasto della sonda spillone<br />
provoca un Allarme guasto della Sonda Spillone solo se è in corso un ciclo di abbattimento a temperatura; in tal<br />
caso il ciclo automaticamente commuta a tempo. Sul display lampeggia la scritta di allarme:ALL Sonda Spill<br />
Premendo il tasto Enter la visualizzazione rientra, l’eventuale fase di conservazione avviene normalmente.<br />
Allarme spillone non inserito<br />
Questo allarme si attiva se fallisce il test di inserimento spillone durante un ciclo di abbattimento a temperatura; il<br />
ciclo automaticamente commuta a tempo e sul display compare l’indicazione: ALL Insert Spill<br />
Premendo il tasto Enter la segnalazione scompare.<br />
Menu 09: Stampa (optional con stampante)<br />
Se viene premuto il tasto Enter si accede alla richiesta della stampa dei cicli di abbattimento memorizzati.<br />
Premendo il tasto Enter si esce dal menu e la stampa non avviene. Premendo il tasto Up inizia la stampa dei cicli di<br />
abbattimento memorizzati con un tempo di campionamento programmato.<br />
Menu 10: Ingressi / Uscite<br />
Se viene premuto il tasto Enter si entra nella modalità di visualizzazione ingressi e uscite. Tramite i tasti Up e Down si<br />
scorrono le gr<strong>and</strong>ezze da visualizzare: I valori della temperature di Cella e Spillone, il valore della sonda evaporatore e<br />
lo stato degli ingressi digitali e dei Relè<br />
Menu 11: Sterilizzazione (optional con lampada UV sterilizzatrice)<br />
Per utilizzare la funzione sterilizzatrice l’abbattitore deve essere vuoto in st<strong>and</strong>-by con la porta chiusa.<br />
Se viene premuto il tasto Enter si accede alla richiesta start sterilizzazione.<br />
Premendo il tasto Enter nuovamente si esce dal menu e la sterilizzazione non viene attivata. Mentre premendo il<br />
tasto Up si attiva un ciclo di sterilizzazione della durata di 20 minuti.<br />
Premendo il tasto Start/Stop la sterilizzazione viene interrotta prima del termine.<br />
Ogni apertura della porta termina anzitempo il ciclo di sterilizzazione.
9<br />
ITALIANO<br />
ABF 20-40-80-120<br />
Nota: Avviene per mezzo di lampade speciali a raggi UV che eliminano i batteri presenti sulle superfici e nell’aria<br />
dell’abbattitore, quindi importantissima per la pulizia del vano interno, per evitare l’innalzamento della carica batterica<br />
nelle condense residue, sviluppate nei periodi di sosta. Può essere utilizzata anche per sterilizzare gli utensili da cucina.<br />
NON deve essere utilizzata per sterilizzare il prodotto da abbattere o congelare.<br />
Caratteristiche costruttive<br />
Celle di abbattimento-congelamento rapido<br />
costruzione a pannelli •acciaio inox AISI 304 •interno con spigoli arrotondati •isolamento in poliuretano • per<br />
inserimento carrelli porta teglie GN1/1 – GN2/1 - BN 60x40 - BN 60x80 •refrigerazione ventilata con evaporatori<br />
e ventilatori facilmente ispezionabili per pulizia e manutenzione •predisposizione per il collegamento ad unità<br />
condensatrici ad aria o ad acqua •misurazione della temperatura con sonda al cuore in abbattimento da +90° a +3°C<br />
ed in congelazione rapida da +90° a -18°C •pannello com<strong>and</strong>i elettronico con display LCD •porte autochiudenti •le<br />
macchine vengono normalmente spedite smontate
10<br />
ENGLISH<br />
ABF 20 P ABF 40 P<br />
ABF 80 P<br />
ABF 120 P<br />
on/off<br />
enter<br />
ABF 20-40-80-120<br />
GENERAL DESCRIPTION<br />
The card allows a control for blast chillers / freezers <strong>and</strong> allows blast chilling <strong>and</strong> freezing cycles with temperature<br />
control at the heart of the product <strong>and</strong> simple time-regulated cycles. A conservation cycle follows to each blast<br />
chilling/freezing cycle. A <strong>manual</strong> <strong>and</strong>/or automatic defrosting cycle is available.<br />
If the chosen pattern allows it, it is possible to connect a printer for printing on-line temperature <strong>and</strong> alarm values.<br />
Description of blast chiller/shock freezer LCD controls Keys<br />
ON/OFF key<br />
By pushing the ON/OFF key for 5 seconds, the controller turns off <strong>and</strong> the word OFF with flashing cursor is displayed.<br />
By subsequently pushing the ON/OFF key the controller turns on again <strong>and</strong> sets in St<strong>and</strong>-By mode:<br />
Enter key<br />
It allows to access menus or to select a parameter.<br />
Menu key<br />
It allows to access the main menu or to return to the previous menu.<br />
Up <strong>and</strong> Down keys<br />
It allows to scroll the various menus or to change the parameter values.<br />
Start/Stop key<br />
It allows to start a chilling/freezing cycle or to stop it.<br />
menù down<br />
up<br />
start/stop
11<br />
ENGLISH<br />
Chilling/Freezing cycles<br />
The compressor remains deactivated until the chamber temperature is over 90°C.<br />
The evaporator fan remains deactivated until the chamber temperature is over 70°C.<br />
A chilling/freezing cycled starts only when the core probe detects a temperature lower than 70°C.<br />
ABF 20-40-80-120<br />
Temperature-based chilling or freezing<br />
To activate this cycle, enter Menu Set <strong>and</strong> select a temperature-based chilling/freezing, then push the Start/Stop<br />
key. In this mode of operation the compressor adjusts itself on the planned SetPoint, referred to the chamber probe.<br />
The normally acknowledged duration for this phase is the planned one, <strong>and</strong> it is expressed in minutes. This operative<br />
phase ends when the core probe temperature reaches the set value. During the execution of this phase the display<br />
shows the chamber probe temperature <strong>and</strong> the core probe temperature. The chilling/freezing phase ends when the<br />
temperature detected by the core probe reaches the planned set, then the system automatically sets in storage mode.<br />
If the chilling/freezing has not ended within the planned duration, the chilling/freezing continues but the writing<br />
TimeOut flashes on the display. By pushing the Up key, the time elapsed from the beginning of the chilling/freezing<br />
is displayed. After the chilling/freezing, the storage phase takes place automatically.<br />
Time-based chilling or freezing To activate this cycle, enter the Menu Set <strong>and</strong> select a time-based chilling/freezing.<br />
The duration of the cycle is the planned one, <strong>and</strong> it is expressed in minutes. Modify this value if necessary, then push<br />
the Start/Stop key. In this mode of operation, the compressor adjusts itself on the planned SetPoint, referred to the<br />
chamber probe. This chilling/freezing phase ends when the set time elapses. During the execution of this phase the<br />
display shows the chamber temperature <strong>and</strong> the remaining time. At the end of the chilling/freezing phase, the storage<br />
phase takes place automatically.<br />
Temperature-based Hard chilling/freezing<br />
To activate this cycle, enter the Menu Set <strong>and</strong> select a temperature-based Hard cycle, then push the Start/Stop<br />
key. In this mode of operation, the chilling/freezing cycle is divided into two phases: in the first phase, called Hard,<br />
the compressor adjusts itself on the Hard Setpoint, referred to the chamber probe; this Hard phased ends when the<br />
core probe temperature reaches the set value. During the execution of this phase the display shows the chamber<br />
temperature <strong>and</strong> the core probe temperature.<br />
In the second phase, called Soft, the compressor adjusts itself on the Setpoint, referred to the chamber probe. The<br />
normally acknowledged duration for the Hard <strong>and</strong> Soft chilling/freezing phase is expressed in minutes. The Soft phase<br />
ends when the core probe temperature reaches the value set by the parameter. During the execution of this phase,<br />
the display shows the chamber temperature <strong>and</strong> the core probe temperature.<br />
The chilling/freezing phase starts when the temperature detected by the core probe reaches the set value. Then<br />
the storage takes place automatically. If the chilling/freezing has not ended within the set time, the chilling/freezing<br />
continues, but the writing TimeOut flashes on the display; by pushing the Up key, the time elapsed from the beginning<br />
of the chilling/freezing is displayed. After the chilling/freezing, the storage phase takes place automatically.<br />
Time-based Hard chilling/freezing<br />
To activate this chilling/freezing cycle, enter the Menu Set <strong>and</strong> select a time-based Hard chilling/freezing, then push<br />
the Start/Stop key. In this mode of operation ,the chilling/freezing is divided into two phases: in the first phase, called<br />
Hard, the compressor adjusts itself on the Setpoint, referred to the chamber probe. The duration of the Hard phase<br />
is the percentage, set on 60%, of the total time. During the execution of this phase the display shows the chamber<br />
temperature <strong>and</strong> the remaining time. In the second phase, called Soft, the compressor adjusts itself on the Setpoint,<br />
referred to the chamber probe. The duration of the Soft phase is the remaining of the total time.<br />
During the execution of this phase the display shows the chamber temperature <strong>and</strong> the remaining time.<br />
At the end of the chilling/freezing phase the storage phase takes place automatically.<br />
Positive <strong>and</strong> negative storage<br />
During the positive storage phase, the display shows: Cell -5 Cons<br />
The compressor adjusts itself on the Setpoint, referred to the chamber probe. This phase ends by pushing the Start/<br />
Stop key <strong>and</strong> the device sets in St<strong>and</strong>-By mode.<br />
Key for quick start of temperature-based chilling<br />
With the board on Stop mode, push the Up key for 5 seconds. A temperature-based st<strong>and</strong>ard chilling cycle starts<br />
immediately. The compressor adjusts itself on the planned Setpoint, referred to the chamber probe. The normally<br />
acknowledged duration of this phase is the longest that has been set, <strong>and</strong> is expressed in minutes.<br />
The chilling phase ends when the temperature detected by the core probe reaches the planned set, then the storage<br />
phase takes place automatically.
Menu 01 Set Chilling/Freezing cycle setting menu<br />
Menu 02 Storage Storage only setting menu<br />
Menu 03 Programs Selection of a stored program<br />
Menu 04 Defrost Defrost activation menu<br />
Menu 05 Settings Device settings menu<br />
Menu 06 Clock set Clock setting menu<br />
Menu 07 Data storage Storage of a set program<br />
Menu 08 Alarms Visualization of stored alarms<br />
Menu 09 Print Stored cycles print menu<br />
Menu 10 Inputs/Outputs Visualization of Input <strong>and</strong> Output status<br />
12<br />
ENGLISH<br />
ABF 20-40-80-120<br />
Key for quick start of temperature-based freezing<br />
With the board on Stop mode, push the Down key for 5 seconds. A temperature-based st<strong>and</strong>ard freezing cycle starts<br />
immediately. The compressor adjusts itself on the planned Setpoint, referred to the chamber probe. The normally<br />
acknowledged duration of this phase is the longest that has been set, <strong>and</strong> is expressed in minutes.<br />
The chilling phase ends when the temperature detected by the core probe reaches the planned set, then the storage<br />
phase takes place automatically.<br />
Defrost<br />
The defrost cycles are automatically managed by the electronic board at the end of each cycle <strong>and</strong> <strong>manual</strong>ly by Menu<br />
04 Manual Defrost Start.<br />
Probe insertion check<br />
At the start of a temperature-based chilling with core probe, a test is performed to check whether the core probe<br />
is correctly inserted in the product. The probe test is organised on two levels: the fist is called fast or threshold; the<br />
second is called slow or differential.<br />
Threshold test<br />
During the fast test 5 comparisons are performed between the chamber temperature <strong>and</strong> the core probe temperature.<br />
If in at least 3 of the five tests the detections respect the following relation:<br />
|T probe – T chamber |>5°C<br />
the probe is considered as inserted in the product to be chilled or frozen. In this case, the next phase of the test<br />
is not executed. The duration of this phase is of around 50 seconds, since each test is performed at intervals of 10<br />
seconds; this type of check should theoretically solve the majority of occurrences, since the differential test is only to<br />
be executed when the product has the same temperature as the chamber. Performing more than one check allows to<br />
have a reliable <strong>and</strong> versatile test, which does not bind the user to a strict operating procedure.<br />
Differential test<br />
The differential test is based upon the fact that, by cooling the chamber, its temperature decreases faster than the<br />
temperature inside the product because of the thermal inertia of the latter. This situation is summarized mathematically<br />
by the following relation. In other words, the test verifies that the Δt between the inside <strong>and</strong> the outside of the<br />
product rises.<br />
| current Δt - previous Dt | > 1°C<br />
The duration of this test is set at 56”, while the increment factor is fixed <strong>and</strong> equal to 1°C. in this case too, 8 detections<br />
are performed; the test is passed when in at least 6 cases the relation was verified.<br />
Setting visualization menu<br />
With the device in St<strong>and</strong>-By mode, push the Enter key <strong>and</strong> enter the setting visualization menu. Cycle settings are<br />
displayed. With the Up <strong>and</strong> Down keys it is possible to scroll further information, such as the chamber SetPoint in<br />
chilling/freezing mode, the chamber SetPoint in storage mode , the value of the core probe chamber, the maximum<br />
allowed time in the Hard <strong>and</strong> Soft phase <strong>and</strong> the chamber SetPoint in Hard <strong>and</strong> Soft chilling /freezing modes. Exit the<br />
setting visualization menu by pushing the Enter key. The device returns to the previous conditions.<br />
Note: the chilling /freezing cycle settings cannot be modified by this menu.<br />
Menu description<br />
From the main window, press the Menu key <strong>and</strong> select the needed menu with the Up <strong>and</strong> Down keys.
13<br />
ENGLISH<br />
ABF 20-40-80-120<br />
Menu 01: Cycle settings<br />
Enter the chilling/freezing cycle setting mode by pushing the Enter key. The display shows: Abbattimento Negativo/<br />
Positivo (Chilling/Freezing). Enter in the modification mode by pushing the Enter key. The setting type flashes, <strong>and</strong> it<br />
is possible to modify this value by pushing the Up <strong>and</strong> Down keys. By pushing the Enter key, the set value is confirmed<br />
<strong>and</strong> the datum does not flash anymore. By pushing the Up <strong>and</strong> Down keys, it is possible to pass on to the next settings:<br />
Time-based Chilling/Freezing, Temperature–based Chilling/Freezing, Cycle duration <strong>and</strong> Setpoint Temperatures.<br />
Push the Menu key to exit the Menu, or the Start/Stop key to immediately start a chilling/freezing cycle.<br />
Note: during a chilling/freezing cycle it is possible to enter the Menu Set to see the settings, but it is not possible to<br />
modify them.<br />
Menu 02: Storage<br />
Enter the Storage mode to start a storage only cycle by pushing the Enter key. The display shows: Conservazione<br />
(storage).<br />
Enter in the modification mode by pushing the Enter key. The setting type flashes, <strong>and</strong> it is possible to modify this<br />
value (Negative/Positive) by pushing the Up <strong>and</strong> Down keys. By pushing the Enter key, the set value is confirmed<br />
<strong>and</strong> the datum does not flash anymore. By pushing the Up <strong>and</strong> Down keys, it is possible to pass on to Set Chamber in<br />
storage mode. By pushing the Enter key, the value is confirmed <strong>and</strong> the datum does not flash anymore.<br />
Push the Menu key to exit the Menu, or the Start/Stop key to immediately start a storage cycle.<br />
Menu 03: Stored program<br />
Enter the program selection mode by pushing the Enter key. Programs are divided into 2 categories: programs<br />
stored by the user, non-modifiable preset programs. The display shows:<br />
User programs<br />
Enter the User program selection (1-20) by pushing the Enter key. The display shows the program number <strong>and</strong> the<br />
type of cycle stored. Other programs can be selected with the Up <strong>and</strong> Down keys. Push the Menu key to exit the<br />
Menu without selecting any program, or push the Start/Stop key to activate the selected cycle immediately.<br />
By pushing the Enter key, the program is selected, <strong>and</strong> the device sets in St<strong>and</strong>-By.<br />
Preset Programs<br />
Enter the Preset Programs selection (21-29) by pushing the Enter key. The display shows the program number with<br />
its name. The other programs can be selected with the Up <strong>and</strong> Down keys.<br />
The preset programs are the following:<br />
Prog Program name<br />
Chilling or<br />
Freezing<br />
Time or<br />
Temperature<br />
Hard<br />
Set storage<br />
chamber<br />
Duration<br />
21 Meat chilling Chilling Temperature Yes +2°C 120 min<br />
22 Creams chilling Chilling Time No +2°C 90 min<br />
23 Pies chilling Chilling Time No +2°C 90 min<br />
24 Preparations chilling Chilling Time No +2°C 90 min<br />
25 Fish products chilling Chilling Time Yes +2°C 90 min<br />
26 Poultry chilling Chilling Time Yes +2 90 min<br />
27 Vegetables chilling Chilling Time No +2°C 90 min<br />
28<br />
Temp-Based<br />
products<br />
freezing generic<br />
Freezing Temperature Yes -22°C 240 min<br />
29<br />
Time-based<br />
products<br />
freezing generic<br />
Freezing Time Yes -22°C 240 min<br />
Menu 04: Defrost Start<br />
Enter the defrost start request by pushing the Enter key. Exit the menu by pushing the Enter key: defrost will not be<br />
activated. By pushing the Up key, defrost is activated if a storage phase is under way. By pushing the Start/Stop key<br />
the defrost is deactivated.<br />
Note: it is possible to immediately start a defrost cycle from the main menu by pushing the Enter key for 5 seconds.<br />
Menu 05: Settings<br />
By pushing the Enter key, a password is requested to access the setting s <strong>and</strong> service submenus. Select the<br />
password with the Up <strong>and</strong> Down keys <strong>and</strong> push the Enter key.<br />
The set password is -19.
14<br />
ENGLISH<br />
ABF 20-40-80-120<br />
Menu 06: Clock Set<br />
Enter the clock set mode by pushing the Enter key. The flashing number can be modified through the Up <strong>and</strong> Down<br />
keys. Confirm the value then pass on to the next datum by pushing the Enter key.<br />
Push the Menu key to go back to the Main Menu.<br />
Menu 07: Program storage<br />
Enter the storage mode for a previously set chilling/freezing program by pushing the Enter key. The display shows the<br />
program number, indicating whether the program has already been stored or it is free. Scroll all the programs from<br />
1 to 20 by pushing the Up <strong>and</strong> Down keys. To store a program at the intended number push the Enter key. Exit the<br />
menu without saving the program by pushing the Menu key.<br />
Menu 08: Alarms list<br />
Enter the alarms visualization mode by pushing the Enter key. It is possible to store up to 30 alarms with their<br />
respective information. The memory is circular: once 30 alarms are reached, the new alarm deletes the oldest. If no<br />
alarms are stored, the display shows NO DATA. If some alarms are stored, the display shows the start time of the last<br />
occurred alarm with a progressive alarm number from A01 to A30. By pushing the Enter key, further information<br />
about the alarm are displayed: maximum <strong>and</strong> minimum temperature, duration, call the SERVICE, time of alarm end if<br />
the alarm has ended, or it indicates that the alarm is still under way. The other stored alarms can be selected through<br />
the Up <strong>and</strong> Down keys.<br />
Push the Menu key to go back to the Main Menu.<br />
Chamber probe<br />
In St<strong>and</strong>-By mode, the display shows the temperature value detected by the probe. A probe breakdown causes a<br />
Chamber Probe Alarm. The buzzer <strong>and</strong> the alarm relay are activated <strong>and</strong> the display shows the flashing error writing<br />
ALL Sonda Cella.<br />
A chilling/freezing cycle is immediately interrupted, <strong>and</strong> the device sets in St<strong>and</strong>-By mode preventing any new<br />
start; on the contrary, during the storage phase the compressor activates cyclically with a Duty-Cycle. The buzzer<br />
rings for a minute, but can be silenced by pushing the Enter key. At the end of the breakdown the alarm is called off<br />
automatically <strong>and</strong> the alarm relay is deactivated.<br />
High Temperature Alarm<br />
During the positive (negative) storage phase, if the temperature settles over the alarm threshold value for over 30<br />
minutes, <strong>and</strong> the delay from the storage phase start or from the end of a defrost has run out, a High Temperature<br />
Alarm activates. The alarm writing Alta Temp Cella flashes on the display. The alarm is stored, the buzzer <strong>and</strong> the<br />
alarm relay activate. The buzzer rings for a minute, but can be silenced by pushing the Enter key. The alarm is called off<br />
immediately when the temperature returns under the limit.<br />
Low Temperature Alarm<br />
During the positive (negative) storage phase, if the temperature settles under the value for over 30 minutes, <strong>and</strong> the<br />
delay from the storage phase start or from the end of a defrost has run out, a Low Temperature Alarm activates. The<br />
alarm writing Bassa Temp Cella flashes on the display. The alarm is stored, the buzzer <strong>and</strong> the alarm relay activate. The<br />
buzzer rings for a minute, but can be silenced by pushing the Enter key. The alarm is called off immediately when the<br />
temperature returns over the limit.<br />
Black Out Alarm<br />
If the board lacks power during the positive (negative) storage phase, <strong>and</strong> if when the power returns the temperature<br />
is higher than the set value, a Black Out Alarm is activated because of a lack of power. The alarm writing ALL BlackOut<br />
flashes on the display. The times of the lack of power <strong>and</strong> of its return are stored, the buzzer <strong>and</strong> the alarm relay are<br />
activated. The buzzer rings for a minute, but can be silenced by pushing the Enter key.
15<br />
ENGLISH<br />
ABF 20-40-80-120<br />
Evaporator Probe<br />
The probe allows to end a defrost <strong>and</strong> to activate the Evaporator Fans. A probe breakdown causes an Evaporator Probe<br />
breakdown Alarm. The buzzer <strong>and</strong> the alarm relay activate. The alarm writing ALL Sonda Evap flashes on the display.<br />
The defrost end by time <strong>and</strong> the activation of the Evaporator Fans take place regardless of the evaporator probe. The<br />
buzzer rings for a minute m but can be silenced by pushing the Enter key. The alarm is immediately called off at the<br />
end of the breakdown <strong>and</strong> the alarm relay deactivates.<br />
Core probe<br />
The core probe is used for temperature-based core chilling/freezing cycles. A breakdown of the core probe causes a<br />
Core Probe Breakdown Alarm only if a temperature-based chilling/freezing cycle is under way; in this case, the cycle<br />
automatically converts into a time-based cycle. The display shows the flashing alarm writing: ALL Sonda Spill<br />
By pushing the Enter key, this visualization disappears, <strong>and</strong> the prospective conservation phase takes place<br />
normally.<br />
Uninserted core probe alarm<br />
This alarm activates if the core probe insertion test fails during a temperature-based chilling/freezing cycle. The cycle<br />
automatically converts into a time-based cycle <strong>and</strong> the display shows: ALL Insert Spill<br />
By pushing the Enter key, the signal disappears.<br />
Menu 09: Print (optional with printer)<br />
Access the stored chilling/freezing cycles printing request by pushing the Enter key. Exit the menu by pushing the<br />
Enter key, <strong>and</strong> the printing does not take place. By pushing the Up key, the stored freezing/chilling cycles printing<br />
starts with a programmed sampling time.<br />
Menu 10: Inputs/Outputs<br />
Enter the input <strong>and</strong> output visualization mode by pushing the Enter key. Scroll the values to be visualized by pushing<br />
the Up <strong>and</strong> Down keys: chamber probe <strong>and</strong> core probe temperature, evaporator probe temperature <strong>and</strong> the digital<br />
inputs <strong>and</strong> relay status.<br />
Building characteristics<br />
Mono-block construction with inside <strong>and</strong> outside in stainless steel AISI 304 18/10 •inside with rounded corners<br />
<strong>and</strong> moulded bottom •CFC <strong>and</strong> HCFC free insulation by high density polyurethane foam with •slide-way <strong>and</strong> wireshelfes<br />
supports easily removable without using tools •internal fitting for GN1/1 <strong>and</strong> GN2/3 containers •air-cooled<br />
refrigerating unit •measuring of temperature by means of core probe, from +90° to +3°C during blast chilling process<br />
<strong>and</strong> from +90° to -18°C during freezing process •electronic control panel •possibilities of choice between “soft” <strong>and</strong><br />
“hard” blast chilling cycles depending on the delicacy of the goods <strong>and</strong> of choice between prearranged cycles •selfclosing<br />
doors with easily replaceable magnetic gaskets •adjustable in height stainless steel feet •voltage 230/1/50<br />
<strong>and</strong> 400/3/50.
Dimensioni esterne L x P x H mm<br />
External dimensions L x D x H mm<br />
Dimensions extérieures L x D x H mm<br />
Außenmaße B x T x H mm<br />
Dimensioni interne utili L x P x H mm<br />
Useful internal dimensions L x D x H mm<br />
Dimensions intérieures utiles L x P x H mm<br />
Nützliche Innenmaßen B x T x H mm<br />
Capacità di carico<br />
Load capacity<br />
Capacité de chargement<br />
Belastungsfähigkeit<br />
Resa kg per ciclo<br />
Output kg for blast chilling +90°/+3° C<br />
Rendement kg<br />
Leistung kg<br />
Resa kg per ciclo<br />
Output kg for blast chilling +90°/-18° C<br />
Rendement kg<br />
Leistung kg<br />
Potenza frigorifera W<br />
Refrigerating power W -23,3 °C /+54,4 °C<br />
Puissance frigorifique W<br />
Gefrierleistung W<br />
Potenza max assorbita kw<br />
Max absorption kw<br />
Absorption max kw<br />
Max Energieverbrauch kw<br />
Potenza nominale compressore HP<br />
Nominal compressor power Hp<br />
Puissance nominale compresseur Hp<br />
Kompressorsnominalleistung HP<br />
Tensione alimentazione<br />
Voltage<br />
Tension d’alimentation<br />
Spannung<br />
Temperatura ambiente max °C / Classe<br />
Room temperature max °C / Class<br />
Température ambiance max °C / Classe<br />
Raumtemperatur max °C / Klasse<br />
Peso cella / unità condensatrice<br />
Cold room / condensing unit weight<br />
Poids chambre froide / unité condensatrice<br />
Kühlzellegewicht/ Kondensationseinheitsgewicht<br />
Fluido refrigerante<br />
Cooling gas<br />
Gaz réfrigérant<br />
Kältemittel<br />
ABF 20 C ABF 20 P<br />
950 X 1190 X 2180 950 X 1190 X 2180<br />
607 X 716 X 1860<br />
1<br />
20 GN 1/1<br />
X 20 60 X 40 1 X<br />
80<br />
60<br />
5370<br />
4,5<br />
4<br />
400N/3/50<br />
+43°C / T<br />
190/173<br />
R404 A<br />
607 X 716 X 1860<br />
20 GN 1/1<br />
20 60 X 40<br />
110<br />
85<br />
7200<br />
5,6<br />
4,5<br />
400N/3/50<br />
+43°C / T<br />
225/175<br />
R404 A<br />
16<br />
Dimensioni esterne L x P x H mm<br />
External dimensions L x D x H mm<br />
Dimensions extérieures L x D x H mm<br />
Außenmaße B x T x H mm<br />
Dimensioni interne utili L x P x H mm<br />
Useful internal dimensions L x D x H mm<br />
Dimensions intérieures utiles L x P x H mm<br />
Nützliche Innenmaßen B x T x H mm<br />
Capacità di carico<br />
Load capacity<br />
Capacité de chargement<br />
Belastungsfähigkeit<br />
Resa kg per ciclo<br />
Output kg for blast chilling<br />
Rendement kg<br />
+90°/+3° C<br />
Leistung kg<br />
Resa kg per ciclo<br />
Output kg for blast chilling<br />
Rendement kg<br />
+90°/-18° C<br />
Leistung kg<br />
Potenza frigorifera W<br />
Refrigerating power W<br />
Puissance frigorifique W<br />
-23,3 °C /+54,4 °C<br />
Gefrierleistung W<br />
Potenza max assorbita kw<br />
Max absorption kw<br />
Absorption max kw<br />
Max Energieverbrauch kw<br />
Potenza nominale compressore HP<br />
Nominal compressor power Hp<br />
Puissance nominale compresseur Hp<br />
Kompressorsnominalleistung HP<br />
Tensione alimentazione<br />
Voltage<br />
Tension d’alimentation<br />
Spannung<br />
Temperatura ambiente max °C / Classe<br />
Room temperature max °C / Class<br />
Température ambiance max °C / Classe<br />
Raumtemperatur max °C / Klasse<br />
Peso cella / unità condensatrice<br />
Cold room / condensing unit weight<br />
Poids chambre froide / unité condensatrice<br />
Kühlzellegewicht/ Kondensationseinheitsgewicht<br />
Fluido refrigerante<br />
Cooling gas<br />
Gaz réfrigérant<br />
Kältemittel<br />
ENGLISH<br />
150<br />
120<br />
12920<br />
9,7<br />
7,5<br />
400N/3/50<br />
+43°C / T<br />
400/243<br />
R404 A<br />
ABF 20-40-80-120<br />
ABF 40 C ABF 40 P<br />
C1/P1 1560 X 1505 X 2420<br />
C2/P2 1560 X 1650 X 2420<br />
C1/P1 821 X 1141 X 2220<br />
C2/P2 821 X 1373 X 2220<br />
1<br />
40 GN 1/1<br />
X 20 GN 2/1 1 X<br />
40 GN 1/1<br />
20 GN 2/1<br />
40 60 X<br />
1<br />
40<br />
X 20 60 X 80 1 X<br />
40 60 X 40<br />
20 60 X 80<br />
220<br />
170<br />
16720<br />
15,8<br />
10<br />
400N/3/50<br />
+43°C / T<br />
440/354<br />
R404 A
Dimensioni esterne L x P x H mm<br />
External dimensions L x D x H mm<br />
Dimensions extérieures L x D x H mm<br />
Außenmaße B x T x H mm<br />
Dimensioni interne utili L x P x H mm<br />
Useful internal dimensions L x D x H mm<br />
Dimensions intérieures utiles L x P x H mm<br />
Nützliche Innenmaßen B x T x H mm<br />
Capacità di carico<br />
Load capacity<br />
Capacité de chargement<br />
Belastungsfähigkeit<br />
Resa kg per ciclo<br />
Output kg for blast chilling<br />
Rendement kg<br />
+90°/+3° C<br />
Leistung kg<br />
Resa kg per ciclo<br />
Output kg for blast chilling<br />
Rendement kg<br />
+90°/-18° C<br />
Leistung kg<br />
Potenza frigorifera W<br />
Refrigerating power W<br />
Puissance frigorifique W<br />
-23,3 °C /+54,4 °C<br />
Gefrierleistung W<br />
Potenza max assorbita kw<br />
Max absorption kw<br />
Absorption max kw<br />
Max Energieverbrauch kw<br />
Potenza nominale compressore HP<br />
Nominal compressor power Hp<br />
Puissance nominale compresseur Hp<br />
Kompressorsnominalleistung HP<br />
Tensione alimentazione<br />
Voltage<br />
Tension d’alimentation<br />
Spannung<br />
Temperatura ambiente max °C / Classe<br />
Room temperature max °C / Class<br />
Température ambiance max °C / Classe<br />
Raumtemperatur max °C / Klasse<br />
Peso cella / unità condensatrice<br />
Cold room / condensing unit weight<br />
Poids chambre froide / unité condensatrice<br />
Kühlzellegewicht/ Kondensationseinheitsgewicht<br />
Fluido refrigerante<br />
Cooling gas<br />
Gaz réfrigérant<br />
Kältemittel<br />
ABF 80 C ABF 80 P<br />
C1/P1 1560 X 2705 X 2420<br />
C2/P2 1560 X 2850 X 2420<br />
C1/P1 821 X 2341 X 2220<br />
C2/P2 821 X 2573 X 2220<br />
2<br />
40 GN 1/1<br />
X 20 GN 2/1 2 X<br />
40 GN 1/1<br />
20 GN 2/1<br />
40 60 X<br />
2<br />
40<br />
X 20 60 X 80 2 X<br />
40 60 X 40<br />
20 60 X 80<br />
340<br />
280<br />
23910<br />
17,8<br />
15<br />
400N/3/50<br />
+43°C / T<br />
720/436<br />
R404 A<br />
420<br />
330<br />
27980<br />
19,4<br />
20<br />
400N/3/50<br />
+43°C / T<br />
800/475<br />
R404 A<br />
17<br />
Dimensioni esterne L x P x H mm<br />
External dimensions L x D x H mm<br />
Dimensions extérieures L x D x H mm<br />
Außenmaße B x T x H mm<br />
Dimensioni interne utili L x P x H mm<br />
Useful internal dimensions L x D x H mm<br />
Dimensions intérieures utiles L x P x H mm<br />
Nützliche Innenmaßen B x T x H mm<br />
Capacità di carico<br />
Load capacity<br />
Capacité de chargement<br />
Belastungsfähigkeit<br />
Resa kg per ciclo<br />
Output kg for blast chilling<br />
Rendement kg<br />
+90°/+3° C<br />
Leistung kg<br />
Resa kg per ciclo<br />
Output kg for blast chilling<br />
Rendement kg<br />
+90°/-18° C<br />
Leistung kg<br />
Potenza frigorifera W<br />
Refrigerating power W<br />
Puissance frigorifique W<br />
-23,3 °C /+54,4 °C<br />
Gefrierleistung W<br />
Potenza max assorbita kw<br />
Max absorption kw<br />
Absorption max kw<br />
Max Energieverbrauch kw<br />
Potenza nominale compressore HP<br />
Nominal compressor power Hp<br />
Puissance nominale compresseur Hp<br />
Kompressorsnominalleistung HP<br />
Tensione alimentazione<br />
Voltage<br />
Tension d’alimentation<br />
Spannung<br />
Temperatura ambiente max °C / Classe<br />
Room temperature max °C / Class<br />
Température ambiance max °C / Classe<br />
Raumtemperatur max °C / Klasse<br />
ENGLISH<br />
Peso cella / unità condensatrice<br />
Cold room / condensing unit weight<br />
Poids chambre froide / unité condensatrice<br />
Kühlzellegewicht/ Kondensationseinheitsgewicht<br />
Fluido refrigerante<br />
Cooling gas<br />
Gaz réfrigérant<br />
Kältemittel<br />
420<br />
330<br />
27980<br />
19,4<br />
20<br />
400N/3/50<br />
+43°C / T<br />
1000/475<br />
R404 A<br />
ABF 20-40-80-120<br />
ABF 120 C ABF 120 P<br />
C1/P1 1560 X 3905 X 2420<br />
C2/P2 1560 X 4050 X 2420<br />
C1/P1 821 X 3541 X 2220<br />
C2/P2 821 X 3773 X 2220<br />
3<br />
40 GN 1/1<br />
X 20 GN 2/1 3<br />
40 GN 1/1<br />
X 20 GN 2/1<br />
40 60 X<br />
3<br />
40<br />
X 20 60 X 80<br />
40 60 X<br />
3<br />
40<br />
X 20 60 X 80<br />
630<br />
480<br />
34800<br />
29,1<br />
30<br />
400N/3/50<br />
+43°C / T<br />
1120/556<br />
R404 A
18<br />
ENGLISH<br />
ABF 20-40-80-120
19<br />
ENGLISH<br />
ABF 20-40-80-120
EVERLASTING s.r.l.<br />
46029 SUZZARA (MN) - ITALY - S.S. Cisa km.161<br />
Tel.0376/521800 (4 linee r.a.) - Telefax 0376/521794 20<br />
http://www.everlasting.it - E-mail:everlasting@everlasting.it<br />
ENGLISH<br />
ABF 20-40-80-120