TR100.2
TR100.2 TR100.2
Owner’s Manual - TR100.2 Introduction www.mtxaudio.com - www.mtxaudio.eu Thank you for purchasing an MTX Audio Hi-Performance amplifier. Proper installation matched with MTX speakers and subwoofers provide superior sound and performance for endless hours of waking the neighbors, slammin' your friends or flat out stomping wanna-be players. Congrats and enjoy the ultimate audio experience with MTX ! Specifications : • 2-Channel Class-AB Amplifier • CEA2006 certified Power Output : - 75 watts RMS x 2-channel at 2 ohm and THD+N ≤1% - 45 watts RMS x 2-channel at 4 ohm and THD+N ≤1% - 150 watts RMS x 1-channel at 4 ohm and THD+N ≤1% • Crossover : - High pass 12dB/oct @80Hz - Low pass 12dB/oct @80Hz • Signal-to-Noise Ratio (1 watt) : > 80dB • THD+Noise (Distortion) (1 watt) : ≤ 1% • Frequency Response (±1dB) : 10Hz-50000Hz • Maximum Input Signal : 6V • Maximum Sensitivity : 200mV • Dimensions : 233x165x53mm • High level inputs Control Panel
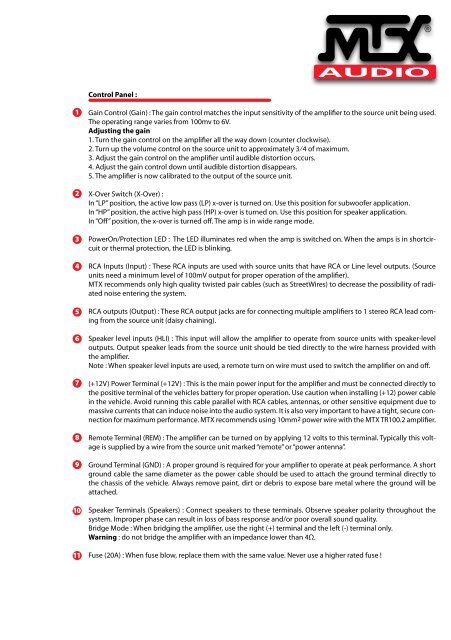
Control Panel : Gain Control (Gain) : The gain control matches the input sensitivity of the amplifier to the source unit being used. The operating range varies from 100mv to 6V. Adjusting the gain 1. Turn the gain control on the amplifier all the way down (counter clockwise). 2. Turn up the volume control on the source unit to approximately 3⁄4 of maximum. 3. Adjust the gain control on the amplifier until audible distortion occurs. 4. Adjust the gain control down until audible distortion disappears. 5. The amplifier is now calibrated to the output of the source unit. X-Over Switch (X-Over) : In “LP” position, the active low pass (LP) x-over is turned on. Use this position for subwoofer application. In “HP” position, the active high pass (HP) x-over is turned on. Use this position for speaker application. In “Off” position, the x-over is turned off. The amp is in wide range mode. PowerOn/Protection LED : The LED illuminates red when the amp is switched on. When the amps is in shortcircuit or thermal protection, the LED is blinking. RCA Inputs (Input) : These RCA inputs are used with source units that have RCA or Line level outputs. (Source units need a minimum level of 100mV output for proper operation of the amplifier). MTX recommends only high quality twisted pair cables (such as StreetWires) to decrease the possibility of radiated noise entering the system. RCA outputs (Output) : These RCA output jacks are for connecting multiple amplifiers to 1 stereo RCA lead coming from the source unit (daisy chaining). Speaker level inputs (HLI) : This input will allow the amplifier to operate from source units with speaker-level outputs. Output speaker leads from the source unit should be tied directly to the wire harness provided with the amplifier. Note : When speaker level inputs are used, a remote turn on wire must used to switch the amplifier on and off. (+12V) Power Terminal (+12V) : This is the main power input for the amplifier and must be connected directly to the positive terminal of the vehicles battery for proper operation. Use caution when installing (+12) power cable in the vehicle. Avoid running this cable parallel with RCA cables, antennas, or other sensitive equipment due to massive currents that can induce noise into the audio system. It is also very important to have a tight, secure connection for maximum performance. MTX recommends using 10mm2 power wire with the MTX TR100.2 amplifier. Remote Terminal (REM) : The amplifier can be turned on by applying 12 volts to this terminal. Typically this voltage is supplied by a wire from the source unit marked “remote” or “power antenna”. Ground Terminal (GND) : A proper ground is required for your amplifier to operate at peak performance. A short ground cable the same diameter as the power cable should be used to attach the ground terminal directly to the chassis of the vehicle. Always remove paint, dirt or debris to expose bare metal where the ground will be attached. Speaker Terminals (Speakers) : Connect speakers to these terminals. Observe speaker polarity throughout the system. Improper phase can result in loss of bass response and/or poor overall sound quality. Bridge Mode : When bridging the amplifier, use the right (+) terminal and the left (-) terminal only. Warning : do not bridge the amplifier with an impedance lower than 4Ω. Fuse (20A) : When fuse blow, replace them with the same value. Never use a higher rated fuse !
- Page 1: TR100.2 2-Channel Class-AB Power Am
- Page 5 and 6: Troubleshooting Problem Cause Solut
- Page 7 and 8: Réglages : Niveau de sensibilité
- Page 9 and 10: Résolution des problèmes PROBLÈM
- Page 11 and 12: Panel de control : Control de ganan
- Page 13 and 14: Posibles problemas encontrados Prob
- Page 15 and 16: Einstellungen : Pegelregler (Gain)
- Page 17 and 18: Problemlösung PROBLEM Ursache Lös
- Page 19 and 20: Pannello Controlli Controllo Gain (
- Page 21 and 22: Ricerca delle Anomalie Problema Cau
- Page 23 and 24: Painel de Controlo Controlo de ganh
- Page 25 and 26: Resolução de problemas Problema C
- Page 27 and 28: Instel paneel : Gain (Gain) : Hierm
- Page 29 and 30: Probleem oplossen Probleem Oorzaak
- Page 31 and 32: Панель управления
- Page 33 and 34: Устранение неиспра
- Page 35 and 36: Panou central : Gain Control (Gain)
- Page 37 and 38: Detectare a defectiunilor tehnice P
- Page 39 and 40: Ohjauspaneeli : Gainin tasonsäät
- Page 41 and 42: Vianetsintä Ongelma Syy Ratkaisu E
- Page 43 and 44: Panel sterowania - Panel podłącze
- Page 45 and 46: Rozwiązywanie problemów : Problem
- Page 48: MTX is proud to be an American Audi
Control Panel :<br />
Gain Control (Gain) : The gain control matches the input sensitivity of the amplifier to the source unit being used.<br />
The operating range varies from 100mv to 6V.<br />
Adjusting the gain<br />
1. Turn the gain control on the amplifier all the way down (counter clockwise).<br />
2. Turn up the volume control on the source unit to approximately 3⁄4 of maximum.<br />
3. Adjust the gain control on the amplifier until audible distortion occurs.<br />
4. Adjust the gain control down until audible distortion disappears.<br />
5. The amplifier is now calibrated to the output of the source unit.<br />
X-Over Switch (X-Over) :<br />
In “LP” position, the active low pass (LP) x-over is turned on. Use this position for subwoofer application.<br />
In “HP” position, the active high pass (HP) x-over is turned on. Use this position for speaker application.<br />
In “Off” position, the x-over is turned off. The amp is in wide range mode.<br />
PowerOn/Protection LED : The LED illuminates red when the amp is switched on. When the amps is in shortcircuit<br />
or thermal protection, the LED is blinking.<br />
RCA Inputs (Input) : These RCA inputs are used with source units that have RCA or Line level outputs. (Source<br />
units need a minimum level of 100mV output for proper operation of the amplifier).<br />
MTX recommends only high quality twisted pair cables (such as StreetWires) to decrease the possibility of radiated<br />
noise entering the system.<br />
RCA outputs (Output) : These RCA output jacks are for connecting multiple amplifiers to 1 stereo RCA lead coming<br />
from the source unit (daisy chaining).<br />
Speaker level inputs (HLI) : This input will allow the amplifier to operate from source units with speaker-level<br />
outputs. Output speaker leads from the source unit should be tied directly to the wire harness provided with<br />
the amplifier.<br />
Note : When speaker level inputs are used, a remote turn on wire must used to switch the amplifier on and off.<br />
(+12V) Power Terminal (+12V) : This is the main power input for the amplifier and must be connected directly to<br />
the positive terminal of the vehicles battery for proper operation. Use caution when installing (+12) power cable<br />
in the vehicle. Avoid running this cable parallel with RCA cables, antennas, or other sensitive equipment due to<br />
massive currents that can induce noise into the audio system. It is also very important to have a tight, secure connection<br />
for maximum performance. MTX recommends using 10mm2 power wire with the MTX <strong>TR100.2</strong> amplifier.<br />
Remote Terminal (REM) : The amplifier can be turned on by applying 12 volts to this terminal. Typically this voltage<br />
is supplied by a wire from the source unit marked “remote” or “power antenna”.<br />
Ground Terminal (GND) : A proper ground is required for your amplifier to operate at peak performance. A short<br />
ground cable the same diameter as the power cable should be used to attach the ground terminal directly to<br />
the chassis of the vehicle. Always remove paint, dirt or debris to expose bare metal where the ground will be<br />
attached.<br />
Speaker Terminals (Speakers) : Connect speakers to these terminals. Observe speaker polarity throughout the<br />
system. Improper phase can result in loss of bass response and/or poor overall sound quality.<br />
Bridge Mode : When bridging the amplifier, use the right (+) terminal and the left (-) terminal only.<br />
Warning : do not bridge the amplifier with an impedance lower than 4Ω.<br />
Fuse (20A) : When fuse blow, replace them with the same value. Never use a higher rated fuse !


