You also want an ePaper? Increase the reach of your titles
YUMPU automatically turns print PDFs into web optimized ePapers that Google loves.
• In case of “mulching”: always avoid removing a large quantity<br />
of grass. Never cut more than one third the total grass height<br />
in a single passage! Regulate the forward speed according to<br />
the lawn conditions and the amount of grass removed.<br />
• For side discharge (if applicable): it is best to mow in a direction<br />
where cut grass is not discharged on the grass still to be<br />
cut.<br />
• If there is a grass-catcher with contents indicator device (if<br />
applicable): while working, with the blade in motion, the indicator<br />
remains lifted as long as the grass-catcher is able to hold<br />
cut grass; when it lowers, it means that the grass-catcher is full<br />
and must be emptied.<br />
To prevent damage to the grass turf, use position «1» only on<br />
perfectly flat, compact and level land.<br />
• Only for models <strong><strong>DM</strong>L</strong>:<br />
IMPORTANT NOTE - If discharge selection (☛ 2.5) needs to be<br />
switched from position «B» (mulching) to another during work with<br />
the lever in position «A» (rear discharge), turn off the machine and<br />
remove grass on the sliding door (1); grass on the door may prevent<br />
full discharge selection lever movement.<br />
LAWN CARE RECOMENDATIONS<br />
Each type of grass has different features and may thus require different<br />
ways to care for the lawn; always read the instructions on<br />
seed boxes for mowing height for the growth conditions in the<br />
work area.<br />
Keep in mind that most grass is made up of a stem and one or<br />
more leaves. If leaves are fully cut, the lawn is damaged and<br />
growth is more difficult.<br />
The following indications generally apply:<br />
– too low a cut causes grass tears and uprooting, with a “spotted”<br />
aspect;<br />
– in the summer, cutting must be higher to avoid the ground from<br />
drying;<br />
– do not cut wet grass; this could reduce blade efficiency due to<br />
sticky grass and tear the lawn;<br />
– for particularly high grass, initially mow at maximum admitted<br />
machine height followed by a second mow after two or three<br />
days.<br />
The appearance of the lawn will improve if you alternate the cutting<br />
in both directions at the same height.<br />
3.4 End of operations<br />
When the work has been completed, release the consent lever (1),<br />
shift the throttle to the “Stop Engine” position and disconnect the<br />
spark plug cap (2). In models where applicable, remove the starter<br />
key (3).<br />
WAIT UNTIL THE BLADE STOPS before performing any work.<br />
4. ROUTINE MAINTENANCE<br />
IMPORTANT - Routine and accurate maintenance is essential<br />
in maintaining original machine safety and performance levels.<br />
Store the lawnmower in a dry place.<br />
1) Wear strong work gloves before cleaning, maintaining or<br />
adjusting the machine.<br />
2) Accurately wash the machine with water after cutting, remove<br />
grass debris and mud accumulated in the chassis to prevent it<br />
from drying and causing problems the next time the lawnmower<br />
is used.<br />
3) In models with painted chassis, internal chassis part paint<br />
may detach over time due to the abrasive action of cut grass;<br />
in this case, promptly touch-up paint with rust-proof paint to<br />
prevent rusting that could corrode the metal.<br />
4) If accessing the lower part is necessary, only tilt the machine<br />
on the side indicated in the engine manual, following the relevant<br />
instructions. In models that include side discharge,<br />
remove the discharge deflector (if installed-☛ 3.1.d).<br />
5) Do not drip petrol onto the plastic parts of the engine or the<br />
machine to prevent damaging them and remove all traces of<br />
spilt petrol immediately. The warranty does not cover damage<br />
to plastic parts caused by petrol.<br />
6) In AVS models: in the event of abnormal handle vibrations,<br />
check the vibration-proof sleeves and contact your Dealer to<br />
replace them if damaged or worn.<br />
26<br />
IMPORTANT - Do not direct high pressure jets of<br />
water on mechanical lawnmower parts (for example<br />
but not limited to bearings and the clutch)<br />
since this could damage the blade engagement system.<br />
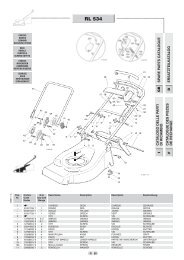
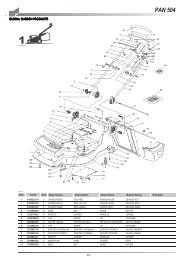
4.1 Each intervention on the blade is best if conducted at a<br />
specialised Centre that has the most appropriate tools.<br />
Only blades with the following codes must be used on this<br />
machine:<br />
81004452/0 (for model 504)<br />
81004455/0 (for model 554)<br />
Blades must always be marked «GGP». Given the product evolution,<br />
the above mentioned blade may be replaced in time by others,<br />
with similar interchangeable and operating safety characteristics.<br />
Reassemble the blade (2) with the code and markings facing the<br />
ground, following the order indicated in the illustration.<br />
Tighten the screws (1) with a torque wrench set to 50-55 Nm.<br />
4.2 On models with drive units, adjust the tension of the belt<br />
with the nut (1) to get the right measurement (6 mm).<br />
4.3 To charge a flat battery, connect it to the battery charger<br />
(1) following the instructions in the battery maintenance manual.<br />
Do not connect the battery charger directly to the engine terminal.<br />
It is not possible to start the engine using the battery charger as<br />
a power source, as it may get damaged.<br />
For prolonged lawnmower disuse, disconnect the battery from the<br />
engine wiring, making sure the charge level is good.<br />
4.4 Always stand behind the lawnmower handle when cleaning.<br />
To clean the internal parts of the lawnmower:<br />
– place the machine on firm ground;<br />
– ower the cutting height as far as possible;<br />
– connect a water hose to its pipe fitting (1);<br />
– start the engine and initially clean in the same operating situation<br />
as before;<br />
– stop the engine, move the discharge selection lever to the<br />
opposite position, start the engine and clean again.<br />
5. ENVIRONMENTAL PROTECTION<br />
Environmental protection should be a priority of considerable<br />
importance when using the machine, for the benefit of both social<br />
coexistence and the environment in which we live.<br />
– Try not to cause any disturbance to the surrounding area.<br />
– Scrupulously comply with local regulations and provisions for<br />
the disposal of waste materials after cutting.<br />
– Scrupulously comply with local regulations and provisions for<br />
the disposal of pakagings, oils, petrol, batteries, filters, damaged<br />
parts or any elements which have a strong impact on the<br />
environment; this waste must not be disposed of as normal<br />
waste, it must be separated and taken to specified waste disposal<br />
centres where the material will be recycled.<br />
– At the time of decommissioning, do not pollute the environment<br />
with the machine, hand it over to a disposal centre, in accordance<br />
with the local laws in force.<br />
6. ACCESSORIES<br />
WARNING: For your safety it is strictly prohibited to fit any other<br />
accessory other than those included in the following list, they<br />
have been exclusively designed for the model and type of<br />
machine you are using.<br />
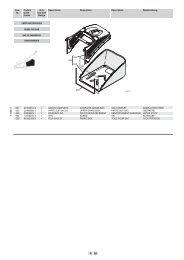
6.1 Kit “Mulching” (if not supplied)<br />
It finely chops the grass cuttings and leaves them on the lawn,<br />
instead of collecting them in the grass-catcher.<br />
For any doubt or problem, please do not hesitate to contact your<br />
nearest Customer Service Centre or Your Dealer.