0T01020-,0T01025-_Daytona_Air_3291c-0313.de,en,fr,nl,es,it,pl,pt ...
0T01020-,0T01025-_Daytona_Air_3291c-0313.de,en,fr,nl,es,it,pl,pt ... 0T01020-,0T01025-_Daytona_Air_3291c-0313.de,en,fr,nl,es,it,pl,pt ...
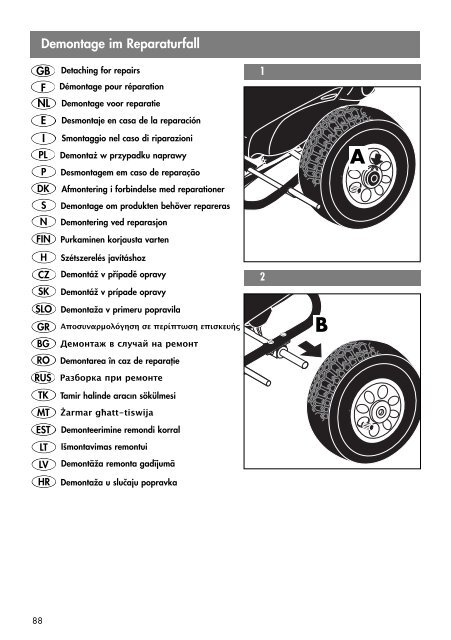
88 Demontage im Reparaturfall GB F NL E I PL Detaching for repairs Démontage pour réparation Demontage voor reparatie Desmontaje en casa de la reparación Smontaggio nel caso di riparazioni Demontaż w przypadku naprawy P Desmontagem em caso de reparação DK Afmontering i forbindelse med reparationer S Demontage om produkten behöver repareras N Demontering ved reparasjon FIN Purkaminen korjausta varten H Szétszerelés javításhoz CZ Demontáž v případě opravy SK Demontáž v prípade opravy SLO Demontaža v primeru popravila GR Αποσυναρµολόγηση σε περίπτωση επισκευής BG Демонтаж в случай на ремонт RO Demontarea în caz de reparaţie RUS Разборка при ремонте TK Tamir halinde aracın sökülmesi MT Żarmar għatt-tiswija EST LT LV Demonteerimine remondi korral Išmontavimas remontui Demontāža remonta gadījumā HR Demontaža u slučaju popravka 1 2 B A
Luftbefüllung D GB E 1 ! Luftbefüllung Der schlauchlose Reifen muss korrekt auf der Felge sitzen. Formen Sie den Reifen mit gleichmäßigem Druck während des Befüllens an den Felgenrand an. Benutzen Sie zum Befüllen einen Kompressor, wie Sie ihn z. B. an Tankstellen finden. Das Befüllen sollte schnell und gleichmäßig erfolgen. Re inflate The rubber tyre needs to be seated correctly on the rim. Squeeze tyre to rim as illustrated to achieve correct seating of the tyre on the rim whilst inflating. It is advisable to inflate the tyre with the aid of a compressor usually found at your local garage. Tyre needs to be inflated quickly. Hinchado de los neumáticos El neumático deshinchado debe estar correctamente montado sobre la llanta. Durante el hinchado, adapte el neumático a los bordes de la llanta ejerciendo una presión uniforme sobre el mismo (ver ilustración). Hinche el neumático con un compresor, como el que p. ej. puede encontrar en una gasolinera. Un neumático debe ser hinchado con rapidez y de forma uniforme. 2 PL NL F ¸ 3 1,7 bar/24 PSI Pompowanie Opona bezdętkowa musi być prawidłowo osadzona na feldze. Podczas pompowania należy oponę równomiernie dociskać do krawędzi felgi. Do pompowania proszę stosować kompresor, na przykład taki, jak na stacji paliw. Pompować należy szybko i równomiernie. Luchtbanden De rubber band dient correct op de velg te zitten. Duw de band op de velg zoals weergegeven, zodat de band tijdens het oppompen correct op de velg komt te zitten. Het is raadzaam de banden met behulp van een compressor op te pompen, dit kunt u doorgaans bij een garage in de buurt. De band dient snel opgepompt tew worden. Gonflage Le pneu en caoutchouc droit être positionné correctement sur la jante. Appuyer le pneu sur la jante comme illustré afin d’obtenir le bon positionnement durant le gonflage. Il est conseillé de gonfler le pneu a l’aide d’un compresseur généralement disponible dans votre garage local. Un pneu nécessite un gonflage rapide. 89
- Page 37 and 38: FIN Asennusohjeet ! HUOMIO! Tarkist
- Page 39 and 40: H nynak (európai szabvány: „Gye
- Page 41 and 42: CZ Důležité pokyny Prosím proč
- Page 43 and 44: CZ Pokyny k montáži ! POZOR! Dbej
- Page 45 and 46: SK ■ Poškodené diely môžu ohr
- Page 47 and 48: SLO Pomembni napotki Pred montažo
- Page 49 and 50: SLO jah/plastičnih vrečkah obstaj
- Page 51 and 52: GR παϊκή νόρµα "Περί
- Page 53 and 54: BG Важни указания Мо
- Page 55 and 56: BG Указания за монта
- Page 57 and 58: RO montarea unor piese neautorizate
- Page 59 and 60: RUS Важные указания
- Page 61 and 62: RUS Указания по сбор
- Page 63 and 64: TK en parçaların takılması vs.
- Page 65 and 66: M Avviżi Importanti Jekk jogħġbo
- Page 67 and 68: M tiġri. Iddisponi per eżempju mi
- Page 69 and 70: ■ Kahjustatud komponendid võivad
- Page 71 and 72: LT Šis KETTLER produktas pagaminta
- Page 73 and 74: LT ko jos montavimą ir ją patikri
- Page 75 and 76: LV kā arī izmainot ierīces konst
- Page 77 and 78: HR Važne napomene Pozorno pročita
- Page 79 and 80: HR ■ Pazite da se vozilo upotrebl
- Page 81 and 82: Checkliste 1 1 1 1 1 2 1 1 1 1/1 1
- Page 83 and 84: 1 2 M 5 x 38 M 5 A A A B 83
- Page 85 and 86: 6 M5x25 8 M5 A B 7 M 5 x 30 C 85
- Page 87: Demontage im Reparaturfall GB F NL
- Page 91 and 92: Luftbefüllung GR BG RO RUS TK Γέ
- Page 93 and 94: Ersatzteilbestellung für Kettcar
- Page 95 and 96: Ersatzteilbestellung für „DAYTON
88<br />
Demontage im Reparaturfall<br />
GB<br />
F<br />
NL<br />
E<br />
I<br />
PL<br />
Detaching for repairs<br />
Démontage pour réparation<br />
Demontage voor reparatie<br />
D<strong>es</strong>montaje <strong>en</strong> casa de la reparación<br />
Smontaggio nel caso di riparazioni<br />
Demontaż w przypadku naprawy<br />
P D<strong>es</strong>montagem em caso de reparação<br />
DK Afmontering i forbindelse med reparationer<br />
S Demontage om produkt<strong>en</strong> behöver repareras<br />
N Demontering ved reparasjon<br />
FIN Purkamin<strong>en</strong> korjausta vart<strong>en</strong><br />
H Szétszerelés javításhoz<br />
CZ Demontáž v případě opravy<br />
SK Demontáž v prípade opravy<br />
SLO Demontaža v primeru popravila<br />
GR Αποσυναρµολόγηση σε περίπτωση επισκευής<br />
BG Демонтаж в случай на ремонт<br />
RO Demontarea în caz de reparaţie<br />
RUS Разборка при ремонте<br />
TK Tamir halinde aracın sökülm<strong>es</strong>i<br />
MT Żarmar għatt-tiswija<br />
EST<br />
LT<br />
LV<br />
Demonteerimine remondi korral<br />
Išmontavimas remontui<br />
Demontāža remonta gadījumā<br />
HR Demontaža u slučaju popravka<br />
1<br />
2<br />
B<br />
A


