PC-7612V PC-7614V
PC-7612V PC-7614V
PC-7612V PC-7614V

You also want an ePaper? Increase the reach of your titles
YUMPU automatically turns print PDFs into web optimized ePapers that Google loves.
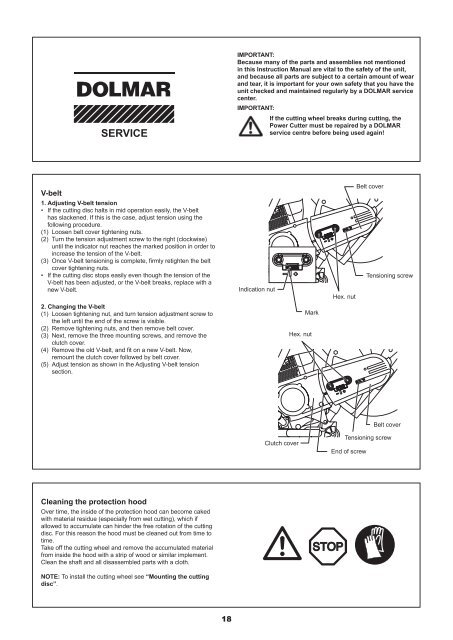
V-belt<br />
SERVICE<br />
1. Adjusting V-belt tension<br />
• If the cutting disc halts in mid operation easily, the V-belt<br />
has slackened. If this is the case, adjust tension using the<br />
following procedure.<br />
(1) Loosen belt cover tightening nuts.<br />
(2) Turn the tension adjustment screw to the right (clockwise)<br />
until the indicator nut reaches the marked position in order to<br />
increase the tension of the V-belt.<br />
(3) Once V-belt tensioning is complete, firmly retighten the belt<br />
cover tightening nuts.<br />
• If the cutting disc stops easily even though the tension of the<br />
V-belt has been adjusted, or the V-belt breaks, replace with a<br />
new V-belt.<br />
2. Changing the V-belt<br />
(1) Loosen tightening nut, and turn tension adjustment screw to<br />
the left until the end of the screw is visible.<br />
(2) Remove tightening nuts, and then remove belt cover.<br />
(3) Next, remove the three mounting screws, and remove the<br />
clutch cover.<br />
(4) Remove the old V-belt, and fit on a new V-belt. Now,<br />
remount the clutch cover followed by belt cover.<br />
(5) Adjust tension as shown in the Adjusting V-belt tension<br />
section.<br />
Cleaning the protection hood<br />
Over time, the inside of the protection hood can become caked<br />
with material residue (especially from wet cutting), which if<br />
allowed to accumulate can hinder the free rotation of the cutting<br />
disc. For this reason the hood must be cleaned out from time to<br />
time.<br />
Take off the cutting wheel and remove the accumulated material<br />
from inside the hood with a strip of wood or similar implement.<br />
Clean the shaft and all disassembled parts with a cloth.<br />
NOTE: To install the cutting wheel see “Mounting the cutting<br />
disc”.<br />
18<br />
IMPORTANT:<br />
Because many of the parts and assemblies not mentioned<br />
in this Instruction Manual are vital to the safety of the unit,<br />
and because all parts are subject to a certain amount of wear<br />
and tear, it is important for your own safety that you have the<br />
unit checked and maintained regularly by a DOLMAR service<br />
center.<br />
IMPORTANT:<br />
Indication nut<br />
If the cutting wheel breaks during cutting, the<br />
Power Cutter must be repaired by a DOLMAR<br />
service centre before being used again!<br />
Clutch cover<br />
Hex. nut<br />
Mark<br />
Hex. nut<br />
Belt cover<br />
Tensioning screw<br />
Belt cover<br />
Tensioning screw<br />
End of screw