You also want an ePaper? Increase the reach of your titles
YUMPU automatically turns print PDFs into web optimized ePapers that Google loves.
84<br />
GB<br />
Never use high-pressure water or air<br />
against the radiator fins. This will<br />
damage the fin structure.<br />
Clean the machine after use. The following instructions<br />
apply to cleaning:<br />
If high-pressure equipment is used, do not point<br />
the washer jet directly at axle seals, electrical<br />
components or hydraulic valves.<br />
Do not point jets of water directly at the engine.<br />
Clean the engine with a brush and/or compressed<br />
air.<br />
Clean the engine’s radiator (13:D) and oil cooler<br />
(13:E) with a soft brush. Large objects can be<br />
removed by hand. If the radiator or cooler is<br />
heavily soiled, use lightly running water with a<br />
suitable detergent.<br />
Never use high-pressure water or air against<br />
the radiator fins. This will damage the fin<br />
structure.<br />
6 MAINTENANCE<br />
6.1 Service program<br />
In order to keep the machine in good condition, as<br />
regards reliability and operational safety as well as<br />
from an environmental perspective, the service instructions<br />
in this section should be followed.<br />
All services should be carried out by authorised<br />
workshops.<br />
Service, carried out by authorised workshops,<br />
guarantees a professional job with original replacement<br />
parts.<br />
The service log should be stamped at every service<br />
carried out by an authorised workshop. A “fully<br />
stamped” service log is a valuable document that<br />
improves the machine’s second-hand value.<br />
The service points are given in the table below. Descriptions<br />
of how the procedures are to be carried<br />
out are given after the table.<br />
6.2 Service points.<br />
1st time Interval See<br />
Service point Hours of operation/ para-<br />
Calendar months graph<br />
Water separator,<br />
50/- 6.4<br />
check<br />
Pre-filter, cleaning 6.4<br />
Fuel filter, replace 400/- 6.5<br />
Tyre pressure,<br />
6.6<br />
check, adjust<br />
Engine oil, filter,<br />
50/12 200/12 6.7<br />
change<br />
Hydraulic oil, fil-<br />
50/12 400/12 6.8<br />
ter, change/clean<br />
ENGLISH<br />
Wheel motors ,<br />
change oil<br />
50/12 200/12 6.9<br />
Belt transmissions,<br />
check<br />
50 200/- 6.10<br />
Cooling system,<br />
clean<br />
1000/12 6.11<br />
Battery, check 50/- 6.12<br />
Air filter, clean prefilter<br />
250/- 6.13<br />
Air filter, change<br />
inner filter<br />
250/- 6.13<br />
Lubrication 6.14<br />
Adjusting valves 1000/- 6.15<br />
Grinding valves 2000/- 6.15<br />
6.3 Preparation<br />
All service and all maintenance must be carried out<br />
on a stationary machine with the engine switched<br />
off.<br />
Prevent the machine from rolling by<br />
always applying the parking brake.<br />
Stop the engine.<br />
Prevent unintentional starting of the<br />
engine by removing the ignition key.<br />
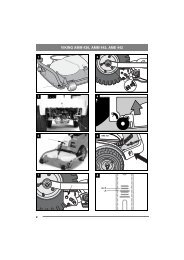
6.4 Water separator<br />
There is a float in the water separator (15:E) that<br />
can be viewed through the transparent cup. The<br />
float must be at the bottom. If the float has risen,<br />
the water separator must be cleaned as follows:<br />
1. Shut off the water separator tap. See fig. 15.<br />
2. Hold a container under the water separator to<br />
collect fuel.<br />
3. Open the cup by pressing its ring (15:A).<br />
4. Carefully remove the cup (15:B) and remove<br />
the spring (15:D) and float (15:E) from the cup.<br />
5. Clean the inside of the cup and thread filter<br />
(15:C).<br />
6. Check that the O-ring is intact and reinstall the<br />
components in reverse order.<br />
7. Open the tap.<br />
8. Bleed the fuel system. See “5.13”.<br />
Clean the fuel tank if water accumulates in the water<br />
separator often. Contact an authorised workshop.<br />
6.5 Fuel filter<br />
1. Shut off the fuel filter’s tap. See fig. 14.<br />
2. Hold a container under the fuel filter to collect<br />
fuel.<br />
3. Detach the cup by turning its ring (14:J).<br />
4. Carefully remove the cup (14:H) and remove<br />
the filter (14:F).