

scarica catalogo in italiano - Nexus
scarica catalogo in italiano - Nexus
scarica catalogo in italiano - Nexus

You also want an ePaper? Increase the reach of your titles
YUMPU automatically turns print PDFs into web optimized ePapers that Google loves.
WINDOW WELL’S ASSEMBLY INSTRUCTION<br />
MANUAL<br />
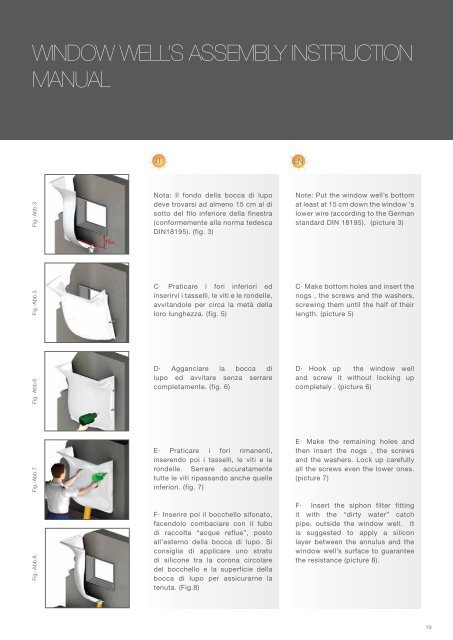
Fig.-Abb.3<br />
Fig.-Abb.5<br />
Fig.-Abb.6<br />
Fig.-Abb.7<br />
Fig.-Abb.8<br />
Nota: Il fondo della bocca di lupo<br />
deve trovarsi ad almeno 15 cm al di<br />
sotto del filo <strong>in</strong>feriore della f<strong>in</strong>estra<br />
(conformemente alla norma tedesca<br />
DIN18195). (fig. 3)<br />
C· Praticare i fori <strong>in</strong>feriori ed<br />
<strong>in</strong>serirvi i tasselli, le viti e le rondelle,<br />
avvitandole per circa la metà della<br />
loro lunghezza. (fig. 5)<br />
D· Agganciare la bocca di<br />
lupo ed avvitare senza serrare<br />
completamente. (fig. 6)<br />
E· Praticare i fori rimanenti,<br />
<strong>in</strong>serendo poi i tasselli, le viti e le<br />
rondelle. Serrare accuratamente<br />
tutte le viti ripassando anche quelle<br />
<strong>in</strong>feriori. (fig. 7)<br />
F· Inserire poi il bocchello sifonato,<br />
facendolo combaciare con il tubo<br />
di raccolta “acque reflue”, posto<br />
all’esterno della bocca di lupo. Si<br />
consiglia di applicare uno strato<br />
di silicone tra la corona circolare<br />
del bocchello e la superficie della<br />
bocca di lupo per assicurarne la<br />
tenuta. (Fig.8)<br />
Note: Put the w<strong>in</strong>dow well’s bottom<br />
at least at 15 cm down the w<strong>in</strong>dow ‘s<br />
lower wire (accord<strong>in</strong>g to the German<br />
standard DIN 18195). (picture 3)<br />
C· Make bottom holes and <strong>in</strong>sert the<br />
nogs , the screws and the washers,<br />
screw<strong>in</strong>g them until the half of their<br />
length. (picture 5)<br />
D· Hook up the w<strong>in</strong>dow well<br />
and screw it without lock<strong>in</strong>g up<br />
completely . (picture 6)<br />
E· Make the rema<strong>in</strong><strong>in</strong>g holes and<br />
then <strong>in</strong>sert the nogs , the screws<br />
and the washers. Lock up carefully<br />
all the screws even the lower ones.<br />
(picture 7)<br />
F· Insert the siphon filter fitt<strong>in</strong>g<br />
it with the “dirty water” catch<br />
pipe, outside the w<strong>in</strong>dow well. It<br />
is suggested to apply a silicon<br />
layer between the annulus and the<br />
w<strong>in</strong>dow well’s surface to guarantee<br />
the resistance (picture 8).<br />
19