

TITAN rev.2.FH11
TITAN rev.2.FH11
TITAN rev.2.FH11

Create successful ePaper yourself
Turn your PDF publications into a flip-book with our unique Google optimized e-Paper software.
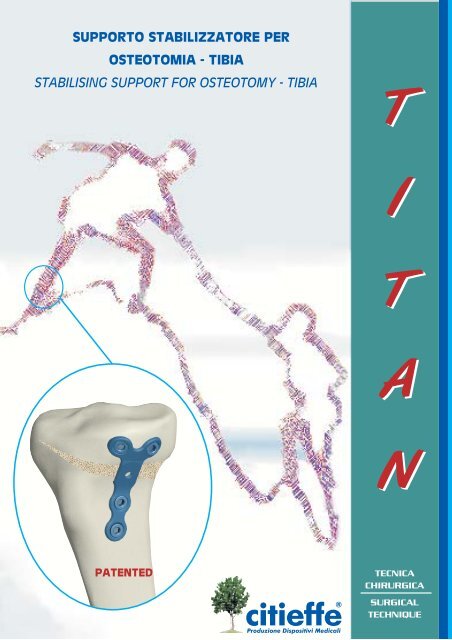
SUPPORTO STABILIZZATORE PER<br />
OSTEOTOMIA - TIBIA<br />
STABILISING SUPPORT FOR OSTEOTOMY - TIBIA<br />
PATENTED<br />
®<br />
T<br />
I<br />
T<br />
A<br />
N<br />
TECNICA<br />
CHIRURGICA<br />
SURGICAL<br />
TECHNIQUE
NOTA BENE La tecnica chirurgica qui descritta è rivolta a professionisti e descrive le procedure standard<br />
suggerite dal produttore.<br />
Comunque la tecnica da seguire è quella che, a giudizio del medico, più si adatta alle esigenze del paziente.<br />
NOTA BENE The technique description herein is made avialable to health care professional to illustrate the<br />
producer's suggested treatment for the uncomplicated procedures. In the final analysis, the preferred treatment<br />
is that which addresses the needs of the specific patient.<br />
Prima dell’uso consultare il libretto di istruzioni “Placche per ostotomia” (allegato alle confezioni)<br />
Before the use, see the instructions given in “Osteotomy plates” (leaflet included in the packaging)
a placca per osteotomia varizzante <strong>TITAN</strong><br />
L presenta un’architettura unica che le consente,<br />
tramite 4 lame, di ancorarsi alla corticale, distalmente<br />
e prossimalmente alla rima di osteotomia.<br />
I numerosi vantaggi derivanti dal suo<br />
utilizzo sono:<br />
• assenza di invasività all'interno della rima di<br />
osteotomia, con aumento del volume disponibile per<br />
l'inserimento di eventuali innesti<br />
ossei;<br />
•<br />
elevata efficienza a livello biomeccanico,<br />
derivante dalla capacità<br />
di ripartire il carico in modo<br />
equilibrato tra i diversi elementi di<br />
presa sulla corticale, in totale<br />
indipendenza dal grado di obliquità<br />
dell'osteotomia e dal grado di<br />
applicazione della placca lungo la<br />
linea di taglio.<br />
Presentazione<br />
prodotto<br />
PATENTED<br />
L'INTERO SISTEMA<br />
PLACCA E VITI DI FISSAGGIO<br />
È REALIZZATO IN LEGA DI <strong>TITAN</strong>IO.<br />
T osteotomy, with its peculiar<br />
design and the 4 blades, allows<br />
a perfect anchorage to the cortex,<br />
above and under the osteotomy<br />
rima.<br />
he <strong>TITAN</strong> plate for varus<br />
Advantages:<br />
• not invasive technique<br />
inside the osteotomy rima with<br />
increase of the available volume for the possible<br />
bone graft;<br />
• high bio-mechanic efficiency thanks to the<br />
balanced load distribuition among the grips<br />
elements on the corticals, without depending on<br />
the osteotomy obliquity degree, on the correction<br />
level to be obtained and on the plate insertion<br />
along the incision line.<br />
THE PLATE SYSTEM<br />
PLATE AND BLOCKING SCREWS<br />
IS PRODUCED IN <strong>TITAN</strong>IUM ALLOY.<br />
Product<br />
presentation<br />
®<br />
citieffe ®<br />
citieffe
Tecnica chirurgica Surgical technique<br />
FIG.1<br />
necessario un attento piano preoperatorio per<br />
È impostare la correzione da ottenere. Per<br />
l'intervento utilizzare un amplificatore<br />
di brillanza. Si inizia con un’incisione<br />
cutanea antero-mediale, a convessità<br />
anteriore, partendo dalla rima<br />
articolare interna e proseguendo<br />
distalmente per 6-8 cm.<br />
Senza aprire l'articolazione e<br />
distaccando parzialmente la zampa<br />
d'oca, scheletrizzare la metafisi tibiale<br />
e inserire due divaricatori,<br />
anteriormente e posteriormente alla<br />
tibia.<br />
Sotto controllo amplioscopico<br />
introdurre un filo guida in direzione<br />
obliqua, partendo 3-5 mm prossimalmente<br />
all’inserzione del tendine rotuleo e mirando il centro<br />
della testa del perone; il filo dovrà seguire una direzione<br />
parallela all’articolazione.<br />
FIG.2<br />
i introduce una sega mec-<br />
S canica distalmente al filo<br />
guida e si esegue l’osteotomia<br />
per non oltre i due terzi della<br />
sezione tibiale. Si deve quindi<br />
proseguire con l'impiego di un<br />
osteotomo, prestando attenzione<br />
a mantenere integra la corticale<br />
laterale.<br />
Con forzatura delicata ma decisa<br />
si corregge il varismo tibiale, inserendo nel contempo<br />
il cuneo (art. GN-1010) nel taglio osteotomico in<br />
modo da stabilizzare la correzione.<br />
®<br />
citieffe<br />
FIG.1<br />
t is necessary a careful preoperative planning in<br />
I order to set the desired correction. An image<br />
intensifier is required. Anterior-<br />
FIG. 1<br />
articulation.<br />
internal skin incision, curved, anterior<br />
convexity, which from the articular<br />
internal rima goes distally 6-8 cm.<br />
Without opening the articulation and<br />
partially detaching, as needed, the<br />
anserine burse, skeletize the tibial<br />
metaphysis and insert 2 retractors,<br />
anterior and posterior to the tibia.<br />
Using an image intensifier, introduce<br />
a guide wire, obliquely, starting 3-5 mm<br />
distally the patella tendon insertion,<br />
targeting the caput fibulae centre. The<br />
guide wire should go parllel the<br />
FIG.2<br />
he osteotomy can be exe-<br />
T cuted using an electric<br />
powered saw distally the guide<br />
wire, for not more than two third<br />
of tibial section, it must continue<br />
with an osteotome and must not<br />
be completed, it is important to<br />
preserve the lateral cortex.<br />
FIG. 2 With a light but secur forcing<br />
correct the tibial varus, inserting<br />
at the same time the wedge (code GN-1010), in<br />
order stabilise the correction .
FIG.3<br />
na volta ottenuta l'apertura<br />
Udesiderata, ruotare verso il<br />
basso il manico del cuneo.<br />
FIG.4<br />
vvitare la placca<br />
A sull'inseritore (art.<br />
GN-1020) e introdurla<br />
attraverso lo spazio<br />
centrale del cuneo, fino<br />
ad appoggiarla all' osteotomia,<br />
facendo attenzione<br />
che le lame della placca<br />
siano posizionate sulle<br />
corticali contrapposte<br />
dell'osteotomia (FIG.<br />
4A). Nel caso di<br />
osteotomie di larghezza<br />
superiore ai 10 mm, si<br />
consiglia di posizionare le<br />
lame distali sul bordo<br />
interno del taglio<br />
osteotomico (FIG. 4B).<br />
FIG. 3<br />
FIG. 4A FIG. 4B<br />
®<br />
citieffe<br />
FIG.3<br />
nce obtained the desired<br />
O opening, turn the wedge<br />
handle down.<br />
FIG.4<br />
crew the plate on the<br />
S insert (code GN-<br />
1020) and introduce the<br />
plate through the central<br />
space left by the wedge,<br />
up to lean it to the osteotomy,<br />
pay particular<br />
attention that the plate<br />
blades lean against the<br />
corticex opposite to the<br />
osteotomy (FIG. 4A).<br />
In case of osteotomies<br />
larger than 10 mm, it is<br />
advisable to position the<br />
distal blades on the interior<br />
rim of the osteotomy<br />
incision (FIG. 4B).
FIG.5<br />
attere sull'inseritore per introdurre<br />
B le lame della placca nell’osso.<br />
Se si incontra una forte resistenza, si<br />
consiglia di procedere con<br />
l’inserimento delle viti (come descritto<br />
nel seguito) in modo da effettuare<br />
un’introduzione graduale.<br />
Con la punta diametro 4,25 mm (art.<br />
GN-0345) perforare solo la prima<br />
corticale dei 2 fori prossimali della<br />
placca, mentre per le viti distali il foro<br />
dovrà interessare entrambe le corticali. FIG. 5<br />
Utilizzando il giravite esagonale (art.<br />
GN-0350) avvitare progressivamente le 2 viti prossimali<br />
e la più prossimale delle distali, fino ad ottenere una<br />
perfetta aderenza della placca all’osso.<br />
FIG.6<br />
imuovere il cuneo, svitare l'inseri-<br />
R tore e inserire la quarta vite con<br />
lo stesso procedimento illustrato in<br />
precedenza. Controllare che le 2 viti<br />
distali siano ancorate alla seconda<br />
corticale.<br />
Si completa l'intervento riempiendo il<br />
cuneo lasciato vuoto dall'osteotomia<br />
con osso autologo, di banca o sintetico.<br />
FIG. 6<br />
I rimozione.<br />
B<br />
mpronta delle lame dopo la<br />
lade marks after the removal.<br />
®<br />
citieffe<br />
FIG.5<br />
eat on the impactor to introduce<br />
B the plate blades in the bone. If<br />
the insertion is particularly difficult, it<br />
is advisable the use of the screws (as<br />
described below) in order to obtain a<br />
gradually insertion.<br />
With the drill bit diameter 4,25 mm<br />
(art. GN-0345) drill only the first cortex<br />
of the 2 plate proximal holes, while for<br />
the distal screws the hole should include<br />
both cortex. Using the hexagonal<br />
screwdriver (art. GN-0350) gradually<br />
screw the 2 proximal screws and the<br />
more proximal of the distal ones, up to obtain a perfect<br />
contact of the plate to the bone.<br />
FIG.6<br />
omplete the surgery removing the<br />
C wedge, un-screwing the impactor,<br />
inserting the 4 th screw and filling the<br />
space left empty by the wedge with<br />
autologus or bank or synthetic bone.<br />
The 2 distal screws must be anchored<br />
to the second cortex.
PATENTED<br />
IMPIANTABILE<br />
IMPLANTABLE<br />
GN-1115 Placca <strong>TITAN</strong> a T per osteotomia 15 mm<br />
<strong>TITAN</strong> osteotomy T plate 15 mm<br />
GN-0155 Vite ø6,5x20 mm Screw ø6,5x20 mm<br />
GN-0160 Vite ø6,5x25 mm Screw ø6,5x25 mm<br />
GN-0165 Vite ø6,5x30 mm Screw ø6,5x30 mm<br />
GN-0170 Vite ø6,5x35 mm Screw ø6,5x35 mm<br />
GN-0175 Vite ø6,5x40 mm Screw ø6,5x40 mm<br />
GN-0180 Vite ø6,5x45 mm Screw ø6,5x45 mm<br />
GN-0185 Vite ø6,5x50 mm Screw ø6,5x50 mm<br />
GN-0190 Vite ø6,5x55 mm Screw ø6,5x55 mm<br />
GN-0195 Vite ø6,5x60 mm Screw ø6,5x60 mm<br />
GN-0197 Vite ø6,5x65 mm Screw ø6,5x65 mm<br />
GN-0198 Vite ø6,5x70 mm Screw ø6,5x70 mm<br />
Materiale: lega di <strong>TITAN</strong>IO 6Al4V<br />
Material: <strong>TITAN</strong>IUM alloy 6Al4V<br />
STRUMENTARIO<br />
INSTRUMENT SET<br />
GN-1010 Cuneo per placca a T<br />
T plate wedge<br />
GN-1020 Battitore placca a T<br />
T plate impactor<br />
GN-0345 Punta diametro 4,25 mm<br />
Drill bit diameter 4,25 mm<br />
GN-0350 Giravite esagono 3,5 mm non cannulato<br />
Not cannulated screwdriver - hexagon 3,5 mm<br />
GN-1050 Vassoio strumentario<br />
Instrument set tray<br />
STERILE EO<br />
PI-3031 Scatola sterilizzazione acciaio 300x130x55 mm<br />
Stainless steel sterilization box 300x130x55 mm<br />
®<br />
citieffe
Via Armaroli, 14 - 21 - 40012 Calderara di Reno (BO)<br />
Tel +39 051 72 18 50 - Fax +39 051 72 18 70<br />
citieffe@citieffe.com - www.citieffe.com<br />
®<br />
Rev. 2 - 11/2007 La citieffe ® si riserva di apportare modifiche senza preavviso citieffe ® reserves the right to make changes without notice