Micromotore da studio Studio micromotor - Carlo De Giorgi
Micromotore da studio Studio micromotor - Carlo De Giorgi Micromotore da studio Studio micromotor - Carlo De Giorgi
STUDIO MICROMOTOR 4.1.3 - CHARGING THE BATTERY PACK The supplied mains power cable (to be connected to socket (6)) is used to charge the battery pack. The power supply voltage can be from 100 (minimum) to 260V (maximum); depending on the input voltage, the time required for charging varies from a minimum of 24 hours to a maximum of 48 hours (approx.). The first time you charge the battery pack we recommend charging time of 48 hours. This period can be reduced for successive charges, but should never be less than 24 hours. Do not use the micromotor while the battery pack is being charged (switch (1) should be set to OFF). To protect the batteries from damage, do not drain them completely. If the appliance remains unused for prolonged periods, charge the battery pack after the first two months of disuse and at regular intervals thereafter. 4.2 - OPERATION AND USE 4.2.1 - OPERATION The appliance should be placed on a work table in front of the operator. Check that the appliance is working by setting the main power switch (1) to ON so that green LED (3) illuminates, and then turning potentiometer (4) (the motor should start to rotate). The direction of tool rotation can be inverted by means of selector (5); rotation direction can be changed only when the motor is stopped or at minimum speed. If the motor fails to start, set the main power switch to OFF and check that the various connectors are correctly inserted. Always switch the appliance OFF after use. 4.2.2 - OPERATOR The operator starts the appliance by means of a voluntary command, thereby assuming direct control of its operation. 4.2.3 - SAFETY WARNINGS - Generic warnings are given in heading 3.2.3. - Do not attempt to lubricate the handpiece by injecting oil into the collet (part B Fig. 4 – model 541/00 only). - always check that the diameter of the tool shank is compatible with the collet (Model 541/00 only). - do not open the battery pack under any circumstances when it is connected to the mains for charging. GB - 12 Carlo de Giorgi
STUDIO MICROMOTOR 4.3 - INSTRUCTIONS FOR USE 4.3.1 - STARTUP (model 541/00 only) With the appliance powered down for safety, fit the required tool in the handpiece. To do this turn lever (A - Fig. 4) through 90° either towards the left or towards the right and then fit the tool inside collet (B). Now return lever (A) to its original position to lock the tool. The appliance can now be powered up by means of main power switch (1); at this point, follow the directions given in heading 4.2.1. D A C B E 13 14 Fig. 4 4.3.2 - EMERGENCY STOP The appliance is stopped by setting main power switch (1) to OFF. 4.3.3 - WARNINGS In relation to the material being machined, use personal protection devices (facemask, gloves, safety glasses, etc.). 4.4 - MAINTENANCE 4.4.1 - CLEANING AND LUBRICATION 4.4.1.1 - Model 540/00 Refer to the directions in heading 3.4.1. 4.4.1.2 - Model 541/00 The appliance requires the following maintenance, especially when subject to continuous use (every day); before cleaning the appliance disconnect it from the power supply. - Clean head (E) as shown in Fig. 5. - Blow compressed air through the collet (B - Fig. 4), preferably with the collet open (to open, turn lever (A) through 90°). Carlo de Giorgi GB - 13
- Page 1 and 2: Manuale di Istruzione Uso e Manuten
- Page 3 and 4: Manuale di Istruzione Uso e Manuten
- Page 5 and 6: MICROMOTORE DA STUDIO 4.2 - FUNZION
- Page 7 and 8: MICROMOTORE DA STUDIO 1 - NORME ED
- Page 9 and 10: MICROMOTORE DA STUDIO - il pedale (
- Page 11 and 12: MICROMOTORE DA STUDIO 3.3.2 - INDIC
- Page 13 and 14: MICROMOTORE DA STUDIO 4 - MICROMOTO
- Page 15 and 16: MICROMOTORE DA STUDIO 4.3 - INDICAZ
- Page 17 and 18: MICROMOTORE DA STUDIO 4.4.2.2 - Sos
- Page 19 and 20: User and Maintenance manual Studio
- Page 21 and 22: STUDIO MICROMOTOR 4.2 - OPERATION A
- Page 23 and 24: STUDIO MICROMOTOR 1 - STANDARDS AND
- Page 25 and 26: STUDIO MICROMOTOR - micromotor (4)
- Page 27 and 28: STUDIO MICROMOTOR 3.3.2 - INSTRUCTI
- Page 29: STUDIO MICROMOTOR 4 - MICROMOTORS 5
- Page 33 and 34: STUDIO MICROMOTOR As soon as you de
- Page 35: Via Tonale, 1 - 20021 Baranzate di
STUDIO MICROMOTOR<br />
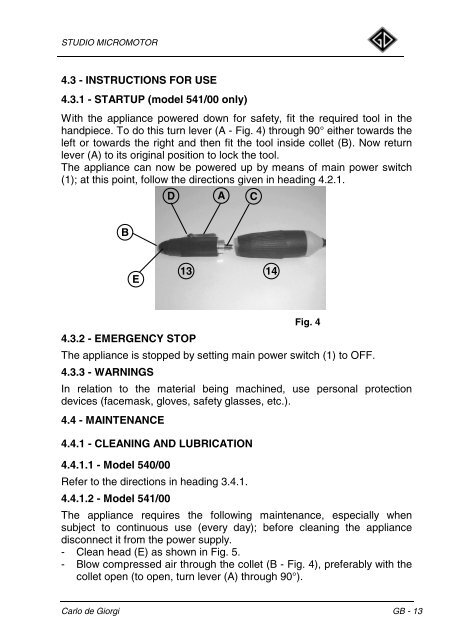
4.3 - INSTRUCTIONS FOR USE<br />
4.3.1 - STARTUP (model 541/00 only)<br />
With the appliance powered down for safety, fit the required tool in the<br />
handpiece. To do this turn lever (A - Fig. 4) through 90° either towards the<br />
left or towards the right and then fit the tool inside collet (B). Now return<br />
lever (A) to its original position to lock the tool.<br />
The appliance can now be powered up by means of main power switch<br />
(1); at this point, follow the directions given in heading 4.2.1.<br />
D A C<br />
B<br />
E<br />
13 14<br />
Fig. 4<br />
4.3.2 - EMERGENCY STOP<br />
The appliance is stopped by setting main power switch (1) to OFF.<br />
4.3.3 - WARNINGS<br />
In relation to the material being machined, use personal protection<br />
devices (facemask, gloves, safety glasses, etc.).<br />
4.4 - MAINTENANCE<br />
4.4.1 - CLEANING AND LUBRICATION<br />
4.4.1.1 - Model 540/00<br />
Refer to the directions in heading 3.4.1.<br />
4.4.1.2 - Model 541/00<br />
The appliance requires the following maintenance, especially when<br />
subject to continuous use (every <strong>da</strong>y); before cleaning the appliance<br />
disconnect it from the power supply.<br />
- Clean head (E) as shown in Fig. 5.<br />
- Blow compressed air through the collet (B - Fig. 4), preferably with the<br />
collet open (to open, turn lever (A) through 90°).<br />
<strong>Carlo</strong> de <strong>Giorgi</strong> GB - 13


