BKRD30/22/42 RedDot 6LIM - Tasco
BKRD30/22/42 RedDot 6LIM - Tasco
BKRD30/22/42 RedDot 6LIM - Tasco

You also want an ePaper? Increase the reach of your titles
YUMPU automatically turns print PDFs into web optimized ePapers that Google loves.
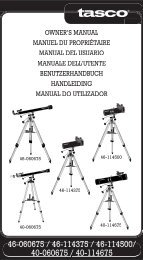
ENGLISH<br />
Rheostat with 11-Position<br />
Detents for Varying Light<br />
Intensity<br />
Dust<br />
Cap<br />
Battery<br />
Compartment<br />
Locking Nut<br />
Windage Adjustment Turret<br />
Elevation Adjustment Turret<br />
Eyebell<br />
Dust<br />
Cap<br />
Congratulations on purchasing your <strong>Tasco</strong> Red Dot illuminated optical sight. Designed with a unique rheostat<br />
that features 11 positive detents for a full range of light intensities, this is a state-of-the-art scope designed for<br />
hunting, plinking and target shooting with pistols, rifles, shotguns and bows.<br />
Engineered for greater speed and accuracy, this scope allows you to unconsciously concentrate on the reticle,<br />
thus increasing accuracy. <strong>Tasco</strong>’s Red Dot illuminated reticle has been pre-focused so the aiming point always<br />
appears against the target. By comparison, open sights force you to focus on the rear sight, front sight and<br />
target at the same time. Also standard rifle or pistol scopes bring the target into focus only on the internal reticle.<br />
Its aiming system is engineered to be the brightest of its kind. All in all, this scope is proof positive that <strong>Tasco</strong><br />
is positioned squarely on the leading edge of advanced technology.<br />
MOUNTING YOUR RED DOT SCOPE<br />
1. The base or bases should be manufactured specifically for your pistol, rifle or shotgun and should create a<br />
uniform horizontal and vertical mounting platform. Be sure they are properly installed and securely fastened<br />
according to the manufacturer’s instructions for your safety. There is no set eye relief for this sight, therefore,<br />
you should provide at least three inches of clearance between the eyebell and your eye when in the shooting<br />
position.<br />
2. Set the clamps onto the base or bases so that they align with the crosscut grooves. Work each clampscrew into<br />
the base until the crossbolt seats into the groove. Securely tighten each locking nut with a coin or screwdriver.<br />
For additional holding power, add a drop of thread-locking compound to the center of each locking nut.<br />
INSTALLING BATTERIES<br />
Your new <strong>Tasco</strong> Red Dot is powered by one 3V “coin-style” lithium battery, Type 2032. Should your reticle grow<br />
dim or not light at all, you will need to replace the batteries. To install new batteries, unscrew the battery<br />
compartment and insert “+” side up. Replace battery cover.<br />
ZEROING YOUR RED DOT SIGHT<br />
CAUTION! BE SURE GUN IS NOT LOADED.<br />
USE SAFE GUN HANDLING PROCEDURES AT ALL TIMES.<br />
NOTE: THE FOLLOWING SHOULD BE DONE AT AN APPROVED RANGE OR OTHER SAFE AREA. EYE AND EAR<br />
PROTECTION IS RECOMMENDED.<br />
1. Activate the illuminated reticle by turning the rheostat knob clockwise to brighten and counterclockwise to dim.<br />
The “1” represents the dimmest and the “11” the brightest illuminations.<br />
2. Remove the windage and elevation adjustment caps.<br />
3. With the scope mounted, rest the gun on a solid support. Sight along the barrel and aim at a target 50 to 100<br />
yards away. Sight through your Red Dot and use the windage and elevation adjustments to align the lighted<br />
reticle with the target as seen along the barrel. Each click of adjustment moves the point of impact by 1/2” at<br />
100 yards, 1/4” at 50 yards, and 1/8” at 25 yards.<br />
4 5