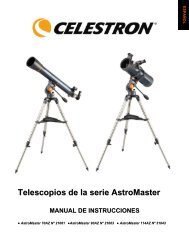
Sct'S - Celestron
Sct'S - Celestron
Sct'S - Celestron

You also want an ePaper? Increase the reach of your titles
YUMPU automatically turns print PDFs into web optimized ePapers that Google loves.
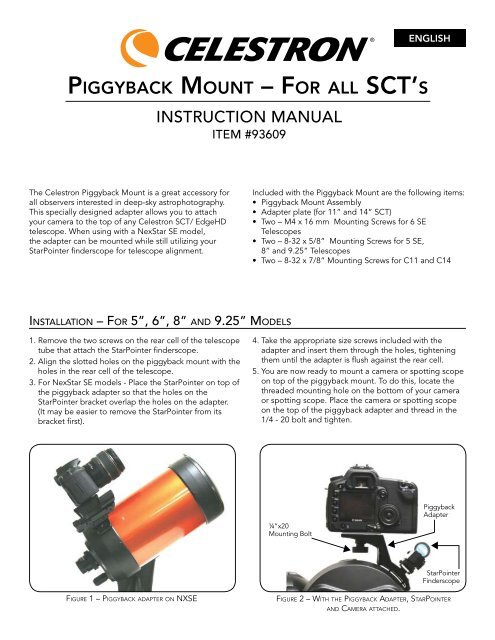
Pig g y b a c k Mo u n t – Fo r al l Sct’S<br />
The <strong>Celestron</strong> Piggyback Mount is a great accessory for<br />
all observers interested in deep-sky astrophotography.<br />
This specially designed adapter allows you to attach<br />
your camera to the top of any <strong>Celestron</strong> SCT/ EdgeHD<br />
telescope. When using with a NexStar SE model,<br />
the adapter can be mounted while still utilizing your<br />
StarPointer finderscope for telescope alignment.<br />
InstructIon Manual<br />
ItEM #93609<br />
InstallatIon – Fo r 5”, 6”, 8” a n d 9.25” Mo d e l s<br />
1. Remove the two screws on the rear cell of the telescope<br />
tube that attach the StarPointer finderscope.<br />
2. Align the slotted holes on the piggyback mount with the<br />
holes in the rear cell of the telescope.<br />
3. For NexStar SE models - Place the StarPointer on top of<br />
the piggyback adapter so that the holes on the<br />
StarPointer bracket overlap the holes on the adapter.<br />
(It may be easier to remove the StarPointer from its<br />
bracket first).<br />
4. Take the appropriate size screws included with the<br />
adapter and insert them through the holes, tightening<br />
them until the adapter is flush against the rear cell.<br />
5. You are now ready to mount a camera or spotting scope<br />
on top of the piggyback mount. To do this, locate the<br />
threaded mounting hole on the bottom of your camera<br />
or spotting scope. Place the camera or spotting scope<br />
on the top of the piggyback adapter and thread in the<br />
1/4 - 20 bolt and tighten.<br />
¼”x20<br />
Mounting Bolt<br />
Piggyback<br />
Adapter<br />
StarPointer<br />
Finderscope<br />
Fi g u r e 1 – Pi g g y b a c k a d a P t e r o n nXSe Fi g u r e 2 – With t h e Pi g g y b a c k adaPter, Sta rPo i n t e r<br />
a n d ca m e r a at ta c h e d .<br />
t<br />
t<br />
english<br />
Included with the Piggyback Mount are the following items:<br />
• Piggyback Mount Assembly<br />
• Adapter plate (for 11” and 14” SCT)<br />
• Two – M4 x 16 mm Mounting Screws for 6 SE<br />
Telescopes<br />
• Two – 8-32 x 5/8” Mounting Screws for 5 SE,<br />
8” and 9.25” Telescopes<br />
• Two – 8-32 x 7/8” Mounting Screws for C11 and C14<br />
t
InstallatIon – Fo r C11 a n d C14 Mo d e l s<br />
1. Remove the two screws on the rear cell of the telescope<br />
tube (opposite the position of your finderscope).<br />
2. Align the slotted holes on the adapter plate with the<br />
holes in the rear cell of the telescope.<br />
3. Insert the 8-32 x 7/8” screws through the holes in the<br />
adapter plate and thread them into the rear cell.<br />
4. For c11 telescopes - Place the Piggyback adapter on<br />
top of the adapter plate so that the holes in the<br />
piggyback adapter are aligned with the two left-most<br />
holes (when standing behind the rear cell of the<br />
telescope). Using these holes ensure that your camera<br />
will be level when placed on the mounting platform of<br />
the adapter.<br />
5. For c14 telescopes - Place the Piggyback adapter on<br />
top of the adapter plate so that the holes in the<br />
piggyback adapter are aligned with the two right-most<br />
holes (when standing behind the rear cell of the<br />
telescope). Using these holes ensure that your camera<br />
will be level when placed on the mounting platform of<br />
the adapter.<br />
6. Insert the 8-32 x 5/8” screws through the holes in the<br />
piggyback adapter and thread them into the holes on<br />
the adapter plate.<br />
7. You are now ready to mount a camera or spotting scope<br />
on top of the piggyback mount. To do this, locate the<br />
threaded mounting hole on the bottom of your camera<br />
or spotting scope. Place the camera or spotting scope<br />
on the top of the piggyback adapter and thread in the<br />
1/4 - 20 bolt and tighten.<br />
WarnInG: IF y o u r e M o v e t h e PI G Gy b a C k Mo u n t,<br />
d o n o t t h r e a d t h e s C r e W s b a C k In t o t h e r e a r C e l l<br />
o F t h e t e l e s C o P e a l l t h e W a y . th e s C r e W s a r e l o n G<br />
e n o u G h to o b s t r u C t t h e M o v e M e n t o F, a n d PossIbly<br />
C h I P t h e P r I Ma r y M I r r o r.<br />
2835 Columbia Street • Torrance, CA 90503 U.S.A.<br />
Telephone: 310.328.9560 • Fax: 310.212.5835<br />
©2010 <strong>Celestron</strong><br />
All rights reserved. • Printed in China • 08-10<br />
Adapter<br />
Plate<br />
C14 Holes<br />
Piggyback<br />
Mount<br />
C11 Holes<br />
Fi g u r e 3 – With t h e Pi g g y b a c k adaPter, adaPter Pl at e<br />
F o r c11/c14<br />
PiggyBack Adapter<br />
Adapter<br />
Plate<br />
t<br />
t<br />
t<br />
t<br />
t<br />
Fi g u r e 4 – With t h e Pi g g y b a c k adaPter, adaPter Pl at e<br />
F o r c11/c14<br />
yo u r <strong>Celestron</strong> a C C e s s o r y h a s a o n e y e a r lIMIted Wa r r a n t y.<br />
Pl e a s e see t h e <strong>Celestron</strong> W e b s It e F o r detaIled In F o r M at Io n o n a l l<br />
<strong>Celestron</strong> a C C e s s o r Ie s at W W W .<strong>Celestron</strong>.C o M.<br />
t<br />
Product design and specifications are subject to change<br />
without prior notification.<br />
Designed and intended for those 13 years of age and older.<br />
t<br />
t
Mo n t u r e Pi g g y b a c k – Po u r t o u s l e s sct<br />
La monture Piggyback de <strong>Celestron</strong> est l’accessoire<br />
idéal de tous les observateurs qui s’intéressent à<br />
l’astrophotographie du ciel profond. Cet adaptateur<br />
spécialement conçu vous permet de fixer votre appareil<br />
photo sur le dos de n’importe quel télescope SCT/<br />
EdgeHD <strong>Celestron</strong>. Utilisé avec le modèle NexStar SE,<br />
l’adaptateur peut être monté tout en continuant à se servir<br />
du chercheur StarPointer pour aligner le télescope.<br />
Manuel de l’utilisateur<br />
référence n° 93609<br />
InstallatIon – Po u r modèles d e 127 m m (5 Po), 152 m m (6 Po), 203 m m (8 Po)<br />
et 235 m m (9,25 Po)<br />
1. Retirez les deux vis situées sur la cellule arrière du tube<br />
télescopique à l’endroit où le chercheur StarPointer<br />
est fixé.<br />
2. Alignez les trous oblongs de la monture Piggyback sur<br />
ceux de la cellule arrière du télescope.<br />
3. Sur les modèles NexStar SE - Placez le StarPointer sur le<br />
dessus de l’adaptateur Piggyback de manière à ce que<br />
les trous du support du StarPointer se superposent sur<br />
ceux de l’adaptateur. (Il peut être plus facile de retirer<br />
d’abord le StarPointer de son support).<br />
4. Prenez les vis de la taille correspondante livrées avec<br />
l’adaptateur et introduisez-les dans les trous, puis<br />
serrez jusqu’à ce que l’adaptateur soit aligné sur la<br />
cellule arrière.<br />
5. Vous pouvez maintenant monter un appareil photo<br />
ou une longue-vue sur la monture Piggyback. Pour cela,<br />
repérez le trou de montage fileté situé sur la partie<br />
inférieure de votre appareil photo ou longue-vue.<br />
Mettez l’appareil photo ou la longue-vue sur l’adaptateur<br />
Piggyback et vissez le boulon ¼ - 20, puis serrez.<br />
Boulon de fixation<br />
¼ po x 20<br />
Fi g u r e 1 – Ad A p tAt e u r pi g g y bA c k s u r le NXse Fi g u r e 2 – Av e c A d A p tAt e u r pi g g y bA c k, stA rpo iN t e r e t<br />
t<br />
A p pA r e i l photo F iX é s dessus<br />
t<br />
FRANÇAIS<br />
Les articles suivants sont livrés avec la monture Piggyback<br />
• Monture Piggyback<br />
• Platine adaptatrice (pour SCT de 274 mm [11 po]<br />
et 355 mm [14 po])<br />
• Deux – Vis de montage M4 x 16 mm pour<br />
télescopes 6 SE<br />
• Deux – Vis de montage 8x32 x 5/8 po pour télescopes<br />
5 SE, 203 mm (8 po) et 235 mm (9,25 po)<br />
• Deux – Vis de montage de 8x32 x 7/8 po pour<br />
C11 et C14<br />
Adaptateur<br />
Piggyback<br />
t<br />
Chercheur<br />
StarPointer
InstallatIon – Po u r m o d è l e s C11 e t C14<br />
1. Retirez les deux vis situées sur la cellule arrière du tube<br />
télescopique (position opposée à celle du chercheur<br />
StarPointer).<br />
2. Alignez les trous oblongs de la platine de l’adaptateur<br />
sur ceux de la cellule arrière du télescope.<br />
3. Introduisez les vis de 8x32 x 7/8 po dans les trous de la<br />
platine de l’adaptateur et vissez-les dans la cellule arrière.<br />
4. Pour les télescopes C11 - Placez l’adaptateur Piggyback<br />
sur la platine de l’adaptateur de manière à ce que les<br />
trous de l’adaptateur Piggyback soient alignés sur les<br />
deux trous les plus à gauche (lorsque l’on se tient<br />
derrière la cellule du télescope). Ces trous permettent<br />
d’assurer que votre appareil photo reste stable lorsqu’il<br />
est placé sur la plate-forme de montage de l’adaptateur.<br />
5. Pour les télescopes C14 - Placez l’adaptateur Piggyback<br />
sur la platine de l’adaptateur de manière à ce que les<br />
trous de l’adaptateur Piggyback soient alignés sur les<br />
deux trous les plus à droite (lorsque l’on se tient derrière<br />
la cellule du télescope). Ces trous permettent d’assurer<br />
que votre appareil photo reste stable lorsqu’il est placé<br />
sur la plate-forme de montage de l’adaptateur.<br />
6. Introduisez les vis de 8x32 x 5/8 po dans les trous de<br />
l’adaptateur Piggyback et vissez-les dans ceux de la<br />
platine de l’adaptateur.<br />
7. Vous pouvez maintenant monter un appareil photo<br />
ou une longue-vue sur la monture Piggyback. Pour<br />
cela, repérez le trou de montage fileté situé sur la partie<br />
inférieure de votre appareil photo ou longue-vue.<br />
Mettez l’appareil photo ou la longue-vue sur<br />
l’adaptateur Piggyback et vissez le boulon de 1/4 – 20,<br />
puis serrez.<br />
aVertIssement : sI V o u s r e t I r e z la m o n t u r e<br />
PIg g y b a C k, n e r e V I s s e z Pa s à f o n d l e s V I s d a n s<br />
la Cellule a r r I è r e d u t é l e s C o P e. le s V I s s o n t<br />
s u f f Is a m m e n t l o n g u e s P o u r g ê n e r le m o u V e m e n t ,<br />
V o Ir e m ê m e a b î m e r le mIroIr P r I m a I r e.<br />
2835 Columbia Street • Torrance, CA 90503 U.S.A.<br />
Téléphone : 310.328.9560 • Fax: 310.212.5835<br />
©2010 <strong>Celestron</strong><br />
Tous droits réservés. • Imprimé en Chine • 08-10<br />
Platine<br />
d’adaptateur<br />
Monture Piggyback<br />
Trous C11<br />
Fi g u r e 3 – Av e c A d A p tAt e u r pi g g y bA c k, plAtiNe A d A p tAt r i c e<br />
p o u r c11/c14<br />
Platine<br />
d’adaptateur<br />
t<br />
Trous C14<br />
Adaptateur<br />
Piggyback<br />
ga r a n t Ie : ga r a n t Ie lImItée d’u n a n.<br />
t<br />
t<br />
t<br />
t<br />
Fi g u r e 4 – Av e c l’A d A p tAt e u r pi g g y bA c k, plAtiNe d’A d A p tAt e u r<br />
p o u r c11/c14<br />
VeuIllez C o n s u lt e r le sIte w e b <strong>Celestron</strong> P o u r d e s In f o r m at Io n s détaIllées s u r<br />
t o u s les a C C e s s o Ir e s <strong>Celestron</strong> s u r w w w .<strong>Celestron</strong>.C o m.<br />
Le design et les spécifications du produit sont sujets à des<br />
modifications sans notification préalable.<br />
Conçu et destiné aux personnes âgées de 13 ans et plus.<br />
t<br />
t<br />
t
Mo n ta j e Pi g g y b a c k – Pa r a t o d o s<br />
l o s M o d e l o s sct<br />
Manual de instrucciones<br />
artículo nº 93609<br />
El montaje Piggyback de <strong>Celestron</strong> es un estupendo<br />
accesorio para todos los observadores interesados en la<br />
astrofotografía del firmamento profundo. Este adaptador<br />
ha sido especialmente diseñado para poder colocar su<br />
cámara encima de cualquier telescopio SCT/ EdgeHD de<br />
<strong>Celestron</strong>. Cuando se utiliza con un modelo NexStar SE, el<br />
adaptador puede permanecer montado mientras que se<br />
utiliza el telescopio buscador StarPointer para la alineación<br />
del telescopio.<br />
In s ta l a c Ió n: Pa r a m o d e l o s d e 127, 152, 203 y 235 m m (5, 6, 8 y 9,25 P u l g.)<br />
1. Quite los dos tornillos del elemento posterior del tubo<br />
del telescopio que se conecta al telescopio buscador<br />
StarPointer.<br />
2. Alinear las ranuras del montaje Piggyback con los<br />
orificios del elemento posterior del telescopio.<br />
3. Para los modelos NexStar SE: Colocar el StarPointer<br />
encima del adaptador piggyback de forma que los<br />
orificios del soporte del StarPointer estén encima de los<br />
del adaptador. (Quizás sea más fácil quitar primero el<br />
StarPointer de su soporte).<br />
4. Insertar los tornillos de tamaño apropiado que vienen<br />
con el adaptador en los orificios, apretándolos hasta<br />
que el adaptador esté ajustado sobre el elemento<br />
posterior.<br />
5. Ya está listo para montar una cámara o telescopio<br />
encima del montaje piggyback. Para hacer esto, busque<br />
el orificio de montaje roscado en la parte inferior de su<br />
cámara o telescopio. Coloque la cámara o telescopio<br />
en la parte superior del adaptador piggyback y enrosque<br />
y apriete el perno de 1/4 – 20.<br />
Perno de<br />
montaje ¼<br />
pulg. x20<br />
Fi g u r a 1 – ad a p ta d o r pi g g y b a c k s o b r e NXse Fi g u r a 2 – co N e l a d a p ta d o r pi g g y b a c k, sta rpo iN t e r<br />
t<br />
y ca m e r a m o N ta d o s<br />
t<br />
ESPAÑOL<br />
Con el montaje Piggyback vienen los siguientes artículos<br />
• Ensamblaje del montaje Piggyback<br />
• Placa del adaptador (para SCT de 274 y 355 mm<br />
[11 y 14 pulg.])<br />
• Dos tornillos de montaje M4 x 16 mm para telescopios<br />
6 SE<br />
• Dos tornillos de montaje 8x32 x 5/8 pulgadas para<br />
telescopios 5 SE, 203 y 235 mm (8 y 9,25 pulg.)<br />
• Dos tornillos de montaje 8x32 x 7/8 pulgadas para<br />
C11 y C14<br />
Adaptador<br />
Piggyback<br />
t<br />
Telescopio<br />
buscador<br />
StarPointer
In s ta l a c Ió n: Pa r a m o d e l o s c11 y c14<br />
1. Quite los dos tornillos del elemento posterior del tubo<br />
del telescopio (opuestos a la posición de su telescopio<br />
buscador).<br />
2. Alinee las ranuras de la placa del adaptador con los<br />
orificios del elemento posterior del telescopio.<br />
3. Inserte los tornillos de 8x32 x 7/8 pulgadas en los<br />
orificios de la placa del adaptador y enrósquelos dentro<br />
del elemento posterior.<br />
4. Para telescopios c11: Coloque el adaptador Piggyback<br />
encima de la placa del adaptador de forma que los<br />
orificios del adaptador Piggyback estén alineados<br />
con los dos orificios más a la izquierda (al estar detrás<br />
del elemento posterior del telescopio). Utilizando<br />
estos orificios, asegúrese de que su cámara esté<br />
nivelada cuando se coloque en la plataforma de<br />
montaje del adaptador.<br />
5. Para telescopios c14: Coloque el adaptador Piggyback<br />
encima de la placa del adaptador de forma que los<br />
orificios del adaptador Piggyback estén alineados<br />
con los dos orificios más a la derecha (al estar detrás<br />
del elemento posterior del telescopio). Utilizando<br />
estos orificios, asegúrese de que su cámara esté<br />
nivelada cuando se coloque en la plataforma de<br />
montaje del adaptador.<br />
6. Inserte los tornillos de 8x32 x 5/8 pulgadas en los<br />
orificios del adaptador Piggyback y enrósquelos dentro<br />
de los orificios de la placa del adaptador.<br />
7. Ya está listo para montar una cámara o telescopio<br />
encima del montaje piggyback. Para hacer esto, busque<br />
el orificio de montaje roscado en la parte inferior de su<br />
cámara o telescopio. Coloque la cámara o telescopio en<br />
la parte superior del adaptador del piggyback y<br />
enrosque y apriete el perno de 1/4 – 20.<br />
adVertencIa: sI q u Ita el m o n ta j e PIg g y b a c k,<br />
n o e n r o q u e d e n u e V o l o s t o r n Il l o s d e l t o d o en el<br />
elemento P o s t e r Io r d e l telescoPIo. lo s t o r n Il l o s<br />
s o n sufIcIentemente l a r g o s c o m o Pa r a ImPedIr el<br />
m o V Im Ie n t o y PosIblemente d a ñ a r el esPejo P r In c I Pa l.<br />
2835 Columbia Street • Torrance, CA 90503 U.S.A.<br />
Teléfono: 310.328.9560 • Fax: 310.212.5835<br />
©2010 <strong>Celestron</strong><br />
Todos los derechos reservados. • Impreso en China 08-10<br />
Placa del<br />
adaptador<br />
Orificios del C14<br />
Placa del<br />
adaptador<br />
t<br />
Montaje<br />
Piggyback<br />
Fi g u r a 3 – co N e l a d a p ta d o r pi g g y b a c k,<br />
p l a c a d e l a d a p ta d o r pa r a c11/c14<br />
Adaptador<br />
PiggyBack<br />
ga r a n t í a: ga r a n t í a lImItada d e u n a ñ o.<br />
t<br />
t<br />
t<br />
t<br />
Fi g u r a 4 – co N e l a d a p ta d o r pi g g y b a c k,<br />
p l a c a d e l a d a p ta d o r pa r a c11/c14<br />
co n s u lt e el sItIo Web d e celestron W W W .celestron.c o m Pa r a obtener<br />
In f o r m a c Ió n d e ta l l a d a s o b r e t o d o s s u s a c c e s o r Io s.<br />
t<br />
t<br />
t<br />
Orificios<br />
del C11<br />
El diseño y las especificaciones del producto están sujetos a<br />
cambio sin previo aviso.<br />
Diseñado para edades de 13 años en adelante.
Huc k e pa c k-Mo n t i e r u n g –<br />
f ü r alle Sct-te l e S k o p e<br />
Die <strong>Celestron</strong> Huckepack-Montierung ist ein nützliches<br />
Zubehörteil für alle Beobachter, die an Deep-Sky-<br />
Astrofotografie interessiert sind. Dieser speziell entwickelte<br />
Adapter ermöglicht den Aufsatz einer Kamera oben auf<br />
allen <strong>Celestron</strong> SCT/EdgeHDTeleskopen. Bei Verwendung<br />
mit einem NexStar SE-Modell kann der Adapter installiert<br />
und das StarPointer-Sucherfernrohr trotzdem noch für die<br />
Teleskopausrichtung verwendet werden.<br />
IBedIenungsanleItung<br />
art.-nr. 93609<br />
InstallatIon – Fü r 5, 6, 8 u n d 9,25 Zo l l Modelle<br />
1. Entfernen Sie die beiden Schrauben an der rückwärtigen<br />
Zelle des Teleskoptubus, mit denen das StarPointer<br />
Sucherfernrohr befestigt ist.<br />
2. Richten Sie die Langlöcher an der Huckepack-<br />
Montierung mit den Öffnungen an der hinteren Zelle<br />
des Teleskops aus.<br />
3. Für NexStar SE-Modelle: Setzen Sie das StarPointer-<br />
Sucherfernrohr oben auf den Huckepack-Adapter, so<br />
dass die Öffnungen an der StarPointer-Halterung<br />
mit den Öffnungen am Adapter überlappen. (Es ist u.U.<br />
einfacher, das StarPointer-Sucherfernrohr zuerst von<br />
seiner Halterung abzunehmen).<br />
4. Stecken Sie die mit dem Adapter mitgelieferten<br />
Schrauben der richtigen Größe durch die Löcher und<br />
ziehen Sie sie an, bis der Adapter direkt an der hinteren<br />
Zelle anliegt.<br />
5. Nun kann die Kamera oder das Spotting-Scope oben<br />
auf der Huckepack-Montierung installiert werden. Dazu .<br />
machen Sie zuerst die Gewindelöcher unten an der<br />
Kamera oder dem Spotting-Scope ausfindig. Setzen<br />
Sie die Kamera oder das Spotting-Scope oben auf den<br />
Huckepack-Adapter und schrauben Sie die ¼ -20<br />
Schraube fest.<br />
¼ Zoll x 20<br />
Befestigungsschraube<br />
Ab b. 1 – Hu c k e pA c k-AdApter A n nXSe Ab b. 2 – Mit A u f g e S e t z t e M Hu c k e pA c k-AdApter,<br />
t<br />
StA rpo i n t e r u n d kA M e r A<br />
t<br />
DEUTSCH<br />
Im Lieferumfang der Huckepack-Montierung sind folgende<br />
Teile enthalten:<br />
• Huckepack-Montierung<br />
• Adapterplatte (für 11-Zoll- und 14-Zoll-SCT)<br />
• Zwei - M4 x 16 mm Befestigungsschrauben für<br />
6 SE-Teleskope<br />
• Zwei – 8 x 32 x 5/8 Zoll Befestigungsschrauben für<br />
5 SE-, 8-Zoll- und 9,25-Zoll-Teleskope<br />
• Zwei - 8 x 32 x 7/8 Zoll Befestigungschrauben für<br />
C11 und C14<br />
• Two – 8-32 x 7/8” Mounting Screws for C11 and C14<br />
Huckepack-<br />
Adapter<br />
t<br />
StarPointer-<br />
Sucherfernrohr
InstallatIon – Fü r C11- u n d C14-Modelle<br />
1. Entfernen Sie die beiden Schrauben auf der hinteren<br />
Zelle des Teleskoptubus (gegenüber der Position des<br />
Sucherfernrohrs).<br />
2. Richten Sie die Langlöcher an der Adapterplatte mit den<br />
Öffnungen an der hinteren Zelle des Teleskops aus.<br />
3. Stecken Sie die 8 x 32 x 7/8 Zoll Schrauben durch die<br />
Löcher in der Adapterplatte und schrauben Sie sie in die<br />
hintere Zelle.<br />
4. Für C11-Teleskope – Setzen Sie den Huckepack<br />
Adapter so oben auf die Adapterplatte, dass die Löcher<br />
im Huckepack-Adapter mit den beiden äußerst linken<br />
Löchern (wenn Sie hinter der hinteren Zelle des<br />
Teleskops stehen) ausgerichtet sind. Stellen Sie<br />
mit Hilfe dieser Löcher sicher, dass Ihre Kamera<br />
waagerecht ist, wenn sie auf der Montageplattform des<br />
Adapters platziert wird.<br />
5. Für C14-Teleskope – Setzen Sie den Huckepack-<br />
Adapter so oben auf die Adapterplatte, dass die Löcher<br />
im Huckepack-Adapter mit den beiden äußerst rechten<br />
Löchern (wenn Sie hinter der hinteren Zelle des<br />
Teleskops stehen) ausgerichtet sind. Stellen Sie mit Hilfe<br />
dieser Löcher sicher, dass Ihre Kamera waagerecht ist,<br />
wenn sie auf der Montageplattform des Adapters<br />
platziert wird.<br />
6. Stecken Sie die 8 x 32 x 5/8 Zoll Schrauben durch die<br />
Löcher im Huckepack-Adapter und schrauben Sie sie in<br />
die Löcher an der Adapterplatte.<br />
7. Nun kann die Kamera oder das Spotting-Scope oben<br />
auf der Huckepack-Montierung installiert werden. Dazu<br />
machen Sie zuerst die Gewindelöcher unten an der<br />
Kamera oder dem Spotting-Scope ausfindig. Setzen<br />
Sie die Kamera oder das Spotting-Scope oben auf den<br />
Huckepack-Adapter und schrauben Sie die ¼ -20<br />
Schraube fest.<br />
aCHtunG: sC H r a u b e n sIe d Ie sC H r a u b e n b e I M<br />
en t F e r n e n d e r Hu C k e pa C k-Mo n t Ie r u n G n I C Ht<br />
G a n Z In d Ie H I n t e r e Zelle d e s te l e s k o p s e I n. dIe<br />
sC H r a u b e n s In d so l a n G, d a s s sIe d Ie be w e G u n G d e s<br />
p r I M ä r e n sp I e G e l s b e H I n d e r n u n d I Hn M ö G l I C H e r w e I s e<br />
Z e r b r e C H e n k ö n n t e n.<br />
2835 Columbia Street • Torrance, CA 90503 U.S.A.<br />
Telefon: 310.328.9560 • Fax: 310.212.5835<br />
©2010 <strong>Celestron</strong><br />
Alle Rechte vorbehalten. • Gedruckt in China • 08-10<br />
Adapterplatte<br />
C14 Öffnungen<br />
Huckepack-<br />
Montierung<br />
C11<br />
Öffnungen<br />
Ab b. 3 – Mit Hu c k e pA c k-AdApter, AdApterplAtte f ü r c11/c14<br />
Huckepack-Adapter<br />
Adapterplatte<br />
t<br />
t<br />
t<br />
t<br />
t<br />
t<br />
Ab b. 4 – Mit Hu c k e pA c k-AdApter, AdApterplAtte f ü r c11/c14<br />
Ga r a n t Ie: eIn G e s C H r ä n k t e eIn-JaHres-Ga r a n t Ie.<br />
au F d e r <strong>Celestron</strong>-we b s It e w w w .<strong>Celestron</strong>.C o M F In d e n sIe detaIllIerte<br />
In F o r M at Io n e n Z u M koMpletten <strong>Celestron</strong>-Zu b e H ö r.<br />
Produktdesign und Spezifikationen können ohne vorherige<br />
Mitteilung geändert werden.<br />
Für Benutzer von mindestens 13 Jahren entwickelt und bestimmt.<br />
t<br />
t
Mon tat u r a Pi g g y b a c k Pe r tu t t i gl i Sct<br />
La montatura Piggyback di <strong>Celestron</strong> è un accessorio<br />
importante per tutti coloro che sono interessati alla<br />
fotografia astrale nel cielo profondo. Questo adattatore è<br />
stato specificamente concepito per montare la fotocamera<br />
sulla parte superiore di qualsiasi telescopio <strong>Celestron</strong> SCT/<br />
EdgeHD. Quando si usa il modello NexStar SE, l’adattatore<br />
può essere montato mentre si sta utilizzando il<br />
cannocchiale cercatore StarPointer per allineare il telescopio.<br />
Manuale di istruzioni<br />
articolo n. 93609<br />
In s ta l l a z Io n e p e r I modellI d a 5, 6, 8 e 9,25 pollIcI<br />
1. Togliere le due viti sulla cella posteriore del tubo<br />
del telescopio che si collega al cannocchiale cercatore<br />
StarPointer.<br />
2. Allineare i fori a fessura sulla montatura Piggyback con i<br />
fori della cella posteriore del telescopio.<br />
3. Per i modelli NexStar SE: sistemare lo StarPointer sulla<br />
parte superiore dell’adattatore Piggyback in modo che i<br />
fori sulla staffa dello StarPointer si sovrappongano a<br />
quelli sull’adattatore. (Potrebbe essere più facile togliere<br />
prima lo StarPointer dalla sua staffa).<br />
4. Scegliere le viti della misura opportuna in dotazione<br />
all’adattatore e inserirle nei fori serrandole fino a quando<br />
l’adattatore non è in piano con la cella posteriore.<br />
5. A questo punto si è pronti a montare la fotocamera o<br />
lo spotting scope sulla montatura Piggyback. Per farlo,<br />
individuare il foro filettato di montatura sul fondo<br />
della fotocamera o dello spotting scope. Posizionare<br />
la fotocamera o lo spotting scope sopra l’adattatore<br />
Piggyback, avvitare il bullone 1/4 - 20 e serrare.<br />
Bullone di<br />
montaggio<br />
¼ poll. x20<br />
Adattatore<br />
Piggyback<br />
Cannocchiale<br />
cercatore<br />
StarPointer<br />
Fi g u r a 1 – ad at tat o r e Pi g g y b a c k su NXse Fi g u r a 2 – co N a d at tat o r e Pi g g y b a c k sta rPo iN t e r e<br />
F o t o c a m e r a collegati.<br />
t<br />
t<br />
ITALIANO<br />
La montatura Piggyback comprende quanto segue:<br />
• Gruppo della montatura Piggyback<br />
• Piastra adattatore (per SCT da 11 e 14 pollici)<br />
• Due viti di montaggio M4 x 16 mm per i telescopi 6 SE<br />
• Due viti di montaggio 8 x 32 x 5/8 di pollice per i<br />
telescopi 5 SE, 8 e 9,25 pollici<br />
• Due viti di montaggio 8 x 32 x 7/8 di pollice per il C11<br />
e il C14<br />
t
In s ta l l a z Io n e p e r I modellI c11 e c14<br />
1. Togliere le due viti sulla cella posteriore del tubo del<br />
telescopio (in posizione opposta a quella del<br />
cannocchiale cercatore).<br />
2. Allineare i fori a fessura sulla piastra adattatore con i fori<br />
della cella posteriore del telescopio.<br />
3. Inserire le viti 8 x 32 x 7/8 di pollice attraverso i fori sulla<br />
piastra adattatore e avvitarle nella cella posteriore.<br />
4. Per i telescopi C11: posizionare l’adattatore Piggyback<br />
sulla piastra adattatore in modo che i fori sull’adattatore<br />
Piggyback siano allineati con i due fori di estrema<br />
sinistra (guardando da dietro alla cella posteriore del<br />
telescopio). Servirsi dei fori per garantire che la<br />
fotocamera sia in piano quando sarà sistemata sulla<br />
piattaforma di montaggio dell’adattatore.<br />
5. Per i telescopi C14: posizionare l’adattatore Piggyback<br />
sulla piastra adattatore in modo che i fori sull’adattatore<br />
Piggyback siano allineati con i due fori di estrema destra<br />
(guardando da dietro alla cella posteriore del<br />
telescopio). Servirsi dei fori per garantire che la<br />
fotocamera sia in piano quando sarà sistemata sulla<br />
piattaforma di montaggio dell’adattatore.<br />
6. Inserire le viti 8 x 32 x 5/8 di pollice attraverso i fori<br />
sulla piastra Piggyback e avvitarle nei fori della piastra<br />
adattatore.<br />
7. A questo punto si è pronti a montare la fotocamera o lo<br />
spotting scope sulla montatura Piggyback. Per fare<br />
questo, individuare il foro filettato di montatura sul<br />
fondo della fotocamera o dello spotting scope.<br />
Posizionare la fotocamera o lo spotting scope sopra<br />
l’adattatore Piggyback, avvitare il bullone 1/4 - 20<br />
e serrare.<br />
aVVertenza: q u a n d o sI t o g l Ie la m o n tat u r a<br />
pIg g y b a c k n o n r IaV V Ita r e d e l tutto le V It I nella cella<br />
posterIore d e l telescopIo. le V It I s o n o d I lunghezza<br />
ta l e c h e p o s s o n o InterferIre c o n Il m o V Im e n t o e<br />
a n c h e s c h e g g Ia r e lo s p e c c h Io prImarIo.<br />
2835 Columbia Street • Torrance, CA 90503 U.S.A.<br />
Telefono: 310.328.9560 • Fax: 310.212.5835<br />
©2010 <strong>Celestron</strong><br />
Tutti i diritti sono riservati. • Stampato in Cina • 08-10<br />
Piastra<br />
Adattatore<br />
Fori C14<br />
Montatura<br />
Piggyback<br />
Fori C11<br />
Fi g u r a 3 – co N a d at tat o r e Pi g g y b a c k e Piastra a d at tat o r e<br />
P e r c11/c14<br />
Adattatore<br />
PiggyBack<br />
t<br />
Adattatore<br />
PiggyBack<br />
t<br />
t<br />
t<br />
t<br />
Fi g u r a 4 – co N a d at tat o r e Pi g g y b a c k e Piastra a d at tat o r e<br />
P e r c11/c14<br />
ga r a n z Ia: g a r a n z Ia l Im Itata d I u n a n n o.<br />
per In f o r m a z Io n I dettaglIate su tuttI g l I a c c e s s o r I celestron,<br />
c o n s u lta r e Il sIto Web d I celestron a l l’IndIrIzzo W W W .celestron.c o m.<br />
t<br />
La progettazione e i dati tecnici del prodotto sono soggetti<br />
a cambiamenti senza preavviso.<br />
Progettato e concepito per persone di almeno 13 anni di età.<br />
t<br />
t
![Guía para realizar un ensablaje rápido [continuación] - Celestron](https://img.yumpu.com/14596837/1/190x245/guia-para-realizar-un-ensablaje-rapido-continuacion-celestron.jpg?quality=85)