••ESEC/new/Manuale ES - HERTZ by Elettromedia
••ESEC/new/Manuale ES - HERTZ by Elettromedia
••ESEC/new/Manuale ES - HERTZ by Elettromedia

Create successful ePaper yourself
Turn your PDF publications into a flip-book with our unique Google optimized e-Paper software.
<strong>ES</strong> 165<br />
<strong>ES</strong> 200<br />
<strong>ES</strong> 250<br />
<strong>ES</strong> 250 D*<br />
D mm<br />
Xmax mm<br />
Re ohm<br />
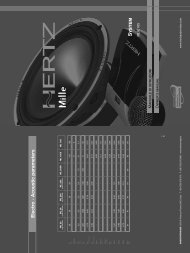
Electro - Acoustic parameters<br />
Fs Hz<br />
Le mH@1kHz<br />
Le mH@10kHz<br />
Vas lit<br />
128 9 2,9 34,8 2,05 0,95 11,40 52,4 0,40 9,43 0,34 0,37 3,40 91<br />
165 9 2,7 47,0 2,42 1,11 7,86 89,9 0,12 10,89 0,52 0,62 3,46 91<br />
210 9 2,6 26,9 2,42 1,11 55,40 105,8 0,33 10,60 0,37 0,41 3,23 93<br />
210 9 1,8 31,0 1,18 0,53 43,42 100,7 0,26 7,93 0,48 0,56 3,50 96<br />
<strong>ES</strong> 300 258 9 2,9 28,2 2,66 1,17 89,40 151,2 0,21 13,46 0,38 0,43 3,45 94<br />
<strong>ES</strong> 300 D* 258 9 1,8 30,2 1,31 0,56 85,57 137,3 0,20 9,91 0,42 0,49 3,36 97<br />
<strong>ES</strong> 380 325 9 2,9 24,2 2,63 1,14 183,00 240,4 0,18 13,28 0,52 0,60 3,93 95<br />
<strong>HERTZ</strong> is manufactured <strong>by</strong><br />
62018 Potenza Picena (MC) Italy - Tel. +39 0733 870870 - Fax +39 0733 870880 - www.elettromedia.it<br />
Mms gr<br />
Cms mm/N<br />
* I valori sono forniti con le bobine collegate in parallelo<br />
* Values are given with coils in parallel connection<br />
BL T-m<br />
Qts<br />
Qes<br />
Qms<br />
Spl dB<br />
04.4<br />
enerGy<br />
MANUALE DI ISTRUZIONI<br />
OWNER’S MANUAL<br />
SUBWOOFER<br />
<strong>ES</strong> 165<br />
<strong>ES</strong> 200<br />
<strong>ES</strong> 250<br />
<strong>ES</strong> 250 D<br />
<strong>ES</strong> 300<br />
<strong>ES</strong> 300 D<br />
<strong>ES</strong> 380<br />
www.hertzaudiovideo.com
I<br />
Istruzioni<br />
Gentili clienti,<br />
complimenti per aver acquistato un prodotto Hertz ENERGY. La nostra soddisfazione è<br />
il primo requisito cui devono rispondere i nostri prodotti; la stessa soddisfazione di<br />
chiunque voglia vivere l’emozione del car audio.<br />
Questo componente, correttamente installato, sarà in grado di regalarVi momenti di<br />
straordinario piacere d’ascolto e perciò Vi preghiamo di seguire attentamente le istruzioni<br />
di questo manuale, in modo da poter sfruttare appieno le qualità di questi altoparlanti.<br />
La realizzazione di sistemi hi-fi car di alto livello richiede una buona conoscenza delle<br />
problematiche meccaniche ed acustiche delle autovetture; qualora riteneste di non avere<br />
gli attrezzi necessari o l’esperienza richiesta non esitate a contattare un installatore<br />
specializzato. Un’installazione a regola d’arte Vi assicurerà prestazioni entusiasmanti e<br />
coinvolgenti, senza influire sulla sicurezza e l’affidabilità della Vostra autovettura.<br />
Attenzione<br />
I SUBWOOFER <strong>HERTZ</strong> ENERGY SONO IN GRADO DI GENERARE ELEVATISSIME PR<strong>ES</strong>SIONI<br />
SONORE INDISTORTE, MA RICORDATE CHE PROLUNGATE <strong>ES</strong>POSIZIONI AD UN LIVELLO ECC<strong>ES</strong>SIVO<br />
DI PR<strong>ES</strong>SIONE ACUSTICA POSSONO PRODURRE DANNI AL VOSTRO UDITO; UTILIZZATE DUNQUE<br />
EQUILIBRIO E BUON SENSO NELL’ASCOLTO.<br />
In ogni situazione dovreste essere in grado di udire i rumori esterni e quelli del vostro<br />
veicolo, per affrontare prontamente situazioni di emergenza; la sicurezza durante la<br />
marcia deve restare sempre al primo posto.<br />
Suggerimenti<br />
Gli altoparlanti Hertz ENERGY <strong>ES</strong> sono stati progettati per integrare la propria<br />
risposta acustica con quella degli abitacoli delle moderne autovetture e si prestano<br />
alla perfezione ad installazioni personalizzate e complesse.<br />
L'altoparlante, però, non può essere considerato come un elemento finito: l'impianto<br />
in cui verrà inserito, le modalità di installazione e la taratura del sistema saranno dunque<br />
direttamente responsabili delle prestazioni acustiche complessive e dell'affidabilità<br />
dell’altoparlante stesso. Ogni utilizzo scorretto o non conforme del prodotto può<br />
causare il decadimento della garanzia. Di seguito troverete delle indicazioni utili e nella<br />
maggior parte dei casi esaustive; per ogni dubbio rivolgetevi al vostro rivenditore di fiducia.<br />
Tecnologia<br />
Gli ENERGY SUB della serie <strong>ES</strong> sono progettati per esprimere il massimo delle<br />
prestazioni in casse dedicate con volumi ridottissimi. Hanno parametri elettroacustici<br />
ottimizzati per il funzionamento in ogni tipo di caricamento acustico, sia come tipologia<br />
(chiuso, reflex, simmetrico, etc.) che come ingombro e offrono una straordinaria<br />
versatilità e prestazioni di altissimo livello.<br />
L’impiego di un equipaggio mobile a lunga escursione e del doppio magnete ad<br />
alta intensità di flusso ha consentito di realizzare altoparlanti in grado di sopportare<br />
elevatissime potenze, con una straordinaria musicalità unita ad una dinamica esplosiva.<br />
Le pregiate rifiniture e gli anelli in gomma butilica proteggono gli altoparlanti permettendo<br />
la realizzazione di unità subwoofer dall’aspetto accattivante e aggressivo.<br />
Progetti: vedi pagina Progetti<br />
Per i subwoofer <strong>ES</strong> consigliamo quattro tipologie di caricamento differenti per ingombro,<br />
difficoltà di realizzazione e risultato acustico. Tutti i progetti sono stati ottimizzati tenendo<br />
conto dell’inserimento di un foglio di materiale assorbente come il FONOFORM di<br />
AZ Audiocomp su tutte le pareti interne del box, sia nelle casse chiuse che in quelle reflex.<br />
Nel caso vogliate realizzare una sezione bassi utilizzando più di un altoparlante,<br />
raccomandiamo di montare lo stesso modello di subwoofer e di utilizzare per tutti i<br />
componenti la stessa tipologia di allineamento. Realizzate una serie di box identici, ognuno<br />
dedicato ad un subwoofer o disegnate una struttura unica suddivisa in singoli box.<br />
Connessioni: vedi pagina Connessioni serie-parallelo<br />
Nella linea di subwoofer <strong>ES</strong> sono disponibili modelli a singola bobina e a doppia<br />
bobina. Questa caratteristica permette di aumentare la flessibilità della vostra sezione<br />
subwoofer e di modificare le modalità di connessione ed il numero di altoparlanti per<br />
adattare il carico all’amplificatore di potenza. Solitamente gli amplificatori per uso<br />
car hanno la capacità di aumentare la potenza di uscita con l’abbassarsi del carico;<br />
consigliamo di verificare nei dati dichiarati dal costruttore l’impedenza minima<br />
accettata dall’amplificatore, e di non scendere mai sotto tale dato.<br />
Nel caso dell’utilizzo di due o più altoparlanti nella sezione subwoofer è estremamente<br />
importante utilizzare componenti dello stesso tipo (modello e numero di bobine)<br />
montati nello stesso tipo di configurazione. Nella pagina Connessioni serie - parallelo<br />
sono mostrati differenti combinazioni di collegamento serie, parallelo e misti<br />
serie/parallelo che rispondono alla maggior parte delle esigenze sia per l’impedenza<br />
di carico che per la massima pressione sonora ottenibile. Di seguito le formule che<br />
permettono di calcolare l’impedenza per differenti tipologie di connessione.<br />
Connessioni in serie:<br />
Impedenza totale = Ω Sub 1 + Ω Sub 2 + Ω Sub 3…<br />
Connessioni in parallelo:<br />
Impedenza totale =<br />
1<br />
…<br />
dove “Ω Sub” è l’impedenza<br />
del Subwoofer numero 1 etc. …<br />
1<br />
Ω Sub 1<br />
1<br />
Ω Sub 2<br />
1<br />
Ω Sub 3<br />
Consigli pratici<br />
Nella realizzazione di una cassa acustica per subwoofer è importante tenere conto di<br />
alcuni accorgimenti:<br />
• Ottenere un perfetto accoppiamento meccanico tra l’altoparlante e il box che<br />
lo deve contenere: utilizzate sempre la guarnizione di tenuta tra cestello e piano di<br />
battuta, serrate con decisione le viti seguendo un ordine a croce.<br />
• Utilizzate gli inserti in dotazione per rifinire le sedi delle viti dopo averle serrate.<br />
Vedi pagina Esempi di installazione - Fissaggio<br />
• Tutte le pareti del box devono essere perfettamente incollate e sigillate: a tale<br />
scopo utilizzate colla vinilica di buona qualità in abbondante quantità, distribuita in<br />
modo uniforme sulle superfici di contatto.<br />
• Per la massima tenuta pneumatica può essere utile ripassare tutte le giunzioni<br />
interne con una pasta di colla vinilica e segatura, ad esempio quella ricavata durante<br />
…
I la lavorazione.<br />
• Utilizzate materiali smorzanti come il FONOMAT di AZ Audiocomp nelle pareti<br />
interne, per smorzarne le vibrazioni spurie.<br />
• Costruite il box con materiale rigido e meccanicamente inerte per non vanificare<br />
le prestazioni acustiche del progetto: usate legno truciolare ad alta densità, MDF,<br />
multistrato marino, etc.<br />
• Una volta realizzato un box reflex, effettuate alcune prove di ascolto in abitacolo<br />
modificando la lunghezza del condotto e variando quindi la frequenza di accordo<br />
o la quantità di materiale fonoassorbente presente all’interno. Solo in questo modo si<br />
può avere la certezza di ottenere il miglior risultato acustico secondo i proprio gusti.<br />
Accorciando il condotto o diminuendo la quantità di fonoassorbente la frequenza di<br />
accordo sale e il basso avrà un suono più netto e deciso, viceversa sarà più profondo<br />
ma meno incisivo.<br />
Cablaggio: vedi pagina Dimensionamento del cablaggio<br />
Il cablaggio di potenza riveste un ruolo estremamente importante poiché influenza<br />
direttamente il fattore di smorzamento del sistema; nella tabella allegata potete<br />
trovare una indicazione della sezione del cavo, consigliata in funzione della lunghezza<br />
e della potenza applicata.<br />
Taratura<br />
Una volta realizzato il box e terminata l’installazione in vettura occorre dedicare alcune<br />
attenzioni alla messa a punto dell’impianto e alla taratura dell’amplificazione dedicata:<br />
• Il livello del gain dell’amplificatore dovrebbe essere regolato in modo da mantenere<br />
sempre la sezione di potenza in una zona di funzionamento lineare, senza distorsioni<br />
o saturazioni che potrebbero danneggiare l’altoparlante.<br />
• La frequenza di taglio dovrebbe essere compresa tra gli 80 e i 50 Hz, a seconda<br />
del tipo di allineamento utilizzato (radiazione diretta come Sealed Box e Reflex Box o<br />
indiretta come Asymmetric Bandpass o Double Reflex).<br />
• Utilizzate, se possibile, il filtro subsonico settando la frequenza di taglio nei dintorni<br />
dei 25 Hz.<br />
• Evitate l’utilizzo del loudness o di equalizzazioni in gamma bassa (
GB<br />
Owner’s manual<br />
Dear Customers,<br />
Our compliments for purchasing a product of Hertz ENERGY line. Our satisfaction is<br />
the first requirement our products must meet, the same satisfaction as that of those<br />
who long for the emotion of car audio.<br />
If correctly installed, this component will give you extraordinary listening pleasure.<br />
Please carefully follow the instructions you will find in this manual in order to exploit<br />
these speakers qualities at best.<br />
In order to build high quality, hi-fi car systems, you need to know the cars mechanic<br />
and acoustic problems well; if you think not to have the right tools or the necessary<br />
experience, please contact a specialised installer. A state-of-the-art installation will<br />
insure you thrilling performances without affecting your car safety and reliability.<br />
Caution<br />
<strong>HERTZ</strong> ENERGY SUBWOOFERS CAN GENERATE VERY HIGH UNDISTORTED SOUND<br />
PR<strong>ES</strong>SURE. LONG EXPOSURE TO EXC<strong>ES</strong>SIVELY HIGH SOUND PR<strong>ES</strong>SURE LEVEL MAY DAMAGE<br />
YOUR HEARING; THEREFORE, PLEASE USE COMMON SENSE AND PRATICE SAFE SOUND.<br />
In order to promptly face possible emergency situations, you should always be able<br />
to hear the noise generated <strong>by</strong> your car or coming from the outside; safety must<br />
be at the first place while driving.<br />
Recommendations<br />
Hertz ENERGY <strong>ES</strong> speakers were designed to integrate their acoustic response<br />
with the latest cars compartment response; therefore, they are perfectly suitable to<br />
customised, complex installations.<br />
Let us remind you that the speaker is not a complete element: the system it is<br />
used into, the way it is installed and the system tuning will directly affect acoustic<br />
performances and reliability. The speaker warranty is void if the product is used<br />
in wrong or improper ways. Below, you will find some useful tips; please contact<br />
your dealer for any doubts.<br />
Technology<br />
ENERGY <strong>ES</strong> subwoofers were designed to work at best when used in very<br />
small boxes. Their electro-acoustic parameters are optimised for employing them<br />
in whatever enclosures, both in terms of typology (sealed box, reflex, bandpass,<br />
etc.) and of size, and for insuring extraordinary versatility and performances.<br />
The use of long excursion mobile voice coil and of the high flux intensity double<br />
magnet permitted to build subwoofers that can stand very high powers with<br />
outstanding musicality and bursting dynamics.<br />
Their finishings and their butyl rubber rings protect them and make them look<br />
young and aggressive.<br />
Find your box (see page Find your box)<br />
We recommend four configurations for <strong>ES</strong> subwoofers, with different size requirements,<br />
complexity and acoustic results.<br />
All projects were optimised considering the use of a panel of absorbing material, like<br />
AZ audiocomp FONOFORM, onto all internal walls, both in sealed and reflex enclosures.<br />
If you want to create a bass section <strong>by</strong> using several speakers, we recommend you<br />
to use the same subwoofer model and the same type of box. Build some equal boxes,<br />
one for every subwoofer, or design a single structure divided in different boxes.<br />
Connecting your subwoofer (see page Connecting your subwoofer)<br />
<strong>ES</strong> series offers single voice coil and double voice coil subwoofers. This permits<br />
you to have a more flexible subwoofer section, to change the way speakers are<br />
connected and their number, in order to make load suitable to the amplifier.<br />
Usually, car amplifiers power output increases when load decreases. Among the<br />
manufacturer’s specifications, please check the minimum impedance the amplifier<br />
accepts and don’t go below it.<br />
When using two or more speakers in the subwoofer section, it is extremely important<br />
to employ drivers of the same type (model and number of voice coils), installed<br />
in the same type of box. We herewith show different combinations of connection in<br />
series, in parallel and mixed (in series - in parallel), which meet most needs in terms<br />
of load impedance and maximum sound pressure. Below, please find the formulas<br />
for calculating impedance according to the type of connection.<br />
Connections in series<br />
Total impedance = Ω Sub 1 + Ω Sub 2 + Ω Sub 3…<br />
Connections in parallel<br />
Total impedance =<br />
1<br />
…<br />
where “Ω Sub” is the impedance<br />
of Subwoofer number 1 etc. …<br />
1<br />
Ω Sub 1<br />
1<br />
Ω Sub 2<br />
1<br />
Ω Sub 3<br />
Practical recommendations<br />
When building your subwoofer box, you’d better care for some details:<br />
• You need to get a perfect match between the speaker and the box it has to be<br />
put into; always use a gasket between basket and mounting surface, fasten screws<br />
gradually and simultaneously.<br />
• Use the rubber inserts given with the subwoofer in order to cosmetically<br />
complete the screws housing after fastening them. See page Installation patterns -<br />
Mounting.<br />
• The box panels must be perfectly glued and sealed; use a lot of good quality vynil<br />
glue, evenly distributed onto touching surfaces.<br />
• To prevent all breathing, you can put a paste of vynil glue and saw dust (the one<br />
you get while working, for instance) onto all internal joints.<br />
• Use damping materials, like AZ audiocomp FONOMAT, onto internal walls in order<br />
to eliminate vibrations.<br />
• Build your box of rigid, anti-vibration material not to compromise the project<br />
…
GB acoustic performances: use high-density wood, MDF, multilayer sea wood, etc.<br />
• After finishing your reflex box, please test it into your car compartment <strong>by</strong> changing<br />
the port length and, thus, frequency, or the quantity of sound-proof material in<br />
the enclosure. This is the only way to be sure you get the acoustic results you want.<br />
By making the port shorter or decreasing the quantity of sound-proof material,<br />
you increase frequency and get clearer, crisper bass; vice versa, bass will be<br />
deeper but less sharp.<br />
Choosing your cable (see page: Choosing your cable)<br />
Power cables are extremely important since they directly affect the system damping<br />
factor; in the enclosed table, we show cable diameters, which we recommend according<br />
to length and applied power.<br />
Tuning<br />
After finishing your box and installing it into your car, you need to spend some time<br />
to tune your system and calibrate your amplifier:<br />
• The amplifier gain level should be adjusted in order to keep power in a linear<br />
functioning area, without distorsions or saturation that might damage the speaker.<br />
• Cut-off frequency should be between 80 and 50 Hz, according to the configuration<br />
you use (direct emission like Sealed Box and Reflex Box or indirect emission like<br />
Asymmetric Bandpass or Double Reflex).<br />
• If possible, use subsonic filter <strong>by</strong> setting its cut-off frequency around 25 Hz.<br />
• Avoid to use loudness or equalisers at low frequencies (
Avvertenze - Warning Progetti / Find your HX 200 box<br />
I disegni dei box riportati nel manuale sono semplicemente indicativi.<br />
E' possibile progettare i box utilizzando soluzioni o geometrie differenti.<br />
In ogni caso in fase di progettazione ricordate di:<br />
• Utilizzare almeno una parete inclinata, per adattare il box al posizionamento in abitacolo,<br />
per risolvere problemi di ingombro e per diminuire le risonanze interne al box.<br />
• Calcolare nel computo dei volumi l'ingombro dell'altoparlante che non è compreso nei<br />
volumi indicati; se posizionerete l'altoparlante con il magnete dentro la cassa aggiungete<br />
il Total driver displacement al volume della cassa stessa.<br />
• Nel caso dei progetti in Reflex, Asymmetric Bandpass e Doppio Reflex, non aggiungere al<br />
computo del volume totale l’ingombro dei tubi e dei condotti di accordo, ma solo il volume<br />
del tipo di supporto utilizzato; es.: la tavola di legno nel caso del Condotto Reflex (Reflex Port).<br />
• Evitare di posizionare la parete posteriore del box in prossimità del fondello dell’altoparlante.<br />
Rispettate una distanza minima di 5 cm per non alterare il corretto funzionamento del foro<br />
di ventilazione posteriore dell’altoparlante (vedi pagina Esempi di installazione - Distanza<br />
dal fondo).<br />
• Utilizzare del materiale fonoassorbente come il FONOFORM di AZ Audiocomp su tutte le<br />
pareti interne di tutti i volumi.<br />
• Nel caso si realizzi una cassa con accordo reflex tenete presente che la vicinanza del tubo<br />
alle pareti interne produce un allungamento virtuale dello stesso, abbassando la frequenza<br />
di accordo: se posizionate il condotto in prossimità di un angolo riducetene la lunghezza<br />
di circa il 30%. Lo stesso prolungamento deve essere utilizzato per la realizzazione di<br />
condotti laminari. Questo tipo di condotto può essere inoltre posizionato in ogni lato della<br />
cassa, per risolvere eventuali esigenze di ingombro.<br />
• La lunghezza dei condotti dichiarata nei vari progetti è comprensiva dell'allungamento<br />
virtuale ed intesa per un montaggio ad angolo dei condotti circolari o per la realizzazione<br />
di condotti laminari.<br />
The boxes drawings you can find in this manual are only some suggestions.<br />
You can design your own boxes <strong>by</strong> using different solutions or geometries.<br />
When designing your box, however, please remind to:<br />
• Use at least one slanted wall in order to make the enclosure fit the car compartment,<br />
solve size problems and decrease the box internal resonances.<br />
• Consider the speaker overall dimensions when calculating volumes since it is not included<br />
in the indicated volumes; if you place the magnet speaker inside the box, add Total driver<br />
displacement to the volume of the box itself.<br />
• Not to add tubes and ports overall dimensions to total volume calculation in case of<br />
Reflex, Asymmetric Bandpass and Double Reflex projects; you only have to add the<br />
volume of the type of support you use (i.e. the wooden panel in case of Reflex Port).<br />
• Avoid to put the box rear panel close to the speaker bottom plate. Place it at least 5 cm<br />
far from it not to affect the correct functioning of the speaker rear vented hole (see page<br />
Installation patterns – Distance from bottom).<br />
• Employ some sound-proof material like AZ audiocomp FONOFORM to cover all the box<br />
internal walls.<br />
• Consider that when building a reflex box, the closer the port is to internal panels, the<br />
longer it virtually seems, lowering frequency; thus, if you place the port next to a corner,<br />
make it 30% shorter approximately. The same extention has to be used when building<br />
rectangular ports. This type of port can be put in every corner of the box in order to solve<br />
possible size problems.<br />
• The ports and tubes length indicated in the projects includes this virtual extension and it<br />
is recommended in order to mount reflex tubes in the corners or to build rectangular ports.<br />
Sealed Box<br />
È il miglior compromesso tra dimensioni e prestazioni, offre una gamma bassa piena e<br />
corposa e una buona dinamica.<br />
It is the best compromise between size and performances; it insures powerful bass and good<br />
dynamics.<br />
Reflex Box<br />
Di dimensioni maggiori del Sealed Box, consente di ottenere una maggiore tenuta in potenza,<br />
con un suono veloce ed esteso.<br />
Bigger than Sealed Box, it permits to have better power handling and fast, wide sound.
Asymmetric Bandpass<br />
Unisce le qualità dei due tipi di caricamento precedenti con un’elevata tenuta in potenza e un<br />
basso veloce e pulito. Indicato con ogni genere musicale.<br />
It combines the qualities of the two previous projects with high power handling and fast, clear bass.<br />
Suitable to any kinds of music.<br />
Double Reflex<br />
Più complesso da realizzare e di maggiori dimensioni. Perfetto per musica elettronica e disco.<br />
It is more difficult to build and bigger. Perfect for techno and disco music.<br />
Condotto Reflex / Reflex Port<br />
Date le dimensioni estremamente ridotte di<br />
questi box in alcuni casi sarà necessario ricorrere<br />
all'utilizzo di un condotto reflex a sezione<br />
costante di cui forniamo l'area della sezione (SP)<br />
e la lunghezza (L).<br />
Considering the extremely small size of these<br />
boxes, sometimes you need to use a constant<br />
section reflex port, of which we provide section<br />
area (SP) and length (L).<br />
Double Reflex<br />
Vb1 = 4 Lit<br />
Fb1 = 85 Hz<br />
Reflex Port* 1<br />
Sp = 36 cm 2<br />
L= 180 mm<br />
Reflex Box<br />
Vb = 7,6 Lit<br />
Fb = 52 Hz<br />
Reflex Tube<br />
Ø= 50 mm<br />
L= 190 mm<br />
Vb2 = 7 Lit<br />
Fb2 = 46 Hz<br />
Reflex Port* 2<br />
Sp = 21,5 cm 2<br />
L= 350 mm<br />
Sealed Box<br />
Vcc = 5 Lit<br />
Fc = 63 Hz<br />
F-3 = 60 Hz<br />
Asymmetric Bandpass<br />
Vcc = 3,5 Lit Vb = 4 Lit<br />
Fb = 75 Hz<br />
Reflex Port*<br />
Sp = 32,5 cm 2<br />
L= 280 mm<br />
<strong>ES</strong> 165<br />
*Vedi pagina Condotto Reflex. See page Reflex Port.
<strong>ES</strong> 200<br />
Sealed Box<br />
Vcc = 15 Lit<br />
Fc = 53 Hz<br />
F-3 = 45 Hz<br />
Asymmetric Bandpass<br />
Vcc = 7 Lit Vb = 11 Lit<br />
Fb = 68 Hz<br />
Reflex Tube<br />
Ø= 82 mm<br />
L= 180 mm<br />
Reflex Box<br />
Vb = 19,5Lit<br />
Fb = 37 Hz<br />
Reflex Tube<br />
Ø= 62 mm<br />
L= 260 mm<br />
Double Reflex<br />
Vb1 = 9 Lit<br />
Fb1 = 83 Hz<br />
Reflex Tube 1<br />
Ø= 82 mm<br />
L= 140 mm<br />
Vb2 = 16 Lit<br />
Fb2 = 44 Hz<br />
Reflex Tube 2<br />
Ø= 62 mm<br />
L= 190 mm<br />
Double Reflex<br />
Vb1 = 16 Lit<br />
Fb1 = 75 Hz<br />
Reflex Tube 1<br />
Ø= 100 mm<br />
L= 145 mm<br />
Vb2 = 20 Lit<br />
Fb2 = 40 Hz<br />
Reflex Tube 2<br />
Ø= 62 mm<br />
L= 160 mm<br />
Reflex Box<br />
Vb = 28 Lit<br />
Fb = 27 Hz<br />
Reflex Tube<br />
Ø= 62 mm<br />
L= 260 mm<br />
Sealed Box<br />
Vcc = 20 Lit<br />
Fc = 43 Hz<br />
F-3 = 38 Hz<br />
Asymmetric Bandpass<br />
Vcc = 8 Lit Vb = 19 Lit<br />
Fb = 65 Hz<br />
Reflex Tube<br />
Ø= 100 mm<br />
L= 200 mm<br />
<strong>ES</strong> 250
<strong>ES</strong> 250 D<br />
Sealed Box<br />
Vcc = 23 Lit<br />
Fc = 50 Hz<br />
F-3 = 44 Hz<br />
Asymmetric Bandpass<br />
Vcc = 8 Lit Vb = 19 Lit<br />
Fb = 65 Hz<br />
Reflex Tube<br />
Ø= 82 mm<br />
L= 130 mm<br />
Reflex Box<br />
Vb = 30 Lit<br />
Fb = 30 Hz<br />
Reflex Tube<br />
Ø= 62 mm<br />
L= 220 mm<br />
Double Reflex<br />
Vb1 = 17 Lit<br />
Fb1 = 75 Hz<br />
Reflex Tube 1<br />
Ø= 82 mm<br />
L= 90 mm<br />
Vb2 = 22 Lit<br />
Fb2 = 40 Hz<br />
Reflex Tube 2<br />
Ø= 82 mm<br />
L= 260 mm<br />
Double Reflex<br />
Vb1 = 20 Lit<br />
Fb1 = 76 Hz<br />
Reflex Tube 1<br />
Ø= 100 mm<br />
L= 145 mm<br />
Reflex Box<br />
Vb = 34 Lit<br />
Fb = 28 Hz<br />
Reflex Tube<br />
Ø= 62 mm<br />
L= 270 mm<br />
Vb2 = 30 Lit<br />
Fb2 = 35 Hz<br />
Reflex Tube 2<br />
Ø= 82 mm<br />
L= 310 mm<br />
Sealed Box<br />
Vcc = 25 Lit<br />
Fc = 50 Hz<br />
F-3 = 45 Hz<br />
Asymmetric Bandpass<br />
Vcc = 16 Lit Vb = 25 Lit<br />
Fb = 65 Hz<br />
Reflex Tube<br />
Ø= 100 mm<br />
L= 145 mm<br />
<strong>ES</strong> 300
<strong>ES</strong> 300 D<br />
Sealed Box<br />
Vcc = 28 Lit<br />
Fc = 57 Hz<br />
F-3 = 50 Hz<br />
Asymmetric Bandpass<br />
Vcc = 20 Lit Vb = 25 Lit<br />
Fb = 64 Hz<br />
Reflex Tube<br />
Ø= 100 mm<br />
L= 145 mm<br />
Reflex Box<br />
Vb = 36 Lit<br />
Fb = 30 Hz<br />
Reflex Tube<br />
Ø= 62 mm<br />
L= 200 mm<br />
Double Reflex<br />
Vb1 = 20 Lit<br />
Fb1 = 74 Hz<br />
Reflex Tube 1<br />
Ø= 100 mm<br />
L= 94 mm<br />
Vb2 = 33 Lit<br />
Fb2 = 34 Hz<br />
Reflex Tube 2<br />
Ø= 82 mm<br />
L= 275 mm<br />
Reflex Box<br />
Vb = 60 Lit<br />
Fb = 25 Hz<br />
Double Reflex<br />
Vb1 = 25 Lit<br />
Fb1 = 75 Hz<br />
Reflex Tube 1<br />
Ø = 2 x100 mm<br />
L= 160 mm<br />
Reflex Tube<br />
Ø= 82 mm<br />
L= 290 mm<br />
Vb2 = 50 Lit<br />
Fb2 = 36 Hz<br />
Reflex Tube 2<br />
Ø = 100 mm<br />
L= 215 mm<br />
Sealed Box<br />
Vcc = 40 Lit<br />
Fc = 50 Hz<br />
F-3 = 42 Hz<br />
Asymmetric Bandpass<br />
Vcc = 25 Lit Vb = 35 Lit<br />
Fb = 65 Hz<br />
Reflex Tube<br />
Ø = 2 x 82 mm<br />
L= 145 mm<br />
<strong>ES</strong> 380
Connessioni serie - parallelo / Connecting your subwoofer<br />
Serie / Series<br />
Parallelo / Parallel<br />
SUBWOOFER A<br />
SINGOLA BOBINA<br />
SINGLE VOICE<br />
COIL SUBWOOFER<br />
<strong>ES</strong> 165<br />
<strong>ES</strong> 200<br />
<strong>ES</strong> 250<br />
<strong>ES</strong> 300<br />
<strong>ES</strong> 380<br />
Misto / Mixed<br />
Serie / Series<br />
SUBWOOFER<br />
A DOPPIA BOBINA<br />
DOUBLE VOICE<br />
COIL SUBWOOFER<br />
<strong>ES</strong> 250 D<br />
<strong>ES</strong> 300 D<br />
Parallelo<br />
/ Parallel<br />
Misto / Mixed
Esempi di connessione / Connection patterns<br />
5 ] Collegamento<br />
elettrico<br />
in controfase<br />
Electric<br />
connection<br />
out of phase<br />
4 ] Collegamento<br />
elettrico in fase<br />
Electric<br />
connection<br />
in phase<br />
Esempi di installazione / Installation patterns<br />
1 ] Posizionamento<br />
Placement<br />
Inserti in<br />
gomma<br />
Rubber<br />
inserts<br />
3 ] Distanza<br />
dal fondo<br />
Distance<br />
from bottom<br />
2 ] Fissaggio<br />
Mounting
Dimensionamento del cablaggio / Choosing your cable Technical specifications<br />
Potenza applicata/Applied power<br />
Lunghezza del collegamento/Connection length<br />
La tavola si riferisce alla potenza continua su un carico di 4 ohm.<br />
Qualora il carico scenda si dovranno aumentare proporzionalmente<br />
le dimensioni del cavo.<br />
The table refers to continuous power with 4 Ohm load.<br />
If load decreases, the cable size needs to be proportionally increased.<br />
Diametro del cavo/Cable diameter<br />
Component<br />
Size<br />
Power<br />
Handling<br />
(Watt)<br />
Impedance<br />
Frequency<br />
response<br />
Sensitivity<br />
Outer<br />
diameter<br />
peak<br />
mm<br />
Ohm<br />
Hz<br />
dB/SPL<br />
mm<br />
Mounting mm<br />
hole diameter<br />
Magnet size mm<br />
Total depth<br />
mm<br />
Mounting<br />
depth<br />
mm<br />
Total driver<br />
displacement<br />
lit<br />
Weight of one kg<br />
component<br />
Voice<br />
coil diameter<br />
mm<br />
Magnet<br />
Cone<br />
Xmech*<br />
continuous<br />
program<br />
mm<br />
<strong>ES</strong> 165 <strong>ES</strong> 200 <strong>ES</strong> 250 <strong>ES</strong> 250 D <strong>ES</strong> 300 <strong>ES</strong> 300 D<br />
Double coil<br />
Double coil<br />
Subwoofer Subwoofer Subwoofer<br />
Subwoofer<br />
Subwoofer Subwoofer<br />
Subwoofer<br />
165 200 250 250 300 300 380<br />
(6 1/2 ”) (8”) (10”) (10”) (12”) (12”) (15”)<br />
300 400 500 500 700 700 900<br />
150 200 250 250 350 350 450<br />
4 4 4 4 + 4 4 4 + 4 4<br />
35-600 30-400 28-300 28-300 25-250 25-250 20-200<br />
91 91 93 96 94 97 95<br />
171 214 264 264 312 312 391<br />
144 180 230 230 277 277 348<br />
100 120 120 120 140 140 140<br />
100 115 136 136 146 146 194<br />
90 104 123,5 123,5 132 132 175<br />
0,5 0,9 1,2 1,2 1,8 1,8 2,3<br />
2,29 3,48 3,92 3,94 4,93 4,94 5,86<br />
35 50 50 50 60 60 60<br />
Double<br />
magnet,<br />
High density<br />
ferrite<br />
Double<br />
magnet,<br />
High density<br />
ferrite<br />
Double<br />
magnet,<br />
High density<br />
ferrite<br />
Double coil,<br />
Double<br />
magnet,<br />
High density<br />
ferrite<br />
Double<br />
magnet,<br />
High density<br />
ferrite<br />
Water-repellent, pressed paper cone<br />
Double coil,<br />
Double<br />
magnet,<br />
High density<br />
ferrite<br />
<strong>ES</strong> 380<br />
Double<br />
magnet,<br />
High density<br />
ferrite<br />
14,5 14,5 14,5 14,5 14,5 14,5 14,5<br />
* Xmech massima escursione meccanica: indica il range di movimento in zona di funzionamento lineare<br />
dell’altoparlante, in entrambi i sensi.<br />
maximum mechanic excursion: it indicates the motion range in the speaker linear functioning<br />
area, in both ways.
Note / Notes