

Professional Garnishing Secrets Secrets professionnels ... - US Jesco
Professional Garnishing Secrets Secrets professionnels ... - US Jesco
Professional Garnishing Secrets Secrets professionnels ... - US Jesco

You also want an ePaper? Increase the reach of your titles
YUMPU automatically turns print PDFs into web optimized ePapers that Google loves.
1<br />
3<br />
Moby Melon Melon Moby<br />
Moby Melon<br />
Choose a melon with a long oval shape rather that one that<br />
is round. Cut a thin slice off the bottom of the melon (see<br />
dotted line) to create a flat surface.<br />
Using a wide-tipped marker, draw cutting lines as shown.<br />
Slice the portion to be discarded into quarters, then cut<br />
an “X” through the rind to prevent splitting.<br />
Remove the center section and using a large metal spoon,<br />
scoop out the watermelon meat, leaving a hollow shell.<br />
(Save the center meat.)<br />
Using your food decorator garnishing tool, make even zig zag<br />
cuts all around the edge of the melon as shown. Use a sharp<br />
paring knife to carve the mouth and eyes.<br />
Fill “Moby Melon” with melon balls (cantaloupe, honeydew,<br />
watermelon) and/or mixed fresh fruit.<br />
Melon Moby<br />
Choisir un melon avec une longue forme ovale plutôt qu’un<br />
melon rond. Couper une tranche fine au bas du melon (voir<br />
le trait pointillé) afin de créer une surface plate.<br />
Utiliser un marqueur à grosse pointe, tracer les lignes<br />
telles que montrées. Couper la portion à laisser de côté en<br />
quartiers, couper ensuite un X dans la couenne pour prévenir<br />
qu’elle se fende.<br />
Enlever la section de centre et utiliser une grande cuillère<br />
en métal pour ramasser la chair du melon afin qu’il ne reste<br />
qu’une coquille creuse. (Sauver la chair du centre.)<br />
En utilisant votre instrument de garniture pour décorer les<br />
aliments, faire des coupures en zig zag tout autour du bord du<br />
melon comme montré. Utiliser le couteau d’office affuté pour<br />
sculpter la bouche et les yeux.<br />
Remplir le « Melon de Moby » avec les boules de melon<br />
(le cantaloup, le melon miel, le melon d’eau) et-ou des fruits<br />
frais mélangés.<br />
11<br />
2<br />
4<br />
1<br />
3<br />
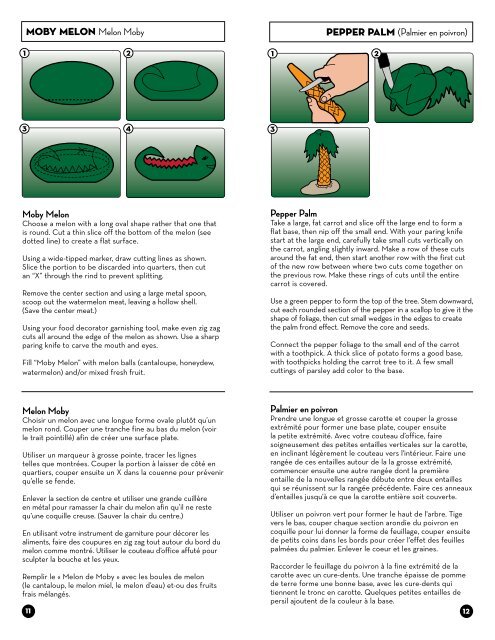
Pepper Palm (Palmier en poivron)<br />
Pepper Palm<br />
Take a large, fat carrot and slice off the large end to form a<br />
flat base, then nip off the small end. With your paring knife<br />
start at the large end, carefully take small cuts vertically on<br />
the carrot, angling slightly inward. Make a row of these cuts<br />
around the fat end, then start another row with the first cut<br />
of the new row between where two cuts come together on<br />
the previous row. Make these rings of cuts until the entire<br />
carrot is covered.<br />
Use a green pepper to form the top of the tree. Stem downward,<br />
cut each rounded section of the pepper in a scallop to give it the<br />
shape of foliage, then cut small wedges in the edges to create<br />
the palm frond effect. Remove the core and seeds.<br />
Connect the pepper foliage to the small end of the carrot<br />
with a toothpick. A thick slice of potato forms a good base,<br />
with toothpicks holding the carrot tree to it. A few small<br />
cuttings of parsley add color to the base.<br />
Palmier en poivron<br />
Prendre une longue et grosse carotte et couper la grosse<br />
extrémité pour former une base plate, couper ensuite<br />
la petite extrémité. Avec votre couteau d’office, faire<br />
soigneusement des petites entailles verticales sur la carotte,<br />
en inclinant légèrement le couteau vers l'intérieur. Faire une<br />
rangée de ces entailles autour de la la grosse extrémité,<br />
commencer ensuite une autre rangée dont la première<br />
entaille de la nouvelles rangée débute entre deux entailles<br />
qui se réunissent sur la rangée précédente. Faire ces anneaux<br />
d’entailles jusqu'à ce que la carotte entière soit couverte.<br />
Utiliser un poivron vert pour former le haut de l'arbre. Tige<br />
vers le bas, couper chaque section arondie du poivron en<br />
coquille pour lui donner la forme de feuillage, couper ensuite<br />
de petits coins dans les bords pour créer l'effet des feuilles<br />
palmées du palmier. Enlever le coeur et les graines.<br />
Raccorder le feuillage du poivron à la fine extrémité de la<br />
carotte avec un cure-dents. Une tranche épaisse de pomme<br />
de terre forme une bonne base, avec les cure-dents qui<br />
tiennent le tronc en carotte. Quelques petites entailles de<br />
persil ajoutent de la couleur à la base.<br />
12<br />
2