
Create successful ePaper yourself
Turn your PDF publications into a flip-book with our unique Google optimized e-Paper software.
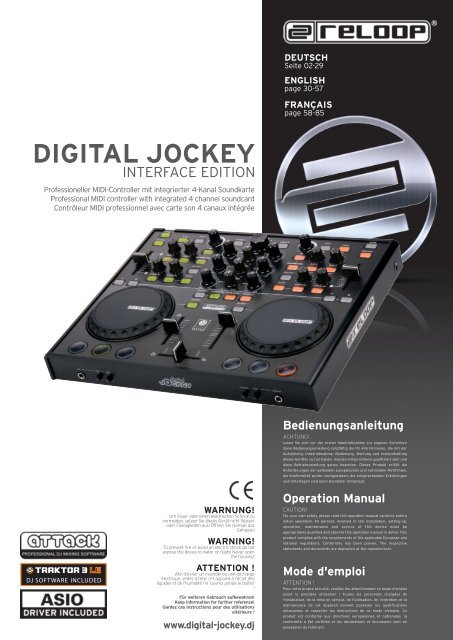
DIGITAL JOCKEY<br />
INTERFACE EDITION<br />
Professioneller MIDI-Controller mit integrierter 4-Kanal Soundkarte<br />
Professional MIDI controller with integrated 4 channel soundcard<br />
Contrôleur MIDI professionnel avec carte son 4 canaux intégrée<br />
WARNUNG!<br />
Um Feuer oder einen elektrischen Schock zu<br />
vermeiden, setzen Sie dieses Gerät nicht Wasser<br />
oder Flüssigkeiten aus! Öffnen Sie niemals das<br />
Gehäuse!<br />
WARNING!<br />
To prevent fire or avoid an electric shock do not<br />
expose the device to water or fluids! Never open<br />
the housing!<br />
ATTENTION !<br />
Afin d'éviter un incendie ou une décharge<br />
électrique, veillez à tenir cet appareil à l'écart des<br />
liquides et de l'humidité ! N´ouvrez jamais le boîtier<br />
!<br />
Für weiteren Gebrauch aufbewahren!<br />
Keep information for further reference!<br />
Gardez ces instructions pour des utilisations<br />
ultérieurs !<br />
www.digital-jockey.dj<br />
<strong>DEUT</strong><strong>SCH</strong><br />
Seite 02-29<br />
ENGLISH<br />
page 30-57<br />
FRANÇAIS<br />
page 58-85<br />
Bedienungsanleitung<br />
ACHTUNG!<br />
Lesen Sie sich vor der ersten Inbetriebnahme zur eigenen Sicherheit<br />
diese Bedienungsanleitung sorgfältig durch! Alle Personen, die mit der<br />
Aufstellung, Inbetriebnahme, Bedienung, Wartung und Instandhaltung<br />
dieses Gerätes zu tun haben, müssen entsprechend qualifiziert sein und<br />
diese Betriebsanleitung genau beachten. Dieses Produkt erfüllt die<br />
Anforderungen der geltenden europäischen und nationalen Richtlinien,<br />
die Konformität wurde nachgewiesen, die entsprechenden Erklärungen<br />
und Unterlagen sind beim Hersteller hinterlegt.<br />
Operation Manual<br />
CAUTION!<br />
For your own safety, please read this operation manual carefully before<br />
initial operation! All persons involved in the installation, setting-up,<br />
operation, maintenance and service of this device must be<br />
appropriately qualified and observe this operation manual in detail. This<br />
product complies with the requirements of the applicable European and<br />
national regulations. Conformity has been proven. The respective<br />
statements and documents are deposited at the manufacturer.<br />
Mode d'emploi<br />
ATTENTION !<br />
Pour votre propre sécurité, veuillez lire attentivement ce mode d'emploi<br />
avant la première utilisation ! Toutes les personnes chargées de<br />
l'installation, de la mise en service, de l'utilisation, de l'entretien et la<br />
maintenance de cet appareil doivent posséder les qualifications<br />
nécessaires et respecter les instructions de ce mode d'emploi. Ce<br />
produit est conforme aux directives européennes et nationales, la<br />
conformité a été certifiée et les déclarations et documents sont en<br />
possession du fabricant.
<strong>DEUT</strong><strong>SCH</strong><br />
2<br />
BEDIENUNGSANLEITUNG<br />
<strong>DEUT</strong><strong>SCH</strong><br />
Wir gratulieren Ihnen zum Kauf des <strong>Reloop</strong> Digital Jockey Interface Edition.<br />
Vielen Dank, dass Sie unserer Diskjockey-Technologie Ihr Vertrauen<br />
schenken. Vor Inbetriebnahme bitten wir Sie, alle Anweisungen sorgfältig zu<br />
studieren und zu befolgen.<br />
Nehmen Sie den <strong>Reloop</strong> Digital Jockey aus der Verpackung. Bitte überprüfen Sie<br />
vor der ersten Inbetriebnahme, ob kein offensichtlicher Transportschaden<br />
vorliegt. Sollten Sie Schäden am Stromkabel oder am Gehäuse entdecken,<br />
nehmen Sie das Gerät nicht in Betrieb und setzen Sie sich bitte mit Ihrem<br />
Fachhändler in Verbindung.<br />
SICHERHEITSHINWEISE<br />
ACHTUNG! Seien Sie besonders vorsichtig beim Umgang mit der<br />
Netzspannung 240 V. Bei dieser Spannung können Sie einen<br />
lebensgefährlichen elektrischen Schlag erhalten! Bei Schäden, die durch<br />
Nichtbeachtung dieser Bedienungsanleitung verursacht werden, erlischt<br />
jeder Gewährleistungsanspruch. Bei Sach- oder Personenschäden, die durch<br />
unsachegemäße Handhabung oder Nichtbeachtung der Sicherheitshinweise<br />
verursacht werden, übernimmt der Hersteller keine Haftung.<br />
- Dieses Gerät hat das Werk in einwandfreiem Zustand verlassen. Um diesen<br />
Zustand zu erhalten und einen gefahrlosen Betrieb sicherzustellen, muss der<br />
Anwender unbedingt die Sicherheitshinweise und die Warnvermerke<br />
beachten, die in dieser Gebrauchsanleitung enthalten sind.<br />
- Aus Sicherheits- und Zulassungsgründen (CE) ist das eigenmächtige<br />
Umbauen und/oder Verändern des Gerätes nicht gestattet. Beachten Sie<br />
bitte, dass Schäden, die durch manuelle Veränderungen an diesem Gerät<br />
verursacht werden, nicht unter den Gewährleistungsanspruch fallen.<br />
- Im Geräteinneren befinden sich keine zu wartenden Teile, ausgenommen die<br />
von außen austauschbaren Verschleißteile. Die Wartung darf nur von<br />
fachkundigem Personal durchgeführt werden, ansonsten verfällt die<br />
Gewährleistung!<br />
- Die Sicherung darf nur gegen Sicherungen des gleichen Typs, der gleichen<br />
Auslösecharakteristik und Nennstromstärke ausgetauscht werden.<br />
- Stellen Sie sicher, dass die Stromversorgung erst nach dem Aufbau des<br />
Gerätes erfolgt. Den Netzstecker immer als letztes einstecken. Vergewissern<br />
Sie sich, dass der Netzschalter auf "OFF" steht, wenn Sie das Gerät ans Netz<br />
anschließen.<br />
- Benutzen Sie nur vorschriftsmäßige Kabel. Achten Sie darauf, dass alle<br />
Stecker und Buchsen fest angeschraubt und richtig angeschlossen sind. Bei<br />
Fragen wenden Sie sich bitte an Ihren Händler.<br />
- Stellen Sie sicher, das beim Aufstellen des Produktes das Netzkabel nicht<br />
gequetscht oder durch scharfe Kanten beschädigt wird.<br />
- Lassen Sie das Netzkabel nicht mit anderen Kabeln in Kontakt kommen!<br />
Seien Sie vorsichtig beim Umgang mit Netzkabeln und -anschlüssen. Fassen<br />
Sie diese Teile nie mit nassen Händen an!<br />
- Stecken Sie das Stromkabel nur in geeignete Schukosteckdosen ein. Als<br />
Spannungsquelle darf dabei nur eine ordnungsgemäße Netzsteckdose des<br />
öffentlichen Versorgungsnetzes verwendet werden.<br />
- Trennen Sie das Gerät bei Nichtbenutzung und vor jeder Reinigung vom<br />
Netz! Fassen Sie dazu den Netzstecker an der Grifffläche an und ziehen Sie<br />
niemals an der Netzleitung!<br />
- Stellen Sie das Gerät auf einer horizontalen und stabilen, schwer<br />
entflammbaren Unterlage auf.<br />
- Vermeiden Sie Erschütterungen und jegliche Gewaltanwendung bei der<br />
Installation oder Inbetriebnahme des Gerätes.<br />
- Achten Sie bei der Wahl des Installationsortes darauf, dass das Gerät nicht<br />
zu großer Hitze, Feuchtigkeit und Staub ausgesetzt wird. Vergewissern Sie<br />
sich, dass keine Kabel frei herumliegen. Sie gefährden Ihre und die Sicherheit<br />
Dritter!
- Stellen Sie keine Flüssigkeitsbehälter, die leicht umfallen können, auf dem<br />
Gerät oder in dessen Nähe ab. Falls doch einmal Flüssigkeit in das<br />
Geräteinnere gelangen sollte, sofort den Netzstecker ziehen. Lassen Sie das<br />
Gerät von einem qualifizierten Servicetechniker prüfen, bevor es erneut<br />
genutzt wird. Beschädigungen, die durch Flüssigkeiten im Gerät<br />
hervorgerufen wurden, sind von der Gewährleistung ausgeschlossen.<br />
- Betreiben Sie das Gerät nicht in extrem heißen (über 35° C) oder extrem<br />
kalten (unter 5° C) Umgebungen. Halten Sie das Gerät von direktem<br />
Sonnenlicht und von Wärmequellen wie Heizkörpern, Öfen, usw. (auch beim<br />
Transport in geschlossenen Wagen) fern. Verdecken Sie niemals vorhandene<br />
Lüfter oder Lüftungsschlitze. Sorgen Sie immer für eine ausreichende<br />
Ventilation.<br />
- Das Gerät darf nicht in Betrieb genommen werden, wenn es von einem kalten<br />
Raum in einen warmen Raum gebracht wurde. Das dabei entstehende<br />
Kondenswasser kann unter Umständen Ihr Gerät zerstören. Lassen Sie das<br />
Gerät solange uneingeschaltet, bis es Zimmertemperatur erreicht hat!<br />
- Regler und Schalter sollten niemals mit Sprühreinigungsmitteln und<br />
Schmiermitteln behandelt werden. Dieses Gerät sollte nur mit einem<br />
feuchten Tuch gereinigt werden, verwenden Sie niemals Lösungsmittel oder<br />
Waschbenzin zum Reinigen.<br />
- Bei Umzügen sollte das Gerät im ursprünglichen Versandkarton<br />
transportiert werden.<br />
- Zu Beginn müssen die Überblendregler und Lautstärkeregler Ihres<br />
Verstärkers auf Minimum eingestellt und die Lautsprecherschalter in "OFF"-<br />
Position geschaltet sein. Vor dem Lauterstellen 8 bis 10 Sekunden warten,<br />
um den durch Einschwingung erzeugten Schroteffekt zu vermeiden, welcher<br />
zu Lautsprecher- und Frequenzweichenschäden führen könnte.<br />
- Geräte, die an Netzspannung betrieben werden, gehören nicht in<br />
Kinderhände. Lassen Sie deshalb in Anwesenheit von Kindern besondere<br />
Vorsicht walten.<br />
- In gewerblichen Einrichtungen sind die Unfallverhütungsvorschriften des<br />
Verbandes der gewerblichen Berufsgenossenschaft zu beachten.<br />
- In Schulen, Ausbildungseinrichtungen, Hobby- oder Selbsthilfewerkstätten<br />
ist das Betreiben des Gerätes durch geschultes Personal verantwortlich zu<br />
überwachen.<br />
- Heben Sie diese Bedienungsanleitung für spätere Fragen und Probleme gut<br />
auf.<br />
BESTIMMUNGSGEMÄßE VERWENDUNG<br />
- Bei diesem Gerät handelt es sich um einen professionellen DJ-MIDI-<br />
Controller mit integrierter Soundkarte mit dem sich Software steuern lässt.<br />
Das Gerät wird dabei mit einem USB-Kabel an den Computer angeschlossen.<br />
- Dieses Produkt ist für den Anschluss an 240 V, 50 Hz Wechselspannung<br />
zugelassen und wurde ausschließlich zur Verwendung in Innenräumen<br />
konzipiert.<br />
- Wird das Gerät anders verwendet als in dieser Bedienungsanleitung<br />
beschrieben, kann dies zu Schäden am Produkt führen und der<br />
Gewährleistungsanspruch erlischt. Außerdem ist jede andere Verwendung<br />
mit Gefahren wie z.B. Kurzschluss, Brand, elektrischem Schlag, etc.<br />
verbunden.<br />
- Die vom Hersteller festgelegte Seriennummer darf niemals entfernt werden,<br />
da ansonsten der Gewährleistungsanspruch erlischt.<br />
<strong>DEUT</strong><strong>SCH</strong><br />
3
<strong>DEUT</strong><strong>SCH</strong><br />
4<br />
WARTUNG<br />
- Überprüfen Sie regelmäßig die technische Sicherheit des Gerätes auf<br />
Beschädigungen des Netzkabels oder des Gehäuses, sowie auf die<br />
Abnutzung von Verschleißteilen wie Dreh- und Schiebereglern.<br />
- Wenn anzunehmen ist, dass ein gefahrloser Betrieb nicht mehr möglich ist,<br />
so ist das Gerät außer Betrieb zu setzten und gegen unbeabsichtigten<br />
Betrieb zu sichern. Netzstecker aus der Steckdose ziehen!<br />
- Es ist anzunehmen, dass ein gefahrloser Betrieb nicht mehr möglich ist,<br />
wenn das Gerät sichtbare Beschädigungen aufweist, das Gerät nicht mehr<br />
funktioniert, nach längerer Lagerung unter ungünstigen Verhältnissen oder<br />
nach schweren Transportbeanspruchungen.<br />
1. ERSTE <strong>SCH</strong>RITTE:<br />
1.1. Hardware Anschluss<br />
Nehmen Sie den <strong>Reloop</strong> Digital Jockey aus der Verpackung und verbinden Sie<br />
das Netzteil mit der DC-Buchse auf der Rückseite des Gerätes.<br />
Schalten Sie das Gerät mittels der Power-Taste ein. Die Load A und Load B Tasten<br />
sollten aufleuchten. Schließen Sie nun das mitgelieferte USB-Kabel mit dem<br />
Controller und einem freien USB-Port Ihres Computers.<br />
Folgende Meldungen sollten beim ersten Anschluss des Digital Jockey, im<br />
Beispiel Windows XP, auf Ihrem Monitor erscheinen:<br />
a) Neue Hardware gefunden – Digital Jockey<br />
b) Neue Hardware gefunden – USB Audio Gerät<br />
c) Neue Hardware gefunden – Die Hardware wurde gefunden und kann jetzt<br />
verwendet werden.<br />
Unter Windows XP, Vista und Mac OS.X wird der Controller automatisch, nach<br />
Plug-N-Play Prinzip, ohne spezielle Treiber, erkannt.<br />
Nun ist Ihre Hardware korrekt mit Ihrem Computer verbunden.<br />
1.2. Peripherie Anschlüsse<br />
Ihr Digital Jockey besitzt ein integriertes professionelles Audio-Interface. Somit<br />
ist eine weitere externe oder integrierte PC-Soundkarte nicht nötig. Im<br />
Folgenden finden Sie eine Auflistung der Anschlüsse, die Sie vornehmen können:<br />
a) Anschluss Output (Geräterückseite)<br />
Hier können Sie Ihre Hauptanlage, beispielsweise Verstärker oder Aktivboxen,<br />
anschließen.<br />
b) Anschluss Input (Geräterückseite)<br />
Hier können Sie ein Abspielmedium, wie beispielsweise Plattenspieler oder CD-<br />
Player, anschließen, um externe Medien in das Setup zu integrieren.
HINWEIS!<br />
Neben dem Input Anschluss befindet sich ein Phono/Line-Umschalter der<br />
der angeschlossenen Quellen entsprechend eingestellt werden sollte. Der<br />
Schalter Input Assign CH A, CH B weisst das Eingangssignal dem Kanalzug<br />
A oder B zu.<br />
c) Anschluss Mikrofon (Gerätevorderseite)<br />
Hier können Sie ein reguläres dynamisches Mikrofon anschließen. Mit Benutzung<br />
der Attack Software können Sie zusätzlich Lautstärke und Soundeigenschaften<br />
mit den entsprechenden Reglern einstellen.<br />
d) Anschluss Kopfhörer (Gerätevorderseite)<br />
An diese Buchse kann ein Kopfhörer angeschlossen werden. Mit Benutzung der<br />
<strong>Reloop</strong> Attack Software können Sie können Sie zusätzlich Lautstärke und<br />
Soundeigenschaften mit den entsprechenden Reglern einstellen.<br />
HINWEIS!<br />
Da der <strong>Reloop</strong> Digital Jockey Interface Edition kein Stand Alone Gerät ist,<br />
funktionieren die Ein- und Ausgänge nur in Verbindung mit Computer und<br />
Software.<br />
PHONO / LINE AMP / SPEAKERS<br />
MIC<br />
HEADPHONES<br />
1.3. ASIO-Treiber Installation:<br />
Legen Sie die im Lieferumfang enthaltene Installations-CD in Ihr CD ROM<br />
Laufwerk. Ein Installationsmenü wird automatisch gestartet.<br />
HINWEIS!<br />
Sollten Sie Ihre CD ROM Autostart-Funktion deaktiviert haben, öffnen Sie<br />
die Datei Autorun.exe manuell auf der CD.<br />
Drücken Sie auf die Schaltfläche „ASIO-Treiber installieren“ um das Setup<br />
auszuführen.<br />
Screen 1:<br />
Wählen Sie Ihre Sprache aus und bestätigen Sie mit OK.<br />
Screen 2:<br />
Nun wählen Sie „Treiber Installieren“ auf der Schaltfläche aus.<br />
<strong>DEUT</strong><strong>SCH</strong><br />
5
<strong>DEUT</strong><strong>SCH</strong><br />
6<br />
Screen 3:<br />
Falls Ihr Controller zu diesem Zeitpunkt nicht per USB angeschlossen wurde, so<br />
führen Sie dies nun aus.<br />
Screen 4:<br />
Nun werden die USB-Treiber geladen.<br />
Screen 5:<br />
Sie werden nun aufgefordert Ihren Controller vom USB-Port zu trennen.<br />
Screen 6:<br />
Nun werden Sie aufgefordert Ihr USB-Kabel wieder anzuschließen.<br />
Screen 7:<br />
Nun wird die Installation abgeschlossen.
Screen 8:<br />
Sie werden aufgefordert Ihren Computer neu zu starten. Falls Sie dies zu einem<br />
späteren Zeitpunkt tun wollen drücken Sie auf „Später Neu Starten“.<br />
Nach einem Neustart ist die ASIO-Treiber Installation abgeschlossen.<br />
1.4. <strong>Reloop</strong> Attack Softwarekonfiguration<br />
Führen Sie die Autorun.exe auf der beiliegenden CD aus und warten Sie bis das<br />
Installationsmenü erscheint.<br />
a) Installations-Begrüßung<br />
Als erstes sehen Sie die Installations-Begrüßung. Drücken Sie auf<br />
„Weiter/Next“.<br />
b) Versionsauswahl<br />
Belassen Sie die Auswahl bei „Complete Version“ und bestätigen Sie mit<br />
„Weiter/Next“.<br />
c) Kundeninformation<br />
Fügen Sie Ihre Daten, Name, Firma und die Seriennummer ein.<br />
HINWEIS!<br />
Ihre persönliche Seriennummer finden Sie auf der Rückseite der CD Hülle.<br />
Bestätigen Sie Ihre Eingaben mit „Weiter/Next“.<br />
<strong>DEUT</strong><strong>SCH</strong><br />
7
<strong>DEUT</strong><strong>SCH</strong><br />
8<br />
d) Installationspfad<br />
Hier wird der Installationspfad angezeigt. Bei Bedarf können Sie diesen<br />
manuell ändern. Bestätigen Sie den Pfad mit „Weiter/Next“.<br />
e) Installationsbestätigung<br />
Bestätigen Sie die Installation indem Sie auf „Install“ drücken.<br />
Nun wird die Installation ausgeführt, eventuell muss nach der Installation Ihr<br />
Computer neu gestartet werden.<br />
f) Installation abgeschlossen<br />
Schließen Sie die Installation mittels der „Finish“ Taste ab.
MIDI DEVICES<br />
Starten Sie nun die <strong>Reloop</strong> Attack Software mittels des Icons auf dem Desktop<br />
oder über das Start Programm Menü im Ordner <strong>Reloop</strong> Software. Gehen Sie in<br />
die „Preferences“. Die Schaltfläche dafür finden Sie oben rechts im Software<br />
Fenster. Öffnen Sie den Reiter „Devices“. Der <strong>Reloop</strong> Digital Jockey Interface<br />
sollte dort sichtbar sein. Drücken Sie auf das <strong>Reloop</strong> Digital Jockey Interface Bild<br />
im Fenster „Availabe Type“. Danach drücken Sie auf „Digital Jockey Interface“<br />
im „MIDI Devices“ Fenster darüber. Als Bestätigung sollte oben der Satz „Digital<br />
Jockey set as <strong>Reloop</strong> Digital Jockey is enabled“ erscheinen.<br />
<strong>DEUT</strong><strong>SCH</strong><br />
9
<strong>DEUT</strong><strong>SCH</strong><br />
10<br />
AUDIO DEVICES<br />
Öffnen Sie nun den Reiter „Audiogeräte“ (Audio Devices).<br />
Im Auswahlmenü „Eingestellte Audiogeräte“ (Used Audio Devices) stellen Sie<br />
„ASIO Gerät“ (ASIO Device) ein.<br />
Öffnen Sie den Unterreiter „ASIO Geräteeinstellungen“ (ASIO Device Setting<br />
Page) und stellen Sie im Auswahlmenü „Audiogerät“ (Audio Device) „Digital<br />
Jockey Interface ASIO“ ein.<br />
In der unteren Kanalauswahl (Type) wählen Sie „4 Kanäle“ (4 Channels) aus.<br />
Unter der Option „gemischter Stereoausgang“ (Stereo Mixed Output +<br />
Monitoring Headphones) stellen Sie unter dem Punkt „Gemischter Ausgang”<br />
„OUT 0-DIGITAL JOCKEY-I“ links ein und auf der rechten Seite „OUT 1-DIGITAL<br />
JOCKEY-I“.<br />
Unter dem Punkt „Kopfhörer“ (Headphones) stellen Sie links „OUT 2-DIGITAL<br />
JOCKEY-I“ und rechts „OUT 3-DIGITAL JOCKEY-I“ ein.<br />
Um die Eingänge (Mikrofon oder Phono /Linequelle) zu aktivieren, müssen<br />
folgende Einstellungen vorgenommen werden:<br />
Setzen Sie das Häkchen bei „Audio Eingang Aktivieren“ (Enable Audio Input).<br />
Wenn Sie das Mikrofon benutzen wollen, stellen Sie links „IN 0-DIGITAL<br />
JOCKEY-I“ und rechts „IN 1-DIGITAL JOCKEY-I“ ein.<br />
Falls Sie den Phono/Line Input einbinden wollen, stellen Sie links „IN 2-DIGITAL<br />
JOCKEY-I“ und rechts „IN 3-DIGITAL JOCKEY-I“ ein. Bestätigen Sie die<br />
Eingaben mit „OK“.
HINWEIS!<br />
Diese Einstellungen müssen nur einmalig vorgenommen werden.<br />
Bestätigen Sie Ihre Eingaben mit der Schaltfläche „OK“. Ihr Controller und Ihre<br />
Software sind nun richtig eingestellt und Sie können mit dem Mixen beginnen.<br />
1.5. Traktor 3 LE Softwarekonfiguration<br />
Führen Sie die Autorun.exe auf der beiliegenden CD aus und warten Sie bis das<br />
Installationsmenü erscheint. Drücken Sie hier auf „Traktor 3 LE“ um das Setup<br />
auszuführen. Das Traktor 3 LE Setup startet nun; bitte folgen Sie den<br />
Anweisungen auf dem Bildschirm, um die Installation auszuführen.<br />
HINWEIS!<br />
Ihre Traktor 3 LE Version wurde optimal auf den Digital Jockey angepasst.<br />
Achten Sie darauf, dass Ihr Controller bei der Installation ausgewählt ist.<br />
Starten Sie Traktor 3 LE nach erfolgreicher Installation. Sofern der Digital<br />
Jockey bei der Installation ausgewählt wurde, sind nun alle Kontrollelemente<br />
richtig eingestellt, so dass keine weiteren Einstellungen mehr nötig sind.<br />
Eine Übersicht der Belegung vom Digital Jockey für Traktor 3 LE und<br />
Traktor 3 Studio (upgradefähig) finden Sie im Anhang.<br />
Hinweis für Mac User:<br />
Führen Sie die Setup Datei “Traktor3LEinstaller.app” auf der beiliegenden<br />
Installationsdisc manuell aus.<br />
<strong>DEUT</strong><strong>SCH</strong><br />
11
<strong>DEUT</strong><strong>SCH</strong><br />
12<br />
36S<br />
17S<br />
16S<br />
28S<br />
27S<br />
16H<br />
14H<br />
19S<br />
21S<br />
18S<br />
27H<br />
15H<br />
25H<br />
19H<br />
21H<br />
8H<br />
ÜBERSICHT CONTROLLER & SOFTWARE<br />
35S<br />
34S<br />
10S<br />
24S<br />
15S<br />
20S<br />
38S<br />
4S<br />
5S<br />
6S<br />
30H<br />
29H<br />
28H<br />
26H<br />
20H<br />
18H<br />
33S<br />
32S<br />
9S 40S<br />
39S<br />
42S 43S 44S<br />
17H 22H 23H 10H 24H 2H 9H 1H 11H 12H 13H<br />
4H 5H 6H 7H<br />
HINWEIS!<br />
Elemente mit gleicher Funktion auf gegenüberliegenden Seiten sind nur<br />
einmal gekennzeichnet.<br />
11S<br />
12S<br />
29S<br />
31S<br />
22S<br />
14S<br />
25S<br />
26S<br />
37S<br />
8S<br />
41S<br />
7S<br />
3S<br />
13S<br />
49H
48H 47H<br />
46H<br />
55H 56H<br />
57H<br />
2. BEZEICHNUNGEN<br />
1 H: . . . . . .Trax Encoder<br />
2 H: . . . . .Load Funktion<br />
3 S: . . . . . .Attack Library<br />
4 H / S: . .Cue<br />
5 H / S: . .Pause<br />
6 H / S: . .Play<br />
7 H / S: . .Crossfader<br />
8 H / S: . .Linefader<br />
9 H / S: . .3-Band Equalizer<br />
10 H / S: .Gain<br />
11 H / S: . .Master Volume<br />
12 H / S: . .Cue Volume<br />
13 H / S: . .Cue Mix<br />
14 H / S: . .Pitch Fader<br />
15 H / S: . .Pitch Bend<br />
16 H / S: . .Key Lock Funktion<br />
17 H / S: . .Sync Funktion<br />
18 H / S: . .Jog Wheel<br />
19 H / S: . .Scratch Funktion<br />
20 H / S: .Search Funktion<br />
21 H / S: . .FX-Reverse Funktion<br />
22 H / S: .Cue/Monitor Funktion<br />
23 H: . . . .Shift Funktion<br />
24 H / S: .Loop In/Out <strong>Reloop</strong> Funktion<br />
25 H / S: .Beat Tact Funktion<br />
26 H / S: .Save To Funktion<br />
27 H / S: .Sample Bänke / Hot Cue Funktion<br />
28 H / S: .Sample Encoder Funktion<br />
29 H / S: .Effect On/Off Funktion<br />
30 H: . . . .Effect Encoder<br />
54H<br />
45H 50H 51H 52H<br />
60H<br />
59H<br />
53H<br />
58H<br />
31 S: . . . . .Single/Continue Funktion<br />
32 S: . . . . .Complete View Ansicht<br />
33 S: . . . . .Infoview Ansicht<br />
34 S: . . . .Needle View Ansicht<br />
35 S: . . . .Auto BPM Funktion<br />
36 S: . . . .Edit BPM Funktion<br />
37 S: . . . . .Sampler Funktion<br />
38 S: . . . .Pegelanzeige<br />
39 S: . . . .Mic Volume Funktion<br />
40 S: . . . .Previosus/Next<br />
41 S: . . . . .Crossfader Curve<br />
42 S: . . . .Playlist maximieren/minimieren<br />
43 S: . . . .Preferences/Options Menü<br />
44 S: . . . .Effektvoreinstellungen<br />
45 H: . . . .USB-Anschluss<br />
46 H: . . . .Ein/Aus-Schalter<br />
47 H: . . . .Netzanschluss<br />
48 H: . . . .Netzkabel-Zugentlastung<br />
49 H: . . . .Kensington Lock<br />
50 H: . . . . .Audio Ausgang (Master)<br />
51 H: . . . . .Audio Eingang<br />
52 H: . . . . .Phono/Line Schalter<br />
53 H: . . . . .Eingangs-Kanalzuweisungs-Schalter<br />
54 H: . . . . .Erdungsschraube<br />
55 H: . . . . .Mikrofon Anschluss<br />
56 H: . . . . .Mikrofon Lautstärke<br />
57 H: . . . . .Mikrofon Toneinstellung<br />
58 H: . . . . .Kopfhöreranschluss<br />
59 H: . . . . .Kopfhörer Toneinstellung<br />
60 H: . . . . .Crossfader Curve-Regler<br />
<strong>DEUT</strong><strong>SCH</strong><br />
13
<strong>DEUT</strong><strong>SCH</strong><br />
14<br />
L �<br />
L ��<br />
L ��<br />
L ���<br />
3. BEDIENUNG<br />
Nachdem Sie die ersten Schritte befolgt haben und den Controller<br />
angeschlossen und die Software richtig konfiguriert haben, können Sie nun, wie<br />
folgend erklärt, Ihren Controller und Ihre Software bedienen:<br />
3.1. Library<br />
Die Attack Library ist Ihre Datenbank für Ihre gesamte Musik. In der Library<br />
können Sie nach Musik suchen, browsen und Informationen, wie beispielsweise<br />
BPM-Werte oder Titellänge, einsehen.<br />
L �<br />
L ��<br />
L ���<br />
L ����<br />
L ��<br />
L �<br />
L ��<br />
L ���<br />
L ���� L ���<br />
3.1.1. Database -LI-<br />
In die Database sollte Ihre gesamte Musik importiert werden. Sie können dies<br />
einerseits durch Drücken der Shortcut-Taste „Add Directory To Database“ -L VIIIausführen,<br />
um ganze Ordner zu importieren. Alternativ können Sie dies auch im<br />
Database-Fenster mit Rechtsklick der Maus, dann durch Anklicken von „Add<br />
Files“ im erscheinenden Untermenü ausführen, um einzelne Dateien zu<br />
importieren. Auch die Drag & Drop-Funktion von Dateien aus dem Windows<br />
Explorer wird unterstützt.<br />
HINWEIS!<br />
Nach erstmaliger Installation werden Sie gefragt, ob Sie Dateien der<br />
Database hinzufügen wollen.<br />
3.1.2. Decks -LII-<br />
Unter Decks finden Sie für Deck A und Deck B getrennte Ordner. Dort können Sie<br />
für ein Set Titel, die Sie abspielen wollen, für Deck A und Deck B individuell<br />
selektieren und laden. Auch hier wird der Rechtsklick mit der Untermenü-<br />
Funktion „Add Files“ unterstützt.<br />
HINWEIS!<br />
Mit der Schaltfläche -40 S- können Sie innerhalb der Deck A / B Playlisten<br />
den nächsten bzw. vorherigen Track laden.<br />
3.1.3. Playlist -LIII-<br />
Sie können unter dem Folder „My Playlist“ eigene Playlisten erstellen und<br />
editieren. So können Sie beispielsweise entweder eine Playlist mit bestimmten<br />
Musikrichtungen vorsortieren oder ein bestimmtes Set für einen Abend<br />
vorbereiten.<br />
Sie erstellen eine neue Playlist, indem Sie auf den Shortcut „Add New Playlist“ -<br />
LV- klicken. Sie nennen eine Playlist um, indem Sie auf die entsprechende Playlist<br />
mit der rechten Maustaste klicken. Sie importieren Tracks in die Playlist<br />
entweder per Drag & Drop aus anderen Ordnern (z.B. Database, Decks, Windows<br />
Explorer) oder mit Hilfe der „Add Files-Funktion” (Rechtsklick oder Shortcut<br />
„Add Files“ -LIX-.
3.1.4. iTunes Playlist -LIV-<br />
Hier werden automatisch Ihre iTunes Playlisten angezeigt. Auch diese können in<br />
zuvor beschriebener Weise editiert und angepasst werden.<br />
HINWEIS!<br />
Mit Hilfe der „Import iTunes Library File To Database“-Funktion -L VIIkönnen<br />
Sie Ihre komplette iTunes Library mit einem Klick der Database<br />
hinzufügen (xml-Format).<br />
3.1.5. Shortcuts Definitionen<br />
-LV- „Add New Playlist“<br />
Hiermit fügen Sie eine Playlist hinzu.<br />
-LVI- „Delete Playlist“<br />
Durch diese Funktion ist es möglich eine ausgewählte Playlist zu löschen.<br />
-LVII- „Import iTunes Library To Database“<br />
Fügen Sie hiermit die iTunes Library der Database hinzu.<br />
-LVIII- „Add Directory To Database“<br />
Hiermit können Sie komplette Ordner der Database hinzufügen.<br />
-LIX- „Add Files“<br />
Einzelne Dateien können über diese Funktion der jeweiligen Playlist bzw.<br />
Database hinzugefügt werden. Folgende Formate werden dabei<br />
unterstützt: .ACC, .CDA, .FLAC, .MP3, .WAV<br />
-LX- „Delete Selected Files“<br />
Hiermit werden ausgewählte Dateien von der Playlist bzw. Database<br />
entfernt.<br />
-LXI- „Analyze Selected Files“<br />
Durch diese Funktion ist es möglich, ausgewählte Dateien automatisch<br />
analysieren zu lassen, um Informationswerte wie BPM, Dateigröße oder<br />
Titelspielzeit anzeigen zu lassen.<br />
HINWEIS!<br />
Dies muss nur einmalig für einen Track ausgeführt werden. Danach sind<br />
diese Meta-Informationen zum jeweiligen Track gespeichert.<br />
-LXII- „Clear List“<br />
Hiermit werden mit einem Klick die Inhalte von Playlisten bzw. der<br />
Database entfernt.<br />
-LXIII- „Select All“<br />
Markieren Sie hiermit alle Titel einer Playlist bzw. Database.<br />
-LXIV- „List View“<br />
Hier werden die Inhalte der Database oder der jeweiligen Playlist angezeigt. Die<br />
Rubriken, die angezeigt werden können, sind:<br />
• File Name (Dateiname)<br />
• Title (Titel)<br />
• Type (Formattyp)<br />
• Artist (Interpret)<br />
• Album<br />
• Beats Per Minute (BPM)<br />
• Duration (Titellänge)<br />
• File Size (Dateigröße)<br />
<strong>DEUT</strong><strong>SCH</strong><br />
15
<strong>DEUT</strong><strong>SCH</strong><br />
16<br />
D ����<br />
HINWEIS!<br />
Durch Rechtsklick auf die Rubrikleiste der List View können Sie einzelne<br />
Rubriken ein- bzw. ausblenden lassen.<br />
3.1.6. Waveform-Displays<br />
Ihnen stehen zwei detailierte Waveform-Displays zur Verfügung:<br />
a) Complete View -32 S-:<br />
Die Complete View zeigt den Wellenverlauf des kompletten Tracks an. So können<br />
Sie die Dynamik des Tracks, beispielsweise Intros oder Breaks eines Tracks, gut<br />
erkennen. Der bereits abgelaufene Teil des aktuellen Tracks wird dabei in der<br />
Complete View dunkler dargestellt.<br />
HINWEIS!<br />
Durch direktes Klicken in der Complete View können Sie zu bestimmten<br />
Stellen, innerhalb des Tracks, direkt springen.<br />
b) Needle View -34 S-:<br />
Die Needle View ist eine vergrößerte Ansicht beider Wellenformdarstellungen<br />
untereinander. In ihr können Sie einzelne Bass-Kicks oder Takt-Punkte erkennen.<br />
Zudem kann man hier erkennen, ob zwei Tracks synchron laufen.<br />
HINWEIS!<br />
Sie können den Zoom-Faktor einstellen, indem Sie mit gehaltener rechter<br />
Maustaste in der Needle View die Maus nach oben oder unten bewegen.<br />
3.1.7. Keyword<br />
In diesem Schnellsuchfeld können Sie einzelne Buchstaben oder ganze Wörter<br />
eintippen, um schneller zu den gesuchten Titeln zu gelangen.<br />
3.1.8. Info View -33 S-<br />
D � D �� D ��� D �� D � D �� D ���<br />
D�� D �� D ��� D ���� D�<br />
DI: Play-Anzeige<br />
Zeigt an ob der Track im Wiedergabemodus ist. Zusätzlich leuchtet die Anzeige<br />
-DVIII- als visuelle Hilfe auf.<br />
DII: Formatanzeige<br />
An dieser Stelle wird Ihnen das Format des aktuell geladenen Tracks angezeigt.<br />
DIII: Wiedergabemodus<br />
Durch Drücken der „SGL/CTN-Taste“ (Single/Continue) -31 S- können Sie den<br />
Wiedergabemodus ändern. Zur Auswahl stehen:<br />
a) Single: Der Track wird abgespielt und stoppt die Wiedergabe am Ende des<br />
Tracks.<br />
HINWEIS!<br />
Wird ein Track aus Deck A / Deck B abgespielt, so wird am Ende des Tracks<br />
der nächste Track in den Player geladen und der Player geht in den<br />
Pauemodus.<br />
b) Repeat: Der Track wird abgespielt und in einer Endlosschleife wiederholt.<br />
c) Repeat All: Nach Ende des letzten Tracks in der Deck A / Deck B Playlist wird<br />
der erste Track wieder abgespielt und die gesamte Playlist<br />
wiederholt.
DIV: Auto Cue-Anzeige<br />
Zeigt an, ob die Auto Cue-Funktion aktiviert ist. Sie können Auto Cue in dem<br />
Voreinstellungesmenü -43 S- im Reiter „Audio Einstellungen“ (Audio System<br />
Settings) beim Punkt „Auto Cue aktivieren“ (Enable Auto Cue) (de-)aktivieren.<br />
DV: Auto BPM-Anzeige<br />
Zeigt an, ob die automatische BPM-Analyse (de-)aktiviert ist.<br />
DVI: Cue-Anzeige<br />
Diese Anzeige blinkt beim Setzen eines Cue-Punktes und leuchtet im Cue-Modus.<br />
DVII: Remain-Anzeige:<br />
Zeigt an, ob die Remain- oder Elapsed-Zeitanzeige aktiviert ist:<br />
Remain: zeigt die noch verbleibende Zeit eines Tracks an.<br />
Elapsed: zeigt die verstrichene Zeit eines Tracks an.<br />
HINWEIS!<br />
Sie stellen den Ramain/Elapsed-Modus durch Klicken auf die Zeitanzeige<br />
-DXIII- um.<br />
DVIII: siehe DI<br />
DIX: Track Nummern-Anzeige<br />
Zeigt die Titelnummer aus der Playlist Deck A / Deck B an -LII-.<br />
DX: Titelanzeige<br />
Hier wird der Titel des geladenen Tracks angezeigt.<br />
DXI: BPM-Anzeige<br />
Zeigt den aktuell ermittelten BPM-Wert an.<br />
DXII: Pitch-Anzeige<br />
Zeigt den aktuell eingestellten Pitch-Wert an.<br />
DXIII: Zeit-Anzeige<br />
Zeigt die aktuelle Zeit an, abhängig vom Remain/Elapsed-Modus. (siehe -DVII-)<br />
HINWEIS!<br />
Die Zeitanzeige wird in Minuten, Sekunden und Frames dargestellt.<br />
3.2. Tracks browsen und laden<br />
Mit Hilfe des großen Trax Encoders -1 H- können Sie in der Database bzw. einer<br />
gewählten Playlist navigieren. Um das gewünschte Lied in den Player zu laden,<br />
drücken Sie die Load A bzw. Load B Taste -2 H-.<br />
Um zwischen einzelnen Ordnern oder Playlisten zu wechseln, halten Sie die<br />
Shift-Taste -23 H- und drehen den Trax Encoder -1 H-.<br />
HINWEIS!<br />
Durch Drücken des Trax Encoders -1 H- oder Betätigen der Schaltfläche<br />
„Playlist“ -42 S-, können Sie die Playlist maximieren bzw. minimieren.<br />
HINWEIS!<br />
Mit der Shift Taste -23 H- können Sie eine zweite Funktion eines<br />
Bedienelementes aufrufen. So ist mit der Shift Taste -23 H- die Anzahl der<br />
MIDI-fähigen Elemente verdoppelt. Achten Sie auf Hinweise einer<br />
Doppelbelegung, um alle Funktionen Ihres Controllers nutzen zu können.<br />
<strong>DEUT</strong><strong>SCH</strong><br />
17
<strong>DEUT</strong><strong>SCH</strong><br />
18<br />
3.3. Transport Controls<br />
Unter dem Jog Wheel -18 H- finden Sie drei Tasten zum Abspielen, Cuen und<br />
Pausieren eines Tracks.<br />
Mittels der Play-Taste -6 H- können Sie den zuvor geladenen Track abspielen.<br />
Erneutes Drücken der Play-Taste -6 H- bewirkt, dass der Track Stutter-artig vom<br />
zuletzt gesetzten Cue-Punkt abgespielt wird (Bop-Funktion).<br />
Um den Track zu pausieren, drücken Sie die Pause-Taste -5 H-.<br />
Mit der Cue-Taste -4 H- gelangen Sie im Wiedergabemodus zum letzt gesetzten<br />
Cue-Punkt zurück. Kurzzeitiges Drücken im Pause-Modus spielt den Track vom<br />
Cue-Punkt, solange die Taste gedrückt wird, ab.<br />
3.4. Cue-Punkte setzen<br />
Um einen Cue-Punkt zu setzen gibt es zwei Möglichkeiten.<br />
a) Erste Möglichkeit ist der “Frame Search”. Im Pause-Modus navigieren Sie mit<br />
dem Jog Wheel -18 H / S- zum gewünschten Punkt und drücken dann Play -<br />
6 H / S-. Der Cue-Punkt ist beim Play-Punkt gesetzt.<br />
b) Zweite Möglichkeit ist die “Loop In”-Funktion. Drücken Sie während der<br />
Wiedergabe auf die Loop In-Taste -24 H / S-, um einen Cue-Punkt zu setzen.<br />
3.5. Mixer-Sektion<br />
Mit dem Crossfader -7 H / S- können Sie von Deck A nach Deck B überblenden<br />
und umgekehrt. Die einzelnen Kanallautstärken können mit den Linefadern<br />
-8 H / S- eingestellt werden. Ihre Software besitzt einen 3-Band Equalizer -9 H /<br />
S-, den Sie mit dem Controller manipulieren können. Durch Drücken der<br />
Equalizer-Potentiometer -9 H- wird die Kill-Funktion im jeweiligen Frequenzband<br />
aktiviert. Die ensprechende Kill-LED leuchtet bei aktivierter Kill-Funktion auf.<br />
Erneutes Drücken deaktiviert die Kill-Funktion.<br />
Mit dem Gain-Regler -10 H / S- können Sie eine Feinjustierung der<br />
Kanallautstärke vornehmen.<br />
Mit dem Master-Regler -11 H / S- stellen Sie die Hauptlautstärke ein. Mit dem Cue<br />
Volume-Regler -12 H / S- stellen Sie die Kopfhörerlautstärke ein.<br />
Mit dem Cue Mix-Regler -13 H / S- können Sie das Verhältnis vom Master-Signal<br />
zum ausgewählten Cue-Kanal überblenden. Dies ist sinnvoll, um einen Mix im<br />
Kopfhörer auszuprobieren.<br />
Die Pegelanzeige -38 S- zeigt die Aussteuerung der Tracks an.<br />
Der Kopfhörer kann mit den Cue-Tasten -22 H / S- für jede Seite aktiviert werden.<br />
So können Sie einen Track vorhören während der andere auf dem Master-<br />
Ausgang läuft.<br />
HINWEIS!<br />
Benutzen Sie den Cue-Mix Regler -13 H / S-, um einen Pre-Mix von Cue auf<br />
Master im Kopfhörer zu simulieren.<br />
Mit dem Mic Volume-Regler -39 S- können Sie die Lautstärke eines eventuell<br />
angeschlossenen Mikrofons einstellen.<br />
Mit dem Long/Cut-Regler -41 S- können Sie die Crossfader-Curve von hart auf<br />
weich stufenlos regulieren. Den Regler dafür finden Sie an der Gerätevorderseite<br />
-60H-.<br />
HINWEIS!<br />
Bitte beachten Sie auch das Kapitel 1.2 Peripherie Anschlüsse.
3.6. Geschwindigkeitskontrolle<br />
Um die Geschwindigkeit zu regulieren, steht Ihnen der Pitchfader -14 H / S- zur<br />
Verfügung. Wenn Sie den Fader nach oben schieben, verringert das die<br />
Geschwindigkeit. Schieben Sie den Fader nach unten, so nimmt die<br />
Geschwindigkeit zu. Der aktuell eingestellte Pitchwert wird im Info Display an<br />
Stelle -DXII- angezeigt.<br />
Der eingestellte Pitch-Bereich wird in der Software links/rechts neben dem<br />
Pitchfader angezeigt. Der Bereich ist auf +/-4%, +/-8%, +/-16& und +/-100%<br />
einstellbar.<br />
Sie können entweder durch direktes Drücken in der Software den Pitch-Bereich<br />
ändern oder aber auch durch die Tastenkombination auf dem Controller: Shift<br />
-23 H- und den Pitch Bend Tasten -15 H-. Die Minus-Taste verkleinert den Bereich,<br />
die Plus-Taste vergrößert den Bereich.<br />
Mit den Pitch Bend +/- Tasten -15 H / S- können Sie ein temporäres Erhöhen bzw.<br />
Vermindern der Geschwindigkeit erzielen, solange die entsprechende Taste<br />
gedrückt wird. Es wird maximal im jeweilig eingestellten Pitch-Bereich das<br />
Tempo kurzzeitig erhöht bzw. verringert.<br />
Diese Funktion ist sinnvoll, um zwei Stücke, die zwar das gleiche Tempo haben,<br />
allerdings nicht synchron laufen, anzugleichen.<br />
Mit der Keylock-Funktion -16 H / S- können Sie die Tonhöhe „fixieren“, d.h. dass<br />
die ursprüngliche Tonhöhe, egal bei welchem Tempo, gehalten wird. So<br />
vermeiden Sie den sogenannten „Micky Maus“-Effekt.<br />
Mittels der Sync-Funktion -17 H / S- können Sie zwei Tracks automatisch<br />
synchronisieren lassen. Dabei wird der BPM-Wert der jeweiligen Sync-Seite dem<br />
gegenüberliegenden Player angepasst. Diese hilfreiche Funktion ermöglicht ein<br />
schnelleres Mixen, ohne viel Zeit für die Tempoanpassung zu verlieren.<br />
Klassisches Speed-Matching mittels Pitch ist selbstverständlich ebenfalls<br />
möglich.<br />
HINWEIS!<br />
Die Sync-Funktion wird anhand analysierter BPM-Werte ausgeführt, ist aber<br />
keine Garantie dafür, dass diese Funktion perfekt für jeden Musikstil und jede<br />
Songart ist. Es sollte also immer vor dem Mixen vorgehört und evtl.<br />
angepasst werden.<br />
Bei Tracks, bei denen der BPM-Wert nicht korrekt angezeigt wird, z.B. wenn der<br />
BPM-Wert viel zu hoch oder niedrig erscheint, (dies kann bei Breakbeats oder<br />
Drum & Bass der Fall sein) kann der BPM-Wert manuell analysiert werden.<br />
Drücken Sie dazu die Schaltfläche Edit BPM -36 S-, um das manuelle BPM-Menü<br />
aufzurufen.<br />
<strong>DEUT</strong><strong>SCH</strong><br />
19
<strong>DEUT</strong><strong>SCH</strong><br />
20<br />
Sie haben zwei Möglichkeiten, um manuell den BPM-Wert zu setzen:<br />
a) Tap-Funktion:<br />
Tappen Sie mit der Maus im Takt auf die Tap-Taste, um den BPM-Wert manuell zu<br />
ermitteln.<br />
HINWEIS!<br />
Sie können dies auch direkt im Informations-Display auf der BPM-Anzeige<br />
durchführen. (-DXI-)<br />
b) BPM Set-Funktion:<br />
Sie können auch den BPM-Wert direkt eingeben und mittels der Set-Taste<br />
bestätigen. Mit den Tasten „x 2“ und „/ 2“ können Sie den BPM-Wert per<br />
Knopfdruck verdoppeln bzw. halbieren.<br />
Drücken Sie die Schaltfläche “Ausblenden” (Hide), um das Edit BPM-Menü zu<br />
verlassen.<br />
HINWEIS!<br />
Um die Auto BPM-Funktion wieder einzuschalten, drücken Sie die<br />
Schaltfläche Auto BPM -35 S-. Im Display wird “A.BPM“ -DV- in rot<br />
angezeigt.<br />
3.7. Jog Wheel-Sektion -18 H / S-<br />
Ihr Digital Jockey Controller besitzt extra große, hochauflösende Jog Wheels -18<br />
H / S-, mit denen Sie verschiedene Aktionen durchführen können:<br />
a) Frame Search-Funktion<br />
Befindet sich der Player im Pause/Cue-Modus, so können Sie mit dm Jog Wheel<br />
Frame-genau suchen, um beispielsweise einen Cue-Punkt zu setzen.<br />
b) Pitch Bend-Funktion<br />
Befindet sich der Player im Wiedergabe-Modus, so können Sie mit dem Jog<br />
Wheel die Pitch Bend Funktion ausführen. Ähnlich wie bei einem Plattenspieler<br />
können Sie so durch kurzzeitiges Drehen im Uhrzeigersinn bzw. gegen den<br />
Uhrzeigersinn die Geschwindigkeit erhöhen bzw. verringern, um die Tracks<br />
miteinander zu synchronisieren.<br />
HINWEIS!<br />
Alternativ können Sie dazu auch die Pitch Bend-Tasten -15 H / Sverwenden.<br />
c) Scratch-Funktion -19 H / S-<br />
Drücken Sie zunächst die Scratch-Taste -19 H / S- um den Scratch-Modus zu<br />
aktivieren. Sie können nun mit den Jog Wheels -18 H / S- wie mit einer regulären<br />
Vinyl-Platte scratchen.<br />
d) Search-Funktion -20 H / S-<br />
Drücken Sie zunächst die Search-Taste -20 H / S-, um den Schnellsuchmodus zu<br />
aktivieren. Nun können Sie durch Vor- oder Zurückdrehen des Jog Wheels<br />
schnell innerhalb eines Tracks vor- oder zurückspulen.
e) FX/Reverse-Funktion -21 H / S-<br />
Drücken Sie zunächst die FX/Reverse-Taste -21 H / S-, um diesen Modus zu<br />
aktivieren. Hier stehen Ihnen 3 Optionen zur Auswahl:<br />
• Reverse-Effekt:<br />
Ist Reverse im Auswahlmenü ausgewählt, aktivieren Sie mit der FX/Reverse-<br />
Taste -21 H / S- den Rückwärtslauf.<br />
• Effekt 1-Funktion:<br />
Ist Effekt 1 im Auswahlmenü ausgewählt, so wird der Effekt aus der Effekt-<br />
Sektion -29 S- aktiviert. Nun kann mit dem Jog Wheel -18 H / S- ein Effekt-<br />
Parameter des jeweilig gewählten Effektes moduliert werden.<br />
HINWEIS!<br />
Durch Drücken & Halten der Shift-Taste -23 H- und Drehen des Jog Wheels<br />
-18 H- kann der zweite Parameter moduliert werden.<br />
• Effekt 2-Funktion:<br />
siehe Punkt b)<br />
Bitte entnehmen Sie weitere Einzelheiten dem nächsten Kapitel 3.8. Effekt-<br />
Sektion.<br />
3.8. Effekt-Sektion<br />
Ihre <strong>Reloop</strong> Attack Software verfügt über 8 hochwertige Effekte. Pro Player<br />
können je zwei Effekte gemeinsam aktiviert werden.<br />
HINWEIS!<br />
Es können zwei verschiedene Effekte pro Player kombiniert werden.<br />
Mit den Tasten -29 H / S- können Sie den jeweiligen Effekt (de-)aktivieren. Der<br />
ausgewählte Effekt wird im Auswahlmenü unter den Aktivierungstasten<br />
angezeigt. Sie können einen anderen Effekt mit der Maus direkt auswählen. Um<br />
den Effekt mit Ihrem Controller zu wechseln, halten Sie die Shift-Taste -23 Hgedrückt<br />
und drücken Sie die Effekt 1 bzw. 2 Taste -29 H- - so wird zwischen den<br />
einzelnen Effekten gewechselt.<br />
Bei jedem Effekt sind zwei Parameter einstellbar. Folgende Effekte stehen Ihnen<br />
dabei zur Verfügung:<br />
Effektname: Parameter Time: Parameter Ratio:<br />
1. Delay 0 – 9.999 Delay Intervall 0 – 255 Delay Gain<br />
2. Skid 100 – 9.999 Stopp-Zeit 100 – 9.999 Start-Zeit<br />
3. Filter 0 – 9.999 Scan Intervall 0 – 255 Filter Frequenz<br />
4. Phase 1 – 9.999 Phasen-Intervall 0 – 255 Sweep Gain<br />
5. Flanger 1 – 9.999 Wellenform Intervall 0 – 255 Mix Gain<br />
6. Echo 0 – 9.999 Echo intervall 0 – 255 Echo Gain<br />
7. Trans 30 – 9.999 Trans Intervall 0 – 255 Trans Intensität<br />
8. Pan 0 – 9.999 Pan Intervall 0 – 255 Pan Gain<br />
<strong>DEUT</strong><strong>SCH</strong><br />
21
<strong>DEUT</strong><strong>SCH</strong><br />
22<br />
Die Effekt-Parameter können im Effekt-Voreinstellungsmenü eingestellt werden.<br />
Das Effekt-Voreinstellungsmenü können Sie entweder mit der Schaltfläche -44<br />
S- aufrufen oder mittels der Tastenkombination Shift -23 H- plus einmaliges<br />
Drücken eines der Effekt-Encoders -30 H-. Die Effekt-Voreinstellungen sind in<br />
Deck A und Deck B eingeteilt.<br />
Die oben aufgelisteten Effekt-Parameter können hier pro Effekt eingestellt<br />
werden. Für eine Variation per Maus ziehen Sie den Indikator nach Belieben nach<br />
links oder rechts. Für eine Modulation per Controller drehen Sie den Level-<br />
Encoder -30 H- um den Parameter Ratio einzustellen und den Time-Encoder -30<br />
H- um den Parameter Time einzustellen.<br />
HINWEIS!<br />
Der Effekt-Encoder Time wurde für eine effektivere Handhabung auf eine<br />
Beat-Takt-Rasterung eingestellt. Per Drehung können Sie zwischen den<br />
Taktlängen 1/4 – 4/1 auswählen.
Jog Wheel Effektmodulation:<br />
Sie haben auch die Möglichkeit mit dem Jog Wheel -18 H- die Effektparameter zu<br />
modulieren. Stellen Sie den gewünschten Effekt ein und stellen Sie den<br />
FX/Reverse-Modus -21 S- auf Effekt 1 oder 2.<br />
HINWEIS!<br />
Um den FX/Reverse-Modus mit dem Controller zu wechseln, halten Sie Shift<br />
-23 H- und drücken Sie FX/Reverse -21 H-.<br />
Nun können Sie je nach eingestelltem Effekt den Parameter Ratio stufenlos mit<br />
dem Jog Wheel -18 H- einstellen. Um den parameter Time stufenlos zu<br />
modulieren, halten Sie Shift -23 H- und drehen das Jog Wheel -18 H-.<br />
HINWEIS!<br />
Ist der FX/Reverse-Slot auf Effekt 1 oder 2 eingestellt -21 S-, so kann mit<br />
der FX/Reverse-Taste -21 H- der Effekt (de-)aktiviert werden.<br />
3.9. Sample, Loop & Cue-Punkt-Sektion<br />
3.9.1. Cue-Punkte<br />
Um einen Cue-Punkt zu setzen haben Sie zwei Möglichkeiten:<br />
a) Die erste ist bei laufender Wiedergabe die Loop-In Taste -24 H- zu betätigen.<br />
Ein Cue-Punkt wird somit auf Knopfdruck gesetzt und mit einem „C“ in der<br />
Needle View angezeigt.<br />
b) Die zweite Möglichkeit ist im Pause-Modus mit dem Jog Wheel -18 H- einen<br />
Frame zu suchen. Am gewünschten Punkt drücken Sie Play -6 H / S- und der<br />
Cue-Punkt ist gesetzt.<br />
HINWEIS!<br />
Dies funktioniert auch bei aktivierter Scratch-Funktion.<br />
Falls Sie diesen Cue-Punkt speichern wollen, drücken Sie die Save To-Taste<br />
-26 H / S- und eine entsprechende Sample Cue-Bank -27 H / S-. Der Cue-Punkt ist<br />
somit dauerhaft gespeichert, bis Sie einen neuen setzen und damit den alten<br />
überschreiben.<br />
3.9.2. Loops<br />
Manueller Loop:<br />
Um einen Loop manuell zu setzen, drücken Sie zum gewünschten Zeitpunkt die<br />
Loop-In Taste -24 H / S- und zum Loop-Ende die Loop-Out Taste -24 H / S-. Nun<br />
geht Ihr Player in den nahtlosen Loop über. Verlassen Sie diesen durch Drücken<br />
der Loop-Out Taste -24 H / S-.<br />
HINWEIS!<br />
Durch Drücken der Loop-Out / <strong>Reloop</strong>-Taste -24 H- im normalen<br />
Wiedergabemodus springt der Player zum zuletzt gesetzten Loop zurück.<br />
Auto-Loop:<br />
Sofern der BPM-Wert zu einem Titel analysiert wurde, kann per Knopfdruck ein<br />
automatischer Beat-Loop gesetzt werden. Drücken Sie dazu die Beat Tact-Taste<br />
-25 H / S- und der Player geht in den Loop-Modus über. Die eingestellte Taktlänge<br />
sehen Sie neben der Beat Tact-Taste (1/2 – 8/1). Um diese Taktlänge zu verändern<br />
drücken Sie entweder per Maus den Takt in der Software oder drücken Sie die<br />
Beat Tact-Taste -25 H- direkt am Controller. Um den Loop zu verlassen, drücken<br />
Sie die Loop-Out Taste -24 H / S-.<br />
<strong>DEUT</strong><strong>SCH</strong><br />
23
<strong>DEUT</strong><strong>SCH</strong><br />
24<br />
P���<br />
P����<br />
P���<br />
P��<br />
HINWEIS!<br />
Um den Beat-Takt vorher einzustellen, halten Sie Shift -23 H- gedrückt und<br />
drücken die Beat Tact-Taste -25 H-.<br />
3.9.3. Sample-Funktion<br />
Sie haben auch die Möglichkeit einen erstellten Loop auf zwei Samplebänke<br />
abzuspeichern. Nachdem ein Loop erstellt wurde, drücken Sie die Save To-Taste<br />
-26 H / S- und wählen die Sample-Bank 1 oder 2 -27 H / S- aus. Der Loop ist nun<br />
auf der entsprechenden Sample-Bank gespeichert.<br />
HINWEIS!<br />
Je nachdem ob nur ein Cue-Punkt oder ein Loop zuletzt gesetzt wurde, kann<br />
so die Sample-Bank als Hot Cue oder Loop-Speicher dienen.<br />
Um das Sample parallel zur Musik abzuspielen, aktivieren Sie den Sampler -<br />
Modus mit der Sampler-Taste -37 S- oder durch einmaliges Drücken des Sample-<br />
Encoders -28 H-. Nun kann per Knopfdruck der jeweiligen Sample-Bank -27 H/Sdas<br />
Sample abgerufen werden.<br />
Mit den Sample-Encodern -28 H- können links die Lautstärke und rechts die<br />
Länge des Samples eingestellt werden.<br />
HINWEIS!<br />
Dies funktioniert nur im Sampler-Modus.<br />
Die Volume/Length-Encoder sind je nach zuletzt angespielter Sample-Bank<br />
zugewiesen. Um das Sample zu stoppen, deaktivieren Sie den Sampler-Modus<br />
durch Drücken des Sampler-Encoders -28 H- oder der Sampler-Taste -37 S-.<br />
4. PREFERENCES<br />
• Audio System Settings<br />
P�� P���
PI: Enable Auto Cue<br />
Ist diese Funktion aktiviert, wird ein Cue-Punkt automatisch beim ersten Beat<br />
des Tracks gesetzt.<br />
PII: Save Data When Program Exits<br />
Ist diese Funktion aktiviert, so werden Ihre Daten (beispielsweise Cue-Punkte,<br />
Samples oder Fader- und Pitch-Werte) beim Beenden des Programms<br />
gespeichert.<br />
PIII / PIV: Replay Gain<br />
Mit diesem Regler -PIV- können Sie den Pegel der Vorverstärkung, beispielsweise<br />
für einen angeschlossenen Plattenspieler, einstellen. Die einstellbaren Werte<br />
reichen von 80 – 100 dB. Aktivieren Sie diese Funktion, indem Sie ein Häkchen in<br />
das Feld -PIII- setzen.<br />
HINWEIS!<br />
Ist diese Funktion aktiviert, so analysiert die Attack-Software bei<br />
erstmaliger Wiedergabe des Tracks den Gain-Wert und speichert diesen in<br />
die Database. So wird Audio-Material mit unterschiedlichen Gain-Werten<br />
automatisch angepasst.<br />
PV: Loop/Sampler-Buffer Length<br />
Mit dem Regler -PV- können Sie die Sampler Buffer-Größe einstellen. Die Werte<br />
für die Loop-Länge sind von 8 – 30 Sekunden einstellbar.<br />
PVI: Auto Beat Sync<br />
Hier kann die Zeitspanne von 0 – 2000 mSek. eingestellt werden, wenn der Beat<br />
synchronisiert werden soll. Befindet sich der Wert bei „0“, so wird der Beat ohne<br />
Zeitverzögerung synchronisiert.<br />
• Audio Device<br />
Die korrekten ASIO Audio Einstellungen für Ihre Interface Edition haben Sie<br />
schon in den ersten Schritten vorgenommen. Beachten Sie dazu auch bitte<br />
Kapitel 1.4, Absatz “Audio Devices”.<br />
Vollständigkeitshalber sind folgend die möglichen DirectSound Optionen<br />
aufgelistet:<br />
P���<br />
P����<br />
P�����<br />
P����<br />
P���<br />
P�����<br />
P������<br />
P����<br />
P����<br />
P�����<br />
P���<br />
P��<br />
P����<br />
<strong>DEUT</strong><strong>SCH</strong><br />
25
<strong>DEUT</strong><strong>SCH</strong><br />
26<br />
PVII: 1st Audio Device<br />
Hier stellen Sie im Auswahlmenü Ihre entsprechende Soundkarte ein.<br />
PVIII / PIX / PX: 2nd Audio Device<br />
Sofern Sie eine Soundkarte mit mindestens vier Kanälen oder eine zweite haben,<br />
können Sie diese hier auswählen und aktivieren. Falls Sie bei der zweiten<br />
Audiokarte zur Optimierung die Latenz einstellen wollen, aktivieren Sie „Device<br />
Parameter“ -PIX- und stellen Sie die Latenz mit dem Regler -PX- ein.<br />
HINWEIS!<br />
Sollte das Signal bei zu niedrig eingestellter Latenz knacken oder ausfallen,<br />
müssen Sie die Latenz mit dem Regler -PX- wieder höher setzen.<br />
PXI / PXII: 3rd Audio Device<br />
<strong>Reloop</strong> Attack unterstützt bis zu drei Soundkarten. Setzen Sie das Häkchen im<br />
Feld -PXI- um die dritte Audiokarte auszuwählen -PXII- und zu aktivieren.<br />
PXIII: Type<br />
Hier können Sie Ihr bevorzugtes und unterstütztes Soundkarten-Routing<br />
einstellen. Folgend finden Sie eine genaue Auflistung:<br />
2 Kanäle gemischter Stereo-Ausgang (Standard)<br />
4 Kanäle 1 x gemischter Stereoausgang;<br />
1 x Stereo-Kopfhörer-Ausgang<br />
4 Kanäle (extern) dieser Typ wird für den Anschluss eines externen<br />
Mischpultes genutzt und der interne Equalizer und Gain<br />
werden umgangen. 2 x Stereo-Ausgänge<br />
6 Kanäle 2 x gemischter Stereo-Ausgang;<br />
1 x Stereo-Kopfhörer-Ausgang<br />
2 Kanäle x 2 1 x gemischter Stereo-Ausgang und 1 x Kopfhörer-<br />
Ausgang auf 2 verschiedenen Soundkarten<br />
2 x Kanäle x 2 (extern) wird für den Anschluss eines externen Mischpultes<br />
genutzt und der interne Equalizer und Gain werden<br />
umgangen. 2 x Stereo-Ausgänge von 2 verschiedenen<br />
Soundkarten<br />
2 Kanäle x 3 2 x gemischte Stereo-Ausgänge auf 2 Soundkarten;<br />
1 x Stereo-Kopfhörer-Ausgang auf 3<br />
verschiedenen Soundkarten<br />
PXIV / PXV / PXVI: Channel Setting<br />
Unter den Punkten -PXIV, PXV, PXVI- werden in den Auswahlmenüs die jeweiligen<br />
Kanäle für den gemischten Ausgang, Kopfhörer und gegebenenfalls das rechte<br />
Deck gewählt.<br />
PXVII / PXVIII / PXIX: Record Device<br />
Mit dem Feld -PXVII können Sie den Eingang aktivieren. Wählen Sie im<br />
Auswahlmenü -PXVIII- den ensprechenden Audiokarten-Eingang und unter<br />
Auswahlmenü -PXIX- den ensprechenden Typ aus. Hier kann beispielsweise ein<br />
Mikrofon zugewiesen werden.
P���<br />
P����<br />
P�����<br />
P�����<br />
P����<br />
P������<br />
P�����<br />
• Keyboard Shortcuts<br />
In den Shortcut-Einstellungen können Sie nach Wunsch verschiedene Funktionen<br />
einer Taste Ihrer Tastatur zuweisen. Wählen Sie mit dem Auswahlmenü -PXX- das<br />
entsprechende Deck aus. Wählen Sie die zu belegende Funktion aus dem<br />
Auswahlmenü -PXXI- aus. Die aktuelle Zuweisung wird im Feld -PXXII- angezeigt.<br />
Die Funktionsbeschreibung wird im Feld -PXIII- angezeigt. Wählen Sie eine Taste<br />
aus, mit der Sie die Funktion belegen wollen und drücken Sie die Schaltfläche<br />
„Assign To Action“ -PXXIV-, um die Funktion zuzuweisen.<br />
HINWEIS!<br />
Bei einer Doppelbelegung oder Überschreibung werden Sie darauf<br />
hingewiesen.<br />
Um eine vorhandene Belegung zu entfernen, betätigen Sie die Remove-Taste<br />
-PXXV-. Um eine individuelle Belegungsliste abzuspeichern oder eine zu laden,<br />
benutzen Sie die Schaltfläche -PXXVI-.<br />
<strong>DEUT</strong><strong>SCH</strong><br />
27
<strong>DEUT</strong><strong>SCH</strong><br />
28<br />
5. SYSTEMANFORDERUNGEN<br />
Minimale Systemanforderung:<br />
• Intel Pentium 4, 1 GHz Prozessor, Intel Centrino Mobile Technology 1,6 GHz<br />
oder höher<br />
• Intel Celeron Prozessor NICHT empfohlen<br />
• Microsoft Windows XP oder Vista<br />
• DirectX 9 oder höher<br />
• Windows Media Player 9 oder höher<br />
• 512MB RAM<br />
• 250MB freier Speicher (200MB für Cache)<br />
Empfohlene Systemanforderungen:<br />
• Intel Pentium 4, 2,4 GHz Prozessor, Intel Centrino Mobile Technology 1,6 GHz<br />
oder höher<br />
• Microsoft Windows XP oder Vista<br />
• DirectX 9 oder höher<br />
• 2 GB RAM<br />
• 550MB freier Speicher (500MB für Cache)<br />
WEITERE INFOS & UPDATES AUF: www.digital-jockey.dj
Keylock<br />
Only mapped in Traktor 3 Studio<br />
FX Parameter 3<br />
Pitchbend<br />
Auto Loop<br />
Scratch<br />
Reverse Play<br />
Pitchfader<br />
FX Parameter 2<br />
FX Amount<br />
FX TAP<br />
FX ON<br />
Set Cue<br />
Jog Wheel<br />
(Pitch Bend/Scratch)<br />
Line Fader<br />
FX Parameter 2 Knob<br />
FX Parameter 1 Knob<br />
FX Parameter 2 Switch<br />
FX Parameter 1 Switch<br />
FX Amount Knob<br />
FX Parameter 3 Knob<br />
FX On<br />
FX Parameter 3 Switch<br />
ANHANG<br />
TRAKTOR 3 LE MAPPING<br />
EQ with Kill<br />
Sync<br />
Master Effect<br />
Select<br />
Gain Load A/B<br />
Track<br />
Master<br />
Cue/Monitor<br />
Loop<br />
In/Out<br />
Browser<br />
Cue Play Cue Pause Play/Stop Crossfader<br />
TRAKTOR 3 STUDIO MAPPING<br />
Phones<br />
Volume<br />
Phones<br />
Mix<br />
Andere Kontrollelemente wie für Traktor 3 LE (siehe oben)<br />
Push Knob:<br />
Loop smaller<br />
Push Knob:<br />
Loop bigger<br />
Push Knob:<br />
Master Effect select<br />
Push Knob:<br />
Master Effect on<br />
<strong>DEUT</strong><strong>SCH</strong><br />
29
ENGLISH<br />
30<br />
OPERATION MANUAL<br />
ENGLISH<br />
Congratulations on purchasing your Digital Jockey Interface Edition. Thank<br />
you for placing your trust in our disc jockey technology. Before operating<br />
this equipment we ask you to carefully study and observe all instructions.<br />
Please remove the Digital Jockey from its packaging. Check before initial<br />
operation to make sure that the device has not been visibly damaged during<br />
transport. If you detect any damage to the power cable or the casing, do not<br />
operate the device. Contact your specialised dealer.<br />
SAFETY INSTRUCTIONS<br />
CAUTION!<br />
Please exercise particular caution when handling 240 V power voltage. This<br />
voltage rating may lead to a critical electrical shock! Any damage caused by<br />
the non-observance of this operation manual excludes any warranty claims.<br />
The manufacturer is not liable for any damage to property or for personal<br />
injury caused by improper handling or non-observance of the safety<br />
instructions.<br />
- This device left the factory in perfect condition. To maintain this condition<br />
and to ensure a risk-free operation the user must observe the safety<br />
instructions and warnings contained in this operation manual.<br />
- For reasons of safety and certification (CE) the unauthorised conversion<br />
and/or modification of the device is prohibited. Please note that in the event<br />
of damage caused by the manual modification to this device any warranty<br />
claims are excluded.<br />
- The inside of the device does not contain any parts which require<br />
maintenance, with the exception of wear parts that can be exchanged from<br />
the outside. Qualified staff must carry out maintenance, otherwise the<br />
warranty does not apply!<br />
- The Fuse must exclusively be exchanged against fuses of the same class,<br />
with the same trigger features and nominal current rating.<br />
- Ensure that the power will only be supplied after the device has been fully<br />
set up. Always plug in the mains plug last. Ensure that the mains switch is in<br />
the “OFF” position when connecting the device to power.<br />
- Only use cables that comply with regulations. Observe that all jacks and<br />
bushes are tightened and correctly hooked up. Refer to your dealer if you<br />
have any questions.<br />
- Ensure that when setting up the product the mains cable is not squashed or<br />
damaged by sharp edges.<br />
- Prevent the mains cable from coming into contact with other cables! Exercise<br />
great care when handling mains cables and connections. Never touch these<br />
parts with wet hands!<br />
- Connect the power cable exclusively to appropriate shock-proof outlets. The<br />
only supply point to be used is a supply outlet in accordance with<br />
specifications of the public supply network.<br />
- Disconnect the device from the supply outlet when not in use and before<br />
cleaning! Be sure to hold the mains plug by the body. Never pull the mains<br />
cord!<br />
- Position the device on a horizontal and stable low-flame base.<br />
- Avoid any concussions or violent impact when installing or operating the<br />
device.<br />
- When selecting the location of installation make sure that the device is not<br />
exposed to excessive heat, humidity, and dust. Be sure that no cables lie<br />
around openly. You will endanger your own safety and that of others!<br />
- Do not rest any containers filled with liquid that could easily spill onto the<br />
device or in its immediate vicinity. If, however, fluids should access the inside<br />
of the device, immediately disconnect the mains plug. Have the device<br />
checked by a qualified service technician before re-use. Damage caused by<br />
fluids inside the device is excluded from the warranty.
- Do not operate the device under extremely hot (in excess of 35° C) or<br />
extremely cold (below 5° C) conditions. Keep the device away from direct<br />
exposure to the sun and heat sources such as radiators, ovens, etc. (even<br />
during transport in a closed vehicle). Never cover the cooling fan or vents.<br />
Always ensure sufficient ventilation.<br />
- The device must not be operated after being taken from a cold environment<br />
into a warm environment. The condensation caused hereby may destroy<br />
your device. Do not switch on or operate the device until it has reached<br />
ambient temperature!<br />
- Controls and switches should never be treated with spray-on cleaning agents<br />
and lubricants. This device should only be cleaned with a damp cloth. Never<br />
use solvents or cleaning fluids with a petroleum base for cleaning.<br />
- When relocating, the device should be transported in its original packaging.<br />
- When starting operation, the crossfaders and volume controls of your<br />
amplifier must be set to minimum level. Bring the loudspeaker switches into<br />
the “OFF” position. Wait between 8 to 10 seconds before increasing the<br />
volume to avoid shot noise created by transient effect, which could cause<br />
damage to loudspeakers and the diplexer.<br />
- Devices supplied by voltage should not be left in the hands of children.<br />
Please exercise particular care when in the presence of children.<br />
- At commercial facilities the regulations for the prevention of accidents as<br />
stipulated by the organization of professional associations must be<br />
observed.<br />
- At schools, training facilities, hobby and self-help workshops the operation of<br />
the device must be monitored with responsibility by trained staff.<br />
- Keep this operation manual in a safe place for later reference in the event of<br />
questions or problems.<br />
APPLICATION IN ACCORDANCE WITH REGULATIONS<br />
- This device is a professional DJ MIDI controller with integrated 4 channel<br />
soundcard that can control software. The device should be connected via<br />
USB cable to a computer.<br />
- This product is authorised for connection to 240 V, 50 Hz AC and is designed<br />
exclusively for indoor application.<br />
- If the device is used for any other purposes than those described in the<br />
operation manual, damage can be caused to the product, leading to<br />
exclusion of warranty rights. Moreover, any other application that does not<br />
comply with the specified purpose harbours risks such as short circuit, fire,<br />
electrical shock, etc.<br />
- The serial number determined by the manufacturer must never be removed<br />
to uphold the warranty rights.<br />
ENGLISH<br />
31
ENGLISH<br />
32<br />
MAINTENANCE<br />
- Check the technical safety of the device regularly for damage to the mains<br />
line or the casing, as well as for wearout of wear parts such as rotary and<br />
sliding switches.<br />
- If it is to be assumed that a safe operation is no longer feasible then the<br />
device must be disconnected and secured against accidental use. Always<br />
disconnect the mains plug from the outlet!<br />
- It must be assumed that a safe operation is no longer feasible if the device<br />
bears visible defects, if the device no longer functions, following longer<br />
storage under unfavourable conditions or after major transport stress.<br />
1. FIRST STEPS:<br />
1.1. Hardware connections<br />
Take the <strong>Reloop</strong> Digital Jockey out of its packaging and connect the mains<br />
adapter to the DC jack on the backside of the device.<br />
Turn on the device via the power button. The Load A and Load B buttons should<br />
light up. Please connect the provided USB cord to the controller and a free USB<br />
port of your computer.<br />
When connecting the Digital Jockey for the first time the following messages<br />
should be displayed on your monitor, as seen under Windows XP:<br />
a) New hardware found – Digital Jockey<br />
b) New hardware found – USB audio device<br />
c) New hardware found - Your new hardware is installed and ready to use.<br />
The controller will automatically be recognised under Windows XP, Vista and Mac<br />
OS.X as Plug 'n' Play, without need for special drivers.<br />
Now your hardware is appropriately connected to your computer.<br />
1.2. Peripheral connections<br />
Your Digital Jockey features an integrated professional audio interface. An<br />
additional external or integrated PC sound card becomes unnecessary. Below<br />
you can find a list of all possible connections.<br />
a) Output connection (rear panel)<br />
Here you can plug in your main stereo system, for example an amplifier or active<br />
speakers.<br />
b) Input connection (rear panel)<br />
You can connect a playback device to this input, such as turntables or CD players<br />
in order to integrate external medias to your setup.
NOTE!<br />
Next to the input there is a phono/line switch that has to be adjusted<br />
according to the connected sources. The switch input assign CH A, CH B<br />
assigns the signal to channels A or B.<br />
c) Microphone connection (front side)<br />
Here you can plug in a regular dynamic microphone. While using the Attack<br />
software it is also possible to adjust the volume and sound characteristics via the<br />
according knobs.<br />
d) Headphones connection (front side)<br />
Connect your headphones to this jack. While using the Attack software it is also<br />
possible to adjust the volume and sound characteristics via the according knobs.<br />
NOTE!<br />
As the <strong>Reloop</strong> Digital Jockey Interface Edition is not a stand-alone device<br />
the inputs and outputs are only functional in combination with computer<br />
and software.<br />
PHONO / LINE AMP / SPEAKERS<br />
MIC<br />
1.3. ASIO driver installation<br />
Put the provided installation CD in your CD ROM drive. An installation menue will<br />
start automatically.<br />
NOTE!<br />
If your CD ROM auto start function has been disbled you can manually open<br />
the autorun.exe file on your CD.<br />
Click on the „Install ASIO Driver“ button in order to carry out the setup.<br />
Screen 1:<br />
Choose your language and confirm by clicking on „ok“.<br />
Screen 2:<br />
Please choose „Install Driver“.<br />
HEADPHONES<br />
ENGLISH<br />
33
ENGLISH<br />
34<br />
Screen 3:<br />
If your controller has not been connected via USB yet, please do so now.<br />
Screen 4:<br />
Now the USB drivers will be loaded.<br />
Screen 5:<br />
You will be asked to disconnect your controller from the USB port.<br />
Screen 6:<br />
You will be asked to re-connect you USB cord again.<br />
Screen 7:<br />
Now the installation will be concluded.
Screen 8:<br />
You will be asked to reboot your computer. If you prefer to do so later on please<br />
click on „Reboot later“.<br />
After a reboot the ASIO drivers installation is complete.<br />
1.4. <strong>Reloop</strong> Attack software configuration<br />
Carry out the autorun.exe on the provided CD and wait until the installation<br />
menue appears.<br />
a) Installation address of welcome<br />
First you will see the address of welcome. Click „next“.<br />
b) Version selection<br />
Leave the „complete version“ as it is and confirm by clicking „next“.<br />
c) Customer information<br />
Enter your data; name, company and serial number.<br />
NOTE!<br />
Your personal serial number can be found on the backside of the CD cover.<br />
Confirm your entries by clicking „next“.<br />
ENGLISH<br />
35
ENGLISH<br />
36<br />
d) Installation path<br />
The installation path is shown here. If required you can change it manually.<br />
Confirm the path by clicking „next“.<br />
e) Installation confirmation<br />
Confirm the installation by clicking „install“.<br />
Now the installation will be carried out, possibly your computer has to be rebooted<br />
after installation.<br />
f) Installation completed<br />
Complete the installation by clicking „finish“.
MIDI DEVICES<br />
Please start the <strong>Reloop</strong> Attack software by clicking on the icon on your desktop<br />
or via the start program menue in the <strong>Reloop</strong> Software folder. Go to<br />
„preferences“. The according button can be found on the upper right software<br />
window. Open the rider „devices“. The <strong>Reloop</strong> Digital Jockey should be visible<br />
there. Click on the <strong>Reloop</strong> Digital Jockey image in the window „available type“.<br />
Afterwards click on „Digital Jockey“ in the window above „MIDI devices“. The<br />
sentence „Digital Jockey set as <strong>Reloop</strong> Digital Jockey is enabled“ should be<br />
displayed.<br />
ENGLISH<br />
37
ENGLISH<br />
38<br />
AUDIO DEVICES<br />
Please open the rider „audio devices“.<br />
In the menue „Used Audio Devices“ please choose „ASIO device“.<br />
Open the sub rider „ASIO Device Setting Page“ and in the preferences „Audio<br />
Device“ select „Digital Jockey Interface ASIO“.<br />
In the lower type select „4 channels“.<br />
Under the option „Stero Mixed Output plus Monitoring Headphones“ under the<br />
item „Mixed Output“ select „OUT 0-DIGITAL JOCKEY-I“ for the left side and<br />
„OUT 1-DIGITAL JOCKEY-I“ for the right side.<br />
Under the item „Headphones“ select „OUT 2-DIGITAL JOCKEY-I“ for the left<br />
side and „OUT 3-DIGITAL JOCKEY-I“ for the right side.<br />
In order to enable the the inputs (microphone or phono/line source) the<br />
following adjustments have to be carried out:<br />
Checkmark „Enable Audio Input“.<br />
If you would like to use a microphone select „IN 0-DIGITAL JOCKEY-I“ for the<br />
left side and „IN 1-DIGITAL JOCKEY-I“ for the right side.<br />
If you want to integrate the phono/line input select „IN 2-DIGITAL JOCKEY-I“ for<br />
the left side and „IN 3-DIGITAL JOCKEY-I“ for the right side. Confirm your<br />
adjustments with „OK“.<br />
NOTE!<br />
These settings have to carried out only once.
Confirm the settings by clicking on „OK“. Your controller and your software have<br />
been mapped accurately and you can now start mixing.<br />
1.5. Traktor 3 LE software configuration<br />
Carry out the „Autorun.exe“ on the provided CD and wait until the installation<br />
menu pops up. Click on „Traktor 3 LE“ in order to carry out the setup. The<br />
Traktor 3 LE setup will start now; please follow the instrucions on screen in order<br />
to carry out the installation.<br />
NOTE!<br />
Your Traktor 3 LE version is optimally adapted to the Digital Jockey. Make<br />
sure that your controller is selected during installation.<br />
Open Traktor 3 LE after the successful installation. If the Digital Jockey was<br />
selected during installation all control elements are optimally mapped so that no<br />
further adjustments are necessary.<br />
You will find an overview of the Digital Jockey assignment for Traktor 3 LE<br />
and Treaktor 3 Studio (can be upgraded) in the appendix.<br />
Note for Mac Users:<br />
Please execute manually the file “Traktor3LEinstaller.app” on the provided<br />
installation disc.<br />
ENGLISH<br />
39
ENGLISH<br />
40<br />
16H<br />
14H<br />
27H<br />
15H<br />
25H<br />
19H<br />
21H<br />
8H<br />
36S<br />
17S<br />
16S<br />
28S<br />
27S<br />
19S<br />
21S<br />
18S<br />
30H<br />
29H<br />
28H<br />
26H<br />
20H<br />
18H<br />
35S<br />
34S<br />
10S<br />
24S<br />
15S<br />
20S<br />
38S<br />
4S<br />
5S<br />
6S<br />
OVERVIEW CONTROLLER AND SOFTWARE<br />
33S<br />
32S<br />
9S 40S<br />
39S<br />
42S 43S 44S<br />
17H 22H 23H 10H 24H 2H 9H 1H 11H 12H 13H<br />
4H 5H 6H 7H<br />
NOTE!<br />
Elements with the same function on the opposite side have only been<br />
marked once.<br />
11S<br />
12S<br />
29S<br />
31S<br />
22S<br />
14S<br />
25S<br />
26S<br />
37S<br />
8S<br />
41S<br />
7S<br />
3S<br />
13S<br />
49H
48H 47H<br />
46H<br />
55H 56H<br />
57H<br />
2. DESIGNATIONS<br />
1 H: . . . . . . . .Trax Encoder<br />
2 H: . . . . . . . . .Load function<br />
3 S: . . . . . . . . .Library function<br />
4 H / S: . . . . .Cue function<br />
5 H / S: . . . . .Pause function<br />
6 H / S: . . . . .Play function<br />
7 H / S: . . . . .Crossfader function<br />
8 H / S: . . . . .Linefader function<br />
9 H / S: . . . . .3-band equalizer<br />
10 H / S: . . . . .Gain function<br />
11 H / S: . . . . .Master volume function<br />
12 H / S: . . . . .Cue volume function<br />
13 H / S: . . . . .Cue mix function<br />
14 H / S: . . . . .Pitch fader function<br />
15 H / S: . . . . .Pitch bend function<br />
16 H / S: . . . . .Key lock function<br />
17 H / S: . . . . .Sync function<br />
18 H / S: . . . . .Jog Wheel function<br />
19 H / S: . . . . .Scratch function<br />
20 H / S: . . . .Search function<br />
21 H / S: . . . . .FX-Reverse function<br />
22 H / S: . . . .Cue/Monitor function<br />
23 H: . . . . . . .Shift function<br />
24 H / S: . . . .Loop In/Out <strong>Reloop</strong> function<br />
25 H / S: . . . .Beat tact function<br />
26 H / S: . . . .Save to function<br />
27 H / S: . . . .Sample banks / Hot cue function<br />
28 H / S: . . . .Sample encoder function<br />
29 H / S: . . . .Effect on/off function<br />
30 H: . . . . . . .Effect encoder<br />
54H<br />
45H 50H 51H 52H<br />
60H<br />
59H<br />
53H<br />
58H<br />
31 S: . . . . . . . .Single/Continue function<br />
32 S: . . . . . . . .Complete view function<br />
33 S: . . . . . . . .Info view function<br />
34 S: . . . . . . .Needle view function<br />
35 S: . . . . . . . .Auto BPM function<br />
36 S: . . . . . . . .Edit BPM function<br />
37 S: . . . . . . . .Sampler function<br />
38 S: . . . . . . .Level display function<br />
39 S: . . . . . . . .Mic volume function<br />
40 S: . . . . . . .Deck function<br />
41 S: . . . . . . . .Crossfader curve function<br />
42 S:. . . . . . . . Maximize/minimize playlist function<br />
43 S: . . . . . . . Preferences menue<br />
44 S: . . . . . . . Effect presettings<br />
45 H: . . . . . . . USB connection<br />
46 H: . . . . . . . ON/Off switch<br />
47 H: . . . . . . . Mains connection<br />
48 H: . . . . . . . Mains cord strain relief<br />
49 H: . . . . . . . Kensington lock<br />
50 H: . . . . . . . Audio output (master)<br />
51 H: . . . . . . . . Audio input<br />
52 H: . . . . . . . Phono/Line switch<br />
53 H: . . . . . . . Channel assignment switch<br />
54 H: . . . . . . . Grounding screw<br />
55 H: . . . . . . . Mic input<br />
56 H: . . . . . . . Mic volume<br />
57 H: . . . . . . . Mic tone adjustment<br />
58 H: . . . . . . . Headphones output<br />
59 H: . . . . . . . Headphones tone adjustment<br />
60 H: . . . . . . . Crossfader curve knob<br />
ENGLISH<br />
41
ENGLISH<br />
42<br />
L �<br />
L ��<br />
L ��<br />
L ���<br />
3. OPERATION<br />
After having concluded the first steps, the controller being connected and the<br />
software being installed properly, you can now operate your controller and<br />
software as follows:<br />
3.1. Library<br />
The Attack library is your data base for all of your music. You can search and<br />
browse the library for music and information such as BPM values or length of<br />
tracks.<br />
L �<br />
L ��<br />
L ���<br />
L ����<br />
L ��<br />
L �<br />
L ��<br />
L ���<br />
L ���� L ���<br />
3.1.1. Database -LI-<br />
All of your music should be imported to the database. On the one hand you can<br />
do this by pressing the shortcut button “Add Directory To Database” -LVIII- in<br />
order to import entire folders. Alternatively you can do this in the database<br />
window via right mouse click followed by a click on “Add Files” in the now visible<br />
submenu in order to import singular files. The drag & drop function for files from<br />
the Windows Explorer is also supported.<br />
NOTE!<br />
After the initial installation you will be asked if you would like to add files to<br />
the database.<br />
3.1.2. Decks -LII-<br />
Under decks you can find separate folders for deck A and deck B. Here you can<br />
individually select and load tracks that you would like to play for deck A and deck<br />
B. The right mouse click with the submenu function “Add Files” is also supported.<br />
NOTE!<br />
With the button -40 S- you can load the next and previous track<br />
respectively within deck A and deck B.<br />
3.1.3. Playlist -LIII-<br />
In the folder “My Playlist” it is possible to create and edit playlists of one's own.<br />
This way you can either presort a playlist with certain music styles or prepare a<br />
certain set for an evening.<br />
You can create a new playlist by clicking the shortcut “Add New Playlist” -LV-.<br />
You can rename a playlist by clicking the right mouse button on the<br />
corresponding list. Either import tracks to the playlist via drag and drop from<br />
other folders (for example database, decks, Windows Explorer) or via the “Add<br />
Files” function (right mouse click or shortcut “Add Files” -LIX-).
3.1.4. iTunes Playlist -LIV-<br />
Your iTunes playlists will be displayed here automatically. They can also be<br />
adjusted as described above.<br />
NOTE!<br />
With one click you can add your complete iTunes library to the database via<br />
the “Import iTunes Library File To Database” function -LVII- (xml format).<br />
3.1.5. Shortcut definitions<br />
-LV- “Add New Playlist”<br />
With this function you can add a playlist.<br />
-LVI- “Delete Playlist”<br />
It is possible to delete a selected playlist via this function.<br />
-LVII- “Import iTunes Library To Database”<br />
Add the iTunes library to the database.<br />
-LVIII- “Add Directory To Database”<br />
You can add whole directories to the database via this function.<br />
-LIX- “Add Files”<br />
Single files can be assigned and added to the corresponding playlist or<br />
database via this function. The following formats are supported:<br />
.ACC, .CDA, .FLAC, .MP3, .WAV<br />
-LX- “Delete Selected Files”<br />
Via this function it is possible to delete selected files from the playlist<br />
and database respectively.<br />
-LXI- “Analyze Selected Files”<br />
Via this function it is possible to automatically analyze selected files in<br />
order to have information displayed regarding for example BPM, file size<br />
or track length.<br />
NOTE!<br />
This has to be done only once per track. Afterwards the meta information for<br />
each track is automatically saved.<br />
-LXII- “Clear List”<br />
With one click you can delete the content of the playlist and database<br />
respectively.<br />
-LXIII- “Select All”<br />
Select all tracks of a playlist or database via this function.<br />
-LXIV- “List View”<br />
The content of the database or respective playlist can be seen here. The<br />
categories that can be displayed are as follows:<br />
• File name<br />
• Title<br />
• Type<br />
• Artist<br />
• Album<br />
• Beats Per Minute (BPM)<br />
• Duration<br />
• File Size<br />
ENGLISH<br />
43
ENGLISH<br />
44<br />
D ����<br />
NOTE!<br />
Via right mouse click on the list view's category task-bar you can fade in and<br />
fade out particular categories.<br />
3.1.6. Waveform Displays<br />
Two detailed waveform displays are at your disposal:<br />
a) Complete View -32 S-:<br />
The Complete View displays the waveform of a whole track. This way it is easy to<br />
recognise a track's dynamic like for example intros or breaks. The elapsed part<br />
of the current track is displayed in a darker shade in Complete View.<br />
NOTE!<br />
Via direct click in Complete View you can go directly to particular parts<br />
within a track.<br />
b) Needle View -34 S-:<br />
The Needle View is a zoomed display of both waveform displays one below the<br />
other. There you can recognise single bass kicks or bar points. Furthermore it is<br />
possible to see whether two tracks are synchronized or not.<br />
NOTE!<br />
You can adjust the zoom factor by moving the mouse back and forth while<br />
clicking and holding the right mouse button when the indicator is in Needle<br />
View.<br />
3.1.7. Keyword<br />
In this quick search field you can write single letters or words in order find the<br />
desired tracks more quickly.<br />
3.1.8. Info View -33 S-<br />
D � D �� D ��� D �� D � D �� D ���<br />
D�� D �� D ��� D ���� D�<br />
DI: Play display<br />
Displays whether a track is in play mode or not. Additionally the display -DVIII- is<br />
illuminated as visual aid.<br />
DII: Format display<br />
Here you can see the current track's format.<br />
DIII: Playback mode<br />
By clicking “SGL/CTN” (single/continue) -31 S- you can change the playback<br />
mode. The following types are available:<br />
a) Single: The track will be played and playback stops at the beginning of the<br />
next track.<br />
NOTE!<br />
If a track from deck A / deck B is played the following track will be assigned<br />
to the other player and both players change to pause mode.<br />
b) Repeat: The track is played and repeated in an endless loop.<br />
c) Repeat All: At the end of the last track from a deck A or deck B playlist the<br />
first track of that playlist will be played and the whole playlist will be<br />
repeated.
DIV: Auto Cue display<br />
Here you can see if the auto cue function is enabled. It is possible to (de-)activate<br />
the auto cue function in the pre-settings menue -43 S-, rider “Audio System<br />
Settings”, item “Enable Auto Cue”.<br />
DV: Auto BPM display<br />
Shows if the automatic BPM analysis is enabled.<br />
DVI: Cue display<br />
This display will flash while setting a cue point and it shines in cue mode.<br />
DVII: Remain display<br />
Shows whether the remain or elapsed time display is enabled.<br />
NOTE!<br />
You can switch between remain/elapsed mode by clicking the time display<br />
-DXIII-.<br />
DVIII: see DI<br />
DIX: Track number display<br />
Shows the track numbers from deck A / deck B playlists -LII-.<br />
DX: Title display<br />
Shows current track's name.<br />
DXI: BPM display<br />
Shows the currently set BPM value.<br />
DXII: Pitch display<br />
Shows the currently set pitch value.<br />
DXIII: Time display<br />
Shows the current time, depending on the remain/elapsed mode. (see DVII).<br />
NOTE!<br />
The time display is shown in minutes, seconds and frames.<br />
3.2. Browsing and loading tracks<br />
Via the large Trax Encoder -1 H- you can browse a database or selected playlist.<br />
In order to assign the desired track to a player push the Load A or Load B button<br />
-2 H-.<br />
In order to change between files or playlists push and hold the shift button -23<br />
H- and turn the Trax Encoder -1 H-.<br />
NOTE!<br />
By pushing the Trax Encoder -1 H- or clicking the playlist button -42 S- you<br />
can maximize or minimize a playlist.<br />
NOTE!<br />
Via the shift button -23 H- you can call up a second function of a control<br />
element. This way the number of MIDI compatible elements is doubled.<br />
Watch out for noted regarding a double assignment in order to be able to use<br />
all functions of your controller.<br />
ENGLISH<br />
45
ENGLISH<br />
46<br />
3.3. Transport Controls<br />
Below the jog wheel -18 H- you can find three buttons for the play, cue or pause<br />
functions of a track.<br />
Via the play button -6 H- you can play the previously selected track. By<br />
repeatedly pushing the play button -6 H- again the track will be played in a<br />
stutter style from the last set cue point (bop function).<br />
In order to pause a track push the pause button -5 H-.<br />
Via the cue button -4 H- you will return to the last set cue point while in play<br />
mode. Temporary pushing in pause mode will continue the track from the cue<br />
point until the button is being pushed.<br />
3.4. Cue points<br />
There are two possibilities to set a cue point.<br />
a) The first possibility is via frame search. In pause mode navigate via the jog<br />
wheel -18 HS- to the desired point and press the play button -6 H / S-. The cue<br />
point is now set at the play point.<br />
b) The second possibility is via the loop in function. During playback push the<br />
Loop In button -24 H / S- in order to set a cue point.<br />
3.5. Mixer section<br />
Via the crossfader -7 H- you can fade from deck A to deck B and vice versa. The<br />
channels' output volume can be adjusted by using the linefaders -8 H / S-. Your<br />
software features a 3-band equalizer -9 H / S- which you can operate via the<br />
controller. By pushing the equalizer potentiometers -9 H- the kill function of the<br />
respective wave band will be activated. The corresponding kill LED shines while<br />
the kill function is activated. By pushing the potentiometer again you will<br />
deactivate the kill function.<br />
Via the gain knob -10 H / S- you can do a vernier adjustment.<br />
The master volume is adjusted via the master knob -11 H-. Via the cue volume<br />
knob -12 H / S- you can adjust the headphones' volume.<br />
Use the cue mix knob -13 H / S- in order to adjust the relation of the master signal<br />
and cue channel. This makes sense when trying out a mix via your headphones.<br />
The level display -38 S- shows the volume level of a track.<br />
The headphones can be enabled for each side via the cue buttons -22 H / S-. This<br />
way you can monitor a track while another track is being played via the master<br />
output.<br />
NOTE!<br />
Use the cue mix knob -13 H / S- in order to simulate a pre-mix from to cue<br />
to master in your headphones.<br />
Via the mic volume knob -39 S- you can adjust the volume of an optionally<br />
connected microphone.<br />
Use the long/cut knob -41 S- in order to change the crossfader curve from hard<br />
to smooth. You find the according knob on the device`s front side -60 H-.<br />
NOTE!<br />
Please also observe chapter 1.2 Peripheral connections.
3.6. Speed control<br />
Use the pitch fader -14 H / S- in order to adjust the speed. If you push the fader<br />
upwards the speed will decrease. Push the fader downwards and the speed will<br />
increase. The currently set pitch value is shown in the info display -DXII-.<br />
The adjusted pitch is shown in the software on the left and right side respectively<br />
of the pitch fader. The range can be adjusted to +/-4%, +/-8%, +/-16%, +/-100%.<br />
You can change the pitch range by either directly clicking on the software or by<br />
using the hot key shift -23 H- plus the pitch bend buttons -15 H- on your<br />
controller. The minus button will decrease the range while the plus button<br />
increases the range.<br />
Via the pitch bend +/- buttons -15 H- you can cause a temporary increasing or<br />
decreasing of the track's speed for as long as you push the respective button.<br />
The maximum speed pitch corresponds to the previously set pitch range-<br />
This function is especially useful if you want to synchronize two tracks that have<br />
the same speed but do not run synchrone.<br />
Via the keylock function -16 H / S- you can freeze the tone pitch. This means that<br />
the original tone pitch is kept no matter at what speed the track is being played.<br />
This way you can avoid the so called “Mikey Mouse” effect.<br />
Via the sync function -17 H / S- you can automatically synchronize two tracks.<br />
The BPM value of the respective sync side is matched to the other player. This<br />
useful function facilitates quicker mixing without losing too much time for speed<br />
matching. Classic speed matching via pitch is also possible of course.<br />
NOTE!<br />
The sync function is carried out corresponding to analyzed BPM values. But<br />
this does not mean that it will work flawlessly for every music style and type<br />
of song. Before mixing one should always monitor and adjust the music.<br />
Sometimes the BPM value of a track may not be displayed correctly, for example<br />
if the BPM value seems to be way too high or low. This can be the case with break<br />
beats or Drum & Bass. In this case you can manually analyze the BPM value. To<br />
do so push the Edit BPM button in order to open the manual BPM menue.<br />
ENGLISH<br />
47
ENGLISH<br />
48<br />
There are to possibilities to manually determine the BPM value.<br />
a) Tap function:<br />
Tap the mouse button on the tap button on screen to the beat of the music in<br />
order to manually determine the BPM value.<br />
NOTE!<br />
You can also accomplish this in the information display on the display.<br />
b) BPM set function:<br />
You can also type in the BPM value and confirm it via the set button. Via the<br />
buttons “x 2” and “/ 2” you can double or halve the BPM value with the push of<br />
a button.<br />
Click on the “Hide” button in order to exit the BPM menu.<br />
NOTE!<br />
In order to re-enable the auto BPM function push the Auto BPM button -35<br />
S-. On the display -DV- “A.BPM” will be shown in red.<br />
3.7. Jog wheel section -18 H / S-<br />
Your Digital Jockey controller disposes of two extra large, high resolution jog<br />
wheels -18 H / S- that can accomplish various function:<br />
a) Frame search function<br />
If the player is in pause/cue mode you can search frame by frame via the jog<br />
wheel -18 H / S- in order to set a cue point for example.<br />
b) Pitch bend function<br />
If the player is in play mode you can carry out the pitch bend function via the jog<br />
wheels. Similar to a normal turntable you can temporarily increase or decrease<br />
the speed by turning the jog wheel clockwise and counter clockwise in order to<br />
synchronize two tracks.<br />
NOTE!<br />
Alternatively you can also use the pitch bend buttons -15 H / S-.<br />
c) Scratch function -19 H / S-<br />
Firstly push the scratch button -19 H / S- in order to enable the scratch mode.<br />
Now you can scratch via the jog wheels -18 H / S- just like a normal vinyl record.<br />
d) Search function -20 H / S-<br />
Firstly push the search button -20 H / S- in order to enable the quick search<br />
mode. By turning the jog wheels you can fast forward and rewind within a track.
e) FX/Reverse function -21 H / S-<br />
Firstly push the FX/Reverse button -21 H / S- in order to enable this mode. There<br />
are three possibilities at your disposal.<br />
• Reverse effect:<br />
If “Reverse” has been selected in the drop down menu you can activate the<br />
reverse play mode by by using the FX/Reverse button<br />
-21 H / S-.<br />
• Effect 1 function:<br />
If effect 1 has been selected in the drop down menu the effect from the effect<br />
section -29 S- will be enabled. By using the jog wheel -18 H / S- you can now<br />
modulate an the selected effect's parameter.<br />
NOTE!<br />
By pushing and holding the shift button -23 H- and turning the jog wheel<br />
-18 H / S- at the same time you can modulate the second parameter.<br />
• Effect 2 function:<br />
see item b)<br />
Please refer to the next chapter 3.8. “Effect Section” for further details.<br />
3.8. Effect section<br />
Your <strong>Reloop</strong> Attack software disposes of 8 high-quality effects. It is possible to<br />
enable two effects per player.<br />
NOTE!<br />
It is possible to combine two different effects per player.<br />
Via the buttons -29 H / S- you can (de-)activate the respective effect. The<br />
selected effect is displayed in the drop down menu below the activating buttons.<br />
You can select another effect via the mouse. In order to change with your<br />
controller push and hold the shift button -23 H- and push the effect 1 or effect 2<br />
button -29 H-. This way you can change the effects. Two parameters per effect<br />
are adjustable. The following effects are at your disposal:<br />
Effect name: Parameter Time: Parameter Ratio:<br />
1. Delay 0 – 9.999 delay gap length 0 – 255 delay gain<br />
2. Skid 100 – 9.999 stop time 100 – 9.999 start time<br />
3. Filter 0 – 9.999 auto scan period 0 – 255 filter frequency<br />
4. Phase 1 – 9.999 play rate 0 – 255 sweep depth length<br />
5. Flanger 1 – 9.999 waveform cycle 0 – 255 mix depth<br />
6. Echo 0 – 9.999 echo gap 0 – 255 echo gain<br />
7. Trans 30 – 9.999 trans X parameter 0 – 255 trans Y parameter<br />
8. Pan 0 – 9.999 pan cycle 0 – 255 pan gain<br />
ENGLISH<br />
49
ENGLISH<br />
50<br />
The effect parameters can be adjusted in the effect preferences. The effect<br />
preferences can be opened by clicking -44 S- or via the hot key combination shift<br />
-23 H- plus pushing the effect encoder -30 H-. The effect preferences are divided<br />
into deck A and deck B.<br />
Here the described effect parameters can be adjusted per effect. For a variation<br />
via mouse simply move the indicator to the left or right. For a modulation via<br />
controller turn the level encoder -30 H- in order to in order to adjust the ratio<br />
parameter and turn the time encoder -30 H- in order to adjust the time<br />
parameter.<br />
NOTE!<br />
In order to obtain a more effective handling the effect encoder time has been<br />
adjusted to a beat raster. Via turning it you can choose bar lengths from 1/4<br />
– 4/1.
Jog wheel effect modulation:<br />
It is also possible to modulate the effect parameters via the jog wheel -18 H-.<br />
Select the desired effect and switch the FX/Reverse mode -21 S- to effect 1 or<br />
effect 2.<br />
NOTE!<br />
In order to change the FX/Reverse mode via controller push and hold the<br />
shift button -23 H- and push FX/Reverse -21 H-.<br />
Depending on the selected effect you can now steplessly adjust the ratio<br />
parameter via the jog wheel -18 H-. In order to steplessly modulate the time<br />
parameter hold shift -23 H- and turn the jog wheel -18 H-.<br />
NOTE!<br />
If the FX/Reverse slot has been adjusted to effect 1 or 2 -21 S- it is possible<br />
to (de-)activate the effect via the FX/Reverse button 21 H-.<br />
3.9. Sample, loop & cue point section<br />
3.9.1. Cue points<br />
There are to possibilities to set a cue point:<br />
a) The first one is to push the loop in button -24 H- during playback. This way a<br />
cue point is set at the push of a button and it is displayed by a “C” in the<br />
needle view.<br />
b) The second possibility is to search a frame via the jog wheel while in pause<br />
mode. Go to the desired point, push play -6 H / S- and the cue point is set.<br />
NOTE!<br />
This is also works if scratch mode is enabled.<br />
If you would like to save a cue point push the “save to” button -26 H / S- and a<br />
respective sample cue bank -27 H / S-. This way the cue point is saved<br />
permanently until you set a new one, thus overwriting the old one.<br />
3.9.2. Loops<br />
Manual loop:<br />
In order to set a loop manually push the loop in button -24 H / S- at the desired<br />
point and at the end of the loop push the loop out button -24 H / S-. Now the<br />
player switches to the seamless loop function. Exit the loop by pushing the loop<br />
out button -24 H / S-.<br />
NOTE!<br />
By pushing the loop out/reloop button -24 H- during playback mode the<br />
player will return to the last set loop.<br />
Auto loop:<br />
If the BPM value of a track has been analyzed an automatic beat loop can be set<br />
at the push of a button. To do so push the beat tact button -25 H / S- and the<br />
player will switch to loop mode. The adjusted bar length is visible next to the beat<br />
tact button (apple – 8/1). In order to change the bar length either click the bar via<br />
mouse in the software or push the beat tact button -25 H- directly on your<br />
controller. In order to exit the loop push the loop out button -24H / S-.<br />
ENGLISH<br />
51
ENGLISH<br />
52<br />
NOTE!<br />
In order to adjust the bars beforehand hold the shift button -23 H- and push<br />
the beat tact button -25 H-.<br />
3.9.3. Sample function<br />
You can also save a created loop to two sample banks. After having created a<br />
loop push the “Save To” button -26 H / S- and select sample bank 1 or 2 -27 H /<br />
S-. The loop has now been saved to the respective sample bank.<br />
NOTE!<br />
Depending on whether a cue point or loop has been set the sample bank can<br />
be used as hot key or loop memory.<br />
In order to play the sample parallel to the music enable the sampler mode via the<br />
sampler button -37 S- or by pushing the sample encoder -28 H-. It is now possible<br />
to call up the sample by clicking the respective sample bank -27 H / S-. Via the<br />
sample encoders -28 H- it is possible to adjust volume on the left and he sample<br />
length on the right side.<br />
NOTE!<br />
This is only available in sampler mode.<br />
Depending on the last played sample bank the volume/length encoders are<br />
assigned. In order to stop a sample disable the sampler mode by pushing the<br />
sampler encoder -28 H- or the sample button -37 S-.<br />
4. PREFERENCES<br />
• Audio System Setting<br />
P���<br />
P����<br />
P���<br />
P��<br />
P�� P���
P���<br />
P����<br />
P�����<br />
P����<br />
P���<br />
P�����<br />
P������<br />
P����<br />
PI: Enable auto cue<br />
If this function is enabled a cue point will be set automatically at the first beat of<br />
a track.<br />
PII: Save data when program exits<br />
If this function is enabled your data, such as cue points, samples or fader and<br />
pitch values, will be saved when exiting the software.<br />
PIII / PIV: Replay gain<br />
With this knob -PIV- you can adjust the pre-amplification level for example for an<br />
optionally connected turntable. The adjustable values go from 80 – 100 dB.<br />
Activate this function by check marking the field -PIII-.<br />
NOTE!<br />
If this function is enabled the Attack software will automatically analyze<br />
and save the track's gain level when playing it for the first time. This way<br />
audio material with differing gain values is automatically matched.<br />
PV: Loop/sampler buffer length<br />
With the knob -PV- you can adjust the sampler buffer length. The value is<br />
adjustable from 8 – 30 seconds.<br />
PVI: Auto beat sync<br />
Here the span of time can be adjusted from 0 – 200 msec. if you want the beat<br />
to be synchronized. If the value is at “0” the beat will be synchronized without<br />
time dely.<br />
• Audio Device<br />
You have already asigned the correct ASIO audio adjustments in the first steps.<br />
Please also observe chapter 1.4 paragraph “Audio device”<br />
To complete the Instruction, below you will finf the possible DirectSound options:<br />
P����<br />
P�����<br />
P���<br />
P��<br />
P����<br />
ENGLISH<br />
53
ENGLISH<br />
54<br />
PVII: 1st audio device<br />
In the preferences you can set your respective sound card.<br />
PVIII / PIX / PX: 2nd audio device<br />
If you have a sound card with at least four channels or a second sound card you<br />
can select and enable it here . If you wish to adjust the latency for optimization<br />
enable the “Device Parameter” -PIX- and adjust the latency via the knob -PX-.<br />
NOTE!<br />
Should you notice any clicking noise or if the music fails completely due to<br />
low latency you must increase the latency via the knob -PX-.<br />
PXI / PXII: 3rd audio device<br />
<strong>Reloop</strong> Attack supports up to three sound cards. Check mark field -PXI- in order<br />
to select and enable the third sound card -PXII-.<br />
PXIII: Type<br />
Here you can adjust your preferred and supported sound card routing. Please<br />
refer to the following list:<br />
2 channels mixed stereo output (standard)<br />
4 channels 1 x mixed stereo output;<br />
1 x stereo headphones output<br />
4 channels (external) this type is used for the connection of an external mixer<br />
and the internal equalizer and gain will be bypassed. 2 x<br />
stereo output<br />
6 channels 2 x mixed stereo output;<br />
1 x stereo headphones output<br />
2 channels x 2 1 x mixed stereo output and 1 x headphones output on 2<br />
different sound cards<br />
2 x channels x 2<br />
(external)<br />
this type is used for the connection of an external mixer<br />
and the internal equalizer and gain will be bypassed. 2 x<br />
stero outputs on two different sound cards<br />
2 channels x 3 2 x mixed stereo output on 2 sound cards;<br />
1 x stereo headphones output on 3 different sound cards<br />
PXIV / PXV / PXVI: Channel setting<br />
Under the items -PXIV / PXV / PXVI- the preferences for the respective channels<br />
for the mixed output, headphones and if necessary the right deck can be seleted.<br />
PXVII / PXVIII / PXIX: Record device<br />
With -PXVII- you can enable the input. In the preferences -PXVIII- select the<br />
respective sound card input and under preferences -PXIX- the respective type.<br />
Here it is possible to assign a microphone for example.
P���<br />
P����<br />
P�����<br />
P�����<br />
P����<br />
P������<br />
P�����<br />
• Keyboard Shortcuts<br />
In the shortcut settings you can assign different functions to a key of your<br />
keyboard. Select the desired function from the preferences -PXXI-. The current<br />
assignment is shown in field -PXXII-. The function description is shown in field -<br />
PXIII-. Select a key that you wish to use for the assignment and click the “Assign<br />
To Action” button -PXXIV- in order to assign the function.<br />
NOTE!<br />
If a double assignment or overwriting occurs you will be notified.<br />
In order to remove an assignment use the remove button -PXXV-. In order to<br />
save or load an individual assignment list use the button -PXXVI-.<br />
ENGLISH<br />
55
ENGLISH<br />
56<br />
5. SYSTEM REQUIREMENTS<br />
Minimum system requirements:<br />
• Intel Pentium 4, 1 GHz processor, Intel Centrino Mobile Technology 1.6 GHz<br />
or above<br />
• Intel Celeron Processor NOT recommended<br />
• Microsoft Windows XP or Vista<br />
• DirectX 9 or above<br />
• Windows Media Player 9 or above<br />
• 512 MB RAM<br />
• 250 MB free hard disc drive (200 MB for cache)<br />
Recommended requirements:<br />
• Intel Pentium 4, 2.4 GHz processor, Intel Centrino Mobile Technology 1.6 GHz<br />
or above<br />
• Microsoft Windows XP or Vista<br />
• DirectX 9 or above<br />
• 2 GB RAM<br />
• 550 MB free hard disc drive (500 MB for cache)<br />
FURTHER INFOS & UPDATES AT: www.digital-jockey.dj
Keylock<br />
Only mapped in Traktor 3 Studio<br />
FX Parameter 3<br />
Pitchbend<br />
Auto Loop<br />
Scratch<br />
Reverse Play<br />
Pitchfader<br />
FX Parameter 2<br />
FX Amount<br />
FX TAP<br />
FX ON<br />
Set Cue<br />
Jog Wheel<br />
(Pitch Bend/Scratch)<br />
Line Fader<br />
FX Parameter 2 Knob<br />
FX Parameter 1 Knob<br />
FX Parameter 2 Switch<br />
FX Parameter 1 Switch<br />
FX Amount Knob<br />
FX Parameter 3 Knob<br />
FX On<br />
FX Parameter 3 Switch<br />
APPENDIX<br />
TRAKTOR 3 LE MAPPING<br />
EQ with Kill<br />
Sync<br />
Master Effect<br />
Select<br />
Gain Load A/B<br />
Track<br />
Master<br />
Cue/Monitor<br />
Loop<br />
In/Out<br />
Browser<br />
Cue Play Cue Pause Play/Stop Crossfader<br />
TRAKTOR 3 STUDIO MAPPING<br />
Phones<br />
Volume<br />
Phones<br />
Mix<br />
All other control elements as for Traktor 3 LE (see above).<br />
Push Knob:<br />
Loop smaller<br />
Push Knob:<br />
Loop bigger<br />
Push Knob:<br />
Master Effect select<br />
Push Knob:<br />
Master Effect on<br />
ENGLISH<br />
57
FRANÇAIS<br />
58<br />
MODE D’EMPLOI<br />
FRANÇAIS<br />
Nous vous félicitons d’avoir choisi la console <strong>Reloop</strong> Digital Jockey Interface<br />
Edition, preuve de la confiance que vous accordez à notre technologie pour<br />
Disc Jockey. Avant la mise en service, nous vous prions de lire<br />
attentivement ce mode d’emploi et de respecter les instructions pendant<br />
l’utilisation.<br />
Retirez la <strong>Reloop</strong> Digital Jockey de son emballage. Avant la première mise en<br />
service, vérifiez le bon état de l’appareil. Si le boîtier ou le câble sont<br />
endommagés, n’utilisez pas l’appareil et contactez votre revendeur.<br />
CONSIGNES DE SÉCURITÉ<br />
ATTENTION !<br />
Soyez particulièrement vigilant lors des branchements avec la tension<br />
secteur 230 V. Une décharge électrique à cette tension peut être mortelle !<br />
La garantie exclu tous les dégâts dus au non-respect des instructions de ce<br />
mode d’emploi. Le fabricant décline toute responsabilité pour les dégâts<br />
matériels et personnels dus à un usage incorrect ou au non-respect des<br />
consignes de sécurité.<br />
- Cet appareil a quitté l’usine de fabrication en parfait état. Afin de conserver<br />
cet état et assurer la sécurité de fonctionnement, l’utilisateur doit<br />
absolument respecter les consignes de sécurité et les avertissements<br />
indiqués dans ce mode d’emploi.<br />
- Pour des raisons de sécurité et de certification (CE), il est interdit de<br />
transformer ou modifier cet appareil. Tous les dégâts dus à une modification<br />
de cet appareil ne sont pas couverts par la garantie.<br />
- Le boîtier ne contient aucune pièce nécessitant un entretien, à l’exception de<br />
pièces d’usure pouvant être remplacées de l’extérieur. La maintenance doit<br />
exclusivement être effectuée par du personnel qualifié afin de conserver les<br />
droits de garantie !<br />
- Les fusibles -57- doivent uniquement être remplacés par des fusibles de<br />
même type, dotés de caractéristiques de déclenchement et d’un ampérage<br />
identique.<br />
- Veillez à n’effectuer le raccordement secteur qu’une fois l’installation<br />
terminée. Branchez toujours la fiche secteur en dernier. Vérifiez que<br />
l’interrupteur principal soit sur "OFF" avant de brancher l’appareil.<br />
- Utilisez uniquement des câbles conformes. Veillez à ce que toutes les fiches<br />
et douilles soient bien vissées et correctement connectées. Si vous avez des<br />
questions, contactez votre revendeur.<br />
- Veillez à ne pas coincer ou endommager le cordon d’alimentation par des<br />
arêtes tranchantes lorsque vous installez l’appareil.<br />
- Prenez garde à ce que le cordon électrique n'entre pas en contact avec<br />
d'autres câbles et soyez prudent lorsque vous manipulez des lignes ou des<br />
prises électriques. Ne touchez jamais ces éléments avec des mains humides!<br />
- Insérez uniquement le cordon d’alimentation dans des prises électriques de<br />
sécurité. La source de tension utilisée doit uniquement être une prise<br />
électrique en ordre du réseau d’alimentation publique.<br />
- Débranchez l’appareil lorsque vous ne l’utilisez pas ou pour le nettoyer ! Pour<br />
débrancher l’appareil, tirez toujours sur la prise, jamais sur le câble !<br />
- Placez l’appareil sur une surface plane, stable et difficilement inflammable.<br />
En cas de larsen, éloignez les enceintes de l’appareil.<br />
- Évitez tous les chocs et l’emploi de la force lors de l’installation et l’utilisation<br />
de l’appareil.<br />
- Installez l’appareil dans un endroit à l’abri de la chaleur, de l’humidité et de<br />
la poussière. Ne laissez pas traîner les câbles pour votre sécurité personnelle<br />
et celle de tiers !<br />
- Ne placez jamais des récipients de liquides susceptibles de se renverser sur<br />
l’appareil ou à proximité directe. En cas d’infiltration de liquides dans le<br />
boîtier, retirez immédiatement la fiche électrique. Faites contrôler l’appareil<br />
par un technicien qualifié avant de le réutiliser. La garantie exclu tous les<br />
dégâts dus aux infiltrations de liquides.
- N’utilisez pas l’appareil dans un environnement extrêmement chaud (plus de<br />
35°C) ou froid (sous 5° C). N’exposez pas l’appareil directement aux rayons<br />
solaires ou à des sources de chaleur telles que radiateurs, fours, etc.<br />
(également valable lors du transport). Veillez à ne pas obstruer les<br />
ventilateurs ou les fentes de ventilation. Assurez toujours une ventilation<br />
convenable.<br />
- N’utilisez pas l’appareil lorsqu’il est amené d’une pièce froide dans une pièce<br />
chaude. L’eau de condensation peut détruire votre appareil. Laissez l’appareil<br />
hors tension jusqu’à ce qu’il ait atteint la température ambiante !<br />
- Ne nettoyez jamais les touches et curseurs avec des produits aérosols ou<br />
gras. Utilisez uniquement un chiffon légèrement humide, jamais de solvants<br />
ou d’essence.<br />
- Utilisez l’emballage original pour transporter l’appareil.<br />
- Réglez d’abord les curseurs de réglage et de volume de votre ampli au<br />
minimum et les interrupteurs des enceintes sur "OFF". Attendez 8 à 20<br />
secondes avant d’augmenter le volume afin d’éviter l’effet de Schottky,<br />
susceptible d’endommager les enceintes et le diviseur de fréquence.<br />
- Les appareils électriques ne sont pas des jouets. Soyez particulièrement<br />
vigilants en présence d’enfants.<br />
- Les directives de prévention des accidents de l’association des fédérations<br />
professionnelles doivent être respectées dans les établissements<br />
commerciaux.<br />
- Dans les écoles, instituts de formation, ateliers de loisirs etc. l’utilisation de<br />
l’appareil doit être effectuée sous la surveillance de personnel qualifié.<br />
- Conservez ce mode d’emploi pour le consulter en cas de questions ou de<br />
problèmes.<br />
UTILISATION CONFORME<br />
- Cet appareil est un contrôlleur MIDI professionnel avec carte son 4 cancux<br />
intégrée permettant de commander le logiciel. L’appareil doit pour cela être<br />
raccorder à un ordinateur par un câble USB.<br />
- Ce produit est certifié pour le branchement sur secteur 230 V, 50 Hz tension<br />
alternative et est exclusivement conçu pour être utilisé en local fermé.<br />
- Toute utilisation non conforme peut endommager le produit et annuler les<br />
droits de garantie. En outre, toute utilisation autre que celle décrite dans ce<br />
mode d’emploi peut être source de courts-circuits, incendies, décharge<br />
électrique, etc.<br />
- Le numéro de série attribué par le fabricant ne doit jamais être effacé sous<br />
peine d’annuler les droits de garantie.<br />
FRANÇAIS<br />
59
FRANÇAIS<br />
60<br />
ENTRETIEN<br />
- Contrôlez régulièrement le bon état de l’appareil (boîtier, cordon) et l’usure<br />
éventuelle des molettes et curseurs.<br />
- Si vous supposez que l’appareil ne peut plus être utilisé en toute sécurité,<br />
mettez l’appareil hors-service et assurez-le contre toute réutilisation<br />
involontaire. Débranchez la fiche électrique de la prise de courant !<br />
- La sécurité d’emploi est susceptible d’être affectée lorsque l’appareil est<br />
visiblement endommagé, ne fonctionne plus correctement, après un<br />
stockage prolongé dans des conditions défavorable ou après une forte<br />
sollicitation de transport.<br />
1. PREMIERS PAS :<br />
1.1 Branchement du matériel<br />
Retirer le <strong>Reloop</strong> Digital Jockey de son emballage et raccorder le bloc secteur<br />
avec la prise DC de la face arrière de l'appareil.<br />
Allumer l'appareil d'une pression sur la touche Power. Les touches Load A et<br />
Load B doivent s'allumer. Brancher à présent le câble USB ci-joint sur le<br />
Controller et un port USB libre de votre ordinateur.<br />
À la première connexion du Digital Jockey, les messages suivants (exemple<br />
Windows XP) s'affichent sur l'écran de l'ordinateur :<br />
a) Nouveau périphérique détecté – Digital Jockey<br />
b) Nouveau périphérique détecté – Périphérique audio USB<br />
c) Nouveau périphérique détecté – Le périphérique a été détecté et peut être<br />
utilisé.<br />
Sous Windows XP, Vista et Mac OS.X, le contrôleur est détecté automatiquement<br />
(Plug-N-Play) et ne requiert aucun pilote spécial.<br />
Votre matériel est à présent correctement connecté à votre ordinateur.<br />
1.2. Connexions du périphérique<br />
Votre Digital Jockey est équipé d'une interface audio professionnelle intégrée.<br />
L'utilisation d'une carte son PC externe ou intégrée n'est donc pas nécessaire.<br />
Veuillez trouver ci-dessous une liste des branchements pouvant être réalisés :<br />
a) Connexion Output (face arrière de l'appareil)<br />
Permet de raccorder votre chaîne principale, par exemple un ampli ou des<br />
enceintes actives.<br />
b) Connexion Input (face arrière de l'appareil)<br />
Permet de raccorder un lecteur, par exemple une platine vinyle ou un lecteur de<br />
disque compact pour intégrer des périphériques dans la configuration.
NOTE<br />
Un commutateur Phono/Line est situé à côté du connecteur Input pour<br />
régler la source respective raccordée. Le commutateur Input Assign CH A,<br />
CH B affecte le signal d'entrée au canaux A ou B.<br />
c) Connecteur microphone (face avant de l'appareil)<br />
Permet de raccorder un microphone dynamique conventionnel. Le logiciel<br />
Attack permet en supplément d'ajuster le volume et de paramétrer les<br />
préférences audio à l'aide des régleurs respectifs.<br />
d) Connecteur du casque (face avant de l'appareil)<br />
Cette prise permet de raccorder un connecteur. Le logiciel Attack permet en<br />
supplément d'ajuster le volume et de paramétrer les préférences audio à l'aide<br />
des régleurs respectifs.<br />
NOTE<br />
Étant donné que le <strong>Reloop</strong> Digital Jockey Interface Edition n'est pas un<br />
équipement autonome, les entrées et sorties fonctionnent uniquement avec<br />
un ordinateur et le logiciel.<br />
PHONO / LINE AMP / SPEAKERS<br />
1.3. Installation du pilote ASIO :<br />
Insérer le cédérom d'installation fourni dans votre lecteur de disque compact. Le<br />
menu d'installation démarre automatiquement.<br />
NOTE<br />
Si la fonction Autostart de votre lecteur est désactivée, vous devez ouvrir<br />
manuellement le fichier Autorun.exe du cédérom.<br />
Cliquer sur le bouton „Installer le pilote ASIO“ pour exécuter le Setup.<br />
Écran 1 :<br />
Sélectionnez votre langue et validez avec OK.<br />
MIC<br />
HEADPHONES<br />
Écran 2 :<br />
Sélectionner ensuite „Installer le pilote“ en cliquant sur le bouton respectif.<br />
FRANÇAIS<br />
61
FRANÇAIS<br />
62<br />
Écran 3 :<br />
Si votre contrôleur n'est pas connecté au port USB, branchez-le maintenant.<br />
Écran 4 :<br />
Les pilotes USB sont alors chargés.<br />
Écran 5 :<br />
Un message demande alors de débrancher le contrôleur du port USB.<br />
Écran 6 :<br />
Vous devez ensuite rebrancher le câble USB.<br />
Écran 7 :<br />
L'installation est à présent finalisée.
Écran 8 :<br />
Vous devez maintenant redémarrer votre ordinateur. Si vous désirez redémarrer<br />
l'ordinateur plus tard, cliquez sur „Redémarrer plus tard“.<br />
Les pilotes ASIO sont correctement installés après le redémarrage.<br />
1.4. Configuration logicielle <strong>Reloop</strong> Attack<br />
Exécuter le fichier Autorun.exe du cédérom ci-joint et attendre l'affichage du<br />
menu d'installation.<br />
a) Accueil de l'installation<br />
Le premier dialogue affiche l'accueil de l'installation. Cliquer sur<br />
„Suivant/Next“.<br />
b) Sélection de la version<br />
Sélectionner „Complete Version“ et valider avec „Suivant/Next“.<br />
c) Informations du client<br />
Entrez vos données, à savoir nom, société et numéro de série.<br />
NOTE<br />
Votre numéro de série personnel est écrit sur la face postérieure de la<br />
pochette du cédérom.<br />
Valider les entrées avec „Suivant/Next“.<br />
FRANÇAIS<br />
63
FRANÇAIS<br />
64<br />
d) Chemin d'installation<br />
Affiche le chemin d'installation. Le cas échéant, vous pouvez modifier le<br />
chemin. Valider la sélection avec „Suivant/Next“.<br />
e) Confirmer l'installation<br />
Confirmer l'installation en cliquant sur „Install“.<br />
L'installation est alors exécutée et il faut ensuite éventuellement redémarrer<br />
l'ordinateur.<br />
f) Installation terminée<br />
Finaliser l'installation d'un clic sur le bouton „Finish“.
MIDI DEVICES<br />
Lancer à présent le logiciel <strong>Reloop</strong> Attack en cliquant sur le symbole affiché sur<br />
le Bureau ou en sélectionnant le répertoire <strong>Reloop</strong> Software dans le menu<br />
Démarrer/Programmes. Sélectionner ensuite „Preferences“. Le bouton respectif<br />
est en haut à droite dans l'écran du logiciel. Ouvrir l'onglet „Devices“. <strong>Reloop</strong><br />
Digital Jockey Interface doit être affiché. Cliquer sur l'image <strong>Reloop</strong> Digital<br />
Jockey Interface dans l'écran „Available Type“. Cliquer ensuite sur „Digital<br />
Jockey Interface“ dans l'écran „MIDI Devices“. Le message de confirmation<br />
„Digital Jockey set as <strong>Reloop</strong> Digital Jockey is enabled“ doit alors s'afficher.<br />
FRANÇAIS<br />
65
FRANÇAIS<br />
66<br />
AUDIO DEVICES<br />
Ouvrir à présent l'onglet „Périphériques audio“ (Audio Devices).<br />
Dans le menu de sélection „Périphériques audio configurés“ (Used Audio<br />
Devices) sélectionner „Périphérique ASIO“ (ASIO Device).<br />
Ouvrir l'onglet „Configuration périphérique ASIO“ (ASIO Device Setting Page) et<br />
sélectionner „Digital Jockey Interface ASIO“ dans le menu de sélection<br />
„Périphérique audio“ (Audio Device).<br />
Sélectionner „4 canaux“ (4 Channels) en bas dans la sélection de canal (Type).<br />
Dans l'option „Sortie stéréo mixte“ (Stereo Mixed Output + Monitoring<br />
Headphones) régler sous „Sortie mixte” „OUT 0-DIGITAL<br />
JOCKEY-I“ à gauche et à droite „OUT 1-DIGITAL JOCKEY-I“.<br />
Sous „Casque“ (Headphones), régler „OUT 2-DIGITAL JOCKEY-I“ à gauche et à<br />
droite „OUT 3-DIGITAL JOCKEY-I“.<br />
Procéder aux réglages suivants pour activer les entrées (microphone ou<br />
source Phono/Line):<br />
Cocher la case „Activer entrée audio“ (Enable Audio Input).<br />
Si vous désirez utiliser un micro, régler „IN-0-DIGITAL JOCKEY-I“ à gauche et à<br />
droite „IN 1-DIGITAL JOCKEY-I“.<br />
Pour intégrer Phono/Line Input, régler „IN 2-DIGITAL JOCKEY-I“ à gauche et à<br />
droite „IN 3-DIGITAL JOCKEY-I“. Valider les entrées avec „OK“.<br />
NOTE<br />
Ces réglages ne doivent être réalisés qu'une seule fois.
Cliquer sur le bouton „OK“ pour confirmer vos entrées. Le contrôleur et le<br />
logiciel sont désormais correctement configurés et vous pouvez commencer le<br />
mixage.<br />
1.5. Configuration du logiciel Traktor 3 LE<br />
Exécuter le fichier Autorun.exe du cédérom ci-joint et attendre l'affichage du<br />
menu d'installation. Cliquer ensuite sur „Traktor 3 LE“ pour exécuter le Setup.<br />
Après le démarrage de Traktor 3 LE Setup, procéder selon les instructions<br />
affichées sur l'écran pour effectuer l'installation.<br />
NOTE<br />
Votre version de Traktor 3 LE est parfaitement adaptée au Digital Jockey.<br />
Veiller à sélectionner votre contrôleur lors de l'installation.<br />
Une fois l'installation correctement terminée, lancer Traktor 3 LE. Si Digital<br />
Jockey a été sélectionné lors de l'installation, tous les éléments de contrôle sont<br />
à présent correctement paramétrés et aucun autre réglage supplémentaire n'est<br />
requis.<br />
Vous trouverez en annexe une vue d’enssemble des affectations de Digital<br />
Jockey pour Traktor 3 LE et Traktor 3 Studio (évolutif).<br />
Note pour utilisateurs Mac : exécuter manuellement le fichier d'installation<br />
"Traktor 3 LE Installer.app" contenu sur le disque d'installation ci-joint.<br />
FRANÇAIS<br />
67
FRANÇAIS<br />
68<br />
16H<br />
14H<br />
27H<br />
15H<br />
25H<br />
19H<br />
21H<br />
8H<br />
36S<br />
17S<br />
16S<br />
28S<br />
27S<br />
19S<br />
21S<br />
18S<br />
30H<br />
29H<br />
28H<br />
26H<br />
20H<br />
18H<br />
VUE D’ENSEMBLE CONTRÔLEUR ET LOGICIEL<br />
35S<br />
34S<br />
10S<br />
24S<br />
15S<br />
20S<br />
38S<br />
4S<br />
5S<br />
6S<br />
33S<br />
32S<br />
9S 40S<br />
39S<br />
42S 43S 44S<br />
17H 22H 23H 10H 24H 2H 9H 1H 11H 12H 13H<br />
4H 5H 6H 7H<br />
NOTE!<br />
Les éléments possédant la même fonction sur le côté apposé ne sont<br />
signalés qu’une seule fois.<br />
11S<br />
12S<br />
29S<br />
31S<br />
22S<br />
14S<br />
25S<br />
26S<br />
37S<br />
8S<br />
41S<br />
7S<br />
3S<br />
13S<br />
49H
48H 47H<br />
46H<br />
55H 56H<br />
57H<br />
2. DESCRIPTIONS<br />
54H<br />
45H 50H 51H 52H<br />
1 H: ..................Trax Encoder<br />
2 H: ..................Fonction Load<br />
3 S: ..................Attack Library<br />
4 H / S: ...........Cue<br />
5 H / S:............Pause<br />
6 H / S:............Play<br />
7 H / S:............Crossfader<br />
8 H / S: ...........Curseur linéaire<br />
9 H / S:............Égaliseur 3 voies<br />
10 H / S: ..........Gain<br />
11 H / S: ...........Volume Master<br />
12 H / S: ..........Volume Cue<br />
13 H / S: ..........Cue Mix<br />
14 H / S: ..........Pitch Fader<br />
15 H / S: ..........Pitch Bend<br />
16 H / S: ..........Fonction Key Lock<br />
17 H / S: ..........Fonction Sync<br />
18 H / S: ..........Jog Wheel<br />
19 H / S: ..........Fonction Scratch<br />
20 H / S: .........Fonction Search<br />
21 H / S: ..........Fonction FX-Reverse<br />
22 H / S: .........Fonction Cue/Monitor<br />
23 H: ................Fonction Shift<br />
24 H / S: .........Fonction Loop In/Out <strong>Reloop</strong><br />
25 H / S: .........Fonction Beat Tact<br />
26 H / S: .........Fonction Save To<br />
27 H / S: .........Bancs d'échantillonnage/Fonction Hot Cue<br />
28 H / S: .........Fonction Sample Encoder<br />
29 H / S: .........Fonction Effect On/Off<br />
30 H:................Effect Encoder<br />
31 S: .................Fonction Single/Continue<br />
60H<br />
59H<br />
53H<br />
58H<br />
32 S: ................Affichage Complete View<br />
33 S: ................Affichage Infoview<br />
34 S: ................Affichage Needle View<br />
35 S: ................Fonction Auto BPM<br />
36 S: ................Fonction Edit BPM<br />
37 S:.................Fonction Sampler<br />
38 S: ................Affichage de niveau<br />
39 S: ................Fonction Mic Volume<br />
40 S:................Previous/Next<br />
41 S: .................Crossfader Curve<br />
42 S: ................Playlist max/min<br />
43 S: ................Menu Preferences/Options<br />
44 S:................Préréglages des effets<br />
45 H:................Port USB<br />
46 H:................Interrupteur Marche/arrêt<br />
47 H:................Alimentation électrique<br />
48 H: ...............Décharge de traction<br />
..................du cordon secteur<br />
49 H:................Kensington Lock<br />
50 H: ...............Sortie audio (Master)<br />
51 H:.................Entrée audio<br />
52 H:................Commutateur Phono/Line<br />
53 H:................Touche d'affectation du canal<br />
54 H:................Vis de mise à la terre<br />
55 H:................Connecteur microphone<br />
56 H:................Volume microphone<br />
57 H:................Réglages microphone<br />
58 H:................Connecteur casque<br />
59 H:................Réglages casque<br />
60 H: ...............Régleur de la courbe du Crossfader<br />
FRANÇAIS<br />
69
FRANÇAIS<br />
70<br />
L �<br />
L ��<br />
L ��<br />
L ���<br />
3. UTILISATION<br />
Après avoir achevé les premiers pas et la configuration correcte du contrôleur<br />
et du logiciel, vous pouvez maintenant les utiliser comme décrit ci-dessous.<br />
3.1. Library<br />
Attack Library désigne votre base de données pour toute votre musique. La<br />
librairie permet de rechercher des pistes et de naviguer dans celles-ci, ainsi que<br />
de consulter des informations telles que les BPM ou la durée du titre.<br />
L �<br />
L ��<br />
L ���<br />
L ����<br />
L ��<br />
L �<br />
L ��<br />
L ���<br />
L ���� L ���<br />
3.1.1. Database -LI-<br />
De préférence, il faut importer toute sa musique dans la base de données. Pour<br />
importer un répertoire entier, utiliser le raccourci „Add Directory To Database“ -<br />
L VIII. Vous pouvez aussi importer des fichiers individuels par un clic sur le<br />
bouton droit de la souris dans la fenêtre Database, puis en sélectionnant „Add<br />
Files“ dans le menu contextuel. Le logiciel prend également en charge la<br />
fonction de copie de fichiers par Cliquer&Glisser de l'Explorateur Windows.<br />
NOTE<br />
Après l'installation, un dialogue vous demande si vous désirez ajouter des<br />
fichiers dans la base de données.<br />
3.1.2. Decks -LII-<br />
Decks contient deux classeurs distincts pour Deck A et Deck B. Vous pouvez<br />
sélectionner et charger individuellement les titres que vous désirez utiliser dans<br />
une session pour les platines A et B. La fonction „Add Files“ du menu contextuel<br />
est ici également disponible.<br />
NOTE<br />
Le bouton -40 S- permet de charger la piste suivante ou précédente dans les<br />
listes de lecture des platines A / B.<br />
3.1.3. Playlist -LIII-<br />
Le classeur „My Playlist“ vous permet de créer et d'éditer vos propres listes de<br />
lecture. Vous pouvez ainsi effectuer un tri préliminaire selon des styles définis<br />
pour une liste de lecture ou préparer une session spécifique pour une nuit.<br />
Utiliser le raccourci „Add New Playlist“ -L V- pour créer une nouvelle liste de<br />
lecture. Cliquer sur la liste de lecture avec le bouton droit de la souris pour entrer<br />
un nom. L'importation de pistes dans la liste de lecture s'effectue au choix par<br />
Cliquer&Glisser dans d'autres classeurs (base de données, platines, Explorateur<br />
Windows) ou avec la fonction „Add Files“ (clic sur le bouton droit ou raccourci<br />
„Add Files“ -L IX-.
3.1.4. iTunes Playlist -LIV-<br />
Affiche automatiquement vos listes de lecture iTunes. Ces listes peuvent<br />
également être éditées et adaptées comme décrit plus haut.<br />
NOTE<br />
La fonction „Import iTunes Library File To Database“ -L VII- permet<br />
d'ajouter votre librairie iTunes entière à la base de données (format xml)<br />
d'un seul clic.<br />
3.1.5. Raccourcis<br />
-LV- „Add New Playlist“<br />
Créer une nouvelle liste de lecture.<br />
-LVI- „Delete Playlist“<br />
Supprimer une liste de lecture sélectionnée.<br />
-LVII- „Import iTunes Library To Database“<br />
Importer la librairie iTunes dans la base de données.<br />
-LVIII- „Add Directory To Database“<br />
Ajouter un classeur complet à la base de données.<br />
-LIX- „Add Files“<br />
Ajouter des fichiers individuels à une liste de lecture ou une base de<br />
données sélectionnée. Les formats suivants sont pris en charge :<br />
.ACC, .CDA, .FLAC, .MP3, .WAV<br />
-LX- „Delete Selected Files“<br />
Supprimer des fichiers spécifiés d'une liste de lecture ou d'une base de<br />
données.<br />
-LXI- „Analyze Selected Files“<br />
Analyser automatiquement des fichiers spécifiés pour afficher des<br />
informations telles que BPM, taille du fichier ou durée du titre.<br />
NOTE<br />
Ceci ne doit être effectué qu'une seule fois pour une piste. Ces méta<br />
informations sont alors enregistrées pour la piste respective.<br />
-LXII- „Clear List“<br />
Supprimer d'un clic le contenu d'une liste de lecture ou d'une base de<br />
données.<br />
-LXIII- „Select All“<br />
Sélectionner tous les titres d'une liste de lecture ou d'une base de<br />
données.<br />
-LXIV- „List View“<br />
Affiche les contenus de la base de données ou de la liste de lecture sélectionnée.<br />
Les informations pouvant être affichées sont :<br />
• File Name (nom du fichier)<br />
• Title (titre)<br />
• Type (format)<br />
• Artist (Interprète)<br />
• Album<br />
• Beats Per Minute (BPM)<br />
• Duration (Durée du titre)<br />
• File Size (taille du fichier)<br />
FRANÇAIS<br />
71
FRANÇAIS<br />
72<br />
D ����<br />
NOTE<br />
Cliquer sur le bouton droit de la souris dans la barre d'infos de la List View<br />
pour afficher ou masquer différentes informations.<br />
3.1.6. Waveform-Displays<br />
Vous disposez de deux oscillogrammes détaillés :<br />
a) Complete View -32 S-:<br />
Complete View affiche le tracé de l'onde de la piste entière. Vous pouvez<br />
clairement visualiser la dynamique de la piste, par exemple les intros ou les<br />
changements de rythme d'une piste. La partie écoulée de la piste actuelle est<br />
représentée plus sombre dans la Complete View.<br />
NOTE<br />
Cliquer directement dans la Complete View pour accéder à certaines zones<br />
de la piste.<br />
b) Needle View -34 S-:<br />
Needle View affiche les deux oscillogrammes superposés et agrandis. Vous<br />
pouvez détecter des battements de graves ou du tempo. Vous pouvez en outre<br />
voir si deux pistes sont synchrones.<br />
NOTE<br />
Vous pouvez régler l'agrandissement en enfonçant le bouton droit de la<br />
souris dans Needle View et en déplaçant la souris vers le haut ou le bas.<br />
3.1.7. Keyword<br />
Ce champ de recherche rapide permet d'entrer des chaînes de caractères ou des<br />
mots complets pour accéder rapidement au titre recherché.<br />
3.1.8. Info View Detail -33 S-<br />
D � D �� D ��� D �� D � D �� D ���<br />
D�� D �� D ��� D ���� D�<br />
DI: Affichage Play<br />
Indique si la piste est en mode de lecture. Le témoin D VIII s'allume également<br />
en tant que signal optique.<br />
DII: Affichage du format<br />
Affiche le format de la piste actuellement chargée.<br />
DIII: Mode de lecture<br />
Cliquer sur „SGL/CTN“ (Single/Continue) -31 S- pour modifier le mode de lecture.<br />
Sélectionner au choix :<br />
a) Single : la piste est lue et la lecture s'arrête à la fin de la piste.<br />
NOTE<br />
Lorsqu'une piste est lue sur Deck A / Deck B, à la fin de la piste, la piste<br />
suivante est chargée dans le lecteur et le lecteur passe en mode Pause.<br />
b) Repeat : la piste est lue et répétée en boucle sans fin.<br />
c) Repeat All : à la fin de la dernière piste de la liste de lecture Deck A / Deck B,<br />
la première piste passe de nouveau en lecture et toute la liste est répétée.
DIV: Affichage Auto Cue<br />
Indique si la fonction Auto Cue est activée. Vous pouvez activer ou désactiver la<br />
fonction Auto Cue dans le menu des préréglages -43 S- de l'onglet „Préréglages<br />
audio“ (Audio System Settings), à l'option „Activer Auto Cue“ (Enable Auto Cue).<br />
DV: Affichage Auto BPM<br />
Indique si l'analyse automatique des BPM est activée ou non.<br />
DVI: Témoin Cue<br />
Ce témoin clignote lors de la définition d'un point Cue et en mode Cue.<br />
DVII: Affichage Remain:<br />
Indique si l'affichage de durée Remain ou Elapsed est activé :<br />
Remain : indique la durée restante d'une piste.<br />
Elapsed : indique la durée écoulée d'une piste.<br />
NOTE<br />
Cliquer sur l'affichage de durée -DXIII- pour régler le mode Remain/Elapsed.<br />
DVIII: voir DI<br />
DIX: Affichage du numéro de la piste<br />
Indique le numéro du titre sur la liste de lecture Deck A / Deck B -LII-.<br />
DX: Affichage du titre<br />
Affiche le titre de la piste chargée.<br />
DXI: Témoin BPM<br />
Indique la valeur BPM actuellement calculée.<br />
DXII: Témoin Pitch<br />
Indique la valeur Pitch actuellement réglée.<br />
DXIII: Affichage de la durée<br />
Indique la durée actuelle en mode Remain ou Elapsed. (voir DVII)<br />
NOTE<br />
La durée est affichée en minutes, secondes et Frames.<br />
3.2. Naviguer dans les pistes et charger<br />
Le grand Trax Encoders -1 H- permet de naviguer dans la base de données ou la<br />
liste de lecture sélectionnée. Pour charger la piste désirée dans le lecteur, cliquer<br />
sur le bouton Load A ou Load B -2 H-.<br />
Pour naviguer dans les classeurs ou les listes de lecture, enfoncer Shift -23 H- et<br />
tourner le Trax Encoder -1 H-.<br />
NOTE<br />
Enfoncer le Trax Encoder -1 H- ou cliquer sur le bouton „Playlist“ -42 Spour<br />
maximiser ou minimiser l'affichage de la liste de lecture.<br />
NOTE<br />
La touche Shift -23 H- permet d'utiliser la deuxième fonction d'un élément<br />
de commande. Le nombre d'éléments compatibles MIDI est ainsi doublé<br />
grâce à la touche Shift -23 H-. Tenir compte des indications de deuxième<br />
affectation d'une touche pour utiliser toutes les fonctions de votre<br />
contrôleur.<br />
FRANÇAIS<br />
73
FRANÇAIS<br />
74<br />
3.3. Transport Controls<br />
Sous la Jog Wheel -18 H-, trois touches servent à exécuter les fonctions lecture,<br />
Cue et pause d'une piste.<br />
La touche Play -6 H- sert à lire la piste chargée auparavant. Appuyer de nouveau<br />
sur Play -6 H- pour lire la piste hachée (Stutter) depuis le dernier point Cue défini<br />
(fonction Bop).<br />
Pour pauser la piste, cliquer sur la touche Pause -5 H-.<br />
La touche Cue -4 H- permet d'accéder au dernier point Cue défini en mode<br />
Pause. Appuyer sur cette touche en mode Pause déclenche la lecture de la piste<br />
depuis le point Cue tant que la touche reste enfoncée.<br />
3.4. Définir les points Cue<br />
Vous disposez de deux méthodes pour définir un point Cue.<br />
a) La première méthode est Frame Search. En mode Pause, naviguer jusqu'au<br />
point Cue désiré avec la Jog Wheel -18 H / S- et cliquer ensuite sur Play -6 H<br />
/ S-. Le point Cue est défini au point Play.<br />
b) La deuxième méthode est la fonction Loop In. Pendant la lecture, appuyer<br />
sur la touche Loop In -24 H / S- pour définir un point Cue.<br />
3.5. Section console de mixage<br />
Le Crossfader -7 H / S- vous permet d'enchaîner de Deck A à Deck B et<br />
inversement. Vous pouvez régler le volume des différents canaux avec les<br />
curseurs linéaires -8 H / S-. Votre logiciel est équipé d'un égaliseur à 3 voies -9<br />
H / S- pour affiner le réglage du contrôleur. Appuyer sur les potentiomètres de<br />
l'égaliseur -9 H- pour activer la fonction Kill dans la gamme de fréquence<br />
respective. La DEL Kill respective s'allume pour indiquer que la fonction Kill est<br />
activée. Appuyer de nouveau sur la touche pour désactiver la fonction Kill.<br />
Le régleur de Gain -10 H / S- sert à ajuster le volume des canaux.<br />
Le régleur Master -11 H / S- permet de régler le volume principal. Le régleur de<br />
volume Cue -12 H / S- ajuste le volume du casque.<br />
Le régleur Cue Mix -13 H / S- sert à modifier le rapport du signal Master et du<br />
canal Cue sélectionné. Ceci est utile pour la pré écoute d'un mixage dans le<br />
casque.<br />
L'affichage du niveau -38 S- indique la saturation de la piste.<br />
Le casque peut être activé avec les touches Cue -22 H / S- pour chaque côte.<br />
Vous pouvez ainsi pré écouter une piste d'un côté tandis que l'autre est en cours<br />
de lecture sur la sortie Master.<br />
NOTE<br />
Utiliser le régleur Cue-Mix -13 H / S- pour simuler un Pre-Mix de Cue sur<br />
Master dans le casque.<br />
Le régleur de volume Mic -39 S- sert, le cas échéant, à ajuster le volume d'un<br />
microphone raccordé.<br />
Le régleur Long/Cut -41 S- permet de régler progressivement la courbe du<br />
Crossfader de fermée à souple.Le régleur se trouve aux devant de<br />
l'appareil -60 H-.<br />
NOTE!<br />
Voir aussi chapitre 1.2 Connexion Périphériques.
3.6. Contrôle de vitesse<br />
Le Pitchfader -14 H / S- sert à contrôler la vitesse. Déplacer le curseur vers le<br />
haut pour diminuer la vitesse. Déplacer le curseur vers le bas pour augmenter la<br />
vitesse. La valeur de BPM actuellement réglée est affichée dans l’écran Infos<br />
sous -DXII-.<br />
Le Pitch réglé est affiché dans le logiciel à gauche/droite à côté du Pitchfader.<br />
La gamme peut être réglée sur +/-4%, +/-8%, +/-16& et +/-100%.<br />
Vous pouvez modifier la gamme de vitesse soit en cliquant directement dans le<br />
logiciel, soit à l'aide des raccourcis sur le contrôleur : Shift -23 H- et touches<br />
Pitch Bend -15 H-. La touche Moins diminue la gamme et la touche Plus<br />
l'augmente.<br />
Les touches Pitch Bend +/- -15 H / S- permettent d'augmenter ou de réduire la<br />
vitesse momentanément en maintenant la touche enfoncée. Le tempo peut au<br />
maximum être varié momentanément dans la gamme Pitch respective activée.<br />
Cette fonction est utile pour caler deux pistes de tempo identique, mais dont la<br />
lecture n'est pas synchronisée.<br />
La fonction Keylock -16 H / S- sert à "fixer" la hauteur du ton, donc de conserver<br />
la hauteur du ton initiale quel que soit le tempo. Vous pouvez ainsi éviter l'effet<br />
„Mickey Mouse“.<br />
La fonction Sync -17 H / S- vous permet de synchroniser deux pistes<br />
automatiquement. Les valeurs BPM et Pitch du côté Sync respectif sont alors<br />
calées sur celles de l'autre lecteur. Cette fonction commode permet de mixer<br />
plus rapidement par un gain de temps pour la synchronisation du tempo. Le<br />
Speed-Matching classique avec le Pitch est bien entendu aussi disponible.<br />
NOTE<br />
La fonction Sync se base sur une analyse des BPM, cependant, il n'est pas<br />
possible de garantir qu'elle soit adéquate pour tous les styles de musique et<br />
types de chanson. Il faut donc toujours pré écouter et ajuster avant le<br />
mixage.<br />
Si les BPM d'une piste ne sont pas affichés correctement (par ex. BPM excessif<br />
ou trop faible), ce qui peut se produire avec les styles Breakbeats ou Drum &<br />
Bass, vous pouvez analyser les BPM manuellement. Cliquer sur le bouton Edit<br />
BPM -36 S- pour ouvrir le menu BPM manuel.<br />
FRANÇAIS<br />
75
FRANÇAIS<br />
76<br />
Vous disposez de deux méthodes pour régler les BPM manuellement :<br />
a) Fonction Tap :<br />
frapper la touche Tap avec la souris au rythme du tempo pour régler les BPM<br />
manuellement.<br />
NOTE<br />
Vous pouvez aussi effectuer ceci directement dans l'écran d'informations<br />
sur l'affichage BPM.<br />
b) Fonction BPM Set :<br />
vous pouvez aussi directement entrer les BPM et valider avec la touche Set. Une<br />
pression sur les touches „x 2“ et „/ 2“ permet de doubler les BPM ou de les<br />
diviser par deux.<br />
Cliquer sur le bouton Masquer (Hide) pour quitter le menu Edit BPM.<br />
NOTE<br />
Pour réactiver la fonction Auto BPM, appuyer sur le bouton Auto BPM -35<br />
S-. !A.BPM“ -D V- est affiché en rouge sur l'écran.<br />
3.7. Section Jog Wheel -18 H / S-<br />
Votre Digital Jockey Controller est équipé d'une Jog Wheel haute résolution<br />
surdimensionnée -18 H / S-, permettant d'exécuter différentes fonctions.<br />
a) Fonction Frame Search :<br />
lorsque le lecteur est en mode Pause/Cue, la Jog Wheel permet de rechercher<br />
une séquence avec précision, par exemple pour définir un point Cue.<br />
b) Fonction Pitch Bend :<br />
lorsque le lecteur est en mode de lecture, la Jog Wheel sert à exécuter la<br />
fonction Pitch Bend. Comme avec une platine vinyle, vous pouvez accélérer ou<br />
freiner la vitesse en tournant momentanément dans le sens des aiguilles d'une<br />
montre ou dans le sens contraire, afin de synchroniser les pistes.<br />
NOTE<br />
Vous pouvez aussi utiliser les touches Pitch Bend -15 H / S-.<br />
c) Fonction Scratch -19 H / S-:<br />
appuyer d'abord sur la touche Scratch -19 H / S- pour activer le mode Scratch.<br />
Vous pouvez à présent scratcher avec la Jog Wheel -18 H / S- comme avec une<br />
platine vinyle normale.<br />
d) Fonction Search -20 H / S-:<br />
appuyer d'abord sur la touche Search -20 H / S- pour activer le mode de<br />
recherche rapide. Vous pouvez à présent naviguer dans une piste en avant et en<br />
arrière en tournant la Jog Wheel à droite ou à gauche.
e) Fonction FX/Reverse -21 H / S-:<br />
appuyer d'abord sur la touche FX/Reverse -21 H / S- pour activer ce mode. Vous<br />
disposez de 3 options au choix.<br />
• Effet Reverse :<br />
si Reverse est marqué dans le menu de sélection, la touche FX/Reverse<br />
-21 H / S- active l'inversion.<br />
• Fonction effet 1 :<br />
si Effet 1 est marqué dans le menu de sélection, l'effet est activé depuis la<br />
section Effets -29 S-. La Jog Wheel -18 H / S- sert alors à moduler un<br />
paramètre de l'effet respectif.<br />
NOTE<br />
Enfoncer la touche Shift -23 H- et tourner la Jog Wheel -18 H- pour moduler<br />
le deuxième paramètre.<br />
• Fonction effet 2 :<br />
voir b)<br />
Vous trouverez d'autres détails au chapitre 3.8. Section Effets.<br />
3.8. Section Effets<br />
Votre logiciel <strong>Reloop</strong> Attack dispose de plus de 8 superbes effets. Jusque deux<br />
effets peuvent être activés simultanément sur chaque lecteur.<br />
NOTE<br />
Il est uniquement possible de combiner deux effets différents par lecteur.<br />
Les touches -29 H / S- servent à (dés-)activer l'effet correspondant. L'effet<br />
sélectionné est affiché dans le menu de sélection sous les touches d'activation.<br />
Vous pouvez directement sélectionner un autre effet avec la souris. Pour<br />
commuter un effet avec le contrôleur, enfoncer la touche Shift -23 H- et appuyer<br />
sur la touche Effet 1 ou Effet 2 -29 H- pour commuter entre les différents effets.<br />
Deux paramètres sont réglables sur chaque effet. Les effets suivants sont<br />
disponibles :<br />
Nom de l'effet : Paramètre Time: Paramètre Ratio:<br />
1. Delay 0 – 9.999 Delay Intervall 0 – 255 Delay Gain<br />
2. Skid 100 – 9.999 Stop Time 100 – 9.999 Start Time<br />
3. Filtre 0 – 9.999 Scan Intervall 0 – 255 Filtre Frequence<br />
4. Phase 1 – 9.999 Phasen-Intervall 0 – 255 Sweep Gain<br />
5. Flanger 1 – 9.999 Wellenform Intervall 0 – 255 Mix Gain<br />
6. Echo 0 – 9.999 Echo intervall 0 – 255 Echo Gain<br />
7. Trans 30 – 9.999 Trans Intervall 0 – 255 Trans Intensity<br />
8. Pan 0 – 9.999 Pan Intervall 0 – 255 Pan Gain<br />
FRANÇAIS<br />
77
FRANÇAIS<br />
78<br />
Les paramètres d'effet peuvent être réglés dans le menu de préréglage des<br />
effets. Pour accéder au menu de préréglage des effets, vous pouvez cliquer sur<br />
le bouton -44 S- ou utiliser le raccourci Shift -23 H- et une pression sur un des<br />
Encoders -30 H-. Les préréglages d'effets sont divisés en Deck A et Deck B.<br />
Les paramètres d'effet plus haut cités peuvent ici être réglés individuellement<br />
pour chaque effet. Ajuster l'effet en déplaçant l'indicateur avec la souris vers la<br />
gauche ou la droite. Pour moduler avec le contrôleur, tourner le Level-Encoder -<br />
30 H- pour régler le paramètre Ratio et le Time-Encoder -30 H- pour régler le<br />
paramètre Time.<br />
NOTE<br />
L'effet Encoder Time a été réglé sur une grille de tempo de rythme pour une<br />
meilleure manipulation. Vous pouvez sélectionner les tempos 1/4 – 4/1 par<br />
rotation.
Modulation d'effet avec Jog Wheel<br />
Vous pouvez aussi moduler le paramètre d'effet avec la Jog Wheel -18 H-. Régler<br />
l'effet désiré et activer le mode FX/Reverse -21 S- sur Effet 1 ou Effet 2.<br />
NOTE<br />
Pour commuter le mode FX/Reverse avec le contrôleur, enfoncer la touche<br />
Shift -23 H- et cliquer sur FX/Reverse -21 H-.<br />
Vous pouvez alors, selon l'effet sélectionné, régler progressivement le<br />
paramètre Ratio de l'effet avec la Jog Wheel -18 H-. Pour moduler le paramètre<br />
Time, enfoncer la touche Shift -23 H- et tourner la Jog Wheel -18 H-.<br />
NOTE<br />
Si FX/Reverse Slot est réglé sur Effet 1 ou Effet 2 -21 S-, la touche<br />
FX/Reverse -21 H- permet d'activer et de désactiver l'effet.<br />
3.9. Section Sample, Loop & point Cue<br />
3.9.1. Points Cue<br />
Vous pouvez définir un point Cue selon deux méthodes.<br />
a) Cliquer sur la touche Loop-In -24 H- pendant la lecture. Le point Cue est alors<br />
défini sur pression de la touche et affiché par un „C“ dans l'écran Needle<br />
View.<br />
b) Vous pouvez aussi rechercher une séquence en mode Pause avec la Jog<br />
Wheel -18 H-. Appuyer sur la touche Play -6 H / S- au point désiré pour définir<br />
le point Cue.<br />
NOTE<br />
Ceci fonctionne aussi si la fonction Scratch est activée.<br />
Si vous désirez enregistrer ce point Cue, cliquer sur la touche Save To -26 H / Set<br />
sur un banc Sample Cue -27 H / S-. Le point Cue est enregistré jusqu'à ce qu'il<br />
soit écrasé par la définition d'un nouveau point Cue.<br />
3.9.2. Loops<br />
Loop manuelle :<br />
Pour définir une boucle manuellement, cliquer sur la touche Loop-In -24 H / Spour<br />
définir le point initial et sur la touche Loop-Out -24 H / S- à la fin de la<br />
boucle. Votre lecteur commute alors en mode de boucle sans fin. Cliquer sur la<br />
touche Loop-Out -24 H / S- pour quitter ce mode.<br />
NOTE<br />
Si vous appuyez sur la touche Loop-Out / <strong>Reloop</strong> -24 H- lors du mode de<br />
lecture normal, le lecteur retourne à la dernière boucle définie.<br />
Auto-Loop :<br />
Si la valeur BPM d'un titre a été analysée, une boucle Beat automatique peut<br />
être réglée sur pression d'une touche. Cliquer pour cela sur la touche Beat Tact<br />
-25 H / S- pour commuter le lecteur en mode Loop. Le tempo réglé est affiché à<br />
côté de la touche Beat Tact (apple – 8/1). Vous pouvez modifier ce tempo en cliquant<br />
dans le logiciel au rythme avec la souris ou directement appuyer sur la touche<br />
Beat Tact -25 H- du contrôleur. Pour quitter la boucle, cliquer sur la touche Loop-<br />
Out -24 H / S-.<br />
FRANÇAIS<br />
79
FRANÇAIS<br />
80<br />
P���<br />
P����<br />
P���<br />
P��<br />
NOTE<br />
Pour prérégler le Beat Tact, enfoncer la touche Shift -23 H- et cliquer sur<br />
Beat Tact -25 H-.<br />
3.9.3. Fonction Sample<br />
Vous pouvez également enregistrer une boucle créée sur deux bancs<br />
d'échantillons. Après avoir défini la boucle, cliquer sur la touche Save To -26 H /<br />
S- et sélectionner le banc d'échantillon 1 ou 2 -27 H / S-. La boucle est à présent<br />
enregistrée sur le banc d'échantillon respectif.<br />
NOTE<br />
Le banc d'échantillon peut ainsi servir de Hot Cue ou de mémoire de boucle<br />
selon le point Cue ou la boucle définis en dernier.<br />
Pour lire l'échantillon avec la musique, activer le mode Sampler d'une pression<br />
sur la touche Sampler -37 S- ou sur le Sample Encoder -28 H-. Vous pouvez<br />
ensuite lire l'échantillon en appuyant sur le bouton du banc d'échantillon -278 Hrespectif.<br />
Les Sample-Encoder -28 H- permettent de régler le volume de l'échantillon à<br />
gauche et la longueur à droite.<br />
NOTE<br />
Ceci fonctionne uniquement en mode Sampler.<br />
Les encodeurs Volume/Length sont affectés en fonction du dernier banc<br />
d'échantillon reproduit. Pour arrêter l'échantillon, désactiver le mode Sampler<br />
en appuyant sur le Sampler Encoder -28 H- ou sur la touche Sampler -37 S-.<br />
4. PREFERENCES<br />
• Audio System Setting<br />
P�� P���
PI: Enable Auto Cue<br />
Si cette fonction est activée, un point Cue est défini automatiquement au<br />
premier battement de la piste.<br />
PII: Save Data When Program Exits<br />
Si cette fonction est activée, vos données (par ex. points Cue, échantillons ou<br />
valeurs Fader et Pitch) sont enregistrées à la fermeture du programme.<br />
PIII / PIV: Replay Gain<br />
Ce régleur -P IV- vous permet d'ajuster le niveau de la préamplification, par<br />
exemple pour une platine vinyle connectée. Les valeurs réglables vont de 80 à<br />
100 dB. Cocher la cache P III pour activer cette fonction.<br />
NOTE<br />
Si cette fonction est activée, le logiciel Attack analyse le Gain à la première<br />
lecture de la piste et l'enregistre dans la base de données. Le matériel audio<br />
est alors adapté automatiquement avec différentes valeurs de gain.<br />
PV: Loop/Sampler-Buffer Length<br />
Le régleur -P V- vous permet de régler la taille du tampon d'échantillons. La<br />
longueur d'une boucle peut être réglée entre 8 et 30 secondes.<br />
PVI: Auto Beat Sync<br />
Permet de régler une durée de 0 – 2000 mSec. pour la synchronisation du<br />
tempo. Si la valeur est sur „0“, le tempo est synchronisé sans délai.<br />
• Audio Device<br />
Normalement, vous avez déjà effectué les réglages audio ASIO corrects pour<br />
votre interface lors des premiers pas. Voir aussi chapitre 1.4., section "Audio<br />
Devices".<br />
Veuillez trouver ci-dessous une liste détaillée des options DirectSound<br />
disponibles:<br />
P���<br />
P����<br />
P�����<br />
P����<br />
P���<br />
P�����<br />
P������<br />
P����<br />
P����<br />
P�����<br />
P���<br />
P��<br />
P����<br />
FRANÇAIS<br />
81
FRANÇAIS<br />
82<br />
PVII: 1st Audio Device<br />
Régler la carte son respective dans le menu de sélection.<br />
PVIII / PIX / PX: 2nd Audio Device<br />
Si votre carte son possède au moins quatre canaux ou si vous avez une<br />
deuxième carte, vous pouvez ici les sélectionner et les activer. Si vous désirez<br />
paramétrer la deuxième carte son pour optimiser la latence, activer „Device<br />
Parameter“ -PIX- et régler la latence avec le régleur -PX-.<br />
NOTE<br />
Si le signal crépite ou est absent en raison d'un réglage trop faible de la<br />
latence, il faut augmenter le réglage de la latence avec le régleur -PX-.<br />
PXI / PXII: 3rd Audio Device<br />
<strong>Reloop</strong> Attack prend en charge jusque trois cartes son. Cocher la case du champ<br />
-P XI- pour sélectionner la troisième carte son et -P XII- pour l'activer.<br />
PXIII: Type<br />
Permet de configurer votre routage personnalisé des cartes son. Veuillez trouver<br />
ci-dessous une liste détaillée :<br />
2 canaux sortie stéréo mixte (standard)<br />
4 canaux 1 x sortie stéréo mixte;<br />
1 x sortie casque stéréo<br />
4 canaux (externe) sert à connecter une console de mixage externe et<br />
contourner l'égaliseur et le contrôle de Gain internes. 2 x<br />
sorties stéréo<br />
6 canaux 2 x sorties stéréo mixtes;<br />
1 x sortie casque stéréo<br />
2 canaux x 2 1 x sortie stéréo mixte et 1 x sortie casque sur 2 cartes son<br />
différentes<br />
2 x canaux x 2 (externe) sert à connecter une console de mixage externe et<br />
contourner l'égaliseur et le contrôle de Gain internes. 2 x<br />
sorties stéréo de 2 cartes son différentes<br />
2 canaux x 3 2 x sorties stéréo mixtes sur 2 cartes son;<br />
1 x sortie casque stéréo sur 3 cartes son différentes<br />
PXIV / PXV / PXVI: Channel Setting<br />
Les menus de sélection sous les options -PXIV, PXV, PXVI- permettent de<br />
sélectionner les canaux respectifs pour les sorties mixtes, le casque et le cas<br />
échéant, la platine de droite.<br />
PXVII / PXVIII / PXIX: Record Device<br />
Le champ -PXVII permet d'activer l'entrée. Sélectionner l'entrée respective des<br />
cartes son dans le menu de sélection -PXVIII- et le type correspondant dans<br />
-PXIX-. Vous pouvez ici affecter, par exemple, un microphone.
P���<br />
P����<br />
P�����<br />
P�����<br />
P����<br />
P������<br />
P�����<br />
• Keyboard Shortcuts<br />
Dans les réglages des raccourcis, vous pouvez affecter au choix différentes<br />
fonctions à une touche de votre clavier. Sélectionner la platine respective dans<br />
le menu de sélection -PXX-. Sélectionner la fonction désirée dans le menu de<br />
sélection -PXXI-. L'affectation actuelle est affichée dans le champ -PXXII-. La<br />
description de la fonction est affichée dans le champ -P XIII-. Sélectionner la<br />
touche à laquelle vous désirez affecter la fonction et appuyer sur le bouton<br />
„Assign To Action“ -PXXIV-, pour appliquer la fonction.<br />
NOTE<br />
Un message est affiché en cas de double affectation ou d'écrasement.<br />
Pour supprimer une affectation existante, cliquer sur le bouton Remove -PXXV-.<br />
Pour enregistrer ou charger une liste d'affectations personnalisée, utiliser le<br />
bouton -PXXVI-.<br />
FRANÇAIS<br />
83
FRANÇAIS<br />
84<br />
5. MATÉRIEL REQUIS<br />
Configuration minimum :<br />
• Intel Pentium 4, processeur 1 GHz, Intel Centrino Mobile Technology 1,6 GHz<br />
ou supérieur<br />
• Les processeurs Intel Celeron NE SONT PAS recommandés<br />
• Microsoft Windows XP ou Vista<br />
• DirectX 9 ou supérieur<br />
• Windows Media Player 9 ou supérieur<br />
• RAM 512MO<br />
• Espace disque 250MO (200MO pour le cache)<br />
Configuration recommandée :<br />
• Intel Pentium 4, processeur 2,4 GHz, Intel Centrino Mobile Technology 1,6<br />
GHz ou supérieur<br />
• Microsoft Windows XP ou Vista<br />
• DirectX 9 ou supérieur<br />
• RAM 2 GO<br />
• Espace disque 550MO (500MO pour le cache)<br />
INFOS & UPDATES SUR: www.digital-jockey.dj
Keylock<br />
Only mapped in Traktor 3 Studio<br />
FX Parameter 3<br />
Pitchbend<br />
Auto Loop<br />
Scratch<br />
Reverse Play<br />
Pitchfader<br />
FX Parameter 2<br />
FX Amount<br />
FX TAP<br />
FX ON<br />
Set Cue<br />
Jog Wheel<br />
(Pitch Bend/Scratch)<br />
Line Fader<br />
FX Parameter 2 Knob<br />
FX Parameter 1 Knob<br />
FX Parameter 2 Switch<br />
FX Parameter 1 Switch<br />
FX Amount Knob<br />
FX Parameter 3 Knob<br />
FX On<br />
FX Parameter 3 Switch<br />
ANNEXE<br />
TRAKTOR 3 LE MAPPING<br />
EQ with Kill<br />
Sync<br />
Master Effect<br />
Select<br />
Gain Load A/B<br />
Track<br />
Master<br />
Cue/Monitor<br />
Loop<br />
In/Out<br />
Browser<br />
Cue Play Cue Pause Play/Stop Crossfader<br />
TRAKTOR 3 STUDIO MAPPING<br />
Phones<br />
Volume<br />
Phones<br />
Mix<br />
Autres éléments de contrôlle comme pour Traktor 3 LE (voir plus haut).<br />
Push Knob:<br />
Loop smaller<br />
Push Knob:<br />
Loop bigger<br />
Push Knob:<br />
Master Effect select<br />
Push Knob:<br />
Master Effect on<br />
FRANÇAIS<br />
85
<strong>Reloop</strong> Distribution<br />
Global Distribution GmbH, Schuckertstr. 28, 48153 Münster/Germany<br />
Fax +49.251.6099368<br />
© COPYRIGHT<br />
Nachdruck verboten!<br />
Reproduction prohibited!<br />
Réproduction interdite !