K/KU TN 70/72 K/KU TNV 70/140
K/KU TN 70/72 K/KU TNV 70/140
K/KU TN 70/72 K/KU TNV 70/140

You also want an ePaper? Increase the reach of your titles
YUMPU automatically turns print PDFs into web optimized ePapers that Google loves.
ARMADI REFRIGERATI<br />
REFRIGERATORS<br />
KÜHLSCHRÄNKE<br />
ARMOIRES REFRIGERÉES<br />
-2 / +8 °C<br />
K/<strong>KU</strong> <strong>TN</strong> <strong>70</strong>/<strong>72</strong><br />
K/<strong>KU</strong> <strong>TN</strong> <strong>140</strong>/142/144<br />
K/<strong>KU</strong> <strong>TN</strong>V <strong>70</strong>/<strong>140</strong><br />
K <strong>TN</strong> 60/62/120/122/124<br />
K <strong>TN</strong>V 60/120<br />
e / and / und / et<br />
ARMADI COMBINATI<br />
COMBINED REFRIGERATORS<br />
KOMBI-KÜHLSCHRÄNKE<br />
ARMOIRES COMBINEES<br />
ISTRUZIONI PER L’INSTALLAZIONE<br />
L’USO E LA MANUTENZIONE<br />
INDICE<br />
AVVERTENZE GENERALI E DATI TECNICI 2<br />
RICEVIMENTO 5<br />
PANNELLO DI COMANDO 7<br />
MESSA IN FUNZIONE E DISMISSIONE 9<br />
PULIZIA E MANUTENZIONE 10<br />
RICERCA GUASTI 11<br />
SCHEMA ELETTRICO 46<br />
INSTALLATION, USE AND<br />
MAINTENANCE INSTRUCTIONS<br />
INDEX<br />
GENERAL NOTICES 13<br />
RECEPTION 16<br />
CONTROL PANEL 18<br />
START-UP AND DISPOSAL OF UNIT 20<br />
CLEANING AND MAINTENANCE 21<br />
FAULT FINDING 22<br />
WIRING DIAGRAM 46<br />
AUFSTELLUNGS-, BEDIENUNGS-<br />
UND WARTUNGSANWEISUNGEN<br />
INHALT<br />
ALLGEMEINE HINWEISE UND TECHNISCHE DATEN 24<br />
ERHALT DER WARE 27<br />
SCHALTTAFEL 29<br />
INBETRIEBNAHME 31<br />
REINIGUNG UND WARTUNG 32<br />
STÖRUNGSSUCHE 33<br />
ELEKTRISCHES SCHEMA 46<br />
NOTICE D’INSTALLATION,<br />
D’EMPLOI ET D’ENTRETIEN<br />
TABLE DES MATIERES<br />
RECOMMANDATIONS GENERALES ET DONNEES TECHNIQUES 35<br />
RECEPTION 38<br />
PANNEAU DE COMMANDE 40<br />
MISE EN SERVICE ET ELIMINATION 42<br />
NETTOYAGE ET ENTRETIEN 43<br />
RECHERCHE DES PANNES 44<br />
SCHEMA ELECTRIQUE 46<br />
14480000396
14480000396-I<br />
Il presente manuale è stato realizzato per permettere una corretta<br />
installazione, messa a punto e manutenzione dell’apparecchio;<br />
è quindi di fondamentale importanza che :<br />
- le avvertenze contenute nel presente libretto siano lette attentamente<br />
in quanto forniscono importanti indicazioni circa la<br />
sicurezza di installazione, d’uso e di manutenzione.<br />
- il presente manuale e lo schema elettrico siano conservati con<br />
cura e messi a disposizione dell’operatore per ogni ulteriore<br />
consultazione.<br />
- l’apparecchio sia installato, collaudato e assistito da personale<br />
qualificato in possesso dei requisiti di legge.<br />
• Viene declinata ogni responsabilità del produttore con decadimento<br />
della garanzia in caso di modifiche elettriche e/o meccaniche.<br />
Manomissioni in genere non espressamente<br />
autorizzate e che non rispettino quanto riportato nel presente<br />
manuale, fanno decadere la garanzia.<br />
• Osservare le norme di sicurezza locali vigenti al momento<br />
dell’installazione.<br />
• Verificare che le caratteristiche della rete elettrica siano<br />
� Dati riferiti a: -19C / + 40C<br />
� Dati riferiti a: -16C / + 39C<br />
� Dati riferiti a: -13C / + 39C<br />
� Dati riferiti a: -12C / + 38C<br />
� Dati riferiti a: -12C / + 42C<br />
AVVERTENZE GENERALI<br />
DATI TECNICI GENERALI<br />
conformi ai dati riportati sulla targhetta matricolare.<br />
• Il materiale di imballaggio (sacchetti in plastica, polistirolo<br />
espanso, chiodi, ecc.) in quanto potenziale fonte di pericolo<br />
deve essere tenuto fuori dalla portata dei bambini e correttamente<br />
riciclato secondo le norme locali in vigore.<br />
• L’apparecchio e’ stato progettato e realizzato per la conservazione<br />
di prodotti alimentari dovrà pertanto essere destinato solo<br />
all’uso per il quale è stato espressamente concepito. Qualsiasi<br />
impiego diverso da quello specificato non comporta per il costruttore<br />
impegno o vincolo di alcun genere.<br />
• Disattivare l’apparecchiatura in caso di guasto o di cattivo<br />
funzionamento.<br />
• Per l’eventuale riparazione rivolgersi esclusivamente ad un<br />
centro di assistenza tecnica autorizzato dal costruttore e richiedere<br />
l’utilizzo di ricambi originali.<br />
• In caso di dubbio non utilizzare l’apparecchio e rivolgersi a<br />
personale professionalmente qualificato. Il mancato rispetto di<br />
quanto sopra può compromettere la sicurezza dell’apparecchiatura.<br />
Modello K <strong>TN</strong> 12 / 13 25 / 35 / 45 60 <strong>70</strong> 60/<strong>70</strong>V 120 / <strong>140</strong> 120V / <strong>140</strong>V<br />
Tensione standard<br />
Pot. compressore W 260� 300� 380�<br />
230/1/50<br />
460� 540�<br />
Temperatura di esercizio °C -2 / +8<br />
Versione a capillare<br />
Sistema refrigerante statico statico / ventilato<br />
Temperatura di evaporazione � °C -19 -16 -13 -12 -12 -12<br />
Sbrinamento tipo pausa elettrico<br />
Sbrinamento n° / durata max minuti 4 / 55’ 4 / 25 4 / 30 4 / 30 4 / 30 4 / 30<br />
Modello B2116Z<br />
Compressore<br />
B6160Z B61<strong>70</strong>Z E6187Z<br />
Tipo motore CSIR CSIR CSIR CSIR<br />
n° giri al minuti rpm 2900<br />
Starting relay<br />
T.I.:9660B 438-114<br />
AMF: MTRP0036-36<br />
T.I.: 9660B...135<br />
T.I.:9660B...138<br />
T.I.: 9660B...149<br />
Overload protector<br />
T.I.: MRP342JZ-3119<br />
AMF: T0567/17<br />
T.I.. MRP56HY...<br />
T.I.: MRP56HK...<br />
T.I. MRP38AMK...<br />
AMF: T0056/..<br />
Star capacitor 43 / 53 MFD 330V 43 / 53 MFD 330V 53 / 64 MFD 250V<br />
Elettroventilatore condensatore<br />
n° e diametro n° x Ø 1 x 200 1 x 230 1 x 230 1 x 230<br />
potenza nominale n° x W 1 x 10 1 x 10 1 x 10 1 x 10<br />
Elettroventilatore evaporatore<br />
n° e diametro n° x Ø - 1 x 60 1 x 60 1 x 60 2 x 60<br />
potenza nominale n° x W - 1 x 20 1 x 20 1 x 20 2 x 20<br />
F.L.A.<br />
L.R.A.<br />
�<br />
�<br />
Compressore<br />
Totale<br />
Compressore<br />
A<br />
A<br />
A<br />
1.9<br />
1.6<br />
8.8<br />
Dati elettrici<br />
2.5<br />
2.2<br />
3.3<br />
10.0<br />
3.4<br />
2.3<br />
9.7<br />
3.9 4.7<br />
3.1<br />
14.0<br />
5.4<br />
F.L.I.<br />
M.I.C.<br />
�<br />
�<br />
Compressore<br />
Totale<br />
W<br />
W<br />
A<br />
342<br />
9.4<br />
302<br />
457<br />
10.2<br />
385<br />
600<br />
11.6<br />
410<br />
625 661<br />
11.3 11.8<br />
835<br />
16.2<br />
540<br />
907<br />
17.0<br />
Refrigerante R134a<br />
Carica g 225 225 325 400 650 650<br />
� Dati riferiti a: - temperatura +32°C - R.U. 60%<br />
� Corrente assorbita alle massime condizioni ammesse<br />
� Corrente di spunto del compressore<br />
� Potenza assorbita alle massime condizioni ammesse<br />
� Max corrente di spunto apparecchio<br />
IMPORTANTE<br />
IL PRESENTE MANUALE RIPORTA I SOLI DATI RELATIVI ALLA CELLA A TEMPERATURA NORMALE.<br />
NEL CASO DI ARMADIO A DUE TEMPERATURE DEVE PERTANTO VENIRE ACCOMPAGNATO DAL MANUALE<br />
RELATIVO ALLA CELLA ABBINATA ED I DATI ELETTRICI VANNO SOMMATI A QUELLI IVI RIPORTATI.<br />
Pag. 2<br />
14480000396-I
Tabella 1 ELENCO DEI MODELLI DESCRITTI<br />
ACCESSORI<br />
L’apparecchio può essere dotato dei seguenti accessori (a<br />
richiesta) :<br />
-tensioni di alimentazione diverse dallo standard;<br />
-kit applicazione ruote 80 mm;<br />
DIMENSIONI E SPAZI FUNZIONALI<br />
NR. TIPO DIMENSIONI PESO VOLUME CAPACITÀ DOTAZIONE<br />
MODELLO<br />
CELLE<br />
IMPIANTO A<br />
mm<br />
B<br />
mm<br />
C<br />
mm<br />
TOTALE<br />
Kg<br />
IMBALLO<br />
mc<br />
PARZIALE<br />
lt<br />
GRIGLIE<br />
650x530 188x480<br />
K/<strong>KU</strong> C <strong>TN</strong> 35/35 2<br />
K<strong>TN</strong> 35<br />
K<strong>TN</strong> 35<br />
740 850 2090 180 1,5<br />
285<br />
285<br />
2<br />
2<br />
K/<strong>KU</strong> C <strong>TN</strong> 35/13 2<br />
K<strong>TN</strong> 35<br />
K<strong>TN</strong> 13<br />
740 850 2090 180 1,5<br />
285<br />
285<br />
2<br />
➀<br />
K/<strong>KU</strong> C <strong>TN</strong> 45/12 2<br />
K<strong>TN</strong> 35<br />
K<strong>TN</strong> 13<br />
740 850 2090 180 1,5<br />
400<br />
1<strong>72</strong><br />
2<br />
➀<br />
K/<strong>KU</strong> C <strong>TN</strong> 25/45 2<br />
K<strong>TN</strong> 35<br />
K<strong>TN</strong> 35<br />
740 850 2090 180 1,5<br />
1<strong>72</strong><br />
400<br />
1<br />
2<br />
K/<strong>KU</strong> C 35/35 2 K<strong>TN</strong> 35 740 850 2090 215 1,5 285 2<br />
K/<strong>KU</strong> C 35/13 2 K<strong>TN</strong> 35 740 850 2090 215 1,5 285 ➀<br />
K/<strong>KU</strong> C 45/12 2 K<strong>TN</strong> 35 740 850 2090 215 1,5 1<strong>72</strong> ➀<br />
K/<strong>KU</strong> C 25/45 2 K<strong>TN</strong> 35 740 850 2090 215 1,5 400 3<br />
K/<strong>KU</strong> P <strong>TN</strong> 35/35 2 K<strong>TN</strong> 35 740 850 2090 174 1,5 285 2<br />
K/<strong>KU</strong> P <strong>TN</strong> 35/13 2 K<strong>TN</strong> 13 740 850 2090 174 1,5 285 ➀<br />
K/<strong>KU</strong> P <strong>TN</strong> 25/45 2 K<strong>TN</strong> 35 740 850 2090 174 1,5 400 2<br />
K C <strong>TN</strong> 30/30 2<br />
K<strong>TN</strong> 30<br />
K<strong>TN</strong> 30<br />
740 <strong>70</strong>0 2090 180 1,3<br />
251<br />
251<br />
2<br />
2<br />
K PC 30/30 2 K<strong>TN</strong> 30 740 <strong>70</strong>0 2090 180 1,3 251 2<br />
K/<strong>KU</strong> <strong>TN</strong> <strong>70</strong> 1 K<strong>TN</strong> <strong>70</strong> 740 850 2090 157 1,5 630 3<br />
K/<strong>KU</strong> <strong>TN</strong> <strong>72</strong> 1 K<strong>TN</strong> <strong>70</strong> 740 850 2090 174 1,5 630 4<br />
K/<strong>KU</strong> <strong>TN</strong>V <strong>70</strong> 1 K<strong>TN</strong>V <strong>70</strong> 740 850 2090 180 1,5 630 3<br />
K/<strong>KU</strong> <strong>TN</strong> 35/13 1 K<strong>TN</strong> <strong>70</strong> 740 850 2090 174 1,5 630 2<br />
K/<strong>KU</strong> <strong>TN</strong> 45/12 1 K<strong>TN</strong> <strong>70</strong> 740 850 2090 180 1,5 630 2<br />
K <strong>TN</strong> 60 1 K<strong>TN</strong> 60 740 <strong>70</strong>0 2090 156 1,3 508 3<br />
K <strong>TN</strong> 62 1 K<strong>TN</strong> 60 740 <strong>70</strong>0 2090 162 1,3 508 4<br />
K <strong>TN</strong>V 60 1 K<strong>TN</strong>V 60 740 <strong>70</strong>0 2090 180 1,3 508 3<br />
K/<strong>KU</strong> C <strong>TN</strong> <strong>70</strong>/<strong>70</strong> 2<br />
K<strong>TN</strong> <strong>70</strong><br />
K<strong>TN</strong> <strong>70</strong><br />
1480 850 2090 298 3,0<br />
630<br />
630<br />
3<br />
3<br />
K/<strong>KU</strong> C <strong>TN</strong> 105/35 2<br />
K<strong>TN</strong> <strong>70</strong><br />
K<strong>TN</strong> 35<br />
1480 850 2090 288 3,0<br />
980<br />
285<br />
5<br />
2<br />
2<br />
K/<strong>KU</strong> C <strong>70</strong>/<strong>70</strong> 2 K<strong>TN</strong> <strong>70</strong> 1480 850 2090 290 3,0 630 3<br />
K/<strong>KU</strong> C 105/35 2 K<strong>TN</strong> <strong>70</strong> 1480 850 2090 301 3,0 980 5 2<br />
K/<strong>KU</strong> P<strong>TN</strong> <strong>70</strong>/<strong>70</strong> 2 K<strong>TN</strong> <strong>70</strong> 1480 850 2090 283 3,0 630 3<br />
K/<strong>KU</strong> P<strong>TN</strong> 105/35 2 K<strong>TN</strong> <strong>70</strong> 1480 850 2090 290 3,0 980 5 2<br />
K C <strong>TN</strong> 60/60 2<br />
K<strong>TN</strong> 60<br />
K<strong>TN</strong> 60<br />
1480 <strong>70</strong>0 2090 295 2,6<br />
538<br />
538<br />
3<br />
3<br />
K C 60/60 2 K<strong>TN</strong> 60 1480 <strong>70</strong>0 2090 295 2,6 538 3<br />
K C 90/30 2 K<strong>TN</strong> 60 1480 <strong>70</strong>0 2090 295 2,6 846 5 2<br />
K PC 90/30 2 K<strong>TN</strong> 60 1480 <strong>70</strong>0 2090 295 2,6 846 5 2<br />
K/<strong>KU</strong> <strong>TN</strong> <strong>140</strong> 1 K<strong>TN</strong> <strong>140</strong> 1480 850 2090 278 3,0 <strong>140</strong>5 6 3<br />
K/<strong>KU</strong> <strong>TN</strong> 142 1 K<strong>TN</strong> <strong>140</strong> 1480 850 2090 283 3,0 <strong>140</strong>5 7 3<br />
K/<strong>KU</strong> <strong>TN</strong> 144 1 K<strong>TN</strong> <strong>140</strong> 1480 850 2090 288 3,0 <strong>140</strong>5 8 4<br />
K/<strong>KU</strong> <strong>TN</strong>V <strong>140</strong> 1 K<strong>TN</strong>V <strong>140</strong> 1480 850 2090 310 3,0 <strong>140</strong>5 6 3<br />
K <strong>TN</strong> 120 1 K<strong>TN</strong> 120 1480 <strong>70</strong>0 2090 269 2,6 1135 6 3<br />
K <strong>TN</strong> 122 1 K<strong>TN</strong> 120 1480 <strong>70</strong>0 2090 277 2,6 1135 7 3<br />
K <strong>TN</strong> 124 1 K<strong>TN</strong> 120 1480 <strong>70</strong>0 2090 287 2,6 1135 8 4<br />
K <strong>TN</strong>V 120 1 K<strong>TN</strong>V 120 1480 <strong>70</strong>0 2090 315 2,6 1135 6 3<br />
� Modello con cassetti<br />
LAYOUT<br />
POSIZIONAMENTO<br />
Gli apparecchi sono progettati per l’installazione all’interno.<br />
-Verificare che il piano d’appoggio sia adatto a sopportare il<br />
peso dell’apparecchio (vedere pesi a pag. 2) e sia in piano.<br />
-Rispettare gli spazi funzionali.<br />
Pag. 3
SPAZI FUNZIONALI<br />
La scelta della dislocazione dell’apparecchio è di fondamentale importanza per<br />
il suo buon funzionamento.<br />
Gli apparecchi necessitano di spazi minimi per il funzionamento e per la manutenzione.<br />
Assicurarsi che venga installato il più lontano possibile da fonti di calore.<br />
Assicurarsi che tra il soffitto od altra copertura superiore e la parte superiore<br />
dell’apparecchio vi sia una luce di almeno 50 cm. per garantire una soddisfacente<br />
circolazione d’aria.<br />
Nota :Le misure delle figure sono espresse in mm.<br />
1<br />
4<br />
2<br />
3<br />
2<br />
Pag. 4<br />
DIMENSIONI<br />
3<br />
Tipo <strong>KU</strong> <strong>70</strong>/<strong>140</strong> Tipo K <strong>70</strong>/<strong>140</strong> Tipo K 60/120<br />
�<br />
1 2 1 �<br />
4<br />
Tipo <strong>KU</strong> Tipo K 60/<strong>70</strong><br />
4<br />
2<br />
3<br />
Tipo K 120/<strong>140</strong><br />
1<br />
2 1<br />
4<br />
�<br />
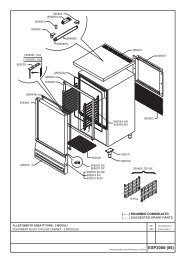
Legenda :<br />
3<br />
�<br />
1 - Pannello comandi<br />
2 - Gruppo compressore<br />
3 - Ingresso linea elettrica<br />
4 - Bacinella autoevaporante<br />
� - Posizione targhetta dati<br />
matricolari
1.0 - CONTROLLO AL RICEVIMENTO<br />
Gli apparecchi sono spediti in appositi imballi di protezione.<br />
Controllare all’arrivo che l’apparecchio non abbia subito<br />
danneggiamenti durante il trasporto e che lo stesso sia<br />
completo nelle sue parti come da ordine.<br />
Nel caso di danni visibili annotare immediatamente sul<br />
documento relativo al trasporto il danno riscontrato<br />
riportando la dicitura :<br />
“RITIRO CON RISERVA PER EVIDENTI DANNI A IMBAL-<br />
LO” in quanto la resa franco stabilimento comporta il risarcimento<br />
dei danni a carico dell’assicurazione.<br />
IMPORTANTE<br />
TUTTE LE OPERAZIONI DI SEGUITO CITATE DEBBONO<br />
ESSERE ESEGUITE IN CONFORMITÀ ALLE NORME DI<br />
SICUREZZA VIGENTI, SIA PER QUANTO RELATIVO<br />
ALL’ATTREZZATURA USATA SIA PER QUANTO<br />
RELATIVO ALLE MODALITÀ OPERATIVE.<br />
ATTENZIONE<br />
PRIMA DI DAR CORSO A OPERAZIONI DI<br />
MOVIMENTAZIONE ASSICURARSI CHE LA CAPACITA’ DI<br />
SOLLEVAMENTO SIA ADEGUATA AL PESO<br />
DELL’APPARECCHIO IN QUESTIONE.<br />
2.0 - MOVIMENTAZIONE<br />
2.1 - MOVIMENTAZIONE con CARRELLO ELEVATORE o<br />
SIMILARE<br />
2.1.1 - Inserire le forche sul lato anteriore o posteriore della<br />
pedana in legno a corredo dell’apparecchio.<br />
2.1.2 - Dar corso al sollevamento assicurandosi che l’apparecchio<br />
sia in equilibrio stabile.<br />
ATTENZIONE<br />
NEL CORSO DELLA MOVIMENTAZIONE NON<br />
CAPOVOLGERE O ROVESCIARE.<br />
RICEVIMENTO<br />
SOMMARIO:<br />
1.0 - CONTROLLO AL RICEVIMENTO<br />
2.0 - MOVIMENTAZIONE<br />
2.1 - MOVIMENTAZIONE con CARRELLO ELEVATORE o SIMILARE<br />
3.0 - RIMOZIONE IMBALLO<br />
AVVERTENZE<br />
IL RISPETTO DELLE RACCOMANDAZIONI RIPORTATE<br />
SUL LATO ESTERNO DELL’IMBALLO È GARANTE DI UNA<br />
INTEGRITÀ FISICA E FUNZIONALE DELL’APPARECCHIO<br />
A TUTTO VANTAGGIO DELL’UTILIZZATORE FINALE.<br />
VIENE RACCOMANDATO QUINDI DI :<br />
- MOVIMENTARE CON CURA<br />
- TENERE ALL’ASCIUTTO<br />
- EVITARE NEL MODO PIÙ ASSOLUTO DI<br />
SOVRAPPORRE ALL’APPARECCHIO ALTRI OGGETTI.<br />
3.0 - RIMOZIONE IMBALLO<br />
3.1 - Imballo in cartone<br />
3.1.1 - Tagliare con forbice le reggette di chiusura.<br />
3.1.2 - Sollevare il cartone di imballo.<br />
3.2 - Imballo in legno<br />
3.2.1 - Schiodare i pannelli in legno iniziando dal frontale e<br />
da quello superiore.<br />
3.2.2 - Togliere la protezione in nylon sfilandola dalla parte<br />
superiore.<br />
3.3 - Imballo in nylon<br />
3.3.1 - Dopo aver tolto il nastro adesivo di fissaggio, togliere<br />
la protezione in nylon sfilandola dalla parte superiore dell’apparecchio.<br />
3.4 - Sollevare l’apparecchio in modo da separarlo dalla pedana.<br />
3.5 - Appoggiare l’apparecchio a terra in corrispondenza del<br />
punto predestinato.<br />
3.6 - Verificare la presenza di danni visibili.<br />
3.7 - Tenere fuori dalla portata di mano dei bambini il materiale<br />
di imballo in quanto potenziale fonte di pericolo.<br />
3.8 - Smaltire i prodotti di imballo facendoli confluire ai centri di<br />
raccolta o di riciclaggio specializzati (attenersi alle norme vigenti).<br />
3.9 - Verificare la rispondenza del numero di matricola con<br />
quanto riportato nel documento di accompagnamento.<br />
Pag. 5
INVERSIONE SENSO APERTURA PORTA<br />
IMPORTANTE<br />
CIÒ CHE SEGUE VUOLE SOLO ED UNICAMENTE<br />
EVIDENZIARE LA POSSIBILITÀ DEGLI APPARECCHI AD<br />
ESSERE ADATTATI ALLE PARTICOLARI ESIGENZE DI<br />
INSTALLAZIONE DETERMINATE DALLA NECESSITÀ DI<br />
INVERTIRE IL SENSO DI APERTURA DELLA PORTA.<br />
NON RAPPRESENTA IN ALCUN MODO UNA SEQUENZA<br />
OPERATIVA ALLA QUALE ATTENERSI SE NON PER<br />
PERSONALE PROFESSIONALMENTE QUALIFICATO.<br />
Gli apparecchi vengono realizzati in fabbrica con la porta incernierata<br />
sul lato dx. Nel caso in cui si rendesse necessario<br />
invertire il lato procedere nel modo seguente:<br />
1 - SMONTARE LA CERNIERA SUPERIORE<br />
1.1 - Svitare le viti di fissaggio che bloccano la staffa [C].<br />
1.2 - Togliere la porta e ruotarla di 180°. Invertire sulla porta<br />
i particolari:<br />
a)bussola in plastica.<br />
b)particolare caricamento per cerniera cromata.<br />
2 - TOGLIERE LA STAFFA INFERIORE [D].<br />
2.1 - Svitare le viti di fissaggio.<br />
A<br />
MODELLO CON<br />
MOTORIZZAZIONE SUPERIORE<br />
MODELLO CON<br />
MOTORIZZAZIONE INFERIORE<br />
Pag. 6<br />
B<br />
A<br />
B<br />
3 - FISSARE LA STAFFA INFERIORE [B] SUL LATO SX<br />
CON LE APPOSITE VITI SENZA SERRARLE<br />
COMPLETAMENTE.<br />
4 - MODIFICARE L’ASSIEME CERNIERA DX [C] A SX [A].<br />
4.1 - Svitare la vite centrale di fissaggio staffa al corpo<br />
cerniera e togliere la staffa [C].<br />
4.2 - Ruotare in senso antiorario di 1/2 giro la forchetta.<br />
4.3 - Rimontare la staffa [A] (richiedere il particolare in caso<br />
di necessita’.<br />
4.4 - Rimontare l’assieme cerniera sx [A] sulla porta.<br />
5 - SOLO PER MODELLI CON DUE MEZZE PORTE.<br />
5.1 - Smontare il traversino centrale svitando le due staffe<br />
poste all’interno della cella, nella parte inferiore del traversino.<br />
5.2 - Ruotare di 180° il traversino centrale fissandolo con le<br />
medesime staffe.<br />
6 - INSTALLAZIONE PORTA.<br />
6.1 - Rimontare la porta fissando la cerniera superiore [A]<br />
completa di staffa.<br />
7 - CONTROLLO GUARNIZIONE.<br />
7.1 - Verificare che la guarnizione magnetica dia garanzia di<br />
tenuta su tutti i lati.<br />
8 - SERRARE LE VITI CHE FISSANO LE CERNIERE.<br />
C<br />
D<br />
C<br />
D
L’apparecchio è provvisto di pannello di controllo posizionato in<br />
corrispondenza del lato superiore della porta.<br />
Sul pannello sono installati tutti gli organi di comando e controllo<br />
necessari al funzionamento dell’apparecchio quali:<br />
� - INTERRUTTORE LUMINOSO ON-OFF<br />
�- INTERRUTTORE VENTOLE ( NON DISPONIBILE PER<br />
APPARECCHI CON IMPIANTO TIPO K<strong>TN</strong> 12 E K<strong>TN</strong> 13 )<br />
�- INTERRUTORE LUCE ( SOLO PER PORTE VETRO )<br />
�- SPIA DI SBRINAMENTO<br />
�- TERMOSTATO ELETTRONICO<br />
1.0 - INTERRUTTORE LUMINOSO<br />
Per l’accensione e lo spegnimento dell’apparecchio. L’accensione<br />
dell’interruttore verde indica che l’impianto elettrico<br />
dell’apparecchio e’ in tensione.<br />
2.0 - INTERRUTTORE LUMINOSO VENTOLE<br />
Per l’accensione e lo spegnimento delle ventole all’interno<br />
dell’apparecchio e l’indicazione dello stato di funzionamento<br />
delle stesse.<br />
Lo spegnimento dell’interruttore giallo comporta il funzionamento<br />
dell’apparecchio in modalità statica.<br />
3.0 - INTERRUTTORE LUMINOSO LUCE<br />
Presente solamente su modelli K <strong>TN</strong>V (con porte vetro), di<br />
colore bianco.<br />
Per l’accensione e lo spegnimento delle luci all’interno dell’apparecchio<br />
e la visualizzione dello stato delle stesse.<br />
4.0 - SPIA DI SBRINAMENTO<br />
Spia rossa riferita allo sbrinamento dell’apparecchio.<br />
L’accensione indica che l’apparecchio si trova nello fase di<br />
sbrinamento.<br />
5.0 - TERMOSTATO ELETTRONICO<br />
Per la regolazione il controllo e la gestione della funzionalità’<br />
dell’apparecchio.<br />
5.1 - TERMOREGOLAZIONE<br />
L’azione del termostato elettronico e’ quella di mantenere la<br />
temperatura all’interno della cella refrigerata più’ prossima<br />
possibile al valore di Set Point .<br />
Il regolatore fa uso, oltre al Set Point di un altro parametro<br />
Isteresi , che viene settato in fabbrica ad un valore predefi-<br />
PANNELLO DI COMANDO<br />
SOMMARIO:<br />
1.0 - INTERRUTTORE LUMINOSO ON-OFF<br />
2.0 - INTERRUTTORE VENTOLE<br />
3.0 - INTERRUTTORE LUCE<br />
4.0 - SPIA DI SBRINAMENTO<br />
5.0 - TERMOSTATO ELETTRONICO<br />
5.1 - TERMOREGOLAZIONE<br />
5.2 - TEMPORIZZAZIONI COMPRESSORE<br />
5.3 - ALLARMI DI MASSIMA E MINIMA TEMPERATURA<br />
5.4 - GESTIONE FUNZIONAMENTO VENTILATORI EVAPORATORE<br />
5.5 - GESTIONE DELLO SBRINAMENTO<br />
6.0 - SET POINT<br />
6.1 - VARIAZIONE SET POINT<br />
7.0 - STATO DI FUNZIONAMENTO DEI COMPONENTI L’APPARECCHIO<br />
8.0 - CODICI ALLARME<br />
nito, e che definisce il campo di variazione ammesso della<br />
temperatura della cella rispetto al Set Point<br />
Esempio :<br />
definiti Set Point = -2°C , Isteresi = 2°C si avrà :<br />
Avviamento compressore quando la temperatura della cella<br />
è superiore a :<br />
-2°C + ( 2°C ) = 0°C.<br />
Fermata compressore quando la temperatura della cella è<br />
uguale a :<br />
-2 °C<br />
Il Set Point è a disposizione del cliente che può fissarne il<br />
valore, in gradi centigradi, a piacere entro un range predefinito<br />
in fabbrica. Tale range è fissato in maniera tale che, sia<br />
la integrità che le prestazioni dell’apparecchio, siano rispettate.<br />
5.2 - TEMPORIZZAZIONI DEL COMPRESSORE<br />
Il regolatore, nel controllare il compressore, tiene conto di<br />
alcune temporizzazioni. Tali temporizzazioni hanno la funzione<br />
di:<br />
a) Limitare il numero di partenze orarie del compressore ad<br />
un valore in linea con i limite imposto dal costruttore.<br />
b) Assicurare, tra una fermata ed una successiva ripartenza<br />
del compressore, un tempo minimo di ritardo atto a permettere<br />
la equalizzazione delle pressioni interne.<br />
E’ importante notare come il temporizzatore del punto (a)<br />
conteggi il ritardo tra una partenza e la successiva ripartenza<br />
del compressore. Il valore associato ad ogni temporizzazione<br />
e’ settabile tramite dei parametri accessibili solo al costruttore<br />
o al centro di assistenza autorizzato<br />
Temporizzazione del compressore sono segnalate dal lampeggiare<br />
del led compressore presente sul frontale del termostato<br />
in corrispondenza della parola “comp” �.<br />
5.3 - ALLARMI DI MASSIMA E MINIMA TEMPERATURA<br />
Il regolatore sovrintende alla gestione sia dell’allarme di<br />
massima che di minima temperatura della cella refrigerata.<br />
I valori settabili tramite dei parametri accessibili solo al<br />
costruttore o al centro di assistenza vanno intesi come<br />
distanza dal Set Point<br />
5.4 - GESTIONE FUNZIONAMENTO VENTILATORI EVAPO-<br />
RATORE<br />
( Funzione non presente sui modelli K <strong>TN</strong> 12 e 13).<br />
Pag. 7
Il regolatore opera in modo tale da mantenere in funzione i<br />
ventilatori all’interno della cella solo sulla base delle esigenze<br />
specifiche di impiego. Parametri accessibili solo al costruttore<br />
o al centro di assistenza permettono di definire<br />
- la fermata o meno dei ventilatori durante lo sbrinamento<br />
- la temperatura di blocco dei ventilatori.<br />
IMPORTANTE : I ventilatori non entreranno in funzione nel<br />
caso l’interruttore giallo � sia spento.<br />
I ventilatori rimarranno fermi durante lo sbrinamento per<br />
evitare di mettere in circolo aria riscaldata dagli elementi di<br />
sbrinamento fino a quando il valore della temperatura letto<br />
dalla sonda posta tra le alette dell’evaporatore e’ superiore<br />
al valore impostato. Dopo lo sbrinamento vi deve essere un<br />
ritardo all’avviamento dei ventilatori per permettere lo sgocciolamento<br />
dell’acqua di sbrinamento<br />
Il funzionamento dei ventilatori e’ segnalato dall’accensione<br />
dell’interruttore luminoso giallo �.<br />
5.5 - GESTIONE SBRINAMENTO<br />
Il ciclo di sbrinamento ha la funzione di sciogliere la brina o<br />
ghiaccio formatesi sulla superficie dell’evaporatore dovuta<br />
ad un forte contenuto di umidità dell’aria.<br />
Parametri accessibili solo al costruttore o al centro di assistenza<br />
permettono di definire :<br />
- la presenza o meno dello sbrinamento all’accensione<br />
- la durata massima della fase di sbrinamento<br />
- l’intervallo tra due fasi successive di sbrinamento<br />
Lo sbrinamento in atto e’ segnalato dall’accensione del led<br />
sbrinamento presente sul frontale del termostato in corrispondenza<br />
della parola “def” � e della spia luminosa rossa<br />
�.<br />
Qualora se ne presentasse la necessità è possibile attivare<br />
manualmente un ciclo di sbrinamento tenendo premuto per<br />
più di cinque secondi il tasto �<br />
6.0 - SET POINT<br />
6.1 - COME SI VARIA IL Set Point.<br />
6.1.1 - Premere l’interruttore ON-OFF.<br />
6.1.2 - Premere il tasto SET � (si avrà la visualizzazione del<br />
Set Point.); il led posto in corrispondenza della parola “set”<br />
� lampeggia.<br />
6.1.3 - Variare il dato agendo entro 5 secondi sui tasti<br />
oppure<br />
(tasto �) per incrementare il valore<br />
(tasto �) per decrementare il valore.<br />
La memorizzazione del nuovo dato avviene automaticamente<br />
con l’uscita dal modo programmazione che si<br />
ottiene non agendo sui pulsanti per alcuni secondi<br />
Tabella 1 ELENCO DEI PARAMETRI ACCESSIBILI<br />
apparecchio Tutti i modelli<br />
descrizione Set point<br />
unità di misura °C<br />
set di fabbrica -2<br />
7.0 - STATO DI FUNZIONAMENTO DEI COMPONENTI<br />
L’APPARECCHIO<br />
Per conoscere lo stato di funzionamento dei vari componenti<br />
l’apparecchio’ e’ sufficiente verificare lo stato dei led presenti<br />
sul termostato. Ognuno di essi e’ abbinato ad un ben preciso<br />
componente l’apparecchio. La tabella 2 ne riporta le corrispondenze<br />
ed i significati.<br />
Pag. 8<br />
Tabella 2 SIGNIFICATO DEI LED<br />
LED relativo a stato significato<br />
comp compressore spento compressore fermo<br />
comp compressore lampeg<br />
temporizzazione<br />
compressore in corso<br />
comp compressore acceso compressore in funzione<br />
def<br />
elementi di<br />
sbrinamento<br />
spento sbrinamento non attivo<br />
def<br />
elementi di<br />
sbrinamento<br />
acceso sbrinamento in corso<br />
def<br />
elementi di<br />
sbrinamento<br />
lampeg. sgocciolamento in corso<br />
set set point spento funzionamento normale<br />
set set point lampeg. variazione parametro<br />
8.0 - CODICI DI ALLARME<br />
Ogni tipo di anomalia che si possa manifestare durante il<br />
funzionamento dell’apparecchio e’ segnalata mediante un<br />
codice di allarme. Nella tabella 3 sono elencati tutti i codici<br />
di allarme significativi per la configurazione di apparecchio<br />
a cui si riferisce questo manuale.<br />
L’anomalia accompagnata da una segnalazione acustica<br />
può essere tacitata premendo uno qualsiasi dei tre tasti<br />
presenti sul frontalino.<br />
IMPORTANTE : L’apparire di un allarme non compreso in<br />
questa lista è indice di una non corretta impostazione dei<br />
parametri di configurazione del modulo di controllo. In questo<br />
caso contattare subito il centro di assistenza autorizzato.<br />
Tabella 3 ELENCO DEI CODICI DI ALLARME<br />
codice E1 E2<br />
componente Sonda di temperatura Sonda di temperatura<br />
descrizione<br />
Guasto sonda di<br />
temperatura cella<br />
Guasto sonda di<br />
temperatura<br />
evaporatore
MESSA IN FUNZIONE E DISMISSIONE<br />
SOMMARIO:<br />
1.0 - CONTROLLI PRELIMINARI<br />
1.1 - CONTROLLI GENERICI<br />
1.2 - CONTROLLI ALLA PARTE ELETTRICA<br />
2.0 - MESSA IN FUNZIONE - VERIFICHE<br />
3.0 - DISMISSIONE<br />
IMPORTANTE<br />
PRIMA DI COLLEGARE L’APPARECCHIO ACCERTARSI CHE I DATI DI TARGA SIANO RISPONDENTI A QUELLI DELLA<br />
RETE ELETTRICA.<br />
LA TARGHETTA MATRICOLARE RECANTE I DATI ELETTRICI NECESSARI ALL’INSTALLAZIONE È POSIZIONATA IN<br />
CORRISPONDENZA DEL LATO SUPERIORE DESTRO DEL PANNELLO FRONTALE COMANDI.<br />
L’INSTALLAZIONE DEVE ESSERE EFFETTUATA SECONDO LE ISTRUZIONI RIPORTATE ALLA PRESENTE SEZIONE<br />
DA PERSONALE PROFESSIONALMENTE QUALIFICATO.<br />
LA SICUREZZA ELETTRICA DI QUESTA APPARECCHIATURA È ASSICURATA SOLTANTO QUANDO LA STESSA È<br />
CORRETTAMENTE COLLEGATA AD UN EFFICACE IMPIANTO DI MESSA A TERRA COME PREVISTO DALLE VIGENTI<br />
NORME DI SICUREZZA ELETTRICA.<br />
È NECESSARIO VERIFICARE QUESTO FONDAMENTALE REQUISITO DI SICUREZZA E, IN CASO DI DUBBIO,<br />
RICHIEDERE UN CONTROLLO ACCURATO DELL’IMPIANTO DA PARTE DI PERSONALE PROFESSIONALMENTE<br />
QUALIFICATO.<br />
IL COSTRUTTORE DECLINA OGNI RESPONSABILITÀ PER EVENTUALI DANNI CAUSATI DALLA MANCANZA DI<br />
MESSA A TERRA DELL’IMPIANTO.<br />
L’APPARECCHIO DEVE ESSERE INOLTRE INCLUSO IN UN SISTEMA EQUIPOTENZIALE LA CUI EFFICIENZA DEVE<br />
ESSERE VERIFICATA SECONDO LE NORME IN VIGORE.<br />
È VIETATO L’USO DI ADATTATORI, PRESE MULTIPLE, E/O PROLUNGHE.<br />
1.0 - CONTROLLI PRELIMINARI<br />
1.1 - CONTROLLI GENERICI<br />
1.1.1 - Controllare che l’apparecchio sia stato posizionato in<br />
bolla. Agire eventualmente sulla parte mobile dei piedini<br />
regolabili fino ad ottenere un perfetto allineamento.<br />
1.1.2 - Controllare che sia stata tolta la plastica a protezione<br />
delle superfici esterne.<br />
1.1.3 - Controllare che sia stato lavato all’interno con acqua<br />
tiepida e sapone neutro.<br />
1.1.4 - Controllare che sia stato posizionato il più’ lontano<br />
possibile da fonti di calore.<br />
1.1.5 - Controllare che non sia impedito il libero circolare<br />
dell’aria del vano motore.<br />
1.1.6 - Controllare che le chiavi di chiusura non siano a<br />
portata di mano dei bambini.<br />
1.2 - CONTROLLI ALLA PARTE ELETTRICA<br />
1.2.1 - Controllare il valore della tensione e della frequenza<br />
di rete :<br />
DEVONO RIENTRARE NEI VALORI RIPORTATI<br />
230 ± 10% 50Hz<br />
1.2.2 - Controllare il corretto serraggio delle viti che fissano<br />
i conduttori ai componenti elettrici presenti nel quadro (durante<br />
la movimentazione ed il trasporto le vibrazioni potrebbero<br />
aver prodotto degli allentamenti).<br />
1.2.3 -Accertarsi che sia stato installato a monte della presa<br />
un interruttore onnipolare con distanza di apertura dei contatti<br />
uguale o superiore a 3 mm.<br />
1.2.4 - Portare l’interruttore generale a cui andrà collegata<br />
la spina del cavo di alimentazione nella posizione OFF.<br />
1.2.5 -Verificare la compatibilità’ della presa con la spina<br />
dell’apparecchio. Nel caso si rendesse necessario fare sostituire<br />
la presa con altra di tipo adatto da personale professionalmente<br />
qualificato. Quest’ultimo dovrà anche accertare<br />
che la sezione dei cavi della presa sia idonea alla potenza<br />
assorbita dall’apparecchiatura.<br />
Verificare che la spina sia inserita nella presa.<br />
2.0 - MESSA IN FUNZIONE - VERIFICHE<br />
Dopo aver effettuato scrupolosamente quanto sopra esposto<br />
è possibile avviare l’apparecchio :<br />
2.1.1 - Portare l’interruttore generale a cui è collegata la<br />
spina del cavo di alimentazione nella posizione ON.<br />
2.1.2 - Portare l’interruttore dell’apparecchio in posizione<br />
ON.<br />
2.1.3 - Visualizzare il SET POINT.<br />
2.1.3.1 - Premere il pulsante SET � del termostato elettronico<br />
verificando che il led set � lampeggi;<br />
2.1.3.2 - Impostare il valore desiderato in base alla tipologia<br />
di prodotto conservato.<br />
Per le modalità operative relative alla variazione del valore<br />
predeterminato in fabbrica consultare la sezione PANNEL-<br />
LO DI COMANDO (pagina ).<br />
IMPORTANTE<br />
PRIMA DI INSERIRE GLI ALIMENTI PORTARE<br />
L’APPARECCHIO A REGIME.<br />
3.0 - DISMISSIONE<br />
In caso di dismissione dell’apparecchio, prima della sua<br />
rottamazione<br />
- renderlo inoperante togliendo il cavo di alimentazione<br />
- eliminarne le parti che possono costituire un pericolo<br />
- rendere inservibile la serratura la cerniera od altri sistemi<br />
di chiusura onde evitare che i bambini, giocando possano<br />
rinchiudersi all’interno o procurarsi danno.<br />
IMPORTANTE<br />
RISPETTARE LE NORMATIVE LOCALI VIGENTI PER LA<br />
ROTTAMAZIONE DI QUESTO GENERE DI APPARECCHI.<br />
Pag. 9
PULIZIA E MANUTENZIONE<br />
SOMMARIO:<br />
1.0 - PULIZIA SETTIMANALE<br />
2.0 - MANUTENZIONE ORDINARIA<br />
2.1 - BATTERIA CONDENSANTE<br />
2.2 - ELETTROVENTILATORI<br />
2.3 - CAVO DI ALIMENTAZIONE<br />
3.0 - FERMATE PROLUNGATE<br />
4.0 - SISTEMA DI ILLUMINAZIONE<br />
Questa sezione è dedicata all’utilizzatore finale ed è estremamente<br />
importante per il regolare funzionamento nel tempo dell’apparecchio.<br />
Poche operazioni eseguite con scrupolo e periodicamente possono<br />
evitare di dover ricorrere a interventi di personale specializzato.<br />
Le operazioni da effettuare non richiedono conoscenze tecniche<br />
particolari e si riassumono in semplici controlli ai componenti<br />
dell’apparecchio.<br />
IMPORTANTE<br />
PRIMA DI DAR CORSO A QUALSIASI OPERAZIONE DI<br />
MANUTENZIONE O DI PULIZIA DELL’APPARECCHIO<br />
DISINSERIRE LO STESSO DALLA RETE DI<br />
ALIMENTAZIONE ELETTRICA.<br />
ATTENZIONE<br />
NON LAVARE L’APPARECCHIO CON GETTI D’ACQUA<br />
DIRETTI E AD ALTA PRESSIONE.<br />
EVITARE DI INDIRIZZARE L’ACQUA SULLE PARTI<br />
ELETTRICHE.<br />
1.0 - PULIZIA SETTIMANALE<br />
1.1 - STRUTTURA<br />
1.1.1 - Verificare lo stato di pulizia delle parti costituenti la<br />
struttura. Particolare attenzione va posta alle parti in acciaio.<br />
1.1.2 - Pulire le superfici interne ed esterne con acqua e<br />
sapone o detergente neutro. Un po’ di aceto aggiunto all’acqua<br />
elimina eventuali cattivi odori.<br />
1.1.3 - Risciacquare abbondantemente con acqua ed asciugare<br />
con cura.<br />
1.2 - SISTEMA RACCOLTA ACQUA DI SBRINAMENTO<br />
1.2.1 - Verificare che il tubo di scarico dell’acqua di condensa<br />
non sia ostruito. Procedere alla sua pulizia se necessario.<br />
ATTENZIONE<br />
UN NUMERO DI APERTURE PORTA SUPERIORE ALLA<br />
MEDIA O UTILIZZI IMPROPRI POSSONO DETERMINARE<br />
LA NECESSITÀ DI FREQUENTI VERIFICHE DELLO STATO<br />
DI RIEMPIMENTO DELLA BACINELLA<br />
2.0 - MANUTENZIONE ORDINARIA<br />
2.1 - BATTERIA CONDENSANTE<br />
E’ importante che la batteria sia in grado di offrire il massimo<br />
scambio termico. E’ importante quindi che la sua superficie<br />
sia sempre libera da sporco o polveri che possono essersi<br />
depositate per effetto dell’azione degli elettroventilatori.<br />
2.1.1 - Rimuovere con l’ausilio di un aspirapolvere e di un<br />
pennello o di una spazzola non metallica tutte le impurità tipo<br />
carta e polveri che possono essersi depositate sulla superficie<br />
della batteria.<br />
2.1.2 - Verificare che le alette in alluminio non abbiano subito<br />
danneggiamenti o piegature, nel caso si riscontrino situazioni<br />
del genere "pettinare" con apposito attrezzo la batteria fino<br />
a ripristinare la situazione iniziale per un ottimale flusso<br />
d’aria.<br />
2.2 - ELETTROVENTILATORI<br />
2.2.1 - Verificare lo stato del fissaggio dell’elettroventilatore<br />
al supporto.<br />
Pag. 10<br />
2.2.2 - Verificare, per quanto possibile, eventuali sbilanciamenti<br />
degli elettroventilatore evidenziati da condizioni di<br />
rumore e vibrazioni anomale.<br />
2.3 - CAVO DI ALIMENTAZIONE<br />
2.3.1 - Verificare che il cavo di alimentazione che collega<br />
l’apparecchio alla presa non presenti lacerazioni, screpolature<br />
o alterazioni tali da comprometterne l’isolamento. Contattare<br />
un centro di assistenza autorizzato nel caso si renda<br />
necessaria della manutenzione.<br />
3.0 - FERMATE PROLUNGATE<br />
In caso di prolungata inattività procedere come di seguito<br />
specificato:<br />
3.1 -Portare l’interruttore di rete in posizione OFF.<br />
3.2 -Togliere la spina dalla presa.<br />
3.3 -Vuotare l’apparecchio e procedere alla sua pulizia come<br />
descritto al punto 1.0.<br />
3.4 -Lasciare le porte socchiuse onde evitare la formazione<br />
di cattivi odori.<br />
3.5 -Proteggere dalla polvere il gruppo compressore.<br />
4.0 - SISTEMA DI ILLUMINAZIONE<br />
Il sistema di illuminazione viene normalmente attivato al<br />
momento dell’apertura delle porte tramite un microinterruttore<br />
meccanico o magnetico, per apparecchi con porte a<br />
vetro, l’accensione è comandata da un interruttore posto sul<br />
pannello comandi.<br />
Nel caso una delle summenzionate normali condizioni di<br />
funzionamento non si verifichi o manifesti un malfunzionamento,<br />
contattare un centro di assistenza autorizzato o<br />
persona professionalmente qualificata per la necessaria<br />
manutenzione<br />
IMPORTANTE<br />
GLI APPARECCHI SONO REALIZZATI IN ACCIAIO AISI 304<br />
RESISTENTE ALLA CORROSIONE DERIVANTE DA<br />
NORMALE UTILIZZO.<br />
EVITARE L’USO DI SOSTANZE DETERGENTI O SISTEMI<br />
DI PULIZIA CHE NE POSSANO COMPROMETTERE<br />
L’INTEGRITÀ.
Ciò che segue vuole essere un aiuto nella ricerca della possibile<br />
soluzione ad alcune anomalie che si poterebbero manifestare<br />
sull’apparecchio, resta inteso che quanto riportato non copre<br />
totalmente la casistica delle possibilità. L’intervento di un dispositivo<br />
di sicurezza indica anomalia di funzionamento; prima di<br />
ripristinare verificare ed eliminarne la causa. Riportiamo di<br />
seguito un elenco dei possibili problemi e le relative cause con<br />
i rimedi (in grassetto).<br />
ATTENZIONE<br />
LE OPERAZIONI RIPORTATE SONO A TOTALE<br />
RESPONSABILITÀ DI CHI LE ESEGUE, È OBBLIGATORIO<br />
RIVOLGERSI AD UN CENTRO DI ASSISTENZA<br />
AUTORIZZATO IN POSSESSO DEI REQUISITI NECESSARI<br />
PER LE OPERAZIONI FINALIZZATE AL RIPRISTINO DELLA<br />
FUNZIONALITÀ.<br />
IMPORTANTE<br />
PRIMA DI DAR CORSO A QUALSIASI OPERAZIONE DI<br />
MANUTENZIONE ALL’APPARECCHIO DISINSERIRE LO<br />
STESSO DALLA RETE DI ALIMENTAZIONE ELETTRICA.<br />
inconveniente<br />
1.0 - ALTA PRESSIONE ANOMALA.<br />
causa 1.1<br />
BATTERIA CONDENSANTE SPORCA.<br />
A compressore funzionante misurare con un manometro il<br />
valore della pressione di condensazione . Con temperatura<br />
aria ingresso condensatore pari a +32C la differenza tra il<br />
valore saturo della pressione di condensazione e la temperatura<br />
aria deve assumere valori prossimi a 10 °C.<br />
intervento<br />
Se la differenza riscontrata supera questo valore eseguire<br />
la pulizia in conformità a quanto riportato alla sezione “<br />
PULIZIA E MANUTENZIONE “ al punto 2.1.<br />
causa 1.2<br />
VENTILATORE CONDENSATORE NON FUNZIONANTE.<br />
A compressore funzionante deve essere in funzione.<br />
intervento<br />
Prima di dar corso alla eventuale sostituzione togliere<br />
tensione all’apparecchio e verificare l’integrità delle<br />
connessioni elettriche.<br />
causa 1.3<br />
PRESENZA DI INCONDENSABILI NEL CIRCUITO.<br />
In presenza di incondensabili la differenza tra il valore saturo<br />
della pressione di condensazione e la temperatura aria<br />
esterna assume valori superiori a 10 °C.<br />
intervento<br />
Togliere tutto il refrigerante presente nel circuito, produrre<br />
un vuoto di valore pari o inferiore a 100Pa, immettere<br />
nel circuito una quantità di refrigerante pari a quella<br />
riportata in targhetta matricolare.<br />
causa 1.4<br />
SCARSA AERAZIONE DELLA ZONA ADIACENTE AL<br />
VANO TECNICO.<br />
intervento<br />
Togliere eventuali ostruzioni al corretto circolare dell’aria<br />
in ingresso / uscita dal condensatore.<br />
RICERCA GUASTI<br />
SOMMARIO:<br />
1.0 - ALTA PRESSIONE ANOMALA<br />
2.0 - BASSA PRESSIONE ANOMALA<br />
3.0 - PROTEZIONI COMPRESSORE<br />
4.0 - GUASTO SONDE<br />
5.0 - COMPRESSORE NON PARTE<br />
6.0 - EVAPORATORE CON ECCESSIVA QUANTITÀ DI BRINA / GHIACCIO<br />
7.0 - IL COMPRESSORE SI ARRESTA RARAMENTE<br />
8.0 - APPARECCHIO RUMOROSO<br />
9.0 - TRACIMAZIONI DALLA BACINELLA AUTOEVAPORANTE<br />
causa 1.5<br />
APPARECCHIO APPENA MESSO IN FUNZIONE.<br />
Se l’apparecchio e’ stato messo in funzione da poco o se si<br />
sono introdotte di recente derrate alimentari si può riscontrare<br />
l’inconveniente descritto.<br />
intervento<br />
Il manifestarsi e’ transitorio e si risolve con il raggiungimento<br />
della temperatura di set.<br />
Nessun intervento da eseguirsi.<br />
2.0 - BASSA PRESSIONE ANOMALA.<br />
causa 2.1<br />
CAPILLARE PARZIALMENTE OSTRUITO.<br />
intervento<br />
Sostituire il capillare con altro di identiche caratteristiche<br />
dimensionali.<br />
causa 2.2<br />
FILTRO DISIDRATATORE SPORCO.<br />
Con un termometro provvisto di sonda a contatto misurare<br />
la temperatura del refrigerante a monte ed a valle del filtro,<br />
differenze di temperatura superiori a 1 °C sono sinonimo di<br />
filtro non efficiente e quindi da sostituire.<br />
intervento<br />
Sostituire.<br />
causa 2.3<br />
CARICA REFRIGERANTE SCARSA.<br />
intervento<br />
Eliminare eventuali punti di perdita, se necessario mettere<br />
in pressione il circuito per evidenziarle, eseguire<br />
operazioni di vuoto e carica.<br />
3.0 - INTERVENTO PROTEZIONI COMPRESSORE.<br />
causa 3.1<br />
IL TERMOSTATO NON CONTEGGIA I TEMPI DI RITAR-<br />
DO.<br />
Partenze ravvicinate non consentono il riequilibrarsi delle<br />
pressioni.<br />
intervento<br />
Verificare parametro relativo ed eventualmente riportare<br />
ai valori di fabbrica.<br />
causa 3.2<br />
TEMPERATURA GAS ASPIRATO SUPERIORE AI VALO-<br />
RI OTTIMALI.<br />
intervento<br />
-Verificare funzionalità dell’organo di laminazione.<br />
-Verificare carica refrigerante e l’eventuale presenza di<br />
punti di perdita, se necessario mettere in pressione il<br />
circuito per evidenziarli, eseguire operazioni di vuoto e<br />
carica.<br />
4.0 - GUASTO SONDE.<br />
causa 4.1<br />
INTERRUZIONI CONNESSIONI ELETTRICHE.<br />
intervento<br />
Verificare l’integrità delle connessioni ed eventualmente<br />
sostituire la sonda.<br />
causa 4.2<br />
SONDA NON FUNZIONALE.<br />
Pag. 11
intervento<br />
intervento<br />
I dati contenuti nel presente manuale non sono impegnativi e possono essere cambiati dal costruttore senza obblighi di preavviso. Riproduzione anche parziale vietata.<br />
Verificare con un tester l’integrità della sonda ed even- -Verificare carica refrigerante e l’eventuale presenza di<br />
punti di perdita, se necessario mettere in pressione il<br />
tualmente sostituire.<br />
circuito per evidenziarli, eseguire operazioni di vuoto e<br />
carica.<br />
causa 7.2<br />
GUARNIZIONI PORTA POCO EFFICIENTI.<br />
intervento<br />
Verificare lo stato delle guarnizione ed eventualmente<br />
sostituire.<br />
causa 7.3<br />
ROTTURA VALVOLA DI ASPIRAZIONE DEL COMPRES-<br />
SORE.<br />
intervento<br />
Verificare con un manometro il valore della pressione di<br />
aspirazione ed il valore della temperatura della carcassa<br />
del compressore. Eventualmente sostituire.<br />
5.0 - MANCATO AVVIO DEL COMPRESSORE.<br />
causa 5.1<br />
I MORSETTI DEL MOTORE ELETTRICO NON RISUL-<br />
TANO ESSERE ALIMENTATI.<br />
intervento<br />
Verificare la continuità dei collegamenti elettrici del<br />
cavo di alimentazione del compressore.<br />
causa 5.2<br />
IL VALORE DELLA TENSIONE DI ALIMENTAZIONE E’<br />
FUORI RANGE AMMESSO.<br />
intervento<br />
Determinare la causa ed eliminarla.<br />
causa 5.3<br />
IL MOTORE ELETTRICO HA UN AVVOLGIMENTO APER-<br />
TO O IN CORTOCIRCUITO.<br />
intervento<br />
Sostituire il compressore.<br />
causa 5.4<br />
IL COMPRESSORE HA DEFICIENZE MECCANICHE.<br />
intervento<br />
Sostituire il compressore<br />
causa 5.5<br />
TERMOSTATO ELETTRONICO NON FUNZIONALE.<br />
intervento<br />
Verificare con l’ausilio di un tester la funzionalità del<br />
contatto del termostato a cui fa capo il cavo d’alimentazione<br />
del compressore.<br />
causa 5.6<br />
MOTORE ELETTRICO BRUCIATO.<br />
intervento<br />
Verificare con l’ausilio di un tester la funzionalità del<br />
motore ed eventualmente sostituire il compressore.<br />
6.0 - EVAPORATORE CON ECCESSIVA QUANTITÀ DI<br />
BRINA / GHIACCIO.<br />
causa 6.1<br />
GUARNIZIONI PORTA POCO EFFICIENTI.<br />
intervento<br />
Verificare lo stato delle guarnizioni ed eventualmente<br />
sostituire.<br />
causa 6.2<br />
SISTEMA DI CHIUSURA PORTE NON FUNZIONALE.<br />
intervento<br />
Verificare la funzionalità ed eventualmente sostituire la<br />
cerniera.<br />
causa 6.3<br />
SBRINAMENTO NON OTTIMALE.<br />
intervento<br />
Verificare che frequenza, durata, modalità degli sbrinamenti<br />
siano conformi alle specifiche del costrut-tore,<br />
eventualmente modificare dopo aver contattato l’ufficio<br />
tecnico di fabbrica.<br />
causa 6.4<br />
SCARICO ACQUA DI SBRINAMENTO NON SIFONATO.<br />
intervento<br />
Verificare la presenza di sifone sul tubo di scarico prima<br />
del raccordo con la parte fissa, eventualmente modificare.<br />
causa 6.5<br />
MERCE INTRODOTTA CALDA E CON ALTO CONTENU-<br />
TO DI ACQUA.<br />
intervento<br />
Curare le condizioni della merce introdotta<br />
7.0 - IL COMPRESSORE SI ARRESTA RARAMENTE.<br />
causa 7.1<br />
CARICA REFRIGERANTE SCARSA.<br />
8.0 - APPARECCHIO RUMOROSO.<br />
causa 8.1<br />
VITI DI FISSAGGIO COMPRESSORE AL BASAMENTO<br />
ALLENTATE.<br />
intervento<br />
Verificarne lo stato di serraggio ed eventualmente stringere.<br />
causa 8.2<br />
TUBI DI COMPRESSIONE O ASPIRAZIONE CHE VIBRA-<br />
NO.<br />
intervento<br />
Verificarne lo stato di fissaggio ed eventualmente distanziare<br />
tubi adiacenti che si urtano.<br />
9.0 - TRACIMAZIONI DALLA BACINELLA AUTOEVAPO-<br />
RANTE<br />
causa 9.1<br />
RESISTENZA BACINELLA NON FUNZIONALE.<br />
intervento<br />
-Verificare con un tester lo stato della resistenza ed<br />
eventualmente sostituire.<br />
-Verificare che la resistenza sia alimentata ( eseguire la<br />
verifica nei periodi in cui la stessa è alimentata, consultare<br />
lo schema elettrico).<br />
causa 9.2<br />
FREQUENTI INTRODUZIONE DI MERCE CALDA E CON<br />
ALTO CONTENUTO DI ACQUA.<br />
intervento<br />
Curare le condizioni della merce introdotta.<br />
causa 9.3<br />
GUARNIZIONI PORTA POCO EFFICIENTI.<br />
intervento<br />
Verificare lo stato delle guarnizioni ed eventualmente<br />
sostituire.<br />
Pag. 12<br />
I dati contenuti nel presente manuale non sono impegnativi e possono essere cambiati dal costruttore senza obblighi di preavviso. Riproduzione anche parziale vietata.
14480000396-GB<br />
This manual has been prepared to enable a correct installation,<br />
regulation and maintenance of the appliance; it is therefore of<br />
fundamental importance that :<br />
- the warnings contained in this booklet are read carefully as<br />
they supply essential indications regarding the safety of the<br />
installation, use and maintenance.<br />
- This manual and the wiring diagram must be stored with care<br />
and made available to the operator for any future consultation.<br />
- The appliance must be installed, tested and serviced by<br />
qualified personnel in possession of the legal qualifications.<br />
• The constructor declines all responsibility with invalidity of the<br />
warranty in the event of electrical and/or mechanical modifications.<br />
Any adjustment whatsoever not expressly authorised and<br />
in disrespect of this manual invalidate the warranty.<br />
• Observe all existing local regulations at the time of installation.<br />
• Verify that the mains line characteristics are conform to the<br />
data given on the serial plate of the appliance.<br />
� Dates refered to: -19C / + 40C<br />
� Dates refered to: -16C / + 39C<br />
� Dates refered to: -13C / + 39C<br />
� Dates refered to: -12C / + 38C<br />
� Dates refered to: -12C / + 42C<br />
GENERAL NOTICES<br />
GENERAL TECHNICAL DATA<br />
IMPORTANT<br />
• The packing materials (plastic bags, polystyrene, nails, etc.)<br />
as potential hazards, must be kept out of the reach of children<br />
and properly recycled of according to existing local regulations.<br />
• The appliance has been designed and constructed for the<br />
conservation of foodstuffs and should therefore be destined to<br />
this sole purpose for which it has been expressly conceived. Any<br />
use whatsoever other this specific purpose does not commit the<br />
constructor in any way whatsoever.<br />
• Shutdown the appliance in the event of breakdown or malfunctions.<br />
• For eventual repairs contact exclusively the service centres<br />
authorised by the constructor and request the use of original<br />
spare parts.<br />
• If in doubt do not use the appliance and contact professionally<br />
qualified personnel.<br />
The disrespect of the above conditions could risk the safety of<br />
the appliance.<br />
Model K <strong>TN</strong> 12 / 13 25 / 35 / 45 60 <strong>70</strong> 60/<strong>70</strong>V 120 / <strong>140</strong> 120V / <strong>140</strong>V<br />
Standard voltage<br />
Compressor capacity W 260� 300� 380�<br />
230/1/50<br />
460� 540�<br />
Working temperatures °C -2 / +8<br />
Version capillary<br />
Cooling system convection convection / ventilated<br />
Evaporating temperature � °C -19 -16 -13 -12 -12 -12<br />
Defrost type pause elettrical<br />
Defrost nr / max duration min 4 / 55’ 4 / 25<br />
Compressor<br />
4 / 30 4 / 30 4 / 30 4 / 30<br />
Model B2116Z B6160Z B61<strong>70</strong>Z E6187Z<br />
Motor type CSIR CSIR CSIR CSIR<br />
revs per minute rpm 2900<br />
Starting relay<br />
T.I.:9660B 438-114<br />
AMF: MTRP0036-36<br />
T.I.: 9660B...135<br />
T.I.:9660B...138<br />
T.I.: 9660B...149<br />
Overload protector<br />
T.I.: MRP342JZ-3119<br />
AMF: T0567/17<br />
T.I.. MRP56HY...<br />
T.I.: MRP56HK...<br />
T.I. MRP38AMK...<br />
AMF: T0056/..<br />
Star capacitor 43 / 53 MFD 330V 43 / 53 MFD 330V 53 / 64 MFD 250V<br />
nr and diameter nr x Ø 1 x 200<br />
Condensatore fan<br />
1 x 230 1 x 230 1 x 230<br />
Nominal capacity nr x W 1 x 10 1 x 10<br />
Evaporator fan<br />
1 x 10 1 x 10<br />
nr. and diameter nr x Ø - 1 x 60 1 x 60 1 x 60 2 x 60<br />
Nominal capacity nr x W - 1 x 20 1 x 20 1 x 20 2 x 20<br />
Electrical data<br />
F.L.A.<br />
L.R.A.<br />
�<br />
�<br />
Compressor<br />
Total<br />
Compressor<br />
A<br />
A<br />
A<br />
1.9<br />
1.6<br />
8.8<br />
2.5<br />
2.2<br />
3.3<br />
10.0<br />
3.4<br />
2.3<br />
9.7<br />
3.9 4.7<br />
3.1<br />
14.0<br />
5.4<br />
F.L.I.<br />
M.I.C.<br />
�<br />
�<br />
Compressor<br />
Total<br />
W<br />
W<br />
A<br />
342<br />
9.4<br />
302<br />
457<br />
10.2<br />
385<br />
600<br />
11.6<br />
410<br />
625 661<br />
11.3 11.8<br />
835<br />
16.2<br />
540<br />
907<br />
17.0<br />
R134a Refrigerant<br />
Charge g 225 225 325 400 650 650<br />
� Dates refered to: - temperature +32°C - R.U. 60%<br />
� Full Load Amperes at maximum specified conditions<br />
� Locked Rotor Ampere of compressor<br />
� Full Load Input at the maximum specified conditions<br />
� Max Inrush Current of the appliance<br />
THIS MANUAL ONLY GIVES DATA REGARDING THE COMPARTMENT AT NORMAL TEMPERATURES.<br />
COMBINED FREEZER WITH TWO TEMPERATURE MUST BE PROVIDED WITH THE RELEVANT MANUAL FOR<br />
COMBINED COMPARTMENTS AND THE ELETRICAL DATA MUST BE ADDED TO THOSE GIVEN HERE.<br />
Pag. 13<br />
14480000396-GB
Table 1 DESCRIPTIONS LIST OF MODELS<br />
ACCESSORIES<br />
The appliance can be fitted with the following accessories (on<br />
request) :<br />
-different voltages from the standard;<br />
-80 mm wheel kit;<br />
DIMENSIONS AND WORKING SPACES<br />
MODEL<br />
NUMBER OF<br />
COMPARTMENT<br />
PLANT<br />
TYPE<br />
DIMENSIONS<br />
A B C<br />
mm mm mm<br />
TOTAL<br />
WEIGHT<br />
Kg<br />
PACKAGED<br />
VOLUME<br />
mc<br />
PARTIAL<br />
CAPACITY<br />
lt<br />
DRAINPANS<br />
PROVIDED<br />
650x530 188x480<br />
LAYOUT<br />
K/<strong>KU</strong> C <strong>TN</strong> 35/35 2<br />
K<strong>TN</strong> 35<br />
K<strong>TN</strong> 35<br />
740 850 2090 180 1,5<br />
285<br />
285<br />
2<br />
2<br />
K/<strong>KU</strong> C <strong>TN</strong> 35/13 2<br />
K<strong>TN</strong> 35<br />
K<strong>TN</strong> 13<br />
740 850 2090 180 1,5<br />
285<br />
285<br />
2<br />
➀<br />
K/<strong>KU</strong> C <strong>TN</strong> 45/12 2<br />
K<strong>TN</strong> 35<br />
K<strong>TN</strong> 13<br />
740 850 2090 180 1,5<br />
400<br />
1<strong>72</strong><br />
2<br />
➀<br />
K/<strong>KU</strong> C <strong>TN</strong> 25/45 2<br />
K<strong>TN</strong> 35<br />
K<strong>TN</strong> 35<br />
740 850 2090 180 1,5<br />
1<strong>72</strong><br />
400<br />
1<br />
2<br />
K/<strong>KU</strong> C 35/35 2 K<strong>TN</strong> 35 740 850 2090 215 1,5 285 2<br />
K/<strong>KU</strong> C 35/13 2 K<strong>TN</strong> 35 740 850 2090 215 1,5 285 ➀<br />
K/<strong>KU</strong> C 45/12 2 K<strong>TN</strong> 35 740 850 2090 215 1,5 1<strong>72</strong> ➀<br />
K/<strong>KU</strong> C 25/45 2 K<strong>TN</strong> 35 740 850 2090 215 1,5 400 3<br />
K/<strong>KU</strong> P <strong>TN</strong> 35/35 2 K<strong>TN</strong> 35 740 850 2090 174 1,5 285 2<br />
K/<strong>KU</strong> P <strong>TN</strong> 35/13 2 K<strong>TN</strong> 13 740 850 2090 174 1,5 285 ➀<br />
K/<strong>KU</strong> P <strong>TN</strong> 25/45 2 K<strong>TN</strong> 35 740 850 2090 174 1,5 400 2<br />
K C <strong>TN</strong> 30/30 2<br />
K<strong>TN</strong> 30<br />
K<strong>TN</strong> 30<br />
740 <strong>70</strong>0 2090 180 1,3<br />
251<br />
251<br />
2<br />
2<br />
K PC 30/30 2 K<strong>TN</strong> 30 740 <strong>70</strong>0 2090 180 1,3 251 2<br />
K/<strong>KU</strong> <strong>TN</strong> <strong>70</strong> 1 K<strong>TN</strong> <strong>70</strong> 740 850 2090 157 1,5 630 3<br />
K/<strong>KU</strong> <strong>TN</strong> <strong>72</strong> 1 K<strong>TN</strong> <strong>70</strong> 740 850 2090 174 1,5 630 4<br />
K/<strong>KU</strong> <strong>TN</strong>V <strong>70</strong> 1 K<strong>TN</strong>V <strong>70</strong> 740 850 2090 180 1,5 630 3<br />
K/<strong>KU</strong> <strong>TN</strong> 35/13 1 K<strong>TN</strong> <strong>70</strong> 740 850 2090 174 1,5 630 2<br />
K/<strong>KU</strong> <strong>TN</strong> 45/12 1 K<strong>TN</strong> <strong>70</strong> 740 850 2090 180 1,5 630 2<br />
K <strong>TN</strong> 60 1 K<strong>TN</strong> 60 740 <strong>70</strong>0 2090 156 1,3 508 3<br />
K <strong>TN</strong> 62 1 K<strong>TN</strong> 60 740 <strong>70</strong>0 2090 162 1,3 508 4<br />
K <strong>TN</strong>V 60 1 K<strong>TN</strong>V 60 740 <strong>70</strong>0 2090 180 1,3 508 3<br />
K/<strong>KU</strong> C <strong>TN</strong> <strong>70</strong>/<strong>70</strong> 2<br />
K<strong>TN</strong> <strong>70</strong><br />
K<strong>TN</strong> <strong>70</strong><br />
1480 850 2090 298 3,0<br />
630<br />
630<br />
3<br />
3<br />
K/<strong>KU</strong> C <strong>TN</strong> 105/35 2<br />
K<strong>TN</strong> <strong>70</strong><br />
K<strong>TN</strong> 35<br />
1480 850 2090 288 3,0<br />
980<br />
285<br />
5<br />
2<br />
2<br />
K/<strong>KU</strong> C <strong>70</strong>/<strong>70</strong> 2 K<strong>TN</strong> <strong>70</strong> 1480 850 2090 290 3,0 630 3<br />
K/<strong>KU</strong> C 105/35 2 K<strong>TN</strong> <strong>70</strong> 1480 850 2090 301 3,0 980 5 2<br />
K/<strong>KU</strong> P<strong>TN</strong> <strong>70</strong>/<strong>70</strong> 2 K<strong>TN</strong> <strong>70</strong> 1480 850 2090 283 3,0 630 3<br />
K/<strong>KU</strong> P<strong>TN</strong> 105/35 2 K<strong>TN</strong> <strong>70</strong> 1480 850 2090 290 3,0 980 5 2<br />
K C <strong>TN</strong> 60/60 2<br />
K<strong>TN</strong> 60<br />
K<strong>TN</strong> 60<br />
1480 <strong>70</strong>0 2090 295 2,6<br />
538<br />
538<br />
3<br />
3<br />
K C 60/60 2 K<strong>TN</strong> 60 1480 <strong>70</strong>0 2090 295 2,6 538 3<br />
K C 90/30 2 K<strong>TN</strong> 60 1480 <strong>70</strong>0 2090 295 2,6 846 5 2<br />
K PC 90/30 2 K<strong>TN</strong> 60 1480 <strong>70</strong>0 2090 295 2,6 846 5 2<br />
K/<strong>KU</strong> <strong>TN</strong> <strong>140</strong> 1 K<strong>TN</strong> <strong>140</strong> 1480 850 2090 278 3,0 <strong>140</strong>5 6 3<br />
K/<strong>KU</strong> <strong>TN</strong> 142 1 K<strong>TN</strong> <strong>140</strong> 1480 850 2090 283 3,0 <strong>140</strong>5 7 3<br />
K/<strong>KU</strong> <strong>TN</strong> 144 1 K<strong>TN</strong> <strong>140</strong> 1480 850 2090 288 3,0 <strong>140</strong>5 8 4<br />
K/<strong>KU</strong> <strong>TN</strong>V <strong>140</strong> 1 K<strong>TN</strong>V <strong>140</strong> 1480 850 2090 310 3,0 <strong>140</strong>5 6 3<br />
K <strong>TN</strong> 120 1 K<strong>TN</strong> 120 1480 <strong>70</strong>0 2090 269 2,6 1135 6 3<br />
K <strong>TN</strong> 122 1 K<strong>TN</strong> 120 1480 <strong>70</strong>0 2090 277 2,6 1135 7 3<br />
K <strong>TN</strong> 124 1 K<strong>TN</strong> 120 1480 <strong>70</strong>0 2090 287 2,6 1135 8 4<br />
K <strong>TN</strong>V 120 1 K<strong>TN</strong>V 120 1480 <strong>70</strong>0 2090 315 2,6 1135 6 3<br />
� Model with drawers<br />
Pag. 14<br />
POSITIONING<br />
The appliances are designed for indoor installation.<br />
-Check that the floor is capable of supporting the weight of<br />
the appliance ( see weights on page 14 ) and that it is level.<br />
-Respect the working spaces.
WORKING SPACES<br />
The choice of the appliance’s position is of fundamental importance for it to work<br />
properly.<br />
The appliances require a minimum space to operate and serving.<br />
It must be installed as far as possible from any heat sources.<br />
Ensure that there is a clearance of at least 50 cm. between the ceiling or other<br />
overhead cover and the top of the appliance, to guarantee adequate air circulation.<br />
Note :The dimensions in the figure are expressed in mm.<br />
1<br />
4<br />
2<br />
3<br />
2<br />
DIMENSIONS<br />
3<br />
Type <strong>KU</strong> <strong>70</strong>/<strong>140</strong> Type K <strong>70</strong>/<strong>140</strong> Type K 60/120<br />
1<br />
�<br />
4<br />
2<br />
1<br />
Type <strong>KU</strong> Type K 60/<strong>70</strong><br />
�<br />
4<br />
2<br />
3<br />
Type K 120/<strong>140</strong><br />
1<br />
2 1<br />
4<br />
�<br />
Legend :<br />
3<br />
�<br />
1 - Control panel<br />
2 - Compressor group<br />
3 - Power line inlet<br />
4 - Self-evaporating drainpain<br />
� - Position of serial number<br />
data<br />
Pag. 15
RECEPTION<br />
CONTENTS:<br />
1.0 - CONTROLS AT RECEPTION<br />
2.0 - HANDLING<br />
2.1 - HANDLING with FORK LIFT or SIMILAR<br />
3.0 - REMOVING THE PACKING<br />
1.0 - CONTROLS AT RECEPTION<br />
The appliances are shipped in appropriate protective packing.<br />
On arrival, check that the appliance has not incurred<br />
transport damage and that it is complete according to the<br />
order. In the event of visible damage immediately note<br />
the damage on the transport documents with the following<br />
wording:<br />
“ RECEIVED WITH RESERVE FOR EVIDENT DAMAGE<br />
OF PACKING ” since the delivery terms are ex factory this<br />
involves reimbursement of damages by the insurance company.<br />
IMPORTANT<br />
ALL THE OPERATIONS INDICATED BELOW MUST BE<br />
PERFORMED IN RESPECT OF EXISTING SAFETY<br />
REGULATIONS, BOTH FOR THE EQUIPMENT IN USE<br />
AND FOR THE OPERATING PROCEDURES.<br />
WARNING<br />
BEFORE BEGINNING HANDLING OPERATIONS ENSURE<br />
THAT THE LIFTING CAPACITY IS SUFFICIENT FOR THE<br />
APPLIANCE IN QUESTION.<br />
2.0 - HANDLING<br />
2.1 - HANDLING with FORK LIFT or SIMILAR<br />
2.1.1 - Insert the forks into the side of back of the wooden<br />
pallet supplied with the appliance.<br />
2.1.2 - Begin lifting checking that the appliance is in stable<br />
equilibrium.<br />
WARNING<br />
DURING HANDLING DO NOT TIP OR TURNOVER<br />
Pag. 16<br />
WARNING<br />
THE RESPECT OF THE RECOMMENDATIONS PRINTED<br />
ON THE OUTSIDE OF THE PACKING IS A GUARANTEE<br />
OF A SOUND PHYSICAL AND OPERATING CONDITION<br />
OF THE APPLIANCE ALL TO THE ADVANTAGE OF THE<br />
END-USER. THEREFORE THE FOLLOWING IS<br />
RECOMMENDED :<br />
- HANDLE WITH CARE<br />
- KEEP DRY<br />
- STACKING OF OTHER OBJECTS ON THE<br />
APPLIANCE MUST BE ABSOLUTELY AVOIDED.<br />
3.0 - UNPACKING<br />
3.1 - Cardboard packing<br />
3.1.1 - Cut the band straps with scissors.<br />
3.1.2 - Lift the carton.<br />
3.2 - Wodden packing<br />
3.2.1 - Unnail the wodden panels starting with the front and<br />
top.<br />
3.2.2 - Slide off the nylon wrapping over the top of the unit.<br />
3.3 - Nylon packing<br />
3.3.1 - After having removing the adhesive tape, slide off the<br />
nylon wrapping over the top of the unit.<br />
3.4 - Lift the appliance to separate it from the pallet.<br />
3.5 - Place the appliance on the ground in its chosen position.<br />
3.6 - Check for visible damage.<br />
3.7 - Keep the packing out of the reach of children as it could be<br />
a danger hazard.<br />
3.8 - Dispose of the packing to the specialised collection or<br />
recycling points ( respect existing regulations ).<br />
3.9 - Check that the serial number corresponds to the transport<br />
documents.
INVERSION OF THE DOOR OPENING<br />
IMPORTANT<br />
THE FOLLOWING HAS THE SOLE OBJECTIVE OF<br />
HIGHLIGHTING THE POSSIBILITY OF ADAPTING THE<br />
APPLIANCES TO THE SPECIFIC INSTALLATION<br />
REQUIREMENTS CONDITIONED BY THE NEED TO<br />
INVERT THE OPENING OF THE DOOR.<br />
THIS DOES NOT REPRESENT, IN ANY WAY WHATSOEVER,<br />
AN OPERATING SEQUENCE TO BE RESPECTED UNLESS<br />
FOR PROFESSIONALLY QUALIFIED PERSONNEL.<br />
The appliances are factory fitted with the door hinged on the right<br />
hand side. If this needs to be inverted proceed as follows:<br />
1 - REMOVE THE TOP HINGE<br />
1.1 - Unscrew the screws that hold bracket [C].<br />
1.2 - Remove the door and turn it by 180°. Invert the following<br />
door parts:<br />
a) the plastic bushing.<br />
b) the support section for the chrome hinge.<br />
2 - REMOVE LOWER BRACKET D.<br />
2.1 - Unscrew the fixing screws.<br />
MODEL WITH MOTOR<br />
POSITIONED ON THE TOP<br />
A<br />
MODEL WITH MOTOR<br />
POSITIONED ON THE BOTTOM<br />
B<br />
A<br />
B<br />
3 - FIT THE LOWER BRACKET [B] WITH THE SUITABLE<br />
SCREWS.<br />
4 - MODIFY THE HINGE ASSEMBLY FROM RIGHT [C] TO<br />
LEFT [A].<br />
4.1 - Unscrew the central screw that blocks the bracket to<br />
the hinge body and remove bracket [C].<br />
4.2 - Turn the fork anti-clockwise by 1 /2 turn.<br />
4.3 - Re-assemble bracket [A] (request the part if necessary).<br />
4.4 - Remount the left hinge assembly [A] onto the door.<br />
5 - ONLY FOR MODELS WITH TWO HALF DOORS.<br />
5.1 - Remove the central brace by unscrewing the two<br />
brackets found inside the compartment, in the lower section<br />
of the brace. 5.2 - Turn by 180° the central brace fixing it with<br />
its brackets.<br />
6 - DOOR INSTALLATION.<br />
6.1 - Remount the door fixing the top hinge [A] with bracket.<br />
7 - CONTROLLING THE GASKET.<br />
7.1 - Check that the magnetic door gasket gives a firm seal<br />
on all sides.<br />
8 - TIGHTEN THE SCREWS THAT FIX THE HINGE.<br />
C<br />
D<br />
C<br />
D<br />
Pag. 17
The appliance is fitted with a control panel found on the panel<br />
at the top of the door.<br />
The panel has been fitted with all the command and control<br />
devices required to operate the appliance:<br />
� - ON-OFF TELLTALE SWITCH<br />
�- FAN SWITCH ( NOT AVAILABLE ON MODELS WITH<br />
PLANT TYPE K<strong>TN</strong> 12 E K<strong>TN</strong> 13 ).<br />
�- LIGHT SWITCH (ONLY FOR GLASS DOOR)<br />
�- DEFROST LIGHT<br />
�- ELECTRONIC THERMOSTAT<br />
1.0 - TELLTALE SWITCH<br />
To turn the appliance on and off. The green light signals that<br />
voltage is supplied to the electric plant of the appliance.<br />
2.0 - FAN TELLTALE SWITCH<br />
To start or stop the fan inside the unit and to signal its<br />
operating status.<br />
By switching off the yellow switch the unit will operate by<br />
convection.<br />
3.0- LIGHT TELLTALE SWITCH<br />
Found only on the K <strong>TN</strong>V models (with glass door), coloured<br />
white.<br />
To turn ON and OFF the inside light and signal its status<br />
4.0- DEFROST LIGHT<br />
The red light referring to the unit defrost cycle.<br />
When ON, it signals that the unit is in the defrost phase.<br />
5.0 - ELECTRONIC THERMOSTAT<br />
To regulate the control and management of the operation of<br />
the appliance.<br />
5.1 - THERMOREGULATION<br />
The electronic thermostat acts to maintain the temperature<br />
inside the fridge compartment as close as possible to the Set<br />
Point value.<br />
Further to the Set Point the regulator uses another parameter<br />
- Hysterysis , that is factory set, and determines the range<br />
of fluctuation from the Set Point permitted for the fridge<br />
compartment temperature<br />
Example :<br />
with Set Point = -2°C and Hysterysis = 2°C we have :<br />
Pag. 18<br />
CONTROL PANEL<br />
CONTENTS:<br />
1.0 - ON-OFF TELLTALE SWITCH<br />
2.0 - FAN TELLTALE SWITCH<br />
3.0 - LIGHT TELLTALE SWITCH<br />
4.0 - DEFROST LIGHT<br />
5.0 - ELECTRONIC THERMOSTAT<br />
5.1 - THERMOREGULATION<br />
5.2 - COMPRESSOR TIMING<br />
5.3 - MAXIMUM AND MINIMUM TEMPERATURE ALARMS<br />
5.4 - EVAPORATOR FAN OPERATION MANAGEMENT<br />
5.5 - DEFROST MANAGEMENT<br />
6.0 - SET POINT<br />
6.1 - SET POINT VARIATION<br />
7.0 - OPERATING STATUS OF THE APPLIANCE COMPONENTS<br />
8.0 - ALARM CODE<br />
The compressor will start when the compartment temperature<br />
rises above :<br />
-2°C + ( 2°C ) = 0°C.<br />
The compressor stops when the compartment’s temperature<br />
reaches:<br />
-2 °C<br />
The Set Point is available to the user who can set the value,<br />
in degrees centigrade, as desired within a factory set range.<br />
This range is established to ensure the well being of the<br />
appliance and to ensure that the performance is respected.<br />
5.2 - COMPRESSOR TIMING<br />
The regulator, in controlling the compressor, accounts for<br />
certain timings. These timings have the function of:<br />
a) To limit the number of compressor starts per hour to a<br />
value established by its constructor.<br />
b) To ensure that, between one stop and the subsequent<br />
start-up of the compressor, there is a minimum delay to<br />
equalise the internal pressures.<br />
It is important to emphasise how the timing at point (a) counts<br />
the delay between one compressor start-up and the next.<br />
The values associated with each timing delay can only be<br />
set by parameters that are only accessible to the constructor<br />
or an authorised service centre.<br />
The compressor timing is signalled by the compressor LED<br />
flashing on the face of the thermostat, indicated by "comp"<br />
�.<br />
5.3 - MAXIMUM AND MINIMUM TEMPERATURE ALARMS<br />
The regulator supervises the management of both the maximum<br />
and minimum temperature alarms of the compartment.<br />
The values are set by parameters that are only<br />
accessible to the constructor or an authorised service centre<br />
and should be considered as the distance from the Set Point<br />
5.4 - EVAPORATOR FAN OPERATION MANAGEMENT<br />
( Function not available on models with plant type K <strong>TN</strong> 12<br />
e K <strong>TN</strong> 13 ).<br />
The regulator functions so that the fans inside the compartment<br />
only operate when specifically required. The parameters,<br />
only accessible to the constructor or the authorised<br />
service centres may be used to define<br />
- if the fans shutdown or not during defrost
- the shutdown temperature of the fans.<br />
IMPORTANT : The fans will not start if the yellow switch �<br />
is OFF.<br />
The fans remain off during defrost to avoid putting in circulation<br />
warm air heated by the defrost elements until the<br />
temperature reading of the sensor fitted on the evaporator<br />
fins has risen above the set value. After defrost there must<br />
be a delay before the fans start-up to allow the defrost water<br />
to drip off.<br />
Fan operation is signalled by the yellow telltale switch �<br />
lighting up.<br />
5.5 - DEFROST MANAGEMENT<br />
The defrost cycle has the function of melting frost or ice<br />
which forms on the outside of the evaporator when the air<br />
has a high humidity content.<br />
The parameters are only accessible to the constructor or<br />
authorised service centres and define:<br />
- if the defrost is activated on start-up or not<br />
- the maximum duration of the defrost cycle<br />
- the interval between to subsequent defrost cycles<br />
The defrost in act is signalled by the defrost LED lighting up<br />
found on the face of the thermostat indicateed by “def” �<br />
and by the red light �.<br />
In the event that the defrost cycle needs to be started<br />
manually, press key � for over 5 seconds.<br />
6.0 - SET POINT<br />
6.1 - HOW TO CHANGE Set Point<br />
6.1.1 - Press the ON-OFF switch<br />
6.1.2 - Press the key SET � (the Set Point is visualised.);<br />
The LED indicated by “set” � flashes.<br />
6.1.3 - Adjust the value by pressing the following keys within<br />
5 seconds<br />
or<br />
(key �) to increase the value<br />
(key �) to decrease the value<br />
The new setting is memorised automatically when the programming<br />
mode is quitted, which occurs when the buttons<br />
are not touched for a few seconds.<br />
Table 1 LIST OF ACCESSIBLE PARAMETERS<br />
appliance All models<br />
description Set point<br />
unit measure °C<br />
factory setting -2<br />
7.0 - OPERATING STATUS OF THE APPLIANCE COMPONENTS<br />
The operating status of the various appliance components<br />
can be easily checked through the LED’s found on the<br />
thermostat. Each LED is associated with a specific component<br />
of the appliance. Table 2 gives the corresponding<br />
components and meanings.<br />
Table 2 MEANINGS OF THE LED’s<br />
LED relative components status meaning<br />
comp compressor off compressor off<br />
comp compressor flashing compressor timing in act<br />
comp compressor on compressor in operation<br />
def defrost element off defrost inactive<br />
def defrost element on defrost in act<br />
def defrost element flashing dripping in progress<br />
set set point off normal working<br />
set set point flashing adjusting parameters<br />
8.0 - ALARM CODES<br />
Each anomaly that may occur during operation of the appliance,<br />
is signalled by the control module, identified by an<br />
alarm code. Table 3 lists all the alarm codes significant for<br />
the appliance configuration referred to in this manual.<br />
The malfunctions, accompanied by an acoustic signal can<br />
be silenced by pressing any of the three keys on the facing.<br />
IMPORTANT : When an alarm appears that is not included<br />
in this list, this is a symptom of a wrong setting of the<br />
configuration parameters of the control module. In this case<br />
contact immediately your authorised service centre.<br />
Table 3 ALARM CODE LIST<br />
code E1 E2<br />
component Temperature sensor Temperature sensor<br />
description<br />
Fridge temperature<br />
sensor failure<br />
Evap. temperature<br />
sensor failure<br />
Pag. 19
START-UP AND DISPOSAL OF UNIT<br />
CONTENTS:<br />
1.0 - PRELIMINARY CONTROLS<br />
1.1 - GENERAL CONTROLS<br />
1.2 - CONTROL OF ELECTRICAL SYSTEM<br />
2.0 - START-UP - CHECKS<br />
3.0 - DISPOSAL OF UNIT<br />
IMPORTANT<br />
BEFORE CONNECTING THE APPLIANCE CHECK THAT THE DATA ON THE SERIAL PLATE CORRESPOND TO THE<br />
ACTUAL ELECTRICAL SUPPLY.<br />
THE SERIAL PLATE GIVING THE ELECTRICAL DATA REQUIRED IN THE INSTALLATION IS FOUND ON THE TOP<br />
RIGHT-HAND SIDE OF THE FRONT CONTROL PANEL.<br />
THE INSTALLATION MUST BE MADE ACCORDING TO THE INSTRUCTIONS GIVEN IN THIS SECTION, BY<br />
PROFESSIONALLY QUALIFIED PERSONNEL.<br />
THE ELECTRICAL SAFETY OF THIS APPLIANCE IS ONLY GUARANTEED WHEN IT IS CONNECTED TO AN EFFICIENT<br />
EARTHING PLANT AS PRESCRIBED BY EXISTING ELECTRICAL SAFETY REGULATIONS.<br />
THIS FUNDAMENTAL SAFETY REQUIREMENT MUST BE VERIFIED AND, IF IN DOUBT, REQUEST A PRECISE<br />
CONTROL OF THE PLANT BY PROFESSIONALLY QUALIFIED PERSONNEL.<br />
THE CONSTRUCTOR DECLINES ALL RESPONSIBILITY FOR DAMAGES CAUSED BY THE DISRESPECT OF AN<br />
EFFICIENT EARTHING OF THE PLANT.<br />
THE APPLIANCE MUST ALSO BE FITTED WITH AN EQUIPOTENTIAL SYSTEM WHOSE EFFICIENCY MUST BE<br />
VERIFIED ACCORDING TO EXISTING REGULATIONS.<br />
THE USE OF ADAPTERS, MULTI-PLUGS, AND/OR EXTENSION LEADS IS STRICTLY PROHIBITED<br />
1.0 - PRELIMINARY CONTROLS<br />
1.1 - GENERAL CONTROLS<br />
1.1.1 - Control the appliance is perfectly level. Regulate the<br />
adjustable feet if necessary.<br />
1.1.2 - Control that the plastic protective coating is removed<br />
from all external surfaces.<br />
1.1.3 - Control that the interior is washed with warm water<br />
and a neutral soap.<br />
1.1.4 - Control that the appliance is positioned as far as<br />
possible from heat sources.<br />
1.1.5 - Control that the free air circulation around the motor<br />
compartment is not obstructed.<br />
1.1.6 - Control that the locking keys are beyond the reach of<br />
children.<br />
1.2 - CONTROL OF THE ELECTRIC SYSTEM<br />
1.2.1 - Control the voltage and frequency of the mains<br />
distribution :<br />
THEY MUST FALL WITHIN THE GIVEN VALUES<br />
230 ± 10% 50Hz<br />
1.2.2 - Tighten all the screws that fix the wires to the electrical<br />
components ( vibrations during handling and transport could<br />
have loosened them ).<br />
1.2.3 -Check that there is a circuit breaker before the socket<br />
with an opening distance of the contacts equal to or over 3<br />
mm.<br />
1.2.4 - Turn the main switch to the OFF position where the<br />
power cable plug will be connected.<br />
1.2.5 -Check the compatibility of the socket with the plug of<br />
the appliance. If necessary, have it changed by professionally<br />
qualified personnel. The technician should also check<br />
that the cable section to the socket is adequate for the<br />
absorbed power of the appliance.<br />
Check that the plug is in the socket.<br />
Pag. 20<br />
2.0 - START-UP - CHECKS<br />
After the above controls have been thoroughly completed<br />
the appliance may be started-up :<br />
2.1.1 - Turn the main switch, connected to the power cable<br />
plug, to the ON position.<br />
2.1.2 - Turn the switch of the appliance to the ON position.<br />
2.1.3 - Visualise the SET POINT.<br />
2.1.3.1 - Press the SET � button on the electronic thermostat<br />
checking that the LED set � is flashing;<br />
2.1.3.2 - Set the desired value, based on the type of product<br />
being stored.<br />
To modify the factory setting of this value consult the CON-<br />
TROL PANEL section (page 18).<br />
IMPORTANT<br />
BEFORE INTRODUCING FOOD ALLOW THE APPLIANCE<br />
TO REACH STABLE OPERATING CONDITIONS.<br />
3.0 - DISPOSAL OF UNIT<br />
To dispose of this appliance, before it is scrapped it must be<br />
rendered unoperational by removing the power cable, eliminating<br />
all parts of the appliance that could constitute a hazard<br />
and invalidate the lock, hinge and any other closing devices<br />
to avoid that children playing could be trapped inside or<br />
injured.<br />
IMPORTANT<br />
RESPECT LOCAL REGULATIONS REGARDING<br />
SCRAPPING OF THIS TYPE OF APPLIANCE.
CLEANING AND MAINTENANCE<br />
CONTENTS:<br />
1.0 - WEEKLY CLEANING<br />
2.0 - ROUTINE MAINTENANCE<br />
2.1 - CONDENSING COIL<br />
2.2 - FANS<br />
2.3 - POWER CABLE<br />
3.0 - LONG SHUTDOWNS<br />
4.0 - LIGHTING<br />
This section has been dedicated to the end-user and is extremely<br />
important for the appliance to work correctly in the longterm.<br />
A few simple operations conscientiously carried out at set periods<br />
can avoid the need of servicing by specialised personnel.<br />
The operations to be made do not require any particular technical<br />
knowledge and can be summarised in simple controls of the<br />
appliances components.<br />
IMPORTANT<br />
BEFORE BEGINNING ANY TYPE OF MAINTENANCE OR<br />
CLEANING WORK ON THE APPLIANCE DISCONNECT<br />
THE MAINS POWER SUPPLY.<br />
WARNING<br />
DO NOT WASH THE APPLIANCE DIRECTLY WITH HIGH<br />
PRESSURE WATER JETS.<br />
AVOID SPRAYING WATER DIRECTLY ONTO ELECTRICAL<br />
PARTS.<br />
1.0 - WEEKLY CLEANING<br />
1.1 - THE BODY WORK<br />
1.1.1 - Check that the body work is clean. Pay particular<br />
attention to the sections in steel.<br />
1.1.2 - Clean the inside and outside surfaces with warm<br />
water and soap or a neutral detergent. To eliminate bad<br />
odours, add a drop of vinegar.<br />
1.1.3 - Rinse with plenty of water and dry thoroughly.<br />
1.2 - DEFROST WATER DRAIN SYSTEM<br />
1.2.1 - Check that the condensate water drain pipe is not<br />
blocked. Clean if necessary.<br />
1.2.2 - Empty the condensate water drainpan and restore to<br />
its correct position. (only for versions without self-evaporating<br />
drainpan)<br />
WARNING<br />
IF THE DOOR IS OPENED MORE THAN NORMAL OR<br />
IMPROPERLY USED, THIS CAN CREATE THE NEED OF<br />
FREQUENT CHECKS ON THE LEVEL OF THE DRAINPAN<br />
2.0 - ROUTINE MAINTENANCE<br />
2.1 - CONDENSING COIL<br />
It is important that the coil is capable of offering the maximum<br />
possible heat exchange. It is therefore important that its<br />
surface be always free of dirt or dust that may be deposited<br />
by the effect of the fan’s operation.<br />
2.1.1 - Use a vacuum cleaner and soft bristled brush to<br />
remove all the impurities such as paper or dust that may<br />
have deposited on the coil.<br />
2.1.2 - Check that the aluminium fins have not been damaged<br />
or bent, if this is the case "comb" the coil with the<br />
appropriate tool until the original condition is regained to<br />
optimise the air flux.<br />
2.2 - FANS<br />
2.2.1 - Check that the fan is properly fixed to its frame<br />
2.2.2 - Check, as best possible, for unbalancing of the fans,<br />
indicated by abnormal noises or vibrations.<br />
2.3 - POWER CABLE<br />
2.3.1 - Check that the power cable that connects the appliance<br />
to the mains socket is not cut, cracked or altered in such<br />
a way as to compromise the insulation. Contact your authorised<br />
service centre if this requires maintenance.<br />
3.0 - LONG SHUTDOWNS<br />
If the appliance is inactive for long periods of time proceed<br />
as follows:<br />
3.1 -Turn the main switch to the OFF position.<br />
3.2 -Remove the plug from its socket.<br />
3.3 -Empty the appliance and clean as in point 1.0.<br />
3.4 -Leave the door ajar to avoid bad odours from forming.<br />
3.5 -Protect the compressor group from dust.<br />
4.0 - LIGHTING<br />
The lighting is normally activated the moment the door is<br />
opened by a mechanical or magnetic microswitch, for appliances<br />
with glass doors, the lighting is controlled by a<br />
switch found on the control panel.<br />
If one of the above normal operating conditions does not<br />
occur or a malfunction is found, contact an authorised service<br />
centre or professionally qualified personnel for the necessary<br />
maintenance.<br />
IMPORTANT<br />
THE APPLIANCES ARE MADE OF AISI 304 STEEL WHICH<br />
IS CORROSION PROOF UNDER NORMAL USE.<br />
AVOID USING DETERGENTS OR SIMILAR CLEANERS<br />
THAT MAY BE DETRIMENTAL TO ITS PROTECTION.<br />
Pag. 21
The following list has been prepared as a guideline to the search<br />
of possible remedies to some anomalies that could be found in<br />
the appliance, it should be understood that this list does not<br />
cover all possible cases. If a safety device trips, this signals an<br />
anomaly in operation; before resetting it, check and eliminate<br />
the cause. The list below gives some of the problems that may<br />
be found with their relevant cause and remedies (in bold print).<br />
WARNING<br />
THE OPERATIONS GIVEN ARE THE SOLE<br />
RESPONSIBILITY OF THE PERSON WHO CARRIES THEM<br />
OUT, AN AUTHORISED SERVICE CENTRE MUST BE<br />
CONTACTED AS THEY HAVE THE NECESSARY<br />
REQUISITES TO CARRY OUT THE OPERATIONS<br />
NECESSARY TO RESTORE NORMAL OPERATION.<br />
IMPORTANT<br />
BEFORE BEGINNING ANY MAINTENANCE WORK ON THE<br />
APPLIANCE DISCONNECT THE ELECTRIC MAINS SUPPLY.<br />
inconvenience<br />
1.0 - ABNORMALLY HIGH PRESSURE.<br />
cause 1.1<br />
DIRTY CONDENSING COIL.<br />
With the compressor operating use a gauge to measure the<br />
condensing pressure. With a condenser inlet air temperature<br />
of +32C the difference between the saturated condensing<br />
pressure and the air temperature must be around 10 °C.<br />
remedy<br />
If the difference is found to be above this value clean<br />
according to the “ CLEANING AND MAINTENANCE “<br />
section at point 2.1.<br />
cause 1.2<br />
THE CONDENSER FAN DOES NOT WORK.<br />
With the compressor operating the fan must operate.<br />
remedy<br />
Before replacing the fan disconnect the supply voltage<br />
and check the electric connections are in good order.<br />
cause 1.3<br />
IMPURITIES PRESENT IN THE CIRCUIT.<br />
If impurities are present the difference between the saturated<br />
condensing pressure and the ambient air temperature will<br />
be over 10 °C.<br />
remedy<br />
Remove all the refrigerant in the circuit, create a vacuum<br />
equal or below 100Pa, charge the circuit with the quantity<br />
of refrigerant given on the serial plate.<br />
cause 1.4<br />
FEEBLE AERATION OF THE ZONE AROUND THE TE-<br />
CHNICAL COMPARTMENT.<br />
remedy<br />
Remove any obstructions to a correct circulation of the<br />
inlet /outlet air to the condenser.<br />
cause 1.5<br />
APPLIANCE HAS JUST BEEN STARTED-UP.<br />
If the appliance has been recently started-up and the fridge<br />
Pag. 22<br />
FAULT FINDING<br />
CONTENTS:<br />
1.0 - ABNORMALLY HIGH PRESSURE<br />
2.0 - ABNORMALLY LOW PRESSURE<br />
3.0 - COMPRESSOR PROTECTIONS<br />
4.0 - SENSOR FAILURE<br />
5.0 - THE COMPRESSOR DOES NOT START<br />
6.0 - EVAPORATOR WITH EXCESSIVE FROST / ICE<br />
7.0 - THE COMPRESSOR RARELY STOPS<br />
8.0 - THE APPLIANCE IS NOISY<br />
9.0 - OVERFLOW OF SELF-EVAPORATING DRAINPAN<br />
compartment has just been filled food stuffs this inconvenience<br />
may be occur.<br />
remedy<br />
It is merely a temporary phase that will disappear the moment<br />
the set point temperature has been reached.<br />
No remedy needed.<br />
2.0 - ABNORMALLY LOW PRESSURE.<br />
cause 2.1<br />
CAPILLARY PARTIALLY BLOCKED.<br />
remedy<br />
Replace the capillary with another of identical dimensional<br />
characteristics.<br />
cause 2.2<br />
DIRTY FILTER DRYER.<br />
With a contact thermometer measure the refrigerant temperature<br />
before and after the filter, a temperature difference of<br />
more than 1 °C is a symptom that the filter has lost efficiency<br />
and should therefore be changed.<br />
remedy<br />
Replace.<br />
cause 2.3<br />
FEEBLE REFRIGERANT CHARGE.<br />
remedy<br />
Eliminate any leaks, if necessary pressurise the circuit<br />
to emphasise them, carry out the vacuum and charging<br />
operations.<br />
3.0 - TRIPPED COMPRESSOR PROTECTION.<br />
cause 3.1<br />
THE THERMOSTAT DOES NOT COUNT THE DELAY<br />
TIME.<br />
Adjacent start-ups don’t allow the pressures the equalise.<br />
remedy<br />
Check relevant parameter and restore to factory setting<br />
if necessary.<br />
cause 3.2<br />
SUCTION GAS TEMPERATURE ABOVE THE OPTIMUM<br />
VALUES.<br />
remedy<br />
- Check that the expansion device is working correctly.<br />
- Check the refrigerant charge and eventually for any<br />
leaks, if necessary pressurise the circuit to emphasise<br />
them, carry out the vacuum and charging operations.<br />
4.0 - SENSOR FAILURE.<br />
cause 4.1<br />
FAULTY ELECTRIC CONTACT.<br />
remedy<br />
Check the connections are in good order and eventually<br />
replace the sensor.<br />
cause 4.2<br />
SENSOR NOT WORKING.<br />
remedy<br />
Use a tester to check the sensor is working and replace<br />
if necessary.<br />
5.0 - THE COMPRESSOR DOES NOT START.<br />
cause 5.1<br />
NO POWER IS REACHING THE TERMINALS OF THE<br />
ELECTRIC MOTOR.
emedy<br />
All specifications Check the and continuity data are subject of to the change electric without connections notice. © Coyright. of the<br />
supply cable to the compressor.<br />
cause 5.2<br />
THE SUPPLY VOLTAGE IS OUT OF THE PERMITTED<br />
RANGE.<br />
remedy<br />
Determine the cause and eliminate it.<br />
cause 5.3<br />
THE MOTOR HAS AN OPEN SHORT CIRCUITED WIN-<br />
DING.<br />
remedy<br />
Replace the compressor.<br />
cause 5.4<br />
THE COMPRESSOR HAS A MECHANICAL FAULT.<br />
remedy<br />
Replace the compressor<br />
cause 5.5<br />
THE ELECTRONIC THERMOSTAT DOESN’T WORK.<br />
remedy<br />
Use a tester to check the contacts of the thermostat<br />
which leads from the compressor supply cable.<br />
cause 5.6<br />
BURNT ELECTRIC MOTOR.<br />
remedy<br />
Use a tester to check the motor and replace the compressor<br />
if necessary.<br />
6.0 - EVAPORATOR WITH EXCESSIVE FROST / ICE.<br />
cause 6.1<br />
THE DOOR GASKET DOES NOT MAKE A SEAL.<br />
remedy<br />
Check the gasket and change if necessary.<br />
cause 6.2<br />
DOOR CLOSE SYSTEM FUNCTIONS BADLY.<br />
remedy<br />
Check the closure and replace the hinge if necessary.<br />
cause 6.3<br />
DEFROST IS NOT COMPLETE.<br />
remedy<br />
Check that the frequency, duration, system conform to<br />
the construction spec’s, if necessary contact the factory<br />
and modify.<br />
cause 6.4<br />
DEFROST WATER DRAIN HAS AN INEFFICIENT DRAIN<br />
TRAP.<br />
remedy<br />
Check that there is a drain trap on the drain pipe before<br />
coupling to the fixed section, modify if necessary.<br />
cause 6.5<br />
HOT GOODS OR WITH A HIGH WATER CONTENT ARE<br />
INTRODUCED.<br />
remedy<br />
Control the conditions of the goods being introduced.<br />
7.0 - THE COMPRESSOR RARELY STOPS.<br />
cause 7.1<br />
FEEBLE REFRIGERANT CHARGE.<br />
remedy<br />
Check the refrigerant charge and for any leaks, if necessary<br />
pressurise the circuit the emphasise them, carry<br />
out the vacuum and charging operations.<br />
cause 7.2<br />
INEFFICIENT DOOR GASKET.<br />
remedy<br />
Check the state of the door gasket and replace if necessary.<br />
cause 7.3<br />
BROKEN SUCTION VALVE ON THE COMPRESSOR.<br />
remedy<br />
Use a gauge to check the suction pressure and the<br />
temperature of the compressor’s crankcase. Replace if<br />
necessary.<br />
8.0 - NOISY APPLIANCE.<br />
cause 8.1<br />
THE FIXING BOLTS OF THE COMPRESSOR TO THE<br />
BASE ARE LOOSE.<br />
remedy<br />
Check the bolts and tighten if necessary.<br />
cause 8.2<br />
COMPRESSION OR SUCTION LINES VIBRATE.<br />
remedy<br />
Check they are fixed properly and if necessary separate<br />
them from nearby pipes that are being knocked.<br />
9.0 - OVERFLOW OF THE SELF-EVAPORATING<br />
DRAINPAN<br />
cause 9.1<br />
DRAINPAN HEATER NOT WORKING.<br />
remedy<br />
- Use a tester to check the state of the heater and replace<br />
if necessary.<br />
- Check that the heater is being powered ( this should<br />
be carried out when the heater is being powered, consult<br />
the wiring diagram).<br />
cause 9.2<br />
FREQUENT INTRODUCTION OF HOT GOODS OR WITH<br />
HIGH WATER CONTENT.<br />
remedy<br />
Control the conditions of the goods introduced.<br />
cause 9.3<br />
INEFFICIENT DOOR GASKET.<br />
remedy<br />
Check the state of the gasket and replace if necessary.<br />
Pag. 23<br />
All specifications and data are subject to change without notice. © Coyright.
14480000396-D<br />
ALLGEMEINE HINWEISE<br />
Das vorliegende Handbuch dient zur korrekten Installation, Ein- • Sich vergewissern, daß die Eigenschaften des elektrischen<br />
stellung und Wartung des Gerätes; deshalb sollte man unbe- Netzes den Daten des Geräteschildes entsprechen.<br />
dingt darauf achten, daß:<br />
Das Verpackungsmaterial (Plastiktüten, Schaumpolystyrol, Nä-<br />
- die folgenden Hinweise aufmerksam durchgelesen werden, da gel, usw...) stellt eine mögliche Gefahrenquelle dar und sollte<br />
sie wichtige Anweisungen zur Sicherheit bei der Installation, deshalb außer Reichweite von Kindern gehalten und unter<br />
dem Gebrauch und der Wartung liefern.<br />
Befolgung der geltenden lokalen Normen beseitigt werden.<br />
- das vorliegende Handbuch und das elektrische Schema an • Das Gerät wurde für die Konservierung von Lebensmitteln<br />
einem sicheren Ort aufbewahrt und dem Bediener zwecks Na- entworfen und hergestellt und sollte deshalb nur zu dem Zweck, zu<br />
chschlagen zur Verfügung gestellt werden.<br />
dem es erbaut wurde, verwendet werden. Der Erbauer lehnt jede<br />
-das Gerät nur vom Fachpersonal, das mit den gesetzlichen Verantwortung im Falle von unsachgemäßer Benutzung ab.<br />
Erfordernisse ausgestattet ist, installiert, geprüft und gewartet • Das Gerät bei Störungen oder bei schlechtem Betrieb aus-<br />
wird.<br />
schalten.<br />
• Der Hersteller lehnt jede Verantwortung im Falle von elektrischen<br />
und/oder mechanischen Abänderungen ab. Die Garantie<br />
• Sich bei erforderlicher Reparatur ausschließlich an einen vom<br />
Erbauer zugelassenen technischen Kundendienst wenden und<br />
erlischt im allgemeinen, wenn unsachgemäße Eingriffe vorge- die Verwendung von Originalersatzteilen fordern.<br />
nommen wurden und wenn die Anweisungen des vorliegenden<br />
Handbuchs nicht befolgt werden.<br />
• Die bei der Installation geltenden lokalen Sicherheitsnormen<br />
beachten.<br />
• Das Gerät im Zweifelsfalle nicht benutzen und sich an ein<br />
qualifiziertes Fachpersonal wenden.<br />
Die Nichtbefolgung der obengenannten Punkte kann die Sicherheit<br />
des Gerätes beeinträchtigen.<br />
ALLGEMEINE TECHNISCHE DATEN<br />
Modell K <strong>TN</strong> 12 / 13 25 / 35 / 45 60 <strong>70</strong> 60/<strong>70</strong>V 120 / <strong>140</strong> 120V / <strong>140</strong>V<br />
Standard- Spannung<br />
Kompressorleistung W 260� 300� 380�<br />
230/1/50<br />
460� 540�<br />
Betriebstemperatur °C -2 / +8<br />
Ausführung Mit Kapillaren<br />
Kühlsystem statisch statisch/belüftet<br />
Verdampfungstemperatur � °C -19 -16 -13 -12 -12 -12<br />
Abtauvorgang Typ Pause Elektrische<br />
Abtauvorgang Nr / max. Dauer min 4 / 55’ 4 / 25 4 / 30 4 / 30 4 / 30 4 / 30<br />
Modell B2116Z<br />
Kompressor<br />
B6160Z B61<strong>70</strong>Z E6187Z<br />
Motortyp CSIR CSIR CSIR CSIR<br />
Umdreh. pro Minute rpm 2900<br />
Starting relay<br />
T.I.:9660B 438-114<br />
AMF: MTRP0036-36<br />
T.I.: 9660B...135<br />
T.I.:9660B...138<br />
T.I.: 9660B...149<br />
Overload protector<br />
T.I.: MRP342JZ-3119<br />
AMF: T0567/17<br />
T.I.. MRP56HY...<br />
T.I.: MRP56HK...<br />
T.I. MRP38AMK...<br />
AMF: T0056/..<br />
Star capacitor 43 / 53 MFD 330V 43 / 53 MFD 330V 53 / 64 MFD 250V<br />
Elektroventilator des Kondensators<br />
Anzahl und Durchmesser n° x Ø 1 x 200 1 x 230 1 x 230 1 x 230<br />
Nennleistung n° x W 1 x 10 1 x 10 1 x 10 1 x 10<br />
Elektroventilator des Verdampfers<br />
Anzahl und Durchmesser n° x Ø - 1 x 60 1 x 60 1 x 60 2 x 60<br />
Nennleistung n° x W - 1 x 20 1 x 20 1 x 20 2 x 20<br />
elektrische-Daten<br />
F.L.A.<br />
L.R.A.<br />
�<br />
�<br />
Kompressor<br />
Insgesamt A<br />
Kompressor<br />
A<br />
A<br />
1.9<br />
1.6<br />
8.8<br />
2.5<br />
2.2<br />
3.3<br />
10.0<br />
3.4<br />
2.3<br />
9.7<br />
3.9 4.7<br />
3.1<br />
14.0<br />
5.4<br />
F.L.I.<br />
M.I.C.<br />
�<br />
�<br />
Kompressor<br />
Insgesamt W<br />
W<br />
A<br />
342<br />
9.4<br />
302<br />
457<br />
10.2<br />
385<br />
600<br />
11.6<br />
410<br />
625 661<br />
11.3 11.8<br />
835<br />
16.2<br />
540<br />
907<br />
17.0<br />
Kühlmittel R134a<br />
Füllung g 225 225 325 400 650 650<br />
� Daten in Bezug auf: -19C / + 40C<br />
� Daten in Bezug auf: -16C / + 39C<br />
� Daten in Bezug auf: -13C / + 39C<br />
� Daten in Bezug auf: -12C / + 38C<br />
� Daten in Bezug auf: -12C / + 42C<br />
� Daten in Bezug auf: - temperatur +32°C - R.U. 60%<br />
� bei maximal zulässigen Bedingungen aufgenommener Strom<br />
� Anlaufstrom des Kompressors<br />
� bei maximal zulässigen Bedingungen aufgenommene Leistung<br />
� Max. Anlaufstrom des Gerätes<br />
WICHTIG<br />
IM VORLIEGENDEN HANDBUCK SIND NUR DIE DATEN, DIE SICH AUF DIE KÜHLZELLEN BEZIEHEN ANGEGEBEN.<br />
DER KOMBINIERT SCHRANK MIT ZWEI TEMPERATUREN MUSS VOM HANDBUCK, DAS SICH AUF DIE<br />
DAZUGEHÖRIGE ZELLE BEZIEHT, BEGLEITET WERDEN. DIE ELEKTRISCHEN DATEN MÜSSEN<br />
ZUSAMMENGEZÄHLT WERDEN<br />
Pag. 24<br />
14480000396-D
ABMESSUNGEN UND FUNKTIONSRÄUME<br />
Tabelle 1 LISTE DER BESCHRIEBENEN MODELLE<br />
ANZAHL ANLGEN- ABMESSUNGEN GESAMT VERPACK TEILFASSUNGS- GITTERAUS-<br />
MODELL DER ART A B C GEWICHT VOLUMEN VERMÖGEN STATTUNG<br />
ZELLEN mm mm mm Kg mc lt 650x530 188x480<br />
K/<strong>KU</strong> C <strong>TN</strong> 35/35 2<br />
K<strong>TN</strong> 35<br />
K<strong>TN</strong> 35<br />
740 850 2090 180 1,5<br />
285<br />
285<br />
2<br />
2<br />
K/<strong>KU</strong> C <strong>TN</strong> 35/13 2<br />
K<strong>TN</strong> 35<br />
K<strong>TN</strong> 13<br />
740 850 2090 180 1,5<br />
285<br />
285<br />
2<br />
➀<br />
K/<strong>KU</strong> C <strong>TN</strong> 45/12 2<br />
K<strong>TN</strong> 35<br />
K<strong>TN</strong> 13<br />
740 850 2090 180 1,5<br />
400<br />
1<strong>72</strong><br />
2<br />
➀<br />
K/<strong>KU</strong> C <strong>TN</strong> 25/45 2<br />
K<strong>TN</strong> 35<br />
K<strong>TN</strong> 35<br />
740 850 2090 180 1,5<br />
1<strong>72</strong><br />
400<br />
1<br />
2<br />
K/<strong>KU</strong> C 35/35 2 K<strong>TN</strong> 35 740 850 2090 215 1,5 285 2<br />
K/<strong>KU</strong> C 35/13 2 K<strong>TN</strong> 35 740 850 2090 215 1,5 285 ➀<br />
K/<strong>KU</strong> C 45/12 2 K<strong>TN</strong> 35 740 850 2090 215 1,5 1<strong>72</strong> ➀<br />
K/<strong>KU</strong> C 25/45 2 K<strong>TN</strong> 35 740 850 2090 215 1,5 400 3<br />
K/<strong>KU</strong> P <strong>TN</strong> 35/35 2 K<strong>TN</strong> 35 740 850 2090 174 1,5 285 2<br />
K/<strong>KU</strong> P <strong>TN</strong> 35/13 2 K<strong>TN</strong> 13 740 850 2090 174 1,5 285 ➀<br />
K/<strong>KU</strong> P <strong>TN</strong> 25/45 2 K<strong>TN</strong> 35 740 850 2090 174 1,5 400 2<br />
K C <strong>TN</strong> 30/30 2<br />
K<strong>TN</strong> 30<br />
K<strong>TN</strong> 30<br />
740 <strong>70</strong>0 2090 180 1,3<br />
251<br />
251<br />
2<br />
2<br />
K PC 30/30 2 K<strong>TN</strong> 30 740 <strong>70</strong>0 2090 180 1,3 251 2<br />
K/<strong>KU</strong> <strong>TN</strong> <strong>70</strong> 1 K<strong>TN</strong> <strong>70</strong> 740 850 2090 157 1,5 630 3<br />
K/<strong>KU</strong> <strong>TN</strong> <strong>72</strong> 1 K<strong>TN</strong> <strong>70</strong> 740 850 2090 174 1,5 630 4<br />
K/<strong>KU</strong> <strong>TN</strong>V <strong>70</strong> 1 K<strong>TN</strong>V <strong>70</strong> 740 850 2090 180 1,5 630 3<br />
K/<strong>KU</strong> <strong>TN</strong> 35/13 1 K<strong>TN</strong> <strong>70</strong> 740 850 2090 174 1,5 630 2<br />
K/<strong>KU</strong> <strong>TN</strong> 45/12 1 K<strong>TN</strong> <strong>70</strong> 740 850 2090 180 1,5 630 2<br />
K <strong>TN</strong> 60 1 K<strong>TN</strong> 60 740 <strong>70</strong>0 2090 156 1,3 508 3<br />
K <strong>TN</strong> 62 1 K<strong>TN</strong> 60 740 <strong>70</strong>0 2090 162 1,3 508 4<br />
K <strong>TN</strong>V 60 1 K<strong>TN</strong>V 60 740 <strong>70</strong>0 2090 180 1,3 508 3<br />
K/<strong>KU</strong> C <strong>TN</strong> <strong>70</strong>/<strong>70</strong> 2<br />
K<strong>TN</strong> <strong>70</strong><br />
K<strong>TN</strong> <strong>70</strong><br />
1480 850 2090 298 3,0<br />
630<br />
630<br />
3<br />
3<br />
K/<strong>KU</strong> C <strong>TN</strong> 105/35 2<br />
K<strong>TN</strong> <strong>70</strong><br />
K<strong>TN</strong> 35<br />
1480 850 2090 288 3,0<br />
980<br />
285<br />
5<br />
2<br />
2<br />
K/<strong>KU</strong> C <strong>70</strong>/<strong>70</strong> 2 K<strong>TN</strong> <strong>70</strong> 1480 850 2090 290 3,0 630 3<br />
K/<strong>KU</strong> C 105/35 2 K<strong>TN</strong> <strong>70</strong> 1480 850 2090 301 3,0 980 5 2<br />
K/<strong>KU</strong> P<strong>TN</strong> <strong>70</strong>/<strong>70</strong> 2 K<strong>TN</strong> <strong>70</strong> 1480 850 2090 283 3,0 630 3<br />
K/<strong>KU</strong> P<strong>TN</strong> 105/35 2 K<strong>TN</strong> <strong>70</strong> 1480 850 2090 290 3,0 980 5 2<br />
K C <strong>TN</strong> 60/60 2<br />
K<strong>TN</strong> 60<br />
K<strong>TN</strong> 60<br />
1480 <strong>70</strong>0 2090 295 2,6<br />
538<br />
538<br />
3<br />
3<br />
K C 60/60 2 K<strong>TN</strong> 60 1480 <strong>70</strong>0 2090 295 2,6 538 3<br />
K C 90/30 2 K<strong>TN</strong> 60 1480 <strong>70</strong>0 2090 295 2,6 846 5 2<br />
K PC 90/30 2 K<strong>TN</strong> 60 1480 <strong>70</strong>0 2090 295 2,6 846 5 2<br />
K/<strong>KU</strong> <strong>TN</strong> <strong>140</strong> 1 K<strong>TN</strong> <strong>140</strong> 1480 850 2090 278 3,0 <strong>140</strong>5 6 3<br />
K/<strong>KU</strong> <strong>TN</strong> 142 1 K<strong>TN</strong> <strong>140</strong> 1480 850 2090 283 3,0 <strong>140</strong>5 7 3<br />
K/<strong>KU</strong> <strong>TN</strong> 144 1 K<strong>TN</strong> <strong>140</strong> 1480 850 2090 288 3,0 <strong>140</strong>5 8 4<br />
K/<strong>KU</strong> <strong>TN</strong>V <strong>140</strong> 1 K<strong>TN</strong>V <strong>140</strong> 1480 850 2090 310 3,0 <strong>140</strong>5 6 3<br />
K <strong>TN</strong> 120 1 K<strong>TN</strong> 120 1480 <strong>70</strong>0 2090 269 2,6 1135 6 3<br />
K <strong>TN</strong> 122 1 K<strong>TN</strong> 120 1480 <strong>70</strong>0 2090 277 2,6 1135 7 3<br />
K <strong>TN</strong> 124 1 K<strong>TN</strong> 120 1480 <strong>70</strong>0 2090 287 2,6 1135 8 4<br />
K <strong>TN</strong>V 120 1 K<strong>TN</strong>V 120 1480 <strong>70</strong>0 2090 315 2,6 1135 6 3<br />
� Modell mit Schubladen<br />
ZUBEHÖRTEILE<br />
Auf Anfrage kann das Gerät mit folgenden Zubehörteilen ausgestattet<br />
werden :<br />
- vom Standard abweichende Betriebsspannungen;<br />
- ein Satz Räder zum Anbringen 80 mm;<br />
LAYOUT<br />
POSITONIERUNG<br />
Die Geräte müssen im Inneren installiert werden.<br />
- Sich vergewissern, daß die Auflageebene dem Gewicht des<br />
Gerätes angemessen (siehe Gewichte S. 25) und waagrecht ist.<br />
- Die Funktionsräume einhalten.<br />
Pag. 25
FUNKTIONSRÄUME<br />
Der optimale Betrieb der Einheit setzt eine gute Positionierung voraus.<br />
Um einen guten Betrieb zu garantieren und auf leichte Weise gewartet zu werden,<br />
benötigen die Geräte etwas Platz.<br />
Sich vergewissern, daß das Gerät möglichst nicht in unmittelbarer Nähe von<br />
Wärmequellen installiert wird.<br />
Sich vergewissern, daß zwischen Decke bzw. sonstige obere Abdeckung ein<br />
Abstand von mindestens 50 cm besteht, um eine zufriedenstellende Luftzirkulation<br />
zu gestatten.<br />
Bemerkung :die Abmessungen der Abbildungen sind in mm angegeben.<br />
1<br />
4<br />
2<br />
3<br />
2<br />
Pag. 26<br />
ABMESSUNGEN<br />
3<br />
Typ <strong>KU</strong> <strong>70</strong>/<strong>140</strong> Typ K <strong>70</strong>/<strong>140</strong> Typ K 60/120<br />
1<br />
�<br />
4<br />
2<br />
1<br />
Typ <strong>KU</strong> Typ K 60/<strong>70</strong><br />
�<br />
4<br />
2<br />
3<br />
Typ K 120/<strong>140</strong><br />
1<br />
2 1<br />
4<br />
�<br />
Legende :<br />
3<br />
�<br />
1 - Schalttafel<br />
2 - Kompressorgruppe<br />
3 - Eingang der elektrischen Linie<br />
4 - Selbstverdunstungsbehälter<br />
� - Position des Schildes mit<br />
der Matrikenlangaben
ERHALT DER WARE<br />
INHALT:<br />
1.0 - KONTROLLE BEI ERHALT DER WARE<br />
2.0 - HANDHABUNG<br />
2.1 - HANDHABUNG MIT GABELSTAPLER O.Ä.<br />
3.0 - BESEITIGUNG DER VERPAC<strong>KU</strong>NG<br />
1.0 - KONTROLLE BEI ERHALT DER WARE<br />
Die Geräte werden in eigens dazu bestimmten Schutzverpackungen<br />
zum Versand gebracht. Man sollte sich bei Erhalt<br />
der Ware vergewissern, ob diese eventuelle Transportschäden<br />
erlitten hat und ob sie mit allen Teilen gemäß Bestellung<br />
ausgestattet ist. Bei sichtbaren Beschädigungen muß der<br />
Schaden umgehend auf der Transportunterlage wie<br />
folgt vermerkt werden:<br />
"RÜCKNAHME MIT VORBEHALT WEGEN AUFFÄLLI-<br />
GEN VERPAC<strong>KU</strong>NGSSCHÄDEN" da die Rückgabe ab<br />
Werk mit dem Schadensersatz zu Lasten der Versicherung<br />
verbunden ist.<br />
WICHTIG<br />
ALLE IM FOLGENDEN AUFGEFÜHRTEN ARBEITSGÄNGE<br />
MÜSSEN DEN GELTENDEN SICHERHEITSNORMEN<br />
GEMÄSS DURCHGEFÜHRT WERDEN. DIES GILT<br />
SOWOHL FÜR DIE VERWENDETE AUSRÜSTUNG ALS<br />
AUCH FÜR DIE BEDIENUNGSWEISE.<br />
ACHTUNG<br />
SICH VOR DER HANDHABUNG VERGEWISSERN, OB<br />
DASS ANHEBUNGSVERMÖGEN DEM GEWICHT DER<br />
BETREFFENDEN EINHEIT ANGEMESSEN IST.<br />
2.0 - HANDHABUNG<br />
2.1 - HANDHABUNG MIT GABELSTAPLER O.Ä.<br />
2.1.1 - Die Gabeln in die Längsseite der mitgelieferten<br />
Holzpalette des Gerätes einführen.<br />
2.1.2 - Die Einheit anheben und sich dabei vergewissern,<br />
daß sich diese im stabilen Gleichgewicht befindet.<br />
ACHTUNG<br />
IM LAUFE DER HANDHABUNG NICHT UMDREHEN BZW.<br />
UMKIPPEN.<br />
WICHTIGE HINWEISE<br />
DIE BEFOLGUNG DER AUF DER AUSSENSEITE DES<br />
VERPAC<strong>KU</strong>NG AUFGEFÜHRTEN EMPFEHLUNGEN<br />
GARANTIERT DEM ENDBENUTZER DIE<br />
UNVERSEHRTHEIT UND DIE FUNKTIONSTÜCHTIGKEIT<br />
DES GERÄTES. DESHALB EMPFIEHLT MAN :<br />
- VORSICHTIGE HANDHABUNG<br />
- TROCKEN LAGERN<br />
- AUF KEINEN FALL ANDERE GEGENSTÄNDE AUF<br />
DAS GERÄT STELLEN.<br />
3.0 - BESEITIGUNG DER VERPAC<strong>KU</strong>NG<br />
3.1 - Kartonverpackung<br />
3.1.1 - Die Umreifungsbänder Verpackung mit einer Schere<br />
durchschneiden.<br />
3.1.2 - Den Verpackungskarton anheben.<br />
3.2 - Holzverpackung<br />
3.2.1 - Die Holzpaneele aufnageln, indem man mit dern<br />
Stim- und Oberpaneel beginnt.<br />
3.2.2 - Die Nylonschutzhülle von oben abziehen.<br />
3.3 - Nylonverpackung<br />
3.3.1 - Den Befestigungsklebestreifen beseitigen und anschließend<br />
die Nylonschutzhülle entfernen, indem man sie<br />
vom oberen Geräteteil abzieht.<br />
3.4 - Das Gerät anheben und von der Palette lösen.<br />
3.5 - Das Gerät in Übereinstimmung mit dem vorbestimmten<br />
Punkt auf den Boden legen.<br />
3.6 - Das Gerät auf sichtbare Beschädigungen prüfen.<br />
3.7 - Das Verpackungsmaterial könnte eine mögliche Gefahrenquelle<br />
darstellen und sollte deshalb außer Reichweite<br />
von Kindern gehalten werden.<br />
3.8 - Die Verpackungsprodukte an spezialisierte Sammelund<br />
Recyclingstellen weiterleiten (die geltenden Normen beachten).<br />
3.9 - Die Kennummer mit den Angaben der Begleitpapiere<br />
vergleichen.<br />
Pag. 27
UMKEHRUNG DES ÖFFNUNGSSINNES DER TÜR<br />
WICHTIG<br />
DIE IM FOLGENDEN AUFGEFÜHRTEN ANGABEN SOLLEN<br />
ERKLÄREN, WIE MAN DIE GERÄTE AN BESONDERE<br />
INSTALLATIONSBEDÜRFNISSE ANPASSEN KANN, D.H. WENN<br />
MAN DEN ÖFFNUNGSSINN DER TÜR UMKEHREN MUSS.<br />
DIESER ARBEITSGANG DARF NUR VOM<br />
QUALIFIZIERTEN FACHPERSONAL DURCHGEFÜHRT<br />
WERDEN.<br />
Die Türscharniere der in der Fabrik angefertigten Geräte befinden<br />
sich auf der rechten Seite. Falls erforderlich, die Seite<br />
umkehren und dabei wie folgt vorgehen:<br />
1 - DAS OBERE SCHARNIER ABMONTIEREN.<br />
1.1 - Die Befestigungsschrauben, die den Bügel C blockieren,<br />
ausdrehen.<br />
1.2 - Die Tür abnehmen und um 180° drehen. Folgende Teile<br />
der Tür umkehren:<br />
a) Kunststoffbuchse.<br />
b) Aufziehteil für das verchromte Scharnier.<br />
2 - DEN UNTEREN BÜGEL D ENTFERNEN.<br />
2.1 - Die Befestigungsschrauben ausdrehen.<br />
3 - DEN UNTEREN BÜGEL B MIT DEN EIGENS DAZU BE-<br />
STIMMTEN SCHRAUBEN BEFESTIGEN.<br />
Pag. 28<br />
MODELL MIT OBERER<br />
MOTORGRUPPE<br />
MODELL MIT UNTERER<br />
MOTORGRUPPE<br />
A<br />
B<br />
A<br />
B<br />
4 - DAS ZUSAMMENGESETZT RECHTE SCHARNIER (C) AN<br />
DIE LINKE SEITE (A) ANBRINGEN.<br />
4.1 - Die mittlere Schraube, die den Bügel an den Scharnierkörper<br />
befestigt, ausdrehen und den Bügel C entfernen.<br />
4.2 - Die Gabel im Gegenuhrzeigersinn um eine 1/2 Umdrehung<br />
drehen.<br />
4.3 - Den Bügel A wieder anbringen (falls erforderlich das<br />
Teil anfordern).<br />
4.4 - Das zusammengesetzte linke Scharnier (A) wieder an<br />
die Tür anbringen.<br />
5 - NÜR FÜR MODELLE MIT ZWEI HALBTÜREN<br />
5.1 - Den mittleren Quersteg abmontieren, indem man die<br />
zwei Bügel, die sich an der Innenseite der Tür an der<br />
Unterseite des Querstegs befinden, abschraubt.<br />
5.2 - Den mittleren Quersteg um 180° drehen und mit den<br />
gleichen Bügeln befestigen.<br />
6 - TÜRINSTALLATION.<br />
6.1 - Die Tür wieder anbringen, indem man das obere<br />
Scharnier A samt Bügel befestigt.<br />
7 - KONTROLLE DER DICHTUNG.<br />
7.1 - Den einwandfreien Zustand der magnetischen Dichtung<br />
an allen Seiten prüfen.<br />
8 - DIE BEFESTIGUNGSSCHRAUBEN DER SCHARNIERE<br />
ANZIEHEN.<br />
C<br />
D<br />
C<br />
D
Das Gerät ist mit einer Schalttafel ausgestattet, die auf dem<br />
Instrumentenbrett in Übereinstimmung mit der oberen Seite der<br />
Tür positioniert ist.<br />
Auf der Schalttafel sind alle Steuer- und Kontrollorgane, die für<br />
den Betrieb des Gerätes erforderlich sind, installiert:<br />
� - LEUCHTSCHALTER ON-OFF<br />
� - FLÜGELRADSCHALTER<br />
(NICHT VORHANDEN BEI MODELLEN MIT<br />
KÜHLANLAGE TYP K <strong>TN</strong> 13 UND K <strong>TN</strong> 12 ).<br />
� - BELEUCHTUNGSSCHALTER (NUR FÜR GLASTÜR)<br />
� - ABTAUKONTROLLEUCHTE<br />
� - ELEKTRONISCHER THERMOSTAT<br />
1.0 -LEUCHTSCHALTER<br />
Für die Ein- bzw. Ausschaltung des Gerätes. Das Aufleuchten<br />
des grünen Schalters zeigt an, daß die elektrische<br />
Anlage des Gerätes unter Spannung steht.<br />
2.0 - FLÜGELRADSCHALTER<br />
Für die Ein- und Ausschaltung der Flügelräder im Inneren<br />
des Gerätes und für die Anzeige des Betriebszustandes<br />
derselben.<br />
Das Erlöschen des gelben Leuchtschalters löst den statischen<br />
Betrieb des Gerätes aus.<br />
3.0 - BELEUCHTUNGSSCHALTER<br />
Dieser weiße Leuchschalter steht nur für die Modelle AR<br />
<strong>TN</strong>V (mit Glastüren) zur Verfügung.<br />
Für die Ein- und Ausschaltung der Beleuchtung im Inneren<br />
des Gerätes und für die Veranschaulichung des Zustands<br />
derselben.<br />
4.0 - ABTAUKONTROLLEUCHTE<br />
Rote Kontrolleuchte, die den Abtauvorgang des Gerätes<br />
anzeigt.<br />
Das Aufleuchten zeigt an daß sich das Gerät in der Abtauphase<br />
befindet.<br />
5.0 -ELEKTRONISCHER THERMOSTAT<br />
Für die Einstellung, Kontrolle und Steuerung der Funktionstüchtigkeit<br />
des Gerätes.<br />
SCHALTTAFEL<br />
INHALT:<br />
1.0 - LEUCHTSCHALTER ON-OFF<br />
2.0 - FLÜGELRADSCHALTER<br />
3.0 - BELEUCHTUNGSSCHALTER<br />
4.0 - ABTAUKONTROLLEUCHTE<br />
5.0 - ELEKTRONISCHER THERMOSTAT<br />
5.1 - TEMPERATURREGELUNG<br />
5.2 - ZEITGEBUNGEN DES KOMPRESSORS<br />
5.3 - MAXIMAL- UND MINIMALTEMPERATURALARM<br />
5.4 - KONTROLLE DES BETRIEBES DER VERDAMPFERGEBLÄSE<br />
5.5 - KONTROLLE DES ABTAUVORGANGS<br />
6.0 - SET -POINT<br />
6.1 - ÄNDERUNG DES SET- POINTS<br />
7.0 - BETRIEBSZUSTAND DER KOMPONENTEN DES GERÄTES<br />
8.0 - ALARMKODES<br />
5.1 -TEMPERATURREGELUNG<br />
Durch den elektronischen Thermostat wird die Temperatur<br />
im Inneren der Zelle so nahe wie möglich an den Set- Point-<br />
Wert gehalten.<br />
Der Regler setzt neben dem Set- Point auch einen anderen<br />
Wert (Hysterese) ein, der in der Fabrik auf einen vorbestimmten<br />
Wert eingestellt wird und den zulässigen Änderungsbereich<br />
der Zellentemperatur hinsichtlich des Set- Points<br />
bestimmt.<br />
Beispiel :<br />
nach Festsetzung des Set- Points= -2°C , Hysterese= 2°C<br />
ergibt sich folgendes:<br />
Anlaufen des Kompressors, sobald die Zellentemperatur<br />
-2°C + ( 2°C ) = 0°C<br />
überschreitet<br />
Ausschaltung des Kompressors, sobald die Zellentemperatur<br />
-2 °C<br />
entspricht<br />
Der Set- Point steht dem Kunden zur Verfügung. Er kann<br />
diesen Wert in (C°) nach Belieben innerhalb eines in der<br />
Fabrik vorbestimmten Bereichs festsetzen. Dabei werden<br />
sowohl die Unversehrtheit als auch die Leistungen des<br />
Gerätes garantiert.<br />
5.2 -ZEITGEBUNGEN DES KOMPRESSORS<br />
Beim Steuern des Kompressors berücksichtigt der Regler<br />
einige Zeitgebungen. Diese Zeitgebungen haben folgende<br />
Funktionen:<br />
a) Einschränkung der stündlichen Anläufe des Kompressors<br />
auf einen Wert, der der vom Erbauer festgesetzten Grenze<br />
entspricht.<br />
b) Versicherung einer Mindestverzögerungszeit zwischen<br />
einer Außerbetriebssetzung und dem anschließenden Anlaufen<br />
des Kompressors, um einen Ausgleich der inneren<br />
Drucke zu gestatten.<br />
Sehr wichtig ist, daß der Regler von Punkt (a) die Verzögerung<br />
zwischen zwei aufeinanderfolgenden Anläufen des<br />
Kompressors ausrechnet. Der mit jeder Regelung verbundene<br />
Wert kann durch einige Parameter eingestellt werden,<br />
die nur dem Erbauer oder dem zugelassenen Kundendienst<br />
zugänglich sind.<br />
Die Zeitgebungen des Kompressors werden durch eine<br />
Pag. 29
linkende Kompressor- LED, die sich an der Vorderseite des<br />
Thermostats in Übereinstimmung mit der Aufschrift “comp”<br />
� befindet, angezeigt.<br />
5.3 -MAXIMAL- UND MINIMALTEMPERATURALARM<br />
Der Regler steuert sowohl den Maximal- als auch den Minimaltemperaturalarm<br />
der Kühlzelle. Die Werte können durch<br />
einige Parameter, die ausschließlich dem Erbauer bzw.<br />
Kundendienst zugänglich sind, eingestellt werden und verstehen<br />
sich als Entfernung vom Set- Point.<br />
5.4 -KONTROLLE DES BETRIEBES DER VERDAMPFERGE-<br />
BLÄSE<br />
( Funktion nicht vorhanden bei Modellen mit Kühlanlage typ<br />
K<strong>TN</strong> 13 und K <strong>TN</strong> 12 ).<br />
Durch den Regler wird der Betrieb der Gebläse im Inneren<br />
der Zelle hinsichtlich der speziellen Verwendungsbedürfnisse<br />
garantiert. Durch einige Parameter, die nur dem Erbauer<br />
bzw. dem zugelassenen Kundendienst zugänglich sind,<br />
kann man folgendes definieren:<br />
- die Ein- bzw. Ausschaltung der Gebläse während der<br />
Abtauphase<br />
- die Ausschaltungstemperatur der Gebläse.<br />
WICHTIG : Falls der gelbe Schalter � nicht aufleuchtet,<br />
werden die Gebläse ihren Betrieb nicht aufnehmen.<br />
Während der Abtauphase werden die Gebläse nicht in Betrieb<br />
sein, um die Zirkulation von Luft, die von den Abtauelementen<br />
erwärmt wurde, zu verhindern. Sie werden ihren Betrieb erst<br />
dann aufnehmen, wenn der vom zwischen den Rippen des<br />
Verdampfers befindliche Fühler abgelesene Wert höher als der<br />
eingestellte Wert sein wird. Nach erfolgter Abtauphase muß<br />
eine Verzögerung des Gebläseanlaufs eintreten, um das Abtropfen<br />
des Abtauwassers zu gestatten.<br />
Der Betrieb der Gebläse wird durch das Aufleuchten des<br />
gelben Leuchtschalters � angezeigt.<br />
5.5 -ABTAUKONTROLLE<br />
Durch den Abtauzyklus wird die Reif- bzw. Eisbildung auf<br />
der Verdampferoberfläche, die auf eine relativ hohe Luftfeuchtigkeit<br />
zurückzuführen ist, beseitigt.<br />
Durch einige Parameter, die nur dem Erbauer bzw. dem<br />
zugelassenen Kundendienst zugänglich sind, kann man<br />
folgendes definieren:<br />
- ob bei der Einschaltung des Gerätes die Abtauphase<br />
abläuft<br />
- die maximale Dauer der Abtauphase<br />
- den Zeitabstand zwischen zwei aufeinanderfolgenden Abtauphasen<br />
Der gerade ablaufende Abtauvorgang wird durch das Aufleuchten<br />
der ABTAU- LED, die sich an der Vorderseite des<br />
Thermostats in Übereinstimmung mit der Aufschrift “def”<br />
� und der roten Kontrolleuchte � befindet, angezeigt.<br />
Falls erforderlich, kann man der Abtauzyklus manuell aktivieren,<br />
indem man mindestens fünf Sekunden lang auf die<br />
Taste � drückt.<br />
6.0 - SET POINT<br />
6.1 - WIE MAN DEN Set- Point ÄNDERT<br />
6.1.1 - Auf den ON-OFF- Schalter drücken.<br />
6.1.2 - Auf die Taste SET � drücken (dadurch wird der Set-<br />
Point veranschaulicht); Die Led, die sich in Übereinstimmung<br />
mit der Aufschrift “set” Ã befindet, blinkt.<br />
6.1.3 - Die Angabe ändern, indem man innerhalb von 5<br />
sekunden folgende Tasten betätigt<br />
oder<br />
Pag. 30<br />
(Taste �), um den Wert zu steigern<br />
(Taste �), um den Wert zu vermindern<br />
Der speicherung der neuen Angabe erfolgt automatisch mit<br />
der Beendung des Programmiermodus. Man muß dabei<br />
einige Sekunden lang die Druckknöpfe betätigen.<br />
Tabelle 1 LISTE DER ZUGÄNGLICHEN PARAMETER<br />
Gerät Alles<br />
Beschreib. Set point<br />
Maßeinheit °C<br />
Fabrik-einstellung -2<br />
7.0 -BETRIEBSZUSTAND DER KOMPONENTEN DES GE-<br />
RÄTES<br />
Um den Betriebszustand der verschiedenen Komponenten<br />
des Gerätes zu ermitteln, muß man den Zustand der sich<br />
am Thermostat befindlichen LED prüfen. Jede LED bezieht<br />
sich auf eine bestimmte Komponente des Gerätes. In der<br />
Tabelle 2 sind die Entsprechungen und die Bedeutungen<br />
dargestellt.<br />
Tabelle 2 BEDEUTUNG DER LEDS<br />
LED Bezug Zust. Bedeutung<br />
comp Kompressor nicht an Kompressor nicht in Betrieb<br />
comp Kompressor blinkt<br />
Zeitgebung des<br />
Kompressor in Gang<br />
comp Kompressor an Kompressor in Betrieb<br />
def Abtau- elemente nicht an Abtauphase nicht aktiv<br />
def Abtau- elemente an Abtauphase in Gang<br />
def Abtau- elemente blinkt Abtropfen in Gang<br />
set set point nicht an Normalbetrieb<br />
set set point blinkt Parameteränderung<br />
8.0 -ALARMKODES<br />
Jede Störung während des Betriebs des Gerätes wird von<br />
einem Alarmkode identifiziert werden. In Tabelle 3 sind alle<br />
Alarmkodes für die Geräteausführung, auf die sich das<br />
vorliegende Handbuch bezieht, aufgeführt.<br />
Die Störung wird durch ein akustische Signal angezeit, das<br />
durch die Betätigung einer der drei Tasten an der Vorderseite<br />
ausgeschaltet werden kann.<br />
WICHTIG : Das Erscheinen eines nicht in dieser Liste enthaltenen<br />
Alarms ist Anzeichen einer falschen Einstellung<br />
der Parameter des Bedienungsmoduls. Man sollte umgehend<br />
einen zugelassenen Kundenservice benachrichtigen.<br />
Tabelle 3 LISTE DER ALARMKODES<br />
Kode E1 E2<br />
Komponente Temperaturfühler Temperaturfühler<br />
Störung des Temperatur Störung des Temperatur<br />
Beschreib.<br />
fühlers der Zelle fühlers desVerdampfers
INBETRIEBNAHME UND BESEITIGUNG<br />
INHALT:<br />
1.0 - EINLEITENDE KONTROLLEN<br />
1.1 - ALLGEMEINE KONTROLLEN<br />
1.2 - KONTROLLEN AM ELEKTRISCHEN TEIL<br />
2.0 - INBETRIEBNAHME- PRÜFUNGEN<br />
3.0 - BESEITIGUNG<br />
WICHTIG<br />
BEVOR MAN DAS GERÄT ANSCHLIESST, SOLLTE MAN SICH VERGEWISSERN, DASS DIE DATEN DES<br />
LEISTUNGSSCHILDES DENEN DES STROMNETZES ENTSPRECHEN.<br />
DAS GERÄTESCHILD, AUF DEM DIE FÜR DIE INSTALLATION ERFORDERLICHEN ELEKTRISCHEN DATEN ANGEGEBEN<br />
SIND, IST IN ÜBEREINSTIMMUNG MIT DER RECHTEN OBERSEITE DER VORDEREN SCHALTTAFEL POSITIONIERT.<br />
DIE INSTALLATION MUSS GEMÄSS DEN ANGABEN DES VORLIEGENDEN ABSCHNITTS VOM QUALIFIZIERTEN<br />
FACHPERSONAL DURCHGEFÜHRT WERDEN.<br />
DIE ELEKTRISCHE SICHERHEIT DIESES GERÄTES IST NUR DANN GARANTIERT, WENN DAS GERÄT DEN GELTENDEN<br />
ELEKTRISCHEN SICHERHEITSNORMEN GEMÄSS AN EINE LESITUNGSFÄHIGE ERDUNGSANLAGE ANGESCHLOSSEN IST.<br />
MAN MUSS DIESE NOTWENDIGE SICHERHEITSANFORDERUNG PRÜFEN UND IM ZWEIFELSFALL EINE<br />
SORGFÄLTIGE KONTROLLE DER ANLAGE VON SEITEN DES QUALIFIZIERTEN FACHPERSONALS FORDERN.<br />
DER ERBAUER LEHNT JEDE VERANTWORTUNG FÜR EVENTUELLE SCHÄDEN AB, DIE AUF EINE FEHLENDE<br />
ERDUNG DER ANLAGE ZURÜCKZUFÜHREN SIND.<br />
DAS GERÄT MUSS AUSSERDEM IN EIN ÄQUIPOTENTIALSYSTEM EINGESCHLOSSEN WERDEN, DESSEN<br />
LEISTUNGSFÄHIGKEIT DEN GELTENDEN NORMEN GEMÄSS GEPRÜFT WERDEN MUSS.<br />
AUF KEINEN FALL ADAPTER, MEHRFACHSTECKDOSEN UND/ODER VERLÄNGERUNGSKABEL BENUTZEN.<br />
1.0 - EINLEITENDE KONTROLLEN<br />
1.1 - ALLGEMEINE KONTROLLEN<br />
1.1.1 - Sich vergewissern, daß das Gerät waagrecht positioniert<br />
wurde. Um eine perfekte Ausrichtung zu erhalten,<br />
eventuell den beweglichen Teil der verstellbaren Füßchen<br />
betätigen.<br />
1.1.2 - Sich vergewissern, daß die Kunststoffschutzschicht<br />
der äußeren Flächen entfernt wurde.<br />
1.1.3 - Sich vergewissern, daß die Innenseite mit lauwarmem<br />
Wasser und neutraler Seife gereinigt wurde.<br />
1.1.4 - Sich vergewissern, daß das Gerät nicht in unmittelbarer<br />
Nähe von Wärmequellen positioniert wurde.<br />
1.1.5 - Sich vergewissern, daß die freie Luftzirkulation im<br />
Motorbereich nicht behindert wird.<br />
1.1.6 - Sich vergewissern, daß sich die Verriegelungsschlüssel<br />
außer Reichweite von Kindern befinden.<br />
1.2 - KONTROLLEN DES ELEKTRISCHEN TEILES<br />
1.2.1 - Den Spannungs- und Netzfrequenzwert prüfen:<br />
MUSS ZWISCHEN FOLGENDEN WERTEN SCHWANKEN<br />
230 ± 10% 50Hz<br />
1.2.2 - Sich vergewissern, daß die Schrauben, welche die<br />
Leitungen an die elektrischen Komponenten der Schalttafel<br />
befestigen, fest angezogen sind (während der Handhabung<br />
und des Transportes könnten eventuelle Vibrationen Lockerungen<br />
verursacht haben).<br />
1.2.3 - Sich vergewissern, daß am Anfang der Steckdose ein<br />
allpoliger Schalter mit einer Entfernungsöffnung der Kontakt-stücke,<br />
die größer oder gleich 3 mm ist, installierte wurde.<br />
1.2.4 - Den Hauptschalter, an den man den Stecker des<br />
Versorgungskabels anschliessen wird, in die OFF- Position<br />
bringen.<br />
1.2.5 -Sich vergewissern, daß der Stecker zur Steckdose<br />
des Gerätes paßt. Sich an das qualifizierte Fachpersonal<br />
wenden, falls der Stecker mit einer geeigneteren Ausführung<br />
ersetzt werden muß. Das Fachpersonal wird sich<br />
auch vergewissern müssen, daß der Durchschnitt der Stec-<br />
kerkabel der aufgenommenen Leistung des Gerätes angemessen<br />
ist.<br />
Sich vergewissern, daß der Stecker in die Steckdose eingeführt<br />
wurde.<br />
2.0 - INBETRIEBNAHME- PRÜFUNGEN<br />
Nachdem die obengenannten Anweisungen sorgfältig durch-geführt<br />
wurden, kann das Gerät in Betrieb gesetzt werden:<br />
2.1.1 - Den Hauptschalter, an den der Stecker des Versorgungs-kabels<br />
angeschlossen ist, in die Position ON bringen.<br />
2.1.2 - Den Schalter des Gerätes in die Position ON bringen.<br />
2.1.3 - Den SET- POINT veranschaulichen.<br />
2.1.3.1 - Auf den SET �- Knopf des elektronischen Thermostats<br />
drücken und sich dabei vergewissern, daß die set � -<br />
LED blinkt;<br />
2.1.3.2 - Den gewünschten Wert je nach Art des konservierten<br />
Produktes einstellen.<br />
Für die Verfahren, die sich auf die Änderung des in der<br />
Fabrik eingestellten Wertes beziehen, den Abschnitt<br />
SCHALTTAFEL durchlesen.<br />
WICHTIG<br />
BEVOR MAN DIE LEBENSMITTEL EINFÜHRT, DAS<br />
GERÄT IN BETRIEBSZUSTAND BRINGEN.<br />
3.0 - BESEITIGUNG<br />
Soll das Gerät beseitigt werden, muß man es vor seiner<br />
Verschrottung stillegen. Man muß dabei das Versorgungskabel<br />
entfernen, alle Teile, die mögliche Gefahrenquellen<br />
darstellen, und die Verriegelung, Scharniere und andere<br />
Schließsysteme beseitigen, um zu verhindern, daß sich<br />
Kinder beim Spielen in die Zelle einschließen un Schäden<br />
davontragen.<br />
WICHTIG<br />
DIE LOKALEN GELTENDEN NORMEN FÜR DIE<br />
VERSCHROTTUNG DIESER GERÄTE BEACHTEN<br />
Pag. 31
REINIGUNG UND WARTUNG<br />
INHALT:<br />
1.0 - WÖCHENTLICHE REINIGUNG<br />
2.0 - ALLGEMEINE WARTUNG<br />
2.1 - KONDENSATIONSBATTERIE<br />
2.2 - ELEKTROVENTILATOREN<br />
2.3 - VERSORGUNGSKABEL<br />
3.0 - LÄNGERE STILLSTANDSZEITEN<br />
4.0 - BELEUCHTUNGSSYSTEM<br />
Dieser Abschnitt betrifft den Endverbraucher und ist für den<br />
dauerhaften und vorschriftsmäßigen Betrieb des Gerätes von<br />
äußerster Wichtigkeit.<br />
Die sorgfältige und regelmäßige Durchführung einiger Arbeitsgänge<br />
beugt dem Eingriff des Fachpersonals vor.<br />
Die durchzuführenden Maßnahmen setzen keine besonderen<br />
technische Kenntnisse voraus. Es handelt sich dabei um einfache<br />
Kontrollen der Gerätekomponenten.<br />
WICHTIG<br />
BEVOR MAN DIE WARTUNG BZW. REINIGUNG<br />
VORNIMMT, DIE STROMVERSORGUNG DES GERÄTES<br />
AUSSCHALTEN.<br />
ACHTUNG<br />
DAS GERÄT NICHT MIT DIREKTEN<br />
HOCHDRUCKWASSERSTRAHLEN REINIGEN.<br />
AUF KEINEN FALL WASSERSTRAHLEN AUF DIE<br />
ELEKTRISCHEN TEILE RICHTEN.<br />
1.0 - WÖCHENTLICHE REINIGUNG<br />
1.1 - STRUKTUR<br />
1.1.1 - Den Sauberkeitszustand der Strukturteile prüfen.<br />
Dabei besonderen Wert auf die Stahlteile legen.<br />
1.1.2 - Die inneren und äußeren Flächen mit Wasser und<br />
Seife bzw. einem neutralen Reinigungsmittel reinigen.<br />
Eventuelle üble Gerüche können mit etwas Essig, das dem<br />
Wasser hinzugefügt wird, beseitigt werden.<br />
1.1.3 - Mit viel Wasser auswaschen und gut abtrocknen.<br />
1.2 - SYSTEM FÜR DIE ABTAUWASSERSAMMLUNG<br />
1.2.1 - Sich vergewissern, daß das Abflußrohr des Kondenswassers<br />
nicht verstopft ist. Falls erforderlich, eine Reinigung<br />
vornehmen.<br />
1.2.2 -.Das Kondenswasserammelbecken entleeren und<br />
wieder in seinen Sitz positionieren (nur für Ausführung ohne<br />
selbstverdunstendes Becken).<br />
ACHTUNG<br />
FALLS DIE OBERE TÜR SEHR OFT GEÖFFNET<br />
BZW.UNSACHGEMÄSSEN BENUTZT WIRD, MUSS MAN<br />
ÖFTERS DEN FÜLLUNGSZUSTAND DES<br />
SAMMELBECKENS PRÜFEN.<br />
2.0 - ALLGEMEINE WARTUNG<br />
2.1 - KONDENSATIONSBATTERIE<br />
Die Batterie muß unbedingt in der Lage sein, maximalen<br />
Wärmeaustausch zu bieten. Deshalb ist es äußerst wichtig,<br />
daß ihre Oberfläche stets frei von Staub- bzw. Schmutzpartikel<br />
ist, die sich infolge der Elektroventilatorentätigkeit abgelagert<br />
haben.<br />
2.1.1 - Mit Hilfe eines Staubsaugers und eines Pinsels bzw.<br />
einer metallfreien Bürste alle Verschmutzungen (z.B. Papier,<br />
Staub), die sich eventuell auf der Batterieoberfläche<br />
abgelagert haben, entfernen.<br />
2.1.2 - Die Aluminiumrippen auf Beschädigungen bzw. Biegungen<br />
prüfen. Falls derartige Beschädigungen vorliegen<br />
sollten, die Batterie mit Hilfe des eigens dazu bestimmten<br />
Gerätes "kämmen", um den optimalen Luftdurchstrom wiederherzustellen.<br />
Pag. 32<br />
2.2 - ELEKTROVENTILATOREN<br />
2.2.1 - Die Befestigung des Elektroventilators an die Halterung<br />
prüfen.<br />
2.2.2 - Im Falle von störenden Geräuschen und Vibrationen<br />
prüfen, ob die Elektroventilatoren ausgeglichen sind.<br />
2.3 - VERSORGUNGSKABEL<br />
2.3.1 - Sich vergewissern, ob das Versorgungskabel Beschädigungen,<br />
Rißbildungen bzw. andere Veränderungen<br />
aufweist, die die Isolierung beeinträchtigen könnten. Sich bei<br />
erforderlicher Wartung an einen zugelassenen Kundendienst<br />
wenden.<br />
3.0 - LÄNGERE STILLSTANDSZEITEN<br />
Bei längeren Stillstandszeiten wie folgt vorgehen:<br />
3.1 -Den Netzschalter in die Position OFF bringen.<br />
3.2 -Den Stecker aus der Steckdose ziehen.<br />
3.3 -Das Gerät entleeren und den Angaben von Punkt<br />
1.0 gemäß vorgehen.<br />
3.4 -Die Türen nicht vollständig schließen, um das Entstehen<br />
von üblen Gerüchen zu vermeiden.<br />
3.5 -Die Kompressorgruppe vor Staub schützen.<br />
4.0 - BELEUCHTUNGSSYSTEM<br />
Das Beleuchtungssystem wird normalerweise bei Öffnung<br />
der Türen durch einen mechanischen bzw. magnetischen<br />
Mikroschalter aktiviert. Bei den Geräten mit Glastüren wird<br />
die Einschaltung von einem Schalter, der sich an der Schalttafel<br />
befindet, gesteuert.<br />
Falls eine der obengenannten Betriebsbedingungen nicht<br />
eintreten sollte bzw. bei Auftreten von Störungen, wenden<br />
Sie sich an einen zugelassenen Kundendienst bzw. an einen<br />
Fachmann, der für die erforderliche Wartung zuständing ist.<br />
WICHTIG<br />
DIE GERÄTE WERDEN AUS AISI- 304- STAHL<br />
HERGESTELLT, DER WIDERSTANDSFÄHIG GEGEN<br />
KORROSIONEN IST, DIE DURCH DEN NORMALEN<br />
GEBRAUCH ENTSTEHEN KÖNNEN .<br />
AUF KEINEN FALL REINIGUNGSMITTEL BZW.<br />
REINIGUNGSSYSTEME ANWENDEN, DIE DIE MASCHINE<br />
BESCHÄDIGEN KÖNNTEN .
Die im folgenden aufgeführten Punkte sollen bei der Lösung<br />
einiger das Gerät betreffenden Störungen behilflich sein. In<br />
diesem Handbuch sind selbstverständlich nicht alle Möglichkeiten<br />
aufgeführt. Die Einschaltung einer Sicherheitsvorrichtung ist<br />
Anzeichen einer Betriebsstörung; vor Wiederinbetriebnahme<br />
muß die Ursache festgestellt und beseitigt werden. Im folgenden<br />
führen wir eine Liste der möglichen Probleme, der entsprechenden<br />
Ursachen und Lösungen auf (halbfett gedruckt).<br />
ACHTUNG<br />
DIE VERANTWORTUNG FÜR DIE AUFGEFÜRTEN<br />
ARBEITSGÄNGE LIEGT BEI DER PERSON, DIE DIESE<br />
DURCHFÜHRT. MAN MUSS SICH AUF JEDEN FALL AN EINEN<br />
ZUGELASSENEN <strong>KU</strong>NDENDIENST WENDEN. DIESER<br />
<strong>KU</strong>NDENDIENST MUSS DIE NOTWENDIGEN<br />
ERFORDERNISSE FÜR DIE ARBEITSGÄNGE, WELCHE DIE<br />
FUNKTIONSTÜCHTIGKEIT WIEDERHERSTELLEN, BESITZEN.<br />
WICHTIG<br />
BEVOR MAN DIE WARTUNG VORNIMMT, DIE<br />
STROMVERSORGUNG DES GERÄTES AUSSCHALTEN.<br />
Störung<br />
1.0 - NICHT NORMALER HOCHDRUCK.<br />
Ursache 1.1<br />
VERSCHMUTZTE KONDENSATIOBSBATTERIE.<br />
Bei eingeschaltetem Kompressor den Wert des Kondensationsdruckes<br />
mit einem Druckmesser messen. Bei einer<br />
Lufttemperatur am Kompressoreingang von +32°C muß der<br />
Unterschied zwischem dem Sättigungswert des Kondensationsdrucks<br />
und der Lufttemperatur bei ca. 10°C liegen.<br />
Eingriff<br />
Falls der festgestellte Unterschied diesen Wert übertreffen<br />
sollte, die Reinigung den Anweisungen des Abschnitts<br />
"REINIGUNG UND WARTUNG" / Punkt 2.1 gemäß vornehmen.<br />
Ursache 1.2<br />
KONDENSATIONSGEBLÄSE FUNKTIONIERT NICHT.<br />
Muß bei funktionierendem Kompressor in Betrieb sein.<br />
Eingriff<br />
Bevor man eine eventuelle Ersetzung vornimmt, die<br />
Spannung des Gerätes ausschalten und die elektrischen<br />
Anschlüsse auf Unversehrtheit prüfen.<br />
Ursache 1.3<br />
VORHANDENSEIN VON NICHT KONDENSIERBAREN<br />
DÄMPFEN IM KREISLAUF.<br />
Bei Vorhandensein von nicht kondensierbaren Dämpfen<br />
wird der Unterschied zwischen dem Sättigungswert des<br />
Kondensationsdruckes und der Außenlufttemperatur über<br />
10°C betragen.<br />
Eingriff<br />
Die ganze Kühlmittelfüllung aus dem Kreislauf entfernen,<br />
einen Wertvakuum, der kleiner bzw. gleich 100Pa<br />
ist, erzeugen und anschließend eine Kühlmittelmenge<br />
einlassen, die den Angaben des Geräteschildes entspricht.<br />
Ursache 1.4<br />
MANGELHAFTE BELÜFTUNG DER ZONE, DIE AN DEN<br />
TECHNISCHEN BEREICH ANGRENZT.<br />
STÖRUNGSSUCHE<br />
INHALT:<br />
1.0 - NICHT NORMALER HOCHDRUCK<br />
2.0 - NICHT NORMALER TIEFDRUCK<br />
3.0 - SCHUTZVORRICHTUNGEN DES KOMPRESSORS<br />
4.0 - FÜHLERDEFEKT<br />
5.0 - DER KOMPRESSOR LÄUFT NICHT AN<br />
6.0 - VERDAMPFER MIT AUSSERGEWÖHNLICHER REIF-/EISBILDUNG<br />
7.0 - DER KOMPRESSOR SETZT SEHR SELTEN SEINEN BETRIEB AUS<br />
8.0 - GERÄUSCHVOLLES GERÄT<br />
9.0 - ÜBERLAUFEN DES SELBSTVERDUNSTUNGSBEHÄLTERS<br />
Eingriff<br />
Enetuelle Verstopfungen, welche die korrekte Luftzirkulation<br />
am Eingang/Ausgang des Kompressors behindern,<br />
beseitigen.<br />
Ursache 1.5<br />
DAS GERÄT WURDE GERADE IN BETRIEB GESETZT.<br />
Falls das Gerät erst seit kurzem in Betrieb gesetzt worden<br />
ist bzw. falls erst seit kurzem Lebensmittel eingeführt wurden,<br />
kann man die obengenannte Störung feststellen.<br />
Eingriff<br />
Es handelt sich um eine nur vorübergehende Störung, die<br />
bei Erreichen der Set- Temperatur verschwindet.<br />
Kein Eingriff erforderlich.<br />
2.0 - NICHT NORMALER TIEFDRUCK.<br />
Ursache 2.1<br />
KAPILLARE TEILWEISE VERSTOPFT.<br />
Eingriff<br />
Die Kapillare mit einer anderen, die die gleichen Abmessungen<br />
aufweist, ersetzen.<br />
Ursache 2.2<br />
DEHYDRATIONSFILTER VERSCHMUTZT.<br />
Mit einem Kontaktthermometer die Temperatur am Anfang<br />
und am Ende des Filters messen, ein Temperatur- terschied<br />
von mehr als 1°C ist Anzeichen eines nicht leistungsfähigen<br />
Filters, der ersetzt werden muß.<br />
Eingriff<br />
Ersetzen.<br />
Ursache 2.3<br />
MANGELHAFTE KÜHLMITTELFÜLLUNG.<br />
Eingriff<br />
Eventuelle Leckstellen beseitigen, falls erforderlich,<br />
den Kreislauf unter Druck setzen, um diese sichtbar zu<br />
machen, Entleerung und Füllung vornehmen.<br />
3.0 - EINGRIFF DER SCHUTZVORRICHTUNGEN DES<br />
KOMPRESSORS.<br />
Ursache 3.1<br />
DER THERMOSTAT ZÄHLT DIE VERZÖGERUNGSZEI-<br />
TEN NICHT.<br />
Zu schnell aufeinanderfolgende Anläufe gestatten keinen<br />
Druckausgleich.<br />
Eingriff<br />
Den entsprechenden Parameter prüfen und eventuell<br />
auf die Fabrikwerte bringen.<br />
Ursache 3.2<br />
DIE TEMPERATUR DES ANGESAUGTEN GASES LIEGT<br />
OBERHALB DER OPTIMALEN WERTE.<br />
Eingriff<br />
Die Funktionstüchtigkeit der Laminardrossel prüfen.<br />
Die Kühlmittelfüllung und das eventuelle Vorhandensein<br />
von Leckstellen prüfen, falls erforderlich, den Kreislauf<br />
unter Druck setzen, um diese sichtbar zu machen,<br />
Entleerung und Füllung vornehmen.<br />
4.0 - FÜHLERDEFEKT.<br />
Ursache 4.1<br />
UNTERBRECHUNGEN DER ELEKTRISCHEN AN-<br />
SCHLÜSSE.<br />
Pag. 33
Eingriff<br />
Ursache 6.5<br />
Die Daten Die Anschlüsse des vorliegenden auf Handbuchs Unversehrtheit sind nicht bindend prüfen und und können eventuell vom Erbauer ohne Vorankündigungspflicht geändert werden.Unerlaubte Abdrücke verboten<br />
EINFÜHRUNG VON WARMER WARE MIT HOHEM WASden<br />
Fühler ersetzen.<br />
SERGEHALT.<br />
Ursache 4.2<br />
Eingriff<br />
FÜHLER NICHT FUNKTIONSTÜCHTIG.<br />
Solche Waren sollten nicht eingeführt werden.<br />
Eingriff<br />
Mit einem Vielfachmeßgerät die Funktionstüchtigkeit 7.0 - DER KOMPORESSOR SETZT SEHR SELTEN SEINEN<br />
des Fühlers prüfen und diesen eventuell ersetzen.<br />
BETRIEB AUS.<br />
Ursache 7.1<br />
MANGELHAFTE KÜHLMITTELFÜLLUNG.<br />
Eingriff<br />
Die Kühlmittelfüllung und das eventuelle Vorhandensein<br />
von Leckstellen prüfen, falls erforderlich, den Kreislauf<br />
unter Druck setzen, um diese sichtbar zu machen,<br />
Entleerung und Füllung vornehmen.<br />
Ursache 7.2<br />
TÜRDICHTUNGEN MIT MANGELHAFTER LEISTUN-<br />
GSFÄHIGKEIT.<br />
Eingriff<br />
Den Zustand der Dichtungen prüfen und eventuell ersetzen.<br />
Ursache 7.3<br />
BESCHÄDIGUNG DES SAUGVENTILS DES KOMPRES-<br />
SORS.<br />
Eingriff<br />
Mit Hilfe eines Vielfachmeßgeräts den Wert des Saugdruckes<br />
und den Wert des Kompressorgehäuses prüfen.<br />
Eventuell ersetzen.<br />
5.0 - KOMPRESSOR LÄUFT NICHT AN.<br />
Ursache 5.1<br />
DIE KLEMMEN DES ELEKTRISCHEN MOTORS WERDEN<br />
NICHT VERSORGT.<br />
Eingriff<br />
Die elektrischen Anschlüsse des Versorgungskabels<br />
des Kompressors auf Unversehrtheit prüfen.<br />
Ursache 5.2<br />
DER WERT DER VERSORGUNGSSPANNUNG BEFIN-<br />
DET SICH AUSSERHALB DES ZULÄSSIGEN BEREICHS.<br />
Eingriff<br />
Die Ursache feststellen und beseitigen.<br />
Ursache 5.3<br />
DIE WICKLUNG DES ELEKTRISCHEN MOTORS IST OF-<br />
FEN BZW. ES LIEGT EIN <strong>KU</strong>RZSCHLUSS VOR.<br />
Eingriff<br />
Den Kompressor ersetzen.<br />
Ursache 5.4<br />
DER KOMPRESSOR WEIST MECHANISCHE DEFEKTE<br />
AUF.<br />
Eingriff<br />
Den Kompressor ersetzen.<br />
Ursache 5.5<br />
DER ELEKTRONISCHE THERMOSTAT IST NICHT FUN-<br />
KTIONSTÜCHTIG.<br />
Eingriff<br />
Mit Hilfe eines Vielfachmeßgeräts die Funktionstüchtigkeit<br />
des Kontaktthermostats, der vom Versorgungskabel<br />
des Kompressors abhängt, prüfen.<br />
Ursache 5.6<br />
DER ELEKTRISCHE MOTOR IST DURCHGEBRANNT.<br />
Eingriff<br />
Mit Hilfe eines Vielfachmeßgeräts die Funktionstüchtigkeit<br />
des Motors prüfen und eventuell den Kompressor<br />
ersetzen.<br />
6.0 - VERDAMPFER MIT AUSSERGEWÖHNLICHER<br />
REIF/EISBILDUNG.<br />
Ursache 6.1<br />
TÜRDICHTUNGEN MIT MANGELHAFTER LEISTUN-<br />
GSFÄHIGKEIT.<br />
Eingriff<br />
Den Zustand der Dichtungen prüfen und eventuell ersetzen.<br />
Ursache 6.2<br />
DAS TÜRSCHLIESSYSTEM IST NICHT FUNKTIONSTÜ-<br />
CHTIG.<br />
Eingriff<br />
Auf Funktionstüchtigkeit prüfen und eventuell das<br />
Scharnier ersetzen.<br />
Ursache 6.3<br />
MANGELHAFTER ABTAUVORGANG.<br />
Eingriff<br />
Sich vergewissern, daß die Anzahl, Dauer, Arbeitsweise<br />
des Abtauvorgänge den Angaben des Erbauers entsprechen,<br />
nach vorausgehender Benachrichtigung des<br />
technischen Fabrikbüros eventuell ändern.<br />
Ursache 6.4<br />
ABTAUWASSERABFLUSS NICHT MIT SIPHON VERSE-<br />
HEN.<br />
Eingriff<br />
Prüfen, ob das Abflußrohr einen Siphon vor dem Anschluß<br />
mit dem festen Teil aufweist, eventuell ändern.<br />
erlaub te Ab drü ck e v erbo ten .<br />
8.0 - GERÄUSCHVOLLES GERÄT.<br />
Ursache 8.1<br />
DIE SCHRAUBEN, DURCH DIE DER KOMPRESSOR AN<br />
DAS MASCHINENGESTELLT BEFESTIGT WIRD, SIND<br />
LOCKER.<br />
Eingriff<br />
Den Anzugszustand prüfen und eventuell die Schrauben<br />
anziehen.<br />
Ursache 8.2<br />
KYMPRESSION- BZW. SAUGROHRE VIBRIEREN.<br />
Eingriff<br />
Den Befestigungszustand prüfen und eventuell angrenzende,<br />
sich berührende Rohre voneinander trennen.<br />
9.0 - ÜBERLAUFEN DES<br />
SELBTVERDUNSTUNGSBEHÄLTERS<br />
Ursache 9.1<br />
NICHT FUNKTIONSTÜCHTIGER BEHÄLTERWIDERSTAND.<br />
Eingriff<br />
- Mit Hilfe eines Vielfachmeßgerätes den Widerstandszustand<br />
prüfen und den Widerstand eventuell ersetzen.<br />
- Prüfen, ob der Widerstand mit Strom versorgt wird (die<br />
Prüfung durchführen, wenn der Widerstand versorgt<br />
wird, das elektrische Schema zu Hilfe ziehen).<br />
Ursache 9.2<br />
ES WIRD OFT WARME WARE MIT HOHEM WASSERGE-<br />
HALT EINGEFÜHRT.<br />
Eingriff<br />
Solche Waren sollten nicht eingeführt werden.<br />
Ursache 9.3<br />
TÜRDICHTUNGEN MIT MANGELHAFTER LEISTUN-<br />
GSFÄHIGKEIT.<br />
Eingriff<br />
Den Zustand der Dichtungen prüfen und eventuell ersetzen.<br />
Pag. 34<br />
Die Daten des vorliegenden Handbuchs sind nicht bindend und können vom Erbauer ohne Vorankündigungspflicht geändert werden.Unerlaubte Abdrücke verboten
14480000396-F<br />
RECOMMANDATIONS GENERALES<br />
Ce manuel a été réalisé pour fournir des conseils en vue conformes aux données mentionnées sur la plaquette portant<br />
d’installer correctement, de mettre en service et d’entretenir le numéro de série.<br />
l’appareil; il est donc vivement conseillé de:<br />
• Les matériaux utilisés pour l’emballage (sacs en plastique, poly-<br />
- lire attentivement les recommandations car elles fournissent styrène expansé, clous, etc...) peuvent représenter un risque et ne<br />
des indications importantes en ce qui concerne la sécurité pour doivent donc pas être laissés à la portée des enfants. Les recycler<br />
l’installation, la mise en service et les opérations d’entretien. correctement conformément aux normes locales en vigueur.<br />
- conserver soigneusement ce manuel ainsi que le schéma • L’appareil a été conçu et réalisé pour la conservation de<br />
électrique et les mettre à disposition de l’opérateur afin qu’il produits alimentaires; ne l’utiliser que pour cette fonction. Le<br />
puisse les consulter à tout moment.<br />
fabricant n’engage pas sa responsabilité au cas où l’appareil<br />
- l’appareil devra être installé, testé et réparé par des techniciens serait utilisé pour des fonctions auxquelles il n’est pas adapté.<br />
qualifiés autorisés.<br />
• Eteindre l’appareil en cas de panne ou de mauvais fonction-<br />
• Le fabricant décline toute responsabilité et fait déchoir la garantie nement.<br />
en cas de modifications électriques et/ou mécaniques. Toute alté- • En cas de panne, s’adresser exclusivement à un centre<br />
ration qui n’aurait pas été expressément autorisée et qui ne respec- d’assistance technique autorisé par le fabricant et demander<br />
terait pas les indications de ce manuel, fait déchoir la garantie. d’utiliser des pièces détachées d’origine.<br />
• Observer les règles de sécurité locales en vigueur au moment • En cas de doute, ne pas utiliser l’appareil et s’adresser à des<br />
de l’installation.<br />
techniciens qualifiés.<br />
• Vérifier que les caractéristiques du réseau électrique soient Le non respect de ces recommandations peut compromettre la<br />
sécurité de l’appareil.<br />
DONNEES TECHNIQUES GENERALES<br />
Modèle K <strong>TN</strong> 12 / 13 25 / 35 / 45 60 <strong>70</strong> 60/<strong>70</strong>V 120 / <strong>140</strong> 120V / <strong>140</strong>V<br />
Tension standard<br />
Puis.compresseur W 260� 300� 380�<br />
230/1/50<br />
460� 540�<br />
Température de service °C -2 / +8<br />
Version à capillaire<br />
Système réfrigérant statique statique/ventilé<br />
Température d’évaporation � °C -19 -16 -13 -12 -12 -12<br />
Dégivrage type arrét életrique<br />
Dégivrage n° / durée maxi min 4 / 55’ 4 / 25 4 / 30 4 / 30 4 / 30 4 / 30<br />
Modèle B2116Z<br />
Compresseur<br />
B6160Z B61<strong>70</strong>Z E6187Z<br />
Type de moteur CSIR CSIR CSIR CSIR<br />
nbre de tours par minute tr/min 2900<br />
Relais de démarrage<br />
T.I.:9660B 438-114<br />
AMF: MTRP0036-36<br />
T.I.: 9660B...135<br />
T.I.:9660B...138<br />
T.I.: 9660B...149<br />
Protection surcharge<br />
T.I.: MRP342JZ-3119<br />
AMF: T0567/17<br />
T.I.. MRP56HY...<br />
T.I.: MRP56HK...<br />
T.I. MRP38AMK...<br />
AMF: T0056/..<br />
Star capacitor 43 / 53 MFD 330V 43 / 53 MFD 330V 53 / 64 MFD 250V<br />
Electroventilateur du condenseur<br />
nbre et diamètre n° x Ø 1 x 200 1 x 230 1 x 230 1 x 230<br />
puissance nominale n° x W 1 x 10 1 x 10 1 x 10 1 x 10<br />
Electroventilateur de l’évaporateur<br />
nbre et diamètre n° x Ø - 1 x 60 1 x 60 1 x 60 2 x 60<br />
puissance nominale n° x W - 1 x 20 1 x 20 1 x 20 2 x 20<br />
Données électriques<br />
F.L.A.<br />
L.R.A.<br />
�<br />
�<br />
Compresseur<br />
Total<br />
Compresseur<br />
A<br />
A<br />
A<br />
1.9<br />
1.6<br />
8.8<br />
2.5<br />
2.2<br />
3.3<br />
10.0<br />
3.4<br />
2.3<br />
9.7<br />
3.9 4.7<br />
3.1<br />
14.0<br />
5.4<br />
F.L.I.<br />
M.I.C.<br />
�<br />
�<br />
Compresseur<br />
Total<br />
W<br />
W<br />
A<br />
342<br />
9.4<br />
302<br />
457<br />
10.2<br />
385<br />
600<br />
11.6<br />
410<br />
625 661<br />
11.3 11.8<br />
835<br />
16.2<br />
540<br />
907<br />
17.0<br />
Fluide frigorigène R134a<br />
Charge g 225 225 325 400 650 650<br />
� Dates referées a: -19C / + 40C<br />
� Dates referées a: -16C / + 39C<br />
� Dates referées a: -13C / + 39C<br />
� Dates referées a: -12C / + 38C<br />
� Dates referées a: -12C / + 42C<br />
� Dates referées a: - temperature +32°C - R.U. 60%<br />
� Intensité absorbée à pleine charge en conditions maxi admises<br />
� Courant de pointe du compresseur.<br />
� Puissance absorbée à pleine charge aux conditions maxi admises<br />
� Intensité de pointe maxi de l’unité.<br />
IMPORTANT<br />
CETTE NOTICE NE RAPPORTE QUE LES DONNEES CONCERNANTES LA CELLULE AVEC TEMPERATURE NORMALE.<br />
DANS LE CAS D’ARMOIRES COMBINEES AYANT DEUX TEMPERATURES, IL FAUT AVOIR AUSSI LA NOTICE POUR LA<br />
CELLULE GROUPEE ET LES DONNEES ELECTRIQUES DOIVENT ETRE ADDITIONNEES A CELLES SUSMENTIONNEES.<br />
Pag. 35<br />
14480000396-F
Tableau 1 LISTE DES MODELES DECRITS<br />
ACCESSOIRES<br />
L’appareil peut être muni des accessoires suivants (sur demande)<br />
:<br />
- tensions d’alimentation autres que version standard;<br />
- kit d’application pour roues 80 mm;<br />
DIMENSIONS E DISTANCES UTILES<br />
NOMBRE TYPE DIMENSIONS POIDS ENCOMBREMENT CAPACITE GRILLES<br />
MODELE DES D’INSTAL- A B C TOTAL DE L’EMBALLAGE PARTIELLE FOURNIES<br />
CELLULES LATION mm mm mm Kg mc lt 650x530 188x480<br />
K/<strong>KU</strong> C <strong>TN</strong> 35/35 2<br />
K<strong>TN</strong> 35<br />
K<strong>TN</strong> 35<br />
740 850 2090 180 1,5<br />
285<br />
285<br />
2<br />
2<br />
K/<strong>KU</strong> C <strong>TN</strong> 35/13 2<br />
K<strong>TN</strong> 35<br />
K<strong>TN</strong> 13<br />
740 850 2090 180 1,5<br />
285<br />
285<br />
2<br />
➀<br />
K/<strong>KU</strong> C <strong>TN</strong> 45/12 2<br />
K<strong>TN</strong> 35<br />
K<strong>TN</strong> 13<br />
740 850 2090 180 1,5<br />
400<br />
1<strong>72</strong><br />
2<br />
➀<br />
K/<strong>KU</strong> C <strong>TN</strong> 25/45 2<br />
K<strong>TN</strong> 35<br />
K<strong>TN</strong> 35<br />
740 850 2090 180 1,5<br />
1<strong>72</strong><br />
400<br />
1<br />
2<br />
K/<strong>KU</strong> C 35/35 2 K<strong>TN</strong> 35 740 850 2090 215 1,5 285 2<br />
K/<strong>KU</strong> C 35/13 2 K<strong>TN</strong> 35 740 850 2090 215 1,5 285 ➀<br />
K/<strong>KU</strong> C 45/12 2 K<strong>TN</strong> 35 740 850 2090 215 1,5 1<strong>72</strong> ➀<br />
K/<strong>KU</strong> C 25/45 2 K<strong>TN</strong> 35 740 850 2090 215 1,5 400 3<br />
K/<strong>KU</strong> P <strong>TN</strong> 35/35 2 K<strong>TN</strong> 35 740 850 2090 174 1,5 285 2<br />
K/<strong>KU</strong> P <strong>TN</strong> 35/13 2 K<strong>TN</strong> 13 740 850 2090 174 1,5 285 ➀<br />
K/<strong>KU</strong> P <strong>TN</strong> 25/45 2 K<strong>TN</strong> 35 740 850 2090 174 1,5 400 2<br />
K C <strong>TN</strong> 30/30 2<br />
K<strong>TN</strong> 30<br />
K<strong>TN</strong> 30<br />
740 <strong>70</strong>0 2090 180 1,3<br />
251<br />
251<br />
2<br />
2<br />
K PC 30/30 2 K<strong>TN</strong> 30 740 <strong>70</strong>0 2090 180 1,3 251 2<br />
K/<strong>KU</strong> <strong>TN</strong> <strong>70</strong> 1 K<strong>TN</strong> <strong>70</strong> 740 850 2090 157 1,5 630 3<br />
K/<strong>KU</strong> <strong>TN</strong> <strong>72</strong> 1 K<strong>TN</strong> <strong>70</strong> 740 850 2090 174 1,5 630 4<br />
K/<strong>KU</strong> <strong>TN</strong>V <strong>70</strong> 1 K<strong>TN</strong>V <strong>70</strong> 740 850 2090 180 1,5 630 3<br />
K/<strong>KU</strong> <strong>TN</strong> 35/13 1 K<strong>TN</strong> <strong>70</strong> 740 850 2090 174 1,5 630 2<br />
K/<strong>KU</strong> <strong>TN</strong> 45/12 1 K<strong>TN</strong> <strong>70</strong> 740 850 2090 180 1,5 630 2<br />
K <strong>TN</strong> 60 1 K<strong>TN</strong> 60 740 <strong>70</strong>0 2090 156 1,3 508 3<br />
K <strong>TN</strong> 62 1 K<strong>TN</strong> 60 740 <strong>70</strong>0 2090 162 1,3 508 4<br />
K <strong>TN</strong>V 60 1 K<strong>TN</strong>V 60 740 <strong>70</strong>0 2090 180 1,3 508 3<br />
K/<strong>KU</strong> C <strong>TN</strong> <strong>70</strong>/<strong>70</strong> 2<br />
K<strong>TN</strong> <strong>70</strong><br />
K<strong>TN</strong> <strong>70</strong><br />
1480 850 2090 298 3,0<br />
630<br />
630<br />
3<br />
3<br />
K/<strong>KU</strong> C <strong>TN</strong> 105/35 2<br />
K<strong>TN</strong> <strong>70</strong><br />
K<strong>TN</strong> 35<br />
1480 850 2090 288 3,0<br />
980<br />
285<br />
5<br />
2<br />
2<br />
K/<strong>KU</strong> C <strong>70</strong>/<strong>70</strong> 2 K<strong>TN</strong> <strong>70</strong> 1480 850 2090 290 3,0 630 3<br />
K/<strong>KU</strong> C 105/35 2 K<strong>TN</strong> <strong>70</strong> 1480 850 2090 301 3,0 980 5 2<br />
K/<strong>KU</strong> P<strong>TN</strong> <strong>70</strong>/<strong>70</strong> 2 K<strong>TN</strong> <strong>70</strong> 1480 850 2090 283 3,0 630 3<br />
K/<strong>KU</strong> P<strong>TN</strong> 105/35 2 K<strong>TN</strong> <strong>70</strong> 1480 850 2090 290 3,0 980 5 2<br />
K C <strong>TN</strong> 60/60 2<br />
K<strong>TN</strong> 60<br />
K<strong>TN</strong> 60<br />
1480 <strong>70</strong>0 2090 295 2,6<br />
538<br />
538<br />
3<br />
3<br />
K C 60/60 2 K<strong>TN</strong> 60 1480 <strong>70</strong>0 2090 295 2,6 538 3<br />
K C 90/30 2 K<strong>TN</strong> 60 1480 <strong>70</strong>0 2090 295 2,6 846 5 2<br />
K PC 90/30 2 K<strong>TN</strong> 60 1480 <strong>70</strong>0 2090 295 2,6 846 5 2<br />
K/<strong>KU</strong> <strong>TN</strong> <strong>140</strong> 1 K<strong>TN</strong> <strong>140</strong> 1480 850 2090 278 3,0 <strong>140</strong>5 6 3<br />
K/<strong>KU</strong> <strong>TN</strong> 142 1 K<strong>TN</strong> <strong>140</strong> 1480 850 2090 283 3,0 <strong>140</strong>5 7 3<br />
K/<strong>KU</strong> <strong>TN</strong> 144 1 K<strong>TN</strong> <strong>140</strong> 1480 850 2090 288 3,0 <strong>140</strong>5 8 4<br />
K/<strong>KU</strong> <strong>TN</strong>V <strong>140</strong> 1 K<strong>TN</strong>V <strong>140</strong> 1480 850 2090 310 3,0 <strong>140</strong>5 6 3<br />
K <strong>TN</strong> 120 1 K<strong>TN</strong> 120 1480 <strong>70</strong>0 2090 269 2,6 1135 6 3<br />
K <strong>TN</strong> 122 1 K<strong>TN</strong> 120 1480 <strong>70</strong>0 2090 277 2,6 1135 7 3<br />
K <strong>TN</strong> 124 1 K<strong>TN</strong> 120 1480 <strong>70</strong>0 2090 287 2,6 1135 8 4<br />
K <strong>TN</strong>V 120 1 K<strong>TN</strong>V 120 1480 <strong>70</strong>0 2090 315 2,6 1135 6 3<br />
� Modèle avec tiroirs<br />
Pag. 36<br />
LAYOUT<br />
EMPLACEMENT<br />
Les appareils sont conçus pour être installés à l’intérieur.<br />
- Vérifier que le plan d’appui puisse supporter le poids de<br />
l’appareil ( voir poids page 36 ) et qu’il soit de niveau.<br />
- Respecter les distances utiles.
DISTANCES UTILES<br />
Le choix de l’emplacement de l’appareil sera déterminant pour son bon fonctionnement.<br />
Les appareils ont besoin d’un espace minimum pour fonctionner correctement.<br />
Cet espace sera également utile pour intervenir librement sur un appareil en cas<br />
d’entretien.<br />
S’assurer que l’appareil soit installé loin de toute source de chaleur.<br />
S’assurer aussi qu’entre le plafond ou la couverture supérieure il y ait un espace<br />
minimum de 50 cm afin que l’air puisse circuler librement.<br />
Nota :Les dimensions des figures sont exprimées en mm.<br />
1<br />
4<br />
2<br />
3<br />
2<br />
DIMENSIONS<br />
3<br />
Version <strong>KU</strong> Version K <strong>70</strong>/<strong>140</strong> Version K 60/120<br />
1<br />
�<br />
Version <strong>KU</strong> Version K 60/<strong>70</strong><br />
4<br />
2<br />
1<br />
�<br />
4<br />
2<br />
3<br />
1<br />
Version K 120/<strong>140</strong><br />
2 1<br />
4<br />
�<br />
3<br />
�<br />
Légende :<br />
1 - Panneau de commande<br />
2 - Groupe compresseur<br />
3 - Entrée ligne électrique<br />
4 - Cuve d’autoévaporation<br />
� - Position des données<br />
matriculaires<br />
Pag. 37
1.0 - CONTROLE A LA RECEPTION<br />
Les appareils sont expédiées dans des emballages de protection<br />
spéciaux. Contrôler à l’arrivée que l’appareil n’ait pas<br />
été endommagé pendant le transport et qu’il présente toutes<br />
les parties mentionnées dans la commande. En cas de<br />
dommages visibles, indiquer immédiatement sur le document<br />
de transport le défaut en ajoutant le commentaire<br />
:<br />
“ RETRAIT SOUS RESERVE POUR DOMMAGES VISI-<br />
BLES SUR L’EMBALLAGE ” car le retour franco l’établissement<br />
comporte le dédommagement à la charge de<br />
l’assurance.<br />
IMPORTANT<br />
TOUTES LES OPERATIONS CITEES CI-APRES<br />
CONCERNANT LES EQUIPEMENTS ET LES MODALITES<br />
OPERATIONNELLES DOIVENT ETRE EFFECTUEES<br />
CONFORMEMENT AUX REGLES DE SECURITE EN<br />
VIGUEUR.<br />
ATTENTION<br />
AVANT DE DEPLACER OU SOULEVER UN APPAREIL,<br />
S’ASSURER QUE LA CAPACITE DE LEVAGE CONVIENT<br />
AU POIDS DE L’APPAREIL.<br />
2.0 - MANUTENTION<br />
2.1 - MANUTENTION avec CHARIOT ELEVATEUR ou SIMI-<br />
LAIRE<br />
2.1.1 - Introduire les fourches à l’avant ou à l’arrière du socle<br />
en bois de l’appareil.<br />
2.1.2 - Soulever le tout en s’assurant que l’appareil est en<br />
équilibre parfait.<br />
ATTENTION<br />
PENDANT LES OPERATIONS DE MANUTENTION, NE PAS<br />
RETOURNER NI RENVERSER L’APPAREIL.<br />
Pag. 38<br />
RECEPTION<br />
SOMMAIRE:<br />
1.0 - CONTROLE A LA RECEPTION<br />
2.0 - MANUTENTION<br />
2.1 - MANUTENTION avec CHARIOT ELEVATEUR ou SIMILAIRE<br />
3.0 - DEBALLAGE<br />
RECOMMANDATIONS<br />
RESPECTER LES RECOMMANDATIONS MENTIONNEES<br />
SUR L’EMBALLAGE POUR GARANTIR L’INTEGRITE<br />
PHYSIQUE ET FONCTIONNELLE DE L’APPAREIL EN VUE<br />
D’EN TIRER LE MEILLEUR PROFIT; IL EST DONC<br />
RECOMMANDE DE :<br />
- MANUTENTIONNER L’APPAREIL AVEC LE PLUS<br />
GRAND SOIN<br />
- L’INSTALLER DANS UN ENDROIT SEC<br />
- EVITER ABSOLUMENT D’INSTALLER D’AUTRES OB-<br />
JETS AU-DESSUS DE L’APPAREIL.<br />
3.0 - DEBALLAGE<br />
3.1 - Emballage en carton<br />
3.1.1 - Couper les feuillards de fermeture à l’aide de ciseaux.<br />
3.1.2 - Soulever le carton d’emballage.<br />
3.2 - Emballage en bois<br />
3.2.1 - Déclover les panneaux en bois en commençant du<br />
frontal et du superieur.<br />
3.2.2 - Enlever la protection en nylon en l’enlevant de la<br />
partie superieure.<br />
3.3 - Emballage en nylon<br />
3.3.1 - Après avoir enlevé le ruban adhésif de fixage, enlever<br />
la protection en nylon en nylon en l’enlevant de la partie<br />
superieure de l’appareil.<br />
3.4 - Soulever l’appareil pour le dégager du socle.<br />
3.5 - Poser l’appareil au sol en correspondance du point prévu<br />
pour l’installation.<br />
3.6 - Vérifier s’il y a des dommages visibles.<br />
3.7 - Ne pas laisser les éléments de l’emballage à la portée<br />
des enfants car ils représentent un danger évident.<br />
3.8 - Eliminer les éléments d’emballage en les amenant dans<br />
des centres spécialisés pour le recyclage ( s’en tenir aux normes<br />
en vigueur ).<br />
3.9 - Vérifier que le numéro de série correspond au numéro<br />
mentionné sur le document d’accompagnement.
INVERSION DU SENS D’OUVERTURE DE LA PORTE<br />
IMPORTANT<br />
CE CHAPITRE ILLUSTRE SEULEMENT LA POSSSIBILITE<br />
D’ADAPTER LES APPAREILS EN FONCTION D’EXIGENCES<br />
D’INSTALLATION PARTICULIERES AVEC NECESSITE<br />
D’INVERSER LE SENS D’OUVERTURE DE LA PORTE.<br />
IL NE S’AGIT EN AUCUNE FAÇON D’UNE PHASE<br />
OPERATIONNELLE OBLIGATOIRE - RESERVE AU<br />
PERSONNEL QUALIFIE.<br />
Les appareils sont fabriqués en usine avec la porte fixée du côté<br />
droit. Lorsqu’il devient nécessaire d’inverser le côté de fixation,<br />
procéder de la façon suivante:<br />
1 - DEMONTER LA CHARNIERE SUPERIEURE<br />
1.1 - Dévisser les vis de fixation qui maintiennent l’étrier [C].<br />
1.2 - Déposer la porte et la faire tourner sur 180°.Inverser<br />
les éléments suivants sur la porte:<br />
a) douille en plastique.<br />
b) élément de tension pour charnière chromée.<br />
2 - DEPOSER L’ETRIER INFERIEUR [D].<br />
2.1 - Dévisser les vis de fixation.<br />
3 - FIXER L’ETRIER INFERIEUR [B] A L’AIDE DES VIS<br />
PREVUES A CET EFFET.<br />
MODELE AVEC GROUPE<br />
COMPRESSEUR EN HAUT<br />
MODELE AVEC GROUPE<br />
COMPRESSEUR EN BAS<br />
A<br />
B<br />
B<br />
4 - MODIFIER L’ENSEMBLE CHARNIERE DROITE [C] A<br />
GAUCHE [A].<br />
4.1 - Dévisser la vis centrale de fixation de l’étrier sur la<br />
charnière puis déposer l’étrier [C].<br />
4.2 - Faire tourner la fourchette d’un demi tour dans le sens<br />
inverse des aiguilles d’une montre.<br />
4.3 - Remonter l’étrier [A] (demander la pièce si nécessaire).<br />
4.4 - Remonter l’ensemble charnière gauche [A] sur la porte.<br />
5 - SEULEMENT POUR LES MODELES AVEC DUEX DEMI-<br />
PORTES<br />
5.1 - Démonter la traverse centrale en devissant deux étriers<br />
qui se trouvent à l’intérieur de la chambre, dans la partie<br />
inférieure de la traverse.<br />
5.2 - Tourner la traverse centrale de 180° tout en la fixant<br />
moyennant les étriers mémes.<br />
6 - INSTALLATION DE LA PORTE.<br />
6.1 - Remonter la porte en fixant la charnière supérieure [A]<br />
munie de l’étrier.<br />
7 - CONTROLE DU JOINT.<br />
7.1 - Vérifier que le joint magnétique assure l’étanchéité sur<br />
tous les côtés.<br />
8 - SERRER LES VIS DE FIXATION DES CHARNIERES.<br />
C<br />
D<br />
C<br />
D<br />
Pag. 39
L’appareil est muni d’un panneau de commande installé sur le<br />
tableau de bord en correspondance du côté supérieur de la<br />
porte.<br />
Le panneau regroupe tous les organes de commande et de<br />
contrôle nécessaires au fonctionnement de l’appareil, à savoir:<br />
� - INTERRUPTEUR LUMINEUX ON-OFF<br />
� - INTERRUPTEUR DE VENTILATION ( PAS PRESENTE<br />
SUR LES MODELES AVEC TYPE D’INSTALLATION<br />
K <strong>TN</strong> 12 ET K <strong>TN</strong> 13 )<br />
� - INTERRUPTEUR D’ECLAIRAGE (SEULEMENT POUR<br />
LA VERSION AVEC PORTE VITREE)<br />
� - LAMPE TÉMOIN DE DEGIVRAGE<br />
� - THERMOSTAT ELECTRONIQUE<br />
1.0 - INTERRUPTEUR LUMINEUX<br />
Sert à allumer et à éteindre l’appareil. Lorsque l’interrupteur<br />
vert s’allume, cela signifie que l’appareil est sous tension.<br />
2.0 - INTERRUPTEUR LUMINEUX DE VENTILATION<br />
Il contrôle le fonctionnement ou l’arrêt des ventilateurs placés<br />
a l’intérieur de l’appareil et en indique leur état.<br />
En éteignant l’interrupter jaune l’appareil fonctionne dans le<br />
mode statique.<br />
3.0 - INTERRUPTEUR LUMINEUX D’ECLAIRAGE<br />
Monté seulement dans le modéles K <strong>TN</strong>V (avec portes<br />
vitrées), il est en couleur blanc.<br />
Il permet le fonctionnement ou l’arrêt de l’éclairage à l’intérieur<br />
de l’appareil et en indique son état.<br />
4.0 - LAMPE TÉMOIN DE DEGIVRAGE<br />
La lampe témoin rouge allumée indique que le dégivrage de<br />
l’appareil est en cours.<br />
5.0 - THERMOSTAT ELECTRONIQUE<br />
Sert à régler, contrôler et commander les fonctions de l’appareil.<br />
5.1 - REGLAGE THERMIQUE<br />
Le thermostat électronique sert à maintenir la température<br />
à l’intérieur de la chambre réfrigérée le plus proche possible<br />
de la valeur du Point de consigne.<br />
Le régulateur utilise, en plus du Point de consigne, un autre<br />
Pag. 40<br />
PANNEAU DE COMMANDE<br />
SOMMAIRE:<br />
1.0 - INTERRUPTEUR LUMINEUX ON-OFF<br />
2.0 - INTERRUPTEUR DE VENTILATION<br />
3.0 - INTERRUPTEUR D’ECLAIRAGE<br />
4.0 - LAMPE TÉMOIN DE DEGIVRAGE<br />
5.0 - THERMOSTAT ELECTRONIQUE<br />
5.1 - REGLAGE THERMIQUE<br />
5.2 - TEMPORISATIONS DU COMPRESSEUR<br />
5.3 - ALARMES POUR TEMPERATURE MAXI ET MINI<br />
5.4 - GESTION DE FONCTIONNEMENT DES VENTILATEURS DE L’EVAPORATEUR<br />
5.5 - GESTION DU DEGIVRAGE<br />
6.0 - POINT DE CONSIGNE<br />
6.1 - MODIFICATION DU POINT DE CONSIGNE<br />
7.0 - ETAT DE FONCTIONNEMENT DES COMPOSANTS DE L’APPAREIL<br />
8.0 - CODES D’ALARME<br />
paramètre Istérési , qui est fixé à l’usine sur une valeur<br />
prédéterminée, et qui définit le champ de variation admis de<br />
la température de la chambre par rapport au Point de consigne.<br />
Exemple :<br />
après avoir défini Point de consigne = 0°C , Istérési = 2°C<br />
on obtient :<br />
Démarrage du compresseur lorsque la température de la<br />
chambre est supérieure à :<br />
-2°C + ( 2°C ) = 0°C.<br />
Arrêt du compresseur lorsque la température de la chambre<br />
correspond à :<br />
-2 °C<br />
Le Point de consigne est à disposition du client qui peut fixer<br />
sa valeur, en degrés centigrades, au choix à l’intérieur d’une<br />
gamme prédéterminée à l’usine. Cette gamme est fixée de<br />
sorte à respecter l’intégrité et les performances de l’appareil.<br />
5.2 - TEMPORISATIONS DU COMPRESSEUR<br />
Alors qu’il contrôle le compresseur, le régulateur tient compte<br />
de certaines temporisations. Ces temporisations ont la<br />
fonciton de:<br />
a) Limiter le nombre de démarrages horaires du compresseur<br />
à une valeur en ligne avec les limites programmées par<br />
le fabricant.<br />
b) Assurer, entre un arrêt et un redémarrage du compresseur,<br />
un retard minimum pour avoir le temps d’égaliser les<br />
pressions internes.<br />
Il est important de noter comment le temporisateur du point<br />
(a) compte le retard entre un démarrage et le redémarrage<br />
suivant du compresseur. La valeur associée à chaque temporisation<br />
peut être fixée à travers des paramètres auxquels<br />
seuls le fabricant ou le centre d’assistance autorisé ont<br />
accès.<br />
Les temporisations du compresseur sont signalées lorsque<br />
la Led du compresseur placée sur la face avant du thermostat<br />
en correspondance du mot “comp” � clignote.<br />
5.3 - ALARMES POUR TEMPERATURE MAXI ET MINI<br />
Le régulateur commande aussi bien l’alarme de température<br />
maxi que l’alarme de température mini de la chambre réfrigérée.<br />
Les valeurs qui peuvent être présélectionnées à<br />
travers des paramètres auxquels seuls le fabricant ou le
centre d’assistance peuvent accéder, doivent être considérées<br />
en tant que distance par rapport au Point de consigne.<br />
5.4 - GESTION DU FONCTIONNEMENT DES<br />
VENTILATEURS DE L’EVAPORATEUR<br />
( Fonction pas présente sur les modèles avec type d’installatione<br />
K <strong>TN</strong> 12 et K <strong>TN</strong> 13 )<br />
Le régulateur agit de sorte à maintenir en fonction les<br />
ventilateurs à l’intérieur de la chambre uniquement sur la<br />
base des exigences d’emploi spécifiques. Des paramètres<br />
auxquels seuls le fabricant ou le centre d’assistance peuvent<br />
accéder permettent de définir:<br />
- si les ventilateurs doivent s’arrêter ou non pendant le<br />
dégivrage<br />
- la température à laquelle les ventilateurs s’arrêteront.<br />
ATTENTION : les ventilateurs ne fonctionnent pas si l’interrupter<br />
jaune � n’est pas allumé.<br />
Les ventilateurs resteront bloqués pendant le dégivrage<br />
pour éviter de mettre en circulation de l’air réchauffé par les<br />
éléments de dégivrage tant que la valeur de la température<br />
lue par la sonde placée entre les ailettes de l’évaporateur<br />
sera supérieure à la valeur sélectionnée. Après l’opération<br />
de dégivrage, les ventilateurs démarreront après un temps<br />
de retard qui permettra à l’eau de dégivrage de s’égoutter<br />
L’indicateur jaune � allumé indique l’activation des ventilateurs.<br />
5.5 - GESTION DU DEGIVRAGE<br />
Le cycle de dégivrage sert à faire fondre le givre ou la glace<br />
qui se sont formés sur la surface de l’évaporateur à cause<br />
du taux élevé d’humidité dans l’air.<br />
Des paramètres auxquels seuls le fabricant ou le centre<br />
d’assistance peuvent accéder, permettent de définir :<br />
- si le cycle de dégivrage est activé ou non lors de l’allumage<br />
de l’appareil.<br />
- la durée maxi de la phase de dégivrage.<br />
- l’intervalle entre deux phases successives de dégivrage.<br />
Si le dégivrage est en cours, la Led dégivrage placée sur la<br />
face avant du thermostat en correspondance du mot “def”<br />
� et la lampe témoin rouge � sont allume.<br />
Le cas échéant, il est possible d’activer, d’une maniére<br />
manuelle, un cycle de dégivrage en appuyant pendant plus<br />
de cinq seconds su la touche �<br />
6.0 - POINT DE CONSIGNE<br />
6.1 - COMMENT MODIFIER LE Point de consigne<br />
6.1.1 - Appuyer sur l’interrupteur ON-OFF<br />
6.1.2 - Appuyer sur la touche SET � ( le Point de consigne<br />
apparaît.); la Led placée en correspondance du mot “set” �<br />
clignote.<br />
6.1.3 - Modifier la donnée en agissant dans 5 seconds sur:<br />
(touche �) pour augmenter la valeur<br />
ou.<br />
(touche �) pour diminuer la valeur<br />
La nouvelle donnée sera mémorisée automatiquement<br />
lorsqu’on sorte du mode programmation. Pour ce<br />
faire agir sur le touches pendant quelques seconds.<br />
Tableau 1 LISTE DES PARAMETRES ACCESSIBLES<br />
appareil Tous les modeles<br />
description Point de consigne<br />
unité de mesure °C<br />
réglage en usine -2<br />
7.0 - ETAT DE FONCTIONNEMENT DES COMPOSANTS<br />
DE L’APPAREIL<br />
Pour connaître l’état de fonctionnement des différents composants<br />
de l’appareil, il suffit de vérifier l’état des Led présentes<br />
sur le thermostat. Chacune d’elles est associée à un<br />
composant précis de l’appareil. Le tableau 2 indique ces<br />
correspondances et les significations.<br />
Tableau 2 SIGNIFICATION DES LED<br />
led relative au étato signification<br />
comp compresseur éteint compresseur à l’arrêt<br />
comp compresseur clign. temporisation du<br />
compresseur en cours<br />
comp compresseur allumé compresseur en marche<br />
def elements de<br />
degivrage<br />
éteint dégivrage non activé<br />
def elements de<br />
degivrage<br />
allumé dégivrage en cours<br />
def<br />
elements de<br />
degivrage<br />
clign. égouttement en cours<br />
set Set Point éteint fonctionnement normal<br />
set Set Point clign. changement de<br />
paramètre<br />
8.0 - CODES D’ALARME<br />
Pour chaque sorte d’anomalie qui pourrait se déclencher<br />
pendant le fonctionnement de l’appareil, le module de commande<br />
signalera cette anomalie en l’identifiant à travers un<br />
code d’alarme. Le tableau 3 regroupe tous les codes d’alarme<br />
significatifs pour la configuration des appareils auxquels<br />
fait référence ce manuel.<br />
L’anomalie suivie d’un signal acoustique peut être neutralisée<br />
en agissant sur une des trois touches qui se trouvent<br />
sur le face avant du thermostat.<br />
IMPORTANT : Si une alarme non comprise dans cette liste<br />
se déclenche, cela signifie que les paramètres de configuration<br />
du module de commande n’ont pas été présélectionnés<br />
correctement. Dans ce cas, s’adresser immédiatement<br />
à un centre d’assistance autorisé.<br />
Tableau 3 LISTE DES CODES D’ALARME<br />
code E1 E2<br />
composant Sonde de température Sonde de température<br />
description<br />
Sonde de température<br />
de la chambre en panne<br />
Sonde de température<br />
de l’évap. en panne.<br />
Pag. 41
MISE EN SERVICE ET ELIMINATION DE L’APPAREIL<br />
SOMMAIRE:<br />
1.0 - CONTROLES PRELIMINAIRES<br />
1.1 - CONTROLES GENERIQUES<br />
1.2 - CONTROLES SUR LA PARTIE ELECTRIQUE<br />
2.0 - MISE EN SERVICE - VERIFICATIONS<br />
3.0 - ELIMINATION<br />
IMPORTANT<br />
AVANT DE BRANCHER L’APPAREIL, S’ASSURER QUE LES DONNEES DE LA PLAQUETTE SIGNALETIQUE<br />
CORRESPONDENT A CELLES DU RESEAU ELECTRIQUE.<br />
LA PLAQUETTE SIGNALETIQUE MENTIONNANT LES DONNEES ELECTRIQUES NECESSAIRES A L’INSTALLATION<br />
EST PLACEE EN CORRESPONDANCE DU COTE SUPERIEUR DROIT DU PANNEAU AVANT DE COMMANDE.<br />
L’INSTALLATION DOIT ETRE EFFECTUEE SELON LES INSTRUCTIONS MENTIONNEES DANS CE CHAPITRE DE LA<br />
PART DE TECHNICIENS QUALIFIES.<br />
LA SECURITE ELECTRIQUE DE CET APPAREIL EST ASSUREE UNIQUEMENT SI L’APPAREIL EST RELIE A UNE<br />
PRISE DE TERRE EFFICACE CONFORMEMENT AUX NORMES DE SECURITE ELECTRIQUE EN VIGUEUR.<br />
IL EST NECESSAIRE DE VERIFIER CETTE CONDITION FONDAMENTALE DE SECURITE ET, EN CAS DE DOUTE,<br />
S’ADRESSER A DES TECHNICIENS QUALIFIES POUR FAIRE CONTROLER SOIGNEUSEMENT L’INSTALLATION.<br />
LE FABRICANT DECLINE TOUTE RESPONSABILITE POUR LES EVENTUELS DOMMAGES DUS A L’ABSENCE DE LA<br />
PRISE DE TERRE.<br />
L’APPAREIL DOIT ETRE EGALEMENT INSERE A L’INTERIEUR D’UN SYSTEME EQUIPOTENTIEL DONT L’EFFICACITE<br />
DEVRA ETRE CONFORME AUX NORMES EN VIGUEUR.<br />
IL EST INTERDIT D’UTILISER DES ADAPTATEURS, DES PRISES MULTIPLES, ET/OU DES RALLONGES.<br />
1.0 - CONTROLES PRELIMINAIRES<br />
1.1 - CONTROLES GENERIQUES<br />
1.1.1 - Contrôler que l’appareil ait été installé parfaitement<br />
droit et calé correctement. Eventuellement, agir sur la partie<br />
mobile des pieds réglables pour le mettre parfaitement de<br />
niveau.<br />
1.1.2 - Contrôler que le plastique de protection des surfaces<br />
externes ait été retiré.<br />
1.1.3 - Contrôler que l’intérieur de l’appareil ait été lavé à<br />
l’eau et au savon neutre.<br />
1.1.4 - Contrôler que l’appareil ait été installé le plus loin<br />
possible des sources de chaleur.<br />
1.1.5 - Contrôler que l’air dans le compartiment du moteur<br />
puisse circuler sans aucun problème.<br />
1.1.6 - Contrôler que les clefs de fermeture ne soient pas à<br />
la portée des enfants.<br />
1.2 - CONTROLES SUR LA PARTIE ELECTRIQUE<br />
1.2.1 - Contrôler la valeur de la tension et de la fréquence<br />
du réseau :<br />
ELLES DOIVENT RENTRER DANS LES LIMITES DES<br />
VALEURS INDIQUEES<br />
230 ± 10% 50Hz<br />
1.2.2 - Contrôler que les vis de fixation des conducteurs sur<br />
les composants électriques présents sur le tableau soient<br />
serrées correctement (pendant la manutention et le transport,<br />
les vibrations pourraient les avoir desserrées ).<br />
1.2.3 -S’assurer qu’un interrupteur multipolaire avec distance<br />
d’ouverture des contacts égale ou supérieure à 3 mm ait<br />
été installé en amont de la prise.<br />
1.2.4 - Amener l’interrupteur général auquel sera reliée la<br />
fiche du câble d’alimentation sur la position OFF.<br />
1.2.5 -Vérifier la compatibilité de la prise avec la fiche de<br />
l’appareil. Si nécessaire, faire appel à des techniciens qualifiés<br />
pour remplacer la prise par une autre de type conforme.<br />
Pag. 42<br />
Les techniciens devront également s’assurer que la section<br />
des câbles de la prise convient à la puissance absorbée par<br />
l’appareil.<br />
Vérifier que la fiche soit introduite dans la prise.<br />
2.0 - MISE EN SERVICE - VERIFICATIONS<br />
Après avoir effectué soigneusement toutes ces opérations,<br />
mettre l’appareil en marche:<br />
2.1.1 - Amener l’interrupteur général auquel est reliée la<br />
fiche du câble d’alimentation sur la position ON.<br />
2.1.2 - Amener l’interrupteur de l’appareil sur la position ON.<br />
2.1.3 - Visualiser le POINT DE CONSIGNE<br />
2.1.3.1 - Appuyer sur la bouton SET � du thermostat électronique<br />
et vérifier que la Led set � clignote;<br />
2.1.3.2 - Sélectionner la valeur souhaitée en fonction du type<br />
de produit conservé.<br />
Pour les modalités opérationnelles concernant la modification<br />
de la valeur présélectionnée à l’usine, voir chapitre<br />
PANNEAU DE COMMANDE.<br />
IMPORTANT<br />
AVANT D’INTRODUIRE LES ALIMENTS, AMENER<br />
L’APPAREIL A LA BONNE TEMPERATURE.<br />
3.0 - ELIMINATION<br />
Dans le cas d’élimination de l’appareil, avant de le mettre à<br />
la ferraile, démonter les parties qui la rend operattionnel.<br />
Enlever le cable d’alimantation et toutes parties qui peuvent<br />
constituer un danger, rendre inusables les serrures, les<br />
charnières ou les autres systèmes de fermeture afin d’éviter<br />
qu’en jouant des enfants s’enferment à l’intérieur ou se<br />
blessent.<br />
IMPORTANT<br />
OBSERVER LE REGLES LOCALES EN VIGUER POUR LA<br />
MISE A LA FERRAILLE DE CE GENRE D’APPAREILS.
NETTOYAGE ET ENTRETIEN<br />
SOMMAIRE:<br />
1.0 - NETTOYAGE HEBDOMADAIRE<br />
2.0 - ENTRETIEN HABITUEL<br />
2.1 - BATTERIE DE CONDENSATION<br />
2.2 - VENTILATEURS<br />
2.3 - CABLE D’ALIMENTATION<br />
3.0 - ARRETS PROLONGES<br />
4.0 - SYSTEME D’ECLAIRAGE<br />
Ce chapitre s’adresse à l’utilisateur final et est extrêmement<br />
important pour le fonctionnement régulier et la durée de vie de<br />
l’appareil.<br />
Quelques opérations effectuées soigneusement et régulièrement<br />
permettent d’éviter de faire appel à des techniciens spécialisés.<br />
Les opérations à effectuer ne nécessitent aucune connaissance<br />
technique spéciale et se résument en de simples contrôles des<br />
composants de l’appareil.<br />
IMPORTANT<br />
AVANT TOUTE OPERATION D’ENTRETIEN OU DE<br />
NETTOYAGE DE L’APPAREIL, NE PAS OUBLIER DE LE<br />
DEBRANCHER.<br />
ATTENTION<br />
NE PAS LAVER L’APPAREIL DIRECTEMENT AU JET<br />
D’EAU A HAUTE PRESSION .<br />
FAIRE ATTENTION A NE PAS MOUILLER LES PARTIES<br />
ELECTRIQUES.<br />
1.0 - NETTOYAGE HEBDOMADAIRE<br />
1.1 - STRUCTURE<br />
1.1.1 - Vérifier si les parties qui constituent la structure sont<br />
propres. Contrôler tout particulièrement les parties en acier.<br />
1.1.2 - Nettoyer les surfaces internes et externes à l’eau et<br />
au savon ou avec un produit détergent neutre. Un peu de<br />
vinaigre mélangé à de l’eau peut servir pour éliminer éventuellement<br />
les mauvaises odeurs.<br />
1.1.3 - Rincer abondamment à l’eau et essuyer soigneusement.<br />
1.2 - SYSTEME DE COLLECTE DE L’EAU DE DEGIVRAGE<br />
1.2.1 - Vérifier que le tuyau d’évacuation de l’eau de condensation<br />
ne soit pas bouché. Le nettoyer si nécessaire.<br />
1.2.2 - Vider la cuve pour l’eau de condensation et la replacer<br />
dans son siège (dans la version sans cuve d’autoévaporation).<br />
ATTENTION<br />
OUVRIR TROP SOUVENT LA PORTE OU UTILISER<br />
IMPROPREMENT L’APPAREIL IMPLIQUE DE DEVOIR<br />
CONTROLER FREQUEMMENT L’ETAT DE REMPLISSAGE<br />
DE LA CUVE<br />
2.0 - ENTRETIEN HABITUEL<br />
2.1 - BATTERIE DE CONDENSATION<br />
Il est important que la batterie puisse offrir le plus grand<br />
échange thermique possible. Il faut donc pour cela que sa<br />
surface soit parfaitement propre: retirer la poussière qui<br />
aurait pu se déposer sous l’effet de l’action des ventilateurs.<br />
2.1.1 - Passer l’aspirateur et un pinceau ou une brosse non<br />
métallique pour retirer toutes les impuretés (papier et poussière)<br />
qui auraient pu se déposer sur la surface de la<br />
batterie.<br />
2.1.2 - Vérifier que les ailettes en aluminium n’aient pas été<br />
endommagées ni pliées, le cas échéant, les "redresser" à<br />
l’aide de l’outil prévu à cet effet pour rétablir la situation<br />
initiale et obtenir un flux d’air optimal.<br />
2.2 - VENTILATEURS<br />
2.2.1 - Vérifier si le ventilateur est fixé correctement au<br />
support.<br />
2.2.2 - Vérifier, si possible, si les ventilateurs sont déséquilibrés;<br />
situation qui se reconnaît au bruit et aux vibrations<br />
anormales.<br />
2.3 - CABLE D’ALIMENTATION<br />
2.3.1 - Vérifier que le câble qui relie l’appareil à la prise ne<br />
soit pas déchiré, crevassé ou endommagé au point de<br />
compromettre son isolation. S’adresser à un centre d’assistance<br />
autorisé au cas où il faudrait intervenir sur le câble.<br />
3.0 - ARRETS PROLONGES<br />
En cas d’arrêt prolongé de l’appareil, procéder de la façon<br />
suivante:<br />
3.1 -Amener l’interrupteur de réseau sur la position OFF.<br />
3.2 -Débrancher l’appareil.<br />
3.3 -Vider l’appareil et le nettoyer en suivant les conseils du<br />
point 1.0.<br />
3.4 -Laisser les portes entr’ouvertes pour éviter la formation<br />
de mauvaises odeurs.<br />
3.5 -Protéger le groupe compresseur contre la poussière.<br />
4.0 - SYSTEME D’ECLAIRAGE<br />
Normalmente le systéme d’éclairage est activé par l’ouverture<br />
des portes moyennant un micro-interrupteur mécanique<br />
ou magnétique. Dans le cas d’appareils avec portes vitrées,<br />
le systeme est actionné grâce à un interrupteur placé sur le<br />
panneau de commande.<br />
En cas de panne ou de mauvais fonctionnement, s’addresser<br />
au service technique après-vente autorisé par le constructeur<br />
ou à une autre personne qualifiée.<br />
IMPORTANT<br />
LES APPAREILS SONT REALISES EN ACIER AISI 304<br />
RESISTANT A LA CORROSION DUE A L’UTILISATION<br />
NORMALE.<br />
EVITER D’UTILISER DES PRODUITS DETERGENTS OU<br />
DES SYSTEMES DE NETTOYAGE QUI POURRAIENT<br />
COMPROMETTRE SON INTEGRITE.<br />
Pag. 43
Ce chapitre représente une aide dans la recherche de solutions<br />
possibles face à certaines anomalies qui pourraient se déclencher<br />
sur l’appareil; nous n’avons évidemment pas pu considérer<br />
la totalité des possibilités. Si un dispositif de sécurité intervient,<br />
cela indique qu’il y a une anomalie de fonctionnement; avant de<br />
rétablir la situation initiale, vérifier et éliminer la cause. Nous<br />
fournissons ci-dessous une liste des problèmes qui pourraient<br />
se déclencher avec leurs causes et leurs remèdes (en gras).<br />
ATTENTION<br />
L’OPERATEUR EST SEUL RESPONSABLE LORSQU’IL<br />
EFFECTUE LES OPERATIONS INDIQUEES CI-DESSOUS -<br />
POUR RETABLIR LES FONCTIONS DE L’APPAREIL,<br />
S’ADRESSER A UN CENTRE D’ASSISTANCE AUTORISE<br />
ET EQUIPE POUR CE TYPE D’OPERATION.<br />
IMPORTANT<br />
AVANT TOUTE OPERATION D’ENTRETIEN, NE PAS<br />
OUBLIER DE DEBRANCHER L’APPAREIL.<br />
inconvénient<br />
1.0 - HAUTE PRESSION ANORMALE.<br />
cause 1.1<br />
BATTERIE DE CONDENSATION SALE.<br />
Mesurer, compresseur en marche, la valeur de la pression<br />
de condensation à l’aide d’un manomètre . Si la température<br />
de l’air arrivant dans le condenseur correspond à +32C, la<br />
différence entre la valeur saturée de la pression de condensation<br />
et la température de l’air doit assumer des valeurs<br />
proches de 10 °C.<br />
intervention<br />
Si la différence mesurée dépasse cette valeur nettoyer la<br />
batterie en suivant les recommandations du chapitre “<br />
NETTOYAGE ET ENTRETIEN “ au point 2.1.<br />
cause 1.2<br />
LE VENTILATEUR DU CONDENSEUR NE FONCTIONNE<br />
PAS.<br />
Doit fonctionner si le compresseur fonctionne.<br />
intervention<br />
Avant de remplacer éventuellement le ventilateur, débrancher<br />
l’appareil et vérifier que les connexions électriques<br />
soient efficaces.<br />
cause 1.3<br />
PRESENCE DE SUBSTANCES INCONDENSABLES<br />
DANS LE CIRCUIT.<br />
S’il y a des substances incondensables dans le circuit, la<br />
différence entre la valeur saturée de la pression de condensation<br />
et la température de l’air extérieur assume des valeurs<br />
supérieures à 10 °C.<br />
intervention<br />
Retirer tout le fluide réfrigérant du circuit, réaliser un<br />
vide de valeur égal ou inférieur à 100Pa, introduire dans<br />
le circuit la quantité de fluide réfrigérant indiquée sur la<br />
plaquette signalétique.<br />
cause 1.4<br />
MAUVAISE AERATION DE LA ZONE ADJACENTE LE<br />
LOGEMENT TECHNIQUE.<br />
Pag. 44<br />
RECHERCHE DES PANNES<br />
SOMMAIRE:<br />
1.0 - HAUTE PRESSION ANORMALE<br />
2.0 - BASSE PRESSION ANORMALE<br />
3.0 - PROTECTIONS DU COMPRESSEUR<br />
4.0 - SONDES EN PANNE<br />
5.0 - LE COMPRESSEUR NE DEMARRE PAS<br />
6.0 - EVAPORATEUR AVEC QUANTITE DE GIVRE/GLACE EXCESSIVE<br />
7.0 - LE COMPRESSEUR S’ARRETE RAREMENT<br />
8.0 - APPAREIL BRUYANT<br />
9.0 - LES CUVES AUTOEVAPORANTES DEBORDENT<br />
intervention<br />
Libérer éventuellement les entrée/sortie du condenseur<br />
pour laisser l’air circuler correctement.<br />
cause 1.5<br />
APPAREIL MIS EN SERVICE DEPUIS PEU.<br />
Si l’appareil a été mis en service depuis peu ou si l’on y a<br />
installé récemment des aliments, il est possible de se trouver<br />
face à ce problème.<br />
intervention<br />
Ce problème est temporaire et se résout lorsque l’appareil<br />
atteint la température du point de consigne.<br />
Aucune opération à effectuer.<br />
2.0 - BASSE PRESSION ANORMALE.<br />
cause 2.1<br />
CAPILLAIRE PARTIELLEMENT BOUCHE.<br />
intervention<br />
Remplacer le capillaire par un neuf présentant les mêmes<br />
caractérisques dimensionnelles.<br />
cause 2.2<br />
FILTRE DESHYDRATEUR COLMATE.<br />
Mesurer la température du fluide réfrigérant en amont et en<br />
aval du filtre à l’aide d’un thermomètre muni d’une sonde de<br />
contact. Des différences de température supérieures à 1 °C<br />
signifient que le filtre n’est pas efficace et qu’il faut le remplacer.<br />
intervention<br />
Remplacer le filtre.<br />
cause 2.3<br />
CHARGE DU FLUIDE REFRIGERANT FAIBLE.<br />
intervention<br />
Eliminer les fuites éventuelles; si nécessaire, mettre le<br />
circuit sous pression pour identifer plus facilement ces<br />
fuites; vider et recharger le circuit.<br />
3.0 - DECLENCHEMENT DES PROTECTIONS DU<br />
COMPRESSEUR.<br />
cause 3.1<br />
LE THERMOSTAT NE CALCULE PAS LES TEMPS DE<br />
RETARD.<br />
Des démarrages rapprochés ne permettent pas aux pressions.de<br />
se rééquilibrer.<br />
intervention<br />
Vérifier le paramètre en question et éventuellement le<br />
ramener aux valeurs fixées en usine.<br />
cause 3.2<br />
TEMPERATURE DU GAZ ASPIRE SUPERIEURE AUX<br />
VALEURS OPTIMALES<br />
intervention<br />
-Vérifier que l’organe de laminage fonctionne correctement.<br />
-Vérifier la charge du fluide réfrigérant et l’éventuelle<br />
présence de fuites; si nécessaire, mettre le circuit sous<br />
pression pour identifier plus facilement ces fuites; vider<br />
et recharger le circuit.<br />
4.0 - SONDES EN PANNE.<br />
cause 4.1<br />
CONNEXIONS ELECTRIQUES.INTERROMPUES
intervention<br />
intervention<br />
Le donnéesi Vérifier contenues que les dans connexions ce manuel ont un soient caractère intègres purement et illustratif éventuel- et peuvent être modifiées Contrôler par le fabricant le type sans de préavis. marchandise Reproduction introduite. même partielle interdite<br />
lement remplacer la sonde.<br />
7.0 - LE COMPRESSEUR S’ARRETE RAREMENT.<br />
cause 4.2<br />
cause 7.1<br />
LA SONDE NE FONCTIONNE PAS.<br />
CHARGE DU FLUIDE REFRIGERANT FAIBLE.<br />
intervention<br />
Vérifier à l’aide d’un testeur l’intégrité de la sonde et<br />
intervention<br />
éventuellement la remplacer.<br />
-Vérifier la charge du fluide réfrigérant et la présence<br />
éventuelle de fuites; si nécessaire, mettre le circuit sous<br />
pression pour identifier plus facilement ces fuites; vider<br />
et recharger le circuit.<br />
cause 7.2<br />
JOINTS DE LA PORTE PEU EFFICACES.<br />
intervention<br />
Vérifier l’état des joints et éventuellement les remplacer.<br />
cause 7.3<br />
SOUPAPE DE REPRISE DU COMPRESSEUR DEFEC-<br />
TUEUSE.<br />
intervention<br />
Vérifier à l’aide d’un manomètre la valeur de la pression<br />
de reprise et la valeur de la température de la carcasse<br />
du compresseur. Eventuellement remplacer.<br />
5.0 - LE COMPRESSEUR N’A PAS DEMARRE.<br />
cause 5.1<br />
LES BORNES DU MOTEUR ELECTRIQUE NE SONT PAS<br />
ALIMENTEES.<br />
intervention<br />
Vérifier la continuité des connexions électriques du<br />
câble d’alimentation du compresseur.<br />
cause 5.2<br />
LA VALEUR DE LA TENSION D’ ALIMENTATION DEPAS-<br />
SE LES VALEURS ADMISES<br />
intervention<br />
Déterminer la cause et l’éliminer.<br />
cause 5.3<br />
LE MOTEUR ELECTRIQUE A UN ENROULEMENT DE-<br />
CLENCHE OU COURTCIRCUITE.<br />
intervention<br />
Remplacer le compresseur.<br />
cause 5.4<br />
LE COMPRESSEUR PRESENTE DES PROBLEMES ME-<br />
CANIQUES.<br />
intervention<br />
Remplacer le compresseur<br />
cause 5.5<br />
LE THERMOSTAT ELECTRONIQUE NE FONCTIONNE<br />
PAS.<br />
intervention<br />
Vérifier à l’aide d’un testeur la fonctionnalité du contact<br />
du thermostat dont dépend le câble d’alimen-tation du<br />
compresseur.<br />
cause 5.6<br />
MOTEUR ELECTRIQUE BRULE.<br />
intervention<br />
Vérifier à l’aide d’un testeur la fonctionnalité du moteur<br />
et éventuellement remplacer le compresseur.<br />
6.0 - EVAPORATEUR PRESENTANT UNE QUANTITE EX-<br />
CESSIVE DE GIVRE / GLACE.<br />
cause 6.1<br />
JOINTS DE LA PORTE PEU EFFICACES.<br />
intervention<br />
Vérifier l’état des joints et éventuellement les remplacer.<br />
cause 6.2<br />
LE SYSTEME DE FERMETURE DES PORTES NE FON-<br />
CTIONNE PAS.<br />
intervention<br />
Vérifier l’état de fonctionnement et éventuellement remplacer<br />
la charnière.<br />
cause 6.3<br />
DEGIVRAGE NON OPTIMAL.<br />
intervention<br />
Vérifier que fréquence, durée, modalité des dégivrages<br />
soient conformes aux caractéristiques du fabricant;<br />
éventuellement modifier après avoir contacté le service<br />
technique de l’usine.<br />
cause 6.4<br />
ABSENCE DU SIPHON SUR LECONDUIT DE SORTIE DE<br />
L’EAU DE DEGIVRAGE.<br />
intervention<br />
Vérifier s’il y a un siphon sur le conduit d’évacuation<br />
devant le raccord avec la partie fixe; éventuellement,<br />
faire les modifications nécessaires.<br />
cause 6.5<br />
INTRODUCTION DE MARCHANDISE CHAUDE ET A<br />
HAUTE TENEUR EN EAU.<br />
8.0 - APPAREIL BRUYANT.<br />
cause 8.1<br />
VIS DE FIXATION DU COMPRESSEUR AU SOCLE DES-<br />
SERREES.<br />
intervention<br />
Vérifier le serrage et éventuellement serrer les vis.<br />
cause 8.2<br />
LES TUYAUX DE COMPRESSION OU DE REPRISE VI-<br />
BRENT.<br />
intervention<br />
Vérifier la fixation et éventuellement éloigner les tuyaux<br />
adjacents qui se touchent.<br />
9.0 - LA CUVE D’ AUTOEVAPORATION DEBORDE.<br />
cause 9.1<br />
LA RESISTANCE DE LA CUVE NE FONCTIONNE PAS.<br />
intervention<br />
-Vérifier à l’aide d’un testeur l’état de la résistance et<br />
éventuellement la remplacer.<br />
-Vérifier que la résistance soit alimentée (effectuer la<br />
vérification au moment où elle est alimentée, consulter<br />
le schéma électrique).<br />
cause 9.2<br />
INTRODUCTIONS FREQUENTES DE MARCHANDISE<br />
CHAUDE ET A HAUTE TENEUR EN EAU.<br />
intervention<br />
Contrôler le type de marchandise introduite.<br />
cause 9.3<br />
JOINTS DE LA PORTE PEU EFFICACES.<br />
intervention<br />
Vérifier l’état des joints et éventuellement les remplacer.<br />
Pag. 45<br />
Le donnéesi contenues dans ce manuel ont un caractère purement illustratif et peuvent être modifiées par le fabricant sans préavis. Reproduction même partielle interdite
SCHEMA ELETTRICO / WIRING DIAGRAM<br />
�<br />
�<br />
�<br />
LEGENDA / LEGEND<br />
K <strong>TN</strong> 60/<strong>70</strong><br />
K <strong>TN</strong> 120/<strong>140</strong><br />
� SOLO CELLE CON IMPIANTO<br />
TIPO K<strong>TN</strong> <strong>140</strong> E K<strong>TN</strong> 120.<br />
- COMPARTMENT WITH PLANT<br />
TYPE K<strong>TN</strong> <strong>140</strong> AND K<strong>TN</strong> 120<br />
- NUR FÜR DIE KÜHLZELLEN<br />
MIT DIE KÜHLANLAGEN TYP<br />
K<strong>TN</strong> <strong>140</strong> UND K<strong>TN</strong> 120<br />
- SEULEMENT POUR LES CEL-<br />
LULES AVEC TYPE D’INSTAL-<br />
LATION K<strong>TN</strong> <strong>140</strong> ET K<strong>TN</strong> 120<br />
[vedi pag. 3]<br />
[see on page 14]<br />
[siehe S. 25]<br />
[voir page 36]<br />
Disegno 0001<br />
Drawing 0001<br />
Abbildung 0001<br />
Dessin 0001<br />
K <strong>TN</strong>V 60/<strong>70</strong><br />
K <strong>TN</strong>V 120/<strong>140</strong><br />
� SOLO CELLE CON IMPIANTO<br />
TIPO K<strong>TN</strong>V <strong>140</strong> E K<strong>TN</strong>V 120;<br />
- COMPARTMENT WITH PLANT<br />
TYPE K<strong>TN</strong>V <strong>140</strong> AND K<strong>TN</strong>V 120;<br />
- NUR FÜR DIE KÜHLZELLEN<br />
MIT KÜHLANLAGEN TYP K<strong>TN</strong>V<br />
<strong>140</strong> UND K<strong>TN</strong>V 120;<br />
- SEULEMENT POUR LES CEL<br />
LULES AVEC TYPE D’INSTAL<br />
LATION K<strong>TN</strong>V <strong>140</strong> ET K<strong>TN</strong>V 120.<br />
[vedi pag. 3]<br />
[see on page 14]<br />
[siehe S. 25]<br />
[voir page 36]<br />
Disegno 0001<br />
Drawing 0001<br />
Abbildung 0001<br />
Dessin 0001<br />
HL1 Luce cella Compartment light QM2 Interrutori ventilatori cella Compartment ventilator fan switch<br />
HL2 Spia sbrinamento Defrost indicator lamp QM3 Interrutori luce cella Compartment light switch<br />
HL3 Spia ventole Fan indicator lamp R Resistenza sbrinamento Defrost heater<br />
KA Relè luce ventole Fan and light relay R1 Resistenza bacinella autoev. Self-evaporating heater<br />
KM Relè potenza Power relay R2 Resistenza cornice Frame heater<br />
M1 Motocompressore Compressor RT Reattore per neon Neon reactor<br />
M2 Motoventilatore condensatore Condenser fan SQ Micro porta Door microswitch<br />
M3 Motoventilatore cella Compartment fan ST Termostato elettronico Electronic thermostat<br />
QM1 Interrutore generale Main switch TC1 Trasformatore 230V/12V Trasformee 230V/12V<br />
Pag. 46
ELEKTRISCHES SCHEMA / SCHEMA ELETRIQUE<br />
�<br />
LEGENDE / LEGENDE<br />
K <strong>TN</strong> 12<br />
K <strong>TN</strong> 13<br />
Disegno 0001<br />
Drawing 0001<br />
Abbildung 0001<br />
Dessin 0001<br />
K <strong>TN</strong> 30<br />
K <strong>TN</strong> 35<br />
� SOLO MODELLI CON PORTA<br />
SUPERIORE;<br />
- UPPER DOOR ONLY;<br />
- NUR FÜR OBERE TÜRE;<br />
- SEULEMENT POUR LA PORTE<br />
SUPERIEURE.<br />
Disegno 0002<br />
Drawing 0002<br />
Abbildung 0002<br />
Dessin 0002<br />
HL1 Neonbeleuchtung Kühlzelle Éclairage neon pour compartinent QM2 Lüfterschalter Kühlzelle Interrupteur ventilateur compartinent<br />
HL2 Kontrollampe Abtaung Lampe-témoin de dégivrage QM3 Lichtschalter Kühlzelle Interrupteur éclairage compartinent<br />
HL3 Kontrollampe Umluftkühlung Lampe-témoin ventilateur R Abtauheizung Résistance de dégivrage<br />
KA LichtrelaisUmluftkühlung Relais éclairage ventilateurs R1 Widerstand Selbstverdunstungsbeckens Résistance d’autoévaporation<br />
KM Leistungrelais Relais puissance R2 Rahmenheizung Résistance cadre<br />
M1 Kälteaggregat Motocompresseur RT Neonreaktor Réacteur pour néon<br />
M2 Motorlüfter für Kondensator Motoventilateur du condenseur SQ Tür-Mikroschalter Micro porte<br />
M3 Motorlüfter für Kühlzelle Motoventilateur de la chambre ST Elektronischer Thermostat Thermostat électronique<br />
QM1 Hauptschalter Interrupteur général TC1 Trasformator 230V/12V Transformateur 230V/12V<br />
Pag. 47
NOTE / NOTE / ANMER<strong>KU</strong>NG / NOTE