Dip-switch
Dip-switch
Dip-switch

You also want an ePaper? Increase the reach of your titles
YUMPU automatically turns print PDFs into web optimized ePapers that Google loves.
REGOLAZIONE ELETTRONICA ELECTRONIC REGULATION REGLAGE ELECTRONIQUE<br />
ELEKTRISCHE REGELVORRICHTUNG REGULACIÓN ELÉCTRICA<br />
MANUALE USO USAGE MANUAL MANUEL D’UTILISATION<br />
BEDIENUNGSANLEITUNG MANUAL DE INSTRUCCIONES<br />
WRL 025-160<br />
IT GB FR DE ES<br />
IWRLFJ. 1105 - 4900575_01 Ver - 4.30
2<br />
IT 4900575_01 / Ver - 4.30
AERMEC S.p.A.<br />
I-37040 Bevilacqua (VR) Italia – Via Roma, 996<br />
Tel. (+39) 0442 633111<br />
Telefax 0442 93730 – (+39) 0442 93566<br />
www.aermec.com - info@aermec.com<br />
MODUCONTROL<br />
NUMERO DI SERIE<br />
DICHIARAZIONE<br />
DI CONFORMITÀ CE<br />
NOME MODUCONTROL<br />
Noi, firmatari della presente, dichiariamo sotto la nostra esclusiva responsabilità che l'insieme in<br />
oggetto così definito:<br />
TIPO Scheda elettronica per refrigeratore ACQUA/ACQUA<br />
Al quale questa dichiarazione si riferisce è conforme alle seguenti norme armonizzate:<br />
CEI EN 60730-1 Norma di sicurezza<br />
CEI EN 61000-6-1<br />
CEI EN 61000-6-3<br />
CEI EN 61000-6-2<br />
CEI EN 61000-6-4<br />
Immunità ed emissione elettromagnetica per l’ambiente residenziale<br />
Immunità ed emissione elettromagnetica per l’ambiente industriale<br />
Soddisfacendo così i requisiti essenziali delle seguenti direttive:<br />
- Direttiva LVD: 2006/95/CE<br />
- Direttiva compatibilità elettromagnetica 2004/108/CE<br />
Bevilacqua 15/01/2008<br />
Direttore Commerciale<br />
Firma<br />
4900575_01 / Ver - 4.30<br />
IT<br />
3
4<br />
IT 4900575_01 / Ver - 4.30<br />
Indice<br />
Precauzioni e norme di sicurezza ..................................................................................... 6<br />
Caratteristiche della regolazione ...................................................................................... 7<br />
Interfaccia utente ................................................................................................................ 7<br />
Settaggi default MENÚ UTENTE ........................................................................................ 8<br />
Settaggi default RESISTENZA ........................................................................................... 8<br />
Settaggi default MENÚ INSTALLATORE ........................................................................... 9<br />
Settaggi default MENÚ INSTALLATORE 2 ........................................................................ 9<br />
Visualizzazioni interfaccia utente e parametri ............................................................... 10<br />
Menù letture ..................................................................................................................... 11<br />
Menù UTENTE .................................................................................................................. 12<br />
Settaggio parametri operativi (livello utente) ................................................................ 12<br />
Impostazione set temperatura a freddo .................................................................... 12<br />
Impostazione banda proporzionale a freddo ............................................................ 12<br />
Impostazione scelta set in base alla temperatura esterna ........................................ 13<br />
Impostazione set temperatura a freddo 1 ................................................................. 13<br />
Impostazione Temperatura aria esterna 1 ................................................................. 13<br />
Impostazione set temperatura a freddo 2 ................................................................. 13<br />
Impostazione Temperatura aria esterna 2 ................................................................. 13<br />
Menù INSTALLATORE ...................................................................................................... 14<br />
Settaggio parametri operativi (livello installatore) ........................................................ 14<br />
Impostazione regolazione in ingresso o uscita ......................................................... 14<br />
Impostazione FORCE-OFF a freddo .......................................................................... 14<br />
Impostazione soglia di sicurezza .............................................................................. 14<br />
Impostazione tempo integrale ................................................................................... 15<br />
Impostazione tempo di derivazione .......................................................................... 15<br />
Impostazione soglia antigelo ..................................................................................... 15<br />
Impostazione frost protection .................................................................................... 15<br />
Configurazione controllo pannello ............................................................................. 15<br />
Configurazione screensaver ...................................................................................... 16<br />
Indirizzo Modbus supervisore ................................................................................... 16<br />
Baudrate supervisore ................................................................................................ 16<br />
Abilitazione scrittura supervisore ............................................................................... 16
Indice<br />
Menù INSTALLATORE_2 .................................................................................................. 17<br />
Settaggio parametri operativi (livello installatore) ........................................................ 17<br />
Soglia di riattivazione dopo spegnimento per force off ............................................. 17<br />
Spegnimento pompa per termostato ......................................................................... 17<br />
Menù RESISTENZA .......................................................................................................... 18<br />
Settaggio parametri operativi (livello resistenza) .......................................................... 18<br />
Impostazione set resistenza antigelo ........................................................................ 18<br />
Impostazione banda resistenza antigelo ................................................................... 18<br />
Tabella configurazione DIP-SWITCH .............................................................................. 19<br />
Protocollo di comunicazione seriale .............................................................................. 21<br />
ELENCO DIGITALI (COIL): ........................................................................................ 21<br />
Comandi MODBUS .................................................................................................... 21<br />
ELENCO READ REGISTER: ....................................................................................... 25<br />
ELENCO WRITE REGISTER: ..................................................................................... 26<br />
ELENCO ECCEZIONI: ............................................................................................... 26<br />
Tabella riassuntiva allarmi ............................................................................................... 27<br />
4900575_01 / Ver - 4.30<br />
IT<br />
5
6<br />
Precauzioni e norme di sicurezza<br />
NON bagnare l’imballo NON calpestare l’imballo Maneggiare con cautela<br />
IT 4900575_01 / Ver - 4.30<br />
Indicazioni sullo smaltimento<br />
Attenzione: questo prodotto contiene apparecchiature elettriche ed<br />
elettroniche che non possono essere smaltite attraverso i normali canali<br />
di raccolta dei rifi uti municipali. Esistono centri di raccolta differenziata<br />
per questi prodotti.<br />
Le apparecchiature elettriche ed elettroniche devono essere trattate separatamente<br />
ed in accordo alle legislazioni vigenti nello stato di appartenenza.<br />
Batterie o accumulatori presenti negli apparecchi devono essere smaltiti<br />
separatamente secondo le disposizioni del comune di appartenenza.<br />
Note sulla manualistica<br />
Simboli di sicurezza<br />
Pericolo tensione<br />
Attenzione<br />
Pericolo organi in<br />
movimento<br />
Conservare i manuali in luogo asciutto, per evitare il deterioramento, per almeno 10<br />
anni per eventuali riferimenti futuri.<br />
Leggere attentamente e completamente tutte le informazioni contenute in questo<br />
manuale. Prestare particolarmente attenzione alle norme d’uso accompagnate<br />
dalle scritte “PERICOLO” o “ATTENZIONE” in quanto, se non osservate, possono<br />
causare danno alla macchina e/o a persone e cose. Per anomalie non contemplate<br />
da questo manuale, interpellare tempestivamente il Servizio Assistenza di zona.<br />
L'apparecchio deve essere installato in maniera tale da rendere possibili operazioni<br />
di manutenzione e/o riparazione.<br />
La garanzia dell'apparecchio non copre in ogni caso i costi dovuti ad autoscale,<br />
ponteggi o altri sistemi di elevazione che si rendessero necessari per effettuare gli<br />
interventi in garanzia. AERMEC S.p.A. declina ogni responsabilità per qualsiasi danno<br />
dovuto ad un uso improprio della macchina, ad una lettura parziale o superfi ciale delle<br />
informazioni contenute in questo manuale.
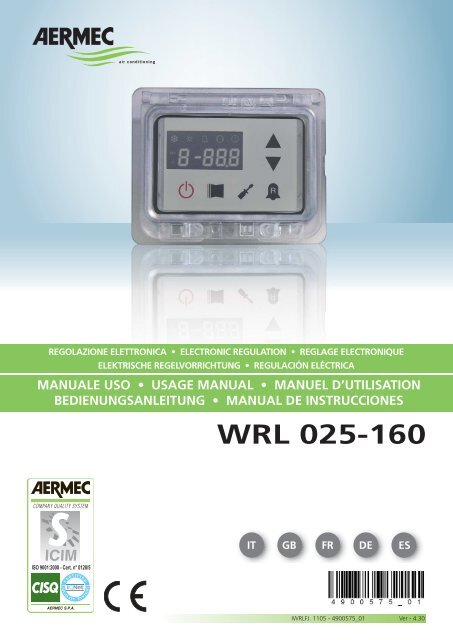
Il pannello comandi dell’unità permette<br />
una rapida impostazione dei parametri<br />
di funzionamento della macchina e la<br />
loro visualizzazione. Il display è costituito<br />
da 4 cifre e diversi led per la segnalazione<br />
del tipo di funzionamento, la<br />
visualizzazione dei parametri impostati<br />
Caratteristiche della regolazione<br />
e degli eventuali allarmi intervenuti. Nella<br />
scheda vengono memorizzate tutte<br />
le impostazioni di default ed eventuali<br />
modifi che. Con l’installazione dell’accessorio<br />
pannello remoto PR3, è possibile<br />
comandare a distanza l’accensione<br />
e lo spegnimento, l’impostazione del<br />
Interfaccia utente<br />
modo di funzionamento (freddo-caldo),<br />
e la visualizzazione del riassunto allarmi.<br />
Dopo un caso di mancanza di tensione,<br />
l’unità è in grado di riavviarsi automaticamente<br />
conservando le impostazioni<br />
originali.<br />
Indice Funzioni<br />
A Pannello a bordo macchina<br />
B Refrigeratore / Pompa di calore<br />
C Modu control<br />
D Pannello remoto PR3<br />
E Collegamento interno tra moducontrol e pannello (già cablato in fabbrica)<br />
F Collegamento tra unità e PR3, di lunghezza massima uguale a 150 metri (cablaggio a cura dell’installatore)<br />
4900575_01 / Ver - 4.30<br />
IT<br />
7
8<br />
Indice - Sigla Significato parametro<br />
1 - StF Set a freddo<br />
2 - bnF Banda a freddo<br />
5 - CSt Correzione set<br />
6 - SF1 Set a freddo 1<br />
7 - tF1 Temperatura aria esterna 1<br />
8 - SF2 Set a freddo 2<br />
9 - tF2 Temperatura aria esterna 2 (freddo)<br />
Indice - Sigla Significato parametro<br />
0 - SrA Set resistenza antigelo<br />
1 - brA Banda resistenza antigelo<br />
IT 4900575_01 / Ver - 4.30<br />
Settaggi default MENÚ UTENTE<br />
Menù UTENTE - (Password 000)<br />
Sigla parametro StF bnF CSt (1) SF1 tF1 SF2 tF2<br />
Indice parametro 1 2 5 6 7 8 9<br />
WRL 7 5 0 12 18 7 30<br />
(1) Se è presente la sonda aria esterna il valore dovrà essere impostato a (1);<br />
Settaggi default RESISTENZA<br />
Sigla parametro<br />
Menù RESISTENZA - (Password 001)<br />
SrA brA<br />
Indice parametro 0 1<br />
WRL 4 1
Settaggi default MENÚ INSTALLATORE<br />
Menù INSTALLATORE - (Passwoerd 030)<br />
Sigla parametro iu oFF SAF int dEr AG FrP PAN SCr Ad1 Bd1 AS1<br />
Indice parametro 0 1 3 4 5 6 7 9 I J L N<br />
WRL 0 4 5 600 0 3 3 0 1 1 1 0<br />
Indice - Sigla Significato parametro<br />
0 - iu Regolazione ingresso/uscita<br />
1 - oFF Force - off a freddo<br />
3 - SAF Banda di riarmo del force - off<br />
4 - int Tempo integrale<br />
5 - dEr Tempo derivativo<br />
6 - AG Antigelo<br />
7 - FrP Frost protection<br />
9 - PAN Configurazione pannello remoto<br />
I - SCr Configurazione salva schermo<br />
J - Ad1 Indirizzo modbus supervisore<br />
L - Bd1 Baudrate supervisore<br />
N - AS1 Abilitazione scrittura supervisore<br />
Settaggi default MENÚ INSTALLATORE 2<br />
Indice parametro 0<br />
Menù INSTALLATORE 2 - (Passwoerd 031)<br />
1 2 3<br />
WRL 6 0 0 0<br />
Indice Significato parametro<br />
0 Delta Temperatura per riattivazione del copressore dopo intervento del FORCE OFF<br />
1 ---<br />
2 ---<br />
3 Spegnimento pompa per termostato<br />
4900575_01 / Ver - 4.30<br />
IT<br />
9
10<br />
Visualizzazioni interfaccia utente e parametri<br />
L’interfaccia utente principale è rappresentata da un pannello<br />
a led con tastiera capacitiva (ovvero con tasti a sfi oramento);<br />
le visualizzazioni sono organizzate tramite tre menù:<br />
Menù LETTURE (tasto (C) Fig.1)<br />
Contiene le informazioni (in sola visualizzazione) sul funzionamento<br />
corrente dell’unità.<br />
Menù SET (tasto (D) Fig.1)<br />
Contiene tutti i parametri che l’utente può modifi care in base<br />
alle esigenze dell’impianto; questi parametri sono raggruppati<br />
in diversi sotto menù:<br />
- Menù UTENTE (Password 000);<br />
- Menù INSTALLATORE (Password 030);<br />
- Menù RESISTENZA (Password 001);<br />
Storico ALLARMI (tasto (E) Fig.1)<br />
Lo storico allarmi registra le condizioni di errore e/o<br />
malfunzionamento dell’unità (siano esse allarmi o preallarmi).<br />
Durante il normale funzionamento, sul display viene<br />
visualizzato l’ultimo parametro modifi cato; nel caso non vengano<br />
successivamente premuti altri tasti per almeno 5 minuti,<br />
il display attiva la modalità salva schermo (funzione impostabile<br />
tramite il parametro (i) nel menù INSTALLATORE.<br />
Per la visualizzazione dei parametri e/o letture, vengono utilizzate<br />
4 cifre; la prima indica l’indice, cioè un numero che<br />
permetta all’utente di sapere a quale parametro o lettura si<br />
stà visualizzando (Fig.3).<br />
Fig.3<br />
A B<br />
Interfaccia utente (Fig.3)<br />
A Indice parametro<br />
B Sigla parametro / Valore parametro<br />
IT 4900575_01 / Ver - 4.30<br />
Fig.1<br />
Interfaccia utente (Fig.1)<br />
A Display di visualizzazione<br />
B Tasto di accensione<br />
C Tasto di accesso al menù letture<br />
D Tasto di accesso al menù set<br />
E Tasto di accesso allo storico allarmi<br />
F Tasti di scorrimento/aumento-diminuzione parametri<br />
Fig.2<br />
1<br />
5 6<br />
dj<br />
7 8 9<br />
SET<br />
2 3<br />
Visualizzazione display (Fig. 2)<br />
1 Menù SET attualmente visualizzato<br />
2 Menù ALLARMI attualmente visualizzato<br />
3 Indice parametro<br />
4 Sigla parametro / Valore parametro<br />
5 Indicatore stagione ESTIVA<br />
6 Indicatore stagione INVERNALE<br />
7 Indicatore stato di allarme in corso<br />
8 Indicatore funzionamento compressore in corso (questa<br />
segnalazione può assumere diverse frequenze di<br />
lampeggio.<br />
9 Indicatore stop in corso<br />
4
Per entrare nel menù letture premere il<br />
tasto in (Fig.4); una volta entrati nel menù<br />
letture, sul display viene visualizzato l’indice<br />
della lettura ed una stringa di tre<br />
caratteri che la identifi ca; la stringa resta<br />
visualizzata per un secondo, dopo<br />
di chè viene sostituita dal valore relativo<br />
Menù letture<br />
alla lettura stessa. Per passare alla lettura<br />
successiva è necessario premere<br />
il tasto in (Fig.5), mentre per tornare a<br />
quella precedente, premere il tasto in<br />
(Fig.6). Ogni volta che si passa da una<br />
lettura ad un altra, oltre al cambio del<br />
valore indice, verrà visualizzato per il<br />
Fig.4 Fig.5 Fig.6<br />
Lista indici e relative letture MENÚ LETTURE (nessuna password)<br />
Indice - Sigla<br />
Temperatura uscita acqua<br />
Temperatura ingresso acqua<br />
Temperatura ingresso condensatore<br />
Temperatura gas premente<br />
Temperatura aria esterna (1)<br />
Pressione di mandata (2)<br />
Temperatura uscita condensatore<br />
Termostato<br />
Banda di sicurezza sul force-off<br />
Tempi CP<br />
Ore di funzionamento (migliaia)<br />
Ore funzionamento (unità)<br />
Indice - Sigla<br />
primo secondo la stringa per identifi care<br />
la lettura in corso (è tuttavia possibile<br />
identifi care qualunque lettura tramite il<br />
valore dell’indice, confrontandolo con la<br />
tabella riportata sotto).<br />
Spunti compressore (migliaia)<br />
Spunti compressore (unità)<br />
Release del software<br />
Release minori del software<br />
Set attualmente in uso<br />
Set pressione di condensazione<br />
Differenziale di pressione condensazione<br />
Ore di funzionamento<br />
COMPRESSORE 1 (migliaia)<br />
Ore funzionamento<br />
COMPRESSORE 2 (unità) (3)<br />
Spunti compressore<br />
COMPRESSORE 1 (migliaia)<br />
Spunti compressore<br />
COMPRESSORE 2 (unità) (3)<br />
Frazione di potenza (4)<br />
(1) Questo valore è visualizzato solo se è installato l’accessorio sonda aria esterna; se tale accessorio non è presente, verranno visualizzati tre trattini<br />
al posto del valore di temperatura;<br />
(2) Questo valore è visualizzato solo se è installato l’accessorio trasduttore di alta pressione; se tale accessorio non è presente, verranno visualizzati<br />
tre trattini al posto del valore di pressione;<br />
(3) Parametri visibili solo nei modelli WRL100-140-160;<br />
4900575_01 / Ver - 4.30<br />
IT<br />
11
12<br />
Per entrare nel menù UTENTE premere<br />
il tasto mostrato in (Fig.7); una<br />
volta premuto il tasto si dovrà inserire<br />
la password per l’accesso ai vari<br />
menù; per accedere al menù utente la<br />
password è 000 (la quale è il default<br />
visualizzato); per modifi care il valore<br />
delle password usare i tasti freccia.<br />
PASSWORD = 000<br />
IT 4900575_01 / Ver - 4.30<br />
Menù UTENTE<br />
Una volta inserita la password corretta<br />
premere il tasto mostrato in (Fig.7). Sul<br />
display viene visualizzato l’indice del<br />
parametro UTENTE ed una stringa di<br />
tre caratteri che la identifi ca; la stringa<br />
resta visualizzata per un secondo, dopo<br />
di chè viene sostituita dal valore relativo<br />
al parametro stesso. Per passare al<br />
Fig.7 Fig.8<br />
parametro successivo, usare i tasti freccia<br />
(Fig.8). Per modifi care un parametro<br />
basta selezionarlo, premere il tasto<br />
mostrato in (Fig.7), modifi care il valore<br />
assegnato tramite i tasti freccia mostrato<br />
in (Fig.8) e per confermare la modifi ca,<br />
ripremere il tasto mostrato in (Fig.7).<br />
Settaggio parametri operativi (livello utente)<br />
Indice - stringa<br />
Indice - stringa<br />
Valore<br />
MIN<br />
Valore<br />
MAX<br />
Impostazione set temperatura a freddo<br />
Funzione parametro<br />
-20 °C 26 °C Questo parametro indica il valore del set di lavoro attivo nella modalità a freddo.<br />
Valore<br />
MIN<br />
Valore<br />
MAX<br />
1 °C 20 °C<br />
Impostazione banda proporzionale a freddo<br />
Funzione parametro<br />
Questo parametro indica la banda proporzionale applicata al set freddo; questa banda<br />
comporta un gestione ottimizzata del compressore, accendendolo solo se la temperatura<br />
dell’acqua in ingresso/uscita (in base al tipo di controllo impostato dal parametro (0)<br />
nel menù installatore) è maggiore al set di lavoro a freddo (parametro (1) menù utente)<br />
più il valore di questo parametro.
Impostazione scelta set in base alla temperatura esterna (con accessorio sonda aria esterna)<br />
Indice - stringa<br />
Indice - stringa<br />
Indice - stringa<br />
Indice - stringa<br />
Indice - stringa<br />
Valore<br />
MIN<br />
Valore<br />
MAX<br />
0 3<br />
Valore<br />
MIN<br />
Valore<br />
MAX<br />
-20 °C 26 °C<br />
Valore<br />
MIN<br />
Valore<br />
MAX<br />
-40 °C 50 °C<br />
Valore<br />
MIN<br />
Valore<br />
MAX<br />
-20 °C 26 °C<br />
Valore<br />
MIN<br />
Valore<br />
MAX<br />
-40 °C 50 °C<br />
Funzione parametro<br />
Questo set attiva l’algoritmo di compensazione del set di lavoro:<br />
Valore (0) = compensazione NON attiva;<br />
Valore (1) = compensazione attiva;<br />
(°C)<br />
SET SF1(F)<br />
SF2<br />
SET (H)<br />
SET TF1 (G) SET TF2(I)<br />
Impostazione set temperatura a freddo 1<br />
(°C)<br />
Funzione parametro<br />
SF1: indice (6) menù utente;<br />
SF2: indice (8) menù utente;<br />
TF1: indice (7) menù utente;<br />
TF2: indice (9) menù utente;<br />
Questo parametro indica il massimo valore del set a freddo, in corrispondenza della minima<br />
temperatura aria esterna (indice (7) menù utente). Questo parametro è visibile solo<br />
se è stato attivata la funzione compensazione (indice (5) menù utente).<br />
Impostazione Temperatura aria esterna 1<br />
Funzione parametro<br />
Questo parametro indica la minima temperatura aria esterna presa in considerazione<br />
per la compensazione a freddo. Questo parametro è visibile solo se è stato attivata la<br />
funzione compensazione (indice (5) menù utente).<br />
Impostazione set temperatura a freddo 2<br />
Funzione parametro<br />
Questo parametro indica il minimo valore del set a freddo, in corrispondenza della massima<br />
temperatura aria esterna (indice (9) menù utente). Questo parametro è visibile solo<br />
se è stato attivata la funzione compensazione (indice (5) menù utente).<br />
Impostazione Temperatura aria esterna 2<br />
Funzione parametro<br />
Nel funzionamento a freddo, il set di<br />
lavoro viene calcolato in maniera automatica<br />
in base alla temperatura esterna<br />
secondo la logica evidenziata sul diagramma.<br />
Questo parametro indica la massima temperatura aria esterna presa in considerazione<br />
per la compensazione a freddo. Questo parametro è visibile solo se è stato attivata la<br />
funzione compensazione (indice (5) menù utente).<br />
4900575_01 / Ver - 4.30<br />
IT<br />
13
Per entrare nel menù INSTALLATORE<br />
premere il tasto mostrato in (Fig.9);<br />
una volta premuto il tasto si dovrà inserire<br />
la password per l’accesso ai vari<br />
menù; per accedere al menù utente la<br />
password è 030; per modifi care il valore<br />
delle password usare i tasti freccia.<br />
Una volta inserita la password corret-<br />
ATTENZIONE: la modifi ca dei seguenti<br />
parametri è di esclusiva competenza<br />
del personale qualifi cato addetto<br />
all’installazione dell’unità.<br />
14<br />
PASSWORD = 030<br />
IT 4900575_01 / Ver - 4.30<br />
Menù INSTALLATORE<br />
ta premere il tasto mostrato in (Fig.9).<br />
Sul display viene visualizzato l’indice<br />
del parametro INSTALLATORE ed una<br />
stringa di tre caratteri che la identifi ca;<br />
la stringa resta visualizzata per un secondo,<br />
dopo di chè viene sostituita dal<br />
valore relativo al parametro stesso. Per<br />
passare al parametro successivo, usare<br />
Fig.9 Fig.10<br />
i tasti freccia (Fig.10). Per modifi care un<br />
parametro basta selezionarlo, premere<br />
il tasto mostrato in (Fig.9), modifi care il<br />
valore assegnato tramite i tasti freccia<br />
mostrato in (Fig.10) e per confermare la<br />
modifi ca, ripremere il tasto mostrato in<br />
(Fig.9).<br />
Settaggio parametri operativi (livello installatore)<br />
Indice - stringa<br />
Indice - stringa<br />
Indice - stringa<br />
Valore<br />
MIN<br />
Valore<br />
MAX<br />
0 2<br />
Valore<br />
MIN<br />
Valore<br />
MAX<br />
-25 °C 25 °C<br />
Valore<br />
MIN<br />
Valore<br />
MAX<br />
0,5 °C 20 °C<br />
Impostazione regolazione in ingresso o uscita<br />
Funzione parametro<br />
In base al valore di questo parametro, la regolazione della macchina sarà basata:<br />
• Se 0, la macchina regola sulla base della temperatura di uscita;<br />
• Se 1, regola sulla base della temperatura di ingresso.<br />
• Se 2, la macchina regola sulla base della temperatura della sonda remota letta dal<br />
quadro DHW (in caso di guasto alla sonda remota la macchina torna a regolare con la<br />
sonda a bordo segnalando con l’allarme codice 157).<br />
In caso sia attiva la produzione di acqua calda sanitaria, la regolazione viene automaticamente<br />
forzata sulla temperatura di uscita acqua indipendentemente dal valore di questo<br />
parametro.<br />
Impostazione FORCE-OFF a freddo<br />
Funzione parametro<br />
Le unità prevedono un controllo sulla temperatura di lavoro (ingresso o uscita) alla quale<br />
viene collegata una soglia di sicurezza oltre la quale viene spento il compressore in<br />
maniera immediata ed automatica; tale soglia è denominata FORCE-OFF.<br />
Impostazione soglia di sicurezza<br />
Funzione parametro<br />
Soglia di temperatura sopra il force-off che riabilita l’avvio del compressore dopo lo spegnimento<br />
per force -off.
Indice - stringa<br />
Indice - stringa<br />
Indice - stringa<br />
Indice - stringa<br />
Indice - stringa<br />
Valore<br />
MIN<br />
Valore<br />
MAX<br />
0 s 999 s<br />
Valore<br />
MIN<br />
Valore<br />
MAX<br />
0 s 120 s<br />
Valore<br />
MIN<br />
Valore<br />
MAX<br />
-50 °C 20 °C<br />
Valore<br />
MIN<br />
Valore<br />
MAX<br />
0 4<br />
Valore<br />
MIN<br />
Valore<br />
MAX<br />
0 3<br />
Impostazione tempo integrale<br />
Funzione parametro<br />
Le unità possiedono una logica evoluta per il controllo della temperatura acqua prodotta;<br />
il controllo integrale evita che il sistema entri in equilibrio ad una temperatura più alta o<br />
più bassa rispetto a quella impostata con il set di lavoro. Si ricorda che aumentando il<br />
tempo di integrazione si indebolisce l’effetto del controllo integrale.<br />
Impostazione tempo di derivazione<br />
Funzione parametro<br />
Tempo entro il quale la temperatura dell’acqua in ingresso viene controllata per stimare il<br />
carico sull’impianto; se la banda sul valore di set viene superata entro tale tempo, l’unità<br />
viene attivata.<br />
Impostazione soglia antigelo<br />
Funzione parametro<br />
Nelle unità e possibile impostare una soglia per l’allarme antigelo; tale valore specifica a<br />
quale temperatura viene attivato l’allarme antigelo. Si ricorda che per poter modificare il<br />
parametro Soglia antigelo, dovrà essere abilitato il dip-<strong>switch</strong> corrispondente (vedi tabella<br />
configurazione dip-<strong>switch</strong>).<br />
Impostazione frost protection<br />
Funzione parametro<br />
Nelle unità è possibile impostare un controllo di sicurezza sulla temperatura di uscita dell’acqua; in base al valore<br />
assegnato a questo parametro la resistenza antigelo viene così gestita:<br />
• valore 0, resistenza antigelo assente;<br />
• valore 1, resistenza antigelo installata e funzionante solo con macchina in funzione a caldo o a freddo;<br />
• valore 2, resistenza antigelo installata e funzionante anche in standby ma accendendo la pompa;<br />
• valore 3, resistenza antigelo funzionante in standby senza pompa attiva;<br />
• valore 4,con temperatura dell’aria esterna minore di 3°C viene attivata la pompa per due minuti ogni trenta,<br />
al fine di monitorare la temperatura dell’acqua sull’intero impianto.<br />
Configurazione controllo pannello<br />
Funzione parametro<br />
Questo set configura il tipo di controllo applicabile alle unità; in base al valore impostato<br />
per questo set, il controllo sul modo di funzionamento (CALDO/FREDDO) e sul comando di<br />
accensione/spegnimento dell’unità, vengono gestiti nel seguente modo:<br />
Valore del set impostato a 0:<br />
• Impostazione modo di funzionamento = impostazione parametro 0<br />
• comando ON/OFF = da pannello a bordo macchina<br />
Valore del set impostato a 1:<br />
• Impostazione modo di funzionamento = impostazione parametro 0<br />
• comando ON/OFF = da pannello remoto<br />
Valore del set impostato a 2:<br />
• Impostazione modo di funzionamento = impostato da contatto remoto<br />
• comando ON/OFF = da pannello a bordo macchina<br />
Valore del set impostato a 3:<br />
• Impostazione modo di funzionamento = impostato da contatto remoto<br />
• comando ON/OFF = da contatto remoto<br />
4900575_01 / Ver - 4.30<br />
IT<br />
15
16<br />
Indice - stringa<br />
Indice - stringa<br />
Indice - stringa<br />
Indice - stringa<br />
Valore<br />
MIN<br />
Valore<br />
MAX<br />
IT 4900575_01 / Ver - 4.30<br />
Configurazione screensaver<br />
Funzione parametro<br />
0 2 Questo parametro indica la configurazione della funzionalità screensaver:<br />
• valore 0, screensaver disabilitato;<br />
• valore 1, screensaver con visualizzazione dei trattini. (da utilizzare con pannelli comandi<br />
con software antecedente alla versione 1.3);<br />
• valore 2, screesaver senza la visualizzazione dei trattini (da utilizzare con pannelli<br />
comandi con software dalla versione 1.3 in poi)<br />
Valore<br />
MIN<br />
Valore<br />
MAX<br />
Indirizzo Modbus supervisore<br />
Funzione parametro<br />
0 999 Questo parametro indica l’indirizzo Modbus assegnato al supervisore; tale indirizzo sarà<br />
utilizzato nella comunicazione tra supervisore e Moducontrol.<br />
Valore<br />
MIN<br />
Valore<br />
MAX<br />
Baudrate supervisore<br />
Funzione parametro<br />
0 2 Questo parametro indica la velocità di comunicazione tra supervisore e moducontrol; tale<br />
velocità viene impostata in base al valore selezionato per questo parametro:<br />
0 = 9600 bps<br />
1 = 19200 bps<br />
2= 38400 bps<br />
Valore<br />
MIN<br />
Valore<br />
MAX<br />
Abilitazione scrittura supervisore<br />
Funzione parametro<br />
0 1 Questo parametro abilita i comandi in scrittura per il supervisore; tale abilitazione viene<br />
impostata in base al valore selezionato per questo parametro:<br />
0 = Disabilita comandi in scrittura;<br />
1 = Abilita comandi in scrittura;<br />
Si ricorda che i comandi in lettura sono sempre attivi.
Menù INSTALLATORE_2<br />
Per entrare nel menù INSTALLATORE_2 seguire la stessa procedura operativa descritta per il menù INSTALLATORE;<br />
l’unica modifi ca è il valore della password, tale valore è 31.<br />
ATTENZIONE: la modifi ca dei seguenti<br />
parametri è di esclusiva competenza<br />
del personale qualifi cato addetto<br />
all’installazione dell’unità.<br />
Settaggio parametri operativi (livello installatore)<br />
Indice<br />
Indice<br />
PASSWORD = 031<br />
Valore<br />
MIN<br />
Soglia di riattivazione dopo spegnimento per force off<br />
Valore<br />
MAX<br />
0 °C 30 °C<br />
Valore<br />
MIN<br />
Valore<br />
MAX<br />
0 1<br />
Fig.9a Fig.10a<br />
Funzione parametro<br />
Nel caso il valore del parametro rin = 4 (parametro 8 del menù installatore), quindi sia<br />
presente una sonda accumulo impianto, questo parametro indica di quanto abbassare la<br />
soglia del force off in modo da evitare che il compressore si riattivi dopo l’intervento del<br />
ForceOff dinamico per spegnersi subito dopo.<br />
Spegnimento pompa per termostato<br />
Funzione parametro<br />
0 = la pompa rimane in funzione quando viene raggiunta la temperatura di setpoint. 1 =<br />
la pompa viene spenta quando è stata raggiunta la temperatura di setpoint. (quando si<br />
seleziona questa opzione viene attivata automaticamente la regolazione sulla base della<br />
temperatura in ingresso). Questo parametro è visibile solo con la regolazione sulla base<br />
della temperatura in ingresso (parametro(0) =1 oppure 2).<br />
4900575_01 / Ver - 4.30<br />
IT<br />
17
Per entrare nel menù RESISTENZA<br />
premere il tasto mostrato in (Fig.14);<br />
una volta premuto il tasto si dovrà inserire<br />
la password per l’accesso ai vari<br />
menù; per accedere al menù utente la<br />
password è 001; per modifi care il valore<br />
delle password usare i tasti freccia.<br />
Una volta inserita la password corretta<br />
ATTENZIONE: la modifi ca dei seguenti<br />
parametri è di esclusiva competenza<br />
del personale qualifi cato addetto<br />
all’installazione dell’unità.<br />
18<br />
PASSWORD = 001<br />
IT 4900575_01 / Ver - 4.30<br />
Menù RESISTENZA<br />
premere il tasto mostrato in (Fig.14). Sul<br />
display viene visualizzato l’indice del<br />
parametro RESISTENZA ed una stringa<br />
di tre caratteri che la identifi ca; la stringa<br />
resta visualizzata per un secondo, dopo<br />
di chè viene sostituita dal valore relativo<br />
al parametro stesso. Per passare al parametro<br />
successivo, usare i tasti freccia<br />
Fig.14 Fig.15<br />
(Fig.15). Per modifi care un parametro<br />
basta selezionarlo, premere il tasto mostrato<br />
in (Fig.14), modifi care il valore assegnato<br />
tramite i tasti freccia mostrato<br />
in (Fig.15) e per confermare la modifi ca,<br />
ripremere il tasto mostrato in (Fig.14).<br />
Settaggio parametri operativi (livello resistenza)<br />
Indice - stringa<br />
Indice - stringa<br />
Valore<br />
MIN<br />
Valore<br />
MAX<br />
-20 °C 50 °C<br />
Valore<br />
MIN<br />
Valore<br />
MAX<br />
0,3 °C 10 °C<br />
Impostazione set resistenza antigelo<br />
Funzione parametro<br />
Le unità prevedono la possibilità di impostare una soglia per l’attivazione della resistenza<br />
antigelo; se la temperatura letta da una delle due sonde acqua (ingresso o uscita, in base<br />
al tipo di controllo abilitato) raggiunge il valore impostato in questo parametro, la resistenza<br />
antigelo viene attivata.<br />
Impostazione banda resistenza antigelo<br />
Funzione parametro<br />
Le unità prevedono la possibilità di impostare una soglia per l’attivazione della resistenza<br />
antigelo; se la temperatura letta da una delle due sonde acqua (ingresso o uscita, in base<br />
al tipo di controllo abilitato) raggiunge il valore impostato in questo parametro, la resistenza<br />
antigelo viene attivata.
Oltre ai parametri inseribili da pannello,<br />
le unità sono dotate di una serie di<br />
dip-<strong>switch</strong>, tramite i quali gestire alcune<br />
opzioni e funzionalità della macchina.<br />
Si ricorda che alcune delle opzioni<br />
gestibili dal pannello sono vincolate<br />
ad uno specifi co settaggio di alcuni<br />
dip-<strong>switch</strong>.<br />
Unità<br />
Tabella configurazione DIP-SWITCH<br />
<strong>Dip</strong>-<strong>switch</strong> (B)<br />
Impostazioni di default DIP-SWITCH MODUCONTROL<br />
DIP-SWITCH (A) DIP-SWITCH (B)<br />
1 2 3 4 5 6 7 8 9 10 11 12 1 2<br />
WRL OFF OFF OFF OFF ON OFF (*) OFF OFF OFF (**) OFF OFF OFF<br />
(*) Il valore di questo DIP-SWITCH dipende dalla presenza o meno dell’accessorio trasduttore di alta pressione;<br />
- Se l’unità prevede il trasduttore di alta, il DIP 7 sarà impostato su ON;<br />
- Se l’unità NON prevede il trasduttore di alta, il DIP 7 sarà impostato su OFF;<br />
(**)<br />
ON = WRL solo freddo (WRL °);<br />
OFF = WRL motoevaporanti (WRL E);<br />
<strong>Dip</strong>-<strong>switch</strong> (A)<br />
4900575_01 / Ver - 4.30<br />
IT<br />
19
20<br />
<strong>Dip</strong>-<strong>switch</strong> N° <strong>Dip</strong> Stato Funzione<br />
A<br />
<strong>Dip</strong>-<strong>switch</strong><br />
B<br />
1<br />
2<br />
3<br />
4<br />
5<br />
6<br />
7<br />
8<br />
9<br />
10<br />
11<br />
12<br />
IT 4900575_01 / Ver - 4.30<br />
ON Impostazioni di fabbrica<br />
OFF Impostazioni di fabbrica<br />
ON Sbrinamento previsto solo per inversione ciclo<br />
OFF Sbrinamento per iniezione di gas caldo<br />
ON Acqua glicolata: set antigelo modificabile<br />
OFF Set antigelo (Parametro B) bloccato<br />
ON Controllo resa disabilitato<br />
OFF Controllo resa abilitato<br />
ON Parzializzazioni di sicurezza disabilitato<br />
OFF Parzializzazioni di sicurezza abilitate<br />
ON Algoritmo di controllo basso contenuto d’acqua disabilitato<br />
OFF Algoritmo di controllo basso contenuto d’acqua abilitato<br />
ON Dispositivo controllo pressione di condensazione presente<br />
OFF Dispositivo controllo pressione di condensazione assente<br />
ON Impostazioni di fabbrica<br />
OFF Impostazioni di fabbrica<br />
ON Configurazione della scheda per unità inverter<br />
OFF Configurazione della scheda per unità chiller ON/OFF<br />
ON Configurazione della scheda per unità motocondensante<br />
OFF Configurazione della scheda per unità chiller<br />
ON Impostazioni di fabbrica<br />
OFF Impostazioni di fabbrica<br />
ON Non utilizzato<br />
OFF Non utilizzato<br />
Combinazioni <strong>Dip</strong> Funzione<br />
DIP 1 DIP 2<br />
OFF OFF Impostazioni di fabbrica<br />
ON OFF Impostazioni di fabbrica<br />
ON ON Impostazioni di fabbrica<br />
OFF ON Impostazioni di fabbrica
La scheda Modu_control mette a disposizione<br />
la possibilità di essere interfacciata ad<br />
un sistema centralizzato attraverso apposita<br />
scheda di espansione seriale, basata sullo<br />
standard elettrico RS485, e utilizzando il<br />
procotollo standard Modbus RTU. La scheda<br />
Modu_Control è sempre Slave della co-<br />
Comandi MODBUS<br />
Protocollo di comunicazione seriale<br />
municazione. Per abilitare la comunicazione<br />
da un sistema di supervisione alla scheda<br />
moducontrol, è necessario settare alcuni<br />
parametri:<br />
Parametro J - Ad1 (Indirizzo modbus del<br />
supervisore);<br />
Parametro L - Bd1 (Baudrate supervisore);<br />
La scheda Modu_Control gestisce verso il supervisore BMS/VMF sia valori<br />
Register (interi/analogici) che Coil (digitali). I comandi che possono essere<br />
utilizzati per la lettura/scrittura di questi sono:<br />
cmd<br />
Codici MODBUS utilizzati<br />
descrizione<br />
0x01 Read Coil Status<br />
0x03 Read Holding Registers<br />
0x05 Force Single Coil<br />
0x06 Preset Single Register<br />
0x0F Preset Multiple Coils<br />
0x10 Preset Multiple Registers<br />
ELENCO DIGITALI (COIL):<br />
COMANDI DIGITALI DISPONIBILI<br />
Read Coil Status<br />
Force Single Coil<br />
Force Multiple Coils<br />
Per avere la possibilità di scrivere i parametri<br />
COIL sulla scheda Modu_Control occorre abilitare<br />
i comandi di supervisione impostando il parametro<br />
parametro(N) = 1 del menù installatore<br />
(password=30) del pannello semplice.<br />
INDIRIZZO DESCRIZIONE<br />
0 Comando Stanby/Acceso (toggle) 0=OFF 1=ON<br />
1 Comando modo funzionamento (toggle) 0=FREDDO 1=CALDO<br />
2 Comando remoto acqua sanitaria 0=Normale, 1=Sanitario<br />
3 Abilitazione Termostato Remoto 0=Disabilitato, 1=Abilitato<br />
4 Comando Reset Allarmi. 1=Reset allarmi<br />
5 Stato compressore1 0=OFF 1=ON<br />
6 Stato compressore2 0=OFF 1=ON<br />
7 Stato Caldaia/Resistenza 0=OFF 1=ON<br />
8 Stato Produzione acqua sanitaria. 0=non attiva 1=attiva<br />
9 Stato ID acqua sanitaria 0=ID chiuso – 1=ID aperto<br />
10 Stato ID ON_OFF remoto 0=ID chiuso – 1=ID aperto<br />
11 Stato ID stagione 0=ID chiuso (Freddo) , 1=ID aperto (Caldo)<br />
12 Stato ID termostato ambiente 0=ID chiuso – 1=ID aperto<br />
13 Riassunto Allarme<br />
14 Riassunto Preallarme<br />
15 Preallarme Magneto Termico compressore<br />
16 Preallarme Magnetotermico Ventilatore<br />
Inoltre è necessario che vengano rispettate<br />
le seguenti caratteristiche:<br />
Stop bits: 2;<br />
Parity: NONE;<br />
!<br />
4900575_01 / Ver - 4.30<br />
IT<br />
21
22<br />
INDIRIZZO DESCRIZIONE<br />
17 Preallarme Pressostato Alta Pressione<br />
18 Preallarme Flussostato/Pressostato differenziale acqua<br />
19 Preallarme Pressostato bassa pressione<br />
20 Preallarme Sonda ingresso NTC1 (SIW)assente<br />
21 Preallarme Sonda ingresso NTC2 (SUW) assente<br />
22 Preallarme Antigelo<br />
23 Preallarme Sonda ingresso NTC4 (SGP) assente<br />
24 Preallarme Temperatura Gas Premente Elevata<br />
25 Preallarme Trasduttore Mandata Compressore Assente<br />
26 Preallarme Alta Pressione<br />
27 Preallarme Sonda ingresso NTC3 (SS) assente<br />
28 Preallarme Trasduttore aspirazione assente<br />
29 Preallarme Bassa Pressione<br />
30 Preallarme Bassa Resa<br />
31 Preallarme Magnetotermico pompa<br />
32 Preallarme Parzializzazione alta pressione<br />
33 Preallarme Parzializzazione bassa pressione<br />
34 Preallarme Parzializzazione temperatura premente<br />
35 Preallarme Errore bemf (Inverter longertek)<br />
36 Preallarme Errore comunicazione interno (longertek)<br />
37 Preallarme Sovracorrente (longertek)<br />
38 Preallarme Assenza di carico (longertek)<br />
39 Preallarme Tensione errata (longertek)<br />
40 Preallarme errore all’avvio (longertek)<br />
41 Preallarme errore di protezione IPM (longertek)<br />
42 Preallarme Errore EEPROM (longertek)<br />
43 Preallarme stallo compressore (longertek)<br />
44 Preallarme comunicazione assente (longertek)<br />
45 Preallarme PFC module (longertek)<br />
46 Preallarme Sovratemperatura di raffreddamento (APY)<br />
47 Preallarme Sovracorrente in accelerazione (APY)<br />
48 Preallarme Sovracorrente a velocità costante (APY)<br />
49 Preallarme Sovracorrente in decelerazione (APY)<br />
50 Preallarme Sottovoltaggio sul DC bus (APY)<br />
51 Preallarme Sovravoltaggio su DC bus(APY)<br />
52 NON USATO<br />
53 NON USATO<br />
54 Preallarme PFC Converter Fault (APY)<br />
55 Preallarme Sovracorrente in accelerazione (APY)<br />
56 Preallarme Sovraccarico (APY)<br />
57 Preallarme Sovracorrente a velocità costante (APY)<br />
58 Preallarme Sovracorrente in decelerazione (APY)<br />
59 Preallarme Compressore non connesso correttamente (APY)<br />
60 Preallarme Assenza di comunicazione (APY)<br />
61 Preallarme Errore sensore di temperatura aletta raffredd. (APY)<br />
62 NON USATO<br />
63 NON USATO<br />
IT 4900575_01 / Ver - 4.30
INDIRIZZO DESCRIZIONE<br />
64 NON USATO<br />
65 Preallarme Condizione anomala (APY)<br />
66 NON USATO<br />
67 NON USATO<br />
68 Preallarme Valvola inversione ciclo<br />
69 Preallarme Alta temperatura ingresso acqua<br />
70 Preallarme Inversione di ciclo per alta temperatura del gas premente<br />
71 NON USATO<br />
72 NON USATO<br />
73 NON USATO<br />
74 NON USATO<br />
75 NON USATO<br />
76 NON USATO<br />
77 NON USATO<br />
78 NON USATO<br />
79 NON USATO<br />
80 NON USATO<br />
81 NON USATO<br />
82 NON USATO<br />
83 NON USATO<br />
84 NON USATO<br />
85 Allarme Magneto Termico compressore<br />
86 Allarme Magnetotermico Ventilatore<br />
87 Allarme Pressostato Alta Pressione<br />
88 Allarme Flussostato/Pressostato differenziale acqua<br />
89 Allarme Pressostato bassa pressione<br />
90 Allarme Sonda ingresso NTC1 assente (SIW)<br />
91 Allarme Sonda ingresso NTC2 assente (SUW)<br />
92 Allarme Antigelo<br />
93 Allarme Sonda ingresso NTC4 assente (SGP)<br />
94 Allarme Temperatura Gas Premente Elevata<br />
95 Allarme Trasduttore Mandata Compressore Assente<br />
96 Allarme Alta Pressione<br />
97 Allarme Sonda ingresso NTC3 assente (SS)<br />
98 Allarme Trasduttore aspirazione assente<br />
99 Allarme Bassa Pressione<br />
100 Allarme Bassa Resa<br />
101 Allarme Magnetotermico pompa<br />
102 Allarme Parzializzazione alta pressione<br />
103 Allarme Parzializzazione bassa pressione<br />
104 Allarme Parzializzazione temperatura premente<br />
105 Allarme Errore bemf (Inverter longertek)<br />
106 Allarme Errore comunicazione interno (longertek)<br />
107 Allarme Sovracorrente (longertek)<br />
108 Allarme Assenza di carico (longertek)<br />
109 Allarme Tensione errata (longertek)<br />
110 Allarme errore all’avvio (longertek)<br />
4900575_01 / Ver - 4.30<br />
IT<br />
23
24<br />
INDIRIZZO DESCRIZIONE<br />
111 Allarme errore di protezione IPM (longertek)<br />
112 Allarme Errore EEPROM (longertek)<br />
113 Allarme stallo compressore (longertek)<br />
114 Allarme comunicazione assente (longertek)<br />
115 Allarme PFC module (longertek)<br />
116 Allarme Sovratemperatura di raffreddamento (APY)<br />
117 Allarme Sovracorrente in accelerazione (APY)<br />
118 Allarme Sovracorrente a velocità costante (APY)<br />
119 Allarme Sovracorrente in decelerazione (APY)<br />
120 Allarme Sottovoltaggio sul DC bus (APY)<br />
121 Allarme Sovravoltaggio (APY)<br />
122 NON USATO<br />
123 NON USATO<br />
124 Allarme PFC Converter Fault (APY)<br />
125 Allarme Sovracorrente in accelerazione (APY)<br />
126 Allarme Sovraccarico (APY)<br />
127 Allarme Sovracorrente a velocità costante (APY)<br />
128 Allarme Sovracorrente in decelerazione (APY)<br />
129 Allarme Compressore non connesso correttamente (APY)<br />
130 Allarme Assenza di comunicazione (APY)<br />
131 Allarme Errore sensore di temperatura aletta raffredd. (APY)<br />
132 NON USATO<br />
133 NON USATO<br />
134 NON USATO<br />
135 Allarme Condizione anomala (APY)<br />
136 NON USATO<br />
137 NON USATO<br />
138 Allarme Valvola inversione ciclo guasta<br />
139 Allarme Alta temperatura ingresso acqua<br />
140 Allarme Inversione di ciclo per alta temperatura del gas premente<br />
141 (Codice 57) Allarme lettura della sonda remota nel quadro DHW<br />
142 (Codice 58) Allarme lettura della sonda temperatura aria esterna<br />
143 NON USATO<br />
144 NON USATO<br />
145 NON USATO<br />
146 NON USATO<br />
147 NON USATO<br />
148 NON USATO<br />
149 NON USATO<br />
150 NON USATO<br />
151 NON USATO<br />
152 NON USATO<br />
153 NON USATO<br />
154 NON USATO<br />
IT 4900575_01 / Ver - 4.30
ELENCO READ REGISTER:<br />
COMANDI LETTURA DISPONIBILI<br />
Read Holding Register<br />
INDIRIZZO DESCRIZIONE<br />
0 Tipologia macchina: 0 – ANL,1 – ANLI, 2 – ANR/ANF/SRP, 3 – ANL-C<br />
1 Tipologia della macchina inverter 0=longertek 1=APY<br />
2 Ingresso NTC1 (TUA) (SIW)<br />
3 Ingresso NTC2 (TIA) (SUW)<br />
4 Ingresso NTC3 (TSB) (SS)<br />
5 Ingresso NTC4 (TGP) (SGP)<br />
6 Ingresso NTC5 (TAE) (SAE)<br />
7 Ingresso trasduttore di alta pressione (AP) (TAP)<br />
8 Ingresso trasduttore di bassa pressione (BP) (TBP)<br />
9 Ingresso 0-10Vdd<br />
10 Stato uscite digitali relè<br />
11 Banda sicurezza su force OFF<br />
12 Tempo all’avvio/spegnimento compressore<br />
13 Ore funzionamento compressore primario (migliaia)<br />
14 Ore funzionamento compressore primario<br />
15 Numero di spunti effettuati dal compressore (migliaia)<br />
16 Numero di spunti effettuati dal compressore<br />
17 Major sw version<br />
18 Minor sw version<br />
19 Setpoint di regolazione della macchina (comprensiva di correzioni)<br />
20 Set pressione controllo della condensazione<br />
21 Differenziale di pressione per controllo condensazione<br />
22 Ore di funzionamento del compressore ausiliario (migliaia)<br />
23 Ore di funzionamento del compressore ausiliario<br />
24 Numero di spunti effettuati dal compressore ausiliario (migliaia)<br />
25 Numero di spunti effettuati dal compressore ausiliario<br />
26 Potenza fornita dalla macchina (chiller ON-OFF) Frequenza in uso (chiller<br />
inverter)<br />
27 Caduta di pressione in aspirazione del compressore<br />
28 Potenza richiesta al controllo inverter<br />
29 Configurazione <strong>Dip</strong>-Switch (0x0000 = tutti OFF ÷ 0x0FFF = tutti ON)<br />
30 Stato Abilitazione Comandi ON_OFF Stagione da Pannello o Remoto<br />
31 Stato abilitazione termostato ambiente collegato a ingresso ID3<br />
32 Stato di funzionamento macchina: 0 - Chiller Off, 1 - Chiller On, 2 – Iniezione<br />
di parzializzazione, 3 – Sbrinamento per iniezione, 4 – Sbrinamento per<br />
inversione di ciclo<br />
33 Accessorio Resistenza/Caldaia: 0=assente 1=resistenza 2=caldaia<br />
34 Corrente inverter APY<br />
35 Tensione uscita inverter APY<br />
36 Tensione di BUS inverter APY<br />
37 Temperatura Aletta di raffreddamento inverter APY<br />
38 Limite massimo impostabile set point a caldo<br />
4900575_01 / Ver - 4.30<br />
IT<br />
25
26<br />
ELENCO WRITE REGISTER:<br />
COMANDI SCRITTURA DISPONIBILI<br />
Preset Single Register<br />
Preset Multiple Registers<br />
INDIRIZZO DESCRIZIONE LIMITI MIN MAX<br />
39 Setpoint Freddo -200 ÷ 260 [°C]<br />
40 Banda Setpoint Freddo 10 ÷ 200 [°C]<br />
41 Setpoint Caldo 250 ÷ 650 [°C]<br />
42 Banda Setpoint Caldo 10 ÷ 200 [°C]<br />
43 Correzione Setpoint 0 ÷ 3<br />
44 Set Freddo 1 -200 ÷ 260 [°C]<br />
45 TA Esterna freddo 1 400 ÷ 500 [°C]<br />
46 Set Freddo 2 -200 ÷ 260 [°C]<br />
47 TA Esterna freddo 2 -400 ÷ 500 [°C]<br />
48 Set Caldo 1 250 ÷ 650 [°C]<br />
49 TA Esterna Caldo 1 -400 ÷ 500 [°C]<br />
50 Set Caldo 2 250 ÷ 650 [°C]<br />
51 TA Esterna Caldo 2 -400 ÷ 500 [°C]<br />
52 Set Acqua Sanitaria -250 ÷ 650 [°C]<br />
53 Banda Acqua Sanitaria 10 ÷ 200 [°C]<br />
54 Percentuale potenza richiesta da termostato 0 ÷ 100 [%]<br />
55 PWD_SET_VMF -32768 ÷ 32767<br />
56 Sonda Remota DHW -32768 ÷ 32767<br />
ELENCO ECCEZIONI:<br />
Di seguito si riportano i codici di errore restituiti dalla scheda Modu Control:<br />
!<br />
ECCEZIONE DESCRIZIONE<br />
ILLEGAL FUNCTION Il codice funzione richiesto non gestito dalla scheda.<br />
ILLEGAL DATA ADDRESS La richiesta dati contiene un riferimento ad un indirizzo non disponibile nella scheda.<br />
ILLEGAL DATA VALUE La richiesta di scrittura del dato contiene un valore fuori range non è quindi premessa<br />
la scrittura.<br />
IT 4900575_01 / Ver - 4.30
Le unità prevedono due tipologie nella segnalazione<br />
di malfunzionamento:<br />
• Preallarme<br />
• Allarme<br />
La prima tipologia viene indicata dal lampeggio<br />
della spia rossa sul display, una sucessiva<br />
pressione del tasto campana permette di<br />
ATTENZIONE:<br />
I preallarmi possono divenire allarmi nel<br />
caso in cui:<br />
• Sia passato un tempo maggiore o uguale<br />
Indice<br />
preallarme<br />
Indice<br />
Allarme<br />
1 101<br />
Tabella riassuntiva allarmi<br />
visualizzare la lista degli allarmi (con indice e<br />
causa indicato nella tabella sottostante). Un<br />
preallarme resta tale per 60 secondi, se dopo<br />
tale tempo non è sparita la condizione che<br />
ha causato il preallarme, quest’ultimo diviene<br />
allarme. Gli allarmi vengono visualizzati nella<br />
stessa maniera dei preallarmi, tranne che<br />
a 60 secondi, nella condizione di preallarme.<br />
• Sia stato superato il numero massimo<br />
di preallarmi in un’ora (cinque), in tal caso<br />
ogni preallarme sucessivo verrà visualizzato<br />
Causa Note<br />
Magnetotermico compressore<br />
Magnetotermico ventilatore<br />
Magnetotermico pompa<br />
2 102 Magnetotermico ventilatore<br />
3 103 Pressostato alta pressione<br />
4 104<br />
Flussostato<br />
Pressostato differenziale acqua<br />
5 105 Pressostato bassa pressione<br />
6 106 Sonda ingresso acqua assente<br />
7 107 Sonda uscita acqua assente<br />
8 108 Gelo acqua<br />
9 109 Sonda premente assente<br />
per l’accensione della spia rossa fissa. Prima<br />
di riarmare l’unità, si consiglia di contattare<br />
il servizio assistenza Per effettuare il riarmo<br />
dell’unità è necessario spegnere e riaccendere<br />
l’unità con il tasto stand-by.<br />
direttamente come allarme, e come tale farà<br />
fermare la macchina sino alla risoluzione<br />
della sua causa.<br />
Questa segnalazione interviene se si apre il contatto relativo all’interruttore<br />
magnetotermico a protezione del compressore MTC<br />
Questa segnalazione interviene se si apre il contatto relativo all’interruttore<br />
magnetotermico a protezione del ventilatore MTV). Questo<br />
codice è visualizzato solo nel caso in cui la scheda è utilizzata come<br />
ricambio di schede con SW fino alla versione 3.6.<br />
Questa segnalazione NON riporta lo stato del pressostato di alta<br />
pressione in sé ma del contattore del compressore. Il pressostato di<br />
alta pressione agisce direttamente sul contattore del compressore.<br />
Se la scheda comanda l’accensione del compressore e il contattore<br />
non diventa attivo dopo 3 secondi, viene presentato questo segnale.<br />
Questo allarme può anche essere causato da un difetto nel funzionamento<br />
del relè di rinvio dal contattore del compressore alla scheda<br />
(indicato come RAP negli schemi elettrici). Se durante il funzionamento<br />
del compressore il contattore si disattiva viene presentato questo<br />
segnale. AP.<br />
Questa segnalazione avviene con l’apertura del contatto relativo<br />
al flussostato o al pressostato differenziale, questo allarme non è<br />
rilevato per i primi 40 secondi dall’avvio della pompa. La macchina<br />
si blocca in allarme quando il numero massimo di interventi flussostato<br />
permessi è superato. Se è attivata la modalità frost protection<br />
in standby (e quindi anche la pompa) anche lo stato del flussostato<br />
viene controllato. FL/PD.<br />
Questa segnalazione interviene quando si apre il contatto relativo al<br />
pressostato di bassa pressione (in aspirazione al compressore) BP.<br />
Questa segnalazione si verifica quando la sonda ingresso acqua risulta<br />
staccata.<br />
Questa segnalazione si verifica quando la sonda uscita acqua risulta<br />
staccata.<br />
Questa segnalazione si verifica quando viene raggiunta la soglia<br />
antigelo (menù installatore, parametro (6) default: 3°C) dalla temperatura<br />
dell’acqua in uscita. Si esce dallo stato di preallarme con<br />
temperatura dell’acqua in uscita superiore al set calcolato dalla<br />
scheda secondo un algoritmo interno; l’allarme antigelo è sospeso<br />
(nel modo caldo) per un tempo pari a 3’ secondi dall’accensione del<br />
compressore.<br />
Questa segnalazione si verifica quando la sonda gas premete risulta<br />
assente.<br />
4900575_01 / Ver - 4.30<br />
IT<br />
27
28<br />
10 110 Temperatura gas premente elevata<br />
11 111<br />
12 112 Alta pressione<br />
IT 4900575_01 / Ver - 4.30<br />
Trasduttore pressione mandata<br />
compressore assente<br />
13 113 Sonda sbrinamento assente<br />
14 114<br />
15 115 Bassa pressione<br />
16 - Bassa resa<br />
Trasduttore pressione aspirazione<br />
compressore assente<br />
17 117 Magnetotermico pompa<br />
18 118 Parzializzazione di alta pressione<br />
19 119 Parzializzazione di bassa pressione<br />
20 120<br />
21 121<br />
Parzializzazione temperatura<br />
premente<br />
Errore bemf (chiller inverter)<br />
errore nella rilevazione della back<br />
emf<br />
Questa segnalazione si verifica quando la temperatura rilevata del gas<br />
premente (sonda SGP) supera la soglia prevista dal parametro. Si esce<br />
dallo stato di preallarme con temperatura impostata in fabbrica (default<br />
125°C).<br />
Questa segnalazione si verifica quando il trasduttore in mandata<br />
del compressore risulta assente e la macchina è impostata come<br />
pompa di calore o è impostata la presenza del DCP.<br />
Questa segnalazione si verifica quando il trasduttore rileva una pressione<br />
di mandata superiore alla soglia impostata (default: 40 bar).<br />
Si esce dallo stato di preallarme con pressione impostata in fabbrica<br />
(default: 38 bar).<br />
Questa segnalazione si verifica quando la sonda di sbrinamento è<br />
assente e la macchina è impostata come pompa di calore.<br />
Questa segnalazione si verifica quando il trasduttore in aspirazione<br />
del compressore risulta assente e la macchina è impostata come<br />
pompa di calore.<br />
Questa segnalazione si verifica quando il trasduttore in mandata<br />
del compressore segnala una pressione in aspirazione inferiore<br />
alla soglia impostata in fabbrica a freddo (default: 4 bar), o a caldo<br />
(default : 2 bar). Si esce dallo stato di preallarme quando la pressione<br />
in aspirazione supera la soglia di intervento prevista, default pari<br />
a 2 bar. L’allarme di bassa pressione è sospeso a caldo per un tempo<br />
pari a 3 secondi dall’accensione del compressore. Ed è permanentemente<br />
sospeso durante l’inversione di ciclo.<br />
Ogniqualvolta la macchina viene alimentata il controllo verifica una<br />
sola volta il comportamento del compressore mediante la procedura<br />
di controllo resa, questo controllo è disabilitabile da dip <strong>switch</strong>.<br />
Questa segnalazione interviene se si apre il contatto relativo all’interruttore<br />
magnetotermico a protezione della pompa. MTP. Questo<br />
codice è visualizzato solo nel caso in cui la scheda è utilizzata come<br />
ricambio di schede con SW fino alla versione 3.6.<br />
Questa segnalazione si verifica ogniqualvolta ha luogo una parzializzazione<br />
causata dal raggiungimento della soglia impostata. La macchina<br />
si blocca in allarme quando il numero massimo di parzializzazioni<br />
permesso (default 5) è superato. Con macchina inverter indica<br />
anche una parzializzazione per alto rapporto di compressione.<br />
Questa segnalazione si verifica ogniqualvolta ha luogo una parzializzazione<br />
di bassa pressione, la macchina si blocca in allarme quando il<br />
numero massimo di parzializzazioni permesso (default 5) è superato.<br />
Questa segnalazione si verifica ogniqualvolta ha luogo una parzializzazione<br />
di temperatura premente, la macchina si blocca in allarme<br />
quando il numero massimo di parzializzazioni (default 5) permesso è<br />
superato.<br />
Questo errore viene restituito dalla scheda controllo inverter ed è<br />
legato a problemi di spunto del compressore.<br />
22 122 Errore di comunicazione interno: La scheda controllo inverter ha problemi interni di comunicazione.<br />
23 123 Sovracorrente Eccesso di assorbimento di corrente da parte del compressore.<br />
24 124 Assenza di carico<br />
Il compressore non assorbe abbastanza corrente, è possibile che<br />
giri a vuoto.<br />
25 125 Tensione errata La scheda di controllo inverter segnala una errata tensione di bus.<br />
26 126 Errore all’avvio:<br />
La scheda di controllo inverter segnala una errata partenza del<br />
motore PMSM.<br />
27 127 Errore protezione IPM Errore sull’IGBT.<br />
28 128 Errore EEPROM: Errore della eeprom sulla scheda di controllo inverter.<br />
29 129 Stallo compressore<br />
30 130 Comunicazione assente<br />
La scheda controllo inverter non risponde, può essere disalimentata<br />
o il cavetto seriale può essere staccato o i segnali A e B invertiti.<br />
31 131 PFC Module Errore del modulo inverter PFC.
32 132<br />
Sovratemperatura aletta di<br />
raffreddamento<br />
33 133 Sovracorrente in accelerazione Errore hardware.<br />
34 134 Sovracorrente a velocità costante Errore hardware.<br />
35 135 Sovracorrente in decelerazione Errore hardware.<br />
36 136 Sottovoltaggio sul DC Bus<br />
37 137 Sovravoltaggio DC Bus<br />
40 140<br />
PFC Converter Fault Errore nel<br />
modulo PFC<br />
Errore software.<br />
41 141 Sovracorrente in accelerazione Errore software.<br />
42 142 Sovraccarico<br />
43 143 Sovracorrente a velocità costante Errore software.<br />
44 144 Sovracorrente in decelerazione Errore software.<br />
45 145<br />
Compressore non connesso<br />
correttamente<br />
46 146 Assenza di comunicazione<br />
47 147<br />
Errore sensore temperatura<br />
aletta di raffreddamento<br />
51 151 Condizione anomala.<br />
Frequenza ridotta da protezione contro sovracorrente o sovratemperatura.<br />
54 154 Valvola inversione di ciclo guasta La valvola di inversione ciclo potrebbere essere guasta o bloccata.<br />
La temperatura di ingresso acqua ha superato il valore del parame-<br />
55 155 Alta temperatura ingresso acqua<br />
tro menù installatore, parametro (H). Probabile presenza caldaia su<br />
stesso impianto. Al terzo intervento del preallarme la macchina va in<br />
allarme e blocco.<br />
-- 156<br />
57 157<br />
58 158<br />
59 159<br />
60 160<br />
Inversione di ciclo per alta<br />
temperatura del gas premente.<br />
Errore nella lettura della sonda<br />
remota del quadro DHW.<br />
Errore nella lettura della sonda<br />
temperatura aria esterna.<br />
Guasto sonda acqua INGRESSO al<br />
condensatore<br />
Guasto sonda acqua USCITA al<br />
condensatore<br />
ATTENZIONE:<br />
Si ricorda che i preallarmi sono a riarmo automatico, mentre gli allarmi sono a riarmo manuale.<br />
Questo preallarme indica l’intervento di uno sbrinamento per inversione<br />
di ciclo senza aver rispettato i tempi tra inversioni di ciclo.<br />
L’innesco dell’inversione di ciclo è stato causato dal superamento<br />
della soglia di parzializzazione per alta temperatura del gas premente<br />
default 130°. Questo preallarme non causa lo stop del compressore<br />
e non presenta un numero limite di interventi.<br />
Questo preallarme indica un guasto della sonda remota o un problema<br />
nella comunicazione con il quadro DHW. L’allarme è attivo solo se<br />
il parametro(8)=4 nel menu con password = 30.<br />
Questo preallarme indica un guasto della sonda temperatura<br />
dell’aria esterna quando è presente il DCP oppure la macchina è una<br />
pompa di calore.<br />
Dalla versione software 3.9.0 è stato introdotto il reset degli allarmi tramite contatto remoto di ON/OFF se abilitato.<br />
Da posizione on, se passa in off e ritorna in on entro 5 secondi resetta gli allarmi; tramite il contatto ON/OFF è possibile eseguire al massimo 3<br />
reset ogni ora.<br />
Prima bisogna resettare gli allarmi con tasto “R”.<br />
In caso di mancanza di tensione vengono resettati gli allarmi.<br />
4900575_01 / Ver - 4.30<br />
IT<br />
29
30<br />
SERIAL NUMBER<br />
GB 4900575_01 / Ver - 4.30<br />
Aermec S.p.A.<br />
I-37040 Bevilacqua (Verona) Italy – Via Roma, 996<br />
Tel. (+39) 0442 633111<br />
Fax 0442 93730 – (+39) 0442 93566<br />
www.aermec.com - info@aermec.com<br />
MODUCONTROL<br />
EC DECLARATION OF<br />
CONFORMITY<br />
NAME MODUCONTROL<br />
We, the undersigned, declare on our own exclusive responsibility that the object in question,<br />
so defined:<br />
TYPE Electronic card for WATER/WATER chiller<br />
And to which this declaration refers, complies with the following standardised regulations:<br />
CEI EN 60730-1 Safety Regulation<br />
CEI EN 61000-6-1<br />
CEI EN 61000-6-3<br />
CEI EN 61000-6-2<br />
CEI EN 61000-6-4<br />
Electromagnetic immunity and emission in residential environment<br />
Electromagnetic immunity and emission in industrial environment<br />
thus meeting the essential requisites of the following directives:<br />
- LV Directive: 2006/95/EC<br />
- Electromagnetic Compatibility Directive 2004/108/EC<br />
Bevilacqua 15/01/2008<br />
Marketing Director<br />
Signature
Index<br />
Precautions and safety regulations ................................................................................ 33<br />
Characteristics of the regulation .................................................................................... 34<br />
User interface ................................................................................................................... 34<br />
ELECTRIC HEATER default settings .............................................................................. 35<br />
USER MENU default settings .......................................................................................... 35<br />
INSTALLER MENU default settings ................................................................................ 36<br />
INSTALLER MENU 2 default settings ............................................................................. 36<br />
User interface and parameter visualisations ................................................................. 37<br />
Readings menu ............................................................................................................... 38<br />
USER menu ..................................................................................................................... 39<br />
Setting operational parameters (user level) ................................................................... 39<br />
Setting of cooling temperature .................................................................................. 39<br />
Setting of proportional cooling band ......................................................................... 39<br />
Settings made on the basis of outside temperature .................................................. 40<br />
Setting cooling temperature setpoint 1...................................................................... 40<br />
Setting the outside air temperature 1 ........................................................................ 40<br />
Setting cooling temperature setpoint 2...................................................................... 40<br />
Setting the outside air temperature 2 ........................................................................ 40<br />
INSTALLER menu ............................................................................................................. 41<br />
Setting operational parameters (installer level) ............................................................ 41<br />
Setting of input and output regulation ....................................................................... 41<br />
Setting cooling FORCE-OFF ...................................................................................... 41<br />
Setting the safety threshold ....................................................................................... 41<br />
Setting integral time ................................................................................................... 42<br />
Setting derivation time ............................................................................................... 42<br />
Setting the anti-freeze threshold ................................................................................ 42<br />
Setting frost protection ............................................................................................... 42<br />
Panel control configuration ........................................................................................ 42<br />
Screensaver configuration ......................................................................................... 43<br />
Modbus supervisor address ...................................................................................... 43<br />
Supervisor baud rate ................................................................................................. 43<br />
Supervisor write enabled ........................................................................................... 43<br />
4900575_01 / Ver - 4.30<br />
GB<br />
31
32<br />
INSTALLER 2 menu .......................................................................................................... 44<br />
Setting operational parameters (installer level) ............................................................ 44<br />
Threshold for reactivation after shutdown force off ................................................... 44<br />
Thermostat pump <strong>switch</strong>-off ...................................................................................... 44<br />
ELECTRIC HEATER menu ............................................................................................... 45<br />
Setting operational parameters (electric heater level) .................................................. 45<br />
Setting anti-freeze electric heater setpoints .............................................................. 45<br />
Impostazione banda resistenza antigelo ................................................................... 45<br />
Table of DIP-SWITCH configuration ................................................................................ 46<br />
Serial communication protocol ....................................................................................... 48<br />
ELENCO DIGITALI (COIL): ........................................................................................ 48<br />
MODBUS commands ................................................................................................ 48<br />
ELENCO READ REGISTER: ....................................................................................... 52<br />
ELENCO WRITE REGISTER: ..................................................................................... 53<br />
LIST OF EXCEPTIONS: .............................................................................................. 53<br />
Recapitulatory table of alarms ........................................................................................ 54<br />
GB 4900575_01 / Ver - 4.30<br />
Index
Precautions and safety regulations<br />
DO NOT dampen the packaging DO NOT tread on the packaging Handle with care<br />
Disposal information<br />
Caution: this product contains electrical and electronic equipment that<br />
may not be disposed of through normal municipal rubbish collection<br />
channels. There are special centres for the separate collection of this<br />
material.<br />
The electrical and electronic apparatus must be treated separately and in<br />
accordance with the relevant legislation in force in the country the apparatus<br />
is installed in.<br />
Batteries or accumulators in the apparatus must be disposed of separately<br />
in accordance with local regulations.<br />
Notes regarding the documentation<br />
Safety symbols<br />
Danger: power supply<br />
Warning<br />
Danger: moving<br />
parts<br />
Store the manuals in a dry location to avoid deterioration, as they must be kept for at<br />
least 10 years for any future reference.<br />
Carefully and thoroughly read all the information referred to in this manual. Pay<br />
particular attention to the usage instructions accompanied by the words "DANGER"<br />
or "WARNING" because, if not observed, they can cause damage to the machine<br />
and/or property and/or injury to people. If any kind of malfunction is not included in<br />
this manual, contact the local After Sales Service immediately.<br />
The device must be installed in such a way that maintenance and/or repair operations<br />
are possible.<br />
The warranty of the device does not in any case cover costs owing to ladder trucks,<br />
lifts or other lifting systems that may be required in order to carry out the interventions<br />
under guarantee. AERMEC S.p.A. declines all liability for any damage due to<br />
improper use of the machine, or the partial or superfi cial reading of the information<br />
contained in this manual.<br />
4900575_01 / Ver - 4.30<br />
GB<br />
33
The command panel of the unit allows<br />
the rapid setting of the working parameters<br />
of the machine, and their visualisation.<br />
The display consists of 4<br />
fi gures and various LEDs for indicating<br />
the type of operational mode, the visualisation<br />
of the parameters set and of any<br />
34<br />
GB 4900575_01 / Ver - 4.30<br />
Characteristics of the regulation<br />
alarms triggered. The card stores all the<br />
default settings and any modifi cations.<br />
With the installation of the PR3 remote<br />
panel accessory, it is possible to control<br />
the <strong>switch</strong>ing on and off from a distance,<br />
as well as the setting of the operational<br />
mode (cooling-heating), and the visua-<br />
User interface<br />
Contents Functions<br />
A Panel on the machine<br />
B Chiller / Heat pump<br />
C Moducontrol<br />
D PR3 remote panel<br />
E Internal connection between moducontrol and panel<br />
(already wired in the factory)<br />
F Connection between the unit and PR3, with a maximum length of 150 metres<br />
(wiring to be carried out by the installer)<br />
lisation of the alarm summary. After the<br />
absence of voltage for any period of<br />
time, the unit is able to start up again<br />
automatically, maintaining the original<br />
settings.
String - index Meaning of parameter<br />
1 - StF Cooling setpoint<br />
2 - bnF Cooling band<br />
5 - CSt Setpoint correction<br />
6 - SF1 Cooling setpoint 1<br />
7 - tF1 Outside air temperature 1<br />
8 - SF2 Cooling setpoint 2<br />
9 - tF2 Outside air temperature 2 (cooling)<br />
String - index Meaning of parameter<br />
0 - SrA Anti-freeze electric heater setpoint<br />
1 - brA Anti-freeze electric heater band<br />
USER MENU default settings<br />
USER menu - (Password 000)<br />
String StF bnF CSt (1) SF1 tF1 SF2 tF2<br />
Index 1 2 5 6 7 8 9<br />
WRL 7 5 0 12 18 7 30<br />
(1) If this is the ambient air probe (accessory) the value should be set to (1);<br />
ELECTRIC HEATER default settings<br />
String<br />
ELECTRIC HEATER menu - (Password 001)<br />
SrA brA<br />
Index 0 1<br />
WRL 4 1<br />
4900575_01 / Ver - 4.30<br />
GB<br />
35
36<br />
INSTALLER MENU default settings<br />
INSTALLER menu - (Passwoerd 030)<br />
String iu oFF SAF int dEr AG FrP PAN SCr Ad1 Bd1 AS1<br />
Index 0 1 3 4 5 6 7 9 I J L N<br />
WRL 0 4 5 600 0 3 3 0 1 1 1 0<br />
String - index Meaning of parameter<br />
0 - iu Regulation Input/Output<br />
1 - oFF Cooling force-off<br />
3 - SAF Reset band of force-off<br />
4 - int Integral time<br />
5 - dEr Derivative time<br />
6 - AG Anti-freeze<br />
7 - FrP Frost protection<br />
9 - PAN Remote panel configuration<br />
I - SCr Screensaver configuration<br />
J - Ad1 Modbus supervisor address<br />
L - Bd1 Supervisor baud rate<br />
N - AS1 Supervisor write enabled<br />
INSTALLER MENU 2 default settings<br />
Index 0<br />
INSTALLER menu 2 - (Passwoerd 031)<br />
1 2 3<br />
WRL 6 0 0 0<br />
Index Meaning of parameter<br />
0 Delta temperature for reactivating the compressor after FORCE OFF intervention<br />
1 ---<br />
2 ---<br />
3 Off pump thermostat<br />
GB 4900575_01 / Ver - 4.30
User interface and parameter visualisations<br />
The main user interface is represented by a LED panel with<br />
capacitive keyboard (touch keys); the visualisations are arranged<br />
in three menus:<br />
READINGS menu (key (C) Fig.1)<br />
Containing the information (visualisation mode only) relating<br />
to current unit functioning.<br />
SETTINGS menu (key (D) Fig.1)<br />
Containing all the parameters that the user can modify according<br />
to system requirements; these parameters are grouped<br />
together in various sub-menus:<br />
- USER menu (Password 000);<br />
- INSTALLER menu (Password 030);<br />
- ELECTRIC HEATER menu (Password 001);<br />
ALARM log (key (E) Fig.1)<br />
The alarm log records unit error and/or malfunctioning conditions<br />
(whether alarms or pre-alarms).<br />
During normal functioning, the monitor visualises the last parameter<br />
modifi ed; if no other keys are pressed for at least 5<br />
minutes, the monitor activates the screensaver mode (this<br />
function can be set via the parameter (i) in the INSTALLER<br />
menu).<br />
To display parameters and/or readings, 4 fi gures are used;<br />
the fi rst is the indicator i.e. a number allowing the user to<br />
know which parameter or reading he is visualising (Fig.3).<br />
Fig.3<br />
A B<br />
User interface (Fig.3)<br />
A Parameter index<br />
B Parameter abbreviation / Parameter value<br />
Fig.1<br />
User interface (Fig.1)<br />
A Monitor visualisation<br />
B "ON" key<br />
C Key to access readings menu<br />
D Button key to access set menu<br />
E Button key to access alarm record<br />
F Keys to scroll/increase-decrease parameters<br />
Fig.2<br />
1<br />
5 6<br />
dj<br />
7 8 9<br />
SET<br />
2 3<br />
Monitor visualisation (Fig.2)<br />
1 SETTINGS menu currently visualised<br />
2 ALARMS menu currently visualised<br />
3 Parameter index<br />
4 Parameter abbreviation / Parameter value<br />
5 Season indicator SUMMER<br />
6 Season indicator WINTER<br />
7 Indicator of current alarm status<br />
8 Indicator of current compressor operational mode (this<br />
indication can have different flashing frequencies).<br />
9 Indicator of stop in progress<br />
4<br />
4900575_01 / Ver - 4.30<br />
GB<br />
37
To access the readings menu, press<br />
the key in (Fig.4); once the readings<br />
menu has been accessed, the monitor<br />
will display the readings index and a<br />
3-character string that identifi es it; the<br />
string will be displayed for one second,<br />
after which it is replaced by the value<br />
38<br />
List of indicators and relative readings in the USER MENU (no password)<br />
GB 4900575_01 / Ver - 4.30<br />
Readings menu<br />
of the reading itself. To move on to the<br />
next reading, press the key in (Fig.5); to<br />
go back to the previous one, press the<br />
key in (Fig.6). Every time you pass from<br />
one reading to another, apart from the<br />
change in the index value you will also<br />
see (for one second) the string identi-<br />
Fig.4 Fig.5 Fig.6<br />
Index - String<br />
Water output temperature<br />
Water input temperature<br />
Condenser inlet temperature<br />
Force gas temperature<br />
Outside air temperature (1)<br />
Delivery pressure (2)<br />
Condenser outlet temperature<br />
Thermostat<br />
Safety band on force-off<br />
CP times<br />
Hours of operation (thousands)<br />
Hours of operation (units)<br />
Index - String<br />
fying the current reading (it is possible,<br />
however, to identify any reading via the<br />
value of the indicator, comparing it with<br />
the table below).<br />
Compressor pickup current (thousands)<br />
Compressor pickup current (units)<br />
Software release<br />
Minor software releases<br />
Setting currently in use<br />
Condensation pressure set<br />
Condensation pressure differential<br />
Operating hours<br />
COMPRESSOR 1 (units)<br />
Operating hours<br />
COMPRESSOR 2 (unit) (3)<br />
Compressor pickup current<br />
COMPRESSOR 1 (thousands)<br />
Compressor pickup current<br />
COMPRESSOR 2 (thousands) (3)<br />
Power fraction (4)<br />
(1) This value is displayed only if the ambient air probe is installed if this accessory is not present, three dashes are displayed instead of the temperature<br />
value;<br />
(2) This value is displayed only if the high pressure transducer is installed; if this accessory is not present, three dashes are displayed instead of the<br />
pressure value;<br />
(3) Visible parameters on WRL100-140-160 models only
To access the USER menu, press the<br />
key in (Fig.7). Once the key has been<br />
pressed, you must insert the password<br />
to access the various menus; to access<br />
the user menu, the password is 000 (displayed<br />
by default). To modify the value<br />
of the passwords, use the arrow keys.<br />
When you have inserted the correct<br />
USER menu<br />
password, press the key in (Fig.7). The<br />
monitor will show the index of the USER<br />
parameter and a 3-character string that<br />
identifi es it; the string will be displayed<br />
for one second, after which it is replaced<br />
by the value of the parameter itself.<br />
To move on to the next parameter, use<br />
the arrow keys (Fig.8). To modify a pa-<br />
Fig.7 Fig.8<br />
rameter, just select it, press the key in<br />
(Fig.7), modify the assigned value using<br />
the arrow keys in (Fig.8), and confi rm<br />
the modifi cation by pressing the key in<br />
(Fig.7) again.<br />
Setting operational parameters (user level)<br />
Index - String<br />
Index - String<br />
PASSWORD = 000<br />
MIN<br />
value<br />
MAX<br />
value<br />
Setting of cooling temperature<br />
Parameter function<br />
-20°C 26°C This parameter indicates the value of the work setting active in cooling mode.<br />
MIN<br />
value<br />
MAX<br />
value<br />
1°C 20°C<br />
Setting of proportional cooling band<br />
Parameter function<br />
This parameter indicates the proportional band applied to the cooling set; this band<br />
produces the optimised management of the compressor, only <strong>switch</strong>ing it on if the inlet/<br />
outlet water temperature (depending on the type of control set by parameter (0) in the<br />
installer menu) is greater than the cooling work set (parameter (1) user menu) plus the<br />
value of this parameter.<br />
4900575_01 / Ver - 4.30<br />
GB<br />
39
40<br />
Index - String<br />
Index - String<br />
Index - String<br />
Index - String<br />
Index - String<br />
Settings made on the basis of outside temperature (with additional air probe)<br />
MIN<br />
value<br />
MAX<br />
value<br />
0 3<br />
MIN<br />
value<br />
MAX<br />
value<br />
-20°C 26°C<br />
MIN<br />
value<br />
MAX<br />
value<br />
-40°C 50°C<br />
MIN<br />
value<br />
MAX<br />
value<br />
-20°C 26°C<br />
MIN<br />
value<br />
MAX<br />
value<br />
-40°C 50°C<br />
GB 4900575_01 / Ver - 4.30<br />
Parameter function<br />
This setting activates the algorithm of compensation of the work setting:<br />
Value (0) = function is not active;<br />
Value (1) = function is active;<br />
(°C)<br />
SET SF1(F)<br />
SF2<br />
SET (H)<br />
SET TF1 (G) SET TF2(I)<br />
Setting cooling temperature setpoint 1<br />
(°C)<br />
Parameter function<br />
This parameter indicates the maximum value of the cooling setting, corresponding with<br />
the minimum outside air temperature (index (7) user menu). This parameter is only visible<br />
if the compensation function has been activated (index (5) user menu).<br />
Setting the outside air temperature 1<br />
Parameter function<br />
This parameter indicates the minimum outside air temperature taken into consideration<br />
for cooling compensation. This parameter is only visible if the compensation function has<br />
been activated (index (5) user menu).<br />
Setting cooling temperature setpoint 2<br />
Parameter function<br />
This parameter indicates the minimum value of the cooling setting, corresponding with<br />
the maximum outside air temperature (index (9) user menu). This parameter is only visible<br />
if the compensation function has been activated (index (5) user menu).<br />
Setting the outside air temperature 2<br />
Parameter function<br />
In cooling mode, the work setting is<br />
calculated automatically on the basis of<br />
the outside temperature, following the<br />
logic highlighted in the diagram.<br />
SF1: index (6) user menu;<br />
SF2: index (8) user menu;<br />
TF1: index (7) user menu;<br />
TF2: index (9) user menu;<br />
This parameter indicates the maximum outside air temperature taken into consideration<br />
for cooling compensation. This parameter is only visible if the compensation function has<br />
been activated (index (5) user menu).
To access the INSTALLER menu, press<br />
the key in (Fig.9). Once the key has been<br />
pressed, you must insert the password<br />
to access the various menus; to access<br />
the user menu, the password is 030.<br />
To modify the value of the passwords,<br />
use the arrow keys. When you have inserted<br />
the correct password, press the<br />
ATTENZIONE: la modifi ca dei seguenti<br />
parametri è di esclusiva competenza<br />
del personale qualifi cato addetto<br />
all’installazione dell’unità.<br />
INSTALLER menu<br />
key in (Fig.9). The monitor will show the<br />
index of the INSTALLER parameter and<br />
a 3-character string that identifi es it; the<br />
string will be displayed for one second,<br />
after which it is replaced by the value<br />
of the parameter itself. To move on to<br />
the next parameter, use the arrow keys<br />
(Fig.10). To modify a parameter, just se-<br />
Fig.9 Fig.10<br />
lect it, press the key in (Fig.9), modify<br />
the assigned value using the arrow keys<br />
in (Fig.10), and confi rm the modifi cation<br />
by pressing the key in (Fig.9) again.<br />
Setting operational parameters (installer level)<br />
Index - String<br />
Index - String<br />
Index - String<br />
PASSWORD = 030<br />
MIN<br />
value<br />
MAX<br />
value<br />
0 2<br />
MIN<br />
value<br />
MAX<br />
value<br />
-25°C 25°C<br />
MIN<br />
value<br />
MAX<br />
value<br />
0.5°C 20°C<br />
Setting of input and output regulation<br />
Parameter function<br />
The machine adjustment will depend on the value of this parameter:<br />
• if 0, the machine adjustment is based on the output temperature;<br />
• if 1, the machine adjustment is based on the input temperature;<br />
• if 2, the machine adjustment is based on the temperature of the remote probe,<br />
as read on the DHW panel (in the event of a fault on the remote probe, the machine<br />
adjustment is based on the built-in probe, signalling this fact via alarm code 157).<br />
If the production of hot domestic water is activated, the adjustment is automatically forced<br />
on the water output temperature, regardless of the value of this parameter.<br />
Setting cooling FORCE-OFF<br />
Parameter function<br />
The units check the working temperature (input or output), to which a safety threshold is<br />
connected, and beyond which the compressor is <strong>switch</strong>ed off immediately and automatically;<br />
this threshold is called FORCE-OFF.<br />
Setting the safety threshold<br />
Parameter function<br />
Temperature threshold above the force-off, which reactivates the start-up of the compressor<br />
after the <strong>switch</strong>ing off for force-off.<br />
4900575_01 / Ver - 4.30<br />
GB<br />
41
42<br />
Index - String<br />
Index - String<br />
Index - String<br />
Index - String<br />
Index - String<br />
MIN<br />
value<br />
0<br />
seconds<br />
MIN<br />
value<br />
0<br />
seconds<br />
MIN<br />
value<br />
MAX<br />
value<br />
999<br />
seconds<br />
MAX<br />
value<br />
120<br />
seconds<br />
MAX<br />
value<br />
-50°C 20°C<br />
MIN<br />
value<br />
MAX<br />
value<br />
0 4<br />
MIN<br />
value<br />
MAX<br />
value<br />
0 3<br />
GB 4900575_01 / Ver - 4.30<br />
Setting integral time<br />
Parameter function<br />
The units possess an advanced logic for controlling the processed water temperature;<br />
the complete check prevents the system arriving at a point of equilibrium at a higher or<br />
lower temperature compared with the one set in the work setting. Remember that an<br />
increase in the integration time weakens the effect of the integral control.<br />
Setting derivation time<br />
Parameter function<br />
Time within which the input water temperature is checked to estimate the load on the<br />
system; if the band on the setting value is exceeded within this time, the unit will be activated.<br />
Setting the anti-freeze threshold<br />
Parameter function<br />
In the units it is possible to set a threshold for the anti-freeze alarm; this value specifies<br />
at what temperature the anti-freeze alarm is activated. Remember that, to modify the<br />
anti-freeze threshold parameter, the corresponding dip-<strong>switch</strong> must be activated (see the<br />
dip-<strong>switch</strong> configuration table).<br />
Setting frost protection<br />
Parameter function<br />
In the units, it is possible to set a safety control on the water output temperature; on the basis of the value assigned<br />
to this parameter, the anti-freeze electric heater is managed as follows:<br />
• value 0, anti-freeze electric heater absent;<br />
• value 1, anti-freeze electric heater installed and working only with machine in heat or cool mode;<br />
• value 2, anti-freeze electric heater installed and working also in standby, but <strong>switch</strong>ing on the pump;<br />
• value 3, anti-freeze electric heater working in standby without the pump being activated;<br />
• value 4, with external air temperature less than 3°C, the pump is activated for 2 minutes every 30, to monitor<br />
the temperature of the water throughout the system.<br />
Panel control configuration<br />
Parameter function<br />
This setting configures the type of control applicable to the units; depending on the value<br />
decided for this setting, the controls on the functioning mode (HEAT/COOL) and the unit<br />
on/off command will be managed in the following way:<br />
Set value 0:<br />
• Setting functioning mode = set parameter 0<br />
• ON/OFF control = from the panel on the machine<br />
Set value 1:<br />
• Setting functioning mode = set parameter 0<br />
• ON/OFF control = from the remote panel<br />
Set value 2:<br />
• Setting functioning mode = set from remote contact<br />
• ON/OFF control = from the panel on the machine<br />
Set value 3:<br />
• Setting functioning mode = set from remote contact<br />
• ON/OFF control = from the remote contact
Index - String<br />
Index - String<br />
Index - String<br />
Index - String<br />
MIN<br />
value<br />
MAX<br />
value<br />
Screensaver configuration<br />
Parameter function<br />
0 2 This parameter indicates the configuration of the screensaver:<br />
• value 0, screensaver disabled;<br />
• value 1, screensaver with visualisation of the dashes (to be used with the control<br />
panels with software prior to version 1.3);<br />
• value 2, screensaver without visualisation of the dashes (to be used with the control<br />
panels with software from version 1.3 onwards).<br />
MIN<br />
value<br />
MAX<br />
value<br />
Modbus supervisor address<br />
Parameter function<br />
0 999 This parameter indicates the Modbus address assigned to the supervisor; this address<br />
will be used in the communication between supervisor and Moducontrol.<br />
MIN<br />
value<br />
MAX<br />
value<br />
Supervisor baud rate<br />
Parameter function<br />
0 2 This parameter indicates the speed of communication between supervisor and<br />
Moducontrol; this speed is set on the basis of the value selected for this parameter:<br />
0 = 9600 bps<br />
1 = 19200 bps<br />
2 = 38400 bps<br />
MIN<br />
value<br />
MAX<br />
value<br />
Supervisor write enabled<br />
Parameter function<br />
0 1 This parameter enables the write commands for the supervisor; this enablement is set<br />
on the basis of the value selected for this parameter:<br />
0 = write command disabled<br />
1 = write command enabled<br />
Remember that the read commands are always active.<br />
4900575_01 / Ver - 4.30<br />
GB<br />
43
44<br />
Index - String<br />
MIN<br />
value<br />
MAX<br />
value<br />
0 1<br />
GB 4900575_01 / Ver - 4.30<br />
INSTALLER 2 menu<br />
To access the INSTALLER_2 menu, follow the same procedure described for the INSTALLER menu; the only difference<br />
is the value of the password, which is 31.<br />
WARNING The following parameters<br />
must only be modifi ed by qualifi ed<br />
personnel authorised to install the<br />
unit.<br />
Setting operational parameters (installer level)<br />
Index - String<br />
PASSWORD = 031<br />
MIN<br />
value<br />
Threshold for reactivation after shutdown force off<br />
MAX<br />
value<br />
0 °C 30 °C<br />
Fig.9a Fig.10a<br />
Thermostat pump <strong>switch</strong>-off<br />
Parameter function<br />
If the parameter value rin = 4 (parameter 8 of the Installer menu), then this is a probe<br />
storage system, this parameter indicates how much lower the threshold of force off so<br />
as to prevent the compressor is reactivated after the intervention of ForceOff dynamic<br />
extinguished soon after.<br />
Parameter function<br />
0 = the pump continues to function when the set point temperature is reached. 1 = the<br />
pump <strong>switch</strong>es off when the set point temperature is reached (when this option is selected,<br />
the adjustment is automatically activated on the basis of the input temperature).<br />
This parameter is only visible with the adjustment on the basis of the input temperature<br />
(parameter (0) =1 or 2).
To access the ELECTRIC HEATER menu,<br />
press the key in (Fig.14). Once the key<br />
has been pressed, you must insert the<br />
password to access the various menus;<br />
to access the user menu, the password<br />
is 001. To modify the value of the passwords,<br />
use the arrow keys. When you<br />
have inserted the correct password,<br />
WARNING The following parameters<br />
must only be modifi ed by qualifi ed<br />
personnel authorised to install the<br />
unit.<br />
PASSWORD = 001<br />
ELECTRIC HEATER menu<br />
press the key in (Fig.14). The monitor will<br />
show the index of the ELECTRIC HEA-<br />
TER parameter and a 3-character string<br />
that identifi es it; the string will be displayed<br />
for one second, after which it is<br />
replaced by the value of the parameter<br />
itself. To move on to the next parameter,<br />
use the arrow keys (Fig.15). To modify a<br />
Fig.14 Fig.15<br />
parameter, just select it, press the key<br />
in (Fig.14), modify the assigned value<br />
using the arrow keys in (Fig.15), and<br />
confi rm the modifi cation by pressing the<br />
key in (Fig.14) again.<br />
Setting operational parameters (electric heater level)<br />
Index - String<br />
Indice - stringa<br />
MIN<br />
value<br />
MAX<br />
value<br />
-20°C 50°C<br />
Valore<br />
MIN<br />
Valore<br />
MAX<br />
0,3 °C 10 °C<br />
Setting anti-freeze electric heater setpoints<br />
Parameter function<br />
The units offer the possibility to set a threshold for the activation of the anti-freeze electric<br />
heater; if the temperature read by one of the two water sensors (input or output,<br />
depending on the type of check enabled) reaches the value set in this parameter, the antifreeze<br />
electric heater is activated.<br />
Impostazione banda resistenza antigelo<br />
Funzione parametro<br />
Le unità prevedono la possibilità di impostare una soglia per l’attivazione della resistenza<br />
antigelo; se la temperatura letta da una delle due sonde acqua (ingresso o uscita, in base<br />
al tipo di controllo abilitato) raggiunge il valore impostato in questo parametro, la resistenza<br />
antigelo viene attivata.<br />
4900575_01 / Ver - 4.30<br />
GB<br />
45
46<br />
Apart from the parameters that can be<br />
inserted from the panel, the units are<br />
fi tted with a series of dip-<strong>switch</strong>es for<br />
managing some options and functions<br />
of the machine.<br />
Remember that some of the options that<br />
can be managed from the panel are<br />
bound to a specifi c setting of some dip<strong>switch</strong>es.<br />
Unit<br />
Table of DIP-SWITCH configuration<br />
GB 4900575_01 / Ver - 4.30<br />
<strong>Dip</strong>-<strong>switch</strong> (B)<br />
Default setting of MODUCONTROL DIP-SWITCH<br />
<strong>Dip</strong>-<strong>switch</strong> (A)<br />
DIP-SWITCH (A) DIP-SWITCH (B)<br />
1 2 3 4 5 6 7 8 9 10 11 12 1 2<br />
WRL OFF OFF OFF OFF ON OFF (*) OFF OFF OFF (**) OFF OFF OFF<br />
(*) The value of this DIP-SWITCH depends on the presence or absence of the high pressure transducer (TP2/TP3)<br />
- If the unit includes the high pressure transducer, DIP 7 is set to ON;<br />
- If the unit does not include the high pressure transducer, DIP 7 is set to OFF<br />
(**)<br />
ON = WRL only cooling (WRL °);<br />
OFF = WRL evaportator less (WRL E);
<strong>Dip</strong>-<strong>switch</strong> No. dip Status Function<br />
A<br />
<strong>Dip</strong>-<strong>switch</strong><br />
B<br />
1<br />
2<br />
3<br />
4<br />
5<br />
6<br />
7<br />
8<br />
9<br />
10<br />
11<br />
12<br />
ON Factory settings<br />
OFF Factory settings<br />
ON Defrosting only by cycle reversal<br />
OFF Defrosting by hot gas injection<br />
ON Glycol water: anti-freeze setting can be modified<br />
OFF Anti-freeze setting (parameter B) blocked<br />
ON Output control deactivated<br />
OFF Output control activated<br />
ON Safety capacity controls deactivated<br />
OFF Safety capacity controls activated<br />
ON Algorithm for check of low water content deactivated<br />
OFF Algorithm for check of low water content activated<br />
ON Condensation pressure control device present<br />
OFF Condensation pressure control device absent<br />
ON Factory settings<br />
OFF Factory settings<br />
ON Configuration of the card for inverter unit<br />
OFF Configuration of the card for ON/OFF chiller unit<br />
ON Configuration of the card for condenser unit<br />
OFF Configuration of the card for chiller unit<br />
ON Factory settings<br />
OFF Factory settings<br />
ON Not used<br />
OFF Not used<br />
<strong>Dip</strong> combinations Function<br />
DIP 1 DIP 2<br />
OFF OFF Factory settings<br />
ON OFF Factory settings<br />
ON ON Factory settings<br />
OFF ON Factory settings<br />
4900575_01 / Ver - 4.30<br />
GB<br />
47
The Modu_control card allows an interface<br />
with a centralised system via a special<br />
serial expansion card based on the<br />
RS485 electric standard and using the<br />
Modbus RTU standard protocol.<br />
The Modu_Control card is always the<br />
48<br />
MODBUS commands<br />
Serial communication protocol<br />
GB 4900575_01 / Ver - 4.30<br />
slave of the communication.<br />
To enable communication from a supervision<br />
system to the Moducontrol card, you<br />
must set the following parameters:<br />
Parametro J - Ad1 (Indirizzo modbus<br />
del supervisore);<br />
The Modu_Control card manages (towards the BMS/VMF supervisor) both<br />
the Register values (whole/analogue) and the Coil values (digital). The<br />
commands that can be used to read/write these values are:<br />
cmd<br />
Codici MODBUS utilizzati<br />
descrizione<br />
0x01 Read Coil Status<br />
0x03 Read Holding Registers<br />
0x05 Force Single Coil<br />
0x06 Preset Single Register<br />
0x0F Preset Multiple Coils<br />
0x10 Preset Multiple Registers<br />
ELENCO DIGITALI (COIL):<br />
COMANDI DIGITALI DISPONIBILI<br />
Read Coil Status<br />
Force Single Coil<br />
Force Multiple Coils<br />
To be able to write the COIL parameters on<br />
the Modu_Control card, you must enable the<br />
supervision commands by setting the parameter<br />
parameter (N) = 1 of the installer menu<br />
(password=30) of the panel on the machine.<br />
ADDRESS DESCRIPTION<br />
0 Standby/On command (toggle) 0=OFF 1=ON<br />
1 Operation mode command (toggle) 0=COOL 1=HEAT<br />
2 Domestic water remote command 0=Normal, 1=Domestic<br />
3 Enable remote thermostat 0=Disabled, 1=Enabled<br />
4 Alarm reset command 1=Alarm reset<br />
5 Compressor1 status 0=OFF 1=ON<br />
6 Compressor2 status 0=OFF 1=ON<br />
7 Boiler/electric heater status 0=OFF 1=ON<br />
8 Hot domestic water production status 0=not active 1=active<br />
9 Domestic water ID status 0=ID closed – 1=ID open<br />
10 Remote ON_OFF ID status 0=ID closed – 1=ID open<br />
11 Season ID status 0=ID closed (cool), 1=ID open (heat)<br />
12 Room thermostat ID status 0=ID closed – 1=ID open<br />
13 Alarm summary<br />
14 Pre-alarm summary<br />
15 Compressor thermomagnetic <strong>switch</strong> pre-alarm<br />
16 Fan thermomagnetic <strong>switch</strong> pre-alarm<br />
Parametro L - Bd1 (Baudrate supervisore);<br />
It is also necessary to ensure compliance<br />
with the following characteristics:<br />
Stop bits: 2;<br />
Parity: NONE;<br />
!
ADDRESS DESCRIPTION<br />
17 High pressure <strong>switch</strong> pre-alarm<br />
18 Flow <strong>switch</strong>/differential pressure <strong>switch</strong> (water) pre-alarm<br />
19 Low pressure <strong>switch</strong> pre-alarm<br />
20 Pre-alarm for absence of NTC1 input probe (SIW)<br />
21 Pre-alarm for absence of NTC2 input probe (SUW)<br />
22 Anti-freeze pre-alarm<br />
23 Pre-alarm for absence of NTC4 input probe (SGP)<br />
24 Pre-alarm for high discharge gas temperature<br />
25 Pre-alarm for absence of compressor delivery transducer<br />
26 High pressure pre-alarm<br />
27 Pre-alarm for absence of NTC3 input probe (SS)<br />
28 Pre-alarm for absence of suction transducer<br />
29 Low pressure pre-alarm<br />
30 Low output pre-alarm<br />
31 Pump thermomagnetic <strong>switch</strong> pre-alarm<br />
32 High pressure capacity control pre-alarm<br />
33 Low pressure capacity control pre-alarm<br />
34 Discharge temperature capacity control pre-alarm<br />
35 Bemf error pre-alarm (longertek inverter)<br />
36 Pre-alarm for internal communication error (longertek)<br />
37 Overcurrent pre-alarm (longertek)<br />
38 Pre-alarm for absence of load (longertek)<br />
39 Pre-alarm for incorrect voltage (longertek)<br />
40 Pre-alarm for start-up error (longertek)<br />
41 Pre-alarm for IPM protection error (longertek)<br />
42 Pre-alarm for EEPROM error (longertek)<br />
43 Pre-alarm for compressor stalling (longertek)<br />
44 Pre-alarm for absence of communication (longertek)<br />
45 PFC module pre-alarm (longertek)<br />
46 Pre-alarm for cooling over-temperature (APY)<br />
47 Pre-alarm for overcurrent in acceleration (APY)<br />
48 Pre-alarm for overcurrent at steady speed (APY)<br />
49 Pre-alarm for overcurrent in deceleration (APY)<br />
50 Pre-alarm for undervoltage on BUS DC (APY)<br />
51 Pre-alarm for overvoltage on BUS DC (APY)<br />
52 NOT USED<br />
53 NOT USED<br />
54 Pre-alarm for converter PFC fault (APY)<br />
55 Pre-alarm for overcurrent in acceleration (APY)<br />
56 Overload pre-alarm (APY)<br />
57 Pre-alarm for overcurrent at steady speed (APY)<br />
58 Pre-alarm for overcurrent in deceleration (APY)<br />
59 Pre-alarm for incorrectly connected compressor (APY)<br />
60 Pre-alarm for absence of communication (APY)<br />
61 Pre-alarm for cooling fin temperature sensor error (APY)<br />
62 NOT USED<br />
63 NOT USED<br />
4900575_01 / Ver - 4.30<br />
GB<br />
49
50<br />
ADDRESS DESCRIPTION<br />
64 NOT USED<br />
65 Fault condition pre-alarm (APY)<br />
66 NOT USED<br />
67 NOT USED<br />
68 Reverse cycle valve pre-alarm<br />
69 Pre-alarm for high water inlet temperature<br />
70 Pre-alarm for reverse cycle due to high discharge gas temperature<br />
71 NOT USED<br />
72 NOT USED<br />
73 NOT USED<br />
74 NOT USED<br />
75 NOT USED<br />
76 NOT USED<br />
77 NOT USED<br />
78 NOT USED<br />
79 NOT USED<br />
80 NOT USED<br />
81 NOT USED<br />
82 NOT USED<br />
83 NOT USED<br />
84 NOT USED<br />
85 Compressor thermomagnetic <strong>switch</strong> alarm<br />
86 Fan thermomagnetic <strong>switch</strong> alarm<br />
87 High pressure <strong>switch</strong> alarm<br />
88 Flow <strong>switch</strong>/differential pressure <strong>switch</strong> (water) alarm<br />
89 Low pressure <strong>switch</strong> alarm<br />
90 Alarm for absence of NTC1 input probe (SIW)<br />
91 Alarm for absence of NTC2 input probe (SUW)<br />
92 Anti-freeze alarm<br />
93 Alarm for absence of NTC4 input probe (SGP)<br />
94 Alarm for high discharge gas temperature<br />
95 Alarm for absence of compressor delivery transducer<br />
96 High pressure alarm<br />
97 Alarm for absence of NTC3 input probe (SS)<br />
98 Alarm for absence of suction transducer<br />
99 Low pressure alarm<br />
100 Low output alarm<br />
101 Pump thermomagnetic <strong>switch</strong> alarm<br />
102 High pressure capacity control alarm<br />
103 Low pressure capacity control alarm<br />
104 Discharge temperature capacity control alarm<br />
105 Bemf error alarm (longertek inverter)<br />
106 Alarm for internal communication error (longertek)<br />
107 Overcurrent alarm (longertek)<br />
108 Alarm for absence of load (longertek)<br />
109 Alarm for incorrect voltage (longertek)<br />
110 Alarm for start-up error (longertek)<br />
GB 4900575_01 / Ver - 4.30
ADDRESS DESCRIPTION<br />
111 Alarm for IPM protection error (longertek)<br />
112 Alarm for EEPROM error (longertek)<br />
113 Alarm for compressor stalling (longertek)<br />
114 Alarm for absence of communication (longertek)<br />
115 PFC module alarm (longertek)<br />
116 Alarm for cooling over-temperature (APY)<br />
117 Alarm for overcurrent in acceleration (APY)<br />
118 Alarm for overcurrent at steady speed (APY)<br />
119 Alarm for overcurrent in deceleration (APY)<br />
120 Alarm for undervoltage on BUS DC (APY)<br />
121 Overvoltage alarm (APY)<br />
122 NOT USED<br />
123 NOT USED<br />
124 Alarm for converter PFC fault (APY)<br />
125 Alarm for overcurrent in acceleration (APY)<br />
126 Overload alarm (APY)<br />
127 Alarm for overcurrent at steady speed (APY)<br />
128 Alarm for overcurrent in deceleration (APY)<br />
129 Alarm for incorrectly connected compressor (APY)<br />
130 Alarm for absence of communication (APY)<br />
131 Alarm for cooling fin temperature sensor error (APY)<br />
132 NOT USED<br />
133 NOT USED<br />
134 NOT USED<br />
135 Fault condition alarm (APY)<br />
136 NOT USED<br />
137 NOT USED<br />
138 Alarm for faulty reverse cycle valve<br />
139 Alarm for high water inlet temperature<br />
140 Alarm for reverse cycle due to high discharge gas temperature<br />
141 (Code 57) Alarm remote reading of the probe within DHW<br />
142 (Code 58) Alarm reading of temperature sensor outside air<br />
143 NOT USED<br />
144 NOT USED<br />
145 NOT USED<br />
146 NOT USED<br />
147 NOT USED<br />
148 NOT USED<br />
149 NOT USED<br />
150 NOT USED<br />
151 NOT USED<br />
152 NOT USED<br />
153 NOT USED<br />
154 NOT USED<br />
4900575_01 / Ver - 4.30<br />
GB<br />
51
52<br />
ELENCO READ REGISTER:<br />
COMANDI LETTURA DISPONIBILI<br />
Read Holding Register<br />
ADDRESS DESCRIPTION<br />
0 Type of machine: 0 – ANL,1 – ANLI, 2 – ANR/ANF/SRP, 3 – ANL-C<br />
1 Type of inverter machine 0=longertek 1=APY<br />
2 NTC1 input (TUA) (SIW)<br />
3 NTC2 input (TIA) (SUW)<br />
4 NTC3 input (TSB) (SS)<br />
5 NTC4 input (TGP) (SGP)<br />
6 NTC5 input (TAE) (SAE)<br />
7 High pressure transducer input (AP) (TAP)<br />
8 Low pressure transducer input (BP) (TBP)<br />
9 0-10V dd input<br />
10 Relay digital output status<br />
11 Safety band on force OFF<br />
12 Time until compressor start-up/<strong>switch</strong>-off<br />
13 Hours of primary compressor operation (in thousands)<br />
14 Hours of primary compressor operation<br />
15 Number of peaks made by the compressor (in thousands)<br />
16 Number of peaks made by the compressor<br />
17 Major sw version<br />
18 Minor sw version<br />
19 Machine adjustment setpoint (including corrections)<br />
20 Condensation control pressure setpoint<br />
21 Pressure differential for condensation control<br />
22 Hours of auxiliary compressor operation (in thousands)<br />
23 Hours of auxiliary compressor operation<br />
24 Number of peaks made by the auxiliary compressor (in thousands)<br />
25 Number of peaks made by the auxiliary compressor<br />
26 Power supplied by the machine (chiller ON-OFF) Use frequency (chiller inverter)<br />
27 Compressor pressure drop during suction<br />
28 Power requested from the inverter control<br />
29 <strong>Dip</strong>-<strong>switch</strong> configuration (0x0000 = all OFF - 0x0FF = all ON)<br />
30 ON_OFF command enablement status Season from panel or remote panel<br />
31 Enablement status for room thermostat connected to ID3 input<br />
32 Machine operation status: 0 - Chiller Off, 1 - Chiller On, 2 – Capacity control<br />
injection, 3 – Defrosting for injection, 4 – Defrosting for reverse cycle<br />
33 Electric heater/boiler accessory: 0=absent 1=electric heater 2=boiler<br />
34 Inverter current APY<br />
35 Inverter output voltage APY<br />
36 Inverter BUS voltage APY<br />
37 Inverter cooling fin temperature APY<br />
38 Limit set point hot<br />
GB 4900575_01 / Ver - 4.30
ELENCO WRITE REGISTER:<br />
COMANDI SCRITTURA DISPONIBILI<br />
Preset Single Register<br />
Preset Multiple Registers<br />
ADDRESS DESCRIPTION MIN-MAX LIMITS<br />
39 Cooling setpoint -200 - 260 [°C]<br />
40 Cooling setpoint band 10 - 200 [°C]<br />
41 Heating setpoint 250 - 650 [°C]<br />
42 Heating setpoint band 10 - 200 [°C]<br />
43 Setpoint correction 0 - 3<br />
44 Cooling setpoint 1 -200 - 260 [°C]<br />
45 External AT in cool mode 1 400 - 500 [°C]<br />
46 Cooling setpoint 2 -200 - 260 [°C]<br />
47 External AT in cool mode 2 -400 - 500 [°C]<br />
48 Heating setpoint 1 250 - 650 [°C]<br />
49 External AT in heat mode 1 -400 - 500 [°C]<br />
50 Heating setpoint 2 250 - 650 [°C]<br />
51 External AT in heat mode 2 -400 - 500 [°C]<br />
52 Domestic water setpoint -250 - 650 [°C]<br />
53 Domestic water band 10 - 200 [°C]<br />
54 Power percentage requested from the thermostat 0 - 100 [%]<br />
55 PWD_SET_VMF -32768 - 32767<br />
56 Remote probe DHW -32768 ÷ 32767<br />
LIST OF EXCEPTIONS:<br />
The error codes highlighted by the Modu Control card are shown below:<br />
!<br />
ECCEZIONE DESCRIZIONE<br />
ILLEGAL FUNCTION The requested function code is not managed by the card.<br />
ILLEGAL DATA ADDRESS The data request contains a reference to an address that is<br />
not available on the card.<br />
ILLEGAL DATA VALUE The data write request contains a value that is out of range,<br />
so writing is not allowed.<br />
4900575_01 / Ver - 4.30<br />
GB<br />
53
54<br />
The units have two types of malfunctioning<br />
warning:<br />
• pre-alarm<br />
• alarm<br />
The first type is indicated by the flashing of the<br />
red indicator light on the display; by pressing<br />
the bell key, you can display the alarm list (with<br />
WARNING<br />
The pre-alarms can become alarms if:<br />
• a period of time equal to, or longer than, 60<br />
seconds passes in the pre-alarm condition<br />
Pre-alarm<br />
index<br />
Alarm<br />
index<br />
1 101<br />
GB 4900575_01 / Ver - 4.30<br />
Recapitulatory table of alarms<br />
index and cause shown in the table below). A<br />
pre-alarm remains such for 60 seconds; if the<br />
condition that caused it does not disappear<br />
within this time, it becomes an alarm. The<br />
alarms are visualised in the same way as the<br />
pre-alarms, apart from the fact that the fixed<br />
red indicator light comes on. Before resetting<br />
• the maximum number of pre-alarms in an<br />
hour (five) is exceeded. In this case, each<br />
subsequent pre-alarm will be visualised<br />
directly as an alarm, and as such will cause<br />
Cause Notes<br />
Compressor thermomagnetic<br />
<strong>switch</strong><br />
Fan thermomagnetic <strong>switch</strong><br />
Pump thermomagnetic <strong>switch</strong><br />
2 102 Fan thermomagnetic <strong>switch</strong><br />
3 103 High pressure <strong>switch</strong><br />
4 104<br />
Flow <strong>switch</strong><br />
Water differential pressure<br />
<strong>switch</strong><br />
5 105 Low pressure <strong>switch</strong><br />
the unit, you are advised to contact the After<br />
Sales Assistance. To reset the unit you must<br />
<strong>switch</strong> it off then on again, using the standby<br />
button.<br />
the machine to stop until its cause is eliminated.<br />
This warning appears if the contact of the thermomagnetic <strong>switch</strong><br />
protecting the MTC compressor is opened.<br />
This warning appears if the contact of the thermomagnetic <strong>switch</strong><br />
protecting the MTV fan is opened. This code is displayed only if the<br />
card is used as a replacement for cards with SW up to version 3.6.<br />
This warning does NOT indicate the status of the high pressure<br />
<strong>switch</strong> itself, but of the compressor contactor. The high pressure<br />
<strong>switch</strong> acts directly on the compressor contactor. If the card controls<br />
the <strong>switch</strong>-on of the compressor, and the contactor is not<br />
activated after 3 seconds, this signal appears. This alarm can also<br />
be caused by a defect in the functioning of the transmission system<br />
relay from the compressor contactor to the card (indicated as RAP<br />
in the wiring diagrams). If the contactor is deactivated while the compressor<br />
is functioning, this warning reappears. AP.<br />
This warning appears with the opening of the contact relating to the<br />
flow <strong>switch</strong> or to the differential pressure <strong>switch</strong>. This alarm is not<br />
detected in the first 40 seconds from when the pump is <strong>switch</strong>ed on.<br />
The machine goes into lockout when the maximum number of flow<br />
<strong>switch</strong> interventions allowed is exceeded. If frost protection mode<br />
(and therefore the pump too) is activated in standby, the flow <strong>switch</strong><br />
status is also controlled. FL/PD.<br />
This warning appears with the opening of the contact of the low pressure<br />
<strong>switch</strong> (intake on the compressor) BP.<br />
6 106 No water inlet probe This warning appears when the water inlet probe is disconnected.<br />
7 107 No water outlet probe This warning appears when the water outlet probe is disconnected.<br />
This warning appears when the anti-freeze temperature threshold<br />
(installer menu, parameter (6) default: 3°C) of the outlet water is<br />
8 108 Water freeze<br />
reached. The pre-alarm condition is removed when the outlet water<br />
temperature exceeds the setpoint calculated by the card on the<br />
basis of an internal algorithm; the anti-freeze alarm is suspended (in<br />
heat mode) for 3 seconds from when the compressor is <strong>switch</strong>ed on.<br />
9 109 No force probe This warning appears when the force gas probe is not detected.<br />
This warning appears when the force gas temperature (SGP probe) exce-<br />
10 110 High force gas temperature eds the threshold set in the parameter. The pre-alarm condition is removed<br />
with the factory-set temperature (default 125°C).
11 111<br />
12 112 High pressure<br />
No compressor delivery pressure<br />
transducer<br />
13 113 No defrosting probe<br />
14 114<br />
15 115 Low pressure<br />
16 - Low output<br />
No compressor suction pressure<br />
transducer<br />
17 117 Pump thermomagnetic <strong>switch</strong><br />
18 118 High pressure capacity control<br />
19 119 Low pressure capacity control<br />
20 120<br />
21 121<br />
Discharge temperature<br />
capacity control<br />
Bemf error (chiller inverter) -<br />
error in the detection of the back<br />
emf<br />
This warning appears when the compressor delivery transducer is<br />
not detected and the machine is set in heat pump mode, or the presence<br />
of the DCP is set.<br />
This warning appears when the transducer detects a delivery pressure<br />
greater than the set threshold (default: 40 bar).<br />
The pre-alarm condition is removed with the factory-set pressure<br />
(default: 38 bar).<br />
This warning appears when the defrosting probe is absent and the<br />
machine is set in heat pump mode.<br />
This warning appears when the compressor suction transducer is<br />
absent and the machine is set in heat pump mode.<br />
This warning appears when the compressor delivery transducer<br />
detects a suction pressure lower than the factory-set threshold in<br />
cool mode (default: 4 bar), or in heat mode (default : 2 bar). The prealarm<br />
condition is removed when the suction pressure exceeds the<br />
envisaged intervention threshold (default equal to 2 bar). The low<br />
pressure alarm is suspended in heat mode for 3 seconds from when<br />
the compressor is <strong>switch</strong>ed on; it is permanently suspended during<br />
cycle reverse.<br />
Whenever the machine is powered, the control checks the behaviour<br />
of the compressor once only, via the output control procedure. This<br />
control can be deactivated by means of the dip-<strong>switch</strong>.<br />
This warning appears if the contact of the thermomagnetic <strong>switch</strong><br />
protecting the pump is opened. MTP. This code is displayed only if the<br />
card is used as a replacement for cards with SW up to version 3.6.<br />
This warning appears whenever there is a capacity control due to<br />
the set threshold being reached. The machine goes into lockout<br />
when the maximum number of capacity controls allowed (default 5)<br />
is exceeded. With the inverter machine, it also indicates a capacity<br />
control due to a high compression ratio.<br />
This warning appears whenever there is a low pressure capacity<br />
control. The machine goes into lockout when the maximum number<br />
of capacity controls allowed (default 5) is exceeded.<br />
This warning appears whenever there is a discharge temperature<br />
capacity control. The machine goes into lockout when the maximum<br />
number of capacity controls allowed (default 5) is exceeded.<br />
This error is given by the inverter control card and is linked to compressor<br />
pickup current problems.<br />
22 122 Internal communication error The inverter control card has internal communication problems.<br />
23 123 Overcurrent Excessive current absorption by the compressor.<br />
24 124 No charge<br />
The compressor does not absorb enough current and may operate<br />
empty.<br />
25 125 Incorrect voltage The inverter control card indicates an incorrect BUS voltage.<br />
26 126 Start-up error<br />
The inverter control card indicates the incorrect start-up of the<br />
PMSM motor.<br />
27 127 IPM protection error Error on the IGBT.<br />
28 128 EEPROM error Eeprom error on the inverter control card.<br />
29 129 Compressor stalling<br />
The inverter control card does not respond; it may not be powered,<br />
30 130 No communication<br />
or the serial cable may be disconnected, or the A and B signals may<br />
be inverted.<br />
31 131 PFC module Error in the PFC inverter module.<br />
32 132<br />
Excessive temperature of cooling<br />
blade<br />
33 133 Overcurrent in acceleration Hardware error.<br />
34 134 Overcurrent at constant speed Hardware error.<br />
35 135 Overcurrent in deceleration Hardware error.<br />
36 136 Undervoltage on BUS DC<br />
4900575_01 / Ver - 4.30<br />
GB<br />
55
56<br />
37 137 Overvoltage on BUS DC<br />
40 140<br />
PFC Converter Fault Error in the<br />
PFC module<br />
Software error.<br />
41 141 Overcurrent in acceleration Software error.<br />
42 142 Overload<br />
43 143 Overcurrent at constant speed Software error.<br />
44 144 Overcurrent in deceleration Software error.<br />
45 145<br />
Compressor not connected<br />
correctly<br />
46 146 No communication<br />
47 147<br />
Error in cooling blade<br />
temperature sensor<br />
51 151 Irregular condition. Frequency reduced by overcurrent or overtemperature protection.<br />
54 154 Faulty reverse cycle valve The reverse cycle valve could be faulty or blocked.<br />
The input water temperature has exceeded the value of installer<br />
55 155 Input water high temperature menu parameter (H). There is probably a boiler in the same system.<br />
With the third pre-alarm intervention, the machine goes into lockout.<br />
This pre-alarm indicates the intervention of a defrosting cycle due to<br />
cycle reverse, without respecting the cycle reverse times. The cycle<br />
-- 156<br />
Cycle reverse due to high<br />
temperature of discharge gas.<br />
reverse was prompted by the capacity control threshold being exceeded<br />
due to the high temperature of the discharge gas (default 130°).<br />
This pre-alarm does not cause the compressor to stop, and there is<br />
no maximum number of interventions.<br />
57 157<br />
Read error of the remote probe<br />
of the DHW panel.<br />
This pre-alarm indicates a fault in the remote probe, or a problem<br />
in communication with the DHW panel. The alarm is only active if<br />
parameter (8)=4 in the menu with password = 30.<br />
58 158<br />
Read error of the outside air temperature<br />
probe.<br />
This pre-alarm indicates a fault in the outside air temperature probe<br />
when the DCP is present, or when the machine is a heat pump.<br />
59 159 Condenser INLET water probe fault<br />
60 160<br />
GB 4900575_01 / Ver - 4.30<br />
Condenser OUTLET water probe<br />
fault<br />
WARNING<br />
Remember that the pre-alarms are reset automatically, but the alarms must be reset manually.<br />
From software version 3.9.0, the alarms can be reset by means of the remote ON/OFF contact, if this is enabled.<br />
From the ON position, move to OFF then back to ON within 5 seconds to reset the alarms; a maximum of 3 resets can be made each hour via<br />
the ON/OFF contact.<br />
You must first reset the alarms using the “R” button.<br />
In the event of a lack of voltage, the alarms will be reset.
AERMEC S.p.A.<br />
I-37040 Bevilacqua (VR) Italia – Via Roma, 996<br />
Tel. (+39) 0442 633111<br />
Telefax 0442 93730 – (+39) 0442 93566<br />
www.aermec.com - info@aermec.com<br />
MODUCONTROL<br />
NUMÉRO DE SÉRIE<br />
DÉCLARATION<br />
DE CONFORMITÉ CE<br />
NOM MODUCONTROL<br />
Les signataires de la présente déclarent sous leur entière responsabilité que l'équipement défini<br />
comme suit :<br />
TYPE Carte électronique pour groupe d'eau glacée EAU/EAU, pompe à chaleur<br />
Auquel cette déclaration fait référence, est conforme aux normes harmonisées suivantes :<br />
CEI EN 60730-1 Norme de sécurité<br />
CEI EN 61000-6-1<br />
CEI EN 61000-6-3<br />
CEI EN 61000-6-2<br />
CEI EN 61000-6-4<br />
Immunité et émission électromagnétique pour le milieu résidentiel.<br />
Immunité et émission électromagnétique pour le milieu industriel.<br />
Satisfaisant ainsi aux conditions essentielles des directives suivantes :<br />
- Directive LVD : 2006/95/CE<br />
- Directive Compatibilité électromagnétique 2004/108/CE<br />
Bevilacqua 15/01/2008<br />
Direttore Commerciale<br />
Firma<br />
4900575_01 / Ver - 4.30<br />
FR<br />
57
58<br />
FR 4900575_01 / Ver - 4.30<br />
Table des matières<br />
Précautions et normes de sécurité ................................................................................. 60<br />
Caractéristiques du réglage ............................................................................................ 61<br />
Interface utilisateur ..........................................................................................................61<br />
Réglages par défaut MENU UTILISATEUR ..................................................................... 62<br />
Réglages par défaut RÉSISTANCE ................................................................................. 62<br />
Réglages par défaut MENU INSTALLATEUR .................................................................. 63<br />
Réglages par défaut MENU INSTALLATEUR 2 ............................................................... 63<br />
Affichages de l’interface utilisateur et des ramètres .................................................... 64<br />
IMenu des lectures .......................................................................................................... 65<br />
Menu UTILISATEUR ........................................................................................................ 66<br />
Réglage des paramètres opérationnels (niveau utilisateur) ........................................ 66<br />
Réglage du point de consigne de la température à froid ......................................... 66<br />
Impostazione banda proporzionale a freddo ............................................................ 66<br />
Réglage du choix du point de consigne sur la base de la température extérieure .. 67<br />
Réglage du point de consigne de la température à froid 1 ...................................... 67<br />
Réglage de la température de l’air extérieur 1 .......................................................... 67<br />
Réglage du point de consigne de la température à froid 2 ...................................... 67<br />
Réglage de la température de l’air extérieur 2 .......................................................... 67<br />
Menu INSTALLATEUR ...................................................................................................... 68<br />
Réglage des paramètres opérationnels (niveau installateur) ...................................... 68<br />
Configuration du réglage à l’entrée ou à la sortie ..................................................... 68<br />
Réglage FORCE-OFF à froid ..................................................................................... 68<br />
Réglage du seuil de sécurité ..................................................................................... 68<br />
Réglage du temps intégral ........................................................................................ 69<br />
Réglage du temps de dérivation ............................................................................... 69<br />
Réglage du seuil antigel ............................................................................................ 69<br />
Réglage de la protection antigel ............................................................................... 69<br />
Configuration du contrôle du panneau ...................................................................... 69<br />
Configuration de l’économiseur d’écran ................................................................... 70<br />
Adresse Modbus du superviseur .............................................................................. 70<br />
Débit en bauds du superviseur ................................................................................. 70<br />
Activation en écriture du superviseur ........................................................................ 70
Table des matières<br />
Menu INSTALLATEUR 2 ................................................................................................... 71<br />
Réglage des paramètres opérationnels (niveau installateur) ...................................... 71<br />
Seuil pour la réactivation après Force Shutdown off ................................................. 71<br />
Extinction de la pompe par thermostat ..................................................................... 71<br />
Menu RÉSISTANCE .......................................................................................................... 72<br />
Réglage des paramètres opérationnels (niveau résistance) ........................................ 72<br />
Réglage du point de consigne de la résistance antigel ............................................ 72<br />
Réglage de la bande de la résistance antigel .......................................................... 72<br />
Tableau de configuration des COMMUTATEURS DIP ................................................... 73<br />
Protocole de communication série ................................................................................. 75<br />
LISTE DES NUMÉRIQUES (COIL) : ........................................................................... 75<br />
Commandes MODBUS .............................................................................................. 75<br />
LISTE DES READ REGISTER: .................................................................................... 79<br />
LISTE DES WRITE REGISTER: .................................................................................. 80<br />
LISTE DES EXCEPTIONS: ......................................................................................... 80<br />
Tableau récapitulatif des alarmes ................................................................................... 81<br />
4900575_01 / Ver - 4.30<br />
FR<br />
59
60<br />
Précautions et normes de sécurité<br />
NE PAS mouiller l’emballage NE PAS marcher sur l’emballage Manipuler avec précaution<br />
FR 4900575_01 / Ver - 4.30<br />
Indications sur l'élimination<br />
Attention : ce produit contient des appareillages électriques et électroniques<br />
qui ne peuvent pas être éliminés avec les déchets ménagers<br />
habituels. Il existe des centres de tri sélectif pour ces produits.<br />
Les appareillages électriques et électroniques doivent être traités à part<br />
conformément aux lois en vigueur dans le pays où se trouve l'appareil.<br />
Les piles ou les accumulateurs qui se trouvent dans les appareils doivent<br />
être éliminés à part conformément aux dispositions de la municipalité où<br />
a été installé l'appareil.<br />
Remarques sur les manuels<br />
Symboles de sécurité<br />
Danger : tension<br />
Attention<br />
Danger : organes en<br />
mouvement<br />
Conserver les manuels dans un endroit sec, afi n d’éviter leur détérioration, pendant au<br />
moins 10 ans, pour toute éventuelle consultation future.<br />
Lire attentivement et entièrement toutes les informations contenues dans ce manuel.<br />
Prêter une attention particulière aux normes d’utilisation signalées par les inscriptions<br />
“DANGER” ou “ATTENTION”, car leur non-observation pourrait causer un<br />
dommage à l’appareil et/ou aux personnes et objets. Pour toute anomalie non mentionnée<br />
dans ce manuel, contacter aussitôt le service d'assistance de votre secteur.<br />
Lors de l'installation de l'appareil, il faut prévoir l'espace nécessaire pour les<br />
opérations d'entretien et/ou de réparation.<br />
La garantie de l'appareil ne couvre pas les coûts dérivant de l'utilisation de voitures<br />
avec échelle mécanique, d'échafaudages ou d'autres systèmes de levage employés<br />
pour effectuer des interventions en garantie. AERMEC S.p.A. décline toute responsabilité<br />
pour tout dommage dû à une utilisation impropre de l’appareil et à une lecture<br />
partielle ou superfi cielle des informations contenues dans ce manuel.
Le panneau de commandes de l'unité<br />
permet un Réglage rapide des paramètres<br />
de fonctionnement de l'appareil<br />
et leur affi chage. L'affi cheur est à 4<br />
chiffres et possède plusieurs DEL pour<br />
la indication du type de fonctionnement,<br />
l'affi chage des paramètres programmés<br />
Caractéristiques du réglage<br />
et des éventuelles alarmes déclenchées.<br />
Dans la carte, toutes les Réglages par<br />
défaut et les modifi cations éventuelles<br />
sont mémorisées. Grâce à l'installation<br />
de l'accessoire panneau à distance<br />
PR3, il est possible de commander à<br />
distance l'allumage et l'extinction, le<br />
Interface utilisateur<br />
réglage du mode de fonctionnement<br />
(froid-chaud) et l'affi chage du récapitulatif<br />
des alarmes. Après une coupure<br />
de courant, l'unité est en mesure de se<br />
remettre en marche automatiquement en<br />
conservant les réglages d'origine.<br />
Index Fonctions<br />
A Panneau intégré sur l'appareil<br />
B Groupe d'eau glacée/Pompe à chaleur<br />
C Modu control<br />
D Panneau à distance PR3<br />
E Branchement interne entre Moducontrol et le panneau<br />
(déjà câblé en usine)<br />
F Branchement entre l'unité et PR3, longueur maximale de 150 mètres (câblage au soin de l'installateur)<br />
4900575_01 / Ver - 4.30<br />
FR<br />
61
62<br />
Réglages par défaut MENU UTILISATEUR<br />
Menu UTILISATEUR - (mot de passe 000)<br />
Chaîne StF bnF CSt (1) SF1 tF1 SF2 tF2<br />
Index 1 2 5 6 7 8 9<br />
WRL 7 5 0 12 18 7 30<br />
(1) Si c’est la sonde de l’air ambiant de la valeur doit être réglé sur (1);;<br />
Index - Chaîne Signification du paramètre<br />
1 - StF Set froid<br />
2 - bnF Bande à froid<br />
5 - CSt Correction set<br />
6 - SF1 Set froid 1<br />
7 - tF1 Température de l’air extérieur 1<br />
8 - SF2 Set froid 2<br />
9 - tF2 Température de l’air extérieur 2 (froid)<br />
Index - Chaîne Signification du paramètre<br />
0 - SrA Set de la résistance antigel<br />
1 - brA Bande de la résistance antigel<br />
FR 4900575_01 / Ver - 4.30<br />
Réglages par défaut RÉSISTANCE<br />
Chaîne<br />
Menu RÉSISTANCE - (Mot de passe 001)<br />
SrA brA<br />
Index 0 1<br />
WRL 4 1
Réglages par défaut MENU INSTALLATEUR<br />
Menù INSTALLATORE - (Passwoerd 030)<br />
Chaîne iu oFF SAF int dEr AG FrP PAN SCr Ad1 Bd1 AS1<br />
Index 0 1 3 4 5 6 7 9 I J L N<br />
WRL 0 4 5 600 0 3 3 0 1 1 1 0<br />
Index - Chaîne Signification du paramètre<br />
0 - iu Réglage entrée/sortie<br />
1 - oFF Force-off à froid<br />
3 - SAF Bande de réarmement du Force-off<br />
4 - int Temps intégral<br />
5 - dEr Temps de dérivation<br />
6 - AG Antigel<br />
7 - FrP Frost protection<br />
9 - PAN Configuration du panneau à distance<br />
I - SCr Configuration de la protection de l’écran<br />
J - Ad1 Adresse Modbus du superviseur<br />
L - Bd1 Débit en bauds du superviseur<br />
N - AS1 Activation en écriture du superviseur<br />
Réglages par défaut MENU INSTALLATEUR 2<br />
Index 0<br />
Menu INSTALLATEUR 2 - (Mot de passe 031)<br />
1 2 3<br />
WRL 6 0 0 0<br />
Index - Chaîne Signification du paramètre<br />
0 Température delta pour réactivation du compresseur après une intervention du FORCE-OFF<br />
1 ---<br />
2 ---<br />
3 thermostat de la pompe Off<br />
4900575_01 / Ver - 4.30<br />
FR<br />
63
64<br />
Affichages de l’interface utilisateur et des ramètres<br />
L’interface utilisateur principal est représentée par un panneau<br />
à DEL avec clavier capacitif (c’est-à-dire avec des<br />
touches à effl eurement) ; les affi chages sont organisés à<br />
l’aide de trois menus :<br />
Menu LECTURES (touche (C) Fig. 1)<br />
Il contient les informations (en affi chage unique) sur le fonctionnement<br />
courant de l’unité.<br />
Menu POINT DE CONSIGNE (touche (D) Fig. 1)<br />
Il contient tous les paramètres que l’utilisateur peut modifi er<br />
sur la base des exigences de l’installation ; ces paramètres<br />
sont regroupés en différents sous-menus :<br />
- Menu UTILISATEUR (Mot de passe 000) ;<br />
- Menu INSTALLATEUR (Mot de passe 030) ;<br />
- Menu RÉSISTANCE (Mot de passe 001) ;<br />
Historiques des ALARMES (touche (E) Fig. 1)<br />
L’historique des alarmes enregistre les conditions d’erreur<br />
et/ou de mauvais fonctionnement de l’unité (qu’il soit des<br />
alarmes ou des pré-alarmes).<br />
Durant le fonctionnement normal, le dernier paramètre modifi<br />
é est affi ché sur l’affi cheur ; si les autres touches ne sont<br />
pas appuyées par la suite durant au mois 5 minutes, l’affi -<br />
cheur active le mode de protection de l’écran (fonction réglable<br />
par le paramètre (i) dans le menu INSTALLATEUR.<br />
Pour l’affi chage des paramètres et/ou des lectures, 4 chiffres<br />
sont utilisés ; le premier indique l’index, c’est-à-dire un numéro<br />
qui permet à l’utilisateur de savoir à quel paramètre ou<br />
Fig.3<br />
A B<br />
Interface utilisateur (Fig. 3)<br />
A Référence du paramètre<br />
B Sigle du paramètre / valeur du paramètre<br />
FR 4900575_01 / Ver - 4.30<br />
Fig.1<br />
Interface utilisateur (Fig. 1)<br />
A Afficheur<br />
B Touche d'allumage<br />
C Touche d'accès au menu des lectures<br />
D Touche d'accès au menu de réglage<br />
E Touche d'accès à l'historique alarmes<br />
F Touches de défilement/augmentation-diminution<br />
Fig.2<br />
1<br />
5 6<br />
dj<br />
7 8 9<br />
SET<br />
2 3<br />
Visualisation de l'afficheur (Fig. 2)<br />
1 Menu RÉGLAGE actuellement affiché<br />
2 Menu ALARMES actuellement affiché<br />
3 Référence du paramètre<br />
4 Sigle du paramètre / valeur du paramètre<br />
5 Indicateur saison ESTIVALE<br />
6 Indicateur saison HIVERNALE<br />
7 Indicateur d'état d'alarme en cours<br />
8 Indicateur de fonctionnement compresseur en cours<br />
(cette indication peut avoir différentes fréquences de<br />
clignotement.<br />
9 Indicateur arrêt en cours<br />
4
Pour entrer dans le menu des lectures,<br />
appuyer sur la touche dans la (Fig. 4).<br />
Une fois dans le menu des lectures, l’index<br />
de la lecture et une chaîne de trois<br />
caractères qui l’identifi e apparaissent<br />
sur l’affi cheur ; la chaîne reste affi chée<br />
durant une seconde, après quoi elle est<br />
Menu des lectures<br />
remplacée par la valeur de la lecture.<br />
Pour passer à la lecture suivante, il faut<br />
appuyer sur la touche dans la (Fig. 5),<br />
tandis que pour revenir à celle précédent,<br />
appuyer sur la touche (Fig. 6).<br />
Chaque fois que l’on passe d’une lecture<br />
à l’autre, en plus du changement de<br />
Fig.4 Fig.5 Fig.6<br />
la valeur index, la chaîne sera visualisée<br />
à la première seconde afi n d’identifi er la<br />
lecture en cours (il est toutefois possible<br />
d’identifi er toute lecture à l’aide de la valeur<br />
de l’index, en la comparant avec le<br />
tableau reporté ci-dessous).<br />
Liste des références et des lectures correspondantes du MENU UTILISATEUR (aucun mot de passe)<br />
Index - chaîne<br />
Température de sortie de l'eau<br />
Température d'entrée de l'eau<br />
Température à l'entrée du condenseur<br />
Température du gaz de refoulement<br />
Température de l'air extérieur ( 1 )<br />
Pression de refoulement (2)<br />
Température à la sortie du condenseur<br />
Thermostat<br />
Bande de sécurité sur le force-off<br />
Temps CP<br />
Heures de fonctionnement (en milliers)<br />
Heures de fonctionnement (en unités)<br />
Index - chaîne<br />
Démarrages du compresseur (en milliers)<br />
Démarrages du compresseur (en unités)<br />
Version logicielle<br />
Versions logicielles inférieures<br />
Réglage actuellement utilisé<br />
Réglage de la pression de condensation<br />
Différentiel de la pression de condensation<br />
Heures de fonctionnement<br />
COMPRESSEUR 1 (en unités)<br />
Heures de fonctionnement<br />
COMPRESSEUR 2 (en unités) (3)<br />
Démarrages du compresseur<br />
COMPRESSEUR 1 (en milliers)<br />
Démarrages du compresseur<br />
COMPRESSEUR 2 (en milliers) (3)<br />
Fraction de puissance (4)<br />
(1) Cette valeur n’est affichée que si l’accessoire sonde air extérieur est installé. En l’absence de cet accessoire, trois tirets seront affichés à la place<br />
de la valeur de température.<br />
(2) Cette valeur n’est affichée que si l’accessoire transducteur de haute pression est installé. En l’absence de cet accessoire, trois tirets seront affichés<br />
à la place de la valeur de pression.<br />
(3) Paramètres visibles uniquement dans les modèles WRL100-140-160.<br />
4900575_01 / Ver - 4.30<br />
FR<br />
65
66<br />
Pour entrer dans le menu UTILISA-<br />
TEUR, appuyer sur la touche indiquée<br />
dans la (Fig. 7). Une fois cette<br />
touche appuyée, il faudra saisir le mot<br />
de passe pour accéder aux différents<br />
menus. Pour accéder au menu utilisateur,<br />
le mot de passe est 000 (lequel<br />
est affi ché par défaut) ; pour modifi er<br />
la valeur des mots de passe, utiliser<br />
PASSWORD = 000<br />
FR 4900575_01 / Ver - 4.30<br />
Menu UTILISATEUR<br />
les fl èches (touches). Une fois le mot<br />
de passe correct saisi, appuyer sur la<br />
touche indiquée dans la (Fig. 7). L’index<br />
du paramètre UTILISATEUR est<br />
visualisé sur l’affi cheur ainsi qu’une<br />
chaîne de trois caractères qui l’identifi<br />
e ; la chaîne reste affi chée durant une<br />
seconde, après quoi elle est remplacée<br />
par la valeur du paramètre. Pour pas-<br />
Fig.7 Fig.8<br />
ser au paramètre suivant, utiliser les<br />
fl èches (touches) (Fig. 8). Pour modifi er<br />
un paramètre, il suffi t de le sélectionner,<br />
appuyer sur la touche indiquée dans<br />
la (Fig. 7), modifi er la valeur assignée<br />
indiquée dans la (Fig. 8) à l’aide des<br />
fl èches (touches) et pour confi rmer la<br />
modifi cation, appuyer à nouveau sur la<br />
touche indiquée dans la (Fig. 7).<br />
Réglage des paramètres opérationnels (niveau utilisateur)<br />
Index - chaîne<br />
Index - chaîne<br />
Valeur<br />
MIN<br />
Réglage du point de consigne de la température à froid<br />
Valeur<br />
MAX<br />
-20 °C 26 °C<br />
Valeur<br />
MIN<br />
Valeur<br />
MAX<br />
1 °C 20 °C<br />
Fonction du paramètre<br />
Ce paramètre indique la valeur du réglage du point de consigne de fonctionnement actif<br />
dans le mode à froid.<br />
Impostazione banda proporzionale a freddo<br />
Fonction du paramètre<br />
Questo parametro indica la banda proporzionale applicata al set freddo; questa banda<br />
comporta un gestione ottimizzata del compressore, accendendolo solo se la temperatura<br />
dell’acqua in ingresso/uscita (in base al tipo di controllo impostato dal parametro (0)<br />
nel menù installatore) è maggiore al set di lavoro a freddo (parametro (1) menù utente)<br />
più il valore di questo parametro.
Réglage du choix du point de consigne sur la base de la température extérieure (avec sonde d’air supplémentaire)<br />
Index - chaîne<br />
Index - chaîne<br />
Index - chaîne<br />
Index - chaîne<br />
Index - chaîne<br />
Valeur<br />
MIN<br />
Valeur<br />
MAX<br />
0 3<br />
Valeur<br />
MIN<br />
Fonction du paramètre<br />
Ce réglage active l’algorithme de compensation du point de consigne de fonctionnement :<br />
Valeur (0) = fonction n’est pas active;<br />
Valeur (1) = fonction active;<br />
(°C)<br />
SET (H)<br />
Réglage du point de consigne de la température à froid 1<br />
Valeur<br />
MAX<br />
-20 °C 26 °C<br />
Valeur<br />
MIN<br />
Valeur<br />
MAX<br />
-40 °C 50 °C<br />
Valeur<br />
MIN<br />
(°C)<br />
Fonction du paramètre<br />
Ce paramètre indique la valeur maximale du point de consigne froid par rapport à la température<br />
minimale de l’air extérieur (index (7) menu utilisateur). Ce paramètre est visible<br />
si la fonction de compensation a été activée (index (5) menu utilisateur).<br />
Réglage de la température de l’air extérieur 1<br />
Fonction du paramètre<br />
Ce paramètre indique la température minimale de l’air extérieur prise en considération<br />
pour la compensation à froid. Ce paramètre est visible si la fonction de compensation a<br />
été activée (index (5) menu utilisateur).<br />
Réglage du point de consigne de la température à froid 2<br />
Valeur<br />
MAX<br />
-20 °C 26 °C<br />
Valeur<br />
MIN<br />
Valeur<br />
MAX<br />
-40 °C 50 °C<br />
SET SF1(F)<br />
SF2<br />
SET TF1 (G) SET TF2(I)<br />
Fonction du paramètre<br />
Ce paramètre indique la valeur minimale du point de consigne à froid par rapport à la<br />
température maximale de l’air extérieur (index (9) menu utilisateur). Ce paramètre est<br />
visible si la fonction de compensation a été activée (index (5) menu utilisateur).<br />
Réglage de la température de l’air extérieur 2<br />
Fonction du paramètre<br />
Dans le fonctionnement à froid, le<br />
point de consigne de fonctionnement<br />
est calculé de manière automatique sur<br />
la base de la température extérieure<br />
selon la logique mise en évidence sur le<br />
diagramme.<br />
SF1 : index (6) menu utilisateur ;<br />
SF2 : index (8) menu utilisateur ;<br />
TF1 : index (7) menu utilisateur ;<br />
TF2 : index (9) menu utilisateur ;<br />
Ce paramètre indique la température maximale de l’air extérieur prise en considération<br />
pour la compensation à froid. Ce paramètre est visible si la fonction de compensation a<br />
été activée (index (5) menu utilisateur).<br />
4900575_01 / Ver - 4.30<br />
FR<br />
67
Pour entrer dans le menu INSTALLA-<br />
TEUR, appuyer sur la touche indiquée<br />
dans la (Fig. 9). Une fois cette touche<br />
appuyée, il faudra saisir le mot de<br />
passe pour accéder aux différents menus.<br />
Pour accéder au menu utilisateur,<br />
le mot de passe est 030 ; pour modifi er<br />
la valeur des mots de passe, utiliser<br />
les fl èches (touches). Une fois le mot<br />
ATTENTION : la modifi cation des paramètres<br />
suivants est du ressort exclusif<br />
du personnel qualifi é chargé de<br />
l’installation de l’unité.<br />
68<br />
PASSWORD = 030<br />
FR 4900575_01 / Ver - 4.30<br />
Menu INSTALLATEUR<br />
de passe correct saisi, appuyer sur la<br />
touche indiquée dans la (Fig. 9). L’index<br />
du paramètre INSTALLATEUR est<br />
visualisée sur l’affi cheur ainsi qu’une<br />
chaîne de trois caractères qui l’identifi<br />
e ; la chaîne reste affi chée durant une<br />
seconde, après quoi elle est remplacée<br />
par la valeur du paramètre. Pour passer<br />
au paramètre suivant, utiliser les fl èches<br />
Fig.9 Fig.10<br />
Réglage des paramètres opérationnels<br />
(niveau installateur)<br />
Index - chaîne<br />
Index - chaîne<br />
Index - chaîne<br />
Valeur<br />
MIN<br />
Configuration du réglage à l’entrée ou à la sortie<br />
Valeur<br />
MAX<br />
0 2<br />
Valeur<br />
MIN<br />
Valeur<br />
MAX<br />
-25 °C 25 °C<br />
Valeur<br />
MIN<br />
Valeur<br />
MAX<br />
0,5 °C 20 °C<br />
Fonction du paramètre<br />
(touches) (Fig. 10). Pour modifi er un<br />
paramètre, il suffi t de le sélectionner,<br />
appuyer sur la touche indiquée dans<br />
la (Fig. 9), modifi er la valeur assignée<br />
indiquée dans la (Fig. 10) à l’aide des<br />
fl èches (touches) et pour confi rmer la<br />
modifi cation, appuyer à nouveau sur la<br />
touche indiquée dans la (Fig. 9).<br />
Sur la base de la valeur de ce paramètre, le réglage de l’appareil sera basé :<br />
• Si la valeur est 0, l’appareil est réglé sur la base de la température de sortie ;<br />
• Si la valeur est 1, il est réglé sur la base de la température d’entrée ;<br />
• Si la valeur est 2, l’appareil est réglé sur la base de la température de la sonde à<br />
distance lue par le tableau DHW (en cas de panne de la sonde à distance, l’appareil<br />
retourne à être réglé par la sonde installée sur le même en signalant avec l’alarme le<br />
code 157).<br />
Si la production d’eau chaude sanitaire est active, le réglage est forcé automatiquement<br />
sur la température de sortie d’eau indépendamment de la valeur de ce paramètre.<br />
Réglage FORCE-OFF à froid<br />
Fonction du paramètre<br />
Les unités prévoient un contrôle de la température de fonctionnement (entrée ou sortie),<br />
à laquelle est relié un seuil de sécurité, au-delà duquel le compresseur s’éteint immédiatement<br />
et automatiquement. Ce seuil s’appelle FORCE-OFF.<br />
Réglage du seuil de sécurité<br />
Fonction du paramètre<br />
Seuil de température au-dessus du force-off qui réactive le démarrage du compresseur<br />
après l’extinction par force-off.
Index - chaîne<br />
Index - chaîne<br />
Index - chaîne<br />
Index - chaîne<br />
Index - chaîne<br />
Valeur<br />
MIN<br />
Valeur<br />
MAX<br />
0 s 999 s<br />
Valeur<br />
MIN<br />
Valeur<br />
MAX<br />
0 s 120 s<br />
Valeur<br />
MIN<br />
Valeur<br />
MAX<br />
-50 °C 20 °C<br />
Valeur<br />
MIN<br />
Valeur<br />
MAX<br />
0 4<br />
Valeur<br />
MIN<br />
Valeur<br />
MAX<br />
0 3<br />
Réglage du temps intégral<br />
Fonction du paramètre<br />
Les unités possèdent une logique évoluée pour le contrôle de la température de l’eau<br />
produite. Le contrôle intégral évite que le système entre en équilibre à une température<br />
supérieure ou inférieure à celle réglée par le point de consigne de fonctionnement. Ne pas<br />
oublier que si l’on augmente le temps d’intégration l’effet du contrôle intégral diminue.<br />
Réglage du temps de dérivation<br />
Fonction du paramètre<br />
Temps durant lequel la température de l’eau d’entrée est contrôlée pour estimer la<br />
charge sur l’installation ; si la bande sur la valeur du point de consigne est dépassée<br />
durant ce temps-là, l’unité est activée.<br />
Réglage du seuil antigel<br />
Fonction du paramètre<br />
Dans les unités, il est possible de programmer un seuil pour l’alarme antigel ; c’est une<br />
valeur qui spécifie à quelle température l’alarme antigel s’active. Ne pas oublier que pour<br />
pouvoir modifier le paramètre du seuil antigel, le commutateur DIP correspondant devra<br />
être activé (voir le tableau de configuration des commutateurs DIP).<br />
Réglage de la protection antigel<br />
Fonction du paramètre<br />
Dans les unités, il est possible de régler un contrôle de sécurité sur la température de sortie de l’eau ; sur la<br />
base de la valeur attribuée à ce paramètre, la résistance antigel est gérée ainsi :<br />
• valeur 0, résistance antigel absente ;<br />
• valeur 1, résistance antigel installée et fonctionnant uniquement avec appareil en fonctionnement chaud ou froid ;<br />
• valeur 2, résistance antigel installée et fonctionnant aussi en veille mais en allumant la pompe ;<br />
• valeur 3, la résistance antigel fonctionnant en veille sans pompe active ;<br />
• valeur 4, avec une température de l’air extérieur inférieur à 3 °C, la pompe est activée durant deux minutes<br />
chaque demi-heure, afin de contrôler la température de l’eau sur l’installation entière.<br />
Configuration du contrôle du panneau<br />
Fonction du paramètre<br />
Ce point de consigne configure le type de contrôle applicable aux unités. Sur la base de<br />
la valeur réglée pour ce point de consigne, les contrôles du mode de fonctionnement<br />
(CHAUD/FROID) et de la commande d’allumage/extinction de l’unité sont gérés de la<br />
même manière :<br />
Valeur du point de consigne réglée à 0 :<br />
• Réglage du mode de fonctionnement = réglage du paramètre 0<br />
• Commande ON/OFF = depuis le panneau intégré sur l’appareil<br />
Valeur du point de consigne réglée à 1 :<br />
• Réglage du mode de fonctionnement = réglage du paramètre 0<br />
• Commande ON/OFF = depuis le panneau à distance<br />
Valeur du point de consigne réglée à 2 :<br />
• Réglage du mode de fonctionnement = réglé depuis le contact à distance<br />
• Commande ON/OFF = depuis le panneau intégré sur l’appareil<br />
Valeur du point de consigne réglée à 3 :<br />
• Réglage du mode de fonctionnement = réglé depuis le contact à distance<br />
• Commande ON/OFF = depuis le contact à distance<br />
4900575_01 / Ver - 4.30<br />
FR<br />
69
70<br />
Index - chaîne<br />
Index - chaîne<br />
Index - chaîne<br />
Index - chaîne<br />
Valeur<br />
MIN<br />
Valeur<br />
MAX<br />
FR 4900575_01 / Ver - 4.30<br />
Configuration de l’économiseur d’écran<br />
Fonction du paramètre<br />
0 2 Ce paramètre indique la configuration de la fonctionnalité de l’économiseur d’écran :<br />
• valeur 0, économiseur d’écran désactivé ;<br />
• valeur 1, un économiseur d’écran avec affichage des tirets. (à utiliser avec des panneaux<br />
de commande avec Logiciel précédent à la version 1.3) ;<br />
• valeur 2, un économiseur d’écran sans l’affichage des tirets (à utiliser avec des panneaux<br />
de commande avec Logiciel à partir de la version 1.3)<br />
Valeur<br />
MIN<br />
Valeur<br />
MAX<br />
Adresse Modbus du superviseur<br />
Fonction du paramètre<br />
0 999 Ce paramètre indique l’adresse Modbus assignée au superviseur ; cette adresse sera<br />
utilisée lors de la communication entre le superviseur et le Moducontrol.<br />
Valeur<br />
MIN<br />
Valeur<br />
MAX<br />
Débit en bauds du superviseur<br />
Fonction du paramètre<br />
0 2 Ce paramètre indique la vitesse de communication entre le superviseur et le<br />
Moducontrol ; cette vitesse est réglée sur la base de la valeur sélectionnée pour ce<br />
paramètre :<br />
0 = 9 600 bps<br />
1 = 19 200 bps<br />
2 = 38 400 bps<br />
Valeur<br />
MIN<br />
Valeur<br />
MAX<br />
Activation en écriture du superviseur<br />
Fonction du paramètre<br />
0 1 Ce paramètre active les commandes en écriture pour le superviseur ; cette activation<br />
est réglée sur la base de la valeur sélectionnée pour ce paramètre :<br />
0 = désactive les commandes en écriture ;<br />
1 = active les commandes en écriture.<br />
Il ne faut pas oublier que les commandes en lecture sont toujours actives.
Menu INSTALLATEUR 2<br />
Pour entrer dans le menu INSTALLATEUR_2, suivre la même procédure décrite pour le menu INSTALLATEUR ; la seule<br />
modifi cation est la valeur du mot de passe qui est 31.<br />
ATTENTION : la modifi cation des paramètres<br />
suivants est du ressort exclusif<br />
du personnel qualifi é chargé de<br />
l’installation de l’unité.<br />
Réglage des paramètres opérationnels (niveau installateur)<br />
Index - chaîne<br />
Index - chaîne<br />
PASSWORD = 031<br />
Valeur<br />
MIN<br />
Seuil pour la réactivation après Force Shutdown off<br />
Valeur<br />
MAX<br />
0 °C 30 °C<br />
Valeur<br />
MIN<br />
Valeur<br />
MAX<br />
0 1<br />
Fig.9a Fig.10a<br />
Fonction du paramètre<br />
Si la valeur du paramètre rin = 4 (paramètre 8 du menu d’installation), alors c’est un<br />
système de stockage de sonde, ce paramètre indique combien d’abaisser le seuil de la<br />
force au large de manière à empêcher le compresseur est réactivé après l’intervention<br />
de ForceOff dynamique éteint peu après.<br />
Extinction de la pompe par thermostat<br />
Fonction du paramètre<br />
0 = la pompe reste en fonctionnement lorsque la température de point de consigne<br />
est atteinte. 1 = la pompe est éteinte lorsque la température de point de consigne est<br />
atteinte. (lorsque cette option est sélectionnée, le réglage sur la base de la température<br />
d’entrée est activé automatiquement). Ce paramètre n’est visible qu’avec le réglage sur<br />
la base de la température d’entrée (paramètre (0) =1 ou 2).<br />
4900575_01 / Ver - 4.30<br />
FR<br />
71
Pour entrer dans le menu RÉSISTANCE,<br />
appuyer sur la touche indiquée dans la<br />
(Fig. 14). Une fois cette touche appuyée,<br />
il faudra saisir le mot de passe pour accéder<br />
aux différents menus. Pour accéder<br />
au menu utilisateur, le mot de<br />
passe est 001 ; pour modifi er la valeur<br />
des mots de passe, utiliser les fl èches<br />
(touches). Une fois le mot de passe<br />
ATTENTION : la modifi cation des paramètres<br />
suivants est du ressort exclusif<br />
du personnel qualifi é chargé de<br />
l’installation de l’unité.<br />
72<br />
PASSWORD = 001<br />
FR 4900575_01 / Ver - 4.30<br />
Menu RÉSISTANCE<br />
correct saisi, appuyer sur la touche indiquée<br />
dans la (Fig. 14). L’index du paramètre<br />
RÉSISTANCE est visualisée sur<br />
l’affi cheur ainsi qu’une chaîne de trois<br />
caractères qui l’identifi e ; la chaîne reste<br />
affi chée durant une seconde, après<br />
quoi elle est remplacée par la valeur du<br />
paramètre. Pour passer au paramètre<br />
suivant, utiliser les fl èches (touches)<br />
Fig.14 Fig.15<br />
(Fig. 15). Pour modifi er un paramètre, il<br />
suffi t de le sélectionner, appuyer sur la<br />
touche indiquée dans la (Fig. 14), modifi<br />
er la valeur assignée indiquée dans la<br />
(Fig. 15) à l’aide des fl èches (touches)<br />
et pour confi rmer la modifi cation, appuyer<br />
à nouveau sur la touche indiquée<br />
dans la (Fig. 14).<br />
Réglage des paramètres opérationnels (niveau résistance)<br />
Index - chaîne<br />
Index - chaîne<br />
Valeur<br />
MIN<br />
Réglage du point de consigne de la résistance antigel<br />
Valeur<br />
MAX<br />
-20 °C 50 °C<br />
Valeur<br />
MIN<br />
Valeur<br />
MAX<br />
0,3 °C 10 °C<br />
Fonction du paramètre<br />
Les unités prévoient la possibilité de régler un seuil pour l’activation de la résistance<br />
antigel ; si la température lue par une des deux sondes de l’eau (entrée ou sortie, sur la<br />
base du type de contrôle activé) atteint la valeur réglée dans ce paramètre, la résistance<br />
antigel est activée.<br />
Réglage de la bande de la résistance antigel<br />
Fonction du paramètre<br />
Les unités prévoient la possibilité de régler un seuil pour l’activation de la résistance<br />
antigel ; si la température lue par une des deux sondes de l’eau (entrée ou sortie, sur la<br />
base du type de contrôle activé) atteint la valeur réglée dans ce paramètre, la résistance<br />
antigel est activée.
Tableau de configuration des COMMUTATEURS DIP<br />
En plus des paramètres pouvant être<br />
saisis à partir du panneau, les unités<br />
sont équipées d’une série de commutateurs<br />
DIP qui permettent de gérer certaines<br />
options et fonctions de l’appareil.<br />
Ne pas oublier que certaines options<br />
pouvant être gérées à partir du panneau<br />
sont liées au réglage spécifi que<br />
Unités<br />
Commutateur DIP (B)<br />
Réglages par défaut du COMMUTATEUR DIP MODUCONTROL<br />
Commutateur DIP (A)<br />
COMMUTATEUR DIP (A<br />
COMMUTATEUR<br />
DIP (B)<br />
1 2 3 4 5 6 7 8 9 10 11 12 1 2<br />
WRL OFF OFF OFF OFF ON OFF (*) OFF OFF OFF (**) OFF OFF OFF<br />
(*) La valeur de ce commutateur DIP dépend de la présence ou absence de l’accessoire transducteur de haute pression (TP2/TP3) :<br />
- Si l’unité prévoit le transducteur de haute pression, le commutateur DIP 7 sera réglé sur ON.<br />
- Si l’unité NE PRÉVOIT PAS le transducteur de haute pression, le commutateur DIP 7 sera réglé sur OFF.<br />
(**)<br />
ON = WRL seul froid (WRL °);<br />
OFF = WRL unité d’évaporation (WRL E);<br />
4900575_01 / Ver - 4.30<br />
FR<br />
73
74<br />
Micro<br />
interrupteur<br />
A<br />
Micro<br />
interrupteur<br />
B<br />
N° <strong>Dip</strong> État Fonction<br />
1<br />
2<br />
3<br />
4<br />
5<br />
6<br />
7<br />
8<br />
9<br />
10<br />
11<br />
12<br />
FR 4900575_01 / Ver - 4.30<br />
ON Programmé à l’usine.<br />
OFF Programmé à l’usine.<br />
ON Dégivrage prévu seulement par inversion de cycle<br />
OFF Dégivrage par injection de gaz chaud<br />
ON Eau/glycol : point de consigne antigel modifiable<br />
OFF Point de consigne antigel (Paramètre B) bloqué<br />
ON Contrôle rendement désactivé<br />
OFF Contrôle rendement activé<br />
ON Découpage de courant de sécurité désactivé<br />
OFF Découpage de courant de sécurité activé<br />
ON Algorithme de contrôle faible contenu en eau désactivé<br />
OFF Algorithme de contrôle faible contenu en eau activé<br />
ON Dispositif de contrôle de présence de la pression de condensation<br />
OFF Dispositif de contrôle d'absence de la pression de condensation<br />
ON Programmé à l’usine.<br />
OFF Programmé à l’usine.<br />
ON Configuration de la carte pour l'unité inverter<br />
OFF Configuration de la carte pour l'unité chiller ON/OFF<br />
ON Configuration de la carte pour l'unité de condensation<br />
OFF Configuration de la carte pour l'unité chiller<br />
ON Programmé à l’usine.<br />
OFF Programmé à l’usine.<br />
ON Non utilizzato<br />
OFF Non utilizzato<br />
Combinaisons<br />
<strong>Dip</strong> Fonction<br />
DIP 1 DIP 2<br />
OFF OFF Programmé à l’usine.<br />
ON OFF Programmé à l’usine.<br />
ON ON Programmé à l’usine.<br />
OFF ON Programmé à l’usine.
La carte Moducontrol peut être interfacée<br />
à un système centralisé à travers une<br />
carte d’expansion série adéquate, sur la<br />
base du standard électrique RS485, et<br />
en utilisant le protocole standard Modbus<br />
RTU. La carte Moducontrol est toujours la<br />
carte esclave de la communication. Pour<br />
Commandes MODBUS<br />
Protocole de communication série<br />
activer la communication depuis un système<br />
de supervision vers la carte Moducontrol,<br />
il faut régler quelques paramètres :<br />
Paramètre J - Ad1 (adresse Modbus du<br />
superviseur) ;<br />
Paramètre L - Bd1 (débit en bauds du<br />
superviseur).<br />
La carte Moducontrol gère vers le superviseur BMS/VMF soit des valeurs<br />
Register (entières/analogiques), soit des Coil (numériques). Les commandes<br />
qui peuvent être utilisées pour leur lecture/écriture sont :<br />
cmd<br />
Codici MODBUS utilizzati<br />
descrizione<br />
0x01 Read Coil Status<br />
0x03 Read Holding Registers<br />
0x05 Force Single Coil<br />
0x06 Preset Single Register<br />
0x0F Preset Multiple Coils<br />
0x10 Preset Multiple Registers<br />
LISTE DES NUMÉRIQUES<br />
COMANDI DIGITALI DISPONIBILI<br />
Read Coil Status<br />
Force Single Coil<br />
Force Multiple Coils<br />
Pour pouvoir écrire les paramètres COIL sur la<br />
carte Moducontrol, il faut activer les commandes<br />
de surveillance en réglant le paramètre (N)<br />
= 1 du menu installateur (mot de passe = 30)<br />
du panneau sur la machine..<br />
ADRESSE DESCRIPTION<br />
0 Commande veille/allumé (à bascule) 0=OFF 1=ON<br />
1 Commande du mode de fonctionnement (à bascule) 0=FROID 1=CHAUD<br />
2 Télécommande d'eau sanitaire 0=normale, 1=sanitaire<br />
3 Activation du thermostat à distance 0=désactivé, 1=activé<br />
4 Commande de réarmement des alarmes. 1=réarmement des alarmes<br />
5 État du compresseur1 0=OFF 1=ON<br />
6 État du compresseur2 0=OFF 1=ON<br />
7 État de la chaudière/résistance 0=OFF 1=ON<br />
8 État de la production d'eau sanitaire. 0=désactivée 1=activée<br />
9 État de l'ID d'eau sanitaire 0=ID fermé – 1=ID ouvert<br />
10 État de l'ID ON_OFF à distance 0=ID fermé – 1=ID ouvert<br />
11 État de l'ID de saison 0=ID fermé (froid), 1=ID ouvert (chaud)<br />
12 État de l'ID du thermostat d'ambiance 0=ID fermé – 1=ID ouvert<br />
13 Récapitulatif des alarmes<br />
14 Récapitulatif des pré-alarmes<br />
15 Pré-alarme de magnétothermique compresseur<br />
16 Pré-alarme de magnétothermique ventilateur<br />
Il est également nécessaire pour assurer<br />
la conformité avec les caractéristiques<br />
suivantes:<br />
Stop bits: 2;<br />
Parity: NON;<br />
!<br />
4900575_01 / Ver - 4.30<br />
FR<br />
75
76<br />
ADRESSE DESCRIPTION<br />
17 Pré-alarme de pressostat haute pression<br />
18 Pré-alarme de fluxostat/pressostat différentiel d'eau<br />
19 Pré-alarme de pressostat basse pression<br />
20 Pré-alarme de sonde d'entrée NTC1 (SIW) absente<br />
21 Pré-alarme de sonde d'entrée NTC2 (SUW) absente<br />
22 Pré-alarme antigel<br />
23 Pré-alarme de sonde d'entrée NTC4 (SGP) absente<br />
24 Pré-alarme de température élevée du gaz de refoulement<br />
25 Pré-alarme de transducteur de refoulement du compresseur absent<br />
26 Pré-alarme haute pression<br />
27 Pré-alarme de sonde d'entrée NTC3 (SS) absente<br />
28 Pré-alarme de transducteur de reprise absent<br />
29 Pré-alarme basse pression<br />
30 Pré-alarme bas rendement<br />
31 Pré-alarme de magnétothermique de la pompe<br />
32 Pré-alarme d'étranglement haute pression<br />
33 Pré-alarme d'étranglement basse pression<br />
34 Pré-alarme d'étranglement de la température de refoulement<br />
35 Pré-alarme d'erreur bemf (Inverter longertek)<br />
36 Pré-alarme d'erreur de communication interne (longertek)<br />
37 Pré-alarme de surintensité (longertek)<br />
38 Pré-alarme d'absence de charge (longertek)<br />
39 Pré-alarme de tension erronée (longertek)<br />
40 Pré-alarme d'erreur lors du démarrage (longertek)<br />
41 Pré-alarme d'erreur de protection IPM (longertek)<br />
42 Pré-alarme d'erreur EEPROM (longertek)<br />
43 Pré-alarme de blocage du compresseur (longertek)<br />
44 Pré-alarme de communication absente (longertek)<br />
45 Pré-alarme PFC module (longertek)<br />
46 Pré-alarme de surtempérature de refroidissement (APY)<br />
47 Pré-alarme de surintensité en accélération (APY)<br />
48 Pré-alarme de surintensité à vitesse constante (APY)<br />
49 Pré-alarme de surintensité en décélération (APY)<br />
50 Pré-alarme de sous-tension sur le DC bus (APY)<br />
51 Pré-alarme de surtension sur le DC bus (APY)<br />
52 NON UTILISÉ<br />
53 NON UTILISÉ<br />
54 Pré-alarme PFC Converter Fault (APY)<br />
55 Pré-alarme de surintensité en accélération (APY)<br />
56 Pré-alarme de surcharge (APY)<br />
57 Pré-alarme de surintensité à vitesse constante (APY)<br />
58 Pré-alarme de surintensité en décélération (APY)<br />
59 Pré-alarme de compresseur mal connecté (APY)<br />
60 Pré-alarme d'absence de communication (APY)<br />
61 Pré-alarme d'Erreur du capteur de température de l'ailette de refr. (APY)<br />
62 NON UTILISÉ<br />
63 NON UTILISÉ<br />
FR 4900575_01 / Ver - 4.30
ADRESSE DESCRIPTION<br />
64 NON UTILISÉ<br />
65 Pré-alarme de condition anormale (APY)<br />
66 NON UTILISÉ<br />
67 NON UTILISÉ<br />
68 Pré-alarme de vanne d'inversion de cycle<br />
69 Pré-alarme de haute température d'entrée d'eau<br />
70 Pré-alarme d'inversion de cycle pour haute température du gaz de refoulement<br />
71 NON UTILISÉ<br />
72 NON UTILISÉ<br />
73 NON UTILISÉ<br />
74 NON UTILISÉ<br />
75 NON UTILISÉ<br />
76 NON UTILISÉ<br />
77 NON UTILISÉ<br />
78 NON UTILISÉ<br />
79 NON UTILISÉ<br />
80 NON UTILISÉ<br />
81 NON UTILISÉ<br />
82 NON UTILISÉ<br />
83 NON UTILISÉ<br />
84 NON UTILISÉ<br />
85 Alarme de magnétothermique du compresseur<br />
86 Alarme de magnétothermique du ventilateur<br />
87 Alarme de pressostat haute pression<br />
88 Alarme de fluxostat/pressostat différentiel d'eau<br />
89 Alarme de pressostat basse pression<br />
90 Alarme de sonde d'entrée NTC1 absente (SIW)<br />
91 Alarme de sonde d'entrée NTC2 absente (SUW)<br />
92 Alarme antigel<br />
93 Alarme de sonde d'entrée NTC4 absente (SGP)<br />
94 Alarme de température élevée du gaz de refoulement<br />
95 Alarme de transducteur de refoulement du compresseur absent<br />
96 Alarme haute pression<br />
97 Alarme de sonde d'entrée NTC3 absente (SS)<br />
98 Alarme de transducteur de reprise absent<br />
99 Alarme basse pression<br />
100 Alarme bas rendement<br />
101 Alarme de magnétothermique de la pompe<br />
102 Alarme d'étranglement haute pression<br />
103 Alarme d'étranglement basse pression<br />
104 Alarme d'étranglement de la température de refoulement<br />
105 Alarme d'erreur bemf (Inverter longertek)<br />
106 Alarme d'erreur de communication interne (longertek)<br />
107 Alarme de surintensité (longertek)<br />
108 Alarme d'absence de charge (longertek)<br />
109 Alarme de tension erronée (longertek)<br />
110 Alarme d'erreur lors du démarrage (longertek)<br />
4900575_01 / Ver - 4.30<br />
FR<br />
77
78<br />
ADRESSE DESCRIPTION<br />
111 Alarme d'erreur de protection IPM (longertek)<br />
112 Alarme d'erreur EEPROM (longertek)<br />
113 Alarme de blocage du compresseur (longertek)<br />
114 Alarme de communication absente (longertek)<br />
115 Alarme PFC module (longertek)<br />
116 Alarme de surtempérature de refroidissement (APY)<br />
117 Alarme de surintensité en accélération (APY)<br />
118 Alarme de surintensité à vitesse constante (APY)<br />
119 Alarme de surintensité en décélération (APY)<br />
120 Alarme de sous-tension sur le DC bus (APY)<br />
121 Alarme de surtension (APY)<br />
122 NON UTILISÉ<br />
123 NON UTILISÉ<br />
124 Alarme PFC Converter Fault (APY)<br />
125 Alarme de surintensité en accélération (APY)<br />
126 Alarme de surcharge (APY)<br />
127 Alarme de surintensité à vitesse constante (APY)<br />
128 Alarme de surintensité en décélération (APY)<br />
129 Alarme de compresseur mal connecté (APY)<br />
130 Alarme d'absence de communication (APY)<br />
131 Alarme d'erreur du capteur de température de l'ailette de refr. (APY)<br />
132 NON UTILISÉ<br />
133 NON UTILISÉ<br />
134 NON UTILISÉ<br />
135 Alarme de condition anormale (APY)<br />
136 NON UTILISÉ<br />
137 NON UTILISÉ<br />
138 Alarme de vanne d'inversion de cycle en panne<br />
139 Alarme de haute température d'entrée d'eau<br />
140 Alarme d'inversion de cycle pour haute température du gaz de refoulement<br />
141 (Code 57) Alarme de lecture à distance de la sonde dans ECS<br />
142 (Code 58) de lecture d'alarme de capteur de température de l'air extérieur<br />
143 NON UTILISÉ<br />
144 NON UTILISÉ<br />
145 NON UTILISÉ<br />
146 NON UTILISÉ<br />
147 NON UTILISÉ<br />
148 NON UTILISÉ<br />
149 NON UTILISÉ<br />
150 NON UTILISÉ<br />
151 NON UTILISÉ<br />
152 NON UTILISÉ<br />
153 NON UTILISÉ<br />
154 NON UTILISÉ<br />
FR 4900575_01 / Ver - 4.30
LISTE DES READ REGISTER:<br />
COMANDI LETTURA DISPONIBILI<br />
Read Holding Register<br />
ADRESSE DESCRIPTION<br />
0 Typologie de l'appareil : 0 – ANL,1 – ANLI, 2 – ANR/ANF/SRP, 3 – ANL-C<br />
1 Typologie de l'appareil inverter 0=longertek 1=APY<br />
2 Entrée NTC1 (TUA) (SIW)<br />
3 Entrée NTC2 (TIA) (SUW)<br />
4 Entrée NTC3 (TSB) (SS)<br />
5 Entrée NTC4 (TGP) (SGP)<br />
6 Entrée NTC5 (TAE) (SAE)<br />
7 Entrée du transducteur de haute pression (AP) (TAP)<br />
8 Entrée du transducteur de basse pression (BP) (TBP)<br />
9 Entrée 0-10 Vdd<br />
10 État des sorties numériques du relais<br />
11 Bande de sécurité du Force-off<br />
12 Temps de démarrage/extinction du compresseur<br />
13 Heures de fonctionnement du compresseur primaire (en milliers)<br />
14 Heures de fonctionnement du compresseur primaire<br />
15 Nombre de démarrages effectués par le compresseur (en milliers)<br />
16 Nombre de démarrages effectués par le compresseur<br />
17 Version logicielle maximale<br />
18 Version logicielle minimale<br />
19 Point de consigne de réglage de l'appareil (corrections comprises)<br />
20 Réglage de la pression de contrôle de la condensation<br />
21 Différentiel de pression pour contrôle de la condensation<br />
22 Heures de fonctionnement du compresseur auxiliaire (en milliers)<br />
23 Heures de fonctionnement du compresseur auxiliaire<br />
24 Nombre de démarrages effectués par le compresseur auxiliaire (en milliers)<br />
25 Nombre de démarrages effectués par le compresseur auxiliaire<br />
26 Puissance fournie par l'appareil (chiller ON-OFF)<br />
Fréquence utilisée (chiller inverter)<br />
27 Chute de pression en reprise du compresseur<br />
28 Puissance requise pour contrôle de l'inverter<br />
29 Configuration des commutateurs DIP (0x0000 = tous OFF ÷ 0x0FFF = tous<br />
ON)<br />
30 État d'activation des commandes ON_OFF<br />
pour saison depuis le panneau ou à distance<br />
31 État d'activation du thermostat d'ambiance connecté à l'entrée ID3<br />
32 État de fonctionnement de l'appareil : 0 - Chiller Off, 1 - Chiller On,<br />
2 – Injection d'étranglement, 3 – Dégivrage pour injection,<br />
4 – Dégivrage pour inversion de cycle<br />
33 Accessoire résistance/chaudière : 0=absente 1=résistance 2=chaudière<br />
34 Courant inverter APY<br />
35 Tension de sortie inverter APY<br />
36 Tension de BUS inverter APY<br />
37 Température de l'ailette de refroidissement inverter APY<br />
38 Limite fixée par points chauds<br />
4900575_01 / Ver - 4.30<br />
FR<br />
79
80<br />
LISTE DES WRITE REGISTER:<br />
COMANDI SCRITTURA DISPONIBILI<br />
Preset Single Register<br />
Preset Multiple Registers<br />
ADRESSE DESCRIPTION LIMITES MIN. - MAX.<br />
39 Point de consigne froid -200 ÷ 260 [°C]<br />
40 Bande du point de consigne froid 10 ÷ 200 [°C]<br />
41 Point de consigne chaud 250 ÷ 650 [°C]<br />
42 Bande du point de consigne chaud 10 ÷ 200 [°C]<br />
43 Correction du point de consigne 0 ÷ 3<br />
44 Set froid 1 -200 ÷ 260 [°C]<br />
45 TA extérieure froid 1 400 ÷ 500 [°C]<br />
46 Set froid 2 -200 ÷ 260 [°C]<br />
47 TA extérieure froid 2 -400 ÷ 500 [°C]<br />
48 Set chaud 1 250 ÷ 650 [°C]<br />
49 TA extérieure chaud 1 -400 ÷ 500 [°C]<br />
50 Set chaud 2 250 ÷ 650 [°C]<br />
51 TA extérieure chaud 2 -400 ÷ 500 [°C]<br />
52 Réglage d'eau sanitaire -250 ÷ 650 [°C]<br />
53 Bande d'eau sanitaire 10 ÷ 200 [°C]<br />
54 Pourcentage de puissance requise par le thermostat 0 ÷ 100 [%]<br />
55 PWD_SET_VMF -32768 ÷ 32767<br />
56 sonde à distance ECS -32768 ÷ 32767<br />
LISTE DES EXCEPTIONS:<br />
Ci-après sont reportés les codes d’erreur affi chés par la carte Moducontrol :<br />
!<br />
EXCEPTIONS DESCRIPTION<br />
ILLEGAL FUNCTION Le code de fonction requis n’est pas géré par la carte.<br />
ILLEGAL DATA ADDRESS La demande des données contient une référence à une adresse non disponible dans<br />
la carte.<br />
ILLEGAL DATA VALUE La demande d’écriture de la donnée contient une valeur hors rang, l’écriture n’est<br />
donc pas prise en compte.<br />
FR 4900575_01 / Ver - 4.30
Les unités prévoient deux typologies dans l’indication<br />
du mauvais fonctionnement :<br />
• Pré-alarme<br />
• Alarme<br />
La première typologie est indiquée par le clignotement<br />
du voyant rouge sur l’afficheur,<br />
une pression suivante de la touche cloche<br />
ATTENTION :<br />
Les pré-alarmes peuvent devenir des<br />
alarmes quand :<br />
• Dans la condition de pré-alarme le temps<br />
Index<br />
pré-alarme<br />
Index<br />
alarme<br />
1 101 Magnéto-thermique compresseur<br />
Magnétothermique ventilateur<br />
Magnétothermique pompe<br />
Tableau récapitulatif des alarmes<br />
permet d’afficher la liste des alarmes (avec<br />
index et cause indiquée dans le tableau cidessous).<br />
Une pré-alarme reste telle pendant<br />
60 secondes, si après ce temps la condition<br />
qui a provoqué la pré-alarme n’a pas disparu,<br />
elle devient une alarme. Les alarmes sont<br />
affichées de la même manière que les pré-<br />
passé est supérieur ou égal à 60 secondes.<br />
• Le nombre maximum de pré-alarmes a<br />
été dépassé dans l’intervalle d’une heure<br />
(cinq), dans ce cas chaque pré-alarme sui-<br />
Cause Remarques<br />
alarmes, à l’exception de l’allumage du voyant<br />
rouge fixe. Avant de réarmer l’unité, il est<br />
conseillé de contacter le service d’assistance.<br />
Pour effectuer le réarmement de l’unité il est<br />
nécessaire d’éteindre et d’allumer à nouveau<br />
l’unité avec la touche stand-by.<br />
vante sera affichée directement comme une<br />
alarme, et comme cette dernière, elle provoquera<br />
l’arrêt de l’appareil jusqu’à la résolution<br />
du problème.<br />
Cette indication intervient si l'interrupteur du contact du magnétothermique<br />
de protection du compresseur MTC s'ouvre.<br />
2 102 Magnétothermique ventilateur Cette indication intervient si le contact correspondant à l'interrupteur<br />
du magnétothermique de protection du ventilateur MTV s'ouvre.<br />
Ce code est affiché seulement au cas où la carte est utilisée comme<br />
rechange de carte avec Logiciel jusqu'à la version 3.6.<br />
3 103 Pressostat Haute pression Cette indication NE concerne PAS l'état du pressostat de haute pression,<br />
mais celui du contacteur compresseur. Le pressostat de haute<br />
pression agit directement sur le contact du compresseur. Si la carte<br />
commande l'allumage du compresseur et que le contacteur n'est<br />
pas activé après 3 secondes, ce signal se présente. Cette alarme<br />
peut également être provoquée par un défaut de fonctionnement<br />
du relais de renvoi du compteur du compresseur à la carte (indiqué<br />
comme RAP sur les schémas électriques). Si le contact se désactive<br />
durant le fonctionnement du compresseur, ce signal se présente. AP.<br />
4 104 Fluxostat<br />
Pressostat différentiel de l'eau<br />
Cette indication se présente à l'ouverture du contact correspondant<br />
au fluxostat ou au pressostat différentiel. Cette alarme n'est pas<br />
détectée lors des 40 premières secondes qui suivent la mise en service<br />
de la pompe. L'appareil déclenche l'alarme et se bloque lorsque<br />
le nombre maximum d'interventions du fluxostat permis est dépassé.<br />
Si le mode protection antigel est en veille (et donc la pompe aussi),<br />
l'état du fluxostat est également contrôlé. FL/PD.<br />
5 105 Pressostat Basse pression Ce signal intervient lorsque le contact correspondant au pressostat<br />
de basse pression s'ouvre (en aspiration du compresseur) BP.<br />
6 106 Sonde d'entrée d'eau absente Cette indication se présente lorsque la sonde d'entrée d'eau est<br />
débranchée.<br />
7 107 Sonde de sortie d'eau absente Cette indication se présente lorsque la sonde de sortie d'eau est<br />
débranchée.<br />
8 108 Gel de l'eau Cette indication se présente lorsque le seuil de l'antigel est atteint<br />
(menu installateur paramètre (6) par défaut : 3 °C) de la température<br />
de l’eau en sortie est atteint. On sort de l'état de pré-alarme<br />
avec une température de l'eau en sortie supérieure au point de<br />
consigne calculé par la carte selon un algorithme interne ; l’alarme<br />
antigel est suspendue (en mode chaud) durant un temps égal à 3<br />
secondes par l'allumage du compresseur.<br />
9 109 Sonde de refoulement absente Ce signal apparaît quand la sonde du gaz de refoulement est absente.<br />
10 110 Température du gaz de refoulement<br />
élevée<br />
Ce signal apparaît quand la température du gaz de refoulement relevée<br />
(sonde SGP) dépasse le seuil prévu sur le paramètre. On sort de l'état de<br />
pré-alarme avec une température réglée en usine (par défaut 125 °C)<br />
4900575_01 / Ver - 4.30<br />
FR<br />
81
82<br />
11 111 Transducteur de pression de<br />
refoulement du compresseur<br />
absent<br />
FR 4900575_01 / Ver - 4.30<br />
Ce signal apparaît quand le transducteur de refoulement du compresseur<br />
est absent et que l'appareil est réglé comme pompe à chaleur<br />
ou que la présence du DCP est configurée.<br />
12 112 Haute pression Ce signal apparaît lorsque le transducteur relève une pression de<br />
refoulement supérieure au seuil réglé (par défaut : 40 bar).<br />
On sort de l'état de pré-alarme avec une pression réglée en usine<br />
(par défaut : 38 bar).<br />
13 113 Sonde dégivrage absente ce signal apparaît quand la sonde de dégivrage est absente et que<br />
l'appareil est configuré comme pompe à chaleur.<br />
14 114 Transducteur de pression d'aspiration<br />
du compresseur absent<br />
ce signal apparaît quand le transducteur d'aspiration du compresseur<br />
est absent et que l'appareil est configuré comme pompe à<br />
chaleur.<br />
15 115 Basse pression Cette indication apparaît lorsque le transducteur de refoulement du<br />
compresseur signal une pression en aspiration inférieure au seuil<br />
réglé en usine à froid (par défaut : 4 bars), ou à chaud (par défaut :<br />
2 bar). On sort de l'état de pré-alarme quand la pression d'aspiration<br />
franchit le seuil d'intervention prévu, par défaut égal à 2 bars.<br />
L’alarme de basse pression est suspendue à chaud pour un temps<br />
égal à 3 secondes par l'allumage du compresseur. Et elle reste suspendue<br />
durant l'inversion de cycle.<br />
16 - Bas rendement À chaque fois que l'appareil est alimenté, le contrôle vérifie une seule<br />
fois le comportement du compresseur au moyen de la procédure de<br />
contrôle du rendement, ce contrôle peut être désactivé par le commutateur<br />
DIP.<br />
17 117 Magnétothermique pompe Cette indication intervient si le contact du magnétothermique de protection<br />
de la pompe s'ouvre. MTP. Ce code est affiché seulement au<br />
cas où la carte est utilisée comme rechange de carte avec Logiciel<br />
jusqu'à la version 3.6.<br />
18 118 Découpage de courant de haute<br />
pression<br />
19 119 Découpage de courant de basse<br />
pression<br />
20 120 Étranglement de la température<br />
de refoulement<br />
21 121 Erreur BEMF (refroidisseur de l'inverter),<br />
erreur lors de la détection<br />
du « back emf »<br />
22 122 Erreur de communication<br />
interne :<br />
Cette indication apparaît chaque fois qu'un étranglement se produit<br />
parce qu'on a atteint le seuil réglé. L'appareil déclenche l'alarme<br />
et se bloque lorsque le nombre maximum d'étranglements autorisé<br />
(par défaut 5) est dépassé. Avec l'inverter, indique également un<br />
étranglement dû à un taux de compression élevé.<br />
Cette indication apparaît chaque fois qu'un étranglement de basse<br />
pression se produit, l'appareil déclenche l'alarme et se bloque quand<br />
le nombre maximum d'étranglements autorisé (par défaut 5) est<br />
dépassé.<br />
Cette indication apparaît chaque fois qu'un étranglement de la température<br />
de refoulement se produit, l'appareil déclenche l'alarme et<br />
se bloque quand le nombre maximum d'étranglements autorisé (par<br />
défaut 5) est dépassé.<br />
Cette erreur est renvoyée par la carte de contrôle de l'inverter et<br />
est liée au problèmes de démarrage du compresseur.<br />
La carte de contrôle de l'inverter a des problèmes internes de communication.<br />
23 123 Surintensité Excès de consommation de courant de la part du compresseur.<br />
24 124 Absence de charge Le compresseur n'absorbe pas assez de courant, il est possible qu'il<br />
tourne à vide.<br />
25 125 Tension erronée La carte de contrôle de l'inverter signale une tension de bus erronée.<br />
26 126 Erreur au démarrage : La carte de contrôle de l'inverter signale un départ du moteur<br />
PMSM erroné.<br />
27 127 Erreur de protection IPM Erreur sur l'IGBT.<br />
28 128 Erreur EEPROM : Erreur de EEPROM sur la carte de contrôle de l'inverter.<br />
29 129 Blocage du compresseur<br />
30 130 Communication absente La carte de contrôle de l'inverter ne répond pas, elle est peut-être<br />
hors tension,le câble série est peut-être détaché, les signaux A et B<br />
sont peut-être inversés.<br />
31 131 PFC Module Erreur du module inverter PFC.
32 132 Température excessive de l'ailette<br />
de refroidissement<br />
33 133 Surintensité en accélération Erreur du matériel<br />
34 134 Surintensité à vitesse constante Erreur du matériel<br />
35 135 Surintensité en décélération Erreur du matériel<br />
36 136 Voltage insuffisant sur bus DC<br />
37 137 Voltage excessif sur bus DC<br />
40 140 PFC Erreur du convertisseur, Erreur du logiciel.<br />
erreur dans le module PFC<br />
41 141 Surintensité en accélération Erreur du Logiciel.<br />
42 142 Surcharge<br />
43 143 Surintensité à vitesse constante Erreur du Logiciel.<br />
44 144 Surintensité en décélération Erreur du Logiciel.<br />
45 145 Compresseur non connecté<br />
correctement<br />
46 146 Absence de communication<br />
47 147 Erreur du capteur de température<br />
ailette du refroidissement<br />
51 151 Condition anormale. Fréquence réduite de protection contre une surintensité ou une température<br />
excessive.<br />
54 154 Vanne d'inversion de cycle en La vanne d'inversion de cycle pourrait être en panne ou bloquée.<br />
panne<br />
55 155 Haute température d'entrée<br />
d'eau<br />
-- 156 Inversion de cycle due à la haute<br />
température du gaz de refoulement.<br />
57 157 Erreur d'écriture de la sonde à<br />
distance du tableau DHW.<br />
58 158 Erreur de lecture de la sonde de<br />
température de l'air extérieur.<br />
59 159<br />
60 160<br />
Panne de la sonde eau à l'ENTRÉE<br />
du condenseur<br />
Panne de la sonde eau à la<br />
SORTIE du condenseur<br />
La température d'entrée d'eau a dépassé la valeur du paramètre<br />
menu installateur, paramètre (H). Présence probable d'une chaudière<br />
sur le même système. À la troisième intervention de la préalarme,<br />
l'appareil déclenche l'alarme et se bloque.<br />
Cette pré-alarme indique l’intervention d'un dégivrage pour une<br />
inversion de cycle sans avoir respecté les temps entre les inversions<br />
de cycle. L’enclenchement de l’inversion de cycle a été causé par le<br />
dépassement du seuil d'étranglement dû à une haute température<br />
du gaz de refoulement par défaut 130°. Cette pré-alarme ne cause<br />
pas l'arrêt du compresseur et ne présente pas un nombre limite<br />
d'interventions.<br />
Cette pré-alarme indique une panne de la sonde à distance ou un<br />
problème dans la communication avec le tableau DHW. L'alarme<br />
s'active seulement si le paramètre (8) est = 4 dans le menu et si le<br />
mot de passe est = 30.<br />
Cette pré-alarme indique une panne de la sonde de température de<br />
l'air extérieur lorsque le DCP est présent ou que l'appareil est une<br />
pompe à chaleur.<br />
ATTENTION :<br />
Se rappeler que les pré-alarmes sont à réarmement automatique, tandis que les alarmes sont à réarmement manuel.<br />
À partir de la version logicielle 3.9.0, on a introduit le réarmement des alarmes à l’aide du contact à distance d’ON/OFF, si activé.<br />
Depuis la position ON, on passe sur OFF et on revient sur ON en 5 secondes, cela réarme les alarmes ; par le contact ON/OFF, il est possible de<br />
réaliser 3 réarmements par heure au maximum.<br />
Il faut d’abord réarmer les alarmes avec la touche « R ».<br />
En cas d’absence de tension, les alarmes sont réarmées.<br />
4900575_01 / Ver - 4.30<br />
FR<br />
83
84<br />
DE 4900575_01 / Ver - 4.30<br />
AERMEC S.p.A.<br />
I-37040 Bevilacqua (VR) Italia – Via Roma, 996<br />
Tel. (+39) 0442 633111<br />
Telefax 0442 93730 – (+39) 0442 93566<br />
www.aermec.com - info@aermec.com<br />
MODUCONTROL<br />
SERIENNUMMER<br />
EG-KONFORMITÄTS-<br />
ERKLÄRUNG<br />
Wir zeichnen eigenverantwortlich, dass die oben genannte Maschineneinheit, bestehend aus:<br />
NAME MODUCONTROL<br />
TYP Elektronikplatine für WASSER/WASSER Kühlvorrichtung, Wärmepumpe<br />
auf das sich diese Erklärung bezieht, den folgenden harmonisierten Normen entspricht:<br />
CEI EN 60730-1 Sicherheitsnorm<br />
CEI EN 61000-6-1<br />
CEI EN 61000-6-3<br />
CEI EN 61000-6-2<br />
CEI EN 61000-6-4<br />
Elektromagnetische Unempfindlichkeit und Emission für Wohnbereiche<br />
Elektromagnetische Unempfindlichkeit und Emission in Industriebereichen<br />
Damit werden die wesentlichen Anforderungen folgender Richtlinien erfüllt:<br />
- Richtlinie LVD: 2006/95/EG<br />
- Richtlinie zur elektromagnetischen Verträglichkeit 2004/108/EG<br />
Bevilacqua 15/01/2008<br />
Direttore Commerciale<br />
Firma
Index<br />
Vorsichtsmaßnahmen und Sicherheitsvorschriften ...................................................... 87<br />
Eigenschaften der Regelvorrichtung .............................................................................. 88<br />
Benutzerschnittstelle ....................................................................................................... 88<br />
Standardeinstellungen im BENUTZERMENÜ ................................................................ 89<br />
Standardeinstellungen des WIDERSTANDS .................................................................. 89<br />
Standardeinstellungen im INSTALLATEUR-MENÜ ........................................................ 90<br />
Standardeinstellungen im INSTALLATEUR-MENÜ 2 ..................................................... 90<br />
Anzeigen der Benutzerschnittstelle und Parameter ..................................................... 91<br />
Lese-Menü ........................................................................................................................ 92<br />
ANWENDER-Menü ........................................................................................................... 93<br />
Einstellung der Betriebsparameter (Benutzerebene) .................................................. 93<br />
Einstellung des Temperatur-Sollwerts im Kühlbetrieb ............................................... 93<br />
Einstellung des Proportionalbereichs im Kühlbetrieb ................................................ 93<br />
Einstellung der Sollwertwahl je nach der Außentemperatur ...................................... 94<br />
Einstellung des Temperatur-Sollwerts im Kühlbetrieb 1 ............................................ 94<br />
Einstellung Außentemperatur 1 ................................................................................. 94<br />
Einstellung des Temperatur-Sollwerts im Kühlbetrieb 2 ............................................ 94<br />
Einstellung Außentemperatur 2 ................................................................................. 94<br />
INSTALLATEUR-Menü ...................................................................................................... 95<br />
Einstellung der Betriebsparameter (Installateurebene) ................................................ 95<br />
Einstellung der Regelung von Ein- oder Ausgang .................................................... 95<br />
Einstellung von FORCE-OFF im Kühlbetrieb ............................................................. 95<br />
Einstellung der Sicherheitsschwelle .......................................................................... 95<br />
Einstellung der Integralzeit ........................................................................................ 96<br />
Einstellung der Derivativzeit ...................................................................................... 96<br />
Einstellung der Frostschutz-Schwelle ........................................................................ 96<br />
Einstellung von Frost Protection ................................................................................ 96<br />
Konfiguration der Paneelsteuerung ........................................................................... 96<br />
Konfiguration des Bildschirmschoners ...................................................................... 97<br />
Modbus-Adresse der Überwachungsvorrichtung ..................................................... 97<br />
Baudrate der Überwachungsvorrichtung .................................................................. 97<br />
Aktivierung des Schreibvorgangs bei der Überwachungsvorrichtung ..................... 97<br />
4900575_01 / Ver - 4.30<br />
DE<br />
85
86<br />
INSTALLATEUR 2-Menü ................................................................................................... 98<br />
Einstellung der Betriebsparameter (Installateurebene) ................................................ 98<br />
Schwellenwerte für die Reaktivierung nach dem Herunterfahren Kraft aus .............. 98<br />
Ausschalten der Pumpe für Thermostat .................................................................... 98<br />
Menü für die Einstellung der WIDERSTÄNDE ................................................................ 99<br />
Einstellung der Betriebsparameter (Widerstandebene) ............................................... 99<br />
Einstellung des Sollwerts des Frostschutzwiderstands ............................................. 99<br />
Einstellung der Bandbreite des Frostschutzwiderstands .......................................... 99<br />
Tabelle zur Konfiguration der DIP-Schalter.................................................................. 100<br />
Serielles Kommunikationsprotokoll ............................................................................. 102<br />
AUFLISTUNG DER DIGITALEN WERTE (COIL): ..................................................... 102<br />
MODBUS-Steuerungen ........................................................................................... 102<br />
VERZEICHNIS READ REGISTER: ............................................................................ 106<br />
VERZEICHNIS WRITE REGISTER: ........................................................................... 107<br />
LISTE DER AUSNAHMEN: ....................................................................................... 107<br />
Alarmübersichtstabelle .................................................................................................. 108<br />
DE 4900575_01 / Ver - 4.30<br />
Index
Vorsichtsmaßnahmen und Sicherheitsvorschriften<br />
Die Verpackung NICHT<br />
nass machen<br />
Hinweise zur Entsorgung<br />
NICHT auf die<br />
Verpackung steigen<br />
Achtung: Dieses Produkt enthält elektrische und elektronische Geräte,<br />
die nicht über die normalen Sammelkanäle für Hausmüll entsorgt<br />
werden können. Für diese Produkte gibt es Zentren zur getrennten<br />
Sammlung.<br />
Die elektrischen und elektronischen Geräte müssen separat sowie unter<br />
Einhaltung der im entsprechenden Land gültigen gesetzlichen Bestimmungen<br />
behandelt werden.<br />
In den Geräten vorhandene Batterien oder Akkumulatoren müssen separat<br />
gemäß den Bestimmungen der entsprechenden Kommune entsorgt<br />
werden.<br />
Anmerkungen zum Handbuch<br />
Vorsichtig mit dem<br />
Produkt umgehen<br />
Sicherheitssymbole<br />
Gefahr durch Stromspannung<br />
Achtung<br />
Vorsicht vor Maschinenteilen<br />
in Bewegung<br />
Die Handbücher an einem trockenen Ort aufbewahren, damit es mindestens weitere<br />
10 Jahre für eventuelle Informationen einsehbar ist.<br />
Alle in diesem Handbuch enthaltenen Informationen aufmerksam und vollständig lesen.<br />
Insbesondere auf die Benutzungsanweisungen mit den Hinweisen "VORSICHT" oder "ACH-<br />
TUNG" achten, da deren Nichtbeachtung Schäden am Gerät bzw. Sach- und Personenschäden<br />
zur Folge haben kann. Bei Betriebsstörungen, die in dieser Gebrauchsanweisung<br />
nicht aufgeführt sind, wenden Sie sich umgehend an die zuständige Kundendienststelle.<br />
Stellen Sie das Gerät so auf, dass Instandhaltungs- und/oder Reparaturarbeiten<br />
durchgeführt werden können.<br />
Die Garantie des Geräts deckt jedenfalls nicht die Kosten für Kraftfahrdrehleitern,<br />
Gerüste oder andere Hebesysteme, die sich bei Garantiearbeiten als erforderlich erweisen<br />
sollten. Die AERMEC S.p.A. übernimmt keine Haftung für Schäden aus dem<br />
unsachgemäßen Gebrauch des Gerätes und der teilweisen oder oberfl ächlichen Lektüre<br />
der in diesem Handbuch enthaltenen Informationen.<br />
4900575_01 / Ver - 4.30<br />
DE<br />
87
Die Bedientafel der Einheit ermöglicht<br />
eine schnelle Einrichtung der Betriebsparameter<br />
der Maschine und ihre Anzeige.<br />
Das Display besteht aus 4 Ziffern und<br />
verschiedenen Leds zur Anzeige von<br />
Betriebsart, eingestellten Parametern<br />
und eventuell ausgelösten Alarmen. Auf<br />
88<br />
Index Funktionen<br />
A Bedientafel am Gerät<br />
B Kühlvorrichtung/ Wärmepumpe<br />
C Modu Control<br />
D Fernbedientafel PR3<br />
DE 4900575_01 / Ver - 4.30<br />
Eigenschaften der Regelvorrichtung<br />
der Platine werden alle Standard-Einstellungen<br />
sowie eventuelle Änderungen<br />
gespeichert. Bei Installation der zum Zubehör<br />
gehörenden Fernbedientafel PR3<br />
lassen sich das Ein- und Ausschalten,<br />
die Einrichtung der Betriebsart (Kühlbetrieb-Heizbetrieb)<br />
und die Anzeige der<br />
Benutzerschnittstelle<br />
Alarmübersicht fernsteuern. Nach einem<br />
Stromausfall ist die Einheit in der Lage<br />
selbst automatisch neu zu starten und<br />
dabei die ursprünglichen Einstellungen<br />
beizubehalten.<br />
Interne Verbindung zwischen Moducontrol und Bedientafel<br />
E<br />
(bereits werkseitig verkabelt)<br />
F Verbindung zwischen dem Gerät und PR3 mit einer maximalen Länge von 150 m (Verkabelung obliegt dem Installateur)
Standardeinstellungen im BENUTZERMENÜ<br />
ANWENDER-Menü - (Passwort 000)<br />
String StF bnF CSt (1) SF1 tF1 SF2 tF2<br />
Index 1 2 5 6 7 8 9<br />
WRL 7 5 0 12 18 7 30<br />
(1) Ist dies der Raumklimafühler sollte der Wert eingestellt werden (1);<br />
Index - String Bedeutung des Parameters<br />
1 - StF Sollwert im Kühlbetrieb<br />
2 - bnF Kühlbereich<br />
5 - CSt Sollwertkorrektur<br />
6 - SF1 Sollwert im Kühlbetrieb 1<br />
7 - tF1 Außentemperatur 1<br />
8 - SF2 Set a freddo 2<br />
9 - tF2 Außenlufttemperatur 2 (Kühlbetrieb)<br />
Standardeinstellungen des WIDERSTANDS<br />
String<br />
Menü für die Einstellung der WIDERSTÄNDE - (Passwort 001)<br />
SrA brA<br />
Index 0 1<br />
WRL 4 1<br />
Index - String Bedeutung des Parameters<br />
0 - SrA Sollwert Frostschutzwiderstand<br />
1 - brA Bereich Frostschutzwiderstand<br />
4900575_01 / Ver - 4.30<br />
DE<br />
89
90<br />
Standardeinstellungen im INSTALLATEUR-MENÜ<br />
INSTALLATEUR-Menü - (Passwort 030)<br />
String iu oFF SAF int dEr AG FrP PAN SCr Ad1 Bd1 AS1<br />
Index 0 1 3 4 5 6 7 9 I J L N<br />
WRL 0 4 5 600 0 3 3 0 1 1 1 0<br />
Index - String Bedeutung des Parameters<br />
0 - iu Regelung von Ein-/Ausgang<br />
1 - oFF Force-off im Kühlbetrieb<br />
3 - SAF Rücksetzbereich von Force-off<br />
4 - int Integralzeit<br />
5 - dEr Derivativzeit<br />
6 - AG Frostschutz<br />
7 - FrP Frost protection<br />
9 - PAN Konfiguration der Fernbedientafel<br />
I - SCr Konfiguration des Bildschirmschoners<br />
J - Ad1 Modbus-Adresse der Überwachungsvorrichtung<br />
L - Bd1 Baudrate der Überwachungsvorrichtung<br />
N - AS1 Aktivierung des Schreibvorgangs bei Überwachungsvorrichtung<br />
Standardeinstellungen im INSTALLATEUR-MENÜ 2<br />
Index 0<br />
INSTALLATEUR-Menü 2 - (Passwort 031)<br />
1 2 3<br />
WRL 6 0 0 0<br />
Index - String Bedeutung des Parameters<br />
0 Temperaturdelta für die Wiederinbetriebnahme des Verdichters nach FORCE OFF Eingriff<br />
1 ---<br />
2 ---<br />
3 Aus Pumpe Thermostat<br />
DE 4900575_01 / Ver - 4.30
Anzeigen der Benutzerschnittstelle und Parameter<br />
Die Haupt-Benutzerschnittstelle besteht aus einer Led-Tafel<br />
mit kapazitiver Tastatur (d.h. mit auf Berührung reagierenden<br />
Schaltfl ächen). die Anzeigen sind in 3 Menüs organisiert:<br />
LESE-Menü (Taste (C) Abb.1)<br />
Enthält die Informationen (nur im Lesemodus) zum laufenden<br />
Betrieb des Geräts.<br />
EINSTELL-Menü (Taste (D) Abb.1)<br />
Enthält alle Parameter, die der Benutzer je nach Anlagenerfordernis<br />
ändern kann; diese Parameter sind in verschiedenen<br />
Untermenüs zusammengefasst:<br />
- ANWENDER-Menü (Passwort 000);<br />
- INSTALLATEUR-Menü (Passwort 030);<br />
- Menü für die Einstellung der WIDERSTÄNDE<br />
(Passwort 001);<br />
ALARM-Übersicht (Taste (E) Abb.1)<br />
Die Alarmübersicht vermerkt die Fehlerzustände und/oder Fehlfunktionen<br />
des Geräts (sowohl Alarme als auch Warnmeldungen)<br />
Während des normalen Betriebs wird am Display der letzte modifi<br />
zierte Parameter angezeigt; wenn anschließend mindestens 5 Minuten<br />
lang keine weiteren Tasten gedrückt werden, aktiviert das Display<br />
den Modus Bildschirmschoner (diese Funktion kann über den<br />
Parameter (i) im INSTALLATEUR-Menü eingestellt werden.<br />
Für die Anzeige der Parameter und/oder Ablesungen werden<br />
4 Ziffern benutzt; die erste gibt den Index an, also eine<br />
Nummer, die den Benutzer wissen lässt, welcher Parameter<br />
oder welche Ablesung gerade angezeigt wird (Abb. 3).<br />
Abb.3<br />
A B<br />
Benutzerschnittstelle (Abb.3)<br />
A Parameterindex<br />
B Parametersymbol / Parameterwert<br />
Abb.1<br />
Benutzerschnittstelle (Abb.1)<br />
A Anzeige-Display<br />
B Einschalttaste<br />
C Taste zum Aufrufen des Lese-Menüs<br />
D Taste zum Aufrufen des Menüs Sollwert<br />
E Taste zum Aufrufen der Alarmübersicht<br />
F Taste zum Durchblättern / Erhöhen-Verringern<br />
der Parameter<br />
1<br />
Abb.2<br />
5 6<br />
dj<br />
7 8 9<br />
SET<br />
2 3<br />
Displayanzeige (Abb.2)<br />
1 Angezeigtes Menü SOLLWERT<br />
2 Angezeigtes Menü ALARME<br />
3 Parameterindex<br />
4 Parametersymbol / Parameterwert<br />
5 Saisonanzeige SOMMER<br />
6 Saisonanzeige WINTER<br />
7 Anzeige für vorliegenden Alarmstatus<br />
8 Anzeige für laufenden Verdichterbetrieb (diese Anzeige<br />
kann verschiedene Blinkfrequenzen aufweisen).<br />
9 Anzeige für laufendes Anhalten<br />
4<br />
4900575_01 / Ver - 4.30<br />
DE<br />
91
Für den Zugriff auf das Lese-Menü die<br />
in Abbildung 4 gezeigte Taste drücken;<br />
Im Lese-Menü erscheint am Display der<br />
Leseindex und ein die Ablesung kennzeichnender<br />
String bestehend aus 3<br />
Zeichen; der String bleibt eine Sekunde<br />
lang angezeigt, danach wird er durch<br />
92<br />
Indexliste und entsprechende Ablesungen ANWENDER-MENÜ (kein Passwort)<br />
DE 4900575_01 / Ver - 4.30<br />
Lese-Menü<br />
den Wert der entsprechenden Ablesung<br />
ersetzt. Will man zur nächsten Ablesung<br />
übergehen, die in Abb. 5 gezeigte Taste<br />
drücken, , will man zur vorherigen Ablesung<br />
zurück blättern, die in Abb. 6 gezeigte<br />
Taste drücken. Bei jedem Übergang<br />
von einer Ablesung zur nächsten<br />
Abb.4 Abb.5 Abb.6<br />
Index - String<br />
Temperatur Austrittswasser<br />
Temperatur Eintrittswasser<br />
Temperatur am Eingang des Verflüssigers<br />
Gastemperatur Vorlauf<br />
Außenlufttemperatur (1)<br />
Vorlaufdruck (2)<br />
Temperatur am Ausgang des Verflüssigers<br />
Thermostat<br />
Sicherheitsbereich bei Force-off<br />
Zeiten CP<br />
Betriebsstunden (Tausend)<br />
Betriebsstunden (Einheit)<br />
Index - String<br />
wird in der ersten Sekunde neben der<br />
Änderung des Indexwerts der String<br />
zum Erkennen der aktuellen Ablesung<br />
angezeigt (jede Ablesung lässt sich<br />
jedoch anhand des Indexwertes durch<br />
den Vergleich mit der nachstehend angeführten<br />
Tabelle erkennen).<br />
Verdichteranläufe (Tausend)<br />
Verdichteranläufe (Einheit)<br />
Software-Release<br />
Kleinere SW-Releases<br />
Derzeit verwendeter Sollwert<br />
Sollwert für Verflüssigungsdruck<br />
Druckdifferential für Verflüssigung<br />
Betriebsstunden<br />
VERDICHTER 1 (Einheit)<br />
Betriebsstunden<br />
VERDICHTER 2 (Einheit) (3)<br />
Verdichteranläufe<br />
VERDICHTER 1 (Tausend)<br />
Verdichteranläufe<br />
VERDICHTER 2 (Tausend) (3)<br />
Leistungsbruchteil (4)<br />
(1) Dieser Wert wird nur angezeigt, wenn das Zubehör Außentemperaturfühler installiert wurde; ist dieses Zubehör nicht vorhanden, werden anstelle<br />
des Temperaturwertes 3 Striche angezeigt;<br />
(2) Dieser Wert wird nur angezeigt, wenn das Zubehör Hochdruckwandler installiert wurde; ist dieses Zubehör nicht vorhanden, werden anstelle des<br />
Druckwertes 3 Striche angezeigt;<br />
(3) Nur bei den Modellen WRL100-140-160 angezeigte Parameter;
Für den Zugriff auf das ANWENDER-Menü<br />
die in Abb. 7 gezeigte Taste drücken;<br />
anschließend das Passwort für den Zugriff<br />
auf das jeweilige Menü eingeben; für<br />
den Zugriff auf das Anwender-Menü lautet<br />
das Passwort 000 (das ist der angezeigte<br />
Standard-Code); zum Ändern eines Passwortcodes<br />
die Pfeiltasten benützen. Nach<br />
ANWENDER-Menü<br />
Eingabe des richtigen Passworts die in Abb.<br />
7 gezeigte Taste drücken. Am Display wird<br />
der Index des Parameters ANWENDER und<br />
ein 3-Zeichen umfassender den Parameter<br />
kennzeichnender String angezeigt; der<br />
String bleibt eine Sekunde lang angezeigt,<br />
danach wird er durch den Wert des entsprechenden<br />
Parameters ersetzt. Für den Über-<br />
Abb.7 Abb.8<br />
gang zum nächsten Parameter die Pfeiltasten<br />
benützen (Abb. 8). Für die Änderung<br />
eines Parameters muss man den Parameter<br />
auswählen, die in Abb. 7 gezeigte Taste<br />
drücken, den zugeordneten Wert mittels der<br />
in Abb. 8 gezeigten Pfeiltasten ändern und<br />
zum Bestätigen der Änderung wieder die in<br />
Abb. 7 gezeigte Taste drücken.<br />
Einstellung der Betriebsparameter (Benutzerebene)<br />
Index - String<br />
Index - String<br />
PASSWORD = 000<br />
Wert<br />
MIN<br />
Einstellung des Temperatur-Sollwerts im Kühlbetrieb<br />
Wert<br />
MAX<br />
Parameterfunktion<br />
-20 °C 26 °C Dieser Parameter gibt den aktiven Betriebssollwert im Kühlbetrieb an.<br />
Wert<br />
MIN<br />
Einstellung des Proportionalbereichs im Kühlbetrieb<br />
Wert<br />
MAX<br />
1 °C 20 °C<br />
Parameterfunktion<br />
Dieser Parameter gibt die proportionale Bandbreite für den Sollwert im Kühlbetrieb an;<br />
in dieser Bandbreite zeigt der Verdichter ein optimales Verhalten, er schaltet sich nur<br />
ein, wenn die Wassertemperatur am Eingang/Ausgang (je nach dem vom Parameter<br />
(0) im Installateur-Menü eingestellten Kontrolltyp) größer ist als der Betriebssollwert im<br />
Kühlbetrieb (Parameter (1) Anwender-Menü) plus der Wert dieses Parameters.<br />
4900575_01 / Ver - 4.30<br />
DE<br />
93
94<br />
Einstellung der Sollwertwahl je nach der Außentemperatur (mit zusätzlichen Luftfühler)<br />
Index - String<br />
Index - String<br />
Index - String<br />
Index - String<br />
Index - String<br />
Wert<br />
MIN<br />
Wert<br />
MAX<br />
0 3<br />
Wert<br />
MIN<br />
DE 4900575_01 / Ver - 4.30<br />
Parameterfunktion<br />
Dieser Sollwert aktiviert den Algorithmus zum Ausgleich des Betriebssollwerts.<br />
Wert (0) = Funktion nicht verfügbar;<br />
Wert (1) = aktive Funktion;<br />
(°C)<br />
SET (H)<br />
Einstellung des Temperatur-Sollwerts im Kühlbetrieb 1<br />
Wert<br />
MAX<br />
-20 °C 26 °C<br />
Wert<br />
MIN<br />
Wert<br />
MAX<br />
-40 °C 50 °C<br />
Wert<br />
MIN<br />
(°C)<br />
Parameterfunktion<br />
Dieser Parameter gibt den maximalen Sollwert im Kühlbetrieb in Zusammenhang mit der<br />
niedrigsten Außenlufttemperatur (Index (7) des Anwender-Menüs) an. Dieser Parameter wird<br />
nur angezeigt, wenn die Ausgleichsfunktion (Index (5) des Anwender-Menüs) aktiviert wurde.<br />
Einstellung Außentemperatur 1<br />
Parameterfunktion<br />
Dieser Parameter zeigt die niedrigste Außentemperatur an, die für den Ausgleich<br />
im Kühlbetrieb berücksichtigt wird. Dieser Parameter wird nur angezeigt, wenn die<br />
Ausgleichsfunktion (Index (5) des Anwender-Menüs) aktiviert wurde.<br />
Einstellung des Temperatur-Sollwerts im Kühlbetrieb 2<br />
Wert<br />
MAX<br />
-20 °C 26 °C<br />
Wert<br />
MIN<br />
Wert<br />
MAX<br />
-40 °C 50 °C<br />
SET SF1(F)<br />
SF2<br />
SET TF1 (G) SET TF2(I)<br />
Parameterfunktion<br />
Dieser Parameter gibt den niedrigsten Sollwert im Kühlbetrieb in Zusammenhang mit der<br />
höchsten Außenlufttemperatur (Index (9) des Anwender-Menüs) an. Dieser Parameter wird<br />
nur angezeigt, wenn die Ausgleichsfunktion (Index (5) des Anwender-Menüs) aktiviert wurde.<br />
Einstellung Außentemperatur 2<br />
Parameterfunktion<br />
Im Kühlbetrieb wird der Betriebssollwert<br />
automatisch aufgrund der<br />
Außentemperatur gemäß der in der<br />
Grafik dargestellten Logik berechnet.<br />
SF1: Index (6) Anwender-Menü;<br />
SF2: Index (8) Anwender-Menü;<br />
TF1: Index (7) Anwender-Menü;<br />
TF2: Index (9) Anwender-Menü;<br />
Dieser Parameter zeigt die höchste Außenlufttemperatur an, die für den Ausgleich<br />
im Kühlbetrieb berücksichtigt wird. Dieser Parameter wird nur angezeigt, wenn die<br />
Ausgleichsfunktion (Index (5) des Anwender-Menüs) aktiviert wurde.
Für den Zugriff auf das INSTALLATEUR-<br />
Menü die in Abb. 9 gezeigte Taste drücken;<br />
anschließend das Passwort für den Zugriff<br />
auf das jeweilige Menü eingeben; für den<br />
Zugriff auf das Installateur-Menü lautet das<br />
Passwort 030; zum Ändern eines Passwortcodes<br />
die Pfeiltasten benützen. Nach<br />
Eingabe des richtigen Passworts die in<br />
ACHTUNG: die Änderung der folgenden<br />
Parameter ist ausschließlich dem<br />
Fachpersonal vorbehalten, das zur Installation<br />
des Geräts befugt ist.<br />
INSTALLATEUR-Menü<br />
Abb. 9 gezeigte Taste drücken. Am Display<br />
wird der Index des Parameters INSTALLA-<br />
TEUR und ein 3-Zeichen umfassender den<br />
Parameter kennzeichnender String angezeigt;<br />
der String bleibt eine Sekunde lang<br />
angezeigt, danach wird er durch den Wert<br />
des entsprechenden Parameters ersetzt.<br />
Für den Übergang zum nächsten Parame-<br />
Abb.9 Abb.10<br />
ter die Pfeiltasten benützen (Abb. 10). Für<br />
die Änderung eines Parameters muss man<br />
den Parameter auswählen, die in Abb. 9<br />
gezeigte Taste drücken, den zugeordneten<br />
Wert mittels der in Abb. 10 gezeigten<br />
Pfeiltasten ändern und zum Bestätigen der<br />
Änderung wieder die in Abb. 9 gezeigte<br />
Taste drücken.<br />
Einstellung der Betriebsparameter (Installateurebene)<br />
Index - String<br />
Index - String<br />
Index - String<br />
PASSWORD = 030<br />
Wert<br />
MIN<br />
Einstellung der Regelung von Ein- oder Ausgang<br />
Wert<br />
MAX<br />
0 2<br />
Wert<br />
MIN<br />
Wert<br />
MAX<br />
-25 °C 25 °C<br />
Wert<br />
MIN<br />
Wert<br />
MAX<br />
0,5 °C 20 °C<br />
Parameterfunktion<br />
Aufgrund des Wertes dieses Parameters wird die Maschineneinstellung wie folgt ausgerichtet:<br />
• Bei 0 nimmt die Maschine die Einstellung aufgrund der Austrittstemperatur vor;<br />
• Bei 1 nimmt die Maschine die Einstellung aufgrund der Eintrittstemperatur vor.<br />
• Bei 2 nimmt die Maschine die Einstellung aufgrund der an der Schalttafel DHW abgelesenen<br />
Temperatur des Fernfühlers vor (bei deinem Defekt des Fernfühlers nimmt die<br />
Maschine die Einstellung wieder mit dem an der Maschine installierten Fühler vor und<br />
zeigt den Alarmcode 157 an).<br />
Ist die Aufbereitung des Brauchwarmwassers aktiv geschaltet, wird die<br />
Einstellung unabhängig vom Wert dieses Parameters automatisch auf die<br />
Austrittswassertemperatur gezwungen.<br />
Einstellung von FORCE-OFF im Kühlbetrieb<br />
Parameterfunktion<br />
Die Einheiten sehen eine Steuerung der Betriebstemperatur (Eingang oder Ausgang) vor,<br />
an die eine Sicherheitsschwelle gekoppelt wird, bei deren Überschreiten der Verdichter<br />
sofort und automatisch ausgeschaltet wird. Diese Schwelle wird als FORCE-OFF bezeichnet.<br />
Einstellung der Sicherheitsschwelle<br />
Parameterfunktion<br />
Temperaturschwelle, oberhalb der der Force-off zur erneuten Aktivierung des<br />
Verdichterstarts nach dem Ausschalten durch Force-off.<br />
4900575_01 / Ver - 4.30<br />
DE<br />
95
96<br />
Index - String<br />
Index - String<br />
Index - String<br />
Index - String<br />
Index - String<br />
Wert<br />
MIN<br />
Wert<br />
MAX<br />
0 s 999 s<br />
Wert<br />
MIN<br />
Wert<br />
MAX<br />
0 s 120 s<br />
Wert<br />
MIN<br />
Wert<br />
MAX<br />
-50 °C 20 °C<br />
Wert<br />
MIN<br />
Wert<br />
MAX<br />
0 4<br />
Wert<br />
MIN<br />
Wert<br />
MAX<br />
0 3<br />
DE 4900575_01 / Ver - 4.30<br />
Einstellung der Integralzeit<br />
Parameterfunktion<br />
Die Einheiten besitzen eine hochentwickelte Logik zur Steuerung der Ausgabe-<br />
Wassertemperatur. Die integrale Steuerung vermeidet, dass das System bei einer<br />
höheren oder niedrigeren Temperatur als jener des eingestellten Betriebssollwerts<br />
ins Gleichgewicht kommt. Es wird darauf hingewiesen, dass eine Zunahme der<br />
Integrationszeit die Wirkung der integralen Steuerung schwächt.<br />
Einstellung der Derivativzeit<br />
Parameterfunktion<br />
Zeitraum, innerhalb dessen die Wassertemperatur am Eingang kontrolliert wird, um die<br />
Befüllung der Anlage zu schätzen; wenn die Bandbreite des Sollwerts in diesem Zeitraum<br />
überschritten wird, wird die Einheit aktiviert.<br />
Einstellung der Frostschutz-Schwelle<br />
Parameterfunktion<br />
Bei den Geräten kann eine Schwelle für die Auslösung des Frostschutzalarms eingestellt<br />
werden; Dieser Wert gibt an, bei welcher Temperatur der Frostschutzalarm<br />
ausgelöst wird. Es wird darauf hingewiesen, dass zur Änderung des Parameters<br />
Frostschutz-Schwelle der entsprechende <strong>Dip</strong>-Schalter aktiviert werden muss (siehe<br />
Tabelle Konfiguration der <strong>Dip</strong>-Schalter).<br />
Einstellung von Frost Protection<br />
Parameterfunktion<br />
Bei den Geräten wurde die Möglichkeit geschaffen, eine Sicherheitssteuerung bei der Ausgangstemperatur<br />
des Wassers einzustellen. aufgrund des Wertes, der diesem Parameter zugeordnet wird, wird der<br />
Frostschutzwiderstand wie folgt gesteuert:<br />
• Wert 0, Frostschutzwiderstand nicht vorhanden;<br />
• Wert 1, Frostschutzwiderstand ist eingebaut und nur betriebsbereit, wenn das Gerät im Heiz- oder<br />
Kühlbetrieb läuft;<br />
• Wert 2, Frostschutzwiderstand eingebaut und auch im Standby-Modus betriebsbereit, aber nur dann, wenn<br />
die Pumpe eingeschaltet ist;<br />
• Wert 3, Frostschutzwiderstand im Standby-Modus ohne aktive Pumpe betriebsbereit;<br />
• Wert 4 bei Außentemperatur unter 3°C wird alle 30 Minuten die Pumpe für 2 Minuten aktiviert, um die<br />
Wassertemperatur in der gesamten Anlage zu überwachen.<br />
Konfiguration der Paneelsteuerung<br />
Parameterfunktion<br />
Mit diesem Sollwert wird der für die Einheiten anwendbare Steuerungstyp konfiguriert;<br />
Je nach eingestelltem Sollwert werden die Steuerung des Betriebsmodus<br />
(HEIZBETRIEB/KÜHLBETRIEB) und die Einschalt-/Ausschaltsteuerung des Geräts folgendermaßen<br />
geregelt:<br />
Der Sollwert ist auf 0 eingestellt:<br />
• Einstellung der Betriebsart = Einstellung des Parameters auf 0<br />
• ON/OFF-Steuerung = über das Bedienfeld an der Maschine<br />
Der Sollwert ist auf 1 eingestellt:<br />
• Einstellung der Betriebsart = Einstellung des Parameters auf 0<br />
• ON/OFF-Steuerung = über Fernbedientafel<br />
Der Sollwert ist auf 2 eingestellt:<br />
• Einstellung der Betriebsart = Einstellung über den Fernkontakt<br />
• ON/OFF-Steuerung = über das Bedienfeld an der Maschine<br />
Der Sollwert ist auf 3 eingestellt:<br />
• Einstellung der Betriebsart = Einstellung über den Fernkontakt<br />
• ON/OFF-Steuerung = über Fernkontakt
Index - String<br />
Index - String<br />
Index - String<br />
Index - String<br />
Wert<br />
MIN<br />
Wert<br />
MAX<br />
Konfiguration des Bildschirmschoners<br />
Parameterfunktion<br />
0 2 Dieser Parameter zeigt die Konfiguration des Betriebszustandes des Bildschirmschoners an:<br />
• Wert 0, Bildschirmschoner deaktiviert;<br />
• Wert 1, Bildschirmschoner mit Anzeige der Bindestriche. (zu verwenden bei<br />
Bedienelementen mit einer Software vor Version 1.3);<br />
• Wert 2, Bildschirmschoner ohne Anzeige der Bindestriche (zu verwenden bei<br />
Bedienelementen mit einer Software ab Version 1.3)<br />
Wert<br />
MIN<br />
Modbus-Adresse der Überwachungsvorrichtung<br />
Wert<br />
MAX<br />
Parameterfunktion<br />
0 999 Dieser Parameter gibt die der Überwachungsvorrichtung zugeordnete Modbus Adresse<br />
an; diese Adresse wird bei der Kommunikation zwischen Überwachungsvorrichtung und<br />
Moducontrol verwendet.<br />
Wert<br />
MIN<br />
Wert<br />
MAX<br />
Baudrate der Überwachungsvorrichtung<br />
Parameterfunktion<br />
0 2 Dieser Parameter gibt die Kommunikationsgeschwindigkeit zwischen<br />
Überwachungsvorrichtung und Moducontrol an; diese Geschwindigkeit wird aufgrund des<br />
für diesen Parameter ausgewählten Wertes eingestellt:<br />
0 = 9600 bps<br />
1 = 19200 bps<br />
2 = 38400 bps<br />
Aktivierung des Schreibvorgangs bei der Überwachungsvorrichtung<br />
Wert<br />
MIN<br />
Wert<br />
MAX<br />
Parameterfunktion<br />
0 1 Dieser Parameter aktiviert die Schreibbefehle für die Überwachungsvorrichtung; diese<br />
Aktivierung wird aufgrund des für diesen Parameter ausgewählten Wertes eingestellt:<br />
0 = Deaktiviert Schreibbefehle ;<br />
1 = Aktiviert Schreibbefehle ;<br />
Es wird darauf hingewiesen, dass die Lesebefehle immer aktiv sind.<br />
4900575_01 / Ver - 4.30<br />
DE<br />
97
98<br />
DE 4900575_01 / Ver - 4.30<br />
INSTALLATEUR 2-Menü<br />
Für den Zugriff auf das Menü INSTALLATEUR_2 dieselbe Vorgangsweise anwenden, wie für das INSTALLATEUR-Menü<br />
beschrieben; die einzige Änderung ist der Wert des Passworts, dieser Wert ist 31.<br />
ACHTUNG: die Änderung der folgenden<br />
Parameter ist ausschließlich dem<br />
Fachpersonal vorbehalten, das zur Installation<br />
des Geräts befugt ist.<br />
Einstellung der Betriebsparameter (Installateurebene)<br />
Index - String<br />
Index - String<br />
PASSWORD = 031<br />
Schwellenwerte für die Reaktivierung nach dem Herunterfahren Kraft aus<br />
Wert<br />
MIN<br />
Wert<br />
MAX<br />
0 °C 30 °C<br />
Wert<br />
MIN<br />
Wert<br />
MAX<br />
0 1<br />
Abb.9a<br />
Parameterfunktion<br />
Wenn der Parameterwert rin = 4 (Parameter 8 der Installer-Menü), dann ist dies eine<br />
Sonde Storage-System, zeigt dieser Parameter, wie viel niedriger die Schwelle von Gewalt<br />
aus, um den Kompressor zu verhindern, ist nach der Intervention der reaktiviert ForceOff<br />
dynamischen erloschen bald nach.<br />
Ausschalten der Pumpe für Thermostat<br />
Parameterfunktion<br />
0 = die Pumpe bleibt in Betrieb wenn die Sollwerttemperatur erreicht wird. 1 = die<br />
Pumpe wird abgeschaltet, wenn die Solltemperatur erreicht wurde. (wenn diese Option<br />
ausgewählt wird, wird automatisch die Einstellung aufgrund der Eintrittstemperatur<br />
aktiviert). Dieser Parameter ist nur bei der Einstellung aufgrund der Eintrittstemperatur<br />
sichtbar (Parameter(0) =1 oder 2).
Menü für die Einstellung der WIDERSTÄNDE<br />
Für den Zugriff auf das Menü für die Einstellung<br />
der WIDERSTÄNDE die in Abb.<br />
14 gezeigte Taste drücken; anschließend<br />
das Passwort für den Zugriff auf<br />
das jeweilige Menü eingeben; für den<br />
Zugriff auf das Menü für die Einstellung<br />
der WIDERSTÄNDE lautet das Passwort<br />
001; zum Ändern eines Passwortcodes<br />
die Pfeiltasten benützen. Nach Einga-<br />
ACHTUNG: die Änderung der folgenden<br />
Parameter ist ausschließlich dem<br />
Fachpersonal vorbehalten, das zur Installation<br />
des Geräts befugt ist.<br />
PASSWORD = 001<br />
be des richtigen Passworts die in Abb.<br />
14 gezeigte Taste drücken. Am Display<br />
wird der Index des Parameters WIDER-<br />
STAND und ein 3-Zeichen umfassender<br />
den Parameter kennzeichnender<br />
String angezeigt; der String bleibt eine<br />
Sekunde lang angezeigt, danach wird<br />
er durch den Wert des entsprechenden<br />
Parameters ersetzt. Für den Übergang<br />
Abb.14 Abb.15<br />
zum nächsten Parameter die Pfeiltasten<br />
benützen (Abb. 15). Für die Änderung<br />
eines Parameters muss man den Parameter<br />
auswählen, die in Abb. 14 gezeigte<br />
Taste drücken, den zugeordneten<br />
Wert mittels der in (Abb. 15) gezeigten<br />
Pfeiltasten ändern und zum Bestätigen<br />
der Änderung wieder die in Abb. 14 gezeigte<br />
Taste drücken.<br />
Einstellung der Betriebsparameter (Widerstandebene)<br />
Index - String<br />
Index - String<br />
Wert<br />
MIN<br />
Einstellung des Sollwerts des Frostschutzwiderstands<br />
Wert<br />
MAX<br />
-20 °C 50 °C<br />
Wert<br />
MIN<br />
Parameterfunktion<br />
Bei den Geräten ist die Möglichkeit der Einstellung eines Schwellwertes für die<br />
Aktivierung des Frostschutzwiderstands vorgesehen; wenn die von einem der beiden<br />
Wasserfühler abgelesene Temperatur (am Eingang oder Ausgang, je nach aktivierter<br />
Steuerung) den in diesem Parameter eingestellten Wert erreicht, wird der<br />
Frostschutzwiderstand aktiviert.<br />
Einstellung der Bandbreite des Frostschutzwiderstands<br />
Wert<br />
MAX<br />
0,3 °C 10 °C<br />
Parameterfunktion<br />
Bei den Geräten ist die Möglichkeit der Einstellung eines Schwellwertes für die<br />
Aktivierung des Frostschutzwiderstands vorgesehen; wenn die von einem der beiden<br />
Wasserfühler abgelesene Temperatur (am Eingang oder Ausgang, je nach aktivierter<br />
Steuerung) den in diesem Parameter eingestellten Wert erreicht, wird der<br />
Frostschutzwiderstand aktiviert.<br />
4900575_01 / Ver - 4.30<br />
DE<br />
99
Tabelle zur Konfiguration der DIP-Schalter<br />
Neben den über die Bedientafel eingebbaren<br />
Parametern verfügen die<br />
Einheiten über eine Reihe von <strong>Dip</strong>-<br />
Schaltern, mit denen einige Optionen<br />
und Funktionen der Maschine gesteuert<br />
werden können.<br />
Es wird darauf hingewiesen, dass einige<br />
der über die Bedientafel steuerbaren<br />
100<br />
Einer<br />
DE 4900575_01 / Ver - 4.30<br />
<strong>Dip</strong>-<strong>switch</strong> (B)<br />
Standard-Einstellungen DIP-SWITCH MODUCONTROL<br />
<strong>Dip</strong>-<strong>switch</strong> (A)<br />
DIP-SWITCH (A) DIP-SWITCH (B)<br />
1 2 3 4 5 6 7 8 9 10 11 12 1 2<br />
WRL OFF OFF OFF OFF ON OFF (*) OFF OFF OFF (**) OFF OFF OFF<br />
(*) Der Wert dieses DIP-SCHALTERS hängt davon ab, ob das Zubehör Hochdruckwandler (TP2/TP3) vorhanden ist oder nicht:<br />
- Wenn das Gerät den Hochdruckwandler vorsieht, ist der DIP-SCHALTER 7 auf ON eingestellt;<br />
- Wenn das Gerät den Hochdruckwandler NICHT vorsieht, ist der DIP-SCHALTER 7 auf OFF eingestellt;<br />
(**)<br />
ON = WRL nur Kühlbetrieb (WRL °);<br />
OFF = WRL Verdampfereinheit (WRL E);
<strong>Dip</strong>-<strong>switch</strong> N° <strong>Dip</strong> Zustand Funktion<br />
A<br />
<strong>Dip</strong>-<strong>switch</strong><br />
B<br />
1<br />
2<br />
3<br />
4<br />
5<br />
6<br />
7<br />
8<br />
9<br />
10<br />
11<br />
12<br />
ON Werkseinstellungen.<br />
OFF Werkseinstellungen.<br />
ON Abtauen nur bei Zyklusumkehrung vorgesehen<br />
OFF Abtauen durch Einspritzung heißen Gases<br />
ON Wasser-Glykol-Mischung Frostschutz-Sollwert änderbar<br />
OFF Frostschutz-Sollwert (Parameter B) gesperrt<br />
ON Steuerung deaktiviert<br />
OFF Steuerung aktiviert<br />
ON Sicherheits-Leistungsregelungen deaktiviert<br />
OFF Sicherheits-Leistungsregelungen aktiviert<br />
ON Steuer-Algorithmus für niedrigen Wassergehalt deaktiviert<br />
OFF Steuer-Algorithmus für niedrigen Wassergehalt aktiviert<br />
ON Vorrichtung zur Steuerung des Kondensationsdrucks vorhanden<br />
OFF Vorrichtung zur Steuerung des Kondensationsdrucks nicht vorhanden<br />
ON Werkseinstellungen.<br />
OFF Werkseinstellungen.<br />
ON Konfiguration der Platine für Invertereinheit<br />
OFF Konfiguration der Platine für Chiller-Einheit ON/OFF<br />
ON Konfiguration der Platine für Verflüssigereinheit<br />
OFF Konfiguration der Platine für Chiller-Einheit<br />
ON Werkseinstellungen.<br />
OFF Werkseinstellungen.<br />
ON Nicht verwendet<br />
OFF Nicht verwendet<br />
<strong>Dip</strong>-<br />
Kombinationen Funktion<br />
DIP 1 DIP 2<br />
OFF OFF Werkseinstellungen.<br />
ON OFF Werkseinstellungen.<br />
ON ON Werkseinstellungen.<br />
OFF ON Werkseinstellungen.<br />
4900575_01 / Ver - 4.30<br />
DE<br />
101
Die Modu_control-Karte bietet die Möglichkeit<br />
einer Schnittstellenverbindung zu<br />
einem zentralgesteuerten System über<br />
eine entsprechende, auf dem elektrischen<br />
Standard RS485 basierende, serielle<br />
Erweiterungskarte und unter Verwendung<br />
des Modbus Standardprotokolls<br />
RTU . Die Modu_Control Karte fungiert<br />
immer als Slave der Kommunikation.<br />
102<br />
MODBUS-Steuerungen<br />
Serielles Kommunikationsprotokoll<br />
DE 4900575_01 / Ver - 4.30<br />
Zur Aktivierung der Kommunikation von<br />
einem Überwachungssystem zur Moducontrol-Karte<br />
müssen einige Parameter<br />
eingestellt werden:<br />
Parameter J - Ad1 (Modbus Adresse<br />
des Überwachungssystems);<br />
Parameter L - Bd1 (Baudrate des Überwachungssystems);<br />
Die Modu_Control Karte steuert sowohl die Registerwerte (ganze/analoge<br />
Zahlen) als auch die Coil-Werte (digitale Werte) zum Überwachungssystem<br />
BMS/VMF.Die diesbezüglichen verwendbaren Lese-/Schreibbefehle lauten:<br />
cmd<br />
Codici MODBUS utilizzati<br />
descrizione<br />
0x01 Read Coil Status<br />
0x03 Read Holding Registers<br />
0x05 Force Single Coil<br />
0x06 Preset Single Register<br />
0x0F Preset Multiple Coils<br />
0x10 Preset Multiple Registers<br />
AUFLISTUNG DER DIGITALEN WERTE (COIL):<br />
COMANDI DIGITALI DISPONIBILI<br />
Read Coil Status<br />
Force Single Coil<br />
Force Multiple Coils<br />
Um die Möglichkeit zu haben, die COIL Parameter auf<br />
die Modu_Control-Karte schreiben zu können, müssen<br />
die Steuerungen des Überwachungssystems<br />
aktiviert werden, dazu den Parameter Parameter(N)<br />
= 1 im Installateur-Menü (Passwort=30) der an der<br />
Maschine installierten Bedientafel einstellen.<br />
ADRESSE BESCHREIBUNG<br />
0 Steuerung Standby/Eingeschaltet (toggle) 0=OFF 1=ON<br />
1 Steuerung Betriebsmodus (toggle) 0=KÜHLBETRIEB 1=HEIZBETRIEB<br />
2 Fernsteuerung Brauchwasser 0=Normal, 1=Brauchwasser<br />
3 Aktivierung des Fernthermostats 0=Deaktiviert, 1=Aktiviert<br />
4 Steuerung Alarmrückstellung. 1=Alarmrückstellung<br />
5 Zustand Verdichter1 0=OFF 1=ON<br />
6 Zustand Verdichter2 0=OFF 1=ON<br />
7 Zustand Heizkessel/Widerstand 0=OFF 1=ON<br />
8 Zustand Brauchwasseraufbereitung. 0=nicht aktiviert 1=aktiviert<br />
9 ID-Zustand Brauchwasser 0=ID geschlossen – 1=ID offen<br />
10 ID-Zustand Remote Fernsteuerung ON_OFF 0=ID geschlossen – 1=ID offen<br />
11 ID-Zustand Jahreszeit 0=ID geschlossen (Kalt) , 1=ID offen (Warm)<br />
12 ID-Zustand Raumthermostat 0=ID geschlossen – 1=ID offen<br />
13 Alarmübersicht<br />
14 Voralarmübersicht<br />
15 Voralarm Wärmeschutzschalter des Verdichters<br />
16 Voralarm Wärmeschutzschalter des Gebläses<br />
Het is ook noodzakelijk om de naleving<br />
van de volgende kenmerken te waarborgen:<br />
Stop bits: 2;<br />
Parity: NONE;<br />
!
ADRESSE BESCHREIBUNG<br />
17 Voralarm Hochdruck-Druckwächter<br />
18 Voralarm Strömungswächter/Wasseraggregat-Differenzdruckwächter<br />
19 Voralarm Niederdruck-Druckwächter<br />
20 Voralarm Messfühler NTC1-Eingang (SIW) nicht vorhanden<br />
21 Voralarm Messfühler NTC2-Eingang (SUW) nicht vorhanden<br />
22 Frostschutz-Voralarm<br />
23 Voralarm Messfühler NTC4-Eingang (SGP) nicht vorhanden<br />
24 Voralarm zu hohe Temperatur des druckseitigen Gases<br />
25 Voralarm Wandler im Verdichtervorlauf nicht vorhanden<br />
26 Hochdruck-Voralarm<br />
27 Voralarm Messfühler NTC3-Eingang (SS) nicht vorhanden<br />
28 Voralarm Wandler in Ansaugung nicht vorhanden<br />
29 Niederdruck-Voralarm<br />
30 Voralarm Geringe Leistung<br />
31 Voralarm Wärmeschutzschalter der Pumpe<br />
32 Voralarm Hochdruck-Leistungsregelung<br />
33 Voralarm Niederdruck-Leistungsregelung<br />
34 Voralarm Temperatur-Leistungsregelung druckseitig<br />
35 Voralarm bemf Fehler (Inverter longertek)<br />
36 Voralarm interner Kommunikationsfehler (longertek)<br />
37 Voralarm Überstrom (longertek)<br />
38 Voralarm Keine Last vorhanden (longertek)<br />
39 Voralarm Falsche Spannung (longertek)<br />
40 Voralarm Startfehler (longertek)<br />
41 Voralarm IPM-Schutzfehler (longertek)<br />
42 Voralarm EEPROM-Fehler (longertek)<br />
43 Voralarm Abriss der Verdichterströmung (longertek)<br />
44 Voralarm keine Kommunikation vorhanden (longertek)<br />
45 Voralarm PFC-Modul (longertek)<br />
46 Voralarm Übertemperatur im Kühlbetrieb (APY)<br />
47 Voralarm Überstrom bei Beschleunigung (APY)<br />
48 Voralarm Überstrom bei konstanter Geschwindigkeit (APY)<br />
49 Voralarm Überstrom bei Verlangsamung (APY)<br />
50 Voralarm Unterspannung am DC-Bus (APY)<br />
51 Voralarm Überspannung am DC-Bus (APY)<br />
52 NICHT VERWENDET<br />
53 NICHT VERWENDET<br />
54 Voralarm PFC Converter Fault (APY)<br />
55 Voralarm Überstrom bei Beschleunigung (APY)<br />
56 Voralarm Überlastung (APY)<br />
57 Voralarm Überstrom bei konstanter Geschwindigkeit (APY)<br />
58 Voralarm Überstrom bei Verlangsamung (APY)<br />
59 Voralarm Verdichter nicht richtig angeschlossen (APY)<br />
60 Voralarm Keine Kommunikation vorhanden (APY)<br />
61 Voralarm Fehler bei Temperaturfühler an der Kühllamelle (APY)<br />
62 NICHT VERWENDET<br />
63 NICHT VERWENDET<br />
4900575_01 / Ver - 4.30<br />
DE<br />
103
104<br />
ADRESSE BESCHREIBUNG<br />
64 NICHT VERWENDET<br />
65 Voralarm Anormaler Zustand (APY)<br />
66 NICHT VERWENDET<br />
67 NICHT VERWENDET<br />
68 Voralarm Zyklusumkehrventil<br />
69 Voralarm Hohe Wassereintrittstemperatur<br />
70 Voralarm Zyklusumkehr wegen hoher Temperatur des druckseitigen Gases<br />
71 NICHT VERWENDET<br />
72 NICHT VERWENDET<br />
73 NICHT VERWENDET<br />
74 NICHT VERWENDET<br />
75 NICHT VERWENDET<br />
76 NICHT VERWENDET<br />
77 NICHT VERWENDET<br />
78 NICHT VERWENDET<br />
79 NICHT VERWENDET<br />
80 NICHT VERWENDET<br />
81 NICHT VERWENDET<br />
82 NICHT VERWENDET<br />
83 NICHT VERWENDET<br />
84 NICHT VERWENDET<br />
85 Alarm Wärmeschutzschalter des Verdichters<br />
86 Alarm Wärmeschutzschalter des Gebläses<br />
87 Hochdruckalarm des Druckwächters<br />
88 Alarm Strömungswächter/Wasseraggregat-Differenzdruckwächter<br />
89 Niederdruckalarm des Druckwächters<br />
90 Alarm Messfühler NTC1-Eingang nicht vorhanden (SIW)<br />
91 Alarm Messfühler NTC2-Eingang nicht vorhanden (SUW)<br />
92 Frostschutzalarm<br />
93 Alarm Messfühler NTC4-Eingang nicht vorhanden (SGP)<br />
94 Alarm zu hohe Temperatur des druckseitigen Gases<br />
95 Alarm Wandler im Verdichtervorlauf nicht vorhanden<br />
96 Hochdruckalarm<br />
97 Alarm Messfühler NTC3-Eingang nicht vorhanden (SS)<br />
98 Alarm Wandler in Ansaugung nicht vorhanden<br />
99 Niederdruckalarm<br />
100 Alarm Geringe Leistung<br />
101 Alarm Wärmeschutzschalter der Pumpe<br />
102 Alarm Hochdruck-Leistungsregelung<br />
103 Alarm Niederdruck-Leistungsregelung<br />
104 Voralarm Temperatur-Leistungsregelung druckseitig<br />
105 Alarm bemf Fehler (Inverter longertek)<br />
106 Alarm interner Kommunikationsfehler (longertek)<br />
107 Alarm Überstrom (longertek)<br />
108 Alarm Keine Last vorhanden (longertek)<br />
109 Alarm Falsche Spannung (longertek)<br />
110 Alarm Startfehler (longertek)<br />
DE 4900575_01 / Ver - 4.30
ADRESSE BESCHREIBUNG<br />
111 Alarm IPM-Schutzfehler (longertek)<br />
112 Alarm EEPROM-Fehler (longertek)<br />
113 Alarm Abriss der Verdichterströmung (longertek)<br />
114 Alarm keine Kommunikation vorhanden (longertek)<br />
115 Alarm PFC-Modul (longertek)<br />
116 Alarm Übertemperatur im Kühlbetrieb (APY)<br />
117 Alarm Überstrom bei Beschleunigung (APY)<br />
118 Alarm Überstrom bei konstanter Geschwindigkeit (APY)<br />
119 Alarm Überstrom bei Verlangsamung (APY)<br />
120 Alarm Unterspannung am DC-Bus (APY)<br />
121 Alarm Überspannung (APY)<br />
122 NICHT VERWENDET<br />
123 NICHT VERWENDET<br />
124 Alarm PFC Converter Fault (APY)<br />
125 Alarm Überstrom bei Beschleunigung (APY)<br />
126 Alarm Überlastung (APY)<br />
127 Alarm Überstrom bei konstanter Geschwindigkeit (APY)<br />
128 Alarm Überstrom bei Verlangsamung (APY)<br />
129 Alarm Verdichter nicht richtig angeschlossen (APY)<br />
130 Alarm Keine Kommunikation vorhanden (APY)<br />
131 Alarm Fehler bei Temperaturfühler an der Kühllamelle (APY)<br />
132 NICHT VERWENDET<br />
133 NICHT VERWENDET<br />
134 NICHT VERWENDET<br />
135 Alarm Anormaler Zustand (APY)<br />
136 NICHT VERWENDET<br />
137 NICHT VERWENDET<br />
138 Alarm Zyklusumkehrventil defekt;<br />
139 Alarm Hohe Wassereintrittstemperatur<br />
140 Alarm Zyklusumkehr wegen hoher Temperatur des druckseitigen Gases<br />
141 (Code 57) Alarm op afstand lezen van de sonde binnen de DHW<br />
142 (Code 58) Alarm lezing van temperatuursensor buitenlucht<br />
143 NICHT VERWENDET<br />
144 NICHT VERWENDET<br />
145 NICHT VERWENDET<br />
146 NICHT VERWENDET<br />
147 NICHT VERWENDET<br />
148 NICHT VERWENDET<br />
149 NICHT VERWENDET<br />
150 NICHT VERWENDET<br />
151 NICHT VERWENDET<br />
152 NICHT VERWENDET<br />
153 NICHT VERWENDET<br />
154 NICHT VERWENDET<br />
4900575_01 / Ver - 4.30<br />
DE<br />
105
VERZEICHNIS READ REGISTER:<br />
106<br />
COMANDI LETTURA DISPONIBILI<br />
Read Holding Register<br />
ADRESSE BESCHREIBUNG<br />
0 Maschinentyp: 0 – ANL,1 – ANLI, 2 – ANR/ANF/SRP, 3 – ANL-C<br />
1 Invertermaschinentyp 0=longertek 1=APY<br />
2 NTC1-Eingang (TUA) (SIW)<br />
3 NTC2-Eingang (TIA) (SUW)<br />
4 NTC3-Eingang (TSB) (SS)<br />
5 NTC4-Eingang (TGP) (SGP)<br />
6 NTC5-Eingang (TAE) (SAE)<br />
7 Eingang Hochdruckwandler (AP) (TAP)<br />
8 Eingang Niederdruckwandler (BP) (TBP)<br />
9 Eingang 0-10Vdd<br />
10 Zustand der digitalen Relaisausgänge<br />
11 Sicherheitsbereich bei Force OFF<br />
12 Einschalt-/Ausschaltzeit des Verdichters<br />
13 Betriebsstunden des Primärverdichters (angegeben in Tausenden)<br />
14 - Betriebsstunden des Primärverdichters<br />
15 Vom Verdichter durchgeführte Anzahl an Anläufen (Angabe in Tausenden)<br />
16 Vom Verdichter durchgeführte Anzahl an Anläufen<br />
17 Major sw version<br />
18 Minor sw version<br />
19 Sollwert für die Einstellung der Maschine (einschließlich der Korrekturen)<br />
20 Druckeinstellung Kondensationskontrolle<br />
21 Druckdifferential für Kondensationskontrolle<br />
22 Betriebsstunden des Hilfsverdichters (Angabe in Tausenden)<br />
23 Betriebsstunden des Hilfsverdichters<br />
24 Vom Hilfsverdichter durchgeführte Anzahl an Anläufen<br />
(Angabe in Tausenden)<br />
25 Vom Hilfsverdichter durchgeführte Anzahl an Anläufen<br />
26 Von der Maschine erbrachte Leistung (Chiller ON-OFF) verwendete<br />
Frequenz (Chiller Inverter)<br />
27 Druckabfall bei Ansaugung des Verdichters<br />
28 Von der Invertersteuerung geforderte Leistung<br />
29 Konfiguration der <strong>Dip</strong>-Schalter (0x0000 = alle OFF ÷ 0x0FFF = alle ON)<br />
30 Aktivierungszustand der Jahreszeit-Steuerungen<br />
ON_OFF über Bedientafel oder Fernsteuerung<br />
31 Aktivierungszustand des an den ID3-Eingang angeschlossenen<br />
Raumthermostats<br />
32 Betriebszustand der Maschine: 0 - Chiller Off, 1 - Chiller On,<br />
2 – Einspritzung Leistungsregelung, 3 – Abtauung für Einspritzung,<br />
4 – Abtauung für Zyklusumkehr<br />
33 Zubehör Widerstand/Heizkessel: 0=nicht vorhanden<br />
1=Widerstand 2=Heizkessel<br />
34 Strom Inverter APY<br />
35 Ausgangsspannung Inverter APY<br />
36 Bus-Spannung Inverter APY<br />
37 Temperatur Kühllamelle Inverter APY<br />
38 Beperk setpoint hot<br />
DE 4900575_01 / Ver - 4.30
VERZEICHNIS WRITE REGISTER:<br />
COMANDI SCRITTURA DISPONIBILI<br />
Preset Single Register<br />
Preset Multiple Registers<br />
ADRESSE BESCHREIBUNG MIN MAX GRENZEN<br />
39 Sollwert Kühlbetrieb -200 ÷ 260 [°C]<br />
40 Einstellungsbereich Sollwert Kühlbetrieb 10 ÷ 200 [°C]<br />
41 Sollwert Heizbetrieb 250 ÷ 650 [°C]<br />
42 Einstellbereich für Sollwert Heizbetrieb 10 ÷ 200 [°C]<br />
43 Sollwertkorrektur 0 ÷ 3<br />
44 Sollwert Kühlbetrieb 1 -200 ÷ 260 [°C]<br />
45 RT Außentemperatur Kühlbetrieb 1 400 ÷ 500 [°C]<br />
46 Sollwert Kühlbetrieb 2 -200 ÷ 260 [°C]<br />
47 RT Außentemperatur Kühlbetrieb 2 -400 ÷ 500 [°C]<br />
48 Sollwert Heizbetrieb 1 250 ÷ 650 [°C]<br />
49 RT Außentemperatur Heizbetrieb 1 -400 ÷ 500 [°C]<br />
50 Sollwert Heizbetrieb 2 250 ÷ 650 [°C]<br />
51 RT Außentemperatur Heizbetrieb 2 -400 ÷ 500 [°C]<br />
52 Sollwert des Brauchwassers -250 ÷ 650 [°C]<br />
53 Einstellbereich für Brauchwasser 10 ÷ 200 [°C]<br />
54 Prozentsatz der vom Thermostat angeforderten Leistung 0 ÷ 100 [%]<br />
55 PWD_SET_VMF -32768 ÷ 32767<br />
56 Remote sonde DHW -32768 ÷ 32767<br />
LISTE DER AUSNAHMEN:<br />
!<br />
AUSNAHME BESCHREIBUNG<br />
ILLEGAL FUNCTION Der angeforderte Funktionscode wird von der Karte nicht verwaltet.<br />
ILLEGAL DATA ADDRESS Die Datenanforderung beinhaltet einen Bezug zu einer Adresse,<br />
die in der Karte nicht verfügbar ist.<br />
ILLEGAL DATA VALUE Die Schreibanforderung der Wertangabe enthält einen Wert außerhalb<br />
der Bandbreite, der Schreibvorgang ist daher nicht zulässig.<br />
Nachstehend werden die Fehlercodes angeführt, die von der Modu Control-Karte<br />
rückgemeldet werden:<br />
4900575_01 / Ver - 4.30<br />
DE<br />
107
Bei den Geräten sind 2 Typen von Störungsanzeigen<br />
vorgesehen:<br />
• Warnmeldung<br />
• Alarm<br />
Der erste Typ wird am Blinken des roten<br />
Kontrolllämpchens am Display erkannt, drückt<br />
man danach die Klingeltaste, wird die Liste<br />
Achtung:<br />
Die Warnmeldungen können zu Alarmen werden,<br />
wenn:<br />
• eine Zeit von gleich oder mehr als 60 s bei<br />
108<br />
Index<br />
Warnmeldung<br />
Index<br />
Alarm<br />
1 101<br />
DE 4900575_01 / Ver - 4.30<br />
Alarmübersichtstabelle<br />
mit den Alarmen angezeigt (mit Index und<br />
Grund wie in nachstehender Tabelle angegeben).<br />
Eine Warnmeldung bleibt ein solche für<br />
60 s. Wenn nach dieser Zeit die Bedingung<br />
nicht entfallen ist, die die Warnmeldung ausgelöst<br />
hat, wird diese zu einem Alarm. Alarme<br />
werden in der gleichen Weise angezeigt wie<br />
Vorliegen einer Warnmeldung vergangen ist.<br />
• wenn die maximale Anzahl von<br />
Warnmeldungen in einer Stunde (fünf) überschritten<br />
wurde. In diesem Fall wird die nächs-<br />
Ursache Bemerkungen<br />
Schutzschalter Verdichter<br />
Schutzschalter für Ventilator<br />
Schutzschalter Pumpe<br />
2 102 Schutzschalter für Ventilator<br />
3 103 Hochdruckwächter<br />
4 104<br />
Strömungswächter<br />
Druckdifferenzschalter Wasser<br />
5 105 Niederdruckwächter<br />
6 106<br />
7 107<br />
8 108 Eis im Wasser<br />
9 109<br />
Temperaturfühler am<br />
Wassereingang nicht vorhanden<br />
Temperaturfühler am<br />
Wasserausgang nicht vorhanden<br />
Fühler für druckseitiges Gases<br />
nicht vorhanden<br />
Warnmeldungen mit dem Unterschied, dass<br />
das rote Kontrolllämpchen kontinuierlich leuchtet.<br />
Bevor der Alarm zurückgestellt wird, sollte<br />
man den Kundendienst kontaktieren. Zum<br />
Rückstellen des Alarms muss das Gerät ausgeschaltet<br />
und mit der Standby-Taste wieder<br />
eingeschaltet werden.<br />
te Warnmeldung direkt als Alarm angezeigt<br />
und bewirkt als solcher das Anhalten der<br />
Maschine bis zur Behebung seiner Ursache.<br />
Diese Anzeige erscheint, wenn sich der Kontakt des entsprechenden<br />
Schutzschalters für den Verdichter öffnet MTC.<br />
Diese Anzeige erscheint, wenn sich der Kontakt des entsprechenden<br />
Schutzschalters für den Ventilator öffnet MTV. Dieser Code wird<br />
nur dann angezeigt, wenn die Platine als Ersatz für Platinen bis zur<br />
SW-Version 3.6. verwendet wird.<br />
Diese Anzeige zeigt NICHT den Zustand des Hochdruckwächters an<br />
sich an, sondern des Verdichterschützes. Der Hochdruckwächter<br />
wirkt direkt auf den Verdichterschütz. Wenn die Platine den Befehl<br />
zum Einschalten des Verdichters erteilt und der Verdichterschütz<br />
wird nicht nach 3 Sekunden aktiv, erscheint diese Anzeige. Dieser<br />
Alarm kann auch durch eine Störung des Rückmelderelais vom<br />
Verdichterschütz zur Platine verursacht werden (als RAP in den<br />
Schaltplänen angegeben). Wenn sich während des Betriebs des<br />
Verdichters der Schütz deaktiviert, erscheint diese Anzeige. AP.<br />
Diese Anzeige erscheint, wenn sich der Kontakt des<br />
Strömungswächters oder des Druckdifferenzschalters öffnet, dieser<br />
Alarm wird in den ersten 40 Sekunden des Hochfahrens der<br />
Pumpe nicht ausgelöst. Die Maschine wird in den Alarmzustand<br />
versetzt, wenn die maximale Anzahl an zulässigen Auslösungen des<br />
Strömungswächters überschritten wird. Wenn der Betriebsmodus<br />
Frost Protection auf Standby aktiviert ist (und daher auch die Pumpe)<br />
wird auch der Zustand des Strömungswächters kontrolliert. FL/PD.<br />
Diese Anzeige erscheint, wenn sich der Kontakt für den<br />
Niederdruckwächter BP öffnet (Bei Ansaugung zum Verdichter).<br />
Diese Anzeige erscheint, wenn der Temperaturfühler am<br />
Wassereingang nicht angeschlossen ist.<br />
Diese Anzeige erscheint, wenn der Temperaturfühler am Wasserausgang<br />
nicht angeschlossen ist.<br />
Diese Anzeige erscheint, wenn die Wassertemperatur am Ausgang<br />
die Frostschutzschwelle erreicht hat (Menü für Installateure,<br />
Parameter (6) Vorgabewert: 3°C). Diese Warnmeldung wird aufgehoben,<br />
sobald die Wassertemperatur am Ausgang höher ist als<br />
der von der Platine nach einem inneren Algorithmus berechnete<br />
Sollwert; der Frostschutzalarm wird (im Heizbetrieb) 3 Sekunden<br />
lang ab Einschalten des Verdichters unterbrochen.<br />
Diese Anzeige erscheint, wenn der Druckgasfühler nicht vorhanden ist.
10 110 Temperatur des druckseitigen Gas<br />
zu hoch<br />
11 111 Wandler im Verdichtervorlauf<br />
nicht vorhanden<br />
Diese Anzeige erscheint, wenn die gemessene Temperatur des druckseitigen<br />
Gases (SGP-Fühler) die vom Parameter vorgesehene Schwelle<br />
überschreitet. Bei der werkseitig eingestellten Temperatur (Vorgabewert<br />
125°C) erlischt die Warnmeldung.<br />
Diese Anzeige erscheint, wenn der Wandler im Verdichtervorlauf<br />
nicht vorhanden ist und die Maschine als Wärmepumpe eingestellt<br />
ist, oder wenn das Vorhandensein des DCP eingestellt ist.<br />
12 112 Hochdruck Diese Anzeige erscheint, wenn der Wandler einen Druck im Vorlauf<br />
erkennt, der über der eingestellten Schwelle liegt (Vorgabewert: 40 bar).<br />
Beim werkseitig eingestellten Druck (Vorgabewert: 38 bar erlischt<br />
die Warnmeldung.<br />
13 113 Abtaufühler nicht vorhanden Diese Anzeige erscheint, wenn der Abtaufühler nicht vorhanden ist<br />
und die Maschine als Wärmepumpe eingestellt ist.<br />
14 114 Wandler Verdichteransaugung<br />
nicht vorhanden<br />
Diese Anzeige erscheint, wenn der Wandler in der Verdichteransaugung<br />
nicht vorhanden ist und die Maschine als Wärmepumpe eingestellt ist.<br />
15 115 Niedriger Druck Diese Anzeige erscheint, wenn der Wandler im Verdichterzulauf einen<br />
Ansaugdruck anzeigt, der unter der werkseitig eingestellten Schwelle<br />
für Kühlbetrieb (Vorgabewert: 4 bar), oder Heizbetrieb (Vorgabewert:<br />
2 bar) liegt. Die Warnmeldung erlischt, wenn der der Ansaugdruck<br />
die vorgesehene Auslöseschwelle überschreitet, Vorgabewert: 2<br />
bar. Der Niederdruckalarm wird (im Heizbetrieb) 3 Sekunden lang ab<br />
Einschalten des Verdichters unterbrochen. Bei der Zyklusumkehr wird<br />
er dauerhaft unterbrochen.<br />
16 - Niedrige Leistung Jedes Mal, wenn der Maschine Strom zugeführt wird, prüft die<br />
Steuerung ein einziges Mal das Verhalten des Verdichters durch das<br />
Leistungskontrollverfahren, diese Steuerung wird über <strong>Dip</strong>Schalter<br />
deaktiviert.<br />
17 117 Schutzschalter Pumpe Diese Anzeige erscheint, wenn sich der Kontakt des entsprechenden<br />
Schutzschalters der Pumpe öffnet. MTP. Dieser Code wird nur dann<br />
angezeigt, wenn die Platine als Ersatz für Platinen bis zur SW-Version<br />
3.6. verwendet wird.<br />
18 118 HD-Leistungsregelung Diese Anzeige erscheint jedes Mal, wenn eine Leistungsregelung<br />
erfolgt, die durch das Erreichen der eingestellten Schwelle verursacht<br />
wird. Die Maschine wird in den Alarmzustand versetzt, wenn<br />
die maximal zulässige Anzahl an Leistungsregelungen (Vorgabewert<br />
5) überschritten wird. Bei Invertermaschinen wird auch eine<br />
Leistungsregelung für hohes Verdichtungsverhältnis angezeigt.<br />
19 119 ND-Leistungsregelung Diese Anzeige erscheint jedes Mal, wenn eine ND-Leistungsregelung<br />
erfolgt, die Maschine wird in den Alarmzustand versetzt, wenn die<br />
maximal zulässige Anzahl an Leistungsregelungen (Vorgabewert 5)<br />
überschritten wird.<br />
20 120 Druckseitige Temperatur-<br />
Leistungsregelung<br />
premente<br />
21 121 Fehler bemf (chiller inverter) Fehler<br />
beim Erkennen der back emf<br />
Diese Anzeige erscheint jedes Mal, wenn eine Leistungsregelung<br />
der druckseitigen Temperatur erfolgt, die Maschine wird in den<br />
Alarmzustand versetzt, wenn die maximal zulässige Anzahl an<br />
Leistungsregelungen (Vorgabewert 5) überschritten wird.<br />
Dieser Fehler kommt von der Steuerungsplatine des Inverters und<br />
hängt mit Anlaufproblemen des Verdichters zusammen.<br />
22 122 Interner Übertragungsfehler Die Steuerungsplatine des Inverters hat interne Übertragungsprobleme.<br />
23 123 Überstrom Zu hohe Stromaufnahme seitens des Verdichters<br />
24 124 Keine Stromlast vorhanden Der Verdichter nimmt zu wenig Strom auf, möglicherweise dreht er<br />
im Leerlauf.<br />
25 125 Falsche Spannung Die Steuerungsplatine des Inverters zeigt eine falsche Busspannung an.<br />
26 126 Startfehler: Die Steuerungsplatine des Inverters zeigt ein falsches Startmanöver<br />
des PMSM-Motors an.<br />
27 127 Schutzfehler IPM Fehler am IGBT.<br />
28 128 EEPROM Fehler: EEPROM Fehler an der Steuerungsplatine des Inverters.<br />
29 129 Abriss der Verdichterströmung<br />
4900575_01 / Ver - 4.30<br />
DE<br />
109
110<br />
30 130 Keine Verbindung vorhanden Die Steuerungsplatine des Inverters antwortet nicht, die Stromzufuhr<br />
kann unterbrochen sein oder das serielle Kabel kann ausgesteckt sein<br />
oder die Signale A und B können verkehrt angesteckt sein.<br />
31 131 PFC-Module Fehler des Invertermoduls PFC.<br />
32 132 Überhitzung der<br />
Kühllamelle<br />
33 133 Überstrom bei Beschleunigung Hardware Fehler.<br />
34 134 Überstrom bei konstanter Hardware Fehler.<br />
Drehzahl<br />
35 135 Überstrom bei Abnahme der Hardware Fehler.<br />
Geschwindigkeit<br />
36 136 Zu wenig Spannung am DC Bus<br />
37 137 Überspannung am DC Bus<br />
40 140 PFC Converter Fault Fehler bei<br />
Modul PFC<br />
Software Fehler.<br />
41 141 Überstrom bei Beschleunigung Software Fehler.<br />
42 142 Überlast<br />
43 143 Überstrom bei konstanter Drehzahl Software Fehler.<br />
44 144 Überstrom bei Abnahme der Software Fehler.<br />
Geschwindigkeit<br />
45 145 Verdichter nicht<br />
richtig angeschlossen<br />
46 146 Keine Verbindung vorhanden<br />
47 147 Fehler Temperaturfühler<br />
Kühllamelle<br />
51 151 Anormaler Zustand Niedrigere Frequenz durch Schutz gegen Überstrom oder<br />
Übertemperatur<br />
54 154 Zyklus-Umkehrventil defekt; Das Zyklus-Umkehrventil könnte defekt oder gesperrt sein.<br />
55 155 Hohe Temperatur am<br />
Wassereingang<br />
-- 156 Zyklusumkehr wegen<br />
hoher Temperatur des druckseitigen<br />
Gases<br />
57 157 Lesefehler bei Fernfühler an der<br />
Schalttafel DHW.<br />
58 158 Lesefehler beim<br />
Außentemperaturfühler.<br />
59 159<br />
60 160<br />
DE 4900575_01 / Ver - 4.30<br />
Störung am Wassertemperaturfühler<br />
am EINGANG des Verflüssigers<br />
Störung am Wassertemperaturfühler<br />
am AUSGANG des Verflüssigers<br />
Die Temperatur am Wassereingang hat den Wert des Parameters<br />
Menü für Installateure, Parameter (H) überschritten. Wahrscheinlich<br />
ist bei derselben Anlage ein Heizkessel vorhanden. Wenn die<br />
Warnmeldung das dritte Mal ausgelöst wird, wird die Maschine in<br />
den Alarm- und Sperrzustand versetzt.<br />
Diese Warnmeldung zeigt an, dass durch Zyklusumkehr ein<br />
Abtauvorgang ausgelöst wurde, ohne dass die Zeiten zwischen den<br />
Zyklusumkehrvorgängen berücksichtigt wurden. Die Zyklusumkehr<br />
wurde durch das Überschreiten der Leistungsregelungsschwelle für<br />
hohe Temperatur des druckseitigen Gases ausgelöst, Vorgabewert<br />
130°. Diese Warnmeldung verursacht nicht den Stopp des<br />
Verdichters und gibt keinen Grenzwert an, wie oft die Warnmeldung<br />
ausgelöst werden kann.<br />
Dieser Voralarm weist auf einen Defekt des Raumfühlers oder auf<br />
ein Problem bei der Kommunikation mit der DHW-Schalttafel DHW<br />
hin. Der Alarm ist nur aktiv, wenn der Parameter(8) den Wert 4 im<br />
Menü mit Passwort = 30 hat.<br />
Dieser Voralarm weist auf einen Defekt des Außentemperaturfühlers<br />
bei installiertem DCP hin, oder die Maschine ist eine Wärmepumpe.<br />
ACHTUNG:<br />
Es wird darauf hingewiesen, dass Warnmeldungen automatisch rückgestellt werden, Alarme dagegen müssen manuell rückgestellt werden.<br />
Ab der SW-Version 3.9.0 wurde die Rückstellung der Alarme durch Fernbedienung über ON/OFF eingeführt, falls aktiviert.<br />
Wenn von ON auf OFF und wieder zurück auf ON geschaltet wird, werden die Alarme innerhalb von 5 Sekunden rückgestellt. über<br />
Fernbedienung ON/OFF können maximal 3 Alarme pro Stunde rückgestellt werden.<br />
Zuerst müssen die Alarme mit der Taste "R" rückgestellt werden.<br />
Bei Stromausfall werden die Alarme rückgestellt.
AERMEC S.p.A.<br />
I-37040 Bevilacqua (VR) Italia – Via Roma, 996<br />
Tel. (+39) 0442 633111<br />
Telefax 0442 93730 – (+39) 0442 93566<br />
www.aermec.com - info@aermec.com<br />
MODUCONTROL<br />
NÚMERO DE SERIE<br />
DECLARACIÓN<br />
DE CONFORMIDAD CE<br />
NOMBRE MODUCONTROL<br />
Los que suscriben la presente declaran bajo la propia y exclusiva responsabilidad que el conjunto<br />
en objeto, definido como sigue:<br />
TIPO Tarjeta electrónica para enfriadora AIRE/AGUA, bomba de calor<br />
Al que se refiere esta declaración, está en conformidad con las siguientes normas armonizadas:<br />
CEI EN 60730-1 Norma de seguridad<br />
CEI EN 61000-6-1<br />
CEI EN 61000-6-3<br />
CEI EN 61000-6-2<br />
CEI EN 61000-6-4<br />
Inmunidad y emisión electromagnética para ambientes residenciales<br />
Inmunidad y emisión electromagnética para ambientes industriales<br />
Satisfaciendo de esta forma los requisitos esenciales de las siguientes directivas:<br />
- Directiva LVD: 2006/95/CE<br />
- Directiva compatibilidad electromagnética 2004/108/CE<br />
Bevilacqua 15/01/2008<br />
Direttore Commerciale<br />
Firma<br />
4900575_01 / Ver - 4.30<br />
ES<br />
111
112<br />
ES 4900575_01 / Ver - 4.30<br />
Indice<br />
Precauciones y normas de seguridad .......................................................................... 114<br />
Características de la regulación ................................................................................... 115<br />
Interfaz del usuario ........................................................................................................ 115<br />
Configuraciones por defecto del MENÚ USUARIO ..................................................... 116<br />
Configuraciones por defecto RESISTENCIA ............................................................... 116<br />
Configuraciones por defecto del MENÚ INSTALADOR .............................................. 117<br />
Configuraciones por defecto del MENÚ INSTALADOR 2 ........................................... 117<br />
Visualizaciones de la interfaz usuarioy de los parámetros ........................................ 118<br />
Menú lecturas ................................................................................................................ 119<br />
Menú USUARIO ............................................................................................................. 120<br />
Configuración de los parámetros operativos (nivel usuario) .................................... 120<br />
Configuración set temperatura en frío ..................................................................... 120<br />
Configuración banda proporcional en frío ............................................................... 120<br />
Configuración elección set según la temperatura exterior ..................................... 121<br />
Configuración del set temperatura en frío 1 ............................................................ 121<br />
Configuración temperatura del aire exterior 1 ......................................................... 121<br />
Configuración del set temperatura en frío 2 ............................................................ 121<br />
Configuración Temperatura aire exterior 2 .............................................................. 121<br />
Menú INSTALADOR ........................................................................................................ 122<br />
Configuración de los parámetros operativos (nivel instalador) ................................ 122<br />
Configuración regulación en entrada o salida ........................................................ 122<br />
Configuración FORCE-OFF en frío .......................................................................... 122<br />
Configuración umbral de seguridad ....................................................................... 122<br />
Configuración tiempo integral ................................................................................. 123<br />
Configuración tiempo de derivación ....................................................................... 123<br />
Configuración umbral antihielo ................................................................................ 123<br />
Configuración frost protection ................................................................................. 123<br />
Configuración control del panel .............................................................................. 123<br />
Configuración del protector de pantalla .................................................................. 124<br />
Dirección Modbus supervisor .................................................................................. 124<br />
Baud rate supervisor ............................................................................................... 124<br />
Habilitación escritura supervisor ............................................................................. 124
Indice<br />
Menú INSTALADOR 2 ..................................................................................................... 125<br />
Configuración de los parámetros operativos (nivel instalador) ................................ 125<br />
Umbral para la reactivación después de la fuerza de cierre fuera de .................... 125<br />
Apagado de la bomba por termostato .................................................................... 125<br />
Menú RESISTENCIA ....................................................................................................... 126<br />
Configuración de los parámetros operativos (nivel resistencia) ............................... 126<br />
Configuración set de la resistencia antihielo ........................................................... 126<br />
Configuración de la banda resistencia antihielo ..................................................... 126<br />
Tabla configuración DIP-SWITCH ................................................................................. 127<br />
Protocolo de comunicación serial ................................................................................ 129<br />
LISTA DIGITALES (COIL): ....................................................................................... 129<br />
Mandos MODBUS ................................................................................................... 129<br />
LISTA READ REGISTER: .......................................................................................... 133<br />
LISTA WRITE REGISTER: ......................................................................................... 134<br />
LISTA DE EXCEPCIONES: ....................................................................................... 134<br />
Tabla resumen alarmas .................................................................................................. 135<br />
4900575_01 / Ver - 4.30<br />
ES<br />
113
114<br />
Precauciones y normas de seguridad<br />
NO mojar el embalaje NO pisar el embalaje Manipular con cuidado<br />
ES 4900575_01 / Ver - 4.30<br />
Indicaciones para la eliminación<br />
ATENCIÓN: este producto contiene elementos eléctricos y electrónicos<br />
que no pueden eliminarse utilizando los canales tradicionales de recogida<br />
de residuos municipales. Para estos productos existen centros de<br />
recogida selectiva.<br />
Los aparatos eléctricos y electrónicos deben tratarse por separado y siguiendo<br />
la legislación vigente en el Estado de pertenencia.<br />
Las baterías o los acumuladores presentes en los aparatos deben eliminarse<br />
por separado, según las disposiciones del municipio de pertenencia.<br />
Sugerencias sobre el manual<br />
Símbolos de seguridad<br />
Peligro tensión<br />
ATENCIÓN<br />
Peligro piezas en<br />
movimiento<br />
Guarde los manuales en un lugar seco para evitar su deterioro, al menos durante<br />
10 años, para posibles consultas futuras.<br />
Leer atenta y completamente todas las informaciones contenidas en este manual.<br />
Prestar particular atención a las normas de uso acompañadas con las indicaciones<br />
"PELIGRO" o "ATENCIÓN" puesto que, si no se cumplen, se puede causar daño a la<br />
máquina y/o a personas y cosas. En caso de anomalías no contempladas en este<br />
manual, contacte inmediatamente el Servicio de Asistencia de su zona.<br />
El aparato debe ser instalado de manera tal que permita posibles operaciones de<br />
mantenimiento y/o reparación.<br />
En cualquier caso, la garantía del aparato no cubre los costes debidos a escaleras<br />
automáticas, andamios u otros sistemas de elevación que fuesen necesarios para<br />
efectuar las intervenciones en garantía. AERMEC S.p.A. declina toda responsabilidad<br />
por cualquier daño debido a un uso impropio de la máquina, o bien a una lectura parcial<br />
o superfi cial de las informaciones contenidas en este manual.
El panel de control de la unidad permite<br />
una rápida confi guración de los<br />
parámetros de funcionamiento de la<br />
máquina y su visualización. El display<br />
está formado por 4 cifras y varios leds<br />
para la indicación del tipo de funcionamiento,<br />
la visualización de los pará-<br />
Características de la regulación<br />
metros confi gurados y de las alarmas<br />
que pudieran intervenir. En la tarjeta se<br />
memorizan todas las confi guraciones<br />
por defecto y las eventuales modifi caciones.<br />
Con la instalación del accesorio<br />
panel remoto PR3, es posible controlar<br />
a distancia el encendido y el apagado,<br />
Interfaz del usuario<br />
la confi guración del modo de funcionamiento<br />
(frío-calor), y la visualización del<br />
resumen de las alarmas. Después de<br />
un caso de falta de tensión, la unidad<br />
es capaz de volverse a encender automáticamente<br />
conservando las confi guraciones<br />
originales.<br />
Índice Funciones<br />
A Panel a bordo máquina<br />
B Enfriadora / Bomba de calor<br />
C Modu control<br />
D Panel remoto PR3<br />
E Conexión interna entre moducontrol y panel<br />
(ya cableado en fábrica)<br />
F Conexión entre unidad y PR3, de longitud máxima igual a 150 metros (cableado a cargo del instalador)<br />
4900575_01 / Ver - 4.30<br />
ES<br />
115
Configuraciones por defecto del MENÚ USUARIO<br />
116<br />
Menú USUARIO - (Password 000)<br />
Línea StF bnF CSt (1) SF1 tF1 SF2 tF2<br />
Índice 1 2 5 6 7 8 9<br />
WRL 7 5 0 12 18 7 30<br />
(1) Si esta es la sonda de ambiente el valor debe ser ajustado a (1);<br />
Indice - Línea Significado del parámetro<br />
1 - StF Set en frío<br />
2 - bnF Banda de/en frío<br />
5 - CSt Corrección set<br />
6 - SF1 Set en frío 1<br />
7 - tF1 Temperatura aire exterior 1<br />
8 - SF2 Set en frío 2<br />
9 - tF2 Temperatura aire exterior 2 (frío)<br />
Configuraciones por defecto RESISTENCIA<br />
Línea<br />
Menú RESISTENCIA - (Password 001)<br />
SrA brA<br />
Índice 0 1<br />
WRL 4 1<br />
Indice - Línea Significado del parámetro<br />
0 - SrA Set resistenza antigelo<br />
1 - brA Banda resistenza antigelo<br />
ES 4900575_01 / Ver - 4.30
Configuraciones por defecto del MENÚ INSTALADOR<br />
Menú INSTALADOR - (Password 030)<br />
Línea iu oFF SAF int dEr AG FrP PAN SCr Ad1 Bd1 AS1<br />
Índice 0 1 3 4 5 6 7 9 I J L N<br />
WRL 0 4 5 600 0 3 3 0 1 1 1 0<br />
Indice - Línea Significado del parámetro<br />
0 - iu Regulación entrada/salida<br />
1 - oFF Force-off en frío<br />
3 - SAF Banda de rearme del force - off<br />
4 - int Tiempo integral<br />
5 - dEr Tiempo derivativo<br />
6 - AG Antihielo<br />
7 - FrP Frost protection<br />
9 - PAN Configuración del panel remoto<br />
I - SCr Configuración protector de pantalla<br />
J - Ad1 Dirección modbus supervisor<br />
L - Bd1 Baud rate supervisor<br />
N - AS1 Habilitación escritura supervisor<br />
Configuraciones por defecto del MENÚ INSTALADOR 2<br />
Índice 0<br />
Menú INSTALADOR 2 - (Password 031)<br />
1 2 3<br />
WRL 6 0 0 0<br />
Indice Significado del parámetro<br />
0 Delta Temperatura per riattivazione del copressore dopo intervento del FORCE OFF<br />
1 ---<br />
2 ---<br />
3 Spegnimento pompa per termostato<br />
4900575_01 / Ver - 4.30<br />
ES<br />
117
118<br />
Visualizaciones de la interfaz usuario<br />
y de los parámetros<br />
La interfaz usuario principal está representado por un panel<br />
de leds con teclado capacitivo (o sea, con botones táctiles);<br />
las visualizaciones se organizan mediante tres menús:<br />
Menú LECTURAS (tecla (C) Fig.1)<br />
Contiene las informaciones (sólo en modalidad visualización)<br />
sobre el funcionamiento normal de la unidad.<br />
Menú SET (tecla (D) Fig.1)<br />
Contiene todos los parámetros que el usuario puede modifi -<br />
car en base a las exigencias de la instalación; estos parámetros<br />
se reagrupan en diferentes submenús:<br />
- Menú USUARIO (Password 000);<br />
- Menú INSTALADOR (Password 030);<br />
- Menú RESISTENCIA (Password 001);<br />
Histórico de alarmas(tecla (E) Fig.1)<br />
El histórico de alarmas registra las condiciones de error y/o mal<br />
funcionamiento de la unidad (ya sean alarmas o prealarmas).<br />
Durante el funcionamiento normal, en la pantalla se visualiza<br />
el último parámetro modifi cado; si no se pulsan sucesivamente<br />
otras teclas por al menos 5 minutos, la pantalla activa la<br />
modalidad protector de pantalla (función que se puede confi<br />
gurar mediante el parámetro (i) en el menú INSTALADOR.<br />
Para la visualización de los parámetros y/o lecturas, se utilizan<br />
4 cifras; la primera indica el índice, es decir un número<br />
que le permita al usuario saber qué parámetro o lectura se<br />
está visualizando (Fig.3).<br />
Fig.3<br />
Interfaz usuario (Fig.3)<br />
A B<br />
A Índice parámetro<br />
B Sigla parámetro / Valor parámetro<br />
ES 4900575_01 / Ver - 4.30<br />
Fig.1<br />
Interfaz usuario (Fig.1)<br />
A Display de visualización<br />
B Botón de encendido<br />
C Tecla de acceso al menú lecturas<br />
D Botón de acceso al menú set<br />
E Botón de acceso al historial de alarmas<br />
F Botón de desplazamiento/aumento-disminución<br />
parámetros<br />
Fig.2<br />
1<br />
5 6<br />
dj<br />
7 8 9<br />
SET<br />
2 3<br />
Visualización pantalla (Fig.2)<br />
1 Menú SET actualmente visualizado<br />
2 Menú ALARMAS actualmente visualizado<br />
3 Índice parámetro<br />
4 Sigla parámetro / Valor parámetro<br />
5 Indicador estación ESTIVAL<br />
6 Indicador estación INVERNAL<br />
7 Indicador estado de alarmas en curso<br />
8 Indicador funcionamiento compresor en curso (esta<br />
indicación puede asumir diferentes frecuencias de intermitencia).<br />
9 Indicador stop en curso<br />
4
Para ingresar al menú lecturas pulsar la<br />
tecla en (Fig.4); una vez ingresados al<br />
menú lecturas, en la pantalla se visualiza<br />
el índice de la lectura y una línea<br />
de tres caracteres que la identifi ca; la<br />
línea se puede visualizar un segundo,<br />
luego se sustituye por el valor corres-<br />
Menú lecturas<br />
pondiente a la lectura misma. Para pasar<br />
a la lectura siguiente es necesario<br />
pulsar la tecla en (Fig.5), mientras que<br />
para volver a la anterior, es preciso pulsar<br />
la tecla en (Fig.6). Cada vez que se<br />
pasa de una lectura a otra, además del<br />
cambio del valor del índice, se visuali-<br />
Fig.4 Fig.5 Fig.6<br />
Lista de índices y respectivas lecturas MENÚ USUARIO (ninguna password)<br />
Indice - Línea<br />
Temperatura salida agua<br />
Temperatura entrada agua<br />
Temperatura de entrada al condensador<br />
Temperatura gas impelente<br />
Temperatura aire externo (1)<br />
Presión de envío (2)<br />
Temperatura de salida del condensador<br />
Termostato<br />
Banda de seguridad sobre el force-off<br />
Tiempos CP<br />
Horas de funcionamiento (miles)<br />
Horas de funcionamiento (unidad)<br />
Indice - Sigla<br />
zará en el primer segundo la línea para<br />
identifi car la lectura en curso (sin embargo<br />
es posible identifi car cualquier<br />
lectura mediante el valor del índice,<br />
comparándolo con la tabla indicada<br />
más abajo<br />
Arranques compresor (miles)<br />
Arranques compresor (unidad)<br />
Release del software<br />
Release menores del software<br />
Set actualmente en uso<br />
Set de presión de condensación<br />
Diferencial de presión de condensación<br />
Horas de funcionamiento<br />
COMPRESOR 1 (unidades)<br />
Horas de funcionamiento<br />
COMPRESOR 2 (unidad) (3)<br />
Arranques del compresor<br />
COMPRESOR 1 (miles)<br />
Arranques del compresor<br />
COMPRESOR 2 (miles) (3)<br />
Fracción de potencia (4)<br />
(1) Este valor se visualiza sólo si está instalado el accesorio sonda aire exterior; si dicho accesorio no está presente, se visualizarán tres guiones en<br />
lugar del valor de temperatura;<br />
(2) Este valor se visualiza sólo si está instalado el accesorio transductor de alta presión; si dicho accesorio no está presente, se visualizarán tres guiones<br />
en lugar del valor de presión;<br />
(3) Parámetros visibles sólo en los modelos WRL100-140-160;<br />
4900575_01 / Ver - 4.30<br />
ES<br />
119
Para ingresar al menú USUARIO pulsar<br />
la tecla indicada en (Fig.7); una vez<br />
pulsada la tecla se deberá ingresar la<br />
password para acceder a los diversos<br />
menús; para acceder al menú usuario<br />
la password es 000 (que es por defecto<br />
la visualizada); para modifi car el valor<br />
de las passwords usar las teclas de<br />
120<br />
PASSWORD = 000<br />
ES 4900575_01 / Ver - 4.30<br />
Menú USUARIO<br />
desplazamiento. Una vez ingresada la<br />
password correcta pulsar la tecla indicada<br />
en (Fig.7). En la pantalla se visualiza<br />
el índice del parámetro USUARIO y una<br />
línea de tres caracteres que la identifi ca;<br />
la línea se puede visualizar un segundo,<br />
luego se sustituye por el valor correspondiente<br />
al parámetro mismo. Para pasar al<br />
Fig.7 Fig.8<br />
parámetro siguiente, usar las teclas de<br />
desplazamiento (Fig.8). Para modifi car<br />
un parámetro basta seleccionarlo, pulsar<br />
la tecla indicada en (Fig.7), modifi car el<br />
valor asignado mediante las teclas de<br />
desplazamiento mostrado en (Fig.8) y<br />
para confi rmar la modifi cación, pulsar<br />
nuevamente la tecla indicada en (Fig.7).<br />
Configuración de los parámetros operativos (nivel usuario)<br />
Índice - línea<br />
Índice - línea<br />
Valor<br />
MIN<br />
Valor<br />
MAX<br />
Configuración set temperatura en frío<br />
Función del parámetro<br />
-20 °C 26 °C Este parámetro indica el valor del set de trabajo activo en la modalidad en frío.<br />
Valor<br />
MIN<br />
Valor<br />
MAX<br />
1 °C 20 °C<br />
Configuración banda proporcional en frío<br />
Función del parámetro<br />
Este parámetro indica la banda proporcional aplicada al set frío; esta banda implica una<br />
gestión optimizada del compresor, encendiéndolo sólo si la temperatura del agua en<br />
entrada/salida (en base al tipo de control configurado por el parámetro (0) en el menú<br />
instalador) es mayor al set de trabajo en frío (parámetro (1) menú usuario) más el valor<br />
de este parámetro.
Configuración elección set según la temperatura exterior (con sonda de aire adicional)<br />
Índice - línea<br />
Índice - línea<br />
Índice - línea<br />
Índice - línea<br />
Índice - línea<br />
Valor<br />
MIN<br />
Valor<br />
MAX<br />
0 3<br />
Valor<br />
MIN<br />
Valor<br />
MAX<br />
-20 °C 26 °C<br />
Valor<br />
MIN<br />
Valor<br />
MAX<br />
-40 °C 50 °C<br />
Valor<br />
MIN<br />
Valor<br />
MAX<br />
-20 °C 26 °C<br />
Valor<br />
MIN<br />
Valor<br />
MAX<br />
-40 °C 50 °C<br />
Función del parámetro<br />
Este set activa el algoritmo de compensación del set de trabajo:<br />
Valor (0) = función no está activa;<br />
Valor (1) = función activa;<br />
(°C)<br />
SET SF1(F)<br />
SF2<br />
SET (H)<br />
SET TF1 (G) SET TF2(I)<br />
Configuración del set temperatura en frío 1<br />
(°C)<br />
Función del parámetro<br />
Este parámetro indica el valor máximo del set en frío, en correspondencia con la temperatura<br />
mínima del aire exterior (índice (7) menú usuario). Este parámetro es visible sólo<br />
si ha sido activada la función compensación (índice (5) menú usuario).<br />
Configuración temperatura del aire exterior 1<br />
Función del parámetro<br />
Este parámetro indica la temperatura mínima del aire exterior tomada en consideración<br />
para la compensación en frío. Este parámetro es visible sólo si ha sido activada la función<br />
compensación (índice (5) menú usuario).<br />
Configuración del set temperatura en frío 2<br />
Función del parámetro<br />
Este parámetro indica el valor del set en frío mínimo, en correspondencia con la temperatura<br />
máxima del aire exterior (índice (9) menú usuario). Este parámetro es visible sólo<br />
si ha sido activada la función compensación (índice (5) menú usuario).<br />
Configuración Temperatura aire exterior 2<br />
Función del parámetro<br />
En el funcionamiento en frío, el set de<br />
trabajo se calcula en modo automático<br />
en base a la temperatura externa<br />
según la lógica indicada en el diagrama.<br />
SF1: índice (6) menú usuario;<br />
SF2: índice (8) menú usuario;<br />
TF1: índice (7) menú usuario;<br />
TF2: índice (9) menú usuario;<br />
Este parámetro indica la temperatura máxima del aire exterior tomada en consideración<br />
para la compensación en frío. Este parámetro es visible sólo si ha sido activada la función<br />
compensación (índice (5) menú usuario).<br />
4900575_01 / Ver - 4.30<br />
ES<br />
121
Para ingresar al menú INSTALADOR<br />
pulsar la tecla indicada en (Fig.9); una<br />
vez pulsada la tecla se deberá ingresar<br />
la password para acceder a los diversos<br />
menús; para acceder al menú<br />
usuario la password es 030; para modifi<br />
car el valor de las passwords usar<br />
las teclas de desplazamiento. Una vez<br />
ATENCIÓN: la modifi cación de los siguientes<br />
parámetros es competencia<br />
exclusiva del personal califi cado encargado<br />
de la instalación de la unidad.<br />
122<br />
PASSWORD = 030<br />
ES 4900575_01 / Ver - 4.30<br />
Menú INSTALADOR<br />
ingresada la password correcta pulsar<br />
la tecla indicada en (Fig.9). En la pantalla<br />
se visualiza el índice del parámetro<br />
INSTALADOR y una línea de tres<br />
caracteres que la identifi ca; la línea se<br />
puede visualizar un segundo, luego se<br />
sustituye por el valor correspondiente al<br />
parámetro mismo. Para pasar al pará-<br />
Fig.9 Fig.10<br />
metro sucesivo, usar las teclas de desplazamiento<br />
(Fig.10). Para modifi car un<br />
parámetro basta seleccionarlo, pulsar<br />
la tecla indicada en (Fig.9), modifi car el<br />
valor asignado mediante las teclas de<br />
desplazamiento mostrado en (Fig.10) y<br />
para confi rmar la modifi cación, pulsar<br />
nuevamente la tecla indicada en (Fig.9).<br />
Configuración de los parámetros operativos (nivel instalador)<br />
Índice - línea<br />
Índice - línea<br />
Índice - línea<br />
Valor<br />
MIN<br />
Valor<br />
MAX<br />
0 2<br />
Valor<br />
MIN<br />
Valor<br />
MAX<br />
-25 °C 25 °C<br />
Valor<br />
MIN<br />
Valor<br />
MAX<br />
0,5 °C 20 °C<br />
Configuración regulación en entrada o salida<br />
Función del parámetro<br />
En base al valor de este parámetro, la regulación de la máquina se basará en:<br />
• Si el valor es 0, la máquina se regula en base a la temperatura de salida;<br />
• Si el valor es 1, se regula en base a la temperatura de entrada.<br />
• Si el valor es 2, la máquina se regula en base a la temperatura de la sonda remota del<br />
tablero DHW (en caso de avería de la sonda remota la máquina se regula con la sonda<br />
de a bordo emitiendo el código de alarma 157).<br />
Si está activa la producción de agua caliente sanitaria, la regulación se fuerza automáticamente<br />
en base a la temperatura de salida del agua, independientemente del valor de<br />
este parámetro.<br />
Configuración FORCE-OFF en frío<br />
Función del parámetro<br />
Las unidades prevén un control de la temperatura de trabajo (entrada o salida) a la que<br />
se conecta un umbral de seguridad más allá del cual el compresor se apaga inmediata y<br />
automáticamente; este umbral se llama FORCE-OFF.<br />
Configuración umbral de seguridad<br />
Función del parámetro<br />
Umbral de temperatura encima del force-off que rehabilita el arranque del compresor<br />
después de haber sido apagado por force -off.
Índice - línea<br />
Índice - línea<br />
Índice - línea<br />
Índice - línea<br />
Índice - línea<br />
Valor<br />
MIN<br />
Valor<br />
MAX<br />
0 s 999 s<br />
Valor<br />
MIN<br />
Valor<br />
MAX<br />
0 s 120 s<br />
Valor<br />
MIN<br />
Valor<br />
MAX<br />
-50 °C 20 °C<br />
Valor<br />
MIN<br />
Valor<br />
MAX<br />
0 4<br />
Valor<br />
MIN<br />
Valor<br />
MAX<br />
0 3<br />
Configuración tiempo integral<br />
Función del parámetro<br />
Las unidades poseen una lógica evolucionada para el control de la temperatura del agua<br />
producida; el control integral evita que el sistema entre en equilibrio a una temperatura<br />
más alta o más baja respecto a la configurada con el set de trabajo. Recordamos que<br />
aumentando el tiempo de integración se debilita el efecto del control integral.<br />
Configuración tiempo de derivación<br />
Función del parámetro<br />
Tiempo dentro del cual la temperatura del agua en entrada se controla para estimar la<br />
carga de la instalación; si la banda del valor de set es superada dentro de dicho tiempo,<br />
la unidad se activa.<br />
Configuración umbral antihielo<br />
Función del parámetro<br />
En las unidades se puede configurar un umbral para las alarmas antihielo; este valor<br />
especifica a qué temperatura se activa la alarma antihielo. Recordamos que para poder<br />
modificar el parámetro Umbral antihielo, se debe habilitar el dip-<strong>switch</strong> correspondiente<br />
(ver tabla configuración de dip-<strong>switch</strong>).<br />
Configuración frost protection<br />
Función del parámetro<br />
En las unidades puede configurarse un control de seguridad de la temperatura de salida del agua. En base al<br />
valor asignado a este parámetro, la resistencia antihielo se controla de la siguiente forma:<br />
• valor 0, resistencia antihielo ausente;<br />
• valor 1, resistencia antihielo instalada, se activa sólo con la máquina funcionando en calor o en frío;<br />
• valor 2, resistencia antihielo instalada, se activa aún con la máquina en standby pero con la bomba encendida;<br />
• valor 3, resistencia antihielo, se activa con la máquina en standby sin la bomba activa;<br />
• valor 4, con temperatura del aire exterior menor a los 3°C se activa la bomba durante dos minutos cada<br />
treinta minutos, con el objetivo de monitorear la temperatura del agua dentro de la instalación.<br />
Configuración control del panel<br />
Función del parámetro<br />
Este set configura el tipo de control aplicable a las unidades; en base al valor configurado<br />
para este set, el control sobre el modo de funcionamiento (CALOR/FRÍO) y sobre el<br />
mando de encendido/apagado de la unidad, se gestiona en el siguiente modo:<br />
Valor del set configurado en 0:<br />
• Configuración modo de funcionamiento = configuración parámetro 0<br />
• mando ON/OFF = mediante panel en la máquina<br />
Valor del set configurado en 1:<br />
• Configuración modo de funcionamiento = configuración parámetro 0<br />
• mando ON/OFF = mediante panel remoto<br />
Valor del set configurado en 2:<br />
• Configuración del modo de funcionamiento = configurado mediante contacto a distancia<br />
• mando ON/OFF = mediante panel en la máquina<br />
Valor del set configurado en 3:<br />
• Configuración del modo de funcionamiento = configurado mediante contacto a distancia<br />
• mando ON/OFF = mediante contacto a distancia<br />
4900575_01 / Ver - 4.30<br />
ES<br />
123
124<br />
Índice - línea<br />
Índice - línea<br />
Índice - línea<br />
Índice - línea<br />
Valor<br />
MIN<br />
Valor<br />
MAX<br />
ES 4900575_01 / Ver - 4.30<br />
Configuración del protector de pantalla<br />
Función del parámetro<br />
0 2 Este parámetro indica la configuración del funcionamiento del protector de pantalla:<br />
• valor 0, protector de pantalla deshabilitado;<br />
• valor 1, protector de pantalla con visualización de guiones. (para utilizar con tableros<br />
de mandos con software anterior a la versión 1.3);<br />
• valor 2, protector de pantalla sin la visualización de guiones (para utilizar con tableros<br />
de mandos con software versión 1.3 en adelante)<br />
Valor<br />
MIN<br />
Valor<br />
MAX<br />
Dirección Modbus supervisor<br />
Función del parámetro<br />
0 999 Este parámetro indica la dirección Modbus asignada al supervisor; esta dirección se utilizará<br />
en la comunicación entre el supervisor y Moducontrol.<br />
Valor<br />
MIN<br />
Valor<br />
MAX<br />
Baud rate supervisor<br />
Función del parámetro<br />
0 2 Este parámetro indica la velocidad de comunicación entre supervisor y moducontrol;<br />
esta velocidad se configura en base al valor seleccionado para este parámetro:<br />
0 = 9600 bps<br />
1 = 19200 bps<br />
2 = 38400 bps<br />
Valor<br />
MIN<br />
Valor<br />
MAX<br />
Habilitación escritura supervisor<br />
Función del parámetro<br />
0 1 Este parámetro habilita los mandos de escritura para el supervisor; esta habilitación se<br />
configura en base al valor seleccionado para este parámetro:<br />
0 = Deshabilita los mandos de escritura;<br />
1 = Habilita los mandos de escritura;<br />
Se recuerda que los mandos de lectura siempre están activos.
Menú INSTALADOR 2<br />
Para ingresar al menú INSTALACIÓN_2 seguir el mismo procedimiento operativo descrito para el menú INSTALACIÓN;<br />
la única modifi cación es el valor de la contraseña que debe ser igual a 31.<br />
ATENCIÓN: la modifi cación de los siguientes<br />
parámetros es competencia<br />
exclusiva del personal califi cado encargado<br />
de la instalación de la unidad.<br />
Configuración de los parámetros operativos (nivel instalador)<br />
Índice - línea<br />
Índice - línea<br />
PASSWORD = 031<br />
Umbral para la reactivación después de la fuerza de cierre fuera de<br />
Valor<br />
MIN<br />
Valor<br />
MAX<br />
0 °C 30 °C<br />
Valor<br />
MIN<br />
Valor<br />
MAX<br />
0 1<br />
Fig.9a Fig.10a<br />
Función del parámetro<br />
Si el rin valor del parámetro = 4 (parámetro 8 del menú de instalación), entonces este<br />
es un sistema de almacenamiento de la sonda, este parámetro indica la cantidad de<br />
reducir el umbral de fuerza frente a fin de evitar que el compresor se reactivó después<br />
de la intervención de dinámica ForceOff extinguido poco después.<br />
Apagado de la bomba por termostato<br />
Función del parámetro<br />
0 = la bomba sigue funcionando cuando se alcanza la temperatura de set point. 1 = la<br />
bomba se apaga cuando se alcanza la temperatura de set point. (cuando se selecciona<br />
esta opción, se activa automáticamente la regulación en base a la temperatura de<br />
entrada). Este parámetro es visible sólo si se fija la regulación en base a la temperatura<br />
(parámetro(0) =1 o bien 2).<br />
4900575_01 / Ver - 4.30<br />
ES<br />
125
Para ingresar al menú RESISTENCIA<br />
pulsar la tecla indicada en (Fig.14); una<br />
vez pulsada la tecla se deberá ingresar<br />
la password para acceder a los diversos<br />
menús; para acceder al menú usuario la<br />
password es 001; para modifi car el valor<br />
de las passwords usar las teclas de<br />
desplazamiento. Una vez ingresada la<br />
ATENCIÓN: la modifi cación de los siguientes<br />
parámetros es competencia<br />
exclusiva del personal califi cado encargado<br />
de la instalación de la unidad.<br />
126<br />
PASSWORD = 001<br />
ES 4900575_01 / Ver - 4.30<br />
Menú RESISTENCIA<br />
password correcta pulsar la tecla indicada<br />
en (Fig.14). En la pantalla se visualiza<br />
el índice del parámetro RESISTEN-<br />
CIA y una línea de tres caracteres que la<br />
identifi ca; la línea se puede visualizar un<br />
segundo, luego se sustituye por el valor<br />
correspondiente al parámetro mismo.<br />
Para pasar al parámetro siguiente, usar<br />
Fig.14 Fig.15<br />
Configuración de los parámetros operativos<br />
(nivel resistencia)<br />
Índice - línea<br />
Índice - línea<br />
Valor<br />
MIN<br />
Valor<br />
MAX<br />
-20 °C 50 °C<br />
Valor<br />
MIN<br />
Configuración set de la resistencia antihielo<br />
Función del parámetro<br />
las teclas de desplazamiento (Fig.15).<br />
Para modifi car un parámetro basta seleccionarlo,<br />
pulsar la tecla indicada en<br />
(Fig.14), modifi car el valor asignado<br />
mediante las teclas de desplazamiento<br />
mostrado en (Fig.15) y para confi rmar<br />
la modifi cación, pulsar nuevamente la<br />
tecla indicada en (Fig.14).<br />
Las unidades prevén la posibilidad de configurar un umbral para la activación de la resistencia<br />
antihielo; si la temperatura leída por una de las dos sondas del agua (entrada o<br />
salida, en base al tipo de control habilitado) alcanza el valor establecido en este parámetro,<br />
la resistencia antihielo se activa.<br />
Configuración de la banda resistencia antihielo<br />
Valor<br />
MAX<br />
0,3 °C 10 °C<br />
Función del parámetro<br />
Las unidades prevén la posibilidad de configurar un umbral para la activación de la resistencia<br />
antihielo; si la temperatura leída por una de las dos sondas del agua (entrada o<br />
salida, en base al tipo de control habilitado) alcanza el valor establecido en este parámetro,<br />
la resistencia antihielo se activa.
Además de los parámetros que se pueden<br />
introducir a través del panel, las<br />
unidades están dotadas de una serie<br />
de dip-<strong>switch</strong> mediante los que se gestionan<br />
algunas opciones y funciones de<br />
la máquina.<br />
Recordamos que algunas de las operaciones<br />
que pueden gestionarse a través<br />
del panel están vinculadas a un ajuste<br />
específi co de algunos dip-<strong>switch</strong>.<br />
Unidades<br />
Tabla configuración DIP-SWITCH<br />
<strong>Dip</strong>-<strong>switch</strong> (B)<br />
Configuraciones por defecto DIP-SWITCH MODUCONTROL<br />
DIP-SWITCH (A) DIP-SWITCH (B)<br />
1 2 3 4 5 6 7 8 9 10 11 12 1 2<br />
WRL OFF OFF OFF OFF ON OFF (*) OFF OFF OFF (**) OFF OFF OFF<br />
(*) El valor de este DIP-SWITCH depende de la presencia o de la ausencia del accesorio transductor de alta presión (TP2/TP3):<br />
- Si la unidad prevé el transductor de alta presión, el DIP 7 será programado en ON;<br />
- Si la unidad NO prevé el transductor de alta presión, el DIP 7 será programado en OFF;<br />
(**)<br />
ON = WRL sólo frío (WRL °);<br />
OFF = WRL motoevaporadora (WRL E);<br />
<strong>Dip</strong>-<strong>switch</strong> (A)<br />
4900575_01 / Ver - 4.30<br />
ES<br />
127
128<br />
<strong>Dip</strong>-<strong>switch</strong> N° <strong>Dip</strong> Estado Función<br />
A<br />
<strong>Dip</strong>-<strong>switch</strong><br />
B<br />
1<br />
2<br />
3<br />
4<br />
5<br />
6<br />
7<br />
8<br />
9<br />
10<br />
11<br />
12<br />
ES 4900575_01 / Ver - 4.30<br />
ON Configuraciones de fábrica<br />
OFF Configuraciones de fábrica<br />
ON Desescarchado previsto sólo para inversión ciclo<br />
OFF Desescarchado para inyección de gas caliente<br />
ON Agua glicolada: set antihielo modificable<br />
OFF Set antihielo (Parámetro B) bloqueado<br />
ON Control rendimiento deshabilitado<br />
OFF Control rendimiento habilitado<br />
ON Parcializaciones de seguridad deshabilitadas<br />
OFF Parcializaciones de seguridad habilitadas<br />
ON Algoritmo de control bajo contenido de agua deshabilitado<br />
OFF Algoritmo de control bajo contenido de agua habilitado<br />
ON Dispositivo de control de la presión de condensación presente<br />
OFF Dispositivo de control de la presión de condensación ausente<br />
ON Configuraciones de fábrica<br />
OFF Configuraciones de fábrica<br />
ON Configuración de la tarjeta para unidad inverter<br />
OFF Configuración de la tarjeta para unidad chiller ON/OFF<br />
ON Configuración de la tarjeta para unidad motocondensadora<br />
OFF Configuración de la tarjeta para unidad chiller<br />
ON Configuraciones de fábrica<br />
OFF Configuraciones de fábrica<br />
ON No utilizado<br />
OFF No utilizado<br />
Combinaciones <strong>Dip</strong> Función<br />
DIP 1 DIP 2<br />
OFF OFF Configuraciones de fábrica<br />
ON OFF Configuraciones de fábrica<br />
ON ON Configuraciones de fábrica<br />
OFF ON Configuraciones de fábrica
La tarjeta Modu_control pone a disposición<br />
la posibilidad de interconectarla con<br />
un sistema centralizado mediante la correspondiente<br />
tarjeta de expansión serial,<br />
basada en el estándar eléctrico RS485, y<br />
utilizando el protocolo estándar Modbus<br />
RTU. La tarjeta Modu_Control siempre es<br />
Mandos MODBUS<br />
Protocolo de comunicación serial<br />
Slave de la comunicación. Para habilitar<br />
la comunicación entre un sistema de supervisión<br />
y la tarjeta moducontrol, se deben<br />
confi gurar algunos parámetros:<br />
Parámetro J - Ad1 (Dirección modbus<br />
del supervisor);<br />
Parámetro L - Bd1 (Baud rate supervisor);<br />
La tarjeta Modu_Control controla hacia el supervisor BMS/VMF tanto los valores<br />
Register (enteros/analógicos) como Coil (digitales). Los mandos que<br />
pueden utilizarse para la lectura/escritura de estos son:<br />
cmd<br />
Codici MODBUS utilizzati<br />
descrizione<br />
0x01 Read Coil Status<br />
0x03 Read Holding Registers<br />
0x05 Force Single Coil<br />
0x06 Preset Single Register<br />
0x0F Preset Multiple Coils<br />
0x10 Preset Multiple Registers<br />
LISTA DIGITALES (COIL):<br />
COMANDI DIGITALI DISPONIBILI<br />
Read Coil Status<br />
Force Single Coil<br />
Force Multiple Coils<br />
Para poder escribir los parámetros COIL en<br />
la tarjeta Modu_Control se deben habilitar<br />
los mandos de supervisión confi gurando el<br />
parámetro (N) = 1 del menú instalador (password=30)<br />
del tablero a bordo.<br />
DIRECCIÓN DESCRIPCIÓN<br />
0 Mando Standby/Encendido (toggle) 0=OFF 1=ON<br />
1 Mando modo funcionamiento (toggle) 0=FRÍO 1=CALOR<br />
2 Mando a distancia agua sanitaria 0=Normal, 1=Sanitaria<br />
3 Habilitación Termostato a distancia 0=Deshabilitado, 1=Habilitado<br />
4 Mando Reset Alarmas. 1=Reset alarmas<br />
5 Estado compresor1 0=OFF 1=ON<br />
6 Estado compresor2 0=OFF 1=ON<br />
7 Estado Caldera/Resistencia 0=OFF 1=ON<br />
8 Estado Producción agua sanitaria. 0=no activa 1=activa<br />
9 Estado ID agua sanitaria 0=ID cerrado – 1=ID abierto<br />
10 Estado ID ON_OFF a distancia 0=ID cerrado – 1=ID abierto<br />
11 Estado ID estación 0=ID cerrado (Frío) , 1=ID abierto (Calor)<br />
12 Estado ID termostato ambiente 0=ID cerrado – 1=ID abierto<br />
13 Resumen Alarma<br />
14 Resumen Prealarma<br />
15 Prealarma Magnetotérmico compresor<br />
16 Prealarma Magnetotérmico Ventilador<br />
También es necesario garantizar el cumplimiento<br />
con las siguientes características:<br />
Stop bits: 2;<br />
Parity: NONE;<br />
!<br />
4900575_01 / Ver - 4.30<br />
ES<br />
129
130<br />
DIRECCIÓN DESCRIPCIÓN<br />
17 Prealarma Presostato de Alta Presión<br />
18 Prealarma Flujostato/Presostato diferencial agua<br />
19 Prealarma Presostato de Baja Presión<br />
20 Prealarma Sonda entrada NTC1 (SIW) ausente<br />
21 Prealarma Sonda entrada NTC2 (SUW) ausente<br />
22 Prealarma Antihielo<br />
23 Prealarma Sonda entrada NTC4 (SGP) ausente<br />
24 Prealarma Temperatura Gas Impelente Elevada<br />
25 Prealarma Transductor Envío Compresor Ausente<br />
26 Prealarma Alta Presión<br />
27 Prealarma Sonda entrada NTC3 (SS) ausente<br />
28 Prealarma Transductor aspiración ausente<br />
29 Prealarma Baja Presión<br />
30 Prealarma Bajo Rendimiento<br />
31 Prealarma Magnetotérmico bomba<br />
32 Prealarma Parcialización de Alta Presión<br />
33 Prealarma Parcialización de Baja Presión<br />
34 Prealarma Parcialización temperatura impelente<br />
35 Prealarma Error bemf (Inverter longertek)<br />
36 Prealarma Error comunicación interno (longertek)<br />
37 Prealarma Sobrecorriente (longertek)<br />
38 Prealarma Ausencia de carga (longertek)<br />
39 Prealarma Tensión incorrecta (longertek)<br />
40 Prealarma Error en arranque (longertek)<br />
41 Prealarma Error de protección IPM (longertek)<br />
42 Prealarma Error EEPROM (longertek)<br />
43 Prealarma punto muerto compresor (longertek)<br />
44 Prealarma comunicación ausente (longertek)<br />
45 Prealarma PFC module (longertek)<br />
46 Prealarma Sobretemperatura de enfriamiento (APY)<br />
47 Prealarma Sobrecorriente en aceleración (APY)<br />
48 Prealarma Sobrecorriente a velocidad constante (APY)<br />
49 Prealarma Sobrecorriente en desaceleración (APY)<br />
50 Prealarma Subvoltaje en el DC bus (APY)<br />
51 Prealarma Sobrevoltaje en el DC bus (APY)<br />
52 NO USADO<br />
53 NO USADO<br />
54 Prealarma PFC Converter Fault (APY)<br />
55 Prealarma Sobrecorriente en aceleración (APY)<br />
56 Prealarma Sobrecarga (APY)<br />
57 Prealarma Sobrecorriente a velocidad constante (APY)<br />
58 Prealarma Sobrecorriente en desaceleración (APY)<br />
59 Prealarma Compresor conectado incorrectamente (APY)<br />
60 Prealarma Ausencia de comunicación (APY)<br />
61 Prealarma Error sensor de temperatura aleta enfriam. (APY)<br />
62 NO USADO<br />
63 NO USADO<br />
ES 4900575_01 / Ver - 4.30
DIRECCIÓN DESCRIPCIÓN<br />
64 NO USADO<br />
65 Prealarma Condición anómala (APY)<br />
66 NO USADO<br />
67 NO USADO<br />
68 Prealarma Válvula de inversión del ciclo<br />
69 Prealarma Alta temperatura entrada de agua<br />
70 Prealarma Inversión del ciclo por alta temperatura del gas impelente<br />
71 NO USADO<br />
72 NO USADO<br />
73 NO USADO<br />
74 NO USADO<br />
75 NO USADO<br />
76 NO USADO<br />
77 NO USADO<br />
78 NO USADO<br />
79 NO USADO<br />
80 NO USADO<br />
81 NO USADO<br />
82 NO USADO<br />
83 NO USADO<br />
84 NO USADO<br />
85 Alarma Magnetotérmico compresor<br />
86 Alarma Magnetotérmico Ventilador<br />
87 Alarma Presostato Alta Presión<br />
88 Alarma Flujostato/Presostato diferencial agua<br />
89 Alarma Presostato Baja Presión<br />
90 Alarma Sonda entrada NTC1 ausente (SIW)<br />
91 Alarma Sonda entrada NTC2 ausente (SUW)<br />
92 Alarma Antihielo<br />
93 Alarma Sonda entrada NTC4 ausente (SGP)<br />
94 Alarma Temperatura Gas Impelente Elevada<br />
95 Alarma Transductor Envío Compresor Ausente<br />
96 Alarma Alta Presión<br />
97 Alarma Sonda entrada NTC3 ausente (SS)<br />
98 Alarma Transductor aspiración ausente<br />
99 Alarma Baja Presión<br />
100 Alarma Bajo Rendimiento<br />
101 Alarma Magnetotérmico bomba<br />
102 Alarma Parcialización Alta Presión<br />
103 Alarma Parcialización Baja Presión<br />
104 Alarma Parcialización temperatura impelente<br />
105 Alarma Error bemf (Inverter longertek)<br />
106 Alarma Error comunicación interno (longertek)<br />
107 Alarma Sobrecorriente (longertek)<br />
108 Alarma Ausencia de carga (longertek)<br />
109 Alarma Tensión incorrecta (longertek)<br />
110 Alarma Error en arranque (longertek)<br />
4900575_01 / Ver - 4.30<br />
ES<br />
131
132<br />
DIRECCIÓN DESCRIPCIÓN<br />
111 Alarma Error de protección IPM (longertek)<br />
112 Alarma Error EEPROM (longertek)<br />
113 Alarma punto muerto compresor (longertek)<br />
114 Alarma comunicación ausente (longertek)<br />
115 Alarma PFC module (longertek)<br />
116 Alarma Sobretemperatura de enfriamiento (APY)<br />
117 Alarma Sobrecorriente en aceleración (APY)<br />
118 Alarma Sobrecorriente a velocidad constante (APY)<br />
119 Alarma Sobrecorriente en desaceleración (APY)<br />
120 Alarma Subvoltaje en el DC bus (APY)<br />
121 Alarma Sobrevoltaje (APY)<br />
122 NO USADO<br />
123 NO USADO<br />
124 Alarma PFC Converter Fault (APY)<br />
125 Alarma Sobrecorriente en aceleración (APY)<br />
126 Alarma Sobrecarga (APY)<br />
127 Alarma Sobrecorriente a velocidad constante (APY)<br />
128 Alarma Sobrecorriente en desaceleración (APY)<br />
129 Alarma Compresor conectado incorrectamente (APY)<br />
130 Alarma Ausencia de comunicación (APY)<br />
131 Alarma Error sensor de temperatura aleta enfriam. (APY)<br />
132 NO USADO<br />
133 NO USADO<br />
134 NO USADO<br />
135 Alarma Condición anómala (APY)<br />
136 NO USADO<br />
137 NO USADO<br />
138 Alarma Válvula de inversión del ciclo averiada<br />
139 Alarma Alta temperatura entrada de agua<br />
140 Alarma Inversión del ciclo por alta temperatura del gas impelente<br />
141 (Código 57) Alarma sonda de lectura a distancia en ACS<br />
142 (Código 58) la lectura de alarma del sensor de temperatura de aire exterior<br />
143 NO USADO<br />
144 NO USADO<br />
145 NO USADO<br />
146 NO USADO<br />
147 NO USADO<br />
148 NO USADO<br />
149 NO USADO<br />
150 NO USADO<br />
151 NO USADO<br />
152 NO USADO<br />
153 NO USADO<br />
154 NO USADO<br />
ES 4900575_01 / Ver - 4.30
LISTA READ REGISTER:<br />
COMANDI LETTURA DISPONIBILI<br />
Read Holding Register<br />
DIRECCIÓN DESCRIPCIÓN<br />
0 Tipología máquina: 0 – ANL,1 – ANLI, 2 – ANR/ANF/SRP, 3 – ANL-C<br />
1 Tipología de la máquina inverter 0=longertek 1=APY<br />
2 Entrada NTC1 (TUA) (SIW)<br />
3 Entrada NTC2 (TIA) (SUW)<br />
4 Entrada NTC3 (TSB) (SS)<br />
5 Entrada NTC4 (TGP) (SGP)<br />
6 Entrada NTC5 (TAE) (SAE)<br />
7 Entrada transductor de alta presión (AP) (TAP)<br />
8 Entrada transductor de baja presión (BP) (TBP)<br />
9 Entrada 0-10Vdd<br />
10 Estado salidas digitales relé<br />
11 Banda de seguridad en force OFF<br />
12 Tiempo para el arranque/apagado del compresor<br />
13 Horas de funcionamiento del compresor primario (miles)<br />
14 Horas de funcionamiento del compresor primario<br />
15 Número de arranques realizados por el compresor (miles)<br />
16 Número de arranques realizados por el compresor<br />
17 Major sw version<br />
18 Minor sw version<br />
19 Set point de regulación de la máquina (con correcciones)<br />
20 Set presión control de la condensación<br />
21 Diferencial de presión para control de la condensación<br />
22 Horas de funcionamiento del compresor auxiliar (miles)<br />
23 Horas de funcionamiento del compresor auxiliar<br />
24 Número de arranques realizados por el compresor auxiliar (miles)<br />
25 Número de arranques realizados por el compresor auxiliar<br />
26 Potencia suministrada por la máquina (chiller ON-OFF)<br />
Frecuencia en uso (chiller inverter)<br />
27 Caída de presión en aspiración del compresor<br />
28 Potencia requerida al control inverter<br />
29 Configuración <strong>Dip</strong>-Switch (0x0000 = todos OFF ÷ 0x0FFF = todos ON)<br />
30 Estado Habilitación Mandos ON_OFF Estación desde Tablero o a Distancia<br />
31 Estado Habilitación Termostato ambiental conectado en entrada ID3<br />
32 Estado de funcionamiento de la máquina: 0 - Chiller Off, 1 - Chiller On,<br />
2 – Inyección de parcialización, 3 – Desescarche por inyección,<br />
4 – Desescarche por inversión de ciclo<br />
33 Accesorio Resistencia/Caldera: 0=ausente 1=resistencia 2=caldera<br />
34 Corriente inverter APY<br />
35 Tensión salida inverter APY<br />
36 Tensión de BUS inverter APY<br />
37 Temperatura Aleta de enfriamiento inverter APY<br />
38 Límite conjunto de puntos calientes<br />
4900575_01 / Ver - 4.30<br />
ES<br />
133
LISTA WRITE REGISTER:<br />
134<br />
COMANDI SCRITTURA DISPONIBILI<br />
Preset Single Register<br />
Preset Multiple Registers<br />
DIRECCIÓN DESCRIPCIÓN LÍMITES MÍN MÁX<br />
39 Set point Frío -200 ÷ 260 [°C]<br />
40 Banda Set point Frío 10 ÷ 200 [°C]<br />
41 Set point Calor 250 ÷ 650 [°C]<br />
42 Banda Set point Calor 10 ÷ 200 [°C]<br />
43 Corrección Set point 0 ÷ 3<br />
44 Set Frío 1 -200 ÷ 260 [°C]<br />
45 TA Externa frío 1 400 ÷ 500 [°C]<br />
46 Set Frío 2 -200 ÷ 260 [°C]<br />
47 TA Externa frío 2 -400 ÷ 500 [°C]<br />
48 Set Calor 1 250 ÷ 650 [°C]<br />
49 TA Externa calor 1 -400 ÷ 500 [°C]<br />
50 Set Calor 2 250 ÷ 650 [°C]<br />
51 TA Externa calor 2 -400 ÷ 500 [°C]<br />
52 Set Agua Sanitaria -250 ÷ 650 [°C]<br />
53 Banda Agua Sanitaria 10 ÷ 200 [°C]<br />
54 Porcentaje de potencia requerida por termostato 0 ÷ 100 [%]<br />
55 PWD_SET_VMF -32768 ÷ 32767<br />
56 Sonda Remota DHW -32768 ÷ 32767<br />
LISTA DE EXCEPCIONES:<br />
A continuación, se indican los códigos de error restituidos por la tarjeta Modu Control:<br />
!<br />
EXCEPCIÓN DESCRIPCIÓN<br />
ILLEGAL FUNCTION El código función requerido no está gestionado por la tarjeta.<br />
ILLEGAL DATA ADDRESS<br />
ILLEGAL DATA VALUE<br />
ES 4900575_01 / Ver - 4.30<br />
El pedido de datos contiene una referencia a una dirección que<br />
no está disponible en la tarjeta.<br />
El pedido de escritura del dato contiene un valor fuera de rango<br />
por lo que no se permite la escritura.
Las unidades prevén dos tipologías para señalar<br />
un mal funcionamiento:<br />
• Prealarmas<br />
• Alarmas<br />
La primera tipología se indica con el parpadeo<br />
del testigo rojo en la pantalla. Presionando<br />
la tecla campana se visualiza la lista de las<br />
ATENCIÓN:<br />
Las prealarmas pueden convertirse en alarmas si:<br />
• Ha pasado un tiempo mayor o igual a<br />
60 segundos en la condición de prealarma.<br />
Índice<br />
prealarma<br />
Índice<br />
Alarmas<br />
1 101<br />
Tabla resumen alarmas<br />
alarmas (con el índice y la causa indicados<br />
en la tabla debajo). Una prealarma dura 60<br />
segundos, si después de este tiempo no ha<br />
desaparecido la condición que ha causado la<br />
prealarma, ésta se convierte en alarma. Las<br />
alarmas se visualizan de la misma manera que<br />
las prealarmas, excepto cuando el testigo rojo<br />
• Ha sido superado el número máximo de<br />
prealarmas en una hora (cinco), en este<br />
caso toda prealarma posterior se visualizará<br />
directamente como alarma y, como tal,<br />
Causa Nota<br />
Magnetotérmico compresor<br />
Magnetotérmico ventilador<br />
Magnetotérmico bomba<br />
2 102 Magnetotérmico ventilador<br />
3 103 Presostato alta presión<br />
4 104<br />
Flujostato<br />
Presostato diferencial agua<br />
5 105 Presostato baja presión<br />
6 106 Sonda entrada de agua ausente<br />
7 107 Sonda salida de agua ausente<br />
8 108 Hielo agua<br />
se enciende de manera fija. Antes de activar<br />
nuevamente la unidad, se aconseja contactar<br />
al Servicio de Asistencia. Para activar nuevamente<br />
la unidad se debe apagar y encender la<br />
misma con la tecla stand-by.<br />
detendrá la máquina hasta que se solucione<br />
su causa.<br />
Esta señalización interviene si se abre el contacto correspondiente<br />
al interruptor magnetotérmico de protección del compresor MTC<br />
Esta señalización interviene si se abre el contacto correspondiente<br />
al interruptor magnetotérmico de protección del ventilador MTV<br />
Este código se visualiza sólo si la tarjeta se usa como repuesto de<br />
tarjetas con SW hasta la versión 3.6.<br />
Esta señalización NO indica el estado del presostato de alta presión<br />
en sí mismo sino el del contactor del compresor. El presostato de<br />
alta presión actúa directamente sobre el contactor del compresor.<br />
Si la tarjeta manda el encendido del compresor y el contactor no se<br />
activa luego de 3 segundos, entonces se presenta esta señal. Esta<br />
alarma también puede ser causada por un defecto de funcionamiento<br />
del relé de reenvío del contactor del compresor a la tarjeta<br />
(indicado como RAP en los esquemas eléctricos). Si durante el funcionamiento<br />
del compresor el contactor se desactiva, se presenta<br />
esta señal. AP.<br />
Esta señalización se genera al abrirse el contacto correspondiente<br />
al flujostato o al presostato diferencial. Esta alarma no se detecta<br />
en los primeros 40 segundos de la puesta en funcionamiento de<br />
la máquina. La máquina se bloquea en alarma cuando se supera el<br />
número máximo permitido de intervenciones del flujostato. Si está<br />
activa la modalidad frost protection en standby (y por lo tanto también<br />
la bomba) también se controla el estado del flujostato. FL/PD.<br />
Esta señalización interviene cuando se abre el contacto correspondiente<br />
al presostato de baja presión (aspiración del compresor) BP.<br />
Esta señalización se produce cuando la sonda de entrada de agua<br />
está desconectada.<br />
Esta señalización se produce cuando la sonda de salida de agua<br />
está desconectada.<br />
Esta señalización se produce cuando se alcanza el umbral antihielo<br />
(menú instalador, parámetro (6) por defecto: 3°C) de la temperatura<br />
de salida del agua. Se sale del estado de prealarma con una temperatura<br />
de salida del agua superior al set calculado por la tarjeta,<br />
según un algoritmo interno. La alarma antihielo se suspende (en la<br />
modalidad calor) a los 3 segundos de encenderse el compresor.<br />
9 109 Sonda gas impelente ausente Esta señalización se produce cuando no está la sonda de gas impelente.<br />
4900575_01 / Ver - 4.30<br />
ES<br />
135
136<br />
10 110<br />
11 111<br />
ES 4900575_01 / Ver - 4.30<br />
Temperatura elevada de gas<br />
impelente<br />
Transductor de presión de envío<br />
del compresor ausente<br />
12 112 Alta presión<br />
13 113 Sonda descongelación ausente<br />
14 114<br />
Transductor de presión de aspiración<br />
del compresor ausente<br />
15 115 Baja presión<br />
16 - Bajo rendimiento<br />
17 117 Magnetotérmico bomba<br />
18 118 Parcialización de alta presión<br />
19 119 Parcialización de baja presión<br />
20 120<br />
21 121<br />
Parcialización temperatura<br />
impelente<br />
Error bemf (chiller inverter) error<br />
en la medición de back emf<br />
22 122 Error interno de comunicación:<br />
Esta señalización se produce cuando la temperatura medida del gas<br />
impelente (sonda SGP) supera el umbral previsto por el parámetro.<br />
Se sale del estado de prealarma con la temperatura configurada en<br />
la fábrica (por defecto 125°C).<br />
Esta señalización se produce cuando no está el transductor en el<br />
envío del compresor y la máquina está configurada como bomba de<br />
calor o se establece la presencia del DCP.<br />
Esta señalización se produce cuando el transductor detecta una<br />
presión de envío superior al umbral establecido (por defecto: 40 bar).<br />
Se sale del estado de prealarma con la presión configurada en<br />
fábrica (por defecto: 38 bar).<br />
Esta señalización se produce cuando no está la sonda de descongelación<br />
y la máquina está configurada como bomba de calor.<br />
Esta señalización se produce cuando no está el transductor en<br />
la aspiración del compresor y la máquina está configurada como<br />
bomba de calor.<br />
Esta señalización se produce cuando el transductor en envío del<br />
compresor señala una presión en aspiración inferior al umbral<br />
configurado en fábrica en frío (por defecto: 4 bar), o en calor (por<br />
defecto: 2 bar). Se sale del estado de prealarma cuando la presión<br />
en aspiración supera el umbral previsto de intervención, por<br />
defecto igual a 2 bar. La alarma de baja presión se suspende (en la<br />
modalidad calor) a los 3 segundos de encenderse el compresor. Se<br />
suspende permanentemente durante la inversión del ciclo.<br />
Cada vez que la máquina es alimentada, el control verifica sólo una<br />
vez el comportamiento del compresor a través del procedimiento<br />
de control de rendimiento. Este control puede desactivarse desde<br />
el dip <strong>switch</strong>.<br />
Esta señalización interviene si se abre el contacto correspondiente<br />
al interruptor magnetotérmico de protección de la bomba. MTP.<br />
Este código se visualiza sólo si la tarjeta se usa como repuesto de<br />
tarjetas con SW hasta la versión 3.6.<br />
Esta señalización se produce cada vez que se da una parcialización<br />
causada cuando se alcanza el umbral establecido. La máquina se<br />
bloquea en alarma cuando se supera el número máximo permitido<br />
de parcializaciones (por defecto 5). Con máquina inverter indica<br />
también una parcialización por alta relación de compresión.<br />
Esta señalización se produce siempre que sucede una parcialización<br />
de baja presión. La máquina se bloquea en alarma cuando se<br />
supera el número máximo permitido (por defecto 5).<br />
Esta señalización se produce siempre que sucede una parcialización<br />
de temperatura impelente. La máquina se bloquea en alarma<br />
cuando se supera el número máximo permitido (por defecto 5).<br />
Este error lo envía la tarjeta de control inverter y está vinculado a<br />
problemas de arranque del compresor.<br />
La tarjeta de control inverter tiene problemas internos de comunicación.<br />
23 123 Sobrecorriente Exceso de absorción de corriente por parte del compresor.<br />
24 124 Ausencia de carga<br />
El compresor no absorbe suficiente corriente, es posible que gire<br />
en vacío.<br />
25 125 Tensión incorrecta La tarjeta de control inverter señala una tensión incorrecta de bus.<br />
26 126<br />
Error al comenzar el funcionamiento:<br />
La tarjeta de control inverter señala una puesta en marcha incorrecta<br />
del motor PMSM.<br />
27 127 Error protección IPM Error en el IGBT.<br />
28 128 Error EEPROM: Error de la eeprom en la tarjeta de control inverter.<br />
29 129 Pérdida de potencia del compresor<br />
La tarjeta de control inverter no responde, puede que no esté ali-<br />
30 130 Comunicación ausente mentada, que el cable serial esté desconectado o que las señales A<br />
y B estén invertidas.
31 131 PFC Module Error del módulo inverter PFC.<br />
32 132<br />
Sobretemperatura aleta de<br />
enfriamiento<br />
33 133 Sobrecorriente en aceleración Error hardware.<br />
34 134<br />
Sobrecorriente a velocidad<br />
constante<br />
Error hardware.<br />
35 135 Sobrecorriente en desaceleración Error hardware.<br />
36 136 Subvoltaje en el DC Bus<br />
37 137 Sobrevoltaje DC Bus<br />
40 140<br />
PFC Converter Fault Error en el<br />
módulo PFC<br />
Error software.<br />
41 141 Sobrecorriente en aceleración Error software.<br />
42 142 Sobrecarga<br />
43 143<br />
Sobrecorriente a velocidad<br />
constante<br />
Error software.<br />
44 144 Sobrecorriente en desaceleración Error software.<br />
45 145<br />
Compresor conectado<br />
incorrectamente<br />
46 146 Falta de comunicación<br />
47 147<br />
Error del sensor de temperatura<br />
de la aleta de refrigeración<br />
51 151 Condición anormal.<br />
Frecuencia reducida de protección contra sobrecorriente o sobretemperatura.<br />
54 154<br />
Válvula de inversión del ciclo<br />
averiada<br />
La válvula de inversión del ciclo podría estar averiada o bloqueada.<br />
La temperatura de entrada de agua ha superado el valor del pará-<br />
55 155<br />
Alta temperatura entrada de<br />
agua<br />
metro menú instalador, parámetro (H). Probable presencia caldera<br />
en la misma instalación. A la tercera intervención de la prealarma,<br />
la máquina entra en alarma y se bloquea.<br />
Esta prealarma indica la intervención de descongelación por inversión<br />
del ciclo sin haber respetado los tiempos entre inversiones de<br />
-- 156<br />
Inversión del ciclo por elevada<br />
temperatura del gas impelente<br />
ciclo. El inicio del cambio de ciclo ha sido causado por sobrepasar<br />
el umbral de parcialización por alta temperatura del gas impelente<br />
por defecto 130°. Esta prealarma no causa la detención del compresor<br />
y no presenta un número limitado de intervenciones.<br />
57 157<br />
Error en la lectura de la sonda a<br />
distancia del cuadro DHW.<br />
Esta prealarma indica una avería en la sonda a distancia o un problema<br />
en la comunicación con el cuadro DHW. La alarma sólo está<br />
activa si el parámetro (8)=4 en el menú con password = 30.<br />
58 158<br />
Error en la lectura de la sonda de<br />
temperatura externa.<br />
Esta prealarma indica una avería en la sonda de temperatura del<br />
aire exterior cuando está presente el DCP o la máquina es una<br />
bomba de calor.<br />
59 159<br />
Avería de la sonda de agua de<br />
ENTRADA al condensador<br />
60 160<br />
Avería de la sonda de agua de<br />
SALIDA del condensador<br />
ATENCIÓN:<br />
Se recuerda que las prealarmas se reactivan automáticamente, mientras que las alarmas se reactivan manualmente.<br />
Desde la versión de software 3.9.0 se introdujo el restablecimiento de las alarmas mediante contacto a distancia de ON/OFF, si estuviera habilitado.<br />
De la posición on, se pasa a off y regresa a on. En 5 segundos restablece las condiciones iniciales de las alarmas. Mediante el contacto ON/OFF<br />
se pueden realizar un máximo de 3 restablecimientos por hora.<br />
Primero se deben restablecer las condiciones iniciales de las alarmas con la tecla “R”.<br />
Si faltara la tensión se restablecen las condiciones iniciales de las alarmas.<br />
4900575_01 / Ver - 4.30<br />
ES<br />
137
I dati tecnici riportati nella presente documentazione non sono impegnativi.<br />
AERMEC S.p.A. si riserva la facoltà di apportare in qualsiasi momento tutte le modifiche ritenute necessarie per il miglioramento del prodotto.<br />
Les données mentionnées dans ce manuel ne constituent aucun engagement de notre part. Aermec S.p.A. se réserve le droit de modifier à tous moments les<br />
données considérées nécessaires à l’amelioration du produit.<br />
Technical data shown in this booklet are not binding.<br />
Aermec S.p.A. shall have the right to introduce at any time whatever modifications deemed necessary to the improvement of the product.<br />
Im Sinne des technischen Fortsschrittes behält sich Aermec S.p.A. vor, in der Produktion Änderungen und Verbesserungen ohne Ankündigung durchzuführen.<br />
Los datos técnicos indicados en la presente documentación no son vinculantes.<br />
Aermec S.p.A. se reserva el derecho de realizar en cualquier momento las modificaciones que estime necesarias para mejorar el producto.<br />
AERMEC S.p.A.<br />
I-37040 Bevilacqua (VR) - Italia<br />
Via Roma, 996 - Tel. (+39) 0442 633111<br />
Telefax (+39) 0442 93730 - (+39) 0442 93566<br />
www.aermec.com - info@aermec.com