SOLIS Ultrasonic
SOLIS Ultrasonic
SOLIS Ultrasonic

Create successful ePaper yourself
Turn your PDF publications into a flip-book with our unique Google optimized e-Paper software.
BDA_<strong>Ultrasonic</strong>.qxd 7.7.2005 17:14 Uhr Seite UG1<br />
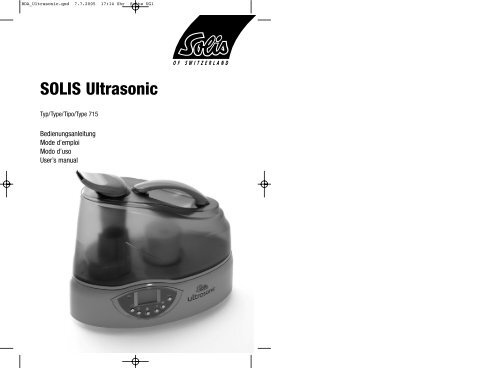
<strong>SOLIS</strong> <strong>Ultrasonic</strong><br />
Typ/Type/Tipo/Type 715<br />
Bedienungsanleitung<br />
Mode d’emploi<br />
Modo d’uso<br />
User’s manual
BDA_<strong>Ultrasonic</strong>.qxd 7.7.2005 17:14 Uhr Seite UG2<br />
1<br />
3<br />
4<br />
12<br />
13<br />
8<br />
6<br />
10<br />
11<br />
2<br />
5<br />
9<br />
7<br />
Gerätebeschreibung<br />
1. Dampfaustritt Düse (drehbar)<br />
2. Traggriff<br />
3. Verneblerkammer<br />
4. Wassertank<br />
5. Wasserstands-Sensor<br />
6. Reservoir<br />
7. Netzleitung<br />
8. Membrane<br />
9. Pinsel<br />
10. Bodenschale<br />
11. Bedien-Panel<br />
12. Entkalkungspatrone<br />
13. Drehverschluss<br />
Description de l'appareil<br />
1. Bouche de diffusion (rotative)<br />
2. Poignée<br />
3. Chambre de vaporisation<br />
4. Réservoir d'eau<br />
5. Palpeur de niveau d'eau<br />
6. Réservoir<br />
7. Prise au secteur<br />
8. Membrane<br />
9. Pinceau<br />
10. Bac de fond<br />
11. Tableau de commande<br />
12. Cartouche décalcifiante<br />
13. Couvercle du réservoir<br />
Descrizione dell'apparecchio<br />
1. Ugello (rotante)<br />
2. Impugnatura<br />
3. Camera del nebulizzatore<br />
4. Recipiente dell'acqua<br />
5. Sensore del livello<br />
6. Serbatoio<br />
7. Spina<br />
8. Membrana<br />
9. Pennello<br />
10. Base<br />
11. Pannello comandi<br />
12. Cartuccia decalcificante<br />
13. Coperchio<br />
Description of the appliance<br />
1. Vapour outlet (rotating)<br />
2. Handle<br />
3. Evaporation chamber<br />
4. Water tank<br />
5. Water-level sensor<br />
6. Reservoir<br />
7. Power cord<br />
8. Membrane<br />
9. Brush<br />
10. Main body<br />
11. Control panel<br />
12. Demineralization cartridge<br />
13. Turn lock<br />
Bedienungsanleitung . . . . . . . . . . . . . . . . . . . . . . . . . . . . . . . . . . . . . . . . . . . . . . . . . . Seite 4– 7<br />
Mode d'emploi . . . . . . . . . . . . . . . . . . . . . . . . . . . . . . . . . . . . . . . . . . . . . . . . . . . . . . Page 8–11<br />
Modo d'uso. . . . . . . . . . . . . . . . . . . . . . . . . . . . . . . . . . . . . . . . . . . . . . . . . . . . . . . . . Pagina 12–15<br />
User's manual . . . . . . . . . . . . . . . . . . . . . . . . . . . . . . . . . . . . . . . . . . . . . . . . . . . . . . . Page 16–19<br />
2 3
BDA_<strong>Ultrasonic</strong>.qxd 7.7.2005 17:14 Uhr Seite 4<br />
Liebe Kundin/Lieber Kunde<br />
Herzlichen Glückwunsch, dass Sie sich für den<br />
<strong>SOLIS</strong> <strong>Ultrasonic</strong> Vernebler entschieden haben.<br />
Das körperliche Wohlbefinden von Mensch und<br />
Tier hängt von vielen Einflüssen ab. Einer davon<br />
ist die richtig befeuchtete Raumluft. Während der<br />
Heizperiode wird die kalte und trockene Aussenluft,<br />
die durch Fenster in die Wohnräume einströmt,<br />
erwärmt. Dies hat ein massives Absinken<br />
der relativen Luftfeuchtigkeit zur Folge. Für<br />
Mensch, Tier und Pflanzen ein ungünstiges Klima.<br />
Man fühlt sich unwohl und wird in verstärktem<br />
Masse anfällig auf Erkältungskrankheiten.<br />
Luftbefeuchtung nach dem Ultraschall-<br />
Prinzip:<br />
Bei dieser sehr wirkungsvollen Technologie in<br />
der Luftbefeuchtung wird das Wasser mit Hochfrequenzschwingungen<br />
in mikrofeinen Nebel<br />
umgewandelt, der dann durch ein Gebläse an die<br />
Raumluft abgegeben wird, wo er sofort verdunstet.<br />
Ultraschall-Luftbefeuchter brauchen wenig Strom.<br />
Eine auswechselbare Entkalkerpatrone sorgt für<br />
hygienisch reinen Wassernebel ohne Kalk- und<br />
Mineralienrückstände. Ultraschall-Luftbefeuchter<br />
haben einen eingebauten Hygrostaten und einen<br />
zusätzlichen Leistungsregler.<br />
Allgemeines:<br />
Angenehm ist das Raumklima in der Regel dann,<br />
wenn die relative Luftfeuchtigkeit zwischen 40–<br />
60 % beträgt. Ihr Luftbefeuchter kontrolliert<br />
die von Ihnen gewünschte und eingestellte Luftfeuchtigkeit<br />
automatisch. Ist es zu trocken,<br />
schaltet er automatisch ein.<br />
Ist die gewünschte Luftfeuchtigkeit erreicht,<br />
schaltet er automatisch aus.<br />
Sicherheitshinweise:<br />
• Gebrauchsanweisung vor der Inbetriebnahme<br />
vollständig durchlesen und zum späteren<br />
Nachschlagen gut aufbewahren.<br />
4<br />
• Das Gerät nur an Wechselstrom anschliessen –<br />
mit Spannung gemäss dem Typenschild am<br />
Gerät.<br />
• Den Luftbefeuchter nur in Wohnräumen und<br />
innerhalb der spezifizierten technischen Daten<br />
verwenden. Ein nicht bestimmungsgemässer<br />
Gebrauch kann Gesundheit und Leben<br />
gefährden.<br />
• Kinder können die Gefahren beim Umgang mit<br />
Elektrogeräten nicht erkennen. Deshalb Kinder<br />
immer beaufsichtigen, wenn sie sich in der<br />
Umgebung des Luftbefeuchters aufhalten.<br />
• Personen, die mit der Gebrauchsanweisung<br />
nicht vertraut sind, sowie Kinder und Personen<br />
unter Medikamenten-, Alkohol- oder Drogeneinfluss,<br />
dürfen das Gerät nicht oder nur unter<br />
Aufsicht bedienen.<br />
• Den Luftbefeuchter nie in Betrieb nehmen,<br />
wenn ein Kabel oder Stecker beschädigt ist,<br />
nach Fehlfunktionen des Gerätes, wenn dieses<br />
herunter gefallen ist oder auf eine andere Art<br />
beschädigt wurde.<br />
• Der Luftbefeuchter darf nur in komplett zusammengebautem<br />
Zustand in Betrieb genommen<br />
werden.<br />
• Reparaturen an Elektrogeräten dürfen nur von<br />
Fachkräften durchgeführt werden. Durch unsachgemässe<br />
Reparaturen können erhebliche<br />
Gefahren für den Benutzer entstehen.<br />
• Der Netzstecker ist bei jedem Füllen/Entleeren<br />
des Wassertanks, vor jeder Reinigung, vor jeder<br />
Montage/Demontage einzelner Teile, vor jeder<br />
Umplatzierung aus der Steckdose zu ziehen.<br />
• Niemals den Netzstecker am Kabel oder mit<br />
nassen Händen aus der Steckdose ziehen.<br />
• Den Luftbefeuchter nur auf eine ebene,<br />
trockene Fläche stellen.<br />
• Gerät nicht direkt auf den Boden oder neben<br />
eine Heizung stellen.<br />
• Keinesfalls Wasser durch die Düsenöffnung<br />
einfüllen.<br />
• Dem Wasser niemals Zusätze (z.B. Duftstoffe,<br />
ätherische Öle, Wasserfrischhaltemittel, etc.)<br />
beigeben.<br />
• Bodenschale nie in Wasser oder andere<br />
Flüssigkeiten tauchen.<br />
Inbetriebnahme:<br />
• Der beste Standort für Ihren Luftbefeuchter ist:<br />
– Einen etwas erhöhten Standort,<br />
ca. 30–50 cm ab Boden.<br />
• Des weiteren ist zu beachten:<br />
– Gerät nicht direkt auf den Boden oder neben<br />
eine Heizung stellen<br />
– Die Düse soll nicht direkt auf Pflanzen oder<br />
Gegenstände gerichtet sein<br />
• Vergewissern Sie sich, dass sich keine fremden<br />
Gegenstände im Wassertank befinden.<br />
• Füllen Sie den Wassertank mit sauberem,<br />
kaltem Leitungswasser (Wasser nicht wärmer<br />
als 40°C) und drehen Sie den Drehverschluss<br />
gut zu. Dem Wasser keine zusätzlichen Reinhaltemittel<br />
beigeben.<br />
• Die Entkalkungspatrone vor Gebrauch ein paar<br />
Stunden in Wasser einlegen.<br />
• Die Entkalkungspatrone sollten Sie alle 2–3<br />
Monate wechseln.<br />
• Stellen Sie den Wassertank auf die Bodenschale<br />
und setzen Sie die Düse ein.<br />
• Schliessen Sie das Netzkabel am Netz an und<br />
schalten Sie das Gerät mit der O/I-Taste ein.<br />
• Etwa 10–15 Minuten nachdem Sie das Gerät<br />
eingeschaltet haben, erreicht das Gerät seine<br />
volle Leistung.<br />
Achtung:<br />
• Der Wassertank ist mit einer Entkalkungspatrone<br />
ausgerüstet. Diese Entkalkungspatrone<br />
muss alle 2–3 Monate ersetzt werden.<br />
• Bei hartem Wasser kann ein Wechsel der<br />
Patrone bereits früher nötig sein.<br />
• Bei einer Wasserhärte von über 25 fH<br />
empfehlen wir den Einsatz des <strong>Ultrasonic</strong><br />
Verneblers nicht!<br />
• Weisser Staub rund um das Gerät ist ein<br />
sicheres Zeichen, dass die Entkalkungspatrone<br />
verbraucht ist.<br />
• Bildet sich trotz neuer Patrone weisser Niederschlag<br />
um das Gerät, so prüfen Sie bitte, ob<br />
das verwendete Wasser wirklich unbehandelt<br />
ist. (ohne Zusätze)<br />
• Fliesst das Wasser vor der Verwendung im Luftbefeuchter<br />
durch eine Hausentkalkungsanlage,<br />
so wird sich Salz rund um das Gerät niederschlagen.<br />
Austausch Entkalkungspatrone:<br />
Drehen Sie den Tank um und öffnen Sie den<br />
Drehverschluss. Die Entkalkungspatrone befindet<br />
sich auf der Innenseite des Drehverschlusses.<br />
Schrauben Sie die Entkalkungspatrone im<br />
Gegenuhrzeigersinn vom Deckel und ersetzen Sie<br />
diese durch eine neue Patrone.<br />
5
BDA_<strong>Ultrasonic</strong>.qxd 7.7.2005 17:14 Uhr Seite 6<br />
Bedienung<br />
Gerät Ein-/Ausschalten<br />
Drücken Sie die O/I-Taste ( 1 ) um den Vernebler<br />
ein- resp. auszuschalten<br />
Betrieb mit Vorheizung<br />
Mit der Taste ( 2 ) wird die Vorheizung ein – bezw.<br />
ausgeschaltet. Bei eingeschalteter Vorheizung<br />
wird das Wasser vor dem Eintreten in den<br />
Verneblerraum auf ca. 80°C vorgeheizt. Der Nebel<br />
tritt jetzt mit angenehmen 40°C aus. Dies hat den<br />
Vorteil, dass die Raumtemperatur nicht absinkt<br />
und sich ausserdem die Wasserreinhaltung<br />
entscheidend verbessert (Bakterien werden<br />
abgetötet).<br />
Timer<br />
Über den eingebauten Timer ( 3 ) kann die<br />
Einschaltdauer zwischen 1 und 9 Stunden resp.<br />
auf Dauerbetrieb eingestellt werden (Das Symbol<br />
( E ) erscheint auf dem Display)<br />
Automatischer Betrieb<br />
Mit der Automatik-Taste ( 4 ) kann der<br />
Automatikbetrieb aktiviert werden. Wenn der<br />
Automatikbetrieb aktiviert ist, wird die ideale<br />
Luftfeuchtigkeit in Relation zur Raumtemperatur<br />
und der gewählten Verneblerstufe<br />
aufrechterhalten. Das Symbol ( D ) mit «Auto»<br />
erscheint auf dem Display.<br />
Hygrostat/Feuchtigkeit einstellen<br />
Mit der Hygrostat-Taste ( 5 ) wird die gewünschte<br />
Luftfeuchtigkeit eingestellt. Empfehlenswert ist<br />
eine relative Luftfeuchtigkeit zwischen 40–60 %.<br />
Überschreitet die Feuchtigkeit die gewünschte<br />
Einstellung, schaltet das Gerät automatisch ab.<br />
Das Gerät schaltet nicht ab, wenn die Funktion auf<br />
Dauerbetrieb eingestellt ist.<br />
Während der Wahl der gewünschten relativen<br />
Luftfeuchtigkeit wird dieser auf dem Display<br />
angezeigt. Nach einigen Sekunden zeigt das<br />
Display den aktuellen Wert an.<br />
Symbol B auf dem Display bedeutet, dass die<br />
gewählte Luftfeuchtigkeit noch nicht erreicht ist.<br />
Symbol C auf dem Display bedeutet, dass die<br />
gewählte Luftfeuchtigkeit erreicht ist.<br />
Verneblerstufen<br />
Durch wiederholtes Drücken der Verneblertaste<br />
( 6 ), können verschiedene Verneblerstufen<br />
eingestellt werden. Wenn der Pfeil ( F ) auf dem<br />
Display vollständig angezeigt wird, haben Sie<br />
die höchste Stufe gewählt.<br />
Wasserstandsanzeige<br />
Der Wasservorrat ist durch den transparenten<br />
Wassertank leicht zu erkennen. Zusätzlich<br />
erscheint bei leerem Wassertank auf dem Display<br />
ein Symbol ( G ) und fordert Sie auf Wasser<br />
nachzufüllen.<br />
Reinigung/Wartung<br />
• Schalten Sie das Gerät aus und ziehen Sie den<br />
Netzstecker aus der Steckdose, bevor Sie das<br />
Gerät reinigen.<br />
• Reinigen Sie den Wassertank und das Reservoir<br />
regelmässig 1x pro Woche (nur mit Wasser,<br />
ohne Spülmittel). Bei Betrieb mit Vorheizung alle<br />
2 Wochen.<br />
• Bitte entkalken Sie die Membrane regelmässig<br />
mit handelsüblichem Entkalkungsmittel.<br />
Spülen Sie das Entkalkungsmittel mit viel<br />
Wasser gut aus.<br />
Achtung:<br />
• Achten Sie darauf, dass kein Wasser in den<br />
Geräteunterteil gelangt.<br />
• Reinigen Sie die Innenteile mit einem weichen<br />
Tuch und verwenden Sie auf keinen Fall Benzin,<br />
Fensterputzmittel und Lösungsmittel.<br />
• Benützen Sie zur wöchentlichen Reinigung der<br />
Membrane ausschliesslich den Pinsel.<br />
• Wechseln Sie das Wasser im Wassertank<br />
mindestens 1x pro Woche.<br />
Lagerung bei längerem Nichtgebrauch<br />
Gerät wie beschrieben reinigen, vollständig austrocknen<br />
lassen und vorzugsweise in der<br />
Originalverpackung an einem trockenen, nicht zu<br />
heissen Ort aufbewahren.<br />
Entsorgen<br />
Ausgediente Geräte müssen unbrauchbar gemacht<br />
werden. Ziehen Sie den Stecker aus der<br />
Steckdose und trennen Sie das Netzkabel vom<br />
Gerät. Übergeben Sie den ausgedienten<br />
Luftbefeuchter Ihrem Händler zur fachgerechten<br />
Entsorgung.<br />
Weitere Entsorgungsmöglichkeiten erfahren Sie<br />
von Ihrer Gemeinde oder Stadtverwaltung.<br />
Elektrogeräte gehören nicht in den Hausmüll. Die<br />
Stiftung Entsorgung Schweiz (S.EN.S) sorgt für<br />
eine umweltgerechte Entsorgung.<br />
Technische Daten<br />
Spannung: 230 Volt / 50 Hz<br />
Leistungsaufnahme:<br />
45 Watt (ohne Vorheizung)<br />
120–130 Watt (mit Vorheizung)<br />
Befeuchtungsleistung: 400g/Std.<br />
Geeignet für Räume bis 60m 2 /150m 3<br />
Wasserinhalt: 5,7 Liter<br />
Gewicht leer: 3,0 Kg<br />
Masse: 397 x 220 x 340 mm<br />
Betriebsgeräusch: < 25 dB(A)<br />
Zubehör: Entkalkungspatrone<br />
Störungen beheben<br />
Problem Mögliche Ursache Was tun<br />
Gerät funktioniert nicht Netzstecker nicht eingesteckt Netzstecker an Steckdose<br />
anschliessen<br />
Kein Wasser im Wassertank Wasser nachfüllen<br />
(Leer-Anzeige leuchtet auf)<br />
Kein Nebelausstoss Luftfeuchtigkeitseinstellung ist Luftfeuchtigkeitseinstellung<br />
geringer als Raumluftfeuchtigkeit erhöhen<br />
Spülmittelrückstände Gerät mit klarem Wasser reinigen<br />
Zu geringer Nebelausstoss Wassertemperatur zu niedrig Nebelausstoss auf Stufe Maximum<br />
stellen, nach10 Min.<br />
arbeitet Gerät wieder einwandfrei<br />
Kalkablagerung auf der Membrane Membrane reinigen<br />
Weisser Niederschlag Entkalkungspatrone verbraucht Entkalkungspatrone wechseln<br />
rund um das Gerät<br />
6 7
BDA_<strong>Ultrasonic</strong>.qxd 7.7.2005 17:14 Uhr Seite 8<br />
Chère cliente, Cher client,<br />
Félicitations, avec le <strong>SOLIS</strong> Vaporisateur<br />
<strong>Ultrasonic</strong> , vous avez choisi le bon produit!<br />
Le bien-être corporel de l'être humain et des<br />
animaux dépend de nombreuses influences<br />
extérieures. L'une d'entre elles est l'air ambiant<br />
qui doit être humidifié de manière équilibrée.<br />
Durant la mauvaise saison, l'air froid et sec qui<br />
s'infltre dans les pièces par la fenêtre est<br />
artificiellement chauffé, ce qui provoque une<br />
chute massive de l'humidité relative. Pour l'être<br />
humain et pour l'animal domestique, mais aussi<br />
pour les plantes, ce climat n'est pas favorable.<br />
On se sent peu à l'aise et plus sensible aux<br />
refroidissements.<br />
Humidification de l'air grâce au principe<br />
ultra son:<br />
Par cette technologie d'humidification efficace,<br />
l'eau est transformée par des oscillations à haute<br />
fréquence en un nuage d'une extrême finesse qui<br />
ensuite est nébulisé dans l'air ambiant par un<br />
ventilateur.<br />
Les humidificateurs ultra son consomment peux<br />
d'électricité. Une cartouche anticalcaire<br />
échangeable permet d'obtenir un nuage d'eau<br />
hygiéniquement pur, déminéralisé et sans résidus<br />
calcaires. Les humidificateurs ultra son sont<br />
équipés d'un hygrostat et d'un régulateur de<br />
puissance supplémentaire.<br />
Remarques générales<br />
Le climat ambiant est agréable quand l'humidité<br />
relative de l'air est entre 40% et 60 %. Votre<br />
humidificateur contrôle automatiquement<br />
l'humidité désirée que vous avez prédéterminée.<br />
Quand l'air est trop sec, il démarre<br />
automatiquement. Quand le degré d'humidité<br />
désiré est atteint, il s'arrête automatiquement.<br />
8<br />
Indications de sécurité<br />
• Etudiez les instructions de service complètes<br />
avant la mise en service, et gardez-les bien<br />
pour des consultations ultérieures.<br />
• Ne branchez l'appareil qu'au courant alternatif<br />
– la tension doit correspondre à celle indiquée<br />
sur la plaque signalétique de l'appareil.<br />
• N'utilisez le vaporisateur que dans des locaux<br />
d'habitation et dans les conditions précisées<br />
dans les spécifications techniques.<br />
• Une utilisation non-conforme aux spécifications<br />
peut mettre en danger la santé et la vie.<br />
• Les enfants ne peuvent pas encore connaître<br />
les dangers résultant de la manipulation<br />
d'appareils électriques. Ne laissez pas les<br />
enfants sans surveillance lorsqu'ils sont à<br />
proximité d'un vaporisateur.<br />
• Les personnes qui ne sont pas familiarisées<br />
avec le mode d'emploi, de même que les<br />
enfants ou les personnes sous l'influence de<br />
médicaments, d'alcool ou de drogues, ne<br />
doivent en aucun cas manipuler l'appareil ci ce<br />
n'est sous surveillance.<br />
• Ne mettez jamais l'appareil en service quand<br />
un câble ou une prise est détérioré, ni après<br />
des malfonctionnements ou après une chute ou<br />
autre dommage quelconque.<br />
• Le vaporisateur ne doit être mis en service<br />
qu'entièrement assemblé.<br />
• Les réparations d'appareils électriques ne<br />
doivent être executées que par des experts<br />
autorisés. Des réparations non-professionnelles<br />
peuvent causer des dangers considérables pour<br />
l'utilisateur.<br />
• La prise au secteur doit être débranchée lors<br />
de chaque remplissage/vidage du réservoir<br />
d'eau, avant chaque nettoyage, avant chaque<br />
montage/démontage de pièces particulières et<br />
avant chaque déplacement de l'appareil.<br />
• Ne débranchez jamais la prise au secteur en<br />
tirant sur le câble ou lorsque vos mains sont<br />
mouillées.<br />
• Ne posez le vaporisateur que sur une surface<br />
sèche et plane.<br />
• Ne posez pas l'appareil directement sur le sol<br />
ni à côté du chauffage.<br />
• Ne remplissez en aucun cas de l'eau par les<br />
bouches de diffusion.<br />
• N'ajoutez jamais des additifs à l'eau (comme<br />
p. ex. matières aromatiques, huiles essentielles,<br />
préservateurs, etc.).<br />
• Ne plongez jamais le bac de fond dans de l'eau<br />
ou d'autres liquides.<br />
Mise en service<br />
• Le meilleur emplacement de votre vaporisateur:<br />
– Un emplacement légèrement surélevé, env.<br />
30 à 50 cm du sol.<br />
• Prêtez attention à ce que:<br />
– Ne posez pas l'appareil directement sur le<br />
sol ni à côté du chauffage.<br />
– Veillez à ce que la bouche de diffusion ne<br />
soit pas orientée en direction de plantes ou<br />
d'objet.<br />
• Assurez-vous, qu'aucun objet étranger ne se<br />
trouve dans le réservoir d'eau.<br />
• Remplissez le réservoir d'eau avec de l'eau<br />
pure et froide (la température ne doit pas être<br />
au-dessus de 40°C), et fermez bien le<br />
couvercle du réservoir en le vissant. Ne rajoutez<br />
pas de produit destiné à conserver à l'eau sa<br />
pureté.<br />
• Laissez tremper la cartouche décalcifiant<br />
dans l'eau quelques heures avant de l'utiliser.<br />
• La cartouche décalcifiant doit être remplacé<br />
tous les 2 à 3 mois.<br />
• Installez le réservoir d'eau à la partie inférieure<br />
et posez la buse.<br />
• Branchez le câble et démarrez l'appareil en<br />
appuyant sur le bouton Marche/arrêt.<br />
• Environ 10 à 15 minutes après la mise sous<br />
tension, l'appareil atteint son plein régime de<br />
fonctionnement.<br />
Attention!<br />
• Le réservoir d'eau est équipé d'une cartouche<br />
décalcifiant. Cette cartouche doit être remplacé<br />
tous les deux à trois mois.<br />
• Si votre eau est très dure, vous risquez d'avoir<br />
à remplacer plus tôt la cartouche.<br />
• Pour une dureté d'eau supérieure à 25 fH, nous<br />
ne recommandons pas l'utilisation du<br />
vaporisateur <strong>Ultrasonic</strong>!<br />
• La présence de poussière blanche autour de<br />
l'appareil est un signe indubitable de l'usure de<br />
la cartouche.<br />
• La formation d'un dépôt blanc autour de<br />
l'appareil alors que la cartouche est neuve peut<br />
signifier que votre eau est déjà traitée.<br />
• Si l'eau de l'humidificateur est déjà adoucie par<br />
une installation domestique, du sel se déposera<br />
autour de l'appareil.<br />
Remplacement de la cartouche décalcifiant<br />
Faites pivoter le réservoir et dévissez le couvercle<br />
du réservoir. La cartouche décalcifiant se trouve<br />
sur la surface interne du couvercle du réservoir.<br />
Enlevez la cartouche décalcifiant du couvercle en<br />
la tournant dans le sens inverse des aiguilles<br />
d'une montre, et remplacez-le par un nouveau<br />
filtre.<br />
9
BDA_<strong>Ultrasonic</strong>.qxd 7.7.2005 17:14 Uhr Seite 10<br />
Emploi<br />
Marche/arrêt<br />
Appuyez sur le bouton ( 1 ) pour mettre<br />
l'humidificateur sous ou hors tension.<br />
Avec préchauffage<br />
Le bouton ( 2 ) met en service le préchauffage<br />
ou le coupe. Lorsqu'il fonctionne, l'eau est<br />
préchauffée à 80°C avant d'entrer dans la<br />
chambre de vaporisation. Le brouillard sort à<br />
l'agréable température de 40°C. Quel intérêt ?<br />
La réponse est simple: vous ne faites pas baisser<br />
la température ambiante et la teneur de l'air en<br />
eau s'améliore de façon décisive (les bactéries<br />
n'y survivent pas).<br />
Minuterie<br />
Le bouton ( 3 ) vous permet de déterminer la<br />
durée de fonctionnement – entre 1 et 9 heures ou<br />
fonctionnement permanent. Lorsque la minuterie<br />
est en service, le symbole ( E ) s'affiche à l'écran.<br />
Auto<br />
Appuyez sur le bouton ( 4 ) pour activer le mode<br />
automatique. Lorsque vous activez le<br />
fonctionnement automatique (affichage du<br />
symbole ( D ) avec «Auto» à l'écran), l'appareil<br />
maintient l'humidité optimale de l'air en fonction<br />
de la température. La régulation fonctionne à<br />
partir du débit et de la valeur imposée.<br />
10<br />
Hygrostat/réglage de l'humidité<br />
Pour régler en % le taux d'humidité souhaitée,<br />
appuyez sur le bouton ( 5 ). Une humidité relative<br />
de l'ordre de 40 à 60% est généralement<br />
recommandée. Si l'humidité dépasse la valeur<br />
réglée, l'appareil se met hors tension. L'appareil<br />
ne se met pas hors tension si vous avez<br />
sélectionné la fonction continue.<br />
Lors de la sélection, la valeur précédente<br />
s'affiche. Elle ne change automatiquement<br />
qu'après quelques secondes pour prendre la<br />
valeur courante.<br />
Le symbole B s'affiche à l'écran lorsque<br />
l'humidité sélectionnée n'est pas encore atteinte.<br />
Le symbole C s'affiche à l'écran lorsque<br />
l'humidité sélectionnée est atteinte.<br />
Réglage du débit de brouillard, puissance de<br />
vaporisation<br />
En appuyant plusieurs fois sur le bouton ( 6 ),<br />
vous pouvez régler le débit de brouillard.<br />
L'affichage de barres rouges ( F ) vous indique<br />
que vous avez sélectionné la puissance de<br />
vaporisation la plus élevée.<br />
Affichage du niveau d'eau<br />
Le niveau d'eau reste bien visible dans le<br />
réservoir d'eau transparent. L'appareil vous<br />
prévient de plus à l'écran ( G ) lorsqu'il manque<br />
d'eau et que vous devez recharger.<br />
Nettoyage/entretien<br />
• Mettez l'appareil hors service et débranchez<br />
la prise au secteur avant le nettoyage de<br />
l'appareil.<br />
• Nettoyez régulièrement le réservoir et le<br />
réservoir amovible une fois par semaine (de<br />
l'eau seulement, sans produit de vaisselle).<br />
Une fois toutes les deux semaines en cas<br />
d'utilisation du préchauffage.<br />
• Détartrez régulièrement la membrane de<br />
pulvérisation avec un détartrant usuel. Rincez<br />
bien le produit détartrant avec beaucoup d'eau.<br />
Attention<br />
• Veillez à ce qu'il n'y ait pas d'eau dans le fond<br />
de l'appareil.<br />
• Nettoyez les parties intérieures avec un chiffon<br />
doux et n'utilisez en aucun cas d'essence, des<br />
produits pour nettoyer des vitres ou des<br />
détergents.<br />
• N'utilisez que le pinceau pour le nettoyage<br />
hebdomadaire de la membrane.<br />
• Changez l'eau du réservoir au moins une fois<br />
par semaine.<br />
Conservation en cas de non-utilisation<br />
prolongée<br />
Nettoyez l'appareil de la manière décrite plus<br />
haut, séchez-le entièrement et conservez-le, de<br />
préférence dans son emballage original, dans un<br />
endroit sec et frais.<br />
Evacuation<br />
Retournez le vaporisateur usé à votre commerçant<br />
pour une évacuation conforme aux règles.<br />
Renseignez-vous sur d'autres possibilités<br />
d'évacuation auprès de votre administration<br />
municipale.<br />
Spécifications techniques<br />
Tension 230 Volt / 50 Hz<br />
Puissance absorbée<br />
45 W (sans préchauffage)<br />
120–130 W (avec préchauffage)<br />
Capacité d'humidification 400 g/heure<br />
Approprié pour des locaux pouvant aller<br />
jusqu'à 60m 2 /150m 3<br />
Volume de remplissage d'eau 5,7 litres<br />
Poids (vide) 3,0 kg<br />
Dimensions 397 x 220 x 340 mm<br />
Bruit en service < 25 dB(A)<br />
Accessoires: cartouche détartrante<br />
Que faire en cas de panne?<br />
Problème Cause Que faire<br />
L'appareil ne fonctionne pas La prise n'est pas branchée Branchez la prise<br />
Le témoin «vide» s'allume Réservoir vide Remplissez le réservoir<br />
Aucun débit de vapeur L'humidité prédéterminée est Augmentez le degré d'humidité<br />
inférieure à l'humidité de l'air<br />
ambiant<br />
Résidus de produits de Nettoyez l'appareil avec de l'eau<br />
nettoyage claire<br />
Débit de vapeur trop faible Température de l'eau est trop Réglez le débit de vapeur au<br />
faible maximum, au bout de 10 minutes,<br />
l'appareil fonctionnera de nouveau<br />
sans défaut<br />
Dépôts de calcaire sur la Nettoyez la membrane<br />
membrane<br />
Précipitations blanches autour Cartouche détartrante usée Remplacez la cartouche<br />
de l'appareil détartrante<br />
11
BDA_<strong>Ultrasonic</strong>.qxd 7.7.2005 17:14 Uhr Seite 12<br />
Stimato Cliente<br />
Complimenti per avere scelto il nebulizzatore<br />
<strong>SOLIS</strong> <strong>Ultrasonic</strong>!<br />
Il benessere delle persone e degli animali dipende<br />
da molti fattori. Uno di essi è il giusto grado di<br />
umidità nell'aria dei locali. Durante il periodo<br />
invernale l'aira fredda e secca, che penetra nei<br />
locali attraverso le finestre, viene scaldata. Ciò<br />
comporta una forte riduzione dell'umidità relativa.<br />
Un clima tutt'altro che ideale per persone, animale<br />
e piante. Non ci si sente a proprio agio e aumenta<br />
la predisposizione per i raffreddori e altre malattie.<br />
L'umidità dell'aria secondo il principio<br />
ultrasuono<br />
Con quest'efficace tecnologia d'umidificazione,<br />
l'acqua si trasforma in finissima nebbia tramite<br />
vibrazioni ad alta frequenza. Questo vapore<br />
fuoriesce da una soffieria e viene così consegnato<br />
all'aria dell'ambiente, dove evapora<br />
immediatamente.<br />
Umidificatori ad ultrasuono hanno bisogno di poca<br />
corrente. Una cartuccia intercambiabile garantisce<br />
un vapore d'acqua igienicamente pulito – senza<br />
residui di calcio e minerali. Umidificatori ad<br />
ultrasuono hanno un idrostato all'interno e in più<br />
un regolatore di potenza supplementare.<br />
Note generali<br />
In generale il clima ambientale è regolare quando<br />
l'umidità relativa oscilla tra il 40 e il 60 %.<br />
L'umidificatore controlla automaticamente<br />
l'umidità dell'aria da Voi desiderata ed impostata.<br />
Quando l'aria è troppo secca, l'umidificatore si<br />
avvia automaticamente. Una volta che viene<br />
raggiunto il livello desiderato di umidità dell'aria,<br />
l'umidificatore si disinserisce automaticamente.<br />
12<br />
Avvertenze sulla sicurezza<br />
• Si prega di leggere interamente le istruzioni per<br />
l'uso prima della messa in funzione e di<br />
conservarle accuratamente per future<br />
consultazioni.<br />
• Collegare l'apparecchio soltanto ad una presa<br />
di corrente alternata – dopo essersi assicurati<br />
che la tensione corrisponde a quella indicata<br />
sulla targhetta dati dell'apparecchio.<br />
• Utilizzare l'umidificatore soltanto in ambienti<br />
abitati e nel rispetto dei dati tecnici specificati.<br />
Un uso improprio può mettere a rischio la<br />
salute e la vita.<br />
• I bambini non sono in grado di conoscere i<br />
rischi provocati dalla manipolazione di<br />
apparecchi elettrici. Per questo motivo non si<br />
devono mai perdere di vista i bambini quando<br />
si trattengono in prossimità dell'umidificatore.<br />
• Le persone che non sono a conoscenza delle<br />
istruzioni per l'uso, come pure i bambini e le<br />
persone sotto l'effetto di farmaci, alcol o droga,<br />
non possono usare l'apparecchio, oppure<br />
possono usarlo soltanto sotto vigilanza.<br />
• Non mettere mai in funzione l'umidificatore<br />
quando un cavo o una spina sono danneggiati,<br />
dopo difetti di funzionamento dell'apparecchio,<br />
oppure se l'apparecchio stesso è caduto o è<br />
stato danneggiato in altro modo.<br />
• L'umidificatore può essere messo in funzione<br />
soltanto dopo essere stato completamente<br />
assemblato.<br />
• Le riparazioni di apparecchi elettrici debbono<br />
essere eseguite soltanto da personale<br />
specializzato. Se le riparazioni non vengono<br />
eseguite a regola d'arte possono determinarsi<br />
gravi rischi per l'utente.<br />
• Occorre staccare la spina dalla presa dopo ogni<br />
carica/vuotamento del recipiente dell'acqua,<br />
prima di ogni pulizia, prima del montaggio/<br />
smontaggio di singole parti, prima di ogni<br />
spostamento.<br />
• Non estrarre mai la spina dalla presa tirando il<br />
cavo o afferrando la spina con le mani bagnate.<br />
• Sistemare l'umidificatore soltanto su una<br />
superficie piana ed asciutta. Non collocare<br />
l'apparecchiatura direttamente sul pavimento o<br />
nelle vicinanze di fonti di calore.<br />
• Non caricare in nessun caso l'acqua attraverso<br />
l'apertura dell'ugello.<br />
• Non aggiungere mai additivi all'acqua (come,<br />
per esempio, sostanze odoranti, oli eterei,<br />
sostanze per mantenere l'acqua fresca, ecc.).<br />
• Non immergere mai la base in acqua o in altri<br />
liquidi.<br />
Messa in funzione<br />
• Il miglior luogo di installazione per il Vostro<br />
umidificatore è:<br />
– Una posizione elevata, ca. 30–50 cm da<br />
terrra.<br />
• Inoltre è da tener conto quanto segue:<br />
– Non collocare l'apparecchiatura direttamente<br />
sul pavimento o nelle vicinanze di fonti di<br />
calore.<br />
– L'ugello non deve mai essere orientato<br />
direttamente su piante o oggetti.<br />
• Accertatevi che non vi siano oggetti estranei<br />
nel recipiente dell'acqua.<br />
• Riempite il recipiente dell'acqua con acqua<br />
corrente pulita e fredda (la temperatura<br />
dell'acqua non deve superare i 40°C) e serrate<br />
bene la chiusura del recipiente. Non aggiungere<br />
sostanze antinquinanti all'acqua.<br />
• Immergere la cartuccia nell'acqua per alcune<br />
ore prima dell'uso.<br />
• La cartuccia decalcisicante deve essere<br />
sostituito ogni 2/3 mesi.<br />
• Appoggiate il serbatoio sulla base inferiore ed<br />
inserite l'ugello.<br />
• Allacciate il cavo alla rete e collegate<br />
l'apparecchio all pulsante Accensione/<br />
Spegnimento.<br />
• Trascorreranno circa 10–15 minuti dalla sua<br />
accensione, prima che l'apparecchio raggiunga<br />
il pieno rendimento.<br />
Attenzione!<br />
• Il recipiente dell'acqua è dotato di una<br />
cartuccia decalcisicante.<br />
• Questa cartuccia deve essere sostituito ogni<br />
2–3 mesi. In presenza di acqua molto dura, può<br />
essere necessario sostituire la cartuccia prima<br />
del previsto.<br />
• Si sconsiglia l'impiego del nebulizzatore Solis<br />
<strong>Ultrasonic</strong> con acqua di durezza superiore a<br />
25 fH!<br />
• La polvere bianca intorno all'apparecchiatura<br />
costituisce un'indicazione sicura del fatto che la<br />
cartuccia sia consumata.<br />
• Qualora, nonostante la nuova cartuccia, si formi<br />
del sedimento bianco intorno all'apparecchiatura,<br />
controllare che l'acqua utilizzata sia<br />
effettivamente non trattata.<br />
• Qualora l'acqua, prima dell'uso, scorra<br />
nell'umidificatore dell'aria attraverso un<br />
impianto domestico di decalcificazione, del sale<br />
si sedimenterà intorno all'apparecchiatura.<br />
Sostituzione del filtro anticalcare<br />
Capovolgete il serbatoio ed svitate il tappo. Il<br />
filtro anticalcare si trova sul lato esterno del<br />
coperchio del recipiente. Svitate il filtro anticalcare<br />
dal coperchio, ruotando in senso antiorario, e<br />
sostituitelo con un filtro nuovo.<br />
13
BDA_<strong>Ultrasonic</strong>.qxd 7.7.2005 17:14 Uhr Seite 14<br />
Istruzioni<br />
Accensione/Spegnimento<br />
Premendo il pulsante 0/I ( 1 ), si accende o si<br />
spegne l'apparecchio.<br />
Funzionamento con preriscaldamento<br />
Il pulsante ( 2 ) serve ad attivare o disattivare la<br />
funzione di preriscaldamento. Se il<br />
preriscaldamento è attivato, l'acqua viene<br />
preriscaldata a ca. 80°C prima di entrare nel<br />
serbatoio di nebulizzazione. La nebbia fuoriesce a<br />
40°C. Questo ha il vantaggio di non abbassare la<br />
temperatura dell'ambiente e di migliorare<br />
decisamente la composizione dell'acqua (i batteri<br />
vengono eliminati).<br />
Timer<br />
Con il pulsante ( 3 ) si può impostare la durata del<br />
funzionamento, regolabile da 1 a 9 ore o la<br />
modalità di funzionamento continuo. (Con il timer<br />
attivato, sul display compare il simbolo ( E )).<br />
Funzionamento automatico<br />
Con il pulsante ( 4 ) si può attivare la modalità<br />
automatica. Con la funzione automatica attiva (sul<br />
display compare il simbolo ( D ) con «auto»), si<br />
mantiene un'umidità dell'aria ideale in relazione<br />
alla temperatura e al livello della nebulizzazione<br />
scelto.<br />
Hygrostat/Regolazione dell'umidità<br />
Premendo il pulsante ( 5 ) è possibile impostare la<br />
percentuale di umidità desiderata. Si consiglia di<br />
impostare l'umidità relativa tra il 40 e il 60%. Se<br />
l'umidità supera il livello impostato, l'apparecchio<br />
14<br />
si spegne. L'apparecchio non si spegne invece se<br />
è stata impostata l'opzione di funzionamento<br />
continuo. Durante la selezione viene visualizzato il<br />
valore nominale. Dopo alcuni secondi compare<br />
automaticamente il valore reale.<br />
Se l'umidità dell'aria scelta non è ancora stata<br />
raggiunta, sul display appare il simbolo B.<br />
Se l'umidità desiderata dell'aria invece è<br />
stata raggiunta, allora sul display compare il<br />
simbolo C.<br />
Regolazione del livello di nebulizzazione<br />
Premendo ripetutamente il pulsante ( 6 ) si può<br />
regolare il livello di nebulizzazione. Se sul display<br />
compare la freccia, significa che è stato impostato<br />
il livello di nebulizzazione massimo.<br />
Indicazione del livello dell'acqua<br />
Il serbatoio trasparente dell'acqua consente di<br />
vedere chiaramente la quantità d'acqua presente.<br />
L'apparecchio segnala inoltre anche sul display<br />
( G ), quando è necessario rabboccare l'acqua.<br />
Pulizia/manutenzione<br />
• Disinserite l'apparecchio e staccate la spina<br />
dalla presa prima di pulire l'apparecchio.<br />
• Pulite regolarmente il recipiente dell'acqua e il<br />
serbatoio una volta alla settimana (solo con<br />
acqua, senza detersivo). Nel caso di funziona-<br />
mento con preriscaldamento, solo ogni due<br />
settimane.<br />
• Si prega di decalcificare regolarmente<br />
la membrana con decalcificatore del tipo<br />
abitualmente reperibile in commercio.<br />
Sciacquare abbondantemente il decalcificatore<br />
con acqua.<br />
Attenzione<br />
• Fate attenzione che non penetri acqua nella<br />
parte inferiore dell'apparecchio.<br />
• Pulite le parti interne con un panno morbido,<br />
non utilizzando mai benzina, detersivi per<br />
finestre e solventi.<br />
• Utilizzate per la pulizia settimanale della<br />
membrana, esclusivamente il pennello.<br />
• Sostituite l'acqua nell'apposito recipiente<br />
almeno una volta la settimana.<br />
Conservazione dell'apparecchio in caso di<br />
lungo periodo di inattività<br />
Pulire l'apparecchio come descritto, farlo<br />
asciugare completamente e conservare<br />
preferibilmente nell'imballaggio originale in un<br />
luogo asciutto e non troppo caldo.<br />
Smaltimento<br />
Gli apparecchi fuori uso devono essere resi<br />
inutilizzabili. Staccate la spina dalla presa e<br />
separate il cavo di alimentazione<br />
dall'umidificatore. Portate l'umidificatore in un<br />
centro di raccolta pubblico o al vostro rivenditore.<br />
Gli elettrodomestici non vanno eliminati insieme<br />
con i rifiuti domestici.<br />
La Stiftung Entsorgung Schweiz (S.EN.S)<br />
garantisce un'elementazione rispettosa<br />
dell'ambiente.<br />
Consegnate l'umidificatore fuori uso al Vostro<br />
fornitore per uno smaltimento adeguato. Potete<br />
informarVi presso la Vostra autorità comunale o<br />
cittadina competente circa ulteriori possibilità di<br />
smaltimento.<br />
Dati tecnici<br />
Tensione 230 VAC / 50 Hz<br />
Potenza assorbita<br />
45 W (senza preriscaldamento)<br />
120–130 W (con preriscaldamento)<br />
Rendimento di umidificazione 400 g/ora<br />
Adatto per ambienti fino a 60m 2 /150m 3<br />
Contenuto di acqua 5,7 litri<br />
Peso (a vuoto) 3,0 kg<br />
Misure 397 x 220 x 340 mm<br />
Rumorosità in funzione < 25 dB(A)<br />
Accessori: cartuccia decalcificante<br />
Eliminazione dei disturbi<br />
Problema Possibile causa Intervento correttivo<br />
L'apparecchio non funziona Spina di rete non inserita Collegare la spina di rete alla<br />
apposita presa<br />
Manca acqua nell'apposito recipiente Rabboccare acqua<br />
(si illumina la segnalazione di vuoto)<br />
Nessuna fuoriuscita di nebbia L'impostazione dell'umidità dell'aria è Aumentare l'impostazione<br />
inferiore all'umidità dell'aria ambiente dell'umidità dell'aria<br />
Residui di detersivo Pulire l'apparecchio con acqua<br />
pulita<br />
Fuoriuscita della nebbia Temperatura dell'acqua troppo bassa Mettere al massimo la fuoriuscita<br />
troppo bassa a livello della nebbia; dopo 10 minuti<br />
l'apparecchio lavora di nuovo<br />
ineccepibilmente<br />
Sedimentazione di calcio sulla Pulire la membrana<br />
membrana<br />
Deposito biancastro intorno Cartuccia decalcificante consumata Sostituire cartuccia decalcificante<br />
all'apparecchio<br />
15
BDA_<strong>Ultrasonic</strong>.qxd 7.7.2005 17:14 Uhr Seite 16<br />
Dear Customer<br />
Congratulations on your choice of the<br />
<strong>SOLIS</strong> <strong>Ultrasonic</strong> Nebulizer!<br />
The physical well-being of people and animals is<br />
influenced by numerous factors, one of which is<br />
the right humidity level of room air. During heating<br />
periods, cold and dry outside air flows into rooms<br />
through the windows, where its temperature rises.<br />
This leads to a massive drop in relative room<br />
air humidity, creating an unfavourable climate for<br />
people, animals and plants. Your well-being<br />
suffers, you become more vunnerable to cold an<br />
flu germs.<br />
Humidification by <strong>Ultrasonic</strong>s:<br />
A highly efficient technology allowing controlled<br />
humidification. High frequency oscillations<br />
transform the water into a microfine mist which is<br />
then passed into the room where it immediately<br />
evaporates.<br />
<strong>Ultrasonic</strong> humidifiers have a low power<br />
consumption. A replaceable demineralisation<br />
cartridge cleans the water from minerals and<br />
other waterborne residues thus providing a<br />
pure mist. <strong>Ultrasonic</strong> humidifiers are equipped<br />
with an integrated hygrostat and output control.<br />
General Information<br />
A comfortable atmosphere indoors is reached with<br />
a relative humidity level between 40 and 60%.<br />
Your humidifier controls automatically the<br />
humidity level according to desired setting. If the<br />
air is too dry, the humidifier will automatically<br />
switch on. As soon as the desired humidity level is<br />
reached, it will switch off.<br />
16<br />
Safety instructions:<br />
• Read the operating instructions carefully before<br />
using the humidifier and keep them for later<br />
reference.<br />
• Connect the unit only to alternating current<br />
with voltage according to the rating label.<br />
• Only use the humidifier indoors and within the<br />
specified technical data. If used for a purpose<br />
for which it is not intended it could cause<br />
serious danger to health and life.<br />
• Children cannot recognise the hazards<br />
associated with the usage of electrical<br />
appliances. For this reason, always supervise<br />
children when they are near the humidifier.<br />
• Persons who are not familiar with the operating<br />
instructions, as well as children and persons<br />
under the influence of medication, alcohol, or<br />
drugs are not permitted to operate the<br />
appliance, or are only permitted to operate it<br />
under supervision.<br />
• Never use the appliance if there is any damage<br />
to the appliance or cable, after malfunction,<br />
after the appliance has been dropped or<br />
damaged in any other way.<br />
• Only operate the humidifier when it is<br />
completely assembled.<br />
• Repairs of electrical appliances are only to be<br />
made by qualified service engineers. Improper<br />
repair work can cause considerable danger to<br />
the user.<br />
• Disconnect the appliance from the mains power<br />
before filling/emptying the water tank, before<br />
cleaning/ maintenance, assembling/<br />
dismantling of individual parts and before<br />
moving the appliance.<br />
• Place the humidifier on a dry, level surface. Do<br />
not place the device directly on the floor or next<br />
to heating.<br />
• Do not pour water into the vapour outlet of the<br />
humidifier.<br />
• Do not put any additives in the water (e.g.<br />
fragrances, essential oils, water fresheners,<br />
etc.)<br />
• Do not submerse the main body in water or<br />
other liquids.<br />
Putting into operation<br />
• Finding the ideal location for your humidifier:<br />
– A slightly heightened place, approx. 30 to<br />
50 cm above the floor.<br />
• Please note that:<br />
– Do not place the device directly on the floor<br />
or next to heating.<br />
– The vapour outlet must not be pointed<br />
directly at plants or other objects.<br />
• Make sure that no foreign objects are in the<br />
water tank.<br />
• Fill the tank with clean, cold water from the<br />
tap (water no hotter than 40°C). Close the cap<br />
of the water tank properly. Do not add any<br />
conditioners to the water.<br />
• Soak the cartridge in water for a few hours<br />
before using it.<br />
• The demineralization cartridge should be<br />
replaced every 2–3 months.<br />
• Place the water tank on the base and insert<br />
the vapour outlet.<br />
• Insert the plug into the socket and switch on<br />
the appliance using the on/off switch.<br />
• About 10 to 15 minutes after having been<br />
switched on the device will reach is full power.<br />
Attention!<br />
• The water tank is equipped with a<br />
demineralization cartridge. This cartridge has<br />
to be replaced every 2–3 months.<br />
• If the water is very hard, it may be necessary<br />
to replace the cartridge earlier.<br />
• We do not recommend the use of this<br />
<strong>Ultrasonic</strong> Nebulizer if your water is harder<br />
than 25 fH!<br />
• White dust around the device is a sure sign<br />
that the cartridge is empty.<br />
• If white precipitate still forms around the device<br />
after a new cartridge has been inserted, please<br />
make sure that the water you are using is really<br />
untreated. (no conditioner)<br />
• If the water flows through a decalcification<br />
system in the building before it is used in the<br />
humidifier, salt will precipitate around the<br />
device.<br />
Replacement of the demineralization<br />
cartridge<br />
Turn around the tank and open the turn-lock. The<br />
demineralization cartridge is attached to the<br />
inside of the cap. Unscrew the cartridge turning it<br />
anti-clockwise and replace it with<br />
a new one.<br />
17
BDA_<strong>Ultrasonic</strong>.qxd 7.7.2005 17:14 Uhr Seite 18<br />
Operating<br />
On-Off<br />
Press button ( 1 ) to turn the air humidifier on<br />
and off.<br />
Operating with preheating<br />
Button ( 2 ) is used to turn the pre-heating on<br />
(symbol A apperars on the display) to off. When it<br />
is on, the water is pre-heated to 80°C before it<br />
enters the fogging chamber. The fog is now at a<br />
confortable 40°C when it is emitted from the<br />
appliance. This is advantageous as it does not<br />
cause the room temperature to fall, in addition<br />
there is substantial improvement in maintaining<br />
the purity of the water (bacteria are killed).<br />
Timer<br />
You can use button ( 3 ) to determine the<br />
operating time. It can be regulated between 1 and<br />
9 hours or for continuous operation. If the timer<br />
has been activated, the symbol ( E ) appears on<br />
the display.<br />
Auto<br />
Pressing button ( 4 ) activates the automatic<br />
mode. If the automatic function has been added<br />
symbol ( D ) with “Auto” appears on the display.<br />
The ideal humidity in relation to temperature and<br />
evaporation rate is maintained.<br />
18<br />
Hygrostat/Set humidity<br />
Set the desired humidity in % by pressing button<br />
( 5 ). We recommend a relative humidity between<br />
40% and 60%. The appliance can be regulated<br />
from 40% to 75%. If the humidity exceeds the<br />
desired setting, the appliance turns itself off. The<br />
appliance does not turn itself off, if it has been set<br />
for continuous operation. The desired value is<br />
shown while you are making the selection. After a<br />
few seconds, the display automatically switches<br />
to the current value.<br />
Symbol B on the display indicates that the set<br />
humidity has not been reached yet.<br />
Symbol C on the display indicates that the<br />
desired humidity has been reached.<br />
Regulating evaporation rate<br />
You can regulate the evaporation rate by pressing<br />
button ( 6 ) several times. If the arrow ( F ) is fully<br />
displayed, you have selected the highest<br />
evaporation rate.<br />
Water level display<br />
The transparent water tank makes it easy to see<br />
how much water is in the appliance. In addition<br />
the symbol ( G ) is displayed when water must be<br />
refilled.<br />
Cleaning/Maintenance<br />
• Switch of the appliance and unplug it from the<br />
socket before cleaning it.<br />
• Clean the water tank and the reservoir regularly<br />
once a week (Use water only, no detergents).<br />
When operating with pre-heating every two<br />
weeks.<br />
• Use decalcification agents found in stores<br />
everywhere to remove deposits from<br />
the membrane regularly. Rinse out the<br />
decalcification agent thoroughly with plenty<br />
of water.<br />
Attention<br />
• Make sure that no water gets into the lower<br />
part of the main body.<br />
• Clean the inner parts with a soft cloth. Do not<br />
use any solvents or aggressive cleaning agents<br />
to clean the appliance.<br />
• Only use the brush to clean the membrane.<br />
This should be done once a week.<br />
• Change the water in the tank at least once a<br />
week.<br />
Storing the appliance<br />
Clean the humidifier as described earlier and dry<br />
it thoroughly. Preferably store the appliance in its<br />
original box. Avoid high temperatures.<br />
Disposal<br />
Appliance that have reached the end of their<br />
service life must be rendered inoperable.<br />
Disconnect the appliance from mains power and<br />
separate mains cable and appliance. Deposit the<br />
appliance at an appropriate waste collection point<br />
or return it to your dealer. Electric appliances<br />
should not be disposed of as houshold waste.<br />
You can obtain information on other ways to<br />
dispose of the humidifier from your local council.<br />
Technical data<br />
Input voltage: 230 Volt / 50 Hz<br />
Power consumption:<br />
45 W (without pre-heating)<br />
120–130 W (with pre-heating)<br />
Humidification performance: 400 g/h<br />
Suitable for rooms up to 60m 2 /150m 3<br />
Water capacity: 5,7 Liter<br />
Weight (empty): 3,0 kg<br />
Dimensions: 397 x 220 x 340 mm<br />
Operating noise < 25 dB(A)<br />
Accessories: demineralization cartridge<br />
Trouble shooting<br />
Problem Possible cause What to do<br />
Humidifier does not operate Power cable not plugged in Plug in power cable<br />
No water in the tank Fill tank with water<br />
(Empty-light flashing)<br />
No vapour output Desired humidity level lower Increase desired setting<br />
than actual<br />
Residues of washing-up liquid Rinse with clear water<br />
Week vapour output Water temperature too low Set vapour output to maximum,<br />
after 10 min. the humidifier<br />
will work properly again<br />
Mineral deposits on membrane Clean membrane<br />
White dust around the Demineralisation cartridge Replace cartridge<br />
humidifier exhausted<br />
19
BDA_<strong>Ultrasonic</strong>.qxd 7.7.2005 17:14 Uhr Seite 20<br />
Nr. 003.12<br />
Schweiz<br />
<strong>SOLIS</strong> AG<br />
Solis-Haus<br />
Europastrasse 11<br />
8152 Glattbrugg<br />
Tel. 044 874 64 64<br />
Fax 044 874 64 99<br />
E-Mail: info@solis.ch<br />
Internet: www.solis.ch