

Samsung LE32B551A6P (LE32B551A6PXXC ) - Manuel de l'utilisateur 27.53 MB, pdf, Anglais, Français, ALLEMAND, Italien
Samsung LE32B551A6P (LE32B551A6PXXC ) - Manuel de l'utilisateur 27.53 MB, pdf, Anglais, Français, ALLEMAND, Italien
Samsung LE32B551A6P (LE32B551A6PXXC ) - Manuel de l'utilisateur 27.53 MB, pdf, Anglais, Français, ALLEMAND, Italien

Create successful ePaper yourself
Turn your PDF publications into a flip-book with our unique Google optimized e-Paper software.
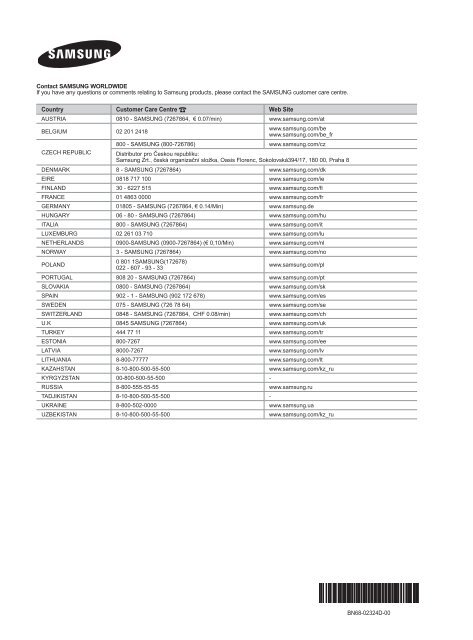
Contact SAMSUNG WORLDWIDE<br />
If you have any questions or comments relating to <strong>Samsung</strong> products, please contact the SAMSUNG customer care centre.<br />
Country Customer Care Centre Web Site<br />
AUSTRIA 0810 - SAMSUNG (7267864, € 0.07/min) www.samsung.com/at<br />
BELGIUM 02 201 2418<br />
CZECH REPUBLIC<br />
www.samsung.com/be<br />
www.samsung.com/be_fr<br />
800 - SAMSUNG (800-726786) www.samsung.com/cz<br />
Distributor pro Českou republiku:<br />
<strong>Samsung</strong> Zrt., česká organizační složka, Oasis Florenc, Sokolovská394/17, 180 00, Praha 8<br />
DENMARK 8 - SAMSUNG (7267864) www.samsung.com/dk<br />
EIRE 0818 717 100 www.samsung.com/ie<br />
FINLAND 30 - 6227 515 www.samsung.com/fi<br />
FRANCE 01 4863 0000 www.samsung.com/fr<br />
GERMANY 01805 - SAMSUNG (7267864, € 0.14/Min) www.samsung.<strong>de</strong><br />
HUNGARY 06 - 80 - SAMSUNG (7267864) www.samsung.com/hu<br />
ITALIA 800 - SAMSUNG (7267864) www.samsung.com/it<br />
LUXE<strong>MB</strong>URG 02 261 03 710 www.samsung.com/lu<br />
NETHERLANDS 0900-SAMSUNG (0900-7267864) (€ 0,10/Min) www.samsung.com/nl<br />
NORWAY 3 - SAMSUNG (7267864) www.samsung.com/no<br />
POLAND<br />
0 801 1SAMSUNG(172678)<br />
022 - 607 - 93 - 33<br />
www.samsung.com/pl<br />
PORTUGAL 808 20 - SAMSUNG (7267864) www.samsung.com/pt<br />
SLOVAKIA 0800 - SAMSUNG (7267864) www.samsung.com/sk<br />
SPAIN 902 - 1 - SAMSUNG (902 172 678) www.samsung.com/es<br />
SWEDEN 075 - SAMSUNG (726 78 64) www.samsung.com/se<br />
SWITZERLAND 0848 - SAMSUNG (7267864, CHF 0.08/min) www.samsung.com/ch<br />
U.K 0845 SAMSUNG (7267864) www.samsung.com/uk<br />
TURKEY 444 77 11 www.samsung.com/tr<br />
ESTONIA 800-7267 www.samsung.com/ee<br />
LATVIA 8000-7267 www.samsung.com/lv<br />
LITHUANIA 8-800-77777 www.samsung.com/lt<br />
KAZAHSTAN 8-10-800-500-55-500 www.samsung.com/kz_ru<br />
KYRGYZSTAN 00-800-500-55-500 -<br />
RUSSIA 8-800-555-55-55 www.samsung.ru<br />
TADJIKISTAN 8-10-800-500-55-500 -<br />
UKRAINE 8-800-502-0000 www.samsung.ua<br />
UZBEKISTAN 8-10-800-500-55-500 www.samsung.com/kz_ru<br />
LCD TV<br />
user manual<br />
imagine the possibilities<br />
Thank you for purchasing this <strong>Samsung</strong> product.<br />
To receive more complete service, please register<br />
your product at<br />
www.samsung.com/register<br />
Mo<strong>de</strong>l<br />
Serial No.<br />
BN68-02324D-00
❑<br />
❑<br />
Digital TV Notice<br />
1. Functionalities related to Digital TV(DVB) are only available in countries/areas where DVB-T (MPEG2 and MPEG4 AVC) digital<br />
terrestrial signals are broadcasted or where you are able to access to a compatible DVB-C(MPEG2 and MPEG4 AAC) cable-<br />
TV service. Please check with your local <strong>de</strong>aler the possibility to receive DVB-T or DVB-C signal.<br />
2. DVB-T is the DVB European consortium standard for the broadcast transmission of digital terrestrial television and DVB-<br />
C is that for the broadcast transmission of digital TV over cable. However, some differentiated features like EPG (Electric<br />
Programme Gui<strong>de</strong>), VOD (Vi<strong>de</strong>o on Demand) and so on, are not inclu<strong>de</strong>d in this specification. So, they cannot be workable at<br />
this moment.<br />
3. Although this TV set meets the latest DVB-T and DVB-C standards, as of [August, 2008], the compatibility with future DVB-T<br />
digital terrestrial and DVB-C digital cable broadcasts cannot be guaranteed.<br />
4. Depending on the countries/areas where this TV set is used some cable-TV provi<strong>de</strong>rs may charge an additional fee for such a<br />
service and you may be required to agree to terms and conditions of their business.<br />
5. Some Digital TV functions might be unavailable in some countries or regions and DVB-C might not work correctly with some<br />
cable service provi<strong>de</strong>rs.<br />
6. For more information, please contact your local <strong>Samsung</strong> customer care centre.<br />
Precautions When Displaying a Still Image<br />
A still image may cause permanent damage to the TV screen<br />
● Do not display still image and partially still on the LCD panel for more than 2 hours as it can cause screen image retention.<br />
This image retention is also known as screen burn. To avoid such image retention, reduce the <strong>de</strong>gree of brightness and<br />
contrast of the screen when displaying a still image.<br />
●<br />
Watching the LCD TV in 4:3 format for a long period of time may leave traces of bor<strong>de</strong>rs displayed on the<br />
left, right and centre of the screen caused by the difference of light emission on the screen. Playing a DVD or<br />
a game console may cause a similar effect to the screen. Damages caused by the above effect are not<br />
covered by the Warranty.<br />
● Displaying still images from Vi<strong>de</strong>o games and PC for longer than a certain period of time may produce partial after-images. To<br />
prevent this effect, reduce the ‘brightness’ and ‘contrast’ when displaying still images.<br />
© 2009 <strong>Samsung</strong> Electronics Co., Ltd. All rights reserved.
Contents<br />
Setting up Your TV<br />
■ Viewing the Control Panel.................................................................. 2<br />
■ Accessories........................................................................................ 3<br />
■ Viewing the Connection Panel........................................................... 4<br />
■ Viewing the Remote Control.............................................................. 6<br />
■ Installing Batteries in the Remote Control.......................................... 7<br />
■ Viewing the menus............................................................................. 7<br />
■ Placing Your Television in Standby Mo<strong>de</strong>.......................................... 8<br />
■ Plug & Play Feature........................................................................... 8<br />
CHANNEL<br />
■ Channel Menu.................................................................................... 9<br />
■ Managing Channels ........................................................................ 12<br />
PICTURE<br />
■ Configuring the Picture Menu........................................................... 14<br />
■ Using Your TV as a Computer (PC) Display.................................... 18<br />
■ Setting up the TV with your PC........................................................ 19<br />
SOUND<br />
■ Configuring the Sound Menu........................................................... 20<br />
■ Selecting the Sound Mo<strong>de</strong>............................................................... 21<br />
SETUP<br />
■ Configuring the Setup Menu............................................................ 22<br />
■ Setting the Time............................................................................... 24<br />
INPUT / SUPPORT<br />
■ Input Menu....................................................................................... 26<br />
■ Support Menu................................................................................... 26<br />
Media Play (USB)<br />
■ Connecting a USB Device................................................................ 28<br />
■ Media Play Function......................................................................... 29<br />
■ Photo List Option Menu.................................................................... 30<br />
■ Viewing a Photo or Sli<strong>de</strong> Show........................................................ 31<br />
■ Sli<strong>de</strong> Show Option Menu.................................................................. 32<br />
■ Music List Option Menu.................................................................... 33<br />
■ Playing Music................................................................................... 34<br />
■ Music Play option Menu................................................................... 35<br />
■ Using the Setup Menu...................................................................... 35<br />
ANYNET+<br />
■ Connecting Anynet+ Devices........................................................... 36<br />
■ Setting Up Anynet+.......................................................................... 37<br />
■ Switching between Anynet+ Devices............................................... 37<br />
■ Recording......................................................................................... 38<br />
■ Listening through a Receiver (Home theatre).................................. 38<br />
■ Troubleshooting for Anynet+............................................................ 39<br />
RECOMMENDATIONS<br />
■ Teletext Feature............................................................................... 40<br />
■ Installing the Stand........................................................................... 41<br />
■ Disconnecting the Stand.................................................................. 42<br />
■ Installing the Wall Mount Kit............................................................. 42<br />
■ Assembling the Cables.................................................................... 42<br />
■ Anti-Theft Kensington Lock.............................................................. 42<br />
■ Securing the Installation Space........................................................ 43<br />
■ Securing the TV to the Wall.............................................................. 43<br />
■ Troubleshooting: Before Contacting Service Personnel................... 44<br />
■ Specifications................................................................................... 45<br />
English<br />
❑<br />
License<br />
TruSurround HD, SRS and symbol are tra<strong>de</strong>marks of SRS Labs, Inc. TruSurround HD technology is<br />
incorporated un<strong>de</strong>r license from SRS Labs, Inc.<br />
Manufactured un<strong>de</strong>r license from Dolby Laboratories. Dolby and the double-D symbol are tra<strong>de</strong>marks of<br />
Dolby Laboratories.<br />
❑<br />
Symbol<br />
N O T<br />
Note One-Touch Button TOOLS Button Press<br />
English -
8<br />
Setting up Your TV<br />
N<br />
Figures and illustrations in this User Manual are provi<strong>de</strong>d for reference only and may differ from actual product appearance.<br />
Product <strong>de</strong>sign and specifications may be changed without notice in or<strong>de</strong>r to enhance product performance.<br />
¦<br />
Viewing the Control Panel<br />
N<br />
N<br />
The product colour and shape may vary <strong>de</strong>pending on the mo<strong>de</strong>l.<br />
The front panel buttons can be activated by touching it with your finger.<br />
8<br />
7 6 5 4 3 2 1<br />
6<br />
5<br />
4<br />
3<br />
2<br />
1<br />
8<br />
78<br />
1 P (POWER): Press to turn the TV on and off.<br />
2 POWER INDICATOR: Blinks and turns off when the power is on and lights up in stand-by mo<strong>de</strong>.<br />
3 z: Press to change channels. In the on-screen menu, use the z buttons as you would use the ▼ and ▲<br />
buttons on the remote control.<br />
4 Y: Press to increase or <strong>de</strong>crease the volume.<br />
In the on-screen menu, use the Y buttons as you would use the ◄ and ► buttons on the remote control.<br />
5 MENU: Press to see an on-screen menu of your TV’s features.<br />
6 SOURCE E: Toggles between all the available input sources. In the on-screen menu, use this button as you would use the<br />
ENTERE button on the remote control.<br />
7 REMOTE CONTROL SENSOR: Aim the remote control towards this spot on the TV.<br />
8 SPEAKERS<br />
English -
¦<br />
Accessories<br />
Remote Control & Batteries (AAA x 2) Power Cord Cover-Bottom<br />
(M4 X L16)<br />
Warranty Card / Safety Gui<strong>de</strong> (Not<br />
available in all locations)<br />
Stand Screw X 4<br />
(Depending on the mo<strong>de</strong>l)<br />
Cleaning Cloth<br />
Hol<strong>de</strong>r-Wire Cable<br />
(Depending on the mo<strong>de</strong>l)<br />
N<br />
N<br />
Please make sure the following items are inclu<strong>de</strong>d with your LCD TV. If any items are missing, contact your <strong>de</strong>aler.<br />
The items colour and shape may vary <strong>de</strong>pending on the mo<strong>de</strong>l.<br />
English -
¦<br />
Viewing the Connection Panel<br />
[TV Si<strong>de</strong> Panel]<br />
1 2<br />
34<br />
[TV Rear Panel]<br />
#<br />
2<br />
@<br />
!<br />
0 9 8 7 6 5<br />
Power Input<br />
N<br />
The product colour and shape may vary <strong>de</strong>pending on the mo<strong>de</strong>l.<br />
1 COMPONENT IN<br />
Connects Component vi<strong>de</strong>o / audio.<br />
2 HDMI IN 1, 2, 3(DVI), 4 / DVI AUDIO IN<br />
Connects to the HDMI jack of a <strong>de</strong>vice with an HDMI output.<br />
N<br />
N<br />
<br />
<br />
N<br />
N<br />
N<br />
No sound connection is nee<strong>de</strong>d for an HDMI to HDMI connection.<br />
What is HDMI?<br />
HDMI(High-Definition Multimedia Interface), is an interface that enables the transmission of digital audio and vi<strong>de</strong>o signals<br />
using a single cable.<br />
The difference between HDMI and DVI is that the HDMI <strong>de</strong>vice is smaller than DVI’s one.<br />
The TV may not output sound and pictures may be displayed with abnormal colour when DVD / Blu-ray player / Cable<br />
Box / Satellite receiver (Set-Top Box) supporting HDMI versions ol<strong>de</strong>r than 1.3 are connected. When connecting an ol<strong>de</strong>r<br />
HDMI cable and there is no sound, connect the HDMI cable to the HDMI IN 3(DVI) jack and the audio cables to the DVI<br />
AUDIO IN jacks on the back of the TV. If this happens, contact the company that provi<strong>de</strong>d the DVD / Blu-ray player /<br />
Cable Box / Satellite receiver (Set-Top Box) to confirm the HDMI version, then request an upgra<strong>de</strong>.<br />
Use the HDMI IN 3(DVI) jack for DVI connection to an external <strong>de</strong>vice. Use a DVI to HDMI cable or DVI-HDMI adapter<br />
(DVI to HDMI) for vi<strong>de</strong>o connection and the DVI AUDIO IN jacks for audio. When using an HDMI / DVI cable connection,<br />
you must use the HDMI IN 3(DVI) jack.<br />
HDMI cables that are not 1.3 may cause annoying flicker or no screen display.<br />
3 PC IN [PC] / [AUDIO]<br />
Connects to the vi<strong>de</strong>o and audio output jacks on your PC.<br />
N<br />
N<br />
If your PC supports an HDMI connection, you can connect this to the HDMI IN 1, 2, 3(DVI) or 4 terminal.<br />
If your PC supports a DVI connection, you can connect this to the HDMI IN 3(DVI) / DVI AUDIO IN terminal.<br />
4 ANT IN<br />
Connects to an antenna or cable TV system.<br />
5 KENSINGTON LOCK (<strong>de</strong>pending on the mo<strong>de</strong>l)<br />
The Kensington Lock (optional) is a <strong>de</strong>vice used to physically fix the system when used in a public place. If you want to use a<br />
locking <strong>de</strong>vice, contact the <strong>de</strong>aler where you purchased the TV.<br />
N The location of the Kensington Lock may be different <strong>de</strong>pending on its mo<strong>de</strong>l.<br />
English -
6 H(HEADPHONE)<br />
Headphone may be connected to the headphone output on your set. While the head phone is connected, the sound from the<br />
built-in speakers will be disabled.<br />
N<br />
N<br />
N<br />
N<br />
Using the sound function is restricted when connecting headphones to the TV.<br />
Prolonged use of headphones at a high volume may damage your hearing.<br />
You will not hear sound from the speakers when you connect headphones to the TV.<br />
The headphone volume and TV volume are adjusted separately.<br />
7 DIGITAL AUDIO OUT (OPTICAL)<br />
Connects to a Digital Audio component such as a Home theatre receiver.<br />
N<br />
N<br />
N<br />
When a Digital Audio System is connected to the DIGITAL AUDIO OUT (OPTICAL) jack: Decrease the volume of the TV<br />
and adjust the volume level with the system’s volume control.<br />
5.1CH audio is possible when the TV is connected to an external <strong>de</strong>vice supporting 5.1CH.<br />
When the receiver (home theatre) is set to On, you can hear sound output from the TV’s Optical jack. When the TV is<br />
displaying a DTV(air) signal, the TV will send out 5.1 channel sound to the Home theatre receiver. When the source is a<br />
digital component such as a DVD / Blu-ray player / Cable Box / Satellite receiver (Set-Top Box) and is connected to the<br />
TV via HDMI, only 2 channel sound will be heard from the Home Theatre receiver. If you want to hear 5.1 channel audio,<br />
connect the digital audio out jack on DVD / Blu-ray player / Cable Box / Satellite receiver (Set-Top Box) directly to an<br />
Amplifier or Home Theatre, not the TV.<br />
8 SERVICE<br />
Connector for service only.<br />
9 AUDIO OUT [R-AUDIO-L]<br />
Connects to the audio input jacks on your Amplifier/Home theatre.<br />
When an audio amplifier is connected to the AUDIO OUT [R-AUDIO-L] jacks: Decrease the volume of the TV and adjust the<br />
volume level with the Amplifier’s volume control.<br />
0 EXT1, 2<br />
Inputs or outputs for external <strong>de</strong>vices, such as VCR, DVD, vi<strong>de</strong>o game <strong>de</strong>vice or vi<strong>de</strong>o disc players.<br />
N<br />
<br />
In EXT Mo<strong>de</strong>, DTV Out supports MPEG SD Vi<strong>de</strong>o and Audio only.<br />
Input/Output Specification<br />
Connector<br />
Input<br />
Output<br />
Vi<strong>de</strong>o Audio (L / R) RGB Vi<strong>de</strong>o + Audio (L / R)<br />
EXT 1 O O O Only TV or DTV output is available.<br />
EXT 2 O O X Output you can choose.<br />
! AV IN [VIDEO] / [R-AUDIO-L]<br />
Vi<strong>de</strong>o and audio inputs for external <strong>de</strong>vices, such as a camcor<strong>de</strong>r or VCR.<br />
@ USB<br />
Connector for software upgra<strong>de</strong>s and Media Play, etc.<br />
# COMMON INTERFACE Slot<br />
<br />
<br />
<br />
N<br />
N<br />
N<br />
N<br />
N<br />
When not inserting ‘CI(CI+) CARD’ in some channels, ‘Scrambled Signal’ is displayed on the screen.<br />
The pairing information containing a telephone number, ‘CI(CI+) CARD’ ID, Host ID and other information will be displayed<br />
in about 2~3 minutes. If an error message is displayed, please contact your service provi<strong>de</strong>r.<br />
When the channel information configuration has finished, the message ‘Updating Completed’ is displayed, indicating that<br />
the channel list is now updated.<br />
You must obtain a ‘CI(CI+) CARD’ from a local cable service provi<strong>de</strong>r. Remove the ‘CI(CI+) CARD’ by carefully pulling it<br />
out with your hands since dropping the ‘CI(CI+) CARD’ may cause damage to it.<br />
Insert the ‘CI(CI+) CARD’ in the direction marked on it.<br />
The place of the COMMON INTERFACE Slot may be different <strong>de</strong>pending on its mo<strong>de</strong>l.<br />
‘CI(CI+) CARD’ is not supported in some countries and regions, check with your authorized <strong>de</strong>aler.<br />
The CI+ function is only applicable to LE********P mo<strong>de</strong>l.<br />
If you have some problems, please contact to service provi<strong>de</strong>r.<br />
English -
¦<br />
Viewing the Remote Control<br />
N<br />
N<br />
N<br />
You can use the remote control up to a distance of about 23 feet from the TV.<br />
The performance of the remote control may be affected by bright light.<br />
The product colour and shape may vary <strong>de</strong>pending on the mo<strong>de</strong>l.<br />
1 POWER : Turns the TV on and<br />
off.<br />
2 NUMERIC BUTTONS : Press to<br />
change the channel.<br />
3 FAV.CH : Used to display<br />
Favourites Channel Lists on the<br />
screen.<br />
4 Y : Press to increase or<br />
<strong>de</strong>crease the volume.<br />
5 SOURCE : Press to display<br />
and select the available vi<strong>de</strong>o<br />
sources.<br />
6 INFO : Press to display<br />
information on the TV screen.<br />
7 TOOLS : Use to quickly select<br />
frequently used functions.<br />
8 CH LIST : Used to display<br />
Channel Lists on the screen.<br />
9 COLOURS BUTTONS : Use<br />
these buttons in the Channel<br />
list, Media Play menu, etc.<br />
! DUAL : Sound effect selection<br />
@ Use these buttons in the Media<br />
Play and Anynet+ mo<strong>de</strong>s. (∏:<br />
This remote can be used to<br />
control recording on <strong>Samsung</strong><br />
recor<strong>de</strong>rs with the Anynet+<br />
feature)<br />
# TV : Selects the TV mo<strong>de</strong><br />
directly.<br />
$ PRE-CH : Enables you to return<br />
to the previous channel you were<br />
watching.<br />
% MUTE M : Press to temporarily<br />
cut off the sound.<br />
^ > P < : Press to change<br />
channels.<br />
& MENU : Displays the main onscreen<br />
menu.<br />
* GUIDE : Electronic Programme<br />
Gui<strong>de</strong> (EPG) display.<br />
( RETURN : Returns to the<br />
previous menu<br />
) UP▲ / DOWN▼ / LEFT◄ /<br />
RIGHT► / ENTERE : Use to<br />
select on-screen menu items and<br />
change menu values.<br />
a EXIT : Press to exit the menu.<br />
b P.SIZE : Picture size selection.<br />
c MEDIA.P : Allows you to play<br />
music files and pictures.<br />
d SUBT. : Digital subtitle display<br />
e AD : Audio Description selection.<br />
Teletext Functions<br />
5 0 : Teletext mo<strong>de</strong> selection<br />
(LIST / FLOF)<br />
6 5 : Teletext reveal<br />
7 4 : Teletext size selection<br />
8 8 : Teletext store<br />
9 Fastext topic selection<br />
0 / : Alternately select<br />
Teletext, Double, or Mix.<br />
# : : Exit from the Teletext<br />
display<br />
$ 1: Teletext sub page<br />
^ 2: Teletext next page<br />
3: Teletext previous page<br />
& 6 : Teletext in<strong>de</strong>x<br />
( 9 : Teletext hold<br />
a 7 : Teletext cancel<br />
1 #<br />
2<br />
3<br />
4<br />
5<br />
6<br />
7<br />
8<br />
9<br />
0<br />
!<br />
@<br />
INFO<br />
CH LIST<br />
AD<br />
$<br />
%<br />
^<br />
&<br />
*<br />
(<br />
)<br />
a<br />
b<br />
c<br />
d<br />
e<br />
English -
¦<br />
Installing Batteries in the Remote Control<br />
1. Lift the cover at the back of the remote control upward as shown in the figure.<br />
2. Install two AAA size batteries.<br />
N Make sure to match the ‘+’ and ‘–’ ends of the batteries with the diagram insi<strong>de</strong> the<br />
compartment.<br />
3. Replace the cover.<br />
N Remove the batteries and store them in a cool, dry place if you won’t be using the<br />
remote control for a long time. (Assuming typical TV usage, the batteries should last for about one year.)<br />
N If the remote control doesn’t work, check the following:<br />
Is the TV power on?<br />
Are the plus and minus ends of the batteries reversed?<br />
Are the batteries drained?<br />
Is there a power outage or is the power cord unplugged?<br />
Is there a special fluorescent light or neon sign nearby?<br />
¦<br />
Viewing the menus<br />
Before using the TV, follow the steps below to learn how to navigate the menu in or<strong>de</strong>r to select and adjust different functions.<br />
MENU Button<br />
Display the main on-screen menu.<br />
INFO<br />
ENTERE / Direction Buttons<br />
Move the cursor and select an<br />
item. Select the currently selected<br />
item. Confirm the setting.<br />
RETURN Button<br />
Return to the previous menu.<br />
EXIT<br />
Exit the on-screen menu.<br />
❑<br />
Operation the OSD (On Screen Display)<br />
The access step may differ <strong>de</strong>pending on the selected menu.<br />
1. Press the MENU button.<br />
AD<br />
INFO<br />
2. The main menu appears on the screen. The menu’s left si<strong>de</strong> has icons : Picture, Sound,<br />
Channel, Setup, Input, Application, Support.<br />
3. Press the ▲ or ▼ button to select one of the icons.<br />
Picture<br />
Mo<strong>de</strong> : Standard ▶<br />
Backlight : 7<br />
Contrast : 95<br />
Brightness : 45<br />
Sharpness : 50<br />
Colour : 50<br />
Tint (G/R)<br />
: G50/R50<br />
Advanced INFO Settings<br />
AD<br />
4. Then press the ENTERE button to access the icon’s sub-menu.<br />
5. Press the ▲ or ▼ button to select the icon’s submenu.<br />
6. Press the ◄ or ► button to <strong>de</strong>crease or increase the value of a particular item. The<br />
adjustment OSD may differ <strong>de</strong>pending on the selected menu.<br />
7. Press the ENTERE button to complete the configuration. Press the EXIT button to exit.<br />
Picture<br />
▲<br />
Backlight<br />
▼<br />
Mo<strong>de</strong><br />
: Standard<br />
Backlight : 7 ▶<br />
Contrast<br />
AD<br />
: 95<br />
Brightness : 45<br />
Sharpness : 50<br />
Colour : 50<br />
Tint (G/R)<br />
: G50/R50<br />
Advanced Settings<br />
Picture Options<br />
7<br />
U Move L Adjust E Enter R Return<br />
Help icon<br />
English -
¦<br />
Placing Your Television in Standby Mo<strong>de</strong><br />
Your set can be placed in standby mo<strong>de</strong> in or<strong>de</strong>r to reduce the power consumption. The standby mo<strong>de</strong> can be useful when you<br />
wish to interrupt viewing temporarily (during a meal, for example).<br />
1. Press the POWERP button on the remote control.<br />
N The screen is turned off and a standby indicator appears on your set.<br />
2. To switch your set back on, simply press the POWERP button again.<br />
N Do not leave your set in standby mo<strong>de</strong> for long periods of time (when you are away on holiday, for example). It is best to<br />
unplug the set from the mains and aerial.<br />
¦<br />
Plug & Play Feature<br />
When the TV is initially powered on, basic settings proceed automatically and subsequently.<br />
1. Press the POWER button on the remote control.<br />
N<br />
N<br />
You can also use the POWERP button on the TV.<br />
The message Select the OSD Language. is displayed.<br />
2. Press the ENTERE button. Select the appropriate language by pressing the ▲ or ▼<br />
button. Press the ENTERE button to confirm your choice.<br />
3. Press the ◄ or ► button to select Store Demo or Home Use, then the ENTERE button.<br />
Menu Language : English ▶<br />
N We recommend setting the TV to Home Use mo<strong>de</strong> for the best picture in your home<br />
environment.<br />
N Store Demo mo<strong>de</strong> is only inten<strong>de</strong>d for use in retail environments.<br />
N If the unit is acci<strong>de</strong>ntally set to Store Demo mo<strong>de</strong> and you want to return to Home Use (Standard): Press the volume<br />
button on the TV. When the volume OSD is displayed, press and hold the MENU button on the TV INFO for 5 seconds.<br />
4. Press the ENTERE button. Select the appropriate country by pressing the ▲ or ▼ button. Press the ENTERE button to<br />
confirm your choice.<br />
5. Press the ▲ or ▼ button to select Air or Cable, then press the ENTERE button.<br />
N<br />
N<br />
Air: Air antenna signal.<br />
Cable: Cable antenna signal.<br />
6. Press the ▲ or ▼ button to select the channel source to memorize. Press the ENTERE button to select Start.<br />
N When setting the antenna source to Cable, a step appears allowing you to set a value for the digital channel search. For<br />
more information, refer to Channel → Auto Store.<br />
AD<br />
N Digital & Analogue: Digital and Analogue channels.<br />
Digital: Digital channels.<br />
Analogue: Analogue channels.<br />
N The channel search will start and end automatically.<br />
N Press the ENTERE button at any time to interrupt the memorization process.<br />
N After all the available channels are stored, the message Set the Clock Mo<strong>de</strong>. is displayed.<br />
7. Press the ENTERE button. Press the ▲ or ▼ button to select Auto, then Press the ENTERE button.<br />
N<br />
N<br />
If you select Manual, Set current date and time is displayed.<br />
If you have received a digital signal, the time will be set automatically. If not, select Manual to set the clock.<br />
8. The <strong>de</strong>scription for the connection method providing the best HD screen quality is displayed. Check the <strong>de</strong>scription and press<br />
the ENTERE button.<br />
9. The message Enjoy your TV. is displayed. When you have finished, press the ENTERE button.<br />
Select the OSD Language.<br />
Plug & Play<br />
E Enter<br />
If you want to reset this feature...<br />
1. Press the MENU button to display the menu. Press the ▲ or ▼ button to select Setup,<br />
then press the ENTERE button.<br />
2. Press the ENTERE button again to select Plug & Play.<br />
3. Enter your 4 digit PIN number. The <strong>de</strong>fault PIN number of a new TV set is ‘0-0-0-0’.<br />
N<br />
N<br />
If you want to change PIN number, use the Change PIN function.<br />
The Plug & Play feature is only available in the TV mo<strong>de</strong>.<br />
Setup<br />
Plug & Play<br />
Menu Language<br />
Time<br />
Broadcast<br />
Security<br />
General<br />
: English<br />
▶<br />
English -
¦<br />
Viewing the Display<br />
The display i<strong>de</strong>ntifies the current channel and the status of certain audio-vi<strong>de</strong>o settings.<br />
O Press the INFO button to viewing the information.<br />
INFO<br />
Press the INFO button on the remote control. The TV will display the channel, the type of<br />
sound, and the status of certain picture and sound settings.<br />
● ▲, ▼: You can view other channel’s information. If you want to move to the currently<br />
selected channel, press ENTERE button.<br />
● ◄, ►: You can view the <strong>de</strong>sired program’s information at the current channel.<br />
abc1<br />
DTV Air<br />
15<br />
18:11 Thu 6 Jan<br />
Life On Venus Avenue<br />
Unclassified<br />
No Detaild Information<br />
18:00 ~ 6:00<br />
E Watch<br />
' Information<br />
N<br />
Press the INFO button once more or wait approximately 10 seconds and the display<br />
disappears automatically.<br />
AD<br />
CHANNEL<br />
¦<br />
Channel Menu<br />
❑<br />
■<br />
■<br />
❑<br />
■<br />
Country<br />
Analogue Channel<br />
You can change the country for analogue channels.<br />
Digital Channel<br />
You can change the country for digital channels.<br />
N The PIN number input screen appears. Enter your 4 digit PIN number.<br />
Auto Store<br />
You can scan for the frequency ranges available to you (and availability <strong>de</strong>pends on your<br />
country). Automatically allocated programme numbers may not correspond to actual or <strong>de</strong>sired programme numbers.<br />
N<br />
If a channel is locked using the Child Lock function, the PIN input window appears.<br />
Air / Cable<br />
Antenna source to memorize<br />
● Digital & Analogue: Digital and Analogue channels.<br />
● Digital: Digital channels.<br />
● Analogue: Analogue channels.<br />
When selecting Cable → Digital & Analogue or Cable → Digital:<br />
Provi<strong>de</strong> a value to scan for cable channels.<br />
● Search Mo<strong>de</strong> → Full / Network /Quick<br />
N Quick<br />
Network ID: Displays the network i<strong>de</strong>ntification co<strong>de</strong>.<br />
Frequency: Displays the frequency for the channel. (Differs in each country)<br />
Modulation: Displays available modulation values.<br />
Symbol Rate: Displays available symbol rates.<br />
N<br />
N<br />
Scans for all channels with active broadcast stations and stores them in the TV’s memory.<br />
If you want to stop Auto Store, press the ENTERE button.<br />
The Stop Auto Store? message will be displayed.<br />
Select Yes by pressing the ◄ or ► button, then press the ENTERE button.<br />
Channel<br />
Country<br />
Auto Store<br />
Manual Store<br />
Full Gui<strong>de</strong><br />
Mini Gui<strong>de</strong><br />
Default Gui<strong>de</strong><br />
Channel List<br />
Channel Mo<strong>de</strong><br />
: Full Gui<strong>de</strong><br />
▶<br />
English -
❑<br />
■<br />
■<br />
❑<br />
Manual Store<br />
N<br />
N<br />
Scans for a channel manually and stores it in the TV’s memory.<br />
If a channel is locked using the Child Lock function, the PIN input window appears.<br />
Digital Channel<br />
Manual store for digital channels.<br />
N<br />
●<br />
●<br />
●<br />
N<br />
Digital Channel is only available in DTV mo<strong>de</strong>.<br />
Channel: Set the Channel number using the ▲, ▼ or number (0~9) buttons.<br />
Frequency: Set the frequency using the number buttons.<br />
Bandwidth: Set the bandwidth using the ▲, ▼ or number (0~9) buttons.<br />
When it has finished, channels are updated in the channel list.<br />
Analogue Channel<br />
Manual store for analogue channel.<br />
● Programme (Programme number to be assigned to a channel): Sets the programme number using the ▲, ▼ or number (0~9)<br />
buttons.<br />
● Colour System → Auto / PAL / SECAM / NTSC4.43: Sets the colour system value using the ▲ or ▼ button.<br />
● Sound System → BG / DK / I / L: Sets the sound system value using the ▲ or ▼ button.<br />
● Channel (When you know the number of the channel to be stored): Press the ▲ or ▼ button to select C (Air channel) or S<br />
(Cable channel). Press the ► button, then press the ▲, ▼ or number (0~9) buttons to select the required number.<br />
N You can also select the channel number directly by pressing the number (0~9) buttons.<br />
N If there is abnormal sound or no sound, reselect the sound standard required.<br />
● Search (When you do not know the channel numbers): Press the ▲ or ▼ button to start the search. The tuner scans the<br />
frequency range until the first channel or the channel that you selected is received on the screen.<br />
● Store (When you store the channel and associated programme number): Set to OK by pressing the ENTERE button.<br />
N<br />
<br />
<br />
<br />
Channel mo<strong>de</strong><br />
P (Programme mo<strong>de</strong>): When completing tuning, the broadcasting stations in your area have been assigned to position<br />
numbers from P00 to P99. You can select a channel by entering the position number in this mo<strong>de</strong>.<br />
C (Air channel mo<strong>de</strong>): You can select a channel by entering the assigned number to each air broadcasting station in this<br />
mo<strong>de</strong>.<br />
S (Cable channel mo<strong>de</strong>): You can select a channel by entering the assigned number for each cable channel in this mo<strong>de</strong>.<br />
Cable Search Option (<strong>de</strong>pending on the country)<br />
Sets additional search options such as the frequency and symbol rate for cable network searches.<br />
● Freq.Start (Frequency Start): Set the start frequency (Differs in each country)<br />
● Freq.Stop (Frequency Stop): Set the stop frequency (Differs in each country)<br />
● Modulation: Displays available modulation values.<br />
● Symbol Rate: Displays available symbol rates.<br />
❑<br />
■<br />
■<br />
Full Gui<strong>de</strong> / Mini Gui<strong>de</strong><br />
The EPG (Electronic Programme Gui<strong>de</strong>) information is provi<strong>de</strong>d by the broadcasters. Programme entries may appear blank or out<br />
of date as a result of the information broadcast on a given channel. The display will dynamically update as soon as new information<br />
becomes available.<br />
O You can also display the gui<strong>de</strong> menu simply by pressing the GUIDE button. (To configure the Default Gui<strong>de</strong>, refer to the<br />
<strong>de</strong>scriptions.)<br />
Full Gui<strong>de</strong><br />
Displays the programme information as time or<strong>de</strong>red One hour segments. Two hours of programme information is displayed which<br />
may be scrolled forwards or backwards in time.<br />
Mini Gui<strong>de</strong><br />
The information of each programme is displayed by each line on the current channel Mini Gui<strong>de</strong> screen from the current<br />
programme onwards according to the programme starting time or<strong>de</strong>r.<br />
English - 10
❑<br />
❑<br />
❑<br />
■<br />
■<br />
❑<br />
Default Gui<strong>de</strong> → Full Gui<strong>de</strong> / Mini Gui<strong>de</strong><br />
You can <strong>de</strong>ci<strong>de</strong> whether to display either the Full Gui<strong>de</strong> or the Mini Gui<strong>de</strong> when the GUIDE button on the remote control is<br />
pressed.<br />
Channel List<br />
For <strong>de</strong>tailed procedures on using the Channel List, refer to the Managing Channels instructions.<br />
O You can select these options by simply pressing the CH LIST button on the remote control.<br />
Channel Mo<strong>de</strong><br />
When press the P >/< button, Channels will be switched within the selected channel list.<br />
Ad<strong>de</strong>d Ch.<br />
Channels will be switched within the memorized channel list.<br />
Favourite Ch.<br />
Channels will be switched within the favourite channel list.<br />
Fine Tune<br />
If the reception is clear, you do not have to fine tune the channel, as this is done automatically during the search and store<br />
operation. If the signal is weak or distorted, you may have to fine tune the channel manually.<br />
N<br />
N<br />
N<br />
Fine tuned channels that have been saved are marked with an asterisk ‘*’ on the right-hand si<strong>de</strong> of the channel number in the<br />
channel banner.<br />
To reset the fine-tuning, select Reset by pressing the ▲ or ▼ button and then press the ENTERE button.<br />
Only Analogue TV channels can be fine tuned.<br />
Using the Full / Mini Gui<strong>de</strong><br />
Full Gui<strong>de</strong><br />
900<br />
DTV Cable 900 f tn<br />
Freshmen On Campus<br />
2:00 - 2:30<br />
No Detailed Information<br />
2:10 Tue 1 Jun<br />
Today 2:00 - 3:00 3:00 - 4:00<br />
900 f tn<br />
Freshmen O.. Street Hypn.. No Information<br />
901 ITV Play Mint Extra<br />
902 Kerrang! Loa<strong>de</strong>d<br />
No Information<br />
903 Kiss<br />
40 with Dynamite MC<br />
Kisstory<br />
904 oneword The Distillery<br />
No Information<br />
▼ 905 Hits<br />
Smash Hits! Sunday<br />
Mini Gui<strong>de</strong><br />
2:00<br />
2:30<br />
▼ 5:00<br />
DTV Cable 900 f tn<br />
Freshmen On Campus<br />
Street Hypnosis<br />
Booze Britain<br />
E Watch Information Page Mini Gui<strong>de</strong> +24 Hours Exit<br />
E Watch Information Page Full Gui<strong>de</strong> Exit<br />
To...<br />
Then...<br />
Watch a programme in the EPG list<br />
Select a programme by pressing the ▲, ▼, ◄, ► button.<br />
Exit the gui<strong>de</strong><br />
Press the blue button<br />
If the next programme is selected, it is scheduled with the clock icon displayed. If the ENTERE button is pressed again, press<br />
the ◄, ► button to select Cancel Schedules, the scheduling is cancelled with the clock icon gone.<br />
View programme information<br />
Select a programme of your choice by pressing the ▲, ▼, ◄, ► button.<br />
Then press the INFO button when the programme of your choice is<br />
highlighted.<br />
The programme title is on the upper part of the screen centre.<br />
Please click on INFO button for the <strong>de</strong>tailed information. Channel Number, Running Time, Status Bar, Parental Level, Vi<strong>de</strong>o<br />
Quality Information (HD / SD), Sound Mo<strong>de</strong>s, Subtitle or Teletext, languages of Subtitle or Teletext and brief summary of the<br />
highlighted programme are inclu<strong>de</strong>d on the <strong>de</strong>tailed information. ‘...’ will be appeared if the summary is long.<br />
Toggle between the Full Gui<strong>de</strong> and Mini Gui<strong>de</strong><br />
In Full Gui<strong>de</strong><br />
Scrolls backwards quickly (24 hours).<br />
Scrolls forwards quickly (24 hours).<br />
Press the Red button repeatedly.<br />
Press the Green button repeatedly.<br />
Press the Yellow button repeatedly.<br />
English - 11
¦<br />
Managing Channels<br />
Using this menu, you can add / <strong>de</strong>lete or set favourites channels and use the programme gui<strong>de</strong> for digital broadcasts.<br />
■<br />
■<br />
■<br />
All Channels<br />
Shows all currently available channels.<br />
Ad<strong>de</strong>d Channels<br />
Shows all ad<strong>de</strong>d channels.<br />
Favourites<br />
Shows all favourite channels.<br />
O To select the favourites channels you have set up, press the FAV.CH button on the remote<br />
control.<br />
Ad<strong>de</strong>d Channels<br />
824 UKTV Gold<br />
825 UKTV style<br />
A 1 C --<br />
A 2 C --<br />
A 3 C --<br />
A 4 C --<br />
A 5 C --<br />
A 6 C --<br />
A 7 C --<br />
A 8 C --<br />
All Channel Type Zoom Select T Tools<br />
■<br />
Programmed<br />
Shows all current reserved programmes.<br />
N Select a channel in the All Channels, Ad<strong>de</strong>d Channels or Favourites screen by pressing the ▲ / ▼ buttons, and pressing<br />
the ENTERE button. Then you can watch the selected channel.<br />
N Using the Colour buttons with the Channel List<br />
<br />
<br />
<br />
<br />
Red (Channel Type): Toggle between your TV, Radio, Data / Other and All.<br />
Green (Zoom): Enlarges or shrinks a channel number.<br />
Yellow (Select): Selects multiple channel lists. You can perform the add/<strong>de</strong>lete or add to favourites/<strong>de</strong>lete from favourites<br />
function for multiple channels at the same time. Select the required channels and press the Yellow button to set all the<br />
selected channels at the same time. The c mark appears to the left of the selected channels.<br />
TOOLS (Tools): Displays the Delete (or Add), Add to Favourite (or Delete from Favourite), Lock (or Unlock), Timer<br />
Viewing, Edit Channel Name, Edit Channel Number, Sort, Select All (or Deselect All), Auto Store menu. (The<br />
Options menus may differ <strong>de</strong>pending on the situation.)<br />
N Channel Status Display Icons<br />
A : An Analogue channel.<br />
c : A channel selected by pressing the Yellow button.<br />
* : A channel set as a Favourite.<br />
( : A programme currently being broadcast.<br />
\ : A locked channel.<br />
) : A reserved programme<br />
Channel List Option Menu (in All Channels / Ad<strong>de</strong>d Channels / Favourites)<br />
N<br />
N<br />
Press the TOOLS button to use the option menu.<br />
Option menu items may differ <strong>de</strong>pending on the channel status.<br />
■<br />
Add / Delete<br />
You can <strong>de</strong>lete or add a channel to display the channels you want.<br />
N<br />
N<br />
N<br />
N<br />
All <strong>de</strong>leted channels will be shown on All Channels menu.<br />
A gray-coloured channel indicates the channel has been <strong>de</strong>leted.<br />
The Add menu only appears for <strong>de</strong>leted channels.<br />
You can also <strong>de</strong>lete a channel to the Ad<strong>de</strong>d Channels or Favourites menu in the same<br />
manner.<br />
All Channels<br />
824 UKTV Gold<br />
825 UKTV style<br />
A 1 C --<br />
A 2 C --<br />
A 3 C --<br />
A 4 C --<br />
A 5 C --<br />
A 6 C --<br />
A 7 C --<br />
A 8 C --<br />
Delete<br />
Add to Favourite<br />
Lock<br />
Timer Viewing<br />
Edit Channel Name<br />
Sort<br />
<br />
■<br />
■<br />
Add to Favourite / Delete from Favourite<br />
You can set channels you watch frequently as favourites.<br />
T<br />
N<br />
N<br />
Press the TOOLS button to display the Tools menu. You can also set the add to (or <strong>de</strong>lete from) Favourite by selecting Tools<br />
→ Add to Favourite (or Delete from Favourite).<br />
The ‘*’ symbol will be displayed and the channel will be set as a favourite.<br />
All favourite channels will be shown on Favourites menu.<br />
Lock / Unlock<br />
You can lock a channel so that the channel cannot be selected and viewed.<br />
N<br />
N<br />
N<br />
N<br />
All Channel Type Zoom Select T Tools<br />
This function is available only when the Child Lock is set to On.<br />
The PIN number input screen appears. Enter your 4 digit PIN number.<br />
The <strong>de</strong>fault PIN number of a new TV set is ‘0-0-0-0’. You can change the PIN, by selecting Change PIN from the menu.<br />
The ‘\’ symbol will be displayed and the channel will be locked.<br />
English - 12
■<br />
■<br />
■<br />
■<br />
■<br />
■<br />
Timer Viewing<br />
If you reserve a programme you want to watch, the channel is automatically switched to the reserved channel in the Channel List;<br />
even when you are watching another channel. To reserve a programme, set the current time first.<br />
N<br />
N<br />
N<br />
N<br />
Only memorized channels can be reserved.<br />
You can set the channel, day, month, year, hour and minute directly by pressing the number buttons on the remote control.<br />
Reserving a programme will be shown in the Programmed menu.<br />
Digital Programme Gui<strong>de</strong> and Viewing Reservation<br />
When a digital channel is selected, and you press the ► button, the Programme Gui<strong>de</strong> for the channel appears. You can<br />
reserve a programme according to the procedures <strong>de</strong>scribed above.<br />
Edit Channel Name (analogue channels only)<br />
Channels can labelled so that their call letters appear whenever the channel is selected.<br />
N The names of digital broadcasting channels are automatically assigned and cannot be renamed.<br />
Edit Channel Number (digital channels only)<br />
You can also edit the channel number by pressing the number buttons on the remote control.<br />
Sort (analogue channels only)<br />
This operation allows you to change the programme numbers of the stored channels. This operation may be necessary after using<br />
the auto store.<br />
Select All / Deselect All<br />
● Select All: You can select all the channels in the channel list.<br />
● Deselect All: You can <strong>de</strong>select all the selected channels.<br />
N You can only select Deselect All when there is a selected channel.<br />
Auto Store<br />
N<br />
N<br />
For <strong>de</strong>tailed procedures on setting up options, refer to the ‘Channel Menu’ instructions.<br />
If a channel is locked using the Child Lock function, the PIN input window appears.<br />
Channel List Option Menu (in Programmed)<br />
■<br />
■<br />
■<br />
■<br />
You can view, modify or <strong>de</strong>lete a reservation.<br />
N Press the TOOLS button to use the option menu.<br />
Change Info<br />
Select to change a viewing reservation.<br />
Cancel Schedules<br />
Select to cancel a viewin`g reservation.<br />
Information<br />
Select to view a viewing reservation.<br />
(You can also change the reservation information.)<br />
Select All<br />
Select all reserved programmes.<br />
Programmed<br />
1 / 1 / 2009<br />
13:59 5 TV1 ) Change Info<br />
Cancel Schedules<br />
18:59 2 TV3 ) The Information Equalizer<br />
20:59 2 TV3 ) McMillan Select All & Wife<br />
21:59 2 TV3 ) M.Spillane’s mike<br />
All Zoom Select T Tools E Information<br />
English - 13
PICTURE<br />
¦<br />
Configuring the Picture Menu<br />
❑<br />
■<br />
■<br />
Mo<strong>de</strong><br />
You can select the type of picture which best corresponds to your viewing requirements.<br />
T Press the TOOLS button to display the Tools menu. You can also set the picture mo<strong>de</strong> by<br />
selecting Tools → Picture Mo<strong>de</strong>.<br />
Dynamic<br />
Selects the picture for increased <strong>de</strong>finition in a bright room.<br />
Standard<br />
Selects the picture for the optimum display in a normal environment.<br />
Picture<br />
Mo<strong>de</strong> : Standard ▶<br />
Backlight : 7<br />
Contrast : 95<br />
Brightness : 45<br />
Sharpness : 50<br />
Colour : 50<br />
Tint (G/R)<br />
: G50/R50<br />
Advanced Settings<br />
■<br />
Natural<br />
Selects the picture for an optimum and eye-comfortable display.<br />
N This function is not available in PC mo<strong>de</strong>.<br />
■<br />
Movie<br />
Selects the picture for viewing movies in a dark room.<br />
❑<br />
Backlight / Contrast / Brightness / Sharpness / Colour / Tint (G/R)<br />
Your television has several setting options that allow you to control the picture quality.<br />
● Backlight: Adjusts the brightness of LCD back light.<br />
● Contrast: Adjusts the contrast level of the picture.<br />
● Brightness: Adjusts the brightness level of the picture<br />
● Sharpness: Adjusts the edge <strong>de</strong>finition of the picture.<br />
● Colour: Adjusts colour saturation of the picture.<br />
● Tint (G/R): Adjusts the colour tint of the picture.<br />
N In analogue TV, Ext., AV mo<strong>de</strong>s of the PAL system, you cannot use the Tint (G/R) Function.<br />
N<br />
N<br />
N<br />
N<br />
U Move L Adjust E Enter R Return<br />
When you make changes to Backlight, Contrast, Brightness, Sharpness, Colour or Tint (G/R) the OSD will be adjusted<br />
accordingly.<br />
In PC mo<strong>de</strong>, you can only make changes to Backlight, Contrast and Brightness.<br />
Settings can be adjusted and stored for each external <strong>de</strong>vice you have connected to an input of the TV.<br />
The energy consumed during use can be significantly reduced if the brightness level of the picture is lowered, which will<br />
reduce the overall running cost.<br />
▲<br />
Backlight<br />
▼<br />
7<br />
❑<br />
■<br />
■<br />
■<br />
Advanced Settings<br />
<strong>Samsung</strong>’s new TVs allow you to make even more precise picture settings than previous<br />
mo<strong>de</strong>ls.<br />
N<br />
N<br />
Advanced Settings is available in Standard or Movie mo<strong>de</strong>.<br />
In PC mo<strong>de</strong>, you can only make changes to Dynamic Contrast, Gamma and White<br />
Balance from among the Advanced Settings items.<br />
Black Tone → Off / Dark / Darker / Darkest<br />
You can select the black level on the screen to adjust the screen <strong>de</strong>pth.<br />
Dynamic Contrast → Off / Low / Medium / High<br />
You can adjust the screen contrast so that the optimal contrast is provi<strong>de</strong>d.<br />
Gamma<br />
You can adjust the primary colour (red, green, blue) intensity.<br />
Advanced Settings<br />
Black Tone : Off ▶<br />
Dynamic Contrast<br />
: Medium<br />
Gamma : 0<br />
Colour Space<br />
: Native<br />
White Balance<br />
Flesh Tone : 0<br />
Edge Enhancement<br />
: On<br />
U Move E Enter R Return<br />
English - 14
■<br />
■<br />
■<br />
■<br />
■<br />
Colour Space<br />
Colour space is a colour matrix composed of red, green and blue colours. Select your favourites colour space to experience the<br />
most natural colour.<br />
●<br />
●<br />
●<br />
Auto: Auto Colour Space automatically adjusts to the most natural colour tone based on Programme sources.<br />
Native: Native Colour Space offers <strong>de</strong>ep and rich colour tone.<br />
Custom: Adjusts the colour range to suit your preference.<br />
N<br />
N<br />
Changing the adjustment value will refresh the adjusted screen.<br />
Settings can be adjusted and stored for each external <strong>de</strong>vice you have connected to an input of the TV. For example, if<br />
you have a DVD player connected to HDMI 1 and it is currently selected, settings and adjustments will be saved for the<br />
DVD player.<br />
<br />
<br />
<br />
<br />
<br />
Colour: Red, Green, Blue, Yellow, Cyan or Magenta<br />
N<br />
N<br />
N<br />
Colour is available when Colour Space is set to Custom.<br />
In Colour, you can adjust the RGB values for the selected colour.<br />
To reset the adjusted RGB value, select Reset.<br />
Red: Adjusts the red saturation level of the selected colour.<br />
Green: Adjusts the green saturation level of the selected colour.<br />
Blue: Adjusts the blue saturation level of the selected colour.<br />
Reset: Resets the colour space to the <strong>de</strong>fault values.<br />
White Balance<br />
You can adjust the colour temperature for more natural picture colours.<br />
● R-Offset: Adjusts the red colour darkness.<br />
● G-Offset: Adjusts the green colour darkness.<br />
● B-Offset: Adjusts the blue colour darkness.<br />
● R-Gain: Adjusts the red colour brightness.<br />
● G-Gain: Adjusts the green colour brightness.<br />
● B-Gain: Adjusts the blue colour brightness.<br />
● Reset: The previously adjusted white balance will be reset to the factory <strong>de</strong>faults.<br />
Flesh Tone<br />
You can emphasize the pink ‘flesh tone’ in the picture.<br />
N Changing the adjustment value will refresh the adjusted screen.<br />
Edge Enhancement → Off / On<br />
You can emphasize object boundaries in the picture.<br />
xvYCC → Off / On<br />
Setting the xvYCC mo<strong>de</strong> to on increases <strong>de</strong>tail and colour space when watching movies from an external <strong>de</strong>vice (ie. DVD player)<br />
connected to the HDMI or Component IN jacks.<br />
N<br />
N<br />
xvYCC is available when the picture mo<strong>de</strong> is set to Movie, and the external input is set to HDMI or Component mo<strong>de</strong>.<br />
This function may not be supported <strong>de</strong>pending on your external <strong>de</strong>vice.<br />
English - 15
❑<br />
■<br />
■<br />
■<br />
■<br />
■<br />
Picture Options<br />
N<br />
In PC mo<strong>de</strong>, you can only make changes to the Colour Tone and Size from among the<br />
items in Picture Options.<br />
Colour Tone → Cool / Normal / Warm1 / Warm2 / Warm3<br />
N<br />
N<br />
Warm1, Warm2 or Warm3 is only activated when the picture mo<strong>de</strong> is Movie.<br />
Settings can be adjusted and stored for each external <strong>de</strong>vice you have connected to an<br />
input of the TV.<br />
Size<br />
Occasionally, you may want to change the size of the image on your screen. Your TV comes<br />
with several screen size options, each <strong>de</strong>signed to work best with specific types of vi<strong>de</strong>o input. Your cable box/satellite receiver<br />
may have its own set of screen sizes as well. In general, though, you should view the TV in 16:9 mo<strong>de</strong> as much as possible.<br />
O<br />
●<br />
●<br />
●<br />
●<br />
●<br />
●<br />
N<br />
N<br />
N<br />
N<br />
N<br />
N<br />
N<br />
N<br />
You can select these options by simply pressing the P.SIZE button on the remote control.<br />
Auto Wi<strong>de</strong>: Automatically adjusts the picture size to the 16:9 aspect ratio.<br />
16:9: Adjusts the picture size to 16:9 appropriate for DVDs or wi<strong>de</strong> broadcasting.<br />
Wi<strong>de</strong> Zoom: Magnify the size of the picture more than 4:3.<br />
Zoom: Magnifies the 16:9 wi<strong>de</strong> picture (in the vertical direction) to fit the screen size.<br />
4:3: This is the <strong>de</strong>fault setting for a vi<strong>de</strong>o movie or normal broadcasting.<br />
Screen Fit: Use the function to see the full image without any cut-off when HDMI (720p / 1080i / 1080p) or Component (1080i<br />
/ 1080p) signals are input.<br />
Depending on the input source, the picture size options may vary.<br />
The items available may differ <strong>de</strong>pending on the selected mo<strong>de</strong>.<br />
In PC Mo<strong>de</strong>, only 16:9 and 4:3 mo<strong>de</strong> can be adjusted.<br />
Settings can be adjusted and stored for each external <strong>de</strong>vice you have connected to an input of the TV.<br />
Temporary image retention may occur when viewing a static image on the set for more than two hours.<br />
Wi<strong>de</strong> Zoom: Press the ► button to Select Position, then press the ENTERE button. Press the ▲ or ▼ button to move the<br />
picture up / down. Then press the ENTERE button.<br />
Zoom: Press the ► button to Select Position, then press the ENTERE button. Press the ▲ or ▼ button to move the picture<br />
up and down. Then press the ENTERE button. Press the ► button to Select Size, then press the ENTERE button. Press<br />
the ▲ or ▼ button to magnify or reduce the picture size in the vertical direction. Then press the ENTERE button.<br />
After selecting Screen Fit in HDMI (1080i / 1080p) or Component (1080i / 1080p) mo<strong>de</strong>: Select Position by pressing the ◄<br />
or ► button. Use the ▲, ▼, ◄ or ► button to move the picture.<br />
Reset: Press the ◄ or ► button to select Reset, then press the ENTERE button. You can initialize the setting.<br />
N If you use the Screen Fit function with HDMI 720p input, 1 line will be cut at the top, bottom, left and right as in the Overscan<br />
function.<br />
Screen Mo<strong>de</strong> → 16:9 / Wi<strong>de</strong> Zoom / Zoom / 4:3<br />
When setting the picture size to Auto Wi<strong>de</strong> in a 16:9 wi<strong>de</strong> TV, you can <strong>de</strong>termine the picture size you want to see the 4:3 WSS<br />
(Wi<strong>de</strong> Screen Service) image or nothing. Each individual European country requires different picture size so this function is<br />
inten<strong>de</strong>d for users to select it.<br />
●<br />
●<br />
●<br />
●<br />
N<br />
N<br />
16:9: Sets the picture to 16:9 wi<strong>de</strong> mo<strong>de</strong>.<br />
Wi<strong>de</strong> Zoom: Magnify the size of the picture more than 4:3.<br />
Zoom: Magnify the size of the picture vertically on screen.<br />
4:3: Sets the picture to 4:3 normal mo<strong>de</strong>.<br />
This function is available in Auto Wi<strong>de</strong> mo<strong>de</strong>.<br />
This function is not available in PC, Component or HDMI mo<strong>de</strong>.<br />
Digital NR → Off / Low / Medium / High / Auto<br />
If the broadcast signal received by your TV is weak, you can activate the Digital Noise Reduction feature to help reduce any static<br />
and ghosting that may appear on the screen.<br />
N When the signal is weak, select one of the other options until the best picture is displayed.<br />
HDMI Black Level → Normal / Low<br />
You can select the black level on the screen to adjust the screen <strong>de</strong>pth.<br />
N This function is active only when an external <strong>de</strong>vice is connected to the TV via HDMI (RGB signals).<br />
Colour Tone : Normal ▶<br />
Size<br />
Screen Mo<strong>de</strong> : 16:9<br />
Digital NR<br />
HDMI Black Level<br />
Film Mo<strong>de</strong><br />
Blue Only Mo<strong>de</strong><br />
Picture Options<br />
: Auto Wi<strong>de</strong><br />
: Auto<br />
: Normal<br />
: Off<br />
: Off<br />
U Move E Enter R Return<br />
English - 16
■<br />
■<br />
❑<br />
Film Mo<strong>de</strong> → Off / Auto1 / Auto2<br />
The TV can be set to automatically sense and process film signals from all sources and adjust the picture for optimum quality.<br />
N<br />
●<br />
●<br />
●<br />
Film Mo<strong>de</strong> is supported in TV, AV, COMPONENT(480i / 1080i) and HDMI(480i / 1080i).<br />
Off: Turn the Film Mo<strong>de</strong> function off.<br />
Auto1: Automatically adjusts the picture for the best quality when watching a film.<br />
Auto2: Automatically optimizes the vi<strong>de</strong>o text on the screen (not including closed captions) when watching a film.<br />
Blue Only Mo<strong>de</strong> → Off / On<br />
This function is for AV <strong>de</strong>vice measurement experts. This function displays the blue signal only by removing the red and green<br />
signals from the vi<strong>de</strong>o signal so as to provi<strong>de</strong> a Blue Filter effect that is used to adjust the Colour and Tint of vi<strong>de</strong>o equipment such<br />
as DVD players, Home Theatres, etc. Using this function, you can adjust the Colour and Tint to preferred values appropriate to<br />
the signal level of each vi<strong>de</strong>o <strong>de</strong>vice using the Red / Green / Blue / Cyan / Magenta / Yellow Colour Bar Patterns, without using an<br />
additional Blue Filter.<br />
N Blue Only Mo<strong>de</strong> is available when the picture mo<strong>de</strong> is set to Movie or Standard.<br />
Picture Reset → Reset Picture Mo<strong>de</strong> / Cancel<br />
Resets all picture settings to the <strong>de</strong>fault values.<br />
N Reset Picture Mo<strong>de</strong>: Current picture values return to <strong>de</strong>fault settings.<br />
English - 17
¦<br />
Using Your TV as a Computer (PC) Display<br />
Setting Up Your PC Software (Based on Windows XP)<br />
The Windows display-settings for a typical computer are shown below. The actual screens on<br />
your PC will probably be different, <strong>de</strong>pending upon your particular version of Windows and<br />
your particular vi<strong>de</strong>o card. However, even if your actual screens look different, the same basic<br />
set-up information will apply in almost all cases. (If not, contact your computer manufacturer or<br />
<strong>Samsung</strong> Dealer.)<br />
1. First, click on ‘Control Panel’ on the Windows start menu.<br />
2. When the control panel window appears, click on ‘Appearance and Themes’ and a display<br />
dialog-box will appear.<br />
3. When the control panel window appears, click on ‘Display’ and a display dialogbox will<br />
appear.<br />
4. Navigate to the ‘Settings’ tab on the display dialog-box.<br />
The correct size setting (resolution) - Optimum: 1920 X 1080 pixels<br />
If a vertical-frequency option exists on your display settings dialog box, the correct<br />
value is ‘60’ or ‘60 Hz’. Otherwise, just click ‘OK’ and exit the dialog box.<br />
Display Mo<strong>de</strong>s<br />
■<br />
If the signal from the system equals the standard signal mo<strong>de</strong>, the screen is adjusted automatically. If the signal from the system<br />
doesn’t equal the standard signal mo<strong>de</strong>, adjust the mo<strong>de</strong> by referring to your vi<strong>de</strong>ocard user gui<strong>de</strong>; otherwise there may be no<br />
vi<strong>de</strong>o. For the display mo<strong>de</strong>s listed on the next page, the screen image has been optimized during manufacturing.<br />
D-Sub and HDMI/DVI Input<br />
Mo<strong>de</strong> Resolution Horizontal Frequency<br />
(KHz)<br />
Vertical Frequency<br />
(Hz)<br />
Pixel Clock Frequency<br />
(MHz)<br />
Sync Polarity<br />
(H / V)<br />
IBM<br />
640 x 350<br />
720 x 400<br />
31.469<br />
31.469<br />
70.086<br />
70.087<br />
25.175<br />
28.322<br />
+/-<br />
-/+<br />
MAC<br />
640 x 480 35.000 66.667 30.240 -/-<br />
832 x 624 49.726 74.551 57.284 -/-<br />
1152 x 870 68.681 75.062 100.000 -/-<br />
VESA CVT<br />
720 x 576 35.910 59.950 32.750 -/+<br />
1152 x 864 53.783 59.959 81.750 -/+<br />
1280 x 720 44.772 59.855 74.500 -/+<br />
1280 x 720 56.456 74.777 95.750 -/+<br />
1280 x 960 75.231 74.857 130.000 -/+<br />
640 x 480 31.469 59.940 25.175 -/-<br />
640 x 480 37.861 72.809 31.500 -/-<br />
640 x 480 37.500 75.000 31.500 -/-<br />
800 x 600 37.879 60.317 40.000 +/+<br />
800 x 600 48.077 72.188 50.000 +/+<br />
800 x 600 46.875 75.000 49.500 +/+<br />
1024 x 768 48.363 60.004 65.000 -/-<br />
1024 x 768 56.476 70.069 75.000 -/-<br />
1024 x 768 60.023 75.029 78.750 +/+<br />
VESA DMT 1152 x 864 67.500 75.000 108.000 +/+<br />
1280 x 1024 63.981 60.020 108.000 +/+<br />
1280 x 1024 79.976 75.025 135.000 +/+<br />
1280 x 800 49.702 59.810 83.500 -/+<br />
1280 x 800 62.795 74.934 106.500 -/+<br />
1280 x 960 60.000 60.000 108.000 +/+<br />
1360 x 768 47.712 60.015 85.500 +/+<br />
1440 x 900 55.935 59.887 106.500 -/+<br />
1440 x 900 70.635 74.984 136.750 -/+<br />
1680 x 1050 65.290 59.954 146.250 -/+<br />
VESA GTF<br />
1280 x 720<br />
1280 x 1024<br />
52.500<br />
74.620<br />
70.000<br />
70.000<br />
89.040<br />
128.943<br />
-/+<br />
-/-<br />
VESA DMT /<br />
DTV CEA<br />
1920 x 1080p 67.500 60.000 148.500 +/+<br />
N<br />
N<br />
N<br />
N<br />
N<br />
When using an HDMI / DVI cable connection, you must use the HDMI IN 3(DVI) jack.<br />
The interlace mo<strong>de</strong> is not supported.<br />
The set might operate abnormally if a non-standard vi<strong>de</strong>o format is selected.<br />
Separate and Composite mo<strong>de</strong>s are supported. SOG is not supported.<br />
Too long or low quality VGA cable can cause picture noise at high resolution mo<strong>de</strong>s (1920x1080).<br />
English - 18
¦<br />
Setting up the TV with your PC<br />
N<br />
Preset: Press the SOURCE button to select PC mo<strong>de</strong>.<br />
❑<br />
Auto Adjustment<br />
Use the Auto Adjust function to have the TV automatically adjust the vi<strong>de</strong>o signals it receives.<br />
The function also automatically fine-tunes the settings and adjusts the frequency values and<br />
positions.<br />
T Press the TOOLS button to display the Tools menu. You can also set the Auto Adjustment<br />
by selecting Tools → Auto Adjustment.<br />
N This function does not work in DVI-HDMI mo<strong>de</strong>.<br />
Picture<br />
Brightness : 45<br />
Sharpness : 50<br />
Auto Adjustment<br />
Screen<br />
Advanced Settings<br />
Picture Options<br />
Picture Reset<br />
▶<br />
❑<br />
Screen<br />
■<br />
■<br />
■<br />
Coarse / Fine<br />
The purpose of picture quality adjustment is to remove or reduce picture noise. If the noise is<br />
not removed by Fine-tuning alone, then adjust the frequency as best as possible (Coarse) and<br />
Fine-tune again. After the noise has been reduced, readjust the picture so that it is aligned on<br />
the centre of screen.<br />
PC Position<br />
Adjust the PC’s screen positioning if it does not fit the TV screen.<br />
Press the ▲ or ▼ button to adjusting the Vertical-Position. Press the ◄ or ► button to adjust<br />
the Horizontal-Position.<br />
Image Reset<br />
You can replace all image settings with the factory <strong>de</strong>fault values.<br />
Screen<br />
Coarse 50<br />
Fine 0<br />
PC Position<br />
Image Reset<br />
U Move E Enter R Return<br />
English - 19
SOUND<br />
¦<br />
Configuring the Sound Menu<br />
❑<br />
Mo<strong>de</strong> → Standard / Music / Movie / Clear Voice / Custom<br />
T<br />
●<br />
●<br />
●<br />
●<br />
●<br />
Press the TOOLS button to display the Tools menu. You can also set the sound mo<strong>de</strong> by<br />
selecting Tools → Sound Mo<strong>de</strong>.<br />
Standard: Selects the normal sound mo<strong>de</strong>.<br />
Music: Emphasizes music over voices.<br />
Movie: Provi<strong>de</strong>s the best sound for movies.<br />
Clear Voice: Emphasizes voice over other sounds.<br />
Custom: Recalls your customized sound settings.<br />
Sound<br />
Mo<strong>de</strong> : Custom ▶<br />
Equalizer<br />
SRS TruSurround HD : Off<br />
Audio Language : ----<br />
Audio Format : ----<br />
Audio Description<br />
Auto Volume<br />
: Off<br />
Speaker Select<br />
: TV Speaker<br />
❑<br />
❑<br />
❑<br />
❑<br />
❑<br />
■<br />
■<br />
❑<br />
Equalizer<br />
The sound settings can be adjusted to suit your personal preferences.<br />
● Mo<strong>de</strong>: Selects the sound mo<strong>de</strong> among the pre<strong>de</strong>fined settings.<br />
● Balance L/R: Adjusts the balance between the right and left speaker.<br />
● 100Hz / 300Hz / 1KHz / 3KHz / 10KHz (Bandwidth Adjustment): To adjust the level of different bandwidth frequencies.<br />
● Reset: Resets the equalizer settings to the <strong>de</strong>fault values.<br />
SRS TruSurround HD → Off / On<br />
SRS TruSurround HD is a patented SRS technology that solves the problem of playing 5.1 multichannel content over two<br />
speakers. TruSurround <strong>de</strong>livers a compelling, virtual surround sound experience through any two-speaker playback system,<br />
including internal television speakers. It is fully compatible with all multichannel formats.<br />
T Press the TOOLS button to display the Tools menu. You can also set the SRS TruSurround HD by selecting Tools → SRS TS<br />
HD.<br />
Audio Language<br />
You can change the <strong>de</strong>fault value for audio languages. Displays the language information for the incoming stream.<br />
N<br />
N<br />
While viewing a digital channel, this function can be selected.<br />
You can only select the language among the actual languages being broadcast.<br />
Audio Format → MPEG / Dolby Digital<br />
When sound is emitted from both the main speaker and the audio receiver, a sound echo may occur due to the <strong>de</strong>coding speed<br />
difference between the main speaker and the audio receiver. In this case, use the TV Speaker function.<br />
N<br />
N<br />
While viewing a digital channel, this function can be selected.<br />
The Audio Format appears according to the broadcasting signal.<br />
Audio Description<br />
This is an auxiliary audio function that provi<strong>de</strong>s an additional audio track for visually challenged persons. This function handles the<br />
Audio Stream for the AD (Audio Description), when it is sent along with the Main audio from the broadcaster. Users can turn the<br />
Audio Description On or Off and control the volume.<br />
O Press the AD button on the remote control to select Off or On.<br />
Audio Description → Off / On<br />
Turn the audio <strong>de</strong>scription function on or off.<br />
Volume<br />
You can adjust the audio <strong>de</strong>scription volume.<br />
N<br />
N<br />
Volume is active when Audio Description is set to On.<br />
While viewing a Digital channel, this function can be selected.<br />
Auto Volume → Off / On<br />
Each broadcasting station has its own signal conditions, and so it is not easy to adjust the volume every time the channel is<br />
changed. This feature lets you automatically adjust the volume of the <strong>de</strong>sired channel by lowering the sound output when the<br />
modulation signal is high or by r<strong>ais</strong>ing the sound output when the modulation signal is low.<br />
English - 20
❑<br />
Speaker Select<br />
When you watch TV with it connecting to a Home theatre, turn the TV speakers off so you can listen to sound from the Home<br />
theatre’s (external) speakers.<br />
● External Speaker: Used to listen to the sound of the External (Home Theatre) Speakers.<br />
● TV Speaker: Used to listen to the sound of the TV Speakers.<br />
N The volume and MUTE buttons do not operate when the Speaker Select is set to External Speaker.<br />
N If you select External Speaker in the Speaker Select menu, the sound settings will be limited<br />
TV’s Internal Speakers<br />
Audio Out (Optical, L/R Out) to Sound System<br />
RF / AV / Component / PC / HDMI<br />
RF / AV / Component / PC / HDMI<br />
TV Speaker Sound Output Sound Output<br />
External Speaker Mute Sound Output<br />
Vi<strong>de</strong>o No Signal Mute Mute<br />
❑<br />
Sound Reset → Reset All / Reset Sound Mo<strong>de</strong> / Cancel<br />
You can restore the Sound settings to the factory <strong>de</strong>faults.<br />
N Reset Sound Mo<strong>de</strong>: Current sound values return to <strong>de</strong>fault settings.<br />
Cancel sound reset.<br />
Sound Reset<br />
Reset All Reset Sound Mo<strong>de</strong> Cancel<br />
L Move E Enter R Return<br />
¦<br />
Selecting the Sound Mo<strong>de</strong><br />
You can set the sound mo<strong>de</strong> by pressing the DUAL button. When you press it, the current sound mo<strong>de</strong> is displayed on the screen.<br />
N<br />
N<br />
N<br />
A2 Stereo<br />
NICAM<br />
Stereo<br />
Audio Type Dual 1 / 2 Default<br />
Mono<br />
MONO<br />
Automatic change<br />
Stereo<br />
STEREO ↔ MONO<br />
Dual DUAL 1 ↔ DUAL 2 DUAL 1<br />
Mono<br />
MONO<br />
Automatic change<br />
Stereo<br />
MONO ↔ STEREO<br />
Dual<br />
MONO ↔ DUAL 1<br />
DUAL 2<br />
If the stereo signal is weak and an automatic switching occurs, then switch to the mono.<br />
This function is only activated in stereo sound signal. It is <strong>de</strong>activated in mono sound signal.<br />
This function is only available in TV mo<strong>de</strong>.<br />
DUAL 1<br />
English - 21
SETUP<br />
¦<br />
Configuring the Setup Menu<br />
❑<br />
Menu Language<br />
You can set the menu language.<br />
Plug & Play<br />
❑<br />
❑<br />
Time<br />
For <strong>de</strong>tailed procedures on setting up options, refer to the ‘Setting the Time’ instructions.<br />
Broadcast<br />
Setup<br />
Menu Language : English ▶<br />
Time<br />
Broadcast<br />
Security<br />
General<br />
■<br />
■<br />
■<br />
■<br />
Subtitle<br />
You can activate and <strong>de</strong>activate the subtitles. Use this menu to set the Subtitle Mo<strong>de</strong>. Normal un<strong>de</strong>r the menu is the basic subtitle<br />
and Hard of hearing is the subtitle for a hearing-impaired person.<br />
● Subtitle → Off / On<br />
Switches subtitles on or off.<br />
● Mo<strong>de</strong> → Normal / Hard of hearing<br />
Sets the subtitle mo<strong>de</strong>.<br />
● Subtitle Language<br />
Set the subtitle language.<br />
N<br />
N<br />
O<br />
If the programme you are watching does not support the Hard of hearing function, Normal automatically activates even<br />
though Hard of hearing mo<strong>de</strong> is selected.<br />
English is the <strong>de</strong>fault in cases where the selected language is unavailable in the broadcast.<br />
You can select these options simply by pressing the SUBT. button on the remote control.<br />
Digital Text → Disable / Enable (UK only)<br />
If the programme is broadcast with digital text, this feature is enabled.<br />
N MHEG (Multimedia and Hypermedia Information Coding Experts Group)<br />
An International standard for data encoding systems used in multimedia and hypermedia. This is at a higher level than the<br />
MPEG system which inclu<strong>de</strong>s data-linking hypermedia such as still images, character service, animation, graphic and vi<strong>de</strong>o<br />
files as well as multimedia data. MHEG is user runtime interaction technology and is being applied to various fields including<br />
VOD (Vi<strong>de</strong>o-On-Demand), ITV (Interactive TV), EC (Electronic Commerce), tele-education, tele-conferencing, digital libraries<br />
and network games.<br />
Teletext Language<br />
You can set the Teletext language by selecting the language type.<br />
N English is the <strong>de</strong>fault in cases where the selected language is unavailable in the broadcast.<br />
Preference<br />
● Primary Audio Language / Secondary Audio Language / Primary Subtitle Language / Secondary Subtitle Language /<br />
Primary Teletext Language / Secondary Teletext Language<br />
Using this feature, users can select one of the languages. The language selected here is the <strong>de</strong>fault when the user selects a<br />
channel.<br />
If you change the language setting, the Subtitle Language, Audio Language, and the Teletext Language of the Language<br />
menu are automatically changed to the selected language.<br />
The Subtitle Language, Audio Language, and the Teletext Language of the Language menu show a list of languages<br />
supported by the current channel and the selection is highlighted. If you change this language setting, the new selection is<br />
only valid for the current channel. The changed setting does not change the setting of the Primary Subtitle Language, Primary<br />
Audio Language, or the Primary Teletext Language of the Preference menu.<br />
English - 22
■<br />
❑<br />
■<br />
■<br />
■<br />
❑<br />
■<br />
Common Interface<br />
● CI Menu<br />
This enables the user to select from the CAM-provi<strong>de</strong>d menu.<br />
Select the CI Menu based on the menu PC Card.<br />
● Application Info.<br />
This contains information on CAM inserted in the CI slot and displays it. The Application Info inserting is about the CI CARD.<br />
You can install the CAM anytime whether the TV is ON or OFF.<br />
1. Purchase the CI CAM module by visiting your nearest <strong>de</strong>aler or by phone.<br />
2. Insert the ‘CI(CI+) CARD’ into the CAM in the direction of the arrow until it fits.<br />
3. Insert the CAM with the ‘CI(CI+) CARD’ installed into the common interface slot. (Insert the CAM in the direction of the<br />
arrow, right up to the end so that it is parallel with the slot.)<br />
4. Check if you can see a picture on a scrambled signal channel.<br />
Security<br />
Child Lock → Off / On<br />
This feature allows you to prevent unauthorized users, such as children, from watching unsuitable programme by muting out vi<strong>de</strong>o<br />
and audio.<br />
N<br />
N<br />
N<br />
N<br />
Before the setup screen appears, the PIN number input screen appears. Enter your 4 digit PIN number.<br />
The <strong>de</strong>fault PIN number of a new TV set is ‘0-0-0-0’. You can change the PIN by selecting Change PIN from the menu.<br />
You can lock some channels in Channel List.<br />
Child Lock is available only in TV mo<strong>de</strong>.<br />
Parental Lock → Parental Rating<br />
This feature allows you to prevent unauthorized users, such as children, from watching unsuitable programme by a 4-digit PIN<br />
(Personal I<strong>de</strong>ntification Number) co<strong>de</strong> that is <strong>de</strong>fined by the user.<br />
N<br />
N<br />
N<br />
N<br />
N<br />
The Parental Rating item differs <strong>de</strong>pending on the country.<br />
Before the setup screen appears, the PIN number input screen appears. Enter your 4 digit PIN number.<br />
The <strong>de</strong>fault PIN number of a new TV set is ‘0-0-0-0’. You can change the PIN by selecting Change PIN from the menu.<br />
When the parental ratings are set, the ‘\’ symbol is displayed.<br />
Allow All: Press to unlock all TV ratings.<br />
Block All: Press to lock all TV ratings.<br />
Change PIN<br />
You can change your personal ID number that is required to set up the TV.<br />
N<br />
N<br />
N<br />
Before the setup screen appears, the PIN number input screen appears. Enter your 4 digit PIN number.<br />
The <strong>de</strong>fault PIN number of a new TV set is ‘0-0-0-0’.<br />
If you forget the PIN co<strong>de</strong>, press the remote control buttons in the following sequence, which resets the PIN to ‘0-0-0-0’:<br />
POWER (Off) → MUTE → 8 → 2 → 4 → POWER (On).<br />
General<br />
Game Mo<strong>de</strong> → Off / On<br />
When connecting to a game console such as PlayStation or Xbox, you can enjoy a more realistic gaming experience by<br />
selecting game menu.<br />
N Restrictions on game mo<strong>de</strong> (Caution)<br />
N<br />
N<br />
N<br />
<br />
<br />
To disconnect the game console and connect another external <strong>de</strong>vice, set Game Mo<strong>de</strong> to Off in the setup menu.<br />
If you display the TV menu in Game Mo<strong>de</strong>, the screen shakes slightly.<br />
Game Mo<strong>de</strong> is not available in regular TV, PC and Ext. mo<strong>de</strong>.<br />
If the picture is poor when external <strong>de</strong>vice is connected to TV, check if Game Mo<strong>de</strong> is On. Set Game Mo<strong>de</strong> to Off and<br />
connect external <strong>de</strong>vices.<br />
If Game Mo<strong>de</strong> is On:<br />
<br />
<br />
<br />
Picture mo<strong>de</strong> is automatically changed to Standard and cannot be changed.<br />
Sound mo<strong>de</strong> is automatically changed to Custom and cannot be changed. Adjust the sound using the equalizer.<br />
The Reset Sound function is activated. Selecting the Reset function after setting the equalizer resets the equalizer<br />
settings to the factory <strong>de</strong>faults.<br />
English - 23
■<br />
■<br />
■<br />
Energy Saving → Off / Low / Medium / High / Picture Off / Auto<br />
This feature adjusts the brightness of the TV in or<strong>de</strong>r to reduce power consumption. When watching TV at night, set the Energy<br />
Saving mo<strong>de</strong> option to High to reduce eye fatigue as well as power consumption.<br />
If you select Picture Off, the screen is turned off and you can only hear the sound. Press any button to get out of Picture Off.<br />
N<br />
T<br />
In the Tools menu, Picture Off function is not supported.<br />
Press the TOOLS button to display the Tools menu. You can also set the Energy Saving option by selecting Tools → Energy<br />
Saving.<br />
Menu Transparency → Bright / Dark<br />
You can set the Transparency of the menu.<br />
Melody → Off / Low / Medium / High<br />
A melody sound can be set to come on when the TV is powered On or Off.<br />
N The Melody does not play<br />
<br />
<br />
<br />
When no sound is output from the TV because the MUTE button has been pressed.<br />
When no sound is output from the TV because the volume has been reduced to minimum with the volum (-) button.<br />
When the TV is turned off by Sleep Timer function.<br />
¦<br />
Setting the Time<br />
❑<br />
■<br />
■<br />
Clock<br />
Setting the clock is necessary in or<strong>de</strong>r to use the various timer features of the TV.<br />
O<br />
N<br />
The current time will appear every time you press the INFO button.<br />
If you disconnect the power cord, you have to set the clock again.<br />
Clock Mo<strong>de</strong><br />
You can set up the current time manually or automatically.<br />
● Auto: Set the current time automatically using the time from the digital broadcast.<br />
● Manual: Set the current time to a manually specified time.<br />
N Depending on the broadcast station and signal, the auto time may not be set correctly. If<br />
this occurs, set the time manually.<br />
N The Antenna or cable must be connected in or<strong>de</strong>r to set the time automatically.<br />
Clock Set<br />
You can set the current time manually.<br />
N<br />
N<br />
This function is only available when Clock Mo<strong>de</strong> is set to Manual.<br />
You can set the day, month, year, hour and minute directly by pressing the number buttons<br />
on the remote control.<br />
Setup<br />
Clock : -- : -- ▶<br />
Sleep Timer<br />
Timer 1<br />
Timer 2<br />
Timer 3<br />
Plug & Play<br />
Language<br />
Time<br />
Broadcast<br />
Security<br />
General<br />
Time<br />
: Off<br />
: English<br />
: Inactivated<br />
: Inactivated<br />
: Inactivated<br />
U Move E Enter R Return<br />
▶<br />
❑<br />
Sleep Timer<br />
The sleep timer automatically shuts off the TV after a preset time (30, 60, 90, 120, 150 and 180 minutes).<br />
T<br />
N<br />
Press the TOOLS button to display the Tools menu. You can also set the sleep timer by selecting Tools → Sleep Timer.<br />
To cancel the Sleep Timer function, select Off.<br />
❑<br />
■<br />
■<br />
Timer 1 / Timer 2 / Timer 3<br />
Three different on / off timer settings can be ma<strong>de</strong>.<br />
You must set the clock first.<br />
On Time<br />
Set the hour, minute, and activate / inactivate.<br />
(To activate timer with the setting you’ve chosen, set to Activate.)<br />
Off Time<br />
Set the hour, minute, and activate / inactivate.<br />
(To activate timer with the setting you’ve chosen, set to Activate.)<br />
Timer 1<br />
On Time<br />
00 00 Inactivate<br />
Off Time<br />
00 00 Inactivate<br />
Volume Source Antenna Channel<br />
10<br />
TV ATV 0<br />
Repeat<br />
Once<br />
Sun Mon Tue Wed Thu Fri Sat<br />
L Move U Adjust E Enter R Return<br />
English - 24
■<br />
■<br />
■<br />
■<br />
■<br />
■<br />
Volume<br />
Set the <strong>de</strong>sired volume level.<br />
Source → TV / USB<br />
You can select the TV or USB <strong>de</strong>vice content to be played when the TV turns on automatically. Select TV or USB. (Make sure that<br />
an USB <strong>de</strong>vice is connected to your TV.)<br />
N When there is only one photo file in the USB, Sli<strong>de</strong> Show will not be executed.<br />
Antenna (when Source is set to TV)<br />
Select ATV or DTV.<br />
Channel (when Source is set to TV)<br />
Select the <strong>de</strong>sired channel.<br />
Contents (when Source is set to USB)<br />
You can select a fol<strong>de</strong>r on the USB Device with music or photo files to be played when the TV turns on automatically.<br />
N<br />
N<br />
If the fol<strong>de</strong>r name is too long, the fol<strong>de</strong>r can not be selected.<br />
If the fol<strong>de</strong>r name to be configured by the Contents function is too long, it cannot be selected.<br />
Repeat<br />
Select Once, Everyday, Mon~Fri, Mon~Sat, Sat~Sun or Manual.<br />
N<br />
N<br />
N<br />
When Manual is selected, press the ► button to select the <strong>de</strong>sired day of the week. Press the ENTERE button over the<br />
<strong>de</strong>sired day and the c mark will appear.<br />
You can set the hour, minute and channel by pressing the number buttons on the remote control.<br />
Auto Power Off<br />
When you set the timer on, the television will eventually turn off, if no controls are operated for 3 hours after the TV was turned<br />
on by the timer. This function is only available in timer on mo<strong>de</strong> and prevents overheating, which may occur if a TV is on for<br />
too long time.<br />
English - 25
INPUT / SUPPORT<br />
¦<br />
Input Menu<br />
❑<br />
■<br />
❑<br />
Source List<br />
Use to select TV or other external input sources such as DVD / Blu-ray players / Cable Box /<br />
Satellite receivers (Set-Top Box) connected to the TV. Use to select the input source of your<br />
choice.<br />
O Press the SOURCE button on the remote control to view an external signal source. TV<br />
mo<strong>de</strong> can be selected by pressing the TV button.<br />
TV / Ext.1 / Ext.2 / AV / Component / PC / HDMI1 / HDMI2 / HDMI3/DVI / HDMI4<br />
N You can choose only those external <strong>de</strong>vices that are connected to the TV. In the Source<br />
List, connected inputs will be highlighted and sorted to the top. Inputs that are not connected<br />
will be sorted to the bottom.<br />
N Ext. and PC always stays activated.<br />
N Using the Colour buttons on the remote with the Source list<br />
Red (Refresh): Refreshes the connected external <strong>de</strong>vices. Press this if your Source is<br />
on and connected, but does not appear in the list.<br />
TOOLS (Tools): Displays the Edit Name and Information menus.<br />
Edit Name<br />
Input<br />
Source List<br />
Edit Name<br />
TV<br />
Refresh<br />
T Tools<br />
Source List<br />
Ext. 1 : - - - -<br />
Ext. 2 : - - - -<br />
PC : - - - -<br />
AV : - - - -<br />
Component : - - - -<br />
■<br />
¦<br />
❑<br />
■<br />
■<br />
VCR / DVD / Cable STB / Satellite STB / PVR STB / AV Receiver / Game / Camcor<strong>de</strong>r / PC / DVI / DVI PC / TV / IPTV / Blu-ray<br />
/ HD DVD / DMA<br />
Name the <strong>de</strong>vice connected to the input jacks to make your input source selection easier.<br />
N When a PC with a resolution of 1920 x 1080@60Hz is connected to the HDMI IN 3(DVI) port, you should set the HDMI3/DVI<br />
mo<strong>de</strong> to DVI PC in the Edit Name of the Input mo<strong>de</strong>.<br />
N When connecting an HDMI/DVI cable to the HDMI IN 3(DVI) port, you should set the HDMI3/DVI mo<strong>de</strong> to DVI or DVI PC in<br />
the Edit Name of the Input mo<strong>de</strong>. In this case, a separate sound connection is required.<br />
Support Menu<br />
Self Diagnosis<br />
Picture Test<br />
If you think you have a picture problem, perform the picture test. Check the colour pattern on<br />
the screen to see if the problem still exists.<br />
● Yes: If the test pattern does not appear or there is noise in the test pattern, select Yes.<br />
There may be a problem with the TV. Therefore, contact <strong>Samsung</strong>’s call centre for<br />
assistance.<br />
● No: If the test pattern is properly displayed, select No. There may be a problem with your<br />
external equipment. Please check your connections. If the problem still persists, refer to the<br />
external <strong>de</strong>vice’s user manual.<br />
Self Diagnosis<br />
Software Upgra<strong>de</strong><br />
HD Connection Gui<strong>de</strong><br />
Contact <strong>Samsung</strong><br />
Sound Test<br />
Picture Test<br />
▶<br />
If you think you have a sound problem, please perform the sound test. You can check the sound<br />
by playing a built-in melody sound through the TV.<br />
Sound Test<br />
Signal Information<br />
N If you hear no sound from the TV’s speakers, before performing the sound test, make sure<br />
Speaker Select is set to TV speaker in the Sound menu.<br />
U Move E Enter R Return<br />
N The melody will be heard during the test even if Speaker Select is set to External Speaker or the sound is muted by pressing<br />
the MUTE button.<br />
● Yes: If during the sound test you can hear sound only from one speaker or not at all, select Yes. There may be a problem with<br />
the TV. Therefore, contact <strong>Samsung</strong>’s call centre for assistance.<br />
● No: If you can hear sound from the speakers, select No. There may be a problem with your external equipment. Please check<br />
your connections. If the problem still persists, refer to the external <strong>de</strong>vice’s user manual.<br />
Support<br />
Self Diagnosis<br />
▶<br />
English - 26
■<br />
Signal Information (digital channels only)<br />
Unlike analogue channels, which can vary in reception quality from ‘snowy’ to clear, digital (HDTV) channels have either perfect<br />
reception quality or you will not receive them at all. So, unlike analogue channels, you cannot fine tune a digital channel. You can,<br />
however, adjust your antenna to improve the reception of available digital channels.<br />
N If the signal strength meter indicates that the signal is weak, physically adjust your antenna to increase the signal strength.<br />
Continue to adjust the antenna until you find the best position with the strongest signal.<br />
❑<br />
Software Upgra<strong>de</strong><br />
<strong>Samsung</strong> may offer upgra<strong>de</strong>s for the TV’s firmware in the future. These upgra<strong>de</strong>s can be<br />
performed via the TV when it is connected to the Internet, or by downloading the new firmware<br />
from samsung.com to a USB memory <strong>de</strong>vice.<br />
N<br />
N<br />
N<br />
Current Version is the software already installed in the TV.<br />
Alternative Software (Backup) shows the previous version that will be replaced.<br />
Software is represented as ‘Year/Month/Day_Version’. The more recent the date, the newer<br />
the software version. Installing the latest version is recommen<strong>de</strong>d.<br />
USB Drive<br />
TV Si<strong>de</strong> Panel<br />
■<br />
By USB<br />
Insert a USB drive containing the firmware upgra<strong>de</strong> downloa<strong>de</strong>d from samsung.com into the<br />
TV. Please be careful to not disconnect the power or remove the USB drive while upgra<strong>de</strong>s<br />
are being applied. The TV will turn off and turn on automatically after completing the firmware<br />
upgra<strong>de</strong>. Please check the firmware version after the upgra<strong>de</strong>s are complete (the new version<br />
will have a higher number than the ol<strong>de</strong>r version).<br />
When software is upgra<strong>de</strong>d, vi<strong>de</strong>o and audio settings you have ma<strong>de</strong> will return to their <strong>de</strong>fault<br />
(factory) settings. We recommend you write down your settings so that you can easily reset<br />
them after the upgra<strong>de</strong>.<br />
Software Upgra<strong>de</strong><br />
Current Version<br />
2009/01/18_000001<br />
By USB<br />
▶<br />
By Channel<br />
Standby Mo<strong>de</strong> Upgra<strong>de</strong> : 45 Min<br />
Alternative Software<br />
2009/01/15_00000<br />
U Move E Enter R Return<br />
■<br />
■<br />
■<br />
❑<br />
❑<br />
By Channel<br />
Upgra<strong>de</strong>s the software using the broadcasting signal.<br />
N If the function is selected during the software transmission period, this function searches for available software and downloads<br />
the software.<br />
N The time required to download the software is <strong>de</strong>termined by the signal status.<br />
Standby Mo<strong>de</strong> Upgra<strong>de</strong><br />
To continue software upgra<strong>de</strong> with master power on, Select On by pressing the ▲ or ▼ button. 45 minutes after entering standby<br />
mo<strong>de</strong>, a manual upgra<strong>de</strong> is automatically conducted. Since the power of the unit is turned on internally, the screen may be on<br />
slightly for the LCD product. This phenomenon may continue for more than 1 hour until the software upgra<strong>de</strong> is completed.<br />
Alternative Software (Backup)<br />
If there is an issue with the new firmware and it is affecting operation, you can change the software to the previous version.<br />
N<br />
N<br />
If software was changed, existing software is displayed.<br />
You can change current software to alternative software by ‘Alternative Software’.<br />
HD Connection Gui<strong>de</strong><br />
This menu presents the connection method that provi<strong>de</strong>s the optimal quality for the HD TV. Refer to this information when<br />
connecting external <strong>de</strong>vices to the TV.<br />
Contact <strong>Samsung</strong><br />
View this information when your TV does not work properly or when you want to upgra<strong>de</strong> the software. You can view the<br />
information regarding the call centre, product and software file download method.<br />
English - 27
Media Play (USB)<br />
¦<br />
Connecting a USB Device<br />
1. Press the POWER button to turn the TV on.<br />
2. Connect a USB <strong>de</strong>vice containing photo and/or music files to the USB jack on the si<strong>de</strong> of the<br />
TV.<br />
3. When the Application selection screen is displayed, press the ENTERE button to select<br />
Media Play (USB).<br />
N<br />
N<br />
N<br />
N<br />
N<br />
N<br />
N<br />
N<br />
N<br />
N<br />
N<br />
N<br />
N<br />
N<br />
MTP (Media Transfer Protocol) is not supported.<br />
The file system supports FAT16, FAT32 and NTFS.<br />
Certain types of USB Digital camera and audio <strong>de</strong>vices may not be compatible with this<br />
TV.<br />
Media Play only supports USB Mass Storage Class <strong>de</strong>vices (MSC). MSC<br />
is a Mass Storage Class Bulk-Only Transport <strong>de</strong>vice. Examples of MSC are<br />
Thumb drives and Flash Card Rea<strong>de</strong>rs (Both USB HDD and HUB are not<br />
supported.)<br />
Please connect directly to the USB port of your TV. If you are using a separate<br />
cable connection, there may be a USB compatibility problem.<br />
Before connecting your <strong>de</strong>vice to the TV, please back up your files to prevent<br />
Photo<br />
them from damage or loss of data. SAMSUNG is not responsible for any data<br />
file damage or data loss.<br />
Do not disconnect the USB <strong>de</strong>vice while it is loading.<br />
The higher the resolution of the image, the longer it takes to display on the screen.<br />
The maximum supported JPEG resolution is 15360X8640 pixels.<br />
For unsupported or corrupted files, the ‘Not Supported File Format’ message is displayed.<br />
MP3 files with DRM that have been downloa<strong>de</strong>d from a non-free site cannot be played. Digital Rights Management (DRM)<br />
is a technology that supports the creation of content, the distribution and management of the content in an integrated<br />
and comprehensive way, including the protection of the rights and interests of the content provi<strong>de</strong>rs, the prevention of the<br />
illegal copying of contents, as well as managing billings and settlements.<br />
When moving to a photo, loading may take a few seconds. At this point, the loading icon will appear at the screen.<br />
If more than one MSC <strong>de</strong>vice is connected, some of them may not be recognized. If a <strong>de</strong>vice requires high power (more<br />
than 500mA or 5V), the USB <strong>de</strong>vice may not be supported.<br />
If an over-power warning message is displayed while you are connecting or using a USB <strong>de</strong>vice, the <strong>de</strong>vice may not be<br />
recognized or may malfunction.<br />
Using the Remote Control Button in Media Play Menu<br />
SUM Device<br />
Button<br />
Operations<br />
▲/▼/◄/►<br />
Move the cursor and select an item.<br />
Select the currently selected item. While playing a sli<strong>de</strong> show or music file:<br />
ENTERE<br />
- Pressing the ENTERE button during play pauses the play.<br />
- Pressing the ENTERE button during pause resumes the play.<br />
∂/∑<br />
Play or pause the Sli<strong>de</strong> Show, music.<br />
RETURN<br />
Return to the previous menu.<br />
TOOLS<br />
Run various functions from the Photo and Music menus.<br />
∫<br />
Stop the current sli<strong>de</strong> show or Music file.<br />
π/μ<br />
Jump to previous group/Jump to next group.<br />
INFO<br />
Show file information.<br />
MEDIA.P<br />
Exit Media Play mo<strong>de</strong>.<br />
< P >, EXIT, TV Stop Media Play mo<strong>de</strong> and Returns to TV mo<strong>de</strong>.<br />
USB Drive<br />
PHOTO<br />
Music<br />
TV Si<strong>de</strong> Panel<br />
SUM<br />
851.86<strong>MB</strong>/993.02<strong>MB</strong> Free<br />
Setup<br />
R Return<br />
English - 28
¦<br />
Media Play Function<br />
This function enables you to view and listen to photo and/or music files saved on a USB Mass Storage Class (MSC) <strong>de</strong>vice.<br />
N It might not work properly with unlicensed multimedia files.<br />
Entering the Media Play (USB) Menu<br />
1. Press the MENU button. Press the ▲ or ▼ button to select Application, then<br />
press the ENTERE button.<br />
INFO<br />
PHOTO<br />
SUM<br />
851.86<strong>MB</strong>/993.02<strong>MB</strong> Free<br />
2. Press the ▲ or ▼ button to select Media Play (USB), then press the ENTERE<br />
button.<br />
N The Media Play (USB) menu is displayed.<br />
Photo<br />
Music<br />
Setup<br />
SUM Device<br />
R Return<br />
O<br />
Press the MEDIA.P button on the remote control to display the Media Play<br />
menu.<br />
AD<br />
O<br />
Press the SOURCE button on the remote control to view the source list.<br />
Then Press the ▲ or ▼ button to select USB.<br />
3. Press the Red button, then press the ▲ or ▼ button to select the USB Memory.<br />
Press the ENTERE button.<br />
N<br />
N<br />
This function differs <strong>de</strong>pending on the USB Memory.<br />
The selected USB <strong>de</strong>vice name appears at the bottom left of the screen.<br />
INFO<br />
4. Press the ◄ or ► button to select an icon (Photo, Music, Setup), then press the ENTERE button.<br />
N To exit Media Play mo<strong>de</strong>, press the MEDIA.P button on the remote control.<br />
Removing a USB Memory Device Safely<br />
You can remove the <strong>de</strong>vice safely from the TV.<br />
1. Press the TOOLS button in the Media Play file list screen, or while a Sli<strong>de</strong> Show<br />
or music is being played.<br />
AD<br />
1 2<br />
2. Press the ▲ or ▼ button to select Remove Safely, then press the ENTERE<br />
button.<br />
3. Remove the USB <strong>de</strong>vice from the TV.<br />
1231.jpg<br />
1232.jpg<br />
1233.jpg<br />
5/15<br />
1234.jpg<br />
Sli<strong>de</strong> Show<br />
Play Current Group<br />
Information<br />
Remove Safely<br />
1236.jpg 1237.jpg<br />
1235.jpg<br />
Screen Display<br />
../Photo/<br />
SUM Device Select T Tools R Upper Fol<strong>de</strong>r<br />
1 2<br />
1<br />
Group List Section<br />
c<br />
5/15<br />
File List Section<br />
1231.jpg 1232.jpg<br />
1236.jpg 1237.jpg<br />
1233.jpg<br />
1235.jpg<br />
1234.jpg<br />
2<br />
4<br />
../Photo/<br />
1File(s) Selected<br />
3 5<br />
SUM Device Select T Tools R Upper Fol<strong>de</strong>r<br />
Move to either ‘Group List Section’ or ‘File List Section’ using the Up and Down buttons. After selecting a section, press the ◄ or ►<br />
buttons to select an item.<br />
English - 29
1 View Groups: The sort group where the currently selected file is contained is highlighted.<br />
2 Currently selected file: The selected file is the file you can now control. Photo file are displayed as thumbnail images.<br />
3 Current Device: Shows the currently selected <strong>de</strong>vice name. Press the Red button to select a <strong>de</strong>vice.<br />
Red (Device) button: Selects a connected <strong>de</strong>vice.<br />
4 Item Selection Information: Shows the number of files that are selected by pressing the Yellow button.<br />
5 Help Items<br />
Yellow (Select) button: Selects file from the file list. Selected files are marked with a symbol c. Press the Yellow button<br />
again to cancel a file selection.<br />
TOOLS (Tools) button: Displays the option menus. (The option menu changes according to the current status.)<br />
¦<br />
Photo List Option Menu<br />
1. Press the MEDIA.P button.<br />
2. Press the ◄ or ► button to select Photo, then press the ENTERE button.<br />
3. Press the ◄ or ► button to select the <strong>de</strong>sired photo file.<br />
N Selecting Multiple Photos<br />
<br />
<br />
<br />
Press the ◄ or ► button to select the <strong>de</strong>sired photo file. Then press the<br />
Yellow button.<br />
Repeat the above operation to select multiple photo files.<br />
The mark c appears to the selected photo file.<br />
4. Press the TOOLS button.<br />
N The option menu changes according to the current status.<br />
1 2<br />
5/15 Sli<strong>de</strong> Show<br />
Play Current Group<br />
Information<br />
Remove Safely<br />
1231.jpg 1232.jpg<br />
1236.jpg 1237.jpg<br />
1233.jpg<br />
1235.jpg<br />
1234.jpg<br />
../Photo/<br />
SUM Device Select T Tools R Upper Fol<strong>de</strong>r<br />
❑<br />
❑<br />
❑<br />
❑<br />
Sli<strong>de</strong> Show<br />
Using this menu, you can play a Sli<strong>de</strong>Show using the photo files on the USB memory <strong>de</strong>vice.<br />
Play Current Group<br />
Using this menu, you can play a Sli<strong>de</strong>Show using only the photo files in the currently selected sorting group.<br />
Deselect All (When at least one file is selected)<br />
You can <strong>de</strong>select all files.<br />
N The c mark indicating the corresponding file is selected is hid<strong>de</strong>n.<br />
Information<br />
The photo file information including the name, the size, the resolution, the date modified and the path is displayed.<br />
N<br />
O<br />
You can view the information of photo files during a Sli<strong>de</strong>Show using the same procedures.<br />
Press the INFO button to viewing the information.<br />
❑<br />
Remove Safely<br />
You can remove the <strong>de</strong>vice safely from the TV.<br />
INFO<br />
AD<br />
English - 30
¦<br />
Viewing a Photo or Sli<strong>de</strong> Show<br />
Viewing a Sli<strong>de</strong> Show<br />
1. Press the ▼ button to select the File List Section.<br />
2. Press the TOOLS button.<br />
3. Press the ▲ or ▼ button to select Sli<strong>de</strong> Show, then press the ENTERE button.<br />
N All files in the File List Section will be used for the Sli<strong>de</strong> Show.<br />
1 2<br />
5/15 Sli<strong>de</strong> Show<br />
Play Current Group<br />
Information<br />
Remove Safely<br />
1231.jpg 1232.jpg<br />
1236.jpg 1237.jpg<br />
1233.jpg<br />
1235.jpg<br />
1234.jpg<br />
../Photo/ INFO<br />
SUM Device Select T Tools R Upper Fol<strong>de</strong>r<br />
N<br />
N<br />
N<br />
During the sli<strong>de</strong> show, files are displayed in or<strong>de</strong>r from the currently shown file.<br />
The Sli<strong>de</strong> Show progresses in the or<strong>de</strong>r sorted in the File List Section.<br />
Music files can be automatically played during the Sli<strong>de</strong> Show if the Background<br />
Music is set to On.<br />
▶ Normal<br />
1234.jpg 580x765 2009/01/02 5/15<br />
O<br />
While a photo list is displayed, press the ∂(Play)/ENTERE button on the<br />
remote control to start sli<strong>de</strong> show.<br />
SUM<br />
E Pause AD◀▶ Previous / Next T Tools R Return<br />
N<br />
Sli<strong>de</strong>Show Control Buttons<br />
Button<br />
Operations<br />
ENTERE Play/Pause the Sli<strong>de</strong> Show.<br />
∂<br />
Play the Sli<strong>de</strong> Show.<br />
∑<br />
Pause the Sli<strong>de</strong> Show.<br />
∫<br />
Exit Sli<strong>de</strong> Show and return to the photo list.<br />
π/μ Change the Sli<strong>de</strong>Show playing speed.<br />
TOOLS<br />
Run various functions from the Photo menus.<br />
Playing current group<br />
1. Press the ▲ button to move to the Group List Section.<br />
2. Select a group using the ◄ and ► buttons.<br />
3. Press the ∂ (Play) button. A sli<strong>de</strong>show begins with the files of the selected<br />
group.<br />
1 2<br />
5/15<br />
●<br />
Alternatively<br />
1. Select the files In the File List Section, contained the <strong>de</strong>sired group.<br />
N To move to the previous/next group, press the π (REW) or µ (FF)<br />
button.<br />
2. Press the TOOLS button.<br />
3. Press the ▲ or ▼ button to select Play Current Group, then press the ENTERE button.<br />
N Only the photos in the sorting group including the selected files will be used for the Sli<strong>de</strong> Show.<br />
To perform a Sli<strong>de</strong> Show with only the selected files<br />
1. Press the ▼ button to select the File List Section.<br />
2. Press the ◄ or ► button to select the <strong>de</strong>sired photo in the File List Section.<br />
3. Press the Yellow button.<br />
4. Repeat the above operation to select multiple photos.<br />
N<br />
N<br />
N<br />
The c mark appears to the left of the selected photo.<br />
If you select one file, the Sli<strong>de</strong> Show will not be performed.<br />
To <strong>de</strong>select all selected files, press the TOOLS button and select Deselect All.<br />
5. Press the ∂ (Play)/ENTERE button.<br />
N The selected files will be used for the Sli<strong>de</strong> Show.<br />
1231.jpg<br />
1232.jpg<br />
../Photo/<br />
1233.jpg<br />
1234.jpg<br />
1235.jpg<br />
1236.jpg<br />
1237.jpg<br />
SUM Device Select T Tools R Upper Fol<strong>de</strong>r<br />
English - 31
● Alternatively<br />
1. In the File List Section, press the Yellow buttons to select the <strong>de</strong>sired photos.<br />
2. Press the TOOLS button.<br />
3. Press the ▲ or ▼ button to select Sli<strong>de</strong> Show, then press the ENTERE button.<br />
N The selected files will be used for the Sli<strong>de</strong> Show.<br />
¦<br />
❑<br />
❑<br />
❑<br />
❑<br />
❑<br />
■<br />
■<br />
❑<br />
❑<br />
❑<br />
Sli<strong>de</strong> Show Option Menu<br />
1. During a sli<strong>de</strong> show (or when viewing a photo), press the TOOLS button to set the<br />
option.<br />
2. Press the ▲ or ▼ button to select the <strong>de</strong>sired option, then press the ENTERE<br />
button.<br />
Stop Sli<strong>de</strong> Show / Start Sli<strong>de</strong> Show<br />
You can start or stop a Sli<strong>de</strong>Show.<br />
Sli<strong>de</strong> Show Speed → Slow / Normal / Fast<br />
You can select the sli<strong>de</strong> show speed.<br />
N<br />
N<br />
This function is available only during a sli<strong>de</strong> show.<br />
You can also change the speed of the Sli<strong>de</strong> Show by pressing the π (REW) or μ (FF) button during the Sli<strong>de</strong> Show.<br />
Rotate<br />
You can rotate photos saved on a USB memory <strong>de</strong>vice.<br />
N<br />
N<br />
N<br />
Zoom<br />
Whenever you press the ◄ button, it rotates by 270˚, 180˚, 90˚, and 0˚.<br />
Whenever you press the ► button, it rotates by 90˚, 180˚, 270˚, and 0˚.<br />
The rotated file is not saved.<br />
You can magnify photos saved on a USB memory <strong>de</strong>vice. (x1 → x2 → x4)<br />
N To move the enlarged photo image, press the ENTERE button, then press the ▲/▼/◄/► buttons. Note that when the<br />
enlarged picture is smaller than the original screen size, the location change function doesn’t work.<br />
N The enlarged file is not saved.<br />
Background Music<br />
You can select background music when watching a Sli<strong>de</strong> Show.<br />
N To use this feature, there must be music and photo files stored on the USB <strong>de</strong>vice.<br />
Background Music → Off / On<br />
● Off: Background music is not played.<br />
● On: When the background music is available, if you select On, the music is played back.<br />
Select Music File (0 File(s) Selected)<br />
Only the selected music file is set as the background music.<br />
Picture Setting / Sound Setting<br />
You can select the picture and sound settings.<br />
Information<br />
The photo file information is displayed.<br />
Remove Safely<br />
You can remove the <strong>de</strong>vice safely from the TV.<br />
Tools<br />
Stop Sli<strong>de</strong> Show<br />
Sli<strong>de</strong> Show Speed : Normal<br />
Rotate<br />
Zoom<br />
Background Music<br />
Picture Setting<br />
Sound Setting<br />
Information<br />
Remove Safely<br />
U Move E Enter e Exit<br />
English - 32
¦<br />
Music List Option Menu<br />
1. Press the MEDIA.P button.<br />
2. Press the ◄ or ► button to select Music, then press the ENTERE button.<br />
3. Press the ◄ or ► button to select the <strong>de</strong>sired Music file.<br />
N Selecting Multiple Music Files<br />
<br />
<br />
<br />
Press the ◄ or ► button to select the <strong>de</strong>sired music file. Then press the<br />
Yellow button.<br />
Repeat the above operation to select multiple music files.<br />
The mark c appears to the selected music file.<br />
4. Press the TOOLS button.<br />
N The option menu changes according to the current status.<br />
4<br />
5 1 2 3<br />
Energetic 3/37 Play Current Group<br />
Glen Hans Information<br />
Once Ost<br />
2007<br />
Remove Safely<br />
Soundtrack<br />
Lies Want Me<br />
Gold Shine<br />
Way<br />
HaHaHa<br />
I Love You<br />
../Music/<br />
SUM Device Select T Tools R Upper Fol<strong>de</strong>r<br />
❑<br />
❑<br />
❑<br />
❑<br />
Play Current Group<br />
Using this menu, you can only play music files in the currently selected sorting group.<br />
Deselect All (When at least one file is selected)<br />
You can <strong>de</strong>select all files.<br />
N The c mark indicating the corresponding file is selected is hid<strong>de</strong>n.<br />
Information<br />
The music file information including the name, the size, the date modified and the path is displayed.<br />
N<br />
O<br />
You can view the music file information during Play Current Group using the same procedures.<br />
Press the INFO button to viewing the information.<br />
Remove Safely<br />
You can remove the <strong>de</strong>vice safely from the TV.<br />
INFO<br />
AD<br />
English - 33
¦<br />
Playing Music<br />
Playing a music file<br />
1. Press the ▼ button to select the File List Section.<br />
2. Press the ◄ or ► button to select a music file to be played.<br />
3. Press the ∂ (Play)/ENTERE button.<br />
N This menu only shows files with the MP3 file extension. Files with other<br />
file extensions are not displayed, even if they are saved on the same USB<br />
<strong>de</strong>vice.<br />
N<br />
N<br />
The selected file is displayed at the top with its playing time.<br />
To adjust the music volume, press the volume button on the remote control.<br />
To mute the sound, press the MUTE button on the remote control.<br />
SUM<br />
E Pause ◀▶ Previous / Next T Tools R Return<br />
N If the sound is odd when playing MP3 files, adjust the Equalizer and SRS TruSurround HD in the Sound menu. (An<br />
over-modulated MP3 file may cause a sound problem.)<br />
N The playing duration of a music file may be displayed as ‘00:00:00’ if its playing time information is not found at the start of<br />
the file.<br />
N π (REW) or μ (FF) buttons do not function during play.<br />
N Music Play Control Buttons<br />
Button<br />
ENTERE<br />
∂<br />
∑<br />
∫<br />
TOOLS<br />
Operations<br />
Play/Pause the music file.<br />
Play the music file<br />
Pause the music file<br />
Exit play mo<strong>de</strong> and return to the music list.<br />
Run various functions from the Music menus.<br />
▶ 00:00:04 / 00:04:04 3/37<br />
Way<br />
I Love You<br />
HaHaHa<br />
N<br />
Music function information icon<br />
p<br />
When all music files in the fol<strong>de</strong>r (or the selected file) are repeated. Repeat Mo<strong>de</strong> is On.<br />
q<br />
When all music files in the fol<strong>de</strong>r (or the selected file) are played once. Repeat Mo<strong>de</strong> is Off.<br />
Playing the music group<br />
1. Press the ▲ button to move to the Group List Section.<br />
2. Select a group using the ◄ and ► buttons.<br />
3. Press the ∂ (Play) button. The files of the selected group will start playing.<br />
●<br />
Alternatively<br />
1. Select the files In the File List Section, contained the <strong>de</strong>sired group.<br />
N To move to the previous/next group, press the π (REW) or µ (FF) button.<br />
2. Press the TOOLS button.<br />
3. Press the ▲ or ▼ button to select Play Current Group, then press the ENTERE button.<br />
N The music files in the sorting group including the selected file are played.<br />
Playing the selected music files<br />
1. Press the ▼ button to select the File List Section.<br />
2. Press the ◄ or ► button to select the <strong>de</strong>sired music file.<br />
3. Press the Yellow button.<br />
4. Repeat the above operation to select multiple music files.<br />
N<br />
N<br />
The c appears to the left of the selected music file.<br />
To <strong>de</strong>select all selected files, press the TOOLS button and select Deselect All.<br />
5. Press the ∂ (Play)/ENTERE button.<br />
N The selected files will be played.<br />
English - 34
¦<br />
Music Play option Menu<br />
Music Play Option Menu<br />
❑<br />
❑<br />
❑<br />
❑<br />
Repeat Mo<strong>de</strong> → On / Off<br />
You can play music files repeatedly.<br />
Picture Setting / Sound Setting<br />
You can configure the picture and sound settings.<br />
Information<br />
The music file information is displayed.<br />
Remove Safely<br />
You can remove the <strong>de</strong>vice safely from the TV.<br />
Tools<br />
Repeat Mo<strong>de</strong> ◀ On ▶<br />
Picture Setting<br />
Sound Setting<br />
Information<br />
Remove Safely<br />
U Move L Adjust e Exit<br />
¦<br />
Using the Setup Menu<br />
Setup displays the user settings of the Media Play menu.<br />
1. Press the MEDIA.P button.<br />
SUM<br />
851.86<strong>MB</strong>/993.02<strong>MB</strong> Free<br />
2. Press the ◄ or ► button to select Setup, then press the ENTERE button.<br />
3. Press the ▲ or ▼ button to select the <strong>de</strong>sired option.<br />
SETUP<br />
4. Press the ◄ or ► button to select the option.<br />
N<br />
To exit Media Play mo<strong>de</strong>, press the MEDIA.P button on the remote control.<br />
■<br />
Music Repeat Mo<strong>de</strong> → On / Off<br />
Select to repeatedly play music files.<br />
Photo<br />
SUM Device<br />
Music<br />
Setup<br />
e Exit<br />
■<br />
■<br />
Screen Saver Run Time → 2 hours / 4 hours / 8 hours<br />
Select to set the waiting time before the screen saver appears.<br />
Information<br />
Select to viewing the information of the connected <strong>de</strong>vice.<br />
Music Repeat Mo<strong>de</strong> ◀ On ▶<br />
Screen Saver Run Time : 2 hours<br />
Information<br />
Remove Safely<br />
■<br />
Remove Safely<br />
You can remove the <strong>de</strong>vice safely from the TV.<br />
SUM Device<br />
U Move L Adjust R Return<br />
English - 35
ANYNET+<br />
¦<br />
Connecting Anynet+ Devices<br />
What is Anynet+?<br />
Anynet+ is a function that enables you to control all connected <strong>Samsung</strong> <strong>de</strong>vices that support Anynet+ with your <strong>Samsung</strong> TV’s<br />
remote. The Anynet+ system can be used only with <strong>Samsung</strong> <strong>de</strong>vices that have the Anynet+ feature. To be sure your <strong>Samsung</strong><br />
<strong>de</strong>vice has this feature, check if there is an Anynet+ logo on it.<br />
To connect to a TV<br />
TV<br />
Anynet + Device 1<br />
Anynet + Device 2 Anynet + Device 3 Anynet + Device 4<br />
HDMI 1.3 Cable<br />
HDMI 1.3 Cable<br />
HDMI 1.3 Cable<br />
HDMI 1.3 Cable<br />
1. Connect the HDMI IN (1, 2, 3(DVI) or 4) jack on the TV and the HDMI OUT jack of the corresponding Anynet+ <strong>de</strong>vice using an<br />
HDMI cable.<br />
To connect to Home Theatre<br />
TV<br />
Home Theatre<br />
Anynet + Device 1<br />
HDMI 1.3 Cable<br />
Optical Cable<br />
HDMI 1.3 Cable<br />
Anynet + Device 2 Anynet + Device 3 Anynet + Device 4<br />
HDMI 1.3 Cable<br />
HDMI 1.3 Cable<br />
HDMI 1.3 Cable<br />
1. Connect the HDMI IN (1, 2, 3(DVI) or 4) jack on the TV and the HDMI OUT jack of the corresponding Anynet+ <strong>de</strong>vice using an<br />
HDMI cable.<br />
2. Connect the HDMI IN jack of the home theatre and the HDMI OUT jack of the corresponding Anynet+ <strong>de</strong>vice using an HDMI<br />
cable.<br />
N<br />
N<br />
N<br />
N<br />
N<br />
N<br />
Connect the Optical cable between the DIGITAL AUDIO OUT (OPTICAL) jack on your TV and the Digital Audio Input on<br />
the Home Theatre.<br />
When following the connection above, the Optical jack only outputs 2 channel audio. You will only hear sound from the<br />
Home Theatre’s Front Left and Right speakers and the subwoofer. If you want to hear 5.1 channel audio, connect the<br />
DIGITAL AUDIO OUT (OPTICAL) jack on the DVD / Satellite Box (ie Anynet Device 1 or 2) directly to the Amplifier or<br />
Home Theatre, not the TV.<br />
Connect only one Home Theatre.<br />
You can connect an Anynet+ <strong>de</strong>vice using the HDMI 1.3 cable. Some HDMI cables may not support Anynet+ functions.<br />
Anynet+ works when the AV <strong>de</strong>vice supporting Anynet+ is in the Standby or On status.<br />
Anynet+ supports up to 12 AV <strong>de</strong>vices in total. Note that you can connect up to 3 <strong>de</strong>vices of the same type.<br />
English - 36
¦<br />
Setting Up Anynet+<br />
❑<br />
T<br />
Setup<br />
Press the TOOLS button to display the Tools menu. You can also display Anynet+ menu by<br />
selecting Tools → Anynet+ (HDMI-CEC).<br />
Application<br />
Media Play (USB)<br />
Anynet+ (HDMI-CEC)<br />
■<br />
Anynet+ (HDMI-CEC) → Off / On<br />
To use the Anynet+ Function, Anynet+ (HDMI-CEC) must be set to On.<br />
N When the Anynet+ (HDMI-CEC) function is disabled, all the Anynet+ related operations are<br />
<strong>de</strong>activated.<br />
Setup<br />
Anynet+ (HDMI-CEC) : On ▶<br />
Auto Turn Off<br />
: Yes<br />
■<br />
¦<br />
Auto Turn Off → No / Yes<br />
Setting an Anynet+ Device to turn Off automatically when the TV is turned Off.<br />
N<br />
N<br />
The active source on the TV remote must be set to TV to use the Anynet+ function.<br />
If you set Auto Turn Off to Yes, connected external <strong>de</strong>vices are also turned off when the<br />
TV is turned off. If an external <strong>de</strong>vice is still recording, it may or may not turn off.<br />
Switching between Anynet+ Devices<br />
U Move E Enter R Return<br />
Setup<br />
Anynet+ (HDMI-CEC)<br />
: On<br />
Auto Turn Off : Yes ▶<br />
U Move E Enter R Return<br />
1. Press the TOOLS button. Press the ENTERE button to select Anynet+ (HDMI-CEC).<br />
2. Press the ▲ or ▼ button to select Device List, then press the ENTERE button.<br />
N<br />
N<br />
Anynet+ <strong>de</strong>vices connected to the TV are listed.<br />
If you cannot find a <strong>de</strong>vice you want, press the red button to scan for <strong>de</strong>vices.<br />
3. Press the ▲ or ▼ button to select a particular <strong>de</strong>vice and press the ENTERE button. It<br />
is switched to the selected <strong>de</strong>vice.<br />
N Only when you set Anynet+ (HDMI-CEC) to On in the Application menu, the Device<br />
List menu appears.<br />
N<br />
N<br />
N<br />
N<br />
N<br />
Switching to the selected <strong>de</strong>vices may take up to 2 minutes. You cannot cancel the<br />
operation during the switching operation.<br />
The time required to scan for <strong>de</strong>vices is <strong>de</strong>termined by the number of connected <strong>de</strong>vices.<br />
When the <strong>de</strong>vice scan is complete, the number of <strong>de</strong>vices found are not displayed.<br />
Although the TV automatically searches the <strong>de</strong>vice list when the TV is turned on via the power button, <strong>de</strong>vices connected to<br />
the TV may not always be automatically displayed in the <strong>de</strong>vice list. Press the red button to search for the connected <strong>de</strong>vice.<br />
If you have selected external input mo<strong>de</strong> by pressing the SOURCE button, you cannot use the Anynet+ function. Make sure to<br />
switch to an Anynet+ <strong>de</strong>vice by using the Device List.<br />
Anynet+ Menu<br />
The Anynet+ menu changes <strong>de</strong>pending on the type and status of the Anynet+ <strong>de</strong>vices connected to the TV.<br />
N<br />
Anynet+ Menu<br />
View TV<br />
Device List<br />
(<strong>de</strong>vice_name) MENU<br />
(<strong>de</strong>vice_name) INFO<br />
Recording: (*recor<strong>de</strong>r)<br />
Stop Recording: (*recor<strong>de</strong>r)<br />
Receiver<br />
View TV<br />
Device List<br />
Recording: DVDR<br />
DVDR MENU<br />
DVDR INFO<br />
Receiver: Off<br />
Setup<br />
Description<br />
Anynet+ mo<strong>de</strong> changes to TV broadcast mo<strong>de</strong>.<br />
Shows the Anynet+ <strong>de</strong>vice list.<br />
Shows the connected <strong>de</strong>vice menus. E.g. If a DVD recor<strong>de</strong>r is connected, the disc<br />
menu of the DVD recor<strong>de</strong>r will appear.<br />
Shows the play menu of the connected <strong>de</strong>vice. E.g. If a DVD recor<strong>de</strong>r is connected,<br />
the play menu of the DVD recor<strong>de</strong>r will appear.<br />
Starts recording immediately using the recor<strong>de</strong>r. (This is only available for <strong>de</strong>vices that<br />
support the recording function.)<br />
Stops recording.<br />
Sound is played through the receiver.<br />
If more than one recording <strong>de</strong>vice is connected, they are displayed as (*recor<strong>de</strong>r) and if only one recording <strong>de</strong>vice is<br />
connected, it will be represented as (*<strong>de</strong>vice_name).<br />
U Move E Enter R Return<br />
English - 37
TV Remote Control Buttons Available in Anynet+ Mo<strong>de</strong><br />
N<br />
N<br />
N<br />
N<br />
N<br />
N<br />
Device Type Operating Status Available Buttons<br />
Anynet+ Device<br />
Device with built-in<br />
Tuner<br />
After switching to the <strong>de</strong>vice, when the<br />
menu of the corresponding <strong>de</strong>vice is<br />
displayed on the screen.<br />
After switching to the <strong>de</strong>vice, while playing<br />
a file.<br />
After switching to the <strong>de</strong>vice, when you<br />
are watching a TV program.<br />
Numeric buttons<br />
▲/▼/◄/►/ ENTERE buttons<br />
Colour buttons / EXIT button<br />
π(Backward search) / μ(Forward search) /<br />
∫(Stop) / ∂(Play) / ∑(Pause)<br />
P > / P < button<br />
Audio Device When Receiver is activated. Y / MUTE button<br />
The Anynet+ function only works when the active source on the TV remote control is set to TV.<br />
The ∏ button works only while in the recordable state.<br />
You cannot control Anynet+ <strong>de</strong>vices using the buttons on the TV. You can control Anynet+ <strong>de</strong>vices only using the TV remote<br />
control.<br />
The TV remote control may not work un<strong>de</strong>r certain conditions. If this occurs, reselect the Anynet+ <strong>de</strong>vice.<br />
The Anynet+ functions do not operate with other manufacturers’ products.<br />
The π, μ operations may differ <strong>de</strong>pending on the <strong>de</strong>vice.<br />
¦<br />
Recording<br />
You can make a recording of a TV program using a <strong>Samsung</strong> recor<strong>de</strong>r.<br />
1. Press the TOOLS button. Press the ENTERE button to select Anynet+ (HDMI-CEC).<br />
2. Press the ▲ or ▼ button to select Recording Immediately and press the ENTERE<br />
button. Recording begins.<br />
N When there is more than one recording <strong>de</strong>vice<br />
When multiple recording <strong>de</strong>vices are connected, the recording <strong>de</strong>vices are listed.<br />
Press the ▲ or ▼ button to select a recording <strong>de</strong>vice and press the ENTERE<br />
button. Recording begins.<br />
N When the recording <strong>de</strong>vice is not displayed select Device List and press the Red<br />
button to search <strong>de</strong>vices<br />
3. Press the EXIT button to exit.<br />
N<br />
N<br />
N<br />
View TV<br />
Device List<br />
Recording: DVDR<br />
DVDR MENU<br />
DVDR INFO<br />
Receiver: Off<br />
Setup<br />
U Move E Enter R Return<br />
You can record the source streams by selecting Recording: (<strong>de</strong>vice_name).<br />
Pressing the ∏ button will record whatever you are currently watching. If you are watching vi<strong>de</strong>o from another <strong>de</strong>vice,<br />
the vi<strong>de</strong>o from the <strong>de</strong>vice is recor<strong>de</strong>d.<br />
Before recording, check whether the antenna jack is properly connected to the recording <strong>de</strong>vice. To properly connect an<br />
antenna to a recording <strong>de</strong>vice, refer to the recording <strong>de</strong>vice’s users manual.<br />
¦<br />
Listening through a Receiver (Home theatre)<br />
You can listen to sound through a receiver instead of the TV speaker.<br />
1. Press the TOOLS button. Press the ENTERE button to select Anynet+ (HDMI-CEC).<br />
2. Press the ▲ or ▼ button to select Receiver. Press the ◄ or ► button to select On or Off.<br />
3. Press the EXIT button to exit.<br />
N<br />
N<br />
N<br />
N<br />
If your receiver supports audio only, it may not appear in the <strong>de</strong>vice list.<br />
The receiver will work when you have properly connected the optical in jack of the<br />
receiver to the DIGITAL AUDIO OUT (OPTICAL) jack of the TV.<br />
When the receiver (home theatre) is set to On, you can hear sound output from<br />
the TV’s Optical jack. When the TV is displaying a DTV(air) signal, the TV will send<br />
View TV<br />
Device List<br />
Recording: DVDR<br />
DVDR MENU<br />
DVDR INFO<br />
Receiver: Off<br />
Setup<br />
U Move E Enter R Return<br />
out 5.1 channel sound to the Home Theatre receiver. When the source is a digital component such as a DVD and is<br />
connected to the TV via HDMI, only 2 channel sound will be heard from the Home Theatre receiver.<br />
If there is a power interruption to the TV when the Receiver is set to On (by disconnecting the power cord or a power<br />
failure), the Speaker Select may be set to External Speaker when you turn the TV on again.<br />
English - 38
¦ Troubleshooting for Anynet+<br />
Problem<br />
Anynet+ does not work.<br />
I want to start Anynet+.<br />
I want to exit Anynet+.<br />
The message<br />
‘Connecting to Anynet+<br />
<strong>de</strong>vice...’ appears on the<br />
screen.<br />
The Anynet+ <strong>de</strong>vice does<br />
not play.<br />
The connected <strong>de</strong>vice is<br />
not displayed.<br />
The TV program cannot<br />
be recor<strong>de</strong>d.<br />
The TV sound is not<br />
output through the<br />
receiver.<br />
●<br />
●<br />
●<br />
●<br />
●<br />
●<br />
●<br />
●<br />
●<br />
●<br />
●<br />
●<br />
●<br />
●<br />
●<br />
●<br />
●<br />
●<br />
●<br />
●<br />
●<br />
●<br />
●<br />
●<br />
●<br />
●<br />
Possible Solution<br />
Check if the <strong>de</strong>vice is an Anynet+ <strong>de</strong>vice. The Anynet+ system supports Anynet+ <strong>de</strong>vices<br />
only.<br />
Connect only one receiver (home theatre).<br />
Check if the Anynet+ <strong>de</strong>vice power cord is properly connected.<br />
Check the Anynet+ <strong>de</strong>vice’s Vi<strong>de</strong>o/Audio/HDMI 1.3 cable connections.<br />
Check whether Anynet+ (HDMI-CEC) is set to On in the Anynet+ setup menu.<br />
Check whether the TV remote control is in TV mo<strong>de</strong>.<br />
Check whether it is Anynet+ exclusive remote control.<br />
Anynet+ doesn’t work in certain situations. (Searching channels, Operating Media Play,<br />
Plug & Play, etc.)<br />
When connecting or removing the HDMI 1.3 cable, please make sure to search <strong>de</strong>vices<br />
again or turn your TV off and on again.<br />
Check if the Anynet+ Function of Anynet+ <strong>de</strong>vice is set on.<br />
Check if the Anynet+ <strong>de</strong>vice is properly connected to the TV and check if the Anynet+<br />
(HDMI-CEC) is set to On in the Anynet+ Setup menu.<br />
Press the TV button on the TV remote control to switch to TV. Then press the TOOLS button<br />
to show the Anynet+ menu and select a menu you want.<br />
Select View TV in the Anynet+ menu.<br />
Press the SOURCE button on the TV remote control and select a <strong>de</strong>vice other than Anynet+<br />
<strong>de</strong>vices.<br />
Press P >/
RECOMMENDATIONS<br />
¦<br />
Teletext Feature<br />
Most television stations provi<strong>de</strong> written information services via Teletext. The in<strong>de</strong>x page of the Teletext service gives you<br />
information on how to use the service. In addition, you can select various options to suit your requirements by using the remote<br />
control buttons.<br />
N For Teletext information to be displayed correctly, channel reception must be stable. Otherwise, information may be missing or<br />
some pages may not be displayed.<br />
1 0 (mo<strong>de</strong>)<br />
Press to select the Teletext mo<strong>de</strong><br />
(LIST/ FLOF). If you press it in<br />
the LIST mo<strong>de</strong>, it switches into<br />
the List save mo<strong>de</strong>. In the List<br />
save mo<strong>de</strong>, you can save Teletext<br />
page into list using the 8(store)<br />
button.<br />
2 5 (reveal)<br />
Used to display the hid<strong>de</strong>n text<br />
(answers to quiz games, for<br />
example). To display normal<br />
screen, press it again.<br />
3 4 (size)<br />
Press to display the double-size<br />
letters in the upper half of the<br />
screen. For lower half of the<br />
screen, press it again. To display<br />
normal screen, press it once<br />
again.<br />
4 8 (store)<br />
Used to store the Teletext pages.<br />
6 / (Teletext on/mix)<br />
Press to activate Teletext mo<strong>de</strong> after<br />
selecting the channel providing the<br />
Teletext service. Press it twice to<br />
overlap the Teletext with the current<br />
broadcasting screen.<br />
7 : (exit)<br />
Exit from the Teletext display.<br />
8 1 (sub-page)<br />
Used to display the available sub-page.<br />
9 2 (page up)<br />
Used to display the next Teletext page.<br />
0 3 (page down)<br />
Used to display the previous Teletext<br />
page.<br />
! 9 (hold)<br />
Used to hold the display on a given<br />
page if the selected page is linked with<br />
several secondary pages which follow<br />
on automatically. To resume, press it<br />
again.<br />
1<br />
2<br />
3<br />
4<br />
5<br />
6<br />
INFO<br />
7<br />
8<br />
9<br />
0<br />
!<br />
@<br />
#<br />
5 Colour buttons (red/green/yellow/<br />
blue)<br />
If the FASTEXT system is used<br />
by a broadcasting company, the<br />
different topics covered on a<br />
Teletext page are colour-co<strong>de</strong>d<br />
and can be selected by pressing<br />
the coloured buttons. Press<br />
one of them corresponding<br />
to the required. The page is<br />
displayed with other coloured<br />
information that can be selected<br />
in the same way. To display the<br />
previous or next page, press the<br />
corresponding coloured button.<br />
@ 6 (in<strong>de</strong>x)<br />
Used to display the in<strong>de</strong>x (contents)<br />
page at any time while you are viewing<br />
Teletext.<br />
# 7 (cancel)<br />
Used to display the broadcast when<br />
searching for a page.<br />
AD<br />
N<br />
You can change Teletext pages by pressing the numeric buttons on the remote control.<br />
English - 40
The Teletext pages are organized according to six categories:<br />
Part<br />
A<br />
B<br />
C<br />
D<br />
E<br />
F<br />
Contents<br />
Selected page number.<br />
Broadcasting channel i<strong>de</strong>ntity.<br />
Current page number or search indications.<br />
Date and time.<br />
Text.<br />
Status information.<br />
FASTEXT information.<br />
N<br />
N<br />
N<br />
N<br />
N<br />
O<br />
Teletext information is often divi<strong>de</strong>d between several pages displayed in sequence, which can be accessed by:<br />
<br />
<br />
<br />
Entering the page number<br />
Selecting a title in a list<br />
Selecting a coloured heading (FASTEXT system)<br />
Teletext level supported by the TV is version 2.5 which is capable of displaying additional graphics or text.<br />
Depending upon the transmission, blank si<strong>de</strong> panels can occur when displaying Teletext.<br />
In these cases, additional graphics or text is not transmitted.<br />
Ol<strong>de</strong>r TV’s which do not support version 2.5 are not capable of displaying any additional graphics or text, regardless of the<br />
Teletext transmission.<br />
Press the TV button to exit from the Teletext display.<br />
¦<br />
Installing the Stand<br />
N<br />
Preset: Place the Gui<strong>de</strong> Stand and Cover Neck onto the stand and fasten it using the<br />
screws. (Depending on the mo<strong>de</strong>l)<br />
Back<br />
INFO<br />
Front<br />
1. Attach your LCD TV to the stand.<br />
N<br />
N<br />
N<br />
Two or more people should carry the TV.<br />
Make sure to distinguish between the front and back of the stand when assembling<br />
them.<br />
To make sure the TV is installed on the stand at a proper level, do not apply excess<br />
downward pressure to the upper left of right si<strong>de</strong>s of the TV.<br />
2. Fasten screws at position 1 and then fasten screws at position 2.<br />
N Stand the product up and fasten the screws. If you fasten the screws with the LCD<br />
TV placed down, it may lean to one si<strong>de</strong>.<br />
1<br />
2<br />
AD<br />
English - 41
¦<br />
Disconnecting the Stand<br />
1. Remove screws from the back of the TV.<br />
2. Separate the stand from the TV.<br />
N Two or more people should carry the TV.<br />
3. Cover the bottom hole with the cover.<br />
¦<br />
Installing the Wall Mount Kit<br />
Wall mount items (sold separately) allow you to mount the TV on the wall.<br />
For <strong>de</strong>tailed information on installing the wall mount, see the instructions provi<strong>de</strong>d with the<br />
Wall Mount items. Contact a technician for assistance when installing the wall mounted<br />
bracket.<br />
<strong>Samsung</strong> Electronics is not responsible for any damage to the product or injury to yourself or<br />
others if you elect to install the TV on your own.<br />
Do not install your Wall Mount Kit while your TV is turned on. It may result in personal<br />
injury due to electric shock.<br />
¦<br />
Assembling the Cables<br />
Enclose the cables in the Hol<strong>de</strong>r-Wire Cable so that the cables are not visible through the<br />
transparent stand.<br />
¦<br />
Anti-Theft Kensington Lock<br />
The Kensington Lock is a <strong>de</strong>vice used to physically fix the system when using it in a public<br />
place. The appearance and locking method may differ from the illustration <strong>de</strong>pending on the<br />
manufacturer.<br />
Refer to the manual provi<strong>de</strong>d with the Kensington Lock for proper use.<br />
N<br />
N<br />
The locking <strong>de</strong>vice has to be purchased separately.<br />
The location of the Kensington Lock may be different <strong>de</strong>pending on its mo<strong>de</strong>l.<br />
1. Insert the locking <strong>de</strong>vice into the Kensington slot on the LCD TV (1) and turn it in the<br />
locking direction (2).<br />
2. Connect the Kensington Lock cable (3).<br />
3. Fix the Kensington Lock to a <strong>de</strong>sk or a heavy stationary object.<br />
3<br />
2<br />
1<br />
<br />
English - 42
¦<br />
Securing the Installation Space<br />
Keep the required distances between the product and other objects (e.g. walls) to ensure proper ventilation.<br />
Failing to do so may result in fire or a problem with the product due to an increase in the internal temperature of the product.<br />
Install the product so the required distances shown in the figure are kept.<br />
N When using a stand or wall-mount, use parts provi<strong>de</strong>d by <strong>Samsung</strong> Electronics only.<br />
If you use parts provi<strong>de</strong>d by another manufacturer, it may result in a problem with the product or an injury due to the<br />
product falling.<br />
If you use parts provi<strong>de</strong>d by another manufacturer, it may result in a problem with the product or fire due to an increase in<br />
the internal temperature of the product due to poor ventilation.<br />
N The appearance may differ <strong>de</strong>pending on the product.<br />
When installing the product with a stand<br />
When installing the product with a wall-mount<br />
10 cm<br />
10 cm<br />
10 cm<br />
10 cm<br />
10 cm<br />
10 cm<br />
10 cm<br />
¦<br />
Securing the TV to the Wall<br />
Caution: Pulling, pushing, or climbing on the TV may cause the TV to fall. In particular, ensure your children do<br />
not hang over or <strong>de</strong>stabilize the TV; doing so may cause the TV to tip over, causing serious injuries or <strong>de</strong>ath.<br />
Follow all safety precautions provi<strong>de</strong>d on the inclu<strong>de</strong>d Safety Flyer. For ad<strong>de</strong>d stability, install the anti-fall <strong>de</strong>vice<br />
for safety purposes, as follows.<br />
■<br />
To avoid the TV from falling:<br />
1. Put the screws into the clamps and firmly fasten them onto the wall. Confirm that the<br />
screws have been firmly installed onto the wall.<br />
N<br />
N<br />
You may need additional material such as an anchor <strong>de</strong>pending on the type of wall.<br />
Since the necessary clamps, screws, and string are not supplied, please purchase<br />
these additionally.<br />
2. Remove the screws from the centre back of the TV, put the screws into the clamps, and<br />
then fasten the screws onto the TV again.<br />
N<br />
N<br />
<br />
<br />
Screws may not be supplied with the product. In this case, please purchase the<br />
screws of the following specifications.<br />
Screw Specifications<br />
For a 17 ~ 29 Inch LCD TV: M4 X L15<br />
For a 32 ~ 40 Inch LCD TV: M6 X L15<br />
Wall<br />
3. Connect the clamps fixed onto the TV and the clamps fixed onto the wall with a strong<br />
string and then tie the string tightly.<br />
N<br />
N<br />
N<br />
Install the TV near to the wall so that it does not fall backwards.<br />
It is safe to connect the string so that the clamps fixed on the wall are equal to or<br />
lower than the clamps fixed on the TV.<br />
Untie the string before moving the TV.<br />
4. Verify all connections are properly secured. Periodically check connections for any sign<br />
of fatigue for failure. If you have any doubt about the security of your connections, contact a professional installer.<br />
Wall<br />
English - 43
¦<br />
Troubleshooting: Before Contacting Service Personnel<br />
No sound or picture<br />
Normal picture but no sound<br />
Screen is black and power<br />
indicator light blinks steadily<br />
No picture or black and white<br />
picture<br />
Sound and picture interference<br />
Blurred or snowy picture,<br />
distorted sound<br />
Remote control malfunctions<br />
‘Check signal cable.’ message is<br />
displayed<br />
On PC mo<strong>de</strong>, ‘Not Supported<br />
Mo<strong>de</strong>.’ message is displayed<br />
The damaged picture appears in<br />
the corner of the screen<br />
The ‘Resets all settings to<br />
the <strong>de</strong>fault values.’ message<br />
appears.<br />
You may see small particles if<br />
you look closely at the edge of<br />
the bezel surrounding the TV<br />
screen.<br />
Check that the mains lead has been connected to a wall socket.<br />
Check that you have pressed the button on your set.<br />
Check the picture contrast and brightness settings.<br />
Check the volume.<br />
Check the volume.<br />
Check whether the MUTEM button has been pressed on the remote control.<br />
Check the Speaker Select settings.<br />
On your computer check; Power, Signal Cable.<br />
The TV is using its power management system.<br />
Move the computer’s mouse or press any key on the keyboard.<br />
Adjust the colour settings.<br />
Check that the broadcast system selected is correct.<br />
Try to i<strong>de</strong>ntify the electrical appliance that is affecting the set and move it further away.<br />
Plug your set into a different mains socket.<br />
Check the direction, location and connections of your aerial.<br />
This interference is often due to the use of an indoor aerial.<br />
Replace the remote control batteries.<br />
Clean the upper edge of the remote control (transmission window).<br />
Check the battery terminals.<br />
Check that the signal cable is firmly connected to the PC or vi<strong>de</strong>o sources.<br />
Check that the PC or vi<strong>de</strong>o sources are turned on.<br />
Check the maximum resolution and the frequency of the vi<strong>de</strong>o adaptor.<br />
Compare these values with the data in the Display Mo<strong>de</strong>s.<br />
If Screen Fit is selected in some external <strong>de</strong>vices, the damaged picture may appear in the corner of the<br />
screen. This symptom is caused by external <strong>de</strong>vices, not TV.<br />
This appears when you press and hold the EXIT button for a while. The product settings are reset to the<br />
factory <strong>de</strong>faults.<br />
This is part of the product’s <strong>de</strong>sign and is not a <strong>de</strong>fect.<br />
N<br />
This TFT LCD panel uses a panel consisting of sub pixels (6 220 800) which require sophisticated technology to produce.<br />
However, there may be few bright or dark pixels on the screen. These pixels will have no impact on the performance of the<br />
product.<br />
English - 44
¦<br />
Specifications<br />
Mo<strong>de</strong>l Name<br />
LE32B550, LE32B551<br />
LE32B553, LE32B554<br />
LE37B550, LE37B551<br />
LE37B553, LE37B554<br />
Screen Size<br />
(Diagonal) 32 inches 37 inches<br />
PC Resolution<br />
(Optimum) 1920 x 1080 @ 60 Hz 1920 x 1080 @ 60 Hz<br />
Sound<br />
(Output) 10W X 2 10W X 2<br />
Dimensions (WxDxH)<br />
Body<br />
With stand<br />
794 X 77 X 524 mm<br />
794 X 240 X 570 mm<br />
917 X 79 X 592 mm<br />
917 X 255 X 658 mm<br />
Weight<br />
With Stand 13 kg 16 kg<br />
Environmental Consi<strong>de</strong>rations<br />
Operating Temperature<br />
Operating Humidity<br />
Storage Temperature<br />
Storage Humidity<br />
Stand Swivel<br />
(Left / Right)<br />
Mo<strong>de</strong>l Name<br />
LE40B550, LE40B551<br />
LE40B553, LE40B554<br />
10°C to 40°C (50°F to 104°F)<br />
10% to 80%, non-con<strong>de</strong>nsing<br />
-20°C to 45°C (-4°F to 113°F)<br />
5% to 95%, non-con<strong>de</strong>nsing<br />
-20˚ ~ 20˚<br />
LE46B550, LE46B551<br />
LE46B553, LE46B554<br />
Screen Size<br />
(Diagonal) 40 inches 46 inches<br />
PC Resolution<br />
(Optimum) 1920 x 1080 @ 60 Hz 1920 x 1080 @ 60 Hz<br />
Sound<br />
(Output) 10W X 2 10W X 2<br />
Dimensions (WxDxH)<br />
Body<br />
With stand<br />
982 X 79 X 626 mm<br />
982 X 255 X 676 mm<br />
1116 X 79 X 706 mm<br />
1116 X 275 X 770 mm<br />
Weight<br />
With Stand 18 kg 23 kg<br />
Environmental Consi<strong>de</strong>rations<br />
Operating Temperature<br />
Operating Humidity<br />
Storage Temperature<br />
Storage Humidity<br />
Stand Swivel<br />
(Left / Right)<br />
N<br />
N<br />
N<br />
10°C to 40°C (50°F to 104°F)<br />
10% to 80%, non-con<strong>de</strong>nsing<br />
-20°C to 45°C (-4°F to 113°F)<br />
5% to 95%, non-con<strong>de</strong>nsing<br />
-20˚ ~ 20˚<br />
Design and specifications are subject to change without prior notice.<br />
This <strong>de</strong>vice is a Class B digital apparatus.<br />
For the power supply and Power Consumption, refer to the label attached to the product.<br />
English - 45
●<br />
●<br />
●<br />
This product uses parts of the software from the In<strong>de</strong>pen<strong>de</strong>nt JPEG Group.<br />
This product uses parts of the software owned by the Freetype Project (www.freetype.org).<br />
This product uses some software programs which are distributed un<strong>de</strong>r the GPL/LGPL license. Accordingly, the following<br />
GPL and LGPL software source co<strong>de</strong>s that have been used in this product can be provi<strong>de</strong>d after asking to vdswmanager@<br />
samsung.com.<br />
GPL software: Linux Kernel, Busybox, Binutils<br />
LGPL software: Glibc, ffmpeg, smpeg, libgphoto, libusb, SDL<br />
¦ GNU GENERAL PUBLIC LICENSE<br />
Version 3, 29 June 2007<br />
Copyright (C) 2007 Free Software Foundation, Inc. <br />
Everyone is permitted to copy and distribute verbatim copies of this license document, but changing it is not allowed.<br />
Preamble<br />
The GNU General Public License is a free, copyleft license for software and other kinds of works.<br />
The licenses for most software and other practical works are <strong>de</strong>signed to take away your freedom to share and change the<br />
works. By contrast, the GNU General Public License is inten<strong>de</strong>d to guarantee your freedom to share and change all versions<br />
of a program--to make sure it remains free software for all its users. We, the Free Software Foundation, use the GNU General<br />
Public License for most of our software; it applies also to any other work released this way by its authors. You can apply it to your<br />
programs, too.<br />
When we speak of free software, we are referring to freedom, not price. Our General Public Licenses are <strong>de</strong>signed to make sure<br />
that you have the freedom to distribute copies of free software (and charge for them if you wish), that you receive source co<strong>de</strong> or<br />
can get it if you want it, that you can change the software or use pieces of it in new free programs, and that you know you can do<br />
these things.<br />
To protect your rights, we need to prevent others from <strong>de</strong>nying you these rights or asking you to surren<strong>de</strong>r the rights. Therefore,<br />
you have certain responsibilities if you distribute copies of the software, or if you modify it: responsibilities to respect the freedom of<br />
others.<br />
For example, if you distribute copies of such a program, whether gratis or for a fee, you must pass on to the recipients the same<br />
freedoms that you received. You must make sure that they, too, receive or can get the source co<strong>de</strong>. And you must show them<br />
these terms so they know their rights.<br />
Developers that use the GNU GPL protect your rights with two steps: (1) assert copyright on the software, and (2) offer you this<br />
License giving you legal permission to copy, distribute and/or modify it.<br />
For the <strong>de</strong>velopers’ and authors’ protection, the GPL clearly explains that there is no warranty for this free software. For both users’<br />
and authors’ sake, the GPL requires that modified versions be marked as changed, so that their problems will not be attributed<br />
erroneously to authors of previous versions.<br />
Some <strong>de</strong>vices are <strong>de</strong>signed to <strong>de</strong>ny users access to install or run modified versions of the software insi<strong>de</strong> them, although the<br />
manufacturer can do so. This is fundamentally incompatible with the aim of protecting users’ freedom to change the software.<br />
The systematic pattern of such abuse occurs in the area of products for individuals to use, which is precisely where it is most<br />
unacceptable. Therefore, we have <strong>de</strong>signed this version of the GPL to prohibit the practice for those products. If such problems<br />
arise substantially in other domains, we stand ready to extend this provision to those domains in future versions of the GPL, as<br />
nee<strong>de</strong>d to protect the freedom of users.<br />
Finally, every program is threatened constantly by software patents. States should not allow patents to restrict <strong>de</strong>velopment and<br />
use of software on general-purpose computers, but in those that do, we wish to avoid the special danger that patents applied to<br />
a free program could make it effectively proprietary. To prevent this, the GPL assures that patents cannot be used to ren<strong>de</strong>r the<br />
program non-free.<br />
The precise terms and conditions for copying, distribution and modification follow.<br />
TERMS AND CONDITIONS<br />
0. Definitions.<br />
“This License” refers to version 3 of the GNU General Public License.<br />
“Copyright” also means copyright-like laws that apply to other kinds of works, such as semiconductor masks.<br />
“The Program” refers to any copyrightable work licensed un<strong>de</strong>r this License. Each licensee is addressed as “you”. “Licensees”<br />
and “recipients” may be individuals or organizations.<br />
To “modify” a work means to copy from or adapt all or part of the work in a fashion requiring copyright permission, other than<br />
the making of an exact copy. The resulting work is called a “modified version” of the earlier work or a work “based on” the<br />
earlier work.
A “covered work” means either the unmodified Program or a work based on the Program.<br />
To “propagate” a work means to do anything with it that, without permission, would make you directly or secondarily liable<br />
for infringement un<strong>de</strong>r applicable copyright law, except executing it on a computer or modifying a private copy. Propagation<br />
inclu<strong>de</strong>s copying, distribution (with or without modification), making available to the public, and in some countries other<br />
activities as well.<br />
To “convey” a work means any kind of propagation that enables other parties to make or receive copies. Mere interaction with<br />
a user through a computer network, with no transfer of a copy, is not conveying.<br />
An interactive user interface displays “Appropriate Legal Notices” to the extent that it inclu<strong>de</strong>s a convenient and prominently<br />
visible feature that (1) displays an appropriate copyright notice, and (2) tells the user that there is no warranty for the work<br />
(except to the extent that warranties are provi<strong>de</strong>d), that licensees may convey the work un<strong>de</strong>r this License, and how to view a<br />
copy of this License. If the interface presents a list of user commands or options, such as a menu, a prominent item in the list<br />
meets this criterion.<br />
1. Source Co<strong>de</strong>.<br />
The “source co<strong>de</strong>” for a work means the preferred form of the work for making modifications to it. “Object co<strong>de</strong>” means any<br />
non-source<br />
form of a work.<br />
A “Standard Interface” means an interface that either is an official standard <strong>de</strong>fined by a recognized standards body, or, in the<br />
case of interfaces specified for a particular programming language, one that is wi<strong>de</strong>ly used among <strong>de</strong>velopers working in that<br />
language.<br />
The “System Libraries” of an executable work inclu<strong>de</strong> anything, other than the work as a whole, that (a) is inclu<strong>de</strong>d in the<br />
normal form of packaging a Major Component, but which is not part of that Major Component, and (b) serves only to enable<br />
use of the work with that Major Component, or to implement a Standard Interface for which an implementation is available to<br />
the public in source co<strong>de</strong> form. A “Major Component”, in this context, means a major essential component (kernel, window<br />
system, and so on) of the specific operating system (if any) on which the executable work runs, or a compiler used to produce<br />
the work, or an object co<strong>de</strong> interpreter used to run it.<br />
The “Corresponding Source” for a work in object co<strong>de</strong> form means all the source co<strong>de</strong> nee<strong>de</strong>d to generate, install, and (for an<br />
executable work) run the object co<strong>de</strong> and to modify the work, including scripts to control those activities. However, it does not<br />
inclu<strong>de</strong> the work’s System Libraries, or general-purpose tools or generally available free programs which are used unmodified<br />
in performing those activities but which are not part of the work. For example, Corresponding Source inclu<strong>de</strong>s interface<br />
<strong>de</strong>finition files associated with source files for the work, and the source co<strong>de</strong> for shared libraries and dynamically linked<br />
subprograms that the work is specifically <strong>de</strong>signed to require, such as by intimate data communication or control flow between<br />
those subprograms and other parts of the work.<br />
The Corresponding Source need not inclu<strong>de</strong> anything that users can regenerate automatically from other parts of the<br />
Corresponding Source.<br />
The Corresponding Source for a work in source co<strong>de</strong> form is that same work.<br />
2. Basic Permissions.<br />
All rights granted un<strong>de</strong>r this License are granted for the term of copyright on the Program, and are irrevocable provi<strong>de</strong>d the<br />
stated conditions are met. This License explicitly affirms your unlimited permission to run the unmodified Program. The output<br />
from running a covered work is covered by this License only if the output, given its content, constitutes a covered work.<br />
This License acknowledges your rights of fair use or other equivalent, as provi<strong>de</strong>d by copyright law. You may make, run and<br />
propagate covered works that you do not convey, without conditions so long as your license otherwise remains in force. You<br />
may convey covered works to others for the sole purpose of having them make modifications exclusively for you, or provi<strong>de</strong><br />
you with facilities for running those works, provi<strong>de</strong>d that you comply with the terms of this License in conveying all material<br />
for which you do not control copyright. Those thus making or running the covered works for you must do so exclusively on<br />
your behalf, un<strong>de</strong>r your direction and control, on terms that prohibit them from making any copies of your copyrighted material<br />
outsi<strong>de</strong> their relationship with you.<br />
Conveying un<strong>de</strong>r any other circumstances is permitted solely un<strong>de</strong>r the conditions stated below. Sublicensing is not allowed;<br />
section 10 makes it unnecessary.<br />
3. Protecting Users’ Legal Rights From Anti-Circumvention Law.<br />
No covered work shall be <strong>de</strong>emed part of an effective technological measure un<strong>de</strong>r any applicable law fulfilling obligations<br />
un<strong>de</strong>r article 11 of the WIPO copyright treaty adopted on 20 December 1996, or similar laws prohibiting or restricting<br />
circumvention of such measures.<br />
When you convey a covered work, you waive any legal power to forbid circumvention of technological measures to the extent<br />
such circumvention is effected by exercising rights un<strong>de</strong>r this License with respect to the covered work, and you disclaim any<br />
intention to limit operation or modification of the work as a means of enforcing, against the work’s users, your or third parties’<br />
legal rights to forbid circumvention of technological measures.<br />
4. Conveying Verbatim Copies.<br />
You may convey verbatim copies of the Program’s source co<strong>de</strong> as you receive it, in any medium, provi<strong>de</strong>d that you<br />
conspicuously and appropriately publish on each copy an appropriate copyright notice; keep intact all notices stating that this<br />
License and any non-permissive terms ad<strong>de</strong>d in accord with section 7 apply to the co<strong>de</strong>; keep intact all notices of the absence<br />
of any warranty; and give all recipients a copy of this License along with the Program.<br />
You may charge any price or no price for each copy that you convey, and you may offer support or warranty protection for a<br />
fee.
5. Conveying Modified Source Versions.<br />
You may convey a work based on the Program, or the modifications to produce it from the Program, in the form of source co<strong>de</strong><br />
un<strong>de</strong>r the terms of section 4, provi<strong>de</strong>d that you also meet all of these conditions:<br />
<br />
<br />
<br />
<br />
a) The work must carry prominent notices stating that you modified it, and giving a relevant date.<br />
b) The work must carry prominent notices stating that it is released un<strong>de</strong>r this License and any conditions ad<strong>de</strong>d un<strong>de</strong>r<br />
section 7. This requirement modifies the requirement in section 4 to “keep intact all notices”.<br />
c) You must license the entire work, as a whole, un<strong>de</strong>r this License to anyone who comes into possession of a copy. This<br />
License will therefore apply, along with any applicable section 7 additional terms, to the whole of the work, and all its<br />
parts, regardless of how they are packaged. This License gives no permission to license the work in any other way, but it<br />
does not invalidate such permission if you have separately received it.<br />
d) If the work has interactive user interfaces, each must display Appropriate Legal Notices; however, if the Program has<br />
interactive interfaces that do not display Appropriate Legal Notices, your work need not make them do so.<br />
A compilation of a covered work with other separate and in<strong>de</strong>pen<strong>de</strong>nt works, which are not by their nature extensions of<br />
the covered work, and which are not combined with it such as to form a larger program, in or on a volume of a storage or<br />
distribution medium, is called an “aggregate” if the compilation and its resulting copyright are not used to limit the access or<br />
legal rights of the compilation’s users beyond what the individual works permit. Inclusion of a covered work in an aggregate<br />
does not cause this License to apply to the other parts of the aggregate.<br />
6. Conveying Non-Source Forms.<br />
You may convey a covered work in object co<strong>de</strong> form un<strong>de</strong>r the terms of sections 4 and 5, provi<strong>de</strong>d that you also convey the<br />
machine-readable Corresponding Source un<strong>de</strong>r the terms of this License, in one of these ways:<br />
a) Convey the object co<strong>de</strong> in, or embodied in, a physical product (including a physical distribution medium), accompanied<br />
by the Corresponding Source fixed on a durable physical medium customarily used for software interchange.<br />
b) Convey the object co<strong>de</strong> in, or embodied in, a physical product (including a physical distribution medium), accompanied<br />
by a written offer, valid for at least three years and valid for as long as you offer spare parts or customer support for that<br />
product mo<strong>de</strong>l, to give anyone who possesses the object co<strong>de</strong> either (1) a copy of the Corresponding Source for all the<br />
software in the product that is covered by this License, on a durable physical medium customarily used for software<br />
interchange, for a price no more than your reasonable cost of physically performing this conveying of source, or (2)<br />
access to copy the Corresponding Source from a network server at no charge.<br />
c) Convey individual copies of the object co<strong>de</strong> with a copy of the written offer to provi<strong>de</strong> the Corresponding Source. This<br />
alternative is allowed only occasionally and noncommercially, and only if you received the object co<strong>de</strong> with such an offer,<br />
in accord with subsection 6b.<br />
d) Convey the object co<strong>de</strong> by offering access from a <strong>de</strong>signated place (gratis or for a charge), and offer equivalent<br />
access to the Corresponding Source in the same way through the same place at no further charge. You need not require<br />
recipients to copy the Corresponding Source along with the object co<strong>de</strong>. If the place to copy the object co<strong>de</strong> is a network<br />
server, the Corresponding Source may be on a different server (operated by you or a third party) that supports equivalent<br />
copying facilities, provi<strong>de</strong>d you maintain clear directions next to the object co<strong>de</strong> saying where to find the Corresponding<br />
Source. Regardless of what server hosts the Corresponding Source, you remain obligated to ensure that it is available for<br />
as long as nee<strong>de</strong>d to satisfy these requirements.<br />
e) Convey the object co<strong>de</strong> using peer-to-peer transmission, provi<strong>de</strong>d you inform other peers where the object co<strong>de</strong> and<br />
Corresponding Source of the work are being offered to the general public at no charge un<strong>de</strong>r subsection 6d. A separable<br />
portion of the object co<strong>de</strong>, whose source co<strong>de</strong> is exclu<strong>de</strong>d from the Corresponding Source as a System Library, need not<br />
be inclu<strong>de</strong>d in conveying the object co<strong>de</strong> work.<br />
A “User Product” is either (1) a “consumer product”, which means any tangible personal property which is normally used for<br />
personal, family, or household purposes, or (2) anything <strong>de</strong>signed or sold for incorporation into a dwelling. In <strong>de</strong>termining<br />
whether a product is a consumer product, doubtful cases shall be resolved in favor of coverage. For a particular product<br />
received by a particular user, “normally used” refers to a typical or common use of that class of product, regardless of the<br />
status of the particular user or of the way in which the particular user actually uses, or expects or is expected to use, the<br />
product. A product is a consumer product regardless of whether the product has substantial commercial, industrial or nonconsumer<br />
uses, unless such uses represent the only significant mo<strong>de</strong> of use of the product.<br />
“Installation Information” for a User Product means any methods, procedures, authorization keys, or other information required<br />
to install and execute modified versions of a covered work in that User Product from a modified version of its Corresponding<br />
Source. The information must suffice to ensure that the continued functioning of the modified object co<strong>de</strong> is in no case<br />
prevented or interfered with solely because modification has been ma<strong>de</strong>.<br />
If you convey an object co<strong>de</strong> work un<strong>de</strong>r this section in, or with, or specifically for use in, a User Product, and the conveying<br />
occurs as part of a transaction in which the right of possession and use of the User Product is transferred to the recipient in<br />
perpetuity or for a fixed term (regardless of how the transaction is characterized), the Corresponding Source conveyed un<strong>de</strong>r<br />
this section must be accompanied by the Installation Information. But this requirement does not apply if neither you nor any<br />
third party retains the ability to install modified object co<strong>de</strong> on the User Product (for example, the work has been installed in<br />
ROM).
The requirement to provi<strong>de</strong> Installation Information does not inclu<strong>de</strong> a requirement to continue to provi<strong>de</strong> support service,<br />
warranty, or updates for a work that has been modified or installed by the recipient, or for the User Product in which it has<br />
been modified or installed. Access to a network may be <strong>de</strong>nied when the modification itself materially and adversely affects the<br />
operation of the network or violates the rules and protocols for communication across the network.<br />
Corresponding Source conveyed, and Installation Information provi<strong>de</strong>d, in accord with this section must be in a format that is<br />
publicly documented (and with an implementation available to the public in source co<strong>de</strong> form), and must require no special<br />
password or key for unpacking, reading or copying.<br />
7. Additional Terms.<br />
“Additional permissions” are terms that supplement the terms of this License by making exceptions from one or more of its<br />
conditions. Additional permissions that are applicable to the entire Program shall be treated as though they were inclu<strong>de</strong>d in<br />
this License, to the extent that they are valid un<strong>de</strong>r applicable law. If additional permissions apply only to part of the Program,<br />
that part may be used separately un<strong>de</strong>r those permissions, but the entire Program remains governed by this License without<br />
regard to the additional permissions.<br />
When you convey a copy of a covered work, you may at your option remove any additional permissions from that copy, or<br />
from any part of it. (Additional permissions may be written to require their own removal in certain cases when you modify the<br />
work.) You may place additional permissions on material, ad<strong>de</strong>d by you to a covered work, for which you have or can give<br />
appropriate copyright permission.<br />
Notwithstanding any other provision of this License, for material you add to a covered work, you may (if authorized by the<br />
copyright hol<strong>de</strong>rs of that material) supplement the terms of this License with terms:<br />
<br />
<br />
<br />
<br />
<br />
<br />
a) Disclaiming warranty or limiting liability differently from the terms of sections 15 and 16 of this License; or<br />
b) Requiring preservation of specified reasonable legal notices or author attributions in that material or in the Appropriate<br />
Legal Notices displayed by works containing it; or<br />
c) Prohibiting misrepresentation of the origin of that material, or requiring that modified versions of such material be<br />
marked in reasonable ways as different from the original version; or<br />
d) Limiting the use for publicity purposes of names of licensors or authors of the material; or<br />
e) Declining to grant rights un<strong>de</strong>r tra<strong>de</strong>mark law for use of some tra<strong>de</strong> names, tra<strong>de</strong>marks, or service marks; or<br />
f) Requiring in<strong>de</strong>mnification of licensors and authors of that material by anyone who conveys the material (or modified<br />
versions of it) with contractual assumptions of liability to the recipient, for any liability that these contractual assumptions<br />
directly impose on those licensors and authors.<br />
All other non-permissive additional terms are consi<strong>de</strong>red “further restrictions” within the meaning of section 10. If the Program<br />
as you received it, or any part of it, contains a notice stating that it is governed by this License along with a term that is a<br />
further restriction, you may remove that term. If a license document contains a further restriction but permits relicensing or<br />
conveying un<strong>de</strong>r this License, you may add to a covered work material governed by the terms of that license document,<br />
provi<strong>de</strong>d that the further restriction does not survive such relicensing or conveying.<br />
If you add terms to a covered work in accord with this section, you must place, in the relevant source files, a statement of the<br />
additional terms that apply to those files, or a notice indicating where to find the applicable terms.<br />
Additional terms, permissive or non-permissive, may be stated in the form of a separately written license, or stated as<br />
exceptions; the above requirements apply either way.<br />
8. Termination.<br />
You may not propagate or modify a covered work except as expressly provi<strong>de</strong>d un<strong>de</strong>r this License. Any attempt otherwise to<br />
propagate or modify it is void, and will automatically terminate your rights un<strong>de</strong>r this License (including any patent licenses<br />
granted un<strong>de</strong>r the third paragraph of section 11).<br />
However, if you cease all violation of this License, then your license from a particular copyright hol<strong>de</strong>r is reinstated (a)<br />
provisionally, unless and until the copyright hol<strong>de</strong>r explicitly and finally terminates your license, and (b) permanently, if the<br />
copyright hol<strong>de</strong>r fails to notify you of the violation by some reasonable means prior to 60 days after the cessation.<br />
Moreover, your license from a particular copyright hol<strong>de</strong>r is reinstated permanently if the copyright hol<strong>de</strong>r notifies you of the<br />
violation by some reasonable means, this is the first time you have received notice of violation of this License (for any work)<br />
from that copyright hol<strong>de</strong>r, and you cure the violation prior to 30 days after your receipt of the notice.<br />
Termination of your rights un<strong>de</strong>r this section does not terminate the licenses of parties who have received copies or rights from<br />
you un<strong>de</strong>r this License. If your rights have been terminated and not permanently reinstated, you do not qualify to receive new<br />
licenses for the same material un<strong>de</strong>r section 10.<br />
9. Acceptance Not Required for Having Copies.<br />
You are not required to accept this License in or<strong>de</strong>r to receive or run a copy of the Program. Ancillary propagation of a covered<br />
work occurring solely as a consequence of using peer-to-peer transmission to receive a copy likewise does not require<br />
acceptance. However, nothing other than this License grants you permission to propagate or modify any covered work. These<br />
actions infringe copyright if you do not accept this License. Therefore, by modifying or propagating a covered work, you<br />
indicate your acceptance of this License to do so.
10. Automatic Licensing of Downstream Recipients.<br />
Each time you convey a covered work, the recipient automatically receives a license from the original licensors, to run, modify<br />
and propagate that work, subject to this License. You are not responsible for enforcing compliance by third parties with this<br />
License.<br />
An “entity transaction” is a transaction transferring control of an organization, or substantially all assets of one, or subdividing<br />
an organization, or merging organizations. If propagation of a covered work results from an entity transaction, each party<br />
to that transaction who receives a copy of the work also receives whatever licenses to the work the party’s pre<strong>de</strong>cessor in<br />
interest had or could give un<strong>de</strong>r the previous paragraph, plus a right to possession of the Corresponding Source of the work<br />
from the pre<strong>de</strong>cessor in interest, if the pre<strong>de</strong>cessor has it or can get it with reasonable efforts.<br />
You may not impose any further restrictions on the exercise of the rights granted or affirmed un<strong>de</strong>r this License. For example,<br />
you may not impose a license fee, royalty, or other charge for exercise of rights granted un<strong>de</strong>r this License, and you may not<br />
initiate litigation (including a cross-claim or counterclaim in a lawsuit) alleging that any patent claim is infringed by making,<br />
using, selling, offering for sale, or importing the Program or any portion of it.<br />
11. Patents.<br />
A “contributor” is a copyright hol<strong>de</strong>r who authorizes use un<strong>de</strong>r this License of the Program or a work on which the Program is<br />
based. The work thus licensed is called the contributor’s “contributor version”.<br />
A contributor’s “essential patent claims” are all patent claims owned or controlled by the contributor, whether already acquired<br />
or hereafter acquired, that would be infringed by some manner, permitted by this License, of making, using, or selling its<br />
contributor version, but do not inclu<strong>de</strong> claims that would be infringed only as a consequence of further modification of the<br />
contributor version. For purposes of this <strong>de</strong>finition, “control” inclu<strong>de</strong>s the right to grant patent sublicenses in a manner<br />
consistent with the requirements of this License.<br />
Each contributor grants you a non-exclusive, worldwi<strong>de</strong>, royalty-free patent license un<strong>de</strong>r the contributor’s essential patent<br />
claims, to make, use, sell, offer for sale, import and otherwise run, modify and propagate the contents of its contributor version.<br />
In the following three paragraphs, a “patent license” is any express agreement or commitment, however <strong>de</strong>nominated, not<br />
to enforce a patent (such as an express permission to practice a patent or covenant not to sue for patent infringement). To<br />
“grant” such a patent license to a party means to make such an agreement or commitment not to enforce a patent against the<br />
party.<br />
If you convey a covered work, knowingly relying on a patent license, and the Corresponding Source of the work is not<br />
available for anyone to copy, free of charge and un<strong>de</strong>r the terms of this License, through a publicly available network server or<br />
other readily accessible means, then you must either (1) cause the Corresponding Source to be so available, or (2) arrange<br />
to <strong>de</strong>prive yourself of the benefit of the patent license for this particular work, or (3) arrange, in a manner consistent with the<br />
requirements of this License, to extend the patent license to downstream recipients. “Knowingly relying” means you have<br />
actual knowledge that, but for the patent license, your conveying the covered work in a country, or your recipient’s use of the<br />
covered work in a country, would infringe one or more i<strong>de</strong>ntifiable patents in that country that you have reason to believe are<br />
valid.<br />
If, pursuant to or in connection with a single transaction or arrangement, you convey, or propagate by procuring conveyance<br />
of, a covered work, and grant a patent license to some of the parties receiving the covered work authorizing them to use,<br />
propagate, modify or convey a specific copy of the covered work, then the patent license you grant is automatically exten<strong>de</strong>d<br />
to all recipients of the covered work and works based on it.<br />
A patent license is “discriminatory” if it does not inclu<strong>de</strong> within the scope of its coverage, prohibits the exercise of, or is<br />
conditioned on the non-exercise of one or more of the rights that are specifically granted un<strong>de</strong>r this License. You may not<br />
convey a covered work if you are a party to an arrangement with a third party that is in the business of distributing software,<br />
un<strong>de</strong>r which you make payment to the third party based on the extent of your activity of conveying the work, and un<strong>de</strong>r which<br />
the third party grants, to any of the parties who would receive the covered work from you, a discriminatory patent license (a)<br />
in connection with copies of the covered work conveyed by you (or copies ma<strong>de</strong> from those copies), or (b) primarily for and in<br />
connection with specific products or compilations that contain the covered work, unless you entered into that arrangement, or<br />
that patent license was granted, prior to 28 March 2007.<br />
Nothing in this License shall be construed as excluding or limiting any implied license or other <strong>de</strong>fenses to infringement that<br />
may otherwise be available to you un<strong>de</strong>r applicable patent law.<br />
12. No Surren<strong>de</strong>r of Others’ Freedom.<br />
If conditions are imposed on you (whether by court or<strong>de</strong>r, agreement or otherwise) that contradict the conditions of this<br />
License, they do not excuse you from the conditions of this License. If you cannot convey a covered work so as to satisfy<br />
simultaneously your obligations un<strong>de</strong>r this License and any other pertinent obligations, then as a consequence you may not<br />
convey it at all. For example, if you agree to terms that obligate you to collect a royalty for further conveying from those to<br />
whom you convey the Program, the only way you could satisfy both those terms and this License would be to refrain entirely<br />
from conveying the Program.<br />
13. Use with the GNU Affero General Public License.<br />
Notwithstanding any other provision of this License, you have permission to link or combine any covered work with a work<br />
licensed un<strong>de</strong>r version 3 of the GNU Affero General Public License into a single combined work, and to convey the resulting<br />
work. The terms of this License will continue to apply to the part which is the covered work, but the special requirements of<br />
the GNU Affero General Public License, section 13, concerning interaction through a network will apply to the combination as<br />
such.
14. Revised Versions of this License.<br />
The Free Software Foundation may publish revised and/or new versions of the GNU General Public License from time to time.<br />
Such new versions will be similar in spirit to the present version, but may differ in <strong>de</strong>tail to address new problems or concerns.<br />
Each version is given a distinguishing version number. If the Program specifies that a certain numbered version of the GNU<br />
General Public License “or any later version” applies to it, you have the option of following the terms and conditions either of<br />
that numbered version or of any later version published by the Free Software Foundation. If the Program does not specify<br />
a version number of the GNU General Public License, you may choose any version ever published by the Free Software<br />
Foundation.<br />
If the Program specifies that a proxy can <strong>de</strong>ci<strong>de</strong> which future versions of the GNU General Public License can be used, that<br />
proxy’s public statement of acceptance of a version permanently authorizes you to choose that version for the Program.<br />
Later license versions may give you additional or different permissions. However, no additional obligations are imposed on any<br />
author or copyright hol<strong>de</strong>r as a result of your choosing to follow a later version.<br />
15. Disclaimer of Warranty.<br />
THERE IS NO WARRANTY FOR THE PROGRAM, TO THE EXTENT PERMITTED BY APPLICABLE LAW. EXCEPT WHEN<br />
OTHERWISE STATED IN WRITING THE COPYRIGHT HOLDERS AND/OR OTHER PARTIES PROVIDE THE PROGRAM<br />
“AS IS” WITHOUT WARRANTY OF ANY KIND, EITHER EXPRESSED OR IMPLIED, INCLUDING, BUT NOT LIMITED TO,<br />
THE IMPLIED WARRANTIES OF MERCHANTABILITY AND FITNESS FOR A PARTICULAR PURPOSE. THE ENTIRE<br />
RISK AS TO THE QUALITY AND PERFORMANCE OF THE PROGRAM IS WITH YOU. SHOULD THE PROGRAM PROVE<br />
DEFECTIVE, YOU ASSUME THE COST OF ALL NECESSARY SERVICING, REPAIR OR CORRECTION.<br />
16. Limitation of Liability.<br />
IN NO EVENT UNLESS REQUIRED BY APPLICABLE LAW OR AGREED TO IN WRITING WILL ANY COPYRIGHT<br />
HOLDER, OR ANY OTHER PARTY WHO MODIFIES AND/OR CONVEYS THE PROGRAM AS PERMITTED ABOVE, BE<br />
LIABLE TO YOU FOR DAMAGES, INCLUDING ANY GENERAL, SPECIAL, INCIDENTAL OR CONSEQUENTIAL DAMAGES<br />
ARISING OUT OF THE USE OR INABILITY TO USE THE PROGRAM (INCLUDING BUT NOT LIMITED TO LOSS OF DATA<br />
OR DATA BEING RENDERED INACCURATE OR LOSSES SUSTAINED BY YOU OR THIRD PARTIES OR A FAILURE OF<br />
THE PROGRAM TO OPERATE WITH ANY OTHER PROGRAMS), EVEN IF SUCH HOLDER OR OTHER PARTY HAS BEEN<br />
ADVISED OF THE POSSIBILITY OF SUCH DAMAGES.<br />
17. Interpretation of Sections 15 and 16.<br />
If the disclaimer of warranty and limitation of liability provi<strong>de</strong>d above cannot be given local legal effect according to their terms,<br />
reviewing courts shall apply local law that most closely approximates an absolute waiver of all civil liability in connection with<br />
the Program, unless a warranty or assumption of liability accompanies a copy of the Program in return for a fee.<br />
¦ END OF TERMS AND CONDITIONS<br />
How to Apply These Terms to Your New Programs<br />
If you <strong>de</strong>velop a new program, and you want it to be of the greatest possible use to the public, the best way to achieve this is to<br />
make it free software which everyone can redistribute and change un<strong>de</strong>r these terms.<br />
To do so, attach the following notices to the program. It is safest to attach them to the start of each source file to most effectively<br />
state the exclusion of warranty; and each file should have at least the “copyright” line and a pointer to where the full notice is found.<br />
Copyright (C) <br />
This program is free software: you can redistribute it and/or modify it un<strong>de</strong>r the terms of the GNU General Public License as<br />
published by the Free Software Foundation, either version 3 of the License, or (at your option) any later version.<br />
This program is distributed in the hope that it will be useful, but WITHOUT ANY WARRANTY; without even the implied<br />
warranty of MERCHANTABILITY or FITNESS FOR A PARTICULAR PURPOSE. See the GNU General Public License for<br />
more <strong>de</strong>tails.<br />
You should have received a copy of the GNU General Public License along with this program. If not, see .<br />
Also add information on how to contact you by electronic and paper mail.<br />
If the program does terminal interaction, make it output a short notice like this when it starts in an interactive mo<strong>de</strong>:<br />
Copyright (C) This program comes with ABSOLUTELY NO WARRANTY; for <strong>de</strong>tails type<br />
`show w’. This is free software, and you are welcome to redistribute it un<strong>de</strong>r certain conditions; type `show c’ for <strong>de</strong>tails.<br />
The hypothetical commands `show w’ and `show c’ should show the appropriate parts of the General Public License. Of course,<br />
your program’s commands might be different; for a GUI interface, you would use an “about box”.<br />
You should also get your employer (if you work as a programmer) or school, if any, to sign a “copyright disclaimer” for the program,<br />
if necessary.<br />
For more information on this, and how to apply and follow the GNU GPL, see .<br />
The GNU General Public License does not permit incorporating your program into proprietary programs. If your program is a<br />
subroutine library, you may consi<strong>de</strong>r it more useful to permit linking proprietary applications with the library. If this is what you want<br />
to do, use the GNU Lesser General Public License instead of this License. But first, please read .
¦ GNU Lesser General Public License (LGPL)<br />
Version 3, 29 June 2007<br />
Copyright (C) 2007 Free Software Foundation, Inc. <br />
Everyone is permitted to copy and distribute verbatim copies of this license document, but changing it is not allowed.<br />
Preamble<br />
The GNU General Public License is a free, copyleft license for software and other kinds of works.<br />
The licenses for most software and other practical works are <strong>de</strong>signed to take away your freedom to share and change the<br />
works. By contrast, the GNU General Public License is inten<strong>de</strong>d to guarantee your freedom to share and change all versions<br />
of a program--to make sure it remains free software for all its users. We, the Free Software Foundation, use the GNU General<br />
Public License for most of our software; it applies also to any other work released this way by its authors. You can apply it to your<br />
programs, too.<br />
When we speak of free software, we are referring to freedom, not price. Our General Public Licenses are <strong>de</strong>signed to make sure<br />
that you have the freedom to distribute copies of free software (and charge for them if you wish), that you receive source co<strong>de</strong> or<br />
can get it if you want it, that you can change the software or use pieces of it in new free programs, and that you know you can do<br />
these things.<br />
To protect your rights, we need to prevent others from <strong>de</strong>nying you these rights or asking you to surren<strong>de</strong>r the rights. Therefore,<br />
you have certain responsibilities if you distribute copies of the software, or if you modify it: responsibilities to respect the freedom of<br />
others.<br />
For example, if you distribute copies of such a program, whether gratis or for a fee, you must pass on to the recipients the same<br />
freedoms that you received. You must make sure that they, too, receive or can get the source co<strong>de</strong>. And you must show them<br />
these terms so they know their rights.<br />
Developers that use the GNU GPL protect your rights with two steps: (1) assert copyright on the software, and (2) offer you this<br />
License giving you legal permission to copy, distribute and/or modify it.<br />
For the <strong>de</strong>velopers’ and authors’ protection, the GPL clearly explains that there is no warranty for this free software. For both users’<br />
and authors’ sake, the GPL requires that modified versions be marked as changed, so that their problems will not be attributed<br />
erroneously to authors of previous versions.<br />
Some <strong>de</strong>vices are <strong>de</strong>signed to <strong>de</strong>ny users access to install or run modified versions of the software insi<strong>de</strong> them, although the<br />
manufacturer can do so. This is fundamentally incompatible with the aim of protecting users’ freedom to change the software.<br />
The systematic pattern of such abuse occurs in the area of products for individuals to use, which is precisely where it is most<br />
unacceptable. Therefore, we have <strong>de</strong>signed this version of the GPL to prohibit the practice for those products. If such problems<br />
arise substantially in other domains, we stand ready to extend this provision to those domains in future versions of the GPL, as<br />
nee<strong>de</strong>d to protect the freedom of users.<br />
Finally, every program is threatened constantly by software patents. States should not allow patents to restrict <strong>de</strong>velopment and<br />
use of software on general-purpose computers, but in those that do, we wish to avoid the special danger that patents applied to<br />
a free program could make it effectively proprietary. To prevent this, the GPL assures that patents cannot be used to ren<strong>de</strong>r the<br />
program non-free.<br />
The precise terms and conditions for copying, distribution and modification follow.<br />
TERMS AND CONDITIONS<br />
0. Definitions.<br />
“This License” refers to version 3 of the GNU General Public License.<br />
“Copyright” also means copyright-like laws that apply to other kinds of works, such as semiconductor masks.<br />
“The Program” refers to any copyrightable work licensed un<strong>de</strong>r this License. Each licensee is addressed as “you”. “Licensees”<br />
and “recipients” may be individuals or organizations.<br />
To “modify” a work means to copy from or adapt all or part of the work in a fashion requiring copyright permission, other than<br />
the making of an exact copy. The resulting work is called a “modified version” of the earlier work or a work “based on” the<br />
earlier work.<br />
A “covered work” means either the unmodified Program or a work based on the Program.<br />
To “propagate” a work means to do anything with it that, without permission, would make you directly or secondarily liable<br />
for infringement un<strong>de</strong>r applicable copyright law, except executing it on a computer or modifying a private copy. Propagation<br />
inclu<strong>de</strong>s copying, distribution (with or without modification), making available to the public, and in some countries other<br />
activities as well.<br />
To “convey” a work means any kind of propagation that enables other parties to make or receive copies. Mere interaction with<br />
a user through a computer network, with no transfer of a copy, is not conveying.<br />
An interactive user interface displays “Appropriate Legal Notices” to the extent that it inclu<strong>de</strong>s a convenient and prominently<br />
visible feature that (1) displays an appropriate copyright notice, and (2) tells the user that there is no warranty for the work<br />
(except to the extent that warranties are provi<strong>de</strong>d), that licensees may convey the work un<strong>de</strong>r this License, and how to view a<br />
copy of this License. If the interface presents a list of user commands or options, such as a menu, a prominent item in the list<br />
meets this criterion.
1. Source Co<strong>de</strong>.<br />
The “source co<strong>de</strong>” for a work means the preferred form of the work for making modifications to it. “Object co<strong>de</strong>” means any<br />
non-source<br />
form of a work.<br />
A “Standard Interface” means an interface that either is an official standard <strong>de</strong>fined by a recognized standards body, or, in the<br />
case of interfaces specified for a particular programming language, one that is wi<strong>de</strong>ly used among <strong>de</strong>velopers working in that<br />
language.<br />
The “System Libraries” of an executable work inclu<strong>de</strong> anything, other than the work as a whole, that (a) is inclu<strong>de</strong>d in the<br />
normal form of packaging a Major Component, but which is not part of that Major Component, and (b) serves only to enable<br />
use of the work with that Major Component, or to implement a Standard Interface for which an implementation is available to<br />
the public in source co<strong>de</strong> form. A “Major Component”, in this context, means a major essential component (kernel, window<br />
system, and so on) of the specific operating system (if any) on which the executable work runs, or a compiler used to produce<br />
the work, or an object co<strong>de</strong> interpreter used to run it.<br />
The “Corresponding Source” for a work in object co<strong>de</strong> form means all the source co<strong>de</strong> nee<strong>de</strong>d to generate, install, and (for an<br />
executable work) run the object co<strong>de</strong> and to modify the work, including scripts to control those activities. However, it does not<br />
inclu<strong>de</strong> the work’s System Libraries, or general-purpose tools or generally available free programs which are used unmodified<br />
in performing those activities but which are not part of the work. For example, Corresponding Source inclu<strong>de</strong>s interface<br />
<strong>de</strong>finition files associated with source files for the work, and the source co<strong>de</strong> for shared libraries and dynamically linked<br />
subprograms that the work is specifically <strong>de</strong>signed to require, such as by intimate data communication or control flow between<br />
those subprograms and other parts of the work.<br />
The Corresponding Source need not inclu<strong>de</strong> anything that users can regenerate automatically from other parts of the<br />
Corresponding Source.<br />
The Corresponding Source for a work in source co<strong>de</strong> form is that same work.<br />
2. Basic Permissions.<br />
All rights granted un<strong>de</strong>r this License are granted for the term of copyright on the Program, and are irrevocable provi<strong>de</strong>d the<br />
stated conditions are met. This License explicitly affirms your unlimited permission to run the unmodified Program. The output<br />
from running a covered work is covered by this License only if the output, given its content, constitutes a covered work.<br />
This License acknowledges your rights of fair use or other equivalent, as provi<strong>de</strong>d by copyright law. You may make, run and<br />
propagate covered works that you do not convey, without conditions so long as your license otherwise remains in force. You<br />
may convey covered works to others for the sole purpose of having them make modifications exclusively for you, or provi<strong>de</strong><br />
you with facilities for running those works, provi<strong>de</strong>d that you comply with the terms of this License in conveying all material<br />
for which you do not control copyright. Those thus making or running the covered works for you must do so exclusively on<br />
your behalf, un<strong>de</strong>r your direction and control, on terms that prohibit them from making any copies of your copyrighted material<br />
outsi<strong>de</strong> their relationship with you.<br />
Conveying un<strong>de</strong>r any other circumstances is permitted solely un<strong>de</strong>r the conditions stated below. Sublicensing is not allowed;<br />
section 10 makes it unnecessary.<br />
3. Protecting Users’ Legal Rights From Anti-Circumvention Law.<br />
No covered work shall be <strong>de</strong>emed part of an effective technological measure un<strong>de</strong>r any applicable law fulfilling obligations<br />
un<strong>de</strong>r article 11 of the WIPO copyright treaty adopted on 20 December 1996, or similar laws prohibiting or restricting<br />
circumvention of such measures.<br />
When you convey a covered work, you waive any legal power to forbid circumvention of technological measures to the extent<br />
such circumvention is effected by exercising rights un<strong>de</strong>r this License with respect to the covered work, and you disclaim any<br />
intention to limit operation or modification of the work as a means of enforcing, against the work’s users, your or third parties’<br />
legal rights to forbid circumvention of technological measures.<br />
4. Conveying Verbatim Copies.<br />
You may convey verbatim copies of the Program’s source co<strong>de</strong> as you receive it, in any medium, provi<strong>de</strong>d that you<br />
conspicuously and appropriately publish on each copy an appropriate copyright notice; keep intact all notices stating that this<br />
License and any non-permissive terms ad<strong>de</strong>d in accord with section 7 apply to the co<strong>de</strong>; keep intact all notices of the absence<br />
of any warranty; and give all recipients a copy of this License along with the Program.<br />
You may charge any price or no price for each copy that you convey, and you may offer support or warranty protection for a<br />
fee.<br />
5. Conveying Modified Source Versions.<br />
You may convey a work based on the Program, or the modifications to produce it from the Program, in the form of source co<strong>de</strong><br />
un<strong>de</strong>r the terms of section 4, provi<strong>de</strong>d that you also meet all of these conditions:<br />
<br />
<br />
<br />
<br />
a) The work must carry prominent notices stating that you modified it, and giving a relevant date.<br />
b) The work must carry prominent notices stating that it is released un<strong>de</strong>r this License and any conditions ad<strong>de</strong>d un<strong>de</strong>r<br />
section 7. This requirement modifies the requirement in section 4 to “keep intact all notices”.<br />
c) You must license the entire work, as a whole, un<strong>de</strong>r this License to anyone who comes into possession of a copy. This<br />
License will therefore apply, along with any applicable section 7 additional terms, to the whole of the work, and all its<br />
parts, regardless of how they are packaged. This License gives no permission to license the work in any other way, but it<br />
does not invalidate such permission if you have separately received it.<br />
d) If the work has interactive user interfaces, each must display Appropriate Legal Notices; however, if the Program has<br />
interactive interfaces that do not display Appropriate Legal Notices, your work need not make them do so.
A compilation of a covered work with other separate and in<strong>de</strong>pen<strong>de</strong>nt works, which are not by their nature extensions of<br />
the covered work, and which are not combined with it such as to form a larger program, in or on a volume of a storage or<br />
distribution medium, is called an “aggregate” if the compilation and its resulting copyright are not used to limit the access or<br />
legal rights of the compilation’s users beyond what the individual works permit. Inclusion of a covered work in an aggregate<br />
does not cause this License to apply to the other parts of the aggregate.<br />
6. Conveying Non-Source Forms.<br />
You may convey a covered work in object co<strong>de</strong> form un<strong>de</strong>r the terms of sections 4 and 5, provi<strong>de</strong>d that you also convey the<br />
machine-readable Corresponding Source un<strong>de</strong>r the terms of this License, in one of these ways:<br />
a) Convey the object co<strong>de</strong> in, or embodied in, a physical product (including a physical distribution medium), accompanied<br />
by the Corresponding Source fixed on a durable physical medium customarily used for software interchange.<br />
b) Convey the object co<strong>de</strong> in, or embodied in, a physical product (including a physical distribution medium), accompanied<br />
by a written offer, valid for at least three years and valid for as long as you offer spare parts or customer support for that<br />
product mo<strong>de</strong>l, to give anyone who possesses the object co<strong>de</strong> either (1) a copy of the Corresponding Source for all the<br />
software in the product that is covered by this License, on a durable physical medium customarily used for software<br />
interchange, for a price no more than your reasonable cost of physically performing this conveying of source, or (2)<br />
access to copy the Corresponding Source from a network server at no charge.<br />
c) Convey individual copies of the object co<strong>de</strong> with a copy of the written offer to provi<strong>de</strong> the Corresponding Source. This<br />
alternative is allowed only occasionally and noncommercially, and only if you received the object co<strong>de</strong> with such an offer,<br />
in accord with subsection 6b.<br />
d) Convey the object co<strong>de</strong> by offering access from a <strong>de</strong>signated place (gratis or for a charge), and offer equivalent<br />
access to the Corresponding Source in the same way through the same place at no further charge. You need not require<br />
recipients to copy the Corresponding Source along with the object co<strong>de</strong>. If the place to copy the object co<strong>de</strong> is a network<br />
server, the Corresponding Source may be on a different server (operated by you or a third party) that supports equivalent<br />
copying facilities, provi<strong>de</strong>d you maintain clear directions next to the object co<strong>de</strong> saying where to find the Corresponding<br />
Source. Regardless of what server hosts the Corresponding Source, you remain obligated to ensure that it is available for<br />
as long as nee<strong>de</strong>d to satisfy these requirements.<br />
e) Convey the object co<strong>de</strong> using peer-to-peer transmission, provi<strong>de</strong>d you inform other peers where the object co<strong>de</strong> and<br />
Corresponding Source of the work are being offered to the general public at no charge un<strong>de</strong>r subsection 6d. A separable<br />
portion of the object co<strong>de</strong>, whose source co<strong>de</strong> is exclu<strong>de</strong>d from the Corresponding Source as a System Library, need not<br />
be inclu<strong>de</strong>d in conveying the object co<strong>de</strong> work.<br />
A “User Product” is either (1) a “consumer product”, which means any tangible personal property which is normally used for<br />
personal, family, or household purposes, or (2) anything <strong>de</strong>signed or sold for incorporation into a dwelling. In <strong>de</strong>termining<br />
whether a product is a consumer product, doubtful cases shall be resolved in favor of coverage. For a particular product<br />
received by a particular user, “normally used” refers to a typical or common use of that class of product, regardless of the<br />
status of the particular user or of the way in which the particular user actually uses, or expects or is expected to use, the<br />
product. A product is a consumer product regardless of whether the product has substantial commercial, industrial or nonconsumer<br />
uses, unless such uses represent the only significant mo<strong>de</strong> of use of the product.<br />
“Installation Information” for a User Product means any methods, procedures, authorization keys, or other information required<br />
to install and execute modified versions of a covered work in that User Product from a modified version of its Corresponding<br />
Source. The information must suffice to ensure that the continued functioning of the modified object co<strong>de</strong> is in no case<br />
prevented or interfered with solely because modification has been ma<strong>de</strong>.<br />
If you convey an object co<strong>de</strong> work un<strong>de</strong>r this section in, or with, or specifically for use in, a User Product, and the conveying<br />
occurs as part of a transaction in which the right of possession and use of the User Product is transferred to the recipient in<br />
perpetuity or for a fixed term (regardless of how the transaction is characterized), the Corresponding Source conveyed un<strong>de</strong>r<br />
this section must be accompanied by the Installation Information. But this requirement does not apply if neither you nor any<br />
third party retains the ability to install modified object co<strong>de</strong> on the User Product (for example, the work has been installed in<br />
ROM).<br />
The requirement to provi<strong>de</strong> Installation Information does not inclu<strong>de</strong> a requirement to continue to provi<strong>de</strong> support service,<br />
warranty, or updates for a work that has been modified or installed by the recipient, or for the User Product in which it has<br />
been modified or installed. Access to a network may be <strong>de</strong>nied when the modification itself materially and adversely affects the<br />
operation of the network or violates the rules and protocols for communication across the network.<br />
Corresponding Source conveyed, and Installation Information provi<strong>de</strong>d, in accord with this section must be in a format that is<br />
publicly documented (and with an implementation available to the public in source co<strong>de</strong> form), and must require no special<br />
password or key for unpacking, reading or copying.<br />
7. Additional Terms.<br />
“Additional permissions” are terms that supplement the terms of this License by making exceptions from one or more of its<br />
conditions. Additional permissions that are applicable to the entire Program shall be treated as though they were inclu<strong>de</strong>d in<br />
this License, to the extent that they are valid un<strong>de</strong>r applicable law. If additional permissions apply only to part of the Program,<br />
that part may be used separately un<strong>de</strong>r those permissions, but the entire Program remains governed by this License without<br />
regard to the additional permissions.
When you convey a copy of a covered work, you may at your option remove any additional permissions from that copy, or<br />
from any part of it. (Additional permissions may be written to require their own removal in certain cases when you modify the<br />
work.) You may place additional permissions on material, ad<strong>de</strong>d by you to a covered work, for which you have or can give<br />
appropriate copyright permission.<br />
Notwithstanding any other provision of this License, for material you add to a covered work, you may (if authorized by the<br />
copyright hol<strong>de</strong>rs of that material) supplement the terms of this License with terms:<br />
<br />
<br />
<br />
<br />
<br />
<br />
a) Disclaiming warranty or limiting liability differently from the terms of sections 15 and 16 of this License; or<br />
b) Requiring preservation of specified reasonable legal notices or author attributions in that material or in the Appropriate<br />
Legal Notices displayed by works containing it; or<br />
c) Prohibiting misrepresentation of the origin of that material, or requiring that modified versions of such material be<br />
marked in reasonable ways as different from the original version; or<br />
d) Limiting the use for publicity purposes of names of licensors or authors of the material; or<br />
e) Declining to grant rights un<strong>de</strong>r tra<strong>de</strong>mark law for use of some tra<strong>de</strong> names, tra<strong>de</strong>marks, or service marks; or<br />
f) Requiring in<strong>de</strong>mnification of licensors and authors of that material by anyone who conveys the material (or modified<br />
versions of it) with contractual assumptions of liability to the recipient, for any liability that these contractual assumptions<br />
directly impose on those licensors and authors.<br />
All other non-permissive additional terms are consi<strong>de</strong>red “further restrictions” within the meaning of section 10. If the Program<br />
as you received it, or any part of it, contains a notice stating that it is governed by this License along with a term that is a<br />
further restriction, you may remove that term. If a license document contains a further restriction but permits relicensing or<br />
conveying un<strong>de</strong>r this License, you may add to a covered work material governed by the terms of that license document,<br />
provi<strong>de</strong>d that the further restriction does not survive such relicensing or conveying.<br />
If you add terms to a covered work in accord with this section, you must place, in the relevant source files, a statement of the<br />
additional terms that apply to those files, or a notice indicating where to find the applicable terms.<br />
Additional terms, permissive or non-permissive, may be stated in the form of a separately written license, or stated as<br />
exceptions; the above requirements apply either way.<br />
8. Termination.<br />
You may not propagate or modify a covered work except as expressly provi<strong>de</strong>d un<strong>de</strong>r this License. Any attempt otherwise to<br />
propagate or modify it is void, and will automatically terminate your rights un<strong>de</strong>r this License (including any patent licenses<br />
granted un<strong>de</strong>r the third paragraph of section 11).<br />
However, if you cease all violation of this License, then your license from a particular copyright hol<strong>de</strong>r is reinstated (a)<br />
provisionally, unless and until the copyright hol<strong>de</strong>r explicitly and finally terminates your license, and (b) permanently, if the<br />
copyright hol<strong>de</strong>r fails to notify you of the violation by some reasonable means prior to 60 days after the cessation.<br />
Moreover, your license from a particular copyright hol<strong>de</strong>r is reinstated permanently if the copyright hol<strong>de</strong>r notifies you of the<br />
violation by some reasonable means, this is the first time you have received notice of violation of this License (for any work)<br />
from that copyright hol<strong>de</strong>r, and you cure the violation prior to 30 days after your receipt of the notice.<br />
Termination of your rights un<strong>de</strong>r this section does not terminate the licenses of parties who have received copies or rights from<br />
you un<strong>de</strong>r this License. If your rights have been terminated and not permanently reinstated, you do not qualify to receive new<br />
licenses for the same material un<strong>de</strong>r section 10.<br />
9. Acceptance Not Required for Having Copies.<br />
You are not required to accept this License in or<strong>de</strong>r to receive or run a copy of the Program. Ancillary propagation of a covered<br />
work occurring solely as a consequence of using peer-to-peer transmission to receive a copy likewise does not require<br />
acceptance. However, nothing other than this License grants you permission to propagate or modify any covered work. These<br />
actions infringe copyright if you do not accept this License. Therefore, by modifying or propagating a covered work, you<br />
indicate your acceptance of this License to do so.<br />
10. Automatic Licensing of Downstream Recipients.<br />
Each time you convey a covered work, the recipient automatically receives a license from the original licensors, to run, modify<br />
and propagate that work, subject to this License. You are not responsible for enforcing compliance by third parties with this<br />
License.<br />
An “entity transaction” is a transaction transferring control of an organization, or substantially all assets of one, or subdividing<br />
an organization, or merging organizations. If propagation of a covered work results from an entity transaction, each party<br />
to that transaction who receives a copy of the work also receives whatever licenses to the work the party’s pre<strong>de</strong>cessor in<br />
interest had or could give un<strong>de</strong>r the previous paragraph, plus a right to possession of the Corresponding Source of the work<br />
from the pre<strong>de</strong>cessor in interest, if the pre<strong>de</strong>cessor has it or can get it with reasonable efforts.<br />
You may not impose any further restrictions on the exercise of the rights granted or affirmed un<strong>de</strong>r this License. For example,<br />
you may not impose a license fee, royalty, or other charge for exercise of rights granted un<strong>de</strong>r this License, and you may not<br />
initiate litigation (including a cross-claim or counterclaim in a lawsuit) alleging that any patent claim is infringed by making,<br />
using, selling, offering for sale, or importing the Program or any portion of it.
11. Patents.<br />
A “contributor” is a copyright hol<strong>de</strong>r who authorizes use un<strong>de</strong>r this License of the Program or a work on which the Program is<br />
based. The work thus licensed is called the contributor’s “contributor version”.<br />
A contributor’s “essential patent claims” are all patent claims owned or controlled by the contributor, whether already acquired<br />
or hereafter acquired, that would be infringed by some manner, permitted by this License, of making, using, or selling its<br />
contributor version, but do not inclu<strong>de</strong> claims that would be infringed only as a consequence of further modification of the<br />
contributor version. For purposes of this <strong>de</strong>finition, “control” inclu<strong>de</strong>s the right to grant patent sublicenses in a manner<br />
consistent with the requirements of this License.<br />
Each contributor grants you a non-exclusive, worldwi<strong>de</strong>, royalty-free patent license un<strong>de</strong>r the contributor’s essential patent<br />
claims, to make, use, sell, offer for sale, import and otherwise run, modify and propagate the contents of its contributor version.<br />
In the following three paragraphs, a “patent license” is any express agreement or commitment, however <strong>de</strong>nominated, not<br />
to enforce a patent (such as an express permission to practice a patent or covenant not to sue for patent infringement). To<br />
“grant” such a patent license to a party means to make such an agreement or commitment not to enforce a patent against the<br />
party.<br />
If you convey a covered work, knowingly relying on a patent license, and the Corresponding Source of the work is not<br />
available for anyone to copy, free of charge and un<strong>de</strong>r the terms of this License, through a publicly available network server or<br />
other readily accessible means, then you must either (1) cause the Corresponding Source to be so available, or (2) arrange<br />
to <strong>de</strong>prive yourself of the benefit of the patent license for this particular work, or (3) arrange, in a manner consistent with the<br />
requirements of this License, to extend the patent license to downstream recipients. “Knowingly relying” means you have<br />
actual knowledge that, but for the patent license, your conveying the covered work in a country, or your recipient’s use of the<br />
covered work in a country, would infringe one or more i<strong>de</strong>ntifiable patents in that country that you have reason to believe are<br />
valid.<br />
If, pursuant to or in connection with a single transaction or arrangement, you convey, or propagate by procuring conveyance<br />
of, a covered work, and grant a patent license to some of the parties receiving the covered work authorizing them to use,<br />
propagate, modify or convey a specific copy of the covered work, then the patent license you grant is automatically exten<strong>de</strong>d<br />
to all recipients of the covered work and works based on it.<br />
A patent license is “discriminatory” if it does not inclu<strong>de</strong> within the scope of its coverage, prohibits the exercise of, or is<br />
conditioned on the non-exercise of one or more of the rights that are specifically granted un<strong>de</strong>r this License. You may not<br />
convey a covered work if you are a party to an arrangement with a third party that is in the business of distributing software,<br />
un<strong>de</strong>r which you make payment to the third party based on the extent of your activity of conveying the work, and un<strong>de</strong>r which<br />
the third party grants, to any of the parties who would receive the covered work from you, a discriminatory patent license (a)<br />
in connection with copies of the covered work conveyed by you (or copies ma<strong>de</strong> from those copies), or (b) primarily for and in<br />
connection with specific products or compilations that contain the covered work, unless you entered into that arrangement, or<br />
that patent license was granted, prior to 28 March 2007.<br />
Nothing in this License shall be construed as excluding or limiting any implied license or other <strong>de</strong>fenses to infringement that<br />
may otherwise be available to you un<strong>de</strong>r applicable patent law.<br />
12. No Surren<strong>de</strong>r of Others’ Freedom.<br />
If conditions are imposed on you (whether by court or<strong>de</strong>r, agreement or otherwise) that contradict the conditions of this<br />
License, they do not excuse you from the conditions of this License. If you cannot convey a covered work so as to satisfy<br />
simultaneously your obligations un<strong>de</strong>r this License and any other pertinent obligations, then as a consequence you may not<br />
convey it at all. For example, if you agree to terms that obligate you to collect a royalty for further conveying from those to<br />
whom you convey the Program, the only way you could satisfy both those terms and this License would be to refrain entirely<br />
from conveying the Program.<br />
13. Use with the GNU Affero General Public License.<br />
Notwithstanding any other provision of this License, you have permission to link or combine any covered work with a work<br />
licensed un<strong>de</strong>r version 3 of the GNU Affero General Public License into a single combined work, and to convey the resulting<br />
work. The terms of this License will continue to apply to the part which is the covered work, but the special requirements of<br />
the GNU Affero General Public License, section 13, concerning interaction through a network will apply to the combination as<br />
such.<br />
14. Revised Versions of this License.<br />
The Free Software Foundation may publish revised and/or new versions of the GNU General Public License from time to time.<br />
Such new versions will be similar in spirit to the present version, but may differ in <strong>de</strong>tail to address new problems or concerns.<br />
Each version is given a distinguishing version number. If the Program specifies that a certain numbered version of the GNU<br />
General Public License “or any later version” applies to it, you have the option of following the terms and conditions either of<br />
that numbered version or of any later version published by the Free Software Foundation. If the Program does not specify<br />
a version number of the GNU General Public License, you may choose any version ever published by the Free Software<br />
Foundation.<br />
If the Program specifies that a proxy can <strong>de</strong>ci<strong>de</strong> which future versions of the GNU General Public License can be used, that<br />
proxy’s public statement of acceptance of a version permanently authorizes you to choose that version for the Program.<br />
Later license versions may give you additional or different permissions. However, no additional obligations are imposed on any<br />
author or copyright hol<strong>de</strong>r as a result of your choosing to follow a later version.
15. Disclaimer of Warranty.<br />
THERE IS NO WARRANTY FOR THE PROGRAM, TO THE EXTENT PERMITTED BY APPLICABLE LAW. EXCEPT WHEN<br />
OTHERWISE STATED IN WRITING THE COPYRIGHT HOLDERS AND/OR OTHER PARTIES PROVIDE THE PROGRAM<br />
“AS IS” WITHOUT WARRANTY OF ANY KIND, EITHER EXPRESSED OR IMPLIED, INCLUDING, BUT NOT LIMITED TO,<br />
THE IMPLIED WARRANTIES OF MERCHANTABILITY AND FITNESS FOR A PARTICULAR PURPOSE. THE ENTIRE<br />
RISK AS TO THE QUALITY AND PERFORMANCE OF THE PROGRAM IS WITH YOU. SHOULD THE PROGRAM PROVE<br />
DEFECTIVE, YOU ASSUME THE COST OF ALL NECESSARY SERVICING, REPAIR OR CORRECTION.<br />
16. Limitation of Liability.<br />
IN NO EVENT UNLESS REQUIRED BY APPLICABLE LAW OR AGREED TO IN WRITING WILL ANY COPYRIGHT<br />
HOLDER, OR ANY OTHER PARTY WHO MODIFIES AND/OR CONVEYS THE PROGRAM AS PERMITTED ABOVE, BE<br />
LIABLE TO YOU FOR DAMAGES, INCLUDING ANY GENERAL, SPECIAL, INCIDENTAL OR CONSEQUENTIAL DAMAGES<br />
ARISING OUT OF THE USE OR INABILITY TO USE THE PROGRAM (INCLUDING BUT NOT LIMITED TO LOSS OF DATA<br />
OR DATA BEING RENDERED INACCURATE OR LOSSES SUSTAINED BY YOU OR THIRD PARTIES OR A FAILURE OF<br />
THE PROGRAM TO OPERATE WITH ANY OTHER PROGRAMS), EVEN IF SUCH HOLDER OR OTHER PARTY HAS BEEN<br />
ADVISED OF THE POSSIBILITY OF SUCH DAMAGES.<br />
17. Interpretation of Sections 15 and 16.<br />
If the disclaimer of warranty and limitation of liability provi<strong>de</strong>d above cannot be given local legal effect according to their terms,<br />
reviewing courts shall apply local law that most closely approximates an absolute waiver of all civil liability in connection with<br />
the Program, unless a warranty or assumption of liability accompanies a copy of the Program in return for a fee.<br />
¦ END OF TERMS AND CONDITIONS<br />
How to Apply These Terms to Your New Programs<br />
If you <strong>de</strong>velop a new program, and you want it to be of the greatest possible use to the public, the best way to achieve this is to<br />
make it free software which everyone can redistribute and change un<strong>de</strong>r these terms.<br />
To do so, attach the following notices to the program. It is safest to attach them to the start of each source file to most effectively<br />
state the exclusion of warranty; and each file should have at least the “copyright” line and a pointer to where the full notice is found.<br />
Copyright (C) <br />
This program is free software: you can redistribute it and/or modify it un<strong>de</strong>r the terms of the GNU General Public License as<br />
published by the Free Software Foundation, either version 3 of the License, or (at your option) any later version.<br />
This program is distributed in the hope that it will be useful, but WITHOUT ANY WARRANTY; without even the implied<br />
warranty of MERCHANTABILITY or FITNESS FOR A PARTICULAR PURPOSE. See the GNU General Public License for<br />
more <strong>de</strong>tails.<br />
You should have received a copy of the GNU General Public License along with this program. If not, see .<br />
Also add information on how to contact you by electronic and paper mail.<br />
If the program does terminal interaction, make it output a short notice like this when it starts in an interactive mo<strong>de</strong>:<br />
Copyright (C) This program comes with ABSOLUTELY NO WARRANTY; for <strong>de</strong>tails type<br />
`show w’. This is free software, and you are welcome to redistribute it un<strong>de</strong>r certain conditions; type `show c’ for <strong>de</strong>tails.<br />
The hypothetical commands `show w’ and `show c’ should show the appropriate parts of the General Public License. Of course,<br />
your program’s commands might be different; for a GUI interface, you would use an “about box”.<br />
You should also get your employer (if you work as a programmer) or school, if any, to sign a “copyright disclaimer” for the program,<br />
if necessary.<br />
For more information on this, and how to apply and follow the GNU GPL, see .<br />
The GNU General Public License does not permit incorporating your program into proprietary programs. If your program is a<br />
subroutine library, you may consi<strong>de</strong>r it more useful to permit linking proprietary applications with the library. If this is what you want<br />
to do, use the GNU Lesser General Public License instead of this License. But first, please read .
¦ LICENSE ISSUES<br />
The OpenSSL toolkit stays un<strong>de</strong>r a dual license, i.e. both the conditions of the OpenSSL License and the original SSLeay license<br />
apply to the toolkit. See below for the actual license texts. Actually both licenses are BSD-style Open Source licenses. In case of<br />
any license issues related to OpenSSL please contact openssl-core@openssl.org.<br />
OpenSSL License<br />
Copyright (c) 1998-2007 The OpenSSL Project. All rights reserved.<br />
Redistribution and use in source and binary forms, with or without modification, are permitted provi<strong>de</strong>d that the following conditions<br />
are met:<br />
1. Redistributions of source co<strong>de</strong> must retain the above copyright notice, this list of conditions and the following disclaimer.<br />
2. Redistributions in binary form must reproduce the above copyright notice, this list of conditions and the following disclaimer in<br />
the documentation and/or other materials provi<strong>de</strong>d with the distribution.<br />
3. All advertising materials mentioning features or use of this software must display the following acknowledgment: “This product<br />
inclu<strong>de</strong>s software <strong>de</strong>veloped by the OpenSSL Project for use in the OpenSSL Toolkit. (http://www.openssl.org/)”<br />
4. The names “OpenSSL Toolkit” and “OpenSSL Project” must not be used to endorse or promote products <strong>de</strong>rived from this<br />
software without prior written permission. For written permission, please contact openssl-core@openssl.org.<br />
5. Products <strong>de</strong>rived from this software may not be called “OpenSSL nor may “OpenSSL” appear in their names without prior<br />
written permission of the OpenSSL Project.<br />
6. Redistributions of any form whatsoever must retain the following acknowledgment: “This product inclu<strong>de</strong>s software <strong>de</strong>veloped<br />
by the OpenSSL Project for use in the OpenSSL Toolkit (http://www.openssl.org/)”<br />
THIS SOFTWARE IS PROVIDED BY THE OpenSSL PROJECT ``AS IS’’ AND ANY EXPRESSED OR IMPLIED WARRANTIES,<br />
INCLUDING, BUT NOT LIMITED TO, THE IMPLIED WARRANTIES OF MERCHANTABILITY AND FITNESS FOR A PARTICULAR<br />
PURPOSE ARE DISCLAIMED. IN NO EVENT SHALL THE OpenSSL PROJECT OR ITS CONTRIBUTORS BE LIABLE FOR<br />
ANY DIRECT, INDIRECT, INCIDENTAL, SPECIAL, EXEMPLARY, OR CONSEQUENTIAL DAMAGES (INCLUDING, BUT NOT<br />
LIMITED TO, PROCUREMENT OF SUBSTITUTE GOODS OR SERVICES; LOSS OF USE, DATA, OR PROFITS; OR BUSINESS<br />
INTERRUPTION) HOWEVER CAUSED AND ON ANY THEORY OF LIABILITY, WHETHER IN CONTRACT, STRICT LIABILITY,<br />
OR TORT (INCLUDING NEGLIGENCE OR OTHERWISE) ARISING IN ANY WAY OUT OF THE USE OF THIS SOFTWARE,<br />
EVEN IF ADVISED OF THE POSSIBILITY OF SUCH DAMAGE.<br />
This product inclu<strong>de</strong>s cryptographic software written by Eric Young (eay@cryptsoft.com). This product inclu<strong>de</strong>s software written by<br />
Tim Hudson (tjh@cryptsoft.com).<br />
Original SSLeay License<br />
Copyright (C) 1995-1998 Eric Young (eay@cryptsoft.com) All rights reserved.<br />
This package is an SSL implementation written by Eric Young (eay@cryptsoft.com). The implementation was written so as to<br />
conform with Netscapes SSL.<br />
This library is free for commercial and non-commercial use as long as the following conditions are aheared to. The following<br />
conditions apply to all co<strong>de</strong> found in this distribution, be it the RC4, RSA, lhash, DES, etc., co<strong>de</strong>; not just the SSL co<strong>de</strong>. The SSL<br />
documentation inclu<strong>de</strong>d with this distribution is covered by the same copyright terms except that the hol<strong>de</strong>r is Tim Hudson (tjh@<br />
cryptsoft.com).<br />
Copyright remains Eric Young’s, and as such any Copyright notices in the co<strong>de</strong> are not to be removed. If this package is used in<br />
a product, Eric Young should be given attribution as the author of the parts of the library used. This can be in the form of a textual<br />
message at program startup or in documentation (online or textual) provi<strong>de</strong>d with the package.<br />
Redistribution and use in source and binary forms, with or without modification, are permitted provi<strong>de</strong>d that the following conditions<br />
are met:<br />
1. Redistributions of source co<strong>de</strong> must retain the copyright notice, this list of conditions and the following disclaimer.<br />
2. Redistributions in binary form must reproduce the above copyright notice, this list of conditions and the following disclaimer in<br />
the documentation and/or other materials provi<strong>de</strong>d with the distribution.<br />
3. All advertising materials mentioning features or use of this software must display the following acknowledgement: “This<br />
product inclu<strong>de</strong>s cryptographic software written by Eric Young (eay@cryptsoft.com)” The word ‘cryptographic’ can be left out if<br />
the rouines from the library being used are not cryptographic related :-).<br />
4. If you inclu<strong>de</strong> any Windows specific co<strong>de</strong> (or a <strong>de</strong>rivative thereof) from the apps directory (application co<strong>de</strong>) you must inclu<strong>de</strong><br />
an acknowledgement: “This product inclu<strong>de</strong>s software written by Tim Hudson (tjh@cryptsoft.com)”<br />
THIS SOFTWARE IS PROVIDED BY ERIC YOUNG ``AS IS’’ AND ANY EXPRESS OR IMPLIED WARRANTIES, INCLUDING,<br />
BUT NOT LIMITED TO, THE IMPLIED WARRANTIES OF MERCHANTABILITY AND FITNESS FOR A PARTICULAR<br />
PURPOSE ARE DISCLAIMED. IN NO EVENT SHALL THE AUTHOR OR CONTRIBUTORS BE LIABLE FOR ANY DIRECT,<br />
INDIRECT, INCIDENTAL, SPECIAL, EXEMPLARY, OR CONSEQUENTIAL DAMAGES (INCLUDING, BUT NOT LIMITED<br />
TO, PROCUREMENT OF SUBSTITUTE GOODS OR SERVICES; LOSS OF USE, DATA, OR PROFITS; OR BUSINESS<br />
INTERRUPTION) HOWEVER CAUSED AND ON ANY THEORY OF LIABILITY, WHETHER IN CONTRACT, STRICT LIABILITY,<br />
OR TORT (INCLUDING NEGLIGENCE OR OTHERWISE) ARISING IN ANY WAY OUT OF THE USE OF THIS SOFTWARE,<br />
EVEN IF ADVISED OF THE POSSIBILITY OF SUCH DAMAGE.<br />
The licence and distribution terms for any publically available version or <strong>de</strong>rivative of this co<strong>de</strong> cannot be changed. i.e. this co<strong>de</strong><br />
cannot simply be copied and put un<strong>de</strong>r another distribution licence [including the GNU Public Licence.]
This page is intentionally<br />
left blank.
❑<br />
❑<br />
Hinweis zu Digitalfernsehen<br />
1. Die Funktionalitäten für Digital TV (DVB) stehen nur in Län<strong>de</strong>rn/Regionen zur Verfügung, in <strong>de</strong>nen digitale terrestrische DVB-<br />
T-Signale (MPEG2 und MPEG4 AVC) gesen<strong>de</strong>t wer<strong>de</strong>n o<strong>de</strong>r in <strong>de</strong>nen Sie Zugang zu einem kompatiblen Kabelfernsehdienst<br />
mit DVB-C (MPEG2 und MPEG4 AAC) haben können. Fragen Sie Ihren örtlichen Händler, wenn Sie Informationen über die<br />
Verfügbarkeit von DVB-T o<strong>de</strong>r DVB-C in Ihrer Gegend benötigen.<br />
2. DVB-T ist <strong>de</strong>r Standard <strong>de</strong>s europäischen DVB-Konsortiums für die terrestrische Versorgung mit digitalem Fernsehen,<br />
und DVB-C ist <strong>de</strong>r Standard <strong>de</strong>s Konsortiums für die Versorgung mit digitalem Kabelfernsehen. Allerdings wer<strong>de</strong>n manche<br />
Unterscheidungsmerkmale wie EPG (elektrische Programmzeitschrift), VOD (Vi<strong>de</strong>o on Demand) usw. in dieser Spezifikation<br />
nicht berücksichtigt. Deshalb können sie zum jetzigen Zeitpunkt noch nicht eingesetzt wer<strong>de</strong>n.<br />
3. Zwar hält dieses Fernsehgerät die aktuellen Standards <strong>de</strong>r DVB-T- und DVB-C-Spezifikationen [Version August 2008] ein,<br />
aber es kann nicht garantiert wer<strong>de</strong>n, dass die Kompatibilität mit zukünftigen digitalen terrestrischen DVB-T und DBV-C-<br />
Signalen gewahrt bleibt.<br />
4. In Abhängigkeit von <strong>de</strong>n Län<strong>de</strong>rn/Regionen, in <strong>de</strong>nen dieses Fernsehgerät eingesetzt wird, verlangen manche<br />
Kabelfernsehanbieter zusätzliche Gebühren für solch einen Dienst, und möglicherweise wird verlangt, dass Sie <strong>de</strong>n<br />
Vertragsbedingungen <strong>de</strong>s Unternehmens zustimmen.<br />
5. Manche Digitalfernsehfunktionen sind in einigen Län<strong>de</strong>rn o<strong>de</strong>r Regionen möglicherweise nicht verfügbar, und bei DVB-C kann<br />
das Gerät möglicherweise bei manchen Kabelfernsehanbietern nicht störungsfrei zusammenarbeiten.<br />
6. Für weitere Informationen setzen Sie sich bitte mit <strong>de</strong>m SAMSUNG-Kun<strong>de</strong>ndienstzentrum in Verbindung.<br />
Vorsichtsmaßnahmen beim Anzeigen von Standbil<strong>de</strong>rn<br />
Ein Standbild kann zu einer dauerhaften Beschädigung <strong>de</strong>s Bildschirms führen.<br />
● Zeigen Sie Standbil<strong>de</strong>r und teilweise unbewegte Bil<strong>de</strong>r nicht länger als 2 Stun<strong>de</strong>n auf <strong>de</strong>m LCD-Bildschirm an, da das Bild auf<br />
diese Weise einbrennen kann. Das Einbrennen von Standbil<strong>de</strong>rn wird auch als ‘Bildkonservierung’ bezeichnet. Sie können<br />
das Einbrennen vermei<strong>de</strong>n, in<strong>de</strong>m Sie die Helligkeit und <strong>de</strong>n Kontrast <strong>de</strong>s Bildschirms beim Anzeigen von Standbil<strong>de</strong>rn<br />
verringern.<br />
●<br />
Der Betrieb <strong>de</strong>s LCD-Monitors im Format 4:3 für einen längeren Zeitraum kann links, rechts und in <strong>de</strong>r Mitte<br />
<strong>de</strong>s Monitors Spuren <strong>de</strong>r Bildrän<strong>de</strong>r hinterlassen, die durch die unterschiedliche Lichtemission auf <strong>de</strong>m<br />
Monitor verursacht wer<strong>de</strong>n. DVD- o<strong>de</strong>r Spielekonsole-Wie<strong>de</strong>rgabe können einen ähnlichen Effekt<br />
verursachen. Schä<strong>de</strong>n, die durch die o. g. Effekte verursacht wur<strong>de</strong>n, fallen nicht unter die Garantie.<br />
● Durch das Anzeigen <strong>de</strong>r Standbil<strong>de</strong>r von Vi<strong>de</strong>ospielen o<strong>de</strong>r vom PC über einen gewissen Zeitraum hinaus können partielle<br />
Nachbil<strong>de</strong>r entstehen. Um diesen Effekt zu verhin<strong>de</strong>rn, verringern Sie Helligkeit und Kontrast, wenn Sie Standbil<strong>de</strong>r anzeigen<br />
möchten.<br />
© 2009 <strong>Samsung</strong> Electronics Co., Ltd. Alle Rechte vorbehalten.
Inhalt<br />
Einrichten Ihres Fernsehgeräts<br />
■ Bedienfeld.......................................................................................... 2<br />
■ Zubehör.............................................................................................. 3<br />
■ Anschlussfeld..................................................................................... 4<br />
■ Fernbedienung................................................................................... 6<br />
■ Batterien in die Fernbedienung einsetzen.......................................... 7<br />
■ Anzeigen von Menüs.......................................................................... 7<br />
■ Fernsehgerät in <strong>de</strong>n Standby-Modus schalten.................................. 8<br />
■ Plug & Play-Funktion.......................................................................... 8<br />
■ Anzeigen <strong>de</strong>s Bildschirmmenüs......................................................... 9<br />
Kanal<br />
■ Kanalmenü......................................................................................... 9<br />
■ Verwalten von Kanälen ................................................................... 12<br />
BILD<br />
■ Konfigurieren <strong>de</strong>s Bildmenüs........................................................... 14<br />
■ Verwen<strong>de</strong>n Ihres Computers als Computerbildschirm (PC)............. 18<br />
■ Fernsehgerät mithilfe <strong>de</strong>s PCs einstellen......................................... 19<br />
SOUND<br />
■ Konfigurieren <strong>de</strong>s Tonmenüs........................................................... 20<br />
■ Tonmodus wählen............................................................................ 21<br />
EINSTELLUNGEN<br />
■ Konfigurieren <strong>de</strong>r Menüeinstellungen.............................................. 22<br />
■ Einstellen <strong>de</strong>r Uhrzeit....................................................................... 24<br />
SIGNALQUELLEN / UNTERSTÜTZUNG<br />
■ Menü Eingang.................................................................................. 26<br />
■ Menü Unterstützung......................................................................... 26<br />
Medienwie<strong>de</strong>rgabe (USB & DLNA)<br />
■ Anschließen eines USB-Geräts....................................................... 28<br />
■ Media Play funktion.......................................................................... 29<br />
■ Menü <strong>de</strong>r Optionen für Fotolisten..................................................... 30<br />
■ Anzeigen eines Fotos o<strong>de</strong>r einer Diashow....................................... 31<br />
■ Menü <strong>de</strong>r Optionen für Diashows..................................................... 32<br />
■ Menü <strong>de</strong>r Optionen für Fotolisten..................................................... 33<br />
■ Wie<strong>de</strong>rgeben von Musik................................................................... 34<br />
■ Menü <strong>de</strong>r Optionen für die Musikwie<strong>de</strong>rgabe.................................. 35<br />
■ Verwen<strong>de</strong>n <strong>de</strong>s Menüs Einstellungen.............................................. 35<br />
ANYNET+<br />
■ Anschließen von Anynet+-Geräten.................................................. 36<br />
■ Einrichten von Anynet+.................................................................... 37<br />
■ Wechseln zwischen von Anynet+-Geräten....................................... 37<br />
■ Aufnahme......................................................................................... 38<br />
■ Wie<strong>de</strong>rgabe über einen Receiver (Heimkinosystem)....................... 38<br />
■ Fehlerbehebung für Anynet+............................................................ 39<br />
EMPFEHLUNGEN<br />
■ Vi<strong>de</strong>otextfunktion.............................................................................. 40<br />
■ Anbringen <strong>de</strong>s Standfußes............................................................... 41<br />
■ Lösen <strong>de</strong>s Standfußes..................................................................... 42<br />
■ Anbringen <strong>de</strong>r Wandhalterung......................................................... 42<br />
■ Verlegen <strong>de</strong>r Kabel........................................................................... 42<br />
■ Kensington-Schloss als Diebstahlsicherung.................................... 42<br />
■ Absichern <strong>de</strong>s Einbaubereichs......................................................... 43<br />
■ Befestigen <strong>de</strong>s Fernsehgeräts an <strong>de</strong>r Wand.................................... 43<br />
■ Fehlerbehebung: Vor <strong>de</strong>r Kontaktaufnahme mit <strong>de</strong>m Kun<strong>de</strong>ndienst... 44<br />
■ Technische Daten............................................................................. 45<br />
Deutsch<br />
❑<br />
Lizenz<br />
TruSurround HD, SRS und das Symbol sind eingetragene Marken von SRS Labs, Inc.<br />
Die TruSurround HD-Technologie wird unter Lizenz von SRS Labs, Inc. in das System integriert.<br />
Hergestellt unter Lizenz <strong>de</strong>r Dolby Laboratories: Dolby sowie das Doppel-D-Symbol sind Warenzeichen <strong>de</strong>r<br />
Dolby Laboratories.<br />
❑<br />
Symbol<br />
N O T<br />
Hinweis Zielwahltaste TOOLS-Taste Drücken<br />
Deutsch -
8<br />
Einrichten Ihres Fernsehgeräts<br />
N<br />
Die Abbildungen und Illustrationen in diesem Handbuch dienen nur zur Information und können vom tatsächlichen Aussehen<br />
<strong>de</strong>s Geräts abweichen. Technische Än<strong>de</strong>rungen und Än<strong>de</strong>rungen am Design <strong>de</strong>s Geräts, insbeson<strong>de</strong>re zur Verbesserung <strong>de</strong>r<br />
Leistungsfähigkeit <strong>de</strong>s Geräts, sind je<strong>de</strong>rzeit vorbehalten.<br />
¦<br />
Bedienfeld<br />
N<br />
N<br />
Form und Farbe <strong>de</strong>s Geräts können sich je nach Mo<strong>de</strong>ll unterschei<strong>de</strong>n.<br />
Die Tasten auf <strong>de</strong>r Frontblen<strong>de</strong> können Sie durch Berühren mit einem Finger bedienen.<br />
8<br />
7 6 5 4 3 2 1<br />
6<br />
5<br />
4<br />
3<br />
2<br />
1<br />
8<br />
78<br />
1 P (Versorgung): Drücken Sie diese Taste, um das Fernsehgerät ein- und auszuschalten.<br />
2 BETRIEBSANZEIGE: Beim Einschalten <strong>de</strong>s Fernsehgeräts blinkt die Netzleuchte kurz und erlischt anschließend. Im<br />
Standbymodus leuchtet die Anzeige permanent.<br />
3 z: Hiermit wechseln Sie <strong>de</strong>n Kanal. Im Bildschirmmenü können Sie die z-Schaltflächen wie die Tasten<br />
▼ und ▲ auf <strong>de</strong>r Fernbedienung verwen<strong>de</strong>n.<br />
4 Y: Hiermit erhöhen o<strong>de</strong>r verringern Sie die Lautstärke.<br />
Im Bildschirmmenü können Sie die Y-Schaltflächen wie die Tasten ◄ und ► auf <strong>de</strong>r Fernbedienung verwen<strong>de</strong>n.<br />
5 MENU: Drücken Sie diese Taste, um ein Bildschirmmenü zu <strong>de</strong>n Funktionen Ihres Fernsehgeräts einzublen<strong>de</strong>n.<br />
6 SOURCE E: Schaltet zwischen allen verfügbaren Signalquellen um. Im Bildschirmmenü können Sie diese Taste wie die<br />
Eingabetaste (ENTERE) auf <strong>de</strong>r Fernbedienung verwen<strong>de</strong>n.<br />
7 FERNBEDIENUNGSSENSOR: Richten Sie die Fernbedienung auf diesen Sensor am Fernsehgerät.<br />
8 LAUTSPRECHER<br />
Deutsch -
¦<br />
Zubehör<br />
Fernbedienung und 2 Batterien (Typ AAA) Netzkabel Untere Ab<strong>de</strong>ckung<br />
(M4 X L16)<br />
Garantiekarte / Sicherheitshinweise<br />
(nicht überall verfügbar)<br />
Schraube für Standfuß X 4<br />
(je nach Mo<strong>de</strong>ll)<br />
Reinigungstuch<br />
Kabelschlauch<br />
(je nach Mo<strong>de</strong>ll)<br />
N<br />
N<br />
Überprüfen Sie die Verpackung Ihres LCD-Fernsehgeräts auf Vollständigkeit. Falls Komponenten fehlen sollten, setzen Sie<br />
sich bitte mit Ihrem Händler in Verbindung.<br />
Die Farbe und die Form <strong>de</strong>r Teile kann je nach Mo<strong>de</strong>ll unterschiedlich sein.<br />
Deutsch -
¦<br />
Anschlussfeld<br />
[Seitenverkleidung <strong>de</strong>s<br />
Fernsehgeräts]<br />
[Rückseite <strong>de</strong>s Fernsehgeräts]<br />
1 2<br />
34<br />
#<br />
2<br />
@<br />
!<br />
0 9 8 7 6 5<br />
Netzanschluss<br />
N<br />
Form und Farbe <strong>de</strong>s Geräts können sich je nach Mo<strong>de</strong>ll unterschei<strong>de</strong>n.<br />
1 COMPONENT IN<br />
Zum Anschließen mit Component-Vi<strong>de</strong>o / -Audio.<br />
2 HDMI IN 1, 2, 3(DVI), 4 / DVI AUDIO IN<br />
Zum Anschließen an die HDMI-Buchse von Geräten mit HDMI-Ausgang.<br />
N<br />
N<br />
<br />
<br />
N<br />
N<br />
N<br />
Beim Anschluss von Geräten über HDMI-Schnittstelle ist keine zusätzliche Audioverbindung erfor<strong>de</strong>rlich.<br />
Was ist HDMI?<br />
HDMI (High-Definition Multimedia Interface) ist eine digitale Schnittstelle, die die Übertragung von digitalen Bild- und<br />
Tonsignalen über ein einziges Kabel ermöglicht.<br />
Der Unterschied zwischen HDMI und DVI besteht darin, dass HDMI-Geräte kleiner als DVI-Geräte sind.<br />
Bei <strong>de</strong>m Fernsehgerät erfolgt u. U. keine Tonausgabe und das Fernsehbild weist evtl. anormale Farben auf, wenn DVDo<strong>de</strong>r<br />
Blu-Ray-Player bzw. Kabel- o<strong>de</strong>r Satellitenreceiver (Set-Top-Box) angeschlossen wer<strong>de</strong>n, die HDMI-Versionen vor 1.3<br />
unterstützen. Beim Anschluss eines älteren HDMI-Kabels und fehlen<strong>de</strong>r Tonausgabe schließen Sie das HDMI-Kabel an <strong>de</strong>n<br />
HDMI IN 3(DVI)-Abschluss und die Audiokabel an die DVI AUDIO IN-Anschlüsse auf <strong>de</strong>r Rückseite <strong>de</strong>s Fernsehgeräts an. Wenn<br />
dies passiert, wen<strong>de</strong>n Sie sich an die Firma, die Ihnen <strong>de</strong>n DVD- o<strong>de</strong>r Blu-Ray-Player bzw. <strong>de</strong>n Kabel- o<strong>de</strong>r Satellitenreceiver<br />
geliefert hat, um die HDMI-Version bestätigen zu lassen. Anschließend for<strong>de</strong>rn Sie ein nötigenfalls Upgra<strong>de</strong> an.<br />
Verwen<strong>de</strong>n Sie <strong>de</strong>n HDMI IN 3(DVI)-Anschluss für DVI-Verbindungen mit einem externen Gerät. Verwen<strong>de</strong>n Sie ein DVI-<br />
HDMI-Kabel o<strong>de</strong>r einen DVI-HDMI-Adapter (DVI auf HDMI) für <strong>de</strong>n Vi<strong>de</strong>oanschluss und die DVI AUDIO IN-Anschlüsse<br />
für die Audioverbindung. Eine Verbindung über HDMI/DVI-Kabel kann nur über <strong>de</strong>n HDMI IN 3(DVI)-Anschluss erfolgen.<br />
HDMI-Kabel für an<strong>de</strong>re Versionen als 1.3 können stören<strong>de</strong>s Flackern <strong>de</strong>s Bildschirms verursachen o<strong>de</strong>r zum völligen<br />
Ausfall <strong>de</strong>s Fernsehgeräts führen.<br />
3 PC IN [PC] / [AUDIO]<br />
Zum Anschließen an <strong>de</strong>n Vi<strong>de</strong>o- und Audioausgang Ihres Computers<br />
N Wenn Ihr PC die Möglichkeit für HDMI-Verbindungen bietet, können Sie diesen Anschluss mit <strong>de</strong>n HDMI IN 1, 2, 3(DVI)<br />
o<strong>de</strong>r 4-Buchsen verbin<strong>de</strong>n.<br />
N Wenn Ihr PC die Möglichkeit für DVI-Verbindungen bietet, können Sie diesen Anschluss mit <strong>de</strong>r HDMI IN 3(DVI) / DVI<br />
AUDIO IN-Buchse verbin<strong>de</strong>n.<br />
4 ANT IN<br />
Anschluss an eine Antenne o<strong>de</strong>r eine Kabelfernsehanlage.<br />
5 KENSINGTON-SCHLOSS (mo<strong>de</strong>llabhängig)<br />
Das (optionale) Kensington-Schloss dient zur Sicherung <strong>de</strong>s Fernsehgeräts bei Verwendung an einem öffentlichen Ort. Wenn<br />
Sie ein Schloss verwen<strong>de</strong>n möchten, wen<strong>de</strong>n Sie sich an <strong>de</strong>n Händler, bei <strong>de</strong>m Sie das Fernsehgerät erworben haben.<br />
N Die Position <strong>de</strong>s Kensington-Schlosses ist mo<strong>de</strong>llabhängig.<br />
Deutsch -
6 H(KOPFHÖRER)<br />
Kopfhörer können an <strong>de</strong>n Kopfhörerausgang <strong>de</strong>s Geräts angeschlossen wer<strong>de</strong>n. Wenn Kopfhörer angeschlossen sind, ist die<br />
Tonwie<strong>de</strong>rgabe über die eingebauten Lautsprecher abgeschaltet.<br />
N<br />
N<br />
N<br />
N<br />
Wenn Sie Kopfhörer an das Fernsehgerät anschließen, sind die Möglichkeiten zur Nutzung <strong>de</strong>r Tonfunktion<br />
eingeschränkt.<br />
Das Verwen<strong>de</strong>n von Kopfhörern bei hoher Lautstärke über einen längeren Zeitraum kann zu Hörschä<strong>de</strong>n führen.<br />
Wenn Sie Kopfhörer an das Fernsehgerät anschließen, wird über die Lautsprecher kein Ton ausgegeben.<br />
Die Lautstärke <strong>de</strong>r Kopfhörer und <strong>de</strong>s Fernsehgeräts wer<strong>de</strong>n getrennt geregelt.<br />
7 DIGITAL AUDIO OUT (OPTICAL)<br />
Anschluss für ein Digitalaudio-Gerät wie z. B. ein Heimkinosystem.<br />
N<br />
N<br />
N<br />
Ein Digital Audio-System ist mit <strong>de</strong>m DIGITAL AUDIO OUT (OPTICAL)-Anschluss verbun<strong>de</strong>n: Vermin<strong>de</strong>rn Sie die<br />
Lautstärke <strong>de</strong>s Fernsehers und stellen Sie die Lautstärke mit <strong>de</strong>m Lautstärkeregler <strong>de</strong>s Systems ein.<br />
5.1-Kanalton ist möglich, wenn das Fernsehgerät an ein externes Gerät angeschlossen ist, das 5.1-Kanalton unterstützt.<br />
Wenn <strong>de</strong>r Receiver (Heimkinosystem) angeschaltet ist, können Sie <strong>de</strong>n Ton so hören, wie er vom optischen Ausgang <strong>de</strong>r<br />
Fernsehgeräts zur Verfügung gestellt wird. Wenn das Fernsehgerät ein (terrestrisches) DTV-Signal anzeigt, überträgt das<br />
Fernsehgerät 5.1-Kanalton an <strong>de</strong>n Receiver <strong>de</strong>s Heimkinosystems. Wenn es sich bei <strong>de</strong>r Signalquelle um eine digitale<br />
Komponente wie beispielsweise einen DVD- o<strong>de</strong>r Blu-Ray-Player bzw. einen Kabel- o<strong>de</strong>r Satellitenreceiver (Set-Top-Box)<br />
han<strong>de</strong>lt, <strong>de</strong>r über HDMI an das Fernsehgerät angeschlossen ist, kann <strong>de</strong>r Receiver <strong>de</strong>s Heimkinosystems nur 2-Kanalton<br />
wie<strong>de</strong>rgeben. Wenn Sie 5.1-Kanalton wünschen, müssen Sie <strong>de</strong>n digitalen Ausdioausgang am DVD- o<strong>de</strong>r Blu-Ray-Player<br />
bzw. Kabel- o<strong>de</strong>r Satellitenreceiver (Set-Top-Box) direkt an einen Verstärker o<strong>de</strong>r ein Heimkinosystem anschließen und<br />
nicht an das Fernsehgerät.<br />
8 SERVICE<br />
Anschluss nur für Servicezwecke<br />
9 AUDIO OUT [R-AUDIO-L]<br />
Zum Anschließen an die Audioeingänge Ihres Verstärker-/Heimkinosystems.<br />
Ein Audioverstärker ist mit <strong>de</strong>n AUDIO OUT [R-AUDIO-L]-Anschlüssen verbun<strong>de</strong>n: Vermin<strong>de</strong>rn Sie die Lautstärke <strong>de</strong>s<br />
Fernsehers und stellen Sie die Lautstärke mit <strong>de</strong>m Lautstärkeregler <strong>de</strong>s Verstärkers ein.<br />
0 EXT1, 2<br />
Ein- und Ausgänge für externe Geräte wie z. B. Vi<strong>de</strong>orecor<strong>de</strong>r, DVD-Player, Spielekonsolen o<strong>de</strong>r Vi<strong>de</strong>o-Disc-Player.<br />
N<br />
<br />
Im EXT-Modus unterstützt DTV Out nur MPEG SD-Vi<strong>de</strong>o und -Audio.<br />
Anschlussmöglichkeiten<br />
Anschluss<br />
Eingang<br />
Ausgang<br />
Vi<strong>de</strong>o Audio (L / R) RGB Vi<strong>de</strong>o + Audio (L / R)<br />
EXT 1 O O O Nur TV- o<strong>de</strong>r DTV-Ausgang verfügbar.<br />
EXT 2 O O X Ausgang frei wählbar.<br />
! AV IN [VIDEO] / [R-AUDIO-L]<br />
Vi<strong>de</strong>o- und Audioeingänge für externe Geräte wie z. B. Camcor<strong>de</strong>r o<strong>de</strong>r Vi<strong>de</strong>orecor<strong>de</strong>r.<br />
@ USB<br />
Anschluss für Softwareaktualisierungen und Media Play, usw.<br />
# COMMON INTERFACE-Steckplatz<br />
<br />
<br />
<br />
N<br />
N<br />
N<br />
N<br />
N<br />
Ohne eingelegte “CI(CI+)-Karte” zeigt das Fernsehgerät auf einigen Kanälen ‘Gestörtes Signal’ an.<br />
Die Verbindungsinformationen mit Telefonnummer, Kennung <strong>de</strong>r CI(CI+)-Kartenkennung, Hostkennung und an<strong>de</strong>ren<br />
Angaben wird nach ungefähr 2 bis 3 Minuten angezeigt. Wenn eine Fehlermeldung angezeigt wird, wen<strong>de</strong>n Sie sich bitte<br />
an Ihren Dienstanbieter.<br />
Wenn die Konfiguration <strong>de</strong>r Kanalinformationen abgeschlossen ist, wird die Meldung ‘Udating Completed’ angezeigt. Dies<br />
be<strong>de</strong>utet, dass die Kanalliste aktualisiert wur<strong>de</strong>.<br />
Sie müssen die CI(CI+)-Karte bei einem <strong>de</strong>r örtlichen Kabelnetzbetreiber erwerben. Ziehen Sie die CI(CI+)-Karte<br />
vorsichtig mit <strong>de</strong>n Hän<strong>de</strong>n heraus. Sie könnte beim Herunterfallen ansonsten beschädigt wer<strong>de</strong>n.<br />
Die Richtung, in <strong>de</strong>r Sie die CI(CI+)Karte einlegen müssen, ist darauf mit einem Pfeil markiert.<br />
Die Position <strong>de</strong>s COMMON INTERFACE-Steckplatzes ist mo<strong>de</strong>llabhängig.<br />
CI(CI+)-Karten wer<strong>de</strong>n in einigen Län<strong>de</strong>rn und Regionen nicht unterstützt. Fragen Sie diesbezüglich Ihren offiziellen<br />
Händler.<br />
Die CI+-Funktion steht nur im Mo<strong>de</strong>ll LE********P zur Verfügung.<br />
Bei Problemen wen<strong>de</strong>n Sie sich an <strong>de</strong>n Dienstanbieter.<br />
Deutsch -
¦<br />
Fernbedienung<br />
N<br />
N<br />
N<br />
Die Reichweite <strong>de</strong>r Fernbedienung beträgt ca. 7 m.<br />
Die Leistungsfähigkeit <strong>de</strong>r Fernbedienung kann durch starke Lichteinstrahlung beeinträchtigt wer<strong>de</strong>n.<br />
Form und Farbe <strong>de</strong>s Geräts können sich je nach Mo<strong>de</strong>ll unterschei<strong>de</strong>n.<br />
1 POWER: Ein- und Ausschalten<br />
<strong>de</strong>s Fernsehgeräts.<br />
2 ZIFFERNTASTEN: Hiermit<br />
wechseln Sie <strong>de</strong>n Kanal.<br />
3 FAV.CH: Zum Anzeigen von<br />
Favorit Kanallisten auf <strong>de</strong>m<br />
Bildschirm.<br />
4 Y: Hiermit erhöhen o<strong>de</strong>r<br />
verringern Sie die Lautstärke.<br />
5 SOURCE: Hiermit können<br />
Sie alle verfügbaren<br />
Vi<strong>de</strong>osignalquellen anzeigen und<br />
auswählen.<br />
6 INFO: Hiermit können Sie<br />
Informationen auf <strong>de</strong>m<br />
Fernsehschirm anzeigen.<br />
7 TOOLS: Hiermit können Sie<br />
häufig verwen<strong>de</strong>te Funktionen<br />
schnell auswählen.<br />
8 CH LIST: Zum Anzeigen von<br />
Kanallisten auf <strong>de</strong>m Bildschirm.<br />
9 FARBTASTEN: Verwen<strong>de</strong>n Sie<br />
diese Tasten bei <strong>de</strong>r Arbeit im<br />
Menü Sen<strong>de</strong>rliste, Media Play<br />
usw.<br />
! DUAL: Auswahl von Toneffekten<br />
@ Verwen<strong>de</strong>n Sie diese Tasten<br />
bei <strong>de</strong>r Arbeit mit Media Play<br />
und Anynet+. (∏: Mit dieser<br />
Fernbedienung können Sie<br />
die Aufnahmen von <strong>Samsung</strong>-<br />
Rekor<strong>de</strong>rn mit <strong>de</strong>r Anynet+-<br />
Funktion fernsteuern.<br />
# TV: Hiermit können Sie <strong>de</strong>n TV-<br />
Modus direkt aufrufen.<br />
$ PRE-CH: Hiermit können Sie<br />
zum zuletzt angezeigten Kanal<br />
wechseln.<br />
% MUTE M: Drücken Sie<br />
diese Taste, um <strong>de</strong>n Ton<br />
vorübergehend auszuschalten.<br />
^ > P
¦<br />
Batterien in die Fernbedienung einsetzen<br />
1. Heben Sie die Ab<strong>de</strong>ckung auf <strong>de</strong>r Rückseite <strong>de</strong>r Fernbedienung an, wie in <strong>de</strong>r Abbildung<br />
dargestellt.<br />
2. Legen Sie zwei AAA-Batterien ein.<br />
N Achten Sie darauf, dass die Pole <strong>de</strong>r Batterien wie im Batteriefach angezeigt<br />
ausgerichtet sind.<br />
3. Schieben Sie die Ab<strong>de</strong>ckung wie<strong>de</strong>r auf die Fernbedienung.<br />
N Wenn die Fernbedienung für einen längeren Zeitraum nicht verwen<strong>de</strong>t wird, nehmen Sie die Batterien heraus, und lagern<br />
Sie sie an einem kühlen, trockenen Ort. (Bei normaler Nutzung <strong>de</strong>r Fernbedienung halten die Batterien ungefähr ein Jahr.)<br />
N Sollte die Fernbedienung nicht funktionieren, überprüfen Sie Folgen<strong>de</strong>s:<br />
Ist das Fernsehgerät eingeschaltet?<br />
Wur<strong>de</strong>n Plus- und Minuspol <strong>de</strong>r Batterien vertauscht?<br />
Sind die Batterien leer?<br />
Liegt ein Stromausfall vor o<strong>de</strong>r ist das Netzkabel <strong>de</strong>s Fernsehgeräts nicht eingesteckt?<br />
Befin<strong>de</strong>t sich eine Leuch tstoffröhre o<strong>de</strong>r ein Neonschild in <strong>de</strong>r Nähe?BEDIENUNG<br />
¦<br />
Anzeigen von Menüs<br />
Vor <strong>de</strong>m ersten Einsatz <strong>de</strong>s Fernsehgeräts führen Sie die folgen<strong>de</strong>n Schritte aus, um zu erfahren, wie Sie im Menü navigieren, um<br />
die verschie<strong>de</strong>nen Funktionen auszuwählen und einzustellen.<br />
MENU-Taste<br />
Bildschirmmenü anzeigen.<br />
INFO<br />
ENTERE / NAVIGATIONS-Taste<br />
Cursor bewegen und Elemente<br />
auswählen. Markiertes Element<br />
auswählen. Einstellung bestätigen.<br />
RETURN-Taste<br />
Zurück zum vorherigen Menü.<br />
EXIT<br />
Bildschirmmenü schließen.<br />
❑<br />
Bedienung <strong>de</strong>s Bildschirmmenüs (OSD)<br />
Die Zugriffsmetho<strong>de</strong>n können in Abhängigkeit vom jeweiligen Menü variieren.<br />
1. Drücken Sie die Taste MENU.<br />
AD<br />
INFO<br />
2. Das Hauptmenü wird auf <strong>de</strong>m Bildschirm angezeigt. Links im Menü sind Symbole zu<br />
sehen: Bild, Ton, Kanal, Einrichtung, Eingang, Anwendung, Unterstützung.<br />
3. Wählen Sie mit <strong>de</strong>n Tasten ▲ o<strong>de</strong>r ▼ eines <strong>de</strong>r Symbole aus.<br />
Bild<br />
Modus : Standard ▶<br />
Hinter.Licht : 7<br />
Kontrast : 95<br />
Helligkeit : 45<br />
Schärfe : 50<br />
Farbe : 50<br />
Farbton (G/R)<br />
: G50/R50<br />
Erweiterte INFO Einstellungen<br />
AD<br />
4. Drücken Sie die ENTERE Taste, um in das Untermenü <strong>de</strong>s jeweiligen Symbols zu<br />
wechseln.<br />
5. Wählen Sie mit <strong>de</strong>n Tasten ▲ o<strong>de</strong>r ▼ eines <strong>de</strong>r Untermenüs aus.<br />
6. Erhöhen o<strong>de</strong>r verringern Sie mit <strong>de</strong>n Tasten ◄ o<strong>de</strong>r ► <strong>de</strong>n Wert für ein bestimmtes<br />
Element. Die Metho<strong>de</strong>n zum Anpassen <strong>de</strong>r Werte im Bildschirmmenü können in<br />
Abhängigkeit vom jeweiligen Menü variieren.<br />
7. Drücken Sie die Taste ENTERE, um die Konfiguration abzuschließen. Zum Been<strong>de</strong>n<br />
drücken Sie die Taste EXIT.<br />
Deutsch - <br />
Bild<br />
▲<br />
Hintergrund<br />
▼<br />
Modus<br />
: Standard<br />
Hinter.Licht : 7 ▶<br />
Kontrast<br />
AD<br />
: 95<br />
Helligkeit : 45<br />
Schärfe : 50<br />
Farbe : 50<br />
Farbton (G/R)<br />
: G50/R50<br />
Erweiterte Einstellungen<br />
Bildoptionen<br />
U Verschieben L Einstellen E Eingeben R Zurück<br />
Hilfesymbol<br />
7
¦<br />
Fernsehgerät in <strong>de</strong>n Standby-Modus schalten<br />
Um <strong>de</strong>n Stromverbrauchs zu senken, kann das Gerät in <strong>de</strong>n Standby-Modus geschaltet wer<strong>de</strong>n. Der Standby-Modus ist nützlich,<br />
wenn Sie das Gerät vorübergehend ausschalten möchten (z. B. während einer Mahlzeit).<br />
1. Drücken Sie die Taste POWERP auf <strong>de</strong>r Fernbedienung drücken.<br />
N Der Bildschirm wird ausgeschaltet, und auf <strong>de</strong>r Vor<strong>de</strong>rseite <strong>de</strong>s Fernsehgeräts leuchtet die Standby-Anzeige auf.<br />
2. Drücken Sie einfach erneut die Taste POWERP, um das Gerät wie<strong>de</strong>r einzuschalten.<br />
N Der Standby-Modus ist nicht für längere Phasen <strong>de</strong>r Abwesenheit gedacht (z. B. wenn Sie verreist sind). Ziehen Sie dann<br />
sicherheitshalber <strong>de</strong>n Netzstecker und das Antennenkabel.<br />
¦<br />
Plug & Play-Funktion<br />
Wenn das Fernsehgerät zum ersten Mal eingeschaltet wird, wer<strong>de</strong>n automatisch die<br />
Grun<strong>de</strong>instellungen vorgenommen.<br />
1. Drücken Sie die Taste POWER auf <strong>de</strong>r Fernbedienung.<br />
N<br />
N<br />
Sie können auch die Netztaste (POWERP) <strong>de</strong>s Fernsehgeräts verwen<strong>de</strong>n.<br />
Die Meldung Select the OSD Language. wird angezeigt.<br />
2. Drücken Sie die Taste ENTERE. Wählen Sie die gewünschte Sprache mit <strong>de</strong>n Tasten ▲<br />
o<strong>de</strong>r ▼ aus. Drücken Sie die Taste ENTERE, um Ihre Auswahl zu bestätigen.<br />
3. Wählen Sie durch Drücken <strong>de</strong>r Tasten ◄ o<strong>de</strong>r ► die Option Shop Demo o<strong>de</strong>r<br />
Privatgebrauch, und drücken Sie dann auf ENTERE.<br />
N<br />
N<br />
N<br />
Wir empfehlen Ihnen, das Fernsehgerät im Modus Privatgebrauch zu verwen<strong>de</strong>n,<br />
um das optimale Bild für <strong>de</strong>n Privatgebrauch zu erzielen.<br />
Shop Demo ist nur geeignet, wenn das Gerät in einem Verkaufsbereich verwen<strong>de</strong>t wird.<br />
Wenn das Gerät versehentlich auf <strong>de</strong>n Modus Shop Demo eingestellt wird, und Sie möchten wie<strong>de</strong>r zurück zu<br />
Privatgebrauch (Standard) wechseln, gehen Sie so vor: Drücken Sie die Lautstärketaste am Fernsehgerät. Wenn das<br />
Menü "Volume" angezeigt wird, halten Sie die Taste MENU am Fernsehgerät 5 Sekun<strong>de</strong>n lang gedrückt.<br />
4. Drücken Sie die Taste ENTERE. Wählen Sie das gewünschte Land mit <strong>de</strong>r Taste ▲ o<strong>de</strong>r ▼ aus. Drücken Sie die Taste<br />
ENTERE, um Ihre Auswahl zu bestätigen.<br />
5. Wählen Sie durch Drücken <strong>de</strong>r Tasten ▲ o<strong>de</strong>r ▼ die Option Antenne o<strong>de</strong>r Kabel, und drücken Sie dann die Taste ENTERE.<br />
N<br />
N<br />
Antenne: Terrestrisches Antennensignal.<br />
Kabel: Kabelgebun<strong>de</strong>nes Antennensignal.<br />
6. Wählen Sie durch Drücken <strong>de</strong>r Tasten ▲ o<strong>de</strong>r ▼ die Signalquelle aus, die gespeichert wer<strong>de</strong>n soll. Drücken AD Sie die Taste<br />
ENTERE, um Start auszuwählen.<br />
N Wenn Sie das Antennensignal auf Kabel einstellen, können Sie im nächsten Schritt einen Wert für die Suche nach<br />
Digitalkanälen eingeben. Weitere Informationen hierzu fin<strong>de</strong>n Sie unter Kanal → Autom. speichern.<br />
N Digital und Analog: Digitale und analoge Kanäle.<br />
Digital: Digitaler Sen<strong>de</strong>r<br />
Analog: Analog Sen<strong>de</strong>r<br />
N Die Kanalsuche wird automatisch gestartet und been<strong>de</strong>t.<br />
N Zum Unterbrechen <strong>de</strong>s Speichervorgangs zu einem beliebigen Zeitpunkt drücken Sie die Taste ENTERE.<br />
N Wenn Sie alle verfügbaren Kanäle gespeichert haben, wird die Meldung Uhrmodus einstellen angezeigt.<br />
7. Drücken Sie die Taste ENTERE. Wählen Sie durch Drücken <strong>de</strong>r Tasten ▲ o<strong>de</strong>r ▼ die Option Auto, und drücken Sie dann<br />
die Taste ENTERE.<br />
N<br />
N<br />
Wenn Sie <strong>Manuel</strong>l wählen, wird Datum und Uhrzeit einstellen angezeigt.<br />
Wenn Sie ein digitales Signal empfangen, wird die Zeit automatisch eingestellt. An<strong>de</strong>renfalls wählen Sie <strong>Manuel</strong>l, um die<br />
Uhr zu stellen.<br />
8. Die Beschreibung <strong>de</strong>r Verbindungsmetho<strong>de</strong> für optimale HD-Bildqualität wird angezeigt. Lesen Sie die Beschreibung und<br />
drücken Sie die Taste ENTERE.<br />
9. Die Meldung Gute Fernsehunterhaltung! wird angezeigt. Drücken Sie abschließend die Taste ENTERE.<br />
INFO<br />
Plug & Play<br />
Select the OSD Language.<br />
Menu Language : English ▶<br />
E Enter<br />
So setzen Sie diese Funktion zurück:<br />
1. Drücken Sie die Taste MENU, um das Menü anzuzeigen. Wählen Sie durch Drücken <strong>de</strong>r<br />
Tasten ▲ o<strong>de</strong>r ▼ die Option Einstellungen, und drücken Sie dann die Taste ENTERE.<br />
2. Drücken Sie die Taste ENTERE erneut, um Plug & Play auszuwählen.<br />
3. Geben Sie nun Ihre vierstellige PIN ein. Der Standard-PIN-Co<strong>de</strong> eines neuen<br />
Fernsehgeräts lautet ‘0-0-0-0’.<br />
N<br />
N<br />
Wenn Sie die PIN än<strong>de</strong>rn möchten, verwen<strong>de</strong>n Sie die Funktion PIN än<strong>de</strong>rn.<br />
Die Plug & Play-Funktion gibt es nur im TV-Modus.<br />
Einstellungen<br />
Plug & Play<br />
Menüsprache<br />
Zeit<br />
Sendungsoptionen<br />
Sicherheit<br />
Allgemein<br />
: Deutsch<br />
▶<br />
Deutsch -
¦<br />
Anzeigen <strong>de</strong>s Bildschirmmenüs<br />
Auf <strong>de</strong>m Bildschirm wer<strong>de</strong>n <strong>de</strong>r aktuelle Kanal und bestimmte Audio/Vi<strong>de</strong>o-Einstellungen<br />
angezeigt.<br />
O Drücken Sie die Taste INFO, um Informationen anzuzeigen.<br />
INFO<br />
Drücken Sie die Taste INFO auf <strong>de</strong>r Fernbedienung. Auf <strong>de</strong>m Bildschirm wer<strong>de</strong>n <strong>de</strong>r<br />
Kanal, <strong>de</strong>r Tonmodus sowie die Werte bestimmter Bild- und Toneinstellungen angezeigt.<br />
● ▲, ▼: Sie können Informationen an<strong>de</strong>rer Kanäle anzeigen. Wenn Sie zum<br />
ausgewählten Sen<strong>de</strong>r wechseln möchten, drücken Sie auf die ENTERE-Taste.<br />
● ◄, ►: Sie können die Informationen zum aktuellen Programm dieses Sen<strong>de</strong>rs<br />
anzeigen.<br />
N Drücken Sie noch einmal auf die INFO-Taste und warten Sie ca. 10 Sekun<strong>de</strong>n lang,<br />
bis die Informationen automatisch angezeigt wer<strong>de</strong>n.<br />
abc1<br />
DTV Air<br />
15<br />
18:11 Thu 6 Jan<br />
Life On Venus Avenue<br />
Unclassified<br />
No Detaild Information<br />
AD<br />
18:00 ~ 6:00<br />
E Watch<br />
' Information<br />
Kanal<br />
¦<br />
❑<br />
■<br />
■<br />
❑<br />
■<br />
Kanalmenü<br />
Land<br />
Analog Sen<strong>de</strong>r<br />
Sie können das Land für Analogsen<strong>de</strong>r än<strong>de</strong>rn.<br />
Digitaler Sen<strong>de</strong>r<br />
Sie können das Land für Digitalsen<strong>de</strong>r än<strong>de</strong>rn.<br />
N Der Eingabebildschirm für die PIN wird geöffnet. Geben Sie nun Ihre vierstellige PIN ein.<br />
Autom. speichern<br />
Sie können <strong>de</strong>n verfügbaren Frequenzbereich nach Sen<strong>de</strong>rn durchsuchen (verfügbare Sen<strong>de</strong>r und Frequenzbereiche sind vom<br />
jeweiligen Land abhängig). Die automatisch zugewiesenen Programmplätze entsprechen unter Umstän<strong>de</strong>n nicht <strong>de</strong>n gewünschten<br />
Programmplätzen.<br />
N Wenn ein Kanal mit <strong>de</strong>r Funktion Kin<strong>de</strong>rsicherung gesperrt wur<strong>de</strong>, wird das Eingabefenster für die PIN geöffnet.<br />
Antenne / Kabel<br />
Antennensignal zum Speichern auswählen<br />
● Digital und Analog: Digitale und analoge Kanäle.<br />
● Digital: Digitaler Sen<strong>de</strong>r<br />
● Analog: Analog Sen<strong>de</strong>r<br />
Kanal<br />
Land<br />
Autom. speichern<br />
Sen<strong>de</strong>r manuell speichern<br />
Ausführlich<br />
Übersicht<br />
Standard<br />
: Ausführlich<br />
Sen<strong>de</strong>rliste<br />
Sen<strong>de</strong>rmodus<br />
▶<br />
Bei Auswahl von Kabel → Digital und Analog o<strong>de</strong>r Kabel → Digital:<br />
Wert für die Suche nach Kabelkanälen eingeben.<br />
● Suchlaufmodus → Voll / Netzwerk / Schnell<br />
N Schnell<br />
Network ID: Anzeigen <strong>de</strong>r Netzwerkkennung.<br />
Frequenz: Hiermit zeigen Sie die Frequenz <strong>de</strong>s Kanals an. (Je nach Land unterschiedlich)<br />
Modulation: Hiermit zeigen Sie die verfügbaren Modulationswerte an.<br />
Symbolrate: Hiermit zeigen Sie die verfügbaren Symbolraten an.<br />
N<br />
N<br />
Das Fernsehgerät durchsucht automatisch alle Kanäle mit aktiven Sen<strong>de</strong>rn und speichert sie im Speicher <strong>de</strong>s Fernsehgeräts.<br />
Wenn Sie die automatische Speicherung anhalten möchten, drücken Sie auf ENTERE.<br />
Die Meldung Automatische Sen<strong>de</strong>rspeicherung been<strong>de</strong>n? wird angezeigt.<br />
Drücken Sie die Taste ◄ o<strong>de</strong>r ►, um Ja auszuwählen, und drücken Sie dann die Taste ENTERE.<br />
Deutsch -
❑<br />
■<br />
■<br />
❑<br />
Sen<strong>de</strong>r manuell speichern<br />
N<br />
N<br />
Hiermit wird manuell ein Sen<strong>de</strong>r gesucht und dieser im Fernsehspeicher abgelegt.<br />
Wenn ein Kanal mit <strong>de</strong>r Funktion Kin<strong>de</strong>rsicherung gesperrt wur<strong>de</strong>, wird das Eingabefenster für die PIN geöffnet.<br />
Digitaler Sen<strong>de</strong>r<br />
Zum manuellen Speichern von digitalen Sen<strong>de</strong>rn.<br />
N<br />
●<br />
●<br />
●<br />
N<br />
Digitaler Sen<strong>de</strong>r ist nur im DTV-Modus verfügbar.<br />
Kanal: Stellen Sie die Kanalnummer mit <strong>de</strong>n Tasten ▲, ▼ o<strong>de</strong>r einer Zifferntaste (0~9) ein.<br />
Frequenz: Stellen Sie die Frequenz mithilfe <strong>de</strong>r Zifferntasten ein.<br />
Bandbreite: Einstellen <strong>de</strong>r Bandbreite mit <strong>de</strong>n Tasten ▲, ▼ o<strong>de</strong>r einer Zifferntaste (0~9).<br />
Nach Abschluss <strong>de</strong>s Suchlaufs wer<strong>de</strong>n die Kanäle in <strong>de</strong>r Kanalliste aktualisiert.<br />
Analog Sen<strong>de</strong>r<br />
Zum manuellen Speichern von analogen Sen<strong>de</strong>rn.<br />
● Programm (<strong>de</strong>r Programmplatz, <strong>de</strong>r <strong>de</strong>m Sen<strong>de</strong>r zugewiesen wer<strong>de</strong>n soll) Stellen Sie <strong>de</strong>n Programmplatz mit <strong>de</strong>n Tasten ▲,<br />
▼ o<strong>de</strong>r einer Zifferntaste (0~9) ein.<br />
● Fernsehnorm → Auto / PAL / SECAM / NTSC4.43: Einstellen <strong>de</strong>r Fernsehnorm mithilfe <strong>de</strong>r Taste ▲ o<strong>de</strong>r ▼.<br />
● Tonsystem → BG / DK / I / L: Einstellen <strong>de</strong>s Tonsystems mithilfe <strong>de</strong>r Taste ▲ o<strong>de</strong>r ▼.<br />
● Kanal (Wenn Ihnen die Nummer <strong>de</strong>s zu speichern<strong>de</strong>n Sen<strong>de</strong>rs bekannt ist) Wählen Sie durch Drücken <strong>de</strong>r Tasten<br />
▲ o<strong>de</strong>r ▼ die Option C (terrestrischer Kanal) o<strong>de</strong>r S (Kabelkanal). Drücken Sie die Taste ►, und drücken Sie dann die Tasten<br />
▲, ▼ o<strong>de</strong>r eine Zifferntaste (0~9) , um die gewünschte Nummer auszuwählen.<br />
N Die Kanalnummer können Sie auch direkt durch Drücken <strong>de</strong>r Zifferntasten (0~9) auswählen.<br />
N Falls kein o<strong>de</strong>r nur schlechter Ton zu hören sein sollte, wählen Sie einen an<strong>de</strong>ren Audiostandard aus.<br />
● Suchlauf (Wenn Ihnen die Kanalnummern nicht bekannt sind): Drücken Sie zum Starten <strong>de</strong>s Suchlaufs die Taste ▲ o<strong>de</strong>r ▼.<br />
Der Tuner durchsucht <strong>de</strong>n Frequenzbereich, bis <strong>de</strong>r erste Sen<strong>de</strong>r bzw. <strong>de</strong>r ausgewählte Sen<strong>de</strong>r empfangen wird.<br />
● Speich (Zum Speichern <strong>de</strong>s Kanals und <strong>de</strong>s zugehörigen Programmplatzes): Drücken Sie die Taste ENTERE, um OK zu<br />
wählen.<br />
N<br />
<br />
<br />
<br />
Kanalmodus<br />
P (Programm-Modus): Nach Abschluss <strong>de</strong>r Einstellungen sind <strong>de</strong>n Sen<strong>de</strong>rn Ihrer Region Plätze mit <strong>de</strong>n Nummern von<br />
P00 bis P99 zugewiesen wor<strong>de</strong>n. In diesem Modus können Sie Sen<strong>de</strong>r durch Eingabe <strong>de</strong>s Programmplatzes auswählen.<br />
C (Antennenempfangsmodus): In diesem Modus können Sie Kanäle durch Eingabe <strong>de</strong>r Nummer anwählen, die je<strong>de</strong>m<br />
Antennensen<strong>de</strong>r zugeordnet ist.<br />
S (Kabelkanal-Modus): In diesem Modus können Sie Sen<strong>de</strong>r durch Eingabe <strong>de</strong>r Nummer anwählen, die je<strong>de</strong>m<br />
Kabelsen<strong>de</strong>r zugeordnet ist.<br />
Suchoptionen für Kabel (je nach Land)<br />
Einstellen weiterer Suchoptionen für die Kanalsuche im Kabelnetz (z. B. Frequenz o<strong>de</strong>r Symbolrate).<br />
● Startfrequenz (Startfrequenz): Einstellen <strong>de</strong>r Startfrequenz (je nach Land unterschiedlich).<br />
● Stoppfrequenz (Stoppfrequenz): Einstellen <strong>de</strong>r Stoppfrequenz (je nach Land unterschiedlich).<br />
● Modulation: Hiermit zeigen Sie die verfügbaren Modulationswerte an.<br />
● Symbolrate: Hiermit zeigen Sie die verfügbaren Symbolraten an.<br />
❑<br />
■<br />
■<br />
Ausführlich / Übersicht<br />
Die Informationen <strong>de</strong>s elektronischen Programmführers wer<strong>de</strong>n von <strong>de</strong>n Sen<strong>de</strong>rn zur Verfügung gestellt. Es kann sein, dass<br />
Programmeinträge leer o<strong>de</strong>r veraltet sind. Dies ist auf die für einen bestimmten Kanal übertragenen Informationen zurückzuführen.<br />
Die Anzeige wird dynamisch aktualisiert, sobald neue Informationen verfügbar sind.<br />
O Sie können das Programmführermenü auch durch Drücken <strong>de</strong>r Taste GUIDE aufrufen. (Weitere Informationen zum<br />
Konfigurieren <strong>de</strong>s Standard fin<strong>de</strong>n Sie bei <strong>de</strong>n entsprechen<strong>de</strong>n Beschreibungen.)<br />
Ausführlich<br />
Hier wer<strong>de</strong>n die Programminformationen in einem Zeitplan mit einer Unterteilung von jeweils 1 Stun<strong>de</strong> angezeigt. Es wird ein<br />
Zeitfenster von 2 Stun<strong>de</strong>n mit Programminformationen angezeigt. Dieses Fenster kann jedoch in <strong>de</strong>r Zeit nach vorne o<strong>de</strong>r nach<br />
hinten verschoben wer<strong>de</strong>n.<br />
Übersicht<br />
Die Informationen für die einzelnen Programme wer<strong>de</strong>n im Fenster für <strong>de</strong>n Mini-Programmführer in chronologischer Reihenfolge<br />
<strong>de</strong>s Programmstarts zeilenweise ab <strong>de</strong>m aktuell laufen<strong>de</strong>n Programm angezeigt.<br />
Deutsch - 10
❑<br />
❑<br />
❑<br />
■<br />
■<br />
❑<br />
Standard → Ausführlich / Übersicht<br />
Mit <strong>de</strong>r Taste GUIDE auf <strong>de</strong>r Fernbedienung können Sie einstellen, ob <strong>de</strong>r Ausführlich o<strong>de</strong>r <strong>de</strong>r Übersicht angezeigt wer<strong>de</strong>n soll.<br />
Sen<strong>de</strong>rliste<br />
Detaillierte Verfahrensbeschreibungen zur Verwendung <strong>de</strong>r Sen<strong>de</strong>rliste entnehmen Sie <strong>de</strong>n Beschreibungen unter Verwalten von<br />
Kanälen.<br />
O Diese Optionen können Sie auch durch Drücken <strong>de</strong>r Taste CH LIST auf <strong>de</strong>r Fernbedienung aufrufen.<br />
Sen<strong>de</strong>rmodus<br />
Durch Drücken <strong>de</strong>r Taste P >/< wechseln Sie innerhalb <strong>de</strong>r gewählten Sen<strong>de</strong>rliste zwischen <strong>de</strong>n Sen<strong>de</strong>rn.<br />
Hinzugef. Sen<strong>de</strong>r<br />
Es wird nur zwischen Sen<strong>de</strong>rn <strong>de</strong>r gespeicherten Sen<strong>de</strong>rliste gewechselt.<br />
Favoriten<br />
Es wird nur zwischen <strong>de</strong>n Sen<strong>de</strong>rn <strong>de</strong>r Favoritenliste gewechselt.<br />
Feinabstimmung<br />
Bei klarem Empfang ist keine Feinabstimmung nötig, da diese automatisch während <strong>de</strong>r Sen<strong>de</strong>rsuche erfolgt. Falls das Signal<br />
jedoch schwach o<strong>de</strong>r das Bild verzerrt ist, müssen Sie unter Umstän<strong>de</strong>n eine manuelle Feinabstimmung durchführen.<br />
N Gespeicherte feinabgestimmte Kanäle wer<strong>de</strong>n mit einem Sternchen ‘*’ auf <strong>de</strong>r rechten Seite <strong>de</strong>r Kanalnummer im Kanal-<br />
Banner markiert.<br />
N Wählen Sie zum Zurücksetzen <strong>de</strong>r Feinabstimmung die Option Reset aus, in<strong>de</strong>m Sie zuerst die Taste ▲ o<strong>de</strong>r ▼ und dann die<br />
Taste ENTERE drücken.<br />
N Eine Feinabstimmung ist nur für Analogfernsehgeräte möglich.<br />
Verwen<strong>de</strong>n <strong>de</strong>s vollständigen Programmführers / Mini-Programmführers<br />
Ausführlich<br />
900<br />
DTV Cable 900 f tn<br />
Freshmen On Campus<br />
2:00 - 2:30<br />
No Detailed Information<br />
2:10 Tue 1 Jun<br />
Today 2:00 - 3:00 3:00 - 4:00<br />
900 f tn<br />
Freshmen O.. Street Hypn.. No Information<br />
901 ITV Play Mint Extra<br />
902 Kerrang! Loa<strong>de</strong>d<br />
No Information<br />
903 Kiss<br />
40 with Dynamite MC<br />
Kisstory<br />
904 oneword The Distillery<br />
No Information<br />
▼ 905 Hits<br />
Smash Hits! Sunday<br />
Übersicht<br />
2:00<br />
2:30<br />
▼ 5:00<br />
DTV Cable 900 f tn<br />
Freshmen On Campus<br />
Street Hypnosis<br />
Booze Britain<br />
E Ansehen Information Seite Übersicht +24 Std. Been<strong>de</strong>n<br />
E Ansehen Information Seite Ausführlich Been<strong>de</strong>n<br />
Sie möchten...<br />
Dann...<br />
Programm aus <strong>de</strong>r Liste <strong>de</strong>s Programmführers Wählen Sie mit <strong>de</strong>n Tasten ▲, ▼, ◄, ► das Programm aus.<br />
anzeigen<br />
Programmführer been<strong>de</strong>n<br />
Drücken Sie die blaue Taste.<br />
Sobald Sie ein Programm gewählt haben, wird es zusammen mit einem Uhr-Symbol angezeigt. Nach<strong>de</strong>m Sie erneut<br />
auf ENTERE gedrückt haben, drücken Sie auf ◄ o<strong>de</strong>r ►, um die Option Prog. Löschen zu wählen. Danach wird die<br />
Programmwahl aufgehoben und das Uhr-Symbol wird entfernt.<br />
Programminformationen anzeigen<br />
Wählen Sie mit <strong>de</strong>n Tasten ▲, ▼, ◄, ► das gewünschte Programm aus.<br />
Drücken Sie die Taste INFO, wenn das Programm Ihrer Wahl markiert ist.<br />
Der Programmtitel wird oben in <strong>de</strong>r Mitte <strong>de</strong>s Bildschirms angezeigt.<br />
Klicken Sie auf die Taste INFO, wenn Sie genauere Informationen benötigen. Zu diesen Informationen gehören: Kanalnummer,<br />
Programmdauer, Statusleiste, Kin<strong>de</strong>rsicherungsstufe, Bildqualität (HD/SD), Tonmodus, Untertitel o<strong>de</strong>r Teletext, Sprache für<br />
Untertitel o<strong>de</strong>r Teletext sowie Kurzzusammenfassung <strong>de</strong>s markierten Programms. wird ‘...’ angezeigt.<br />
Schalten Sie zwischen Ausführlich und Übersicht<br />
Im ausführlichen Programmführer<br />
Schnell zurückblättern (24 Stun<strong>de</strong>n).<br />
Schnell weiterblättern (24 Stun<strong>de</strong>n).<br />
Drücken Sie mehrmals die rote Taste.<br />
Drücken Sie mehrmals die grüne Taste.<br />
Drücken Sie mehrmals die gelbe Taste.<br />
Deutsch - 11
¦<br />
Verwalten von Kanälen<br />
Mit diesem Menübefehl können Sie Favoriten hinzufügen, löschen o<strong>de</strong>r einstellen und <strong>de</strong>n digitalen Programmführer für<br />
Digitalsendungen verwen<strong>de</strong>n.<br />
■<br />
■<br />
■<br />
■<br />
Alle Sen<strong>de</strong>r<br />
Hiermit zeigen Sie alle verfügbaren Kanäle an.<br />
Hinzugefügte Sen<strong>de</strong>r<br />
Hiermit zeigen Sie alle hinzugefügten Kanäle an.<br />
Favorit<br />
Hiermit zeigen Sie alle Favoritenkanäle an.<br />
O Durch Drücken <strong>de</strong>r Taste FAV.CH auf <strong>de</strong>r Fernbedienung aufrufen können Sie die<br />
eingerichteten Favoritenkanäle auswählen.<br />
Programmiert<br />
Hiermit zeigen Sie alle vorgemerkten Programme an.<br />
N Wählen Sie im Fenster Alle Sen<strong>de</strong>r, Hinzugefügte Sen<strong>de</strong>r o<strong>de</strong>r Favorit einen Kanal. Drücken Sie hierzu die Tasten ▲ / ▼<br />
und die Taste ENTERE. Nun können Sie <strong>de</strong>n gewählten Kanal ansehen.<br />
N Verwen<strong>de</strong>n <strong>de</strong>r Farbtasten in Verbindung mit <strong>de</strong>r Kanalliste.<br />
Rot (Sen<strong>de</strong>rtyp): Schalten Sie zwischen TV, Radio, Daten / And. und Alle um.<br />
Grün (Zoom): Hiermit vergrößern o<strong>de</strong>r verkleinern Sie die Kanalnummer.<br />
Gelb (Wählen): Hiermit wählen Sie mehrere Kanallisten aus. Sie können die Funktionen zum Hinzufügen / Löschen<br />
/ Hinzufügen zu Favoriten / Löschen aus Favoriten für mehrere Kanäle gleichzeitig verwen<strong>de</strong>n. Markieren Sie die<br />
gewünschten Kanäle und drücken Sie die gelbe Taste, um alle markierten Kanäle zugleich einzustellen. Links neben <strong>de</strong>m<br />
Namen <strong>de</strong>s gewählten Kanals wird das Symbol c angezeigt.<br />
TOOLS (Extras): Hiermit zeigen Sie die Menüs Löschen (o<strong>de</strong>r Hinzufügen), Zu Favoriten hinzufügen (o<strong>de</strong>r Aus<br />
Favoriten löschen), Sperren (o<strong>de</strong>r Freigabe), Timer-Wie<strong>de</strong>rgabe, Sen<strong>de</strong>rnamen bearbeiten, Programmplatz<br />
bearbeiten, Sortieren, Alle wählen (o<strong>de</strong>r Alle abwählen), Autom. speichern an. (Der Inhalt <strong>de</strong>s Menüs "Optionen"<br />
hängt von <strong>de</strong>r jeweiligen Situation ab.)<br />
N Symbole zur Anzeige <strong>de</strong>s Kanalstatus<br />
A : Ein analoger Kanal.<br />
c : Ein Kanal, <strong>de</strong>r durch Drücken <strong>de</strong>r gelben Taste gewählt wur<strong>de</strong>.<br />
* : Ein Kanal, <strong>de</strong>r als Favorit eingestellt ist.<br />
( : Ein Programm, das gera<strong>de</strong> gesen<strong>de</strong>t wird.<br />
\ : Ein gesperrter Kanal.<br />
) : Ein vorgemerktes Programm<br />
Hinzugefügte Sen<strong>de</strong>r<br />
824 UKTV Gold<br />
825 UKTV style<br />
A 1 C --<br />
A 2 C --<br />
A 3 C --<br />
A 4 C --<br />
A 5 C --<br />
A 6 C --<br />
A 7 C --<br />
A 8 C --<br />
Alle Sen<strong>de</strong>rtyp Zoom Wählen T Extras<br />
Optionsmenü für Kanallisten (in Alle Sen<strong>de</strong>r / Hinzugefügte Sen<strong>de</strong>r / Favorit)<br />
■<br />
■<br />
■<br />
N<br />
N<br />
Drücken Sie die Taste TOOLS, um das Optionsmenü zu öffnen.<br />
Der Inhalt <strong>de</strong>s Optionsmenüs hängt vom jeweiligen Kanalstatus ab.<br />
Hinzufüg./Löschen<br />
Sie können Kanäle löschen o<strong>de</strong>r hinzufügen, damit nur die gewünschten Kanäle angezeigt<br />
wer<strong>de</strong>n.<br />
N<br />
N<br />
N<br />
N<br />
Alle gelöschten Kanäle wer<strong>de</strong>n im Menü Alle Sen<strong>de</strong>r angezeigt.<br />
Wenn <strong>de</strong>r Kanal in grauer Farbe dargestellt wird, wur<strong>de</strong> er gelöscht.<br />
Das Menü Hinzufügen wird nur für gelöschte Kanäle angezeigt.<br />
Sie können einen Kanal aus <strong>de</strong>m Menü Hinzugefügte Sen<strong>de</strong>r o<strong>de</strong>r Favorit in gleicher<br />
Weise löschen.<br />
Zu Favoriten hinzufügen / Aus Favoriten löschen<br />
Sie können Kanäle, die Sie häufig sehen, als Favorit festlegen.<br />
T Drücken Sie die Taste TOOLS, um das Menü Extras anzuzeigen. Sie können das Hinzufügen zu (o<strong>de</strong>r Löschen aus) <strong>de</strong>n<br />
Favoriten auch durch Auswählen von Extras → Zu Favoriten hinzufügen(o<strong>de</strong>r Aus Favoriten löschen) einstellen.<br />
N Das Symbol ‘*’ wird angezeigt, und <strong>de</strong>r Kanal wird als Favorit festgelegt.<br />
N Alle Favoritenkanäle wer<strong>de</strong>n im Menü Favorit angezeigt.<br />
Sperren / Freigabe<br />
Sie können einen Kanal sperren, sodass er nicht ausgewählt und angezeigt wer<strong>de</strong>n kann.<br />
N Diese Funktion ist nur verfügbar, wenn die Kin<strong>de</strong>rsicherung aktiviert ist (Ein).<br />
N Der Eingabebildschirm für die PIN wird geöffnet. Geben Sie nun Ihre vierstellige PIN ein.<br />
N Der Standard-PIN-Co<strong>de</strong> eines neuen Fernsehgeräts lautet ‘0-0-0-0’. Sie können die PIN än<strong>de</strong>rn, in<strong>de</strong>m Sie im Menü <strong>de</strong>n<br />
Befehl PIN än<strong>de</strong>rn wählen.<br />
N Das Symbol ‘\’ wird angezeigt, und <strong>de</strong>r Kanal wird gesperrt.<br />
Alle Sen<strong>de</strong>r<br />
824 UKTV Gold<br />
825 UKTV style<br />
A 1 C --<br />
A 2 C --<br />
A 3 C --<br />
A 4 C --<br />
A 5 C --<br />
A 6 C --<br />
A 7 C --<br />
A 8 C --<br />
Löschen<br />
Zu Favoriten hinzufügen<br />
Sperren<br />
Timer-Wie<strong>de</strong>rgabe<br />
Sen<strong>de</strong>rnamen bearbeiten<br />
Sortieren<br />
Alle Sen<strong>de</strong>rtyp Zoom Wählen T Extras<br />
<br />
Deutsch - 12
■<br />
■<br />
■<br />
■<br />
■<br />
■<br />
Timer-Wie<strong>de</strong>rgabe<br />
Wenn Sie ein Programm zum Anschauen vorgemerkt haben, wechselt das Fernsehgerät automatisch zum vorgemerkten Kanal in<br />
<strong>de</strong>r Kanalliste, auch wenn Sie gera<strong>de</strong> einen an<strong>de</strong>ren Kanal anschauen. Um ein Programm vorzumerken, müssen Sie zuerst die<br />
Uhrzeit einstellen.<br />
N<br />
N<br />
N<br />
N<br />
Sie können nur gespeicherte Kanäle vormerken.<br />
Sie können Kanal, Tag, Monat, Jahr, Stun<strong>de</strong> und Minute auch direkt über die Zifferntasten auf <strong>de</strong>r Fernbedienung einstellen.<br />
Das Vormerken eines Programms wird im Menü Programmiert angezeigt.<br />
Digitaler Programmführer und Vormerken von Sendungen<br />
Wenn Sie einen digitalen Kanal gewählt haben und die Taste ► drücken, wird <strong>de</strong>r Programmführer für diesen Kanal<br />
angezeigt. Gehen Sie in <strong>de</strong>r oben beschriebenen Weise vor, wenn Sie ein Programm vormerken möchten.<br />
Sen<strong>de</strong>rnamen bearbeiten (nur Analogkanäle)<br />
Sie können Kanäle mit Beschriftungen versehen, sodass die ersten Buchstaben <strong>de</strong>s Namens immer dann angezeigt wer<strong>de</strong>n, wenn<br />
Sie <strong>de</strong>n Kanal wählen.<br />
N Die Namen <strong>de</strong>r digitalen Sen<strong>de</strong>r wer<strong>de</strong>n automatisch zugewiesen und können nicht geän<strong>de</strong>rt wer<strong>de</strong>n.<br />
Programmplatz bearbeiten (nur Digitalkanäle)<br />
Sie können die Kanalnummer auch mit <strong>de</strong>n Zifferntasten <strong>de</strong>r Fernbedienung einstellen.<br />
Sortieren (nur Analogkanäle)<br />
Mit diesem Vorgang können Sie die Programmnummern gespeicherter Sen<strong>de</strong>r än<strong>de</strong>rn. Das ist möglicherweise nach <strong>de</strong>m<br />
automatischen Speichern von Sen<strong>de</strong>rn erfor<strong>de</strong>rlich.<br />
Alle wählen / Alle abwählen<br />
● Alle wählen: Sie können alle Kanäle in <strong>de</strong>r Kanalliste auswählen.<br />
● Alle abwählen: Nun können Sie die Auswahl aller Kanäle aufheben.<br />
N Alle abwählen können Sie nur wählen, wenn min<strong>de</strong>stens ein Kanal gewählt ist.<br />
Autom. speichern<br />
N<br />
N<br />
Genaue Beschreibungen für die Verfahren zum Einstellen <strong>de</strong>r Optionen fin<strong>de</strong>n Sie im Kapitel "Kanalmenü".<br />
Wenn ein Kanal mit <strong>de</strong>r Funktion Kin<strong>de</strong>rsicherung gesperrt wur<strong>de</strong>, wird das Eingabefenster für die PIN geöffnet.<br />
Optionsmenü für Kanallisten (in Programmiert)<br />
■<br />
■<br />
■<br />
■<br />
Mit dieser Menüoption können Sie eine Vormerkung anzeigen, än<strong>de</strong>rn o<strong>de</strong>r löschen.<br />
N Drücken Sie die Taste TOOLS, um das Optionsmenü zu öffnen.<br />
Info än<strong>de</strong>rn<br />
Wählen Sie diese Option, um eine Vormerkung zu än<strong>de</strong>rn.<br />
Prog. Löschen<br />
Wählen Sie diese Option, um eine Vormerkung zu stornieren.<br />
Information<br />
Wählen Sie diese Option, um eine Vormerkung anzuzeigen.<br />
(Sie können auch die Vormerkinformationen auswählen).<br />
Alle wählen<br />
Wählen Sie alle vorgemerkten Programme.<br />
Programmiert<br />
1 / 1 / 2009<br />
13:59 5 TV1 ) Info än<strong>de</strong>rn<br />
Prog. Löschen<br />
18:59 2 TV3 ) The Information Equalizer<br />
20:59 2 TV3 ) McMillan Alle wählen & Wife<br />
21:59 2 TV3 ) M.Spillane’s mike<br />
Alle Zoom Wählen T Extras E Information<br />
Deutsch - 13
BILD<br />
¦<br />
❑<br />
■<br />
■<br />
■<br />
■<br />
❑<br />
Konfigurieren <strong>de</strong>s Bildmenüs<br />
Modus<br />
Sie können <strong>de</strong>n Bildstandard auswählen, <strong>de</strong>r für Ihre Sehgewohnheiten am besten geeignet ist.<br />
T Drücken Sie die Taste TOOLS, um das Menü Extras anzuzeigen. Sie können <strong>de</strong>n<br />
Bildmodus durch Auswahl von Extras → Bildmodus einstellen.<br />
Dynamisch<br />
Wählen Sie diese Option für Anzeige mit höherer Auflösung bei starker<br />
Umgebungsbeleuchtung.<br />
Standard<br />
Wählen Sie diese Option für die optimale Anzeige von Fernsehbil<strong>de</strong>rn bei normaler Umgebungsbeleuchtung aus.<br />
Natürlich<br />
Stellt das Bild für optimale und augenschonen<strong>de</strong> Anzeige ein.<br />
N Diese Funktion ist im PC-Modus nicht verfügbar.<br />
Film<br />
Wählen Sie diese Option für die optimale Anzeige von Filmen in einem abgedunkelten Zimmer.<br />
Hinter.Licht / Kontrast / Helligkeit / Schärfe / Farbe / Farbton (G/R)<br />
Das Gerät verfügt über mehrere Einstellmöglichkeiten für die Bildqualität:<br />
Hinter.Licht: Hiermit stellen Sie die Helligkeit <strong>de</strong>r LCD-Hintergrundbeleuchtung ein.<br />
Kontrast: Hiermit stellen Sie <strong>de</strong>n Kontrast <strong>de</strong>s Bilds ein.<br />
Helligkeit: Hiermit stellen Sie die Helligkeit <strong>de</strong>s Bilds ein.<br />
Schärfe: Hiermit stellen Sie die Kantenauflösung <strong>de</strong>s Bilds ein.<br />
Farbe: Hiermit stellen Sie die Farbsättigung <strong>de</strong>s Bilds ein.<br />
Farbton (G/R): Hiermit stellen Sie die Farbtemperatur ein.<br />
●<br />
●<br />
●<br />
●<br />
●<br />
●<br />
N<br />
N<br />
N<br />
N<br />
N<br />
Modus : Standard ▶<br />
Hinter.Licht : 7<br />
Kontrast : 95<br />
Helligkeit : 45<br />
Schärfe : 50<br />
Farbe : 50<br />
Farbton (G/R)<br />
: G50/R50<br />
Erweiterte Einstellungen<br />
Sie können die Funktion Farbton (G/R) im Analogmodus von TV, Ext., AV <strong>de</strong>s PAL-Systems nicht verwen<strong>de</strong>n.<br />
Wenn Sie Än<strong>de</strong>rungen an Hinter.Licht, Kontrast, Helligkeit, Schärfe, Farbe o<strong>de</strong>r Farbton (G/R) vornehmen, wird das<br />
Bildschirmmenü entsprechend eingestellt.<br />
Im PC-Modus können Sie nur Hinter.Licht, Kontrast und Helligkeit einstellen.<br />
Sie können die Einstellungen für je<strong>de</strong>s externe Gerät festlegen und speichern, das Sie an einen Eingang <strong>de</strong>s Fernsehgeräts<br />
angeschlossen haben.<br />
Die im Betrieb verbrauchte Energiemenge geht <strong>de</strong>utlich zurück, wenn Sie die Helligkeit <strong>de</strong>s Bil<strong>de</strong>s reduzieren. Damit senken<br />
Sie die Betriebskosten.<br />
Bild<br />
▲<br />
Hintergrund<br />
▼<br />
U Verschieben L Einstellen E Eingeben R Zurück<br />
7<br />
❑<br />
■<br />
■<br />
■<br />
Erweiterte Einstellungen<br />
Bei <strong>de</strong>n neuen Fernsehgeräten von <strong>Samsung</strong> können Sie die Bil<strong>de</strong>instellungen noch genauer<br />
anpassen als mit <strong>de</strong>n früheren Mo<strong>de</strong>llen.<br />
N<br />
N<br />
Erweiterte Einstellungen stehen in <strong>de</strong>n Modi Standard o<strong>de</strong>r Film zur Verfügung.<br />
Im PC-Modus können von <strong>de</strong>n Erweiterte Einstellungen nur Optimalkontrast, Gamma<br />
und Weißabgleich eingestellt wer<strong>de</strong>n.<br />
Schwarzton → Aus / Dunkel / Dunkler / Dunkelst<br />
Sie können <strong>de</strong>n Schwarzwert direkt auf <strong>de</strong>m Bildschirm auswählen, um die Bildschirmtiefe<br />
anzupassen.<br />
Optimalkontrast → Aus / Gering / Mittel / Hoch<br />
Sie können <strong>de</strong>n Bildschirmkontrast so anpassen, dass ein optimaler Kontrast gewährleistet ist.<br />
Gamma<br />
Sie können die Intensität <strong>de</strong>r Primärfarben (Rot, Grün und Blau) einstellen.<br />
Erweiterte Einstellungen<br />
Schwarzton : Aus ▶<br />
Optimalkontrast<br />
: Mittel<br />
Gamma : 0<br />
Farbraum<br />
: Nativ<br />
Weißabgleich<br />
Flesh Tone : 0<br />
Kantenglättung<br />
: Ein<br />
U Navig. E Eingabe R Zurück<br />
Deutsch - 14
■<br />
■<br />
■<br />
■<br />
■<br />
Farbraum<br />
Der Farbraum ist eine Farbmatrix bestehend aus <strong>de</strong>n Farben Rot, Grün und Blau. Wählen Sie Ihren bevorzugten Farbraum, um<br />
die Welt in <strong>de</strong>n natürlichsten Farben zu erfahren.<br />
●<br />
●<br />
●<br />
Auto: Bei automatischer Einstellung <strong>de</strong>s Farbraums wird, je nach Programmquelle, <strong>de</strong>r natürlichste Farbton eingestellt.<br />
Nativ: Der native Farbraum ermöglicht tiefe und lebhafte Farbtöne.<br />
Benutzerd.: Hiermit stellen Sie <strong>de</strong>n Farbbereich wunschgemäß ein.<br />
N<br />
N<br />
Wenn Sie <strong>de</strong>n Anpassungswert än<strong>de</strong>rn, wird <strong>de</strong>r angepasste Bildschirm aktualisiert.<br />
Sie können die Einstellungen für je<strong>de</strong>s externe Gerät festlegen und speichern, das Sie an einen Eingang <strong>de</strong>s<br />
Fernsehgeräts angeschlossen haben. Wenn Sie zum Beispiel einen DVD-Player an HDMI 1 angeschlossen und sie<br />
gewählt haben, wer<strong>de</strong>n die Einstellungen und Parameter für diesen DVD-Player gespeichert.<br />
<br />
<br />
<br />
<br />
<br />
Farbe: Rot, Grün, Blau, Gelb, Zyan o<strong>de</strong>r Magenta<br />
N<br />
N<br />
N<br />
Farbe ist verfügbar, wenn <strong>de</strong>r Farbraum auf Benutzerd. eingestellt ist.<br />
Unter Farbe können Sie die RGB-Werte <strong>de</strong>r jeweils gewählten Farbe einstellen.<br />
Wählen Sie Reset, um <strong>de</strong>n eingestellten RGB-Wert zurückzusetzen.<br />
Rot: Hiermit stellen Sie Rotsättigung <strong>de</strong>r gewählten Farbe ein.<br />
Grün: Hiermit stellen Sie Grünsättigung <strong>de</strong>r gewählten Farbe ein.<br />
Blau: Hiermit stellen Sie Blausättigung <strong>de</strong>r gewählten Farbe ein.<br />
Reset: Setzt <strong>de</strong>n Farbraum auf die Standardwerte zurück.<br />
Weißabgleich<br />
Um natürlichere Bildfarben zu erhalten, können Sie die Farbtemperatur anpassen.<br />
● R-Offset: Hiermit stellen Sie die Dunkelheit <strong>de</strong>r roten Farbe ein.<br />
● G-Offset: Hiermit stellen Sie die Dunkelheit <strong>de</strong>r grünen Farbe ein.<br />
● B-Offset: Hiermit stellen Sie die Dunkelheit <strong>de</strong>r blauen Farbe ein.<br />
● R-Gain: Hiermit stellen Sie die Helligkeit <strong>de</strong>r roten Farbe ein.<br />
● G-Gain: Hiermit stellen Sie die Helligkeit <strong>de</strong>r grünen Farbe ein.<br />
● B-Gain: Hiermit stellen Sie die Helligkeit <strong>de</strong>r blauen Farbe ein.<br />
● Reset: Der zuvor angepasste Weißabgleich wird auf die Werkseinstellungen zurückgesetzt.<br />
Hautton<br />
Sie können im Bild <strong>de</strong>n Farbton Rosa (Fleischfarbe) betonen.<br />
N Wenn Sie <strong>de</strong>n Anpassungswert än<strong>de</strong>rn, wird <strong>de</strong>r angepasste Bildschirm aktualisiert.<br />
Kantenglättung → Aus / Ein<br />
Sie können die Objektbegrenzungen im Bild betonen.<br />
xvYCC → Aus / Ein<br />
Durch Aktivieren <strong>de</strong>s xvYCC-Modus vergrößern Sie die Detailtreue und <strong>de</strong>n Farbraum beim Abspielen von Filmen auf einem<br />
externen Gerät (d.h. DVD-Player), das an <strong>de</strong>n HDMI- o<strong>de</strong>r Komponenteneingang angeschlossen ist.<br />
N<br />
N<br />
xvYCC ist verfügbar, wenn <strong>de</strong>r Bildmodus auf Film und <strong>de</strong>r externe Eingang auf HDMI o<strong>de</strong>r Component eingestellt ist.<br />
Diese Funktion wird, je nach externem Gerät, möglicherweise nicht unterstützt.<br />
Deutsch - 15
❑<br />
■<br />
■<br />
■<br />
■<br />
■<br />
Bildoptionen<br />
N<br />
Im PC-Modus können von <strong>de</strong>n Bildoptionen nur Farbtemp. und Größe eingestellt<br />
wer<strong>de</strong>n.<br />
Farbtemp. → Kalt / Normal / Warm1 / Warm2 / Warm3<br />
N<br />
N<br />
Warm1, Warm2 o<strong>de</strong>r Warm3 nur aktiviert, wenn <strong>de</strong>r Bildmodus auf Film eingestellt ist.<br />
Sie können die Einstellungen für je<strong>de</strong>s externe Gerät festlegen und speichern, das Sie an<br />
einen Eingang <strong>de</strong>s Fernsehgeräts angeschlossen haben.<br />
Größe<br />
Gelegentlich möchten Sie vielleicht die Größe <strong>de</strong>s auf Ihrem Monitor angezeigten Bilds än<strong>de</strong>rn.<br />
Ihr Fernsehgerät bietet Ihnen unterschiedliche Bildformate, die jeweils für einen bestimmten Bildsignaltyp i<strong>de</strong>al geeignet sind.<br />
Möglicherweise verfügt auch Ihr Kabel-/Satellitenreceiver über eigene Bildschirmformate. Im Allgemeinen sollten Sie doch so viel<br />
wie möglich im 16:9-Format fernsehen.<br />
O<br />
●<br />
●<br />
●<br />
●<br />
●<br />
●<br />
N<br />
N<br />
N<br />
N<br />
N<br />
N<br />
N<br />
N<br />
N<br />
Diese Optionen können Sie auch durch Drücken <strong>de</strong>r Taste P.SIZE auf <strong>de</strong>r Fernbedienung aufrufen.<br />
Auto Breit: Mit dieser Option stellen Sie das Bildformat automatisch auf das Seitenverhältnis 16:9 ein.<br />
16:9: Wählen Sie diese Option aus, um als Bildformat das Seitenverhältnis 16:9 für DVDs o<strong>de</strong>r Breitbildsendungen<br />
einzustellen.<br />
BreitZoom: Diese Option vergrößert das Bild auf mehr als 4:3.<br />
Zoom: Wählen Sie diese Option aus, um das 16:9-Breitbild auf die volle Bildschirmbreite zu vergrößern.<br />
4:3: Dies ist die Standar<strong>de</strong>instellung zum Anzeigen von Vi<strong>de</strong>os und herkömmlichen Fernsehsendungen.<br />
Bildanpassung: Mit dieser Funktion wird das ganze Bild auch bei Versorgung mit HDMI- (720p/1080i/1080p) o<strong>de</strong>r<br />
Komponentensignalen (1080i/1080p) vollständig und ohne Beschneidung angezeigt.<br />
Je nach Signalquelle können die Bildgrößenoptionen variieren.<br />
Die verfügbaren Elemente können in Abhängigkeit vom ausgewählten Modus variieren.<br />
Im PC-Modus können nur die Modi 16:9 und 4:3 eingestellt wer<strong>de</strong>n.<br />
Sie können die Einstellungen für je<strong>de</strong>s externe Gerät festlegen und speichern, das Sie an einen Eingang <strong>de</strong>s Fernsehgeräts<br />
angeschlossen haben.<br />
Es kann zu vorübergehen<strong>de</strong>r Bildkonservierung kommen, wenn Sie auf <strong>de</strong>m Gerät mehr als zwei Stun<strong>de</strong>n lang ein<br />
unbewegten Bild angezeigt haben.<br />
BreitZoom: Wählen Sie durch Drücken <strong>de</strong>r Taste ► die Option Position, und drücken Sie dann die Taste ENTERE. Mit <strong>de</strong>n<br />
Tasten ▲ o<strong>de</strong>r ▼ können Sie das Bild nach oben o<strong>de</strong>r nach unten verschieben. Drücken Sie dann die Taste ENTERE.<br />
Zoom: Wählen Sie durch Drücken <strong>de</strong>r Taste ► die Option Position, und drücken Sie dann die Taste ENTERE. Mit <strong>de</strong>r Taste<br />
▲ o<strong>de</strong>r ▼ können Sie das Bild nach oben o<strong>de</strong>r nach unten verschieben. Drücken Sie dann die Taste ENTERE. Wählen Sie<br />
durch Drücken <strong>de</strong>r Taste ► die Option Größe, und drücken Sie dann die Taste ENTERE. Drücken Sie die Tasten ▲ o<strong>de</strong>r ▼,<br />
um das Bild in vertikaler Richtung zu vergrößern o<strong>de</strong>r zu verkleinern. Drücken Sie dann die Taste ENTERE.<br />
Auswahl von Bildanpassung im HDMI (1080i / 1080p) o<strong>de</strong>r Komp. modus (1080i / 1080p): Wählen Sie durch Drücken <strong>de</strong>r<br />
Tasten ◄ o<strong>de</strong>r ► die Option Position. Mit <strong>de</strong>n Tasten ▲, ▼, ◄ o<strong>de</strong>r ► können Sie das Bild verschieben.<br />
Reset: Wählen Sie durch Drücken <strong>de</strong>r Tasten ◄ o<strong>de</strong>r ► die Option Reset, und drücken Sie dann die Taste ENTERE.<br />
Sie können die Einstellung initialisieren.<br />
Wenn Sie die Funktion Bildanpassung zusammen mit einem 720p HDMI-Signal verwen<strong>de</strong>n, wird wie bei Overscan oben,<br />
unten, links und rechts eine Zeile abgeschnitten.<br />
Bildschirmmodus → 16:9 / BreitZoom / Zoom / 4:3<br />
Wenn Sie die Bildgröße bei einem Fernsehgerät im 16:9-Format auf Auto Breit einstellen, können Sie bestimmen, dass das Bild<br />
als 4:3 WSS (Breitbilddienst) o<strong>de</strong>r gar nicht angezeigt wer<strong>de</strong>n soll. Da je<strong>de</strong>s europäische Land eine an<strong>de</strong>re Bildgröße verwen<strong>de</strong>t,<br />
können die Benutzer sie damit einstellen.<br />
●<br />
●<br />
●<br />
●<br />
N<br />
N<br />
16:9: Mit dieser Option stellen Sie das Breitbildformat 16:9 ein.<br />
BreitZoom: Diese Option vergrößert das Bild auf mehr als 4:3.<br />
Zoom: Hiermit vergrößern Sie das Bild vertikal.<br />
4:3: Hiermit stellen Sie das Bildformat auf <strong>de</strong>n Normal-Modus 4:3 ein.<br />
Diese Funktion ist im Modus Auto Breit verfügbar.<br />
Diese Funktion ist im PC-, Komponenten- o<strong>de</strong>r HDMI-Modus nicht verfügbar.<br />
Digitale RM → Aus / Gering / Mittel / Hoch / Auto<br />
Wenn das vom Fernsehgerät empfangene Sen<strong>de</strong>signal schwach ist, können Sie die digitale Rauschunterdrückung aktivieren, um<br />
ggf. statische Bil<strong>de</strong>r o<strong>de</strong>r Doppelbil<strong>de</strong>r auf <strong>de</strong>m Bildschirm zu verringern.<br />
N Bei schwachem Signal wählen Sie diejenige <strong>de</strong>r an<strong>de</strong>ren Optionen, bei <strong>de</strong>r das beste Bild angezeigt wird.<br />
HDMI-Schwarzp. → Normal / Gering<br />
Sie können <strong>de</strong>n Schwarzwert direkt auf <strong>de</strong>m Bildschirm auswählen, um die Bildschirmtiefe anzupassen.<br />
N Diese Funktion ist nur aktiv, wenn ein externes Gerät über HDMI (RGB-Signale) mit <strong>de</strong>m TV verbun<strong>de</strong>n ist.<br />
Farbtemp. : Normal ▶<br />
Größe<br />
Bildschirmmodus : 16:9<br />
Digitale RM<br />
HDMI-Schwarzp.<br />
Filmmodus<br />
Blaumodus<br />
Bildoptionen<br />
: Auto Breit<br />
: Auto<br />
: Normal<br />
: Aus<br />
: Aus<br />
U Navig. E Eingabe R Zurück<br />
Deutsch - 16
■<br />
■<br />
❑<br />
Filmmodus → Aus / Auto1 / Auto2<br />
Sie können das Fernsehgerät so einstellen, dass eine Filmsignal aus allen Quellen automatisch empfangen und verarbeitet und<br />
das Bild auf die optimale Qualität eingestellt wer<strong>de</strong>n kann.<br />
N<br />
●<br />
●<br />
●<br />
Filmmodus wird bei TV, AV, COMPONENT(480i / 1080i) und HDMI(480i / 1080i). unterstützt.<br />
Aus: Deaktiviert <strong>de</strong>n Filmmodus.<br />
Auto1: Hiermit wird das Bild bei Filmanzeige automatisch auf die beste Qualität eingestellt.<br />
Auto2: Automatische Optimierung von Vi<strong>de</strong>otext auf <strong>de</strong>m Bildschirm (ohne geschlossene Beschriftungen), wenn Sie einen<br />
Film sehen.<br />
Blaumodus → Aus / Ein<br />
Diese Funktion ist für Experten zum Ausmessen von AV-Geräten bestimmt. Mit dieser Funktion wer<strong>de</strong>n das rote und das grüne<br />
Signal aus <strong>de</strong>m Vi<strong>de</strong>osignal entfernt, sodass nur das blaue Signal angezeigt wird. Damit wird ein Blaufilter erzeugt, mithilfe<br />
<strong>de</strong>ssen die Farbe und <strong>de</strong>r Farbton von Vi<strong>de</strong>ogeräten wie DVD-Playern, Heimkinosystemen usw. eingestellt wer<strong>de</strong>n können.Mit<br />
dieser Funktion können Sie die Farbe und <strong>de</strong>n Farbton auf Werte einstellen, die <strong>de</strong>m Signalpegel <strong>de</strong>r verschie<strong>de</strong>nen Vi<strong>de</strong>ogeräte<br />
angemessen sind. Verwen<strong>de</strong>n Sie hierzu die Streifenmuster für die Farben Rot/Grün/Blau/Cyan/Magenta/Gelb, ohne zusätzlich<br />
<strong>de</strong>n Blaufilter zu verwen<strong>de</strong>n.<br />
N Blaumodus ist verfügbar, wenn <strong>de</strong>r Bildmodus auf Film o<strong>de</strong>r Standard eingestellt ist.<br />
Bild zurücksetzen → Bildmodus zurücksetzen / Abbrechen<br />
Hiermit wer<strong>de</strong>n alle Bil<strong>de</strong>instellungen auf die Standardwerte zurückgesetzt.<br />
N Bildmodus zurücksetzen: Alle aktuellen Bildwerte wer<strong>de</strong>n auf die Standardwerte zurückgesetzt.<br />
Deutsch - 17
¦<br />
Verwen<strong>de</strong>n Ihres Computers als Computerbildschirm (PC)<br />
Konfigurieren Ihrer PC-Software (unter Windows XP)<br />
Im Folgen<strong>de</strong>n sind die typischen Anzeigeeinstellungen für einen Windows-Computer<br />
aufgeführt. Die von Ihrem PC angezeigten Fenster entsprechen je nach installierter Windows-<br />
Version und verwen<strong>de</strong>ter Grafikkarte möglicherweise nicht genau <strong>de</strong>r Abbildung. Dennoch<br />
sind die hier nachfolgen<strong>de</strong>n grundlegen<strong>de</strong>n Konfigurationsinformationen in fast allen Fällen<br />
anwendbar. (Wen<strong>de</strong>n Sie sich an<strong>de</strong>rnfalls an <strong>de</strong>n Computerhersteller o<strong>de</strong>r <strong>Samsung</strong>-Händler.)<br />
1. Klicken Sie im Startmenü von Windows auf die Systemsteuerung.<br />
2. Wenn das Fenster <strong>de</strong>r Systemsteuerung angezeigt wird, klicken Sie auf „Darstellung und<br />
Designs”. Ein Dialogfeld wird geöffnet.<br />
3. Wenn das Fenster <strong>de</strong>r Systemsteuerung angezeigt wird, klicken Sie auf „Anzeige“.<br />
Anschließend wird ein Dialogfeld angezeigt.<br />
4. Klicken Sie nun im Dialogfeld „Anzeige“ auf die Registerkarte „Einstellungen”.<br />
Das richtige (optimale) Bildformat lautet: 1920 x 1080 Pixel<br />
Wenn das Dialogfeld eine Option für die Bildschirmfrequenz enthält, muss als<br />
Einstellung 60 o<strong>de</strong>r 60 Hz ausgewählt wer<strong>de</strong>n. An<strong>de</strong>rnfalls klicken Sie einfach auf OK, um das Dialogfeld zu schließen.<br />
Anzeigemodi<br />
■<br />
Wenn das Signal <strong>de</strong>s Computers <strong>de</strong>n folgen<strong>de</strong>n Standards entspricht, wird <strong>de</strong>r Bildschirm automatisch darauf eingestellt. Wenn<br />
das Signal <strong>de</strong>s Computers nicht diesen Standards entspricht, stellen Sie einen <strong>de</strong>r aufgeführten Modi ein; Informationen hierzu<br />
entnehmen Sie <strong>de</strong>r Bedienungsanleitung <strong>de</strong>r Grafikkarte <strong>de</strong>s Computers. An<strong>de</strong>rnfalls wird u. U. nichts auf <strong>de</strong>m Bildschirm<br />
angezeigt. Für die auf <strong>de</strong>r nächsten Seite gezeigten Anzeigemodi wur<strong>de</strong> das Bild bereits bei <strong>de</strong>r Produktion optimiert.<br />
D-Sub- und HDMI/DVI-Eingang<br />
N<br />
N<br />
N<br />
N<br />
N<br />
Modus<br />
IBM<br />
MAC<br />
VESA CVT<br />
VESA DMT<br />
VESA GTF<br />
VESA DMT /<br />
DTV CEA<br />
Auflösung<br />
Horizontalfrequenz<br />
(kHz)<br />
Vertikalfrequenz<br />
(Hz)<br />
Pixeltakt (MHz)<br />
Synchronisationspolarität<br />
(H/V)<br />
640 x 350<br />
720 x 400<br />
31,469<br />
31,469<br />
70,086<br />
70,087<br />
25,175<br />
28,322<br />
+/-<br />
-/+<br />
640 x 480 35,000 66,667 30,240 -/-<br />
832 x 624 49,726 74,551 57,284 -/-<br />
1152 x 870 68,681 75,062 100,000 -/-<br />
720 x 576 35,910 59,950 32,750 -/+<br />
1152 x 864 53,783 59,959 81,750 -/+<br />
1280 x 720 44,772 59,855 74,500 -/+<br />
1280 x 720 56,456 74,777 95,750 -/+<br />
1280 x 960 75,231 74,857 130,000 -/+<br />
640 x 480 31,469 59,940 25,175 -/-<br />
640 x 480 37,861 72,809 31,500 -/-<br />
640 x 480 37,500 75,000 31,500 -/-<br />
800 x 600 37,879 60,317 40,000 +/+<br />
800 x 600 48,077 72,188 50,000 +/+<br />
800 x 600 46,875 75,000 49,500 +/+<br />
1024 x 768 48,363 60,004 65,000 -/-<br />
1024 x 768 56,476 70,069 75,000 -/-<br />
1024 x 768 60,023 75,029 78,750 +/+<br />
1152 x 864 67,500 75,000 108,000 +/+<br />
1280 x 1024 63,981 60,020 108,000 +/+<br />
1280 x 1024 79,976 75,025 135,000 +/+<br />
1280 x 800 49,702 59,810 83,500 -/+<br />
1280 x 800 62,795 74,934 106,500 -/+<br />
1280 x 960 60,000 60,000 108,000 +/+<br />
1360 x 768 47,712 60,015 85,500 +/+<br />
1440 x 900 55,935 59,887 106,500 -/+<br />
1440 x 900 70,635 74,984 136,750 -/+<br />
1680 x 1050 65,290 59,954 146,250 -/+<br />
1280 x 720<br />
1280 x 1024<br />
52,500<br />
74,620<br />
70,000<br />
70,000<br />
89,040<br />
128,943<br />
-/+<br />
-/-<br />
1920 x 1080p 67,500 60,000 148,500 +/+<br />
Eine Verbindung über HDMI/DVI-Kabel kann nur über <strong>de</strong>n HDMI IN 3(DVI)-Anschluss erfolgen.<br />
Das Zeilensprungverfahren wird nicht unterstützt.<br />
Das Fernsehgerät funktioniert möglicherweise nicht ordnungsgemäß, wenn kein Standardmodus ausgewählt wird.<br />
Separate- und Composite-Modus wer<strong>de</strong>n unterstützt. SOG wird nicht unterstützt.<br />
Ein zu langes o<strong>de</strong>r qualitativ geringwertiges VGA-Kabel kann in hochauflösen<strong>de</strong>n Modi (1920 x 1080) zu Bildrauschen führen.<br />
Deutsch - 18
¦<br />
Fernsehgerät mithilfe <strong>de</strong>s PCs einstellen<br />
N<br />
Voreinstellung: Drücken Sie die Taste SOURCE (Quelle), um <strong>de</strong>n Modus „PC“einzustellen.<br />
❑<br />
Autom. Einstellung<br />
Verwen<strong>de</strong>n Sie die Funktion zum automatischen Einstellen, damit sich das Fernsehgerät<br />
automatisch auf das empfangene Vi<strong>de</strong>osignal einstellt.<br />
Bei dieser Funktion erfolgt auch automatisch eine Feineinstellung sowie die Anpassung <strong>de</strong>r<br />
Frequenzwerte und Positionen.<br />
T Drücken Sie die Taste TOOLS, um das Menü Extras anzuzeigen. Sie können die<br />
automatische Einstellung durch Auswahl von Extras → Autom. Einstellung durchführen.<br />
N Diese Funktion ist im DVI-HDMI-Modus nicht verfügbar.<br />
Bild<br />
Helligkeit : 45<br />
Schärfe : 50<br />
Autom. Einstellung<br />
PC-Bildschirm<br />
Erweiterte Einstellungen<br />
Bildoptionen<br />
Bild zurücksetzen<br />
▶<br />
❑<br />
PC-Bildschirm<br />
■<br />
■<br />
■<br />
Grob / Fine<br />
Durch das Einstellen <strong>de</strong>r Bildqualität können Bildstörungen und Rauschen beseitigt o<strong>de</strong>r<br />
verringert wer<strong>de</strong>n. Falls sich Bildrauschen durch die Feinabstimmung allein nicht beheben lässt,<br />
stellen Sie zunächst die Frequenz möglichst genau ein (Grob). Nach<strong>de</strong>m Sie das Bildrauschen<br />
durch die Grob- und Feinabstimmung <strong>de</strong>s Bil<strong>de</strong>s verringert haben, stellen Sie die Position <strong>de</strong>s<br />
Bil<strong>de</strong>s so ein, dass es auf <strong>de</strong>m Bildschirm zentriert ist.<br />
PC-Position<br />
Passen Sie die Position <strong>de</strong>s PC-Bilds an, wenn es nicht auf das Fernsehbild passt.<br />
Stellen Sie mit <strong>de</strong>n Tasten ▲ o<strong>de</strong>r ▼ die vertikale Position ein. Stellen Sie mit <strong>de</strong>n Tasten ▲<br />
o<strong>de</strong>r ▼ die horizontale Position ein.<br />
Bild zurücksetzen<br />
Sie können alle Bil<strong>de</strong>instellungen auf die werkseitig eingestellten Ausgangswerte zurücksetzen.<br />
PC-Bildschirm<br />
Coarse 50<br />
Fine 0<br />
PC-Position<br />
Bild zurücksetzen<br />
U Navig. E Eingabe R Zurück<br />
Deutsch - 19
SOUND<br />
¦<br />
Konfigurieren <strong>de</strong>s Tonmenüs<br />
❑<br />
Modus → Standard / Musik / Film / Sprache / Benutzerd.<br />
T<br />
●<br />
●<br />
●<br />
●<br />
●<br />
Drücken Sie die Taste TOOLS, um das Menü Extras anzuzeigen. Sie können <strong>de</strong>n<br />
Tonmodus durch Auswahl von Extras → Tonmodus konfigurieren.<br />
Standard: Auswahl <strong>de</strong>s normalen Tonmodus.<br />
Musik: Betont die Musik im Verhältnis zu Stimmen.<br />
Film: Ermöglicht optimale Tonwie<strong>de</strong>rgabe für Filme.<br />
Sprache: Betont Stimmen im Verhältnis zu an<strong>de</strong>ren Tönen.<br />
Benutzerd.: Abrufen ihrer benutzer<strong>de</strong>finierten Toneinstellungen.<br />
Ton<br />
Modus : Benutzerd. ▶<br />
Equalizer<br />
SRS TruSurround HD : Aus<br />
Wie<strong>de</strong>rgabesprache : ----<br />
Audioformat : ----<br />
Audio für Sehgeschädigte<br />
Auto. Lautst.<br />
: Aus<br />
Lautsprecher auswählen : TV-Lautsprecher<br />
❑<br />
❑<br />
❑<br />
❑<br />
❑<br />
■<br />
■<br />
❑<br />
Equalizer<br />
Sie können <strong>de</strong>n Ton Ihrem persönlichen Geschmack anpassen.<br />
● Modus: Auswählen <strong>de</strong>s Tonmodus <strong>de</strong>r <strong>de</strong>finierten Einstellungen.<br />
● Balance L/R: Anpassen <strong>de</strong>r Balance zwischen <strong>de</strong>m linken und <strong>de</strong>m rechten Lautsprecher.<br />
● 100Hz / 300Hz / 1KHz / 3KHz / 10KHz (Bandbreitenanpassung): Zum Einstellen <strong>de</strong>r unterschiedlichen<br />
Bandbreitenfrequenzen.<br />
● Reset: Hiermit stellen Sie die Equalizereinstellungen auf die Standardwerte zurück.<br />
SRS TruSurround HD → Aus / Ein<br />
SRS TEXT (SRS-Text) ist eine patentierte SRS-Technologie, die das Problem mit <strong>de</strong>r Ausgabe von 5.1-Mehrkanalinhalten<br />
über zwei Lautsprecher löst. Mit TruSurround kommen Sie mit je<strong>de</strong>m Stereo-System mit zwei Lautsprechern, auch <strong>de</strong>n<br />
internen Gerätelautsprechern, in <strong>de</strong>n Genuss überzeugen<strong>de</strong>r Virtual Surround-Effekte. Es ist vollständig kompatibel mit allen<br />
Mehrkanalformaten.<br />
T Drücken Sie die Taste TOOLS, um das Menü Extras anzuzeigen. Sie können SRS TruSurround HD außer<strong>de</strong>m durch Auswahl<br />
von Extras → SRS TS HD anpassen.<br />
Wie<strong>de</strong>rgabesprache<br />
Sie können die Standardsprache für Audio än<strong>de</strong>rn. Zeigt die Sprachinformationen für <strong>de</strong>n eingehen<strong>de</strong>n Audiostream an.<br />
N<br />
N<br />
Während Sie ein digitales Programm anschauen, können Sie diese Funktion auswählen.<br />
Sie können nur Sprachen auswählen, die auch tatsächlich übertragen wer<strong>de</strong>n.<br />
Audioformat → MPEG / Dolby Digital<br />
Wenn Sie für die Tonausgabe sowohl <strong>de</strong>n Hauptlautsprecher als auch <strong>de</strong>n Audioreceiver verwen<strong>de</strong>n, kann es aufgrund <strong>de</strong>r<br />
Geschwindigkeitsunterschie<strong>de</strong> beim Dekodieren durch die bei<strong>de</strong>n Systeme zu einem Echoeffekt kommen. Verwen<strong>de</strong>n Sie in<br />
diesen Fall die TV-Lautsprecher.<br />
N<br />
N<br />
Während Sie ein digitales Programm anschauen, können Sie diese Funktion auswählen.<br />
Entsprechend <strong>de</strong>m Sen<strong>de</strong>signal wird Audioformat angezeigt.<br />
Audio für Sehgeschädigte<br />
Dies ist eine zusätzliche Audiofunktion, mit <strong>de</strong>r für sehbehin<strong>de</strong>rte Personen eine zusätzliche Tonspur wie<strong>de</strong>rgegeben wird.<br />
Diese Funktion verarbeitet <strong>de</strong>n Audiostream für die AB (Audio-Beschreibung), sofern diese vom Sen<strong>de</strong>r zusammen mit <strong>de</strong>m<br />
Vor<strong>de</strong>rgrundton übertragen wird. Der Benutzer kann die Audio-Beschreibung aktivieren o<strong>de</strong>r <strong>de</strong>aktivieren und die Lautstärke<br />
einstellen.<br />
O Drücken Sie die Taste AD auf <strong>de</strong>r Fernbedienung, um Aus o<strong>de</strong>r Ein zu wählen.<br />
Audio für Sehgeschädigte → Aus / Ein<br />
Hiermit wird <strong>de</strong>r Audiokommentar für Sehbehin<strong>de</strong>rte ein- und ausgeschaltet.<br />
Lautst.<br />
Hiermit stellen Sie die Lautstärke <strong>de</strong>s Audiokommentars für Sehbehin<strong>de</strong>rte ein.<br />
N<br />
N<br />
Lautst. ist aktiv, wenn Audio für Sehgeschädigte aktiviert Ein ist.<br />
Während Sie ein digitales Programm anschauen, können Sie diese Funktion auswählen.<br />
Auto. Lautst. → Aus / Ein<br />
Aufgrund unterschiedlicher Signalbedingungen unterschei<strong>de</strong>n sich Fernsehsen<strong>de</strong>r in <strong>de</strong>r Lautstärke, so dass es erfor<strong>de</strong>rlich<br />
sein kann, die Lautstärke beim Umschalten zwischen Sen<strong>de</strong>rn je<strong>de</strong>s Mal nachzuregeln. Mit <strong>de</strong>r Funktion für automatische<br />
Lautstärkeeinstellung wird die Lautstärke automatisch bei starkem Modulationssignal verringert und bei schwachem<br />
Modulationssignal erhöht.<br />
Deutsch - 20
❑<br />
Lautsprecherauswahl<br />
Wenn Sie fernsehen, während das Gerät an ein Heimkinosystem angeschlossen ist, schalten Sie die Fernsehlautsprecher aus,<br />
damit Sie nur <strong>de</strong>n Ton <strong>de</strong>r (externen) Lautsprecher <strong>de</strong>s Heinkinosystems hören.<br />
● Ext. Lautsprecher: Tonwie<strong>de</strong>rgabe über die externen Lautsprecher (Heimkinosystem).<br />
● TV-Lautsprecher: Verwen<strong>de</strong>n Sie diese Option, um <strong>de</strong>n Ton über die Fernsehlautsprecher wie<strong>de</strong>rzugeben.<br />
N Die Lautstärketasten und MUTE sind <strong>de</strong>aktiviert, wenn Lautsprecherauswahl auf Ext. Lautsprecher geschaltet ist.<br />
N Wenn Sie im Menü Lautsprecherauswahl die Option Ext. Lautsprecher wählen, wer<strong>de</strong>n die Audioeinstellungen<br />
eingeschränkt.<br />
Eingebaute Lautsprecher <strong>de</strong>s Fernsehgeräts Audioausgang (Optical) zum Soundsystem<br />
RF / AV / Komp. / PC / HDMI<br />
RF / AV / Komp. / PC / HDMI<br />
TV-Lautsprecher Audioausgang Audioausgang<br />
Ext. Lautsprecher Ton aus Audioausgang<br />
Kein Vi<strong>de</strong>osignal Ton aus Ton aus<br />
❑<br />
Ton zurücksetzen → Alle zurücksetzen / Ton-Modus reset / Abbrechen<br />
Sie können alle Audioeinstellungen wie<strong>de</strong>r auf die Werkseinstellungen zurücksetzen.<br />
N Ton-Modus reset: Alle aktuellen Tonwerte wer<strong>de</strong>n auf die Standardwerte zurückgesetzt.<br />
Ton zurücksetzen<br />
Optionen für Zurücksetzen <strong>de</strong>s Tons auswählen.<br />
Alle zurücksetzen Ton-Modus reset Abbrechen<br />
L Navig. E Eingabe R Zurück<br />
¦<br />
Tonmodus wählen<br />
Sie können <strong>de</strong>n Tonwie<strong>de</strong>rgabemodus durch Drücken <strong>de</strong>r Taste DUAL wählen. Wenn Sie die Taste drücken, wird <strong>de</strong>r aktuelle<br />
Tonwie<strong>de</strong>rgabemodus auf <strong>de</strong>m Bildschirm angezeigt.<br />
N<br />
N<br />
N<br />
A2-Stereo<br />
NICAM-<br />
Stereo<br />
Audiosystem Dual 1 / 2 Standard<br />
Mono<br />
MONO<br />
Automatischer Wechsel<br />
Stereo<br />
STEREO ↔ MONO<br />
Dual DUAL 1 ↔ DUAL 2 DUAL 1<br />
Mono<br />
MONO<br />
Automatischer Wechsel<br />
Stereo<br />
MONO ↔ STEREO<br />
Dual<br />
MONO ↔ DUAL 1<br />
DUAL 2<br />
Falls das Stereosignal schwach ist und automatisch umgeschaltet wird, sollten Sie zu mono wechseln.<br />
Diese Funktion ist nur bei einem Stereosignal aktiviert. Bei Monosignalen ist es <strong>de</strong>aktiviert.<br />
Diese Funktion ist nur im TV-Modus verfügbar.<br />
DUAL 1<br />
Deutsch - 21
EINSTELLUNGEN<br />
¦<br />
Konfigurieren <strong>de</strong>r Menüeinstellungen<br />
❑<br />
❑<br />
Menüsprache<br />
Sie können die Menüsprache festlegen.<br />
Zeit<br />
Genaue Beschreibungen für die Verfahren zum Einstellen <strong>de</strong>r Optionen fin<strong>de</strong>n Sie im Kapitel<br />
‘Einstellen <strong>de</strong>r Uhrzeit’.<br />
Einstellungen<br />
Plug & Play<br />
Menüsprache : Deutsch ▶<br />
Zeit<br />
Sendungsoptionen<br />
Sicherheit<br />
Allgemein<br />
❑<br />
Sendungsoptionen<br />
■<br />
■<br />
■<br />
■<br />
Untertitel<br />
Sie können Untertitel aktivieren und <strong>de</strong>aktivieren. Mit diesem Menü legen Sie <strong>de</strong>n Untertitelmodus fest. Die Menüoption Normal ist<br />
die Grun<strong>de</strong>instellung für Untertitel, und die Option Schwerhörig ist für hörgeschädigte Personen bestimmt.<br />
● Untertitel → Aus / Ein<br />
Untertitel aktivieren o<strong>de</strong>r <strong>de</strong>aktivieren.<br />
● Modus → Normal / Schwerhörig<br />
Hiermit können Sie <strong>de</strong>n Modus <strong>de</strong>r Untertitelfunktion einstellen.<br />
● Untertitelsprache<br />
Hiermit können Sie die Untertitelsprache festlegen.<br />
N<br />
N<br />
O<br />
Wenn das Programm, das Sie gera<strong>de</strong> sehen, die Funktion Schwerhörig nicht unterstützt, wird selbst bei ausgewählter<br />
Funktion Schwerhörig automatisch die Funktion Normal aktiviert.<br />
Englisch ist <strong>de</strong>r Standardwert in Fällen, wo die ausgewählte Sprache für die Sendung nicht verfügbar ist.<br />
Sie können diese Optionen auswählen, in<strong>de</strong>m Sie einfach die Taste SUBT. auf <strong>de</strong>r Fernbedienung drücken.<br />
Digitaltext → Deaktivieren / Aktivieren (nur Großbritannien)<br />
Wenn das Programm mit Digitaltext gesen<strong>de</strong>t wird, ist diese Funktion aktiviert.<br />
N MHEG (Multimedia and Hypermedia Information Coding Experts Group)<br />
Ein internationaler Standard für Datenkompressionssysteme für Multimedia- und Hypermedia-Anwendungen. Dies ist ein<br />
höheres Niveau als das MPEG-System, das solche datenverknüpfen<strong>de</strong>n Hypertextmedien wie Standbil<strong>de</strong>r, Zeichendienst,<br />
Animations-, Grafik- und Vi<strong>de</strong>odateien sowie Multimediadateien umfasst. MHEG ist eine Technologie für Laufzeitinteraktion<br />
mit <strong>de</strong>m Benutzer, und sie wird auf verschie<strong>de</strong>nen Gebieten verwen<strong>de</strong>t, z. B. VOD (Vi<strong>de</strong>o-On-Demand), ITV (Interactive TV),<br />
EC (Electronic Commerce), Teleweiterbildung, Telekonferenzen, digitale Bibliotheken und Netzwerkspiele.<br />
Teletextsprache<br />
Sie können die Vi<strong>de</strong>otextsprache durch Auswählen <strong>de</strong>s Sprachtyps einstellen.<br />
N Englisch ist <strong>de</strong>r Standardwert in Fällen, wo die ausgewählte Sprache für die Sendung nicht verfügbar ist.<br />
Benutzer<strong>de</strong>f.<br />
● Primäre Wie<strong>de</strong>rgabesprache / Sekundäre Wie<strong>de</strong>rgabesprache / Primäre Untertitelsprache / Sekundäre<br />
Untertitelsprache / Primäre Teletextsprache / Sekundäre Teletextsprache<br />
Mit dieser Funktion können Sie eine <strong>de</strong>r verfügbaren Sprachen wählen. Die hier gewählte Sprache ist die Standardsprache,<br />
wenn <strong>de</strong>r Benutzer einen Kanal auswählt.<br />
Wenn Sie die Spracheinstellung än<strong>de</strong>rn, wer<strong>de</strong>n die Untertitelsprache, die Audiosprache und die Vi<strong>de</strong>otextsprache im Menü<br />
‘Sprache’ automatisch in die gewünschte Sprache geän<strong>de</strong>rt.<br />
Mit <strong>de</strong>n Untermenüs für die Untertitelsprache, Audiosprache und Vi<strong>de</strong>otextsprache im Menü ‘Sprache’ zeigen Sie eine<br />
Liste <strong>de</strong>r vom aktuellen Kanal unterstützten Sprachen an, und die aktuelle Auswahl wird hervorgehoben. Wenn Sie die<br />
Spracheinstellung än<strong>de</strong>rn, gilt die neue Auswahl nur für <strong>de</strong>n aktuellen Kanal. Die geän<strong>de</strong>rte Einstellung hat keinen Einfluss auf<br />
die Einstellung <strong>de</strong>r Untertitelsprache, Audiosprache und Teletext-Sprache im Menü Voreinstellung.<br />
Deutsch - 22
■<br />
❑<br />
■<br />
■<br />
■<br />
❑<br />
■<br />
Common Interface<br />
● CI-Menü<br />
Hiermit kann <strong>de</strong>r Benutzer seine Auswahl in <strong>de</strong>m vom CAM-Modul bereitgestellten Menü treffen.<br />
Wählen Sie das CI-Menü ausgehend vom Menü ‘PC Card’ (PC-Karte).<br />
● Anwendungsinformationen<br />
Die folgen<strong>de</strong>n Erklärungen gelten für <strong>de</strong>n Fall, dass ein CAM-Modul in <strong>de</strong>n CI-Schlitz gesteckt ist und angezeigt wird.<br />
In <strong>de</strong>n Anwendungsinformationen wird die CI(CI+)-Karte beschrieben. Sie können das CAM-Modul unabhängig davon<br />
anschließen, ob das Fernsehgerät angeschaltet ist o<strong>de</strong>r nicht.<br />
1. Sie können das CI-CAM-Modul bei Ihrem nächsten Händler o<strong>de</strong>r durch telefonische Bestellung erwerben.<br />
2. Schieben Sie die CI(CI+)-Karte in Richtung <strong>de</strong>s Pfeils in das CAM-Modul ein, bis sie fest sitzt.<br />
3. Schieben Sie das CAM-Modul mit installierter CI(CI+)-Karte in <strong>de</strong>n CI-Steckplatz (Common Interface) hinein.<br />
(Schieben Sie das CAM-Modul in Pfeilrichtung bis zum Anschlag, sodass es parallel mit <strong>de</strong>m Steckplatz ist.)<br />
4. Kontrollieren Sie, ob Sie ein Bild sehen o<strong>de</strong>r ein gestörtes Signal.<br />
Sicherheit<br />
Kin<strong>de</strong>rsicherung → Aus / Ein<br />
Mit dieser Funktion können Sie nicht autorisierte Benutzer, z. B. Kin<strong>de</strong>r, daran hin<strong>de</strong>rn ungeeignete Programme anzuschauen,<br />
in<strong>de</strong>m das Bild blockiert und <strong>de</strong>r Ton stummgeschaltet wird.<br />
N<br />
N<br />
N<br />
N<br />
Ehe das Einstellungsfenster angezeigt wird, wird das Fenster zur Eingabe <strong>de</strong>r PIN geöffnet. Geben Sie nun Ihre vierstellige<br />
PIN ein.<br />
Der Standard-PIN-Co<strong>de</strong> eines neuen Fernsehgeräts lautet 0-0-0-0. Sie können die PIN än<strong>de</strong>rn, in<strong>de</strong>m Sie im Menü <strong>de</strong>n<br />
Befehl PIN än<strong>de</strong>rn wählen.<br />
Sie können einige <strong>de</strong>r Kanäle in <strong>de</strong>r Kanalliste sperren.<br />
Kin<strong>de</strong>rsicherung ist nur im TV-Modus verfügbar.<br />
Sicherungsstufe → Sicherungsstufe<br />
Mit dieser Funktion können Sie nicht autorisierte Benutzer, z. B. Kin<strong>de</strong>r, daran hin<strong>de</strong>rn, ungeeignete Programme anzuschauen.<br />
Hierzu verwen<strong>de</strong>n Sie eine benutzer<strong>de</strong>finierte vierstellige PIN.<br />
N<br />
N<br />
N<br />
N<br />
N<br />
Die für Sicherungsstufe verfügbaren Elemente können in Abhängigkeit vom jeweiligen Land variieren.<br />
Ehe das Einstellungsfenster angezeigt wird, wird das Fenster zur Eingabe <strong>de</strong>r PIN geöffnet. Geben Sie nun Ihre vierstellige<br />
PIN ein.<br />
Der Standard-PIN-Co<strong>de</strong> eines neuen Fernsehgeräts lautet ‘0-0-0-0’. Sie können die PIN än<strong>de</strong>rn, in<strong>de</strong>m Sie im Menü <strong>de</strong>n<br />
Befehl PIN än<strong>de</strong>rn wählen.<br />
Nach<strong>de</strong>m die Altersbeschränkungen eingestellt sind, wird das Symbol '\' angezeigt.<br />
Alle zul.: Drücken Sie diese Taste, um alle Altersbeschränkungen aufzuheben.<br />
Keine zul.: Drücken Sie diese Taste, um alle Altersbeschränkungen zu aktivieren.<br />
PIN än<strong>de</strong>rn<br />
Sie können Ihre zum Einrichten <strong>de</strong>s Fernsehgeräts benötigte persönliche Kennnummer än<strong>de</strong>rn.<br />
N<br />
N<br />
N<br />
Ehe das Einstellungsfenster angezeigt wird, wird das Fenster zur Eingabe <strong>de</strong>r PIN geöffnet. Geben Sie nun Ihre vierstellige<br />
PIN ein.<br />
Der Standard-PIN-Co<strong>de</strong> eines neuen Fernsehgeräts lautet ‘0-0-0-0’.<br />
Wenn Sie <strong>de</strong>n PIN-Co<strong>de</strong> vergessen haben, drücken Sie die Fernbedienungstasten in <strong>de</strong>r angegebenen Reihenfolge, um die<br />
PIN auf 0-0-0-0: POWER (Aus) → MUTE → 8 → 2 → 4 → POWER (Ein).<br />
Allgemein<br />
Spielemodus → Aus / Ein<br />
Wenn Sie eine Spielekonsole wie PlayStation o<strong>de</strong>r Xbox anschließen, können Sie durch Auswählen <strong>de</strong>s Spielemenüs ein<br />
realitätsnaheres Spielerlebnis genießen.<br />
N Einschränkungen im Spielmodus (Achtung!)<br />
Wenn Sie die Spielekonsole wie<strong>de</strong>r vom Gerät trennen und ein an<strong>de</strong>res externes Gerät anschließen möchten, been<strong>de</strong>n<br />
(Aus) Sie über das Einrichtmenü <strong>de</strong>n Spielemodus.<br />
Wenn Sie im Spielemodus das TV-Menü anzeigen, zittert das Bild leicht.<br />
N<br />
N<br />
N<br />
Spielemodus ist im normalen TV-, PC- und Ext.-Modus nicht verfügbar.<br />
Kontrollieren Sie, ob <strong>de</strong>r Spielemodus noch aktiviert (Ein) ist, wenn die Bildqualität bei angeschlossenem externem Gerät<br />
schlecht ist. Deaktivieren Sie <strong>de</strong>n Spielemodus (Aus) und schließen Sie externe Geräte an.<br />
Wenn <strong>de</strong>r Spielemodus aktiviert ist:<br />
<br />
<br />
<br />
Der Bildmodus wird automatisch auf Standard eingestellt und kann nicht geän<strong>de</strong>rt wer<strong>de</strong>n.<br />
Der Tonmodus wird automatisch auf Benutzerd. eingestellt und kann nicht geän<strong>de</strong>rt wer<strong>de</strong>n. Passen Sie <strong>de</strong>n Ton unter<br />
Verwendung <strong>de</strong>s Equalizers an.<br />
Die Funktion zum Zurücksetzen <strong>de</strong>r Audioeinstellungen ist aktiviert. Durch Auswählen <strong>de</strong>r Reset-Funktion nach <strong>de</strong>m<br />
Einstellen <strong>de</strong>s Equalizers wird die Equalizer-Einstellung auf die Werkseinstellungen zurückgesetzt.<br />
Deutsch - 23
■<br />
■<br />
■<br />
Energiesparmod. → Aus / Gering / Mittel / Hoch / Bild aus / Auto<br />
Mit dieser Funktion stellen Sie die Helligkeit <strong>de</strong>s Fernsehgeräts ein, um <strong>de</strong>n Stromverbrauch zu senken. Wenn Sie nachts<br />
fernsehen, stellen Sie Energiesparmod. auf Hoch ein, um sowohl die Augenermüdung als auch <strong>de</strong>n Stromverbrauch zu senken.<br />
Wenn Sie Bild aus wählen, wird <strong>de</strong>r Bildschirm abgeschaltet und Sie können nur noch <strong>de</strong>n Ton hören. Drücken Sie eine beliebige<br />
Taste, um Bild aus zu been<strong>de</strong>n.<br />
N<br />
T<br />
Im Menü Extras wird die Funktion Bild aus nicht unterstützt.<br />
Drücken Sie die Taste TOOLS, um das Menü Extras anzuzeigen. Sie können zu<strong>de</strong>m die Energiesparoption durch Auswahl<br />
von Extras → Energiesparmod. anpassen.<br />
Menütransparenz → Hell / Dunkel<br />
Sie können die Transparenz <strong>de</strong>s Menüs einstellen.<br />
Melodie → Aus / Gering / Mittel / Hoch<br />
Es kann eine Melodie abgespielt wer<strong>de</strong>n, wenn <strong>de</strong>r Bildschirm an- o<strong>de</strong>r ausgeschaltet wird.<br />
N Die Melodie wird nicht abgespielt.<br />
<br />
<br />
<br />
Das Fernsehgerät gibt keinen Ton aus, weil die MUTE-Taste gedrückt wur<strong>de</strong>.<br />
Das Fernsehgerät gibt keinen Ton aus, weil die Lautstärketaste (-) solange gedrückt wur<strong>de</strong>, bis <strong>de</strong>r Ton aus war.<br />
Das Fernsehgerät wur<strong>de</strong> mit <strong>de</strong>m Sleep-Timer ausgeschaltet.<br />
¦<br />
❑<br />
■<br />
■<br />
❑<br />
Einstellen <strong>de</strong>r Uhrzeit<br />
Uhr<br />
Die Uhr muss eingestellt wer<strong>de</strong>n, damit Sie die verschie<strong>de</strong>nen Timerfunktionen <strong>de</strong>s<br />
Fernsehgeräts verwen<strong>de</strong>n können.<br />
O<br />
N<br />
Je<strong>de</strong>s Mal, wenn Sie die Taste INFO drücken, wird die aktuelle Zeit angezeigt.<br />
Wenn Sie das Netzkabel ziehen, müssen Sie die Uhr erneut einstellen.<br />
Uhr-Modus<br />
Sie können die aktuelle Zeit manuell o<strong>de</strong>r automatisch einstellen.<br />
● Auto: Hiermit stellen Sie die Uhrzeit automatisch anhand <strong>de</strong>r Zeit aus <strong>de</strong>r digitalen<br />
Übertragung ein.<br />
● <strong>Manuel</strong>l: Hiermit stellen Sie die aktuelle Zeit auf einen manuell eingestellten Wert ein.<br />
N Je nach Sen<strong>de</strong>station und Signal erfolgt die automatische Zeiteinstellung möglicherweise<br />
nicht korrekt. In diesem Fall müssen Sie die Zeit manuell einstellen.<br />
N Der Antennen- o<strong>de</strong>r Kabelanschluss muss vorhan<strong>de</strong>n sein, um die Zeit automatisch<br />
einzustellen.<br />
Zeit einstellen<br />
Sie können die aktuelle Zeit manuell einstellen.<br />
N<br />
N<br />
Diese Funktion ist nur verfügbar, wenn Sie Uhr-Modus auf <strong>Manuel</strong>l eingestellt haben.<br />
Sie können Tag, Monat, Jahr, Stun<strong>de</strong> und Minute auch direkt über die Zifferntasten auf <strong>de</strong>r Fernbedienung einstellen.<br />
Sleep-Timer<br />
Uhr : -- : -- ▶<br />
Der Sleep-Timer schaltet das Fernsehgerät automatisch nach einer eingestellten Zeit (30, 60, 90, 120, 150, 180 Minuten) aus.<br />
T Drücken Sie die Taste TOOLS, um das Menü Extras anzuzeigen. Sie können <strong>de</strong>n Sleep-Timer durch Auswahl von Extras →<br />
Sleep-Timer einstellen.<br />
N Um die Sleep-Timer-Funktion abzubrechen, wählen Sie Aus.<br />
Einstellungen<br />
Sleep-Timer<br />
Timer 1<br />
Timer 2<br />
Timer 3<br />
Plug & Play<br />
Menüsprache<br />
Zeit<br />
Sendungsoptionen<br />
Sicherheit<br />
Allgemein<br />
Zeit<br />
: Aus<br />
: Deutsch<br />
: Deaktiviert<br />
: Deaktiviert<br />
: Deaktiviert<br />
U Navig. E Eingabe R Zurück<br />
▶<br />
❑<br />
■<br />
■<br />
Timer 1 / Timer 2 / Timer 3<br />
Sie können drei verschie<strong>de</strong>ne Einstellungen für <strong>de</strong>n Ein-/Ausschalttimer vornehmen.<br />
Voraussetzung dafür ist, dass Sie die Uhr gestellt haben.<br />
Anschaltzeit<br />
Stellen Sie Stun<strong>de</strong>, Minute ein und aktivieren bzw. <strong>de</strong>aktivieren Sie die Funktion.<br />
Zum Aktivieren <strong>de</strong>s Timers, wenn Sie mit <strong>de</strong>n Einstellungen fertig sind, wählen Sie Aktivieren.<br />
Ausschaltzeit<br />
Stellen Sie Stun<strong>de</strong>, Minute ein und aktivieren bzw. <strong>de</strong>aktivieren Sie die Funktion.<br />
Zum Aktivieren <strong>de</strong>s Timers, wenn Sie mit <strong>de</strong>n Einstellungen fertig sind, wählen Sie Aktivieren.<br />
Timer 1<br />
Anschaltzeit<br />
00 00 Deaktiv.<br />
Ausschaltzeit<br />
00 00 Deaktiv.<br />
Lautst. Quelle TV-Empfang Kanal<br />
10<br />
TV ATV 0<br />
Wie<strong>de</strong>rholmodus<br />
Einmal<br />
So Mo Di Mi Do Fr Sa<br />
L Navig. U Einst. E Eingabe R Zurück<br />
Deutsch - 24
■<br />
■<br />
■<br />
■<br />
■<br />
■<br />
Lautst.<br />
Stellen Sie die gewünschte Lautstärke ein.<br />
Quelle → TV / USB<br />
Sie können <strong>de</strong>n Inhalt <strong>de</strong>s TV- o<strong>de</strong>r USB-Gerät einstellen, <strong>de</strong>r beim Anschalten <strong>de</strong>s Fernsehers automatisch wie<strong>de</strong>rgegeben wird.<br />
Wählen Sie TV o<strong>de</strong>r USB. (Stellen Sie sicher, dass ein USB-Gerät an das Fernsehgerät angeschlossen ist.)<br />
N Wenn auf <strong>de</strong>m USB-Gerät nur eine Fotodatei gespeichert ist, wird die Diashow nicht wie<strong>de</strong>rgegeben.<br />
TV-Empfang (wenn Quelle auf TV eingestellt ist)<br />
Wählen Sie ATV o<strong>de</strong>r DTV.<br />
Kanal (wenn Quelle auf TV eingestellt ist)<br />
Wählen Sie <strong>de</strong>n gewünschten Kanal.<br />
Inhalt (wenn Source auf USB eingestellt ist)<br />
Sie können auf <strong>de</strong>m USB-Gerät einen Ordner mit Musik- o<strong>de</strong>r Fotodateien wählen, die beim Anschalten <strong>de</strong>s Fernsehgeräts<br />
automatisch angezeigt wer<strong>de</strong>n.<br />
N<br />
N<br />
Wenn <strong>de</strong>r Ordnername zu lang ist, kann <strong>de</strong>r Ordner nicht ausgewählt wer<strong>de</strong>n.<br />
Wenn <strong>de</strong>r Ordnername, <strong>de</strong>r von <strong>de</strong>r Inhaltsfunktion konfiguriert wer<strong>de</strong>n soll, zu lang ist, kann <strong>de</strong>r Ordner nicht ausgewählt<br />
wer<strong>de</strong>n.<br />
Wie<strong>de</strong>rholmodus<br />
Wählen Sie Einmal, Täglich, Mo~Fr, Mo~Sa, Sa~So o<strong>de</strong>r <strong>Manuel</strong>l.<br />
N<br />
N<br />
N<br />
Wenn Manual gewählt ist, drücken Sie die Taste ►, um <strong>de</strong>n gewünschten Wochentag einzustellen. Drücken Sie die Taste<br />
ENTERE, wenn <strong>de</strong>r gewünschte Tag markiert ist, und das Symbol c wird angezeigt.<br />
Sie können die Stun<strong>de</strong>n, Minuten und <strong>de</strong>n Kanal auch über die Zifferntasten auf <strong>de</strong>r Fernbedienung einstellen.<br />
Autom. Ausschalten<br />
Wenn Sie <strong>de</strong>n Timer aktivieren, schaltet sich das Fernsehgerät drei Stun<strong>de</strong>n nach <strong>de</strong>m Einschalten durch <strong>de</strong>n Timer ab,<br />
wenn in dieser Zeit keine Funktionen verwen<strong>de</strong>t wur<strong>de</strong>n Diese Funktion ist nur verfügbar, wenn <strong>de</strong>r Timer aktiviert ist, und sie<br />
verhin<strong>de</strong>rt Schä<strong>de</strong>n durch Überhitzung, wenn das Fernsehgerät zu lange eingeschaltet ist.<br />
Deutsch - 25
SIGNALQUELLEN / UNTERSTÜTZUNG<br />
¦<br />
Menü Eingang<br />
❑<br />
■<br />
❑<br />
Quellen<br />
Hiermit wählen Sie, ob das Fernsehgerät mit einem Fernsehsignal versorgt wird o<strong>de</strong>r an an<strong>de</strong>re<br />
externe Signaleingänge wie z. B. DVD- bzw. Blu-Ray-Player o<strong>de</strong>r an einen Kabelreceiver /<br />
Satellitenreceiver (Set-Top Box) angeschlossen ist. Stellen Sie die gewünschte Signalquelle ein.<br />
O Drücken Sie die Taste SOURCE auf <strong>de</strong>r Fernbedienung, um eine externe Signalquelle<br />
anzuzeigen. Stellen Sie mit <strong>de</strong>r TV-Taste <strong>de</strong>n TV-Modus ein.<br />
TV / Ext.1 / Ext.2 / AV / Component / PC / HDMI1 / HDMI2 / HDMI3/DVI / HDMI4<br />
N Sie können nur solche externen Geräte wählen, die an das Fernsehgerät angeschlossen<br />
sind. Bei Quellen wer<strong>de</strong>n die angeschlossenen Signalquellen hervorgehoben und am<br />
Anfang dargestellt. Nicht angeschlossene Signalquellen wer<strong>de</strong>n am En<strong>de</strong> <strong>de</strong>r Liste<br />
dargestellt.<br />
N Ext. und PC bleiben immer aktiviert.<br />
N Verwen<strong>de</strong>n <strong>de</strong>r Farbtasten auf <strong>de</strong>r Fernbedienung in Verbindung mit <strong>de</strong>r Kanalliste.<br />
Rot (Aktual.): Aktualisieren <strong>de</strong>r angeschlossenen externen Geräte. Drücken Sie diese<br />
Taste, wenn Ihr Eingangsgerät angeschaltet und angeschlossen ist, aber nicht in <strong>de</strong>r<br />
Liste erscheint.<br />
TOOLS (Extras): Anzeigen <strong>de</strong>r Menüs Name bearb. und Information.<br />
Name bearb.<br />
Eingang<br />
Quellen<br />
Name bearb.<br />
TV<br />
Aktual.<br />
T Extras<br />
Quellen<br />
Ext. 1 : - - - -<br />
Ext. 2 : - - - -<br />
PC : - - - -<br />
AV : - - - -<br />
Komp. : - - - -<br />
■<br />
¦<br />
❑<br />
■<br />
■<br />
VCR / DVD / Kabel-STB / Sat-STB / PVR-STB / AV-Receiver / Spiel / Camcor<strong>de</strong>r / PC / DVI / DVI PC / TV / IPTV / Blu-ray / HD<br />
DVD / DMA<br />
Vergeben Sie Namen für die an die Eingangsbuchsen angeschlossenen Geräte, um die Auswahl <strong>de</strong>r Signalquelle zu vereinfachen.<br />
N Wenn ein PC mit einer Auflösung von 1920 x 1080 bei 60 Hz an <strong>de</strong>n Anschluss HDMI IN 3(DVI) angeschlossen wird, stellen<br />
Sie unter Name bearb. im Modus Eingang <strong>de</strong>n HDMI3/DVI-Modus auf DVI PC ein.<br />
N Wenn Sie ein HDMI/DVI-Kabel mit <strong>de</strong>m HDMI IN 3(DVI)-Anschluss verbin<strong>de</strong>n, stellen Sie <strong>de</strong>n HDMI3/DVI-Modus im Bereich<br />
Name bearb. <strong>de</strong>s Modus Eingang auf DVI o<strong>de</strong>r DVI PC ein. In diesem Fall ist ein geson<strong>de</strong>rter Audioanschluss erfor<strong>de</strong>rlich.<br />
Menü Unterstützung<br />
Eigendiagnose<br />
Bildtest<br />
Bei schlechter Bildqualität führen Sie einen Bildtest durch. Prüfen Sie das bunte Testbild auf<br />
<strong>de</strong>m Bildschirm um festzustellen, ob das Problem weiterhin besteht.<br />
● Ja: Wenn das Testbild nicht angezeigt wird o<strong>de</strong>r wenn es verrauscht ist, wählen Sie Ja.<br />
Möglicherweise liegt ein Problem mit <strong>de</strong>m Fernsehgerät vor. Hilfe erhalten Sie in diesem<br />
Fall beim beim Callcenter von <strong>Samsung</strong>.<br />
● Nein: Wenn das Testbild fehlerlos angezeigt wird, wählen Sie Nein. Möglicherweise liegt<br />
ein Problem mit Ihrer Haustechnik vor. Bitte überprüfen Sie sämtliche Anschlüsse noch<br />
einmal. Wenn das Problem weiterhin besteht, schlagen Sie im Benutzerhandbuch für das<br />
externe Gerät nach.<br />
Eigendiagnose<br />
Software-Update<br />
HD-Anschlussplan<br />
<strong>Samsung</strong> kontaktieren<br />
Audiotest<br />
Audiotest<br />
Signalinformation<br />
Bei schlechter Tonqualität führen Sie einen Audiotest durch. Sie können die Tonqualität<br />
U Navig. E Eingabe R Zurück<br />
kontrollieren, in<strong>de</strong>m Sie über <strong>de</strong>n Fernseher ein im Gerät gespeicherte Melodie abspielen.<br />
N Wenn die Fernsehlautsprecher keinen Ton ausgeben, müssen Sie vor <strong>de</strong>m Audiotest sicherstellen, dass<br />
Lautsprecherauswahl im Audiomenü auf TV-Lautsprecher eingestellt ist.<br />
N Die Melodie ist im Test auch dann zu hören, wenn Lautsprecherauswahl auf Ext. Lautsprecher eingestellt ist, o<strong>de</strong>r wenn<br />
<strong>de</strong>r Ton mit <strong>de</strong>r Taste MUTE stumm geschaltet wur<strong>de</strong>.<br />
● Ja: Wenn Sie <strong>de</strong>n Ton beim Test nur durch einen Lautsprecher o<strong>de</strong>r gar nicht hören, wählen Sie Ja. Möglicherweise liegt ein<br />
Problem mit <strong>de</strong>m Fernsehgerät vor. Hilfe erhalten Sie in diesem Fall beim beim Callcenter von <strong>Samsung</strong>.<br />
● Nein: Wenn Sie <strong>de</strong>n Ton über die Lautsprecher hören können, wählen Sie Nein. Möglicherweise liegt ein Problem mit Ihrer<br />
Haustechnik vor. Bitte überprüfen Sie sämtliche Anschlüsse noch einmal. Wenn das Problem weiterhin besteht, schlagen Sie<br />
im Benutzerhandbuch für das externe Gerät nach.<br />
Unterstützung<br />
Bildtest<br />
Eigendiagnose<br />
▶<br />
▶<br />
Deutsch - 26
■<br />
Signalinformation (nur Digitalkanäle)<br />
Im Gegensatz zu analogen Kanälen, <strong>de</strong>ren Empfangsqualität von "verregnet" bis ungestört variieren kann, zeichnen sich digitale<br />
Kanäle (HDTV) dadurch aus, dass sie entwe<strong>de</strong>r perfekte Empfangsqualität bieten o<strong>de</strong>r gar keinen Empfang ermöglichen. Deshalb<br />
können Sie an<strong>de</strong>rs als bei Analogkanälen keine Feinabstimmung vornehmen. Sie können aber Ihre Antenne so einstellen, dass<br />
<strong>de</strong>r Empfang <strong>de</strong>r verfügbaren Digitalkanäle besser wird.<br />
N Wenn die Signalstärkeanzeige ein schwaches Signal anzeigt, verän<strong>de</strong>rn Sie die Position Ihre Antenne so, dass die<br />
Signalstärke zunimmt. Machen Sie dies solange, bis Sie die optionale Ausrichtung mit <strong>de</strong>m stärksten Signal gefun<strong>de</strong>n haben.<br />
❑<br />
■<br />
Software-Update<br />
Möglicherweise wird <strong>Samsung</strong> in <strong>de</strong>r Zukunft Upgra<strong>de</strong>s <strong>de</strong>r TV-Firmware anbieten. Diese<br />
Upgra<strong>de</strong>s können über das Fernsehen ausgeführt wer<strong>de</strong>n, sofern es an das Internet<br />
angeschlossen ist, o<strong>de</strong>r durch Herunterla<strong>de</strong>n <strong>de</strong>r neuen Firmware von samsung.com auf ein<br />
USB-Speichergerät.<br />
N<br />
N<br />
N<br />
Aktuelle Version, wenn die Software bereits im Fernsehgerät installiert ist.<br />
Alternative Software (Sicherung) zeigt die alte Version an, die ersetzt wird.<br />
Die Software wird angegeben als Jahr/Monat/Tag_Version. Je aktueller das Datum, <strong>de</strong>sto<br />
neuer die Softwareversion. Installieren Sie möglichst immer die aktuellste Version.<br />
PER USB<br />
Legen Sie ein USB-Laufwerk mit <strong>de</strong>m gespeicherten Firmwareupgra<strong>de</strong> von samsung.com in<br />
das Fernsehgerät ein. Achten Sie beim Einspielen <strong>de</strong>s Upgra<strong>de</strong>s darauf, die Stromversorgung<br />
nicht zu unterbrechen und das USB-Laufwerk nicht zu entfernen. Das Fernsehgerät wird<br />
automatisch ab- und wie<strong>de</strong>r angeschaltet, sobald das Firmwareupgra<strong>de</strong> abgeschlossen ist.<br />
Überprüfen Sie die Firmwareversion, nach<strong>de</strong>m das Upgra<strong>de</strong> durchgeführt wur<strong>de</strong> (die neue<br />
Version hat eine höhere Nummer als die ältere Version).<br />
Nach<strong>de</strong>m die Software aktualisiert wur<strong>de</strong>, sind die Vi<strong>de</strong>o- und Audioeinstellungen wie<strong>de</strong>r auf die<br />
werkseitigen Standardwerte zurückgesetzt. Wir empfehlen, diese Werte aufzuschreiben, damit<br />
Sie sie nach <strong>de</strong>m Upgra<strong>de</strong> einfach wie<strong>de</strong>r einstellen können.<br />
Aktuelle Version<br />
PER USB<br />
PER Channel<br />
Update im Standby<br />
Alternative Software<br />
Seitenverkleidung <strong>de</strong>s<br />
Fernsehgeräts<br />
USB-Laufwerk<br />
Software-Update<br />
2009/01/18_000001<br />
: 45 Min<br />
2009/01/15_00000<br />
U Navig. E Eingabe R Zurück<br />
▶<br />
■<br />
■<br />
■<br />
❑<br />
❑<br />
PER Channel<br />
Aktualisierung <strong>de</strong>r Software über das Sen<strong>de</strong>signal.<br />
N Wenn Sie diese Funktion während <strong>de</strong>s Übertragungszeitraums für Software wählen, sucht die Funktion nach verfügbarer<br />
Software und lädt sie herunter.<br />
N Die zum Herunterla<strong>de</strong>n <strong>de</strong>r Software erfor<strong>de</strong>rliche Zeit hängt vom Signalstatus ab.<br />
Update im Standby<br />
Um die Softwareaktualisierung mit eingeschaltetem Hauptnetz fortzusetzen, wählen Sie mit <strong>de</strong>n Tasten ▲ o<strong>de</strong>r ▼ „Ein“ aus. 45<br />
Minuten nach Beginn <strong>de</strong>s Standbymodus wird die manuelle Aktualisierung automatisch ausgeführt. Da intern die Stromversorgung<br />
für das Gerät eingeschaltet ist, kann <strong>de</strong>r LCD-Bildschirm leicht beleuchtet sein. Dieser Zustand kann etwas mehr als eine Stun<strong>de</strong><br />
andauern, bis die Softwareaktualisierung abgeschlossen ist.<br />
Alternative Software (Sicherung)<br />
Wenn es ein Problem mit <strong>de</strong>r neuen Firmware gibt, durch das <strong>de</strong>r Betrieb beeinflusst wird, können Sie die neue Software durch die<br />
vorherige Version ersetzen.<br />
N<br />
N<br />
Wenn die Software geän<strong>de</strong>rt wur<strong>de</strong>, wird die vorhan<strong>de</strong>ne Software angezeigt.<br />
Sie können die aktuelle Software durch die alternative Software ersetzen, in<strong>de</strong>m Sie "Alternative Software" wählen.<br />
HD-Anschlussplan<br />
In diesem Menü wird die Verbindungsmetho<strong>de</strong> für optimale HDTV-Qualität vorgeschlagen. Beachten Sie diese Informationen,<br />
wenn Sie externe Geräte an <strong>de</strong>n Fernseher anschließen.<br />
<strong>Samsung</strong> kontaktieren<br />
Zeigen Sie diese Informationen an, wenn Ihr Fernseher nicht ordnungsgemäß arbeitet o<strong>de</strong>r wenn Sie die Software aktualisieren<br />
möchten. Sie fin<strong>de</strong>n hier Informationen zum Callcenter, zum Gerät und zum Herunterla<strong>de</strong>n <strong>de</strong>r Softwaredateien.<br />
Deutsch - 27
Medienwie<strong>de</strong>rgabe (USB & DLNA)<br />
¦<br />
Anschließen eines USB-Geräts<br />
1. Drücken Sie zum Einschalten <strong>de</strong>s Computers die POWER-Taste.<br />
2. Schließen Sie ein USB-Gerät mit Foto- und/o<strong>de</strong>r Musikdateien an die USB -Buchse seitlich<br />
am Fernsehgerät an.<br />
3. Wenn das Fenster zur Auswahl <strong>de</strong>r Anwendung angezeigt wird, drücken Sie auf die Taste<br />
ENTERE, um Media Play (USB) zu wählen.<br />
N<br />
N<br />
N<br />
N<br />
N<br />
N<br />
N<br />
N<br />
N<br />
N<br />
N<br />
N<br />
N<br />
N<br />
MTP (Media Transfer Protocol) wird nicht unterstützt.<br />
Als Dateisystem wird ausschließlich FAT16, FAT32 und NTFS unterstützt.<br />
Einige Typen von USB-Digitalkameras und -Audiogeräten sind eventuell nicht mit<br />
diesem Fernseher kompatibel.<br />
Media Play unterstützt ausschließlich USB-Massenspeichergeräte vom<br />
Typ MSC (Mass Storage Class). MSC-Geräte sind Massenspeicher zur<br />
Übertragung von Daten. Beispiele für MSC sind Speicherkarten und<br />
Flashkartenleser (We<strong>de</strong>r USB HDD noch HUB wer<strong>de</strong>n unterstützt.)<br />
Stellen Sie die Verbindung direkt zum USB-Anschluss Ihres Fernsehgeräts<br />
her. Wenn Sie eine geson<strong>de</strong>rte Kabelverbindung verwen<strong>de</strong>n, können USB-<br />
Kompatibilitätsprobleme auftreten.<br />
Ehe Sie Ihr Gerät an das Fernsehgerät anschließen, sichern Sie Ihre Dateien,<br />
um eventuellem Datenverlust vorzubeugen. SAMSUNG haftet nicht für Verlust<br />
und Beschädigung von Daten.<br />
Trennen Sie das USB-Gerät nicht, solange Daten gela<strong>de</strong>n wer<strong>de</strong>n.<br />
Je höher die Auflösung <strong>de</strong>s Bilds, <strong>de</strong>sto länger dauert es, um es auf <strong>de</strong>m Bildschirm anzuzeigen.<br />
Die maximal unterstützte JPEG-Auflösung beträgt 15360x8640 Pixel.<br />
Bei nicht unterstützten o<strong>de</strong>r beschädigten Dateien wird die Meldung "Dateiformat wird nicht unterstützt" angezeigt.<br />
MP3-Dateien mit DRM, die von einer nicht-lizenzfreien Site heruntergela<strong>de</strong>n wor<strong>de</strong>n sind, können nicht abgespielt<br />
wer<strong>de</strong>n. Digital Rights Management (DRM) ist eine Technologie, die das Erstellen von Inhalten und die Distribution<br />
und das Management <strong>de</strong>r Inhalte integriert und umfassend unterstützt. Dies beinhaltet <strong>de</strong>n Schutz <strong>de</strong>r Rechte und <strong>de</strong>r<br />
Interessen <strong>de</strong>r Content-Provi<strong>de</strong>r, die Verhütung von unerlaubtem Kopieren <strong>de</strong>r Inhalte sowie das Management von<br />
Abrechnung und Bezahlung.<br />
Wenn Sie zu einem an<strong>de</strong>ren Foto wechseln, kann das La<strong>de</strong>n einige Sekun<strong>de</strong>n dauern. In diesem Fall wird das<br />
La<strong>de</strong>symbol angezeigt.<br />
Wenn mehr als ein MSC-Gerät angeschlossen ist, wer<strong>de</strong>n einige davon möglicherweise nicht anerkannt. Wenn ein Gerät<br />
hohe elektrische Leistung (mehr als 500 mA o<strong>de</strong>r 5 V) abfor<strong>de</strong>rt, wird es möglicherweise nicht versorgt.<br />
Wenn eine Überstrom-Warnung angezeigt wird, während Sie ein USB-Gerät anschließen o<strong>de</strong>r verwen<strong>de</strong>n, wird das Gerät<br />
möglicherweise nicht erkannt o<strong>de</strong>r weist eine Störung auf.<br />
Verwen<strong>de</strong>n <strong>de</strong>r Fernbedienungstasten im Menü Media Play<br />
Taste<br />
Vorgang<br />
▲/▼/◄/►<br />
Cursor bewegen und Elemente auswählen.<br />
Markiertes Element auswählen. Bei <strong>de</strong>r Wie<strong>de</strong>rgabe einer Diashow o<strong>de</strong>r einer Musikdatei:<br />
- Durch Drücken <strong>de</strong>r Taste ENTERE während <strong>de</strong>r Wie<strong>de</strong>rgabe wird die Wie<strong>de</strong>rgabe<br />
ENTERE<br />
unterbrochen.<br />
- Durch erneutes Drücken <strong>de</strong>r Taste ENTERE während <strong>de</strong>r Wie<strong>de</strong>rgabe wird die Wie<strong>de</strong>rgabe<br />
fortgesetzt.<br />
∂/∑<br />
Wie<strong>de</strong>rgabe o<strong>de</strong>r Pause <strong>de</strong>r Diashow o<strong>de</strong>r Musikdatei.<br />
RETURN<br />
Zurück zum vorherigen Menü.<br />
TOOLS<br />
Ausführen verschie<strong>de</strong>ner Funktionen aus <strong>de</strong>m Photo- und Musikmenü.<br />
∫<br />
Anhalten <strong>de</strong>r aktuellen Präsentation o<strong>de</strong>r Musikdatei.<br />
π/μ<br />
Wechsel zur vorherigen Gruppe/nächsten Gruppe.<br />
INFO<br />
Anzeigen von Dateiinformationen.<br />
MEDIA.P<br />
Been<strong>de</strong>n <strong>de</strong>s Modus Media Play.<br />
< P >, EXIT, TV Been<strong>de</strong>n <strong>de</strong>s Modus Media Play und Rückehr in <strong>de</strong>n TV-Modus.<br />
Photo<br />
SUM Gerät<br />
Seitenverkleidung <strong>de</strong>s Fernsehgeräts<br />
USB-Laufwerk<br />
PHOTO<br />
Music<br />
SUM<br />
851,86 <strong>MB</strong>/993,02 <strong>MB</strong> Frei<br />
Setup<br />
R Zurück<br />
Deutsch - 28
¦<br />
Media Play funktion<br />
Mit dieser Funktion können Sie auf einem USB-Speichermedium (MSC) gespeicherte Foto- und/o<strong>de</strong>r Musikdateien anzeigen bzw.<br />
wie<strong>de</strong>rgeben.<br />
N Möglicherweise treten bei lizenzfreien Multimediadateien weniger Probleme auf.<br />
Öffnen <strong>de</strong>s Menüs Media Play (USB).<br />
1. Drücken Sie die Taste MENU. Wählen Sie durch Drücken <strong>de</strong>r Tasten ▲ o<strong>de</strong>r ▼<br />
die Option Anwendung, und drücken Sie dann die Taste ENTERE.<br />
INFO<br />
PHOTO<br />
SUM<br />
851,86 <strong>MB</strong>/993,02 <strong>MB</strong> Frei<br />
2. Wählen Sie durch Drücken <strong>de</strong>r Tasten ▲ o<strong>de</strong>r ▼ die Option Media Play (USB),<br />
und drücken Sie dann die Taste ENTERE.<br />
N Das Menü Media Play (USB) wird geöffnet.<br />
Photo<br />
Music<br />
Setup<br />
SUM Gerät<br />
R Zurück<br />
O<br />
Drücken Sie die MEDIA.P-Taste auf <strong>de</strong>r Fernbedienung, um das Media<br />
Play-Menü anzuzeigen.<br />
AD<br />
O<br />
Drücken Sie die Taste SOURCE auf <strong>de</strong>r Fernbedienung, um die Liste <strong>de</strong>r<br />
Signalquellen anzuzeigen. Drücken Sie dann auf ▲ o<strong>de</strong>r ▼, und wählen Sie<br />
USB.<br />
3 Drücken Sie die rote Taste und dann ▲ o<strong>de</strong>r ▼, um <strong>de</strong>n USB-Speicher zu wählen. Drücken Sie die Taste ENTERE.<br />
N<br />
N<br />
Diese Funktion kann sich je nach USB-Speicher abweichen.<br />
Der Name <strong>de</strong>s USB-Geräts wird links unten auf <strong>de</strong>m Bildschirm angezeigt.<br />
INFO<br />
4. Drücken Sie die Tasten ◄ o<strong>de</strong>r ►, um ein Symbol (Photo, Music, Setup) auszuwählen, und drücken Sie dann die Taste<br />
ENTERE.<br />
N Um <strong>de</strong>n Media Play-Modus zu been<strong>de</strong>n, drücken Sie auf <strong>de</strong>r Fernbedienung die Taste MEDIA.P.<br />
Sicheres Entfernen von USB-Geräten<br />
Sie können das Gerät sicher vom Fernsehgerät entfernen.<br />
1. Drücken Sie die TOOLS-Taste in <strong>de</strong>r Dateiliste von Media Play o<strong>de</strong>r während<br />
eine Diashow o<strong>de</strong>r Musikdatei wie<strong>de</strong>rgegeben wird.<br />
2. Wählen Sie durch Drücken <strong>de</strong>r Tasten ▲ o<strong>de</strong>r ▼ die Option Sicher entfernen<br />
und drücken Sie dann die Taste ENTERE .<br />
3. Entfernen Sie das USB-Gerät sicher vom Fernsehgerät.<br />
1231.jpg<br />
1232.jpg<br />
1233.jpg<br />
AD<br />
1 2<br />
5/15 Diashow<br />
Gruppe abspielen<br />
Information<br />
Sicher entfernen<br />
1236.jpg<br />
1235.jpg<br />
1234.jpg<br />
1237.jpg<br />
Bildschirmanzeige<br />
../Photo/<br />
SUM Gerät Wählen T Extras R Ordner darüber<br />
1 2<br />
1<br />
Abschnitt mit <strong>de</strong>r Gruppenliste<br />
c<br />
5/15<br />
Abschnitt mit <strong>de</strong>r Dateiliste<br />
1231.jpg 1232.jpg<br />
1236.jpg 1237.jpg<br />
1233.jpg<br />
1235.jpg<br />
1234.jpg<br />
2<br />
4<br />
../Photo/<br />
1Datei(en) gew.<br />
3 5<br />
SUM Gerät Wählen T Extras R Ordner darüber<br />
Wechseln Sie mit <strong>de</strong>n Auf- und Ab-Tasten entwe<strong>de</strong>r zum Abschnitt mit <strong>de</strong>r Gruppenliste o<strong>de</strong>r zum Abschnitt mit <strong>de</strong>r Dateiliste.<br />
Wählen Sie einen Abschnitt und drücken Sie auf die Taste ◄ o<strong>de</strong>r ►, um einen Eintrag auszuwählen.<br />
Deutsch - 29
1 Anzeigegruppen: Die Sortiergruppe mit <strong>de</strong>r ausgewählten Musikdatei wird hervorgehoben.<br />
2 Ausgewählte Datei: Die gewählte Datei können Sie nun steuern. Die Fotodateien wer<strong>de</strong>n als Miniaturbil<strong>de</strong>r angezeigt.<br />
3 Aktuelles Gerät: Zeigt <strong>de</strong>n Namen <strong>de</strong>s aktuell ausgewählten Geräts an. Wählen Sie mit <strong>de</strong>r roten Taste ein Gerät.<br />
Rote Taste (Gerät): Dient zur Auswahl eines angeschlossenen Geräts.<br />
4 Informationen zur Auswahl von Elementen: Zeigt die Anzahl <strong>de</strong>r Dateien an, die durch Drücken <strong>de</strong>r gelben Taste ausgewählt<br />
wur<strong>de</strong>n.<br />
5 Hilfe<br />
Gelbe Taste (Wählen): Hiermit wählen Sie eine Datei aus <strong>de</strong>r Dateiliste aus. Die ausgewählten Dateien wer<strong>de</strong>n mit <strong>de</strong>m<br />
Symbolcgekennzeichnet. Drücken Sie die gelbe Taste noch einmal, um die Auswahl einer Datei zu stornieren.<br />
TOOLS-Taste (Extras): Hiermit zeigen Sie die Optionsmenüs an. (Der Inhalt <strong>de</strong>s Optionsmenüs richtet sich nach <strong>de</strong>m<br />
jeweiligen Status.)<br />
¦<br />
Menü <strong>de</strong>r Optionen für Fotolisten<br />
1. Drücken Sie die Taste MEDIA.P.<br />
2. Wählen Sie durch Drücken <strong>de</strong>r Tasten ◄ o<strong>de</strong>r ► die Option Photo, und drücken<br />
Sie dann die Taste ENTERE .<br />
3. Wählen Sie die gewünschte Musikdatei mit <strong>de</strong>n Tasten ◄ o<strong>de</strong>r ►.<br />
N Wählen mehrerer Fotos<br />
Wählen Sie die gewünschte Musikdatei mit <strong>de</strong>n Tasten ◄ o<strong>de</strong>r ►.<br />
Drücken Sie dann die gelbe Taste.<br />
Wie<strong>de</strong>rholen Sie <strong>de</strong>n obigen Vorgang, um mehrere Fotodateien<br />
auszuwählen.<br />
Links neben <strong>de</strong>m Namen <strong>de</strong>r Fotodatei wird das Symbol c angezeigt.<br />
4. Drücken Sie die Taste TOOLS.<br />
N Der Inhalt <strong>de</strong>s Optionsmenüs richtet sich nach <strong>de</strong>m jeweiligen Status.<br />
1 2<br />
5/15 Diashow<br />
Gruppe abspielen<br />
Information<br />
Sicher entfernen<br />
1231.jpg 1232.jpg<br />
1236.jpg 1237.jpg<br />
1233.jpg<br />
1235.jpg<br />
1234.jpg<br />
../Photo/<br />
SUM Gerät Wählen T Extras R Ordner darüber<br />
❑<br />
❑<br />
❑<br />
❑<br />
❑<br />
Diashow<br />
Mit diesem Menübefehl können Sie eine Diashow mit <strong>de</strong>n Fotodateien auf <strong>de</strong>m USB-Speicher ablaufen lassen.<br />
Gruppe abspielen<br />
Mit diesem Menübefehl können Sie eine Diashow nur mit <strong>de</strong>n Fotodateien aus <strong>de</strong>r aktuell ausgewählten Sortiergruppe ablaufen<br />
lassen.<br />
Alle abwählen (Wenn min<strong>de</strong>stens eine Datei gewählt ist)<br />
Sie können die Auswahl aller Dateien aufheben.<br />
N Das Zeichen c zur Darstellung <strong>de</strong>r entsprechen<strong>de</strong>n Datei wird ausgeblen<strong>de</strong>t.<br />
Information<br />
Die Informationen <strong>de</strong>r Fotodatei wie Name, Größe, Auflösung, Än<strong>de</strong>rungsdatum und Pfad wer<strong>de</strong>n angezeigt.<br />
N Sie können die Informationen von Fotodateien mit <strong>de</strong>n gleichen Verfahren auch während einer Diashow anzeigen.<br />
O Drücken Sie die Taste INFO, um Informationen anzuzeigen.<br />
Sicher entfernen<br />
Sie können das Gerät sicher vom Fernsehgerät entfernen.<br />
INFO<br />
AD<br />
Deutsch - 30
¦<br />
Anzeigen eines Fotos o<strong>de</strong>r einer Diashow<br />
Anzeigen von Diashows<br />
1. Drücken die Taste ▼, um <strong>de</strong>n Dateilistenabschnitt zu wählen.<br />
1 2<br />
2. Drücken Sie die Taste TOOLS.<br />
3. Wählen Sie durch Drücken <strong>de</strong>r Tasten ▲ o<strong>de</strong>r ▼ die Option Diashow, und<br />
drücken Sie dann die Taste ENTERE .<br />
N Alle Dateien in <strong>de</strong>r Dateiliste wer<strong>de</strong>n für die Diashow verwen<strong>de</strong>t.<br />
1231.jpg<br />
1232.jpg<br />
../Photo/<br />
1233.jpg<br />
INFO<br />
5/15<br />
1234.jpg<br />
Diashow<br />
Gruppe abspielen<br />
Information<br />
Sicher entfernen<br />
1236.jpg<br />
1235.jpg<br />
1237.jpg<br />
N<br />
N<br />
Die Bil<strong>de</strong>r wer<strong>de</strong>n nacheinan<strong>de</strong>r, beginnend mit <strong>de</strong>r aktuell angezeigten Datei<br />
angezeigt.<br />
Die Diashow wird entsprechend <strong>de</strong>r Sortierreihenfolge in <strong>de</strong>r Dateiliste<br />
ausgeführt.<br />
SUM Gerät Wählen T Extras R Ordner darüber<br />
▶ Normal<br />
1234.jpg 580x765 2009/01/02 5/15<br />
N<br />
Musikdateien können während <strong>de</strong>r Diashow automatisch abgespielt wer<strong>de</strong>n,<br />
wenn Hintergrundmusik aktiviert (Ein) ist.<br />
O<br />
Drücken Sie die Fernbedienungstaste ∂(Play)/ENTERE, während die<br />
Fotoliste angezeigtwird, um die Diashow zu starten.<br />
SUM<br />
E Pause ◀▶ ADVorherige/Weiter T Extras R Zurück<br />
N<br />
Diashow-Steuertasten<br />
Taste<br />
ENTERE<br />
∂<br />
∑<br />
∫<br />
π/μ<br />
TOOLS<br />
Vorgang<br />
Abspielen/Pause <strong>de</strong>r Diashow.<br />
Abspielen <strong>de</strong>r Diashow.<br />
Diashow anhalten.<br />
Been<strong>de</strong>n Sie die Diashow und wechseln Sie wie<strong>de</strong>r zur<br />
Fotoliste.<br />
Än<strong>de</strong>rn <strong>de</strong>r Abspielgeschwindigkeit <strong>de</strong>r Diashow.<br />
Hiermit führen Sie verschie<strong>de</strong>ne Funktionen aus <strong>de</strong>n<br />
Fotomenüs aus.<br />
Abspielen <strong>de</strong>r aktuellen Gruppe<br />
1. Drücken Sie die Taste ▼, um zum Abschnitt mit <strong>de</strong>r Gruppenliste zu wechseln.<br />
2. Drücken Sie die Tasten ◄ und ►, um eine Gruppe auszuwählen.<br />
3. Drücken Sie die Taste ∂ (Wie<strong>de</strong>rgabe). Eine Diashow mit <strong>de</strong>n Dateien <strong>de</strong>r<br />
gewählten Gruppe beginnt.<br />
1 2<br />
5/15<br />
●<br />
Alternative<br />
1. Wählen Sie im Abschnitt mit <strong>de</strong>r Dateiliste die Dateien aus <strong>de</strong>r gewünschten<br />
Gruppe aus.<br />
N Um zur vorherigen/nächsten Gruppe zu wechseln, drücken Sie die Taste π<br />
(REW) o<strong>de</strong>r µ (FF).<br />
2. Drücken Sie die Taste TOOLS.<br />
3. Wählen Sie durch Drücken <strong>de</strong>r Tasten ▲ o<strong>de</strong>r ▼ die Option Gruppe abspielen, und drücken Sie dann die Taste ENTERE.<br />
N Nur die Fotos aus <strong>de</strong>r Sortiergruppe mit <strong>de</strong>n ausgewählten Dateien wer<strong>de</strong>n für die Diashow verwen<strong>de</strong>t.<br />
So starten Sie eine Diashow nur mit <strong>de</strong>n gewählten Dateien<br />
1. Drücken die Taste ▼, um <strong>de</strong>n Dateilistenabschnitt zu wählen.<br />
2. Wählen Sie das gewünschte Foto mit <strong>de</strong>n Tasten ◄ o<strong>de</strong>r ► aus <strong>de</strong>r Dateiliste aus.<br />
3. Drücken Sie die gelbe Taste.<br />
4. Wie<strong>de</strong>rholen Sie <strong>de</strong>n obigen Vorgang, um mehrere Fotodateien auszuwählen.<br />
N Links neben <strong>de</strong>m Namen <strong>de</strong>r Fotodatei wird das Symbol c angezeigt.<br />
N Wenn Sie nur eine Datei wählen, wird keine Diashow gestartet.<br />
N Um die Auswahl sämtlicher Dateien aufzuheben, drücken Sie die Taste TOOLS und wählen Sie dann Alle abwählen.<br />
5. Drücken Sie die Taste ∂ (Wie<strong>de</strong>rgabe) / ENTERE .<br />
N Die ausgewählten Dateien wer<strong>de</strong>n für die Diashow verwen<strong>de</strong>t.<br />
1231.jpg<br />
1232.jpg<br />
../Photo/<br />
1233.jpg<br />
1234.jpg<br />
1235.jpg<br />
1236.jpg<br />
1237.jpg<br />
SUM Gerät Wählen T Extras R Ordner darüber<br />
Deutsch - 31
● Alternative:<br />
1. Wählen Sie die gewünschten Fotos mit <strong>de</strong>r gelben Taste aus <strong>de</strong>r Dateiliste aus.<br />
2. Drücken Sie die Taste TOOLS.<br />
3. Wählen Sie durch Drücken <strong>de</strong>r Tasten ▲ o<strong>de</strong>r ▼ die Option Diashow, und drücken Sie dann die Taste ENTERE .<br />
N Die ausgewählten Dateien wer<strong>de</strong>n für die Diashow verwen<strong>de</strong>t.<br />
¦<br />
❑<br />
❑<br />
❑<br />
❑<br />
❑<br />
■<br />
■<br />
❑<br />
❑<br />
❑<br />
Menü <strong>de</strong>r Optionen für Diashows<br />
1. Während einer Diashow (o<strong>de</strong>r beim Anzeigen eines Fotos) drücken Sie die Taste<br />
TOOLS, um die Option einzustellen.<br />
2. Wählen Sie durch Drücken <strong>de</strong>r Tasten ▲ o<strong>de</strong>r ▼ die Option, und drücken Sie<br />
dann die Taste ENTERE.<br />
Diashow anhalten / Diashow starten<br />
Hiermit können Sie eine Diashow starten o<strong>de</strong>r anhalten.<br />
Diashow-Geschw. → Langsam / Normal / Schnell<br />
Sie können die Geschwindigkeit <strong>de</strong>r Diashow festlegen.<br />
N<br />
N<br />
Diese Funktion ist nur während einer Diashow verfügbar.<br />
Wenn Sie die Tasten π (REW) o<strong>de</strong>r µ (FF) während einer Diashow drücken, können Sie auch <strong>de</strong>ren<br />
Abspielgeschwindigkeit än<strong>de</strong>rn.<br />
Drehen<br />
Sie können alle auf einem USB-Speichergerät gespeicherten Dateien drehen.<br />
N<br />
N<br />
N<br />
Zoom<br />
Wenn Sie die Taste ◄ drücken, wird es nacheinan<strong>de</strong>r um 270˚, 180˚, 90˚ und 0˚ gedreht.<br />
Wenn Sie die Taste ► drücken, wird das Foto nacheinan<strong>de</strong>r um 90˚, 180˚, 270˚ und 0˚ gedreht.<br />
Die gedrehte Datei wird nicht gespeichert.<br />
Sie können alle auf einem USB-Speichergerät gespeicherten Fotos vergrößern. (x1 → x2 → x4)<br />
N Um das vergrößerte Foto zu verschieben, drücken sie die Taste ENTERE und anschließend ▲/▼/◄/►. Beachten Sie, dass<br />
die Funktion zum Verschieben <strong>de</strong>aktiviert ist, wenn das vergrößerte Bild kleiner als das ursprüngliche Fenster ist.<br />
N Die vergrößerte Datei wird nicht gespeichert.<br />
Hintergrundmusik<br />
Sie können die Hintergrundmusik auswählen, während Sie eine Diashow anzeigen.<br />
N Um diese Funktion zu verwen<strong>de</strong>n, müssen auf <strong>de</strong>m UB-Speicher Musik- und Fotodateien gespeichert sein.<br />
Hintergrundmusik → Aus / Ein<br />
● Aus: Die Hintergrundmusik wird nicht wie<strong>de</strong>rgegeben.<br />
● Ein: Sofern die Hintergrundmusik verfügbar ist, wird sie abgespielt, wenn Sie diese Funktion aktivieren *Ein).<br />
Musikdatei wählen (0 Datei(en) gew.)<br />
Nur die gewählte Musikdatei wird als Hintergrundmusik eingestellt.<br />
Bil<strong>de</strong>instellungen / Toneinstellungen<br />
Sie können die Bild- und Toneinstellungen festlegen.<br />
Information<br />
Die Informationen zur Fotodatei wer<strong>de</strong>n angezeigt.<br />
Sicher entfernen<br />
Sie können das Gerät sicher vom Fernsehgerät entfernen.<br />
Extras<br />
Detener presentación<br />
Diashow-Geschwindigkeit : Normal<br />
Drehen<br />
Zoom<br />
Hintergrundmusik<br />
Bil<strong>de</strong>instellungen<br />
Toneinstellungen<br />
Information<br />
Sicher entfernen<br />
U Navig. E Eingabe e Been<strong>de</strong>n<br />
Deutsch - 32
¦<br />
Menü <strong>de</strong>r Optionen für Fotolisten<br />
1. Drücken Sie die Taste MEDIA.P.<br />
2. Wählen Sie durch Drücken <strong>de</strong>r Tasten ◄ o<strong>de</strong>r ► die Option Music, und drücken<br />
Sie dann die Taste ENTERE.<br />
3. Drücken Sie die Taste ◄ o<strong>de</strong>r ► , um die gewünschte Musikdatei zu wählen.<br />
N Wählen mehrerer Musikdateien<br />
Wählen Sie mit <strong>de</strong>n Tasten ◄ o<strong>de</strong>r ► die gewünschte Musikdatei.<br />
Drücken Sie dann die gelbe Taste.<br />
Wie<strong>de</strong>rholen Sie <strong>de</strong>n obigen Vorgang, um mehrere Musikdateien<br />
auszuwählen.<br />
Links neben <strong>de</strong>m Namen <strong>de</strong>r Musikdatei wird das Symbol c angezeigt.<br />
4. Drücken Sie die Taste TOOLS.<br />
N Der Inhalt <strong>de</strong>s Optionsmenüs richtet sich nach <strong>de</strong>m jeweiligen Status.<br />
4<br />
5 1 2 3<br />
Traurig<br />
3/37 Gruppe abspielen<br />
Glen Hans Information<br />
Once Ost<br />
2007<br />
Sicher entfernen<br />
Soundtrack<br />
Lies Want Me<br />
Gold Shine<br />
Way<br />
HaHaHa<br />
I Love You<br />
../Music/<br />
SUM Gerät Wählen T Extras R Ordner darüber<br />
❑<br />
❑<br />
❑<br />
❑<br />
Gruppe abspielen<br />
Mit diesem Menübefehl können Sie nur die Musikdateien aus <strong>de</strong>r aktuell ausgewählten Sortiergruppe abspielen.<br />
Alle abwählen (Wenn min<strong>de</strong>stens eine Datei gewählt ist)<br />
Sie können die Auswahl aller Dateien aufheben.<br />
N Das Zeichen c zur Darstellung <strong>de</strong>r entsprechen<strong>de</strong>n Datei wird ausgeblen<strong>de</strong>t.<br />
Information<br />
Die Informationen <strong>de</strong>r Fotodatei wie Name, Größe, Än<strong>de</strong>rungsdatum und Pfad wer<strong>de</strong>n angezeigt.<br />
N Sie können die Informationen von Musikdateien mit <strong>de</strong>n gleichen Verfahren auch während Gruppe abspielen anzeigen.<br />
O Drücken Sie die Taste INFO, um Informationen anzuzeigen.<br />
Sicher entfernen<br />
Sie können das Gerät sicher vom Fernsehgerät entfernen.<br />
INFO<br />
AD<br />
Deutsch - 33
¦<br />
Wie<strong>de</strong>rgeben von Musik<br />
Wie<strong>de</strong>rgeben einer Musikdatei<br />
1. Drücken die Taste ▼, um <strong>de</strong>n Dateilistenabschnitt zu wählen.<br />
2. Drücken Sie die Taste ◄ o<strong>de</strong>r ► , um eine Musikdatei zu wählen, die abgespielt<br />
wer<strong>de</strong>n soll.<br />
3. Drücken Sie die Taste ∂ (Wie<strong>de</strong>rgabe)/ENTERE .<br />
N Dieses Menü zeigt nur Dateien mit <strong>de</strong>r Dateinamenserweiterung MP3.<br />
Dateien mit an<strong>de</strong>rer Dateinamenserweiterung wer<strong>de</strong>n nicht angezeigt, auch<br />
wenn sie auf <strong>de</strong>m gleichen USB-Gerät gespeichert wur<strong>de</strong>n.<br />
N Die ausgewählte Datei wird zusammen mit <strong>de</strong>r Abspieldauer oben angezeigt.<br />
SUM<br />
N Um die Musiklautstärke anzupassen, drücken Sie auf <strong>de</strong>r Fernbedienung die<br />
Lautstärketaste auf <strong>de</strong>r Fernbedienung. Wenn Sie <strong>de</strong>n Ton ausschalten möchten, drücken Sie die MUTE-Taste auf <strong>de</strong>r<br />
Fernbedienung.<br />
N Wenn <strong>de</strong>r Ton beim Abspielen von MP3-Datei ‘schräg’ ist stellen Sie im Tonmenü <strong>de</strong>n Equalizer und SRS TruSurround<br />
HD ein. (Bei übermodulierten MP3-Dateien kann es zu Tonproblemen kommen.)<br />
N Die Abspieldauer einer Musikdatei wird möglicherweise als ‘00:00:00’ angezeigt, wenn am Anfang <strong>de</strong>r Datei keine<br />
Informationen über die Abspieldauer gefun<strong>de</strong>n wer<strong>de</strong>n.<br />
N π (REW) o<strong>de</strong>r µ (FF) sind bei <strong>de</strong>r Wie<strong>de</strong>rgabe funktionslos.<br />
N Regler für Musikwie<strong>de</strong>rgabe<br />
Taste<br />
ENTERE<br />
∂<br />
∑<br />
∫<br />
TOOLS<br />
▶ 00:00:04 / 00:04:04 3/37<br />
Vorgang<br />
Wie<strong>de</strong>rgabe/Pause einer Musikdatei.<br />
Spielen Sie die Musikdatei ab.<br />
Hiermit wird die Musikdatei angehalten.<br />
Been<strong>de</strong>n <strong>de</strong>s Wie<strong>de</strong>rgabemodus und Rückkehr zur Musikliste.<br />
Hiermit führen Sie verschie<strong>de</strong>ne Funktionen aus <strong>de</strong>n Musikmenüs aus.<br />
Way<br />
I Love You<br />
HaHaHa<br />
E Pause ◀▶ Zurück / Weiter T Extras R Zurück<br />
N<br />
Symbol für Informationen zur Musik-Funktion<br />
p<br />
q<br />
Hiermit wer<strong>de</strong>n alle Musikdateien im Ordner (o<strong>de</strong>r die markierte Datei) wie<strong>de</strong>rholt abgespielt.<br />
Wie<strong>de</strong>rhol-M. ist aktiviert (Ein).<br />
Hiermit wer<strong>de</strong>n alle Musikdateien im Ordner (o<strong>de</strong>r die markierte Datei) einmal abgespielt.<br />
Wie<strong>de</strong>rhol-M. ist <strong>de</strong>aktiviert (Aus).<br />
Abspielen einer Musikgruppe<br />
1. Drücken Sie die Taste ▼, um zum Abschnitt mit <strong>de</strong>r Gruppenliste zu wechseln.<br />
2. Drücken Sie die Tasten ◄ und ►, um eine Gruppe auszuwählen.<br />
3. Drücken Sie die Taste ∂ (Wie<strong>de</strong>rgabe). Die Dateien <strong>de</strong>r ausgewählten Gruppe wer<strong>de</strong>n nun abgespielt.<br />
●<br />
Alternative:<br />
1. Wählen Sie im Abschnitt mit <strong>de</strong>r Dateiliste die Dateien aus <strong>de</strong>r gewünschten Gruppe aus.<br />
N Um zur vorherigen/nächsten Gruppe zu wechseln, drücken Sie die Taste π (REW) o<strong>de</strong>r µ (FF).<br />
2. Drücken Sie die Taste TOOLS.<br />
3. Wählen Sie durch Drücken <strong>de</strong>r Tasten ▲ o<strong>de</strong>r ▼ die Option Gruppe abspielen, und drücken Sie dann die TasteENTERE.<br />
N Die Musikdateien in <strong>de</strong>r Sortiergruppe einschließlich <strong>de</strong>r markierten Datei wer<strong>de</strong>n einmal abgespielt.<br />
Abspielen ausgewählter Musikdateien<br />
1. Drücken die Taste ▼, um <strong>de</strong>n Dateilistenabschnitt zu wählen.<br />
2. Wählen Sie mit <strong>de</strong>n Tasten ◄ o<strong>de</strong>r ► die gewünschte Musikdatei.<br />
3. Drücken Sie die gelbe Taste.<br />
4. Wie<strong>de</strong>rholen Sie <strong>de</strong>n obigen Vorgang, um mehrere Musikdateien auszuwählen.<br />
N<br />
N<br />
Links neben <strong>de</strong>m Namen <strong>de</strong>r Musikdatei wird das Symbol c angezeigt.<br />
Um die Auswahl sämtlicher Dateien aufzuheben, drücken Sie die Taste TOOLS und wählen Sie dann Alle abwählen.<br />
5. Drücken Sie die Taste ∂ (Wie<strong>de</strong>rgabe)/ENTERE .<br />
N Die gewählten Dateien wer<strong>de</strong>n nun wie<strong>de</strong>rgegeben.<br />
Deutsch - 34
¦<br />
Menü <strong>de</strong>r Optionen für die Musikwie<strong>de</strong>rgabe<br />
Menü <strong>de</strong>r Optionen für die Musikwie<strong>de</strong>rgabe<br />
❑<br />
❑<br />
❑<br />
❑<br />
Wie<strong>de</strong>rhol-M. → Ein / Aus<br />
Sie können Musikdateien wie<strong>de</strong>rholt abspielen.<br />
Bil<strong>de</strong>instellungen / Toneinstellungen<br />
Sie können die Bild- und Toneinstellungen konfigurieren.<br />
Information<br />
Die Informationen zur Musikdatei wer<strong>de</strong>n angezeigt.<br />
Sicher entfernen<br />
Sie können das Gerät sicher vom Fernsehgerät entfernen.<br />
Extras<br />
Wie<strong>de</strong>rhol-Modus ◀ An ▶<br />
Bil<strong>de</strong>instellungen<br />
Toneinstellungen<br />
Information<br />
Sicher entfernen<br />
U Navig. L Einst. e Been<strong>de</strong>n<br />
¦<br />
Verwen<strong>de</strong>n <strong>de</strong>s Menüs Einstellungen<br />
Mit <strong>de</strong>m Setup zeigen Sie die im Media Play-Menü vorgenommenen<br />
Benutzereinstellungen an.<br />
SUM<br />
851,86 <strong>MB</strong>/993,02 <strong>MB</strong> Frei<br />
1. Drücken Sie die Taste MEDIA.P.<br />
2. Wählen Sie durch Drücken <strong>de</strong>r Tasten ◄ o<strong>de</strong>r ► die Option sETUP, und drücken<br />
Sie dann die Taste ENTERE.<br />
SETUP<br />
3. Wählen Sie mit <strong>de</strong>n Tasten ▲ o<strong>de</strong>r ▼ die gewünschte Option aus.<br />
4. Wählen Sie die Option mit <strong>de</strong>n Tasten ◄ o<strong>de</strong>r ► aus.<br />
N Um <strong>de</strong>nMedia Play-Modus zu been<strong>de</strong>n, drücken Sie auf <strong>de</strong>r Fernbedienung<br />
die Taste MEDIA.P.<br />
Photo<br />
SUM Gerät<br />
Music<br />
Setup<br />
e Been<strong>de</strong>n<br />
■<br />
■<br />
Musik wie<strong>de</strong>rholen → Ein / Aus<br />
Hiermit können Sie Musikdateien wie<strong>de</strong>rholt abspielen.<br />
Laufzeit Bildschirmsch. → 2 Std. / 4 std. / 8 std.<br />
Wählen Sie die Wartezeit bis zum Aktivieren <strong>de</strong>s Bildschirmschoners.<br />
Musik wie<strong>de</strong>rholen ◀ Ein ▶<br />
Laufzeit Bildschirmsch. : 2 Std.<br />
Information<br />
Sicher entfernen<br />
■<br />
Information<br />
Hiermit zeigen Sie die Informationen zum angeschlossenen Gerät an.<br />
SUM Gerät<br />
U Navig. L Einst. R Zurück<br />
■<br />
Sicher entfernen<br />
Sie können das Gerät sicher vom Fernsehgerät entfernen.<br />
Deutsch - 35
ANYNET+<br />
¦<br />
Anschließen von Anynet+-Geräten<br />
Was ist Anynet+?<br />
Bei Anynet+ han<strong>de</strong>lt es sich um eine Funktion, mit <strong>de</strong>r Sie alle angeschlossenen <strong>Samsung</strong>-Geräte, die Anynet+ unterstützen, mit<br />
<strong>de</strong>r Fernbedienung für Ihr <strong>Samsung</strong>-Fernsehgerät steuern können. Das Anynet+-System unterstützt nur Anynet+-fähige <strong>Samsung</strong>-<br />
Geräte. Wenn Sie wissen möchten, ob Ihr <strong>Samsung</strong>-Gerät diese Funktion unterstützt, suchen Sie das Anynet+ auf Ihrem Gerät.<br />
Anschließen an ein Fernsehgerät<br />
TV<br />
Anynet + Gerät 1<br />
Anynet + Gerät 2 Anynet + Gerät 3 Anynet + Gerät 4<br />
HDMI 1.3-Kabel<br />
HDMI 1.3-Kabel<br />
HDMI 1.3-Kabel<br />
HDMI 1.3-Kabel<br />
1. Verbin<strong>de</strong>n Sie einen <strong>de</strong>r Anschlüsse HDMI IN (1, 2, 3(DVI) o<strong>de</strong>r 4) am Fernsehgerät mit <strong>de</strong>m HDMI OUT-Anschluss am<br />
entsprechen<strong>de</strong>n Anynet+-Gerät. Verwen<strong>de</strong>n Sie hierfür ein HDMI-Kabel.<br />
Anschluss an das Heimkinosystem<br />
TV<br />
Heimkino<br />
Anynet + Gerät 1<br />
HDMI 1.3-Kabel<br />
Optical Cable<br />
HDMI 1.3-Kabel<br />
Anynet + Gerät 2 Anynet + Gerät 3 Anynet + Gerät 4<br />
HDMI 1.3-Kabel<br />
HDMI 1.3-Kabel<br />
HDMI 1.3-Kabel<br />
1. Verbin<strong>de</strong>n Sie einen <strong>de</strong>r Anschlüsse HDMI IN (1, 2, 3(DVI) o<strong>de</strong>r 4) am Fernsehgerät mit <strong>de</strong>m HDMI OUT-Anschluss am<br />
entsprechen<strong>de</strong>n Anynet+-Gerät. Verwen<strong>de</strong>n Sie hierfür ein HDMI-Kabel.<br />
2. Verbin<strong>de</strong>n Sie <strong>de</strong>n HDMI IN-Anschluss <strong>de</strong>s Heimkinosystems mit <strong>de</strong>m HDMI OUT-Anschluss <strong>de</strong>s entsprechen<strong>de</strong>n Anynet+-<br />
Geräts. Verwen<strong>de</strong>n Sie hierfür das HDMI-Kabel.<br />
N<br />
N<br />
N<br />
N<br />
N<br />
N<br />
Verbin<strong>de</strong>n Sie DIGITAL AUDIO OUT (OPTICAL)-Anschluss am Fernsehgerät und <strong>de</strong>n Digital Audio-Eingang <strong>de</strong>s<br />
Heimkinosystems mit Hilfe <strong>de</strong>s Glasfaserkabels.<br />
Bei obiger Vorgehensweise überträgt <strong>de</strong>r optische Anschluss nur 2-Kanalaudio. Die Tonausgabe erfolgt also nur über <strong>de</strong>n<br />
linken und rechten Frontlautsprecher sowie <strong>de</strong>n Subwoofer <strong>de</strong>s Heimkinosystems. Wenn Sie 5.1-Kanalton wünschen,<br />
müssen Sie <strong>de</strong>n DIGITAL AUDIO OUT (OPTICAL)-Ausgang <strong>de</strong>s DVD-Players o<strong>de</strong>r <strong>de</strong>s Kabel-/Sattellitenreceivers (also<br />
Anynet-Gerät 1 o<strong>de</strong>r 2) direkt an einen Verstärker o<strong>de</strong>r ein Heimkinosystem und nicht an das Fernsehgerät anschließen.<br />
Schließen Sie nur ein Heimkinosystem an.<br />
Sie können Anynet+-Geräte mithilfe eines HDMI 1.3-Kabels verbin<strong>de</strong>n. Einige HDMI-Kabel unterstützen möglicherweise<br />
keine Anynet+-Funktionen.<br />
Anynet+ arbeitet, wenn das AV-Gerät, das Anynet+ unterstützt, im Standby-Modus o<strong>de</strong>r angeschaltet ist.<br />
Anynet+ unterstützt maximal 12 AV-Geräte. Beachten Sie, dass Sie maximal 3 Geräte <strong>de</strong>s gleichen Typs anschließen können.<br />
Deutsch - 36
¦<br />
Einrichten von Anynet+<br />
❑<br />
T<br />
Drücken Sie die Taste TOOLS, um das Menü Extras anzuzeigen. Sie können das Anynet+-<br />
Menü auch durch Auswahl von Extras → Anynet+ (HDMI-CEC) auswählen.<br />
Einstellungen<br />
Anwendung<br />
Media Play (USB)<br />
Anynet+(HDMI-CEC)<br />
■<br />
Anynet+ (HDMI-CEC) → Aus / Ein<br />
Damit Sie die Funktionen von Anynet+ nutzen können, muss Anynet+ (HDMI-CEC) aktiviert<br />
(Ein) sein.<br />
N Wenn die Funktion Anynet+ (HDMI-CEC) <strong>de</strong>aktiviert ist, sind auch alle Funktionen in<br />
Verbindung mit Anynet+ <strong>de</strong>aktiviert.<br />
Einstellungen<br />
Anynet+(HDMI-CEC) : Ein ▶<br />
Autom. Ausschalten<br />
: Ja<br />
■<br />
¦<br />
Autom. Ausschalten → Nein / Ja<br />
Automatisches Abschalten von Anynet+-Geräten durch Abschalten <strong>de</strong>s Fernsehgeräts<br />
N Damit Sie Anynet+ verwen<strong>de</strong>n können, muss die Geräteauswahl <strong>de</strong>r Fernbedienung auf<br />
TV eingestellt sein.<br />
N Wenn Sie Autom. Ausschalten aktivieren (auf Ja setzen), wer<strong>de</strong>n auch die<br />
angeschlossenen externen Geräte ausgeschaltet, wenn Sie das Fernsehgerät ausschalten.<br />
Wenn das externe Gerät jedoch gera<strong>de</strong> aufnimmt, wird es möglicherweise abgeschaltet<br />
o<strong>de</strong>r auch nicht.<br />
Wechseln zwischen von Anynet+-Geräten<br />
U Navig. E Eingabe R Zurück<br />
Einstellungen<br />
Anynet+(HDMI-CEC)<br />
: Ein<br />
Autom. Ausschalten : Ja ▶<br />
U Navig. E Eingabe R Zurück<br />
1. Drücken Sie die Taste TOOLS. Drücken Sie die Taste ENTERE, um Anynet+ (HDMI-<br />
CEC) auszuwählen.<br />
2. Wählen Sie durch Drücken <strong>de</strong>r Tasten ▲ o<strong>de</strong>r ▼ die Option Geräteliste, und drücken Sie<br />
dann die Taste ENTERE.<br />
N Anynet+-Geräte aufgelistet.<br />
N Wenn Sie das gewünschte Gerät nicht fin<strong>de</strong>n, drücken Sie die rote Taste, um nach<br />
Geräten zu suchen.<br />
3. Wählen Sie ein bestimmtes Gerät durch Drücken <strong>de</strong>r Tasten ▲ o<strong>de</strong>r ▼, und drücken Sie<br />
dann die Taste ENTERE. Das System wechselt zum ausgewählten Gerät.<br />
N Nur wenn Sie Anynet+ (HDMI-CEC) im Anwendung-Menü aktivieren (Ein), wird das<br />
Menü Geräteliste angezeigt.<br />
N Das Umschalten zu <strong>de</strong>n ausgewählten Geräten kann bis zu 2 Minuten dauern. Sie können diesen Vorgang während <strong>de</strong>s<br />
Umschaltens nicht abbrechen.<br />
N Die zum Suchen nach Geräten erfor<strong>de</strong>rliche Zeit hängt von <strong>de</strong>r Anzahl <strong>de</strong>r angeschlossenen Geräte ab.<br />
N Wenn die Gerätesuche abgeschlossen ist, wird die Anzahl <strong>de</strong>r gefun<strong>de</strong>nen Geräte nicht angezeigt.<br />
N Zwar sucht das Fernsehgerät beim Anschalten mit <strong>de</strong>r Netztaste automatisch die Geräteliste, aber die an das Fernsehgerät<br />
angeschlossenen Geräte erscheinen <strong>de</strong>nnoch möglicherweise nicht in <strong>de</strong>r Geräteliste. Drücken Sie die rote Taste, um die<br />
angeschlossenen Geräte zu suchen.<br />
N Wenn Sie mit <strong>de</strong>r Taste SOURCE eine externe Signalquelle eingestellt haben, können Sie die Anynet+-Funktion nicht<br />
verwen<strong>de</strong>n. Achten Sie darauf, immer nur mit Geräteliste zu einem Anynet+-Gerät zu wechseln.<br />
Anynet+-Menü<br />
Der Inhalt <strong>de</strong>s Anynet+-Menüs hängt vom Typ und Status <strong>de</strong>r an das Fernsehgerät angeschlossenen Anynet+-Geräte ab.<br />
N<br />
Anynet+-Menü<br />
Fernsehen<br />
Geräteliste<br />
(Geräte_Name) MENU<br />
(Geräte_Name) INFO<br />
Aufnahme: (*Aufnahmegerät)<br />
Aufnahme anhalten:<br />
(*Aufnahmegerät)<br />
Empfänger<br />
Beschreibung<br />
Wechsel vom Anynet+-Modus zum Fernsehmodus.<br />
Anzeige <strong>de</strong>r Anynet+-Geräteliste.<br />
Hiermit öffnen Sie die Menüs <strong>de</strong>r angeschlossenen Geräte. Wenn z. B. ein DVD-<br />
Recor<strong>de</strong>r angeschlossen ist, wird das DVD-Menü <strong>de</strong>s DVD-Recor<strong>de</strong>rs angezeigt.<br />
Zeigt das Wie<strong>de</strong>rgabemenü <strong>de</strong>s angeschlossenen Geräts an. Wenn z. B. ein DVD-<br />
Recor<strong>de</strong>r angeschlossen ist, wird das Wie<strong>de</strong>rgabemenü <strong>de</strong>s DVD-Recor<strong>de</strong>rs angezeigt.<br />
Sofortiges Starten einer Aufnahme mit <strong>de</strong>m Rekor<strong>de</strong>r (Diese Funktion ist nur für<br />
Geräte mit Aufnahmefunktion verfügbar.)<br />
Been<strong>de</strong>n <strong>de</strong>r Aufnahme.<br />
Die Tonausgabe erfolgt über <strong>de</strong>n Receiver.<br />
Fernsehen<br />
Geräteliste<br />
Aufnahme: DVDR<br />
DVDR MENU<br />
DVDR INFO<br />
Empfänger Aus<br />
Einstellungen<br />
U Navig. E Eingabe R Zurück<br />
Bei Anschluss von mehr als einem Aufnahmegerät wer<strong>de</strong>n sie als (*Aufnahmegerät) angezeigt, bei Anschluss eines einzigen<br />
Aufnahmegeräts erfolgt die Anzeige als (*Geräte_Name).<br />
Deutsch - 37
Im Anynet+-Modus verfügbare Tasten <strong>de</strong>r TV-Fernbedienung<br />
N<br />
N<br />
N<br />
N<br />
N<br />
N<br />
Gerätetyp Betriebsstatus Verfügbare Tasten<br />
Anynet+-Gerät<br />
Gerät mit<br />
eingebautem Tuner<br />
Nach <strong>de</strong>m Wechseln zum Gerät wird das<br />
Menü <strong>de</strong>s entsprechen<strong>de</strong>n Geräts auf<br />
<strong>de</strong>m Bildschirm angezeigt.<br />
Nach <strong>de</strong>m Wechseln zum Gerät beim<br />
Abspielen einer Datei.<br />
Nach <strong>de</strong>m Wechseln zum Gerät beim<br />
Fernsehen.<br />
Zifferntasten<br />
▲/▼/◄/►/ Taste ENTERE<br />
Farbtasten / EXIT-Taste<br />
π(Suche rückwärts) / µ(Suche vorwärts)<br />
∫(Stopp) / ∂(Wie<strong>de</strong>rgabe) / ∑(Pause)<br />
P > / P
¦ Fehlerbehebung für Anynet+<br />
Problem<br />
Anynet+ funktioniert nicht.<br />
Ich möchte Anynet+ starten.<br />
Ich möchte Anynet+ been<strong>de</strong>n.<br />
Die Meldung "Verbin<strong>de</strong>n mit<br />
Anynet+-Gerät" wird angezeigt.<br />
Keine Wie<strong>de</strong>rgabe mit <strong>de</strong>m<br />
Anynet+-Gerät.<br />
Das angeschlossene Gerät wird<br />
nicht angezeigt.<br />
Das Fernsehprogramm kann nicht<br />
aufgezeichnet wer<strong>de</strong>n.<br />
Die Ausgabe <strong>de</strong>s Fernsehtons<br />
erfolgt über <strong>de</strong>n Receiver.<br />
Mögliche Lösung<br />
● Überprüfen Sie, ob das Gerät Anynet+-tauglich ist. Das Anynet+-System unterstützt<br />
nur Anynet+-fähige Geräte.<br />
●<br />
●<br />
●<br />
●<br />
●<br />
●<br />
●<br />
●<br />
●<br />
●<br />
●<br />
●<br />
●<br />
●<br />
●<br />
●<br />
●<br />
●<br />
●<br />
●<br />
●<br />
●<br />
●<br />
●<br />
●<br />
Schließen Sie nur einen Receiver (Heimkinosystem) an.<br />
Prüfen Sie, ob das Netzkabel <strong>de</strong>s Anynet+-Geräts richtig angeschlossen ist.<br />
Prüfen Sie die Vi<strong>de</strong>o/Audio/HDMI 1.3-Kabelverbindungen <strong>de</strong>s Anynet+-Geräts.<br />
Prüfen Sie, ob Anynet+ (HDMI-CEC) im Setupmenü von Anynet+ aktiviert ist.<br />
Überprüfen Sie, ob die Fernbedienung im TV-Modus arbeitet.<br />
Prüfen Sie, ob es sich um eine ausschließlich für Anynet+ geeignete Fernbedienung<br />
han<strong>de</strong>lt.<br />
Anynet+ funktioniert unter bestimmten Umstän<strong>de</strong>n nicht. (Kanalsuche, Bedienung von<br />
Media Play, Plug & Play usw.)<br />
Stellen Sie nach <strong>de</strong>m Anschließen o<strong>de</strong>r Entfernen <strong>de</strong>s HDMI 1.3-Kabels sicher, dass<br />
die Geräte wie<strong>de</strong>r gesucht wer<strong>de</strong>n, o<strong>de</strong>r schalten Sie das TV-Gerät aus und wie<strong>de</strong>r ein.<br />
Überprüfen Sie, ob die Anynet+-Funktion <strong>de</strong>s Anynet+-Geräts eingeschaltet ist.<br />
Prüfen Sie, ob das Anynet+-Gerät ordnungsgemäß an das Fernsehgerät<br />
angeschlossen ist, und kontrollieren Sie zu<strong>de</strong>m, ob AnynetAnynet+ (HDMI-CEC) im<br />
Anynet+-Menü Setup aktiviert (On) ist.<br />
Drücken Sie die TV-Taste auf <strong>de</strong>r TV-Fernbedienung, um zu TV zu wechseln. Drücken<br />
Sie dann die TOOLS-Taste, um das Anynet+-Menü anzuzeigen und die gewünschte<br />
Menüoption auszuwählen.<br />
Wählen Sie im Anynet+-Menü die Option View TV.<br />
Drücken Sie die Taste SOURCE auf <strong>de</strong>r TV-Fernbedienung, und wählen Sie ein Gerät,<br />
bei <strong>de</strong>m es sich nicht um ein Anynet+-Gerät han<strong>de</strong>lt.<br />
Drücken Sie auf P >/
EMPFEHLUNGEN<br />
¦<br />
Vi<strong>de</strong>otextfunktion<br />
Die meisten Fernsehsen<strong>de</strong>r bieten über Vi<strong>de</strong>otext Informationen an. Auf <strong>de</strong>r Vi<strong>de</strong>otext-In<strong>de</strong>xseite fin<strong>de</strong>n Sie Verwendungshinweise<br />
zum Vi<strong>de</strong>otext. Darüber hinaus können Sie über die Tasten <strong>de</strong>r Fernbedienung nach Bedarf verschie<strong>de</strong>ne Optionen einstellen.<br />
N Für die korrekte Anzeige von Vi<strong>de</strong>otextinformationen muss <strong>de</strong>r Sen<strong>de</strong>rempfang einwandfrei sein. An<strong>de</strong>rnfalls können<br />
Informationen unvollständig sein o<strong>de</strong>r einige Seiten nicht angezeigt wer<strong>de</strong>n.<br />
1 0 (Modus)<br />
Drücken Sie diese Taste,<br />
um <strong>de</strong>n Vi<strong>de</strong>otextmodus<br />
auszuwählen (LISTE/FLOF)<br />
Wenn Sie diese Taste im Modus<br />
LIST (Liste) drücken, wird in<br />
<strong>de</strong>n Listenspeichermodus<br />
umgeschaltet. Im<br />
Listenspeichermodus können<br />
Sie mit <strong>de</strong>r Taste 8(Speichern)<br />
Vi<strong>de</strong>otextseiten in einer Liste<br />
speichern.<br />
2 5 (anzeigen)<br />
Drücken Sie diese Taste,<br />
um verborgenen Text<br />
anzuzeigen (z. B. Antworten bei<br />
Quizsendungen). Drücken Sie die<br />
Taste erneut, um <strong>de</strong>n Vi<strong>de</strong>otext<br />
auszublen<strong>de</strong>n.<br />
3 4 (Größe)<br />
Drücken Sie diese Taste, um<br />
Vi<strong>de</strong>otext in doppelt so großen<br />
Buchstaben in <strong>de</strong>r oberen Hälfte<br />
<strong>de</strong>s Bildschirms anzuzeigen.<br />
Drücken Sie die Taste erneut, um<br />
<strong>de</strong>n Text in <strong>de</strong>r unteren Hälfte<br />
<strong>de</strong>s Bildschirms anzuzeigen.<br />
Zum Ausblen<strong>de</strong>n <strong>de</strong>s Vi<strong>de</strong>otextes<br />
drücken Sie die Taste erneut.<br />
4 8 (Speichern)<br />
Drücken Sie diese Taste, um<br />
Vi<strong>de</strong>otextseiten zu speichern.<br />
5 Farbtasten (rot/grün/gelb/blau)<br />
Wenn <strong>de</strong>r Sen<strong>de</strong>r das<br />
FASTEXT-System verwen<strong>de</strong>t,<br />
sind die verschie<strong>de</strong>nen Themen<br />
auf <strong>de</strong>n Vi<strong>de</strong>otextseiten farbig<br />
gekennzeichnet und können<br />
mit <strong>de</strong>n Farbtasten auf <strong>de</strong>r<br />
Fernbedienung angewählt<br />
wer<strong>de</strong>n. Drücken Sie die<br />
Farbtaste, die <strong>de</strong>m Thema<br />
entspricht, das Sie anzeigen<br />
möchten. Die Seite wird mit<br />
an<strong>de</strong>ren farbig markierten<br />
Informationen angezeigt, die<br />
auf dieselbe Art ausgewählt<br />
wer<strong>de</strong>n können. Drücken Sie die<br />
entsprechen<strong>de</strong> Farbtaste, um<br />
die vorherige o<strong>de</strong>r nächste Seite<br />
anzuzeigen.<br />
6 / (Vi<strong>de</strong>otext an/mix)<br />
Drücken Sie diese Taste, um <strong>de</strong>n<br />
Vi<strong>de</strong>otextmodus zu aktivieren,<br />
nach<strong>de</strong>m Sie einen Sen<strong>de</strong>r ausgewählt<br />
haben, <strong>de</strong>r Vi<strong>de</strong>otext anbietet.<br />
Drücken Sie die Taste zweimal, um<br />
die Vi<strong>de</strong>otextinformationen gleichzeitig<br />
mit <strong>de</strong>r aktuellen Sendung auf <strong>de</strong>m<br />
Bildschirm einzublen<strong>de</strong>n.<br />
7 : (En<strong>de</strong>)<br />
Vi<strong>de</strong>otext been<strong>de</strong>n<br />
8 1 (Unterseite)<br />
Drücken Sie diese Taste, um eine<br />
verfügbare untergeordnete Seite<br />
anzuzeigen.<br />
9 2 (Weiterblättern)<br />
Drücken Sie diese Taste, um die<br />
nächste Vi<strong>de</strong>otextseite anzuzeigen.<br />
0 3 (Zurückblättern)<br />
Drücken Sie diese Taste, um die<br />
vorherige Vi<strong>de</strong>otextseite anzuzeigen.<br />
! 9 (Halten)<br />
Drücken Sie diese Taste, um bei einer<br />
angezeigten Seite, die mit weiteren,<br />
untergeordnete Seiten verknüpft<br />
ist, das automatische Umblättern<br />
zu verhin<strong>de</strong>rn. Drücken Sie zum<br />
Fortfahren die Taste erneut.<br />
@ 6 (in<strong>de</strong>x)<br />
Drücken Sie diese Taste, um<br />
die Vi<strong>de</strong>otext-In<strong>de</strong>xseite (In<strong>de</strong>x)<br />
anzuzeigen.<br />
# 7 (Abbrechen)<br />
Drücken Sie diese Taste, um beim<br />
Suchen nach einer Seite die Sendung<br />
anzuzeigen.<br />
1<br />
2<br />
3<br />
4<br />
5<br />
6<br />
INFO<br />
AD<br />
7<br />
8<br />
9<br />
0<br />
!<br />
@<br />
#<br />
N<br />
Sie können die Vi<strong>de</strong>otextseiten durch Drücken <strong>de</strong>r Zifferntasten auf <strong>de</strong>r Fernbedienung wechseln.<br />
Deutsch - 40
Die Vi<strong>de</strong>otextseiten sind in sechs Kategorien unterteilt:<br />
Sportergebnisse<br />
A<br />
B<br />
C<br />
D<br />
E<br />
F<br />
Inhalt<br />
Gewählte Seitennummer<br />
Sen<strong>de</strong>rkennung<br />
Aktuelle Seitenzahl o<strong>de</strong>r Suchhinweise<br />
Datum und Uhrzeit<br />
Text<br />
Statusinformation<br />
FASTEXT-Informationen<br />
N<br />
N<br />
N<br />
N<br />
N<br />
O<br />
Vi<strong>de</strong>otextinformationen sind oft auf mehrere, aufeinan<strong>de</strong>r folgen<strong>de</strong> Seiten verteilt, die wie folgt aufgerufen wer<strong>de</strong>n können:<br />
<br />
<br />
<br />
Eingabe <strong>de</strong>r Seitennummer<br />
Auswahl eines Titels in einer Liste<br />
Auswahl einer farbigen Überschrift (FASTEXT-System)<br />
Das Fernsehgerät unterstützt Vi<strong>de</strong>otext Version 2.5. Damit können zusätzlich Graphik o<strong>de</strong>r Text angezeigt wer<strong>de</strong>n.<br />
Je nach Übertragungsmodus können bei <strong>de</strong>r Anzeige von Vi<strong>de</strong>otext am linken und rechten Rand Leerbereiche vorkommen.<br />
In diesem Fall wird keine zusätzliche Graphik o<strong>de</strong>r Text übertragen.<br />
Ältere Fernsehgeräte, die Version 2.5 nicht unterstützen, können zusätzliche Graphiken o<strong>de</strong>r Texte unabhängig vom Modus<br />
<strong>de</strong>r Vi<strong>de</strong>otextübertragung nicht anzeigen.<br />
Drücken Sie die Taste TV, um Vi<strong>de</strong>otext zu been<strong>de</strong>n.<br />
¦<br />
Anbringen <strong>de</strong>s Standfußes<br />
N<br />
Voreinstellung: Stellen Sie die Leitschiene und die Halterungsab<strong>de</strong>ckung auf <strong>de</strong>n<br />
Standfuß, und befestigen Sie diese mit <strong>de</strong>n Schrauben. (je nach Mo<strong>de</strong>ll)<br />
Rückseite<br />
INFO<br />
Vor<strong>de</strong>rseite<br />
1. Verbin<strong>de</strong>n Sie Ihren LCD-Fernseher mit <strong>de</strong>m Standfuß.<br />
N<br />
N<br />
N<br />
Der Fernseher sollte von min<strong>de</strong>stens zwei Personen getragen wer<strong>de</strong>n.<br />
Verwechseln Sie beim Zusammenbauen nicht die Vor<strong>de</strong>r- und Rückseite <strong>de</strong>s<br />
Standfußes.<br />
Damit sichergestellt ist, dass das Fernsehgerät auf richtiger Höhe mit <strong>de</strong>m Standfuß<br />
verbun<strong>de</strong>n wird, dürfen Sie oben links und rechts nicht zu stark auf <strong>de</strong>n Fernseher<br />
drücken.<br />
2. Ziehen Sie zuerst die Schrauben an Position 1 und dann die Schrauben an Position 2<br />
fest.<br />
N Stellen Sie das Gerät aufrecht hin und ziehen Sie die Schrauben fest. Wenn Sie die<br />
Schrauben festziehen, während <strong>de</strong>r LCD-Fernseher liegt, kann es passieren, dass er<br />
seitlich geneigt ist.<br />
2<br />
1<br />
AD<br />
Deutsch - 41
¦<br />
Lösen <strong>de</strong>s Standfußes<br />
1. Entfernen Sie Schrauben von <strong>de</strong>r Rückseite <strong>de</strong>s Fernsehgerätes.<br />
2. Lösen Sie <strong>de</strong>n Standfuß vom Fernsehgerät.<br />
N Der Fernseher sollte von min<strong>de</strong>stens zwei Personen getragen wer<strong>de</strong>n.<br />
3. Decken Sie die Aussparung an <strong>de</strong>r Unterseite <strong>de</strong>s Fernsehgeräts mit <strong>de</strong>r Ab<strong>de</strong>ckung ab.<br />
¦<br />
Anbringen <strong>de</strong>r Wandhalterung<br />
Mit <strong>de</strong>r separat erhältlichen Wandhalterung können Sie das Fernsehgerät an einer Wand<br />
befestigen.<br />
Detaillierte Informationen zum Montieren <strong>de</strong>r Wandhalterung fin<strong>de</strong>n Sie in <strong>de</strong>n Anweisungen,<br />
die im Lieferumfang <strong>de</strong>r Wandhalterung enthalten sind. Lassen Sie sich beim Anbringen <strong>de</strong>r<br />
Wandmontagehalterung von einem Techniker helfen.<br />
<strong>Samsung</strong> Electronics haftet nicht für Schä<strong>de</strong>n an Gerät o<strong>de</strong>r Personen, wenn die Montage<br />
vom Kun<strong>de</strong>n selbst durchgeführt wird.<br />
Installieren Sie die Wandhalterung nicht bei angeschaltetem Fernsehgerät. Sie könnten<br />
dabei einen Stromschlag erhalten und sich verletzen.<br />
¦<br />
Verlegen <strong>de</strong>r Kabel<br />
Verstecken Sie die Kabel im Kabelschlauch, damit Sie durch <strong>de</strong>n transparenten Standfuß hindurch<br />
nicht zu sehen sind.<br />
¦<br />
Kensington-Schloss als Diebstahlsicherung<br />
Ein Kensington-Schloss dient zur physischen Sicherung <strong>de</strong>s Systems bei Verwendung in<br />
öffentlichen Bereichen. Je nach Hersteller können Aussehen und Verriegelungsverfahren<br />
von <strong>de</strong>r Abbildung abweichen.<br />
Informationen zur richtigen Anwendung entnehmen Sie bitte <strong>de</strong>r Bedienungsanleitung <strong>de</strong>s<br />
Kensington-Schlosses.<br />
N<br />
N<br />
Das Schloss muss separat erworben wer<strong>de</strong>n.<br />
Die Position <strong>de</strong>s Kensington-Schlosses ist mo<strong>de</strong>llabhängig.<br />
1. "Führen Sie das Schloss in <strong>de</strong>n Kensington-Einschub am LCD-Fernseher ein (1), und<br />
drehen Sie es in die Verriegelungsposition (2).<br />
2. Schließen Sie das Kabel für das Kensington-Schloss an (3).<br />
3. Befestigen Sie das Kensington-Schloss an einem Tisch o<strong>de</strong>r einem schweren<br />
feststehen<strong>de</strong>n Objekt.<br />
3<br />
2<br />
1<br />
<br />
Deutsch - 42
¦<br />
Absichern <strong>de</strong>s Einbaubereichs<br />
Halten Sie die erfor<strong>de</strong>rlichen Abstän<strong>de</strong> zwischen <strong>de</strong>m Gerät und an<strong>de</strong>ren Objekten (z.B. Wän<strong>de</strong>n) ein, um ausreichen<strong>de</strong> Lüftung<br />
sicherzustellen.<br />
Wenn Sie dies nicht tun, besteht die Gefahr, dass aufgrund eines Anstiegs <strong>de</strong>r Temperatur im Innern <strong>de</strong>s Geräts ein Brand<br />
ausbricht o<strong>de</strong>r an<strong>de</strong>re Probleme mit <strong>de</strong>m Gerät auftreten.<br />
Stellen Sie das Gerät so auf, dass die in <strong>de</strong>r Abbildung gezeigten Min<strong>de</strong>stabstän<strong>de</strong> eingehalten wer<strong>de</strong>n.<br />
N Verwen<strong>de</strong>n Sie nur Teile von <strong>Samsung</strong> Electronics, wenn Sie einen Standfuß o<strong>de</strong>r eine Wandhalterung einsetzen.<br />
Wenn Sie Teile eines an<strong>de</strong>ren Herstellers verwen<strong>de</strong>n, kann es zu Problemen mit <strong>de</strong>m Gerät o<strong>de</strong>r zu Verletzungen<br />
kommen, weil das Gerät herunterfällt.<br />
Wenn Sie Teile eines an<strong>de</strong>ren Herstellers verwen<strong>de</strong>n, kann es zu Problemen mit <strong>de</strong>m Gerät o<strong>de</strong>r zu einem Brand<br />
kommen, weil die Innentemperatur aufgrund schlechter Belüftung <strong>de</strong>s Geräts ansteigt.<br />
N Das Aussehen kann sich je nach Gerät unterschei<strong>de</strong>n.<br />
Aufstellen <strong>de</strong>s Geräts mit <strong>de</strong>m Standfuß<br />
Installieren <strong>de</strong>s Geräts mit einer Wandhalterung<br />
10 cm<br />
10 cm<br />
10 cm<br />
10 cm<br />
10 cm<br />
10 cm<br />
10 cm<br />
¦<br />
Befestigen <strong>de</strong>s Fernsehgeräts an <strong>de</strong>r Wand<br />
Achtung: Das Fernsehgerät kann hinfallen, wenn Sie daran ziehen, es schieben o<strong>de</strong>r darauf klettern. Stellen<br />
Sie insbeson<strong>de</strong>re sicher, dass sich keine Kin<strong>de</strong>r an das Gerät hängen o<strong>de</strong>r es aus <strong>de</strong>m Gleichgewicht bringen.<br />
An<strong>de</strong>renfalls könnte das Gerät umkippen und schwere Verletzungen o<strong>de</strong>r <strong>de</strong>n Tod verursachen. Beachten<br />
Sie alle Anweisungen <strong>de</strong>r beigefügten Sicherheitshinweise. Noch mehr Stabilität erreichen Sie, wenn Sie <strong>de</strong>n<br />
Kippschutz installieren. Gehen Sie hierzu folgen<strong>de</strong>rmaßen vor.<br />
■<br />
So verhin<strong>de</strong>rn Sie, dass das Fernsehgerät umkippt:<br />
1. Stecken Sie die Schrauben durch die Halterungen und befestigen Sie sie fest an <strong>de</strong>r<br />
Wand. Vergewissern Sie sich, dass die Schrauben gut halten.<br />
N Je nach Ausführung <strong>de</strong>r Wand benötigen Sie zum Befestigen weiteres Material, wie<br />
z. B. einen Dübel.<br />
N Da die benötigten Halterungen, Schrauben und das Band nicht zum Lieferumfang<br />
gehören, müssen Sie diese Teile geson<strong>de</strong>rt erwerben.<br />
2. Entfernen Sie die Schrauben in <strong>de</strong>r Mitte auf <strong>de</strong>r Rückseite <strong>de</strong>s Fernsehgeräts. Setzen<br />
Sie diese Schrauben in die Halterungen ein und befestigen Sie die Schrauben dann<br />
wie<strong>de</strong>r am Fernsehgerät.<br />
N<br />
N<br />
<br />
<br />
Die Schrauben wer<strong>de</strong>n möglicherweise nicht zusammen mit <strong>de</strong>m Gerät geliefert.<br />
Kaufen Sie in diesem Fall Schrauben entsprechend <strong>de</strong>n folgen<strong>de</strong>n Angaben.<br />
Daten <strong>de</strong>r Schrauben<br />
Für LCD-Fernsehgeräte von 17 – 29 Zoll: M4 X L15<br />
Für LCD-Fernsehgeräte von 32 – 40 Zoll: M6 X L15<br />
Wand<br />
3. Verbin<strong>de</strong>n Sie die Halterungen an <strong>de</strong>r Wand und die Halterung am Fernsehgerät mit<br />
einem festen Band miteinan<strong>de</strong>r und ziehen Sie das Band dann fest.<br />
N Stellen Sie das Fernsehgerät in <strong>de</strong>r Nähe <strong>de</strong>r Wand auf, damit es nicht nach hinten<br />
kippen kann.<br />
N Es ist noch sicherer, wenn die Halterungen an <strong>de</strong>r Wand niedriger als die<br />
Halterungen am Fernsehgerät sind.<br />
N Lösen Sie das Band, ehe Sie <strong>de</strong>n Fernsehapparat bewegen.<br />
4. Kontrollieren Sie, ob alle Anschlüsse weiterhin fest verbun<strong>de</strong>n sind. Prüfen Sie<br />
regelmäßig die Verbindungen auf Zeichen von Ermüdung o<strong>de</strong>r Versagen. Bei Zweifeln<br />
hinsichtlich <strong>de</strong>r Sicherheit Ihrer Halterung wen<strong>de</strong>n Sie sich an einen professionellen Installationsbetrieb.<br />
Wand<br />
Deutsch - 43
¦<br />
Fehlerbehebung: Vor <strong>de</strong>r Kontaktaufnahme mit <strong>de</strong>m Kun<strong>de</strong>ndienst<br />
Kein Ton o<strong>de</strong>r Bild<br />
Normales Bild, aber kein Ton<br />
Der Bildschirm ist schwarz<br />
und die Betriebsanzeige blinkt<br />
kontinuierlich.<br />
Kein Bild o<strong>de</strong>r nur<br />
schwarzweißes Bild<br />
Ton- und Bildstörungen<br />
Verzerrtes o<strong>de</strong>r verschneites Bild,<br />
verzerrter Ton<br />
Fernbedienung funktioniert nicht<br />
richtig<br />
Es wird eine Meldung angezeigt,<br />
dass das Signalkabel überprüft<br />
wer<strong>de</strong>n soll.<br />
Im PC-Modus wird eine Meldung<br />
angezeigt, dass dieser Modus<br />
nicht unterstützt wird.<br />
Das beschädigte Bild wird in <strong>de</strong>r<br />
Ecke <strong>de</strong>s Bildschirms angezeigt.<br />
Es wird eine Meldung angezeigt,<br />
dass alle Einstellungen auf die<br />
Standardwerte zurückgesetzt<br />
wer<strong>de</strong>n.<br />
Sie erkennen möglicherweise<br />
kleine Partikel, wenn Sie<br />
<strong>de</strong>n Rahmen um <strong>de</strong>n<br />
Fernsehbildschirm herum genau<br />
betrachten.<br />
N<br />
Stellen Sie sicher, dass das Netzkabel an eine Steckdose angeschlossen ist.<br />
Stellen Sie sicher, dass Sie auf <strong>de</strong>r Fernbedienung die Taste gedrückt haben.<br />
Überprüfen Sie die Einstellungen für Kontrast und Helligkeit.<br />
Überprüfen Sie die Lautstärke.<br />
Überprüfen Sie die Lautstärke.<br />
Überprüfen Sie, ob die Taste MUTEM auf <strong>de</strong>r Fernbedienung gedrückt wur<strong>de</strong>.<br />
Überprüfen Sie die Einstellungen für Lautsprecher auswählen.<br />
Überprüfen Sie Stromversorgung und Signalkabel Ihres Computers.<br />
Das Fernsehgerät befin<strong>de</strong>t sich im Energiesparmodus.<br />
Bewegen Sie die Maus <strong>de</strong>s Computers, o<strong>de</strong>r drücken Sie eine Taste auf <strong>de</strong>r Tastatur.<br />
Än<strong>de</strong>rn Sie die Farbeinstellungen.<br />
Stellen Sie sicher, dass die korrekte Fernsehnorm ausgewählt ist.<br />
"Suchen Sie das elektrische Gerät, das die Störungen am Fernsehgerät verursacht, und stellen Sie es in<br />
einem größeren Abstand auf."<br />
Schließen Sie das Fernsehgerät an eine an<strong>de</strong>re Steckdose an.<br />
Überprüfen Sie Ausrichtung, Standort und Anschlüsse <strong>de</strong>r Antenne.<br />
Interferenzen wer<strong>de</strong>n oft durch Zimmerantennen verursacht.<br />
Tauschen Sie die Batterien <strong>de</strong>r Fernbedienung aus.<br />
Reinigen Sie die Vor<strong>de</strong>rseite <strong>de</strong>r Fernbedienung (dort befin<strong>de</strong>t sich <strong>de</strong>r Infrarotsen<strong>de</strong>r).<br />
Überprüfen Sie die Batteriekontakte.<br />
Stellen Sie sicher, dass das Signalkabel fest mit <strong>de</strong>m Computer o<strong>de</strong>r <strong>de</strong>r Vi<strong>de</strong>oquelle verbun<strong>de</strong>n ist.<br />
Vergewissern Sie sich, dass <strong>de</strong>r Computer bzw. die Vi<strong>de</strong>oquelle eingeschaltet ist.<br />
Ermitteln Sie die maximale Auflösung und Bildwie<strong>de</strong>rholfrequenz <strong>de</strong>r Vi<strong>de</strong>okarte.<br />
Vergleichen Sie diese Werte mit <strong>de</strong>n Angaben in <strong>de</strong>r Tabelle zu <strong>de</strong>n Anzeigemodi.<br />
Wenn für manche externe Geräte Bildschirmanpassung gewählt ist, erscheint in <strong>de</strong>r Ecke <strong>de</strong>s<br />
Bildschirms ein beschädigtes Bild. Dieses Symptom ist auf das externe Gerät und nicht auf das<br />
Fernsehgerät zurückzuführen.<br />
Diese erscheint, wenn Sie die EXIT-Taste gedrückt halten. Die Geräteeinstellungen wer<strong>de</strong>n auf die<br />
Werkseinstellungen zurückgesetzt.<br />
Dies ist Teil <strong>de</strong>s Produkt<strong>de</strong>signs und kein Defekt.<br />
Der TFT-LCD-Bildschirm enthält Unterpixel (6 220 800), wofür eine ausgefeilte Fertigungstechnologie erfor<strong>de</strong>rlich ist.<br />
Allerdings können ein paar zu helle o<strong>de</strong>r zu dunkle Pixel auf <strong>de</strong>r Bildfläche zu sehen sein. Diese Pixelfehler haben keinen<br />
Einfluss auf die Geräteleistung.<br />
Deutsch - 44
¦<br />
Technische Daten<br />
Mo<strong>de</strong>llname<br />
LE32B550, LE32B551<br />
LE32B553, LE32B554<br />
LE37B550, LE37B551<br />
LE37B553, LE37B554<br />
Bildschirmgröße<br />
(Diagonal) 32 Zoll 37 Zoll<br />
PC-Auflösung<br />
(Optimal) 1920 x 1080 bei 60 Hz 1920 x 1080 bei 60 Hz<br />
Ton<br />
(Ausgang) 2 x 10 W 2 x 10 W<br />
Abmessungen (BxTxH)<br />
Gehäuse<br />
Mit Fuß<br />
794 x 77 x 524 mm<br />
794 x 240 x 570 mm<br />
917 x 79 x 592 mm<br />
917 x 255 x 658 mm<br />
Gewicht<br />
Mit Fuß 13 kg 16 kg<br />
Umgebungsbedingungen<br />
Betriebstemperatur<br />
Luftfeuchtigkeit (bei Betrieb)<br />
Lagerungstemperatur<br />
Luftfeuchtigkeit (Lagerung)<br />
Drehbarer Fuß<br />
(Links und rechts)<br />
Mo<strong>de</strong>llname<br />
LE40B550, LE40B551<br />
LE40B553, LE40B554<br />
10°C bis 40°C<br />
10% bis 80%, nicht kon<strong>de</strong>nsierend<br />
-20°C bis 45°C<br />
5% bis 95%, nicht kon<strong>de</strong>nsierend<br />
-20˚ ~ 20˚<br />
LE46B550, LE46B551<br />
LE46B553, LE46B554<br />
Bildschirmgröße<br />
(Diagonal) 40 Zoll 46 Zoll<br />
PC-Auflösung<br />
(Optimal) 1920 x 1080 bei 60 Hz 1920 x 1080 bei 60 Hz<br />
Ton<br />
(Ausgang) 2 x 10 W 2 x 10 W<br />
Abmessungen (BxTxH)<br />
Gehäuse<br />
Mit Fuß<br />
982 x 79 x 626 mm<br />
982 x 255 x 676 mm<br />
1116 x 79 x 706 mm<br />
1116 X 275 X 770 mm<br />
Gewicht<br />
Mit Fuß 18 kg 23 kg<br />
Umgebungsbedingungen<br />
Betriebstemperatur<br />
Luftfeuchtigkeit (bei Betrieb)<br />
Lagerungstemperatur<br />
Luftfeuchtigkeit (Lagerung)<br />
Drehbarer Fuß<br />
(Links und rechts)<br />
N<br />
N<br />
N<br />
10°C bis 40°C<br />
10% bis 80%, nicht kon<strong>de</strong>nsierend<br />
-20°C bis 45°C<br />
5% bis 95%, nicht kon<strong>de</strong>nsierend<br />
-20˚ ~ 20˚<br />
Än<strong>de</strong>rungen <strong>de</strong>r technischen Daten und <strong>de</strong>s Geräte-Designs vorbehalten.<br />
Dies ist ein digitales Gerät <strong>de</strong>r Klasse B.<br />
Die technischen Daten zur benötigten Netzspannung fin<strong>de</strong>n Sie auf <strong>de</strong>m Etikett am Produkt.<br />
Deutsch - 45
❑<br />
❑<br />
Notifications pour le téléviseur numérique<br />
1. Les fonctions relatives au téléviseur numérique (DVB) ne sont disponibles que dans les pays ou régions où <strong>de</strong>s signaux<br />
terrestres numériques <strong>de</strong> type DVB-T (MPEG2 et MPEG4 AVC) sont diffusés ou dans lesquels vous avez accès à un service<br />
<strong>de</strong> télévision par câble compatible DVB-C (MPEG2 et MPEG4 AAC). Consultez votre distributeur local pour connaître les<br />
possibilités <strong>de</strong> réception <strong>de</strong>s signaux DVB-T ou DVB-C.<br />
2. DVB-T est la norme du consortium européen pour la diffusion <strong>de</strong> signaux terrestres <strong>de</strong> télévision numérique. La norme DVB-<br />
C est quant à elle prévue pour la diffusion <strong>de</strong>s signaux <strong>de</strong> télévision numérique par câble. Certaines fonctions particulières,<br />
telles que le gui<strong>de</strong> électronique <strong>de</strong>s programmes (Electric Program Gui<strong>de</strong> - EPG), la vidéo à la <strong>de</strong>man<strong>de</strong> (Vi<strong>de</strong>o on Demand<br />
- VOD), etc., ne sont toutefois pas incluses dans cette spécification. Elles ne seront par conséquent pas traitées pour l'instant.<br />
3. Bien que ce téléviseur soit conforme aux <strong>de</strong>rnières normes DVB-T et DVB-C (août 2008), il n'est pas garanti qu'il soit<br />
compatible avec les futures diffusions <strong>de</strong> signaux numériques terrestres DVB-T et par câble DVB-C.<br />
4. En fonction du pays ou <strong>de</strong> la région où vous vous trouvez, certains opérateurs <strong>de</strong> télévision par câble peuvent facturer <strong>de</strong>s<br />
fr<strong>ais</strong> supplémentaires pour un tel service. Vous <strong>de</strong>vrez aussi peut-être accepter les termes et conditions <strong>de</strong> ces sociétés.<br />
5. Il se peut que certaines fonctions <strong>de</strong> TV numérique ne soient pas disponibles dans certains pays ou certaines régions et que<br />
la réception <strong>de</strong>s signaux DVB-C ne soit pas correcte avec tous les opérateurs.<br />
6. Pour plus d'informations, contactez votre service client <strong>Samsung</strong>.<br />
Précautions à prendre lors <strong>de</strong> l'affichage d'une image fixe<br />
Une image fixe peut occasionner <strong>de</strong>s dommages irrémédiables à l'écran du téléviseur.<br />
● N'affichez pas d'image fixe sur l'écran LCD pendant plus <strong>de</strong> 2 heures car cela pourrait provoquer une rémanence <strong>de</strong> l'image<br />
à l'écran. Cette rémanence <strong>de</strong> l'image est également appelée ‘brûlure <strong>de</strong> l'écran’. Pour l'éviter, réduisez la luminosité et le<br />
contraste <strong>de</strong> l'écran lorsque vous affichez une image fixe.<br />
●<br />
L'affichage sur l'écran LCD du téléviseur d'images au format 4:3 pendant une pério<strong>de</strong> prolongée peut l<strong>ais</strong>ser<br />
<strong>de</strong>s traces <strong>de</strong> bordures à gauche, à droite et au centre <strong>de</strong> l'écran, dues à la différence d'émission <strong>de</strong> lumière<br />
sur celui-ci. La lecture d'un DVD ou l'utilisation d'une console <strong>de</strong> jeu peut avoir un effet similaire sur l'écran.<br />
Les dommages occasionnés par l'effet précité ne sont pas couverts par la garantie.<br />
● L'affichage d'images fixes <strong>de</strong> jeux vidéo et d'ordinateurs pendant une pério<strong>de</strong> excessive peut produire <strong>de</strong>s rémanences. Pour<br />
éviter cela, réduisez la ‘luminosité’ et le ‘contraste’ lors <strong>de</strong> l'affichage d'images fixes.<br />
© 2009 <strong>Samsung</strong> Electronics Co., Ltd. Tous droits réservés.
Sommaire<br />
Installation du téléviseur<br />
■ Présentation du panneau <strong>de</strong> comman<strong>de</strong>........................................... 2<br />
■ Accessoires........................................................................................ 3<br />
■ Présentation du panneau <strong>de</strong> branchement........................................ 4<br />
■ Présentation <strong>de</strong> la télécomman<strong>de</strong>...................................................... 6<br />
■ Insertion <strong>de</strong>s piles dans la télécomman<strong>de</strong>......................................... 7<br />
■ Affichage <strong>de</strong>s menus.......................................................................... 7<br />
■ Mise en mo<strong>de</strong> veille <strong>de</strong> votre téléviseur............................................. 8<br />
■ Fonction Plug & Play.......................................................................... 8<br />
■ Visualisation <strong>de</strong> l’affichage................................................................. 9<br />
Canal<br />
■ Menu Canal........................................................................................ 9<br />
■ Gestion <strong>de</strong>s chaînes ....................................................................... 12<br />
Image<br />
■ Configuration du menu Image.......................................................... 14<br />
■ Utilisation <strong>de</strong> votre téléviseur comme écran d'ordinateur (PC)........ 18<br />
■ Configuration du téléviseur avec le PC............................................ 19<br />
SON<br />
■ Configuration du menu Son............................................................. 20<br />
■ Sélection du mo<strong>de</strong> son..................................................................... 21<br />
Configuration<br />
■ Configuration du menu Setup.......................................................... 22<br />
■ Réglage <strong>de</strong> l'heure........................................................................... 24<br />
ENTRÉE / ASSISTANCE<br />
■ Menu Entrée..................................................................................... 26<br />
■ Menu Assistance.............................................................................. 26<br />
Media Play (USB)<br />
■ Connexion d'un périphérique USB................................................... 28<br />
■ Fonction Media Play......................................................................... 29<br />
■ Menu d'options <strong>de</strong> la liste <strong>de</strong>s photos.............................................. 30<br />
■ Visualisation d'une photo ou d'un diaporama................................... 31<br />
■ Menu d'options du diaporama.......................................................... 32<br />
■ Menu d'options <strong>de</strong> la liste musicale.................................................. 33<br />
■ Lecture <strong>de</strong> musique.......................................................................... 34<br />
■ Menu d'options <strong>de</strong> lecture <strong>de</strong> musique............................................. 35<br />
■ Utilisation du menu Setup................................................................ 35<br />
ANYNET+<br />
■ Connexion <strong>de</strong> périphériques Anynet+.............................................. 36<br />
■ Configuration d'Anynet+................................................................... 37<br />
■ Commutation entre périphériques Anynet+...................................... 37<br />
■ Enregistrement................................................................................. 38<br />
■ Écoute via un récepteur (home cinéma).......................................... 38<br />
■ Dépannage d'Anynet+...................................................................... 39<br />
RECOMMENDATIONS<br />
■ Fonction Télétexte............................................................................ 40<br />
■ Montage du socle............................................................................. 41<br />
■ Branchement du socle..................................................................... 42<br />
■ Installation du kit <strong>de</strong> montage mural................................................ 42<br />
■ Assemblage <strong>de</strong>s câbles................................................................... 42<br />
■ Verrou antivol Kensington................................................................ 42<br />
■ Sécurisation <strong>de</strong> l'emplacement d'installation.................................... 43<br />
■ Fixation du téléviseur au mur........................................................... 43<br />
■ Dépannage : Avant <strong>de</strong> contacter un technicien................................ 44<br />
■ Caractéristiques............................................................................... 45<br />
Franç<strong>ais</strong><br />
❑<br />
Licence<br />
TruSurround HD, SRS et le symbole sont <strong>de</strong>s marques déposées <strong>de</strong> SRS Labs, Inc. La technologie<br />
TruSurround HD est intégrée à cet appareil sous licence consentie par SRS Labs, Inc.<br />
Fabriqué sous licence <strong>de</strong> Dolby Laboratories. Dolby et le symbole du double D sont <strong>de</strong>s marques déposées<br />
<strong>de</strong> Dolby Laboratories.<br />
❑<br />
Symboles<br />
N O T<br />
Remarque Bouton tactile Bouton TOOLS Appuyez sur<br />
Franç<strong>ais</strong> -
8<br />
Installation du téléviseur<br />
N<br />
Les figures et illustrations contenues dans ce mo<strong>de</strong> d'emploi sont fournies pour référence uniquement. Elles peuvent différer<br />
<strong>de</strong> l'aspect réel du produit. La conception et les caractéristiques du produit peuvent être modifiées sans avertissement afin<br />
d'améliorer ses performances.<br />
¦<br />
Présentation du panneau <strong>de</strong> comman<strong>de</strong><br />
N<br />
N<br />
La couleur et la forme du produit peuvent varier en fonction du modèle.<br />
Pour activer les boutons situés en face avant, effleurez-les avec votre doigt.<br />
8<br />
7 6 5 4 3 2 1<br />
6<br />
5<br />
4<br />
3<br />
2<br />
1<br />
8<br />
78<br />
1 P (PUISSANCE): Permet d'allumer et d'éteindre le téléviseur.<br />
2 TEMOIN D'ALIMENTATION : Clignote et s'éteint lorsqu'il est sous tension et s'allume en mo<strong>de</strong> veille.<br />
3 z : Permet <strong>de</strong> changer <strong>de</strong> chaîne. Dans le menu à l'écran, utilisez les boutons z <strong>de</strong> la même façon que les<br />
boutons ▼ et ▲ <strong>de</strong> la télécomman<strong>de</strong>.<br />
4 Y : Permet d'augmenter ou <strong>de</strong> b<strong>ais</strong>ser le volume.<br />
Dans le menu à l'écran, utilisez les boutons Y <strong>de</strong> la même façon que les boutons ◄ et ► <strong>de</strong> la télécomman<strong>de</strong>.<br />
5 MENU: Permet d'afficher un menu à l'écran <strong>de</strong>s fonctions du téléviseur.<br />
6 SOURCE E: Bascule entre toutes les sources d'entrée disponibles. Dans le menu à l'écran, utilisez ce bouton <strong>de</strong> la même<br />
façon que le bouton ENTERE <strong>de</strong> la télécomman<strong>de</strong>.<br />
7 CAPTEUR DE LA TÉLÉCOMMANDE: Dirigez la télécomman<strong>de</strong> vers ce point du téléviseur.<br />
8 HAUT-PARLEURS<br />
Franç<strong>ais</strong> -
¦<br />
Accessoires<br />
Télécomman<strong>de</strong> et piles (2 x AAA) Cordon d'alimentation Couvercle-Fond<br />
(M4 X L16)<br />
Carte <strong>de</strong> garantie /<br />
<strong>Manuel</strong> <strong>de</strong> sécurité<br />
(non disponible dans certains pays)<br />
Vis <strong>de</strong> socle X 4<br />
(En fonction du modèle)<br />
Chiffon <strong>de</strong> nettoyage<br />
Serre-câbles<br />
(En fonction du modèle)<br />
N<br />
N<br />
Vérifiez que les éléments suivants sont fournis avec votre téléviseur LCD. S'il manque <strong>de</strong>s éléments, contactez votre<br />
reven<strong>de</strong>ur.<br />
La couleur et la forme <strong>de</strong>s éléments peuvent varier en fonction du modèle.<br />
Franç<strong>ais</strong> -
¦<br />
Présentation du panneau <strong>de</strong> branchement<br />
[Panneau latéral<br />
du téléviseur]<br />
[Panneau arrière du téléviseur]<br />
1 2<br />
34<br />
#<br />
2<br />
@<br />
!<br />
0 9 8 7 6 5<br />
Entrée <strong>de</strong><br />
l'alimentation<br />
N<br />
La couleur et la forme du produit peuvent varier en fonction du modèle.<br />
1 COMPONENT IN<br />
Pour raccor<strong>de</strong>r une prise vidéo / audio à composantes.<br />
2 HDMI IN 1, 2, 3(DVI), 4 / DVI AUDIO IN<br />
Pour raccor<strong>de</strong>r la fiche HDMI d'un périphérique équipé d'une sortie HDMI.<br />
N<br />
N<br />
<br />
<br />
N<br />
N<br />
N<br />
Aucune connexion audio n'est nécessaire pour une connexion HDMI-HDMI.<br />
Qu'est-ce que HDMI ?<br />
HDMI (High-Definition Multimedia Interface) est une interface qui permet la transmission <strong>de</strong>s signaux audio et vidéo<br />
numériques à l'ai<strong>de</strong> d'un seul câble.<br />
Entre le périphérique HDMI et le périphérique DVI la différence rési<strong>de</strong> dans la taille, le HDMI étant plus petit.<br />
Il se peut que le téléviseur n'émette aucun son et que les images s'affichent dans <strong>de</strong>s couleurs anormales en cas <strong>de</strong><br />
connexion d'un lecteur DVD, d'un lecteur Blu-ray, d'un déco<strong>de</strong>ur câble ou d'un récepteur satellite compatible avec <strong>de</strong>s<br />
versions <strong>de</strong> l'interface HDMI antérieures à HDMI 1.3. Si, lorsque vous branchez un câble HDMI <strong>de</strong> génération antérieure,<br />
aucun son n'est émis, connectez le câble HDMI à la prise HDMI IN 3 (DVI) et les câbles audio aux prises DVI AUDIO<br />
IN situées à l'arrière du téléviseur. Dans ce cas, contactez la société ayant fourni le lecteur DVD, le lecteur Blu-ray, le<br />
déco<strong>de</strong>ur câble ou le récepteur satellite afin <strong>de</strong> vérifier la version <strong>de</strong> l'interface HDMI, puis <strong>de</strong>man<strong>de</strong>z une mise à jour <strong>de</strong><br />
celui-ci.<br />
Utilisez la prise HDMI IN 3 (DVI) pour une connexion DVI à un périphérique externe. Utilisez un câble ou un adaptateur<br />
DVI-HDMI pour la connexion vidéo et les prises DVI AUDIO IN pour le son. Lorsque vous utilisez une connexion avec<br />
câble HDMI/DVI, vous <strong>de</strong>vez utiliser la prise HDMI IN 3 (DVI).<br />
Les câbles HDMI qui ne sont pas <strong>de</strong> version 1.3 peuvent provoquer <strong>de</strong>s nuisances à l’écran ou une absence d’image.<br />
3 PC IN [PC] / [AUDIO]<br />
Pour raccor<strong>de</strong>r les fiches <strong>de</strong> sortie audio et vidéo <strong>de</strong> votre PC.<br />
N<br />
N<br />
Si votre PC dispose d'une prise HDMI, vous pouvez la relier à la borne HDMI IN 1, 2, 3 (DVI) ou 4.<br />
Si votre PC dispose d'une prise DVI, vous pouvez la relier à la borne HDMI IN 3 (DVI) / DVI AUDIO IN.<br />
4 ANT IN<br />
Pour raccor<strong>de</strong>r une antenne ou un système <strong>de</strong> câblodiffusion.<br />
5 Verrou KENSINGTON (en fonction du modèle)<br />
Le verrou Kensington (en option) est un dispositif permettant <strong>de</strong> fixer physiquement le système en cas d'utilisation dans un<br />
lieu public. Si vous désirez utiliser un dispositif <strong>de</strong> verrouillage, contactez le reven<strong>de</strong>ur auquel vous avez acheté le téléviseur.<br />
N L'emplacement du verrou Kensington peut varier en fonction du modèle.<br />
Franç<strong>ais</strong> -
6 H (CASQUE)<br />
Un casque peut être connecté à la sortie casque du poste. Lorsque le casque est branché, les haut-parleurs intégrés<br />
n'émettent plus <strong>de</strong> son.<br />
N<br />
N<br />
N<br />
N<br />
L’utilisation <strong>de</strong> la fonction Son est limitée lorsqu’un casque est connecté au téléviseur.<br />
L'utilisation prolongée d'un casque à un niveau sonore élevé peut endommager l'ouïe.<br />
Aucun son n'est émis <strong>de</strong>puis les enceintes lorsque vous connectez le casque au téléviseur.<br />
Le volume du casque et celui du téléviseur sont réglés séparément.<br />
7 DIGITAL AUDIO OUT (OPTICAL)<br />
Pour raccor<strong>de</strong>r un composant audio numérique tel qu'un récepteur home cinéma.<br />
N<br />
N<br />
N<br />
Lorsqu'un système audio numérique est relié à la prise DIGITAL AUDIO OUT (OPTICAL): réduisez le volume du<br />
téléviseur et réglez le volume à l'ai<strong>de</strong> du système audio numérique.<br />
L'audio 5.1 est disponible si le téléviseur est relié à un appareil externe le prenant en charge.<br />
Lorsque le récepteur (home cinéma) est activé, vous pouvez écouter le son sortant <strong>de</strong> la prise optique du téléviseur.<br />
Lorsque le téléviseur affiche un signal DTV (Hertzien), il envoie un son canal 5.1 au récepteur du home cinéma. Lorsque<br />
la source est un composant numérique (par exemple, un DVD, un lecteur Blu-ray, un déco<strong>de</strong>ur câble ou un récepteur<br />
satellite) connecté au téléviseur en HDMI, le récepteur home cinéma n'émet le son que sur 2 canaux. Pour obtenir du son<br />
en 5.1, reliez la prise <strong>de</strong> sortie audio numérique du lecteur DVD, du lecteur Blu-ray, du déco<strong>de</strong>ur câble ou du récepteur<br />
satellite directement à un amplificateur ou un système home cinéma, et non au téléviseur.<br />
8 SERVICE<br />
Prise pour tests uniquement.<br />
9 AUDIO OUT [R-AUDIO-L]<br />
Pour raccor<strong>de</strong>r la fiche d'entrée audio <strong>de</strong> votre amplificateur ou système home cinéma.<br />
Lorsqu'un amplificateur audio est relié aux prises AUDIO OUT [R-AUDIO-L] : réduisez le volume du téléviseur et réglez le<br />
volume à l'ai<strong>de</strong> <strong>de</strong> l'amplificateur.<br />
0 EXT1, 2<br />
Entrées ou sorties pour périphériques externes tels que <strong>de</strong>s magnétoscopes, <strong>de</strong>s lecteurs DVD, <strong>de</strong>s consoles <strong>de</strong> jeux vidéo<br />
ou <strong>de</strong>s lecteurs <strong>de</strong> vidéodisques.<br />
N<br />
<br />
En mo<strong>de</strong> EXT, la sortie DTV prend uniquement en charge les signaux audio et vidéo MPEG SD.<br />
Spécifications entrée/sortie<br />
Connecteur<br />
Entrée<br />
Sortie<br />
Vidéo Audio (G / D) RVB Vidéo + Audio (G / D)<br />
EXT 1 O O O Seule la sortie TV ou DTV est disponible.<br />
EXT 2 O O X Sortie que vous pouvez sélectionner.<br />
! AV IN [VIDEO] / [R-AUDIO-L]<br />
Entrées audio et vidéo pour périphériques externes, tels qu'un caméscope ou un magnétoscope.<br />
@ USB<br />
Prise utilisée pour les mises à jour logicielles, la fonction Media Play, etc.<br />
# Emplacement COMMON INTERFACE<br />
Si vous n’insérez pas la carte d’interface commune ‘CI(CI+) CARD’ dans certains canaux, le message ‘Signal brouillé’<br />
s’affiche.<br />
Les informations <strong>de</strong> pairage contenant un numéro <strong>de</strong> téléphone, l’ID <strong>de</strong> la carte d’interface commune ‘CI(CI+) CARD’,<br />
l’ID <strong>de</strong> l’hôte et d’autres informations s’afficheront dans 2 ou 3 minutes. Si un message d'erreur s'affiche, contactez votre<br />
fournisseur <strong>de</strong> service.<br />
Lorsque la configuration <strong>de</strong>s informations sur les chaînes est terminée, le message ‘Updating Completed’ s'affiche,<br />
indiquant que la liste <strong>de</strong>s chaînes est à jour.<br />
N Vous <strong>de</strong>vez vous procurer une carte d’interface commune ‘CI(CI+) CARD’ auprès d’un fournisseur local <strong>de</strong> câblodiffusion.<br />
Extrayez la carte d’interface commune ‘CI(CI+) CARD’ en la tirant délicatement. Une chute pourrait l’endommager.<br />
N Insérez la carte d’interface commune ‘CI(CI+) CARD’ dans le sens indiqué sur celle-ci.<br />
N L'emplacement <strong>de</strong> la fente COMMON INTERFACE peut varier en fonction du modèle.<br />
N La carte d’interface commune ‘CI(CI+) CARD’ n’est pas prise en charge dans certains pays et certaines régions ; vérifiez<br />
auprès <strong>de</strong> votre reven<strong>de</strong>ur agréé.<br />
N La fonction CI+ n’est applicable qu’au modèle LE********P.<br />
Si vous rencontrez <strong>de</strong>s problèmes, contactez le prestataire <strong>de</strong> service.<br />
Franç<strong>ais</strong> -
¦<br />
Présentation <strong>de</strong> la télécomman<strong>de</strong><br />
N<br />
N<br />
N<br />
Vous pouvez utiliser la télécomman<strong>de</strong> jusqu'à une distance maximale d'environ 7 m du téléviseur.<br />
Une lumière intense peut affecter le bon fonctionnement <strong>de</strong> la télécomman<strong>de</strong>.<br />
La couleur et la forme du produit peuvent varier en fonction du modèle.<br />
1 POWER : Pour allumer et<br />
éteindre la télévision.<br />
2 TOUCHES NUMÉRIQUES :<br />
Permettent <strong>de</strong> changer <strong>de</strong><br />
chaîne.<br />
3 FAV.CH : Affiche la liste <strong>de</strong>s<br />
chaînes favorites à l'écran.<br />
4 Y : Permet d'augmenter<br />
ou <strong>de</strong> b<strong>ais</strong>ser le volume.<br />
5 SOURCE : Permet d'afficher et<br />
<strong>de</strong> sélectionner les sources vidéo<br />
disponibles.<br />
6 INFO : Permet d'afficher <strong>de</strong>s<br />
informations sur l'écran du<br />
téléviseur.<br />
7 TOOLS: Permet <strong>de</strong> sélectionner<br />
rapi<strong>de</strong>ment les fonctions<br />
fréquemment utilisées.<br />
8 CH LIST : Permet d'afficher la<br />
liste <strong>de</strong>s chaînes sur l'écran du<br />
téléviseur.<br />
9 BOUTONS DE COULEUR :<br />
utilisez ces boutons dans les<br />
menus Channel list, Media<br />
Play, etc.<br />
! DUAL : sélection d'effets<br />
sonores.<br />
@ Utilisez ces boutons avec les<br />
mo<strong>de</strong>s Media Play et Anynet+.<br />
(∏ : cette télécomman<strong>de</strong> peut<br />
être utilisée pour contrôler les<br />
enregistreurs <strong>Samsung</strong> avec la<br />
fonction Anynet+.)<br />
# TV : Sélectionne directement le<br />
mo<strong>de</strong> TV.<br />
$ PRE-CH : Vous permet <strong>de</strong><br />
revenir à la chaîne que vous<br />
regardiez précé<strong>de</strong>mment.<br />
% MUTE M : Vous permet <strong>de</strong><br />
couper le son temporairement.<br />
^ > P < : Permet <strong>de</strong> changer <strong>de</strong><br />
chaîne.<br />
& MENU : Affiche le menu principal<br />
à l'écran.<br />
* GUIDE : Affichage du gui<strong>de</strong><br />
électronique <strong>de</strong>s programmes<br />
(EPG).<br />
( RETURN : Revient au menu<br />
précé<strong>de</strong>nt<br />
) HAUT▲ / BAS▼ / GAUCHE◄<br />
/ DROITE► / ENTERE :<br />
Permettent <strong>de</strong> sélectionner <strong>de</strong>s<br />
options <strong>de</strong> menu à l'écran et <strong>de</strong><br />
modifier <strong>de</strong>s valeurs <strong>de</strong> menu.<br />
a EXIT : Permet <strong>de</strong> quitter le menu.<br />
b P.SIZE : sélection <strong>de</strong> la taille <strong>de</strong><br />
l'image.<br />
c MEDIA.P : Permet <strong>de</strong> lire les<br />
fichiers <strong>de</strong> musique et les<br />
images.<br />
d SUBT. : Affichage numérique <strong>de</strong>s<br />
sous-titres.<br />
e AD : Sélection <strong>de</strong> la <strong>de</strong>scription<br />
audio.<br />
Fonctions Télétexte<br />
5 0 : Sélection du mo<strong>de</strong><br />
Télétexte (LIST/FLOF).<br />
6 5 : Activation du télétexte.<br />
7 4 : Sélection <strong>de</strong> la taille du<br />
télétexte.<br />
8 8 : Mémorisation du télétexte.<br />
9 Sélection <strong>de</strong>s rubriques Fastext<br />
0 / : Sélection alternative <strong>de</strong><br />
Teletext, Double ou Mix.<br />
# : : fermer l'affichage du<br />
télétexte.<br />
$ 1 : Page secondaire du<br />
télétexte.<br />
^ 2 : Page <strong>de</strong> télétexte suivante<br />
3 : Page <strong>de</strong> télétexte<br />
précé<strong>de</strong>nte.<br />
& 6 : In<strong>de</strong>x du télétexte<br />
( 9 : Pause du télétexte.<br />
a 7 : Annulation du télétexte.<br />
1 #<br />
2<br />
3<br />
4<br />
5<br />
6<br />
7<br />
8<br />
9<br />
0<br />
!<br />
@<br />
INFO<br />
CH LIST<br />
AD<br />
$<br />
%<br />
^<br />
&<br />
*<br />
(<br />
)<br />
a<br />
b<br />
c<br />
d<br />
e<br />
Franç<strong>ais</strong> -
¦<br />
Insertion <strong>de</strong>s piles dans la télécomman<strong>de</strong><br />
1. Soulevez le couvercle au dos <strong>de</strong> la télécomman<strong>de</strong> comme illustré dans la figure.<br />
2. Placez-y <strong>de</strong>ux piles AAA.<br />
N Assurez-vous que les pôles ‘+’ et ‘–’ <strong>de</strong>s piles correspon<strong>de</strong>nt au schéma situé à<br />
l'intérieur du compartiment.<br />
3. Replacez le couvercle.<br />
N Retirez les piles et stockez-les dans un endroit fr<strong>ais</strong> et sec si vous n'utilisez pas la<br />
télécomman<strong>de</strong> pendant longtemps. (Les piles <strong>de</strong>vraient durer environ un an en cas d'usage normal).<br />
N Si la télécomman<strong>de</strong> ne fonctionne pas, vérifiez les points suivants:<br />
Le téléviseur est-il sous tension?<br />
Les bornes + et - <strong>de</strong>s piles ne sont-elles pas inversées?<br />
Les piles sont-elles déchargées?<br />
Le cordon d'alimentation est-il débranché ou y a-t-il une panne <strong>de</strong> courant?<br />
Une lampe fluorescente ou néon est-elle allumée à proximité?<br />
¦<br />
Affichage <strong>de</strong>s menus<br />
Avant d'utiliser le téléviseur, procé<strong>de</strong>z comme suit pour apprendre à naviguer dans le menu afin <strong>de</strong> sélectionner et <strong>de</strong> régler les<br />
différentes fonctions.<br />
Bouton MENU<br />
Afficher le menu principal à l'écran.<br />
INFO<br />
ENTERE / Boutons DIRECTIONNELS<br />
Déplace le curseur pour sélectionner un<br />
élément. Vali<strong>de</strong> l'élément actuellement<br />
sélectionné. Confirmer un paramétrage.<br />
Bouton RETURN<br />
Revient au menu précé<strong>de</strong>nt.<br />
EXIT<br />
Fermer le menu affiché à l'écran.<br />
❑<br />
Maniement <strong>de</strong> l'affichage à l'écran<br />
L'étape d'accès peut varier en fonctoin du menu sélectionné.<br />
1. Appuyez sur le bouton MENU.<br />
AD<br />
INFO<br />
2. Le menu principal apparaît à l'écran. Plusieurs icônes s’affichent sur le côté gauche du<br />
menu: Image, Son, Canal, Configuration, Entrée, Application, Assistance.<br />
3. Appuyez sur le bouton ▲ ou ▼ pour sélectionner l'une <strong>de</strong>s icônes.<br />
Image<br />
Mo<strong>de</strong> : Moyen ▶<br />
Contre-jour : 7<br />
Contraste : 95<br />
Luminosité : 45<br />
Netteté : 50<br />
Couleur : 50<br />
Teinte (V/R)<br />
: V50/R50<br />
Réglages INFO avancés<br />
AD<br />
4. Appuyez ensuite sur le bouton ENTERE pour accé<strong>de</strong>r au sous-menu <strong>de</strong> l'icône.<br />
5. Appuyez sur le bouton ▲ ou ▼ pour sélectionner l'un <strong>de</strong>s sous-menus <strong>de</strong> l'icône.<br />
6. Appuyez sur le bouton ◄ ou ► pour diminuer ou augmenter la valeur d'un élément<br />
spécifique. Les informations affichées à l'écran peuvent varier en fonction du menu<br />
sélectionné.<br />
7. Appuyez sur le bouton ENTERE pour finir la configuration. Appuyez sur le bouton EXIT<br />
pour quitter.<br />
Image<br />
▲<br />
Contre-jour<br />
▼<br />
Mo<strong>de</strong><br />
: Moyen<br />
Contre-jour : 7 ▶<br />
Contraste<br />
AD<br />
: 95<br />
Luminosité : 45<br />
Netteté : 50<br />
Couleur : 50<br />
Teinte (V/R)<br />
: V50/R50<br />
Réglages avancés<br />
Options d'image<br />
7<br />
U Déplacer L Régler E Entrer R Retour<br />
Icône <strong>de</strong> l’Ai<strong>de</strong><br />
Franç<strong>ais</strong> -
¦<br />
Mise en mo<strong>de</strong> veille <strong>de</strong> votre téléviseur<br />
Vous pouvez mettre votre téléviseur en mo<strong>de</strong> Veille afin <strong>de</strong> réduire la consommation électrique. Le mo<strong>de</strong> veille peut être utile si<br />
vous souhaitez éteindre votre téléviseur temporairement (pendant un repas par exemple).<br />
1. Appuyez sur le bouton POWERP <strong>de</strong> la télécomman<strong>de</strong>.<br />
N L'écran s'éteint et un voyant <strong>de</strong> veille apparaît sur votre téléviseur.<br />
2. Pour rallumer le téléviseur, appuyez <strong>de</strong> nouveau sur le bouton POWERP.<br />
N Ne l<strong>ais</strong>sez pas le téléviseur en mo<strong>de</strong> Veille pendant <strong>de</strong> longues pério<strong>de</strong>s (lorsque vous êtes en vacances par exemple). Il<br />
est conseillé <strong>de</strong> débrancher le téléviseur du secteur et <strong>de</strong> l'antenne.<br />
¦<br />
Fonction Plug & Play<br />
Lorsque vous allumez le téléviseur pour la première fois, <strong>de</strong>s réglages <strong>de</strong> base s'effectuent<br />
l'un après l'autre <strong>de</strong> manière automatique.<br />
1. Appuyez sur le bouton POWER <strong>de</strong> la télécomman<strong>de</strong>.<br />
N<br />
N<br />
Vous pouvez également utiliser le bouton POWERP du téléviseur.<br />
Le message Select the OSD Language. s'affiche à l'écran.<br />
2. Appuyez sur le bouton ENTERE. Sélectionnez la langue <strong>de</strong> votre choix en appuyant sur<br />
le bouton ▲ ou ▼. Appuyez sur le bouton ENTERE pour confirmer votre choix.<br />
3. Appuyez sur le bouton ◄ ou ► pour sélectionner Démo magasin ou Util. à domicile,<br />
puis appuyez sur le bouton ENTERE.<br />
N<br />
N<br />
N<br />
Nous recommandons <strong>de</strong> régler le téléviseur sur le mo<strong>de</strong> Util. domicile pour une<br />
meilleure qualité d'image dans votre environnement personnel.<br />
Démo magasin n'est prévu que pour un usage en magasin.<br />
Si l'unité est acci<strong>de</strong>ntellement réglée sur le mo<strong>de</strong> Démo magasin et que vous souhaitez revenir au mo<strong>de</strong> Util. domicile<br />
(Standard): Appuyez sur le bouton Volume du téléviseur. Lorsque l'affichage écran du volume apparaît, appuyez pendant<br />
5 secon<strong>de</strong>s sur le bouton MENU du téléviseur.<br />
4. Appuyez sur le bouton ENTERE. Sélectionnez le pays approprié en appuyant sur le bouton ▲ ou ▼. Appuyez sur le bouton<br />
ENTERE pour confirmer votre choix.<br />
5. Appuyez sur le bouton ▲ ou ▼ pour sélectionner Hertzien ou Câble, puis appuyez sur le bouton ENTERE.<br />
N<br />
N<br />
Hertzien: signal d'antenne aérienne.<br />
Câble: signal d'antenne câble.<br />
6. Appuyez sur le bouton ▲ ou ▼ pour sélectionner la source <strong>de</strong> chaîne à mémoriser. Appuyez sur le bouton ENTERE pour<br />
AD<br />
sélectionner Démarrer.<br />
N Lors du réglage <strong>de</strong> la source d'antenne sur Câble, une fenêtre s'affiche, qui vous permet <strong>de</strong> définir une valeur pour la<br />
recherche <strong>de</strong> chaîne numérique. Pour plus d'informations, reportez-vous à Canal → Mémorisation Auto.<br />
N Numérique et Analogique: Chaînes numériques et analogiques.<br />
Numérique: Chaînes numériques.<br />
Analogique: Canal analogique.<br />
N La recherche <strong>de</strong> chaînes démarre et se termine automatiquement.<br />
N Appuyez sur le bouton ENTERE à tout moment pour interrompre la mémorisation.<br />
N Une fois toutes les chaînes disponibles mémorisées, le message Définit le mo<strong>de</strong> Horloge s'affiche.<br />
7. Appuyez sur le bouton ENTERE. Appuyez sur le bouton ▲ ou ▼ pour sélectionner Auto., puis appuyez sur le bouton<br />
ENTERE.<br />
N<br />
N<br />
Si vous sélectionnez <strong>Manuel</strong>, le message Définit la date et l’heure s'affiche.<br />
Si vous recevez un signal numérique, l'heure se règle automatiquement. Sinon, sélectionnez <strong>Manuel</strong> pour régler<br />
l'horloge.<br />
8. La <strong>de</strong>scription relative à la métho<strong>de</strong> <strong>de</strong> connexion fournissant la meilleure qualité d'image en HD s'affiche à l'écran. Lisez-la<br />
puis appuyez sur le bouton ENTERE.<br />
9. Le message Profitez <strong>de</strong> votre téléviseur. s'affiche. Lorsque vous avez terminé, appuyez sur le bouton ENTERE.<br />
INFO<br />
Plug & Play<br />
Select the OSD Language.<br />
Menu Language : English ▶<br />
E Enter<br />
Si vous souhaitez réinitialiser cette fonction...<br />
1. Appuyez sur le bouton MENU pour afficher le menu. Appuyez sur le bouton ▲ ou ▼ pour<br />
sélectionner Configuration, puis sur le bouton ENTERE.<br />
2. Appuyez <strong>de</strong> nouveau sur le bouton ENTERE pour sélectionner Plug & Play.<br />
3. Entrez votre co<strong>de</strong> PIN à quatre chiffres. Le co<strong>de</strong> PIN par défaut d'un nouveau téléviseur<br />
est ‘0-0-0-0’.<br />
N<br />
N<br />
Si vous voulez modifier le co<strong>de</strong> PIN, utilisez la fonction Modifier PIN.<br />
La fonction Plug & Play est uniquement disponible en mo<strong>de</strong> TV.<br />
Configuration<br />
Plug & Play<br />
Langue <strong>de</strong>s menus<br />
Horloge<br />
Diffuser<br />
Sécurité<br />
Général<br />
: Franç<strong>ais</strong><br />
▶<br />
Franç<strong>ais</strong> -
¦<br />
Visualisation <strong>de</strong> l’affichage<br />
L’affichage i<strong>de</strong>ntifie la chaîne en cours et l’état <strong>de</strong> certains paramètres audio et vidéo.<br />
O Appuyez sur le bouton INFO pour afficher les informations.<br />
INFO<br />
Appuyez sur le bouton INFO <strong>de</strong> la télécomman<strong>de</strong>. La télévision affiche la chaîne, le type<br />
<strong>de</strong> son et l’état <strong>de</strong> certains paramètres <strong>de</strong> son et d’image.<br />
● ▲, ▼: Vous pouvez afficher <strong>de</strong>s informations relatives à une autre chaîne. Pour<br />
accé<strong>de</strong>r à la chaîne actuellement sélectionnée, appuyez sur le bouton ENTERE.<br />
● ◄, ►: Vous pouvez afficher les informations relatives au programme souhaité <strong>de</strong> la<br />
chaîne actuelle.<br />
N Appuyez <strong>de</strong> nouveau sur le bouton INFO ou atten<strong>de</strong>z environ 10 secon<strong>de</strong>s pour que<br />
l’affichage dispar<strong>ais</strong>se automatiquement.<br />
abc1<br />
DTV Air<br />
15<br />
18:11 Thu 6 Jan<br />
Life On Venus Avenue<br />
Unclassified<br />
No Detaild Information<br />
AD<br />
18:00 ~ 6:00<br />
E Watch<br />
' Information<br />
Canal<br />
¦<br />
❑<br />
■<br />
■<br />
❑<br />
■<br />
Menu Canal<br />
Pays<br />
Canal analogique<br />
Permet <strong>de</strong> changer <strong>de</strong> pays pour les chaînes analogiques.<br />
Canal numérique<br />
Permet <strong>de</strong> changer <strong>de</strong> pays pour les chaînes numériques.<br />
N L'écran <strong>de</strong> s<strong>ais</strong>ie du co<strong>de</strong> PIN s'affiche. Entrez votre co<strong>de</strong> PIN à quatre chiffres.<br />
Mémorisation Auto<br />
Vous pouvez chercher les plages <strong>de</strong> fréquence disponibles par balayage (leur disponibilité dépend <strong>de</strong> votre pays). Il est possible<br />
que les numéros <strong>de</strong> programme attribués automatiquement ne correspon<strong>de</strong>nt pas aux numéros <strong>de</strong> programme souhaités ou réels.<br />
N<br />
Si une chaîne est verrouillée par la fonction Verrouillage Canal, la fenêtre <strong>de</strong> s<strong>ais</strong>ie du co<strong>de</strong> PIN s'affiche.<br />
Hertzien / Câble<br />
Source d'antenne à mémoriser<br />
● Numérique et Analogique: Chaînes numériques et analogiques.<br />
● Numérique: Chaînes numériques.<br />
● Analogique: Canal analogique.<br />
Canal<br />
Pays<br />
Mémorisation Auto<br />
Mémorisation <strong>Manuel</strong>le<br />
Gui<strong>de</strong> Complet<br />
Mini Gui<strong>de</strong><br />
Par défaut<br />
Liste <strong>de</strong>s chaînes<br />
Mo<strong>de</strong> Canal<br />
: Gui<strong>de</strong> Complet<br />
▶<br />
Lors <strong>de</strong> la sélection <strong>de</strong> Câble → Numérique et Analogique ou <strong>de</strong> Câble → Numérique :<br />
Fournissez une valeur à rechercher pour les chaînes câblées.<br />
● Mo<strong>de</strong> <strong>de</strong> recherche → Complet / Réseau / Rapi<strong>de</strong><br />
N Rapi<strong>de</strong><br />
Network ID : affiche le co<strong>de</strong> d'i<strong>de</strong>ntification du réseau.<br />
Fréquence : affiche la fréquence correspondant au canal (varie d'un pays à l'autre).<br />
Modulation: affiche les valeurs <strong>de</strong> modulation disponibles.<br />
Taux <strong>de</strong> symbole: affiche les débits <strong>de</strong> symboles disponibles.<br />
N<br />
N<br />
Cherche toutes les chaînes avec <strong>de</strong>s stations <strong>de</strong> diffusion actives et les enregistre dans la mémoire du téléviseur.<br />
Pour arrêter la mémorisation automatique, appuyez sur le bouton ENTERE.<br />
Le message Arrêter le programme automatique? s'affiche.<br />
Sélectionnez Oui en appuyant sur le bouton◄ ou ►puis appuyez sur le bouton ENTERE.<br />
Franç<strong>ais</strong> -
❑<br />
■<br />
■<br />
❑<br />
Mémorisation <strong>Manuel</strong>le<br />
N<br />
N<br />
Permet <strong>de</strong> chercher manuellement une chaîne et <strong>de</strong> l'enregistrer dans la mémoire du téléviseur.<br />
Si une chaîne est verrouillée par la fonction Verrouillage Canal, la fenêtre <strong>de</strong> s<strong>ais</strong>ie du co<strong>de</strong> PIN s'affiche.<br />
Canal numérique<br />
Enregistrement manuel <strong>de</strong> chaînes numériques.<br />
N<br />
●<br />
●<br />
●<br />
N<br />
Canal numérique est uniquement disponible en mo<strong>de</strong> DTV.<br />
Canal: Sélectionnez le numéro <strong>de</strong> chaîne à l'ai<strong>de</strong> <strong>de</strong>s boutons ▲, ▼ ou <strong>de</strong>s chiffres (0-9).<br />
Fréquence : Sélectionnez la fréquence à l'ai<strong>de</strong> <strong>de</strong>s chiffres.<br />
Ban<strong>de</strong> passante : Sélectionnez la ban<strong>de</strong> passante à l'ai<strong>de</strong> <strong>de</strong>s boutons ▲, ▼ ou <strong>de</strong>s chiffres (0-9).<br />
Au terme <strong>de</strong> la recherche, les chaînes <strong>de</strong> la liste sont mises à jour.<br />
Canal analogique<br />
Enregistrement manuel <strong>de</strong> chaînes analogiques.<br />
● Programme (numéro <strong>de</strong> programme à attribuer à une chaîne): Sélectionnez le numéro <strong>de</strong> chaîne à l'ai<strong>de</strong> <strong>de</strong>s boutons ▲, ▼<br />
ou <strong>de</strong>s chiffres (0-9).<br />
● Système <strong>de</strong> Couleur → Auto. / PAL / SECAM / NTSC4.43: Sélectionnez le système <strong>de</strong> couleurs à l'ai<strong>de</strong> du bouton ▲ ou ▼.<br />
● Système Sonore → BG / DK / I / L: Sélectionnez le système audio à l'ai<strong>de</strong> du bouton ▲ ou ▼.<br />
● Canal (si vous conn<strong>ais</strong>sez le numéro <strong>de</strong> la chaîne à mémoriser): Appuyez sur le bouton ▲ ou ▼ pour sélectionner C (chaîne<br />
hertzienne) ou S (chaîne câblée). Appuyez sur le bouton ►, puis sur le bouton ▲ ou ▼ ou un chiffre (0~9) pour sélectionner<br />
le numéro <strong>de</strong> votre choix.<br />
N Vous pouvez également sélectionner le numéro <strong>de</strong> chaîne directement en appuyant sur les touches numériques (0~9).<br />
N Si aucun son ne sort ou si le son produit est anormal, sélectionnez <strong>de</strong> nouveau la norme son requise.<br />
● Recherche (lorsque vous ne conn<strong>ais</strong>sez pas les numéros <strong>de</strong> chaîne) : Appuyez sur le bouton ▲ ou ▼ pour lancer la<br />
recherche. Le syntoniseur balaie la plage <strong>de</strong> fréquences jusqu'à ce que vous receviez la première chaîne ou la chaîne que<br />
vous avez sélectionnée à l'écran.<br />
● Mémoriser (permet <strong>de</strong> mémoriser la chaîne et le numéro <strong>de</strong> programme correspondant): Sélectionnez OK en appuyant sur le<br />
bouton ENTERE.<br />
N<br />
<br />
<br />
<br />
Mo<strong>de</strong> Canal<br />
P (Mo<strong>de</strong> Programme) : à la fin du réglage, <strong>de</strong>s numéros <strong>de</strong> position compris entre P00 et P99 sont attribués aux stations<br />
<strong>de</strong> radiodiffusion <strong>de</strong> votre région. Dans ce mo<strong>de</strong>, vous pouvez sélectionner un chaîne en s<strong>ais</strong>issant son numéro <strong>de</strong><br />
position.<br />
C (Mo<strong>de</strong> chaîne hertzienne) : dans ce mo<strong>de</strong>, vous pouvez sélectionner une chaîne en s<strong>ais</strong>issant le numéro attribué à<br />
chacune <strong>de</strong>s stations <strong>de</strong> télédiffusion.<br />
S (Mo<strong>de</strong> chaîne câblée) : dans ce mo<strong>de</strong>, vous pouvez sélectionner une chaîne en s<strong>ais</strong>issant le numéro attribué à<br />
chacune <strong>de</strong>s chaînes câblées.<br />
Option <strong>de</strong> recherche <strong>de</strong> câble (en fonction du pays)<br />
Définit <strong>de</strong>s options supplémentaires telles que la fréquence et le débit <strong>de</strong> symboles pour les recherches sur réseau câblé.<br />
● Fréq. début (Frequency Start): définit la fréquence <strong>de</strong> démarrage (différente dans chaque pays).<br />
● Fréq. fin (Frequency Stop): définit la fréquence d'arrêt (différente dans chaque pays).<br />
● Modulation: affiche les valeurs <strong>de</strong> modulation disponibles.<br />
● Taux <strong>de</strong> symbole: affiche les débits <strong>de</strong> symboles disponibles.<br />
❑<br />
■<br />
■<br />
Gui<strong>de</strong> Complet / Mini Gui<strong>de</strong><br />
Les informations relatives au gui<strong>de</strong> électronique <strong>de</strong>s programmes (EPG) sont fournies par les diffuseurs. Des entrées <strong>de</strong><br />
programmes peuvent être vi<strong>de</strong>s ou ne pas être à jour en r<strong>ais</strong>on <strong>de</strong>s informations diffusées sur un canal donné. L'affichage est<br />
automatiquement actualisé dès que <strong>de</strong> nouvelles informations sont disponibles.<br />
O Vous pouvez aussi afficher le gui<strong>de</strong> en appuyant simplement sur le bouton GUIDE (pour configurer Par défaut, reportez-vous<br />
aux <strong>de</strong>scriptions).<br />
Gui<strong>de</strong> Complet<br />
Affiche le programme heure par heure. Deux heures <strong>de</strong> programme sont affichées et vous pouvez faire défiler le programme en<br />
avançant ou en remontant dans le temps.<br />
Mini Gui<strong>de</strong><br />
Les informations <strong>de</strong> chaque programme sont affichées ligne par ligne sur l'écran du mini-gui<strong>de</strong> <strong>de</strong> la chaîne actuelle, en<br />
commençant par le programme en cours, dans l'ordre <strong>de</strong>s heures <strong>de</strong> début <strong>de</strong>s programmes.<br />
Franç<strong>ais</strong> - 10
❑<br />
❑<br />
❑<br />
■<br />
■<br />
❑<br />
Par défaut → Gui<strong>de</strong> Complet / Mini Gui<strong>de</strong><br />
Vous pouvez choisir d'afficher le Gui<strong>de</strong> Complet ou le Mini Gui<strong>de</strong> lorsque vous appuyez sur le bouton GUIDE <strong>de</strong> la<br />
télécomman<strong>de</strong>.<br />
Liste <strong>de</strong>s chaînes<br />
Pour obtenir plus <strong>de</strong> détails sur les procédures d'utilisation <strong>de</strong> la Liste <strong>de</strong>s chaînes, reportez-vous aux instructions <strong>de</strong><br />
Gestion <strong>de</strong>s chaînes.<br />
O Vous pouvez sélectionner ces options en appuyant sur le bouton CH LIST <strong>de</strong> la télécomman<strong>de</strong>.<br />
Mo<strong>de</strong> <strong>de</strong>s chaînes<br />
Lorsque vous appuyez sur le bouton P >/
¦<br />
Gestion <strong>de</strong>s chaînes<br />
Ce menu permet d'ajouter/supprimer ou définir <strong>de</strong>s chaînes favorites et d'utiliser le gui<strong>de</strong> <strong>de</strong>s programmes pour les émissions<br />
numériques.<br />
■<br />
■<br />
■<br />
Tous les canaux<br />
Affiche toutes les chaînes actuellement disponibles.<br />
Chaînes ajoutées<br />
Affiche toutes les chaînes ajoutées.<br />
Favoris<br />
Affiche toutes les chaînes favorites.<br />
O Pour sélectionner les chaînes favorites que vous avez configurées, appuyez sur le bouton<br />
FAV.CH <strong>de</strong> la télécomman<strong>de</strong>.<br />
Chaînes ajoutées<br />
824 UKTV Gold<br />
825 UKTV style<br />
A 1 C --<br />
A 2 C --<br />
A 3 C --<br />
A 4 C --<br />
A 5 C --<br />
A 6 C --<br />
A 7 C --<br />
A 8 C --<br />
Tous Type <strong>de</strong> canal Zoom Sélection T Outils<br />
■<br />
Programmé<br />
Affiche tous les programmes actuellement réservés.<br />
N Sélectionnez une chaîne sur l'écran Tous les canaux, Chaînes ajoutées ou Favoris en appuyant sur le boutons ▲ / ▼, puis<br />
sur le bouton ENTERE. Vous pouvez alors regar<strong>de</strong>r la chaîne sélectionnée.<br />
N Utilisation <strong>de</strong>s boutons <strong>de</strong> couleur dans la liste <strong>de</strong>s chaînes<br />
<br />
<br />
<br />
<br />
Rouge (Type <strong>de</strong> canal) : Permet <strong>de</strong> basculer entre TV, Radio, Donn/autre et Tous.<br />
Vert (Zoom) : Agrandit ou réduit un numéro <strong>de</strong> chaîne.<br />
Jaune (Sélection): Sélectionne plusieurs listes <strong>de</strong> chaînes. Vous pouvez appliquer les fonctions d'ajout/suppression ou<br />
ajout/suppression <strong>de</strong> favoris à plusieurs chaînes à la fois. Sélectionnez les chaînes voulues, puis appuyez sur le bouton<br />
jaune pour traiter toutes les chaînes sélectionnées à la fois. La marque c s'affiche à gauche <strong>de</strong>s chaînes sélectionnées.<br />
TOOLS (Outils) : Affiche le menu Supprimer (ou Ajouter), Ajouter aux favoris (ou Supprimer <strong>de</strong>s favoris), Verrouil.<br />
(ou Déverr.), Rappel <strong>de</strong> prog., Modifi. nom <strong>de</strong> chaîne, Modif. numéro chaîne, Tri <strong>de</strong>s canaux, Sélectionner tout (ou<br />
Désélectionner tout), Mémorisation Auto. (Les menus Options peuvent varier en fonction <strong>de</strong> la situation.)<br />
N Icônes d'état <strong>de</strong>s chaînes<br />
A : chaîne analogique.<br />
c : chaîne sélectionnée en appuyant sur le bouton jaune.<br />
* : Chaîne définie comme favorite.<br />
( : Programme en cours <strong>de</strong> diffusion.<br />
\ : Chaîne verrouillée.<br />
) : Programme réservé.<br />
Menu d'options <strong>de</strong> la liste <strong>de</strong>s chaînes (dans Tous les canaux / Chaînes ajoutées / Favoris)<br />
N<br />
N<br />
Appuyez sur le bouton TOOLS pour utiliser le menu d'options.<br />
Les éléments du menu Options peuvent varier selon l'état <strong>de</strong> la chaîne.<br />
■<br />
Ajouter / Supprimer<br />
Vous pouvez supprimer ou ajouter une chaîne afin d'afficher les chaînes <strong>de</strong> votre choix.<br />
N<br />
N<br />
N<br />
N<br />
Toutes les chaînes supprimées apparaîtront dans le menu Tous les canaux.<br />
Une chaîne grisée est une chaîne qui a été supprimée.<br />
Le menu Ajouter s'affiche uniquement pour les chaînes supprimées.<br />
Vous pouvez également supprimer une chaîne du menu Chaînes ajoutées ou Favoris <strong>de</strong><br />
la même manière.<br />
Tous les canaux<br />
824 UKTV Gold<br />
825 UKTV style<br />
A 1 C --<br />
A 2 C --<br />
A 3 C --<br />
A 4 C --<br />
A 5 C --<br />
A 6 C --<br />
A 7 C --<br />
A 8 C --<br />
Supprimer<br />
Ajouter aux favoris<br />
Verrouil.<br />
Rappel <strong>de</strong> prog.<br />
Modifi. nom <strong>de</strong> chaîne<br />
Tri <strong>de</strong>s canaux<br />
<br />
■<br />
■<br />
Ajouter aux favoris / Supprimer <strong>de</strong>s favoris<br />
Vous pouvez définir comme favorites les chaînes que vous regar<strong>de</strong>z souvent.<br />
T<br />
N<br />
N<br />
Appuyez sur le bouton TOOLS pour afficher le menu Outils. Vous pouvez également définir l'ajout aux (ou suppression <strong>de</strong>s)<br />
favoris en sélectionnant Outils → Ajouter aux favoris (ou Supprimer <strong>de</strong>s favoris).<br />
Le symbole ‘*’ s’affiche et la chaîne est définie comme favorite.<br />
Toutes les chaînes favorites apparaîtront dans le menu Favoris.<br />
Verrouil. / Déverr.<br />
Vous pouvez verrouiller une chaîne afin qu'elle ne puisse pas être sélectionnée ni visualisée.<br />
N<br />
N<br />
N<br />
N<br />
Tous Type <strong>de</strong> canal Zoom Sélection T Outils<br />
Cette fonction n'est disponible que si l'option Verrouillage Canal est définie sur Mar..<br />
L'écran <strong>de</strong> s<strong>ais</strong>ie du co<strong>de</strong> PIN s'affiche. Entrez votre co<strong>de</strong> PIN à quatre chiffres.<br />
Le co<strong>de</strong> PIN par défaut d'un nouveau téléviseur est ‘0-0-0-0’. Vous pouvez modifier le co<strong>de</strong> PIN en sélectionnant Modifier PIN<br />
dans le menu.<br />
Le symbole ‘\’ s'affiche et la chaîne est verrouillée.<br />
Franç<strong>ais</strong> - 12
■<br />
■<br />
■<br />
■<br />
■<br />
■<br />
Rappel <strong>de</strong> prog.<br />
Si vous réservez un programme que vous souhaitez regar<strong>de</strong>r, la chaîne bascule automatiquement vers la chaîne réservée dans<br />
la liste <strong>de</strong> chaînes, même si vous êtes en train <strong>de</strong> regar<strong>de</strong>r une autre chaîne. Pour réserver un programme, réglez d'abord l'heure<br />
actuelle<br />
N<br />
N<br />
N<br />
N<br />
Il n'est possible <strong>de</strong> réserver que <strong>de</strong>s chaînes mémorisées.<br />
Vous pouvez régler directement la chaîne, le jour, le mois, l'heure et les minutes à l'ai<strong>de</strong> <strong>de</strong>s touches numériques <strong>de</strong> la<br />
télécomman<strong>de</strong>.<br />
Les programmes réservés appar<strong>ais</strong>sent dans le menu Programmé.<br />
Gui<strong>de</strong> <strong>de</strong>s programmes numérique et affichage <strong>de</strong>s réservations<br />
Quand une chaîne numérique est sélectionnée et que vous appuyez sur le bouton ►, le Gui<strong>de</strong> <strong>de</strong>s programmes <strong>de</strong> la chaîne<br />
s'affiche. Vous pouvez réserver un programme en suivant les procédures décrites ci-<strong>de</strong>ssus.<br />
Modifi. nom <strong>de</strong> chaîne (chaînes analogiques uniquement)<br />
Vous pouvez attribuer aux chaînes un libellé qui s'affiche chaque fois que vous les sélectionnez.<br />
N Les noms <strong>de</strong>s chaînes numériques leur sont automatiquement attribués ; vous ne pouvez pas les modifier.<br />
Modif. numéro chaîne (chaînes numériques uniquement)<br />
Vous pouvez également modifier le numéro <strong>de</strong> chaîne à l'ai<strong>de</strong> du pavé numérique <strong>de</strong> la télécomman<strong>de</strong>.<br />
Tri <strong>de</strong>s canaux (chaînes analogiques uniquement)<br />
Cette opération permet <strong>de</strong> changer les numéros <strong>de</strong> programme <strong>de</strong>s chaînes mémorisées. Cette opération peut s'avérer<br />
nécessaire après l'utilisation <strong>de</strong> la mémorisation automatique.<br />
Sélectionner tout / Désélectionner tout<br />
● Sélectionner tout: Vous pouvez sélectionner toutes les chaînes <strong>de</strong> la liste <strong>de</strong>s chaînes.<br />
● Désélectionner tout : Vous pouvez désélectionner toutes les chaînes sélectionnées.<br />
N La fonction Désélectionner tout n'est disponible que si au moins une chaîne est sélectionnée.<br />
Mémorisation Auto<br />
N<br />
N<br />
Pour la procédure détaillée du réglage <strong>de</strong>s options, reportez-vous à la rubrique "Menu Canal".<br />
Si une chaîne est verrouillée par la fonction Verrouillage Canal, la fenêtre <strong>de</strong> s<strong>ais</strong>ie du co<strong>de</strong> PIN s'affiche.<br />
Menu d'options <strong>de</strong> la liste <strong>de</strong>s chaînes (dans Programmé)<br />
Vous pouvez voir, modifier ou supprimer une réservation.<br />
N Appuyez sur le bouton TOOLS pour utiliser le menu d'options.<br />
■<br />
■<br />
■<br />
■<br />
Infos modif.<br />
Permet <strong>de</strong> modifier une réservation.<br />
Annuler progr.<br />
Permet d'annuler une réservation.<br />
Information<br />
Permet <strong>de</strong> visualiser une réservation<br />
(et d'en changer les données).<br />
Sélectionner tout<br />
Permet <strong>de</strong> sélectionner tous les programmes réservés.<br />
Programmé<br />
1 / 1 / 2009<br />
13:59 5 TV1 ) Infos modif.<br />
Annuler progr.<br />
18:59 2 TV3 ) The Information Equalizer<br />
20:59 2 TV3 ) McMillan Sélectionner & Wife tout<br />
21:59 2 TV3 ) M.Spillane’s mike<br />
Tous Zoom Sélection T Outils E Information<br />
Franç<strong>ais</strong> - 13
Image<br />
¦<br />
Configuration du menu Image<br />
❑<br />
■<br />
■<br />
Mo<strong>de</strong><br />
Vous pouvez sélectionner le type d'image correspondant le mieux à vos besoins d'affichage.<br />
T Appuyez sur le bouton TOOLS pour afficher le menu Outils. Vous pouvez également<br />
définir le mo<strong>de</strong> d'image en sélectionnant Outils → Mo<strong>de</strong> Image.<br />
Dynamique<br />
Sélectionne l'image pour un affichage à plus haute définition dans une pièce lumineuse.<br />
Standard<br />
Sélectionne l'image pour un affichage optimal dans un environnement normal.<br />
Image<br />
Mo<strong>de</strong> : Standard ▶<br />
Rétroéclairage : 7<br />
Contraste : 95<br />
Luminosité : 45<br />
Netteté : 50<br />
Couleur : 50<br />
Teinte (V/R)<br />
: V50/R50<br />
Paramètres avancés<br />
■<br />
Naturel<br />
Sélectionne l'image pour un affichage optimal et confortable pour les yeux.<br />
N Cette fonction n'est pas disponible en mo<strong>de</strong> PC.<br />
■<br />
Film<br />
Sélectionne l'image pour un affichage agréable <strong>de</strong> films dans une pièce sombre.<br />
❑<br />
Rétroéclairage / Contraste / Luminosité / Netteté / Couleur / Teinte (V/R)<br />
Votre téléviseur offre <strong>de</strong> plusieurs options <strong>de</strong> paramétrage qui permettent <strong>de</strong> contrôler la qualité<br />
d'image.<br />
●<br />
●<br />
●<br />
●<br />
●<br />
●<br />
N<br />
N<br />
N<br />
N<br />
N<br />
▲<br />
Rétroéclairage<br />
▼<br />
Rétroéclairage : Règle la luminosité du rétroéclairage <strong>de</strong> l'écran LCD.<br />
Contraste : Règle le niveau <strong>de</strong> contraste <strong>de</strong> l'image.<br />
Luminosité : Règle le niveau <strong>de</strong> luminosité <strong>de</strong> l'image.<br />
Netteté : Règle la définition <strong>de</strong>s bords <strong>de</strong> l'image.<br />
Couleur : Règle la saturation <strong>de</strong> couleur <strong>de</strong> l'image.<br />
Teinte (V/R) : Règle la teinte <strong>de</strong> l'image.<br />
Dans les mo<strong>de</strong>s analogiques TV, Ext., AV du système PAL, vous ne pouvez pas utiliser la fonction Teinte (V/R).<br />
U Déplacer L Régler E Entrer R Retour<br />
Lorsque vous modifiez les paramètres Rétroéclairage, Contraste, Luminosité, Netteté, Couleur ou Teinte (V/R) l'affichage<br />
écran change en conséquence.<br />
En mo<strong>de</strong> PC, vous ne pouvez modifier que les options Rétroéclairage, Contraste et Luminosité.<br />
Vous pouvez régler et enregistrer <strong>de</strong>s paramètres pour chaque périphérique externe connecté à une entrée du téléviseur.<br />
Vous pouvez réduire sensiblement l'énergie consommée en cours d'utilisation en b<strong>ais</strong>sant le niveau <strong>de</strong> luminosité <strong>de</strong> l'image,<br />
<strong>de</strong> façon à diminuer le coût <strong>de</strong> fonctionnement général.<br />
7<br />
❑<br />
■<br />
■<br />
■<br />
Paramètres avancés<br />
Les nouveaux téléviseurs <strong>Samsung</strong> permettent d'effectuer <strong>de</strong>s réglages d'image encore plus<br />
précis que les modèles précé<strong>de</strong>nts.<br />
N<br />
N<br />
Paramètres avancés est disponible dans les mo<strong>de</strong>s Standard et Film.<br />
En mo<strong>de</strong> PC, vous ne pouvez modifier que les paramètres Contraste Dynam., Gamma et<br />
Balance blancs parmi les options du menu Paramètres avancés.<br />
Nuance <strong>de</strong> noir → Arr. / Sombre / Plus sombre / Le plus sombre<br />
Vous pouvez choisir le niveau <strong>de</strong> noir pour régler la profon<strong>de</strong>ur <strong>de</strong> l'écran.<br />
Contraste Dynam. → Arr. / Bas / Moyen / Elevé<br />
Vous pouvez régler le contraste <strong>de</strong> l'écran pour obtenir un résultat optimal.<br />
Gamma<br />
Vous pouvez régler l'intensité <strong>de</strong>s couleurs primaires (rouge, vert, bleu).<br />
Paramètres avancés<br />
Nuance <strong>de</strong> noir : Arr. ▶<br />
Contraste Dynam.<br />
: Moyen<br />
Gamma : 0<br />
Espace couleur<br />
: Natif<br />
Balance blancs<br />
Carnation : 0<br />
Netteté <strong>de</strong>s contours<br />
: Mar.<br />
U Déplacer E Entrer R Retour<br />
Franç<strong>ais</strong> - 14
■<br />
■<br />
■<br />
■<br />
■<br />
Espace couleur<br />
Un espace colorimétrique est une matrice <strong>de</strong> couleurs composée <strong>de</strong> rouge, <strong>de</strong> vert et <strong>de</strong> bleu. Sélectionnez votre espace<br />
colorimétrique préféré et appréciez la couleur la plus naturelle.<br />
●<br />
●<br />
●<br />
Auto.: règle automatiquement la nuance <strong>de</strong> couleur la plus naturelle sur la base <strong>de</strong>s sources <strong>de</strong> programme.<br />
Natif: offre une nuance <strong>de</strong> couleur profon<strong>de</strong> et riche.<br />
Personnel: permet <strong>de</strong> régler l'espace colorimétrique en fonction <strong>de</strong> vos préférences.<br />
N<br />
N<br />
La modification <strong>de</strong>s valeurs <strong>de</strong> réglage actualise l'affichage à l'écran.<br />
Vous pouvez régler et enregistrer <strong>de</strong>s paramètres pour chaque périphérique externe connecté à une entrée du téléviseur.<br />
Par exemple, si vous avez un lecteur <strong>de</strong> DVD connecté à la prise HDMI 1 et s'il est sélectionné, les paramètres et<br />
réglages seront enregistrés pour le lecteur <strong>de</strong> DVD.<br />
<br />
<br />
<br />
<br />
<br />
Couleur: Rouge, Vert, Bleu, Jaune, Cyan ou Magenta<br />
N<br />
N<br />
N<br />
Couleur est disponible lorsque Espace couleur est réglé sur Personnel.<br />
Dans Couleur, vous pouvez régler les valeurs RVB <strong>de</strong> la couleur sélectionnée.<br />
Pour réinitialiser les valeurs RVB, sélectionnez Réinit..<br />
Rouge: Règle le niveau <strong>de</strong> saturation en rouge <strong>de</strong> la couleur sélectionnée.<br />
Vert: Règle le niveau <strong>de</strong> saturation en vert <strong>de</strong> la couleur sélectionnée.<br />
Bleu : Règle le niveau <strong>de</strong> saturation en bleu <strong>de</strong> la couleur sélectionnée.<br />
Réinit.: rétablit les valeurs par défaut <strong>de</strong> l'espace <strong>de</strong> couleur.<br />
Balance blancs<br />
Vous pouvez régler la température <strong>de</strong>s couleurs pour que celles-ci soient plus naturelles.<br />
● Aj. Rouge: Règle la profon<strong>de</strong>ur du rouge.<br />
● Aj. Vert : Règle la profon<strong>de</strong>ur du vert.<br />
● Aj. Bleu : Règle la profon<strong>de</strong>ur du bleu.<br />
● Regl. Rouge: Règle la luminosité du rouge.<br />
● Regl. vert: Règle la luminosité du vert.<br />
● Regl. bleu: Règle la luminosité du bleu.<br />
● Réinit.: les valeurs par défaut <strong>de</strong> l'équilibrage du blanc réglé précé<strong>de</strong>mment sont rétablies.<br />
Carnation<br />
Vous pouvez accentuer le ‘ton chair’ <strong>de</strong> l'image.<br />
N La modification <strong>de</strong>s valeurs <strong>de</strong> réglage actualise l'affichage à l'écran.<br />
Netteté <strong>de</strong>s contours → Arr. / Mar.<br />
Vous pouvez faire ressortir les contours <strong>de</strong>s objets dans l'image.<br />
xvYCC → Arr. / Mar.<br />
L'activation du mo<strong>de</strong> xvYCC augmente les détails et agrandit l'espace colorimétrique lors <strong>de</strong> l'affichage <strong>de</strong>s films provenant d'un<br />
appareil externe (lecteur <strong>de</strong> DVD, etc.) relié à la prise HDMI ou Component IN.<br />
N xvYCC est disponible lorsque le mo<strong>de</strong> d'image est réglé sur Film et lorsque l'entrée externe est en mo<strong>de</strong> HDMI ou<br />
Component.<br />
N Il se peut que cette fonction ne soit pas prise en charge sur votre périphérique.<br />
Franç<strong>ais</strong> - 15
❑<br />
■<br />
■<br />
■<br />
■<br />
■<br />
Options d'image<br />
N<br />
En mo<strong>de</strong> PC, vous ne pouvez modifier que les paramètres Nuance Coul. et Format parmi<br />
les options du menu Options d'image.<br />
Nuance Coul. → Froi<strong>de</strong> / Normal / Chau<strong>de</strong>1 / Chau<strong>de</strong>2 / Chau<strong>de</strong>3<br />
N<br />
N<br />
Chau<strong>de</strong>1, Chau<strong>de</strong>2 ou Chau<strong>de</strong>3 ne sont activées que si le mo<strong>de</strong> d'image est Film.<br />
Vous pouvez régler et enregistrer <strong>de</strong>s paramètres pour chaque périphérique externe<br />
connecté à une entrée du téléviseur.<br />
Taille<br />
Vous pouvez parfois modifier la taille <strong>de</strong> l’image sur votre écran. Votre télévsieur dispose <strong>de</strong><br />
plusieurs options relatives à la taille <strong>de</strong> l'écran, chacune d'entre elles étant conçue pour fonctionner au mieux avec un certain type<br />
d'entrée vidéo. Votre décou<strong>de</strong>ur câble / récepteur satellite peut également avoir son propre jeu <strong>de</strong> tailles d'écran. Toutefois, il est<br />
conseillé d’utiliser le mo<strong>de</strong> 16:9, autant que possible.<br />
O<br />
●<br />
●<br />
●<br />
●<br />
●<br />
●<br />
N<br />
N<br />
N<br />
N<br />
N<br />
N<br />
N<br />
N<br />
N<br />
Vous pouvez sélectionner ces options en appuyant sur le bouton P.SIZE <strong>de</strong> la télécomman<strong>de</strong>.<br />
16/9 auto : règle automatiquement la taille <strong>de</strong> l'image sur le format 16:9.<br />
16:9 : règle la taille <strong>de</strong> l'image sur 16:9 <strong>de</strong> façon appropriée pour les DVD ou la diffusion au format cinémascope.<br />
Zoom large : agrandit l'image à une taille supérieure à 4:3.<br />
Zoom : agrandit l'image en 16:9 (dans le sens vertical) pour l'adapter à la taille <strong>de</strong> l'écran.<br />
4:3 : paramètre par défaut pour un film vidéo ou une diffusion normale.<br />
Adapter à l'écran : Permet <strong>de</strong> voir l'intégralité <strong>de</strong> l'image sans coupure lors <strong>de</strong> l'entrée <strong>de</strong> signaux HDMI (720p / 1080i /<br />
1080p) ou Composant(1080i / 1080p).<br />
Les options <strong>de</strong> taille <strong>de</strong> l'image peuvent varier en fonction <strong>de</strong> la source d'entrée.<br />
Les options disponibles peuvent varier en fonction du mo<strong>de</strong> sélectionné.<br />
En mo<strong>de</strong> PC, seuls les mo<strong>de</strong>s 16:9 et 4:3 peuvent être réglés.<br />
Vous pouvez régler et enregistrer <strong>de</strong>s paramètres pour chaque périphérique externe connecté à une entrée du téléviseur.<br />
Une rémanence temporaire peut se produire si vous affichez une image statique pendant plus <strong>de</strong> <strong>de</strong>ux heures sur l'écran du<br />
téléviseur.<br />
Zoom large : Appuyez sur le bouton ► pour sélectionner Position, puis appuyez sur le bouton ENTERE. Appuyez sur le<br />
bouton ▲ ou ▼ pour déplacer l'image vers le haut ou vers le bas. Appuyez ensuite sur le bouton ENTERE.<br />
Zoom : Appuyez sur le bouton ► pour sélectionner Position, puis appuyez sur le bouton ENTERE. Appuyez sur le bouton<br />
▲ ou ▼ pour déplacer l'image vers le haut et vers le bas. Appuyez ensuite sur le bouton ENTERE. Appuyez sur le bouton<br />
► pour sélectionner Taille, puis appuyez sur le bouton ENTERE. Appuyez sur le bouton ▲ ou ▼ pour augmenter ou<br />
réduire la hauteur <strong>de</strong> l'image. Appuyez ensuite sur le bouton ENTERE.<br />
Après avoir sélectionné l’option Adapter à l'écran en mo<strong>de</strong> HDMI (1080i / 1080p) ou Composant (1080i / 1080p):<br />
sélectionnez Position à l'ai<strong>de</strong> du bouton ◄ ou ►. Utilisez le bouton ▲, ▼, ◄ ou ► pour déplacer l'image.<br />
Réinit.: Appuyez sur le bouton◄ ou ►pour sélectionner Réinit., puis sur le bouton ENTERE. Vous pouvez initialiser le<br />
réglage.<br />
Si vous utilisez la fonction Adapter à l'écran avec l'entrée HDMI 720p, une ligne sera coupée en haut, en bas, à gauche et à<br />
droite, comme avec la fonction Overscan.<br />
Mo<strong>de</strong> écran → 16:9 / Zoom large / Zoom / 4:3<br />
Lorsque vous réglez la taille <strong>de</strong> l' image sur 16/9 auto sur un téléviseur 16:9, vous pouvez déterminer la taille d'affichage d'une<br />
image 4:3 WSS (Wi<strong>de</strong> Screen Service/service d'écran large) ou choisir <strong>de</strong> ne rien afficher pour ce format. Chaque pays européen<br />
impose une taille d'image différente ; cette fonction permet aux utilisateurs <strong>de</strong> sélectionner la leur.<br />
●<br />
●<br />
●<br />
●<br />
N<br />
N<br />
16:9 : règle l'image en mo<strong>de</strong> large, c'est-à-dire en 16:9.<br />
Zoom large: agrandit l'image à une taille supérieure à 4:3.<br />
Zoom: agrandit la taille <strong>de</strong> l'image sur l'écran dans le sens vertical.<br />
4:3: règle l'image en mo<strong>de</strong> normal, c'est-à-dire en 4:3.<br />
Cette fonction n'est disponible qu'en mo<strong>de</strong> 16/9 auto.<br />
Cette fonction n'est pas disponible en mo<strong>de</strong> PC, Composant ni HDMI.<br />
Nuance Coul. : Normal ▶<br />
NR numérique → Arr. / Bas / Moyen / Elevé / Auto.<br />
Si le signal <strong>de</strong> radiodiffusion reçu est faible, vous pouvez activer la fonction Digital Noise Reduction pour faciliter la réduction<br />
d'images fantômes ou statiques qui peuvent apparaître à l'écran.<br />
N Lorsque le signal est faible, sélectionnez une autre option jusqu'à obtention <strong>de</strong> la meilleure image possible.<br />
Niv. noir HDMI → Normal / Bas<br />
Vous pouvez choisir le niveau <strong>de</strong> noir pour régler la profon<strong>de</strong>ur <strong>de</strong> l'écran.<br />
N Cette fonction n'est active que si un appareil externe est reliée au téléviseur via la prise HDMI (signaux RVB).<br />
Taille<br />
Mo<strong>de</strong> écran : 16:9<br />
NR numérique<br />
Niv. noir HDMI<br />
Mo<strong>de</strong> Film<br />
Mo<strong>de</strong> bleu uniquement<br />
Options d'image<br />
: 16/9 auto<br />
: Auto.<br />
: Normal<br />
: Arr.<br />
: Arr.<br />
U Déplacer E Entrer R Retour<br />
Franç<strong>ais</strong> - 16
■<br />
■<br />
❑<br />
Mo<strong>de</strong> Film → Arr. / Auto.1 / Auto.2<br />
Vous pouvez régler le téléviseur <strong>de</strong> sorte qu'il détecte et traite automatiquement les signaux <strong>de</strong> cinéma <strong>de</strong> toutes les sources et<br />
adapte l'image pour obtenir une qualité optimale.<br />
N<br />
●<br />
●<br />
●<br />
Mo<strong>de</strong> Film n'est prise en charge que dans TV, AV, COMPONENT(480i / 1080i) et HDMI(480i / 1080i).<br />
Arr. : désactive la fonction Film Mo<strong>de</strong>.<br />
Auto.1 : règle automatiquement l'image afin d'obtenir une qualité optimale lors du visionnage d'un film.<br />
Auto.2 : Optimise automatiquement le texte vidéo affiché l'écran (à l'exception <strong>de</strong>s sous-titres) lors du visionnage d'un film.<br />
Mo<strong>de</strong> bleu uniquement → Arr. / Mar.<br />
Cette fonction est <strong>de</strong>stinée aux spécialistes <strong>de</strong> mesure <strong>de</strong>s appareils AV. Elle affiche uniquement le signal bleu en éliminant<br />
les signaux rouge et vert du signal vidéo <strong>de</strong> manière à créer un effet <strong>de</strong> filtre bleu utilisé pour régler ca Couleur et la teinte <strong>de</strong>s<br />
appareils vidéo (lecteurs <strong>de</strong> DVD, home cinéma, etc.). Cette fonction vous permet <strong>de</strong> régler la couleur et la teinte sur les valeurs<br />
les plus adaptées au signal <strong>de</strong> chaque appareil vidéo à l'ai<strong>de</strong> <strong>de</strong>s mires <strong>de</strong> couleur rouge / verte / bleue / cyan / magenta / jaune,<br />
et ce, sans <strong>de</strong>voir utiliser <strong>de</strong> filtre bleu externe.<br />
N Mo<strong>de</strong> bleu uniquement est disponible lorsque le mo<strong>de</strong> d'image est réglé sur Film ou Standard.<br />
Réinitialisation <strong>de</strong> l'image → Réinitial. mo<strong>de</strong> image / Annuler<br />
Rétablit tous les paramètres <strong>de</strong>s images aux valeurs par défaut.<br />
N Réinitial. mo<strong>de</strong> image : rétablit les paramètres par défaut pour les valeurs <strong>de</strong> l'image actuelle.<br />
Franç<strong>ais</strong> - 17
¦<br />
Utilisation <strong>de</strong> votre téléviseur comme écran d'ordinateur (PC)<br />
Configuration <strong>de</strong> votre logiciel PC (instructions basées sur Windows XP)<br />
Les paramètres d'affichage Windows indiqués ci-<strong>de</strong>ssous sont valables pour ordinateur<br />
standard. Les affichages écran sur votre PC seront probablement différents, en fonction <strong>de</strong><br />
votre version <strong>de</strong> Windows et votre carte vidéo. Cependant, même si les affichages réels<br />
diffèrent, les mêmes informations <strong>de</strong> configuration <strong>de</strong> base s'appliquent dans la plupart <strong>de</strong>s<br />
cas. (Dans le cas contraire, contactez le fabricant <strong>de</strong> votre ordinateur ou votre reven<strong>de</strong>ur<br />
<strong>Samsung</strong>.)<br />
1. Dans le menu Démarrer <strong>de</strong> Windows, cliquez sur ‘Panneau <strong>de</strong> configuration’.<br />
2. Dans le Panneau <strong>de</strong> configuration, cliquez sur ‘Apparence et thèmes’. Une boîte <strong>de</strong><br />
dialogue s'affiche.<br />
3. Cliquez sur ‘Affichage’. Une nouvelle boîte <strong>de</strong> dialogue s'affiche.<br />
4. Cliquez sur l'onglet ‘Paramètres’.<br />
Réglage correct <strong>de</strong> la taille (résolution) - Optimal : 1920 x 1080 pixels.<br />
S’il existe une option <strong>de</strong> fréquence verticale sur votre boîte <strong>de</strong> dialogue <strong>de</strong>s<br />
paramètres d’affichage, la valeur correcte est ‘60’ ou ‘60 Hz’. Sinon, cliquez<br />
simplement sur ‘OK’ pour quitter la boîte <strong>de</strong> dialogue.<br />
Mo<strong>de</strong>s d'affichage<br />
Si le signal du système équivaut au mo<strong>de</strong> <strong>de</strong> signal standard, l'écran se règle automatiquement. Si le signal du système ne<br />
correspond pas au mo<strong>de</strong> <strong>de</strong> signal standard, réglez le mo<strong>de</strong> en vous reportant le cas échéant au manuel d'utilisation <strong>de</strong> la carte<br />
vidéo. Pour les mo<strong>de</strong>s d'affichage répertoriés en page suivante, l'image <strong>de</strong> l'écran a été optimisée lors <strong>de</strong> la fabrication.<br />
■<br />
Entrée D-Sub et HDMI/DVI<br />
Mo<strong>de</strong> Résolution Fréquence horizontale<br />
(KHz)<br />
IBM<br />
MAC<br />
VESA CVT<br />
VESA DMT<br />
VESA GTF<br />
VESA DMT /<br />
DTV CEA<br />
Fréquence verticale<br />
(kHz)<br />
Fréquence d'horloge<br />
pixels (MHz)<br />
Polarité<br />
synchronisée<br />
(H/V)<br />
640 x 350 31,469 70,086 25,175 +/-<br />
720 x 400 31,469 70,087 28,322 -/+<br />
640 x 480 35,000 66,667 30,240 -/-<br />
832 x 624 49,726 74,551 57,284 -/-<br />
1152 x 870 68,681 75,062 100,000 -/-<br />
720 x 576 35,910 59,950 32,750 -/+<br />
1152 x 864 53,783 59,959 81,750 -/+<br />
1280 x 720 44,772 59,855 74,500 -/+<br />
1280 x 720 56,456 74,777 95,750 -/+<br />
1280 x 960 75,231 74,857 130,000 -/+<br />
640 x 480 31,469 59,940 25,175 -/-<br />
640 x 480 37,861 72,809 31,500 -/-<br />
640 x 480 37,500 75,000 31,500 -/-<br />
800 x 600 37,879 60,317 40,000 +/+<br />
800 x 600 48,077 72,188 50,000 +/+<br />
800 x 600 46,875 75,000 49,500 +/+<br />
1024 x 768 48,363 60,004 65,000 -/-<br />
1024 x 768 56,476 70,069 75,000 -/-<br />
1024 x 768 60,023 75,029 78,750 +/+<br />
1152 x 864 67,500 75,000 108,000 +/+<br />
1280 x 1024 63,981 60,020 108,000 +/+<br />
1280 x 1024 79,976 75,025 135,000 +/+<br />
1280 x 800 49,702 59,810 83,500 -/+<br />
1280 x 800 62,795 74,934 106,500 -/+<br />
1280 x 960 60,000 60,000 108,000 +/+<br />
1360 x 768 47,712 60,015 85,500 +/+<br />
1440 x 900 55,935 59,887 106,500 -/+<br />
1440 x 900 70,635 74,984 136,750 -/+<br />
1680 x 1050 65,290 59,954 146,250 -/+<br />
1280 x 720 52,500 70,000 89,040 -/+<br />
1280 x 1024 74,620 70,000 128,943 -/-<br />
1920 x 1080p 67,500 60,000 148,500 +/+<br />
N<br />
N<br />
N<br />
N<br />
N<br />
Lorsque vous utilisez une connexion avec câble HDMI/DVI, vous <strong>de</strong>vez utiliser la prise HDMI IN 3(DVI).<br />
Le mo<strong>de</strong> entrelacé n'est pas pris en charge.<br />
Le téléviseur peut fonctionner <strong>de</strong> façon anormale si le format vidéo sélectionné n'est pas standard.<br />
Les mo<strong>de</strong>s Séparé et Composite sont pris en charge. Le format SOG (SVSV) n'est pas pris en charge.<br />
Un câble VGA trop long ou <strong>de</strong> qualité médiocre peut être source <strong>de</strong> parasites visuels dans les mo<strong>de</strong>s haute résolution (1920 x<br />
1080).<br />
Franç<strong>ais</strong> - 18
¦<br />
Configuration du téléviseur avec le PC<br />
N<br />
Préréglage : Appuyez sur le bouton SOURCE pour sélectionner le mo<strong>de</strong> PC.<br />
❑<br />
Réglage Automatique<br />
Utilisez la fonction Auto Adjust pour que le téléviseur règle automatiquement les signaux vidéo<br />
qu'il reçoit.<br />
La fonction règle aussi automatiquement les paramètres ainsi que les valeurs et positions <strong>de</strong><br />
fréquences.<br />
T Appuyez sur le bouton TOOLS pour afficher le menu Outils. Vous pouvez également<br />
définir le réglage automatique en sélectionnant Outils → Réglage Automatique.<br />
N Cette fonction ne s'applique pas en mo<strong>de</strong> DVI-HDMI.<br />
Image<br />
Luminosité : 45<br />
Netteté : 50<br />
Réglage Automatique<br />
Ecran<br />
Paramètres avancés<br />
Options d'image<br />
Réinitialisation <strong>de</strong> l'image<br />
▶<br />
❑<br />
Ecran<br />
■<br />
■<br />
■<br />
Regl. Base / Regl. Prec<br />
Lorsque vous réglez la qualité <strong>de</strong> l'image, l'objectif est d'éliminer ou <strong>de</strong> réduire les parasites<br />
visuels. Si vous ne pouvez pas éliminer ces parasites par une syntonisation fine, réglez la<br />
fréquence (Regl. Base) au mieux, puis effectuez <strong>de</strong> nouveau une syntonisation fine. Une<br />
fois les parasites réduits, effectuez un nouveau réglage <strong>de</strong> l'image pour l'aligner au centre <strong>de</strong><br />
l'écran.<br />
Position du PC<br />
Réglez la position d'affichage du PC si elle ne convient pas pour l'écran du téléviseur.<br />
Appuyez sur le bouton ▲ ou ▼ pour régler la position verticale. Appuyez sur le bouton ◄ ou ►<br />
pour régler la position horizontale.<br />
Réinitialiser Image<br />
Vous pouvez rétablir les valeurs par défaut <strong>de</strong> tous les paramètres d'image.<br />
Ecran<br />
Regl. Base 50<br />
Regl. Prec 0<br />
Position du PC<br />
Réinitialiser Image<br />
U Déplacer E Entrer R Retour<br />
Franç<strong>ais</strong> - 19
SON<br />
¦<br />
Configuration du menu Son<br />
❑<br />
Mo<strong>de</strong> → Standard / Musique / Film / Voix claire / Personnel<br />
T<br />
●<br />
●<br />
●<br />
●<br />
●<br />
Appuyez sur le bouton TOOLS pour afficher le menu Outils. Vous pouvez également<br />
définir le mo<strong>de</strong> sonore en sélectionnant Outils → Mo<strong>de</strong> Son.<br />
Standard : Sélectionne le mo<strong>de</strong> son normal.<br />
Musique : Accentue la musique par rapport aux voix.<br />
Film : Offre le meilleur son pour les films.<br />
Voix claire : Accentue les voix par rapport aux autres sons.<br />
Personnel: Rétablit vos paramètres <strong>de</strong> son personnalisés.<br />
Son<br />
Mo<strong>de</strong> : Personnel ▶<br />
Egaliseur<br />
SRS TruSurround HD : Arr.<br />
Langue audio : ----<br />
Format Audio : ----<br />
Description audio<br />
Volume auto<br />
: Arr.<br />
Sélection Haut-parleur : Haut-parleur TV<br />
❑<br />
❑<br />
❑<br />
❑<br />
❑<br />
■<br />
■<br />
❑<br />
Egaliseur<br />
Vous pouvez régler les paramètres du son en fonction <strong>de</strong> vos préférences.<br />
● Mo<strong>de</strong>: permet <strong>de</strong> sélectionner le mo<strong>de</strong> sonore parmi plusieurs paramètres prédéfinis.<br />
● Balance L/R: règle la balance entre les haut-parleurs droit et gauche.<br />
● 100Hz / 300Hz / 1KHz / 3KHz / 10KHz (réglage <strong>de</strong> la ban<strong>de</strong> passante) : permet <strong>de</strong> régler le niveau <strong>de</strong> fréquences <strong>de</strong> la ban<strong>de</strong><br />
passante.<br />
● Réinit.: Rétablit les valeurs par défaut <strong>de</strong> l'égaliseur.<br />
SRS TruSurround HD → Arr. / Mar.<br />
Le SRS TruSurround HD est une technologie SRS brevetée qui remédie au problème <strong>de</strong> la lecture <strong>de</strong> contenu multicanal 5.1 sur<br />
<strong>de</strong>ux haut-parleurs. Le TruSurround produit un son surround virtuel excellent au moyen <strong>de</strong> n'importe quel système <strong>de</strong> lecture à<br />
<strong>de</strong>ux haut-parleurs, dont les haut-parleurs internes du téléviseur. Il est totalement compatible avec tous les formats multicanal.<br />
T Appuyez sur le bouton TOOLS pour afficher le menu Outils. Vous pouvez également définir l'option SRS TruSurround HD en<br />
sélectionnant Outils→ SRS TS HD.<br />
Langue audio<br />
Vous pouvez modifier la langue par défaut <strong>de</strong>s sous-titres et <strong>de</strong> l'audio. Affiche les informations relatives à la langue pour le flux<br />
entrant.<br />
N<br />
N<br />
Cette fonction peut être sélectionnée pendant que vous regar<strong>de</strong>z une chaîne numérique.<br />
Vous pouvez sélectionner la langue uniquement parmi les langues en cours <strong>de</strong> diffusion.<br />
Format Audio → MPEG / Dolby Digital<br />
Lorsque le son est émis à la fois par le haut-parleur principal et le récepteur audio, un effet d'écho peut se produire en r<strong>ais</strong>on<br />
<strong>de</strong> la différence <strong>de</strong> vitesse <strong>de</strong> décodage entre le haut-parleur principal et le récepteur audio. Dans ce cas, utilisez la fonction TV<br />
Speaker (haut-parleur du téléviseur).<br />
N<br />
N<br />
Cette fonction peut être sélectionnée pendant que vous regar<strong>de</strong>z une chaîne numérique.<br />
Le format audio s'affiche en fonction du signal diffusé.<br />
Description audio<br />
Il s'agit d'une fonction audio auxiliaire qui fournit une piste audio supplémentaire à l'intention <strong>de</strong>s personnes malvoyantes. Cette<br />
fonction traite le flux audio relatif à la <strong>de</strong>scription audio (AD) lorsqu'il est envoyé avec le son principal par le radiodiffuseur. Les<br />
utilisateurs peuvent activer ou désactiver la <strong>de</strong>scription audio et régler le volume.<br />
O Appuyez sur le bouton AD <strong>de</strong> la télécomman<strong>de</strong> pour sélectionner Arr. ou Mar..<br />
Description audio → Arr. / Mar.<br />
Active ou désactive la fonction <strong>de</strong> <strong>de</strong>scription verbale.<br />
Volume<br />
Il est possible <strong>de</strong> régler le volume <strong>de</strong> la <strong>de</strong>scription verbale.<br />
N<br />
N<br />
Volume est actif lorsque Description audio est défini sur Mar..<br />
Cette fonction peut être sélectionnée pendant que vous regar<strong>de</strong>z une chaîne numérique.<br />
Volume auto → Arr. / Mar.<br />
Chaque station <strong>de</strong> télédiffusion possè<strong>de</strong> ses propres conditions <strong>de</strong> signal. Il n'est donc pas facile <strong>de</strong> régler le volume chaque fois<br />
que vous changez <strong>de</strong> chaîne. Cette fonction permet <strong>de</strong> régler automatiquement le volume du canal désiré en réduisant la sortie<br />
son lorsque le signal <strong>de</strong> modulation est puissant ou en l'augmentant lorsque le signal est faible.<br />
Franç<strong>ais</strong> - 20
❑<br />
Sélection Haut-parleur<br />
Lorsque vous regar<strong>de</strong>z la télévision alors que vous téléviseur est relié à un système home cinéma, éteignez les haut-parleurs du<br />
téléviseur afin d'écouter le son sur les haut-parleurs (externes) du système home cinéma.<br />
●<br />
●<br />
N<br />
N<br />
Ht-parl ext : permet d'écouter le son <strong>de</strong>s haut-parleurs externes (ceux du système home cinéma).<br />
Haut-parleur TV : permet d'écouter le son <strong>de</strong>s haut-parleurs du téléviseur.<br />
Les boutons <strong>de</strong> volume et MUTE ne fonctionnent pas lorsque la fonction Sélection Haut-parleur est réglée sur Ht-parl ext.<br />
Si vous sélectionnez Ht-parl ext dans le menu Sélection Haut-parleur, les paramètres <strong>de</strong> son sont limités.<br />
Haut-parleurs internes du téléviseur Sortie audio (Optique, Sortie G/D) vers système audio<br />
RF / AV / Composant / PC / HDMI<br />
RF / AV / Composant / PC / HDMI<br />
Haut-parleur TV Sortie son Sortie son<br />
Ht-parl ext Muet Sortie son<br />
Absence <strong>de</strong> signal vidéo Muet Muet<br />
❑<br />
Réinitialisation du son → Réinitial. tout / Réinitial. mo<strong>de</strong> son / Annuler<br />
Vous pouvez rétablir les valeurs par défaut <strong>de</strong>s paramètres audio.<br />
N Réinitial. mo<strong>de</strong> son : rétablit les paramètres par défaut pour le son.<br />
Réinitialisation du son<br />
Choisir les options <strong>de</strong> rétablissement du son.<br />
Réinitial. tout Réinitial. mo<strong>de</strong> son Annuler<br />
L Déplacer E Entrer R Retour<br />
¦<br />
Sélection du mo<strong>de</strong> son<br />
Vous pouvez configurer le mo<strong>de</strong> sonore en appuyant sur le bouton DUAL. Lorsque vous appuyez sur ce bouton, le mo<strong>de</strong> sonore<br />
courant s'affiche à l'écran.<br />
Stéréo A2<br />
NICAM stéréo<br />
N<br />
N<br />
N<br />
Type d'audio Dual 1 / 2 Par défaut<br />
Mono<br />
MONO<br />
Changement automatique<br />
Stéréo<br />
STEREO ↔ MONO<br />
Dual DUAL 1 ↔ DUAL 2 DUAL 1<br />
Mono<br />
MONO<br />
Changement automatique<br />
Stéréo<br />
MONO ↔ STEREO<br />
Dual<br />
MONO ↔ DUAL 1<br />
DUAL 2<br />
Si le signal stéréo est faible et qu'une commutation automatique se produit, passez alors en Mono.<br />
Cette fonction n'est activée qu'en son stéréo. Elle est désactivée en mo<strong>de</strong> mono.<br />
Cette fonction n'est disponible qu'en mo<strong>de</strong> TV.<br />
DUAL 1<br />
Franç<strong>ais</strong> - 21
Configuration<br />
¦<br />
Configuration du menu Setup<br />
❑<br />
❑<br />
Langue <strong>de</strong>s menus<br />
Permet <strong>de</strong> définir la langue <strong>de</strong>s menus.<br />
Horloge<br />
Pour la procédure détaillée du réglage <strong>de</strong>s options, reportez-vous à la rubrique ‘Réglage <strong>de</strong><br />
l'heure’.<br />
Configuration<br />
Plug & Play<br />
Langue <strong>de</strong>s menus : Franç<strong>ais</strong> ▶<br />
Horloge<br />
Diffuser<br />
Sécurité<br />
Général<br />
❑<br />
Diffuser<br />
■<br />
■<br />
■<br />
■<br />
Sous-titres<br />
Vous pouvez activer ou désactiver les sous-titres. Utilisez ce menu pour définir le mo<strong>de</strong> <strong>de</strong>s sous-titres. Normal sélectionne les<br />
sous-titres <strong>de</strong> base ; Malentendants sélectionne les sous-titres pour personnes malentendantes.<br />
● Sous-titres → Arr. / Mar.<br />
Active/désactive les sous-titres.<br />
● Mo<strong>de</strong> → Normal / Malentendants<br />
Sélectionne le mo<strong>de</strong> <strong>de</strong> la fonction Sous-titres.<br />
● Langue <strong>de</strong>s sous-titres<br />
Définit la langue <strong>de</strong>s sous-titres.<br />
N<br />
N<br />
N<br />
Si le programme visionné n'offre pas <strong>de</strong> fonction Malentendants, le mo<strong>de</strong> Normal est automatiquement activé, même si<br />
le mo<strong>de</strong> Malentendants est sélectionné.<br />
L'angl<strong>ais</strong> est la langue par défaut si la langue sélectionnée n'est pas diffusée.<br />
Vous pouvez sélectionner ces options en appuyant sur le bouton SUBT. <strong>de</strong> la télécomman<strong>de</strong>.<br />
Texte numérique → Désactiver / Activer (Royaume-Uni uniquement)<br />
Si le programme est diffusé avec du texte numérique, cette fonction est activée.<br />
N MHEG (Multimedia and Hypermedia Information Coding Experts Group)<br />
Norme internationale pour les systèmes <strong>de</strong> codage <strong>de</strong>s données utilisés avec le multimédia et l'hypermédia. Niveau supérieur<br />
à celui du système MPEG, qui inclut <strong>de</strong> l'hypermédia à li<strong>ais</strong>on <strong>de</strong> données tel que <strong>de</strong>s images fixes, le service <strong>de</strong> caractères,<br />
l'animation, les fichiers graphiques et vidéo et les données multimédia. MHEG est une technologie d'interaction <strong>de</strong> <strong>l'utilisateur</strong><br />
en cours d'utilisation appliquée à divers domaines, dont la vidéo à la <strong>de</strong>man<strong>de</strong> (VOD), la télévision interactive (ITV), le<br />
commerce électronique, la téléformation, la téléconférence, les bibliothèques numériques et les jeux en réseau.<br />
Langue du télétexte<br />
Vous pouvez définir la langue du télétexte en sélectionnant le type <strong>de</strong> langue.<br />
N L'angl<strong>ais</strong> est la langue par défaut si la langue sélectionnée n'est pas diffusée.<br />
Préférence<br />
● Première Langue Audio / Deuxième Langue Audio / Langue princ. sous-titres / Langue sec. sous-titres / Première<br />
Langue Télétexte / Deuxième Langue Télétexte<br />
Cette fonction permet <strong>de</strong> sélectionner une <strong>de</strong>s langues disponibles. La langue sélectionnée ici est la langue par défaut <strong>de</strong> la<br />
chaîne sélectionnée.<br />
Si vous changez la langue, les options Langue <strong>de</strong>s sous-titres, Langue audio et Langue du télétexte du menu Langue sont<br />
automatiquement modifiées en conséquence.<br />
Les options Langue <strong>de</strong>s sous-titres, Langue audio et Langue du télétexte du menu Langue présentent une liste <strong>de</strong>s langues<br />
prises en charge par la chaîne actuelle et la langue sélectionnée est affichée en surbrillance. Si vous modifiez le paramètre <strong>de</strong><br />
la langue, la nouvelle sélection n'est valable que pour la chaîne actuelle. Le nouveau paramétrage n'affecte pas le réglage <strong>de</strong>s<br />
options Langue princ. sous-titres, Première Langue Audio ou Première Langue Télétexte du menu Préférence.<br />
Franç<strong>ais</strong> - 22
■<br />
❑<br />
■<br />
■<br />
■<br />
❑<br />
■<br />
Interface commune<br />
● CI Menu<br />
Cela ai<strong>de</strong> <strong>l'utilisateur</strong> à sélectionner un élément du menu pris en charge par CAM.<br />
Sélectionnez le menu CI dans le menu PC Card.<br />
● Infos sur l'application<br />
Contient <strong>de</strong>s informations sur le module CAM inséré dans la fente CI et les affiche. Les données Application Info concernent la<br />
carte d’interface commune (CI(CI+) CARD). Vous pouvez installer le module CAM que le téléviseur soit allumé ou éteint.<br />
1. Achetez le module CI CAM en vous rendant chez le reven<strong>de</strong>ur le plus proche ou par téléphone.<br />
2. Insérez la carte d’interface commune (CI(CI+) CARD) dans le CAM dans le sens indiqué par la flèche jusqu’à ce qu’elle<br />
se loge en place.<br />
3. Insérez le CAM avec la carte d’interface commune (CI(CI+) CARD) installée dans la fente <strong>de</strong> l’interface commune.<br />
(Insérez le module CAM dans le sens indiqué par la flèche, à fond, <strong>de</strong> façon à ce qu'il soit parallèle à la fente.)<br />
4. Vérifiez si une image est visible sur un canal à signal brouillé.<br />
Sécurité<br />
Verrouillage Canal → Arr. / Mar.<br />
Cette fonction permet d'empêcher que <strong>de</strong>s utilisateurs non autorisés, tels que <strong>de</strong>s enfants, regar<strong>de</strong>nt <strong>de</strong>s programmes<br />
inappropriés, en désactivant la vidéo et l'audio.<br />
N<br />
N<br />
N<br />
N<br />
L'écran <strong>de</strong> s<strong>ais</strong>ie du co<strong>de</strong> PIN s'affiche avant l'écran <strong>de</strong> configuration. Entrez votre co<strong>de</strong> PIN à quatre chiffres.<br />
Le co<strong>de</strong> PIN par défaut d'un nouveau téléviseur est ‘0-0-0-0’. Vous pouvez modifier le co<strong>de</strong> PIN en sélectionnant Modifier PIN<br />
dans le menu.<br />
Vous pouvez verrouiller certaines chaînes dans la liste <strong>de</strong>s chaînes.<br />
Verrouillage Canal est uniquement disponible en mo<strong>de</strong> TV.<br />
Verrouillage parental → Classement parental<br />
Cette fonction permet d'empêcher certains utilisateurs, par exemple <strong>de</strong>s enfants, <strong>de</strong> regar<strong>de</strong>r <strong>de</strong>s émissions inappropriées, en les<br />
protégeant à l'ai<strong>de</strong> d’un co<strong>de</strong> <strong>de</strong> 4 chiffres défini par <strong>l'utilisateur</strong>.<br />
N<br />
N<br />
N<br />
N<br />
N<br />
L'option Classement parental diffère en fonction du les pays.<br />
L'écran <strong>de</strong> s<strong>ais</strong>ie du co<strong>de</strong> PIN s'affiche avant l'écran <strong>de</strong> configuration. Entrez votre co<strong>de</strong> PIN à quatre chiffres.<br />
Le co<strong>de</strong> PIN par défaut d'un nouveau téléviseur est ‘0-0-0-0’. Vous pouvez modifier le co<strong>de</strong> PIN en sélectionnant Modifier PIN<br />
dans le menu.<br />
Une fois la signalétique définie, le symbole ‘\’ s’affiche.<br />
Autor.tout : appuyez sur ce bouton pour déverrouiller toutes les évaluations TV.<br />
Bloq. tout: appuyez sur ce bouton pour verrouiller tous les classements TV.<br />
Modifier PIN<br />
Vous pouvez modifier le co<strong>de</strong> personnel <strong>de</strong>mandé pour pouvoir configurer le téléviseur.<br />
N<br />
N<br />
N<br />
L'écran <strong>de</strong> s<strong>ais</strong>ie du co<strong>de</strong> PIN s'affiche avant l'écran <strong>de</strong> configuration. Entrez votre co<strong>de</strong> PIN à quatre chiffres.<br />
Le co<strong>de</strong> PIN par défaut d'un nouveau téléviseur est ‘0-0-0-0’.<br />
Si vous avez oublié le co<strong>de</strong>, appuyez sur les boutons <strong>de</strong> la télécomman<strong>de</strong> dans l'ordre suivant, ce qui remet le co<strong>de</strong> à ‘0-0-0-0’<br />
: POWER (Arr.) → MUTE → 8 → 2 → 4 → POWER (Mar.).<br />
Général<br />
Mo<strong>de</strong> Jeu → Arr. / Mar.<br />
En reliant le téléviseur à une console <strong>de</strong> jeu telle que PlayStation ou Xbox, vous pouvez profiter d'une expérience <strong>de</strong> jeu plus<br />
réaliste en sélectionnant le menu <strong>de</strong> jeu.<br />
N Limitations du mo<strong>de</strong> jeu (attention)<br />
Pour déconnecter la console <strong>de</strong> jeu et connecter un autre périphérique externe, réglez le mo<strong>de</strong> Mo<strong>de</strong> Jeu sur Arr. dans<br />
le menu Configuration.<br />
Si vous affichez le menu du téléviseur en mo<strong>de</strong> Mo<strong>de</strong> Jeu, l'écran vacille légèrement.<br />
N<br />
N<br />
N<br />
Mo<strong>de</strong> Jeu n'est pas disponible avec les mo<strong>de</strong>s TV, PC et Ext classiques.<br />
Si l'image est <strong>de</strong> mauv<strong>ais</strong>e qualité lorsqu'un périphérique est connecté au téléviseur, vérifiez si le mo<strong>de</strong> Mo<strong>de</strong> Jeu réglé sur<br />
Mar.. Réglez le mo<strong>de</strong> Mo<strong>de</strong> Jeu sur Arr. et connectez les périphériques externes.<br />
Si le Mo<strong>de</strong> Jeu est activé:<br />
<br />
<br />
<br />
Le mo<strong>de</strong> Image bascule automatiquement sur Standard et il est impossible d'en changer.<br />
Le mo<strong>de</strong> Sound bascule automatiquement sur Personnel et il est impossible d'en changer. Réglez le son à l'ai<strong>de</strong> <strong>de</strong><br />
l'égaliseur.<br />
La fonction Régler du menu Son est activée. Sélectionner la fonction Reset après avoir réglé l'égaliseur rétablit ses<br />
paramètres par défaut.<br />
Franç<strong>ais</strong> - 23
■<br />
■<br />
■<br />
Mo<strong>de</strong> éco. → Arr. / Bas / Moyen / Elevé / Image désactivée / Auto.<br />
Cette fonction règle la luminosité du téléviseur afin <strong>de</strong> réduire la consommation d'énergie. Lorsque vous regar<strong>de</strong>z la télévision le<br />
soir, réglez l'option du mo<strong>de</strong> Mo<strong>de</strong> éco. sur Elevé pour reposer vos yeux et réduire la consommation d'énergie.<br />
Si vous sélectionnez Image désactivée, l’écran s’éteint. Seul le son est émis. Appuyez à nouveau sur ce bouton pour désactiver<br />
la fonction Image désactivée.<br />
N<br />
T<br />
La function Image désactivée n’est pas prise en charge dans le menu Outils.<br />
Appuyez sur le bouton TOOLS pour afficher le menu Outils. Vous pouvez également régler l'option d'économie d'énergie en<br />
sélectionnant Outils → Mo<strong>de</strong> éco.<br />
Transparence du menu → Lumineux / Sombre<br />
Vous pouvez régler la transparence du menu.<br />
Mélodie → Arr. / Bas / Moyen / Elevé<br />
Il est possible <strong>de</strong> programmer la lecture d'une mélodie lors <strong>de</strong> la mise sous tension ou hors tension du téléviseur.<br />
N Aucune mélodie n'est lue dans les cas suivants<br />
<br />
<br />
<br />
Aucun son n'est émis par le téléviseur parce que le bouton MUTE a été actionné.<br />
Aucun son n'est émis par le téléviseur car le volume est réglé au minimum à l'ai<strong>de</strong> du bouton (–).<br />
Lorsque le téléviseur est mis hors tension par la fonction <strong>de</strong> veille..<br />
¦<br />
Réglage <strong>de</strong> l'heure<br />
❑<br />
■<br />
■<br />
❑<br />
Horloge<br />
Le réglage <strong>de</strong> l'horloge est nécessaire pour utiliser les différentes fonctions <strong>de</strong> minuterie <strong>de</strong> la<br />
télévision.<br />
O<br />
N<br />
L'heure actuelle s'affiche chaque fois que vous appuyez sur le bouton INFO.<br />
Si vous débranchez le cordon d'alimentation, vous <strong>de</strong>vez régler <strong>de</strong> nouveau l'horloge.<br />
Mo<strong>de</strong> Horloge<br />
Vous pouvez définir l'heure actuelle manuellement ou automatiquement.<br />
● Auto.: Définit l'heure en cours automatiquement en utilisant l'heure <strong>de</strong> la transmission<br />
numérique.<br />
● <strong>Manuel</strong> : Définit l'heure en cours d'après l'heure entrée manuellement.<br />
N En fonction <strong>de</strong> la station <strong>de</strong> diffusion et du signal diffusé, il se peut que l'heure ne soit pas<br />
réglée correctement. Si cela se produit, réglez l'heure manuellement.<br />
N Pour que l'heure soit réglée automatiquement, l'antenne ou le câble doit être connecté.<br />
Réglage Horloge<br />
Vous pouvez définir l'heure en cours manuellement.<br />
N<br />
N<br />
Horloge : -- : -- ▶<br />
Cette option est uniquement disponible lorsque Mo<strong>de</strong> Horloge est réglé sur <strong>Manuel</strong>.<br />
Vous pouvez régler directement le jour, le mois, l'année, l'heure et la minute en appuyant sur les touches numériques <strong>de</strong> la<br />
télécomman<strong>de</strong>.<br />
Veille<br />
La minuterie <strong>de</strong> mise en veille éteint automatiquement la télévision après une durée préréglée (30, 60, 90, 120, 150 ou 180<br />
minutes).<br />
T Appuyez sur le bouton TOOLS pour afficher le menu Outils. Vous pouvez également régler la minuterie <strong>de</strong> mise en veille en<br />
sélectionnant Outils → Veille.<br />
N Pour annuler la fonction Veille, sélectionnez Arr..<br />
Configuration<br />
Veille<br />
Minuteur 1<br />
Minuteur 2<br />
Minuteur 3<br />
Plug & Play<br />
Langue <strong>de</strong>s menus<br />
Horloge<br />
Diffuser<br />
Sécurité<br />
Général<br />
Heure<br />
: Arr.<br />
: Arrêt<br />
: Arrêt<br />
: Arrêt<br />
: Franç<strong>ais</strong><br />
U Déplacer E Entrer R Retour<br />
▶<br />
❑<br />
■<br />
■<br />
Minuteur 1 / Minuteur 2 / Minuteur 3<br />
Trois réglages différents <strong>de</strong> mise en marche/arrêt peuvent être définis.<br />
Vous <strong>de</strong>vez préalablement régler l'horloge.<br />
Pério<strong>de</strong> d'activation<br />
Sélectionnez l'heure, la minute et l'action activer/désactiver<br />
(Pour activer le minuteur selon les réglages définis, choisissez Activer".)<br />
Pério<strong>de</strong> <strong>de</strong> désactivation<br />
Sélectionnez l'heure, la minute et l'action activer/désactiver<br />
(Pour activer le minuteur selon les réglages définis, choisissez Activer".)<br />
Minuteur 1<br />
Pério<strong>de</strong> d'activation<br />
00 00 Désactiver<br />
Pério<strong>de</strong> <strong>de</strong> désactivation<br />
00 00 Désactiver<br />
Volume Source Antenne Canal<br />
10<br />
TV ATV 0<br />
Répétition<br />
Une fois<br />
Dim Lun Mar Mer Jeu Ven Sam<br />
L Déplacer U Régler E Entrer R Retour<br />
Franç<strong>ais</strong> - 24
■<br />
■<br />
■<br />
■<br />
■<br />
■<br />
Volume<br />
Sélectionne le volume désiré.<br />
Source → TV / USB<br />
Permet d'indiquer le contenu du périphérique TV ou USB qui doit être lu lorsque le téléviseur s'allume automatiquement.<br />
Sélectionnez TV ou USB. (Assurez-vous que le périphérique USB est branché sur le téléviseur.)<br />
N S'il n'y a qu'un seul fichier image sur le périphérique USB, la fonction Sli<strong>de</strong> Show ne démarre pas.<br />
Antenne (lorsque Source est réglé sur TV)<br />
Sélectionnez ATV ou DTV.<br />
Canal (lorsque Source est réglé sur TV)<br />
Sélectionnez la chaîne désirée.<br />
Contents (lorsque Source est réglé sur USB)<br />
Permet <strong>de</strong> sélectionner le dossier du périphérique USB contenant les fichiers <strong>de</strong> musique ou les images <strong>de</strong>vant être lus lorsque le<br />
téléviseur s'allume automatiquement.<br />
N<br />
N<br />
Les dossiers dont le nom est trop long ne peuvent pas être sélectionnés.<br />
Les dossiers dont le nom est trop long pour être configuré par la fonction Contents ne peuvent pas être sélectionnés.<br />
Répétition<br />
Sélectionnez Une fois, Ts jours, Lun~Ven, Lun~Sam, Sam~Dim ou <strong>Manuel</strong>.<br />
N<br />
N<br />
N<br />
Lorsque Manual est sélectionné, appuyez sur le bouton ► pour sélectionner le jour <strong>de</strong> la semaine. Appuyez sur le bouton<br />
ENTERE sur le jour <strong>de</strong> votre choix. Le symbole c s'affiche alors.<br />
Vous pouvez régler l'heure, la minute et la chaîne directement à l'ai<strong>de</strong> <strong>de</strong>s touches numériques <strong>de</strong> la télécomman<strong>de</strong>.<br />
Mise hors tension automatique<br />
Lorsque vous réglez la minuterie sur ON, le téléviseur s’éteint si aucune comman<strong>de</strong> n’est utilisée dans les 3 heures qui<br />
suivent la mise sous tension par le minuteur. Cette fonction est disponible uniquement lorsque la minuterie est réglée sur ON ;<br />
elle permet d'éviter toute surchauffe occasionnée par une utilisation prolongée du téléviseur.<br />
Franç<strong>ais</strong> - 25
ENTRÉE / ASSISTANCE<br />
¦<br />
Menu Entrée<br />
❑<br />
■<br />
❑<br />
Liste Source<br />
Permet <strong>de</strong> sélectionner le téléviseur ou d'autres sources externes (lecteur DVD, lecteur Blu-ray,<br />
déco<strong>de</strong>ur câble,<br />
Récepteurs satellite (boîtiers déco<strong>de</strong>urs) connectés au téléviseur. Permet <strong>de</strong> sélectionner la<br />
source d'entrée <strong>de</strong> votre choix.<br />
O Appuyez sur le bouton SOURCE <strong>de</strong> la télécomman<strong>de</strong> pour afficher une source <strong>de</strong> signal<br />
externe. Une pression sur le bouton TV sélectionne le mo<strong>de</strong> TV.<br />
TV / Ext.1 / Ext.2 / AV / Component / PC / HDMI1 / HDMI2 / HDMI3/DVI / HDMI4<br />
N Vous ne pouvez sélectionner que <strong>de</strong>s périphériques externes connectés au téléviseur. Dans<br />
Liste Source, les entrées connectées s'affichent en surbrillance en début <strong>de</strong> liste. Les<br />
entrées non connectées s'affichent en bas <strong>de</strong> liste.<br />
N Les options Ext. et PC sont toujours activées.<br />
N Utilisation <strong>de</strong>s boutons <strong>de</strong> couleur <strong>de</strong> la télécomman<strong>de</strong> dans la liste <strong>de</strong>s sources<br />
Rouge (Rafraîchir) : actualise la liste <strong>de</strong>s appareils externes connectés. Appuyez sur ce<br />
bouton si votre source est allumée et correctement branchée m<strong>ais</strong> n'apparaît pas dans<br />
la liste.<br />
TOOLS (Outils) : Affiche les menus Modif. Nom et Information.<br />
Modif. Nom<br />
Entrée<br />
Liste Source<br />
Modif. Nom<br />
TV<br />
Rafraîchir<br />
Liste Source<br />
Ext. 1 : - - - -<br />
Ext. 2 : - - - -<br />
PC : - - - -<br />
AV : - - - -<br />
Composant : - - - -<br />
T Outils<br />
■<br />
¦<br />
❑<br />
■<br />
■<br />
Magnétoscope / DVD / Déco<strong>de</strong>ur Câble / Déco<strong>de</strong>ur satellite / Déco<strong>de</strong>ur PVR / Récepteur AV / Jeu / Caméscope / PC / DVI /<br />
DVI PC / TV / IPTV / Blu-ray / HD DVD / DMA<br />
Nommez le périphérique connecté aux prises d'entrée pour faciliter la sélection <strong>de</strong> source d'entrée.<br />
N Si un PC d'une résolution <strong>de</strong> 1920 x 1080 à 60 Hz est connecté au port HDMI IN 3(DVI), vous <strong>de</strong>vez régler le mo<strong>de</strong> HDMI3/<br />
DVI sur DVI PC dans le champ Modif. Nom du mo<strong>de</strong> Entrée.<br />
N Lorsque vous connectez un câble HDMI/DVI au port HDMI IN 3(DVI), vous <strong>de</strong>vez régler le mo<strong>de</strong> HDMI3/DVI sur DVI ou DVI<br />
PC dans le menu Modif. Nom du mo<strong>de</strong> Entrée. Dans ce cas, une connexion audio séparée est indispensable.<br />
Menu Assistance<br />
Diagnostic automatique<br />
Test <strong>de</strong> l'image<br />
Si vous pensez que l'image n'est pas optimale, exécutez le test d'image. Vérifiez la mire <strong>de</strong><br />
couleur à l'écran pour voir si le problème persiste.<br />
● Oui : si la mire <strong>de</strong> couleur n'apparaît pas où si elle est parasitée, sélectionnez Oui. Il se<br />
peut que le téléviseur soit défaillant. Dans ce cas, <strong>de</strong>man<strong>de</strong>z <strong>de</strong> l'ai<strong>de</strong> au centre d'appel <strong>de</strong><br />
<strong>Samsung</strong>.<br />
● Non: si la mire <strong>de</strong> couleur s'affiche correctement, sélectionnez Non. Il se peut que<br />
l'équipement externe soit défaillant. Vérifiez les connexions. Si le problème persiste,<br />
reportez-vous au mo<strong>de</strong> d'emploi du périphérique externe.<br />
Diagnostic automatique<br />
Mise à niveau du logiciel<br />
Gui<strong>de</strong> <strong>de</strong> connexion HD<br />
Contacter <strong>Samsung</strong><br />
Test du son<br />
Si vous pensez que le son n'est pas optimal, exécutez le test du son. Vous pouvez contrôler le<br />
son en diffusant une mélodie préenregistrée sur le téléviseur.<br />
Test <strong>de</strong> l'image<br />
Test du son<br />
Informations <strong>de</strong> signal<br />
▶<br />
N Si les haut-parleurs du téléviseur restent muets, avant d'effectuer le test du son, vérifiez<br />
que l'option Sélection Haut-parleur est réglée sur Haut-parleur TV dans le menu Sound.<br />
U Déplacer E Entrer R Retour<br />
N La mélodie est diffusée pendant le test, même si l'option Sélection Haut-parleur est réglée sur Ht-parl ext ou si le son a été<br />
désactivé en appuyant sur le bouton MUTE.<br />
● Oui : si, pendant le test du son, vous n'enten<strong>de</strong>z du son que d'un haut-parleur ou pas <strong>de</strong> son du tout, sélectionnez Oui. Il se<br />
peut que le téléviseur soit défaillant. Dans ce cas, <strong>de</strong>man<strong>de</strong>z <strong>de</strong> l'ai<strong>de</strong> au centre d'appel <strong>de</strong> <strong>Samsung</strong>.<br />
● Non: Si vous enten<strong>de</strong>z du son <strong>de</strong>s haut-parleurs, sélectionnez Non. Il se peut que l'équipement externe soit défaillant.<br />
Vérifiez les connexions. Si le problème persiste, reportez-vous au mo<strong>de</strong> d'emploi du périphérique externe.<br />
Assistance<br />
Diagnostic automatique<br />
▶<br />
Franç<strong>ais</strong> - 26
■<br />
Informations <strong>de</strong> signal (chaînes numériques uniquement)<br />
À l'inverse <strong>de</strong>s chaînes analogiques, dont la qualité <strong>de</strong> réception peut varier <strong>de</strong> ‘neigeuse’ à claire, les chaînes numériques (HDTV)<br />
présentent une qualité <strong>de</strong> réception parfaite ou bien vous ne les recevez pas. Contrairement aux chaînes analogiques, vous ne<br />
pouvez donc pas syntoniser une chaîne numérique. Vous avez toutefois la possibilité <strong>de</strong> régler votre antenne pour améliorer la<br />
réception <strong>de</strong>s chaînes numériques disponibles.<br />
N Si l'indicateur d'intensité du signal indique que celui-ci est faible, réglez physiquement votre antenne afin d'en augmenter<br />
l'intensité. Continuez à régler l'antenne jusqu'à ce que trouver la position offrant le signal le plus puissant.<br />
❑<br />
■<br />
Mise à niveau du logiciel<br />
A l'avenir, <strong>Samsung</strong> peut proposer <strong>de</strong>s mises à niveau pour le micrologiciel <strong>de</strong> votre téléviseur.<br />
Ces mises à jour peuvent être installées sur le téléviseur lorsque celui-ci se connecte à Internet<br />
ou peuvent être téléchargées manuellement sur le site samsung.com et installées via une clé<br />
USB.<br />
N<br />
N<br />
N<br />
Version actuelle indique la version du logiciel installé sur votre téléviseur.<br />
Autre logiciel (sauvegar<strong>de</strong>) indique la version précé<strong>de</strong>nte, qui sera remplacée.<br />
Le numéro <strong>de</strong> version est affiché au format suivant : ‘année/mois/jour_version’. Plus la date<br />
est récente, plus la version du logiciel est élevée. Il est toujours recommandé d'installer la<br />
<strong>de</strong>rnière version.<br />
USB<br />
Branchez sur le téléviseur un lecteur USB contenant la mise à niveau du microprogramme<br />
téléchargée sur samsung.com. Veillez à ne pas couper l'alimentation ni retirer le lecteur<br />
USB pendant l'application <strong>de</strong>s mises à niveau. Une fois la mise à niveau du micrologiciel<br />
terminée, le téléviseur se met automatiquement hors puis sous tension. Vérifiez la version du<br />
microprogramme une fois la mise à jour terminée (la nouvelle version doit avoir un numéro plus<br />
élevé que l'ancienne).<br />
Lorsque le logiciel est mis à niveau, les paramètres vidéo et audio définis reprennent leur valeur<br />
par défaut (usine). Il est recommandé <strong>de</strong> noter les paramétrages afin <strong>de</strong> pouvoir les rétablir<br />
facilement après la mise à niveau.<br />
Panneau latéral du téléviseur<br />
Lecteur USB<br />
Mise à niveau du logiciel<br />
Version actuelle<br />
2009/01/18_000001<br />
USB<br />
▶<br />
Canal<br />
Mise à niveau en mo<strong>de</strong> veille : 45 Min.<br />
Autre logiciel<br />
2009/01/15_00000<br />
U Déplacer E Entrer R Retour<br />
■<br />
■<br />
■<br />
❑<br />
❑<br />
Canal<br />
Mise à niveau du logiciel à l'ai<strong>de</strong> du signal <strong>de</strong> diffusion.<br />
N Si elle est sélectionnée pendant la pério<strong>de</strong> <strong>de</strong> transmission du logiciel, cette fonction recherche le logiciel disponible et le<br />
télécharge.<br />
N Le temps nécessaire au téléchargement du logiciel dépend <strong>de</strong> l'état du signal.<br />
Mise à niveau en mo<strong>de</strong> veille<br />
Pour poursuivre la mise à jour du logiciel en gardant le téléviseur sous tension, sélectionnez Marche en appuyant sur le bouton<br />
▲ ou ▼. Une mise à jour manuelle a lieu automatiquement 45 minutes après que l'entrée en mo<strong>de</strong> veille. Étant donné que la mise<br />
sous tension s'effectue <strong>de</strong> façon interne, il se peut que l'écran LCD s'allume légèrement. Ce phénomène peut se produire pendant<br />
plus d'une heure, jusqu'à ce que la mise à jour logiciel soit terminée.<br />
Autre logiciel (sauvegar<strong>de</strong>)<br />
En cas problème avec le nouveau microprogramme (si, par exemple, le téléviseur ne fonctionne plus correctement), vous pouvez<br />
revenir à la version précé<strong>de</strong>nte.<br />
N<br />
N<br />
Si le logiciel a été modifié, la version existante s'affiche.<br />
Vous pouvez passer à la version <strong>de</strong> sauvegar<strong>de</strong> du logiciel en sélectionnant ‘Autre logiciel’.<br />
Gui<strong>de</strong> <strong>de</strong> connexion HD<br />
Ce menu indique la métho<strong>de</strong> <strong>de</strong> connexion offrant la qualité optimale pour le téléviseur haute définition. Consultez ces<br />
informations lors <strong>de</strong> la connexion <strong>de</strong> périphériques externes au téléviseur.<br />
Contacter <strong>Samsung</strong><br />
Consultez ces informations si le téléviseur ne fonctionne pas correctement ou si vous voulez mettre à niveau le logiciel. Vous<br />
pouvez consulter les informations concernant le centre d'appel, le produit et la métho<strong>de</strong> <strong>de</strong> téléchargement du logiciel.<br />
Franç<strong>ais</strong> - 27
Media Play (USB)<br />
¦<br />
Connexion d'un périphérique USB<br />
1. Appuyez sur le bouton POWER pour allumer le téléviseur.<br />
2. Connectez un périphérique USB contenant <strong>de</strong>s photos et/ou <strong>de</strong>s fichiers <strong>de</strong> musique au port<br />
USB sur le côté du téléviseur.<br />
3. Lorsque l'écran <strong>de</strong> sélection Application s'affiche, appuyez sur le bouton ENTERE pour<br />
sélectionner Media Play (USB).<br />
N<br />
N<br />
N<br />
N<br />
N<br />
N<br />
N<br />
N<br />
N<br />
N<br />
N<br />
N<br />
N<br />
N<br />
Le protocole MTP (Media Transfer Protocol) n'est pas pris en charge.<br />
Le système <strong>de</strong> fichiers prend en charge les formats FAT16, FAT32 et NTFS.<br />
Il est possible que certains types d'appareils photo numériques et <strong>de</strong> périphériques audio<br />
USB ne soient pas compatibles avec ce téléviseur.<br />
Media Play ne prend en charge que les périphériques <strong>de</strong> stockage <strong>de</strong> masse<br />
USB <strong>de</strong> la classe MSC. Cette <strong>de</strong>rnière est dédiée aux périphériques <strong>de</strong><br />
transport <strong>de</strong> masse uniquement. Il s’agit notamment <strong>de</strong>s clés USB et <strong>de</strong>s<br />
lecteurs <strong>de</strong> cartes Flash (les concentrateurs et les disques durs USB ne sont<br />
pas pris en charge).<br />
Connectez-vous directement au port USB <strong>de</strong> votre téléviseur. Si vous utilisez<br />
une connexion par câble distincte, un problème <strong>de</strong> compatibilité USB risque<br />
<strong>de</strong> se poser.<br />
Avant <strong>de</strong> connecter l'appareil au téléviseur, sauvegar<strong>de</strong>z vos fichiers afin<br />
d'éviter qu'ils ne soient endommagés ou que <strong>de</strong>s données ne soient perdues. SAMSUNG ne saurait, en aucun cas, être<br />
tenu responsable <strong>de</strong> la perte <strong>de</strong> données ou <strong>de</strong> l'endommagement d'un fichier <strong>de</strong> données.<br />
Ne déconnectez pas le périphérique USB en cours <strong>de</strong> chargement.<br />
Plus la résolution <strong>de</strong> l'image est élevée, plus le temps d'affichage à l'écran sera long.<br />
La résolution JPEG maximale prise en charge est 15 360 x 8 640 pixels.<br />
Pour les fichiers non pris en charge ou endommagés, le message ‘Format <strong>de</strong> fichier inconnu’ s'affiche.<br />
Les fichiers MP3 avec gestion <strong>de</strong>s droits numériques (DRM) téléchargés à partir d'un site payant ne peuvent pas être lus.<br />
La technologie DRM (Gestion <strong>de</strong>s droits numériques) prend en charge la création <strong>de</strong> contenu, la distribution et la gestion<br />
intégrales du contenu (par exemple, la protection <strong>de</strong>s droits et <strong>de</strong>s intérêts <strong>de</strong>s fournisseurs <strong>de</strong> contenu, la prévention <strong>de</strong><br />
la copie illégale du contenu), ainsi que la gestion <strong>de</strong> la facturation et <strong>de</strong>s règlements.<br />
Si vous passez à une photo, son chargement peut prendre quelques secon<strong>de</strong>s. A ce sta<strong>de</strong>, l'icône <strong>de</strong> chargement<br />
apparaît.<br />
Si plusieurs périphériques MSC sont connectés, certains d'entre eux peuvent ne pas être reconnus. Si un périphérique<br />
nécessite beaucoup <strong>de</strong> puissance (plus <strong>de</strong> 500 mA ou 5 V), le périphérique USB peut ne pas être pris en charge.<br />
Si un message d'avertissement <strong>de</strong> surcharge s'affiche lorsque vous connectez ou utilisez un périphérique USB, le<br />
périphérique peut ne pas être reconnu ou mal fonctionner.<br />
Utilisation du bouton Remote Control dans le menu Media Play<br />
Bouton<br />
Opération<br />
▲/▼/◄/►<br />
Déplace le curseur pour sélectionner un élément.<br />
Vali<strong>de</strong> l'élément actuellement sélectionné. Lors <strong>de</strong> la lecture d'un diaporama ou d'un fichier <strong>de</strong><br />
ENTERE<br />
musique :<br />
- Appuyer sur le bouton ENTERE pendant la lecture suspend celle-ci.<br />
- Appuyer sur le bouton ENTERE en mo<strong>de</strong> Pause relance la lecture.<br />
∂/∑<br />
Lance la lecture ou bascule en pause.<br />
RETURN<br />
Revient au menu précé<strong>de</strong>nt.<br />
TOOLS<br />
Exécute diverses fonctions dans les menus Photo et Music (Musique).<br />
∫<br />
Arrête la lecture du diaporama ou du fichier <strong>de</strong> musique en cours.<br />
π/μ<br />
Passe au groupe précé<strong>de</strong>nt/suivant.<br />
INFO<br />
Affiche <strong>de</strong>s informations sur le fichier.<br />
MEDIA.P<br />
Quitte le mo<strong>de</strong>Media Play<br />
< P >, EXIT, TV Arrête le mo<strong>de</strong> Media Play et retourne au mo<strong>de</strong> TV.<br />
Photo<br />
SUM Périph.<br />
Panneau latéral du téléviseur<br />
Lecteur USB<br />
PHOTO<br />
Music<br />
SUM<br />
851.86<strong>MB</strong>/993.02<strong>MB</strong> Libre<br />
Setup<br />
R Retour<br />
Franç<strong>ais</strong> - 28
¦<br />
Fonction Media Play<br />
Cette fonction vous permet <strong>de</strong> lire les photos et/ou les fichiers <strong>de</strong> musique enregistrés sur un périphérique <strong>de</strong> stockage <strong>de</strong> masse<br />
USB (MSC).<br />
N Il est se peut que le fonctionnement ne soit pas correct avec <strong>de</strong>s fichiers multimédias sans licence.<br />
Accès au menuMedia Play (USB)<br />
1. Appuyez sur le bouton MENU. Appuyez sur le bouton ▲ ou ▼ pour sélectionner<br />
Application, puis sur le bouton ENTERE.<br />
2. Appuyez sur le bouton ▲ ou ▼ pour sélectionner Media Play (USB), puis sur le<br />
bouton ENTERE.<br />
N Le menu Media Play (USB) s'affiche.<br />
Photo<br />
INFO<br />
PHOTO<br />
Music<br />
SUM<br />
851.86<strong>MB</strong>/993.02<strong>MB</strong> Libre<br />
Setup<br />
SUM Périph.<br />
R Retour<br />
O<br />
Appuyez sur le bouton MEDIA.P <strong>de</strong> la télécomman<strong>de</strong> pour afficher le menu<br />
Media Play.<br />
AD<br />
O<br />
Appuyez sur le bouton SOURCE <strong>de</strong> la télécomman<strong>de</strong> pour afficher la liste<br />
<strong>de</strong>s sources. Appuyez ensuite sur le bouton ▲ ou ▼ pour sélectionner USB.<br />
3. Appuyez sur le bouton rouge, puis sur le bouton ▲ ou ▼ pour sélectionner la mémoire USB. Appuyez sur le bouton<br />
ENTERE.<br />
N<br />
N<br />
Cette fonction diffère selon l'unité <strong>de</strong> stockage USB.<br />
Le nom du périphérique USB sélectionné s'affiche dans le coin inférieur gauche <strong>de</strong> l'écran.<br />
4. Appuyez sur le bouton◄ ou ►pour sélectionner une icône (Photo, Music, Setup), puis appuyez sur le bouton ENTERE.<br />
N Pour quitter le mo<strong>de</strong> Media Play, appuyez sur le bouton MEDIA.P <strong>de</strong> la télécomman<strong>de</strong>.<br />
INFO<br />
Retrait d'une unité <strong>de</strong> stockage USB en toute sécurité<br />
Vous pouvez retirer le périphérique du téléviseur en toute sécurité.<br />
1. Appuyez sur le bouton TOOLS dans l'écran <strong>de</strong> la liste <strong>de</strong>s fichiers Media Play ou<br />
pendant la lecture d'un fichier <strong>de</strong> musique ou d'un diaporama.<br />
2. Appuyez sur le bouton ▲ ou ▼ pour sélectionner Retrait sécurisé puis sur le<br />
bouton ENTERE.<br />
3. Retirez le périphérique USB du téléviseur.<br />
1231.jpg<br />
1232.jpg<br />
1233.jpg<br />
AD<br />
1 2<br />
5/15 Diaporama<br />
Lire gp act.<br />
Information<br />
Retrait sécurisé<br />
1236.jpg<br />
1235.jpg<br />
1234.jpg<br />
1237.jpg<br />
Affichage<br />
../Photo/<br />
SUM Périph. Sélection T Outils R Dossier supérieur<br />
1 2<br />
1<br />
Section Liste <strong>de</strong> groupes<br />
c<br />
5/15<br />
Section Liste <strong>de</strong> fichiers<br />
1231.jpg 1232.jpg<br />
1236.jpg 1237.jpg<br />
1233.jpg<br />
1235.jpg<br />
1234.jpg<br />
2<br />
4<br />
../Photo/<br />
1Fich. sél.<br />
3 5<br />
SUM Périph. Sélection T Outils R Dossier supérieur<br />
Accé<strong>de</strong>z à Group List Section ou File List Section à l'ai<strong>de</strong> <strong>de</strong>s boutons Haut et Bas. Après avoir sélectionné une section, appuyez<br />
sur le bouton◄ ou ►pour sélectionner un élément.<br />
Franç<strong>ais</strong> - 29
1 View Groups : Le groupe <strong>de</strong> tri contenant le fichier actuellement sélectionné est mis en surbrillance.<br />
2 Fichier actuellement sélectionné: vous pouvez contrôler le fichier sélectionné. Les fichiers <strong>de</strong> photo sont affichés sous la forme<br />
<strong>de</strong> miniatures.<br />
3 Périphérique actuel: indique le nom du périphérique actuellement sélectionné. Appuyez sur le bouton rouge pour sélectionner<br />
un périphérique.<br />
rouge (Périph.): Sélectionne un appareil connecté.<br />
4 Informations <strong>de</strong> sélection: indique le nombre <strong>de</strong> fichiers sélectionnés en appuyant sur le bouton jaune.<br />
5 Options d'ai<strong>de</strong><br />
jaune (Sélection): sélectionne le fichier dans la liste. Les fichiers sélectionnés sont marqués du symbole c. Appuyez<br />
une nouvelle fois sur le bouton jaune pour annuler la sélection d'un fichier.<br />
TOOLS (Outils): affiche les menus d'options (le menu varie en fonction <strong>de</strong> l'état actuel).<br />
¦<br />
Menu d'options <strong>de</strong> la liste <strong>de</strong>s photos<br />
1. Appuyez sur le bouton MEDIA.P.<br />
2. Appuyez sur le bouton◄ ou ►pour sélectionner Photo, puis appuyez sur le<br />
bouton ENTERE.<br />
3. Appuyez sur le bouton◄ ou ►pour sélectionner le fichier photo <strong>de</strong> votre choix.<br />
N Sélection <strong>de</strong> plusieurs photos<br />
Appuyez sur le bouton◄ ou ►pour sélectionner le fichier photo <strong>de</strong> votre<br />
choix. Appuyez ensuite sur le bouton jaune.<br />
Répétez l'opération ci-<strong>de</strong>ssus pour sélectionner plusieurs fichiers photo.<br />
La marque c s'affiche à côté du fichier photo sélectionné.<br />
4. Appuyez sur le bouton TOOLS.<br />
N Le menu varie en fonction <strong>de</strong> l'état actuel.<br />
1 2<br />
5/15 Diaporama<br />
Lire gp act.<br />
Information<br />
Retrait sécurisé<br />
1231.jpg 1232.jpg<br />
1236.jpg 1237.jpg<br />
1233.jpg<br />
1235.jpg<br />
1234.jpg<br />
../Photo/<br />
SUM Périph. Sélection T Outils R Dossier supérieur<br />
❑<br />
❑<br />
❑<br />
❑<br />
Diaporama<br />
Ce menu vous permet <strong>de</strong> lire un diaporama à l'ai<strong>de</strong> <strong>de</strong>s fichiers photo situés sur l'unité <strong>de</strong> stockage USB.<br />
Lire gp act.<br />
Ce menu vous permet <strong>de</strong> lire un diaporama portant uniquement sur les fichiers photo du groupe <strong>de</strong> tri sélectionné.<br />
Désélectionner tout (lorsqu'au moins un fichier est sélectionné)<br />
Vous pouvez désélectionner tous les fichiers.<br />
N La marquec indiquant que le fichier correspondant est sélectionné est masquée.<br />
Information<br />
Affiche <strong>de</strong>s informations sur les fichiers photo, notamment le nom, la taille, la résolution, la date <strong>de</strong> modification et le chemin<br />
d'accès.<br />
N<br />
O<br />
Vous pouvez appliquer les mêmes procédures pour afficher les informations <strong>de</strong>s fichiers photo pendant un diaporama.<br />
Appuyez sur le bouton INFO pour afficher les informations.<br />
❑<br />
Retrait sécurisé<br />
Vous pouvez retirer le périphérique du téléviseur en toute sécurité.<br />
INFO<br />
AD<br />
Franç<strong>ais</strong> - 30
¦<br />
Visualisation d'une photo ou d'un diaporama<br />
Visualisation d'un diaporama<br />
1. Appuyez sur le bouton ▼ pour sélectionner Section Liste <strong>de</strong> fichiers.<br />
2. Appuyez sur le bouton TOOLS.<br />
3. Appuyez sur le bouton ▲ ou ▼ pour sélectionner Diaporama, puis appuyez sur<br />
le bouton ENTERE.<br />
N Tous les fichiers <strong>de</strong> la section Liste <strong>de</strong> fichiers seront utilisés pour le<br />
diaporama.<br />
1 2<br />
5/15 Diaporama<br />
Lire gp act.<br />
Information<br />
Retrait sécurisé<br />
1231.jpg 1232.jpg<br />
1236.jpg 1237.jpg<br />
1233.jpg<br />
1235.jpg<br />
1234.jpg<br />
../Photo/ INFO<br />
SUM Périph. Sélection T Outils R Dossier supérieur<br />
N<br />
N<br />
N<br />
Durant le diaporama, les fichiers s'affichent dans l'ordre à partir du fichier à<br />
l'écran.<br />
Le diaporama progresse dans l'ordre <strong>de</strong> tri choisi dans la section Liste <strong>de</strong> fichiers.<br />
Des fichiers musicaux peuvent être lus automatiquement pendant le diaporama,<br />
si l'option Fond musical est définie sur Mar..<br />
▶ Normal<br />
1234.jpg 580x765 2009/01/02 5/15<br />
SUM<br />
E Pause AD ◀▶ Préc/Suiv T Outils R Retour<br />
O<br />
Lorsqu'une liste <strong>de</strong> photos est affichée, appuyez sur le bouton ∂(Lire)/<br />
ENTERE <strong>de</strong> la télécomman<strong>de</strong> pour lancer le diaporama.<br />
N<br />
Boutons <strong>de</strong> comman<strong>de</strong> du diaporama<br />
Bouton<br />
Opération<br />
ENTERE Lance/interrompt la lecture du diaporama.<br />
∂<br />
Lance la lecture du diaporama.<br />
∑<br />
Interrompt la lecture du diaporama.<br />
Permet <strong>de</strong> quitter le mo<strong>de</strong> diaporama et <strong>de</strong> revenir à la<br />
∫<br />
liste <strong>de</strong>s photos.<br />
π/μ Modifie la vitesse <strong>de</strong> lecture du diaporama.<br />
TOOLS<br />
Exécute diverses fonctions dans les menus Photo.<br />
Lecture du groupe courant<br />
1. Appuyez sur le bouton ▼ pour accé<strong>de</strong>r à Section Liste <strong>de</strong> groupes.<br />
2. Sélectionnez un groupe à l'ai<strong>de</strong> <strong>de</strong>s boutons ◄ et ►.<br />
3. Appuyez sur le bouton ∂ (Lire). Un diaporama débute par les fichiers du<br />
groupe sélectionné.<br />
1 2<br />
5/15<br />
●<br />
Ou<br />
1. Dans File List Section, sélectionnez les fichiers contenus dans le groupe désiré.<br />
N Pour passer au groupe précé<strong>de</strong>nt/suivant, appuyez sur le bouton π<br />
(Retour arrière) ou µ (Avance rapi<strong>de</strong>).<br />
2. Appuyez sur le bouton TOOLS.<br />
3. Appuyez sur le bouton ▲ ou ▼ pour sélectionner Lire gp act., puis sur le bouton ENTERE.<br />
N Seules les photos du groupe contenant les fichiers sélectionnés seront utilisées pour le diaporama.<br />
Pour exécuter un diaporama avec uniquement les fichiers sélectionnés<br />
1. Appuyez sur le bouton ▼ pour sélectionner Section Liste <strong>de</strong> fichiers.<br />
2. Appuyez sur le bouton◄ ou ►pour sélectionner la photo voulue dans File List Section.<br />
3. Appuyez sur le bouton jaune.<br />
4. Répétez l'opération ci-<strong>de</strong>ssus pour sélectionner plusieurs photos.<br />
N<br />
N<br />
N<br />
La marque c s'affiche à gauche <strong>de</strong>s photos sélectionnées.<br />
Si vous sélectionnez un seul fichier, le diaporama ne s'exécute pas.<br />
Pour désélectionner tous les fichiers, appuyez sur le bouton TOOLS, puis sélectionnez Désélectionner tout.<br />
5. Appuyez sur le bouton ∂ (Lire)/ENTERE.<br />
N Les fichiers sélectionnés seront utilisés pour le diaporama.<br />
1231.jpg<br />
1232.jpg<br />
../Photo/<br />
1233.jpg<br />
1234.jpg<br />
1235.jpg<br />
1236.jpg<br />
1237.jpg<br />
SUM Périph. Sélection T Outils R Dossier supérieur<br />
Franç<strong>ais</strong> - 31
● Ou<br />
1. Dans File List Section, appuyez sur les boutons jaunes pour sélectionner les photos <strong>de</strong> votre choix.<br />
2. Appuyez sur le bouton TOOLS.<br />
3. Appuyez sur le bouton ▲ ou ▼ pour sélectionner Diaporama, puis appuyez sur le bouton ENTERE.<br />
N Les fichiers sélectionnés seront utilisés pour le diaporama.<br />
¦<br />
❑<br />
❑<br />
❑<br />
❑<br />
❑<br />
■<br />
■<br />
❑<br />
❑<br />
❑<br />
Menu d'options du diaporama<br />
1. Pendant un diaporama (ou l'affichage d'une photo), appuyez sur le bouton TOOLS<br />
pour définir l'option.<br />
2. Appuyez sur le bouton ◄ ou ► pour sélectionner l'option, puis appuyez sur le<br />
bouton ENTERE.<br />
Arrêter le diaporama / Lancer le diaporama<br />
Vous pouvez lancer ou arrêter un diaporama.<br />
Vitesse du diaporama → Lent / Normal / Rapi<strong>de</strong><br />
Sélectionnez cette option pour modifier la vitesse <strong>de</strong> défilement du diaporama.<br />
N<br />
N<br />
Cette fonction est uniquement disponible au cours d'un diaporama.<br />
Vous pouvez également modifier la vitesse du diaporama en appuyant sur la touche π (Retour arrière) ou μ (Avance<br />
rapi<strong>de</strong>) pendant la lecture.<br />
Rotat.<br />
Vous pouvez faire pivoter les photos enregistrées sur une unité <strong>de</strong> stockage USB.<br />
N<br />
N<br />
N<br />
Chaque fois que vous appuyez sur le bouton ◄, la photo pivote successivement à 270˚, 180˚, 90˚ et 0˚.<br />
Chaque fois que vous appuyez sur le bouton ►, la photo pivote successivement <strong>de</strong> 90˚, 180˚, 270˚ et 0˚.<br />
Le fichier pivoté n'est pas enregistré.<br />
Zoom<br />
Vous pouvez faire agrandir les photos enregistrées sur une unité <strong>de</strong> stockage USB. (x1 → x2 → x4)<br />
N Pour déplacer l'image agrandie, appuyez sur le bouton ENTERE, puis sur les boutons ▲/▼/◄/►. Notez que lorsque la<br />
taille <strong>de</strong> l'image agrandie est inférieure à celle <strong>de</strong> l'écran, la fonction <strong>de</strong> déplacement est inopérante.<br />
N Le fichier agrandi n'est pas enregistré.<br />
Fond musical<br />
Vous pouvez sélectionner le fond musical d'un diaporama.<br />
N Pour utiliser cette fonction, <strong>de</strong> la musique et <strong>de</strong>s photos doivent être stockées sur l'unité USB.<br />
Fond musical → Arr. / Mar.<br />
● Arr. : le fond musical n'est pas lu.<br />
● Mar.: lorsque le fond musical est disponible, si vous sélectionnez Mar., la musique est lue.<br />
Sél. fich. music. (0 Fich. sél.)<br />
Seul le fichier musical sélectionné est défini comme fond musical.<br />
Réglage <strong>de</strong> l'image / Réglage du son<br />
Vous pouvez sélectionner les réglages <strong>de</strong> l'image et du son.<br />
Information<br />
Les informations relatives au fichier photo sont affichées.<br />
Retrait sécurisé<br />
Vous pouvez retirer le périphérique du téléviseur en toute sécurité.<br />
Outils<br />
Arrêter le diaporama<br />
Vitesse du diaporama :<br />
Rotat.<br />
Zoom<br />
Fond musical<br />
Réglage <strong>de</strong> l'image<br />
Réglage du son<br />
Information<br />
Retrait sécurisé<br />
Normal<br />
U Déplacer E Entrer e Quitter<br />
Franç<strong>ais</strong> - 32
¦<br />
Menu d'options <strong>de</strong> la liste musicale<br />
1. Appuyez sur le bouton MEDIA.P.<br />
2. Appuyez sur le bouton ◄ ou ►pour sélectionner Music, puis appuyez sur le<br />
bouton ENTERE.<br />
3. Appuyez sur le bouton ◄ ou ► pour sélectionner le fichier musical <strong>de</strong> votre<br />
choix.<br />
N Sélection <strong>de</strong> plusieurs fichiers musicaux<br />
Appuyez sur le bouton◄ ou ►pour sélectionner le fichier musical <strong>de</strong><br />
votre choix. Appuyez ensuite sur le bouton jaune.<br />
Répétez l'opération ci-<strong>de</strong>ssus pour sélectionner plusieurs fichiers<br />
musicaux.<br />
La marque c s'affiche à côté du fichier musical sélectionné.<br />
4. Appuyez sur le bouton TOOLS.<br />
N Le menu varie en fonction <strong>de</strong> l'état actuel.<br />
4<br />
5 1 2 3<br />
Energique 3/37 Lire gp act.<br />
Glen Hans Information<br />
Once Ost<br />
2007<br />
Retrait sécurisé<br />
Soundtrack<br />
Lies Want Me<br />
Gold Shine<br />
Way<br />
HaHaHa<br />
I Love You<br />
../Music/<br />
SUM Périph. Sélection T Outils R Dossier supérieur<br />
❑<br />
❑<br />
❑<br />
Lire gp act.<br />
Ce menu vous permet <strong>de</strong> lire uniquement les fichiers musicaux du groupe <strong>de</strong> tri sélectionné.<br />
Désélectionner tout (lorsqu'au moins un fichier est sélectionné)<br />
Vous pouvez désélectionner tous les fichiers.<br />
N La marquec indiquant que le fichier correspondant est sélectionné est masquée.<br />
Information<br />
Affiche <strong>de</strong>s informations sur les fichiers musicaux, notamment le nom, la taille, la date <strong>de</strong> modification et le chemin d'accès.<br />
N<br />
O<br />
Vous pouvez afficher les informations du fichier musical durant Lire gp act. à l'ai<strong>de</strong> <strong>de</strong>s mêmes procédures.<br />
Appuyez sur le bouton INFO pour afficher les informations.<br />
❑<br />
Retrait sécurisé<br />
Vous pouvez retirer le périphérique du téléviseur en toute sécurité.<br />
INFO<br />
AD<br />
Franç<strong>ais</strong> - 33
¦<br />
Lecture <strong>de</strong> musique<br />
Lecture d'un fichier musical<br />
1. Appuyez sur le bouton ▼ pour sélectionner Section Liste <strong>de</strong> fichiers.<br />
2. Appuyez sur le bouton◄ ou ►pour sélectionner le fichier musical à lire.<br />
3. Appuyez sur le bouton ∂ (Lire)/ENTERE.<br />
N Ce menu affiche uniquement les fichiers portant l'extension MP3. Les fichiers<br />
portant d'autres extensions ne s'affichent pas, même s'ils sont enregistrés<br />
sur le même périphérique USB.<br />
N Le fichier sélectionné s'affiche en haut <strong>de</strong> l'écran, avec la durée <strong>de</strong> lecture.<br />
N Pour régler le volume sonore, appuyez sur le bouton <strong>de</strong> volume <strong>de</strong> la<br />
SUM<br />
télécomman<strong>de</strong>. Pour couper le son, appuyez sur le bouton MUTE <strong>de</strong> la<br />
télécomman<strong>de</strong>.<br />
N Si le son est déformé lors <strong>de</strong> la lecture <strong>de</strong> fichiers MP3, réglez les options Egaliseur et SRS TruSurround HD dans le<br />
menu Sound. (un fichier MP3 surmodulé peut être à l'origine d'un problème sonore).<br />
N La durée <strong>de</strong> lecture d'un fichier musical peut s'afficher sous la forme ‘00:00:00’ si les informations relatives au temps <strong>de</strong><br />
lecture ne figurent pas au début du fichier.<br />
N π (Retour arrière) et µ (Avance rapi<strong>de</strong>) ne fonctionnent pas durant la lecture.<br />
N Boutons <strong>de</strong> comman<strong>de</strong> <strong>de</strong> lecture<br />
Bouton<br />
ENTERE<br />
∂<br />
∑<br />
∫<br />
TOOLS<br />
Opération<br />
Lance/interrompt la lecture du fichier musical.<br />
Lance la lecture du fichier musical.<br />
Interrompt la lecture du fichier musical.<br />
Quitte le mo<strong>de</strong> <strong>de</strong> lecture et revient à la liste musicale.<br />
Exécute diverses fonctions dans les menus Musique.<br />
▶ 00:00:04 / 00:04:04 3/37<br />
Way<br />
I Love You<br />
HaHaHa<br />
E Pause ◀▶ Préc/Suiv T Outils R Retour<br />
N<br />
Icône d'informations sur la fonction Musique (Music)<br />
p<br />
q<br />
Tous les fichiers musicaux du dossier (ou le fichier sélectionné) sont répétés. Mo<strong>de</strong> rep. est<br />
défini sur Mar..<br />
Tous les fichiers musicaux du dossier (ou le fichier sélectionné) sont lus une seule fois. Mo<strong>de</strong><br />
rep. est défini sur Arr..<br />
Lecture du groupe <strong>de</strong> musiques<br />
1. Appuyez sur le bouton ▼ pour accé<strong>de</strong>r à Section Liste <strong>de</strong> groupes.<br />
2. Sélectionnez un groupe à l'ai<strong>de</strong> <strong>de</strong>s boutons ◄ et ►.<br />
3. Appuyez sur le bouton ∂ (Lire). La lecture <strong>de</strong>s fichiers du groupe sélectionné commence.<br />
●<br />
Ou<br />
1. Dans File List Section, sélectionnez les fichiers contenus dans le groupe désiré.<br />
N Pour passer au groupe précé<strong>de</strong>nt/suivant, appuyez sur le bouton π (Retour arrière) ou µ (Avance rapi<strong>de</strong>).<br />
2. Appuyez sur le bouton TOOLS.<br />
3. Appuyez sur le bouton ▲ ou ▼ pour sélectionner Lire gp act., puis sur le bouton ENTERE.<br />
N Tous les fichiers musicaux du groupe <strong>de</strong> tri, y compris le fichier sélectionné, sont lus.<br />
Lecture <strong>de</strong>s fichiers musicaux sélectionnés<br />
1. Appuyez sur le bouton ▼ pour sélectionner Section Liste <strong>de</strong> fichiers.<br />
2. Appuyez sur le bouton◄ ou ►pour sélectionner le fichier musical <strong>de</strong> votre choix.<br />
3. Appuyez sur le bouton jaune.<br />
4. Répétez l'opération ci-<strong>de</strong>ssus pour sélectionner plusieurs fichiers musicaux.<br />
N<br />
N<br />
La marque c s'affiche à gauche du fichier musical sélectionné.<br />
Pour désélectionner tous les fichiers, appuyez sur le bouton TOOLS, puis sélectionnez Désélectionner tout.<br />
5. Appuyez sur le bouton ∂ (Lire)/ENTERE.<br />
N Les fichiers sélectionnés sont lus.<br />
Franç<strong>ais</strong> - 34
¦<br />
Menu d'options <strong>de</strong> lecture <strong>de</strong> musique<br />
Menu d'options <strong>de</strong> lecture <strong>de</strong> musique<br />
❑<br />
❑<br />
❑<br />
❑<br />
Mo<strong>de</strong> rep. → Mar. / Arrêt<br />
Vous pouvez lire <strong>de</strong>s fichiers musicaux en boucle.<br />
Réglage <strong>de</strong> l'image / Réglage du son<br />
Vous pouvez configurer les réglages <strong>de</strong> l'image et du son.<br />
Information<br />
Les informations relatives au fichier musical sont affichées.<br />
Retrait sécurisé<br />
Vous pouvez retirer le périphérique du téléviseur en toute sécurité.<br />
Outils<br />
Modo rep. ◀ Mar. ▶<br />
Réglage <strong>de</strong> l'image<br />
Réglage du son<br />
Information<br />
Retrait sécurisé<br />
U Déplacer L Régler e Quitter<br />
¦<br />
Utilisation du menu Setup<br />
Le menu Setup affiche les paramètres utilisateur du menu Media Play.<br />
1. Appuyez sur le bouton MEDIA.P.<br />
851.86<strong>MB</strong>/993.02<strong>MB</strong> Libre<br />
SUM<br />
2. Appuyez sur le bouton◄ ou ► pour sélectionner Setup, puis sur le bouton<br />
ENTERE.<br />
SETUP<br />
3. Appuyez sur le bouton ▲ ou ▼ pour sélectionner l'option <strong>de</strong> votre choix.<br />
4. Appuyez sur le bouton◄ ou ► pour sélectionner l'option.<br />
N<br />
Pour quitter le mo<strong>de</strong> Media Play, appuyez sur le bouton MEDIA.P <strong>de</strong> la<br />
télécomman<strong>de</strong>.<br />
Photo<br />
SUM Périph.<br />
Music<br />
Setup<br />
e Quitter<br />
■<br />
■<br />
■<br />
Mo<strong>de</strong> Répéter la musique → Mar. / Arr.<br />
Permet <strong>de</strong> répéter la lecture <strong>de</strong> fichiers musicaux.<br />
Temps d’ex. éco. écran → 2 Heures / 4 Heures / 8 Heures<br />
Sélectionnez cette option pour définir le délai avant l'activation <strong>de</strong> l'écran <strong>de</strong> veille.<br />
Information<br />
Affiche les informations <strong>de</strong> l'appareil connecté.<br />
Mo<strong>de</strong> Répéter la musique ◀ Mar. ▶<br />
Temps d'ex. éco. écran : 2 heures<br />
Information<br />
Retrait sécurisé<br />
■<br />
Retrait sécurisé<br />
Vous pouvez retirer le périphérique du téléviseur en toute sécurité.<br />
SUM Périph.<br />
U Déplacer L Régler R Retour<br />
Franç<strong>ais</strong> - 35
ANYNET+<br />
¦<br />
Connexion <strong>de</strong> périphériques Anynet+<br />
Qu’est-ce qu'Anynet+?<br />
Anynet+ est une fonction qui vous permet <strong>de</strong> contrôler tous les appareils <strong>Samsung</strong> connectés compatibles Anynet+ avec votre<br />
télécomman<strong>de</strong> <strong>Samsung</strong>. Le système Anynet+ peut être utilisé uniquement avec les appareils <strong>Samsung</strong> disposant <strong>de</strong> la fonction<br />
Anynet+. Pour vérifier que votre périphérique <strong>Samsung</strong> dispose <strong>de</strong> cette fonction, assurez-vous qu'il porte le logo Anynet+.<br />
Connexion à un téléviseur<br />
TV<br />
Périphérique Anynet + 1<br />
Périphérique Anynet + 2 Périphérique Anynet + 3 Périphérique Anynet + 4<br />
Câble HDMI 1.3<br />
Câble HDMI 1.3<br />
Câble HDMI 1.3<br />
Câble HDMI 1.3<br />
1. A l'ai<strong>de</strong> d'un câble HDMI, reliez la prise HDMI IN (1, 2, 3(DVI) ou 4) du téléviseur à la prise HDMI OUT du périphérique<br />
Anynet+ correspondant.<br />
Connexion à un système home cinéma<br />
TV<br />
Home cinéma<br />
Périphérique Anynet + 1<br />
Câble HDMI 1.3<br />
Câble optique<br />
Câble HDMI 1.3<br />
Périphérique Anynet + 2 Périphérique Anynet + 3 Périphérique Anynet + 4<br />
Câble HDMI 1.3<br />
Câble HDMI 1.3<br />
Câble HDMI 1.3<br />
1. A l'ai<strong>de</strong> d'un câble HDMI, reliez la prise HDMI IN (1, 2, 3(DVI) ou 4) du téléviseur à la prise HDMI OUT du périphérique<br />
Anynet+ correspondant.<br />
2. A l'ai<strong>de</strong> du câble HDMI, reliez la prise HDMI IN du système home cinéma à la prise HDMI OUT <strong>de</strong> l'appareil Anynet+<br />
correspondant.<br />
N<br />
N<br />
N<br />
N<br />
N<br />
N<br />
Connectez le câble optique entre la prise DIGITAL AUDIO OUT (OPTICAL) <strong>de</strong> votre téléviseur et l'entrée Digital Audio<br />
(audio numérique) <strong>de</strong> votre système home cinéma.<br />
Si vous suivez les instructions <strong>de</strong> connexion ci-avant, la prise optique produit uniquement un signal audio 2 voies. Vous<br />
n'entendrez du son qu'au niveau <strong>de</strong>s haut-parleurs avant gauche et droit et du c<strong>ais</strong>son <strong>de</strong> basses <strong>de</strong> votre système home cinéma.<br />
Pour écouter <strong>de</strong>s chaînes audio 5.1, branchez la prise DIGITAL AUDIO OUT (OPTICAL) du lecteur DVD ou du récepteur satellite<br />
(c.-à-d. appareil Anynet 1 ou 2) directement sur l’amplificateur ou sur un système home cinéma, et non sur le téléviseur.<br />
Ne connectez qu'un seul système home cinéma.<br />
Vous pouvez connecter un périphérique Anynet+ à l'ai<strong>de</strong> du câble HDMI 1.3. Certains câbles HDMI peuvent ne pas<br />
prendre en charge les fonctions Anynet+.<br />
Anynet+ fonctionne si le périphérique compatible est en mo<strong>de</strong> veille (Veille) ou en marche (Marche).<br />
Anynet+ prend en charge jusqu'à 12 périphériques AV. Vous pouvez connecter jusqu'à 3 périphériques du même type.<br />
Franç<strong>ais</strong> - 36
¦<br />
Configuration d'Anynet+<br />
T<br />
Appuyez sur le bouton TOOLS pour afficher le menu Outils. Vous pouvez également<br />
afficher le menu Anynet+ en sélectionnant Outils → Anynet+ (HDMI-CEC).<br />
Application<br />
Media Play (USB)<br />
Anynet+ (HDMI-CEC)<br />
❑<br />
■<br />
Configuration<br />
Anynet+ (HDMI-CEC) → Arr./ Mar.<br />
Pour utiliser la fonction Anynet+, l'option Anynet+ (HDMI-CEC) doit être activée (Mar.).<br />
N Lorsque la fonction Anynet+ (HDMI-CEC) est désactivée, toutes les activités associées à<br />
Anynet+ sont également désactivées.<br />
Configuration<br />
Anynet+ (HDMI-CEC) : Mar. ▶<br />
Arrêt automatique<br />
: Oui<br />
■<br />
¦<br />
Arrêt automatique → Non / Oui<br />
Extinction automatique d'un périphérique Anynet+ lorsque le téléviseur est mis hors tension<br />
N La source active sur la télécomman<strong>de</strong> du téléviseur doit être définie sur TV pour pouvoir<br />
utiliser la fonction Anynet+.<br />
N Si vous réglez Arrêt automatique sur Oui, les périphériques connectés s'éteignent lors <strong>de</strong><br />
la mise hors tension du téléviseur. Toutefois, si un périphérique est en train d'enregistrer, il<br />
se peut qu'il ne s'éteigne pas.<br />
Commutation entre périphériques Anynet+<br />
U Déplacer E Entrer R Retour<br />
Configuration<br />
Anynet+ (HDMI-CEC)<br />
: Mar.<br />
Arrêt automatique : Oui ▶<br />
U Déplacer E Entrer R Retour<br />
1. Appuyez sur le bouton TOOLS. Appuyez sur le bouton ENTERE pour sélectionner<br />
Anynet+ (HDMI-CEC).<br />
2. Appuyez sur le bouton ▲ ou ▼ pour sélectionner Liste d'appareils, puis appuyez sur le<br />
bouton ENTERE.<br />
N<br />
N<br />
La liste <strong>de</strong>s périphériques Anynet+ connectés au téléviseur s'affiche.<br />
Si le périphérique souhaité est introuvable, appuyez sur le bouton rouge pour<br />
chercher <strong>de</strong>s périphériques.<br />
3. Appuyez sur le bouton ▲ ou ▼ pour sélectionner un périphérique particulier, puis<br />
appuyez sur le bouton ENTERE. Vous passez ainsi au périphérique sélectionné.<br />
N Le menu Liste d'appareils ne s'affiche que si Anynet+ (HDMI-CEC) est activé dans le menu Application.<br />
N<br />
N<br />
N<br />
N<br />
N<br />
Le basculement vers le périphérique sélectionné peut prendre jusqu'à 2 minutes. Il est impossible d'annuler l'opération <strong>de</strong><br />
basculement en cours.<br />
Le temps <strong>de</strong> recherche nécessaire dépend du nombre <strong>de</strong> périphériques connectés.<br />
Au terme <strong>de</strong> la recherche, le nombre <strong>de</strong> périphériques trouvés ne s'affiche pas.<br />
Bien que le téléviseur examine automatiquement la liste <strong>de</strong>s périphériques lorsqu'il est mis sous tension à l'ai<strong>de</strong> du bouton<br />
marche/arrêt, les périphériques connectés au téléviseur alors que celui-ci est déjà allumé ne s'affichent pas toujours<br />
automatiquement dans la liste. Appuyez sur le bouton rouge pour rechercher le périphérique connecté.<br />
Si vous avez choisi un mo<strong>de</strong> d'entrée externe en appuyant sur le bouton SOURCE, vous ne pouvez pas utiliser la fonction<br />
Anynet+. Veillez à basculer vers un périphérique Anynet+ à l'ai<strong>de</strong> <strong>de</strong> la Liste d'appareils.<br />
Menu Anynet+<br />
Le menu Anynet+ varie selon le type et l'état <strong>de</strong>s périphériques Anynet+ connectés au téléviseur.<br />
N<br />
Menu Anynet+<br />
Voir télévision<br />
Liste d'appareils<br />
MENU (nom_appareil)<br />
INFO (nom_appareil)<br />
Enregistrement :<br />
(*enregistreur)<br />
Arrêter Enr. : (*enregistreur)<br />
Récepteur<br />
Voir télévision<br />
Liste d'appareils<br />
Enregistrement: DVDR<br />
DVDR MENU<br />
DVDR INFO<br />
Récepteur : Arr.<br />
Configuration<br />
U Déplacer E Entrer R Retour<br />
Description<br />
Le mo<strong>de</strong> Anynet+ change en mo<strong>de</strong> <strong>de</strong> diffusion TV.<br />
Affiche la liste <strong>de</strong>s périphériques Anynet+.<br />
Affiche les menus du périphérique connecté. Par exemple, si un graveur DVD est<br />
connecté, son menu <strong>de</strong> disque s'affiche.<br />
Affiche le menu <strong>de</strong> lecture du périphérique connecté. Par exemple, si un graveur DVD<br />
est connecté, son menu <strong>de</strong> lecture s'affiche.<br />
Lance immédiatement l'enregistrement avec le graveur (cette fonction n'est disponible<br />
que pour les périphériques prenant en charge la fonction d'enregistrement).<br />
Arrête l'enregistrement.<br />
Le son est émis par l'intermédiaire du récepteur.<br />
Si plusieurs enregistreurs sont connectés, ils s'affichent sous la forme (*enregistreur); si un seul enregistreur est connecté, il<br />
s'affiche sous la forme (*nom_périphérique).<br />
Franç<strong>ais</strong> - 37
Boutons <strong>de</strong> la télécomman<strong>de</strong> du téléviseur disponibles en mo<strong>de</strong> Anynet+<br />
N<br />
N<br />
N<br />
N<br />
N<br />
N<br />
Type <strong>de</strong> périph. État <strong>de</strong> fonctionnement Boutons disponibles<br />
Périphérique<br />
Anynet+<br />
Après basculement vers le périphérique,<br />
lorsque son menu s'affiche à l'écran.<br />
Touches numériques<br />
▲/▼/◄/►/ENTERE<br />
Boutons <strong>de</strong> couleur / Bouton EXIT<br />
Après basculement vers le périphérique,<br />
pendant la lecture d'un fichier.<br />
Après le basculement vers l'appareil,<br />
Périphérique à<br />
lorsque vous regar<strong>de</strong>z un programme P > / P <<br />
tuner intégré<br />
télévisé.<br />
Périphérique audio Lorsque le récepteur est activé. Y/ bouton MUTE<br />
π(recherche vers l'arrière) / μ(recherche vers<br />
l'avant) / ∫(Arrêt) / ∂(Lire) / ∑(Pause)<br />
La fonction Anynet+ n'est utilisable que si la source active définie sur la télécomman<strong>de</strong> est TV.<br />
Le bouton ∏ ne fonctionne que si le périphérique est dans un état où l'enregistrement est possible.<br />
Il est impossible <strong>de</strong> comman<strong>de</strong>r <strong>de</strong>s périphériques Anynet+ à l'ai<strong>de</strong> <strong>de</strong>s boutons situés sur le téléviseur. Vous ne pouvez<br />
comman<strong>de</strong>r <strong>de</strong>s périphériques Anynet+ qu'au moyen <strong>de</strong> la télécomman<strong>de</strong> du téléviseur.<br />
Il se peut que la télécomman<strong>de</strong> du téléviseur ne fonctionne pas dans certaines conditions. Dans ce cas, sélectionnez <strong>de</strong><br />
nouveau le périphérique Anynet+.<br />
Les fonctions d'Anynet+ n'opèrent pas sur <strong>de</strong>s produits d'autres fabricants.<br />
Les opérations π et µ peuvent varier en fonction du périphérique.<br />
¦<br />
Enregistrement<br />
Vous pouvez enregistrer un programme télévisé à l'ai<strong>de</strong> d'un enregistreur <strong>Samsung</strong>.<br />
1. Appuyez sur le bouton TOOLS. Appuyez sur le bouton ENTERE pour sélectionner<br />
Anynet+ (HDMI-CEC).<br />
2. Appuyez sur le bouton ▲ ou ▼ pour sélectionner Recording Immediately puis appuyez<br />
sur le bouton ENTERE. L'enregistrement commence.<br />
N S'il y a plusieurs périphériques d'enregistrement<br />
Si plusieurs enregistreurs sont connectés, leur liste s'affiche. Appuyez sur le bouton<br />
▲ ou ▼ pour sélectionner un appareil, puis appuyez sur le bouton ENTERE.<br />
L'enregistrement commence.<br />
N Si le périphérique d'enregistrement ne s'affiche pas, sélectionnez Liste d’appareils<br />
puis appuyez sur le bouton rouge pour chercher <strong>de</strong>s appareils<br />
3. Appuyez sur le bouton EXIT pour quitter le menu.<br />
N<br />
N<br />
N<br />
Voir télévision<br />
Liste d'appareils<br />
Enregistrement: DVDR<br />
DVDR MENU<br />
DVDR INFO<br />
Récepteur : Arr.<br />
Configuration<br />
U Déplacer E Entrer R Retour<br />
Vous pouvez effectuer un enregistrement en sélectionnant Enregistrement: (nom_périphérique).<br />
Appuyer sur le bouton ∏ permet d'enregistrer ce que vous regar<strong>de</strong>z. Si vous regar<strong>de</strong>z une vidéo provenant d'un autre<br />
périphérique, elle est enregistrée.<br />
Avant d'enregistrer, vérifiez la connexion <strong>de</strong> la fiche d'antenne au périphérique d'enregistrement. Pour connecter<br />
correctement une antenne à un périphérique d'enregistrement, reportez-vous au mo<strong>de</strong> d'emploir <strong>de</strong> ce <strong>de</strong>rnier.<br />
¦<br />
Écoute via un récepteur (home cinéma)<br />
Vous pouvez écouter du son via un récepteur au lieu du haut-parleur du téléviseur.<br />
1. Appuyez sur le bouton TOOLS. Appuyez sur le bouton ENTERE pour sélectionner<br />
Anynet+ (HDMI-CEC).<br />
2. Appuyez sur le bouton ▲ ou ▼ pour sélectionner Récepteur: Appuyez sur le bouton<br />
◄ ou ► pour sélectionner Mar. ou Arr..<br />
Voir télévision<br />
Liste d'appareils<br />
Enregistrement: DVDR<br />
DVDR MENU<br />
DVDR INFO<br />
Récepteur : Arr.<br />
Configuration<br />
3. Appuyez sur le bouton EXIT pour quitter le menu.<br />
N Si votre récepteur ne prend en charge que l'audio, il se peut qu'il ne figure pas dans<br />
la liste <strong>de</strong>s périphériques.<br />
N Le récepteur fonctionnera lorsque vous aurez correctement raccordé la fiche d'entrée<br />
U Déplacer E Entrer R Retour<br />
optique du récepteur à la prise <strong>de</strong> sortie numérique (optique) DIGITAL AUDIO OUT<br />
(OPTICAL) du téléviseur.<br />
N Lorsque le récepteur (home cinéma) est activé, vous pouvez écouter le son sortant <strong>de</strong> la prise optique du téléviseur.<br />
Lorsque le téléviseur affiche un signal DTV (air), il envoie un son 5.1 au récepteur du home cinéma. Lorsque la source est<br />
un composant numérique (par exemple, un DVD) connecté au téléviseur TV via HDMI, le récepteur home cinéma n'émet<br />
qu'un son 2 voies.<br />
N Si une coupure <strong>de</strong> courant se produit alors que l'option Récepteur est réglée sur Mar. (câble d'alimentation débranché<br />
ou panne <strong>de</strong> courant), il se peut que l'option Sélection Haut-parleur soit réglée sur Ht-parl ext lorsque vous rallumez le<br />
téléviseur.<br />
Franç<strong>ais</strong> - 38
¦ Dépannage d'Anynet+<br />
Problème<br />
Anynet+ ne fonctionne pas.<br />
Je veux démarrer Anynet+.<br />
Je veux quitter Anynet+.<br />
Le message ‘Connexion à<br />
Anynet +’ apparaît à l'écran.<br />
La lecture ne démarre pas sur<br />
l'appareil Anynet+.<br />
Le périphérique connecté ne<br />
s'affiche pas.<br />
Le programme TV ne<br />
s’enregistre pas.<br />
Le son du téléviseur ne sort<br />
pas par le récepteur.<br />
Solution possible<br />
● Vérifiez si le périphérique est compatible Anynet+. Le système Anynet+ ne prend en charge<br />
que les périphériques compatibles Anynet+.<br />
●<br />
●<br />
●<br />
●<br />
●<br />
●<br />
●<br />
●<br />
●<br />
●<br />
●<br />
●<br />
●<br />
●<br />
●<br />
●<br />
●<br />
●<br />
●<br />
●<br />
●<br />
●<br />
●<br />
●<br />
●<br />
Ne connectez qu'un seul récepteur (home cinéma).<br />
Vérifiez si le cordon d'alimentation du périphérique Anynet+ est bien connecté.<br />
Vérifiez la connexion <strong>de</strong>s câbles vidéo/audio/HDMI 1.3 du périphérique Anynet+.<br />
Vérifiez qu'Anynet+ (HDMI-CEC) est défini sur ON dans le menu <strong>de</strong> configuration<br />
d'Anynet+.<br />
Vérifiez si la télécomman<strong>de</strong> du téléviseur est en mo<strong>de</strong> TV.<br />
Vérifiez s'il s'agit d'une télécomman<strong>de</strong> spéciale Anynet+.<br />
Anynet+ ne fonctionne pas dans toutes les conditions. (Recherche <strong>de</strong> chaînes,<br />
fonctionnement <strong>de</strong> Media Play, Plug & Play, etc.)<br />
Lorsque vous branchez ou retirez le câble HDMI 1.3, veillez à relancer une recherche <strong>de</strong><br />
périphérique ou à éteindre et rallumer votre téléviseur.<br />
Vérifiez si la fonction Anynet+ du périphérique Anynet+ est activée.<br />
Assurez-vous que le périphérique Anynet+ est correctement connecté au téléviseur et<br />
que la fonction Anynet+ (HDMI-CEC) est réglée sur Mar. dans le menu Configuration<br />
d'Anynet+.<br />
Appuyez sur le bouton TV <strong>de</strong> la télécomman<strong>de</strong> pour allumer le téléviseur. Appuyez ensuite<br />
sur le bouton TOOLS pour afficher le menu Anynet+ puis sélectionnez le menu <strong>de</strong> votre<br />
choix.<br />
Sélectionnez Voir télévision dans le menu Anynet+.<br />
Appuyez sur le bouton SOURCE <strong>de</strong> la télécomman<strong>de</strong>, puis sélectionnez un périphérique<br />
non compatible Anynet+<br />
Appuyez sur P >/
RECOMMENDATIONS<br />
¦<br />
Fonction Télétexte<br />
La plupart <strong>de</strong>s chaînes <strong>de</strong> télévision offrent <strong>de</strong>s services d'informations écrites via le télétexte. La page d'in<strong>de</strong>x du télétexte<br />
contient <strong>de</strong>s instructions sur l'utilisation du service. Vous pouvez, en outre, sélectionner différentes options à l'ai<strong>de</strong> <strong>de</strong>s touches <strong>de</strong><br />
la télécomman<strong>de</strong>.<br />
N Pour que les informations du télétexte s'affichent correctement, la réception <strong>de</strong>s chaînes doit être stable. Dans le cas<br />
contraire, <strong>de</strong>s informations pourraient manquer ou certaines pages pourraient ne pas s'afficher.<br />
1 0 (mo<strong>de</strong>)<br />
Permet <strong>de</strong> sélectionner le mo<strong>de</strong><br />
Télétexte (LIST/FLOF). Si vous<br />
appuyez sur cette touche en mo<strong>de</strong><br />
LISTE, vous basculez en mo<strong>de</strong><br />
d'enregistrement <strong>de</strong> liste. En<br />
mo<strong>de</strong> d'enregistrement <strong>de</strong> liste,<br />
vous pouvez enregistrer une page<br />
télétexte dans une liste à l'ai<strong>de</strong> du<br />
bouton 8 (mémoriser).<br />
2 5 (afficher)<br />
Permet d'afficher le texte masqué<br />
(par exemple, les réponses à un<br />
questionnaire). Pour rétablir le<br />
mo<strong>de</strong> d'affichage normal, appuyez<br />
<strong>de</strong> nouveaux <strong>de</strong>ssus.<br />
3 4 (taille)<br />
Permet d'afficher la moitié<br />
supérieure <strong>de</strong> l'écran en<br />
caractères <strong>de</strong>ux fois plus grands.<br />
Pour afficher la moitié inférieure<br />
<strong>de</strong> l'écran, appuyez <strong>de</strong> nouveau<br />
sur cette touche. Pour rétablir le<br />
mo<strong>de</strong> d'affichage normal, appuyez<br />
<strong>de</strong>ssus une fois <strong>de</strong> plus.<br />
4 8 (mémoriser)<br />
Permet d'enregistrer les pages <strong>de</strong><br />
télétexte.<br />
5 Boutons <strong>de</strong> couleur (rouge/vert/<br />
jaune/bleu)<br />
Si une société <strong>de</strong> télédiffusion<br />
utilise le système FASTEXT, les<br />
différentes rubriques d'une page<br />
<strong>de</strong> télétexte sont associées à un<br />
co<strong>de</strong> couleur qui permet <strong>de</strong> les<br />
sélectionner à l'ai<strong>de</strong> <strong>de</strong>s touches<br />
<strong>de</strong> couleur <strong>de</strong> la télécomman<strong>de</strong>.<br />
Appuyez sur la touche dont la<br />
couleur correspond à celle <strong>de</strong><br />
la rubrique souhaitée. La page<br />
affiche d'autres informations<br />
en couleur que vous pouvez<br />
sélectionner <strong>de</strong> la même<br />
manière. Pour afficher la page<br />
précé<strong>de</strong>nte ou la page suivante,<br />
appuyez sur la touche <strong>de</strong><br />
couleur correspondante.<br />
6 / (télétexte actif/mixte)<br />
Permet d'activer le mo<strong>de</strong> Télétexte<br />
après avoir choisi la chaîne diffusant<br />
le service télétexte. Appuyez <strong>de</strong>ux<br />
fois sur cette touche pour superposer<br />
le télétexte à l'émission en cours <strong>de</strong><br />
diffusion.<br />
7 : (quitter)<br />
Quitte l'affichage du télétexte.<br />
8 1 (page secondaire)<br />
Permet d'afficher une page secondaire.<br />
9 2 (page suivante)<br />
Permet d'afficher la page <strong>de</strong> télétexte<br />
suivante.<br />
0 3 (page précé<strong>de</strong>nte)<br />
Permet d'afficher la page <strong>de</strong> télétexte<br />
précé<strong>de</strong>nte.<br />
! 9 (hold)<br />
Permet <strong>de</strong> bloquer l'affichage sur<br />
une page précise, si celle-ci est<br />
reliée à plusieurs pages secondaires<br />
qui défilent automatiquement. Pour<br />
reprendre l'affichage <strong>de</strong> celles-ci,<br />
appuyez <strong>de</strong> nouveau sur cette touche.<br />
@ 6 (in<strong>de</strong>x)<br />
Permet d'afficher la page d'in<strong>de</strong>x du<br />
télétexte (sommaire) à tout moment.<br />
# 7 (Annuler)<br />
Permet d'afficher le programme lors <strong>de</strong><br />
la recherche d'une page.<br />
1<br />
2<br />
3<br />
4<br />
5<br />
6<br />
INFO<br />
AD<br />
7<br />
8<br />
9<br />
0<br />
!<br />
@<br />
#<br />
N<br />
Vous pouvez changer <strong>de</strong> page <strong>de</strong> télétexte en appuyant sur les touches numériques <strong>de</strong> la télécomman<strong>de</strong>.<br />
Franç<strong>ais</strong> - 40
Les pages <strong>de</strong> télétexte sont organisées en six catégories :<br />
Catégorie<br />
A<br />
B<br />
C<br />
D<br />
E<br />
F<br />
Sommaire<br />
Numéro <strong>de</strong> la page sélectionnée.<br />
I<strong>de</strong>ntité <strong>de</strong> la chaîne émettrice.<br />
Numéro <strong>de</strong> la page actuelle ou indications <strong>de</strong><br />
recherche.<br />
Date et heure.<br />
Texte.<br />
Informations sur l'état.<br />
Informations FASTEXT.<br />
N<br />
N<br />
N<br />
N<br />
N<br />
O<br />
Les informations du télétexte sont souvent réparties sur plusieurs pages qui s'affichent successivement. Ces pages sont<br />
accessibles en :<br />
<br />
<br />
<br />
entrant le numéro <strong>de</strong> page ;<br />
sélectionnant un titre dans une liste ;<br />
sélectionnant un titre <strong>de</strong> couleur (système FASTEXT).<br />
Le téléviseur prend en charge le niveau <strong>de</strong> télétexte 2.5 qui peut afficher <strong>de</strong>s graphiques ou textes supplémentaires.<br />
En fonction <strong>de</strong> la transmission, <strong>de</strong>s panneaux latéraux vi<strong>de</strong>s peuvent apparaître lors <strong>de</strong> l'affichage du télétexte.<br />
Dans ce cas, les graphiques ou textes supplémentaires ne sont pas transmis.<br />
Les téléviseurs plus anciens qui ne prennent pas en charge la version 2.5 ne peuvent pas afficher les graphiques et textes<br />
supplémentaires, indépendamment <strong>de</strong> la transmission télétexte.<br />
Appuyez sur le bouton TV pour quitter l'affichage du télétexte.<br />
¦<br />
Montage du socle<br />
N<br />
Préréglage : Placez le support du gui<strong>de</strong> et le goulot du couvercle sur le socle et fixez-les à<br />
l'ai<strong>de</strong> <strong>de</strong>s vis. (En fonction du modèle)<br />
Arrière<br />
INFO<br />
Avant<br />
1. Fixez le téléviseur LCD sur le socle.<br />
N<br />
N<br />
N<br />
Le téléviseur doit être porté par au moins <strong>de</strong>ux personnes.<br />
Veillez à bien faire la distinction entre l'avant et l'arrière du socle lors <strong>de</strong><br />
l'assemblage.<br />
Pour être certain d'installer le téléviseur sur son socle au niveau approprié,<br />
n'exercez pas <strong>de</strong> pression vers le bas excessive sur ses côtés supérieurs gauche<br />
et droit.<br />
2. Insérez les vis dans l'emplacement 1, puis dans l'emplacement 2.<br />
N Redressez le produit et serrez les vis. Si vous serrez les vis tandis que le téléviseur<br />
LCD est couché, il se peut qu'il penche d'un côté.<br />
1<br />
2<br />
AD<br />
Franç<strong>ais</strong> - 41
¦<br />
Branchement du socle<br />
1. Retirez les vis situées à l’arrière du téléviseur.<br />
2. Retirez le support du téléviseur.<br />
N Le téléviseur doit être porté par au moins <strong>de</strong>ux personnes.<br />
3. Recouvrez le trou inférieur à l'ai<strong>de</strong> du cache.<br />
¦<br />
Installation du kit <strong>de</strong> montage mural<br />
Les éléments du support mural (vendus séparément) permettent <strong>de</strong> fixer le téléviseur au<br />
mur.<br />
Pour plus d'informations sur l'installation du support mural, reportez-vous aux instructions<br />
fournies avec les éléments <strong>de</strong> montage mural. Faites appel à un technicien pour vous ai<strong>de</strong>r<br />
à installer le support mural.<br />
<strong>Samsung</strong> Electronics ne saurait être tenu responsable <strong>de</strong> tout dommage sur le produit ni<br />
<strong>de</strong> toute blessure subie par vous ou par d'autres personnes si vous choisissez d'effectuer<br />
l'installation murale.<br />
N'installez pas le kit <strong>de</strong> montage mural lorsque le téléviseur est sous tension. Cela<br />
pourrait entraîner une blessure par choc électrique.<br />
¦<br />
Assemblage <strong>de</strong>s câbles<br />
Insérez les câbles dans le serre-câbles <strong>de</strong> telle manière qu'ils ne soient pas visibles à travers le<br />
pied transparent.<br />
¦<br />
Verrou antivol Kensington<br />
Le verrou Kensington est un dispositif utilisé pour fixer physiquement le système en cas<br />
d'utilisation dans un lieu public. L'aspect du verrou et la métho<strong>de</strong> <strong>de</strong> verrouillage peuvent<br />
différer <strong>de</strong> l'illustration en fonction du fabricant.<br />
Consultez le manuel fourni avec le verrou Kensington pour obtenir <strong>de</strong>s instructions<br />
d’utilisation.<br />
N<br />
N<br />
Le dispositif <strong>de</strong> verrouillage est vendu séparément.<br />
L'emplacement du verrou Kensington peut varier en fonction du modèle.<br />
1. Insérez le dispositif <strong>de</strong> verrouillage dans le logement Kensington du téléviseur LCD (1),<br />
puis tournez-le dans le sens <strong>de</strong> verrouillage (2).<br />
2. Branchez le câble du verrou Kensington (3).<br />
3. Fixez le câble du verrou Kensington sur un bureau ou tout autre objet lourd inamovible.<br />
3<br />
2<br />
1<br />
<br />
Franç<strong>ais</strong> - 42
¦<br />
Sécurisation <strong>de</strong> l'emplacement d'installation<br />
Respectez les distances requises entre le produit et d'autres objets (p. ex. murs) pour assurer une ventilation adéquate.<br />
Le non-respect <strong>de</strong> cette consigne pourrait provoquer un incendie ou un problème avec le produit en r<strong>ais</strong>on <strong>de</strong> l'augmentation <strong>de</strong> la<br />
température interne <strong>de</strong> ce <strong>de</strong>rnier.<br />
Installez le produit <strong>de</strong> manière à respecter les distances requises indiquées sur la figure.<br />
N En cas d'utilisation d'un support ou <strong>de</strong> montage mural, n'utilisez que <strong>de</strong>s pièces <strong>Samsung</strong> Electronics.<br />
L'emploi <strong>de</strong> pièces d'un autre fabricant risque d'entraîner <strong>de</strong>s problèmes avec le produit ou d'occasionner <strong>de</strong>s blessures<br />
dues à la chute du produit.<br />
L'emploi <strong>de</strong> pièces d'un autre fabricant risque d'entraîner un problème avec le produit ou <strong>de</strong> provoquer un incendie en<br />
r<strong>ais</strong>on <strong>de</strong> l'augmentation <strong>de</strong> la température interne du produit due à une ventilation insuffisante.<br />
N L'aspect peut varier en fonction du produit.<br />
Installation du produit sur un support<br />
Montage mural du produit<br />
10 cm<br />
10 cm<br />
10 cm<br />
10 cm<br />
10 cm<br />
10 cm<br />
10 cm<br />
¦<br />
Fixation du téléviseur au mur<br />
Attention: Si vous tirez ou poussez le téléviseur ou si vous grimpez <strong>de</strong>ssus, il risque <strong>de</strong> tomber. Veillez en<br />
particulier, à ce que vos enfants ne se suspen<strong>de</strong>nt pas au téléviseur, ni ne le déséquilibrent, car cela pourrait le<br />
faire basculer et occasionner <strong>de</strong>s blessures graves pouvant entraîner la mort. Respectez toutes les précautions<br />
<strong>de</strong> sécurité indiquées dans la brochure relative à la sécurité. Pour une stabilité accrue, installez le dispositif<br />
antichute comme indiqué ci-après.<br />
■<br />
Pour éviter toute chute du téléviseur :<br />
1. Glissez les vis dans les colliers, puis fixez-les soli<strong>de</strong>ment au mur. Assurez-vous que les<br />
vis sont soli<strong>de</strong>ment fixées au mur.<br />
N En fonction du type <strong>de</strong> mur, il est possible que vous ayez besoin <strong>de</strong> matériel<br />
supplémentaire, tel que <strong>de</strong>s chevilles.<br />
N Les colliers, vis et chaînettes n'étant pas fournis, vous <strong>de</strong>vez les acheter<br />
séparément.<br />
2. Retirez les vis situées sur la partie centrale arrière du téléviseur, glissez-les dans les<br />
colliers, puis fixez-les <strong>de</strong> nouveau sur le téléviseur.<br />
N<br />
N<br />
<br />
<br />
Il est possible que les vis ne soient pas fournies avec le produit. Dans ce cas,<br />
achetez <strong>de</strong>s vis présentant les caractéristiques suivantes.<br />
Caractéristiques <strong>de</strong>s vis<br />
Pour un téléviseur LCD 17 à 29 pouces : M4 X L15<br />
Pour un téléviseur LCD 32 à 40 pouces : M6 X L15<br />
Mur<br />
3. Reliez les bagues fixées au téléviseur et celles fixées sur le mur à l'ai<strong>de</strong> <strong>de</strong> chaînettes,<br />
puis attachez-les fermement.<br />
N<br />
N<br />
N<br />
Placez le téléviseur à proximité du mur afin qu'il ne bascule pas vers l'arrière.<br />
Il est recommandé <strong>de</strong> placer la chaînette <strong>de</strong> façon à ce que les colliers fixés au mur<br />
soient placés à même hauteur ou plus bas que ceux fixés au téléviseur.<br />
Détachez la chaînette avant <strong>de</strong> déplacer le téléviseur.<br />
4. Vérifiez que toutes les connexions sont fixées correctement. Vérifiez régulièrement que<br />
les connexions ne présentent aucun signe d'usure. Si vous avez un doute quant à la<br />
sécurité <strong>de</strong>s connexions, contactez un installateur professionnel.<br />
Mur<br />
Franç<strong>ais</strong> - 43
¦<br />
Dépannage : Avant <strong>de</strong> contacter un technicien<br />
Aucune image ni aucun son<br />
Image normale, m<strong>ais</strong> aucun son<br />
L'écran est noir et le témoin<br />
d'alimentation clignote sans arrêt.<br />
Aucune image ou image en noir<br />
et blanc<br />
Interférence <strong>de</strong> son et d'image<br />
Image neigeuse ou floue,<br />
distorsion du son<br />
Dysfonctionnements <strong>de</strong> la<br />
télécomman<strong>de</strong><br />
Le message ‘Vérifier le signal du<br />
câble.’ s'affiche<br />
En mo<strong>de</strong> PC, le message ‘Mo<strong>de</strong><br />
non pris en charge’ s'affiche.<br />
L'image endommagée apparaît<br />
dans le coin <strong>de</strong> l'écran<br />
Le message ‘Rétablir tous les<br />
paramètres à leur valeur par<br />
défaut.’ s'affiche.<br />
Il se peut que vous voyiez<br />
<strong>de</strong> petites particules si vous<br />
regar<strong>de</strong>z <strong>de</strong> près le bord du<br />
cadre <strong>de</strong> l'écran du téléviseur.<br />
N<br />
Vérifiez que le cordon d'alimentation secteur est branché à une prise murale.<br />
Vérifiez que vous avez appuyé sur le bouton <strong>de</strong> marche/arrêt du téléviseur.<br />
Vérifiez les réglages du contraste et <strong>de</strong> la luminosité <strong>de</strong> l'image.<br />
Vérifiez le volume.<br />
Vérifiez le volume.<br />
Vérifiez si le bouton MUTEM <strong>de</strong> la télécomman<strong>de</strong> a été actionné.<br />
Vérifiez les paramètres Sélection Haut-parleur.<br />
Sur votre ordinateur, contrôlez l'alimentation et le câble du signal.<br />
Le téléviseur utiliser son système <strong>de</strong> gestion <strong>de</strong> l'alimentation.<br />
Déplacez la souris <strong>de</strong> l'ordinateur ou appuyez sur une touche du clavier.<br />
Réglez les paramètres <strong>de</strong> couleur.<br />
Vérifiez que le système d'émission sélectionné est correct.<br />
Essayez d'i<strong>de</strong>ntifier l'appareil électrique qui perturbe le fonctionnement du téléviseur et éloignez-le.<br />
Branchez le téléviseur à une autre prise secteur.<br />
Vérifiez l'orientation, l'emplacement et les connexions <strong>de</strong> l'antenne.<br />
Cette interférence est souvent due à l'utilisation d'une antenne intérieure.<br />
Remplacez les piles <strong>de</strong> la télécomman<strong>de</strong>.<br />
Nettoyez la lentille <strong>de</strong> la télécomman<strong>de</strong>.<br />
Contrôlez les bornes <strong>de</strong>s piles.<br />
Assurez-vous que le câble du signal est correctement connecté au PC et aux sources vidéo.<br />
Assurez-vous le PC et les sources vidéo sont sous tension.<br />
Vérifiez la résolution maximale et la fréquence <strong>de</strong> la carte vidéo.<br />
Comparez ces valeurs aux données <strong>de</strong>s mo<strong>de</strong>s d'affichage.<br />
Si Adapter à l’écran est sélectionné sur certains périphériques externes, l'image endommagée peut<br />
apparaître dans le coin <strong>de</strong> l'écran. Ce problème est dû à <strong>de</strong>s périphériques, pas au téléviseur.<br />
Il s'affiche lorsque vous appuyez longuement sur le bouton EXIT. Les valeurs par défaut <strong>de</strong>s paramètres<br />
du produit sont rétablies.<br />
Elles font partie <strong>de</strong> la conception du produit et ne constituent pas un défaut.<br />
Ce téléviseur LCD TFT est équipé d'un écran constitué <strong>de</strong> sous-pixels (6 220 800) dont la fabrication nécessite une<br />
technologie sophistiquée. Il se peut toutefois que <strong>de</strong>s points clairs ou sombres appar<strong>ais</strong>sent à l'écran. Ceux-ci n'ont aucune<br />
inci<strong>de</strong>nce sur les performances du produit.<br />
Franç<strong>ais</strong> - 44
¦<br />
Caractéristiques<br />
Nom du modèle<br />
LE32B550, LE32B551<br />
LE32B553, LE32B554<br />
LE37B550, LE37B551<br />
LE37B553, LE37B554<br />
Taille <strong>de</strong> l'écran<br />
(Diagonale) 32 pouces 37 pouces<br />
Résolution du PC<br />
(Optimale) 1920 x 1080 à 60 Hz 1920 x 1080 à 60 Hz<br />
Son<br />
(Sortie) 10 W X 2 10 W X 2<br />
Dimensions (L x P x H)<br />
Corps<br />
Avec socle<br />
794 X 77 X 524 mm<br />
794 X 240 X 570 mm<br />
917 X 79 X 592 mm<br />
917 X 255 X 658 mm<br />
Poids<br />
Avec socle 13 kg 16 kg<br />
Considérations environnementales<br />
Température <strong>de</strong> fonctionnement<br />
Humidité en cours <strong>de</strong> fonctionnement<br />
Température <strong>de</strong> stockage<br />
Humidité sur le lieu <strong>de</strong> stockage<br />
Socle orientable<br />
(Gauche / droite)<br />
Nom du modèle<br />
LE40B550, LE40B551<br />
LE40B553, LE40B554<br />
10°C à 40°C (10,00°C à 40,00°C)<br />
10% à 80%, sans con<strong>de</strong>nsation<br />
-20°C à 45°C (-20,00°C à 45,00°C)<br />
5 % à 95 %, sans con<strong>de</strong>nsation<br />
-20˚ ~ 20˚<br />
LE46B550, LE46B551<br />
LE46B553, LE46B554<br />
Taille <strong>de</strong> l'écran<br />
(Diagonale) 40 pouces 46 pouces<br />
Résolution du PC<br />
(Optimale) 1920 x 1080 à 60 Hz 1920 x 1080 à 60 Hz<br />
Son<br />
(Sortie) 10 W X 2 10 W X 2<br />
Dimensions (L x P x H)<br />
Corps<br />
Avec socle<br />
982 X 79 X 626 mm<br />
982 X 255 X 676 mm<br />
1116 X 79 X 706 mm<br />
1116 X 275 X 770 mm<br />
Poids<br />
Avec socle 18 kg 23 kg<br />
Considérations environnementales<br />
Température <strong>de</strong> fonctionnement<br />
Humidité en cours <strong>de</strong> fonctionnement<br />
Température <strong>de</strong> stockage<br />
Humidité sur le lieu <strong>de</strong> stockage<br />
Socle orientable<br />
(Gauche / droite)<br />
N<br />
N<br />
N<br />
10°C à 40°C (10,00°C à 40,00°C)<br />
10% à 80%, sans con<strong>de</strong>nsation<br />
-20°C à 45°C (-20,00°C à 45,00°C)<br />
5 % à 95 %, sans con<strong>de</strong>nsation<br />
-20˚ ~ 20˚<br />
La conception et les spécifications peuvent être modifiées sans préavis.<br />
Ce périphérique est un appareil numérique <strong>de</strong> classe B.<br />
Concernant l'alimentation et la consommation électrique, reportez-vous à l'étiquette apposée sur le produit.<br />
Franç<strong>ais</strong> - 45
❑<br />
❑<br />
Avviso relativo alla trasmissione TV digitale<br />
1. Le funzioni relative alla trasmissione televisiva digitale (DVB) sono disponibili solo nei paesi o nelle aree in cui vengono<br />
trasmessi segnali digitali terrestri DVB-T (MPEG2 E MPEG4 AVC) o laddove l'utente abbia la possibilità di acce<strong>de</strong>re a un<br />
servizio TV via cavo DVB-C (MPEG2 e MPEG4 AAC) compatibile. Verificare con il rivenditore locale la possibilità di ricevere<br />
segnali DVB-T o DVB-C.<br />
2. DVB-T è lo standard <strong>de</strong>l consorzio europeo DVB per la trasmissione <strong>de</strong>lla televisione digitale terrestre mentre DVB-C è lo<br />
standard per la trasmissione <strong>de</strong>lla televisione digitale via cavo. Tuttavia, alcune funzioni quali EPG (Electric Program Gui<strong>de</strong>),<br />
VOD (Vi<strong>de</strong>o on Demand) e altre non sono incluse in queste specifiche. Per questo motivo, al momento non sono disponibili.<br />
3. Sebbene questo apparecchio TV soddisfi i più recenti standard DVB-T e DVB-C, [Agosto, 2008], la compatibilità con future<br />
trasmissioni digitali via cavo DVB-C e terrestri DVB-T non può essere garantita.<br />
4. In base al paese o all'area in cui si utilizza questo televisore, alcuni fornitori di trasmissioni TV via cavo potrebbero applicare<br />
una tariffa aggiuntiva per tali servizi e richie<strong>de</strong>re all'utente di accettare i termini e le condizioni <strong>de</strong>lla loro offerta.<br />
5. Alcune funzioni <strong>de</strong>lla trasmissione TV digitale potrebbero non essere disponibili in alcuni paesi o regioni e DVB-C potrebbe<br />
non funzionare correttamente con alcuni fornitori di servizi via cavo.<br />
6. Per maggiori informazioni contattare il locale centro assistenza clienti SAMSUNG.<br />
Precauzioni da adottare quando si visualizza un'immagine fissa<br />
Un'immagine fissa può causare danni permanenti allo schermo TV<br />
● Non visualizzare un’immagine fissa o parzialmente fissa sul pannello LCD per oltre 2 ore poiché può causare la ritenzione<br />
<strong>de</strong>ll’immagine sullo schermo. Il fenomeno di ritenzione <strong>de</strong>ll’immagine è anche noto come “bruciatura <strong>de</strong>llo schermo”. Per<br />
evitare il fenomeno di ritenzione <strong>de</strong>ll’immagine, ridurre il grado di luminosità e contrasto <strong>de</strong>llo schermo quando si visualizza<br />
un’immagine fissa.<br />
●<br />
Su un TV LCD, l’uso <strong>de</strong>l formato 4:3 per un periodo di tempo prolungato può lasciare traccia <strong>de</strong>i bordi sulla<br />
parte sinistra, <strong>de</strong>stra e centrale <strong>de</strong>l vi<strong>de</strong>o a causa <strong>de</strong>lle differenti emissioni luminose <strong>de</strong>llo schermo. La<br />
riproduzione di un DVD o l’uso di una console per vi<strong>de</strong>ogiochi può causare effetti analoghi sullo schermo.<br />
Questo tipo di danni non è coperto dalla Garanzia.<br />
● La visualizzazione prolungata di immagini fisse da vi<strong>de</strong>ogiochi e PC può causare immagini residue parziali. Per evitare questo<br />
problema, ridurre la ‘luminosità’ e il ‘contrasto’ mentre si visualizzano immagini fisse.<br />
© 2009 <strong>Samsung</strong> Electronics Co., Ltd. Tutti i diritti riservati.
Contenuti<br />
Configurazione <strong>de</strong>l televisore<br />
■ Pannello di controllo........................................................................... 2<br />
■ Accessori............................................................................................ 3<br />
■ Pannello <strong>de</strong>i collegamenti.................................................................. 4<br />
■ Telecomando...................................................................................... 6<br />
■ Installazione <strong>de</strong>lle batterie nel telecomando...................................... 7<br />
■ Visualizzazione <strong>de</strong>i menu................................................................... 7<br />
■ Attivazione modalità standby............................................................. 8<br />
■ Funzioni Plug & Play.......................................................................... 8<br />
■ Visualizzazione <strong>de</strong>l display................................................................ 9<br />
CANALE<br />
■ Menu Canale...................................................................................... 9<br />
■ Gestione <strong>de</strong>i canali .......................................................................... 12<br />
IMMAGINE<br />
■ Configurazione <strong>de</strong>l menu Picture..................................................... 14<br />
■ Uso <strong>de</strong>l televisore come uno schermo PC....................................... 18<br />
■ Configurazione <strong>de</strong>l televisore con il PC........................................... 19<br />
SUONO<br />
■ Configurazione <strong>de</strong>l menu audio....................................................... 20<br />
■ Selezione <strong>de</strong>lla modalità audio........................................................ 21<br />
Impostazione<br />
■ Configurazione <strong>de</strong>l menu Setup....................................................... 22<br />
■ Impostazione <strong>de</strong>ll’orario................................................................... 24<br />
Ingressi / Supporto<br />
■ Menu Ingressi................................................................................... 26<br />
■ Menu Supporto................................................................................. 26<br />
Media Play (USB)<br />
■ Collegamento di un dispositivo USB................................................ 28<br />
■ Funzione Media Play........................................................................ 29<br />
■ Menu Opzione <strong>de</strong>ll’Elenco foto........................................................ 30<br />
■ Visualizzazione di una foto o di una proiezione di diapositive......... 31<br />
■ Menu opzioni di Sli<strong>de</strong> Show............................................................. 32<br />
■ Menu Opzione <strong>de</strong>ll’Elenco musica................................................... 33<br />
■ Riproduzione di un file musicale...................................................... 34<br />
■ Menu Opzione <strong>de</strong>lla riproduzione di file musicali............................. 35<br />
■ Utilizzo <strong>de</strong>l menu Impostazione....................................................... 35<br />
ANYNET+<br />
■ Collegamento <strong>de</strong>i dispositivi Anynet+............................................... 36<br />
■ Configurazione di Anynet+............................................................... 37<br />
■ Passaggio tra dispositivi Anynet+..................................................... 37<br />
■ Registrazione................................................................................... 38<br />
■ Ascolto tramite il Ricevitore (Home theater)..................................... 38<br />
■ Risoluzione <strong>de</strong>i problemi con Anynet+............................................. 39<br />
RACCOMANDAZIONI<br />
■ Funzione Teletext............................................................................. 40<br />
■ Installazione <strong>de</strong>l piedistallo.............................................................. 41<br />
■ Smontare il piedistallo...................................................................... 42<br />
■ Installazione <strong>de</strong>l Kit di montaggio a parete...................................... 42<br />
■ Assemblaggio <strong>de</strong>i cavi..................................................................... 42<br />
■ Blocco antifurto Kensington............................................................. 42<br />
■ Messa in sicurezza <strong>de</strong>lla posizione di installazione......................... 43<br />
■ Fissaggio <strong>de</strong>l televisore alla parete.................................................. 43<br />
■ Risoluzione <strong>de</strong>i problemi: Prima di contattare l’assistenza.............. 44<br />
■ Specifiche......................................................................................... 45<br />
■ Diagrammi a blocchi......................................................................... 46<br />
Questo apparecchio è fabbricato in conformità al<br />
D.M.28.08.95 n.548 ed in particolare a quanto specificato nell<br />
Art.2, comma 1. Questo apparecchio è fabbricato nella U.E.<br />
in conformità al D.M.28.08.95 n.548 Art.2, comma 1 ed al<br />
D.M.26.03.92 Art.1<br />
❑<br />
Licenza<br />
Italiano<br />
TruSurround HD, SRS e il simbolo<br />
utilizzata su licenza di SRS Labs, Inc.<br />
sono marchi di SRS Labs, Inc. La tecnologiaTruSurround HD è<br />
Prodotto su licenza di Dolby Laboratories. Dolby e il simbolo <strong>de</strong>lla doppia D sono marchi di Dolby<br />
Laboratories.<br />
❑<br />
Simbolo<br />
N O T<br />
Nota Tasto One-Touch Tasto TOOLS Premere<br />
Italiano -
8<br />
Configurazione <strong>de</strong>l televisore<br />
N<br />
Le figure e le illustrazioni presenti in questo Manuale <strong>de</strong>ll'utente sono fornite unicamente a titolo di riferimento e possono<br />
differire da quelle <strong>de</strong>l prodotto attuale. Il <strong>de</strong>sign e le specifiche <strong>de</strong>l prodotto possono variare senza preavviso allo scopo di<br />
migliorare costantemente le prestazioni <strong>de</strong>l prodotto.<br />
¦<br />
Pannello di controllo<br />
N<br />
N<br />
La forma e il colore <strong>de</strong>l prodotto possono variare in base al mo<strong>de</strong>llo.<br />
I tasti <strong>de</strong>l pannello anteriore possono essere attivati toccandoli con un dito.<br />
8<br />
7 6 5 4 3 2 1<br />
6<br />
5<br />
4<br />
3<br />
2<br />
1<br />
8<br />
78<br />
1 P (ALIMENTAZIONE): Premere per accen<strong>de</strong>re e spegnere il televisore.<br />
2 INDICATORE DI ALIMENTAZIONE: Lampeggia e si spegne quando l’alimentazione è attiva, si accen<strong>de</strong> in modalità standby.<br />
3 z: Premere per cambiare canale. Nel menu a vi<strong>de</strong>o, utilizzare i tasti z così come si usano i tasti ▼ e ▲ <strong>de</strong>l<br />
telecomando.<br />
4 Y: Premere per aumentare o diminuire il volume.<br />
Nel menu a vi<strong>de</strong>o, utilizzare i tasti Y così come si usano i tasti ◄ e ► <strong>de</strong>l telecomando.<br />
5 MENU: Premere per visualizzare il menu a vi<strong>de</strong>o con le funzioni <strong>de</strong>l televisore.<br />
6 SOURCE E: Alterna tutte le sorgenti d’ingresso disponibili. Nel menu a vi<strong>de</strong>o, utilizzare questo tasto come si usa il tasto<br />
ENTERE <strong>de</strong>l telecomando.<br />
7 SENSORE DEL TELECOMANDO: Puntare il telecomando in direzione di questo punto sul televisore.<br />
8 ALTOPARLANTI<br />
Italiano -
¦<br />
Accessori<br />
Telecomando e batterie (2 tipo AAA) Cavo di alimentazione Copertura-Fondo<br />
(M4 X L16)<br />
Scheda di garanzia / Guida alla<br />
sicurezza (non disponibili in tutte le<br />
sedi)<br />
Viti piedistallo X 4<br />
(In base al mo<strong>de</strong>llo)<br />
Panno per la pulizia<br />
Ferma cavo<br />
(In base al mo<strong>de</strong>llo)<br />
N<br />
N<br />
Controllare che nella confezione <strong>de</strong>l TV LCD siano contenuti i seguenti componenti. Se qualsiasi componente risultasse<br />
mancante, contattare il rivenditore.<br />
La forma e il colore <strong>de</strong>i componenti possono variare in base al mo<strong>de</strong>llo.<br />
Italiano -
¦<br />
Pannello <strong>de</strong>i collegamenti<br />
[Pannello laterale <strong>de</strong>l<br />
[Pannello posteriore <strong>de</strong>l televisore]<br />
televisore]<br />
1 2<br />
34<br />
#<br />
2<br />
@<br />
!<br />
Ingresso<br />
alimentazione<br />
0 9 8 7 6 5<br />
N<br />
La forma e il colore <strong>de</strong>l prodotto possono variare in base al mo<strong>de</strong>llo.<br />
1 COMPONENT IN<br />
Collega Component vi<strong>de</strong>o / audio.<br />
2 HDMI IN 1, 2, 3(DVI), 4 / DVI AUDIO IN<br />
Collega alla porta HDMI un dispositivo con uscita HDMI.<br />
N<br />
N<br />
<br />
<br />
N<br />
N<br />
N<br />
Non è necessario un ulteriore collegamento audio per la connessione HDMI-HDMI.<br />
Che cosa significa HDMI?<br />
HDMI (High-Definition Multimedia Interface), è una interfaccia che permette la trasmissione di segnali audio e vi<strong>de</strong>o<br />
digitali mediante un solo cavo.<br />
La differenza tra HDMI e DVI è che il dispositivo HDMI è di dimensioni inferiori rispetto a quello DVI.<br />
Se sono collegati lettori DVD / Blu-ray / ricevitori via cavo / ricevitori satellitari (STB) che supportano versioni HDMI<br />
prece<strong>de</strong>nti alla 1.3, il televisore potrebbe non riprodurre l’audio o le immagini visualizzate potrebbero presentare colori<br />
anomali. Se collegando un cavo HDMI di una versione prece<strong>de</strong>nte non vi è audio, collegare il cavo HDMI alla porta HDMI<br />
IN 3 (DVI) e i cavi audio alla porta DVI AUDIO IN sul retro <strong>de</strong>l televisore. In questo caso, contattare la società fornitrice<br />
<strong>de</strong>l lettore DVD / Blu-ray / ricevitore via cavo / ricevitore satellitare (STB) per verificare la versione HDMI, quindi richie<strong>de</strong>re<br />
un aggiornamento <strong>de</strong>l firmware.<br />
Utilizzare la porta HDMI IN 3 (DVI) per il collegamento DVI a un dispositivo esterno. Utilizzare un cavo o un adattatore<br />
DVI-HDMI per la connessione vi<strong>de</strong>o e la porta DVI AUDIO IN per l'audio. Quando si effettua una connessione mediante<br />
cavo HDMI / DVI, è necessario utilizzare la porta HDMI IN 3 (DVI).<br />
I cavi HDMI che non supportano la versione 1.3 possono causare sfarfallio o mancanza di immagini a schermo.<br />
3 PC IN [PC] / [AUDIO]<br />
Collegare alla porta di uscita audio e vi<strong>de</strong>o <strong>de</strong>l PC.<br />
N<br />
N<br />
Se il PC supporta una connessione HDMI, è possibile collegare questa alla porta HDMI IN 1, 2, 3(DVI) o al terminale 4.<br />
Se il PC supporta una connessione DVI, è possibile collegare questa al terminale HDMI IN 3(DVI) / DVI AUDIO IN.<br />
4 ANT IN<br />
Collega a un sistema TV via cavo o antenna.<br />
5 BLOCCO KENSINGTON (a seconda <strong>de</strong>l mo<strong>de</strong>llo)<br />
Il blocco Kensington (opzionale) è un dispositivo usato per assicurare fisicamente il sistema quando viene utilizzato in un<br />
luogo pubblico. Se si <strong>de</strong>si<strong>de</strong>ra utilizzare un dispositivo di blocco, contattare il punto vendita in cui si è acquistato il televisore.<br />
N La posizione <strong>de</strong>l blocco Kensington può variare a seconda <strong>de</strong>l mo<strong>de</strong>llo.<br />
Italiano -
6 H(CUFFIE)<br />
Le cuffie possono essere collegate all'uscita prevista sull'apparecchio. Il collegamento <strong>de</strong>lle cuffie disattiva l'audio proveniente<br />
dall'altoparlante interno.<br />
N<br />
N<br />
N<br />
N<br />
Collegando le cuffie al televisore l’uso <strong>de</strong>lla funzione audio è inibita.<br />
L’uso prolungato <strong>de</strong>lle cuffie ad alto volume può causare danni all’udito.<br />
Quando si collegano le cuffie al televisore, gli altoparlanti vengono disattivati.<br />
Il volume <strong>de</strong>lle cuffie e quello <strong>de</strong>l televisore sono regolabili indipen<strong>de</strong>ntemente.<br />
7 DIGITAL AUDIO OUT (OPTICAL)<br />
Collega a un componente Digital Audio quale un ricevitore Home theatre.<br />
N<br />
N<br />
N<br />
Quando un sistema Digital Audio viene collegato alla porta DIGITAL AUDIO OUT (OPTICAL): Diminuire il volume <strong>de</strong>l<br />
televisore e regolarlo con la manopola di regolazione <strong>de</strong>l sistema.<br />
L'audio 5.1CH è disponibile quando il televisore è collegato a un dispositivo esterno che lo supporta.<br />
Quando il ricevitore (home theatre) è impostato su Acceso, è possibile udire l'audio proveniente dall'uscita ottica <strong>de</strong>l<br />
televisore. Quando il televisore visualizza un segnale DTV (Antenna), invia l’audio a 5.1 canali al ricevitore Home Theater.<br />
Se la sorgente è un componente digitale, come per es. un lettore DVD / Blu-ray / ricevitore digitale / ricevitore satellitare<br />
(STB) ed è collegata al televisore mediante HDMI, saranno udibili solo 2 canali audio dal ricevitore Home Theater. Per<br />
avere un audio a 5.1 canali, collegare il jack di uscita audio digitale <strong>de</strong>l lettore DVD / Blu-ray / ricevitore digitale / ricevitore<br />
satellitare (STB) direttamente a un amplificatore o all’Home Theatre, non al televisore.<br />
8 SERVICE<br />
Connettore solo di servizio.<br />
9 AUDIO OUT [R-AUDIO-L]<br />
Collega le porte di ingresso audio <strong>de</strong>ll'amplificatore/Home theatre.<br />
Quando un amplificatore audio viene collegato alle porte AUDIO OUT [R-AUDIO-L]: Diminuire il volume <strong>de</strong>l televisore e<br />
regolarlo con la manopola di regolazione <strong>de</strong>ll'amplificatore.<br />
0 EXT1, 2<br />
Ingressi e uscite di dispositivi esterni quali vi<strong>de</strong>oregistratori, DVD, periferiche di gioco o lettori di dischi vi<strong>de</strong>o.<br />
N<br />
<br />
In modalità EXT, l'uscita DTV supporta solo vi<strong>de</strong>o e audio SD MPEG.<br />
Specifiche Ingressi/Uscite<br />
Connettore<br />
Ingressi<br />
Uscita<br />
Vi<strong>de</strong>o Audio (L / R) RGB Vi<strong>de</strong>o + Audio (L / R)<br />
EXT 1 O O O Solo l'uscita TV o DTV è disponibile.<br />
EXT 2 O O X Uscita da selezionare.<br />
! AV IN [VIDEO] / [R-AUDIO-L]<br />
Ingressi vi<strong>de</strong>o e audio per dispositivi esterni, come una telecamera o un vi<strong>de</strong>oregistratore.<br />
@ USB<br />
Connettore per aggiornamenti software e Media Play, ecc.<br />
# COMMON INTERFACE Alloggiamento<br />
Se per alcuni canali non si inserisce la ‘SCHEDA CI (CI+)’, il messaggio ‘Scramble Signal’ (Segnale criptato) viene<br />
visualizzato sullo schermo.<br />
Le informazioni di pairing che contengono un numero telefonico, l’ID <strong>de</strong>lla SCHEDA CI (CI+), l’ID host e altri dati,<br />
verranno visualizzate entro 2~3 minuti. Se viene visualizzato un messaggio di errore, contattare il service provi<strong>de</strong>r.<br />
Quando la configurazione <strong>de</strong>lle informazioni relative al canale è stata completata, viene visualizzato il messaggio<br />
‘Completato aggiornamento’, a indicare che l’elenco <strong>de</strong>i canali è stato aggiornato.<br />
N È necessario richie<strong>de</strong>re una ‘SCHEDA CI (CI+)’ al service provi<strong>de</strong>r locale. Estrarre con <strong>de</strong>licatezza la scheda ‘SCHEDA<br />
CI (CI+)’ tirandola con le dita; fare attenzione a non far ca<strong>de</strong>re la ‘SCHEDA CI (CI+)’ poiché potrebbe subire danni.<br />
N Inserire la scheda ‘SCHEDA CI (CI+)’ nella direzione indicata sulla scheda stessa.<br />
N La posizione <strong>de</strong>l blocco COMMON INTERFACE può variare a seconda <strong>de</strong>l mo<strong>de</strong>llo.<br />
N La ‘SCHEDA CI (CI+)’ non è supportata in alcune nazioni e regioni; controllare con il rivenditore autorizzato di zona.<br />
N La funzione CI+ è applicabile solo al mo<strong>de</strong>llo LE********P.<br />
In caso di problemi, contattare il fornitore <strong>de</strong>l servizio.<br />
Italiano -
¦<br />
Telecomando<br />
N<br />
N<br />
N<br />
Il telecomando è utilizzabile fino a una distanza di 7 metri dal televisore.<br />
Una illuminazione troppo intensa può avere conseguenze sulle prestazioni <strong>de</strong>l telecomando.<br />
La forma e il colore <strong>de</strong>l prodotto possono variare in base al mo<strong>de</strong>llo.<br />
1 POWER: Premere per accen<strong>de</strong>re<br />
e spegnere il televisore.<br />
2 TASTI NUMERICI: Premere per<br />
cambiare canale.<br />
3 FAV.CH: Utilizzato per<br />
visualizzare gli elenchi <strong>de</strong>i canali<br />
preferiti.<br />
4 Y: Premere per<br />
aumentare o diminuire il volume.<br />
5 SOURCE: Premere per<br />
visualizzare e selezionare le<br />
sorgenti vi<strong>de</strong>o disponibili.<br />
6 INFO : Premere per visualizzare<br />
le informazioni sullo schermo TV.<br />
7 TOOLS: Per selezionare<br />
rapidamente le funzioni più<br />
frequentemente utilizzate.<br />
8 CH LIST: Per visualizzare<br />
l'elenco <strong>de</strong>i canali sullo schermo.<br />
9 TASTI COLORATI: Usare questi<br />
tasti nel menu Elenco canali,<br />
Media Play ecc...<br />
! DUAL : Per la selezione <strong>de</strong>gli<br />
effetti audio<br />
@ Usare questi tasti nelle modalità<br />
Media Play e Anynet+. (∏:<br />
Questo telecomando può<br />
essere usato per controllare<br />
la registrazione sui registratori<br />
<strong>Samsung</strong> dotati di funzione<br />
Anynet+)<br />
# TV: Seleziona direttamente la<br />
modalità TV.<br />
$ PRE-CH : Consente di tornare<br />
al canale prece<strong>de</strong>ntemente<br />
visualizzato.<br />
% MUTE M : Premere per<br />
esclu<strong>de</strong>re temporaneamente<br />
l'audio.<br />
^ > P < : Premere per cambiare<br />
canale.<br />
& MENU: Visualizza il menu a<br />
vi<strong>de</strong>o principale.<br />
* GUIDE: Visualizzazione <strong>de</strong>lla<br />
Guida elettronica <strong>de</strong>i programmi<br />
(EPG)<br />
( RETURN: Ritorna al menu<br />
prece<strong>de</strong>nte.<br />
) SU ▲ / GIU' ▼ / SINISTRA ◄ /<br />
DESTRA ► / ENTERE : Utile<br />
per selezionare i menu OSD e<br />
modificarne i valori impostati.<br />
a EXIT: Premere per uscire dal<br />
menu.<br />
b P.SIZE: Per la selezione <strong>de</strong>lla<br />
dimensione <strong>de</strong>ll'immagine<br />
c MEDIA.P: Permette di riprodurre<br />
brani musicali e immagini.<br />
d SUBT. : Visualizzazione sottotitoli<br />
digitali<br />
e AD: Selezione Descrizione audio.<br />
Funzioni Teletext<br />
5 0 : Selezione <strong>de</strong>lla modalità<br />
Teletext (LIST / FLOF)<br />
6 5: Visualizzazione Teletext<br />
7 4: Selezione formato Teletext<br />
8 8: Negozio Teletext<br />
9 Selezione argomento Fastext<br />
0 /: Seleziona<br />
alternativamente le modalità<br />
Teletext, Double o Mix.<br />
# : : Uscita dalla schermata<br />
Teletext<br />
$ 1: Pagina secondaria Teletext<br />
^ 2: Pagina Teletext successiva<br />
3: Pagina Teletext prece<strong>de</strong>nte<br />
& 6 : Indice Teletext<br />
( 9 : Mantieni Teletext<br />
a 7 : Annulla Teletext<br />
1 #<br />
2<br />
3<br />
4<br />
5<br />
6<br />
7<br />
8<br />
9<br />
0<br />
!<br />
@<br />
INFO<br />
CH LIST<br />
AD<br />
$<br />
%<br />
^<br />
&<br />
*<br />
(<br />
)<br />
a<br />
b<br />
c<br />
d<br />
e<br />
Italiano -
¦<br />
Installazione <strong>de</strong>lle batterie nel telecomando<br />
1. Sollevare il coperchio sul retro <strong>de</strong>l telecomando come mostrato in figura.<br />
2. Installare le due batterie AAA.<br />
N Fare corrispon<strong>de</strong>re i poli ‘+’ e ‘–’ <strong>de</strong>lle batterie con lo schema riportato all’interno <strong>de</strong>l vano.<br />
3. Riposizionare il coperchio.<br />
N Se si preve<strong>de</strong> di non utilizzare il telecomando per un periodo di tempo prolungato,<br />
rimuovere le batterie e riporle in un luogo asciutto e fresco. (Presupponendo un uso<br />
tipico <strong>de</strong>l televisore, le batterie dovrebbero durare circa un anno.)<br />
N Se il telecomando non funziona, effettuare il seguente controllo:<br />
Il televisore è acceso?<br />
I poli - e + <strong>de</strong>lle batterie sono invertiti?<br />
Le batterie sono esaurite?<br />
Si è verificata una interruzione di corrente o il cavo di alimentazione è scollegato?<br />
È presente una luce a fluorescenza speciale o un neon nelle vicinanze?FUNZIONAMENTO<br />
¦<br />
Visualizzazione <strong>de</strong>i menu<br />
Prima di utilizzare il televisore, seguire questi passaggi per imparare a navigare tra i menu, selezionando e regolando le diverse<br />
funzioni.<br />
MENU<br />
Visualizza il menu a vi<strong>de</strong>o<br />
principale.<br />
Tasti ENTERE / FRECCIA<br />
Sposta il cursore e seleziona<br />
una voce. Attiva la voce<br />
attualmente selezionata. Conferma<br />
l'impostazione.<br />
INFO<br />
Tasto RETURN<br />
Ritorna al menu prece<strong>de</strong>nte.<br />
EXIT<br />
Esce dal menu a vi<strong>de</strong>o.<br />
❑<br />
Uso <strong>de</strong>i menu OSD (On Screen Display)<br />
La procedura d'accesso può essere diversa a seconda <strong>de</strong>l menu selezionato.<br />
1. Premere il tasto MENU.<br />
AD<br />
INFO<br />
2. Il menu principale viene visualizzato a schermo. Sul lato sinistro <strong>de</strong>l menu compaiono<br />
alcune icone: immagine, Suono, Canale, Impost, Ingressi, Applicazione, Supporto.<br />
3. Premere il tasto ▲ o ▼ per selezionare una <strong>de</strong>lle icone.<br />
immagine<br />
Modalità : Standard ▶<br />
Retroillumin : 7<br />
Contrasto : 95<br />
Luminosità : 45<br />
Niti<strong>de</strong>zza : 50<br />
Colore : 50<br />
Tinta (V/R)<br />
: V50/R50<br />
Impostazioni INFO avanzate<br />
AD<br />
4. Quindi premere ENTERE per acce<strong>de</strong>re ai sotto menu <strong>de</strong>ll'icona.<br />
5. Premere ▲ o ▼ per selezionare uno <strong>de</strong>i sotto menu <strong>de</strong>ll'icona.<br />
6. Premere ◄ o ► per diminuire o aumentare il valore di un elemento. L'OSD di regolazione<br />
può differire in base al menu selezionato.<br />
7. Premere ENTERE per completare la configurazione. Per uscire, premere EXIT.<br />
Italiano - <br />
immagine<br />
▲<br />
Retroillumin<br />
▼<br />
Modalità<br />
: Standard<br />
Retroillumin : 7 ▶<br />
Contrasto<br />
AD<br />
: 95<br />
Luminosità : 45<br />
Niti<strong>de</strong>zza : 50<br />
Colore : 50<br />
Tinta (V/R)<br />
: V50/R50<br />
Impostazioni avanzate<br />
Opzioni immagine<br />
U Sposta L Regola E Conf. R Ritorno<br />
Icona Guida<br />
7
¦<br />
Attivazione modalità standby<br />
E' possibile attivare la modalità standby <strong>de</strong>l televisore per ridurre il consumo di corrente. La modalità standby è particolarmente<br />
utile quando si <strong>de</strong>si<strong>de</strong>ra disattivare temporaneamente il televisore (ad esempio durante i pasti).<br />
1. Premere POWERP sul telecomando.<br />
N Lo schermo si spegne e sull’apparecchio compare la spia di standby.<br />
2. Per riattivare il televisore, premere nuovamente il tasto POWERP.<br />
N Non lasciare il televisore in modalità standby per lunghi periodi di tempo (partendo per le vacanze ad esempio). E'<br />
consigliabile scollegare il cavo di alimentazione e il cavo <strong>de</strong>ll'antenna dalle prese a muro.<br />
¦<br />
Funzioni Plug & Play<br />
Se il televisore viene acceso per la prima volta, alcune impostazioni di base vengono<br />
visualizzate automaticamente e in sequenza.<br />
1. Premere POWER sul telecomando.<br />
N<br />
N<br />
E' inoltre possibile usare il tasto POWERP sul televisore.<br />
Viene visualizzato il messaggio Select the OSD Language..<br />
2. Premere ENTERE. Selezionare la lingua <strong>de</strong>si<strong>de</strong>rata premendo ▲ o ▼. Premere<br />
ENTERE per confermare la scelta.<br />
3. Premere ◄ o ► per selezionare Demo Negozio o Uso dom., quindi premere ENTERE.<br />
N Si consiglia di impostare la modalità TV su Uso dom. per ottenere la migliore qualità<br />
E Enter<br />
<strong>de</strong>ll’immagine in un ambiente domestico.<br />
N Demo Negozio è intesa solo per un uso commerciale <strong>de</strong>l prodotto.<br />
N Se l’unità è stata acci<strong>de</strong>ntalmente impostata sulla modalità Demo Negozio e si <strong>de</strong>si<strong>de</strong>ra tornare INFO alla modalità Uso dom.<br />
(Standard): Premere il tasto Volume <strong>de</strong>l televisore. Quando il menu OSD Volume viene visualizzato, tenere premuto il<br />
tasto MENU <strong>de</strong>l televisore per 5 secondi.<br />
4. Premere ENTERE. Selezionare la nazione <strong>de</strong>si<strong>de</strong>rata premendo il pulsante ▲ o ▼. Premere ENTERE per confermare la<br />
scelta.<br />
5. Premere ▲ o ▼ per selezionare Antenna o Cavo, quindi premere ENTERE.<br />
N<br />
N<br />
Antenna: Segnale antenna via etere.<br />
Cavo: Segnale antenna via cavo.<br />
6. Premere il pulsante ▲ o ▼ per selezionare i canali da memorizzare. Premere ENTERE per selezionare Avvio.<br />
AD<br />
N Quando si imposta la sorgente antenna su Cavo, viene visualizzata una procedura che consente di impostare un valore<br />
per la ricerca <strong>de</strong>i canali digitali. Per ulteriori informazioni, ve<strong>de</strong>re Canale → Memorizzazione auto.<br />
N Digitale e Analogico: Canali digitali e analogici.<br />
Digitale: Canale digitale.<br />
Analogico: Canale analogico.<br />
N La ricerca <strong>de</strong>i canali inizia e termina in modo automatico.<br />
N Premere ENTERE in qualsiasi momento per interrompere il processo di memorizzazione.<br />
N Una volta memorizzati tutti i canali disponibili, viene visualizzato il messaggio Imposta la modalità Orologio..<br />
7. Premere ENTERE. Premere ▲ o ▼ per selezionare Automatico, quindi premere ENTERE.<br />
N<br />
N<br />
Selezionando Manuale, viene visualizzato il messaggio Imposta la data e l'ora correnti..<br />
Ricevendo un segale digitale, l’orario verrà impostato automaticamente. In caso contrario, selezionare Manuale per<br />
impostare l’orologio.<br />
8. Viene visualizzata la <strong>de</strong>scrizione per il metodo di connessione che fornisce la migliore qualità <strong>de</strong>llo schermo HD. Leggere la<br />
<strong>de</strong>scrizione e premere il tasto ENTERE.<br />
9. Viene visualizzato il messaggio Buon divertimento.. Al termine, premere ENTERE<br />
Plug & Play<br />
Select the OSD Language.<br />
Menu Language : English ▶<br />
Per reimpostare questa funzione...<br />
1. Premere il tasto MENU per visualizzare il menu. Premere ▲ o ▼ per selezionare Impost,<br />
quindi premere ENTERE.<br />
2. Premere nuovamente ENTERE per selezionare Plug & Play.<br />
3. Digitare il PIN a quattro cifre. Il PIN pre<strong>de</strong>finito di un nuovo apparecchio TV è ‘0-0-0-0’.<br />
N<br />
N<br />
Per cambiare il codice PIN, utilizzare la funzione Cambia PIN.<br />
La funzione Plug & Play è disponibile solo in modalità TV.<br />
Impostazione<br />
Plug & Play<br />
Lingua menu<br />
Ora<br />
Trasmissione<br />
Sicurezza<br />
Generale<br />
: Inglese<br />
▶<br />
Italiano -
¦<br />
Visualizzazione <strong>de</strong>l display<br />
Il display i<strong>de</strong>ntifica il canale corrente e lo stato di <strong>de</strong>terminate impostazioni audio e vi<strong>de</strong>o.<br />
O Premere il tasto INFO per visualizzare le informazioni.<br />
INFO<br />
Premere INFO sul telecomando. Il televisore visualizzerà il canale, il tipo di audio e lo<br />
stato di <strong>de</strong>terminate impostazioni immagine e audio.<br />
● ▲, ▼: E’ possibile visualizzare altre informazioni relative al canale. Se si <strong>de</strong>si<strong>de</strong>ra<br />
spostarsi sul canale selezionato, premere ENTERE.<br />
● ◄, ►: E’ possibile visualizzare le informazioni <strong>de</strong>l programma <strong>de</strong>si<strong>de</strong>rato sul canale<br />
corrente.<br />
abc1<br />
DTV Air<br />
15<br />
18:11 Thu 6 Jan<br />
Life On Venus Avenue<br />
Unclassified<br />
No Detaild Information<br />
18:00 ~ 6:00<br />
E Watch<br />
' Information<br />
N<br />
Premere nuovamente INFO o atten<strong>de</strong>re 10 secondi finché il display scomparirà<br />
automaticamente.<br />
AD<br />
CANALE<br />
¦<br />
Menu Canale<br />
❑<br />
Nazione<br />
■<br />
■<br />
Canale analogico<br />
Funzione per la modifica <strong>de</strong>l paese per i canali analogici.<br />
Canale digitale<br />
Funzione per la modifica <strong>de</strong>l paese per i canali digitali.<br />
N Comparirà la richiesta <strong>de</strong>l PIN. Digitare il PIN a quattro cifre.<br />
Canale<br />
Nazione<br />
Memorizzazione auto<br />
Memorizzazione manuale<br />
Guida Compl<br />
Mini Guida<br />
Guida Pre<strong>de</strong>finita : Guida Compl<br />
Elenco canali<br />
Mod. Canale<br />
▶<br />
❑<br />
■<br />
Memorizzazione auto<br />
È possibile effettuare la scansione <strong>de</strong>lle gamme di frequenza disponibili (in base alla nazione).<br />
I numeri di programma assegnati automaticamente potrebbero non corrispon<strong>de</strong>re ai numeri di programma effettivi o <strong>de</strong>si<strong>de</strong>rati.<br />
N Se un canale è stato bloccato mediante la funzione Blocco canali, comparirà la schermata di inserimento <strong>de</strong>l PIN.<br />
Antenna / Cavo<br />
Sorgente antenna per la memorizzazione<br />
● Digitale e Analogico: Canali digitali e analogici.<br />
● Digitale: Canale digitale.<br />
● Analogico: Canale analogico.<br />
Quando si seleziona Cable → Digital & Analogue o Cable → Digital:<br />
Inserire un valore per ricercare i canali via cavo.<br />
● Mod ricerca → Completa / Rete / Rapida<br />
N Rapida<br />
Network ID: Visualizza il codice di i<strong>de</strong>ntificazione <strong>de</strong>l network.<br />
Frequenza: Visualizza la frequenza <strong>de</strong>l canale. (Varia in base alla nazione)<br />
Modulazione: Visualizza i valori di modulazione disponibili.<br />
Symbol Rate: Visualizza i valori di symbol rate disponibili.<br />
N<br />
N<br />
Scorrere tutti i canali per le stazioni emittenti attive e memorizzarle nella memoria <strong>de</strong>l televisore.<br />
Per interrompere la funzione Memorizzazione auto, premere ENTERE.<br />
Verrà visualizzato il messaggio Interrompere Memorizzazione auto?.<br />
Selezionare Yes premendo ◄ o ► quindi premere ENTERE.<br />
Italiano -
❑<br />
■<br />
■<br />
❑<br />
Memorizzazione manuale<br />
N<br />
N<br />
Ricerca un canale manualmente e lo memorizza nella memoria TV.<br />
Se un canale è stato bloccato mediante la funzione Blocco canali, comparirà la schermata di inserimento <strong>de</strong>l PIN.<br />
Canale digitale<br />
Memorizzazione manuale <strong>de</strong>i canali digitali.<br />
N<br />
●<br />
●<br />
●<br />
N<br />
Canale digitale è disponibile solo in modalità DTV.<br />
Canale: Impostare il numero <strong>de</strong>l canale mediante i tasti ▲, ▼ o i tasti numerici (0~9).<br />
Frequenza: Impostare la frequenza utilizzando i tasti numerici.<br />
Larg. di banda: Impostare la larghezza di banda mediante i tasti ▲, ▼ o i tasti numerici (0~9).<br />
Al termine, i canali vengono aggiornati nell'elenco <strong>de</strong>i canali.<br />
Canale analogico<br />
Memorizzazione manuale <strong>de</strong>i canali analogici.<br />
● Programma (Numero di programma da assegnare a un canale): Impostare il numero <strong>de</strong>l programma mediante i tasti ▲, ▼ o<br />
i tasti numerici (0~9).<br />
● Sistema colore → Auto / PAL / SECAM / NTSC4.43: Impostare il sistema colore utilizzando i tasti ▲ o ▼.<br />
● Sistema audio → BG / DK / I / L: Impostare il sistema audio utilizzando i tasti ▲ o ▼.<br />
● Canale (quando si conosce il numero <strong>de</strong>l canale da memorizzare): Premere ▲ o ▼ per selezionare C (Antenna) o S (Cavo).<br />
Premere il tasto ►, quindi premere ▲, ▼ o un tasto numerico (0~9) per selezionare il numero <strong>de</strong>si<strong>de</strong>rato.<br />
N E’ anche possibile selezionare direttamente il numero <strong>de</strong>l canale premendo i tasti numerici (0~9).<br />
N Se l’audio è anomalo o assente, riselezionare lo standard audio richiesto.<br />
● Ricerca (quando non si conosce il numero <strong>de</strong>l canale): Premere il tasto ▲ o ▼ per avviare la ricerca. Il sintonizzatore effettua<br />
la scansione <strong>de</strong>lla gamma di frequenza fino a quando appare il primo canale o il canale selezionato.<br />
● Memorizza (quando si memorizza il canale e il numero di programma corrispon<strong>de</strong>nte): Impostare su OK premendo<br />
ENTERE.<br />
N<br />
<br />
<br />
<br />
Mod. Canale<br />
P (modalità Programma): Una volta completata la sintonizzazione, alle emittenti <strong>de</strong>lla propria area viene assegnato<br />
un numero compreso tra P00 e P99. In questa modalità, è possibile selezionare un canale digitando il numero<br />
corrispon<strong>de</strong>nte.<br />
C (modalità Antenna): È possibile selezionare un canale immettendo in questa modalità il numero assegnato a ciascuna<br />
emittente.<br />
S (modalità Cavo): E’ possibile selezionare un canale immettendo in questa modalità il numero assegnato a ciascun<br />
canale via cavo.<br />
Opzione ricerca via cavo (in base alla nazione)<br />
Imposta ulteriori opzioni di ricerca quali frequenza e symbol rate per ricerche network via cavo.<br />
● Frequenza inizio (frequenza iniziale): Imposta la frequenza di avvio (Può essere diversa a seconda <strong>de</strong>l paese)<br />
● Frequenza arresto (frequenza finale): Imposta la frequenza di arresto (Può essere diversa a seconda <strong>de</strong>l paese)<br />
● Modulazione: Visualizza i valori di modulazione disponibili.<br />
● Symbol Rate: Visualizza i valori di symbol rate disponibili.<br />
❑<br />
■<br />
■<br />
Guida Compl / Mini Guida<br />
Le informazioni EPG (Electronic Programme Gui<strong>de</strong>) sono fornite dall’emittente. Le voci relative ai programmi potrebbero risultare<br />
vuote o non aggiornate, a seconda <strong>de</strong>lle informazioni trasmesse dall'emittente su un <strong>de</strong>terminato canale. La schermata viene<br />
aggiornata automaticamente non appena sono disponibili nuove informazioni.<br />
O È anche possibile visualizzare il menu <strong>de</strong>lla guida semplicemente premendo il tasto GUIDE. (Per configurare la Guida<br />
Pre<strong>de</strong>finita, ve<strong>de</strong>re le relative <strong>de</strong>scrizioni.)<br />
Guida Compl<br />
Visualizza la informazioni sui programmi ordinate in segmenti di un’ora. Sono comprese due ore di programmi che è possibile<br />
scorrere in avanti o indietro.<br />
Mini Guida<br />
Su ogni riga <strong>de</strong>lla Mini guida <strong>de</strong>l canale corrente sono riportate le informazioni relative a ogni programma partendo dal programma<br />
corrente in avanti in ordine di orario.<br />
Italiano - 10
❑<br />
❑<br />
❑<br />
■<br />
■<br />
❑<br />
Guida Pre<strong>de</strong>finita → Guida Compl / Mini Guida<br />
E’ possibile scegliere se visualizzare la Guida Compl o la Mini Guida premendo il tasto GUIDE <strong>de</strong>l telecomando.<br />
Elenco canali<br />
Per le istruzioni <strong>de</strong>ttagliate sull’uso di Elenco canali, ve<strong>de</strong>re la sezione Gestione <strong>de</strong>i canali.<br />
O È possibile selezionare queste opzioni semplicemente premendo il tasto CH LIST sul telecomando.<br />
Mod. Canale<br />
Premendo il tasto P >/
¦<br />
■<br />
■<br />
■<br />
■<br />
Gestione <strong>de</strong>i canali<br />
Usando questo menu è possibile aggiungere, eliminare o impostare i canali preferiti e utilizzare la guida <strong>de</strong>i programmi per le<br />
trasmissioni digitali.<br />
Tutti i Canali<br />
Mostra tutti i canali attualmente disponibili.<br />
Canali aggiunti<br />
Mostra tutti i canali aggiunti.<br />
Preferiti<br />
Mostra tutti i canali preferiti.<br />
O Per selezionare i canali preferiti impostati, premere FAV.CH sul telecomando.<br />
Programmato<br />
Mostra tutti i canali prenotati.<br />
N Selezionare un canale nella schermata Tutti i Canali, Canali aggiunti o Preferiti premendo i tasti ▲ / ▼, quindi premere<br />
ENTERE. Ora è possibile guardare il canale selezionato.<br />
N Uso <strong>de</strong>i tasti colorati nell'elenco <strong>de</strong>i canali<br />
<br />
<br />
<br />
<br />
Rosso (Tipo canale): Alterna tra TV, Radio, Dati / Altro e Tutto.<br />
Ver<strong>de</strong> (Zoom): Ingrandisce o riduce il numero di un canale.<br />
Giallo (Selezione): Seleziona più elenchi di canali. E’ possibile utilizzare contemporaneamente le funzioni Aggiungi /<br />
Elimina o Aggiungi a Preferiti/ Elimina da Preferiti per più canali alla volta. Selezionare i canali <strong>de</strong>si<strong>de</strong>rati e premere il<br />
tasto giallo per impostare tutti i canali selezionati contemporaneamente. Il simboloc compare a sinistra <strong>de</strong>i canali<br />
selezionati.<br />
TOOLS (Strumenti): Visualizza i menu Elimina (o Aggiungi), Aggiungi a Preferiti (o Elimina da Preferiti), Blocca (o<br />
Sblocco), Timer visione, Modifica nome canale, Modifica numero canale, Ordina, Seleziona tutti (o Deseleziona<br />
tutti), Memorizzazione auto. (Il menu Options può essere diverso in base alla situazione).<br />
N Icone sullo stato <strong>de</strong>l canale<br />
A : Canale analogico.<br />
c : Canale selezionato mediante il tasto giallo.<br />
* : Canale impostato come preferito.<br />
( : Programma attualmente trasmesso.<br />
\ : Canale bloccato.<br />
) : Programma prenotato<br />
Canali aggiunti<br />
824 UKTV Gold<br />
825 UKTV style<br />
A 1 C --<br />
A 2 C --<br />
A 3 C --<br />
A 4 C --<br />
A 5 C --<br />
A 6 C --<br />
A 7 C --<br />
A 8 C --<br />
Tutto Tipo canale Zoom Selezione T Strumenti<br />
Menu Elenco canali Opzione (in Tutti i Canali / Canali aggiunti / Preferiti)<br />
■<br />
■<br />
■<br />
N<br />
N<br />
Premere il tasto TOOLS per usare il menu Option.<br />
Gli elementi <strong>de</strong>l menu Option possono differire in base allo stato <strong>de</strong>l canale.<br />
Agg. / Canc.<br />
E' possibile eliminare o aggiungere un canale per visualizzare i canali <strong>de</strong>si<strong>de</strong>rati.<br />
N<br />
N<br />
N<br />
N<br />
Tutti i canali eliminati saranno visibili nel menu Tutti i Canali.<br />
Se il canale in elenco è evi<strong>de</strong>nziato in grigio, significa che il canale è stato eliminato.<br />
Il menu Aggiungi viene visualizzato solo per i canali eliminati.<br />
E’ anche possibile eliminare un canale nel menu Canali aggiunti o Preferiti allo stesso<br />
modo.<br />
Aggiungi a Preferiti / Elimina da Preferiti<br />
I canali che si guardano più di frequente possono essere impostati come preferiti.<br />
T<br />
N<br />
N<br />
Premere il tasto TOOLS per visualizzare il menu Strumenti. E' inoltre possibile impostare aggiunte (o cancellazioni) tra i<br />
canali Preferiti selezionando Strumenti → Aggiungi a Preferiti (o Elimina da Preferiti).<br />
Il simbolo ‘*’ verrà evi<strong>de</strong>nziato e il canale verrà impostato come preferito.<br />
Tutti i canali preferiti saranno visibili nel menu Preferiti.<br />
Blocco / Sblocco<br />
E’ possibile bloccare un canale in modo che non possa essere selezionato e visualizzato.<br />
N<br />
N<br />
N<br />
N<br />
Questa funzione è disponibile solo quando la funzione Blocco canali è impostata su Acceso.<br />
Comparirà la richiesta <strong>de</strong>l PIN. Digitare il PIN a quattro cifre.<br />
Il PIN pre<strong>de</strong>finito di un nuovo apparecchio TV è ‘0-0-0-0’. E’ possibile modificare il PIN selezionando Cambia PIN nel menu.<br />
Verrà visualizzato il simbolo ‘\’ e il canale verrà bloccato.<br />
Tutti i Canali<br />
824 UKTV Gold<br />
825 UKTV style<br />
A 1 C --<br />
A 2 C --<br />
A 3 C --<br />
A 4 C --<br />
A 5 C --<br />
A 6 C --<br />
A 7 C --<br />
A 8 C --<br />
Elimina<br />
Aggiungi a Preferiti<br />
Blocco<br />
Timer visione<br />
Modifica nome canale<br />
Ordina<br />
Tutto Tipo canale Zoom Selezione T Strumenti<br />
<br />
Italiano - 12
■<br />
■<br />
■<br />
■<br />
■<br />
■<br />
Timer visione<br />
Se si è effettuata la prenotazione di un canale, all’ora stabilita verrà visualizzato il canale prenotato anche durante la visione di un<br />
altro canale contenuto nell'Elenco canali. Per prenotare un programma, impostare prima l’orario corrente.<br />
N<br />
N<br />
N<br />
N<br />
E' possibile prenotare solo i canali memorizzati.<br />
È possibile impostare il canale, il giorno, il mese, l'anno,l'ora e i minuti premendo direttamente i tasti numerici <strong>de</strong>l<br />
telecomando.<br />
Durante le prenotazione di un programma comparirà il menu Programmato.<br />
Digital Programme Gui<strong>de</strong> e Visualizzazione prenotazione<br />
Selezionando un canale digitale e premendo il tasto ►, comparirà la Programme Gui<strong>de</strong> <strong>de</strong>l canale. Per prenotare un<br />
programma seguire le procedure <strong>de</strong>scritte sopra.<br />
Modifica nome canale (solo canali analogici)<br />
Ai canali è possibile attribuire un nome in modo da visualizzarlo durante la visione.<br />
N I nomi <strong>de</strong>i canali digitali trasmessi vengono automaticamente assegnati e non possono essere modificati.<br />
Modifica numero canale (solo canali digitali)<br />
È anche possibile impostare il numero di canale premendo i tasti numerici sul telecomando.<br />
Ordina (solo canali analogici)<br />
Questa operazione consente di modificare i numeri di programma <strong>de</strong>i canali memorizzati. Questa operazione può essere<br />
necessaria dopo la memorizzazione automatica <strong>de</strong>i canali.<br />
Seleziona tutto / Deselez tutto<br />
● Seleziona tutto: Seleziona tutti i canali presenti nell'elenco <strong>de</strong>i canali.<br />
● Deselez tutto: E' possibile selezionare e <strong>de</strong>selezionare tutti i canali selezionati.<br />
N E’ possibile selezionare Deselez tutto solo quando è stato selezionato almeno un canale.<br />
Memorizzazione auto<br />
N<br />
N<br />
Per la <strong>de</strong>scrizione <strong>de</strong>ttagliata <strong>de</strong>lle procedure per l'impostazione <strong>de</strong>lle opzioni, ve<strong>de</strong>re le istruzioni 'Menu Canale'.<br />
Se un canale è stato bloccato mediante la funzione Blocco canali, comparirà la schermata di inserimento <strong>de</strong>l PIN.<br />
Menu Elenco canali Opzione (in Programmato)<br />
■<br />
■<br />
■<br />
■<br />
E' possibile visualizzare, modificare o annullare una prenotazione.<br />
N Premere il tasto TOOLS per usare il menu Option.<br />
Modifica info<br />
Selezionare questa funzione per modificare una prenotazione.<br />
Annulla Program<br />
Selezionare questa funzione per annullare una prenotazione.<br />
Informazioni<br />
Selezionare questa funzione per visualizzare una prenotazione.<br />
(E' inoltre possibile modificare le informazioni relative alla prenotazione.)<br />
Seleziona tutto<br />
Selezionare tutti i programmi prenotati.<br />
Programmato<br />
1 / 1 / 2009<br />
13:59 5 TV1 ) Modifica info<br />
Annulla Program<br />
18:59 2 TV3 ) The Informazioni Equalizer<br />
20:59 2 TV3 ) McMillan Seleziona & Wife tutto<br />
21:59 2 TV3 ) M.Spillane’s mike<br />
Tutto Zoom Selezione T Strumenti EInformazioni<br />
Italiano - 13
IMMAGINE<br />
¦<br />
Configurazione <strong>de</strong>l menu Picture<br />
❑<br />
■<br />
■<br />
Modalità<br />
È possibile selezionare il tipo di immagine che più corrispon<strong>de</strong> alle proprie esigenze.<br />
T Premere il tasto TOOLS per visualizzare il menu Strumenti. E’ inoltre possibile impostare<br />
la modalità <strong>de</strong>ll’immagine selezionando Strumenti → Modalità immagine.<br />
Dinamica<br />
Imposta l’immagine da visualizzare in alta <strong>de</strong>finizione in un ambiente luminoso.<br />
Standard<br />
Imposta l’immagine per una visualizzazione ottimale in condizioni di luce normali.<br />
immagine<br />
Modalità : Standard ▶<br />
Retroillumin : 7<br />
Contrasto : 95<br />
Luminosità : 45<br />
Niti<strong>de</strong>zza : 50<br />
Colore : 50<br />
Tinta (V/R)<br />
: V50/R50<br />
Impostazioni avanzate<br />
■<br />
Naturale<br />
Seleziona l'immagine per una visione ottimale, confortevole per la vista.<br />
N Questa funzione non è disponibile in modalità PC.<br />
■<br />
Film<br />
Imposta l'immagine per una visualizzazione confortevole in un ambiente buio.<br />
❑<br />
Retroillumin / Contrasto / Luminosità / Niti<strong>de</strong>zza / Colore / Tinta (V/R)<br />
Il televisore ha diverse opzioni che consentono di controllare la qualità <strong>de</strong>ll'immagine.<br />
Retroillumin: Regola la luminosità <strong>de</strong>lla retroilluminazione <strong>de</strong>ll’LCD.<br />
Contrasto: Regola il livello di contrasto <strong>de</strong>ll'immagine.<br />
Luminosità: Regola il livello di luminosità <strong>de</strong>ll’immagine.<br />
Niti<strong>de</strong>zza: Regola la <strong>de</strong>finizione <strong>de</strong>i bordi <strong>de</strong>ll'immagine.<br />
Colore: Regola la saturazione <strong>de</strong>i colori <strong>de</strong>ll'immagine.<br />
Tinta (V/R): Regola la tonalità <strong>de</strong>lle tinte <strong>de</strong>ll'immagine.<br />
●<br />
●<br />
●<br />
●<br />
●<br />
●<br />
N<br />
N<br />
N<br />
N<br />
N<br />
▲<br />
Retroillumin<br />
▼<br />
U Sposta L Regola E Conf. R Ritorno<br />
Nelle modalità analogiche TV, Est., AV <strong>de</strong>l sistema PAL, non è possibile utilizzare la funzione Tinta (V/R).<br />
Apportando le modifiche ai valori Retroillumin, Contrasto, Luminosità, Niti<strong>de</strong>zza, Colore o Tinta (V/R), il menu OSD verrà<br />
regolato di conseguenza.<br />
In modalità PC, è possibile modificare solo i parametri Retroillumin, Contrasto e Luminosità.<br />
Le impostazioni possono essere regolate e memorizzate per ogni dispositivo esterno connesso a un ingresso TV.<br />
E' possibile ridurre significativamente il consumo di energia, e i costi ad esso associati, diminuendo la luminosità <strong>de</strong>llo<br />
schermo.<br />
7<br />
❑<br />
■<br />
■<br />
■<br />
Impostazioni avanzate<br />
I nuovi TV <strong>Samsung</strong> permettono di impostare ancora più precisamente la visualizzazione <strong>de</strong>lle<br />
immagini rispetto ai mo<strong>de</strong>lli prece<strong>de</strong>nti.<br />
N<br />
N<br />
Impostazioni avanzate è disponibile in modalità Standard o Film.<br />
In modalità PC, è possibile modificare solo i parametri Contrasto Dinamico, Gamma e<br />
Bilan bianco tra le opzioni <strong>de</strong>lla voce Impostazioni avanzate.<br />
Tonalità nero → Spenta / Scuro / Più scura / Extra scura<br />
Consente di selezionare il livello di nero <strong>de</strong>llo schermo per regolare la profondità <strong>de</strong>ll'immagine.<br />
Contrasto Dinamico → Sposta / Basso /Medio / Alta<br />
Consente di regolare in modo ottimale il livello di contrasto <strong>de</strong>llo schermo.<br />
Gamma<br />
Consente di regolare l’intensità <strong>de</strong>i colori primari (rosso, ver<strong>de</strong>, blu).<br />
Impostazioni avanzate<br />
Tonalità nero : Spenta ▶<br />
Contrasto Dinamico<br />
: Medio<br />
Gamma : 0<br />
Spazio colore<br />
: Nativa<br />
Bilan bianco<br />
Incarnato : 0<br />
Migliora imm bordi<br />
: Acceso<br />
U Sposta E Conf. R Ritorno<br />
Italiano - 14
■<br />
■<br />
■<br />
■<br />
■<br />
Spazio colore<br />
Spazio colore è la matrice di colori composta dai colori rosso, ver<strong>de</strong> e blu. Per scoprire lo straordinario mondo <strong>de</strong>i colori naturali<br />
basta selezionare lo spazio colore preferito.<br />
●<br />
●<br />
●<br />
Automatico: Auto Spazio colore regola automaticamente la tonalità più naturale <strong>de</strong>i colori basata sulle sorgenti <strong>de</strong>l<br />
programma.<br />
Nativa: Native Spazio colore offre tonalità di colore ricche e profon<strong>de</strong>.<br />
Personaliz: Regola la gamma colore per adattarla alle proprie preferenze.<br />
N<br />
N<br />
Una volta modificato il valore, lo schermo viene automaticamente regolato di conseguenza.<br />
Le impostazioni possono essere regolate e memorizzate per ogni dispositivo esterno connesso a un ingresso TV. Ad<br />
esempio, se si ha un lettore DVD connesso alla porta HDMI 1 e correntemente selezionato, verranno memorizzate le<br />
impostazioni e le regolazioni per il lettore DVD.<br />
<br />
<br />
<br />
<br />
<br />
Colore: Rosso, Ver<strong>de</strong>, Blu, Giallo, Ciano o Magenta<br />
N<br />
N<br />
N<br />
Colore è disponibile quando l’opzione Spazio colore è impostata su Personaliz.<br />
Colore, è possibile regolare i valori RGB per i colori selezionati.<br />
Per reimpostare il valore RGB regolato, selezionare Reset.<br />
Rosso: Regola il livello di saturazione di rosso <strong>de</strong>l colore selezionato.<br />
Ver<strong>de</strong>: Regola il livello di saturazione di ver<strong>de</strong> <strong>de</strong>l colore selezionato.<br />
Blu: Regola il livello di saturazione di blu <strong>de</strong>l colore selezionato.<br />
Reset: Ripristina le impostazioni <strong>de</strong>llo spazio colore ai valori pre<strong>de</strong>finiti.<br />
Bilan bianco<br />
Consente di regolare la temperatura <strong>de</strong>l colore per ottenere immagini più naturali.<br />
● R-Offset: Regola l'intensità <strong>de</strong>l colore rosso.<br />
● G-Offset: Regola l'intensità <strong>de</strong>l colore ver<strong>de</strong>.<br />
● B-Offset: Regola l'intensità <strong>de</strong>l colore blu.<br />
● R-Gain: Regola la luminosità <strong>de</strong>l colore rosso.<br />
● G-Gain: Regola la luminosità <strong>de</strong>l colore ver<strong>de</strong>.<br />
● B-Gain: Regola la luminosità <strong>de</strong>l colore blu.<br />
● Reset: Consente di ripristinare i valori pre<strong>de</strong>finiti di bilanciamento <strong>de</strong>l bianco.<br />
Incarnato<br />
E’ possibile enfatizzare il tono ‘incarnato’ <strong>de</strong>ll’immagine.<br />
N Una volta modificato il valore, lo schermo viene automaticamente regolato di conseguenza.<br />
Migliora imm bordi → Spenta / Acceso<br />
E' possibile enfatizzare i contorni <strong>de</strong>gli oggetti <strong>de</strong>ll'immagine.<br />
xvYCC → Spenta / Acceso<br />
Impostando la modalità xvYCC su on, si noterà un miglioramento nei <strong>de</strong>ttagli e nel colore durante la visione di un film da un<br />
dispositivo esterno (per es. un lettore DVD) collegato alla porta HDMI o Component IN.<br />
N<br />
N<br />
xvYCC è disponibile quando la modalità <strong>de</strong>ll'immagine è impostata a Film, e l'ingresso esterno è impostato su HDMI o Comp..<br />
Questa funzione potrebbe non essere supportata dal dispositivo esterno in uso.<br />
Italiano - 15
❑<br />
■<br />
■<br />
■<br />
■<br />
■<br />
Opzioni immagine<br />
N<br />
In modalità PC, è possibile modificare solo i parametri Toni colore e Formato tra le<br />
opzioni <strong>de</strong>lla voce Opzioni immagine.<br />
Toni colore → Freddo / Normale / Caldo1 / Caldo2 / Caldo3<br />
N<br />
N<br />
Caldo1, Caldo2 o Caldo3 vengono attivate solo quando la modalità Immagine è Film.<br />
Le impostazioni possono essere regolate e memorizzate per ogni dispositivo esterno<br />
connesso a un ingresso TV.<br />
Formato<br />
Occasionalmente è possibile variare la dimensione <strong>de</strong>ll'immagine sullo schermo. Il televisore<br />
ha diverse possibilità di dimensione, ognuna adatta a dare i migliori risultati con specifici tipi di ingressi vi<strong>de</strong>o. Il ricevitore via cavo/<br />
satellitare potrebbe anch'esso avere la propria serie di dimensioni preimpostate. In generale, tuttavia, si consiglia la visione il più<br />
possibile nel formato 16:9.<br />
O<br />
●<br />
●<br />
●<br />
●<br />
●<br />
●<br />
N<br />
N<br />
N<br />
N<br />
N<br />
N<br />
N<br />
N<br />
E' possibile selezionare queste opzioni semplicemente premendo il tasto P.SIZE sul telecomando.<br />
Automatico: Regola automaticamente la dimensione <strong>de</strong>ll'immagine su un formato 16:9.<br />
16:9: Regola la dimensione <strong>de</strong>ll’immagine su 16:9, un valore appropriato per visualizzare DVD o trasmissioni panoramiche.<br />
Wi<strong>de</strong> Zoom: Aumenta le dimensioni <strong>de</strong>ll’immagine a oltre 4:3.<br />
Zoom: Ingrandisce il formato 16:9 (in senso verticale) per adattarlo alle dimensioni <strong>de</strong>llo schermo.<br />
4:3: Questa è l’impostazione pre<strong>de</strong>finita per un filmato vi<strong>de</strong>o o una trasmissione normale.<br />
Adatta a schermo: Utilizzare questa funzione per visualizzare l'immagine completa con segnali HDMI (720p/1080i/1080p) o<br />
Comp. (1080i/1080p).<br />
A seconda <strong>de</strong>l tipo di sorgente di ingresso, le opzioni relative alla dimensione <strong>de</strong>ll'immagine possono variare.<br />
Le voci disponibili variano in base alla modalità selezionata.<br />
In modalità PC, è possibile regolare solo i formati 16:9 e 4:3.<br />
Le impostazioni possono essere regolate e memorizzate per ogni dispositivo esterno connesso a un ingresso TV.<br />
Se si visualizza una immagine fissa per oltre due ore, sullo schermo potrebbe apparire una immagine residua temporanea.<br />
Wi<strong>de</strong> Zoom: Premere il tasto ► per selezionare Posizione, quindi premere ENTERE. Per spostare la schermata in alto o in<br />
basso, utilizzare il tasto ▲ o ▼. Quindi premere il tasto ENTERE.<br />
Zoom: Premere il tasto ► per selezionare Posizione, quindi premere ENTERE. Per spostare l’immagine in alto o in basso,<br />
utilizzare il tasto ▲ o ▼. Quindi premere il tasto ENTERE. Premere il tasto ► per selezionare Formato, quindi premere<br />
ENTERE. Premere il tasto ▲ o ▼ per aumentare o ridurre la dimensione <strong>de</strong>ll’immagine in direzione verticale. Quindi<br />
premere il tasto ENTERE.<br />
Dopo aver selezionato l’opzione Adatta a schermo in HDMI (1080i / 1080p) o Comp. (1080i / 1080p): Selezionare Posizione<br />
premendo il tasto ◄ o ►. Utilizzare il tasto ▲, ▼, ◄ o ► per spostare l’immagine.<br />
Reset: Premere il tasto ◄ o ► per selezionare Reset, quindi premere ENTERE. E' possibile azzerare le impostazioni.<br />
N Usando la funzione Adatta a schermo con un ingresso HDMI 720p, 1 riga verrà tagliata all’inizio, alla fine, a sinistra e a<br />
<strong>de</strong>stra come nella funzione Overscan.<br />
Mod schermo → 16:9 / Wi<strong>de</strong> Zoom / Zoom / 4:3<br />
Quando si imposta la dimensione <strong>de</strong>ll’immagine su Automatico su un televisore con formato wi<strong>de</strong> 16:9, è possibile <strong>de</strong>terminare o<br />
meno le dimensioni <strong>de</strong>ll’immagine da visualizzare nel formato 4:3 WSS (Wi<strong>de</strong> Screen Service). Ogni nazione europea richie<strong>de</strong> un<br />
formato <strong>de</strong>ll’immagine diverso e questa funzione <strong>de</strong>ve essere quindi selezionata dall’utente.<br />
●<br />
●<br />
●<br />
●<br />
N<br />
N<br />
16:9: Imposta l’immagine sul formato wi<strong>de</strong> 16:9.<br />
Wi<strong>de</strong> Zoom: Aumenta le dimensioni <strong>de</strong>ll’immagine a oltre 4:3.<br />
Zoom: Ingrandisce verticalmente la dimensione <strong>de</strong>ll'immagine sullo schermo.<br />
4:3: Imposta l’immagine sul formato 4:3.<br />
Questa funzione è disponibile in modalità Automatico.<br />
Questa funzione non è disponibile in modalità PC, Comp. o HDMI.<br />
Toni colore : Normale ▶<br />
Digital NR → Spenta / Basso / Medio / Alta / Automatico<br />
Se il segnale ricevuto dal televisore è <strong>de</strong>bole, è possibile attivare la funzione Digital Noise Reduction per ridurre i disturbi statici e<br />
l’effetto ‘ghosting’ sullo schermo.<br />
N Se il segnale è <strong>de</strong>bole, selezionare una <strong>de</strong>lle altre opzioni disponibili fino a ottenere la migliore qualità visiva.<br />
Livello di nero HDMI → Normale / Basso<br />
Consente di selezionare il livello di nero <strong>de</strong>llo schermo per regolare la profondità <strong>de</strong>ll'immagine.<br />
N Questa funzione è attiva solo quando un dispositivo esterno viene collegato al televisore mediante una porta HDMI (segnali<br />
RGB).<br />
Formato<br />
Mod schermo : 16:9<br />
Digital NR<br />
Livello di nero HDMI<br />
Modalità Film<br />
Modalità Solo blu<br />
Opzioni immagine<br />
: Automatico<br />
: Automatico<br />
: Normale<br />
: Spenta<br />
: Spenta<br />
U Sposta E Conf. R Ritorno<br />
Italiano - 16
■<br />
■<br />
❑<br />
Modalità Film → Spenta / Auto1 / Auto2<br />
Il televisore può essere impostato automaticamente nel senso <strong>de</strong>si<strong>de</strong>rato, per elaborare i segnali <strong>de</strong>i film provenienti da tutte le<br />
sorgenti e per regolare l'immagine in modo da ottenere una visualizzazione ottimale.<br />
N<br />
●<br />
●<br />
●<br />
Modalità Film è supportata in modalità TV, AV, COMPONENT (480i / 1080i) e HDMI (480i / 1080i).<br />
Spenta: Disattiva la funzione Modalità Film.<br />
Auto1: Regola automaticamente l'immagine alla migliore qualità possibile per la visione di un film.<br />
Auto2: Ottimizza automaticamente il testo visualizzato sullo schermo (esclusi i sottotitoli) durante la visione di un film.<br />
Modalità Solo blu → Spenta / Acceso<br />
Questa funzione è solo per gli utenti esperti in grado di regolare le misurazioni <strong>de</strong>l dispositivo AV. Questa funzione visualizza solo<br />
il segnale blu rimuovendo i segnali rosso e ver<strong>de</strong> dal vi<strong>de</strong>o, in modo da offrire un effetto Blue Filter utile per regolare le opzioni<br />
Colour e Tint <strong>de</strong>lle apparecchiature vi<strong>de</strong>o quali lettori DVD, impianti Home Theater, ecc. Questa funzione consente di regolare<br />
a livello di segnale le opzioni Colour e Tint di qualsiasi dispositivo vi<strong>de</strong>o che utilizzi mo<strong>de</strong>lli di tipo Color Bar Pattern per i colori<br />
Rosso/Ver<strong>de</strong>/Blu/Ciano/Magenta/Giallo, senza l'uso di un ulteriore Blue Filter.<br />
N Modalità Solo blu è disponibile solo quando la modalità immagine è impostata su Film o Standard.<br />
Reset immagine → Azzera modalità immagine / Annul<br />
Ripristina tutte le impostazione <strong>de</strong>ll'immagine ai valori pre<strong>de</strong>finiti.<br />
N Azzera modalità immagine: I valori <strong>de</strong>ll'immagine corrente tornano alle impostazioni pre<strong>de</strong>finite.<br />
Italiano - 17
¦<br />
Uso <strong>de</strong>l televisore come uno schermo PC<br />
Impostazione <strong>de</strong>l software <strong>de</strong>l PC (basato su Windows XP)<br />
Di seguito vengono illustrate le impostazioni di visualizzazione di Windows per un PC tipico.<br />
Le schermate visualizzate sul PC possono differire in base alla versione di Windows e alla<br />
scheda vi<strong>de</strong>o installate. Nel caso le schermate risultassero differenti, le stesse informazioni di<br />
base per la configurazione sono applicabili in quasi tutti i casi. (In caso contrario, contattare la<br />
casa costruttrice <strong>de</strong>l computer oppure un rivenditore <strong>Samsung</strong>.)<br />
1. Fare clic sul ‘Pannello di controllo’ nel menu Start di Windows.<br />
2. Quando appare la finestra <strong>de</strong>l pannello di controllo, fare clic su ‘Aspetto e temi’. Verrà<br />
visualizzata una finestra di dialogo.<br />
3. Quando appare la finestra <strong>de</strong>l pannello di controllo, fare clic su ‘Schermo’. Verrà<br />
visualizzata una finestra di dialogo.<br />
4. Fare clic sulla scheda ‘Impostazioni’ nella finestra di dialogo.<br />
Impostazione <strong>de</strong>lla dimensione corretta (risoluzione) - Ottimale: 1920 x 1080 pixel<br />
Se la finestra di dialogo <strong>de</strong>lle impostazioni contiene un’opzione relativa alla frequenza<br />
verticale, il valore corretto è ‘60’ o ‘60 Hz’. In caso contrario, fare clic su ‘OK’ e uscire dalla finestra di dialogo.<br />
Modalità di visualizzazione<br />
■<br />
Se il segnale <strong>de</strong>l sistema equivale alla modalità <strong>de</strong>l segnale standard, lo schermo viene automaticamente regolato. Se il segnale<br />
<strong>de</strong>l sistema non equivale alla modalità <strong>de</strong>l segnale standard, regolare la modalità riferendosi alla guida <strong>de</strong>ll'utente <strong>de</strong>lla scheda<br />
vi<strong>de</strong>o; in caso contrario potrebbe non essere visualizzata alcuna immagine. Per le modalità vi<strong>de</strong>o elencate alla pagina successiva,<br />
l'immagine a schermo è stata ottimizzata durante la produzione.<br />
Ingresso D-Sub e HDMI/DVI<br />
Modalità Risoluzione Frequenza orizzontale<br />
(kHz)<br />
Frequenza verticale<br />
(Hz)<br />
Frequenza di clock <strong>de</strong>i<br />
pixel (MHz)<br />
Polarità sync<br />
(O/V)<br />
IBM<br />
640 x 350<br />
720 x 400<br />
31,469<br />
31,469<br />
70,086<br />
70,087<br />
25,175<br />
28,322<br />
+/-<br />
-/+<br />
MAC<br />
640 x 480 35,000 66,667 30,240 -/-<br />
832 x 624 49,726 74,551 57,284 -/-<br />
1152 x 870 68,681 75,062 100,000 -/-<br />
VESA CVT<br />
720 x 576 35,910 59,950 32,750 -/+<br />
1152 x 864 53,783 59,959 81,750 -/+<br />
1280 x 720 44,772 59,855 74,500 -/+<br />
1280 x 720 56,456 74,777 95,750 -/+<br />
1280 x 960 75,231 74,857 130,000 -/+<br />
640 x 480 31,469 59,940 25,175 -/-<br />
640 x 480 37,861 72,809 31,500 -/-<br />
640 x 480 37,500 75,000 31,500 -/-<br />
800 x 600 37,879 60,317 40,000 +/+<br />
800 x 600 48,077 72,188 50,000 +/+<br />
800 x 600 46,875 75,000 49,500 +/+<br />
1024 x 768 48,363 60,004 65,000 -/-<br />
1024 x 768 56,476 70,069 75,000 -/-<br />
1024 x 768 60,023 75,029 78,750 +/+<br />
VESA DMT 1152 x 864 67,500 75,000 108,000 +/+<br />
1280 x 1024 63,981 60,020 108,000 +/+<br />
1280 x 1024 79,976 75,025 135,000 +/+<br />
1280 x 800 49,702 59,810 83,500 -/+<br />
1280 x 800 62,795 74,934 106,500 -/+<br />
1280 x 960 60,000 60,000 108,000 +/+<br />
1360 x 768 47,712 60,015 85,500 +/+<br />
1440 x 900 55,935 59,887 106,500 -/+<br />
1440 x 900 70,635 74,984 136,750 -/+<br />
1680 x 1050 65,290 59,954 146,250 -/+<br />
VESA GTF<br />
1280 x 720<br />
1280 x 1024<br />
52,500<br />
74,620<br />
70,000<br />
70,000<br />
89,040<br />
128,943<br />
-/+<br />
-/-<br />
VESA DMT /<br />
DTV CEA<br />
1920 x 1080p 67,500 60,000 148,500 +/+<br />
N<br />
N<br />
N<br />
N<br />
N<br />
Quando si effettua una connessione mediante cavo HDMI / DVI, è necessario utilizzare la porta HDMI IN 3(DVI).<br />
La modalità interlacciata non è supportata.<br />
Questo dispositivo potrebbe non funzionare correttamente se si seleziona un formato vi<strong>de</strong>o non standard.<br />
Le modalità Separate e Composite sono supportate. Il formato SOG non è supportato.<br />
Se il cavo VGA è di scarsa qualità o troppo lungo, in alta risoluzione (1920x1080) le immagini possono risultare disturbate.<br />
Italiano - 18
¦<br />
Configurazione <strong>de</strong>l televisore con il PC<br />
N<br />
Preimpostazione: Premere il tasto SOURCE per selezionare la modalità PC.<br />
❑<br />
Regolazione auto<br />
Usare la funzione Auto Adjust per far sì che il televisore regoli automaticamente i segnali vi<strong>de</strong>o<br />
che riceve.<br />
La funzione sintonizza automaticamente le impostazioni e regola i valori <strong>de</strong>lla frequenza e le<br />
posizioni.<br />
T Premere il tasto TOOLS per visualizzare il menu Strumenti. E’ anche possibile impostare<br />
la funzione Auto Adjustment selezionando Strumenti → Regolazione auto.<br />
N Questa funzione non è disponibile in modalità DVI-HDMI.<br />
immagine<br />
Luminosità : 45<br />
Niti<strong>de</strong>zza : 50<br />
Regolazione auto<br />
Schermo<br />
Impostazioni avanzate<br />
Opzioni immagine<br />
Reset immagine<br />
▶<br />
❑<br />
Schermo<br />
■<br />
■<br />
■<br />
Grossa / Fine<br />
Lo scopo <strong>de</strong>lla regolazione <strong>de</strong>lla qualità <strong>de</strong>ll’immagine è quello di eliminare o ridurre eventuali<br />
disturbi di visualizzazione. Se non si riesce a eliminare il disturbo mediante sintonizzazione,<br />
regolare la frequenza nel modo migliore possibile (Grossa) ed eseguire nuovamente la<br />
sintonizzazione fine. Una volta ridotto il disturbo, regolare l’immagine in modo che sia<br />
perfettamente centrata sullo schermo.<br />
Posizione PC<br />
Regolare la posizione <strong>de</strong>llo schermo <strong>de</strong>l PC se non si adatta allo schermo <strong>de</strong>l televisore.<br />
Premere il tasto ▲ o ▼ per regolare la posizione verticale. Premere il tasto ◄ o ► per regolare<br />
la posizione orizzontale.<br />
Reset immagine<br />
È possibile sostituire tutte le impostazioni <strong>de</strong>ll'immagine ripristinando i valori di fabbrica.<br />
Schermo<br />
Grossa 50<br />
Fine 0<br />
Posizione PC<br />
Reset immagine<br />
U Sposta E Conf. R Ritorno<br />
Italiano - 19
SUONO<br />
¦<br />
Configurazione <strong>de</strong>l menu audio<br />
❑<br />
Modalità → Standard / Musica / Film / Voce cristallina / Personaliz<br />
T<br />
●<br />
●<br />
●<br />
●<br />
●<br />
Premere il tasto TOOLS per visualizzare il menu Strumenti. E’ inoltre possibile impostare<br />
la modalità audio selezionando Strumenti → Modalità audio.<br />
Standard: Seleziona la modalità audio normale.<br />
Musica: Enfatizza la musica rispetto alle voci.<br />
Film: Offre la migliore qualità audio per la visione di film.<br />
Voce cristallina: Enfatizza i dialoghi rispetti altri altri suoni.<br />
Personaliz: Richiama le impostazioni audio personalizzate.<br />
Suono<br />
Modalità : Personaliz ▶<br />
Equalizzatore<br />
SRS TruSurround HD : Spenta<br />
Lingua audio : ----<br />
Formato audio : ----<br />
Descrizione audio<br />
Volume auto<br />
: Spenta<br />
Selezione altoparlante : Altoparlante TV<br />
❑<br />
❑<br />
❑<br />
❑<br />
❑<br />
■<br />
■<br />
❑<br />
Equalizzatore<br />
Le impostazioni audio possono essere regolate in base alle proprie preferenze personali.<br />
● Modalità: Seleziona la modalità audio tra quelle pre<strong>de</strong>finite.<br />
● Bilanciamento L/R: Controlla il bilanciamento <strong>de</strong>gli altoparlanti sinistro e <strong>de</strong>stro.<br />
● 100Hz / 300Hz / 1KHz / 3KHz / 10KHz (Regolazione larghezza di banda): Per regolare il livello <strong>de</strong>lle diverse frequenze di<br />
larghezza di banda.<br />
● Reset: Ripristina le impostazione pre<strong>de</strong>finite <strong>de</strong>ll’equalizzatore.<br />
SRS TruSurround HD → Spenta / Acceso<br />
SRS TruSurround HD è una tecnologia SRS brevettata che risolve il problema <strong>de</strong>lla riproduzione di contenuti multicanale 5.1 su<br />
due altoparlanti. TruSurround offre una straordinaria esperienza Surround Sound virtuale attraverso un sistema di riproduzione a<br />
due altoparlanti, inclusi gli altoparlanti interni <strong>de</strong>l televisore. È pienamente compatibile con tutti i formati multicanale.<br />
T Premere il tasto TOOLS per visualizzare il menu Strumenti. E’ possibile impostare la funzione SRS TruSurround HD<br />
selezionando Strumenti → SRS TS HD.<br />
Lingua audio<br />
È possibile modificare la lingua pre<strong>de</strong>finita. Visualizza le informazioni sulla lingua relative alla trasmissione in corso.<br />
N<br />
N<br />
Durante la visione di un canale digitale, è possibile selezionare questa funzione.<br />
E' possibile selezionare solo una <strong>de</strong>lle lingue trasmesse.<br />
Formato audio → MPEG / Dolby Digital<br />
Quando l’audio è generato sia dall’altoparlante principale sia dal ricevitore audio, potrebbe prodursi un effetto di eco a causa <strong>de</strong>lla<br />
diversa velocità di <strong>de</strong>codifica <strong>de</strong>i due dispositivi. In questo caso, attivare la funzione TV Speaker.<br />
N<br />
N<br />
Durante la visione di un canale digitale, è possibile selezionare questa funzione.<br />
Il formato audio dipen<strong>de</strong> dal segnale trasmesso dall'emittente.<br />
Descrizione audio<br />
Questa funzione audio ausiliaria fornisce una traccia audio aggiuntiva per aiutare le persone con problemi visivi. Questa funzione<br />
gestisce il flusso audio per l’opzione AD (Descrizione audio), quando è trasmesso insieme all’Audio principale dall'emittente. Gli<br />
utenti possono attivare o disattivare la funzione Descrizione audio selezionando Acceso o Spenta e regolarne il volume.<br />
O Premere il tasto AD sul telecomando per selezionare Spenta o Acceso.<br />
Descrizione audio → Spenta / Acceso<br />
Attiva e disattiva la funzione Audio Description.<br />
Volume<br />
E’ possibile regolare il volume <strong>de</strong>lla funzione Descrizione audio.<br />
N<br />
N<br />
Volume è attivo quando la funzione Descrizione audio è impostata su Acceso.<br />
Durante la visione di un canale digitale, è possibile selezionare questa funzione.<br />
Volume auto → Spenta / Acceso<br />
Le condizioni <strong>de</strong>l segnale variano a seconda <strong>de</strong>ll’emittente, ma non è pratico regolare il volume ogni volta che si cambia canale.<br />
Questa funzione consente di regolare automaticamente il volume <strong>de</strong>l canale <strong>de</strong>si<strong>de</strong>rato diminuendo il livello <strong>de</strong>ll’uscita audio<br />
quando il segnale di modulazione è alto, oppure aumentando il livello <strong>de</strong>ll’uscita audio quando il segnale di modulazione è basso.<br />
Italiano - 20
❑<br />
Selezione altoparlante<br />
Durante la visione <strong>de</strong>l televisore con un sistema Home theatre collegato, disattivare gli altoparlanti in modo da poter ascoltare<br />
l'audio proveniente dagli altoparlanti esterni <strong>de</strong>l sistema Home theatre.<br />
● Altoparlante est: Per ascoltare l'audio proveniente dagli altoparlanti esterni (Home Theatre).<br />
● Altoparlante TV: Per ascoltare l’audio tramite gli altoparlanti <strong>de</strong>l televisore.<br />
N I tasti di regolazione <strong>de</strong>l volume e il tasto MUTE non sono attivi quando Selezione altoparlante è impostato su Altoparlante<br />
est.<br />
N Selezionando Altoparlante est nel menu Selezione altoparlante, le impostazioni <strong>de</strong>ll’audio saranno limitate.<br />
Altoparlanti interni <strong>de</strong>l televisore Da Audio Out (Optical, L/R Out) a Sistema audio<br />
RF / AV / Comp. / PC / HDMI<br />
RF / AV / Comp. / PC / HDMI<br />
Altoparlante TV Uscita audio Uscita audio<br />
Altoparlante est Muto Uscita audio<br />
Nessun segnale vi<strong>de</strong>o Muto Muto<br />
❑<br />
Reset impostazioni audio → Azzera tutto / Azz mod audio / Annulla<br />
E' possibile ripristinare le impostazioni audio ai valori di fabbrica.<br />
N Azz mod audio: I valori correnti tornano alle impostazioni pre<strong>de</strong>finite.<br />
Reset impostazioni audio<br />
Selezionare le opzioni di reset <strong>de</strong>ll'audio.<br />
Azzera tutto Azz mod audio Annulla<br />
L Sposta E Conf. R Ritorno<br />
¦<br />
Selezione <strong>de</strong>lla modalità audio<br />
E' possibile impostare la modalità audio premento il tasto DUAL. Questo tasto consente di visualizzare a schermo la modalità<br />
audio impostata.<br />
N<br />
N<br />
N<br />
A2 Stereo<br />
NICAM<br />
Stereo<br />
Tipo di audio Dual 1 / 2 Pre<strong>de</strong>finito<br />
Mono<br />
MONO<br />
Cambio automatico<br />
Stereo<br />
STEREO ↔ MONO<br />
Dual DUAL 1 ↔ DUAL 2 DUAL 1<br />
Mono<br />
MONO<br />
Cambio automatico<br />
Stereo<br />
MONO ↔ STEREO<br />
Dual<br />
MONO ↔ DUAL 1<br />
DUAL 2<br />
DUAL 1<br />
Se il segnale stereo è <strong>de</strong>bole e si verifica un cambio automatico, passare alla modalità Mono.<br />
Questa funzione è attiva solo con segnale audio stereo. Al contrario, non è attiva con segnale audio mono.<br />
Questa funzione è disponibile solo in modalità TV.<br />
Italiano - 21
Impostazione<br />
¦<br />
Configurazione <strong>de</strong>l menu Setup<br />
❑<br />
Lingua menu<br />
E' possibile impostare la lingua <strong>de</strong>i menu.<br />
Plug & Play<br />
❑<br />
Ora<br />
Per la <strong>de</strong>scrizione <strong>de</strong>ttagliata <strong>de</strong>lle procedure per l'impostazione <strong>de</strong>lle opzioni, ve<strong>de</strong>re<br />
'Impostazione <strong>de</strong>ll'orario'.<br />
Impostazione<br />
Lingua menu : Italiano ▶<br />
Ora<br />
Trasmissione<br />
Sicurezza<br />
Generale<br />
❑<br />
Trasmissione<br />
■<br />
■<br />
■<br />
■<br />
Sottotitoli<br />
È possibile attivare e disattivare i sottotitoli. Utilizzare questo menu per impostare la modalità sottotitoli. Normale rappresenta il<br />
sottotitolo di base mentre Non u<strong>de</strong>nti è il sottotitolo per le persone con problemi uditivi.<br />
● Sottotitoli → Spenta / Acceso<br />
Attiva e disattiva i sottotitoli.<br />
● Modalità → Normale / Non u<strong>de</strong>nti<br />
Imposta la modalità <strong>de</strong>i sottotitoli.<br />
● Lingua Sottotitoli<br />
Imposta la lingua <strong>de</strong>i sottotitoli.<br />
N<br />
N<br />
O<br />
Se il programma che si sta guardando non supporta la funzione Non u<strong>de</strong>nti si attiva automaticamente l’opzione Normale<br />
anche se è selezionata la modalità Non u<strong>de</strong>nti.<br />
La lingua pre<strong>de</strong>finita è l'inglese, nel caso in cui la trasmissione non supporti la lingua selezionata.<br />
È possibile selezionare queste opzioni semplicemente premendo il tasto SUBT. sul telecomando.<br />
Testo digitale → Disattiva / Attiva (solo RU)<br />
Se il programma è trasmesso con testo digitale, questa funzione è attivata.<br />
N MHEG (Multimedia and Hypermedia Information Coding Experts Group)<br />
Uno standard internazionale per i sistemi di codifica <strong>de</strong>i dati multimediali e ipermediali. È un sistema più complesso rispetto al<br />
formato MPEG in quanto inclu<strong>de</strong> collegamenti a dati ipermediali come immagini fisse, servizi di caratteri, animazione, grafica<br />
e file vi<strong>de</strong>o, oltre ai dati multimediali. MHEG è una tecnologia interattiva con vari campi di applicazione, come sistemi VOD<br />
(Vi<strong>de</strong>o-On-Demand), ITV (Interactive TV), EC (Electronic Commerce), teleformazione, teleconferenza, librerie digitali e giochi<br />
di rete.<br />
Lingua Teletext<br />
E' possibile impostare la lingua <strong>de</strong>l Teletext.<br />
N La lingua pre<strong>de</strong>finita è l'inglese, nel caso in cui la trasmissione non supporti la lingua selezionata.<br />
Preferenze<br />
● Lingua principale audio / Lingua secondaria audio / Lingua principale sottotitoli / Lingua secondaria sottotitoli /<br />
Lingua principale Teletext / Lingua secondaria Teletext<br />
Mediante questa funzione, gli utenti sono in grado di selezionare una <strong>de</strong>lle lingue disponibili. La lingua selezionata viene<br />
impostata automaticamente durante la selezione di un canale.<br />
Modificando l’impostazione <strong>de</strong>lla lingua, le opzioni Lingua Sottotitoli, Lingua audio e Lingua Teletext <strong>de</strong>l menu Lingua vengono<br />
automaticamente impostate sulla lingua selezionata<br />
Le opzioni Lingua Sottotitoli, Lingua audio, e Lingua Teletext <strong>de</strong>l menu Lingua mostrano l’elenco <strong>de</strong>lle lingue supportate dal<br />
canale corrente, dove l’opzione corrente appare evi<strong>de</strong>nziata. Se si modifica una di queste opzioni, la nuova lingua viene<br />
applicata solo al canale corrente. La nuova impostazione non viene invece applicata alle opzioni Lingua principale sottotitoli,<br />
Lingua principale audio o Lingua principale Teletext <strong>de</strong>l menu Preference.<br />
Italiano - 22
■<br />
❑<br />
■<br />
■<br />
■<br />
❑<br />
■<br />
Interfaccia comune<br />
● Menu CI<br />
Ciò permette all'utente di acce<strong>de</strong>re al menu <strong>de</strong>l modulo CAM.<br />
Selezionare il Menu CI in base alla scheda PC.<br />
● Info sull'applicazione<br />
Contiene informazioni sul modulo CAM inserito nello slot CI e le visualizza. Le informazioni sull’applicazione sono relative alla<br />
‘SCHEDA CI (CI+)’. È possibile installare il modulo CAM in qualsiasi momento sia mentre il televisore è acceso sia mentre è<br />
spento.<br />
1. Acquistare il modulo CI CAM presso il rivenditore locale o via telefono.<br />
2. Inserire la scheda ‘SCHEDA CI (CI+)’ nel modulo CAM nella direzione indicata dalla freccia.<br />
3. Inserire il modulo CAM con la ‘SCHEDA CI (CI+)’ installata nell’alloggiamento common interface. (Inserire completamente<br />
il CAM nella direzione indicata dalla freccia in modo che risulti parallelo allo slot.)<br />
4. Verificare la visione <strong>de</strong>ll’immagine su un canale a segnale criptato.<br />
Sicurezza<br />
Blocco canali → Spenta / Acceso<br />
Tramite questa funzione è possibile impedire agli utenti non autorizzati, ad esempio i bambini, di guardare programmi non adatti a<br />
loro, annullando il vi<strong>de</strong>o e azzerando l’audio.<br />
N<br />
N<br />
N<br />
N<br />
Prima <strong>de</strong>lla comparsa <strong>de</strong>ll’immagine, compare la richiesta <strong>de</strong>l PIN. Digitare il PIN a quattro cifre.<br />
Il PIN pre<strong>de</strong>finito di un nuovo apparecchio TV è ‘0-0-0-0’. E' possibile modificare il PIN selezionando Cambia PIN nel menu.<br />
E' possibile bloccare alcuni canali nell'elenco <strong>de</strong>i canali.<br />
Blocco canali è disponibile solo in modalità TV.<br />
Cambia PIN<br />
E' possibile modificare il numero ID necessario per configurare il televisore.<br />
N<br />
N<br />
N<br />
Prima <strong>de</strong>lla comparsa <strong>de</strong>ll’immagine, compare la richiesta <strong>de</strong>l PIN. Digitare il PIN a quattro cifre.<br />
Il PIN pre<strong>de</strong>finito di un nuovo apparecchio TV è ‘0-0-0-0’.<br />
Qualora si sia dimenticato il codice PIN, premere i tasti <strong>de</strong>l telecomando nella sequenza seguente per ripristinare il codice PIN<br />
pre<strong>de</strong>finito ‘0-0-0-0’: POWER (Spenta) → MUTE → 8 → 2 → 4 → POWER (Acceso).<br />
Blocco Canale → Grado Blocco Canale<br />
Questa funzione consente di immettere un codice PIN di i<strong>de</strong>ntificazione personale a 4 cifre <strong>de</strong>finito dall’utente per impedire agli<br />
utenti non autorizzati, come ad esempio i bambini, di ve<strong>de</strong>re programmi non adatti a loro.<br />
N<br />
N<br />
N<br />
N<br />
N<br />
La voce Grado Blocco Canale può essere diversa in base alla nazione.<br />
Prima <strong>de</strong>lla comparsa <strong>de</strong>ll’immagine, compare la richiesta <strong>de</strong>l PIN. Digitare il PIN a quattro cifre.<br />
Il PIN pre<strong>de</strong>finito di un nuovo apparecchio TV è ‘0-0-0-0’. E' possibile modificare il PIN selezionando Cambia PIN nel menu.<br />
Una volta impostata la classificazione <strong>de</strong>i programmi, verrà visualizzato il simbolo ‘\’.<br />
Cons tutto: Premere per sbloccare tutte le classificazioni <strong>de</strong>i canali TV.<br />
Bloc tutto: Premere per bloccare tutte le classificazioni <strong>de</strong>i canali TV.<br />
Generale<br />
Modalità gioco → Spenta / Acceso<br />
Durante la connessione a una console per vi<strong>de</strong>ogiochi come PlayStation o Xbox, il gioco sarà più realistico selezionando il<br />
relativo menu.<br />
N Limitazioni <strong>de</strong>lla modalità gioco (Attenzione)<br />
Per scollegare una console per vi<strong>de</strong>ogiochi e collegare un altro dispositivo esterno, impostare la modalità Modalità gioco<br />
su Spenta nel menu di impostazione.<br />
Visualizzando il menu TV in modalità Modalità gioco si potrebbe verificare un leggero sfarfallio.<br />
N<br />
N<br />
N<br />
Modalità gioco non è disponibile in modalità TV, PC ed Est.<br />
Se la qualità <strong>de</strong>ll'immagine è sca<strong>de</strong>nte quando al televisore è collegato un dispositivo esterno, verificare se la Modalità gioco<br />
è impostata su Acceso. Impostare Modalità gioco su Spenta e collegare i dispositivi esterni.<br />
Se Modalità gioco è Acceso:<br />
<br />
<br />
<br />
La Modalità immagine viene automaticamente impostata su Standard e non può essere modificata.<br />
La Modalità audio viene automaticamente impostata su Personaliz e non può essere modificata. Regolare l'audio<br />
mediante l'equalizzatore.<br />
La funzione Reset Suono viene attivata. La selezione <strong>de</strong>lla funzione Reset dopo l'impostazione <strong>de</strong>ll'equalizzatore<br />
ripristina le impostazione di fabbrica <strong>de</strong>ll'equalizzatore.<br />
Italiano - 23
■<br />
■<br />
■<br />
¦<br />
❑<br />
■<br />
■<br />
❑<br />
Risp. energia → Spenta / Basso / Medio / Alta / Immagine off / Automatico<br />
Questa funzione regola la luminosità <strong>de</strong>l televisore in modo da ridurre il consumo di energia. Durante la visione notturna <strong>de</strong>l<br />
televisore, impostare l’opzione <strong>de</strong>lla modalità Risp. energia su Alta in modo da ridurre l’affaticamento <strong>de</strong>gli occhi oltre al consumo<br />
energetico.<br />
Selezionando Immagine off, lo schermo si spegne lasciando attivo solo l’audio. Premere un tasto qualsiasi per uscire dalla<br />
modalità Immagine off.<br />
N<br />
T<br />
Nel menu Strumenti, la funzione Immagine off non è supportata.<br />
Premere il tasto TOOLS per visualizzare il menu Strumenti. E' inoltre possibile impostare l'opzione Energy Saving<br />
selezionando Strumenti → Risp. energia.<br />
Trasparenza menu → Luminoso / Scuro<br />
E’ possibile impostare la trasparenza <strong>de</strong>l menu.<br />
Melodia → Spenta / Basso / Medio / Alta<br />
E' possibile impostare una melodia da attivare a ogni accensione o spegnimento <strong>de</strong>l monitor.<br />
N La modalità Melody non funziona<br />
<br />
<br />
<br />
Se il televisore non emette alcun suono significa che è stato premuto il tasto MUTE.<br />
Se non proviene audio dal televisore, ciò potrebbe essere causato dal volume impostato sul minimo mediante il tasto (-).<br />
Se il televisore è stato spento mediante la funzione Timer stand-by.<br />
Impostazione <strong>de</strong>ll’orario<br />
Orologio<br />
L’impostazione <strong>de</strong>ll’orologio è necessaria per utilizzare le varie funzioni di timer <strong>de</strong>l televisore.<br />
O<br />
N<br />
L’ora corrente appare ogni volta che si preme il tasto INFO.<br />
Se il cavo di alimentazione viene scollegato, è necessario impostare nuovamente l’orologio.<br />
Modalità orologio<br />
E’ possibile impostare manualmente o automaticamente l’orario corrente.<br />
● Automatico: Imposta automaticamente l’orario corrente utilizzando l’orario inviato dalla<br />
trasmissione digitale.<br />
● Manuale: Imposta manualmente l’ora corrente.<br />
N In base all'emittente e al segnale, la funzione <strong>de</strong>ll'impostazione automatica <strong>de</strong>ll'orario<br />
potrebbe non essere corretta. In questo caso, impostare l'orario manualmente.<br />
N La connessione Antenna o Cavo <strong>de</strong>ve consentire l'impostazione automatica <strong>de</strong>ll'orario.<br />
Imposta Ora<br />
È possibile impostare manualmente l’ora corrente.<br />
N Questa funzione è disponibile solo quando la funzione Modalità orologio è impostata su<br />
Manuale.<br />
N È possibile impostare il giorno, il mese, l’anno, l’ora e i minuti premendo direttamente i tasti numerici <strong>de</strong>l telecomando.<br />
Timer stand-by<br />
Orologio : -- : -- ▶<br />
Timer stand-by<br />
Il timer di spegnimento disattiva automaticamente il televisore dopo il tempo impostato (30, 60, 90, 120, 150 e 180 minuti).<br />
T Premere il tasto TOOLS per visualizzare il menu Strumenti. E’ inoltre possibile impostare il timer di stand-by selezionando<br />
Strumenti → Timer stand-by.<br />
N Per annullare la funzione Timer stand-by selezionare Spenta.<br />
Impostazione<br />
Timer 1<br />
Timer 2<br />
Timer 3<br />
Plug & Play<br />
Lingua menu<br />
Ora<br />
Trasmissione<br />
Sicurezza<br />
Generale<br />
Ora<br />
: Spenta<br />
: Inglese<br />
: Disattivato<br />
: Disattivato<br />
: Disattivato<br />
U Sposta E Conf. R Ritorno<br />
▶<br />
❑<br />
■<br />
■<br />
Timer 1 / Timer 2 / Timer 3<br />
Possono essere impostate tre diverse opzioni <strong>de</strong>l Timer.<br />
Prima è necessario impostare l’orologio.<br />
Orario TV on<br />
Impostare l’ora e i minuti e attivare / disattivare.<br />
(Per attivare il timer selezionare Attiva).<br />
Orario TV off<br />
Impostare l’ora e i minuti e attivare / disattivare.<br />
(Per attivare il timer selezionare Attiva).<br />
Timer 1<br />
Orario TV on<br />
00 00 Disattiva<br />
Orario TV off<br />
00 00 Disattiva<br />
Volume Sorgente Antenna Canale<br />
10<br />
TV ATV 0<br />
Ripetizione<br />
Una volta<br />
Dom Lun Mar Mer Gio Ven Sab<br />
L Sposta U Regola E Conf. R Ritorno<br />
Italiano - 24
■<br />
■<br />
■<br />
■<br />
■<br />
■<br />
Volume<br />
Selezionare il livello <strong>de</strong>l volume <strong>de</strong>si<strong>de</strong>rato.<br />
Sorgente → TV / USB<br />
E' possibile selezionare il contenuto <strong>de</strong>l dispositivo TV o USB da riprodurre all'accensione automatica <strong>de</strong>l televisore. Selezionare<br />
TV o USB. (Assicurarsi che al televisore sia collegato un dispositivo USB.)<br />
N Nel caso ci sia un solo file fotografico memorizzato sul dispositivo USB, la funzione Sli<strong>de</strong> Show non è disponibile.<br />
Antenna (quando Sorgente è impostata su TV)<br />
Selezionare ATV o DTV.<br />
Canale (quando Sorgente è impostata su TV)<br />
Selezionare il canale <strong>de</strong>si<strong>de</strong>rato.<br />
Contenuti (quando Sorgente è impostata su USB)<br />
E' possibile selezionare una cartella <strong>de</strong>l dispositivo USB con i file musicali o fotografici da riprodurre all'accensione automatica <strong>de</strong>l<br />
televisore.<br />
N<br />
N<br />
Se il nome <strong>de</strong>lla cartella è troppo lungo, la cartella non è selezionabile.<br />
Se il nome <strong>de</strong>lla cartella da configurare mediante la funzione Contenuti è troppo lungo, la cartella non è selezionabile.<br />
Ripetizione<br />
Selezionare Una volta, Ogni gg, Lun~Ven, Lun~Sab, Sab~Dom, o Manuale.<br />
N<br />
N<br />
N<br />
Quando viene selezionato Manuale, premere il tasto ► per impostare il giorno <strong>de</strong>lla settimana. Premere il tasto ENTERE<br />
sul giorno <strong>de</strong>si<strong>de</strong>rato per visualizzare un simbolo c.<br />
È possibile impostare l’ora, i minuti e il canale anche premendo i tasti numerici <strong>de</strong>l telecomando.<br />
Spegnimento automatico<br />
Quando il televisore si accen<strong>de</strong> mediante il timer impostato su Acceso, si spegne automaticamente se per 3 ore non viene<br />
premuto alcun tasto di controllo. Questa funzione è disponibile solo se il timer è impostato su Acceso e impedisce l’eventuale<br />
surriscaldamento <strong>de</strong>l televisore dovuto a un periodo di accensione troppo lungo.<br />
Italiano - 25
Ingressi / Supporto<br />
¦<br />
Menu Ingressi<br />
❑<br />
■<br />
❑<br />
Elenco sorgenti<br />
Per selezionare il televisore o altre sorgenti esterne di ingresso quali DVD / lettori Blu-ray /<br />
Cable Box /<br />
Ricevitori satellitari (Set-Top Box) collegati al televisore. Utilizzare la funzione per selezionare la<br />
sorgente di ingresso <strong>de</strong>si<strong>de</strong>rata.<br />
O Premere il tasto SOURCE sul telecomando per visualizzare una sorgente <strong>de</strong>l segnale<br />
esterna. La modalità TV può essere selezionata premendo il tasto TV.<br />
TV / Ext.1 / Ext.2 / AV / Component / PC / HDMI1 / HDMI2 / HDMI3/DVI / HDMI4<br />
N E’ possibile scegliere solo i dispositivi esterni collegati al televisore. In Elenco sorgenti, gli<br />
ingressi collegati verranno evi<strong>de</strong>nziati e ordinati in cima all'elenco. Gli ingressi non collegati<br />
verranno ordinati in fondo all’elenco.<br />
N Ext. e PC rimangono sempre attive.<br />
N Uso <strong>de</strong>i tasti colorati <strong>de</strong>l telecomando nell'elenco <strong>de</strong>lle sorgenti<br />
Rosso (Aggiorna): Aggiorna il collegamento ai dispositivi esterni. Premere questo tasto<br />
se la propria sorgente è accesa e collegata ma non compare nell'elenco.<br />
TOOLS (Strumenti): Visualizza i menu Modifica Nome e Informazioni.<br />
Modifica Nome<br />
Ingressi<br />
Elenco sorgenti<br />
Modifica Nome<br />
TV<br />
Aggiorna<br />
Elenco sorgenti<br />
Ext. 1 : - - - -<br />
Ext. 2 : - - - -<br />
PC : - - - -<br />
AV : - - - -<br />
Comp. : - - - -<br />
T Strumenti<br />
■<br />
¦<br />
❑<br />
■<br />
■<br />
VCR / DVD / STB cavo / STB satellite / STB PVR / Ricevitore AV / Giochi / Vi<strong>de</strong>ocamera / PC / DVI / DVI PC / TV / IPTV /<br />
Blu-ray / HD DVD / DMA<br />
Assegnare un nome al dispositivo collegato ai jack di ingresso per semplificare la selezione <strong>de</strong>lla sorgente di ingresso.<br />
N Quando un PC con una risoluzione di 1920 x 1080 a 60Hz è collegato alla porta HDMI IN 3(DVI) è necessario impostare la<br />
modalità HDMI3/DVI su DVI PC in Modifica Nome <strong>de</strong>lla modalità Ingressi.<br />
N Quando si collega un cavo HDMI/DVI alla porta HDMI IN 3(DVI), impostare la modalità HDMI3/DVI su DVI o DVI PC alla voce<br />
Modifica Nome <strong>de</strong>lla modalità Ingressi. In questo caso, è necessaria una connessione separata per il segnale audio.<br />
Menu Supporto<br />
Auto diagnosi<br />
Test immagine<br />
In caso di problemi di visualizzazione <strong>de</strong>ll'immagine, eseguire il test pertinente. Verificare il color<br />
pattern sullo schermo per ve<strong>de</strong>re se il problema persiste.<br />
● Sì: Se il test pattern non compare oppure presenta disturbi, selezionare Sì. Potrebbe<br />
essersi verificato un problema con il televisore. Contattare il call center <strong>Samsung</strong> per<br />
richie<strong>de</strong>re assistenza.<br />
● No: Se il test pattern è visualizzato correttamente, selezionare No. Potrebbe essersi<br />
verificato un problema con i dispositivi esterni. Controllare lo stato <strong>de</strong>i collegamenti. Se il<br />
problema persiste, consultare il manuale <strong>de</strong>ll'utente <strong>de</strong>i dispositivi esterni.<br />
Auto diagnosi<br />
Aggiornamento software<br />
Guida alla connessione HD<br />
Contattare <strong>Samsung</strong><br />
Test audio<br />
Test immagine<br />
▶<br />
Test audio<br />
In caso di problemi di audio, eseguire il test pertinente. Controllare l'audio riproducendo un test<br />
Informazioni sul segnale<br />
melodico attraverso le casse <strong>de</strong>l televisore.<br />
N Se non c'è ritorno audio dagli altoparlanti <strong>de</strong>l televisore, prima di eseguire il test audio<br />
verificare che Selezione altoparlante sia impostato su Altoparlante TV nel menu Suono.<br />
U Sposta E Conf. R Ritorno<br />
N E' possibile ascoltare la melodia durante il test anche se Selezione altoparlante è impostato su Altoparlante est oppure<br />
l'audio è stato disattivato mediante la pressione <strong>de</strong>l tasto MUTE.<br />
● Sì: Se durante l'esecuzione <strong>de</strong>l test audio il suono proviene da un solo altoparlante, selezionare Sì. Potrebbe essersi verificato<br />
un problema con il televisore. Contattare il call center <strong>Samsung</strong> per richie<strong>de</strong>re assistenza.<br />
● No: Se è possibile ascoltare il suono dagli altoparlanti, selezionare No. Potrebbe essersi verificato un problema con i<br />
dispositivi esterni. Controllare lo stato <strong>de</strong>i collegamenti. Se il problema persiste, consultare il manuale <strong>de</strong>ll'utente <strong>de</strong>i dispositivi<br />
esterni.<br />
Supporto<br />
Auto diagnosi<br />
▶<br />
Italiano - 26
■<br />
Informazioni sul segnale (solo canali digitali)<br />
Diversamente dai canali analogici, la cui qualità di ricezione può variare da ‘molto disturbata’ a 'chiara', i canali digitali (HDTV)<br />
sono caratterizzati da una perfetta qualità oppure dalla totale mancanza di ricezione. Non è quindi possibile sintonizzare i canali<br />
digitali. Per migliorare la ricezione <strong>de</strong>i canali digitali disponibili è tuttavia possibile regolare l'antenna.<br />
N Se il misuratore <strong>de</strong>lla potenza <strong>de</strong>l segnale indica che il segnale è <strong>de</strong>bole, regolare fisicamente l'antenna per aumentare il<br />
segnale. Continuare a regolare l'antenna fino a trovare la posizione migliore per ricevere il segnale in modo ottimale.<br />
❑<br />
■<br />
Aggiornamento software<br />
<strong>Samsung</strong> potrà in futuro ren<strong>de</strong>re disponibili aggiornamenti <strong>de</strong>l firmware <strong>de</strong>l televisore. Tali<br />
aggiornamenti possono essere scaricati mediante il televisore se collegato a Internet, o<br />
scaricando il nuovo firmware dal sito samsung.com su un dispositivo USB.<br />
N<br />
N<br />
N<br />
Versione corrente è il software già installato nel televisore.<br />
Software alternativo (Backup) mostra la versione prece<strong>de</strong>nte che verrà sostituita.<br />
Il software è rappresentato da ‘Anno/Mese/Giorno_Versione’. Più recente è la data, più<br />
recente la versione <strong>de</strong>l software. Si consiglia di installare la più recente versione disponibile.<br />
Tramite USB<br />
Inserire un’unità USB contenente l’aggiornamento <strong>de</strong>l firmware scaricato dal sito samsung.com<br />
nel televisore. Fare attenzione a non disattivare l'alimentazione o rimuovere l'unità USB mentre<br />
l'aggiornamento è in corso. Al termine <strong>de</strong>ll'aggiornamento <strong>de</strong>l firmware, il televisore si spegnerà<br />
e riaccen<strong>de</strong>rà automaticamente. Verificare la versione <strong>de</strong>l firmware dopo avere effettuato<br />
l'aggiornamento (la nuova versione avrà un numero superiore rispetto alla prece<strong>de</strong>nte.)<br />
Al termine <strong>de</strong>ll'aggiornamento <strong>de</strong>l software, le impostazioni vi<strong>de</strong>o e audio modificate torneranno<br />
alle impostazioni pre<strong>de</strong>finite di fabbrica. Si consiglia di scrivere le impostazioni in modo da<br />
poterle facilmente ripristinare dopo l’aggiornamento.<br />
Pannello laterale <strong>de</strong>l televisore<br />
Unità USB<br />
Aggiornamento software<br />
Versione corrente<br />
2009/01/18_000001<br />
Tramite USB<br />
▶<br />
Tramite canale<br />
Aggiornamento mod Standby : 45 Min<br />
Software alternativo<br />
2009/01/15_00000<br />
U Sposta E Conf. R Ritorno<br />
■<br />
■<br />
■<br />
❑<br />
❑<br />
Tramite canale<br />
Aggiorna il software mediante il segnale trasmesso.<br />
N Se la funzione viene selezionata durante la trasmissione software, questa funzione ricerca il software disponibile e ne scarica<br />
gli aggiornamenti.<br />
N Il tempo necessario per scaricare il software è <strong>de</strong>terminato dallo stato <strong>de</strong>l segnale.<br />
Aggiornamento mod Standby<br />
Per continuare l’aggiornamento software anche quando l’alimentazione principale è attiva, selezionare Acceso premendo il tasto<br />
▲ o ▼ . 45 minuti dopo l’ingresso in modalità Standby, viene effettuato un aggiornamento manuale. Poiché l’alimentazione<br />
<strong>de</strong>ll’unità si attiva internamente, lo schermo LCD potrà attivarsi per breve tempo. Questo fenomeno può continuare per più di<br />
un’ora, fino al termine <strong>de</strong>ll’aggiornamento software.<br />
Software alternativo (Backup)<br />
In caso di problemi con il nuovo firmware che possano influenzare il regolare funzionamento <strong>de</strong>l prodotto, è possibile ripristinare la<br />
versione prece<strong>de</strong>nte <strong>de</strong>l software.<br />
N<br />
N<br />
Se il software è stato cambiato, viene visualizzata la versione corrente.<br />
E' possibile cambiare la versione <strong>de</strong>l software corrente selezionando ‘Software alternativo’.<br />
Guida alla connessione HD<br />
Questo menu presenta la modalità di connessione in grado di offrire la qualità ottimale per i televisori HD. Consultare queste<br />
informazioni durante la connessione di dispositivi esterni al televisore.<br />
Contattare <strong>Samsung</strong><br />
Fare riferimento a queste informazioni in caso di funzionamento anomalo <strong>de</strong>l televisore o se si <strong>de</strong>si<strong>de</strong>ra aggiornare il software. E'<br />
possibile visualizzare le informazioni relative a call centre, prodotto e metodo di scaricamento <strong>de</strong>l software.<br />
Italiano - 27
Media Play (USB)<br />
¦<br />
Collegamento di un dispositivo USB<br />
1. Per accen<strong>de</strong>re il televisore premere il tasto POWER.<br />
2. Collegare un dispositivo USB contenente file fotografici e/o musicali al jack USBposto sul<br />
pannello laterale <strong>de</strong>l televisore.<br />
3. Quando viene visualizzata la schermata di selezione Applicazione, premere ENTERE per<br />
selezionare Media Play (USB).<br />
N<br />
N<br />
N<br />
N<br />
N<br />
N<br />
N<br />
N<br />
N<br />
N<br />
N<br />
N<br />
N<br />
N<br />
MTP (Media Transfer Protocol) non è supportato.<br />
Il file system supporta FAT16, FAT32 e NTFS.<br />
Alcuni dispositivi audio e vi<strong>de</strong>ocamere digitali USB possono non essere compatibili con<br />
questo televisore.<br />
Media Play supporta solo il dispositivo USB MSC (Mass Storage Class). MSC<br />
è un dispositivo di memorizzazione di massa Bulk-Only Transport. Ne sono<br />
esempi i thumb drive e i lettori di sche<strong>de</strong> flash (gli HUB e i dischi fissi USB<br />
non sono supportati).<br />
Collegare direttamente alla porta USB <strong>de</strong>l TV. Se si utilizza un cavo separato,<br />
possono verificarsi problemi di compatibilità USB.<br />
Prima di collegare il dispositivo al televisore, eseguire il backup <strong>de</strong>i file<br />
per prevenire una perdita acci<strong>de</strong>ntale o eventuali danni. SAMSUNG non è<br />
responsabile di eventuali danni ai file dati o perdite di dati.<br />
Non scollegare il dispositivo USB durante il caricamento.<br />
Maggiore è la risoluzione <strong>de</strong>ll’immagine, più lungo è il tempo necessario per visualizzarla sullo schermo.<br />
La risoluzione massima supportata in JPEG è di 15360X8640 pixel.<br />
In caso di file non supportati o danneggiati, comparirà il messaggio ‘Formato file non supportato’.<br />
I file MP3 con DRM prece<strong>de</strong>ntemente scaricati da un sito a pagamento non potranno essere riprodotti. Digital Rights<br />
Management (DRM) è una tecnologia che supporta la creazione, la distribuzione e la gestione di contenuti in modo<br />
completo e integrato, compresa la protezione <strong>de</strong>i diritti e <strong>de</strong>gli interessi <strong>de</strong>i fornitori <strong>de</strong>i contenuti, la prevenzione dalla<br />
copia illegale, così come la gestione <strong>de</strong>gli ad<strong>de</strong>biti e <strong>de</strong>i pagamenti.<br />
Passare da una foto all’altra potrebbe richie<strong>de</strong>re alcuni secondi. Ora, sullo schermo comparirà l’icona che indica il<br />
caricamento in corso.<br />
Se sono collegati più dispositivi MSC, alcuni di essi potrebbero non essere riconosciuti. Se un dispositivo richie<strong>de</strong> molta<br />
potenza (più di 500mA o 5V), il dispositivo USB può non essere supportato.<br />
Nel caso in cui, quando si collega o si utilizza un dispositivo USB, venga visualizzato un messaggio che indica la<br />
presenza di sovratensione, il dispositivo potrebbe non essere riconosciuto o non funzionare correttamente.<br />
Utilizzo <strong>de</strong>l tasto Telecomando nel menu Media Play<br />
Tasto<br />
Operazioni<br />
▲/▼/◄/►<br />
Sposta il cursore e seleziona una voce.<br />
Attiva la voce attualmente selezionata. Durante la proiezione di diapositive o la riproduzione di<br />
ENTERE<br />
un brano musicale:<br />
- Premendo il tasto ENTERE durante una riproduzione, l’esecuzione si arresta in pausa.<br />
- Premendo il tasto ENTERE durante una pausa, l’esecuzione ripren<strong>de</strong>.<br />
∂/∑<br />
Riproduce o interrompe la proiezione di diapositive o la riproduzione di un brano musicale.<br />
RETURN<br />
Ritorna al menu prece<strong>de</strong>nte.<br />
TOOLS<br />
Esegue varie funzioni nei menu Foto e Musica.<br />
∫<br />
Arresta la proiezione di diapositive o la riproduzione <strong>de</strong>l file musicale in corso.<br />
π/μ<br />
Passa al gruppo prece<strong>de</strong>nte/successivo.<br />
INFO<br />
Mostra le informazioni relative al file.<br />
MEDIA.P<br />
Esce dalla modalità Media Play.<br />
< P >, EXIT, TV Interrompe la modalità Media Play e torna alla modalità TV.<br />
Photo<br />
SUM Dispositivo<br />
Pannello laterale <strong>de</strong>l televisore<br />
Unità USB<br />
Photo<br />
Music<br />
SUM<br />
851.86<strong>MB</strong>/993.02<strong>MB</strong> Libero<br />
Setup<br />
R Ritorno<br />
Italiano - 28
¦<br />
Funzione Media Play<br />
Questa funzione consente di visualizzare e riprodurre file fotografici e/o musicali memorizzati su dispositivi USB MSC (Mass<br />
Storage Class).<br />
N Utilizzando file multimediali senza licenza, il prodotto potrebbe non funzionare correttamente.<br />
Accesso al menu Media Play (USB)<br />
1. Premere il tasto MENU. Premere il tasto ▲ o ▼ per selezionare Applicazione,<br />
quindi premere il tasto ENTERE.<br />
INFO<br />
Photo<br />
SUM<br />
851.86<strong>MB</strong>/993.02<strong>MB</strong> Libero<br />
2. Premere il tasto ▲ o ▼ per selezionare Media Play (USB), quindi premere il tasto<br />
ENTERE.<br />
N Viene visualizzato il menu Media Play (USB).<br />
Photo<br />
SUM Dispositivo<br />
Music<br />
Setup<br />
R Ritorno<br />
O<br />
Premere il tasto MEDIA.P sul telecomando per visualizzare il menu Media<br />
Play.<br />
AD<br />
O<br />
Premere il tasto SOURCE sul telecomando per visualizzare l'elenco <strong>de</strong>lle<br />
sorgenti. Quindi premere il tasto ▲ o ▼ per selezionare USB.<br />
3. Premere il tasto rosso, quindi il tasto ▲ o ▼ per selezionare la memoria USB. Premere il tasto ENTERE .<br />
N<br />
N<br />
Questa funzione può risultare diversa a seconda <strong>de</strong>lla memoria USB utilizzata.<br />
Nella parte inferiore sinistra <strong>de</strong>llo schermo comparirà il nome <strong>de</strong>l dispositivo USB selezionato.<br />
INFO<br />
4. Premere il tasto ◄ o ► per selezionare un'icona (Photo, Music, Setup), quindi premere il tasto ENTERE.<br />
N Per uscire dalla modalità Media Play premere il tasto MEDIA.P sul telecomando.<br />
Rimozione sicura di un dispositivo USB<br />
Il dispositivo può essere rimosso dal televisore in modo sicuro.<br />
1. Premere TOOLS nella schermata di elenco <strong>de</strong>i file Media Play, o durante la<br />
proiezione di diapositive o la riproduzione di un brano musicale.<br />
AD<br />
1 2<br />
2. Premere il tasto ▲ o ▼ per selezionare Rimozione sicura, quindi premere il<br />
tasto ENTERE .<br />
3. Rimuovere il dispositivo USB dal televisore.<br />
1231.jpg<br />
1232.jpg<br />
1233.jpg<br />
5/15<br />
1234.jpg<br />
Sli<strong>de</strong> show<br />
Riproduci gruppo corrente<br />
Informazioni<br />
Rimozione sicura<br />
1236.jpg 1237.jpg<br />
1235.jpg<br />
../Photo/<br />
Schermo<br />
SUM Dispositivo Selezione T Strumenti R Cartella superiore<br />
1 2<br />
1<br />
Sezione Elenco gruppi<br />
c<br />
5/15<br />
Sezione Elenco file<br />
1231.jpg 1232.jpg<br />
1236.jpg 1237.jpg<br />
1233.jpg<br />
1235.jpg<br />
1234.jpg<br />
2<br />
4<br />
../Photo/<br />
1 File selez<br />
3 5<br />
SUM Dispositivo Selezione T Strumenti R Cartella superiore<br />
Passare alla sezione ‘Elenco gruppi’ o ‘Elenco file’ utilizzando i tasti Su e Giù. Dopo avere selezionato una sezione, premere il<br />
tasto ◄ o ► per selezionare una voce.<br />
Italiano - 29
1 Visualizza gruppi: Il gruppo di ordinamento che contiene il file attualmente selezionato viene evi<strong>de</strong>nziato.<br />
2 File attualmente selezionato: Il file selezionato è quello che è possibile controllare. I file fotografici vengono visualizzati come<br />
miniature.<br />
3 Dispositivo corrente: Mostra il nome <strong>de</strong>l dispositivo attualmente selezionato. Premere il tasto Rosso per selezionare un<br />
dispositivo.<br />
Tasto Rosso (Dispositivo): Seleziona un dispositivo connesso.<br />
4 Informazioni sulla selezione <strong>de</strong>gli elementi: Mostra il numero di file selezionati premendo il tasto Giallo.<br />
5 Voci <strong>de</strong>lla guida<br />
Tasto Giallo (Selezione): Seleziona il file dall’elenco. I file selezionati vengono evi<strong>de</strong>nziati con un simboloc. Premere<br />
nuovamente il tasto giallo per <strong>de</strong>selezionare il file.<br />
Tasto TOOLS (Strumenti): Visualizza i menu <strong>de</strong>lle opzioni. (Il menu <strong>de</strong>lle opzioni varia in base allo stato corrente).<br />
¦<br />
Menu Opzione <strong>de</strong>ll’Elenco foto<br />
1. Premere il tasto MEDIA.P.<br />
2. Premere il tasto ◄ o ► per selezionare Photo, quindi premere il tasto<br />
ENTERE.<br />
3. Per selezionare la foto <strong>de</strong>si<strong>de</strong>rata, premere il tasto ◄ o ►.<br />
N Selezione di più foto<br />
Per selezionare la foto <strong>de</strong>si<strong>de</strong>rata, premere il tasto ◄ o ►. Quindi<br />
premere il tasto giallo.<br />
Ripetere l'operazione per selezionare più file di foto.<br />
Il contrassegno c appare per il file di foto selezionato.<br />
4. Premere il tastoTOOLS.<br />
N Il menu <strong>de</strong>lle opzioni varia in base allo stato corrente.<br />
1 2<br />
5/15 Sli<strong>de</strong> show<br />
Riproduci gruppo corrente<br />
Informazioni<br />
Rimozione sicura<br />
1231.jpg 1232.jpg<br />
1236.jpg 1237.jpg<br />
1233.jpg<br />
1235.jpg<br />
1234.jpg<br />
../Photo/<br />
SUM Dispositivo Selezione T Strumenti R Cartella superiore<br />
❑<br />
❑<br />
❑<br />
❑<br />
Sli<strong>de</strong> show<br />
Questo menu consente di avviare una proiezione di diapositive <strong>de</strong>lle foto contenute nel dispositivo USB.<br />
Riproduci gruppo corrente<br />
Questo menu consente di avviare una proiezione di diapositive solo <strong>de</strong>lle foto contenute nel gruppo di ordinamento selezionato.<br />
Deselez tutto (se è selezionato almeno un file)<br />
È possibile <strong>de</strong>selezionare tutti i file.<br />
N Il contrassegno c che indica che il file corrispon<strong>de</strong>nte è selezionato è nascosto.<br />
Informazioni<br />
Le informazioni di un file fotografico includono il nome, la dimensione, la risoluzione, la data di modifica e il percorso.<br />
N<br />
O<br />
Usando le stesse procedure durante una proiezione di diapositive, è possibile ve<strong>de</strong>re le informazioni relative ai file fotografici.<br />
Premere il tasto INFO per visualizzare le informazioni.<br />
❑<br />
Rimozione sicura<br />
Il dispositivo può essere rimosso dal televisore in modo sicuro.<br />
INFO<br />
AD<br />
Italiano - 30
¦<br />
Visualizzazione di una foto o di una proiezione di diapositive<br />
Proiezione di diapositive<br />
1. Premere il tasto ▼ per selezionare la sezione Elenco file.<br />
2. Premere il tastoTOOLS.<br />
3. Premere il tasto ▲ o ▼ per selezionare Sli<strong>de</strong> show, quindi premere il tasto<br />
ENTERE .<br />
N Nella proiezione di diapositive verranno utilizzate tutte le foto contenute<br />
nell’Elenco file.<br />
1 2<br />
5/15 Sli<strong>de</strong> show<br />
Riproduci gruppo corrente<br />
Informazioni<br />
Rimozione sicura<br />
1231.jpg 1232.jpg<br />
1236.jpg 1237.jpg<br />
1233.jpg<br />
1235.jpg<br />
1234.jpg<br />
../Photo/ INFO<br />
SUM Dispositivo Selezione T Strumenti R Cartella superiore<br />
N<br />
N<br />
N<br />
Durante la proiezione di diapositive, i file appaiono in sequenza a partire da quello<br />
correntemente visualizzato.<br />
La proiezione di diapositive prosegue in base all’ordine specificato nell'Elenco file.<br />
Impostando l'opzione Musica di sottof su Acceso durante la proiezione <strong>de</strong>lle<br />
diapositive i brani musicali vengono riprodotti automaticamente.<br />
▶ Normale<br />
1234.jpg 580x765 2009/01/02 5/15<br />
O<br />
Quando si visualizza un Elenco foto, per iniziare la proiezione di diapositive<br />
premere il tasto ∂(Riproduci)/ENTEREsul telecomando.<br />
SUM<br />
E Pausa ◀▶ Prece<strong>de</strong>nte AD / Successivo T Strumenti R Ritorno<br />
N<br />
Tasti di controllo per la proiezione di diapositive<br />
Tasto<br />
Operazioni<br />
ENTERE Riproduci/Arresta la proiezione di diapositive.<br />
∂<br />
Riproduci la proiezione di diapositive.<br />
∑<br />
Arresta la proiezione di diapositive.<br />
Esce dalla proiezione diapositive e torna all'elenco <strong>de</strong>lle<br />
∫<br />
foto.<br />
π/μ Varia la velocità di riproduzione <strong>de</strong>lla proiezione.<br />
TOOLS<br />
Esegue varie funzioni nei menu Photo.<br />
Riproduce il gruppo corrente<br />
1. Premere il tasto ▲ per passare alla sezione Elenco gruppi.<br />
2. Selezionare un gruppo utilizzando i tasti ◄ e ► .<br />
3. Premere il tasto ∂ (Riproduci). Viene avviata una proiezione di diapositive con i<br />
file <strong>de</strong>l gruppo selezionato.<br />
1 2<br />
5/15<br />
●<br />
In alternativa<br />
1. Selezionare i file nella sezione Elenco file contenuti nel gruppo <strong>de</strong>si<strong>de</strong>rato.<br />
N Per passare al gruppo successivo/prece<strong>de</strong>nte, premere il tasto π (REW) o<br />
µ (FF) .<br />
2. Premere il tasto TOOLS.<br />
3. Premere il tasto ▲ o ▼ per selezionare Riproduci gruppo corrente, quindi premere il tastoENTERE .<br />
N Per la proiezione verranno utilizzati solo i file contenuti nel gruppo di ordinamento.<br />
Per riprodurre una proiezione di diapositive <strong>de</strong>i soli file selezionati<br />
1. Premere il tasto ▼ per selezionare la sezione Elenco file.<br />
2. Premere il tasto ◄ o ► per selezionate la foto <strong>de</strong>si<strong>de</strong>rata nell'Elenco file.<br />
3. Premere il tasto giallo.<br />
4. Ripetere l'operazione per selezionare più foto.<br />
N Il contrassegno cappare a sinistra <strong>de</strong>lla foto selezionata.<br />
N Selezionando un solo file, la proiezione di diapositive non avrà inizio.<br />
N Per <strong>de</strong>selezionare tutti i file, premere il tasto TOOLS quindi selezionare Deselez tutto.<br />
5. Premere il tasto ∂ (Riproduci)/ENTERE .<br />
N I file selezionati verranno utilizzati per la proiezione di diapositive.<br />
1231.jpg<br />
1232.jpg<br />
../Photo/<br />
1233.jpg<br />
1234.jpg<br />
1235.jpg<br />
1236.jpg<br />
1237.jpg<br />
SUM Dispositivo Selezione T Strumenti R Cartella superiore<br />
Italiano - 31
● In alternativa<br />
1. Nell'Elenco file, premere il tasto giallo per selezionare le foto <strong>de</strong>si<strong>de</strong>rate.<br />
2. Premere il tasto TOOLS.<br />
3. Premere il tasto ▲ o ▼ per selezionare Sli<strong>de</strong> show, quindi premere il tasto ENTERE .<br />
N I file selezionati verranno utilizzati per la proiezione di diapositive.<br />
¦<br />
❑<br />
❑<br />
❑<br />
❑<br />
❑<br />
■<br />
■<br />
❑<br />
❑<br />
❑<br />
Menu opzioni di Sli<strong>de</strong> Show<br />
1. Durante una proiezione di diapositive (o la visualizzazione di una foto), premere il<br />
tasto TOOLS per impostare l'opzione.<br />
2. Premere il tasto ▲ o ▼ per selezionare l'opzione, quindi premere ENTERE.<br />
Arresta proiezione diapositive / Avvia proiezione diapositive<br />
E’ possibile iniziare o interrompere la proiezione di diapositive.<br />
Velocità sli<strong>de</strong> show → Lenta / Normale / Veloce<br />
Selezionare questa opzione per <strong>de</strong>terminare la velocità di proiezione <strong>de</strong>lle diapositive.<br />
N<br />
N<br />
Ruota<br />
La funzione è disponibile solo durante una proiezione.<br />
La velocità di proiezione <strong>de</strong>lle diapositive può essere modificata premendo il tasto π (REW) o µ (FF) durante le<br />
proiezione.<br />
E’ possibile ruotare le foto memorizzate su un dispositivo USB.<br />
N<br />
N<br />
N<br />
Zoom<br />
Premendo il tasto ◄, la foto verrà ruotata di 270˚, 180˚, 90˚ e 0˚.<br />
Premendo il tasto ►, la foto verrà ruotata di 90˚, 180˚, 270˚ e 0˚.<br />
Il file ruotato non viene memorizzato.<br />
E’ possibile ingrandire le foto memorizzate su un dispositivo USB. (x1 → x2 → x4)<br />
N Per spostare l'immagine ingrandita, premere il tasto ENTERE , quindi i tasti ▲/▼/◄/►. Notare che se l’immagine ingrandita<br />
è più piccola <strong>de</strong>lla dimensione <strong>de</strong>llo schermo originale, la funzione di modifica <strong>de</strong>lla posizione non avrà alcun effetto.<br />
N Il file ingrandito non può essere memorizzato.<br />
Musica di sottof<br />
Durante una proiezione di diapositive è possibile impostare la musica di sottofondo <strong>de</strong>si<strong>de</strong>rata.<br />
N Per usare questa funzione, la musica scelta <strong>de</strong>ve essere memorizzata sul dispositivo USB.<br />
Musica di sottof → Spenta / Acceso<br />
● Spenta: la musica di sottofondo non viene riprodotta.<br />
● Acceso: Se la musica di sottofondo è disponibile, selezionando Acceso viene riprodotta.<br />
Seleziona file musicale (0 File selez)<br />
Solo il file musicale selezionato viene impostato come musica di sottofondo.<br />
Selez. File musicale / Impostazioni audio<br />
È possibile selezionare le impostazioni <strong>de</strong>lle immagini e <strong>de</strong>ll'audio.<br />
Informazioni<br />
Vengono visualizzate le informazioni relative alla foto.<br />
Rimozione sicura<br />
Il dispositivo può essere rimosso dal televisore in modo sicuro.<br />
Strumenti<br />
Arresta proiezione diapositive<br />
Velocità sli<strong>de</strong> show : Normale<br />
Ruota<br />
Zoom<br />
Musica di sottofondo<br />
Impostazioni immagine<br />
Impostazioni audio<br />
Informazioni<br />
Rimozione sicura<br />
U Sposta E Conferma e Esci<br />
Italiano - 32
¦<br />
Menu Opzione <strong>de</strong>ll’Elenco musica<br />
1. Premere il tasto MEDIA.P.<br />
2. Premere il tasto ◄ o ► per selezionare Music, quindi premere il tasto<br />
ENTERE.<br />
3. Premere il tasto ◄ o ► per selezionare il brano musicale <strong>de</strong>si<strong>de</strong>rato.<br />
N Selezione di più file musicali<br />
Per selezionare il brano musicale <strong>de</strong>si<strong>de</strong>rato, premere il tasto ◄ o ►.<br />
Quindi premere il tasto giallo.<br />
Ripetere l'operazione per selezionare più file musicali.<br />
Il contrassegno c appare per il file musicale selezionato.<br />
4. Premere il tastoTOOLS.<br />
N Il menu <strong>de</strong>lle opzioni varia in base allo stato corrente.<br />
4<br />
5 1 2 3<br />
Energetico 3/37 Riproduci gruppo corrente<br />
Glen Hans Informazioni<br />
Once Ost<br />
2007<br />
Rimozione sicura<br />
Soundtrack<br />
Lies Want Me<br />
Gold Shine<br />
Way<br />
HaHaHa<br />
I Love You<br />
../Music/<br />
SUM Dispositivo Selezione T Strumenti R Cartella superiore<br />
❑<br />
❑<br />
❑<br />
Riproduci gruppo corrente<br />
Il menu Riproduci gruppo corrente consente di riprodurre solo i brani musicali nel gruppo di ordinamento selezionato.<br />
Deselez tutto (se è selezionato almeno un file)<br />
È possibile <strong>de</strong>selezionare tutti i file.<br />
N Il contrassegno c che indica che il file corrispon<strong>de</strong>nte è selezionato è nascosto.<br />
Informazioni<br />
Le informazioni di un file musicale includono il nome, la dimensione, la data di modifica e il percorso.<br />
N Utilizzando le stesse procedure, è possibile visualizzare le informazioni <strong>de</strong>l file musicale con la funzione Riproduci gruppo<br />
corrente attiva.<br />
O Premere il tasto INFO per visualizzare le informazioni.<br />
❑<br />
Rimozione sicura<br />
Il dispositivo può essere rimosso dal televisore in modo sicuro.<br />
INFO<br />
AD<br />
Italiano - 33
¦<br />
Riproduzione di un file musicale<br />
Riproduzione di un file musicale<br />
1. Premere il tasto ▼ per selezionare la sezione Elenco file.<br />
2. Premere il tasto ◄ o ► per selezionare un file musicale da riprodurre.<br />
3. Premere il tasto ∂ (Riproduci)/ENTERE .<br />
N Questo menu mostra solo i file con estensione MP3. I file con altre estensioni<br />
non vengono visualizzati, nemmeno se sono stati salvati sul me<strong>de</strong>simo<br />
dispositivo USB.<br />
N Il file selezionato appare in alto con il relativo tempo di riproduzione.<br />
N Per regolare il volume <strong>de</strong>lla musica, premere il tasto <strong>de</strong>l volume sul<br />
SUM E Pausa<br />
telecomando. Per azzerare il volume, premere il tasto MUTE sul<br />
telecomando.<br />
N Se l'audio risulta anomalo quando si riproducono file MP3, regolare le impostazioni Equalizzatore e SRS TruSurround<br />
HD nel menu Sound. (Un file MP3 sovramodulato può causare problemi audio.)<br />
N La durata di un filmato può essere visualizzata come ‘00:00:00’ se all'inizio <strong>de</strong>lla riproduzione non vengono reperite le<br />
informazioni relative al tempo di riproduzione.<br />
N π (REW) e µ (FF) non sono attivi durante la riproduzione.<br />
N Tasti di controllo <strong>de</strong>lla riproduzione musicale<br />
Tasto<br />
ENTERE<br />
∂<br />
∑<br />
∫<br />
TOOLS<br />
Operazioni<br />
Riproduce/Interrompe il brano musicale.<br />
Riproduce il brano musicale<br />
Interrompe il brano musicale<br />
Esce dalla modalità di riproduzione e torna all’Elenco musica.<br />
Esegue varie funzioni nei menu Music.<br />
▶ 00:00:04 / 00:04:04 3/37<br />
Way<br />
I Love You<br />
HaHaHa<br />
◀▶ Prece<strong>de</strong>nte / Successivo T Strumenti R Ritorno<br />
N<br />
Icona informazioni sulla funzione Music<br />
p<br />
q<br />
Quando tutti i brani musicali presenti nella cartella (o i file selezionati) sono stati ripetuti Mod<br />
Ripetiz. è impostata su Acceso.<br />
Quando tutti i brani musicali presenti nella cartella (o i file selezionati) sono stati riprodotti una<br />
volta Mod Ripetiz. è impostata su Spenta.<br />
Riproduzione di un gruppo di brani<br />
1. Premere il tasto ▼ per passare alla sezione Elenco gruppi.<br />
2. Selezionare un gruppo utilizzando i tasti ◄ e ► .<br />
3. Premere il tasto ∂ (Riproduci). Viene avviata la riproduzione <strong>de</strong>i file <strong>de</strong>l gruppo selezionato.<br />
●<br />
In alternativa<br />
1. Selezionare i file nella sezione Elenco file contenuti nel gruppo <strong>de</strong>si<strong>de</strong>rato.<br />
N Per passare al gruppo successivo/prece<strong>de</strong>nte, premere il tasto π (REW) o µ (FF) .<br />
2. Premere il tasto TOOLS.<br />
3. Premere il tasto ▲ o ▼ per selezionare Riproduci gruppo corrente, quindi premere il tasto ENTERE .<br />
N Vengono riprodotti i brani musicali inseriti nel gruppo di ordinamento, compresi i brani selezionati.<br />
Riproduzione <strong>de</strong>i brani musicali selezionati<br />
1. Premere il tasto ▼ per selezionare la sezione Elenco file.<br />
2. Per selezionare il file musicale <strong>de</strong>si<strong>de</strong>rato, premere il tasto ◄ o ►.<br />
3. Premere il tasto giallo.<br />
4. Ripetere l'operazione per selezionare più file musicali.<br />
N<br />
N<br />
Il contrassegno c appare a sinistra <strong>de</strong>l brano musicale selezionato.<br />
Per <strong>de</strong>selezionare tutti i file, premere il tasto TOOLS quindi selezionare Deselez tutto.<br />
5. Premere il tasto ∂ (Riproduci)/ENTERE .<br />
N Vengono riprodotti i file selezionati.<br />
Italiano - 34
¦<br />
Menu Opzione <strong>de</strong>lla riproduzione di file musicali<br />
Menu Opzione <strong>de</strong>lla riproduzione di file musicali<br />
❑<br />
❑<br />
❑<br />
❑<br />
Mod Ripetiz. → Acceso / Spenta<br />
E’ possibile riprodurre ripetutamente i brani musicali.<br />
Impostazioni immagine / Impostazioni audio<br />
È possibile configurare le impostazioni <strong>de</strong>lle immagini e <strong>de</strong>ll'audio.<br />
Informazioni<br />
Vengono visualizzate le informazioni relative al brano musicale.<br />
Rimozione sicura<br />
Il dispositivo può essere rimosso dal televisore in modo sicuro.<br />
Strumenti<br />
Mod Ripetiz. ◀ Acceso ▶<br />
Impostazioni immagine<br />
Impostazioni audio<br />
Informazioni<br />
Rimozione sicura<br />
U Sposta L Regola e Esci<br />
¦<br />
■<br />
■<br />
■<br />
Utilizzo <strong>de</strong>l menu Impostazione<br />
Il menu Impostazioni mostra le impostazioni utente <strong>de</strong>l menu Media Play.<br />
1. Premere il tasto MEDIA.P.<br />
2. Premere il tasto ◄ o ► per selezionare Setup, quindi premere il tasto ENTERE.<br />
3. Per selezionare l’opzione <strong>de</strong>si<strong>de</strong>rata, premere il tasto ▲ o ▼.<br />
4. Premere ◄ o ► per selezionare per selezionare l'opzione.<br />
N Per uscire dalla modalità Media Play premere il tasto MEDIA.P sul<br />
telecomando.<br />
Modalità Ripeti musica → Acceso / Spenta<br />
Selezionare questa opzione per riprodurre ripetutamente i brani musicali.<br />
Durata salvaschermo → 2 ore / 4 ore / 8 ore<br />
Selezionare questa opzione per impostare il tempo di attesa prima che lo screen saver<br />
entri in funzione.<br />
Informazioni<br />
Selezionare questa opzione per visualizzare le informazioni sul dispositivo collegato.<br />
Photo<br />
SUM Dispositivo<br />
SETUP<br />
Music<br />
SUM<br />
851.86<strong>MB</strong>/993.02<strong>MB</strong> Libero<br />
Setup<br />
Modalità Ripeti musica ◀ Acceso ▶<br />
Durata salvaschermo : 2 ore<br />
Informazioni<br />
Rimozione sicura<br />
e Esci<br />
■<br />
Rimozione sicura<br />
Il dispositivo può essere rimosso dal televisore in modo sicuro.<br />
SUM Dispositivo<br />
U Sposta L Regola R Ritorno<br />
Italiano - 35
ANYNET+<br />
¦<br />
Collegamento <strong>de</strong>i dispositivi Anynet+<br />
Cos'è Anynet+?<br />
Anynet+ è una funzione che permette di controllare mediante il telecomando <strong>de</strong>l televisore <strong>Samsung</strong> tutti i dispositivi <strong>Samsung</strong><br />
collegati che supportano Anynet+. Il sistema Anynet+può essere usato solo con i dispositivi <strong>Samsung</strong> dotati <strong>de</strong>lla funzione<br />
Anynet+. Per controllare se il dispositivo <strong>Samsung</strong> in uso è dotato di questa funzione, verificare la presenza <strong>de</strong>l logo Anynet+.<br />
Per effettuare il collegamento a un televisore<br />
TV<br />
Anynet + 1<br />
Anynet + 2 Anynet + 3 Anynet + 4<br />
Cavo HDMI 1.3<br />
Cavo HDMI 1.3<br />
Cavo HDMI 1.3<br />
Cavo HDMI 1.3<br />
1. Collegare la porta HDMI IN (1, 2, 3(DVI)o 4) <strong>de</strong>l televisore alla porta HDMI OUT <strong>de</strong>l dispositivo Anynet+ corrispon<strong>de</strong>nte tramite<br />
un cavo HDMI.<br />
Per effettuare il collegamento a un sistema Home Theatre<br />
TV<br />
Home Theater<br />
Anynet + 1<br />
Cavo HDMI 1.3<br />
Cavo ottico<br />
Cavo HDMI 1.3<br />
Anynet + 2 Anynet + 3 Anynet + 4<br />
Cavo HDMI 1.3<br />
Cavo HDMI 1.3<br />
Cavo HDMI 1.3<br />
1. Collegare la porta HDMI IN (1, 2, 3(DVI) o 4) <strong>de</strong>l televisore alla porta HDMI OUT <strong>de</strong>l dispositivo Anynet+ corrispon<strong>de</strong>nte tramite<br />
un cavo HDMI.<br />
2. Collegare la porta HDMI IN <strong>de</strong>l sistema Home Theatre alla porta HDMI OUT <strong>de</strong>l dispositivo Anynet+ corrispon<strong>de</strong>nte tramite un<br />
cavo HDMI.<br />
N<br />
N<br />
N<br />
N<br />
N<br />
N<br />
Collegare un cavo ottico tra la porta DIGITAL AUDIO OUT (OPTICAL) <strong>de</strong>l televisore all'ingresso Digital Audio <strong>de</strong>l sistema<br />
Home Theatre.<br />
Se si opta per una connessione di questo genere, la presa Ottica permette l’uscita di soli 2 canali audio. In questo modo<br />
sarà possibile sentire l’audio solo dagli altoparlanti frontali sinistro e <strong>de</strong>stro <strong>de</strong>l sistema Home Theatre e dal subwoofer.<br />
Per avere un audio a 5.1 canali, collegare la porta DIGITAL AUDIO OUT (OPTICAL) <strong>de</strong>l lettore DVD / Ricevitore<br />
satellitare (p. es. dispositivo Anynet 1 o 2) direttamente a un amplificatore o all’Home Theatre, non al televisore.<br />
Collegare solo un sistema Home Theatre.<br />
E’ possibile collegare un dispositivo Anynet+ tramite un cavo HDMI 1.3. Alcuni cavi HDMI potrebbero non supportare le<br />
funzioni Anynet+.<br />
Anynet+ si attiva solo quando il relativo dispositivo AV che supporta Anynet+ è acceso o in modalità Standby.<br />
Anynet+ supporta fino a 12 dispositivi AV. Da notare che è possibile collegare fino a 3 dispositivi <strong>de</strong>llo stesso tipo.<br />
Italiano - 36
¦<br />
Configurazione di Anynet+<br />
❑<br />
T<br />
Premere il tasto TOOLS per visualizzare il menu Strumenti. E' inoltre possibile visualizzare<br />
il menu Anynet+ selezionando Strumenti → Anynet+ (HDMI-CEC).<br />
Impostazione<br />
Applicazione<br />
Media Play (USB)<br />
Anynet+ (HDMI-CEC)<br />
■<br />
Anynet+ (HDMI-CEC) → Spenta / Acceso<br />
Per utilizzare la funzione Anynet+, Anynet+ (HDMI-CEC) <strong>de</strong>ve essere impostato su Acceso.<br />
N Quando la funzione Anynet+ (HDMI-CEC) è disattivata, sono disattivate anche tutte le<br />
funzioni relative a Anynet+.<br />
Impostazione<br />
Anynet+ (HDMI-CEC) : Acceso ▶<br />
Spegnimento auto<br />
: Sì<br />
■<br />
¦<br />
Spegnimento auto → No / Sì<br />
Impostazione <strong>de</strong>lla disattivazione automatica di un dispositivo Anynet+ allo spegnimento <strong>de</strong>l<br />
televisore.<br />
N La sorgente attiva <strong>de</strong>ve essere impostata sul telecomando in modo che il televisore utilizzi<br />
la funzione Anynet+.<br />
N Se si imposta Spegnimento auto su Sì, i dispositivi esterni collegati al televisore si<br />
spengono ogniqualvolta si spegne il televisore. Se un dispositivo esterno è in fase di<br />
registrazione, potrebbe non spegnersi automaticamente.<br />
Passaggio tra dispositivi Anynet+<br />
U Sposta E Conf. R Ritorno<br />
Impostazione<br />
Anynet+ (HDMI-CEC)<br />
: Acceso<br />
Spegnimento auto : Sì ▶<br />
U Sposta E Conf. R Ritorno<br />
1. Premere il tasto TOOLS. Premere ENTERE per selezionare Anynet+ (HDMI-CEC).<br />
2. Premere il tasto ▲ o ▼ per selezionare Elenco dispositivi, quindi premere ENTERE.<br />
N<br />
N<br />
Vengono elencati tutti i dispositivi Anynet+ collegati al televisore.<br />
Se non si trova il dispositivo <strong>de</strong>si<strong>de</strong>rato, premere il tasto rosso per eseguire la<br />
scansione <strong>de</strong>i dispositivi.<br />
3. Premere il tasto ▲ o ▼ per selezionare un particolare dispositivo, quindi premere<br />
ENTERE. Il dispositivo selezionato viene attivato.<br />
N Solo all’impostazione di Anynet+ (HDMI-CEC) su Acceso nel menu Applicazione<br />
comparirà il menu Elenco dispositivi.<br />
N<br />
N<br />
N<br />
N<br />
N<br />
Il passaggio al dispositivo selezionato può richie<strong>de</strong>re fino a 2 minuti. Non è possibile annullare l’operazione durante il<br />
passaggio da un dispositivo all’altro.<br />
Il tempo richiesto per la scansione <strong>de</strong>i dispositivi dipen<strong>de</strong> dal numero di dispositivi collegati.<br />
Al termine <strong>de</strong>lla scansione, il numero di dispositivi trovati non appare.<br />
Sebbene all’accensione <strong>de</strong>l televisore l’apparecchio ricerchi automaticamente tutti i dispositivi collegati, questi non vengono<br />
automaticamente visualizzati nell’elenco <strong>de</strong>i dispositivi collegati. Per ricercare il dispositivo collegato premere il tasto rosso.<br />
Se si è selezionata una modalità di ingresso esterna tramite il tasto SOURCE non sarà possibile utilizzare la funzione<br />
Anynet+. Passare a un dispositivo Anynet+ utilizzando Elenco dispositivi.<br />
Menu Anynet+<br />
Il menu Anynet+ può variare a seconda <strong>de</strong>l tipo e <strong>de</strong>llo stato <strong>de</strong>l dispositivo Anynet+ collegato al televisore.<br />
N<br />
Menu Anynet+<br />
Visualizza TV<br />
Elenco dispositivi<br />
(nome_dispositivo) MENU<br />
(nome_dispositivo) INFO<br />
Registrazione: (*registratore)<br />
Interrompere registrazione:<br />
(*registratore)<br />
Ricevitore<br />
Descrizione<br />
Anynet+ passa alla modalità di trasmissione TV.<br />
Visualizza l’elenco <strong>de</strong>i dispositivi Anynet+.<br />
Mostra i menu <strong>de</strong>l dispositivo collegato. Ad esempio, se è collegato un registratore<br />
DVD, comparirà il menu <strong>de</strong>l disco <strong>de</strong>l registratore DVD.<br />
Mostra i menu di riproduzione <strong>de</strong>l dispositivo collegato. Ad esempio, se è collegato un<br />
registratore DVD, comparirà il menu di riproduzione <strong>de</strong>l registratore DVD.<br />
Avvia immediatamente la registrazione mediante il registratore. (Questa funzione è<br />
disponibile solo per i dispositivi che supportano la funzione di registrazione.)<br />
Interrompe la registrazione.<br />
L’audio viene riprodotto attraverso il ricevitore.<br />
Visualizza TV<br />
Elenco dispositivi<br />
Registrazione<br />
DVDR MENU<br />
DVDR INFO<br />
Ricevitore<br />
Impostazione<br />
U Sposta E Conf. R Ritorno<br />
Se al sistema è collegato più di un dispositivo di registrazione, questi vengono visualizzati come (*registratore); in caso il<br />
dispositivo collegato sia uno solo, verrà rappresentato come (*nome_dispositivo).<br />
: DVDR<br />
: Spenta<br />
Italiano - 37
Tasti <strong>de</strong>l telecomando disponibili in modalità Anynet+<br />
N<br />
N<br />
N<br />
N<br />
N<br />
N<br />
Tipo dispos Stato operativo Tasti disponibili<br />
Dispositivo Anynet+<br />
Dispositivo con<br />
sintonizzatore<br />
incorporato<br />
Una volta attivato il dispositivo, quando<br />
il menu <strong>de</strong>l dispositivo corrispon<strong>de</strong>nte<br />
appare sullo schermo.<br />
Una volta attivato il dispositivo, quando si<br />
riproduce un file<br />
Una volta attivato il dispositivo, durante la<br />
visione di un programma televisivo.<br />
Tasti numerici<br />
▲/▼/◄/►/ tastoENTERE<br />
Tasti colorati / tasto EXIT<br />
π(Ricerca indietro) / µ(Ricerca avanti)<br />
∫(Arresta) / ∂(Riproduci) / ∑(Pausa)<br />
P > / P <<br />
Dispositivo audio Una volta attivato il ricevitore. Y / MUTE<br />
La funzione Anynet+ è utilizzabile solo quando il telecomando è impostato su TV.<br />
Il tasto ∏ è attivo solo in fase di registrazione.<br />
Non è possibile gestire i dispositivi Anynet+ utilizzando i pulsanti <strong>de</strong>l televisore. I dispositivi Anynet+ possono essere gestiti<br />
solo tramite telecomando.<br />
In <strong>de</strong>terminate condizioni, il telecomando <strong>de</strong>l televisore potrebbe non funzionare. In questo caso, selezionare nuovamente il<br />
dispositivo Anynet+.<br />
Le funzioni Anynet+ non sono attive con prodotti di altre marche.<br />
Le operazioni π, µ possono differire in base al dispositivo in uso.<br />
¦<br />
Registrazione<br />
Con un vi<strong>de</strong>oregistratore <strong>Samsung</strong> è possibile registrare un programma televisivo.<br />
1. Premere il tasto TOOLS. Premere ENTERE per selezionare Anynet+ (HDMI-CEC).<br />
2. Premere il tasto ▲ o ▼ per selezionare Recording Immediately, quindi premere<br />
ENTERE. La registrazione ha inizio.<br />
N Se sono presenti più dispositivi di registrazione<br />
Se sono collegati più dispositivi di registrazione, questi vengono elencati. Premere il<br />
tasto ▲ o ▼ per selezionare un particolare dispositivo, quindi premere ENTERE .<br />
La registrazione ha inizio.<br />
N Se il dispositivo di registrazione non è visualizzato,selezionare Elenco dispositivi e<br />
premere il tasto rosso per eseguire la ricerca <strong>de</strong>i dispositivi<br />
3. Per uscire, premere EXIT.<br />
N<br />
N<br />
N<br />
Visualizza TV<br />
Elenco dispositivi<br />
Registrazione<br />
DVDR MENU<br />
DVDR INFO<br />
Ricevitore<br />
Impostazione<br />
E’ possibile registrare il segnale preveniente da una sorgente selezionando Registrazione: (nome_dispositivo).<br />
Premendo il tasto ∏ si eseguirà la registrazione <strong>de</strong>l programma attualmente visualizzato sul televisore. Se si stanno<br />
guardando le immagini provenienti da un altro dispositivo, vengono registrate le immagini di quel dispositivo.<br />
Prima di registrare, controllare che il jack <strong>de</strong>ll’antenna sia correttamente collegato al dispositivo di registrazione. Per<br />
collegare in modo corretto un’antenna a un dispositivo di registrazione, consultare il manuale <strong>de</strong>ll'utente <strong>de</strong>l dispositivo di<br />
registrazione utilizzato.<br />
: DVDR<br />
: Spenta<br />
U Sposta E Conf. R Ritorno<br />
¦<br />
Ascolto tramite il Ricevitore (Home theater)<br />
È possibile ascoltare l’audio tramite un ricevitore anzichè dagli altoparlanti <strong>de</strong>l televisore.<br />
1. Premere il tasto TOOLS. Premere ENTERE per selezionare Anynet+ (HDMI-CEC).<br />
2. Premere ▲ o ▼ per selezionare Ricevitore. Premere ◄ o ► per selezionare Acceso o<br />
Spenta.<br />
3. Per uscire, premere EXIT.<br />
N<br />
N<br />
N<br />
N<br />
Visualizza TV<br />
Elenco dispositivi<br />
Registrazione: DVDR<br />
DVDR MENU<br />
DVDR INFO<br />
Ricevitore<br />
Impostazione<br />
Se il ricevitore supporta solo l’audio, potrebbe non comparire nell’elenco <strong>de</strong>i<br />
dispositivi.<br />
Il ricevitore è operativo solo se è collegata in modo appropriato la porta ottica di<br />
ingresso <strong>de</strong>l ricevitore alla porta DIGITAL AUDIO OUT (OPTICAL) <strong>de</strong>l televisore.<br />
Quando il ricevitore (home theatre) è impostato su Acceso, è possibile udire l'audio proveniente dall'uscita ottica <strong>de</strong>l<br />
U Sposta E Conf. R Ritorno<br />
televisore. Quando il televisore visualizza un segnale DTV (Antenna), invia l'audio a 5.1 canali al ricevitore Home Theatre.<br />
Se la sorgente è un componente digitale, come per es. un DVD, ed è collegata al televisore mediante HDMI, saranno<br />
udibili solo 2 canali audio dal ricevitore Home Theatre.<br />
Nel caso di una interruzione di corrente al televisore quando il menu Ricevitore è impostato su Acceso (per lo<br />
scollegamento <strong>de</strong>l cavo o un calo di potenza), la funzione Selezione altoparlante può essere impostata su Altoparlante<br />
est alla riaccensione <strong>de</strong>l televisore.<br />
: Spenta<br />
Italiano - 38
¦ Risoluzione <strong>de</strong>i problemi con Anynet+<br />
Problema<br />
Anynet+ non funziona.<br />
Per avviare Anynet+.<br />
Per uscire da Anynet+.<br />
Sullo schermo viene visualizzato<br />
il messaggio ‘Connecting to<br />
Anynet+ <strong>de</strong>vice...’.<br />
Impossibile avviare la<br />
riproduzione sul dispositivo<br />
Anynet+.<br />
Lo schermo <strong>de</strong>l dispositivo<br />
esterno non appare.<br />
Il programma TV non può essere<br />
registrato.<br />
L’audio <strong>de</strong>l televisore non viene<br />
riprodotto attraverso il ricevitore.<br />
Possibile soluzione<br />
● Controllare se si sta utilizzando un dispositivo Anynet+. Il sistema Anynet+ può essere<br />
utilizzato solo con dispositivi che supportano Anynet+.<br />
●<br />
●<br />
●<br />
●<br />
●<br />
●<br />
●<br />
●<br />
●<br />
●<br />
●<br />
●<br />
●<br />
●<br />
●<br />
●<br />
●<br />
●<br />
●<br />
●<br />
●<br />
●<br />
●<br />
●<br />
●<br />
Collegare un solo ricevitore (Home Theatre).<br />
Controllare che il cavo di alimentazione di Anynet+ sia correttamente collegato.<br />
Controllare i collegamenti <strong>de</strong>i cavi Vi<strong>de</strong>o/Audio/HDMI 1.3 <strong>de</strong>l dispositivo Anynet+.<br />
Verificare se Anynet+ (HDMI-CEC) è impostato su Acceso nel menu Impostazione di<br />
Anynet+.<br />
Verificare che il telecomando <strong>de</strong>l televisore sia in modalità TV.<br />
Verificare che sia Anynet+ la modalità esclusiva <strong>de</strong>l telecomando.<br />
In particolari condizioni, Anynet+ non funziona. (Ricerca canali, Media Play,<br />
Plug & Play, ecc).<br />
Quando si collega o si rimuove il cavo HDMI 1.3, eseguire una nuova ricerca <strong>de</strong>i<br />
dispositivi oppure spegnere e riaccen<strong>de</strong>re il televisore.<br />
Controllare che la funzione Anynet+ <strong>de</strong>l dispositivo Anynet+ sia attivata.<br />
Verificare che il dispositivo Anynet+ sia collegato correttamente al televisore e che<br />
Anynet+ (HDMI-CEC) sia impostato su Acceso nel menu Anynet+ Impostazione.<br />
Premere il tasto TV sul telecomando per passare al controllo <strong>de</strong>l televisore. Premere il<br />
tasto TOOLS per visualizzare il menu Anynet+ e selezionare l’opzione <strong>de</strong>si<strong>de</strong>rata.<br />
Selezionare Visualizza TV nel menu Anynet+.<br />
Premere il tasto SOURCE sul telecomando <strong>de</strong>l televisore e selezionare un dispositivo<br />
non Anynet+.<br />
Premere P >/
RACCOMANDAZIONI<br />
¦<br />
Funzione Teletext<br />
La maggior parte <strong>de</strong>lle emittenti televisive fornisce servizi informativi tramite il servizio Teletext. La pagina <strong>de</strong>ll’indice <strong>de</strong>l servizio<br />
Teletext contiene informazioni sull’uso <strong>de</strong>l servizio. Inoltre, è possibile selezionare varie opzioni tramite i tasti <strong>de</strong>l telecomando.<br />
N Per visualizzare correttamente le informazioni <strong>de</strong>l servizio Teletext, è necessario che la ricezione <strong>de</strong>l canale sia stabile.<br />
In caso contrario, alcune informazioni potrebbero essere perse o alcune pagine potrebbero non essere visualizzate<br />
correttamente.<br />
1 0 (modalità)<br />
Premere questo tasto per<br />
selezionare la modalità Teletext<br />
(LIST/FLOF). Premendo questo<br />
tasto nella modalità LIST, si attiva<br />
la modalità di memorizzazione<br />
<strong>de</strong>ll’elenco. In modalità di<br />
salvataggio List, è possibile<br />
memorizzare la pagina Teletext<br />
all'interno di un elenco utilizzando<br />
il tasto 8(memorizza).<br />
2 5 (scopri)<br />
Consente di visualizzare il<br />
testo nascosto (risposte a quiz,<br />
ad esempio). Per tornare alla<br />
modalità di visualizzazione<br />
normale, premere di nuovo il tasto.<br />
3 4 (Formato)<br />
Premere questo tasto per<br />
raddoppiare le dimensioni <strong>de</strong>i<br />
caratteri nella metà superiore<br />
<strong>de</strong>llo schermo. Premere di nuovo<br />
il tasto per ingrandire i caratteri<br />
nella metà inferiore <strong>de</strong>llo schermo.<br />
Per tornare alla modalità di<br />
visualizzazione normale, premere<br />
di nuovo il tasto.<br />
4 8 (memorizza)<br />
Utilizzato per memorizzare le<br />
pagine Teletext.<br />
5 Tasti colorati (rosso/ver<strong>de</strong>/giallo/<br />
blu)<br />
Se una emittente usa il sistema<br />
FASTEXT, i vari argomenti<br />
trattati in una pagina Teletext<br />
vengono codificati in base<br />
ai colori e possono essere<br />
selezionati premendo i relativi<br />
tasti colorati. Premere il tasto il<br />
cui colore corrispon<strong>de</strong> a quello<br />
<strong>de</strong>ll’argomento <strong>de</strong>si<strong>de</strong>rato. La<br />
pagina viene visualizzata con<br />
altre informazioni colorate che<br />
possono essere selezionate allo<br />
stesso modo. Per visualizzare la<br />
pagina successiva o prece<strong>de</strong>nte,<br />
premere il tasto colorato<br />
corrispon<strong>de</strong>nte.<br />
6 / (Teletext on/mix)<br />
Premere questo tasto per attivare<br />
la modalità Teletext dopo avere<br />
selezionato un canale che fornisce<br />
questo tipo di servizio. Premere di<br />
nuovo il tasto per sovrapporre le<br />
informazioni <strong>de</strong>l servizio Teletext alla<br />
trasmissione corrente.<br />
7 : (esci)<br />
Esce dalla visualizzazione <strong>de</strong>l servizio<br />
Teletext.<br />
8 1 (pagina secondaria)<br />
Visualizza la pagina secondaria<br />
disponibile.<br />
9 2 (pagina su)<br />
Consente di visualizzare la pagina<br />
Teletext successiva.<br />
0 3 (pagina giù)<br />
Consente di visualizzare la pagina<br />
Teletext prece<strong>de</strong>nte.<br />
! 9 (mantieni)<br />
Consente di mantenere visualizzata<br />
una pagina, se la pagina è collegata<br />
a più pagine secondarie che<br />
scorrono automaticamente. Premerlo<br />
nuovamente per ripren<strong>de</strong>re la<br />
visualizzazione.<br />
@ 6 (indice)<br />
In modalità Teletext, premere questo<br />
tasto in qualsiasi momento per<br />
visualizzare la pagina <strong>de</strong>ll’indice<br />
(contenuti).<br />
# 7 (annulla)<br />
Utilizzato per visualizzare le stazioni<br />
emittenti durante la ricerca di una<br />
pagina.<br />
1 #<br />
2<br />
3<br />
4<br />
5<br />
6<br />
7<br />
8<br />
9<br />
0<br />
!<br />
@<br />
INFO<br />
CH LIST<br />
AD<br />
$<br />
%<br />
^<br />
&<br />
*<br />
(<br />
)<br />
a<br />
b<br />
c<br />
d<br />
e<br />
N<br />
E’ possibile cambiare le pagine Teletext premendo i tasti numerici sul telecomando.<br />
Italiano - 40
Le pagine Teletext sono organizzate in base a sei categorie:<br />
Parte<br />
A<br />
B<br />
C<br />
D<br />
E<br />
F<br />
Contenuti<br />
Numero <strong>de</strong>lla pagina selezionata.<br />
I<strong>de</strong>ntità <strong>de</strong>lla stazione emittente.<br />
Numero <strong>de</strong>lla pagina corrente o stato <strong>de</strong>lla ricerca.<br />
Data e ora.<br />
Testo.<br />
Informazioni sullo stato.<br />
Informazioni FASTEXT.<br />
N<br />
N<br />
N<br />
N<br />
N<br />
O<br />
Le informazioni <strong>de</strong>l servizio Teletext sono spesso suddivise su più pagine visualizzate in sequenza alle quali è possibile<br />
acce<strong>de</strong>re come segue:<br />
<br />
<br />
<br />
Digitando il numero di pagina<br />
Selezionando un titolo in un elenco<br />
Selezionando un’intestazione colorata (sistema FASTEXT)<br />
Il servizio Teletext supportato dal televisore è la versione 2.5 che consente di visualizzare ulteriori elementi grafici o di testo.<br />
In base alla trasmissione, possono comparire ban<strong>de</strong> laterali vuote durante la visualizzazione <strong>de</strong>l servizio Teletext.<br />
In questo caso, non verranno trasmessi ulteriori elementi grafici o di testo.<br />
I televisori meno recenti che non supportano la versione 2.5 non sono in grado di visualizzare alcun elemento grafico o di<br />
testo aggiuntivo, a prescin<strong>de</strong>re dal tipo di trasmissione Teletext.<br />
Premere il tasto TV per uscire dal servizio Teletext.<br />
¦<br />
Installazione <strong>de</strong>l piedistallo<br />
N<br />
Preimpostazione: Collocare la guida <strong>de</strong>l piedistallo e il collare <strong>de</strong>lla copertura sul<br />
piedistallo e avvitarli usando le viti fornite. (In base al mo<strong>de</strong>llo)<br />
Retro<br />
INFO<br />
Fronte<br />
1. Assemblare il TV LCD al piedistallo.<br />
N<br />
N<br />
N<br />
Il televisore <strong>de</strong>ve essere sorretto da due o più persone.<br />
Prima di assemblare le due parti, controllare se il lato <strong>de</strong>l piedistallo (anteriore/<br />
posteriore) è quello corretto.<br />
Per installare il televisore sul piedistallo a un'altezza corretta, non applicare una forza<br />
eccessiva verso il basso sul lati sinistro o <strong>de</strong>stro superiori <strong>de</strong>l televisore.<br />
2. Avvitare le viti nella posizione 1, quindi avvitare le altre viti nella posizione 2.<br />
N Raddrizzare il prodotto e serrare le viti. Avvitando le viti con lo schermo LCD<br />
appoggiato sul piano, una volta sollevato il prodotto potrebbe risultare inclinato su un<br />
lato.<br />
2<br />
1<br />
AD<br />
Italiano - 41
¦<br />
Smontare il piedistallo<br />
1. Svitare le viti sul retro <strong>de</strong>l televisore.<br />
2. Separare il piedistallo dal televisore.<br />
N Il televisore <strong>de</strong>ve essere sorretto da due o più persone.<br />
3. Coprire il foro sul fondo con l'apposito tappo.<br />
¦<br />
Installazione <strong>de</strong>l Kit di montaggio a parete<br />
Gli articoli <strong>de</strong>l kit di montaggio a parete (venduti separatamente) consentono di montare il<br />
televisore alla parete.<br />
Per informazioni <strong>de</strong>ttagliate sull’installazione <strong>de</strong>l kit di montaggio a parete, consultare le<br />
istruzioni fornite insieme agli articoli <strong>de</strong>l kit. Contattare un tecnico per richie<strong>de</strong>re assistenza<br />
quando si monta la staffa a parete.<br />
<strong>Samsung</strong> Electronics non può essere ritenuta responsabile per qualsiasi danno al prodotto o<br />
infortuni causati da una installazione autonoma <strong>de</strong>l televisore da parte <strong>de</strong>ll’utente.<br />
Non installare il Kit di montaggio a parete mentre il televisore è acceso. In caso contrario,<br />
potrebbero verificarsi inci<strong>de</strong>nti con lesioni personali causate da scosse elettriche.<br />
¦<br />
Assemblaggio <strong>de</strong>i cavi<br />
Racchiu<strong>de</strong>re i cavi nel fermacavi in modo che non siano visibili attraverso il piedistallo trasparente.<br />
¦<br />
Blocco antifurto Kensington<br />
Il blocco Kensington è un dispositivo usato per fissare fisicamente il sistema quando viene<br />
utilizzato in un luogo pubblico. L’aspetto <strong>de</strong>l dispositivo e il metodo di blocco possono variare<br />
in base alla marca <strong>de</strong>l prodotto.<br />
Per informazioni sull’uso, consultare il manuale fornito insieme al blocco Kensington.<br />
N<br />
N<br />
Il dispositivo di blocco è in vendita separatamente.<br />
La posizione <strong>de</strong>l blocco Kensington può variare a seconda <strong>de</strong>l mo<strong>de</strong>llo.<br />
1. Inserire il dispositivo nell’alloggiamento <strong>de</strong>l blocco Kensington sul TV LCD (1) e<br />
ruotarlo nella direzione di chiusura (2).<br />
2. Collegare il cavo <strong>de</strong>l blocco Kensington (3).<br />
3. Fissare il blocco Kensington a un tavolo o un altro oggetto pesante.<br />
3<br />
2<br />
1<br />
<br />
Italiano - 42
¦<br />
Messa in sicurezza <strong>de</strong>lla posizione di installazione<br />
Mantenere le distanze necessarie tra il prodotto e gli altri elementi presenti (per esempio le pareti) per garantire un’a<strong>de</strong>guata<br />
ventilazione.<br />
La mancata osservanza di tale precauzione può comportare un pericolo d’incendio o un malfunzionamento a causa <strong>de</strong>l<br />
surriscaldamento <strong>de</strong>l prodotto.<br />
Installare il prodotto mantenendo le distanze indicate in figura.<br />
N Quando si usa un piedistallo o un sistema di montaggio a parete, utilizzare solo le parti fornite da <strong>Samsung</strong> Electronics.<br />
L’uso di parti di altre marche può causare un malfunzionamento o lesioni provocate da una eventuale caduta <strong>de</strong>l prodotto.<br />
L’uso di parti di altre marche può comportare un malfunzionamento o un pericolo di incendio per il surriscaldamento <strong>de</strong>l<br />
prodotto a causa di una ventilazione ina<strong>de</strong>guata.<br />
N L’aspetto <strong>de</strong>l prodotto può variare a seconda <strong>de</strong>l mo<strong>de</strong>llo.<br />
Durante l’installazione <strong>de</strong>l prodotto con un piedistallo<br />
Durante l’installazione <strong>de</strong>l prodotto con un sistema di montaggio a parete<br />
10 cm<br />
10 cm<br />
10 cm<br />
10 cm<br />
10 cm<br />
10 cm<br />
10 cm<br />
¦<br />
Fissaggio <strong>de</strong>l televisore alla parete<br />
Attenzione: Tirare, spingere o arrampicarsi sul televisore sono azioni che possono provocarne la caduta.<br />
Si raccomanda di non far giocare i bambini con il televisore poiché potrebbero appen<strong>de</strong>rsi ad esso<br />
<strong>de</strong>stabilizzandolo; se ciò dovesse verificarsi, il televisore potrebbe ca<strong>de</strong>re provocando lesioni personali gravi<br />
e perfino mortali. Seguire tutte le precauzioni di sicurezza <strong>de</strong>scritte <strong>de</strong>lla documentazione allegata. Per una<br />
maggiore stabilità e sicurezza <strong>de</strong>l prodotto, installare il dispositivo anticaduta come segue.<br />
■<br />
Per evitare una eventuale caduta <strong>de</strong>l televisore:<br />
1. Avvitare saldamente i ganci alla parete. Verificare che le viti di fissaggio siano ben<br />
serrate.<br />
N<br />
N<br />
A seconda <strong>de</strong>l tipo di parete, potrebbe essere necessario utilizzare anche un fisher.<br />
Poiché i ganci, le viti e il cavo di sicurezza non sono forniti in dotazione, è<br />
necessario acquistare tali materiali separatamente.<br />
2. Rimuovere le viti dal centro <strong>de</strong>l pannello posteriore <strong>de</strong>l televisore, inserirle nei ganci e<br />
quindi avvitarle nuovamente al televisore.<br />
N<br />
N<br />
<br />
<br />
Le viti potrebbero non essere fornite insieme al prodotto. In questo caso, acquistare<br />
le viti separatamente in base alle specifiche qui riportate.<br />
Specifiche <strong>de</strong>lle viti<br />
Per un TV LCD da 17 ~ 29 pollici: M4 X L15<br />
Per un TV LCD da 32 ~ 40 pollici: M6 X L15<br />
Parete<br />
3. Collegare i ganci fissati al televisore a quelli fissati alla parete utilizzando un cavo<br />
resistente, quindi legarlo strettamente.<br />
N Installare il televisore il più possibile vicino alla parete in modo che non possa<br />
ca<strong>de</strong>re all’indietro.<br />
N Collegare il cavo in modo che i ganci fissati alla parete si trovino allineati o<br />
leggermente più in basso di quelli fissati al televisore.<br />
N Slegare il cavo prima di spostare il televisore.<br />
4. Accertarsi che tutte le connessioni siano a<strong>de</strong>guatamente fissate. Controllare<br />
periodicamente le connessioni per verificarne l’eventuale usura o rottura. Per qualsiasi<br />
dubbio relativo alla sicurezza <strong>de</strong>lle connessioni effettuate, contattare un installatore specializzato.<br />
Parete<br />
Italiano - 43
¦<br />
Risoluzione <strong>de</strong>i problemi: Prima di contattare l’assistenza<br />
Nessun audio o immagine<br />
Immagine normale ma audio<br />
assente<br />
Lo schermo è nero e l’indicatore<br />
di alimentazione lampeggia in<br />
modo continuo<br />
Nessuna immagine oppure<br />
immagine in bianco e nero<br />
Interferenze audio e immagine<br />
Immagini offuscate o poco niti<strong>de</strong>,<br />
audio distorto<br />
Telecomando non funzionante<br />
Viene visualizzato il messaggio<br />
'Controlla cavo segnale.'.<br />
In modalità PC, viene visualizzato<br />
il messaggio 'Modo non<br />
supportato'.<br />
L’immagine danneggiata viene<br />
visualizzata nell’angolo <strong>de</strong>llo<br />
schermo.<br />
Viene visualizzato il messaggio<br />
‘Ripristina tutte le impostazioni ai<br />
valori pre<strong>de</strong>finiti.’.<br />
Guardando da vicino il bordo<br />
<strong>de</strong>lla cornice <strong>de</strong>llo schermo <strong>de</strong>l<br />
televisore è possibile notare <strong>de</strong>lle<br />
piccole particelle.<br />
N<br />
Controllare che il cavo di alimentazione sia collegato alla presa di corrente.<br />
Verificare di aver premuto il tasto sul dispositivo.<br />
Controllare le impostazioni relative al contrasto e alla luminosità <strong>de</strong>ll’immagine.<br />
Controllare il volume.<br />
Controllare il volume.<br />
Controllare se il tasto MUTEM <strong>de</strong>l telecomando è stato premuto.<br />
Verificare le impostazioni <strong>de</strong>ll’opzione Selezione altoparlante.<br />
Sul computer controllare l’alimentazione e il cavo di segnale.<br />
Il televisore sta utilizzando il proprio sistema di gestione alimentazione.<br />
Muovere il mouse o premere un tasto qualsiasi sulla tastiera <strong>de</strong>l computer.<br />
Regolare le impostazioni <strong>de</strong>l colore.<br />
Controllare se la selezione <strong>de</strong>l sistema di trasmissione è corretta.<br />
Provare a i<strong>de</strong>ntificare l’apparecchiatura elettrica che causa le interferenze e spostarla più lontano.<br />
Collegare il televisore a un’altra presa di alimentazione.<br />
Controllare la direzione, la posizione e i collegamenti <strong>de</strong>ll’antenna.<br />
Questo problema si verifica spesso quando si utilizza un’antenna interna.<br />
Sostituire le batterie <strong>de</strong>l telecomando.<br />
Pulire il bordo superiore <strong>de</strong>l telecomando (finestra di trasmissione).<br />
Controllare i terminali <strong>de</strong>lle batterie.<br />
Controllare che il cavo <strong>de</strong>l segnale sia saldamente collegato al PC o alle sorgenti vi<strong>de</strong>o.<br />
Controllare che le sorgenti vi<strong>de</strong>o o il PC siano accesi.<br />
Controllare la risoluzione massima e la frequenza <strong>de</strong>ll’adattatore vi<strong>de</strong>o.<br />
Confrontare questi valori con i dati <strong>de</strong>lle modalità di visualizzazione.<br />
Se Adatta a schermo è selezionata in alcuni dispositivi esterni, l’immagine danneggiata può essere<br />
visibile nell’angolo <strong>de</strong>llo schermo. Questa anomalia è causata dalle periferiche esterne, non dal televisore.<br />
Ciò si verifica quando si tiene premuto il tasto EXIT per qualche istante. Le impostazioni <strong>de</strong>l prodotto<br />
vengono reimpostate ai valori di fabbrica.<br />
Ciò non costituisce un difetto ma fa parte <strong>de</strong>l <strong>de</strong>sign <strong>de</strong>l prodotto.<br />
Lo schermo LCD TFT usa un pannello composto da sotto pixel (6 220 800) che richiedono una speciale tecnologia di<br />
produzione. Tuttavia, alcuni pixel potrebbero risultare più luminosi o più scuri. Questo fenomeno non ha alcun impatto sulle<br />
prestazioni <strong>de</strong>l prodotto.<br />
Italiano - 44
¦<br />
Specifiche<br />
Nome mo<strong>de</strong>llo<br />
LE32B550, LE32B551<br />
LE32B553, LE32B554<br />
LE37B550, LE37B551<br />
LE37B553, LE37B554<br />
Dimensione schermo<br />
(Diagonale) 32 poll. 37 poll.<br />
Risoluzione PC<br />
(Ottimale) 1920 x 1080 a 60 Hz 1920 x 1080 a 60 Hz<br />
Audio<br />
(Uscita) 2 x 10W 2 x 10W<br />
Dimensioni (LarxProxAlt)<br />
Corpo<br />
Con piedistallo<br />
794 X 77 X 524 mm<br />
794 X 240 X 570 mm<br />
917 X 79 X 592 mm<br />
917 X 255 X 658 mm<br />
Peso<br />
Con piedistallo 13 kg 16 kg<br />
Caratteristiche ambientali<br />
Temperatura di esercizio<br />
Umidità di esercizio<br />
Temperatura di stoccaggio<br />
Umidità di stoccaggio<br />
Piedistallo ruotabile<br />
(Sinistra / Destra)<br />
Nome mo<strong>de</strong>llo<br />
LE40B550, LE40B551<br />
LE40B553, LE40B554<br />
Da 10°C a 40°C (50°F a 104°F)<br />
Dal 10% all’80%, senza con<strong>de</strong>nsa<br />
Da -20°C a 45°C (-4°F a 113°F)<br />
Dal 5% al 95%, senza con<strong>de</strong>nsa<br />
-20˚ ~ 20˚<br />
LE46B550, LE46B551<br />
LE46B553, LE46B554<br />
Dimensione schermo<br />
(Diagonale) 40 poll. 46 poll.<br />
Risoluzione PC<br />
(Ottimale) 1920 x 1080 a 60 Hz 1920 x 1080 a 60 Hz<br />
Audio<br />
(Uscita) 2 x 10W 2 x 10W<br />
Dimensioni (LarxProxAlt)<br />
Corpo<br />
Con piedistallo<br />
982 X 79 X 626 mm<br />
982 X 255 X 676 mm<br />
1116 X 79 X 706 mm<br />
1116 X 275 X 770 mm<br />
Peso<br />
Con piedistallo 18 kg 23 kg<br />
Caratteristiche ambientali<br />
Temperatura di esercizio<br />
Umidità di esercizio<br />
Temperatura di stoccaggio<br />
Umidità di stoccaggio<br />
Piedistallo ruotabile<br />
(Sinistra / Destra)<br />
N<br />
N<br />
N<br />
Da 10°C a 40°C (50°F a 104°F)<br />
Dal 10% all’80%, senza con<strong>de</strong>nsa<br />
Da -20°C a 45°C (-4°F a 113°F)<br />
Dal 5% al 95%, senza con<strong>de</strong>nsa<br />
-20˚ ~ 20˚<br />
Design e specifiche sono soggetti a modifiche senza preavviso.<br />
Questo prodotto è un’apparecchiatura digitale di Classe B.<br />
Per l’alimentazione elettrica e il consumo di corrente, consultare l’etichetta apposta al prodotto.<br />
Italiano - 45
Correct Disposal of This Product (Waste Electrical & Electronic Equipment)<br />
(Applicable in the European Union and other European countries with separate collection systems) This marking on the product, accessories<br />
or literature indicates that the product and its electronic accessories (e.g. charger, headset, USB cable) should not be disposed of with other<br />
household waste at the end of their working life. To prevent possible harm to the environment or human health from uncontrolled waste<br />
disposal, please separate these items from other types of waste and recycle them responsibly to promote the sustainable reuse of material<br />
resources. Household users should contact either the retailer where they purchased this product, or their local government office, for <strong>de</strong>tails<br />
of where and how they can take these items for environmentally safe recycling. Business users should contact their supplier and check the<br />
terms and conditions of the purchase contract. This product and its electronic accessories should not be mixed with other commercial wastes<br />
for disposal.<br />
[English]<br />
Les bons gestes <strong>de</strong> mise au rebut <strong>de</strong> ce produit (Déchets d’équipements électriques et électroniques)<br />
(Applicable dans les pays <strong>de</strong> l’Union Européenne et dans d’autres pays européens pratiquant le tri sélectif)<br />
Ce symbole sur le produit, ses accessoires ou sa documentation indique que ni le produit, ni ses accessoires électroniques usagés<br />
(chargeur, casque audio, câble USB, etc.) ne peuvent être jetés avec les autres déchets ménagers. La mise au rebut incontrôlée <strong>de</strong>s<br />
déchets présentant <strong>de</strong>s risques environnementaux et <strong>de</strong> santé publique, veuillez séparer vos produits et accessoires usagés <strong>de</strong>s autres<br />
déchets. Vous favoriserez ainsi le recyclage <strong>de</strong> la matière qui les compose dans le cadre d’un développement durable. Les particuliers sont<br />
invités à contacter le magasin leur ayant vendu le produit ou à se renseigner auprès <strong>de</strong>s autorités locales pour connaître les procédures et<br />
les points <strong>de</strong> collecte <strong>de</strong> ces produits en vue <strong>de</strong> leur recyclage. Les entreprises et professionnels sont invités à contacter leurs fournisseurs<br />
et à consulter les conditions <strong>de</strong> leur contrat <strong>de</strong> vente. Ce produit et ses accessoires ne peuvent être jetés avec les autres déchets<br />
professionnels et commerciaux.<br />
[Franç<strong>ais</strong>]<br />
Korrekte Entsorgung von Altgeräten (Elektroschrott)<br />
(In <strong>de</strong>n Län<strong>de</strong>rn <strong>de</strong>r Europäischen Union und an<strong>de</strong>ren europäischen Län<strong>de</strong>rn mit einem separaten Sammelsystem)<br />
Die Kennzeichnung auf <strong>de</strong>m Produkt, Zubehörteilen bzw. auf <strong>de</strong>r dazugehörigen Dokumentation gibt an, dass das Produkt und Zubehörteile<br />
(z. B. La<strong>de</strong>gerät, Kopfhörer, USB-Kabel) nach ihrer Lebensdauer nicht zusammen mit <strong>de</strong>m normalen Haushaltsmüll entsorgt wer<strong>de</strong>n dürfen.<br />
Entsorgen Sie dieses Gerät und Zubehörteile bitte getrennt von an<strong>de</strong>ren Abfällen, um <strong>de</strong>r Umwelt bzw. <strong>de</strong>r menschlichen Gesundheit<br />
nicht durch unkontrollierte Müllbeseitigung zu scha<strong>de</strong>n. Helfen Sie mit, das Altgerät und Zubehörteile fachgerecht zu entsorgen, um die<br />
nachhaltige Wie<strong>de</strong>rverwertung von stofflichen Ressourcen zu för<strong>de</strong>rn. Private Nutzer wen<strong>de</strong>n sich an <strong>de</strong>n Händler, bei <strong>de</strong>m das Produkt<br />
gekauft wur<strong>de</strong>, o<strong>de</strong>r kontaktieren die zuständigen Behör<strong>de</strong>n, um in Erfahrung zu bringen, wo Sie das Altgerät bzw. Zubehörteile für eine<br />
umweltfreundliche Entsorgung abgeben können. Gewerbliche Nutzer wen<strong>de</strong>n sich an ihren Lieferanten und gehen nach <strong>de</strong>n Bedingungen<br />
<strong>de</strong>s Verkaufsvertrags vor. Dieses Produkt und elektronische Zubehörteile dürfen nicht zusammen mit an<strong>de</strong>rem Gewerbemüll entsorgt<br />
wer<strong>de</strong>n.<br />
[Deutsch]<br />
Correcte verwij<strong>de</strong>ring van dit product (elektrische & elektronische afvalapparatuur)<br />
Dit merkteken op het product, <strong>de</strong> accessoires of het informatiemateriaal duidt erop dat het product en zijn elektronische accessoires (bv.<br />
la<strong>de</strong>r, headset, USB-kabel) niet met an<strong>de</strong>r huishou<strong>de</strong>lijk afval verwij<strong>de</strong>rd mogen wor<strong>de</strong>n aan het ein<strong>de</strong> van hun gebruiksduur. Om mogelijke<br />
scha<strong>de</strong> aan het milieu of <strong>de</strong> menselijke gezondheid door ongecontroleer<strong>de</strong> afvalverwij<strong>de</strong>ring te voorkomen, moet u <strong>de</strong>ze artikelen van<br />
an<strong>de</strong>re soorten afval schei<strong>de</strong>n en op een verantwoor<strong>de</strong> manier recyclen, zodat het duurzame hergebruik van materiaalbronnen wordt<br />
bevor<strong>de</strong>rd. Huishou<strong>de</strong>lijke gebruikers moeten contact opnemen met <strong>de</strong> winkel waar ze dit product hebben gekocht of met <strong>de</strong> gemeente<br />
waar ze wonen om te vernemen waar en hoe ze <strong>de</strong>ze artikelen milieuvrien<strong>de</strong>lijk kunnen laten recyclen. Zakelijke gebruikers moeten<br />
contact opnemen met hun leverancier en <strong>de</strong> algemene voorwaar<strong>de</strong>n van <strong>de</strong> koopovereenkomst nalezen. Dit product en zijn elektronische<br />
accessoires mogen niet met an<strong>de</strong>r bedrijfsafval voor verwij<strong>de</strong>ring wor<strong>de</strong>n gemengd.<br />
[Ne<strong>de</strong>rlands]<br />
Corretto smaltimento <strong>de</strong>l prodotto (rifiuti elettrici ed elettronici)<br />
(Applicabile nell’Unione Europea e in altri paesi europei con sistema di raccolta differenziata)<br />
Il marchio riportato sul prodotto, sugli accessori o sulla documentazione indica che il prodotto e i relativi accessori elettronici (quali<br />
caricabatterie, cuffia e cavo USB) non <strong>de</strong>vono essere smaltiti con altri rifiuti domestici al termine <strong>de</strong>l ciclo di vita. Per evitare eventuali danni<br />
all’ambiente o alla salute causati dall’inopportuno smaltimento <strong>de</strong>i rifiuti, si invita l’utente a separare il prodotto e i sud<strong>de</strong>tti accessori da altri<br />
tipi di rifiuti e di riciclarli in maniera responsabile per favorire il riutilizzo sostenibile <strong>de</strong>lle risorse materiali. Gli utenti domestici sono invitati a<br />
contattare il rivenditore presso il quale è stato acquistato il prodotto o l’ufficio locale preposto per tutte le informazioni relative alla raccolta<br />
differenziata e al riciclaggio per questo tipo di materiali. Gli utenti aziendali sono invitati a contattare il proprio fornitore e verificare i termini<br />
e le condizioni <strong>de</strong>l contratto di acquisto. Questo prodotto e i relativi accessori elettronici non <strong>de</strong>vono essere smaltiti unitamente ad altri rifiuti<br />
commerciali.<br />
[Italiano]<br />
Eliminación correcta <strong>de</strong> este producto (Residuos <strong>de</strong> aparatos eléctricos y electrónicos)<br />
(Aplicable en la Unión Europea y en países europeos con sistemas <strong>de</strong> recogida selectiva <strong>de</strong> residuos)<br />
La presencia <strong>de</strong> este símbolo en el producto, accesorios o material informativo que lo acompañan, indica que al finalizar su vida útil ni el<br />
producto ni sus accesorios electrónicos (como el cargador, cascos, cable USB) <strong>de</strong>berán eliminarse junto con otros residuos domésticos.<br />
Para evitar los posibles daños al medio ambiente o a la salud humana que representa la eliminación incontrolada <strong>de</strong> residuos, separe<br />
estos productos <strong>de</strong> otros tipos <strong>de</strong> residuos y recíclelos correctamente. De esta forma se promueve la reutilización sostenible <strong>de</strong> recursos<br />
materiales. Los usuarios particulares pue<strong>de</strong>n contactar con el establecimiento don<strong>de</strong> adquirieron el producto o con las autorida<strong>de</strong>s locales<br />
pertinentes para informarse sobre cómo y dón<strong>de</strong> pue<strong>de</strong>n llevarlo para que sea sometido a un reciclaje ecológico y seguro. Los usuarios<br />
comerciales pue<strong>de</strong>n contactar con su proveedor y consultar las condiciones <strong>de</strong>l contrato <strong>de</strong> compra. Este producto y sus accesorios<br />
electrónicos no <strong>de</strong>ben eliminarse junto a otros residuos comerciales.<br />
[Español]<br />
Eliminação Correcta Deste Produto (Resíduos <strong>de</strong> Equipamentos Eléctricos e Electrónicos)<br />
Esta marca apresentada no produto, nos acessórios ou na literatura – indica que o produto e os seus acessórios electrónicos (por exemplo,<br />
o carregador, o auricular, o cabo USB) não <strong>de</strong>verão ser eliminados juntamente com os resíduos domésticos no final do seu período <strong>de</strong><br />
vida útil. Para impedir danos ao ambiente ou à saú<strong>de</strong> humana causados pela eliminação incontrolada <strong>de</strong> resíduos, <strong>de</strong>verá separar estes<br />
equipamentos <strong>de</strong> outros tipos <strong>de</strong> resíduos e reciclá-los <strong>de</strong> forma responsável, para promover uma reutilização sustentável dos recursos<br />
materi<strong>ais</strong>. Os utilizadores domésticos <strong>de</strong>verão contactar o estabelecimento on<strong>de</strong> adquiriram este produto ou as entida<strong>de</strong>s ofici<strong>ais</strong> loc<strong>ais</strong><br />
para obterem informações sobre on<strong>de</strong> e <strong>de</strong> que forma po<strong>de</strong>m entregar estes equipamentos para permitir efectuar uma reciclagem segura<br />
em termos ambient<strong>ais</strong>. Os utilizadores profission<strong>ais</strong> <strong>de</strong>verão contactar o seu fornecedor e consultar os termos e condições do contrato <strong>de</strong><br />
compra. Este produto e os seus acessórios electrónicos não <strong>de</strong>verão ser misturados com outros resíduos comerci<strong>ais</strong> para eliminação.<br />
[Português]
Ustrezno odstranjevanje tega iz<strong>de</strong>lka (odpadna električna in elektronska oprema)<br />
Oznaka na iz<strong>de</strong>lku, dodatni opremi ali dokumentaciji pomeni, da iz<strong>de</strong>lka in njegove elektronske dodatne opreme (npr. električni polnilnik,<br />
slušalke, kabel USB) ob koncu dobe uporabe ni dovoljeno odvreči med gospodinjske odpadke. Te iz<strong>de</strong>lke ločite od drugih vrst odpadkov<br />
in jih odgovorno predajte v recikliranje ter tako spodbudite trajnostno vnovično uporabo materialnih virov. Tako boste preprečili morebitno<br />
tveganje za okolje ali zdravje ljudi zaradi nenadzoro vanega odstranjevanja odpadkov. Uporabniki v gospodinjstvih naj se za podrobnosti<br />
o tem, kam in kako lahko te iz<strong>de</strong>lke predajo v okolju prijazno recikliranje, obrnejo na trgovino, kjer so iz<strong>de</strong>lek kupili, ali na krajevni upravni<br />
organ. Poslovni uporabniki naj se obrnejo na dobavitelja in preverijo pogoje kupne pogodbe. Tega iz<strong>de</strong>lka in njegove elektronske dodatne<br />
opreme pri odstranjevanju ni dovoljeno mešati z drugimi gospodarskimi odpadki.<br />
[Slovenščina]<br />
Korrekt avfallshantering av produkten (elektriska och elektroniska produkter)<br />
Denna markering på produkten, tillbehören och i manualen anger att produkten och <strong>de</strong> elektroniska tillbehören (t.ex. laddare, headset,<br />
USB-kabel) inte bör sorteras tillsammans med annat hushållsavfall när <strong>de</strong> kasseras. Till förebyggan<strong>de</strong> av skada på miljö och hälsa bör<br />
<strong>de</strong>ssa föremål hanteras separat för ändamålsenlig återvinning av bestånds<strong>de</strong>larna. Hushållsanvändare bör kontakta <strong>de</strong>n återförsäljare<br />
som sålt produkten eller sin kommun för vidare information om var och hur produkten och tillbehören kan återvinnas på ett miljösäkert sätt.<br />
Företagsanvändare bör kontakta leverantören samt verifiera angivna villkor i köpekontraktet. Produkten och <strong>de</strong> elektroniska tillbehören bör<br />
inte hanteras tillsammans med annat kommersiellt avfall.<br />
[Svenska]<br />
Korrekt affaldsbortskaffelse af <strong>de</strong>tte produkt (elektrisk & elektronisk udstyr)<br />
Mærket på <strong>de</strong>tte produkt, på tilbehør eller i <strong>de</strong>n medfølgen<strong>de</strong> dokumentation bety<strong>de</strong>r, at produktet og elektronisk tilbehør hertil (f.eks.<br />
opla<strong>de</strong>r, hovedsæt, USB-ledning) ikke må bortskaffes sammen med almin<strong>de</strong>ligt husholdningsaffald efter endt levetid. For at undgå ska<strong>de</strong>lige<br />
miljø- eller sundhedspåvirkninger på grund af ukontrolleret affaldsbortskaffelse skal ovennævnte bortskaffes særskilt fra an<strong>de</strong>t affald og<br />
indleveres behørigt til fremme for bæredygtig materialegenvinding. Forbrugere be<strong>de</strong>s kontakte forhandleren, hvor <strong>de</strong> har købt produktet,<br />
eller kommunen for oplysning om, hvor og hvordan <strong>de</strong> kan indlevere ovennævnte med henblik på miljøforsvarlig genvinding. Virksomhe<strong>de</strong>r<br />
be<strong>de</strong>s kontakte leverandøren og læse betingelserne og vilkårene i købekontrakten. Dette produkt og elektronisk tilbehør hertil bør ikke<br />
bortskaffes sammen med an<strong>de</strong>t erhvervsaffald.<br />
[Dansk]<br />
Korrekt avhending av <strong>de</strong>tte produktet (Avfall fra elektrisk og elektronisk utstyr)<br />
Denne merkingen som vises på produktet, <strong>de</strong>ts tilbehør eller dokumentasjon, indikerer at produktet eller <strong>de</strong>t elektroniske tilbehøret (for<br />
eksempel la<strong>de</strong>r, headset, USB-kabel) ikke skal kastes sammen med annet husholdningsavfall ved slutten av leveti<strong>de</strong>n. For å hindre<br />
potensiell ska<strong>de</strong> på miljøet eller helseska<strong>de</strong>r grunnet ukontrollert avfallsavhending ber vi om at <strong>de</strong>tte avfallet hol<strong>de</strong>s adskilt fra andre<br />
typer avfall og resirkuleres på ansvarlig måte for å fremme bærekraftig gjenbruk av materielle ressurser. Private forbrukere bør kontakte<br />
enten forhandleren <strong>de</strong> kjøpte produktet av, eller lokale myndigheter, for <strong>de</strong>taljer om hvor og hvordan disse artiklene kan resirkuleres på<br />
en miljøvennlig måte. Forretningsbrukere bør kontakte sin leverandør og un<strong>de</strong>rsøke vilkårene i kjøpskontrakten. Dette produktet og <strong>de</strong>t<br />
elektroniske tilbehøret skal ikke blan<strong>de</strong>s med annet kommersielt avfall som skal kastes.<br />
[Norsk]<br />
Tuotteen turvallinen hävittäminen (elektroniikka ja sähkölaitteet)<br />
Oheinen merkintä tuotteessa, lisävarusteissa tai käyttöohjeessa merkitsee, että tuotetta tai lisävarusteina toimitettavia sähkölaitteita (esim.<br />
laturia, kuulokkeita tai USB kaapelia) ei saa hävittää kotitalousjätteen mukana nii<strong>de</strong>n käyttöiän päätyttyä. Virheellisestä jätteenkäsittelystä<br />
ympäristölle ja tervey<strong>de</strong>lle aiheutuvien haittojen välttämiseksi tuote ja lisävarusteet on eroteltava muusta jätteestä ja kierrätettävä<br />
kestävän kehityksen muk<strong>ais</strong>ta uusiokäyttöä varten. Kotikäyttäjät saavat lisätietoja tuotteen ja lisävarustei<strong>de</strong>n turvallisesta kierrätyksestä<br />
ottamalla yhteyttä tuotteen myyneeseen jälleenmyyjään tai paikalliseen ympäristöviranom<strong>ais</strong>een. Yrityskäyttäjien tulee ottaa yhteyttä<br />
tavarantoimittajaan ja selvittää hankintasopimuksen ehdot. Tuotetta tai sen lisävarusteita ei saa hävittää muun kaupallisen jätteen seassa.<br />
[Suomi]<br />
A termék hulladékba helyezésének módszere(WEEE – Elektromos és elektronikus beren<strong>de</strong>zések hulladékai)<br />
Ez a jelzés a terméken, tartozékain vagy dokumentációján arra utal, hogy hasznos élettartama végén a terméket és elektronikus tartozékait<br />
(pl. töltőegység, fejhallgató, USB kábel) nem szabad a háztartási hulladékkal együtt kidobni. A szabálytalan hulladékba helyezés által<br />
okozott környezet- és egészségkárosodás megelőzése ér<strong>de</strong>kében ezeket a tárgyakat különítse el a többi hulladéktól, és felelősségteljesen<br />
gondoskodjon az újrahasznosításukról az anyagi erőforrások fenntartható újrafelhasználásának elősegítése ér<strong>de</strong>kében. A háztartási<br />
felhasználók a termék forgalmazójától vagy a helyi önkormányzati szervektől kérjenek tanácsot arra vonatkozóan, hová és hogyan vihetik<br />
el az elhasznált termékeket a környezetvé<strong>de</strong>lmi szempontból biztonságos újrahasznosítás céljából. Az üzleti felhasználók lépjenek<br />
kapcsolatba beszállítójukkal, és vizsgálják meg az adásvételi szerződés feltételeit. Ezt a terméket és tartozékait nem szabad az egyéb<br />
közületi hulladékkal együtt kezelni.<br />
[Magyar]<br />
Prawidłowe usuwanie produktu (zużyty sprzęt elektryczny i elektroniczny)<br />
To oznaczenie umieszczone na produkcie, akcesoriach lub dokumentacji oznacza, że po zakończeniu eksploatacji nie należy tego produktu<br />
ani jego akcesoriów (np. ładowarki, zestawu słuchawkowego, przewodu USB) wyrzucać wraz ze zwykłymi odpadami gospodarstwa<br />
domowego. Aby uniknąć szkodliwego wpływu na środowisko naturalne i zdrowie ludzi wskutek niekontrolowanego usuwania odpadów,<br />
prosimy o oddzielenie tych przedmiotów od odpadów innego typu oraz o odpowiedzialny recykling i praktykowanie ponownego<br />
wykorzystania materiałów. W celu uzyskania informacji na temat miejsca i sposobu bezpiecznego dla środowiska recyklingu tych<br />
przedmiotów, użytkownicy w gospodarstwach domowych powinni skontaktować się z punktem sprzedaży <strong>de</strong>talicznej, w którym dokonali<br />
zakupu produktu, lub z organem władz lokalnych. Użytkownicy w firmach powinni skontaktować się ze swoim dostawcą i sprawdzić warunki<br />
umowy zakupu. Produktu ani jego akcesoriów nie należy usuwać razem z innymi odpadami komercyjnymi.<br />
[Polski]
Σωστή Απόρριψη αυτού του Προϊόντος (Απόβλητα Ηλεκτρικού & Ηλεκτρονικού Εξοπλισμού)<br />
(Ισχύει για την Ευρωπαϊκή Ένωση και για άλλες ευρωπαϊκές χώρες με χωριστά συστήματα συλλογής) Αυτό το σήμα που εμφανίζεται επάνω<br />
στο προϊόν, στα εξαρτήματά του ή στα εγχειρίδια που το συνοδεύουν, υποδεικνύει ότι το προϊόν και τα ηλεκτρονικά του εξαρτήματα (π.χ.<br />
φορτιστής, ακουστικά, καλώδιο USB) δεν θα πρέπει να ρίπτονται μαζί με τα υπόλοιπα οικιακά απορρίμματα μετά το τέλος του κύκλου ζωής<br />
τους. Προκειμένου να αποφευχθούν ενδεχόμενες βλαβερές συνέπειες στο περιβάλλον ή την υγεία εξαιτίας της ανεξέλεγκτης διάθεσης<br />
απορριμμάτων, σας παρακαλούμε να διαχωρίσετε αυτά τα προϊόντα από άλλους τύπους απορριμμάτων και να τα ανακυκλώσετε, ώστε<br />
να βοηθήσετε στην βιώσιμη επαναχρησιμοποίηση των υλικών πόρων. Οι οικιακοί χρήστες θα πρέπει να έλθουν σε επικοινωνία είτε με<br />
το κατάστημα απ’ όπου αγόρασαν αυτό το προϊόν, είτε με τις κατά τόπους υπηρεσίες, προκειμένου να πληροφορηθούν τις λεπτομέρειες<br />
σχετικά με τον τόπο και τον τρόπο με τον οποίο μπορούν να δώσουν αυτά τα προϊόντα για ασφαλή προς το περιβάλλον ανακύκλωση.<br />
Οι επιχειρήσεις-χρήστες θα πρέπει να έλθουν σε επαφή με τον προμηθευτή τους και να ελέγξουν τους όρους και τις προϋποθέσεις του<br />
συμβολαίου αγοράς. Αυτό το προϊόν και τα ηλεκτρονικά του εξαρτήματα δεν θα πρέπει να αναμιγνύονται με άλλα συνηθισμένα απορρίμματα<br />
προς διάθεση.<br />
[Ελληνικά]<br />
Правилно третиране на изделието след края на експлоатационния му живот<br />
(Отпадъци, представляващи електрическо и електронно оборудване)(Важи за държавите на Европейския съюз и други европейски<br />
държави със системи за разделно сметосъбиране)<br />
Този знак, поставен върху изделието, негови принадлежности или печатни материали, означава, че продуктът и принадлежностите<br />
(например зарядно устройство, слушалки, USB кабел) не бива да се изхвърлят заедно с другите битови отпадъци, когато изтече<br />
експлоатационният му живот. Отделяйте тези устройства от другите видови отпадъци и ги предавайте за рециклиране. Спазвайки<br />
това правило не излагате на опасност здравето на други хора и предпазвате околната среда от замърсяване, предизвикано от<br />
безконтролно изхвърляне на отпадъци. Освен това, подобно отговорно поведение създава възможност за повторно (екологично<br />
съобразно) използване на материалните ресурси. Домашните потребители трябва да се свържат с търговеца на дребно, от когото<br />
са закупили изделието, или със съответната местна държавна агенция, за да получат подробни инструкции къде и кога могат<br />
да занесат тези устройства за рециклиране, безопасно за околната среда. Корпоративните потребители следва да се свържат с<br />
доставчика си и да проверят условията на договора за покупка. Това изделие и неговите електронни принадлежности не бива да се<br />
сместват с другите отпадъци на търговското предприятие.<br />
[Български]<br />
Správná likvidace výrobku (Elektrický a elektronický odpad)<br />
Toto označení na výrobku, jeho příslušenství nebo dokumentaci znamená, že výrobek a jeho elektronické příslušenství (například nabíječku,<br />
náhlavní sadu, USB kabel) je po skončení životnosti zakázáno likvidovat jako běžný komunální odpad. Možným negativním dopadům na<br />
životní prostředí nebo lidské zdraví způsobeným nekontrolovanou likvidací zabráníte oddělením zmíněných produktů od ostatních typů<br />
odpadu a jejich zodpovědnou recyklací za účelem udržitelného využívání druhotných surovin. Uživatelé z řad domácností by si měli od<br />
pro<strong>de</strong>jce, u něhož produkt zakoupili, nebo u příslušného městského úřadu vyžádat informace, k<strong>de</strong> a jak mohou tyto výrobky o<strong>de</strong>vzdat k<br />
bezpečné ekologické recyklaci. Podnikoví uživatelé by měli kontaktovat dodavatele a zkontrolovat všechny podmínky kupní smlouvy. Tento<br />
výrobek a jeho elektronické příslušenství nesmí být likvidován spolu s ostatním průmyslovým odpa<strong>de</strong>m.<br />
[Čeština]<br />
Správna likvidácia tohoto výrobku (Elektrotechnický a elektronický odpad)<br />
(Platné pre Európsku úniu a ostatné európske krajiny so systémom trie<strong>de</strong>ného odpadu)<br />
Toto označenie na výrobku, príslušenstve alebo v sprievodnej brožúre hovorí, že po skončení životnosti by produkt ani jeho elektronické<br />
príslušenstvo (napr. nabíjačka, náhlavná súprava, USB kábel) nemali byť likvidované s ostatným domovým odpadom. Prípadnému<br />
poško<strong>de</strong>niu životného prostredia alebo ľudského zdravia môžete predísť tým, že bu<strong>de</strong>te tieto výrobky od<strong>de</strong>ľovať od ostatného odpadu a<br />
vrátite ich na recykláciu. Používatelia v domácnostiach by pre podrobné informácie, ako ekologicky bezpečne naložiť s týmito výrobkami,<br />
mali kontaktovať buď predajcu, ktorý im ich predal, alebo príslušný úrad v mieste ich bydliska. Priemyselní používatelia by mali kontaktovať<br />
svojho dodávateľa a preveriť si podmienky kúpnej zmluvy. Tento výrobok a ani jeho elektronické príslušenstvo by nemali byť likvidované<br />
spolu s ostatným priemyselným odpadom.<br />
[Slovensky]<br />
Cum se elimină corect acest produs (Deşeuri <strong>de</strong> echipamente electrice şi electronice)<br />
(Aplicabil în ţările Uniunii Europene şi în alte ţări cu sisteme <strong>de</strong> colectare selectivă)<br />
Acest simbol <strong>de</strong> pe produs, accesorii şi documentaţie indică faptul că produsul şi accesoriile sale electronice (încărcător, căşti, cablu USB)<br />
nu trebuie eliminate împreună cu alte <strong>de</strong>şeuri menajere la finalul duratei lor <strong>de</strong> utilizare. Dat fiind că eliminarea necontrolată a <strong>de</strong>şeurilor<br />
poate dăuna mediului înconjurător sau sănătăţii umane, vă rugăm să separaţi aceste articole <strong>de</strong> alte tipuri <strong>de</strong> <strong>de</strong>şeuri şi să le reciclaţi în<br />
mod responsabil, promovând astfel reutilizarea durabilă a resurselor materiale. Utilizatorii casnici trebuie să-l contacteze pe distribuitorul<br />
care le-a vândut produsul sau să se intereseze la autorităţile locale un<strong>de</strong> şi cum pot să ducă aceste articole pentru a fi reciclate în mod<br />
ecologic. Utilizatorii comerciali trebuie să-şi contacteze furnizorul şi să consulte termenii şi condiţiile din contractul <strong>de</strong> achiziţie. Acest produs<br />
şi accesoriile sale electronice nu trebuie eliminate împreună cu alte <strong>de</strong>şeuri comerciale.<br />
[Română]<br />
Izstrādājuma pareiza likvidēšana (Attiecas uz nolietotām elektriskām un elektroniskām ierīcēm)<br />
(Spēkā Eiropas Savienībā un pārējās Eiropas valstīs, kas izmanto atkritumu dalītu savākšanu)<br />
Šis uz izstrādājuma un tā pie<strong>de</strong>rumiem vai pievienotajā dokumentācijā izvietot<strong>ais</strong> marķējums norāda, ka izstrādājumu un tā elektroniskos<br />
pie<strong>de</strong>rumus (piem., uzlā<strong>de</strong>s ierīci, austiņas, USB kabeli) pēc ekspluatācijas laika beigām nedrīkst likvidēt kopā ar citiem sadzīves<br />
atkritumiem. Lai nepieļautu atkritumu nekontrolētas likvidēšanas radītu varbūtēju kaitējumu vi<strong>de</strong>i un cilvēku veselībai, lūdzam minētās ierīces<br />
nošķirt no citiem atkritumiem un disciplinēti nodot pienācīgai pārstrā<strong>de</strong>i, tā sekmējot materiālo resursu atkārtotu izmantošanu. Lai uzzinātu,<br />
kur un kā minētās ierīces iespējams nodot ekoloģiski drošai pārstrā<strong>de</strong>i, mājsaimniecībām jāsazinās ar izstrādājuma pār<strong>de</strong>vēju vai savu<br />
pašvaldību. Iestādēm un uzņēmumiem jāsazinās ar izstrādājuma piegādātāju un jāiepazīstas ar pirkuma līguma nosacījumiem. Izstrādājumu<br />
un tā elektroniskos pie<strong>de</strong>rumus nedrīkst nodot likvidēšanai kopā ar citiem iestāžu un uzņēmumu atkritumiem.<br />
[Latviešu]
Tinkamas šio gaminio išmetimas (elektros ir elektroninės įrangos atliekos)<br />
Šis ženklas, pateiktas ant gaminio, jo priedų ar dokumentacijoje, nurodo, kad gaminio ir jo elektroninių priedų (pvz., įkroviklio, ausinių,<br />
USB kabelio) negalima išmesti kartu su kitomis buitinėmis atliekomis gaminio naudojimo laikui pasibaigus. Kad būtų išvengta galimos<br />
nekontroliuojamo atliekų išmetimo žalos aplinkai arba žmonių sveikatai ir skatinamas aplinką tausojantis antrinių žaliavų panaudojimas,<br />
atskirkite šiuos elementus nuo kitų rūšių atliekų ir atiduokite perdirbti. Informacijos kur ir kaip pristatyti šiuos elementus saugiai perdirbti,<br />
privatūs vartotojai turėtų kreiptis į parduotuvę, kurioje šį gaminį pirko, arba į vietos valdžios institucijas. Verslo vartotojai turėtų kreiptis<br />
į savo tiekėją ir peržiūrėti pirkimo sutarties sąlygas. Tvarkant atliekas, šio gaminio ir jo elektroninių priedų negalima maišyti su kitomis<br />
pramoninėmis atliekomis.<br />
[Lietuvių kalba]<br />
Õige viis toote kasutuselt kõrvaldamiseks (elektriliste ja elektrooniliste seadmete jäätmed)<br />
Selline tähistus tootel või selle tarvikutel või dokumenti<strong>de</strong>l näitab, et too<strong>de</strong>t ega selle elektroonilisi tarvikuid (nt laadija, peakomplekt, USBkaabel)<br />
ei tohi kasutusaja lõppemisel kõrvaldada koos muu<strong>de</strong> olmejäätmetega. Selleks et vältida jäätmete kontrollimatu kõrvaldamisega<br />
seotud võimaliku kahju tekitamist keskkonnale või inimeste tervisele ning e<strong>de</strong>ndada materiaalsete vahendite säästvat taaskasutust,<br />
eraldage need esemed muu<strong>de</strong>st jäätmetest ja suunake need vastutustundlikult taasringlusse. Kodukasutajad saavad teavet nen<strong>de</strong> esemete<br />
keskkonnaohutu ringlussevõtu kohta kas toote müüjalt või keskkonnaametist. Firmad peaksid võtma ühendust tarnijaga ning kontrollima<br />
ostulepingu tingimusi ja sätteid. Too<strong>de</strong>t ega selle elektroonilisi tarvikuid ei tohi panna muu<strong>de</strong> hävitamiseks mõeldud kaubandusjäätmete<br />
hulka.<br />
[Eesti]
Correct disposal of batteries in this product<br />
(Applicable in the European Union and other European countries with separate battery return systems.)<br />
This marking on the battery, manual or packaging indicates that the batteries in this product should not be disposed of with other household<br />
waste at the end of their working life. Where marked, the chemical symbols Hg, Cd or Pb indicate that the battery contains mercury, cadmium<br />
or lead above the reference levels in EC Directive 2006/66. If batteries are not properly disposed of, these substances can cause harm to<br />
human health or the environment. To protect natural resources and to promote material reuse, please separate batteries from other types of<br />
waste and recycle them through your local, free battery return system.<br />
[English]<br />
Elimination <strong>de</strong>s batteries <strong>de</strong> ce produit<br />
(Applicable aux pays <strong>de</strong> l’Union européenne et aux autres pays européens dans lesquels <strong>de</strong>s systèmes <strong>de</strong> collecte sélective sont mis en<br />
place.)<br />
Le symbole sur la batterie, le manuel ou l’emballage indique que les batteries <strong>de</strong> ce produit ne doivent pas être éliminées en fin <strong>de</strong> vie avec<br />
les autres déchets ménagers. L’indication éventuelle <strong>de</strong>s symboles chimiques Hg, Cd ou Pb signifie que la batterie contient <strong>de</strong>s quantités <strong>de</strong><br />
mercure, <strong>de</strong> cadmium ou <strong>de</strong> plomb supérieures aux niveaux <strong>de</strong> référence stipulés dans la directive CE 2006/66. Si les batteries ne sont pas<br />
correctement éliminées, ces substances peuvent porter préjudice à la santé humaine ou à l’environnement. Afin <strong>de</strong> protéger les ressources<br />
naturelles et d’encourager la réutilisation du matériel, veillez à séparer les batteries <strong>de</strong>s autres types <strong>de</strong> déchets et à les recycler via votre<br />
système local <strong>de</strong> collecte gratuite <strong>de</strong>s batteries.<br />
[Franç<strong>ais</strong>]<br />
Korrekte Entsorgung <strong>de</strong>r Batterien dieses Produkts<br />
(In <strong>de</strong>n Län<strong>de</strong>rn <strong>de</strong>r Europäischen Union und an<strong>de</strong>ren europäischen Län<strong>de</strong>rn mit einem separaten Altbatterie-Rücknahmesystem)<br />
Die Kennzeichnung auf <strong>de</strong>r Batterie bzw. auf <strong>de</strong>r dazugehörigen Dokumentation o<strong>de</strong>r Verpackung gibt an, dass die Batterie zu diesem<br />
Produkt nach seiner Lebensdauer nicht zusammen mit <strong>de</strong>m normalen Haushaltsmüll entsorgt wer<strong>de</strong>n darf. Wenn die Batterie mit <strong>de</strong>n<br />
chemischen Symbolen Hg, Cd o<strong>de</strong>r Pb gekennzeichnet ist, liegt <strong>de</strong>r Quecksilber-, Cadmium- o<strong>de</strong>r Blei-Gehalt <strong>de</strong>r Batterie über <strong>de</strong>n in <strong>de</strong>r<br />
EG-Richtlinie 2006/66 festgelegten Referenzwerten. Wenn Batterien nicht ordnungsgemäß entsorgt wer<strong>de</strong>n, können sie <strong>de</strong>r menschlichen<br />
Gesundheit bzw. <strong>de</strong>r Umwelt scha<strong>de</strong>n. Bitte helfen Sie, die natürlichen Ressourcen zu schützen und die nachhaltige Wie<strong>de</strong>rverwertung<br />
von stofflichen Ressourcen zu för<strong>de</strong>rn, in<strong>de</strong>m Sie die Batterien von an<strong>de</strong>ren Abfällen getrennt über Ihr örtliches kostenloses Altbatterie-<br />
Rücknahmesystem entsorgen.<br />
[Deutsch]<br />
Correcte behan<strong>de</strong>ling van een gebruikte accu uit dit product<br />
(Van toepassing op <strong>de</strong> Europese Unie en an<strong>de</strong>re Europese lan<strong>de</strong>n met afzon<strong>de</strong>rlijke inzamelingssystemen voor accu’s en batterijen.)<br />
Dit merkteken op <strong>de</strong> accu, handleiding of verpakking geeft aan dat <strong>de</strong> accu in dit product aan het ein<strong>de</strong> van <strong>de</strong> levensduur niet samen met<br />
an<strong>de</strong>r huishou<strong>de</strong>lijk afval mag wor<strong>de</strong>n weggegooid. De chemische symbolen Hg, Cd of Pb geven aan dat het kwik-, cadmium- of loodgehalte<br />
in <strong>de</strong> accu hoger is dan <strong>de</strong> referentieniveaus in <strong>de</strong> Richtlijn 2006/66/EC. Indien <strong>de</strong> gebruikte accu niet op <strong>de</strong> juiste wijze wordt behan<strong>de</strong>ld,<br />
kunnen <strong>de</strong>ze stoffen scha<strong>de</strong>lijk zijn voor <strong>de</strong> gezondheid van mensen of het milieu. Ter bescherming van <strong>de</strong> natuurlijke hulpbronnen en ter<br />
bevor<strong>de</strong>ring van het hergebruik van materialen, verzoeken wij u afgedankte accu’s en batterijen te schei<strong>de</strong>n van an<strong>de</strong>re soorten afval en<br />
voor recycling aan te bie<strong>de</strong>n bij het gratis inzamelingssysteem voor accu’s en batterijen in uw omgeving.<br />
[Ne<strong>de</strong>rlands]<br />
Corretto smaltimento <strong>de</strong>lle batterie <strong>de</strong>l prodotto<br />
(Applicabile nei paesi <strong>de</strong>ll’Unione Europea e in altri paesi europei con sistemi di conferimento differenziato <strong>de</strong>lle batterie.)<br />
Il marchio riportato sulla batteria o sulla sua documentazione o confezione indica che le batterie di questo prodotto non <strong>de</strong>vono essere<br />
smaltite con altri rifiuti domestici al termine <strong>de</strong>l ciclo di vita. Dove raffigurati, i simboli chimici Hg, Cd o Pb indicano che la batteria contiene<br />
mercurio, cadmio o piombo in quantità superiori ai livelli di riferimento <strong>de</strong>lla direttiva UE 2006/66. Se le batterie non vengono smaltite<br />
correttamente, queste sostanze possono causare danni alla salute umana o all’ambiente. Per proteggere le risorse naturali e favorire il<br />
riutilizzo <strong>de</strong>i materiali, separare le batterie dagli altri tipi di rifiuti e riciclarle utilizzando il sistema di conferimento gratuito previsto nella propria<br />
area di resi<strong>de</strong>nza.<br />
[Italiano]<br />
Eliminación correcta <strong>de</strong> las baterías <strong>de</strong> este producto<br />
(Aplicable en la Unión Europea y en otros países europeos con sistemas <strong>de</strong> recogida selectiva <strong>de</strong> baterías.)<br />
La presencia <strong>de</strong> esta marca en las baterías, el manual o el paquete <strong>de</strong>l producto indica que cuando haya finalizado la vida útil <strong>de</strong> las<br />
baterías no <strong>de</strong>berán eliminarse junto con otros residuos domésticos. Los símbolos químicos Hg, Cd o Pb, si aparecen, indican que la batería<br />
contiene mercurio, cadmio o plomo en niveles superiores a los valores <strong>de</strong> referencia admitidos por la Directiva 2006/66 <strong>de</strong> la Unión Europea.<br />
Si las baterías no se <strong>de</strong>sechan convenientemente, estas sustancias podrían provocar lesiones personales o dañar el medioambiente. Para<br />
proteger los recursos naturales y promover el reciclaje, separe las baterías <strong>de</strong> los <strong>de</strong>más residuos y recíclelas mediante el sistema <strong>de</strong><br />
recogida gratuito <strong>de</strong> su localidad.<br />
[Español]<br />
Eliminação correcta das baterias existentes neste produto<br />
(Aplicável na União Europeia e noutros países europeus com sistemas <strong>de</strong> recolha <strong>de</strong> baterias separados.)<br />
Esta marca, apresentada na bateria, manual ou embalagem, indica que as baterias existentes neste produto não <strong>de</strong>vem ser eliminadas<br />
juntamente com os resíduos domésticos indiferenciados no final do seu período <strong>de</strong> vida útil. On<strong>de</strong> existentes, os símbolos químicos Hg, Cd<br />
ou Pb indicam que a bateria contém mercúrio, cádmio ou chumbo acima dos níveis <strong>de</strong> referência indicados na Directiva CE 2006/66. Se as<br />
baterias não forem correctamente eliminadas, estas substâncias po<strong>de</strong>rão ser prejudici<strong>ais</strong> para a saú<strong>de</strong> humana ou para o meio ambiente.<br />
Para proteger os recursos natur<strong>ais</strong> e promover a reutilização dos materi<strong>ais</strong>, separe as baterias dos outros tipos <strong>de</strong> resíduos e recicle-as<br />
através do sistema gratuito <strong>de</strong> recolha local <strong>de</strong> baterias.<br />
[Português]<br />
Ustrezno odstranjevanje baterij v tem iz<strong>de</strong>lku<br />
(Uporabno v EU in ostalih evropskih državah s sistemi ločenega odstranjevanja baterij)<br />
Ta oznaka na bateriji, v navodilih ali na embalaži pomeni, da baterij ob izteku njihove življenjske dobe v tem iz<strong>de</strong>lku ne smete odstraniti<br />
skupaj z ostalimi gospodinjskimi odpadki. Oznake za kemijske elemente Hg, Cd ali Pb pomenijo, da baterija vsebuje živo srebro, kadmij ali<br />
svinec v količinah, ki presegajo referenčne nivoje v direktivi EC 2006/66. Če te baterije niso ustrezno odstranjene, te snovi lahko škodujejo<br />
zdravju ljudi oziroma okolju. Za zaščito naravnih virov in za vzpodbujanje ponovne uporabe materialov prosimo, ločite te baterije od ostalih<br />
odpadkov in jih oddajte na predvi<strong>de</strong>nih lokalnih zbirnih reciklažnih mestih.<br />
[Slovenščina]<br />
Korrekt avfallshantering av batterierna i <strong>de</strong>nna produkt<br />
(Gäller EU och andra europeiska län<strong>de</strong>r med särskild batteriåtervinning.) Denna markering på batteriet, i manualen eller på förpackningen<br />
anger att batterierna i <strong>de</strong>nna produkt inte bör slängas tillsammans med annat hushållsavfall. De kemiska symbolerna Hg, Cd eller Pb<br />
visar i förekomman<strong>de</strong> fall att batterierna innehåller kvicksilver, kadmium eller bly i mäng<strong>de</strong>r överstigan<strong>de</strong> <strong>de</strong> gränsvär<strong>de</strong>n som anges i<br />
EU-direktivet 2006/66. Om batterierna inte slängs på ett ansvarsfullt sätt kan <strong>de</strong>ssa substanser utgöra en fara för hälsa eller miljö. Hjälp till<br />
att skydda naturresurser och bidra till materialåtervinning genom att sortera batterierna separat från annat avfall och lämna in <strong>de</strong>m på en<br />
återvinningsstation.<br />
[Svenska]
KKorrekt bortskaffelse af batterierne i <strong>de</strong>tte produkt<br />
(Gæl<strong>de</strong>r i EU og andre europæiske lan<strong>de</strong> med særlige retursystemer for batterier).<br />
Mærket på <strong>de</strong>tte batteri, dokumentationen eller emballagen bety<strong>de</strong>r, at batterierne i <strong>de</strong>tte produkt efter endt levetid ikke må bortskaffes<br />
sammen med an<strong>de</strong>t husholdningsaffald. Mærkning med <strong>de</strong> kemiske symboler Hg, Cd eller Pb bety<strong>de</strong>r, at batteriet in<strong>de</strong>hol<strong>de</strong>r kviksølv,<br />
cadmium eller bly over grænseværdierne i EU-direktiv 2006/66. Hvis batterierne ikke bortskaffes korrekt, kan disse stoffer være ska<strong>de</strong>lige<br />
for menneskers helbred eller for miljøet. For at beskytte naturens ressourcer og fremme genbrug, skal batterier hol<strong>de</strong>s adskilt fra andre typer<br />
affald og genanven<strong>de</strong>s via dit lokale, gratis batteriretursystem.<br />
[Dansk]<br />
Korrekt avhending av batterier i <strong>de</strong>tte produkt<br />
(Kommer til anven<strong>de</strong>lse i Den europeiske union og i andre europeiske land med separate systemer for retur av batterier.)<br />
Denne merkingen på batteriet, håndboken eller emballasjen angir at batteriene i <strong>de</strong>tte produktet ikke skal kastes sammen med annet<br />
husholdningsavfall ved slutten av sin levetid. Der <strong>de</strong>t er merket, angir <strong>de</strong> kjemiske symbolene Hg, Cd eller Pb at batteriet innehol<strong>de</strong>r<br />
kvikksølv, kadmium eller bly over referansenivåene i EF-direktiv 2006/66. Hvis batteriene ikke avhen<strong>de</strong>s på riktig måte, kan disse stoffene<br />
ska<strong>de</strong> menneskers helse eller miljøet. For å beskytte naturressurser og for å fremme gjenbruk av materialer, ber vi <strong>de</strong>g adskille batterier fra<br />
andre typer avfall og resirkulere <strong>de</strong>m ved å levere <strong>de</strong>m på din lokale, gratis mottaksstasjon.<br />
[Norsk]<br />
Tuotteen paristojen oikea hävittäminen<br />
(Koskee Euroopan Unionia ja muita Euroopan maita, joissa on erillinen paristojen palautusjärjestelmä.)<br />
Pariston, käyttöoppaan tai pakkauksen tämä merkintä tarkoittaa, että tämän tuotteen sisältämiä paristoja ei saa hävittää muun<br />
kotitalousjätteen seassa, kun nii<strong>de</strong>n käyttöikä on päättynyt. Kemiallinen symboli Hg, Cd tai Pb ilm<strong>ais</strong>ee, että paristo sisältää elohopeaa,<br />
kadmiumia tai lyijyä ylin EU: n direktiivien 2006/66 viiterajojen. Jos paristoja ei hävitetä oikein, nämä aineet voivat vahingoittaa ihmisten<br />
terveyttä tai ympäristöä. Suojaa luonnonvaroja ja edistä materiaalien uusiokäyttöä - erottele paristot muusta jätteestä ja toimita ne<br />
kierrätettäväksi paikalliseen maksuttomaan paristojen palautusjärjestelmään.<br />
[Suomi]<br />
A termékhez tartozó akkumulátorok megfelelő ártalmatlanítása<br />
(Az Európai Unió területén és más, önálló akkumulátorleadó rendszerrel ren<strong>de</strong>lkező európai országok területén alkalmazandó.)<br />
Az akkumulátoron, a kézikönyvön vagy a csomagoláson szereplő jelzés arra utal, hogy hasznos élettartama végén a terméket nem<br />
szabad egyéb háztartási hulladékkal együtt kidobni. Ahol szerepel a jelzés, a Hg, Cd vagy Pb kémiai elemjelölések arra utalnak, hogy<br />
az akkumulátor az EK 2006/66. számú irányelvben rögzített referenciaszintet meghaladó mennyiségű higanyt, kadmiumot vagy ólmot<br />
tartalmaz. Az akkumulátorok nem megfelelő kezelése esetén ezek az anyagok veszélyt jelenthetnek az egészségre vagy a környezetre.<br />
A természeti erőforrások megóvása és az anyagok újrafelhasználásának ösztönzése ér<strong>de</strong>kében kérjük, különítse el az akkumulátorokat a<br />
többi hulladéktól és vigye vissza a helyi, ingyenes akkumulátorleadó helyre.<br />
[Magyar]<br />
Sposób poprawnego usuwania baterii, w które wyposażony jest niniejszy produkt<br />
(Dotyczy obszaru Unii Europejskiej oraz innych krajów europejskich posiadających oddzielne systemy zwrotu zużytych baterii.)<br />
Niniejsze oznaczenie na baterii, instrukcji obsługi lub opakowaniu oznacza, że po upływie okresu użytkowania baterie, w które wyposażony<br />
był dany produkt, nie mogą zostać usunięte wraz z innymi odpadami pochodzącymi z gospodarstw domowych. Przy zastosowaniu takiego<br />
oznaczenia symbole chemiczne (Hg, Cd lub Pb) wskazują, że dana bateria zawiera rtęć, kadm lub ołów w ilości przewyższającej poziomy<br />
odniesienia opisane w dyrektywie WE 2006/66. Jeśli baterie nie zostaną poprawnie zutylizowane, substancje te mogą powodować<br />
zagrożenie dla zdrowia ludzkiego lub środowiska naturalnego. Aby chronić zasoby naturalne i promować ponowne wykorzystanie<br />
materiałów, należy oddzielać baterie od innego typu odpadów i poddawać je utylizacji poprzez lokalny, bezpłatny system zwrotu baterii.<br />
[Polski]<br />
Σωστή απόρριψη των μπαταριών αυτού του προϊόντος<br />
(Ισχύει στην Ευρωπαϊκή Ένωση και άλλες ευρωπαϊκές χώρες με συστήματα ξεχωριστής ανακύκλωσης μπαταριών.)<br />
Αυτή η επισήμανση πάνω στη μπαταρία, το εγχειρίδιο ή τη συσκευασία υποδεικνύει ότι οι μπαταρίες αυτού του προϊόντος δεν πρέπει να<br />
απορρίπτονται μαζί με άλλα οικιακά απορρίμματα στο τέλος του κύκλου ζωής τους. Όπου υπάρχουν, τα χημικά σύμβολα Hg, Cd ή Pb<br />
υποδεικνύουν ότι η μπαταρία περιέχει υδράργυρο, κάδμιο ή μόλυβδο πάνω από τα επίπεδα αναφοράς της Ευρωπαϊκής Οδηγίας 2006/66.<br />
Αν οι μπαταρίες δεν απορριφθούν σωστά, αυτές οι ουσίες ενδέχεται να προκαλέσουν βλαβερές συνέπειες στην ανθρώπινη υγεία ή το<br />
περιβάλλον. Παρακαλούμε διαχωρίζετε τις μπαταρίες από άλλους τύπους απορριμμάτων και ανακυκλώνετέ τις μέσω του τοπικού σας,<br />
δωρεάν συστήματος ανακύκλωσης μπαταριών, για την προστασία των φυσικών πόρων και την προώθηση της επαναχρησιμοποίησης<br />
υλικών.<br />
[Ελληνικά]<br />
Правилно изхвърляне на батериите в този продукт<br />
(Приложимо в Европейския съюз и други европейски държави със самостоятелни системи за връщане на батерии.)<br />
Това обозначение върху батерията, ръководството или опаковката, показва, че батериите в този продукт не бива да се изхвърлят<br />
с другите битови отпадъци в края на техния полезен живот. Където са маркирани, химическите символи Hg, Cd или Pb показват,<br />
че батерията съдържа живак, кадмий или олово над контролните нива в Директива 2006/66 на ЕО. Ако батериите не се изхвърлят<br />
правилно, тези вещества могат да предизвикат увреждане на човешкото здраве или на околната среда. За да предпазите<br />
природните ресурси и за да съдействате за многократната употреба на материалните ресурси, моля отделяйте батериите от<br />
другите видове отпадъчни продукти и ги рециклирайте посредством Вашата локална система за безплатно връщане на батерии.<br />
[Български]
Správná likvidace baterií v tomto výrobku<br />
(Platí v Evropské unii a dalších evropských zemích s vlastními systémy zpětného odběru baterií.)<br />
Tato značka na baterii, návodu nebo obalu znamená, že baterie v tomto výrobku nesmí být na konci své životnosti likvidovány společně s<br />
jiným domovním odpa<strong>de</strong>m. Případně vyznačené symboly chemikálií Hg, Cd nebo Pb upozorňují na to, že baterie obsahuje rtuť, kadmium<br />
nebo olovo v množství překračujícím referenční úrovně stanovené směrnicí ES 2006/66. Pokud baterie nejsou správně zlikvidovány, mohou<br />
tyto látky poškodit zdraví osob nebo životní prostředí. Pro ochranu přírodních zdrojů a pro podporu opakovaného využívání materiálů<br />
oddělte, prosím, baterie od ostatních typů odpadu a nechte je recyklovat prostřednictvím místního bezplatného systému zpětného odběru<br />
baterií.<br />
[Čeština]<br />
Správna likvidácia batérií v tomto výrobku<br />
(Aplikovateľné v krajinách Európskej únie a v ostatných európskych krajinách, v ktorých existujú systémy separovaného zberu batérií.)<br />
Toto označenie na batérii, príručke alebo balení hovorí, že batérie v tomto výrobku by sa po skončení ich životnosti nemali likvidovať spolu<br />
s ostatným domovým odpadom. V prípa<strong>de</strong> takéhoto označenia chemické symboly Hg, Cd alebo Pb znamenajú, že batéria obsahuje ortuť,<br />
kadmium alebo olovo v množstve presahujúcom referenčné hodnoty smernice 2006/66/ES. Pri nevhodnej likvidácii batérií môžu tieto látky<br />
poškodiť zdravie alebo životné prostredie. Za účelom ochrany prírodných zdrojov a podpory opätovného použitia materiálu batérie likvidujte<br />
od<strong>de</strong>lene od iných typov odpadou a recyklujte ich prostredníctvom miestneho systému bezplatného zberu batérií.<br />
[Slovensky]<br />
Dispoziţii privind eliminarea corectă a bateriilor acestui produs<br />
(aplicabile în Uniunea Europeană şi în alte ţări europene cu sisteme separate <strong>de</strong> colectare a bateriilor)<br />
Acest marcaj <strong>de</strong> pe baterie, <strong>de</strong> pe manualul <strong>de</strong> utilizare sau <strong>de</strong> pe ambalaj indică faptul că bateriile acestui produs nu trebuie eliminate<br />
împreună cu alte <strong>de</strong>şeuri menajere la sfârşitul ciclului lor <strong>de</strong> viaţă. Dacă sunt marcate, simbolurile chimice Hg, Cd sau Pb indică faptul că<br />
bateria conţine mercur, cadmiu sau plumb peste nivelurile <strong>de</strong> referinţă prevăzute în Directiva CE 2006/66. În cazul în care bateriile nu sunt<br />
eliminate corespunzător, aceste substanţe pot fi dăunătoare pentru sănătatea omului sau pentru mediu. În ve<strong>de</strong>rea protejării resurselor<br />
naturale şi a promovării refolosirii materialelor, vă rugăm să separaţi bateriile <strong>de</strong> celelalte tipuri <strong>de</strong> <strong>de</strong>şeuri şi să le reciclaţi prin intermediul<br />
sistemului gratuit <strong>de</strong> returnare a bateriilor la nivel local.<br />
[Română]<br />
Šī izstrādājuma bateriju pareiza utilizācija<br />
(Piemērojama Eiropas Savienībā un citās Eiropas valstīs ar atsevišķām bateriju nodošanas sistēmām.)<br />
Šis marķējums uz baterijas, rokasgrāmatā vai uz iepakojuma norāda, ka šī izstrādājuma bateriju pēc tās kalpošanas laika beigām nedrīkst<br />
izmest ar citiem sadzīves atkritumiem. Ja uz baterijas ir atzīmēti ķīmiskie simboli, piem., Hg, Cd vai Pb, tie norāda, ka baterija satur<br />
dzīvsudrabu, kadmiju vai svinu, kura saturs ir lielāks par EK Direktīvā 2006/66 minētajiem lielumiem. Ja baterijas tiek nepareizi likvidētas, šīs<br />
vielas var radīt kaitējumu cilvēku veselībai vai vi<strong>de</strong>i. Lai aizsargātu dabas resursus un veicinātu materiālu otrreizēju izmantošanu, šķirojiet<br />
baterijas atsevišķi no citiem atkritumu veidiem un nododiet tās otrreizējai pārstrā<strong>de</strong>i, izmantojot bateriju vietējo bezmaksas nodošanas<br />
sistēmu.<br />
[Latviešu]<br />
Tinkamas šio produkto akumuliatorių tvarkymas<br />
(Taikoma Europos Sąjungoje ir kitose Europos šalyse, kuriose galioja atskiros akumuliatorių grąžinimo sistemos.)<br />
Šis ženklas yra pateikiamas ant akumuliatoriaus, jo dokumentacijoje ar ant pakuotės nurodo, kad šio produkto akumuliatorių, pasibaigus<br />
jų tarnavimo laikui, negalima išmesti kartu su kitomis buitinėmis atliekomis. Cheminiai simboliai Hg, Cd arba Pb rodo, kad akumuliatoriuje<br />
yra gyvsidabrio, kadmio ar švino, kurio kiekis viršija normą, nurodytą ES direktyvoje 2006/66. Jei akumuliatoriai nebus tinkamai išmesti,<br />
šios medžiagos gali sukelti žalos žmonių sveikatai ar aplinkai. Tam, kad būtų apsaugoti gamtos ištekliai ir skatinamas antrinių žaliavų<br />
panaudojimas, pašome atskirti akumuliatorių nuo kitų rūšių atliekų ir atiduoti perdirbti vietinėje akumuliatorių grąžinimo sistemai.<br />
[Lietuvių kalba]<br />
Őige viis toote aku<strong>de</strong> kasutusest kőrvaldamiseks<br />
(Rakendatav Euroopa Liidus ja teistes Euroopa riiki<strong>de</strong>s, kus on kasutusel spetsiaalsed aku<strong>de</strong> kogumissüsteemid).<br />
Selline tähistus akul, dokumenti<strong>de</strong>l vői pakendil näitab, et toote akusid ei tohi kasutusaja lőppemisel kőrvaldada koos muu<strong>de</strong><br />
olmejäätmetega. Keemilised elemendid Hg, Cd, vői Pb näitavad, et aku elavhőbeda, kaadmiumi vői plii sisaldus on EÜ direktiivi 2006/66<br />
sihttasemest suurem. Kui akusid ei kőrvaldata őigel viisil, vőib nen<strong>de</strong> sisu pőhjustada tervise-vői keskkonnakahjustusi. Selleks, et kaitsta<br />
loodusvarasid ja e<strong>de</strong>ndada materjali<strong>de</strong> taaskasutamist, eraldage akud muu<strong>de</strong>st jäätmetest ja suunake need taaskasutusse kohaliku, tasuta<br />
teenusena pakutava aku<strong>de</strong> tagastussüsteemi abil.<br />
[Eesti]


