

BlackandDecker Detecteur De Fuite Thermique- Tld100 - Type 1 - Instruction Manual (Anglaise)
BlackandDecker Detecteur De Fuite Thermique- Tld100 - Type 1 - Instruction Manual (Anglaise)
BlackandDecker Detecteur De Fuite Thermique- Tld100 - Type 1 - Instruction Manual (Anglaise)

Create successful ePaper yourself
Turn your PDF publications into a flip-book with our unique Google optimized e-Paper software.
TLD100
A<br />
B<br />
C<br />
D<br />
E<br />
2
(Original instructions)<br />
ENGLISH<br />
Intended use<br />
Your Black & <strong>De</strong>cker Thermal Leak <strong>De</strong>tector has been<br />
designed to easily detect energy leaks in your home. This<br />
product is intended for consumer use only.<br />
Safety instructions<br />
General power tool safety warnings<br />
@<br />
Warning! When using battery-powered<br />
appliances, basic safety precautions, including<br />
the following, should always be followed to<br />
reduce the risk of fire, leaking batteries, personal<br />
injury and material damage.<br />
u Read all of this manual carefully before using the<br />
appliance.<br />
u The intended use is described in this manual. The use of<br />
any accessory or attachment or the performance of any<br />
operation with this appliance other than those<br />
recommended in this instruction manual may present a<br />
risk of personal injury.<br />
u Retain this manual for future reference.<br />
Using your appliance<br />
Always take care when using the appliance.<br />
u Do not immerse the appliance in water.<br />
u Do not open body casing. There are no user-serviceable<br />
parts inside.<br />
u Do not operate the appliance in explosive atmospheres,<br />
such as in the presence of flammable liquids, gases or<br />
dust.<br />
u Never look directly into the light or shine the light into<br />
another persons eyes.<br />
Safety of others<br />
u This appliance is not intended for use by persons<br />
(including children) with reduced physical, sensory or<br />
mental capabilities, or lack of experience and knowledge,<br />
unless they have been given supervision or instruction<br />
concerning use of the appliance by a person responsible<br />
for their safety.<br />
u Children should be supervised to ensure that they do not<br />
play with the appliance.<br />
After use<br />
u When not in use, the appliance should be stored in a dry,<br />
well ventilated place out of the reach of children.<br />
u Children should not have access to stored appliances.<br />
u When the appliance is stored or transported in a vehicle it<br />
should be placed in the boot or restrained to prevent<br />
movement following sudden changes in speed or<br />
direction.<br />
u The appliance should be protected from direct sunlight,<br />
heat and moisture.<br />
Inspection and repairs<br />
u Before use, check the appliance for damaged or defective<br />
parts. Check for breakage of parts, damage to switches<br />
and any other conditions that may affect its operation.<br />
u Do not use the appliance if any part is damaged or<br />
defective.<br />
u Have any damaged or defective parts repaired or replaced<br />
by an authorised repair agent.<br />
u Never attempt to remove or replace any parts other than<br />
those specified in this manual.<br />
Additional safety warnings<br />
u If liquid crystal comes in contact with your skin: Wash<br />
area off completely with plenty of water. Remove<br />
contaminated clothing.<br />
u If liquid crystal gets into your eye: Flush the affected<br />
eye with clean water and then seek medical attention.<br />
u If liquid crystal is swallowed: Flush your mouth<br />
thoroughly with water then seek medical attention.<br />
Additional safety instructions for non-rechargeable<br />
batteries<br />
@<br />
Warning! Batteries can explode, or leak, and<br />
can cause injury or fire, to reduce this risk:<br />
u Make sure that the on/off switch is in the off position<br />
before inserting the battery(s). Inserting batteries into<br />
power tools and appliances that have the switch on invites<br />
accidents.<br />
u Under abusive conditions, liquid may be ejected from<br />
the battery, avoid contact. If contact accidentally occurs,<br />
flush with water. If liquid contacts eyes, additionally seek<br />
medical help. Liquid ejected from the battery may cause<br />
irritation or burns.<br />
u Carefully follow all instructions and warnings on the<br />
battery label and package.<br />
u Always insert batteries correctly with regard to polarity (+<br />
and -), marked on the battery and the equipment.<br />
u Do not short battery terminals.<br />
u Do not charge batteries.<br />
u Do not mix old and new batteries. Replace all of them at<br />
the same time with new batteries of the same brand and<br />
type<br />
u Keep batteries out of the reach of children.<br />
u Remove batteries if the device will not be used for several<br />
months.<br />
u Never attempt to open for any reason.<br />
u Do not store in locations where the temperature may<br />
exceed 40 °C.<br />
3
ENGLISH<br />
(Original instructions)<br />
u When disposing of batteries, follow the instructions given<br />
in the section “Protecting the environment”.<br />
u Do not incinerate the batteries.<br />
u Do not expose the batteries to water.<br />
Warning Symbols<br />
The following symbols are found on the tool:<br />
;<br />
Warning! To reduce the risk of injury, the user<br />
must read the instruction amnual.<br />
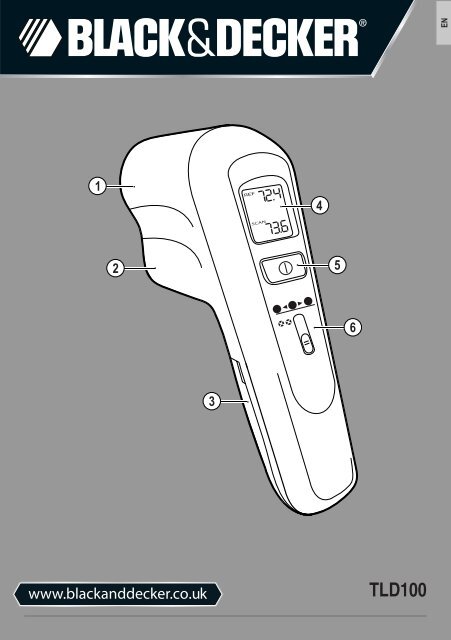
Features<br />
This tool includes some or all of the following features.<br />
1. LED spot projector<br />
2. Infrared sensor<br />
3. Battery Compartment<br />
4. LCD screen<br />
5. ON/OFF button<br />
6. Threshold setting<br />
Fig. A<br />
LCD Display.<br />
7. Reference temperature<br />
Shows the temperature of the area where the instrument<br />
was initially pointed when you turned on the power. To<br />
reset the reference, turn the power off, aim at a new<br />
reference spot, and turn the power back on.<br />
8. Scan temperature<br />
Shows the average temperature across the area you're<br />
aiming at.<br />
Note: The Thermal Leak <strong>De</strong>tector compares these two<br />
temperatures. When the difference exceeds the threshold<br />
you've set, the projected LED spot will change to red or blue.<br />
Assembly<br />
Warning! Use 9V size (6LR61) alkaline batteries only.<br />
Installing the battery (fig. B)<br />
u Open the battery compartment cover (3) by pressing the<br />
tabs of the cover in towards the center and pulling the<br />
cover out.<br />
u Insert one 9V (6LR61) alkaline battery.<br />
Note: Always insert batteries correctly with regard to polarity<br />
(+ and –), marked on the battery and the equipment.<br />
Note: Remove dead batteries immediately.<br />
Changing the temperature display (fig. B)<br />
u Open the battery compartment cover (3) by pressing the<br />
tabs of the cover in towards the center and pulling the<br />
cover out.<br />
u Slide the temperature selection switch to the desired<br />
position.<br />
Note: Will set your thermal leak detector to the<br />
Fahrenheit scale.<br />
Note: Will set your thermal leak detector to the<br />
Centigrade scale.<br />
Use<br />
Switching On and Off<br />
u Press the ON/OFF button to turn the unit on.<br />
u Press the ON/OFF button to turn the unit off.<br />
Note: The unit will automatically turn off after 10 minutes.<br />
Setting the threshold for colour change (fig. C)<br />
u For detecting small temperature changes of 1º F (0.5º C),<br />
move the slider to the 1º mark (9) on the back of the<br />
detector.<br />
u For detecting medium temperature changes of 5º F (3º C),<br />
move the slider to the 5º mark (10) on the back of the<br />
detector.<br />
u For detecting large temperature changes of more than 10º<br />
F (5.5º C), move the slider to the 10º (11) mark on the<br />
back of the detector.<br />
u If you do not want the LED spot to change color, move the<br />
slider to the top position (12) where the color spots are<br />
X-ed out.<br />
Note: You can change the threshold setting while you are<br />
scanning. If the color is changing erratically, try increasing the<br />
threshold. If you see a temperature difference on the screen,<br />
but the light is not changing color, try reducing the threshold.<br />
Using the thermal leak detector (fig. D)<br />
u Hold the unit as shown. Aim near the location you want to<br />
scan for a draft or thermal leak. This initial aim point will<br />
be your reference target.<br />
u Turn on the power.<br />
u Keep the unit aimed at the reference target until the green<br />
light shines on the target and a Reference Temperature<br />
appears on the screen.<br />
u Slowly scan the Thermal Leak <strong>De</strong>tector across the area of<br />
interest. If the scanned temperature is hotter than the<br />
reference temperature by more than the threshold, the<br />
light will turn from green to red. If the scanned temperature<br />
is colder than the reference temperature by more than the<br />
threshold, the light will turn from green to blue.<br />
4
(Original instructions)<br />
ENGLISH<br />
Examples of Use:<br />
u Scan around a light fixture to determine if ceiling insulation<br />
was removed during installation.<br />
u Scan along window and door sills to see where to add<br />
weather-stripping.<br />
u Scan where a wall and the floor meet to find drafts that<br />
should be caulked.<br />
u Scan an attic door to see if you need to add insulation.<br />
Note: Shiny or polished surfaces can give inaccurate<br />
readings. To compensate for this, cover the surface with<br />
masking tape or flat colored paint. When the tape or paint<br />
reaches the same temperature as the target underneath,<br />
measure the temperature of the item.<br />
Note: The thermometer cannot measure through transparent<br />
surfaces such as glass or plastic. It will measure the surface<br />
temperature instead.<br />
Note: Steam, dust, smoke, and other optical obstructions can<br />
prevent accurate measurement. Hold the thermometer back<br />
and at an angle for an accurate measurement.<br />
Field of View (fig. E)<br />
The Thermal Leak <strong>De</strong>tector measures temperature over an<br />
area that may be larger than the LED spot, especially if you<br />
are far away from the surface you are measuring. The<br />
diameter of the measured area is 1/6 the distance from the<br />
<strong>De</strong>tector. In other words, if you are 6 inches (152 mm) from<br />
the target, the <strong>De</strong>tector will measure the average temperature<br />
over a circle 1 inch (25mm) in diameter. As shown in the table<br />
below, the farther the distance from the target, the larger the<br />
measured area.<br />
Position (fig. E) 13 14 15 16<br />
Distance to target (mm) 152 305 457 610<br />
Diameter of measurement<br />
area (mm)<br />
25 51 76 102<br />
If you are just looking for hot and cold areas, it's OK if the<br />
scanned area is larger than your target. However, if you want<br />
to accurately measure the temperature of an object, move the<br />
<strong>De</strong>tector close so that the scanned area is about half the size<br />
of the object you want to measure.<br />
Maintenance<br />
Your Black & <strong>De</strong>cker corded/cordless appliance/tool has been<br />
designed to operate over a long period of time with a minimum<br />
of maintenance. Continuous satisfactory operation depends<br />
upon proper appliance/tool care and regular cleaning.<br />
Warning! Before performing any maintenance on corded/<br />
cordless appliance/tool:<br />
u Switch off and remove the battery from the appliance.<br />
u Regularly clean the appliance using a soft cloth. For<br />
stubborn marks the cloth may be made damp using mild<br />
soapy water.<br />
u Do not use abrasive cleaners.<br />
Protecting the environment<br />
Separate collection. This product must not be<br />
disposed of with normal household waste.<br />
Z<br />
Should you find one day that your Black & <strong>De</strong>cker product<br />
needs replacement, or if it is of no further use to you, do not<br />
dispose of it with household waste. Make this product<br />
available for separate collection.<br />
z<br />
Separate collection of used products and<br />
packaging allows materials to be recycled and<br />
used again.<br />
Re-use of recycled materials helps prevent<br />
environmental pollution and reduces the demand<br />
for raw materials.<br />
Local regulations may provide for separate collection of<br />
electrical products from the household, at municipal waste<br />
sites or by the retailer when you purchase a new product.<br />
Black & <strong>De</strong>cker provides a facility for the collection and<br />
recycling of Black & <strong>De</strong>cker products once they have reached<br />
the end of their working life. To take advantage of this service<br />
please return your product to any authorised repair agent who<br />
will collect them on our behalf.<br />
You can check the location of your nearest authorised repair<br />
agent by contacting your local Black & <strong>De</strong>cker office at the<br />
address indicated in this manual. Alternatively, a list of<br />
authorised Black & <strong>De</strong>cker repair agents and full details of our<br />
after-sales service and contacts are available on the Internet<br />
at: www.2helpU.com<br />
Batteries<br />
At the end of their useful life, discard batteries<br />
with due care for our environment:<br />
Z<br />
u Do not short-circuit the battery terminals.<br />
u Do not dispose of the battery(s) in fire, as this may result<br />
in a risk of personal injury or an explosion.<br />
u Run the battery down completely, then remove it from the<br />
appliance/tool.<br />
5
ENGLISH<br />
(Original instructions)<br />
u Batteries are recyclable. Place the battery in suitable<br />
packaging to ensure that the terminals cannot be<br />
short-circuited. Take them to any authorised repair agent<br />
or a local recycling station.<br />
Technical data<br />
Voltage V DC<br />
9<br />
TLD100 (H1)<br />
Battery required<br />
1 x 9V (6LR61)<br />
Alkaline<br />
Guarantee<br />
Black & <strong>De</strong>cker is confident of the quality of its products and<br />
offers an outstanding guarantee. This guarantee statement is<br />
in addition to and in no way prejudices your statutory rights.<br />
The guarantee is valid within the territories of the Member<br />
States of the European Union and the European Free Trade<br />
Area.<br />
If a Black & <strong>De</strong>cker product becomes defective due to faulty<br />
materials, workmanship or lack of conformity, within 24<br />
months from the date of purchase, Black & <strong>De</strong>cker guarantees<br />
to replace defective parts, repair products subjected to fair<br />
wear and tear or replace such products to ensure minimum<br />
inconvenience to the customer unless:<br />
u The product has been used for trade, professional or hire<br />
purposes;<br />
u The product has been subjected to misuse or neglect;<br />
u The product has sustained damage through foreign<br />
objects, substances or accidents;<br />
u Repairs have been attempted by persons other than<br />
authorised repair agents or Black & <strong>De</strong>cker service staff.<br />
To claim on the guarantee, you will need to submit proof of<br />
purchase to the seller or an authorised repair agent. You can<br />
check the location of your nearest authorised repair agent by<br />
contacting your local Black & <strong>De</strong>cker office at the address<br />
indicated in this manual. Alternatively, a list of authorised<br />
Black & <strong>De</strong>cker repair agents and full details of our after-sales<br />
service and contacts are available on the Internet at:<br />
www.2helpU.com<br />
Please visit our website www.blackanddecker.co.uk to<br />
register your new Black & <strong>De</strong>cker product and to be kept up to<br />
date on new products and special offers. Further information<br />
on the Black & <strong>De</strong>cker brand and our range of products is<br />
available at www.blackanddecker.co.uk<br />
6
ENGLISH<br />
Do not forget to register your product!<br />
www.blackanddecker.co.uk/productregistration<br />
Register your product online at www.blackanddecker.co.uk/productregistration or send your name, surname and product<br />
code to Black & <strong>De</strong>cker in your country.<br />
7
Australia<br />
Black & <strong>De</strong>cker (Australia) Pty. Ltd. Tel. 03-8720 5100<br />
20 Fletcher Road, Mooroolbark, Fax 03-9727 5940<br />
Victoria, 3138<br />
New Zealand<br />
Black & <strong>De</strong>cker Tel. +64 9 259 1133<br />
5 Te Apunga Place Fax +64 9 259 1122<br />
Mt Wellington<br />
Auckland 1060<br />
United Kingdom<br />
Black & <strong>De</strong>cker Tel. 01753 511234<br />
210 Bath Road Fax 01753 551155<br />
Slough, Berkshire SL1 3YD Helpline 01753 574277<br />
90564182 REV-1 04/2010


