


Create successful ePaper yourself
Turn your PDF publications into a flip-book with our unique Google optimized e-Paper software.
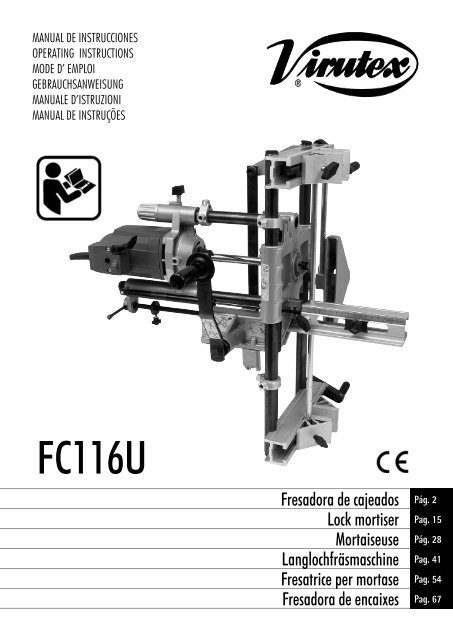
MANUAL DE INSTRUCCIONESÍNDICE1 DATOS TÉCNICOS 32 UTILIZACIÓN 33 INSTRUCCIONES DE SEGURIDADPARA EL MANEJO DE LA MAQUINA 44 EQUIPO ESTÁNDAR 45 MONTAJE DE LA MANIVELA AVANCE CARRO 4Especificaciones sujetas acambio sin previo aviso.6 MONTAJE DE LAS HERRAMIENTAS DE CORTE 57 INTERRUPTOR 58 AJUSTE DE LA ANCHURA DEL FRESADO 59 AJUSTE DE LA LONGITUD DEL FRESADO 610 AJUSTE DE LA PROFUNDIDAD DE FRESADO 611 FRESADO DE CAJEADO EN UNA PUERTA 7MEDIR Y TRAZAR REFERENCIAS 7FRESAR EL ENCAJE DE LA CAJA 812 FRESADO DEL ENCAJE PARALA PLACA FRONTAL DE LA CERRADURA 9CAMBIAR LA FRESA 9MEDIR, TRAZAR REFERENCIA Y SITUAR FC116UEN LA PUERTA 9REGULAR LA CARRERA DEL FRESADO 9REGULAR LA PROFUNDIDAD DEL FRESADO 10FRESAR EL ENCAJE 1013 PERFORADO DE LOS PASOSPARA LA MANIJA Y LA LLAVE 11MONTAJE DEL ÚTIL DE LA PLANTILLA UC16I 11SITUACIÓN DEL ÚTIL Y PERFORADO 11HERRAMIENTAS OPCIONALES PARA TALADRO 1114 FRESADO DEL CAJEADO SOBRE VARIASPUERTAS 1215 FRESADO DE CAJEADOS EN POSICIÓNHORIZONTAL 1216 CORRECCIONES PARA PUERTAS SOLAPADAS 1217 ACOPLAMIENTO DE ASPIRACIÓN 1318 EXTRACCIÓN DEL EJE ACANALADO 1319 CAMBIO DE ESCOBILLAS 1320 LUBRICACIÓN Y LIMPIEZA 1321 HERRAMIENTAS Y ACCESORIOS OPCIONALES 1422 NIVEL DE RUIDO Y VIBRACIONES 1423 GARANTÍA 14
3. INSTRUCCIONES DE SEGURIDADPARA EL MANEJO DE LA MAQUINAAsegúrese <strong>de</strong> que la persona que va a usar estamáquina, lea cuidadosamente y comprenda esteMANUAL DE INSTRUCCIONES, y el FOLLETO DEINSTRUCCIONES GENERALES DE SEGURIDADadjunto, antes <strong>de</strong> empezar a trabajar con ella.• Compruebe antes <strong>de</strong> conectar la máquina, que la tensión <strong>de</strong>alimentación correspon<strong>de</strong> con la indicada en la chapa <strong>de</strong> características.• Para cambiar la fresa o realizar cualquier otra operación cerca<strong>de</strong>l cabezal <strong>de</strong> corte, <strong>de</strong>sconecte la máquina <strong>de</strong> la red eléctrica.• Use gafas <strong>de</strong> seguridad, para trabajar con la fresadora.• No ponga en marcha el motor, si se ha extraído <strong>de</strong>l armazón<strong>de</strong> la máquina.• Compruebe el recorrido <strong>de</strong>l cable <strong>de</strong> alimentación, para evitarque pueda enredarse durante la utilización.• Ponga siempre en marcha la fresadora mediante la palanca <strong>de</strong>linterruptor principal.• Una vez situada la fresadora sobre la pieza a fresar, efectúesiempre el <strong>de</strong>splazamiento <strong>de</strong> la herramienta, utilizando la manivela<strong>de</strong> avance <strong>de</strong>l carro. No empuje nunca con las manos ocon herramientas extrañas.• Asegúrese que el motor está completamente parado, antes <strong>de</strong>sacar la fresadora <strong>de</strong> la mortaja realizada.• Utilice siempre fresas <strong>de</strong>l diámetro a<strong>de</strong>cuado, correctamentemontadas en el eje acanalado.• No utilice nunca fresas incorrectas, <strong>de</strong>fectuosas o en mal estado.Utilice unicamente fresas y recambios originales VIRUTEX.4. EQUIPO ESTÁNDAREn el interior <strong>de</strong> la caja Ud., encontrará los elementos siguientes:• Fresadora <strong>de</strong> cajeados FC116U• Un útil <strong>de</strong> taladrar bombín y aguja UT16I• Llaves <strong>de</strong> servicio y una plantilla <strong>de</strong> trazar• Varilla <strong>de</strong> altura <strong>de</strong>smontable en 4 secciones y un tope puerta.• Cuatro protectores <strong>de</strong> mordazas para trabajos <strong>de</strong>licados montados.• Fresa <strong>de</strong> cajeados diámetro 16 mm.• <strong>Manual</strong> <strong>de</strong> <strong>instrucciones</strong> y documentación diversaFig. 15. MONTAJE DE LA MANIVELA AVANCE CARROCompruebe que la fresadora se encuentra <strong>de</strong>sconectada<strong>de</strong> la red eléctrica.(Figura 1)4 - FC116U / <strong>Manual</strong> <strong>de</strong> <strong>instrucciones</strong>• Encajar la ranura rectangular <strong>de</strong> la manivela avance carro "A",encarándolo sobre los planos <strong>de</strong>l eje "B", poner la aran<strong>de</strong>la "C",y el tornillo "D", como se indica en la (Fig. 1). Apretar el tornillo"D", con la llave "F", él cúal fijará la maneta avance carro, en sualojamiento.• ES IMPORTANTE NO GOLPEAR SOBRE LA SUPERFICIE DE LAMANETA AVANCE "A"
6. MONTAJE DE LAS HERRAMIENTAS DE CORTEECompruebe que la fresadora se encuentra <strong>de</strong>sconectada<strong>de</strong> la red eléctrica.FG• La fresadora <strong>de</strong> cajeados se suministra, con una fresa <strong>de</strong> diámetro16 mm montada en el extremo <strong>de</strong>l eje acanalado.Para cambiar la fresa, bloquee el eje acanalado por sus planos,con la llave "E" (Fig. 2), <strong>de</strong>senrosque la fresa "G" con la llave "F"y sustitúyala por otra <strong>de</strong>l diámetro <strong>de</strong>seado.(Figura 2)7. INTERRUPTOR• La caja <strong>de</strong>l interruptor, (Fig. 3), está provista <strong>de</strong> una palanca"Y", para el arranque <strong>de</strong> la máquina y un seguro <strong>de</strong> enclavelateral "Z". Para efectuar el arranque, se acciona el seguro <strong>de</strong>enclave "Z" y, sin soltarlo, se pulsa la palanca "Y" manteniéndoseasí, la máquina en marcha.Al pulsar la palanca "Y" con la máquina en marcha, el seguro "Z"se <strong>de</strong>senclava automáticamente y la máquina se para.El seguro <strong>de</strong> enclave <strong>de</strong>l interruptor "Z", impi<strong>de</strong> la puesta enmarcha acci<strong>de</strong>ntal <strong>de</strong> la máquina.ZY(Figura 3)N8. AJUSTE DE LA ANCHURA DEL FRESADO• Mida el punto más ancho "N", <strong>de</strong> la caja <strong>de</strong> la cerradura, incluyendocualquier protuberancia que tenga, (Fig. 4). NO INCLUYAla cara embellecedora exterior <strong>de</strong> la cerradura.Compruebe que la fresadora se encuentra <strong>de</strong>sconectada<strong>de</strong> la red eléctrica.• Coloque una fresa <strong>de</strong> cajeados <strong>de</strong> la medida tomada o ligeramentemayor, siguiendo las <strong>instrucciones</strong> <strong>de</strong>l apartado 6.(Figura 4)FC116U / <strong>Manual</strong> <strong>de</strong> <strong>instrucciones</strong> - 5
9. AJUSTE DE LA LONGITUD DEL FRESADOH• Mida el punto más largo "H", <strong>de</strong> la caja <strong>de</strong> la cerradura, incluyendocualquier protuberancia que tenga, (Fig. 5). NO INCLUYAla cara embellecedora exterior <strong>de</strong> la cerradura.TCompruebe que la fresadora se encuentra <strong>de</strong>sconectada<strong>de</strong> la red eléctrica.(Figura 5)• Para ajustar la máquina a la longitud <strong>de</strong> fresado "H" <strong>de</strong>seada,afloje la tuerca "P" (Fig. 6) con la llave "F" y accione el pomo husillo"R" hasta que el Indicador <strong>de</strong> longitud "S" alcance la medida<strong>de</strong>seada "H" y apriete la tuerca "P" en esta posición.PAsegurese <strong>de</strong> apretar la tuerca "P" (Fig. 6), <strong>de</strong> locontrario se pue<strong>de</strong> producir la rotura <strong>de</strong>l mecanismo<strong>de</strong> ajuste <strong>de</strong> longitud <strong>de</strong> fresado.FSREl centraje <strong>de</strong> la fresa sobre el grueso <strong>de</strong> la puerta o <strong>de</strong> la piezaa cajear, es automático, si las plaquitas "J" (Fig. 7) están en posición"0", en las dos guías mordaza "V", (Fig. 7).V(Figura 6)V(Figura 7)JWAVAW10. AJUSTE DE LA PROFUNDIDAD DE FRESADO• Mida la profundidad "T" (Fig. 5) <strong>de</strong> la caja <strong>de</strong> la cerradura,incluyendo cualquier protuberancia que tenga en su fondo, elgrueso <strong>de</strong> la cara embellecedora exterior, y unos mm más comoholgura.(Figura 8)6 - FC116U / <strong>Manual</strong> <strong>de</strong> <strong>instrucciones</strong>UCompruebe que la fresadora se encuentra <strong>de</strong>sconectada<strong>de</strong> la red eléctrica.• La profundidad <strong>de</strong> fresado se controla por medio <strong>de</strong> la reglagraduada "U" (Fig. 8) la cual esta marcada en divisiones <strong>de</strong> 1 mm.Afloje el pomo "W" y sitúe el anillo "A", <strong>de</strong> modo que su carainferior coincida con la profundidad <strong>de</strong>seada, y apriete el pomo"W" en esa posición.
"c""H2"11. FRESADO DE CAJEADO EN UNA PUERTA• Coloque la puerta en posición y fíjela firmemente para queno se mueva. Si la puerta ya se encuentra montada en el marco,ponga cuñas <strong>de</strong>bajo <strong>de</strong> ella, para que no se mueva.MEDIR Y TRAZAR REFERENCIAS• Sitúe la cerradura contra la puerta, <strong>de</strong> modo que el paso parael pomo o manija, que<strong>de</strong> a la altura <strong>de</strong>seada <strong>de</strong>l suelo"H0" (Fig.9), y marque un trazo "0" (Fig. 9) en la cara y en el canto <strong>de</strong> lapuerta.• Mida la distancia "H2" (Fig. 9), <strong>de</strong>s<strong>de</strong> el centro <strong>de</strong> la manija alcentro <strong>de</strong> la caja <strong>de</strong> la cerradura."rs""rs""rs""0""c""H2""0""c"Pt"c""H0""0""c""H2"(Figura 9)• Trazar el centro "c" <strong>de</strong> la caja <strong>de</strong> la cerradura, sobre elcanto <strong>de</strong> la puerta, usando para ello la plantilla <strong>de</strong> trazar"Pt" (Fig. 9), que se libra con el equipo.Esta plantilla dispone <strong>de</strong> una colección <strong>de</strong> ranuras situadas a 5mm entre ellas; <strong>de</strong> modo que <strong>de</strong>be situar la plantilla sobre elcanto <strong>de</strong> la puerta, haciendo coincidir el trazo "0" (Fig. 9), conla ranura que se corresponda con la medida "H2" (Fig. 9) que hatomado anteriormente, (20 mm en la Fig. 9), y marcar el trazo"c" (Fig. 9) en el bor<strong>de</strong> inferior <strong>de</strong> la plantilla.• Trazar la referencia superior "rs" (Fig. 9), que servirá comoreferencia para el montaje <strong>de</strong> la máquina sobre la puerta.Para ello situar el extremo inferior <strong>de</strong> la plantilla <strong>de</strong> trazar "Pt"(Fig. 9) sobre el trazo "c" (Fig. 9), y marque el trazo "rs" (Fig. 9)en el extremo superior <strong>de</strong> la plantilla.FC116U / <strong>Manual</strong> <strong>de</strong> <strong>instrucciones</strong> - 7
"N3"N112. FRESADO DEL ENCAJE PARA LA PLACA FRONTAL DE LACERRADURA"Nt"Compruebe que la fresadora se encuentra <strong>de</strong>sconectada<strong>de</strong> la red eléctrica.(Figura 11)"N2"N2-N3= X mm"rs"CAMBIAR LA FRESA• Mida el ancho "N1" (Fig. 11) <strong>de</strong>l frontal <strong>de</strong> la cerradura y monteen la máquina una fresa <strong>de</strong> cajeados <strong>de</strong> la medida correspondiente,siguiendo las <strong>instrucciones</strong> <strong>de</strong>l apartado 6 <strong>de</strong>l manual.V"rs1"MEDIR, TRAZAR REFERENCIA Y SITUAR FC116U EN LAPUERTA(Figura 12)S1"rs"N2-N3= X mm"rs1"(Figura 13)• Tome las medidas entre la caja <strong>de</strong> la cerradura y cada uno <strong>de</strong>los dos extremo <strong>de</strong>l frontal <strong>de</strong> la cerradura "N2" y "N3" (Fig. 11).• Si las dos medidas "N2" y "N3" (Fig. 11) son iguales: Sujetarla máquina sobre la puerta, alineando la arista superior <strong>de</strong>ltravesaño "V" (Fig. 12), con el trazo <strong>de</strong> referencia superior “rs”(Fig. 12), con lo que quedan alineados los centros <strong>de</strong> la carrera<strong>de</strong> la máquina; <strong>de</strong> la caja cerradura y <strong>de</strong> la placa frontal <strong>de</strong> lacerradura.• Si las medidas "N2" y "N3" (Fig. 11) no son iguales, tomar ladiferencia entre ambas "N2"-"N3"=X mm (Fig. 11); trazar unanueva marca <strong>de</strong> referencia superior “rs1” (Fig. 13 y 12), <strong>de</strong>splazadaX mm, hacia el lado <strong>de</strong> la medida mayor entre la "N2" y "N3"y a continuación sujetar la máquina sobre la puerta, alineando laarista superior <strong>de</strong>l travesaño "V" (Fig. 12), con el nuevo trazo <strong>de</strong>referencia superior “rs1” (Fig. 12), con lo que quedan alineadosel centro <strong>de</strong> la carrera <strong>de</strong> la máquina, con el centro <strong>de</strong> la placafrontal <strong>de</strong> la cerradura.S2S1S(Figura 14)REGULAR LA CARRERA DEL FRESADO• Medir la longitud <strong>de</strong>l frontal "NT" (Fig. 11) <strong>de</strong> la cerradura yfijar los dos topes longitudinales "S1" (Fig. 12 y 14), sobre la divisióncorrespondiente a la medida NT, en la escala <strong>de</strong> la columnaguia "S" (Fig. 14).• Situar y fijar los dos topes correctores <strong>de</strong>l diámetro <strong>de</strong> la fresa"S2" (Fig. 14), sobre la marca correspondiente al diámetro <strong>de</strong> lafresa que se ha montado (Fig. 14).• Ajustar la longitud <strong>de</strong>l fresado en la biela, a una medida algomayor que el frontal <strong>de</strong> la cerradura "NT" (Fig. 11), <strong>de</strong>l modo quese explica en el apartado 9 (Fig. 6) <strong>de</strong> este manual.FC116U / <strong>Manual</strong> <strong>de</strong> <strong>instrucciones</strong> - 9
WKS1rsrs1REGULAR LA PROFUNDIDAD DEL FRESADO• Elevar el pomo "W" (Figs. 15-18) hasta su posición límite superior,girándolo en sentido anti-horario.• Comprobar que la varilla <strong>de</strong> blocaje "J" (Fig. 15) está en posiciónhorizontal, (avance <strong>de</strong> profundidad <strong>de</strong>sconectado).• Aflojar el pomo "K" (Fig. 16); <strong>de</strong>splazar la máquina hacia abajo,empujando suavemente con la mano sobre el motor, hasta quela fresa toque justo el canto <strong>de</strong> la puerta y retenerla en estaposición fijando el pomo "K" (Fig. 16).• Colocar el frontal <strong>de</strong> la cerradura (Fig. 17), tocando la parte inferior<strong>de</strong>l soporte <strong>de</strong>l motor; <strong>de</strong>splazar y fijar el tope <strong>de</strong> profundidad"S3" (Fig. 16 y 17), aprisionando el frontal <strong>de</strong> la cerradura.• Aflojar el pomo "K" (Figs. 15-17), para que la máquina asciendaa su posición inicial.JA(Figura 15)WWKS3S3K(Figura 17)(Figura 16)ZYAS1(Figura 18)10 - FC116U / <strong>Manual</strong> <strong>de</strong> <strong>instrucciones</strong>WS3FRESAR EL ENCAJE• Comprobar que la varilla <strong>de</strong> blocaje "J" (Fig. 15) está en posiciónhorizontal, (avance <strong>de</strong> profundidad <strong>de</strong>sconectado).• Conectar la máquina a la red eléctrica, poner en marcha el motor,presionando la palanca "Y" (Fig. 18) y enclavando el seguro<strong>de</strong> "Z" (Fig. 18).• Girar el pomo "W" (Figs. 17 y 18) hasta que el soporte <strong>de</strong>lmotor toque el tope <strong>de</strong> profundidad "S3" (Fig.18). Al alcanzar laherramienta la profundidad <strong>de</strong> corte prevista para el frontal <strong>de</strong>la cerradura, accionar la manivela <strong>de</strong> avance <strong>de</strong>l carro "A" (Figs.15 y 18) con suavidad, hasta alcanzar cada uno <strong>de</strong> los dos topes"S1" (Fig. 15 y 18), situados en cada final <strong>de</strong> la carrera <strong>de</strong>l carro,en un movimiento <strong>de</strong> vaivén.Si el encaje a realizar es mayor <strong>de</strong> 2 mm, es aconsejable efectuarloen dos o más pasadas sucesivas, actuando repetidamentesobre el pomo “W”.• Restituir el pomo "W" (Fig. 18) y el tope <strong>de</strong> profundidad "S3"(Fig. 16) a su posición inicial al terminar el fresado.
13. PERFORADO DE LOS PASOS PARA LA MANIJA Y LALLAVE• Por último, con la ayuda <strong>de</strong> la plantilla UT16I suministradacon la máquina, pue<strong>de</strong>n realizarse los taladros necesarios para elmontaje <strong>de</strong> la cerradura, como los pasos <strong>de</strong> la manija, <strong>de</strong>l cierre<strong>de</strong> con<strong>de</strong>na, <strong>de</strong>l bombín <strong>de</strong> llave, etc.BA"c""c"MONTAJE DEL ÚTIL DE LA PLANTILLA UC16I• Introducir una varilla <strong>de</strong> altura <strong>de</strong>smontable<strong>de</strong> las <strong>de</strong>l equipo, por <strong>de</strong>ntro <strong>de</strong> los agujeros“A”, y <strong>de</strong>slizar el útil hasta situar el "0" <strong>de</strong> referenciasobre el centro “c” <strong>de</strong> la caja <strong>de</strong> lacerradura. (Fig. 19).• Fijar con el pomo “B” y enrasar al mismotiempo la cara interna “C” <strong>de</strong> la chapa <strong>de</strong> referenciaen el canto <strong>de</strong> la puerta.(Fig. 19).centro caja cerradura "c"CA(Figura 19)SITUACIÓN DEL ÚTIL Y PERFORADOcentro caja cerraduraGH "c""c"• Aflojar el casquillo guía “G”, y <strong>de</strong>slizarlo ensentido horizontal, situando el índice “H” a lamedida “D” y apretarlo <strong>de</strong> nuevo. (Fig. 20).• Con referencia en el centro “c” <strong>de</strong> la caja <strong>de</strong>cerradura, <strong>de</strong>slizar el útil en sentido vertical,para situarlo a la medida “E” y ó “F” <strong>de</strong>seada.(Fig. 20)• Situada la posición <strong>de</strong>l agujero, se proce<strong>de</strong> aefectuar el taladro con una broca <strong>de</strong> diámetro11 mm.• Con referencia nuevamente al centro “c” <strong>de</strong>la caja cerradura, se podrá situar el siguienteagujero que necesite la cerradura.centro caja cerradura "c"(Figura 20)HERRAMIENTAS OPCIONALES PARA TALADRO1640148 16401491640148 Fresa <strong>de</strong> agrandar D.18 c/guía <strong>de</strong> 111640149 Fresa <strong>de</strong> agrandar D.23 c/guía <strong>de</strong> 11FC116U / <strong>Manual</strong> <strong>de</strong> <strong>instrucciones</strong> - 11
U1(Figura 21)A2S1T1A114. FRESADO DEL CAJEADO SOBRE VARIAS PUERTAS• Si <strong>de</strong>sea cajear varias puertas y situar las cerraduras a una mismaaltura, le aconsejamos emplee la varilla <strong>de</strong> alturas "A1" (Fig.21), que le facilitará la operación.Para ello, <strong>de</strong>spués <strong>de</strong> haber <strong>de</strong>terminado la altura <strong>de</strong> la cerraduraen la primera puerta, y situado la máquina en posición para fresar,monte las cuatro varillas <strong>de</strong> altura "A1" (Fig. 21), e insértelas enlos orificios <strong>de</strong> las mordazas "X" (Fig. 22), <strong>de</strong> modo que el disco <strong>de</strong>tope "A2" (Fig. 21) <strong>de</strong> su extremo, haga tope en el canto superior<strong>de</strong> la puerta y fije la varilla <strong>de</strong> altura "A1" (Fig. 21 y 22), en éstaposición, con los pomos "B1" (Fig. 22). Para la próxima puerta, notendrá mas que colocar la máquina, con el disco <strong>de</strong> tope "A2" (Fig.21), <strong>de</strong> la varilla <strong>de</strong> altura "A1", <strong>de</strong>scansando sobre el canto superior<strong>de</strong> la puerta y, fijar las mordazas en esta posición, y marcarpara su uso posterior, el trazo <strong>de</strong> referencia superior “rs” en estanueva puerta, con lo que conseguirá que todas las cerraduras que<strong>de</strong>na la misma altura.La varilla <strong>de</strong> alturas "A1" (Fig. 21) sin el disco tope "A2" (Fig. 21),pue<strong>de</strong> emplearse también si lo <strong>de</strong>sea, como referencia <strong>de</strong> alturarespecto al suelo.XJQA1B1XF15. FRESADO DE CAJEADOS EN POSICIÓN HORIZONTAL• Para trabajar con la FC116U en posición horizontal, por ejemploen la realización <strong>de</strong> cajeados en puertas antes <strong>de</strong> colgarlas, esconveniente <strong>de</strong>sconectar el amortiguador "T1" (Fig. 21), para <strong>de</strong>jarlibre <strong>de</strong> su presión, el movimiento <strong>de</strong>l carro "U1".Para ello, afloje la tuerca "P" (Fig. 23) con la llave "F" y accionandoel pomo husillo "R", <strong>de</strong>splace el indicador <strong>de</strong> longitud "S"hasta el tope "A2" <strong>de</strong> final <strong>de</strong> carrera.Quite el pomo "S1" (Fig. 21), que sujeta el amortiguador "T1",para que éste que<strong>de</strong> <strong>de</strong>sconectado. Guar<strong>de</strong> el pomo "S1" en lugarseguro, para una próxima utilización.Finalmente ajuste la longitud <strong>de</strong> fresado <strong>de</strong>seada, <strong>de</strong>l modo indicadoen el apartado 9, antes <strong>de</strong> trabajar con la máquina, ya queésta no <strong>de</strong>be trabajar nunca en el final <strong>de</strong> carrera, por encima <strong>de</strong>la longitud máxima.(Figura 22)16. CORRECCIONES PARA PUERTAS SOLAPADASA2Para el cajeado <strong>de</strong> puertas con solape, <strong>de</strong>berá corregir el centraje <strong>de</strong>la máquina y la profundidad <strong>de</strong> fresado <strong>de</strong>l siguiente modo:PCompruebe que la fresadora se encuentra <strong>de</strong>sconectada<strong>de</strong> la red eléctrica.FSR• Para centrar la máquina, sobre la sección <strong>de</strong> puerta sin solape,afloje con la llave "F" (Fig. 22), los tornillos "Q" que bloquean lasmordazas "X" y <strong>de</strong>splace las placas "J" hacia el lado <strong>de</strong>l solape, lamitad <strong>de</strong> la anchura <strong>de</strong> éste en mm, y fije <strong>de</strong> nuevo los tornillos"Q" en esta posición.• Al ajustar la profundidad <strong>de</strong> fresado, como se explica en elapartado 10, <strong>de</strong>berá situar el anillo <strong>de</strong> tope "A" (Fig. 8), a unaaltura <strong>de</strong> la escala "U" (Fig. 8), que sea la suma <strong>de</strong> la profundidadnecesaria para la cerradura, más la altura <strong>de</strong>l solape <strong>de</strong> la puerta,ya que la máquina se apoyará sobre este solape.(Figura 23)12 - FC116U / <strong>Manual</strong> <strong>de</strong> <strong>instrucciones</strong>
17. ACOPLAMIENTO DE ASPIRACIÓND2D1• La fresadora <strong>de</strong> cajeados FC116U, dispone <strong>de</strong> una boquilla "D2"(Fig. 24), que montada en la varilla <strong>de</strong> posición "D1" (Fig. 24), sobrela abertura <strong>de</strong> la caja a realizar, permite la conexión a los aspiradores<strong>Virutex</strong> AS182K, AS282K, AS382L y ASC482U, o a otroaspirador industrial, para la extracción <strong>de</strong> la viruta <strong>de</strong>l fresado.(Figura 24)EGt18. EXTRACCIÓN DEL EJE ACANALADOPara cambiar el eje acanalado "M" (Fig. 26) <strong>de</strong>smonte primero lafresa "G" (Fig. 25), como se explica en el apartado 6.Coloque el pasador "L" (Fig. 26) en el orificio central <strong>de</strong> la carcasa,hasta bloquear el eje <strong>de</strong>l motor y extraiga el eje acanalado"M" con la llave "E".FGpG19. CAMBIO DE ESCOBILLAS(Figura 25)Asegúrese que la máquina esté <strong>de</strong>sconectada <strong>de</strong>la red eléctrica antes <strong>de</strong> realizar cualquier manipulación.L(Figura 26)EM• Las escobillas <strong>de</strong>ben ser sustituidas cuando tengan una longitudmínima <strong>de</strong> 5 mm. Para ello <strong>de</strong>smonte la caja <strong>de</strong>l interruptor"F1" (Fig. 27), retirando los tornillos "G1" que la sujetan.Quite los tapones "H1", que sujetan las escobillas "I1" y sustitúyalaspor otras originales VIRUTEX, comprobando que <strong>de</strong>slicensuavemente en el interior <strong>de</strong> las guías. Asegúrese al montar <strong>de</strong>nuevo la caja interruptor "F1", <strong>de</strong> que los cables que<strong>de</strong>n biensituados en su interior.Es aconsejable <strong>de</strong>jar la máquina en marcha en vacío durantealgunos minutos <strong>de</strong>spués <strong>de</strong> un cambio <strong>de</strong> escobillas. Aprovecheel cambio <strong>de</strong> escobillas para verificar el estado <strong>de</strong>l colector. Siéste presentase quemaduras o resaltes, es aconsejable llevarlo areparar, a un Servicio Técnico VIRUTEX.H1I1I1F1H1G120. LUBRICACIÓN Y LIMPIEZA• Antes <strong>de</strong> fresar el primer encaje, lubrique las columnas <strong>de</strong> guía<strong>de</strong> la profundidad "Gp" (Fig. 25) y las transversales "Gt" (Fig. 25),con un trapo ligeramente impregnado en aceite, para suavizarlos dos movimientos. Es importante limpiar siempre la máquina<strong>de</strong>spués <strong>de</strong> su utilización, con un chorro <strong>de</strong> aire seco.Mantenga siempre el cable <strong>de</strong> alimentación en perfectas condiciones<strong>de</strong> uso.(Figura 27)FC116U / <strong>Manual</strong> <strong>de</strong> <strong>instrucciones</strong> - 13
21. HERRAMIENTAS Y ACCESORIOS OPCIONALES• Fresas para fresadora <strong>de</strong> cajeados FC116U disponibles:NÚMERO DIAM.EXT. ALTURA1640127 16 mm. 13.5 mm.1640150 17 " 13.5 "1640128 18 " 13.5 "1640367 20 " 13.5 "1640129 21 " 13.5 "1640130 23 " 13.5 "1640368 23,5 " 13.5 "1640131 25 " 13.5 "1640369 29 " 13.5 "1640132 30 " 13.5 "1640140 Fresa <strong>de</strong> taladrar Ø 24• El útil prolongador UP16I, 1645287, permite prolongar la sujección<strong>de</strong> la máquina más allá <strong>de</strong> la propia puerta.22. NIVEL DE RUIDO Y VIBRACIONESLos niveles <strong>de</strong> ruido y vibraciones <strong>de</strong> esta herramienta eléctricahan sido medidos <strong>de</strong> acuerdo con la Norma Europea EN 61029-1y sirven como base <strong>de</strong> comparación con máquinas <strong>de</strong> semejanteaplicación.El nivel <strong>de</strong> vibraciones indicado ha sido <strong>de</strong>terminado para lasaplicaciones principales <strong>de</strong> la herramienta, y pue<strong>de</strong> ser utilizadocomo valor <strong>de</strong> partida para la evaluación <strong>de</strong> la exposición alriesgo <strong>de</strong> las vibraciones. Sin embargo, el nivel <strong>de</strong> vibracionespue<strong>de</strong> llegar a ser muy diferente al valor <strong>de</strong>clarado en otras condiciones<strong>de</strong> aplicación, con otros útiles <strong>de</strong> trabajo o con un mantenimientoinsuficiente <strong>de</strong> la herramienta eléctrica y sus útiles,pudiendo llegar a resultar un valor mucho más elevado <strong>de</strong>bidoa su ciclo <strong>de</strong> trabajo y modo <strong>de</strong> uso <strong>de</strong> la herramienta eléctrica.Por tanto, es necesario fijar medidas <strong>de</strong> seguridad <strong>de</strong> protecciónal usuario contra el efecto <strong>de</strong> las vibraciones, como pue<strong>de</strong>n sermantener la herramienta y útiles <strong>de</strong> trabajo en perfecto estadoy la organización <strong>de</strong> los tiempos <strong>de</strong> los ciclos <strong>de</strong> trabajo (talescomo tiempos <strong>de</strong> marcha con la herramienta bajo carga, y tiempos<strong>de</strong> marcha <strong>de</strong> la herramienta en vacío y sin ser utilizadarealmente ya que la reducción <strong>de</strong> estos últimos pue<strong>de</strong> disminuir<strong>de</strong> forma sustancial el valor total <strong>de</strong> exposición).23. GARANTÍATodas las máquinas electroportátiles VIRUTEX, tienen una garantíaválida <strong>de</strong> 12 meses a partir <strong>de</strong>l día <strong>de</strong> su suministro, quedandoexcluidas todas las manipulaciones o daños ocasionadospor manejos ina<strong>de</strong>cuados o por <strong>de</strong>sgaste natural <strong>de</strong> la máquina.Para cualquier reparación dirigirse al Servicio Oficial <strong>de</strong> AsistenciaVIRUTEX S.A.VIRUTEX, se reserva el <strong>de</strong>recho <strong>de</strong> modificar sus productos sinprevio aviso.14 - FC116U / <strong>Manual</strong> <strong>de</strong> <strong>instrucciones</strong>
OPERATING INSTRUCTIONSINDEX1 TECHNICAL INFORMATION 162 USE 163 MACHINE HANDLINGSAFETY INSTRUCTIONS 174 STANDARD UNIT 17Specifications are subjectto change without priornotice.5 ASSEMBLING THECARRIAGE ADVANCE HANDLE 176 MOUNTING THE CUTTING TOOL 187 SWITCH 188 ADJUSTING THE TRIMMING WIDTH 189 ADJUSTING THE TRIMMING LENGTH 1910 ADJUSTING THE TRIMMING DEPTH 1911 MORTISING EDGE TRIMMING ON A DOOR 20MEASURING AND TRACING REFRENCES 20TRIMMING THE BOX FITTING 2112 TRIMMING THE FITTING FORTHE FRONT PLATE OF THE LOCK 22CHANGING THE TRIMMING 22MEASURING, MARKING REFERENCE POINTSAND PLACING THE FC116U ON THE DOOR 22ADJUST THE TRIMMING PATH 22ADJUSTING THE DEPTH OF THE TRIM 23TRIMMING THE FITTING 2313 DRILLING THE HOLES FORTHE HANDLE AND KEY 24ASSEMBLING THE TOOL FOR THE UC16I TEMPLATE 24POSITIONING THE TOOL AND PERFORATING 24OPTIONAL DRILLING TOOLS 2414 TRIMMING THE LOCKS FOR SEVERAL DOORS 2515 HORIZONTAL MORTISING 2516 CORRECTIONS FOR OVERLAPPING DOORS 2517 DUST COLLECTOR ATTATCHMENT 2618 REMOVING THE SPLINE SHAFT 2619 CHANGING THE BRUSHES 2620 LUBRICATION AND CLEANING 2621 OPTIONAL TOOLS AND ACCESSORIES 2722 NOISE AND VIBRATION LEVEL 2723 WARRANTY 27FC116U / Operating instructions - 15
FC116U LOCK MORTISERIMPORTANTRead these OPERATING INSTRUCTIONS and the attached GENE-RAL SAFETY INSTRUCTIONS LEAFLET carefully before using themachine. Make sure you have un<strong>de</strong>rstood them before operatingthe machine for the first time. Keep both sets of instructions forany future queries.1. TECHNICAL INFORMATIONUniversal motor.............................................................................50/60 HzPower................................................................................................1,100 WNo-load speed..........................................................................23,000 min -1Maximum bit diameter....................................................................30 mmMaximum trimming <strong>de</strong>pth......................................................0-125 mmMaximum trimming width...................................................bit diameterMaximum trimming length.................................177 mm + bit diameterMaximum opening of the clamp vises........................................190 mmMaximum grip of the clamp vises....................................................13 mmSi<strong>de</strong> movement of the bit over thickness of door...........+/- 15 mmWeight...................................................................................................14 KgWeighted equivalent continuous acoustic pressure level A......88 dBAAcoustic power level A.........................................................................99 dBAUncertainty......................................................................................K = 3 dbAWear ear protection!Vibration total values............................................................a h: 2.6 m/s 2Uncertainty................................................................................K: 1.5 m/s 22. USEThe FC116U portable lock mortiser is an electrical tool, for thetrimming of mortises to mount door locks, mortise assemblies,etc.In addition to the box for the lock, you can also trim the fittingfor the front plate of the lock. With the help of the tool UC16I,which comes with the equipment, you can drill the entry pointsin the door for the cylin<strong>de</strong>r and the handle.16 - FC116U / Operating instructions
3. MACHINE HANDLING SAFETY INSTRUCTIONSEnsure that the person who is to use this machinereads these OPERATING INSTRUCTIONS andthe enclosed GENERAL SAFETY INSTRUCTIONSLEAFLET carefully and un<strong>de</strong>rstands them beforestarting work.• Before connecting the machine, ensure that the power supplyvoltage corresponds to that indicated on the characteristics plate.• To change the bit or carry out any other operation close to thecutting head, disconnect the machine from the mains.• Use safety goggles when working with the trimmer.• Do not start the motor if the machine chassis has been removed.• Check the power supply cable to make sure it does not twistduring use.• Always start the trimmer using the main switch lever.• Once the trimmer has been placed on the part to be trimmed,always move the tool using the carriage advance crank handle.Never push it by hand or with extraneous tools.• Ensure that the motor is at a complete standstill before removingthe trimmer from the completed mortise.• Always use bits of the correct diameter, correctly mounted onthe serrated axis.• Never use bits that are incorrect, <strong>de</strong>fective or in bad condition.Use only authentic VIRUTEX bits and spare parts.4. STANDARD UNITThe following elements are inclu<strong>de</strong>d in the box:• Lock mortiser FC116U• Drilling tool for cylin<strong>de</strong>r and needle UT16I• Service keys and tracing template• Detachable height bar in 4 sections and a door limiter.• Four clamp vise protectors for precise mounted jobs.• Mortising trimmer bit, 16 mm diameter.• Operating Instructions and miscellaneous documen-tation.5. ASSEMBLING THE CARRIAGE ADVANCE HANDLEFig. 1Check that the trimmer is disconnected from themains.• Match the rectangular carriage forward handle slot "A" to theplanes of the shaft "B". Fit washer "C" and screw "D", as shown in(Fig. 1). Tighten screw "D" with spanner "F", to hold the carriageadvance handle in place.• MAKE SURE NOT TO KNOCK THE SURFACE OF ADVANCE HAN-DLE "A".(Figure 1)FC116U / Operating instructions - 17
6. MOUNTING THE CUTTING TOOLECheck that the trimmer is disconnected from themains.• The mortising trimmer is supplied with a 16 mm diameter bitmounted on the end of the spline shaft.To change the bit, lock the spline shaft by its planes with key "E"(Fig. 2), unscrew the bit "G" with key "F" and replace with one ofthe required diameter.(Figure 2)7. SWITCH• Cut-out box (Fig. 3) is equipped with lever "Y" for starting upthe machine and lateral fixing stop "Z". To start it up, activatefixing stop "Z" and, without releasing it, push forward lever "Y",thus keeping the machine running.When lever "Y" is pushed forward with the machine running,stop "Z" loosens automatically and the machine comes to a halt.The switch's fixing stop "Z" prevents the machine from startingup acci<strong>de</strong>ntally.ZY(Figure 3)N8. ADJUSTING THE TRIMMING WIDTH• Measure the wi<strong>de</strong>st point, "N", of the lock box, including anyprotuberance it may have (Fig. 4). DO NOT INCLUDE the exterior<strong>de</strong>corative face of the lock.Check that the trimmer is disconnected from themains.• Place a mortising trimmer bit of the measurement taken orslightly larger, according to the instructions in section 6.(Figure 4)18 - FC116U / Operating instructions
H9. ADJUSTING THE TRIMMING LENGTH• Measure the longest point, "H", of the lock box, including anyprotuberance it may have (Fig. 5). DO NOT INCLUDE the exterior<strong>de</strong>corative face of the lock.TCheck that the trimmer is disconnected from themains.(Figure 5)• To adjust the machine to the required trimming length "H",loosen nut "P" (Fig. 6) with key "F" and move screw knob "R"until the length indicator "S" reaches the <strong>de</strong>sired measurement"H", then tighten nut "P" in this position.PBe sure to tighten nut "P" (Fig. 6); if not, thismay cause the trimming length adjustment mechanismto break.FSRThe centring of the bit over the thickness of the door or the partto be mortised is automatic if the small plates "J" (Fig. 7) are inthe "0" position on the two clamp vise gui<strong>de</strong>s "V" (Fig. 7).V(Figure 6)V(Figure 7)JWAVAW10. ADJUSTING THE TRIMMING DEPTH• Measure the <strong>de</strong>pth "T" (Fig. 5) of the lock box including anyprotuberance it may have at the bottom, the thickness of theexterior <strong>de</strong>corative face and an additional few centimetres asallowance.UCheck that the trimmer is disconnected from themains.(Figure 8)• The trimming <strong>de</strong>pth is controlled by the graduated rule "U"(Fig. 8), marked in 1 mm divisions. Loosen knob "W" and positionring "A" so that the insi<strong>de</strong> face coinci<strong>de</strong>s with the required <strong>de</strong>pth,then tighten knob "W" in this position.FC116U / Operating instructions - 19
"c""H2"11. MORTISING EDGE TRIMMING ON A DOOR• Place the door vertically and fasten well so that it does notmove. If the door is already mounted on the frame, place wedgesun<strong>de</strong>r it to prevent it from moving.MEASURING AND TRACING REFRENCES• Place the lock against the door so that the path for the doorknob or handle is at the <strong>de</strong>sired height from the ground “H0”(Fig. 9) and mark the point “0” (Fig. 9) on the face and edge ofthe door.• Measure the distance “H2” (Fig. 9) from the centre of the handleto the centre of the box for the lock."rs""rs""rs""0""c""H2""0""c"Pt"c""H0""0""c""H2"(Figure 9)• Mark the centre "c" of the box for the lock onto the edgeof the door using the tracing template “Pt” (Fig. 9), whichcomes with the equipment.This template has a set of grooves 5 mm apart. You must placethe template onto the edge of the door so that the mark “0” (Fig.9) is lined up with the groove that corresponds to the measurement“H2” (Fig. 9) ma<strong>de</strong> earlier (20 mm in Fig. 9). Now make the"c" mark (Fig. 9) on the lower edge of the template.• Trace the upper reference “rs” (Fig. 9) which acts as a referencefor attaching the machine to the door.To do this, place the lower edge of the tracing template “Pt” (Fig.9) on the mark "c” (Fig. 9) and mark the point “rs” (Fig. 9) on theupper edge of the template.20 - FC116U / Operating instructions
TRIMMING THE BOX FITTINGVYK"rs""c"• Hold the machine against the door, aligning the upper edgeof the crossbeam “V” (Fig. 10) with the upper reference tracing“rs” (Fig. 10) and firmly fix the clamps with crank handles “K”(Fig. 10).• Check that the advance crank handle "A" (Fig. 7) is able to turnfreely over the whole path.• Turn locking bar "J" (Fig. 10) to the vertical position to gear thetrimming <strong>de</strong>pth advance mechanism.• Connect the machine to the mains, switch on the motor, pressingthe lever “Y” (Fig. 10) and set the safety “Z” (Fig. 10).• Turn the advance crank handle "A" (Fig. 10) repeatedly toeffect a synchronised tool advance, both lengthways and in<strong>de</strong>pth, to the end of the path as fixed in section 10.• Stop the machine by activating lever "Y" (Fig. 10).ZJ(Figure 10)ADisconnect the trimmer from the mains.• Turn the locking bar “J” (Fig. 10) to the horizontal position,completely freeing the advance mechanism of the tool and themotor goes back to the end of the stretch.FC116U / Operating instructions - 21
"Nt""N3"N112. TRIMMING THE FITTING FOR THE FRONT PLATE OF THELOCKCheck that the trimmer is disconnected from themains.(Figure 11)V"N2"N2-N3= X mm"rs""rs1"CHANGING THE TRIMMING• Measure the width “N1” (Fig. 11) of the front of the lock andattach a mortising bit of the correct size to the machine, followingthe instructions in section 6 of the manual.MEASURING, MARKING REFERENCE POINTS AND PLACINGTHE FC116U ON THE DOOR(Figure 12)S1"rs"N2-N3= X mm"rs1"(Figure 13)• Measure the distance between the box for the lock and each ofthe two edges of the front of the lock, giving you measurements“N2” and “N3” (Fig. 11).• If the two measurements “N2” and “N3” (Fig. 11) are the same:Hold the machine against the door, aligning the upper edge ofcrossbeam “V” (Fig. 12) with the upper reference mark “rs” (Fig.12), which aligns the centres of the machine’s trimming path forthe lock box and the front plate for the lock.• If the measurements “N2” and “N3” (Fig. 11) are not the same,calculate the difference between them, “N2”-“N3”=X mm (Fig.11) and make a new upper reference mark “rs1” (Figs. 13 and 12),which is X mm in the direction of the si<strong>de</strong> with the greater measurement,either “N2” or “N3”. Then hold the machine againstthe door, aligning the upper edge of crossbeam “V” (Fig. 12),using the new upper reference mark "rs1" (Fig. 12), which resultsin the alignment of the machine's trimming path with the centreof the front plate for the lock.S1SS2ADJUST THE TRIMMING PATH• Measure the length of the front “NT” (Fig. 11) of the lock andfix the two longitudinal stops “S1” (Figs. 12 and 14) onto thecorresponding division of the measurement NT, using the scaleon the gui<strong>de</strong> column "S" (Fig. 14).• Position and fix the two correcting stops for the diameter ofthe cutter bit "S2" (Fig. 14) onto the frame corresponding to thediameter of the cutter bit attached (Fig. 14).• Adjust the length of the trim on the connecting rod to a measurementsomewhat greater than the front of the lock “NT” (Fig.11), as explained in section 9 (Fig. 6) of this manual.(Figure 14)22 - FC116U / Operating instructions
WKS1rsrs1ADJUSTING THE DEPTH OF THE TRIM• Raise the knob "W" (Figs. 15-18) to its maximum upper position,turning it counter-clockwise.• Check that the lock lever “J” (Fig. 15) is in the horizontal position(advance <strong>de</strong>pth disconnected).• Loosen knob “K” (Fig. 16). Move the machine downwards,gently pushing the motor with your hand until the bit justtouches the edge of the door. Hold it in this position, tighteningknob "K" (Fig. 16).• Place the front of the lock (Fig. 17) so that it is touching thelower part of the motor support; move and fix the <strong>de</strong>pth stop"S3” (Figs. 16 and 17), trapping the front of the lock.• Loosen knob "K" (Figs. 15-17) so that the machine rises to itsoriginal position.JA(Figure 15)WWKS3S3K(Figure 17)(Figure 16)ZYAS1(Figure 18)WS3TRIMMING THE FITTING• Check that the lock lever “J” (Fig. 15) is in the horizontal position(advance <strong>de</strong>pth disconnected).• Connect the machine to the mains, switch on the motor, pressingthe lever “Y” (Fig. 18) and set the safety “Z” (Fig. 18).• Turn the knob "W" (Figs. 17 and 18) until the motor supporttouches <strong>de</strong>pth stop "S3" (Fig. 18). When the tool reaches the<strong>de</strong>pth of cut planned for the front of the lock, move the carriageadvance crank handle "A" (Figs. 15 and 18) gently until it reacheseach of the two stops “S1” (Figs. 15 and 18) located at eachend of the carriage path, in a rocking movement.If the fitting to be created is greater than 2 mm, it is advisable tocomplete this process using two or three successive movements,repeatedly using knob "W".• Return the knob "W" (Fig. 18) and the <strong>de</strong>pth stop “S3” (Fig. 16)to their initial position once the trim has been completed.FC116U / Operating instructions - 23
13. DRILLING THE HOLES FOR THE HANDLE AND KEY• Lastly, with the help of template UT16I supplied with the machine,you can carry out the drilling necessary to attach the lock,such as the holes for the handle, the chain lock, the key cylin<strong>de</strong>r,etc.AASSEMBLING THE TOOL FOR THE UC16ITEMPLATEB"c"centro caja cerradura "c""c"• Introduce a removable height bar from theequipment insi<strong>de</strong> the holes “A” and sli<strong>de</strong> thetool until the reference mark “0” is over thecentre “c” of the box for the lock (Fig. 19).• Fix using knob B while at the same time levellingthe insi<strong>de</strong> face C of the reference plateon the edge of the door. (Fig. 19).CA(Figure 19)centro caja cerraduraGH "c""c"POSITIONING THE TOOL AND DRILLING• Slacken bushing gui<strong>de</strong> “G” and sli<strong>de</strong> it in ahorizontal direction, placing in<strong>de</strong>x "H" at measurement"D", and retighten it. (Fig. 20).• Using the centre of the mortise as a reference,sli<strong>de</strong> the tool vertically, to position it atmeasurement “E” or “F”, as <strong>de</strong>sired. (Fig. 20).• Once the hole position has been chosen, drillusing a bit Ø 11 mm.• The second hole nee<strong>de</strong>d for the lock can bema<strong>de</strong> by using again the centre "c" of the mortiseas a reference.centro caja cerradura "c"(Figure 20)24 - FC116U / Operating instructions1640148 1640149OPTIONAL DRILLING TOOLS1640148 Enlargement bit D.18 f/gui<strong>de</strong> 111640149 Enlargement bit D.23 f/gui<strong>de</strong> 11
A214. TRIMMING THE LOCKS FOR SEVERAL DOORSU1(Figure 21)S1T1A1• Should you wish to trim several doors and position the locksat the same height, we recommend you use the height bar "A1"(Fig. 21) to simplify this operation.To do this, having <strong>de</strong>termined the height of the lock on the firstdoor, and placed the machine in the trimming position, mount thefour height bars "A1" (Fig. 21) and insert them in the clamp viseapertures "X" (Fig. 22), so that the end limiter disc "A2" (Fig. 21)has its limit at the upper edge of the door, and then fix the heightbar "A1" (Figs. 21 and 22) in this position with the knobs "B1" (Fig.22). For the following door, simply put the machine in place, withthe limiter disc“A2” (Fig. 21) of the height bar “A1” resting on theupper edge of the door, fix the clamp vises in this position andmark the upper reference mark “rs” on this new door for later useso that all the locks remain at the same height.The height bar "A1" (Fig. 21) without the limiter disc "A2" (Fig.21) may also be used, if <strong>de</strong>sired, as a height reference relativeto the floor.JXA1B1XF15. HORIZONTAL MORTISING• To work with the FC116U horizontally, for example to mortisedoors before hanging them, it is advisable to disconnect the damper"T1" (Fig. 21) to leave the movement of carriage "U1" free ofits pressure.To do this, loosen nut "P" (Fig. 23) with key "F" and by moving thescrew knob "R", advance the length indicator "S" towards the endof stroke limiter "A2".Remove knob "S1" (Fig. 21) that fastens silencer "T1" so that thisis disconnected. Keep knob "S1" in a safe place for later use. Finally,adjust the length of the mortising required, as <strong>de</strong>scribed insection 9, before starting work with the machine, as it must neveroperate at the end of stroke, over the maximum length.Q(Figure 22)A216. CORRECTIONS FOR OVERLAPPING DOORSFor mortise trimming of doors with overlap, the centring of themachine and the <strong>de</strong>pth of the edge trimming should be changed,as follows:PCheck that the trimmer is disconnected from themains.F(Figure 23)SR• To centre the machine over the section of the door withoutoverlap, loosen the screws "Q", which lock the clamp vises "X",with key "F" (Fig. 22), and move the plates "J" to the overlapsi<strong>de</strong>, half the width of this in mm, and fix the screws "Q" againin this position.• When the trimming <strong>de</strong>pth is adjusted, as explained in section10, the limiter ring "A" (Fig. 8) must be positioned at a height onthe scale "U" (Fig. 8) which is the sum of the <strong>de</strong>pth necessary forthe lock, plus the height of the door overlap, since the machinewill be supported on this overlap.FC116U / Operating instructions - 25
17. DUST COLLECTOR ATTATCHMENTD2D1• The FC116U mortising trimmer is equipped with a nozzle, "D2"(Fig. 24) which, when mounted on the position bar "D1" (Fig. 24)over the opening of the box to be ma<strong>de</strong>, allows the connectionof the <strong>Virutex</strong> AS182K, AS282K, AS382L and ASC482U dust collectoror another Industrial Dust Collector for the collection oftrimming chips(Figure 24)Gt18. REMOVING THE SPLINE SHAFTEFIn or<strong>de</strong>r to change the spline shaft "M" (Fig. 26), first dismountthe bit "G" (Fig. 25) as explained in section 6.Place the lock pin "L" (Fig. 26) in the central aperture of thechassis until the motor axis is locked and remove the spline shaft"M" with the key "E".GpG(Figure 25)19. CHANGING THE BRUSHESMake sure that the machine is disconnectedfrom the mains before any handling is done.L(Figure 26)EM• The brushes should be changed when they are a minimum of5 mm long. To do this, dismount the switch box "F1" (Fig. 27),removing the screws "G1" which fasten it.Remove the plugs "H1" which fasten the brushes "I1" and replacewith new original VIRUTEX ones, checking that they sli<strong>de</strong>smoothly on the insi<strong>de</strong> of the gui<strong>de</strong>s. Ensure when mounting theswitch box "F1" again that the cables are properly positionedinsi<strong>de</strong>. It is advisable to leave the machine running for a few minutesafter a change of brushes. Take advantage of the changeof brushes to check the state of the collector. If this shows signsof burns or wear and tear, it is advisable to take it to VIRUTEXtechnical service for repair.H1I1I1H1F1G120. LUBRICATION AND CLEANING• Before trimming the first fitting, lubricate the <strong>de</strong>pth gui<strong>de</strong>columns "Gp" (Fig. 25) and si<strong>de</strong> columns "Gt" (Fig. 25), with alightly oiled cloth, in or<strong>de</strong>r to smooth the two movements. It isimportant always to clean the machine carefully after use, witha dry air jet.Always keep the power supply cable in perfect condition.(Figure 27)26 - FC116U / Operating instructions
MODE D'EMPLOIINDEX1 DONNÉES TECHNIQUES 292 EMPLOI 293 INSTRUCTIONS DE SÉCURITÉPOUR LE MANIEMENT DE LA MACHINE 304 ÉQUIPEMENT STANDARD 30VIRUTEX se réserve le droit<strong>de</strong> modifier ses produitssans préavis.5 MONTAGE DE LA MANIVELLED'AVANCE DU CHARIOT 306 MONTAGE DES OUTILS DE COUPE 317 INTERRUPTEUR 318 RÉGLAGE DE LA LARGEUR DU FRAISAGE 319 RÉGLAGE DE LA LONGUEUR DU FRAISAGE 3210 RÉGLAGE DE LA PROFONDEUR DE FRAISAGE 3211 FRAISAGE DE MORTAISAGE SUR UNE PORTE 33MESURE ET TRAÇAGE DES REPÈRES 33FRAISAGE DU DÉLARDEMENT DU LOGEMENT 3412 FRAISAGE DU DÉLARDEMENT POUR LAPLAQUE FRONTALE DE LA SERRURE 35CHANGEMENT DE LA FRAISE 35MESURE, TRAÇAGE DE REPÈRE ET MISE ENPLACE DE LA FC116U SUR LA PORTE 35RÉGLAGE DE LA COURSE DU FRAISAGE 35RÉGLAGE DE LA PROFONDEUR DU FRAISAGE 36FRAISAGE DU DÉLARDEMENT 3613 PERÇAGE DES TROUS POURLA POIGNÉE ET LA CLÉ 37MONTAGE DE L’OUTIL DU GABARIT UC16I 37SITUATION DE L’OUTIL ET PERÇAGE 37OUTILS DE PERÇAGE EN OPTION 3714 FRAISAGE DE LA MORTAISE SUR PLUSIEURS PORTES 3815 FRAISAGE DE MORTAISAGESEN POSITION HORIZONTALE 3816 CORRECTIONS POUR PORTES À CHEVAUCHEMENT 3817 KIT D'ASPIRATION 3918 EXTRACTION DE L'AXE CANNELÉ 3919 CHANGEMENT DES BALAIS 3920 LUBRIFICATION ET NETTOYAGE 3921 OUTILS ET ACCESSOIRES OPTIONNELS 4022 NIVEAU DE BRUIT 4023 GARANTIE 4028 - FC116U / Mo<strong>de</strong> d’emploi
MORTAISEUSE FC116UIMPORTANTAvant d'utiliser la machine, lisez attentivement ce MANUELD'INSTRUCTIONS et la BROCHURE D'INSTRUCTIONS GÉNÉRALESDE SÉCURITÉ qui vous sont fournis avec cette machine. Assurezvous<strong>de</strong> bien avoir tout compris avant <strong>de</strong> commencer à travaillersur la machine.Gar<strong>de</strong>z toujours ces <strong>de</strong>ux manuels d'instructions à portée <strong>de</strong> lamain pour pouvoir les consulter, en cas <strong>de</strong> besoin.1. DONNÉES TECHNIQUESMoteur universel.............................................................................50/60 HzPuissance.............................................................................................1.100 WVitesse à vi<strong>de</strong>...............................................................................23.000 t/minDiamètre maximum <strong>de</strong> fraise..............................................................30 mmProfon<strong>de</strong>ur maximum <strong>de</strong> fraisage........................................0-125 mmLargeur maximum <strong>de</strong> fraisage..................................................diam. fraiseLongueur maxi. <strong>de</strong> fraisage...............................177 mm + diamètre fraiseOuverture maximum <strong>de</strong>s étaux........................................................190 mmSerrage minimum <strong>de</strong>s étaux..............................................................13 mmDéplacement latéral <strong>de</strong> la fraise surl'épaisseur <strong>de</strong> la porte.....................................................................+/- 15 mmPoids..........................................................................................................14 kgNiveau <strong>de</strong> pression acoustiquecontinu équivalent pondéré A........................................................87 dBANiveau <strong>de</strong> puissance acoustique A.................................................98 dBAIncertitu<strong>de</strong>.....................................................................................K = 3 dbAPorter une protection acoustique!Valeurs totales <strong>de</strong>s vibrations...................................................a h: 2,6 m/s 2Incertitu<strong>de</strong>...................................................................................K: 1,5 m/s 22. EMPLOILa mortaiseuse portative FC116U est un outil électrique pour lefraisage <strong>de</strong> mortaises pour monter <strong>de</strong>s serrures <strong>de</strong> portes, <strong>de</strong>sassemblages à emboîtement, etc.En plus du logement pour la serrure, il est également possible <strong>de</strong>fraiser le délar<strong>de</strong>ment pour la plaque frontale <strong>de</strong> la serrure et ledélar<strong>de</strong>ment pour la plaque <strong>de</strong> la gâche dans l’encadrement. Enoutre, l’outil UC16I fourni avec la machine permet <strong>de</strong> percer lespassages pour le cylindre ou le barillet et pour la poignée dansla porte.FC116U / Mo<strong>de</strong> d’emploi - 29
3. INSTRUCTIONS DE SÉCURITÉPOUR LE MANIEMENT DE LA MACHINEFaire en sorte que la personne qui va utilisercette machine lise attentivement et comprennebien ce MODE D'EMPLOI et la BROCHURED'INSTRUCTIONS GÉNÉRALES DE SÉCURITÉ cijointe,avant <strong>de</strong> commencer à travailler avec lamachine.• Avant <strong>de</strong> brancher la machine vérifier si la tension d'alimentationcorrespond à celle indiquée sur la plaque <strong>de</strong>s caractéristiques.• Pour changer la fraise ou pour faire toute opération près <strong>de</strong> latête <strong>de</strong> coupe, débrancher la machine du secteur.• Utiliser <strong>de</strong>s lunettes <strong>de</strong> sécurité pour travailler avec la mortaiseuse.• Ne pas mettre le moteur en marche si on a retiré la carcasse<strong>de</strong> la machine.• Vérifier le parcours du câble d'alimentation pour éviter qu'ils'enroule pendant l'utilisation.• Toujours mettre la mortaiseuse en marche avec le levier <strong>de</strong>l'interrupteur principal.• Après avoir placé la mortaiseuse sur la pièce à fraiser, déplacertoujours l'outil en utilisant la manivelle d'avance du chariot. Nejamais pousser avec les mains ou avec <strong>de</strong>s outils étrangers.• S'assurer que le moteur est complètement arrêté avant <strong>de</strong> sortirla fraiseuse <strong>de</strong> la mortaise réalisée.• Toujours utiliser <strong>de</strong>s fraises du diamètre approprié, correctementmontées sur l'axe cannelé.• Ne jamais utiliser <strong>de</strong> fraises incorrectes, défectueuses ou enmauvais état. N'utiliser que <strong>de</strong>s fraises et <strong>de</strong>s pièces <strong>de</strong> rechanged'origine VIRUTEX.4. ÉQUIPEMENT STANDARDÀ l'intérieur <strong>de</strong> la boîte, on trouvera les éléments suivants:• Mortaiseuse FC116U• Outil <strong>de</strong> perçage cylindre et entraxe UT16I• Clés <strong>de</strong> service et gabarit <strong>de</strong> traçage• Tige <strong>de</strong> hauteur démontable en 4 sections et une butée <strong>de</strong>porte.• Quatre protecteurs d’étaux pour travaux délicats montés.• Fraise <strong>de</strong> mortaisage diamètre 16 mm.• Mo<strong>de</strong> d’emploi et documentation diverseFig. 15. MONTAGE DE LA MANIVELLE D'AVANCE DU CHARIOTVérifier si la mortaiseuse est bien débranchée dusecteur.(Figure 1)30 - FC116U / Mo<strong>de</strong> d’emploi• Encastrer la rainure rectangulaire <strong>de</strong> la manivelle avance chariot"A", en la positionnant sur les plans <strong>de</strong> l'axe "B", placer laron<strong>de</strong>lle "C" et la vis "D", comme l'indique la (Fig. 1). Serrer la vis"D" à l'ai<strong>de</strong> <strong>de</strong> la clé "F", ce qui fixera la manivelle avance chariotdans son logement.• IL EST IMPORTANT DE NE PAS DONNER DE COUP SUR LA SUR-FACE DE LA MANIVELLE AVANCE "A".
6. MONTAGE DES OUTILS DE COUPEEVérifier si la mortaiseuse est bien débranchée dusecteur.• La mortaiseuse est fournie avec une fraise <strong>de</strong> 16 mm <strong>de</strong> diamètremontée sur l'extrémité <strong>de</strong> l'axe cannelé.Pour changer la fraise, bloquer l'axe cannelé par ses faces avecla clé "E" (Fig. 2), dévisser la Fraise "G" avec la clé "F" et la remplacerpar une autre du diamètre voulu.(Figure 2)7. INTERRUPTEUR• Le boîtier <strong>de</strong> l'interrupteur (Fig. 3) est pourvu d'un levier "Y"pour la mise en marche <strong>de</strong> la machine et d'un verrouillage <strong>de</strong>sûreté latéral "Z". Pour mettre en marche la machine, actionnerle verrouillage <strong>de</strong> sûreté "Z" et sans le lâcher, appuyer sur lelevier "Y", la machine restera ainsi en marche.En appuyant sur le levier "Y" avec la machine en marche, le verrouillage<strong>de</strong> sûreté "Z" se déverrouille automatiquement et lamachine s'arrête.Le verrouillage <strong>de</strong> sûreté <strong>de</strong> l'interrupteur "Z" empêche la miseen marche acci<strong>de</strong>ntelle <strong>de</strong> la machine.ZY(Figure 3)N8. RÉGLAGE DE LA LARGEUR DU FRAISAGE• Mesurer le point le plus large "N" du logement <strong>de</strong> la serrure,y compris toute protubérance, (Fig. 4), NE PAS INCLURE le côtéenjoliveur extérieur <strong>de</strong> la serrure.Vérifier si la mortaiseuse est bien débranchée dusecteur.(Figure 4)• Placer une fraise <strong>de</strong> mortaisage <strong>de</strong> la dimension prise ou légèrementplus gran<strong>de</strong> en suivant les instructions du paragraphe6.FC116U / Mo<strong>de</strong> d’emploi - 31
9. RÉGLAGE DE LA LONGUEUR DU FRAISAGEH• Mesurer le point le plus long "H" du logement <strong>de</strong> la serrure,y compris toute protubérance, (Fig. 5), NE PAS INCLURE le côtéenjoliveur extérieur <strong>de</strong> la serrure.TVérifier si la mortaiseuse est bien débranchée dusecteur.(Figure 5)• Pour régler la machine à la longueur <strong>de</strong> fraisage "H" voulue,<strong>de</strong>sserrer l'écrou "P" (Fig. 6) avec la clé "F" et actionner le boutonà vis "R" jusqu'à ce que l'indicateur <strong>de</strong> longueur "S" atteigne lamesure voulue "H" et serrer l'Écrou "P" dans cette position.PVérifier si on a bien serré l'écrou "P" (Fig. 6) carsinon cela pourrait produire la rupture du mécanisme<strong>de</strong> réglage <strong>de</strong> la longueur du fraisage.FSRLe centrage <strong>de</strong> la fraise sur l'épaisseur <strong>de</strong> la porte ou <strong>de</strong> la pièceà mortaiser est automatique, si les plaquettes "J" (Fig. 7) sont enposition "0", sur les <strong>de</strong>ux guidages d'étau "V" (Fig. 7).V(Figure 6)V(Figure 7)JWAV10. RÉGLAGE DE LA PROFONDEUR DE FRAISAGEW• Mesurer la profon<strong>de</strong>ur "T" (Fig. 5) du logement <strong>de</strong> la serrure,y compris toute protubérance qu'il aurait au fond, l'épaisseurdu côté enjoliveur extérieur et quelques mm <strong>de</strong> plus pour le jeu.AVérifier si la mortaiseuse est bien débranchée dusecteur.(Figure 8)32 - FC116U / Mo<strong>de</strong> d’emploiU• On contrôle la profon<strong>de</strong>ur <strong>de</strong> fraisage par la règle graduée "U"(Fig. 8) qui est divisée en 1 mm. Desserrer le bouton "W" et placerl'anneau "A" <strong>de</strong> manière à ce que sa face intérieure coïnci<strong>de</strong>avec la profon<strong>de</strong>ur voulue, et serrer le bouton "W" dans cetteposition.
"c""H2"11. FRAISAGE DE MORTAISAGE SUR UNE PORTE• Placer la porte en position verticale et la fixer fermement pourqu'elle ne bouge pas. Si la porte est déjà montée sur l'encadrement,mettre <strong>de</strong>s cales <strong>de</strong>ssous pour qu'elle ne bouge pas.MESURE ET TRAÇAGE DES REPÈRES• Poser la serrure contre la porte, <strong>de</strong> façon à ce que le passagepour le bouton ou la poignée soit à la hauteur voulue du sol"H0" (Fig. 9), puis marquer un trait "0" (Fig. 9) sur la face et surle chant <strong>de</strong> la porte.• Mesurer la distance "H2" (Fig. 9) <strong>de</strong>puis le centre <strong>de</strong> la poignéejusqu’au centre du logement <strong>de</strong> la serrure."rs""rs""rs""0""c""H2""0""c"Pt"c""H0""0""c""H2"(Figure 9)• Tracer le centre "c" du logement <strong>de</strong> la serrure sur le chant<strong>de</strong> la porte, en utilisant pour ce faire le gabarit <strong>de</strong> traçage"Pt" (Fig. 9) fourni avec la machine.Ce gabarit comporte une série <strong>de</strong> rainures situées à 5 mm lesunes <strong>de</strong>s autres; il faut donc le situer sur le chant <strong>de</strong> la porte,en faisant coïnci<strong>de</strong>r le trait "0" (Fig. 9) avec la rainure correspondantà la mesure "H2" (Fig. 9) qui a été prise précé<strong>de</strong>mment,(20 mm sur la Fig. 9), puis marquer le trait "c" (Fig. 9) sur le bordinférieur du gabarit.• Tracer le repère supérieur "rs" (Fig. 9) qui servira pour lemontage <strong>de</strong> la machine sur la porte.Pour ce faire, situer l’extrémité inférieure du gabarit <strong>de</strong> traçage"Pt" (Fig. 9) sur le trait "c" (Fig. 9), puis marquer le trait "rs" (Fig.9) sur l’extrémité supérieure du gabarit.FC116U / Mo<strong>de</strong> d’emploi - 33
FRAISAGE DU DÉLARDEMENT DU LOGEMENTVYZK"rs""c"• Fixer la machine sur la porte, en alignant l’arête supérieure dulongeron "V" (Fig. 10) sur le trait <strong>de</strong> repère supérieur "rs" (Fig.10), puis fixer fermement les étaux avec les manivelles "K" (Fig.10).• Vérifier si la manivelle d’avance "A" (Fig. 10) peut tourner librementsur toute sa course.• Tourner la tige <strong>de</strong> blocage "J" (Fig. 10) en position verticale,pour engrener le mécanisme d’avance <strong>de</strong> profon<strong>de</strong>ur du fraisage.• Brancher la machine sur le secteur, puis mettre en marche lemoteur en appuyant sur le levier "Y" (Fig. 10) et en bloquant leverrouillage <strong>de</strong> sûreté "Z" (Fig. 10).• Tourner plusieurs fois la manivelle d’avance "A" (Fig. 10), cequi permettra d’obtenir une avance synchronisée <strong>de</strong> l’outil, enlongueur et en profon<strong>de</strong>ur, jusqu'à la fin <strong>de</strong> la course fixée auparagraphe 10.• Arrêter la machine en actionnant le levier "Y" (Fig. 10).JADébrancher la mortaiseuse du secteur.(Figure 10)• Tourner la tige <strong>de</strong> blocage "J" (Fig. 10) en position horizontale,ce qui permet <strong>de</strong> libérer le mécanisme d’avance <strong>de</strong> l’outil, pourque le moteur recule jusqu’à la fin <strong>de</strong> sa course.34 - FC116U / Mo<strong>de</strong> d’emploi
"N3"N112. FRAISAGE DU DÉLARDEMENT POUR LA PLAQUE FRON-TALE DE LA SERRURE"Nt"Vérifier si la mortaiseuse est bien débranchée dusecteur.(Figure 11)"N2"N2-N3= X mm"rs"CHANGEMENT DE LA FRAISE• Mesurer la largeur « N1 » (Fig. 11) <strong>de</strong> la partie frontale <strong>de</strong> laserrure et monter sur la machine une fraise <strong>de</strong> mortaisage <strong>de</strong>dimension correcte, en suivant les instructions du paragraphe6 du manuel.V"rs1"MESURE, TRAÇAGE DE REPÈRE ET MISE EN PLACE DE LAFC116U SUR LA PORTE(Figure 12)S2S1S(Figure 14)S1"rs"N2-N3= X mm"rs1"(Figure 13)• Prendre les mesures entre le logement <strong>de</strong> la serrure et chacune<strong>de</strong>s <strong>de</strong>ux extrémités <strong>de</strong> la partie frontale <strong>de</strong> la serrure "N2" et"N3" (Fig. 11).• Si les <strong>de</strong>ux mesures "N2" et "N3" (Fig. 11) sont égales: fixer lamachine sur la porte, en alignant l’arête supérieure du longeron"V" (Fig. 12) sur le trait <strong>de</strong> repère supérieur "rs" (Fig. 12), ce quipermet d’aligner les centres <strong>de</strong> la course <strong>de</strong> la machine, du logement<strong>de</strong> la serrure et <strong>de</strong> la plaque frontale <strong>de</strong> la serrure.• Si les mesures "N2" et "N3" (Fig. 11) ne sont pas égales, prendrela différence entre les <strong>de</strong>ux "N2" - "N3" = X mm (Fig. 11); tracerun nouveau repère supérieur "rs1" (Fig. 13 et 12), déplacé <strong>de</strong> Xmm, sur le côté <strong>de</strong> la mesure la plus gran<strong>de</strong> entre la "N2" et la"N3", puis fixer la machine sur la porte, en alignant l'arête supérieuredu longeron "V" (Fig. 12) sur le nouveau trait <strong>de</strong> repèresupérieur "rs1" (Fig. 12), pour aligner le centre <strong>de</strong> la course <strong>de</strong> lamachine sur le centre <strong>de</strong> la plaque frontale <strong>de</strong> la serrure.RÉGLAGE DE LA COURSE DU FRAISAGE• Mesurer la longueur <strong>de</strong> la partie frontale "NT" (Fig. 11) <strong>de</strong> laserrure et fixer les <strong>de</strong>ux butées longitudinales "S1" (Fig. 12 et 14)sur la division correspondant à la mesure "NT" <strong>de</strong> l’échelle <strong>de</strong> lacolonne <strong>de</strong> guidage "S" (Fig. 14).• Situer et fixer les <strong>de</strong>ux butées <strong>de</strong> correction du diamètre <strong>de</strong> lafraise "S2" (Fig. 14) sur le repère correspondant au diamètre <strong>de</strong>la fraise montée (Fig. 14).• Régler sur l’indicateur la longueur du fraisage en prenant unemesure un peu plus gran<strong>de</strong> que celle <strong>de</strong> la partie frontale <strong>de</strong> laserrure "NT" (Fig. 11), comme cela est expliqué au paragraphe 9(Fig. 6) <strong>de</strong> ce manuel.FC116U / Mo<strong>de</strong> d’emploi - 35
WKS1rsrs1RÉGLAGE DE LA PROFONDEUR DU FRAISAGE• Relever le bouton "W" (Fig. 15-18) jusqu’à sa position limitesupérieure, en le faisant tourner dans le sens contraire <strong>de</strong>s aiguillesd’une montre.• Vérifier si la tige <strong>de</strong> blocage "J" (Fig. 15) est bien en positionhorizontale, (avance <strong>de</strong> profon<strong>de</strong>ur déconnectée).• Dévisser le bouton "K" (Fig. 16); déplacer la machine vers lebas, en poussant doucement le moteur avec la main, jusqu’à ceque la fraise touche juste le chant <strong>de</strong> la porte et la fixer danscette position en serrant le bouton "K" (Fig. 16).• Poser la partie frontale <strong>de</strong> la serrure (Fig. 17) sur la partie inférieuredu support du moteur, puis déplacer et fixer la butée <strong>de</strong>profon<strong>de</strong>ur "S3" (Fig. 16 et 17) pour bloquer la partie frontale<strong>de</strong> la serrure.• Desserrer le bouton "K" (Fig. 15-17) pour que la machine revienneà sa position <strong>de</strong> départ.JA(Figure 15)WWKS3S3K(Figure 17)(Figure 16)ZYAS1(Figure 18)36 - FC116U / Mo<strong>de</strong> d’emploiWS3FRAISAGE DU DÉLARDEMENT• Vérifier si la tige <strong>de</strong> blocage "J" (Fig. 15) est bien en positionhorizontale, (avance <strong>de</strong> profon<strong>de</strong>ur déconnectée).• Brancher la machine sur le secteur, puis mettre en marche lemoteur en appuyant sur le levier "Y" (Fig. 18) et en bloquant leverrouillage <strong>de</strong> sûreté "Z" (Fig. 18).• Tourner le bouton "W" (Fig. 17 et 18) jusqu’à ce que le supportdu moteur entre en contact avec la butée <strong>de</strong> profon<strong>de</strong>ur"S3" (Fig. 18). Une fois que la machine a atteint la profon<strong>de</strong>ur<strong>de</strong> coupe prévue pour la partie frontale <strong>de</strong> la serrure, actionnerdoucement la manivelle d’avance du chariot "A" (Fig. 15 et 18)pour atteindre chacune <strong>de</strong>s <strong>de</strong>ux butées "S1" (Fig. 15 et 18), situéessur chaque fin <strong>de</strong> course du chariot, dans un mouvement<strong>de</strong> va-et-vient.Si le délar<strong>de</strong>ment à réaliser est plus grand que 2 mm, il est conseillé<strong>de</strong> le faire en <strong>de</strong>ux passages successifs ou plus, en actionnantà plusieurs reprises le bouton "W".• Remettre le bouton "W" (Fig. 18) et la butée <strong>de</strong> profon<strong>de</strong>ur"S3" (Fig. 16) dans leur position <strong>de</strong> départ à la fin du fraisage.
13. PERÇAGE DES TROUS POUR LA POIGNÉE ET LA CLÉ• Pour terminer, le gabarit UT16I fourni avec la machine permet<strong>de</strong> réaliser les trous nécessaires pour le montage <strong>de</strong> la serrure,tels que les passages pour la poignée, le verrou, le barillet <strong>de</strong>serrure, etc.BA"c""c"MONTAGE DE L’OUTIL DU GABARIT UC16I• Introduire une tige <strong>de</strong> hauteur démontablefournie avec la machine dans les trous "A",puis faire glisser l’outil jusqu’à ce que le "0" <strong>de</strong>repère soit situé au centre "c" du logement <strong>de</strong>la serrure. (Fig. 19).• Fixer avec le bouton "B" et araser en mêmetemps la face interne "C" <strong>de</strong> la tôle <strong>de</strong> référencesur le chant <strong>de</strong> la porte. (Fig. 19).centro caja cerradura "c"CA(Figure 19)centro caja cerraduraSITUATION DE L’OUTIL ET PERÇAGEGH "c"centro caja cerradura "c""c"• Desserrer la douille <strong>de</strong> guidage "G" et la faireglisser horizontalement, en situant l’in<strong>de</strong>x "H"sur la mesure "D", puis resserrer la douille. (Fig.20).• En prenant comme repère le centre "c" dulogement <strong>de</strong> la serrure, faire glisser l’outil verticalementpour le situer sur la mesure "E" et"F" voulue. (Fig. 20)• Après avoir situé la position du trou, on peutpercer avec un foret <strong>de</strong> 11 mm <strong>de</strong> diamètre.• En reprenant comme référence le centre "c"du logement <strong>de</strong> la serrure, on pourra situer letrou suivant dont a besoin la serrure.(Figure 20)OUTILS DE PERÇAGE EN OPTION1640148 16401491640148 Fraise à évaser D.18 avec gui<strong>de</strong> <strong>de</strong> 111640149 Fraise à évaser D.23 avec gui<strong>de</strong> <strong>de</strong> 11FC116U / Mo<strong>de</strong> d’emploi - 37
A214. FRAISAGE DE LA MORTAISE SUR PLUSIEURS PORTESU1(Figure 21)S1T1A1• Si on veut mortaiser plusieurs portes et situer les serrures àla même hauteur, il est conseillé d'employer la tige <strong>de</strong> hauteurs"A1" (Fig. 21) qui facilitera l'opération.Pour ce faire, après avoir déterminé la hauteur <strong>de</strong> la serrure surla première porte, et situé la machine en position pour fraiser,monter les quatre tiges <strong>de</strong> hauteur "A1" (Fig. 21) et les insérer dansles orifices <strong>de</strong>s étaus "X" (Fig. 22), <strong>de</strong> manière à ce que le disque<strong>de</strong> butée "A2" (Fig. 21) <strong>de</strong> leur extrémité fasse butée sur le chantsupérieur <strong>de</strong> la porte et fixer la tige <strong>de</strong> hauteur "A1" (Fig. 21 et 22)dans cette position, avec les boutons "B1" (Fig. 22). Pour la portesuivante, il n’y aura qu’à placer la machine, avec le disque <strong>de</strong> butée"A2" (Fig. 21) <strong>de</strong> la tige <strong>de</strong> hauteur "A1" reposant sur le chantsupérieur <strong>de</strong> la porte, puis à fixer les étaux dans cette position età marquer le trait <strong>de</strong> repère supérieur "rs" pour l'utiliser par lasuite sur cette nouvelle porte, ce qui permettra <strong>de</strong> poser toutes lesserrures à la même hauteur.On peut également employer la tige <strong>de</strong> hauteurs "A1" (Fig. 21) sansle disque <strong>de</strong> butée "A2" (Fig. 21) comme référence <strong>de</strong> hauteur parrapport au sol.JXQA1B1XF15. FRAISAGE DE MORTAISAGESEN POSITION HORIZONTALE• Pour travailler avec la FC116U en position horizontale, parexemple pour la réalisation <strong>de</strong> mortaises sur portes avant <strong>de</strong> lesmonter, il convient <strong>de</strong> déconnecter l'amortisseur "T1", (Fig. 21),pour libérer le mouvement du chariot "U1".Pour ce faire, dévisser l'ecrou "P" (Fig. 23) avec la clé "F" et enactionnant le bouton à vis "R", déplacer l'indicateur <strong>de</strong> longueur"S" jusqu'à la butée "A2" <strong>de</strong> fin <strong>de</strong> course.Retirer le bouton "S1" (Fig. 21) qui fixe l'amortisseur "T1" pourle déconnecter. Gar<strong>de</strong>r le bouton "S1" dans un endroit sûr pourune prochaine utilisation. Pour terminer, régler la longueur <strong>de</strong>fraisage voulue, selon ce qui est indiqué au paragraphe 9, avant<strong>de</strong> travailler avec la machine, car elle ne doit jamais travailler enfin <strong>de</strong> course, au-<strong>de</strong>là <strong>de</strong> la longueur maximum.(Figure 22)PF(Figure 23)38 - FC116U / Mo<strong>de</strong> d’emploiA2SR16. CORRECTIONS POUR PORTES À CHEVAUCHEMENTPour le mortaisage <strong>de</strong> portes à chevauchement, il faudra corrigerle centrage <strong>de</strong> la machine et la profon<strong>de</strong>ur <strong>de</strong> fraisage comme suit:Vérifier si la machine est bien débranchée dusecteur.• Pour centrer la machine, sur la section <strong>de</strong> porte sans chevauchement,<strong>de</strong>sserrer avec la clé "F" (Fig. 22) les vvis "Q" qui bloquentles étaus "X" et déplacer les plaques "J" vers le côté duchevauchement <strong>de</strong> la moitié <strong>de</strong> la largeur <strong>de</strong> celui-ci en mm, etfixer à nouveau les vis "Q" dans cette position.• En réglant la profon<strong>de</strong>ur <strong>de</strong> fraisage, comme cela est expliquéau paragraphe 10, il faudra situer l'anneau <strong>de</strong> butée "A" (Fig. 8)à une hauteur <strong>de</strong> l'échelle "U" (Fig. 8) qui soit la somme <strong>de</strong> laprofon<strong>de</strong>ur nécessaire pour la serrure plus la hauteur du chevauchement<strong>de</strong> la porte, puisque la machine s'appuiera sur cechevauchement.
17. KIT D'ASPIRATIOND2D1•La mortaiseuse FC116U dispose d'une buse "D2" (Fig. 24) qui,montée sur la tige <strong>de</strong> position "D1" (Fig. 24), sur l'ouverture dulogement à réaliser, permet <strong>de</strong> brancher l'Aspirateur <strong>Virutex</strong>AS182K, AS282K, AS382L et ASC482U ou un autre aspirateurindustriel pour l'évacuation <strong>de</strong>s copeaux du fraisage.(Figure 24)EGt18. EXTRACTION DE L'AXE CANNELÉPour changer l'axe cannelé "M" (Fig. 26), démonter tout d'abordla fraise "G" (Fig. 25) comme cela est expliqué au paragraphe 6.Placer la clavette "L" (Fig. 26) dans l'orifice central <strong>de</strong> la carcasse,jusqu'à ce que l'axe du moteur se bloque puis extraire l'axecannelé "M" avec la clé "E".FGp(Figure 25)G19. CHANGEMENT DES BALAISVérifier si la machine est bien débranchée dusecteur avant <strong>de</strong> faire toute manipulation.L(Figure 26)EM• Les balais doivent être changés quand ils ont une longueurminimum <strong>de</strong> 5 mm. Pour ce faire, démonter le boîtier <strong>de</strong>l'interrupteur "F1" (Fig. 27) en retirant les vis "G1" qui le fixent.Retirer les bouchons "H1" qui fixent les balais "I1" et les remplacerpar d'autres d'origine VIRUTEX, en vérifiant qu'ils glissentdoucement à l'intérieur <strong>de</strong>s guidages. Vérifier, en remontant leboîtier <strong>de</strong> l'interrupteur "F1", que les câbles sont bien situés àl'intérieur.Il est conseillé <strong>de</strong> laisser la machine en marche à vi<strong>de</strong> pendantquelques minutes après avoir remplacé les balais. Profiter duchangement <strong>de</strong>s balais pour vérifier l'état du collecteur. Si celuiciprésente <strong>de</strong>s brûlures ou <strong>de</strong>s ressauts, il est conseillé <strong>de</strong> le faireréparer par un Service Technique VIRUTEX.H1I1I1(Figure 27)F1H1G120. LUBRIFICATION ET NETTOYAGE• Avant <strong>de</strong> fraiser le premier délar<strong>de</strong>ment, lubrifier les colonnes<strong>de</strong> guidage <strong>de</strong> profon<strong>de</strong>ur "Gp" (Fig. 25) et les transversales"Gt" (Fig. 25) avec un chiffon légèrement imprégné d'huile pourfaciliter les <strong>de</strong>ux mouvements. Il est cependant important <strong>de</strong>toujours nettoyer soigneusement la machine après son utilisation,avec un souffle d'air sec.Toujours conserver le câble d'alimentation dans <strong>de</strong> parfaitesconditions d'emploi.FC116U / Mo<strong>de</strong> d’emploi - 39
21. OUTILS ET ACCESSOIRES OPTIONNELS• Fraises pour mortaiseuse FC16S disponibles:NUMÉRO DIAM.EXT. HAUTEUR1640127 16 mm. 13.5 mm.1640150 17 " 13.5 "1640128 18 " 13.5 "1640367 20 " 13.5 "1640129 21 " 13.5 "1640130 23 " 13.5 "1640368 23,5 " 13.5 "1640131 25 " 13.5 "1640369 29 " 13.5 "1640132 30 " 13.5 "1640140 Fraise à percer Ø 24• La rallonge UP16I, 1645287, permet <strong>de</strong> rallonger la fixation <strong>de</strong>la machine au-<strong>de</strong>là <strong>de</strong> la porte.22. NIVEAU DE BRUITLes niveaux <strong>de</strong> bruit et <strong>de</strong> vibrations <strong>de</strong> cet appareil électriqueont été mesurés conformément à la norme européenne EN61029-1 et font office <strong>de</strong> base <strong>de</strong> comparaison avec <strong>de</strong>s machinesaux applications semblables.Le niveau <strong>de</strong> vibrations indiqué a été déterminé pour les principalesapplications <strong>de</strong> l’appareil, et il peut être pris comme valeur<strong>de</strong> base pour l’évaluation du risque lié à l’exposition aux vibrations.Toutefois, dans d’autres conditions d’application, avecd’autres outils <strong>de</strong> travail ou lorsque l’entretien <strong>de</strong> l’appareil électriqueet <strong>de</strong> ses outils est insuffisant, il peut arriver que le niveau<strong>de</strong> vibrations soit très différent <strong>de</strong> la valeur déclarée, voire mêmebeaucoup plus élevé en raison du cycle <strong>de</strong> travail et du mo<strong>de</strong>d'utilisation <strong>de</strong> l'appareil électrique.Il est donc nécessaire <strong>de</strong> fixer <strong>de</strong>s mesures <strong>de</strong> sécurité pour protégerl'utilisateur contre les effets <strong>de</strong>s vibrations, notamment gar<strong>de</strong>rl’appareil et les outils <strong>de</strong> travail en parfait état et organiserles temps <strong>de</strong>s cycles <strong>de</strong> travail (temps <strong>de</strong> fonctionnement avecl’appareil en service, temps <strong>de</strong> fonctionnement avec l’appareil àvi<strong>de</strong>, sans être utilisé réellement), car la diminution <strong>de</strong> ces tempspeut réduire substantiellement la valeur totale d’exposition.23. GARANTIEToutes les machines électroportatives VIRUTEX ont une garantievalable 12 mois à partir du jour <strong>de</strong> la fourniture, étant exclustoutes les manipulations ou les dommages causés par <strong>de</strong>smaniements incorrects ou provenant <strong>de</strong> l'usure naturelle <strong>de</strong> lamachine. Pour toute réparation, s'adresser au Service Officield'Assistance Technique VIRUTEX.VIRUTEX se réserve le droit <strong>de</strong> modifier ses produits sans avispréalable.40 - FC116U / Mo<strong>de</strong> d’emploi
GEBRAUCHSANWEISUNGINDEX1 TECHNISCHE DATEN 422 EINSATZ 423 SICHERHEITSHINWEISE ZUM GEBRAUCHDER MASCHINE 434 STANDARDAUSRÜSTUNG 435 MONTAGE DER SCHLITTENVORSCHUBKURBEL 43Spezifikationsän<strong>de</strong>rungenvorbehalten.6 MONTAGE DER SCHNEIDWERKZEUGE 447 SCHALTER 448 EINSTELLUNG DER FRÄSBREITE 449 EINSTELLUNG DER FRÄSLÄNGE 4510 EINSTELLUNG DER FRÄSTIEFE 4511 LANGLOCHFRÄSUNG AN EINER TÜR 46BEZUGSLINIEN MESSEN UND ZEICHNEN 46FRÄSEN DES SCHLOSSKASTENS 4712 FRÄSEN DES SITZES FÜR DIE FRONTPLATTEDES SCHLOSSES 48AUSTAUSCHEN DER FRÄSE 48BEZUGSLINIEN MESSEN, ZEICHNEN UNDFC116U AN DER TÜR BEFESTIGEN 48EINSTELLEN DES FRÄSWEGS 48EINSTELLEN DER FRÄSTIEFE 49FRÄSEN DES SITZES 4913 BOHREN DER ÖFFNUNGEN FÜR DIETÜRKLINKE UND DEN SCHLÜSSEL 50ANBRINGEN DER VORRICHTUNG VON SCHABLO-NE UC16I 50POSITIONIEREN DER VORRICHTUNG UND BOHREN 50OPTIONALE BOHRWERKZEUGE 5014 FRÄSEN DES SCHLOSSKASTENS AN MEHRERENTÜREN 5115 LANGLOCHFRÄSUNG IN WAAGERECHTER LAGE 5116 KORREKTUREN BEI ÜBERL APPENDEN TÜREN 5117 ANSCHLUSS EINES STAUBSAUGERS 5218 AUSBAU DER GEKEHLTEN ACHSE 5219 AUSWECHSELN DER STROMABNEHMER 5220 SCHMIERUNG UND REINIGUNG 5221 WERKZEUGE UND SONDERZUBEHÖR 5322 LÄRMPEGEL 5323 GARANTIE 53FC116U / Gebrauchsanweisung - 41
LANGLOCHFRÄSMASCHINE FC116UBITTE BEACHTENLesen Sie bitte vor Benutzung <strong>de</strong>r Maschine die beiliegen<strong>de</strong>GEBRAUCHSANWEISUNG und die ALLGEMEINEN SICHERHEITS-HINWEISE sorgfältig durch.Stellen Sie sicher, dass Sie sowohl die Gebrauchsanweisung alsauch die allegemeinen Sicherheitshinweise verstan<strong>de</strong>n haben,bevor Sie die Maschine bedienen. Bewahren Sie bei<strong>de</strong> Gebrauchsanweisungenzum späteren Nachschlagen auf.1. TECHNISCHE DATENUniversal-Motor............................................................................50/60 HzLeistung.............................................................................................1.100 WLeerlaufgeschwindigkeit.....................................................23.000 min -1Maximaler Fräserdurchmesser......................................................30 mmMaximale Frästiefe....................................................................0 - 125 mmMaximale Fräsbreite..................................................FräserdurchmesserMaximale Fräslänge...............................177 mm + FräserdurchmesserMaximale Backenöffnung..........................................................190 mmKleinstübermaß <strong>de</strong>r Backen.............................................................13 mmSeitliche Verschiebung <strong>de</strong>s Fräsers über die Türstärke..........± 15 mmGewicht.................................................................................................14 KgGewichteter akustischer Dauerdruckpegel A........................87 dBAAkustischer Druckpegel A..........................................................98 dBAUnsicherheit......................................................................................K = 3 dBAGehörschutz tragen!Schwingungsgesamtwerte................................................a h:
6. MONTAGE DER SCHNEIDWERKZEUGEEÜberprüfen Sie, ob die Fräsmaschine von <strong>de</strong>rStromversorgung getrennt ist.• Die Langlochfräsmaschine wird mit einem Fräser mit einemDurchmesser von 16 mm am En<strong>de</strong> <strong>de</strong>r gekehlten Achse geliefert.Zum Wechseln <strong>de</strong>s Fräsers blockieren Sie die gekehlte Achse aufihren Planseiten mit <strong>de</strong>m Schlüssel "E" (Abb. 2), schrauben Sie<strong>de</strong>n Fräser "G" mit <strong>de</strong>m Schlüssel "F" ab und ersetzen Sie ihndurch einen mit <strong>de</strong>m gewünschten Durchmesser.(Abb. 2)7. SCHALTER• Das Schaltergehäuse (Abb. 7), ist mit einem Hebel "Y" zumStarten <strong>de</strong>r Maschine und einer seitlichen Sperrsicherung "Z"versehen. Zum Starten betätigt man die Sperrsicherung "Z" unddrückt, ohne loszulassen, <strong>de</strong>n Hebel "Y", um die Maschine in Betriebzu halten.Wenn man <strong>de</strong>n Hebel "Y" bei laufen<strong>de</strong>r Maschine drückt, löstsich automatisch die Sicherung "Z" und die Maschine hält an.Die Sperrsicherung <strong>de</strong>s Schalters "Z" verhin<strong>de</strong>rt die unbeabsichtigteInbetriebnahme <strong>de</strong>r Maschine.ZY(Abb. 3)N8. EINSTELLUNG DER FRÄSBREITE• Messen Sie <strong>de</strong>n breitesten Punkt "N" <strong>de</strong>s Schlosses einschließlichaller möglichen vorstehen<strong>de</strong>n Teile (Abb. 4). NEHMENSIE NICHT die äußere Blen<strong>de</strong>nseite <strong>de</strong>s Schlosses mit hinzu.Vergewissern Sie sich, daß die Fräsmaschine von<strong>de</strong>r elektrischen Stromversorgung getrennt ist.(Abb. 4)44 - FC116U / Gebrauchsanweisung• Verwen<strong>de</strong>n Sie einen Langlochfräser mit <strong>de</strong>m genommenenMaß o<strong>de</strong>r mit einem etwas größeren und montieren Sie ihn nach<strong>de</strong>n Anweisungen in Abschnitt 6.
9. EINSTELLUNG DER FRÄSLÄNGEH• Messen Sie <strong>de</strong>n längsten Punkt "H" <strong>de</strong>s Schlosses einschließlichaller möglichen vorstehen<strong>de</strong>n Teile (Abb. 5). NEHMEN SIE NICHTdie äußere Blen<strong>de</strong>nseite <strong>de</strong>s Schlosses mit hinzu.T(Abb. 5)Vergewissern Sie sich, daß die Fräsmaschine von<strong>de</strong>r elektrischen Stromversorgung getrennt ist.• Zur Anpassung <strong>de</strong>r Maschine an die gewünschte Fräslänge "H"lösen Sie die Mutter "P" (Abb. 6) mit <strong>de</strong>m Schlüssel "F" und betätigenSie <strong>de</strong>n Spin<strong>de</strong>lknauf "R", bis die Längenanzeige "S" dasgewünschte Maß "H" erreicht und ziehen Sie die Mutter "P" indieser Stellung fest.FPSRVergewissern Sie sich, daß Sie die Mutter "P"(Abb. 6) festgezogen haben, da sonst <strong>de</strong>r Mechanismuszum Einstellen <strong>de</strong>r Fräslänge zerstörtwer<strong>de</strong>n kann.Das Zentrieren <strong>de</strong>s Fräsers auf die Stärke <strong>de</strong>r Tür o<strong>de</strong>r <strong>de</strong>s zufräsen<strong>de</strong>n Teils geschieht automatisch, wenn die Plättchen "J"(Abb. 7) an <strong>de</strong>n bei<strong>de</strong>n Backenführungen "V" in <strong>de</strong>r Stellung "0"(Abb. 7) sind.V(Abb. 6)V(Abb. 7)JWAV10. EINSTELLUNG DER FRÄSTIEFEAW• Messen Sie die Tiefe "T" (Abb. 5) <strong>de</strong>s Schlosses einschließlichaller möglichen vorstehen<strong>de</strong>n Teile an <strong>de</strong>r Unterseite und <strong>de</strong>rStärke <strong>de</strong>r äußeren Blen<strong>de</strong>nseite und geben Sie einige MillimeterSpiel hinzu.Vergewissern Sie sich, daß die Fräsmaschine von<strong>de</strong>r elektrischen Stromversorgung getrennt ist.(Abb. 8)U• Die Frästiefe wird über die Meßschiene "U" (Abb. 8) eingestellt,die in 1-mm-Abstän<strong>de</strong> unterteilt ist. Lösen Sie <strong>de</strong>n Knauf"W" und setzen Sie <strong>de</strong>n Ring "A" so an, daß seine Unterseite mit<strong>de</strong>r gewünschten Tiefe übereinstimmt, und ziehen Sie <strong>de</strong>n Knauf"W" in dieser Stellung wie<strong>de</strong>r fest.FC116U / Gebrauchsanweisung - 45
"c""H2"11. LANGLOCHFRÄSUNG AN EINER TÜR• Stellen Sie die Tür vertikal und halten Sie sie fest, so daß siesich nicht bewegen kann. Wenn sich die Tür bereits eingebautim Rahmen befin<strong>de</strong>t, schieben Sie Keile darunter, so daß sie sichnicht bewegen kann.BEZUGSLINIEN MESSEN UND ZEICHNEN• Legen Sie das Schloss so an <strong>de</strong>r Tür an, dass das Loch für dieKlinke auf <strong>de</strong>r gewünschten Höhe ab Bo<strong>de</strong>n “H0” liegt (Abb. 9)und zeichnen Sie eine Bezugslinie “0” (Abb. 9) auf <strong>de</strong>m Türblattund auf <strong>de</strong>r Kante.• Messen Sie <strong>de</strong>n Abstand “H2” (Abb. 9) von <strong>de</strong>r Mitte <strong>de</strong>r Klinkebis zur Mitte <strong>de</strong>s Schlosskastens."rs""rs""rs""0""c""H2""0""c"Pt"c""H0""0""c""H2"(Abb. 9)• Zeichnen Sie die Mitte "c" <strong>de</strong>s Schlosskastens auf dieTürkante. Verwen<strong>de</strong>n Sie dazu die mitgelieferte Zeichenschablone“Pt” (Abb. 9).Diese Schablone verfügt über eine Reihe von Schlitzen in einemjeweiligen Abstand von 5 mm. Legen Sie die Schablone so an<strong>de</strong>r Türkante an, dass die Linie "0” (Abb. 9) mit <strong>de</strong>m Schlitz übereinstimmt,<strong>de</strong>r <strong>de</strong>m Maß "H2” (Abb. 9) entspricht, das sie vorhergemessen haben (20 mm in Abb. 9). Zeichnen Sie nun die Linie"c” (Abb. 9) am unteren Rand <strong>de</strong>r Schablone.• Zeichnen Sie die obere Bezugslinie "rs” (Abb. 9), die alsReferenz für das Anbringen <strong>de</strong>r Maschine auf <strong>de</strong>r Tür dient.Legen Sie dazu das untere En<strong>de</strong> <strong>de</strong>r Zeichenschablone "Pt” (Abb.9) auf die Linie "c” (Abb. 9) und zeichnen Sie die Bezugslinie "rs”(Abb. 9) am oberen En<strong>de</strong> <strong>de</strong>r Schablone.46 - FC116U / Gebrauchsanweisung
FRÄSEN DES SCHLOSSKASTENSVYZJAK"rs""c"• Halten Sie die Maschine auf die Tür und richten Sie das Rahmenoberstück"V” (Abb. 10) mit <strong>de</strong>r oberen Linie "rs” (Abb. 10)aus. Befestigen Sie die Backen, in<strong>de</strong>m Sie die Kurbeln "K” (Abb.10) fest anziehen.• Überprüfen Sie, ob sich die Vorschubkurbel "A" (Abb. 10) auf<strong>de</strong>r gesamten Fräslänge frei bewegen kann.• Drehen Sie <strong>de</strong>n Feststellstift "J" (Abb. 10) in die vertikale Stellung,damit <strong>de</strong>r Vorschubmechanismus für die Frästiefe eingreifenkann.• Schließen Sie die Maschine an <strong>de</strong>r Stromversorgung an, schaltenSie <strong>de</strong>n Motor durch Drücken <strong>de</strong>s Hebels "Y” (Abb. 10) einund rasten Sie die Sicherheitsverriegelung "Z” (Abb. 10) ein.• Drehen Sie wie<strong>de</strong>rholt die Vorschubkurbel "A" (Abb. 10), wodurchSie einen synchronisierten Vorschub <strong>de</strong>s Werkzeuges in<strong>de</strong>r Länge und in <strong>de</strong>r Tiefe bis zum in Abschnitt 10 festgelegtenFräsen<strong>de</strong> erreichen.• Bringen Sie durch Betätigen <strong>de</strong>s Hebels "Y" die Maschine zumStillstand (Abb. 10).(Abb. 10)Trennen Sie die Fräsmaschine vom elektrischenStromnetz.• Drehen Sie <strong>de</strong>n Feststellstift "J” (Abb. 10) in die horizontaleStellung, damit <strong>de</strong>r Vorschubmechanismus <strong>de</strong>s Werkzeugs gelöstwird und <strong>de</strong>r Motor bis zum En<strong>de</strong> <strong>de</strong>s Fräswegs zurückkehrt.FC116U / Gebrauchsanweisung - 47
"N3"N112. FRÄSEN DES SITZES FÜR DIE FRONTPLATTE DESSCHLOSSES"Nt"Vergewissern Sie sich, daß die Fräsmaschine von<strong>de</strong>r elektrischen Stromversorgung getrennt ist.(Abb. 11)"N2"N2-N3= X mm"rs"AUSTAUSCHEN DER FRÄSE• Messen Sie die Breite “N1” (Abb. 11) <strong>de</strong>r Front <strong>de</strong>s Schlossesund installieren Sie in <strong>de</strong>r Maschine eine Langlochfräse <strong>de</strong>s entsprechen<strong>de</strong>nMaßes. Halten Sie sich dazu an die Anleitungen inAbschnitts 6 <strong>de</strong>s Handbuchs.V"rs1"BEZUGSLINIEN MESSEN, ZEICHNEN UND FC116U AN DERTÜR BEFESTIGEN(Abb. 12)S1"rs"N2-N3= X mm"rs1"(Figura 13)• Messen Sie die Distanzen zwischen <strong>de</strong>m Schlosskasten undbei<strong>de</strong>n En<strong>de</strong>n <strong>de</strong>r Frontplatte <strong>de</strong>s Schlosses "N2” und “N3” (Abb.11).• Wenn bei<strong>de</strong> Maße “N2” und “N3” (Abb. 11) gleich sind: HaltenSie die Maschine auf die Tür und richten Sie das Rahmenoberstück"V” (Abb. 12) mit <strong>de</strong>r oberen Bezugslinie "rs” (Abb. 12) aus.Dadurch bleiben die Zentren <strong>de</strong>s Maschinenhubs, <strong>de</strong>s Schlosskastensund <strong>de</strong>r Frontplatte <strong>de</strong>s Schlosses ausgerichtet.• Wenn die Maße “N2” und “N3” (Abb. 11) nicht gleich sind, nehmenSie die Differenz zwischen bei<strong>de</strong>n Maßen “N2”-“N3”=X mm(Abb. 11). Zeichnen Sie eine neue obere Bezugslinie "rs1” (Abb.13 und 12), die um X mm in Richtung <strong>de</strong>s größeren Maßes von"N2” und "N3” verschoben ist. Halten Sie anschließend die Maschineauf die Tür und richten Sie das Rahmenoberstück "V” (Abb.12) auf die obere Bezugslinie "rs1” (Abb. 12) aus. Dadurch bleibendie Zentren <strong>de</strong>s Maschinenhubs, <strong>de</strong>s Schlosskastens und <strong>de</strong>rFrontplatte <strong>de</strong>s Schlosses ausgerichtet.S1SS2EINSTELLEN DES FRÄSWEGS• Messen Sie die Länge <strong>de</strong>r Stirnseite "NT” (Abb. 11) <strong>de</strong>s Schlossesund stellen Sie die zwei Längsanschläge "S1” (Abb. 12und 14) auf <strong>de</strong>r Unterteilung fest, die <strong>de</strong>m Maß "NT” auf <strong>de</strong>rFührungsstange "S” (Abb. 14) entspricht.• Legen Sie die zwei Anschläge zum Ausgleichen <strong>de</strong>s Fräserdurchmessers"S2” (Abb. 14) auf <strong>de</strong>r Markierung an, die <strong>de</strong>m Durchmesser<strong>de</strong>s montierten Fräsers entspricht (Abb. 14).• Stellen Sie auf <strong>de</strong>r Schubstange die Länge <strong>de</strong>s Fräswegs aufeine Länge ein, die etwas länger als die Stirnseite <strong>de</strong>s Schlosses"NT” (Abb. 11) ist. Siehe hierzu Abschnitt 9 (Abb. 6) dieses Handbuchs.(Abb. 14)48 - FC116U / Gebrauchsanweisung
WKS1rsrs1EINSTELLEN DER FRÄSTIEFE• Heben Sie <strong>de</strong>n Feststellknopf "W” (Abb. 15 - 18) bis in seinehöchste Position, in<strong>de</strong>m sie ihn im Gegenuhrzeigersinn drehen.• Stellen Sie sicher, dass <strong>de</strong>r Feststellstift "J” (Abb. 15) in <strong>de</strong>rhorizontalen Stellung ist (Tiefenvorschub ausgeschaltet).• Lösen Sie <strong>de</strong>n Griff “K” (Abb. 16). Verschieben Sie die Maschinedurch sanften Druck mit <strong>de</strong>r Hand auf <strong>de</strong>n Motor nach unten,bis die Fräse die Türkante berührt. Halten Sie sie in dieser Positionfest und ziehen Sie <strong>de</strong>n Feststellknopf "K” (Abb. 16) an.• Legen Sie Stirnseite <strong>de</strong>s Schlosses (Abb. 17) an und berührenSie dabei <strong>de</strong>n unteren Bereich <strong>de</strong>r Motorhalterung. VerschiebenSie <strong>de</strong>n Tiefenanschlag "S3” (Abb. 16 und 17) und klemmen Siedie Stirnseite <strong>de</strong>s Schlosses ein.• Lösen Sie <strong>de</strong>n Feststellknopf "K” (Abb. 15 - 17), damit die Maschinein ihre Startposition gehoben wird.JA(Abb. 15)WWKS3S3K(Abb. 16)ZYAS1(Abb. 18)WS3(Abb. 17)FRÄSEN DES SITZES• Stellen Sie sicher, dass <strong>de</strong>r Feststellstift "J” (Abb. 15) in <strong>de</strong>rhorizontalen Stellung ist (Tiefenvorschub ausgeschaltet).• Schließen Sie die Maschine an <strong>de</strong>r Stromversorgung an, schaltenSie <strong>de</strong>n Motor durch Drücken <strong>de</strong>s Hebels "Y” (Abb. 18) einund rasten Sie die Sicherheitsverriegelung "Z” (Abb. 18) ein.• Drehen Sie <strong>de</strong>n Feststellknopf "W” (Abb. 17 und 18), bis dieMotorhalterung <strong>de</strong>n Tiefenanschlag "S3” berührt (Abb. 18). Sobalddas Werkzeug die für die Frontplatte <strong>de</strong>s Schlosses vorgeseheneFrästiefe erreicht hat, betätigen Sie sanft in einer HinundHerbewegung die Vorschubkurbel <strong>de</strong>s Wagens "A” (Abb. 15und 18), bis die bei<strong>de</strong>n Anschläge "S1” am Anfang und En<strong>de</strong> <strong>de</strong>sFräswegs (Abb. 15 und 18) erreicht wor<strong>de</strong>n sind.Wenn <strong>de</strong>r zu fräsen<strong>de</strong> Sitz tiefer als 2 mm ist, wird empfohlen,<strong>de</strong>n Vorgang in zwei o<strong>de</strong>r mehreren aufeinan<strong>de</strong>r folgen<strong>de</strong>n Durchgängeauszuführen und dabei wie<strong>de</strong>rholt <strong>de</strong>n Feststellknopf"W” zu betätigen.• Stellen Sie nach Been<strong>de</strong>n <strong>de</strong>s Fräsvorgangs am Feststellknopf"W” (Abb. 18) und am Tiefenanschlag "S3” (Abb. 16) wie<strong>de</strong>r dieGrun<strong>de</strong>instellungen ein.FC116U / Gebrauchsanweisung - 49
13. BOHREN DER ÖFFNUNGEN FÜR DIE TÜRKLINKE UNDDEN SCHLÜSSEL• Als letzten Schritt können mithilfe <strong>de</strong>r mitgelieferten SchablonenUT16I die für die Montage <strong>de</strong>s Schlosses erfor<strong>de</strong>rlichen Bohrungen,wie die Bohrungen für die Klinke, die Türverriegelung,das Schlüsselloch usw. angebracht wer<strong>de</strong>n.BA"c"centro caja cerradura "c""c"ANBRINGEN DER VORRICHTUNG VONSCHABLONE UC16I• Führen Sie eine <strong>de</strong>r zerlegbaren Höhenmessstangen<strong>de</strong>r Ausrüstung in die Öffnungen"A” ein und verschieben Sie die Vorrichtung,bis die Referenz "0” auf <strong>de</strong>m Zentrum "c” <strong>de</strong>sSchlosskastens liegt. (Abb. 19).• Befestigen Sie sie mit <strong>de</strong>m Knauf "B" undbringen Sie gleichzeitig die Innenseite "C" <strong>de</strong>sFührungsblechs bündig mit <strong>de</strong>r Türkante inStellung. (Abb. 19).CA(Abb. 19)centro caja cerraduraPOSITIONIEREN DER VORRICHTUNG UNDBOHRENGH "c"centro caja cerradura "c""c"• Lösen Sie die Lagerbüchse "G” und verschiebenSie sie horizontal, bis die Anzeige "H” mit<strong>de</strong>m Maß "D” ausgerichtet ist und ziehen Siesie wie<strong>de</strong>r an. (Abb. 20).• Verschieben Sie die Vorrichtung in Bezug aufdas Zentrum "c” <strong>de</strong>s Schlosskastens in vertikalerRichtung, um es auf das gewünschte Maß"E” und/o<strong>de</strong>r "F” einzustellen. (Abb. 20)• Nach<strong>de</strong>m die Position <strong>de</strong>s Lochs festgelegtist, bohren Sie es mit einem Bohrer von 11 mmDurchmesser.• Wie<strong>de</strong>r mit <strong>de</strong>r Mitte "c" <strong>de</strong>r Schloßaufnahmeals Bezugspunkt kann nun ein weitereseventuell erfor<strong>de</strong>rliches Loch positioniert wer<strong>de</strong>n.(Abb. 20)OPTIONALE BOHRWERKZEUGE50 - FC116U / Gebrauchsanweisung1640148 16401491640148 Erweiterungsfräser D.18 mit 11er-Führung1640149 Erweiterungsfräser D.23 mit 11er-Führung
U1(Abb. 21)A2S1T1A114. FRÄSEN DES SCHLOSSKASTENS AN MEHREREN TÜREN• Wenn Sie mehrere Türen mit <strong>de</strong>m Schloß auf <strong>de</strong>rselben Höhefräsen möchten, empfehlen wir Ihnen, <strong>de</strong>n Höhenstab "A1" (Abb.21) zu verwen<strong>de</strong>n, <strong>de</strong>r Ihnen die Arbeit erleichtern wird.Dazu schrauben Sie nach Bestimmung <strong>de</strong>r Schloßhöhe an <strong>de</strong>r erstenTür und mit <strong>de</strong>r Maschine in <strong>de</strong>r Fräsposition die vier Höhenstäbe"A1" (Abb. 21) an, setzen sie in die Öffnungen <strong>de</strong>r Backen "X"(Abb. 22), so daß die Anschlagsscheibe "A2" (Abb. 21) an ihremEn<strong>de</strong> an <strong>de</strong>r oberen Türkante anschlägt, und drehen die Höhenstäbe"A1" (Abb. 21 und 22) mit <strong>de</strong>n Knäufen "B1" (Abb. 22) in dieserStellung fest. Für die folgen<strong>de</strong> Türe müssen Sie lediglich nochdie Maschine mit <strong>de</strong>r Anschlagscheibe “A2” (Abb. 21) <strong>de</strong>r Höhenmessstange“A1” auf <strong>de</strong>r oberen Türkante anlegen und die Spannbackenin dieser Position festziehen. Markieren Sie zu<strong>de</strong>m für diespätere Verwendung auf dieser neuen Tür die obere Bezugslinie"rs”, damit alle Schlösser auf <strong>de</strong>r gleichen Höhe zu liegen kommen.Der Höhenstab "A1" (Abb. 21) kann auch ohne die Anschlagscheibe"A2" (Abb. 21) als Höhenreferenz bezüglich <strong>de</strong>s Fußbo<strong>de</strong>nseingesetzt wer<strong>de</strong>n.JXQA1B1XF15. LANGLOCHFRÄSUNG IN WAAGERECHTER LAGE• Um mit <strong>de</strong>r FC116U Langlochfräsungen in waagerechter Lagedurchzuführen, etwa bei Schlitzen für Schlösser an Türen, die erstdanach in <strong>de</strong>n Rahmen gehängt wer<strong>de</strong>n, ist es ratsam, <strong>de</strong>n Dämpfer"T1" (Abb. 21) außer Funktion zu setzen, damit <strong>de</strong>r Schlitten"U1" sich ohne <strong>de</strong>ssen Druck bewegt. Dafür lockern Sie dieMutter "P" (Abb. 23) mit <strong>de</strong>m Schlüssel "F" und bewegen Sie dieLängenanzeige "S" durch Betätigen <strong>de</strong>s Spin<strong>de</strong>lknaufs "R" bis zumAnschlag "A2" am En<strong>de</strong> <strong>de</strong>s Laufweges.Entfernen Sie <strong>de</strong>n Knauf "S1" (Abb. 21), <strong>de</strong>r <strong>de</strong>n Dämpfer "T1"festhält, womit dieser außer Funktion gesetzt wird. Bewahren Sie<strong>de</strong>n Knauf "S1" für seine künftige Verwendung sorgfältig auf.Stellen Sie abschließend, wie in Abschnitt 9 beschrieben, diegewünschte Fräslänge ein, bevor Sie beginnen, mit <strong>de</strong>r Maschinezu arbeiten, da diese nie am En<strong>de</strong> <strong>de</strong>s Laufwegs, also über <strong>de</strong>rmaximalen Fräslänge, arbeiten darf.(Abb. 22)16. KORREKTUREN BEI ÜBERL APPENDEN TÜRENA2Für das Langlochfräsen von Türen mit Überlappungen müssen Siedie Zentrierung <strong>de</strong>r Maschine und die Frästiefe folgen<strong>de</strong>rmaßenkorrigieren:PVergewissern Sie sich, daß die Fräsmaschine von<strong>de</strong>r elektrischen Stromversorgung getrennt ist.F(Abb. 23)SR• Lösen Sie zum Zentrieren <strong>de</strong>r Maschine am Türabschnitt ohneÜberlappung mit <strong>de</strong>m Schlüssel "F" (Abb. 22) die Schrauben "Q",die die Backen "X" blockieren, und verschieben Sie die Platten"J1" um die Hälfte <strong>de</strong>r Überlappungsbreite in mm in Richtung<strong>de</strong>r Überlappungsseite und ziehen Sie anschließend die Schrauben"Q" in dieser Stellung wie<strong>de</strong>r fest.• Beim Einstellen <strong>de</strong>r Frästiefe wie in Abschnitt 10 erklärt müssenSie <strong>de</strong>n Anschlagring "A" (Abb. 8) auf eine Höhe <strong>de</strong>r Skala"U" (Abb. 8) bringen, die <strong>de</strong>r Summe <strong>de</strong>r notwendigen Tiefe fürdas Schloß und <strong>de</strong>r Höhe <strong>de</strong>r Überlappung an <strong>de</strong>r Tür entspricht,da sich die Maschine auf <strong>de</strong>r Überlappung bewegt.FC116U / Gebrauchsanweisung - 51
17. ANSCHLUSS EINES STAUBSAUGERSD2D1• Die Langlochfräsmaschine FC116U verfügt über eine Mündung"D2" (Abb. 24), die am Positionsstab "D1" (Abb. 24) über<strong>de</strong>r zu fräsen<strong>de</strong>n Aufnahme montiert <strong>de</strong>n Anschluß <strong>de</strong>s <strong>Virutex</strong>Staubsaugers AS182K, AS282K, AS382L und ASC482U o<strong>de</strong>r einesan<strong>de</strong>ren Industriestaubsaugers zur Absaugung von Frässpänenerlaubt.(Abb. 24)EGtF18. AUSBAU DER GEKEHLTEN ACHSEWenn Sie die gekehlte Achse "M" (Abb. 26) auswechseln wollen,schrauben Sie zuerst <strong>de</strong>n Fräser "G" (Abb. 25) wie in Abschnitt6 erklärt ab.Setzen Sie <strong>de</strong>n Bolzen "L" (Abb. 26) in die mittlere Öffnung <strong>de</strong>sGehäuses, bis die Motorachse blockiert ist und ziehen Sie diegekehlte Achse "M" mit <strong>de</strong>m Schlüssel "E" heraus.GpG19. AUSWECHSELN DER STROMABNEHMER(Abb. 25)Vergewissern Sie sich, daß die Maschine vor je<strong>de</strong>rReparatur von <strong>de</strong>r elektrischen Stromversorgunggetrennt wird.(Abb. 26)H1LEMI1• Die Stromabnehmer müssen bei einer minimalen Länge von 5mm ausgewechselt wer<strong>de</strong>n. Dazu schrauben Sie das Schaltergehäuse"F1" (Abb. 27) mit <strong>de</strong>n Schrauben "G1" ab.Nehmen Sie die Kappen "H1" ab, die die Stromabnehmer "I1"festhalten und tauschen Sie diese durch Original <strong>Virutex</strong>-Stromabnehmeraus. Überprüfen Sie, ob sie sich ohne Probleme imInnern <strong>de</strong>r Führungen bewegen. Vergewissern Sie sich beimMontieren <strong>de</strong>s Schaltergehäuses "F1", daß sich die Kabel im Innernnicht verhed<strong>de</strong>rn.Es wird empfohlen, die Maschine nach <strong>de</strong>m Wechseln <strong>de</strong>r Stromabnehmereinige Minuten leerlaufen zu lassen. Nutzen Sie <strong>de</strong>nWechsel <strong>de</strong>r Stromabnehmer zur Überprüfung <strong>de</strong>s Kollektorzustan<strong>de</strong>s.Sollte dieser Kontaktabbrand o<strong>de</strong>r Ansätze aufweisen,sollten Sie ihn zur Reparatur zu einem autorisierten <strong>Virutex</strong>-Händler bringen.I1H1(Abb. 27)52 - FC116U / GebrauchsanweisungF1G120. SCHMIERUNG UND REINIGUNG• Schmieren Sie vor <strong>de</strong>m Fräsen <strong>de</strong>s ersten Sitzes dieFührungsstangen für die Tiefeneinstellung (Gp, Abb. 2) und dieQuereinstellung (Gt, Abb. 2) mit einem leicht geölten Lappen,damit die bei<strong>de</strong>n Bewegungen leichtgängig ausgeführt wer<strong>de</strong>nkönnen. Es ist wichtig, die Maschine nach <strong>de</strong>r Verwendung immergründlich mit Druckluft zu reinigen.Halten Sie das Stromkabel immer in einem einwandfreien Zustand.
21. WERKZEUGE UND SONDERZUBEHÖR• Lieferbare Fräser für die Langlochfräsmaschine FC116U:BEST.-NR. AUSSENDURCHMES SERHÖHE1640127 16 mm. 13.5 mm.1640150 17 " 13.5 "1640128 18 " 13.5 "1640367 20 " 13.5 "1640129 21 " 13.5 "1640130 23 " 13.5 "1640368 23,5 " 13.5 "1640131 25 " 13.5 "1640369 29 " 13.5 "1640132 30 " 13.5 "1640140 Bohrfräse Ø 24• Mit <strong>de</strong>r Verlängerungsvorrichtung UP16I, 1645287, kann dieBefestigung <strong>de</strong>r Maschine über die Türe hinaus verlängert wer<strong>de</strong>n.22. LÄRMPEGELDie Lärm- und Vibrationswerte dieses Elektrowerkzeugs wur<strong>de</strong>nin Übereinstimmung mit <strong>de</strong>r europäischen Norm EN 661029-1gemessen und dienen als Vergleichsgrundlage bei Maschinen fürähnliche Anwendungen.Der angegebene Vibrationspegel wur<strong>de</strong> für die wesentlichenEinsatzzwecke <strong>de</strong>s Werkzeugs ermittelt und kann bei <strong>de</strong>r Beurteilung<strong>de</strong>r Gefahren durch die Aussetzung unter Vibrationenals Ausgangswert benutzt wer<strong>de</strong>n. Die Vibrationswerte könnensich jedoch unter an<strong>de</strong>ren Einsatzbedingungen, mit an<strong>de</strong>renArbeitswerkzeugen o<strong>de</strong>r bei einer ungenügen<strong>de</strong>n Wartung <strong>de</strong>sElektrowerkzeugs o<strong>de</strong>r seiner Werkzeuge stark vom angegebenenWert unterschei<strong>de</strong>n und aufgrund <strong>de</strong>s Arbeitszyklus und <strong>de</strong>rEinsatzweise <strong>de</strong>s Elektrowerkzeugs einen be<strong>de</strong>utend höherenWert aufweisen.Es ist daher erfor<strong>de</strong>rlich, Sicherheitsmaßnahmen zum Schutz<strong>de</strong>s Anwen<strong>de</strong>rs vor <strong>de</strong>n Vibrationen festzulegen. Dazu könnendie Aufrechterhaltung <strong>de</strong>s einwandfreien Zustands <strong>de</strong>s Werkzeugsund <strong>de</strong>r Arbeitsutensilien sowie die Festlegung <strong>de</strong>r Zeiten<strong>de</strong>r Arbeitszyklen gehören (wie Laufzeiten <strong>de</strong>s Werkzeugs unterLast und im Leerlauf, ohne tatsächlich eingesetzt zu wer<strong>de</strong>n,wodurch die Gesamtzeit <strong>de</strong>r Vibrationsauswirkungen be<strong>de</strong>utendverringert wer<strong>de</strong>n kann).23. GARANTIEAlle maschinen von VIRUTEX haben eine Garantie von 12 Monatenab <strong>de</strong>m Lieferdatum. Hiervon ausgeschlossen sind alle Eingriffeo<strong>de</strong>r Schä<strong>de</strong>n aufgrund von unsachgemäßem Gebraucho<strong>de</strong>r natürlicher Abnutzung <strong>de</strong>s Geräts. Wen<strong>de</strong>n Sie sich im Falleeiner Reparatur immer an <strong>de</strong>n zugelassenen Kun<strong>de</strong>ndienst vonVIRUTEX.VIRUTEX behält sich das Recht vor, die Produkte ohne vorherigeAnkündigung zu verän<strong>de</strong>rn.FC116U / Gebrauchsanweisung - 53
MANUALE D’ISTRUZIONIINDICE1 SPECIFICHE TECNICHE 552 USO 553 ISTRUZIONI DI SICUREZZA PER L'USO DE-LLA MACCHINA 564 APPARECCHIATURA STANDARD 56Specifiche soggette acambiamento senza alcunpreavviso.5 MONTAGGIO DELLA MANOVELLAAVANZAMENTO CARRELLO 566 MONTAGGIO DEGLI UTENSILI DA TAGLIO 577 INTERRUTTORE 578 REGOLAZ. DELLA LARGHEZZA DELLA FRESATURA 579 REGOLAZ. DELLA LUNGHEZZA DELLA FRESATURA 5810 REGOLAZ. DELLA PROFONDITÀ DELLA FRESATURA 5811 FRESATURA DI UNA MORTASA SU UNA PORTA 59MISURARE E TRACCIARE RIFERIMENTI 59FRESARE L’INCASSO DELLA SCATOLA 6012 FRESATURA DELL’INCASSO PER LA PIASTRAFRONTALE DELLA SERRATURA 61CAMBIARE LA FRESA 61MISURARE, TRACCIARE RIFERIMENTI E POSIZIO-NARE FC116U SULLA PORTA 61REGOLARE LA CORSA DELLA FRESATURA 61REGOLARE LA PROFONDITÀ DI FRESATURA 62FRESARE L’INCASSO 6213 REALIZZAZIONE DEI FORI PER LA MANIGLIAE LA CHIAVE 63MONTAGGIO DELL’UTENSILE DELLA DIMA UC16I 63DISPOSIZIONE DELL’UTENSILE E PERFORAZIONE 63UTENSILI OPZIONALI PER FORATURA 6314 FRESATURA DELL’INCASSO SU VARIE PORTE 6415 FRESATURA DI MORTASE IN POSIZIONEORIZZONTALE 6416 CORREZIONI PER PORTE CON BATTUTA 6417 KIT ASPIRATORE 6518 ESTRAZIONE DELL'ALBERO SCANALATO 6519 SOSTITUZIONE DELLE SPAZZOLE 6520 LUBRIFICAZIONE E PULIZIA 6521 UTENSILI OPZIONALI 6622 LIVELLO DI RUMORE 6623 GARANZIA 6654 - FC116U / <strong>Manual</strong>e d’istruzioni
FRESATRICE PER MORTASE FC16SIMPORTANTEPrima di utilizzare la macchina, leggere attentamente questoMANUALE DI ISTRUZIONI e il PROSPETTO DELLE NORME GENE-RALI DI SICUREZZA allegato. Non cominciate a lavorare con lamacchina se non siete sicuri di avere compreso integralmente illoro contenuto.Conservare tutti e due i manuali per eventuali consultazioni successive.1. SPECIFICHE TECNICHEMotore universale.......................................................................50/60 HzPotenza..................................................................................1.100 WVelocità a vuoto....................................................................23.000 min -1Diametro massimo fresa...............................................................30 mmProfondità massima <strong>de</strong>lla fresatura................................0 - 125 mmLarghezza massima <strong>de</strong>lla fresatura....................................diam. fresaLunghezza mas. <strong>de</strong>lla fresatura........................177 mm + diam. fresaApertura massima <strong>de</strong>lle ganasce.........................................190 mmChiusura minima <strong>de</strong>lle ganasce.................................................13 mmSpostamento laterale <strong>de</strong>lla fresa sullo spessore <strong>de</strong>lla porta.....± 15 mmPeso.........................................................................................................14 KgLivello di pressione acustica continuoequivalente pon<strong>de</strong>rato A..............................................................87 dBALivello di potenza acustica A........................................................98 dBAIncertezza <strong>de</strong>lla misura............................................................K = 3 dBAUsare la protezione acustica!Valori totali <strong>de</strong>lle oscillazioni............................................a h:
3. ISTRUZIONI DI SICUREZZA PER L'USO DELLA MACCHINAAccertarsi che la persona che utilizzerà questamacchina legga attentamente e comprenda ilpresente MANUALE D'ISTRUZIONI e l'OPUSCOLODI ISTRUZIONI GENERALI DI SICUREZZA allegato,prima di iniziare a lavorarci.• Prima di collegare a rete la macchina, controllare che la tensionedi alimentazione corrisponda a quella indicata nella targhettasegnaletica.• Prima di sostituire la fresa o di effettuare qualsiasi altro interventonelle vicinanze <strong>de</strong>lla testa da taglio, staccare la macchinadalla rete elettrica.• Usare occhiali protettivi per lavorare con la fresatrice.• Non avviare il motore se è stato estratto dall'intelaiatura <strong>de</strong>llamacchina.• Verificare il percorso <strong>de</strong>l filo di alimentazione per evitare chepossa impigliarsi durante l'uso.• Per avviare la fresatrice agire sempre sulla leva <strong>de</strong>ll'interruttoreprincipale.• Dopo aver collocato la fresatrice sul pezzo da fresare, eseguirelo spostamento <strong>de</strong>ll'utensile servendosi sempre <strong>de</strong>lla manovelladi avanzamento <strong>de</strong>l carrello. Non spingerla mai con le mani ocon utensili impropri.• Prima di togliere la fresatrice dalla mortasa realizzata, accertarsiche il motore si sia fermato completamente.• Usare sempre frese <strong>de</strong>l diametro a<strong>de</strong>guato e correttamentemontate sull'albero scanalato.• Non usare mai frese improprie, difettose o in cattivo stato.Adoperare unicamente frese e ricambi originali VIRUTEX.4. APPARECCHIATURA STANDARDAll'interno <strong>de</strong>lla scatola troverete i seguenti elementi:• Fresatrice per mortase FC116U• Utensile per forare cilindretto e ago UT16I• Chiavi di servizio e una dima per tracciare• Asta di regolazione <strong>de</strong>ll'altezza smontabile in 4 sezioni e unfermo per porte.• Quattro copriganasce, per lavori di montaggio <strong>de</strong>licati.• Fresa per mortase diametro 16 mm.• <strong>Manual</strong>e d'istruzioni e documentazione variaFig. 15. MONTAGGIO DELLA MANOVELLAAVANZAMENTO CARRELLOVerificare che la fresatrice sia staccata dallarete elettrica.(Figura 1)56 - FC116U / <strong>Manual</strong>e d’istruzioni• Montare la manovella di avanzamento <strong>de</strong>l carrello "A" innestandola scanalatura rettangolare sui piani <strong>de</strong>ll’asse "B", e inserirela ron<strong>de</strong>lla "C" e la vite "D" come indicato nella (Fig. 1).Stringere la vite "D" con la chiave "F", in modo da fissare in se<strong>de</strong>la manovella di avanzamento <strong>de</strong>l carrello..• EVITARE I COLPI SULLA SUPERFICIE DELLA MANOVELLA DIAVANZAMENTO "A".
9. REGOLAZIONE DELLA LUNGHEZZA DELLA FRESATURAH• Misurare il punto "H" più lungo <strong>de</strong>lla carcassa <strong>de</strong>lla serratura,inclu<strong>de</strong>ndo ogni eventuale protuberanza (Fig. 5); NON INCLUDE-RE la bocchetta esterna <strong>de</strong>lla serratura.TVerificare che la fresatrice sia staccata dalla reteelettrica.(Figura 5)• Per regolare la macchina sulla lunghezza di fresatura <strong>de</strong>si<strong>de</strong>rata"H", allentare il dado "P" (Fig. 6) per mezzo <strong>de</strong>lla chiave "F"e azionare la manopola <strong>de</strong>l perno a vite "R" finché l'indicatoredi lunghezza "S" avrà raggiunto la misura <strong>de</strong>si<strong>de</strong>rata "H", quindiserrare il dado "P" in tale posizione.PVerificare che il dado "P" (Fig. 6) sia serrato bene,altrimenti il meccanismo di regolazione <strong>de</strong>llalunghezza <strong>de</strong>lla fresatura potrebbe rompersi.FSRIl centraggio <strong>de</strong>lla fresa sullo spessore <strong>de</strong>lla porta o <strong>de</strong>l pezzo damortasare è automatico se le piastrine "J" (Fig. 7) si trovano inposizione "0" sulle due gui<strong>de</strong> <strong>de</strong>lla morsa "V" (Fig. 7).V(Figura 6)V(Figura 7)JWAVAW10. REGOLAZIONE DELLA PROFONDITÀ DELLA FRESATURA• Misurare la profondità "T" (Fig. 5) <strong>de</strong>lla carcassa <strong>de</strong>lla serratura,inclu<strong>de</strong>ndo ogni eventuale protuberanza sul fondo, lo spessore<strong>de</strong>lla bocchetta esterna e alcuni mm in più di tolleranza.Verificare che la fresatrice sia staccata dalla reteelettrica.(Figura 8)58 - FC116U / <strong>Manual</strong>e d’istruzioniU• La profondità <strong>de</strong>lla fresatura si controlla mediante la riga graduata"U" (Fig. 8) su cui sono riportate suddivisioni di 1 mm.Allentare la manopola "W" e collocare l'anello "A" in modo taleche il lato inferiore coincida con la profondità <strong>de</strong>si<strong>de</strong>rata, quindiserrare la manopola "W" in tale posizione.
"c""H2"11. FRESATURA DI UNA MORTASA SU UNA PORTA• Sistemare la porta in posizione e fissarla saldamente in modoche non possa muoversi. Se la porta è già montata sul telaio,inserirvi sotto <strong>de</strong>i cunei per bloccarla.MISURARE E TRACCIARE RIFERIMENTI• Posizionare la serratura contro la porta, in modo tale che ilforo <strong>de</strong>l pomello o <strong>de</strong>lla maniglia si trovi all’altezza <strong>de</strong>si<strong>de</strong>ratada terra "H0" (Fig. 9) e segnare un tratto "0" (Fig. 9) su un lato esul bordo <strong>de</strong>lla porta.• Misurare la distanza "H2" (Fig. 9) dal centro <strong>de</strong>lla maniglia alcentro <strong>de</strong>lla scatola <strong>de</strong>lla serratura."rs""rs""rs""0""c""H2""0""c"Pt"c""H0""0""c""H2"(Figura 9)• Tracciare il centro "c" <strong>de</strong>lla scatola <strong>de</strong>lla serratura, sulbordo <strong>de</strong>lla porta, usando la dima "Pt" (Fig. 9) fornita acorredo.La dima è dotata di una serie di scanalature a 5 mm l’unadall’altra, di modo che bisognerà posizionarla sul bordo <strong>de</strong>llaporta facendo coinci<strong>de</strong>re il tratto “0” (Fig. 9) con la scanalaturacorrispon<strong>de</strong>nte alla misura "H2" (Fig. 9) presa prece<strong>de</strong>ntemente(20 mm nella Fig. 9) e segnare il tratto "c" (Fig. 9) sul bordo inferiore<strong>de</strong>lla dima.• Tracciare il riferimento superiore "rs" (Fig. 9) che serviràda riferimento per il montaggio <strong>de</strong>lla macchina sulla porta.A tal fine posizionare l’estremità inferiore <strong>de</strong>lla dima “Pt” (Fig.9) sul tratto "c" (Fig. 9) e segnare il tratto "rs" (Fig. 9) sul bordosuperiore <strong>de</strong>lla dima.FC116U / <strong>Manual</strong>e d’istruzioni - 59
FRESARE L’INCASSO DELLA SCATOLAVYZJAK"rs""c"• Fissare la macchina alla porta, allineando lo spigolo superiore<strong>de</strong>lla traversa "V" (Fig. 10) con il tratto di riferimento superiore"rs" (Fig. 10) e fissare saldamente i morsetti con le manovelle "K"(Fig. 10).• Verificare che la manovella di avanzamento "A" (Fig. 10) possagirare liberamente per tutto il suo percorso.• Girare l'asta di bloccaggio "J" (Fig. 10) in posizione verticaleper fare ingranare il meccanismo di avanzamento <strong>de</strong>lla profonditàdi fresatura.• Collegare la macchina alla rete elettrica, mettere in moto ilmotore premendo la leva "Y" (Fig. 10) e bloccando la sicura "Z"(Fig. 10).• Girare ripetutamente la manovella di avanzamento "A" (Fig.10) per ottenere un avanzamento sincronizzato <strong>de</strong>ll'utensile, sialongitudinale che in profondità, fino alla fine <strong>de</strong>l percorso stabilitonel punto 10.• Spegnere la macchina agendo sulla leva "Y" (Fig. 10).Staccare la fresatrice dalla rete elettrica.(Figura 10)• Girare l’asta di bloccaggio "J" (Fig. 10) in posizione orizzontale,in modo da liberare il meccanismo di avanzamento <strong>de</strong>ll’utensilee riportare indietro il motore fino a fine corsa.60 - FC116U / <strong>Manual</strong>e d’istruzioni
"Nt""N3"N112. FRESATURA DELL’INCASSO PER LA PIASTRA FRONTALEDELLA SERRATURAVerificare che la fresatrice sia staccata dalla reteelettrica.(Figura 11)V"N2"N2-N3= X mm"rs""rs1"CAMBIARE LA FRESA• Misurare la larghezza "N1" (Fig. 11) <strong>de</strong>lla parte frontale <strong>de</strong>llaserratura e montare sulla macchina una fresa per mortase <strong>de</strong>llamisura corrispon<strong>de</strong>nte, seguendo le istruzioni <strong>de</strong>l paragrafo 6<strong>de</strong>l manuale.MISURARE, TRACCIARE RIFERIMENTI E POSIZIONAREFC116U SULLA PORTA(Figura 12)S1"rs"N2-N3= X mm"rs1"(Figura 13)• Pren<strong>de</strong>re le misure tra la scatola <strong>de</strong>lla serratura e ciascuna<strong>de</strong>lle due estremità <strong>de</strong>lla parte frontale <strong>de</strong>lla serratura "N2" e"N3" (Fig. 11).• Se le due misure "N2" e "N3" (Fig. 11) sono uguali: Fissare lamacchina alla porta, allineando lo spigolo superiore <strong>de</strong>lla traversa"V" (Fig. 12) con il tratto di riferimento superiore "rs" (Fig. 12).In questo modo i centri <strong>de</strong>lla corsa <strong>de</strong>lla macchina, <strong>de</strong>lla scatolae <strong>de</strong>lla piastra frontale <strong>de</strong>lla serratura sono allineati.• Se le misure "N2" e "N3" (Fig. 11) non sono uguali, misurare ladifferenza tra le stesse "N2"-"N3"=X mm (Fig. 11), tracciare unnuovo segno di riferimento superiore “rs1” (Fig. 13 e 12), spostatodi X mm, verso il lato <strong>de</strong>lla misura maggiore tra "N2" e "N3"e fissare la macchina alla porta, allineando lo spigolo superiore<strong>de</strong>lla traversa "V" (Fig. 12) con il nuovo tratto di riferimentosuperiore "rsl" (Fig. 12). In questo modo i centri <strong>de</strong>lla corsa <strong>de</strong>llamacchina e <strong>de</strong>lla piastra frontale <strong>de</strong>lla serratura sono allineati.S2S1S(Figura 14)REGOLARE LA CORSA DELLA FRESATURA• Misurare la lunghezza <strong>de</strong>lla parte frontale "NT" (Fig. 11) <strong>de</strong>llaserratura e fissare i due finecorsa longitudinali "S1" (Fig. 12 e 14)sulla divisione corrispon<strong>de</strong>nte alla misura NT, sulla scala <strong>de</strong>llacolonna di guida "S" (Fig. 14).• Posizionare e fissare i due finecorsa correttori <strong>de</strong>l diametro<strong>de</strong>lla fresa "S2" (Fig. 14) sul segno corrispon<strong>de</strong>nte al diametro<strong>de</strong>lla fresa montata (Fig. 14).• Regolare la lunghezza <strong>de</strong>lla fresatura sulla biella su una misuraleggermente superiore alla parte frontale <strong>de</strong>lla serratura"NT" (Fig. 11), come illustrato nel paragrafo 9 (Fig. 6) di questomanuale.FC116U / <strong>Manual</strong>e d’istruzioni - 61
WKS1rsrs1REGOLARE LA PROFONDITÀ DI FRESATURA• Sollevare la manopola "W" (Figg. 15-18) fino alla posizionelimite superiore, ruotandolo in senso antiorario.• Verificare che l’asta di bloccaggio "J" (Fig. 15) si trovi in posizioneorizzontale (avanzamento in profondità disattivato).• Allentare la manopola "K" (Fig. 16), spostare la macchina versoil basso, spingendo leggermente il motore con la mano fino ache la fresa raggiunge il bordo <strong>de</strong>lla porta e mantenerla in questaposizione fissando la manopola "K" (Fig. 16).• Posizionare la parte frontale <strong>de</strong>lla serratura (Fig. 17) toccandola parte inferiore <strong>de</strong>l supporto <strong>de</strong>l motore, spostare e fissare ilfinecorsa di profondità "S3" (Fig. 16 e 17) immobilizzando laparte frontale <strong>de</strong>lla serratura.• Allentare la manopola "K" (Fig. 15-17) affinché la macchinasalga fino a raggiungere la posizione iniziale.JA(Figura 15)WWKS3S3K(Figura 17)(Figura 16)ZYAS1(Figura 18)62 - FC116U / <strong>Manual</strong>e d’istruzioniWS3FRESARE L’INCASSO• Verificare che l’asta di bloccaggio "J" (Fig. 15) si trovi in posizioneorizzontale (avanzamento in profondità disattivato).• Collegare la macchina alla rete elettrica, mettere in moto ilmotore premendo la leva "Y" (Fig. 18) e bloccando la sicura "Z"(Fig. 18).• Ruotare la manopola "W" (Fig. 17 e 18) fino a che il supporto<strong>de</strong>l motore raggiunge il finecorsa di profondità "S3" (Fig. 18).Quando l’utensile raggiunge la profondità di taglio previstaper la parte frontale <strong>de</strong>lla serratura, azionare la manopola diavanzamento <strong>de</strong>l carrello "A" (Figg. 15 e 18) lentamente, finoa raggiungere entrambi i finecorsa "S1" (Fig. 15 e 18), situatiin corrispon<strong>de</strong>nza <strong>de</strong>l termine <strong>de</strong>lla corsa <strong>de</strong>l carrello, con unmovimento oscillante.Se l’incasso da realizzare è superiore a 2 mm, si consiglia di realizzarloin due o più passate successive, agendo ripetutamentesulla manopola “W”.• Riportare la manopola "W" (Fig. 18) e il finecorsa di profondità"S3" (Fig. 16) in posizione iniziale al termine <strong>de</strong>lla fresatura.
13. REALIZZAZIONE DEI FORI PER LA MANIGLIA E LA CHI-AVE• Per finire, con l’aiuto <strong>de</strong>lla dima UT16I fornita a corredo, èpossibile eseguire i fori necessari al montaggio <strong>de</strong>lla serratura,oltre ai fori per la maniglia, per il nottolino di chiusura, per ilcilindretto <strong>de</strong>lla chiave, etc.BA"c""c"MONTAGGIO DELL’UTENSILE DELLA DIMAUC16I• Inserire un’asta di altezza smontabile (fornitaa corredo) nei fori “A” e far scorrere l’utensilefino a posizionare lo "0" di riferimento sul centro“c” <strong>de</strong>lla scatola <strong>de</strong>lla serratura. (Fig. 19).• Fissare con la manopola "B" e contemporaneamentelivellare il lato interno "C" <strong>de</strong>llasagoma in lamierino sullo spigolo <strong>de</strong>lla porta.(Fig. 19).centro caja cerradura "c"CA(Figura 19)centro caja cerraduraDISPOSIZIONE DELL’UTENSILE E PERFORA-ZIONEGH "c"centro caja cerradura "c""c"• Allentare la boccola guida "G" e farla scorrereorizzontalmente fino a posizionare l'indice"H" in corrispon<strong>de</strong>nza <strong>de</strong>lla misura "D", stringerlonuovamente. (Fig. 20).• Pren<strong>de</strong>ndo come riscontro il centro “c”<strong>de</strong>ll’incavo <strong>de</strong>lla serratura, fare scorrerel’utensile in senso verticale fino a posizionarlosulla misura “E” e “F” <strong>de</strong>si<strong>de</strong>rata. (Fig. 20)• Dopo aver <strong>de</strong>terminato la posizione <strong>de</strong>l foro,trapanare con una punta di 11 mm di diametro.• Pren<strong>de</strong>ndo nuovamente come riscontro ilcentro"c" <strong>de</strong>ll'incavo <strong>de</strong>lla serratura si potrà<strong>de</strong>terminare l'altro foro necessario per la serratura.(Figura 20)UTENSILI OPZIONALI PER FORATURA1640148 16401491640148 Fresa per allargare D.18 c/guida da 111640149 Fresa per allargare D.23 c/guida da 11FC116U / <strong>Manual</strong>e d’istruzioni - 63
A214. FRESATURA DELL’INCASSO SU VARIE PORTEU1(Figura 21)XJ(Figura 22)QA1S1T1A1B1XF• Se <strong>de</strong>si<strong>de</strong>rate mortasare più porte e sistemare le serrature allame<strong>de</strong>sima altezza, si consiglia di adoperare l'asta di regolazione<strong>de</strong>ll'altezza "A1" (Fig. 21) che ren<strong>de</strong>rà più facile l'operazione.Per fare questo, dopo aver <strong>de</strong>terminato l'altezza <strong>de</strong>lla serratura<strong>de</strong>lla prima porta, e aver sistemato la macchina nella posizionedi fresatura, montare le quattro aste di regolazione <strong>de</strong>ll'altezza"A1" (Fig. 21) e inserirle nei fori <strong>de</strong>lle ganasce "X" (Fig. 22), inmodo tale che il disco finecorsa "A2" (Fig. 21) <strong>de</strong>ll'estremità sifermi sullo spigolo superiore <strong>de</strong>lla porta, e fissare l'asta di regolazione<strong>de</strong>ll'altezza "A1" (Figg. 21 e 22) in tale posizione mediantele manopole "B1" (Fig. 22). Per la porta seguente non dovretefare altro che sistemare la macchina con il disco di finecorsa “A2”(Fig. 21) <strong>de</strong>ll’asta di regolazione <strong>de</strong>ll’altezza "A1" poggiato sullospigolo superiore <strong>de</strong>lla porta, e fissare le ganasce in tale posizione,segnando (per un uso successivo) il tratto di riferimento superiore“rs” sulla nuova porta, in modo che tutte le serrature saranno situatealla stessa altezza.L'asta di regolazione <strong>de</strong>ll'altezza "A1" (Fig. 21) senza il disco difinecorsa "A2" (Fig. 21) si può anche adoperare, se si <strong>de</strong>si<strong>de</strong>ra,come riscontro <strong>de</strong>ll'altezza dal pavimento.15. FRESATURA DI MORTASE IN POSIZIONE ORIZZONTALE• Per lavorare con la FC116U in posizione orizzontale, ad esempioper eseguire mortase in una porta prima di poggiarla sui cardini,è conveniente staccare l'ammortizzatore "T1" (Fig. 21) in modoche non eserciti pressione sul carrello "U1", ostacolandone il movimento.A tale scopo, allentare il dado "P" (Fig. 23) con la chiave "F" e agiresulla manopola <strong>de</strong>l perno a vite "R" per spostare l'indicatore dilunghezza "S" fino al finecorsa "A2".Togliere la manopola "S1" (Fig. 21) che sostiene l'ammortizzatore"T1" per staccare quest'ultimo. Conservare la manopola "S1" in unluogo sicuro per poterla utilizzare di nuovo.Infine, regolare la lunghezza di fresatura <strong>de</strong>si<strong>de</strong>rata - come indicatoal punto 9 - prima di lavorare con la macchina, dato chequest'ultima non <strong>de</strong>ve mai lavorare a finecorsa, oltre la lunghezzamassima.A216. CORREZIONI PER PORTE CON BATTUTAPer mortasare porte con battuta, occorre correggere il centraggio<strong>de</strong>lla macchina e la profondità <strong>de</strong>lla fresatura nel modo seguente:PVerificare che la fresatrice sia staccata dalla reteelettrica.F(Figura 23)64 - FC116U / <strong>Manual</strong>e d’istruzioniSR• Per centrare la macchina sulla sezione <strong>de</strong>lla porta senza battuta,allentare con la chiave "F" (Fig. 22) le viti "Q" che fissanole ganasce "X" e spostare le piastrine "J1", verso il lato <strong>de</strong>lla battuta,<strong>de</strong>lla metà <strong>de</strong>lla larghezza (in mm) di quest'ultima, quindiserrare nuovamente le viti "Q" in tale posizione.• Quando si regola la profondità <strong>de</strong>lla fresatura, come indicatonel punto 10, occorrerà sistemare l'anello di finecorsa "A" (Fig. 8)a un'altezza <strong>de</strong>lla scala "U" (Fig. 8) pari alla somma <strong>de</strong>lla profonditànecessaria per la serratura, più l'altezza <strong>de</strong>lla battuta <strong>de</strong>llaporta, dato che la macchina poggerà su tale battuta.
17. KIT ASPIRATORED2D1• La fresatrice per mortase FC16S dispone di un ugello "D2"(Figg. 8 e 9) che, montato nell'asta posizionatrice "D1" (Fig. 8),sull'apertura <strong>de</strong>lla mortasa da praticare, permette di collegarel'aspiratore <strong>Virutex</strong> AS182K, AS282K, AS382L e ASC482U o unaltro aspiratore industriale per estrarre i trucioli creati dalla fresatura.(Figura 24)EGt18. ESTRAZIONE DELL'ALBERO SCANALATOPer sostituire l'albero scanalato "M" (Fig. 26), smontare dapprimala fresa "G" (Fig. 25) come indicato nel punto 6.Sistemare il perno "L" (Fig. 26) nel foro centrale <strong>de</strong>lla carcassa, inmodo da bloccare l'albero <strong>de</strong>l motore, ed estrarre l'albero scanalato"M" con la chiave "E".FGp(Figura 25)G19. SOSTITUZIONE DELLE SPAZZOLEVerificare che la fresatrice sia staccata dalla reteelettrica prima di eseguire qualsiasi intervento.L(Figura 26)EM• Le spazzole vanno sostituite quando raggiungono una lunghezzaminima di 5 mm. Per farlo, smontare la cassa <strong>de</strong>ll'interruttore"F1" (Fig. 27) togliendo le viti "G1" che la fissano.Togliere i tappi "H1" che fissano le spazzole "I1" e sostituirle connuove spazzole originali <strong>Virutex</strong>, accertandosi che entrino senzadifficoltà nelle gui<strong>de</strong>. Quando si rimonta la cassa <strong>de</strong>ll'interruttore"F1", verificare che i fili interni siano sistemati correttamente.È consigliabile lasciare la macchina in moto per alcuni minutidopo la sostituzione <strong>de</strong>lle spazzole. Approfittate di questa operazioneper verificare le condizioni <strong>de</strong>l collettore. Se quest'ultimopresenta bruciature o <strong>de</strong>formazioni, è consigliabile farlo riparareda un servizio tecnico <strong>Virutex</strong>.H1I1I1F1H1G120. LUBRIFICAZIONE E PULIZIA• Prima di fresare la prima mortasa, lubrificare le colonne di guida<strong>de</strong>lla profondità "Gp", (Fig. 2) e quelle trasversali "Gt", (Fig. 2),con uno straccio leggermente imbevuto d’olio, per ren<strong>de</strong>re fluidii due movimenti. È importante pulire sempre e accuratamente lamacchina dopo l'uso con un getto d'aria compressa.Mantenere sempre il filo di alimentazione in perfette condizioni.(Figura 27)FC116U / <strong>Manual</strong>e d’istruzioni - 65
21. UTENSILI OPZIONALI• Frese disponibili per le fresatrici per mortase FC116U:NUMERO DIAM. EST. ALTEZZA1640127 16 mm. 13.5 mm.1640150 17 " 13.5 "1640128 18 " 13.5 "1640367 20 " 13.5 "1640129 21 " 13.5 "1640130 23 " 13.5 "1640368 23,5 " 13.5 "1640131 25 " 13.5 "1640369 29 " 13.5 "1640132 30 " 13.5 "1640140 Fresa per forature Ø 24• L’utensile di prolunga UP16I, 1645287 permette di prolungareil fissaggio <strong>de</strong>lla macchina oltre la stessa porta.22. LIVELLO DI RUMOREI livelli di rumore e vibrazioni di questo apparato elettrico sonostati misurati in conformità con la Norma Europea EN 61029-1e fungono da base di confronto con macchine per applicazionisimili.Il livello di vibrazioni indicato è stato <strong>de</strong>terminato per le principaliapplicazioni <strong>de</strong>ll’apparato e può essere utilizzato comepunto di partenza per la valutazione <strong>de</strong>ll’esposizione al rischio<strong>de</strong>lle vibrazioni. Ciononostante, il livello di vibrazioni può variarenotevolmente rispetto al valore dichiarato in altre condizioni diapplicazione, con altri strumenti di lavoro o in caso di manutenzioneinsufficiente <strong>de</strong>ll’apparato elettrico e <strong>de</strong>i suoi strumenti,e può aumentare notevolmente come conseguenza <strong>de</strong>l ciclo dilavoro e <strong>de</strong>l modo d’uso <strong>de</strong>ll’apparato elettrico.Pertanto è necessario stabilire misure di sicurezza per la protezione<strong>de</strong>ll’utente dall’effetto <strong>de</strong>lle vibrazioni, ad esempiomantenendo l’apparato e gli strumenti di lavoro in perfetto statoe pianificando i tempi <strong>de</strong>i cicli lavorativi (ad esempio i tempidi funzionamento <strong>de</strong>ll’apparato sotto carico e i tempi di funzionamentoa vuoto quando l'apparato non viene realmente utilizzato,dato che la riduzione di questi ultimi può ridurre in modosostanziale il valore totale <strong>de</strong>ll’esposizione).23. GARANZIATodas las máquinas electroportátiles VIRUTEX, tienen una garantíaválida <strong>de</strong> 12 meses a partir <strong>de</strong>l día <strong>de</strong> su suministro, quedandoexcluidas todas las manipulaciones o daños ocasionadospor manejos ina<strong>de</strong>cuados o por <strong>de</strong>sgaste natural <strong>de</strong> la máquina.Para cualquier reparación dirigirse al Servicio Oficial <strong>de</strong> AsistenciaVIRUTEX S.A.VIRUTEX, se reserva el <strong>de</strong>recho <strong>de</strong> modificar sus productos sinprevio aviso.66 - FC116U / <strong>Manual</strong>e d’istruzioni
MANUAL DE INSTRUÇÕESINDICE1 DADOS TÉCNICOS 682 UTILIZAÇÃO 683 INSTRUÇÕES DE SEGURANÇA PARA A UTI-LIZAÇÃO DA MÁQUINA 694 EQUIPAMENTO STANDARD 695 MONTAGEM DA MANIVELA AVANÇO CARRO 69Especificações sujeitas aalteração sem aviso prévio.6 MONTAGEM DAS FERRAMENTAS DE CORTE 707 INTERRUPTOR 708 AJUSTAMENTO DA LARGURA DA FRESAGEM 709 AJUSTAMENTO DO COMPRIMENTO DAFRESAGEM 7110 AJUSTA. DA PROFUNDIDADE DA FRESAGEM 7111 FRESAGEM DE ENCAIXE NUMA PORTA 72MEDIR E TRAÇAR REFERÊNCIAS 72FRESAR O ENCAIXE DA CAIXA 7312 FRESAGEM DO ENCAIXE PARA A PLACAFRONTAL DA FECHADURA 74SUBSTITUIR A FRESA 74MEDIR, TRAÇAR REFERÊNCIA E COLOCARFC116U NA PORTA 74REGULAR O PERCURSO DE FRESAGEM 74REGULAR A PROFUNDIDADE DA FRESAGEM 75FRESAGEM DO ENCAIXE 7513 REALIZAÇÃO DOS FUROS PARA A MAÇANE-TA E PARA A CHAVE 76MONTAGEM DO MOLDE UC16I 76SITUAÇÃO DO UTENSÍLIO E PERFURAÇÃO 76FERRAMENTAS OPCIONAIS DE PERFURAÇÃO 7614 FRESAGEM DO ENCAIXE EM VÁRIAS PORTAS 7715 FRESAGEM DE ENCAIXES EM POSIÇÃOHORIZONTAL 7716 CORRECÇÕES PARA PORTAS COM SOLAPA 7717 ACOPLAMENTO DE ASPIRAÇÃO 7818 EXTRACÇÃO DO EIXO ACANALADO 7819 SUBSTITUIÇÃO DE ESCOVAS 7820 LUBRIFICAÇÃO E LIMPEZA 7821 FERRAMENTAS E ACESSÓRIOS OPCIONAIS 7922 NIVEL SONORO 7923 GARANTIA 79FC116U / <strong>Manual</strong> <strong>de</strong> instruções- 67
FRESADORA DE ENCAIXES FC116UIMPORTANTEAntes <strong>de</strong> utilizar a máquina leia atentamente este MANUAL DEINSTRUÇÕES e o FOLHETO DE INSTRUÇÕES GERAIS DE SEGU-RANÇA anexo. Assegure-se <strong>de</strong> os ter compreendido antes <strong>de</strong> começara trabalhar com a máquina.Conserve os dois manuais <strong>de</strong> instruções para possíveis consultasposteriores.1. DADOS TÉCNICOSMotor universal........................................................................50/60 HzPotência........................................................................1.100 WVelocida<strong>de</strong> em vazio..................................................23.000 min -1Diâmetro máximo da Fresa.......................................................30 mmProfundida<strong>de</strong> máxima <strong>de</strong> fresagem................................0 - 125 mmLargura máxima <strong>de</strong> fresagem..........................diâmetro da fresaComprimento máx.<strong>de</strong> fresagem..................................177mm+diâm. da fresaAbertura máxima dos tornos...................................................190 mmAperto mínimo dos tornos..........................................................13 mmDeslocação lateral da fresa sobrea grossura da porta..................................................................± 15 mmPeso...........................................................................................14 KgNível <strong>de</strong> pressão acústica contínuoequivalente pon<strong>de</strong>rado A..............................................................87 dBANível <strong>de</strong> potência acústica A.....................................................98 dBAIncerteza.......................................................................................K = 3 dBAUsar protecção auricular!Valores totais <strong>de</strong> vibração...............................................a h:
3. INSTRUÇÕES DE SEGURANÇAPARA A UTILIZAÇÃO DA MÁQUINACertifique-se <strong>de</strong> que a pessoa que vai usar estamáquina leia cuidadosamente e compreendaeste MANUAL DE INSTRUÇÕES e o FOLHETO DEINSTRUÇÕES GERAIS DE SEGURANÇA anexo,antes <strong>de</strong> começar a trabalhar com ela.• Antes <strong>de</strong> ligar a máquina, verifique se a tensão <strong>de</strong> alimentação<strong>de</strong> que dispõe correspon<strong>de</strong> à indicada na placa <strong>de</strong> característicasda máquina.• Para substituir a fresa ou realizar qualquer outra operaçãocerca do cabeçal <strong>de</strong> corte, <strong>de</strong>sligue a máquina da re<strong>de</strong> <strong>de</strong> correnteeléctrica.• Use óculos <strong>de</strong> segurança quando trabalhar com a fresadora.• Não ponha o motor em funcionamento, se se tiver extraído daarmação da máquina.• Verifique o percurso do cabo <strong>de</strong> alimentação, a fim <strong>de</strong> po<strong>de</strong>revitar que se possa emaranhar durante a utilização.• Ponha a fresadora em funcionamento sempre por meio da alavancado interruptor principal.• Depois da fresadora se encontrar situada sobre a peça a fresar,efectue sempre a <strong>de</strong>slocação da ferramenta utilizando a manivela<strong>de</strong> avanço do carro. Não empurre nunca com as mãos oucom ferramentas alheias.• Certifique-se <strong>de</strong> que o motor se encontra completamente parado,antes <strong>de</strong> retirar a fresadora do encaixe realizado.• Utilize sempre as fresas do diâmetro a<strong>de</strong>quado e correctamentemontadas no eixo acanalado.• Não utilize jamais fresas incorrectas, <strong>de</strong>feituosas ou em mau estado.Utilize unicamente fresas e sobressalentes originais VIRUTEX.4. EQUIPAMENTO STANDARDNo interior da caixa Você encontrará os seguintes elementos:• Fresadora <strong>de</strong> encaixes FC116U• Utensílio <strong>de</strong> perfuração para o canhão e agulha UT16I• Chaves <strong>de</strong> serviço e mol<strong>de</strong> <strong>de</strong> <strong>de</strong>senho• Vareta <strong>de</strong> altura <strong>de</strong>smontável em 4 secções e um topo porta.• Quatro protectores <strong>de</strong> mordaças para processos <strong>de</strong>licados <strong>de</strong>montagem.• Fresa <strong>de</strong> encaixes <strong>de</strong> diâmetro <strong>de</strong> 16 mm.• <strong>Manual</strong> <strong>de</strong> instruções e diversa documentação.Fig. 15. MONTAGEM DA MANIVELA AVANÇO CARROVerifique se a fresadora se encontra <strong>de</strong>sligadada re<strong>de</strong> <strong>de</strong> corrente eléctrica.(Figura 1)• Encaixar a ranhura rectangular da manivela <strong>de</strong> avanço do carro"A", colocando-a sobre a superfície do eixo "B", e colocar aanilha "C" e o parafuso "D", tal como se indica na (Fig. 1). Apertaro parafuso "D" com a chave "F", para fixar o manípulo <strong>de</strong> avançodo carro no seu alojamento.• IMPORTANTE: NÃO BATER NA SUPERFÍCIE DO MANÍPULO DEAVANÇO "A".FC116U / <strong>Manual</strong> <strong>de</strong> instruções - 69
6. MONTAGEM DAS FERRAMENTAS DE CORTEEVerifique se a fresadora se encontra <strong>de</strong>sligada dare<strong>de</strong> <strong>de</strong> corrente eléctrica.FG• A fresadora <strong>de</strong> encaixes fornece-se com uma fresa do diâmetro<strong>de</strong> 16 mm, montada na extremida<strong>de</strong> do eixo acanalado.A fim <strong>de</strong> substituir a fresa, bloqueie o eixo acanalado pelos seusplanos, com a chave "E" (Fig. 2), <strong>de</strong>senrosque a fresa "G" com achave "F" e substitua-a por outra do diâmetro <strong>de</strong>sejado.(Figura 2)7. INTERRUPTOR• A caixa do interruptor (Fig. 3), é provida <strong>de</strong> uma alavanca "Y"para o arranque da máquina e <strong>de</strong> um seguro <strong>de</strong> encravamentolateral "Z". A fim <strong>de</strong> po<strong>de</strong>r efectuar o arranque, há que accionaro seguro <strong>de</strong> encravamento "Z" e, sem o soltar, premir a alavanca"Y", mantendo-se <strong>de</strong> esta maneira a máquina em movimento.Ao premir a alavanca "Y" tendo a máquina em movimento, oseguro "Z" <strong>de</strong>sencrava-se automaticamente e a máquina pára.O seguro <strong>de</strong> encravamento do interruptor "Z" impe<strong>de</strong> a entradaem movimento aci<strong>de</strong>ntal da máquina.ZY(Figura 3)8. AJUSTAMENTO DA LARGURA DA FRESAGEMN• Meça o ponto mais largo "N" da caixa da fechadura, incluindoqualquer protuberância que tiver (Fig. 4). NÃO INCLUA a faceembelezadora exterior da fechadura.Verifique se a fresadora se encontra <strong>de</strong>sligada dare<strong>de</strong> <strong>de</strong> corrente eléctrica.• Coloque uma fresa <strong>de</strong> encaixes da medida feita, ou ligeiramentemaior, seguindo as instruções do capítulo 6.(Figura 4)70 - FC116U / <strong>Manual</strong> <strong>de</strong> instruções
9. AJUSTAMENTO DO COMPRIMENTO DA FRESAGEMH• Meça o ponto mais largo "H" da caixa <strong>de</strong> fechadura, incluindoqualquer protuberância que tiver (Fig. 5). NÃO INCLUA a faceembelezadora exterior da fechadura.TVerifique se a fresadora se encontra <strong>de</strong>sligada dare<strong>de</strong> <strong>de</strong> corrente eléctrica.(Figura 5)• A fim <strong>de</strong> ajustar a máquina ao comprimento <strong>de</strong> fresagem "H"<strong>de</strong>sejado, afrouxe a porca "P" (Fig. 6) com a chave "F" e accionea manete fuso "R" até que o indicador <strong>de</strong> comprimento "S" alcancea medida <strong>de</strong>sejada "H" e aperte a porca "P" nesta posição.PTenha a certeza <strong>de</strong> apertar a porca "P" (Fig. 6);do contrário, po<strong>de</strong>-se produzir a rotura do mecanismo<strong>de</strong> ajustamento do comprimento <strong>de</strong> fresagem.FSRA centragem da fresa sobre a grossura da porta, ou da peça aencaixar, é automática se as plaquinhas "J" (Fig. 7) estiverem naposição <strong>de</strong> "0" nas duas guias torno "V" (Fig. 7).V(Figura 6)V(Figura 7)JWAV10. AJUSTAMENTO DA PROFUNDIDADE DA FRESAGEMAW• Meça a profundida<strong>de</strong> "T" (Fig. 5) da caixa da fechadura, incluindoqualquer proteburância que tiver no seu fundo, incluindoa grossura da face embelezadora exterior e uns mm maiscomo folga.Verifique se a fresadora se encontra <strong>de</strong>sligada dare<strong>de</strong> <strong>de</strong> corrente eléctrica.(Figura 8)U• A profundida<strong>de</strong> <strong>de</strong> fresagem controla-se por meio da réguagraduada "U" (Fig. 8), a qual se encontra marcada em divisões<strong>de</strong> 1 mm. Afrouxe a manete "W" e coloque o anel "A", <strong>de</strong> modoque a sua face inferior coincida com a profundida<strong>de</strong> <strong>de</strong>sejada, eaperte a manete "W" nessa posição.FC116U / <strong>Manual</strong> <strong>de</strong> instruções - 71
FRESAR O ENCAIXE DA CAIXAVYZJAK"rs""c"• Colocar a máquina sobre a porta, alinhando a aresta superiordo travessão "V" (Fig. 10), com o traço <strong>de</strong> referência superior "rs"(Fig. 10) e fixar firmemente as mordaças usando as alavancas"K" (Fig. 10).• Verifique se a manivela <strong>de</strong> avanço "A" (Fig. 10) po<strong>de</strong> girarlivremente em todo o seu percurso.• Gire a vareta blocagem "J" (Fig. 10) para a posição vertical, afim <strong>de</strong> engrenar o mecanismo <strong>de</strong> avanço da profundida<strong>de</strong> <strong>de</strong>fresagem.• Ligar a máquina à re<strong>de</strong> <strong>de</strong> alimentação eléctrica, e accionar omotor usando a alavanca "Y" (Fig. 10) e bloquear a segurançacarregando em "Z" (Fig. 10).• Gire repetidamente a manivela <strong>de</strong> avanço "A" (Fig. 10), com oqual obterá um avanço sincronizado da ferramenta, longitudinale em profundida<strong>de</strong>, até ao final do percurso fixado no capítulo10.• Detenha a máquina ao accionar a alavanca "Y" do interruptor(Fig. 10).(Figura 10)Desligue a fresadora da re<strong>de</strong> <strong>de</strong> corrente eléctrica.• Girar a vareta <strong>de</strong> bloqueio "J" (Fig. 10) até atingir a posiçãohorizontal, libertando o mecanismo <strong>de</strong> avanço da ferramenta efazendo o motor retroce<strong>de</strong>r até ao final do percurso.FC116U / <strong>Manual</strong> <strong>de</strong> instruções - 73
"Nt""N3"N112. FRESAGEM DO ENCAIXE PARA A PLACA FRONTAL DAFECHADURAVerifique se a fresadora se encontra <strong>de</strong>sligada dare<strong>de</strong> <strong>de</strong> corrente eléctrica.(Figura 11)V"N2"N2-N3= X mm"rs""rs1"SUBSTITUIR A FRESA• Meça a largura "N1" (Fig. 11) da parte frontal da fechadurae monte na máquina uma fresa com a medida correspon<strong>de</strong>nte,seguindo as instruções da secção 6 do manual.MEDIR, TRAÇAR REFERÊNCIA E COLOCAR FC116U NA POR-TA(Figura 12)S1"rs"N2-N3= X mm"rs1"(Figura 13)• Registar as medidas entre a caixa da fechadura e cada umadas extremida<strong>de</strong>s da parte frontal da fechadura "N2" e "N3" (Fig.11).• Se as duas medidas "N2" e "N3" (Fig. 11) forem iguais: Apertara máquina <strong>de</strong> encontro à porta, alinhando a aresta superior dotravessão"V" (Fig. 12), com o traço <strong>de</strong> referência superior "rs"(Fig. 12), alinhando assim os centros do percurso da máquina, dacaixa da fechadura e da placa frontal da fechadura.• Se as medidas "N2" e "N3" (Fig. 11) não forem iguais, registe adiferença entre ambas "N2"-"N3"=X mm (Fig. 11) e <strong>de</strong>senhe umanova marca <strong>de</strong> referência superior “rs1” (Fig. 13 e 12), com uma<strong>de</strong>slocação <strong>de</strong> X mm para o lado da medida maior entre "N2"e "N3", e seguidamente aperte a máquina <strong>de</strong> encontro à portaalinhando a aresta superior do travessão "V" (Fig. 12), com onovo traço <strong>de</strong> referência superior “rs1” (Fig. 12), alinhando assimo centro do percurso da máquina com o centro da placa frontalda fechadura.S1SS2REGULAR O PERCURSO DE FRESAGEM• Medir o comprimento da parte frontal "NT" (Fig. 11) da fechadura,e fixar os dois topos longitudinais "S1" (Fig. 12 e 14), sobrea divisão correspon<strong>de</strong>nte à medida NT na escala da coluna <strong>de</strong>guia "S" (Fig. 14).• Posicionar e fixar os dois topos correctores do diâmetro dafresa "S2" (Fig. 14), sobre a marca correspon<strong>de</strong>nte ao diâmetroda fresa montada (Fig. 14).• Ajustar o comprimento da fresagem na biela a uma medida umpouco maior do que a da parte frontal da fechadura "NT" (Fig.11), tal como se <strong>de</strong>monstrou na secção 9 (Fig. 6) <strong>de</strong>ste manual(Figura 14)74 - FC116U / <strong>Manual</strong> <strong>de</strong> instruções
WKS1rsrs1REGULAR A PROFUNDIDADE DA FRESAGEM• Girar a alavanca "W" (Figs. 15-18) até à sua posição limitesuperior, girando-a no sentido anti-horário.• Verificar que a vareta <strong>de</strong> bloqueio "J" (Fig. 15) se encontra naposição horizontal (avanço <strong>de</strong> profundida<strong>de</strong> <strong>de</strong>sligado).• Afrouxar a alavanca "K" (Fig. 16); <strong>de</strong>slocar a máquina parabaixo, empurrando-a suavemente com a mão sobre o motor, atéque a fresa toque o canto da porta, e mantê-la nesta posiçãofixando a alavanca "K" (Fig. 16).• Colocar a parte frontal da fechadura (Fig. 17), tocando a parteinferior do suporte do motor; <strong>de</strong>slocar e fixar o topo <strong>de</strong> profundida<strong>de</strong>"S3" (Fig. 16 e 17), fixando a parte frontal da fechadura.• Afrouxar a alavanca "K" (Fig. 15-17), para que a máquina possasubir até à sua posição inicial.JA(Figura 15)WWKS3S3K(Figura 17)(Figura 16)ZYAS1(Figura 18)WS3FRESAGEM DO ENCAIXE• Verificar que a vareta <strong>de</strong> bloqueio "J" (Fig. 15) se encontra naposição horizontal (avanço <strong>de</strong> profundida<strong>de</strong> <strong>de</strong>sconectado).• Ligue a máquina à re<strong>de</strong> <strong>de</strong> alimentação eléctrica e ligue o motoraccionando a alavanca "Y" (Fig. 18) e bloqueie o dispositivo<strong>de</strong> segurança carregando em "Z" (Fig. 18).• Girar a alavanca"W" (Fig. 17 e 18) até que o suporte do motortoque o topo <strong>de</strong> profundida<strong>de</strong> "S3" (Fig.18). Quando a ferramentaalcançar a profundida<strong>de</strong> <strong>de</strong> corte prevista para a parte frontalda fechadura, accionar a manivela <strong>de</strong> avanço do carro "A" (Fig.15 e 18) com suavida<strong>de</strong> até alcançar cada um dos dois topos"S1" (Fig. 15 e 18), situados em cada final do percurso do carro,num movimento <strong>de</strong> vai-vém.Se o encaixe a realizar for superior a 2 mm, é aconselhável executá-loem duas ou mais passagens sucessivas, accionando repetidamentea alavanca “W”.• Colocar a alavanca "W" (Fig. 18) e o topo <strong>de</strong> profundida<strong>de</strong> "S3"(Fig. 16) na sua posição inicial ao terminar a fresagem.FC116U / <strong>Manual</strong> <strong>de</strong> instruções - 75
13. REALIZAÇÃO DOS FUROS PARA A MAÇANETA E PARAA CHAVE• Por último, com a ajuda do mol<strong>de</strong> UT16I fornecido com a máquina,po<strong>de</strong>m realizar os furos necessários para a montagem dafechadura, como os orifícios <strong>de</strong> passagem da maçaneta, do fechomanual, do canhão da chave, etc.BA"c""c"MONTAGEM DO MOLDE UC16I• Introduzir uma das varetas <strong>de</strong> altura <strong>de</strong>smontávelincluídas com o equipamento nointerior dos orifícios “A”, e <strong>de</strong>slizar o utensílioaté colocar o "0" <strong>de</strong> referência sobre o centro“c” da caixa da fechadura. (Fig. 19).• Fixar com a manete "B" e, ao mesmo tempo,nivelar a face interna "C" da chapa <strong>de</strong> referênciano canto da porta. (Fig. 19).centro caja cerradura "c"CA(Figura 19)centro caja cerraduraSITUAÇÃO DO UTENSÍLIO E PERFURAÇÃOGH "c"centro caja cerradura "c""c"• Afrouxar o casquilho guia “G” e <strong>de</strong>slizá-lono sentido horizontal, situando o índice “H” namedida “D”, e apertá-lo novamente. (Fig. 20).• Tomando como referência o centro “c” dacaixa da fechadura, <strong>de</strong>slizar o utensílio no sentidovertical para o situar na medida “E” ou “F”<strong>de</strong>sejada. (Fig. 20)• Depois <strong>de</strong> situada a posição do orifício, proce<strong>de</strong>r-se-áa efectuar a perfuração com umabroca <strong>de</strong> 11 mm <strong>de</strong> diâmetro.• Tendo a referência <strong>de</strong> novo no centro "c" dacaixa da fechadura, po<strong>de</strong>r-se-á situar o seguinteorifício que a fechadura necessitar.(Figura 20)FERRAMENTAS OPCIONAIS DE PERFURAÇÃO76 - FC116U / <strong>Manual</strong> <strong>de</strong> instruções1640148 16401491640148 Fresa <strong>de</strong> alargamento D.18 c/guia <strong>de</strong> 111640149 Fresa <strong>de</strong> alargamento D.23 c/guia <strong>de</strong> 11
U1(Figura 21)A2S1T1A114. FRESAGEM DO ENCAIXE EM VÁRIAS PORTAS• Se <strong>de</strong>sejar fazer encaixes em várias portas e colocar as fechadurasa uma mesma altura, aconselhamos-lhe que empregue avareta <strong>de</strong> alturas "A1" (Fig. 21), o que lhe facilitará a operação.Para isso, <strong>de</strong>pois <strong>de</strong> ter <strong>de</strong>terminado a altura da fechadura naprimeira porta e <strong>de</strong> ter situado a máquina na posição <strong>de</strong> fresas,monte as quatro varetas <strong>de</strong> altura "A1" (Fig. 21) e introduza-as nosorifícios dos tornos "X" (Fig. 22), <strong>de</strong> modo que o Disco <strong>de</strong> topo "A2"(Fig. 21) da sua extremida<strong>de</strong> estabeleça topo no canto superior daporta, e fixe a vareta <strong>de</strong> altura "A1" (Figs. 21 e 22) nesta posiçãopor meio das manetes "B1" (Fig. 22). Para a porta seguinte, bastacolocar a máquina como disco <strong>de</strong> topo "A2" (Fig. 21), da vareta<strong>de</strong> altura "A1", assente sobre o canto superior da porta, e fixar asmordaças nesta posição, marcando para uso posterior o traço <strong>de</strong>referência superior “rs” na nova porta para que todas as fechadurasse situem à mesma altura.A vareta <strong>de</strong> alturas "A1" (Fig. 21) sem o disco topo "A2" (Fig. 21)po<strong>de</strong> também ser empregue, se o <strong>de</strong>sejar, como referência daaltura em relação ao chão.XJQA1B1XF15. FRESAGEM DE ENCAIXES EM POSIÇÃO HORIZONTAL• Para trabalhar com a FC116U em posição horizontal, como porexemplo para a realização <strong>de</strong> encaixes em portas antes <strong>de</strong> pendurá-las,é conveniente <strong>de</strong>sligar o amortecedor "T1" (Fig. 21), a fim<strong>de</strong> <strong>de</strong>ixar livre da sua pressão, o movimento do Carro "U1".Para isso, afrouxar a porca "P" (Fig. 23) com a chave "F" e, accionandoa manete Fuso "R", <strong>de</strong>slocar o Indicador <strong>de</strong> comprimento"S" até ao Topo "A2" <strong>de</strong> final <strong>de</strong> percurso.Retirar a manete "S1" (Fig. 21), que agarra o amortecedor "T1",para que este fique <strong>de</strong>sligado. Guardar a manete "S1" num lugarseguro, para uma próxima utilização.Finalmente, ajustar o comprimento <strong>de</strong> fresagem <strong>de</strong>sejado, <strong>de</strong>acordo com o modo indicado no capítulo 9, antes <strong>de</strong> trabalharcom a máquina, visto que esta não <strong>de</strong>ve trabalhar nunca no final<strong>de</strong> percurso, acima do comprimento máximo.(Figura 22)16. CORRECÇÕES PARA PORTAS COM SOLAPAA2Para o encaixe <strong>de</strong> portas com solapa, <strong>de</strong>verá corrigir a centragem damáquina e a profundida<strong>de</strong> <strong>de</strong> fresagem, do seguinte modo:PVerifique se a fresadora se encontra <strong>de</strong>sligada dare<strong>de</strong> <strong>de</strong> corrente eléctrica.FSR• A fim <strong>de</strong> centrar a máquina sobre a secção da porta sem solapa,afrouxe a chave "F" (Fig. 22) e os parafusos "Q" que bloqueiamos tornos "X", e <strong>de</strong>sloque as placas "J" para o lado da solapa, àmeta<strong>de</strong> da largura <strong>de</strong>sta em mm, e fixe <strong>de</strong> novo os parafusos "Q"nesta posição.• Ao ajustar a profundida<strong>de</strong> <strong>de</strong> fresagem, tal e como se explicano capítulo 10, <strong>de</strong>verá colocar o anel <strong>de</strong> topo "A" (Fig. 8) a umaaltura da escala "U" (Fig. 8) que seja a soma da profundida<strong>de</strong>necessária para a fechadura mais a altura da solapa da porta,visto que a máquina se apoiará nesta solapa.(Figura 23)FC116U / <strong>Manual</strong> <strong>de</strong> instruções - 77
17. ACOPLAMENTO DE ASPIRAÇÃOD2D1• A máquina <strong>de</strong> encaixes FC116U dispõe <strong>de</strong> uma boquilha "D2"(Fig. 24) que, <strong>de</strong>pois <strong>de</strong> montada na vareta <strong>de</strong> posição "D1" (Fig.24), sobre a abertura da caixa a realizar, permite a ligação doaspiradores <strong>Virutex</strong> AS182K, AS282K, AS382L e ASC482U ou <strong>de</strong>outro aspirador industrial, para a extracção das aparas da fresagem.(Figura 24)EGt18. EXTRACÇÃO DO EIXO ACANALADOPara trocar o eixo acanalado "M" (Fig. 26) <strong>de</strong>smonte primeiro afresa "G" (Fig. 25), conforme explicado no capítulo 6.Coloque o passador "L" (Fig. 26) no orifício central da carcaça,até bloquear o eixo do motor e extraia o eixo acanalado "M"com a chave "E".FGpG19. SUBSTITUIÇÃO DE ESCOVAS(Figura 25)Certifique-se <strong>de</strong> que a máquina esteja <strong>de</strong>sligadada re<strong>de</strong> <strong>de</strong> corrente eléctrica, antes <strong>de</strong> realizarqualquer manipulação.L(Figura 26)EM• As escovas <strong>de</strong>vem ser substituídas quanto tiverem um comprimentomínimo <strong>de</strong> 5 mm. Para isso, <strong>de</strong>smonte a caixa do interruptor"F1" (Fig. 27), retirando os parafusos "G1" que a agarram.Tire os tampões "H1" que agarram as escovas "I1" e substitua-aspor outras originais VIRUTEX, comprovando que <strong>de</strong>slizem suavementeno interior das guias. Ao montar <strong>de</strong> novo a caixa interruptor"F1", certifique-se <strong>de</strong> que os cabos fiquem bem situadosno seu interior.É aconselhável <strong>de</strong>ixar a máquina em funcionamento em vaziodurante alguns minutos, <strong>de</strong>pois <strong>de</strong> uma substituição <strong>de</strong> escovas.Aproveite a substituição <strong>de</strong> escovas para verificar o estado docolector. Se este apresentasse queimaduras ou saliências, torna-seaconselhável levá-lo a um Serviço Técnico VIRUTEX pararepará-lo.H1I1I1(Figura 27)78 - FC116U / <strong>Manual</strong> <strong>de</strong> instruçõesF1H1G120. LUBRIFICAÇÃO E LIMPEZA• Antes <strong>de</strong> fresar o primeiro encaixe, lubrifique as colunas <strong>de</strong>guia da profundida<strong>de</strong> "Gp" (Fig. 25) e as transversais "Gt" (Fig.25) com um pano ligeiramente impregnado em óleo, para suavizaros dois movimentos. É importante limpar sempre a máquina<strong>de</strong>pois da sua utilização, empregando um jacto <strong>de</strong> ar seco.Mantenha sempre o cabo <strong>de</strong> alimentação em perfeitas condições<strong>de</strong> utilização.
21. FERRAMENTAS E ACESSÓRIOS OPCIONAIS• Fresas para a fresadora <strong>de</strong> encaixes FC116U disponíveis:NÚMERO DIÂM. EXT. ALTURA1640127 16 mm. 13.5 mm.1640150 17 " 13.5 "1640128 18 " 13.5 "1640367 20 " 13.5 "1640129 21 " 13.5 "1640130 23 " 13.5 "1640368 23,5 " 13.5 "1640131 25 " 13.5 "1640369 29 " 13.5 "1640132 30 " 13.5 "1640140 Fresa <strong>de</strong> taladrar Ø 24• O utensílio <strong>de</strong> extensão UP16I, 1645287 permite prolongar afixação da máquina para além da própria porta.22. NIVEL SONOROOs níveis <strong>de</strong> ruído e vibrações <strong>de</strong>sta ferramenta eléctrica forammedidos <strong>de</strong> acordo com a Norma Europeia EN 61029-1 e servemcomo base <strong>de</strong> comparação com uma máquina <strong>de</strong> aplicação semelhante.O nível <strong>de</strong> vibrações indicado foi <strong>de</strong>terminado para as principaisaplicações da ferramenta e po<strong>de</strong> ser utilizado como valor<strong>de</strong> partida para a avaliação da exposição ao risco das vibrações.Contudo, o nível <strong>de</strong> vibrações po<strong>de</strong> alcançar valores muito diferentesdo valor indicado noutras condições <strong>de</strong> aplicação, comoutros dispositivos <strong>de</strong> trabalho ou com uma manutenção <strong>de</strong>ficienteda ferramenta eléctrica e respectivos dispositivos, po<strong>de</strong>ndoresultar num valor muito mais elevado <strong>de</strong>vido ao seu ciclo <strong>de</strong>trabalho e modo <strong>de</strong> utilização.Por conseguinte, é necessário estabelecer medidas <strong>de</strong> segurançapara protecção do utilizador contra o efeito das vibrações, taiscomo a manutenção da ferramenta, conservação dos respectivosdispositivos em perfeito estado e organização dos períodos <strong>de</strong>trabalho (tais como os períodos <strong>de</strong> trabalho com a ferramentaem carga e períodos <strong>de</strong> trabalho com a ferramenta em vazio esem ser realmente utilizada, uma vez que a redução da cargapo<strong>de</strong> diminuir <strong>de</strong> forma substancial o valor total da exposição).23. GARANTIATodas as máquinas VIRUTEX possuem uma garantia válida por12 meses contados a partir do dia <strong>de</strong> fornecimento, ficando <strong>de</strong>laexcluídas todas as manipulações ou danos ocasionados por utilizaçõesnão a<strong>de</strong>quadas, ou pelo <strong>de</strong>sgaste natural da máquina.Para qualquer reparação, há que se dirigir ao Serviço Oficial <strong>de</strong>Assistência Técnica VIRUTEX.A VIRUTEX reserva para si o direito <strong>de</strong> po<strong>de</strong>r modificar os seusprodutos, sem a necessida<strong>de</strong> <strong>de</strong> aviso prévio.FC116U / <strong>Manual</strong> <strong>de</strong> instruções - 79
1696685 052010<strong>Virutex</strong>, S.A.Antoni Capmany, 108028 Barcelona (Spain)www.virutex.es

