empire battle tested rip clip quick start manual - Paintball Solutions
empire battle tested rip clip quick start manual - Paintball Solutions
empire battle tested rip clip quick start manual - Paintball Solutions

Create successful ePaper yourself
Turn your PDF publications into a flip-book with our unique Google optimized e-Paper software.
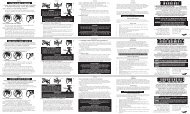
EMPIRE BATTLE TESTED RIP CLIPQUICK START MANUALRead the full Operator’s Manual for technical information, usage instructions, and maintenance tips for your Empire Battle TestedRip-Clip Loader System. The full <strong>manual</strong> can be found on the enclosed CD in English, French, and Spanish or by contacting<strong>Paintball</strong> <strong>Solutions</strong> at 1-800-220-3222 or at www.paintballsolutions.comGetting StartedThe Empire Battle Tested Rip-Clip comes with 2 different adapterplates and 2 different length rail locking screw sets for use on allTM Series, BT-4 Series, and Omega markers.• Select the adapter plate for your marker, they are labeled eitherTM-15 or TM-7. No adapter plate is needed for BT-4 Seriesmarkers or the BT Omega.• Select the correct length screws for your marker. The TM-7 andTM-15 use the long rail locking screws and the BT Omega andBT-4 Series markers use the short length screws.• Put both screws with thumb nuts attached into the Picatinnyrail locking arm.• Place the correct adapter onto the Rip-Clip body if needed.• Install the rail locking arm with screws and thumb nuts onto theRip-Clip body using a flat head screw driver.• Make sure the screws are fully seated into the body.Battery Installation• Using a Phillips-head screwdriver remove the screw on top ofbattery door and lift off door.• Install (4) AA alkaline batteries following the polarity markings• Reinstall the door and battery door screw.Note: For best results, only use quality name brand alkalinebatteries. When replacing batteries, used batteries should berecycled.Rip-Clip Installation• Loosen up the thumb nuts• Install the Rip-Clip onto the Marker’s Picatinny rail• Check the position on the Picatinny rail and make sure the Rip-Clip is aligned with the feed hole on the side of the marker• Tighten up the thumb nuts and your ready to go.Hopper Installation• You will notice that the loader has an alignment tab on the leftside.• Locate the slot for the tab within the Rip-Clip body.• Insert the hopper into the slot and turn the loadercounter-clockwise until it is locked firmly into theRip-Clip.Activating the Rip-Clip• Locate the power button on the rear of the Rip-Clip. Quickly tapthe power button to turn the Rip-Clip on. The motor will spinfor a second and the loader is now ready to use.• The green LED will flash repeatedly while the unit is on to showit is ready. If the LED flashing changes to red, then the batteriesare low and need to be replaced.• To turn off the Rip-Clip, press and hold the power button until theLED changes to Red. Release the button and the loader will turnoff. If the loader is left on, it will shut off after 1 hour of inactivity.Board Functions and RF (Radio Frequency)(See Programming section of Operator’s Manual for more details).Covered by one or more of the following U.S. patent numbers: 5,954,042; 6,109,252; 6,701,907; 6,792,933; 7,343,909; GB2322438.Rip Clip Quick-Start Manual Ver. 1.0 • 05/11Rip Clip Quick-Start Manual.indd 15/4/11 5:33 PM
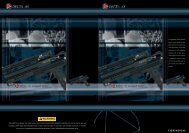
MANUEL DE DÉMARRAGE RAPIDE DU RIP CLIP EMPIRE BATTLE TESTEDLire le manuel de l’utilisateur pour consulter les informations techniques, les instructions d’utilisation, et obtenir des conseils sur la maintenance de votre dispositif de chargement Empire Battle Tested Rip-Clip . Le manuel complet estdisponible sur les CD en anglais, en français et en espagnol. Vous pouvez obtenir ces informations en communiquant directement avec <strong>Paintball</strong> <strong>Solutions</strong> au 001-800-220-3222 ou en consultant notre site : www.paintballsolutions.comMise en routeLe Rip-Clip Empire Battle Tested est livré avec 2 adaptateurs et 2 ensembles de vis de verrouillage delongueurs différentes pour une utilisation sur tous les marqueurs TM, BT-4, et Omega.• Sélectionnez l’adaptateur pour votre marqueur, ceux-ci portent la mention TM-15 ou MD-7. Aucunadaptateur n’est nécessaire pour les marqueurs de série BT-4 ou Omega BT.• Choisissez les vis de longueur adaptée à votre marqueur. Les modèles TM-7 et TM-15 utilisent les visde blocage longues et les marqueurs Oméga BT et BT-4 utilisent les vis courtes.• Placez les deux vis avec écrous à oreilles dans le bras de verrouillage du rail Picatinny.• Placez l’adaptateur correct sur le corps du Rip-Clip si nécessaire.• Installez le bras de verrouillage du rail avec les vis et les écrous à oreilles sur le corps du Rip-Clip, enutilisant un tournevis à tête plate.• Assurez-vous que les vis sont bien montées sur le corps.Activation du Rip-Clip• Localisez le bouton d’alimentation à l’arrière du Rip-Clip. Appuyez rapidement sur le boutond’alimentation pour activer le Rip-Clip. Le moteur tourne pendant une seconde et le chargeur est alorsprêt pour son utilisation.• La LED verte clignote à plusieurs reprises lorsque l’appareil est allumé, pour indiquer que celui-ci estprêt. Si la lumière de la LED clignote au rouge, alors les piles sont faibles et doivent être remplacées.• Pour désactiver le Rip-Clip, enfoncez et maintenez le bouton d’alimentation, jusqu’à ce que le témoinpasse au rouge. Relâchez le bouton et le chargeur s’éteint. Si le chargeur est allumé, il s’éteindraautomatiquement après 1 heure d’inactivité.Fonctions d’affichage et RF (Radio Fréquence)(Voir la Section Programmation du Manuel de l’utilisateur pour de plus amples informations).Installation de piles• A l’aide d’un tournevis cruciforme, enlevez la vis située sur le dessus du couvercle de la batterie etsoulevez la porte.• Installez (4) piles alcalines AA en respectant lespolarités• Réinstaller le couvercle et la vis du compartimentdes piles.Remarque : Pour de meilleurs résultats, n’utilisezque des piles alcalines. Lors du remplacementdes piles, les piles usagées doivent être recyclées.Installation du Rip-Clip• Dévissez les écrous à oreilles• Installez le Rip-Clip sur le rail Picatinny desmarqueurs• Vérifiez la position sur le rail Picatinny etassurez-vous que le Rip-Clip est aligné avec letrou d’alimentation sur le côté du marqueur• Serrez les écrous à oreilles et vous voilà prêt.Installation du chargeur• Notez que le chargeur a un onglet d’alignementsur le côté gauche.• Repérez l’emplacement de l’onglet sur le Rip-Clip.• Insérez le chargeur dans la fente et tourner lechargeur dans le sens inverse des aiguillesd’une montre, jusqu’à ce qu’il soit bien verrouillédans le Rip-Clip.MANUAL DE INICIO RÁPIDO DEL CARGADOR EMPIRE RIP-CLIP PUESTO A PRUEBA EN COMBATESLea el Manual de Operación para información técnica completa, instrucciones de uso y consejos de mantenimiento para su Sistema de Carga del Cargador puesto a prueba en combates marca Empire Rip-Clip. El <strong>manual</strong> completo se encuentra en el CD adjunto en versión inglés, francés y español, o contacte a Soluciones <strong>Paintball</strong> al teléfono 1-800-220-3222 o en la página web www.paintballsolutions.com.Cómo EmpezarEl Cargador Empire Rip-Clip es provisto con dos placas adaptadoras diferentes y 2 diferentes juegosde tornillos de ajuste de longitud de riel para su uso en todas las marcadoras TM, BT.4 y Omega.• Seleccione el plato adaptador para su marcadora, están rotulados como TM-15 o TM-7. No serequiere plato adaptador para las marcadoras Serie BT-4 o la BT Omega.• Seleccione la longitud correcta de los tornillos de su marcadora. La TM-7 y la TM-15 utilizan lostornillos largos para el riel de bloqueo y las marcadoras BT Omega y Serie BT-4 utilizan los tornilloscortos.• Coloque ambos tornillos con sus tuercas-ma<strong>rip</strong>osa conectados al brazo de bloqueo del rielPicatinny.• Coloque el adaptador apropiado al cuerpo del Cargador Rip-Clip si se requiere.• Instale el brazo de seguridad del riel con los tornillos y tuercas ma<strong>rip</strong>osa al cuerpo del CargadorRip-Clip utilizando un destornillador plano.• Asegúrese de que los tornillos estén completamente asentados en el cuerpo.Battery Installation• Utilizando un destornillador de estrella suelte el tornillo sobre la compuerta de la batería y levante lacompuerta.• Instale (4) baterías alcalinas conforme loindicant las señales de polaridad.• Reponga la compuerta y atornille la misma.Nota: Para mejores resultados solo utilicebaterías de reconocida calidad. Al reemplazarlas baterías, las baterías usadas deben serrecicladas.• Inserte la tolva en la ranura y gire el cargador en sentido inverso a las agujas del reloj hasta que seengrane firmemente al cargador Rip-Clip.Activando el cargador Rip-Clip• Encuentre el botón de encendido en la parte posterior del cargador Rip-Clip. Pulse el botónligeramente para encender el cargador Rip-Clip. El motor girará por un segundo y el cargador ahoraestá listo para utilizar.• La luz LED verde se encenderá intermitentemente mientras la unidad está encendida para indicarque está lista para utilizar. Si la luz LED intermitente cambia a rojo, entonces está indicando quequeda poca carga en las baterías y éstas se deben reemplazar.• Para apagar el cargador Rip-Clip, presione el botón de encendido y manténgalo presionadohasta que la luz LED cambie a rojo. Entonces suelte el botón y el cargador se apagará. Si se dejaencendido, el cargador se apagará después de 1 hora de inactividad.Funciones del Tablero y RF (Frecuencia de Radio)(vea la sección de Programación del Manual de Operación para más detalles).Instalación del Cargador Rip-Clip• Afloje las tuercas-ma<strong>rip</strong>osa.• Instale el Cargador Rip-Clip en el riel picatinnyde la Marcadora.• Verifique la posición del riel picatinny yasegúrese de que el Cargador Rip-Clip estáalineado con el hoyo de alimentación en el ladode la marcadora.• Apriete las tuercas-ma<strong>rip</strong>osa y ya está ustedlisto para salir.Instalación de la Tolva• Usted notará que el cargador tiene unalengüeta de alineación en el lado izquierdo.• Encuentre la ranura para la lengüeta en elcargador Rip-Clip.Rip Clip Quick-Start Manual.indd 25/4/11 5:33 PM