IAttenzione - Wertherint.de
IAttenzione - Wertherint.de
IAttenzione - Wertherint.de

Create successful ePaper yourself
Turn your PDF publications into a flip-book with our unique Google optimized e-Paper software.
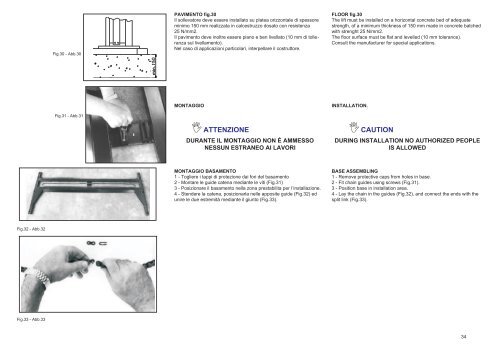
Fig.30 - Abb.30PAVIMENTO fig.30Il sollevatore <strong>de</strong>ve essere installato su platea orizzontale di spessoreminimo 150 mm realizzata in calcestruzzo dosato con resistenza25 N/mm2.Il pavimento <strong>de</strong>ve inoltre essere piano e ben livellato (10 mm di tolleranzasul livellamento).Nel caso di applicazioni particolari, interpellare il costruttore.FLOOR fig.30The lift must be installed on a horizontal concrete bed of a<strong>de</strong>quatestrength, of a minimum thickness of 150 mm ma<strong>de</strong> in concrete batchedwith strenght 25 N/mm2.The floor surface must be flat and levelled (10 mm tolerance).Consult the manufacturer for special applications.Fig.31 - Abb.31MONTAGGIOATTENZIONEDURANTE IL MONTAGGIO NON É AMMESSONESSUN ESTRANEO AI LAVORIINSTALLATION.CAUTIONDURING INSTALLATION NO AUTHORIZED PEOPLEIS ALLOWEDMONTAGGIO BASAMENTO1 - Togliere i tappi di protezione dai fori <strong>de</strong>l basamento2 - Montare le gui<strong>de</strong> catena mediante le viti (Fig.31)3 - Posizionare il basamento nella zona prestabilita per l’installazione.4 - Sten<strong>de</strong>re la catena, posizionarla nelle apposite gui<strong>de</strong> (Fig.32) edunire le due estremità mediante il giunto (Fig.33).BASE ASSEMBLING1 - Remove protective caps from holes in base.2 - Fit chain gui<strong>de</strong>s using screws (Fig.31).3 - Position base in installation area.4 - Lay the chain in the gui<strong>de</strong>s (Fig.32), and connect the ends with thesplit link (Fig.33).Fig.32 - Abb.32Fig.33 - Abb.3334