owner's manual manuel de l'utilisateur - Yorkville Sound
owner's manual manuel de l'utilisateur - Yorkville Sound
owner's manual manuel de l'utilisateur - Yorkville Sound

You also want an ePaper? Increase the reach of your titles
YUMPU automatically turns print PDFs into web optimized ePapers that Google loves.
The MAIN fa<strong>de</strong>rs also <strong>de</strong>termine the signal levels <strong>de</strong>stined for the EQ/AMP ASSIGNbutton where they are directed as follows:a) Up in the L&R position, the ASSIGN button directs the Left & Right MAINmaster signals to EQ1 and EQ2 respectively. Thereafter they go in two directionsat once - to the L&R inputs of the built-in power amplifier and to theL&R POST EQ LINE OUTPUT jacks.b) Down in the MAIN/MON position, the ASSIGN button also does two things.First, it sums some of the LEFT and RIGHT MAIN signals into a single monosignal and directs it to the input of EQ1, the output of which is then split andgoes to both the LEFT power amp channel and to the POST EQ MAIN (L)LINE OUTPUT jack. Secondly, the button takes some of the MON MASTER’soutput signal and routes it to the input of EQ2, thereafter to be split and routedto the RIGHT channel of the built in power amplifier and to the POST EQMON (R) LINE OUTPUT jack.User tip: The stereo operating mo<strong>de</strong> of the AP312 would be with the EQ/AMPASSIGN button up in the L&R position. This would supply up to 320 watts of stereopower (160 watts/channel) plus separate L&R 9-band EQ’s for the main system speakers.Power and equalization for the monitors would come from a separate poweramplifier and graphic EQ. With the EQ/AMP ASSIGN button down in the MAIN/MON position, you now have 160 watts of mono power @ 8 Ohms plus a single 9-band EQ for the main PA speakers, also 160 watts @ 8 Ohms and a single 9-band EQfor the monitors. Connect main PA speakers to the AMP 1 SPEAKEROUTPUT’s andmonitors to AMP 2 SPEAKER OUTPUTS. See un<strong>de</strong>r SPEAKER CON-NECTIONS forsuggested speaker impedances.Pre & Post EQ Line OutputsThese are the outputs of the L&R main mixing busses. They are all at line level (donot connect speakers directly) and unbalanced. The PRE EQ outputs are not affectedby either of the graphic equalizers. The stereo main mix is available from them at alltimes, regardless of the EQ/AMP ASSIGN button setting. These would be availablefor connecting a secondary mixer perhaps for a house PA, broadcast and/or recordingpurposes. These outputs,although not balanced, havebeen <strong>de</strong>signed to supply thenoise-canceling benefits ofbalanced outputs as long asthe inputs of the unit (poweramp or mixer) you are connectingthem to have balancedinputs, and you useTRS balanced cablesThe POST EQ outputsignals are affected by the graphic equalizers. They are also affected by the EQ/AMPASSIGN button. With the button up in the L&R MAIN position, these jacks receivethe output of EQ1 at the L MAIN jack and EQ2 at the R MON jack. With the EQ/AMPASSIGN button down in the MAIN/MON position, the L MAIN jack receives mono(left & right mixed together) main mix signal from EQ1 and monitor signals from EQ2.The POST EQ outputs are best for driving power amplifiers whether for main or monitorspeaker systems.EQ1 & EQ2 Graphic EqualizersThese are 9-band EQs having standard ISO octave-spaced frequencies. The Q-factoris greater in cut-mo<strong>de</strong> than in boost-mo<strong>de</strong>, which is <strong>de</strong>sirable when using the EQfor feedback control. Up to 12dB of cut or boost is available. For more informationabout their internal routing, see un<strong>de</strong>r LEFT & RIGHT MAIN MASTERS and EQ/AMPASSIGN BUTTON above.6User tip: As with all graphic EQ’s, minimal variations above or below center settingsare always recommen<strong>de</strong>d. The only exception to this rule might be in the fight againstfeedback, but even there the i<strong>de</strong>al solution is to separate the offending speaker from theoffending mic or at least aim them in different directions. This way the whole system’s
natural frequency response does not have to be compromised because of one micand one speaker. I<strong>de</strong>ally, a Real-time Frequency Analyzer and Pink Noise would beemployed before the audience arrives to help you pre-adjust the EQ(s) to cut obvioussystem/room response spikes likely to cause feedback later on. Without such <strong>de</strong>vicesyou can achieve a vaguely similar result by simply turning up the level until a mic feedsback, then reacting accordingly (this may or may not involve the EQ’s). In any case, theprime suspect wheneverfeedback starts is alwaysa monitor. A graphic EQwith a MIC level input canbe inserted between theoffending mic and the mixerinput to solve that channel’sproblem without alteringthe whole monitor systemresponseEffects Bus RoutingOverviewThe AP312’s effects busreceives and mixes down allthe channel EFX SEND signals.Its output is regulatedby the MASTER EFX SENDcontrol and is internallyrouted, first to the EFX SEND/ FOOTSWITCH jack. Thisis a switching jack whichnormally allows the signalto proceed internally to theeffects processor. But whena jack is inserted here, theswitching function reroutesthe effects bus signal out thejack to either an on/off footswitch or whatever you have patched it to, probably anexternal effects unit, or possibly something else if you have <strong>de</strong>ci<strong>de</strong>d to do withouteffects and perhaps feed a broadcast transmitter or recording unit. In any case, theoutput of the internal digital effects processor is permanently routed to the MASTEREFX fa<strong>de</strong>r and thereafter to the LEFT & RIGHT MAIN MASTER busses, also to the EFXto MON master control and thereafter to the monitor bus.User tip: The EFX SEND/FOOTSWITCH jack can be used as an auxiliary mono output.The internal effects will not be disabled and can be used as per normal.Master EFX Send Control & Clip LEDFor the quietest performance, you should run the MASTER EFX SEND level as high aspossible without causing distortion. With the channel EFX SEND controls turned uproughly half-way and signals coming into the channels, increase the MASTER EFX SENDlevel until some EFX CLIP LED activity is observed, then turn it back down slightlyuntil the flashing stops. You may now re-adjust the channels EFX levels as <strong>de</strong>sired. TheMASTER EFX SEND may now be used to tailor the EFX mix on all channels at once.7
8Digital Effects ProcessorThe internal Digital Effects Processor is afull 16 bit, 20kHz bandwidth DSP-base<strong>de</strong>ffects subsystem <strong>de</strong>veloped by AppliedResearch & Technology in Rochester,New York. It has been custom programmedwith 255 effects ranging fromreverb to echo and special effects.The selection of effects was <strong>de</strong>termined incollaboration with a panel of sound engineersexperienced in live performance mixing.The panel was asked to choose effects,which would be of the most practical usein actual, live performance situations. As aresult you will find the internal system to bemore than a<strong>de</strong>quate for most applicationEFX Footswitch/Send JackA standard on/off footswitch (optional)plugged into this jack will enable you toturn the internal effects system on and off.Optionally, this jack may be employed tofeed the EFX signal to an external effectsunit the output of which could be returnedvia an input channel - perhaps channel9/10 or 11/12 if the effects unit is stereo. Inthis mo<strong>de</strong>, the channel fa<strong>de</strong>r would become the master effects return control, thereforebe sure to set that fa<strong>de</strong>r fairly low and adjust to <strong>de</strong>sired levels. Be sure to turn theEFX send control off in or<strong>de</strong>r to avoid creating a loop. Also, be sure to pull the EFXMASTER fa<strong>de</strong>r down to the off position.Phones Jack, Level Control & SourcesThe PHONES jack accepts standard stereo headphones and is located in the upperright area of the panel. The PHONES level control is located in the lower right area.The source for all headphone signals is the MONitor bus until a CUE button is<strong>de</strong>pressed at which time only the cued channel can be heard through the phones.Level MetersThese meters follow either the Left and Right MAIN bus activities or a mono mix ofthe mains on the Left-meter and monitors on the Right-meter, all <strong>de</strong>pending on theposition of the EQ/AMP ASSIGN button. If either or both CLIP lights at the top of thelevel meters is flashing too much of the time, lower the appropriate MAIN MASTERlevel to avoid possible distortion on peaks.Amp 1 & 2 InputsThese are switching jacks, which enable you to directly access either or both channelsof the built-in power amplifier while disconnecting them from normal internalfunctions. This permits you to insert an external-EQ, a processor/crossover (e.g. élite)or a compressor/limiter between the mixer section’s POST EQ LINE OUTPUTS andthe AMP 1 & AMP 2 INPUTS thus providing the 100% signal processing essential forthese functions to work properly.User tip: If you have an electronic-crossover or processor/crossover, you can drivesubwoofers and full-range cabinets in a biamped system with the AP312. The hookupgoes as follows:1. With the EQ/AMP ASSIGN button down in the MAIN/MON position, run a patchcable from the POST EQ MAIN (L) LINE OUTPUT to the input on an electroniccrossover/processor.2. Now run a second patch cable from the low-frequency or subwoofer output onthe crossover to the AP312’s AMP 1 INPUT and a third patch cable from thecrossover’s high-frequency or full-range output to the AP312’s AMP 2 INPUT.
3. Now connect one 8 ohm subwoofer to the AMP 1 SPEAKER OUTPUT jack and one8 ohm full-range cabinet to the AMP2 SPEAKER OUTPUT jack.4. The complete systemis now functional, notincluding monitors.How-ever, if you needto vary the comparativevolume levels of thesubwoofer/s relative tothe full-range cabinets,another setup will berequired with an externalpower amp for thesubwoofers or employingpowered subwoofers.In that system, AMP 1 would be for full-range speakers and AMP 2 would be formonitors. In other words, this is a standard setup but with the MAIN (L) LINEOUTPUT going to the input of the processor/crossover and then to an externalamp driving the subwoofer/s, or simply direct to the input of a powered subwoofer(ours have crossovers built in).Power Amplifier - GeneralThe AP312 has a built-in 320 watt stereo power amplifier. Each channel has an inputsensitivity of +4dBv (1.4 volts RMS) for full-power output and each can <strong>de</strong>liver over160 watts into a 8 ohm speaker load. These amplifiers incorporate computer <strong>de</strong>signedinternal heatsinks and a variable-speed fan which automatically provi<strong>de</strong>s quiet operationconsistent with cooling requirements. Cool air is drawn into the front of themixer, and heated air is expelled along the bottom of the back. Even at maximumpower, this arrangement results in quiet, <strong>de</strong>pendable performance.PLEASE NOTE: THE AIR VENTS AT THE FRONT AND BOTTOM REAR OF THEMIXER ARE ESSENTIAL FOR PROPER OPERATION. BLOCKING THE FREE FLOWOF AIR THROUGH THE MIXER WILL RESULT IN SYSTEM SHUT-DOWN DUE TOOVERHEATING. REPEATED OVERHEATING MAY EVENTUALLY CAUSE DAMAGE.PLEASE KEEP THE VENTS FREE OF OBSTRUCTIONS.Speaker ConnectionsThe two 1/4-inch jacks are in parallel with each amp-channel output stage. This allowsthe use of speaker cables equipped with either type of connector. For full-power applicationswe recommend 18-gauge cables or heavier - possibly 16-guage, or even 12-guageConnect one or two 8 ohm speakers to each channel.Note: The amplifier puts out maximum power into 8 ohms per channePower Amplifier ProtectionThe AP312’s power amplifier is protected from damage due to open, shorted or excessivelylow speaker loads. It will continue to run into a low (less than 4 ohms) overallspeaker impedance, or even a total short circuit, however the output power will beautomatically reduced to maintain an optimum safe operating temperature. In a worstcasesituation, the thermal breaker on the transformers primary windings will shut theAP312 down until it cools sufficiently.User tip: Cooling will require a few minutes. Take this time to check the number,and impedances of connected speakers (are there significantly more than two 8 Ohmspeakers per channel?). Also check insi<strong>de</strong> the speaker cable jacks; there may be straybits of wire that could be causing short circuits. Also, connection tabs may be tooclose to each other. Remove the short and/or reduce the number of connected speakers.AC Power Circuit-BreakerLocated on the back panel near the SPEAKER connectors, this circuit breaker’s mainfunction is to shut the AP312 down completely in case of an AC power overload. If,for example, the unit were acci<strong>de</strong>ntally connected to a high-voltage power outlet, this9
eaker would open as soon as the AP312’s POWER switch was flipped on. If thisbreaker opens more than once in a short space of time, try plugging the AP312 intoanother power outlet.Rack MountingTo rack-mount the AP312 you will need to purchase a pair of the accessory mo<strong>de</strong>l RK812rack ears, then simply remove the three screws holding each of the AP-312’s two end moldingsin place and use the screws to mount the rack ears to the si<strong>de</strong>s of the mixerGeneral Operating Instructions1. Connect the AC power cord to a 120Volt AC groun<strong>de</strong>d power outlet (220 to 240Volts in export units).2. Switch on the POWER and turn the MAIN and MONITOR MASTER controls toOFF for now.3. Connect low-impedance microphones to the 3-pin XLR type MIC inputs.4. Connect high-impedance mics or mono line-level signal sources - i.e. amplifierline outputs, the output of a mono-mixer, an electric instrument, etc. to the 1/4-inch BAL LINE IN jacks. Do not connect more than one thing to any of thesechannels, that inclu<strong>de</strong>s stereo outputs (if you try to connect a stereo source to amono channel using a Y adapter, you may get distortion).5. Connect stereo sources - tape <strong>de</strong>ck, CD-player, stereo keyboard, instrument, etc.- to channels 9/10 and 11/12, either via the RCA (phono) type inputs or the 1/4-inch BAL LINE IN connectors. Once again, connect only one signal source perchannel and use shiel<strong>de</strong>d patch cords for all pre-amp connections. Stereo sourcesmay be connected to channels 1 through 8 if you use two of them, one pannedleft, the other right.Note A: The following setup applies to the system with the EQ/AMP ASSIGN button downin the MAIN/MON position. This is with a mono main mix going to AMP 1 and the monitormix going to AMP 2 so that the whole system is being powered by the AP312.6. Using heavy-gauge speaker cables (see un<strong>de</strong>r SPEAKER CONNECTIONS) connectone 8 ohm main PA speaker to the AMP 1 SPEAKER outputs on the back panel.Similarly, connect one 8 ohm monitor to the AMP 2 SPEAKER output7. Position your main PA speakers at the front of the stage, pointing directly out atthe audience and position your monitor speakers on the stage floor, in front ofthe mic stands, pointing up at the backs of the mics (remember to use cardioid oruni-directional mics to reduce the threat of monitor feedback).8. During a sound check with the band playing or other sources feeding the mixerinputs, make the following control adjustments::a) Set the channel LOW, MID & HIGH EQ controls and PAN or BAL controls tocenter. (Note; the PAN controls will have no effect now that the main mix ismono so you can ignore them). Now set the channel GAIN, MON and EFXcontrols to OFF, the channel fa<strong>de</strong>r all the way down, and the GRAPHIC EQsli<strong>de</strong>rs to the center positionUser Tip: Since the main mix has been converted to mono by the EQ/AMP ASSIGNbutton being in the MAIN/MON position, you can use the 1/4-inch INPUT jacks on10
channels 9-10 and/or 11-12 as separate inputs perhaps for additional (high Z) mics,instruments or other sources. In this situation, the channel BAL control will regulatethe comparative volume levels of any two sources coming into one of these channels.The level fa<strong>de</strong>r MON, EFXand EQ controls would then be adjusted to regulate bothsources at onceb) Set the MAIN fa<strong>de</strong>rs at 0dB, turn the MONITOR MASTER control up to approx.8, the MAIN EFX master to around 7 and MONITOR EFX master to 5.c) With the level fa<strong>de</strong>rs still off, turn up the channel GAIN controls slowly untilthe CLIP LED’s down besi<strong>de</strong> the level fa<strong>de</strong>rs begin to flash slightly. Now bringup the channel level fa<strong>de</strong>rs slowly until each channel can be heard at the<strong>de</strong>sired volume level through the main PA speakersd) Turn up the channel MON controls until the performers can hear themselvesat a<strong>de</strong>quate volume levels without feedback..e) Turn up the EFX controls on those channels requiring reverb. Usually thiswould be the lead and harmony vocal channels. Reverb may be used onother channels or on recor<strong>de</strong>d music, but at lower levelsf) Set the EFX SELECT control to establish the basic type of reverb, <strong>de</strong>lay or whateveryou prefer, then adjust the MODIFY control to establish the final sound.9. Feedback during a performance is usually caused by one of the monitors. Themain PA is less likely to feed back because the mics are so far away from themain PA speakers. Therefore, if one of the monitors and a mic are feeding back,try the following procedures:a) Turn the MONITOR master down until the feedback stops.b) Go to EQ 2 and pull down one or two (but not more) of the EQ sli<strong>de</strong>rs in thefrequency range where the sound seems to be occurringc) Now turn the MONITOR master back up. If the feedback recurs, push the EQsli<strong>de</strong>r/s back up to center position and try pulling down one or two others.d) In the rare case of main system feedback, follow the above type of procedure,but using the MAIN master and the built in GRAPHIC EQ.Note B: The following notes apply to the system with the EQ/AMP ASSIGN button upin the stereo L&R positionn.(Everything is as above un<strong>de</strong>r Note A except that the main mix is now stereo whichmeans that the PAN and BALance controls can be used to position sources in thesound field. Try NOT to postion sources (voices, instruments, etc.) too far left or righthowever, because audience members near the “wrong” speakers won’t be able tohear them. Also, EQ1 and EQ2 are both regulating the main PA sound now, so adjustthem similarly. Later on it may become necessary to adjust one of them slightly differentlybecause room acoustics have changed on that si<strong>de</strong> of the room with peoplecoming or goingIf you are employing a separate power amplifier for the monitor speakers, connect themain speakers to the AMP 1 and AMP 2 SPEAKER OUTPUTS as in 6. above (also seeSPEAKER CONNECTIONS). Now run a shiel<strong>de</strong>d patch cord from the MONITOR OUTjack to the input of the monitor power amp.If you are employing a graphic equalizer for the monitors (a good i<strong>de</strong>a - rememberthere is no channel-EQ on the monitor signals and the AP312’s EQ 1 and EQ 2 arenow <strong>de</strong>dicated to the main-PA sound), run a shiel<strong>de</strong>d patch cord from the MONITOROUT jack to the input of the EQ, then another one from the EQ’s output to the inputof the monitor power amp (the <strong>Yorkville</strong> Beta-150EQ power amp has an EQ builin).Follow the above steps in 7. and 8. to get the system ready to run. Now, take amoment to read the following tips on running the this, or any, system.11
IntroductionVotre n ouveau Mixeur/Amplificateur <strong>Yorkville</strong> AP312 a été conçu et construit <strong>de</strong> façonà offrir une performance fiable pour plusieurs années à venir. Tirant sur trente annéesd’expérience dans la conception et la fabrication <strong>de</strong> mixeurs amplifiés, les ingénieurs<strong>de</strong> <strong>Yorkville</strong> ont été capables <strong>de</strong> doter le mixeur AP312 <strong>de</strong> caractéristiques tel montageen rack optionnel, ventilateur interne silencieux, <strong>de</strong>ux canaux stéréo avec <strong>de</strong>s boutonscue, monitoring par casque d’écoute <strong>de</strong>s signaux du bus <strong>de</strong> moniteur et du cue, alimentationen duplex, double égalisateurs graphique 9 ban<strong>de</strong>s, canaux d’amplificateur<strong>de</strong> puissance et égalisateur assignable en mo<strong>de</strong> d’opération stéréo Gauche/Droite ou enmo<strong>de</strong> d’opération mono, unité <strong>de</strong> traitant <strong>de</strong> signal numérique 255 pré-réglages, indicateur<strong>de</strong> niveau double, 320 watts <strong>de</strong> puissance stéréo intégré.Terminologie• 3 Les entrées à 3-tiges pour microphone sont appelées connecteurs XLR.• Les prises réceptacles 1/4” sont appelées prises 1/4”• Les prises symétriques 1/4”, d’entrée ou <strong>de</strong> sortie, sont appelés TRS (Tip-Ring-Sleeve) ou Pointe - Bague - Corps• Le contrôle maître et les canaux <strong>de</strong> mélange sont appelés bus.• Les clignotants <strong>de</strong> surcharge sont appelés DEL d’écrêtage.• Les câbles <strong>de</strong> branchement blindé avec <strong>de</strong>s conducteurs doubles et prises 1/4”TRS sont appelés câbles <strong>de</strong> branchement symétrique.14Caractéristiques <strong>de</strong> BaseCanaux 1 - 8• Entrée XLR MIC et TRS LIGNE symétrique avec circuit d’entrée offrant unniveau <strong>de</strong> bruit réduit.• Entrée DE LIGNE symétrique acceptant les branchements niveau ligne symétriqueou asymétrique.• ALIMENTATION EN DUPLEX (24 volts).• Gamme <strong>de</strong> réglage <strong>de</strong> gain à l’entrée <strong>de</strong> 78dB.• Les contrôles d’envoi MONiteur sont pré-EQ et pré-fa<strong>de</strong>r pour un mélange <strong>de</strong>moniteur totalement indépendant.• Trois ban<strong>de</strong>s d’égalisation avec gammes <strong>de</strong> +/- 15dB.• Controle d’envoi EFX, post-EQ, et post-fa<strong>de</strong>r• Les contrôles <strong>de</strong> panoramiques fournissent <strong>de</strong>s niveaux <strong>de</strong> gain constants à tous réglages.• Circuit d’extension dynamique et <strong>de</strong> gain accru pour un mélange plus flexible.• Branchement interne avec contact en or pour une vie prolongée et intégritémaximal <strong>de</strong> signal.• Les DEL D’ÉCRÊTAGE avec impulsions rallongé indiquent même les pointesd’écrêtage les plus fines et s’illuminent à -3dB, bien avant l’écrêtage réel et ce àtoute le étage actifs du canal.Les Canaux Stéréo 9/10 & 11/12• Les prises d’entrée ligne symétriques TRS gauche et droite 1/4” acceptent les lignessymétriques ou asymétriques.• La prise d’entrées TRS GAUCHE peut être employée pour Branchez une sourcemono. Le signal sera branché intérieurement au circuit d’entrée <strong>de</strong> canal DROITE.• Prises d’entrées RCA GAUCHE et DROITE.• Egalisateur à étalement pour fréquence HAUTE et BASSE.• Contrôle <strong>de</strong> balance• Les boutons DE SIGNAL CUE vous permettent d’écouter, à l’ai<strong>de</strong> d’un casqued’écoute, ces canaux indépendamment du réglage <strong>de</strong> niveau du fa<strong>de</strong>r.
Caracteristiques <strong>de</strong> la Section Maitresse• Les contrôles SELECT et MODIFY fournissent un assortiment <strong>de</strong> 255 effets préréglés <strong>de</strong> reverb, délais et autres effets.• Contrôles séparés pour effets au mixe principal et effets aux moniteurs.• Le sous-système interne d’effets, basé sur le processeur numérique d’effets A.R.T.16 bit, offre une performance claire et définie.• LE CONTRÔLE MASTER EFX vous permet d’insérer l’effet interne rapi<strong>de</strong>ment et aisément.• Contrôle MASTER EFX SEND avec sa propre DEL D’ECRETAGE pour ai<strong>de</strong>r àprévenir l’écrêtage à ce stage.• fa<strong>de</strong>rs PRINCIPAL GAUCHE et DROITE - en fait tout les fa<strong>de</strong>rs - dotés <strong>de</strong> lamarques <strong>de</strong> référence 0dB.• Le contrôle MON MASTER possè<strong>de</strong> sa propre DEL D’ECRETAGE pour ai<strong>de</strong>r àprévenir l’écrêtage à ce stage.• Le contrôle <strong>de</strong> niveau PHONE règle le niveau <strong>de</strong> l’amplificateur pour le casqueDouble prises <strong>de</strong> sortie 1/4” standardDetails <strong>de</strong>s Caractéristiques &Conseils à l’UtilisateurBan<strong>de</strong>s <strong>de</strong> CanalEntréesChaque canal est doté <strong>de</strong> prises d’entrée MIC et LIGNE (à l’exception <strong>de</strong> <strong>de</strong>s canaux9/10 & 11/12 qui a sont dotés d’entrées RCA et 1/4” TRS). L’entrée LIGNE acceptera<strong>de</strong>s signaux symétriques ou asymétriques <strong>de</strong> tous types <strong>de</strong> sources. L’entrée MIC estoptimisée pour les microphones basse impédance. L’entrée LIGNE est du type TRSsymétrique, avec la Pointe en phase, l’anneau hors phase et le corps à la masse. Laprise XLR est connectée comme suit: tige 1=masse, tige 2 = en phase & tige 3 =hors phase. Cette configuration est la norme à travers le mon<strong>de</strong>..Conseil à l’utilisateur: Le problème; un bourdonnement avec source est asymétrique.. . Les raccor<strong>de</strong>ments asymétriques peuvent être faits à l’entrée LIGNE avec uncâble asymétrique blindé. Cependant, <strong>de</strong>s effets <strong>de</strong> champs ou fuite peuvent induire<strong>de</strong>s courants <strong>de</strong> masse entre différentes pièces d’équipement produisant un bourdonnement.La plupart <strong>de</strong>s instruments électroniques, par exemple, emploient toujours<strong>de</strong>s raccor<strong>de</strong>ments asymétriques. Parfois même le débranchement du circuit <strong>de</strong> massen’ai<strong>de</strong> pas si l’équipement a plus d’une sortie qui alimentent le mixeur.ATTENTION: Nous vous prions <strong>de</strong> ne jamais enlever la tige <strong>de</strong> mise à la masse sur leCORDON D’ALIMENTATION. Autrement dit, désactiver le raccor<strong>de</strong>ment <strong>de</strong> sécurité<strong>de</strong> mise à la terre. Cela pourrait vous exposer à un risque sérieux <strong>de</strong> choc. En plus,vos problèmes d’interférence radio seraient probablement accrut et dans certains casvos problèmes <strong>de</strong> bourdonnement seraient même pireQue faire: Le bourdonnement peut être réduit ou éliminé en toute sûreté en utilisantl’entrée symétrique du mixeur AP312 même quand le signal <strong>de</strong> source est asymétrique.Employez simplement <strong>de</strong>s câbles <strong>de</strong> branchement symétriques avec prises typeTRS. Cependant, dans les pire cas, il peut être nécessaire <strong>de</strong> créer un câble spécial<strong>de</strong> raccor<strong>de</strong>ment. Dans ce cas, employez un câble avec fiches 1/4” TRS (stéréo).Raccor<strong>de</strong>z une prise 1/4” TRS (stéréo) à l’extrémité du câble qui sera branché àl’entrée symétrique du mixeur, comme suit; 1) sou<strong>de</strong>r le blindage au corps, 2) sou<strong>de</strong>rle conducteur # 1 à la pointe, 3) sou<strong>de</strong>z le conducteur # 2 à la bague. Attachez maintenantune prise mono à l’autre extrémité du câble comme suit: 4) sou<strong>de</strong>z le blindageet le conducteur # 2 au corps, 5) sou<strong>de</strong>z le conducteur # 1 à la pointe. Branchezmaintenant cette extrémité mono à la sortie <strong>de</strong> l’appareil asymétrique et l’extrémitéstéréo à l’entrée ligne du AP312. Cette technique réduira toujours le bourdonnement,et elle peut être employé pour Branchez tout équipement avec ENTRÉE symétrique àtout autre équipement avec SORTIE asymétrique.15
phone à cassette pour enregistrer la performance.Branchez simplement à la prise <strong>de</strong> sortie MON OUTun adaptateur en Y (1/4” mâle - à - double 1/4”femelle). Acheminez ensuite à partir <strong>de</strong> l’adaptateuren Y <strong>de</strong>ux câbles <strong>de</strong> branchement appropriés (probablement1/4” mâle à RCA mâle) aux entrées lignes<strong>de</strong> gauche et droite du magnétophone. Vous aurezmaintenant l’avantage d’être capable <strong>de</strong> contrôler lesniveaux du mélange pour enregistrer, indépendamment<strong>de</strong>s réglages du mélange principal.Contrôles Principales Maitres Droit etGauche et Bouton "EQ/Amp"Les fa<strong>de</strong>rs maîtres PRINCIPAUX reçoivent les signauxprovenant <strong>de</strong>s contrôles PAN/BAL <strong>de</strong> chaque canal etdéterminent les niveaux <strong>de</strong> signal <strong>de</strong> sortie aux prises<strong>de</strong> sortie LIGNE L & R PRÉ-EQ.Conseil: Indépendamment du réglage du boutonASSIGN, les prises DE SORTIE DE LIGNE PRÉ-EQporteront toujours le mélange stéréo avant égalisationG & D Cela peut être utile si vous enregistrez laperformance en direct.18Les fa<strong>de</strong>rs PRINCIPAUX déterminent aussi lesniveaux <strong>de</strong> signal <strong>de</strong>stinés aux bouton EQ/AMP ASSIGNoù ils sont ensuite dirigés comme suit:a) En position sortie (L & R), le bouton ASSIGNdirige les signaux maîtres PRINCIPAUX droit& gauche aux égalisateurs EQ1 et EQ2 respectivement.Les signaux sont ensuite dirigés à lafois aux entrées <strong>de</strong> l’amplificateur <strong>de</strong> puissanceinterne gauche & droite et aux prises DE SORTIEDE LIGNE gauche & droite POST EQ.b) En position poussée (MAIN/ MON), le boutonASSIGN fait aussi <strong>de</strong>ux choses. En premier lieu,il mélange une partie <strong>de</strong>s signaux PRINCIPAUXGAUCHE et DROIT en un signal mono etle dirige à l’entrée <strong>de</strong> l’égalisateur EQ1. Lesignal à la sortie <strong>de</strong> l’égalisateur est ensuiteséparé et dirigé à la fois au canal GAUCHE <strong>de</strong>l’amplificateur interne et à la prise DE SORTIELIGNE POSTE EQ PRINCIPAL (GAUCHE). En<strong>de</strong>uxième lieu, le bouton prend une partie dusignal <strong>de</strong> sortie MON MASTER et l’achemineà l’entrée <strong>de</strong> l’égalisateur EQ2. Le signal estensuite séparé et acheminé au canal DROIT <strong>de</strong>l’amplificateur <strong>de</strong> puissance interne et à la priseDE SORTIE DE LIGNE POSTE EQ MON (Droit).Conseil: Le mo<strong>de</strong> d’opération stéréo est obtenu avecle bouton EQ/AMP ASSIGN en position sortie (L&R).Cela procure jusqu’à 800 watts <strong>de</strong> puissance stéréo(400 watts/canal) en plus d’une paire (gauche etdroite) d’égalisateurs 9 ban<strong>de</strong>s pour les haut-parleursprincipaux du système. En mo<strong>de</strong> stéréo, un amplificateur<strong>de</strong> puissance et un égalisateur graphiqueexterne fournissent l’amplification et l’égalisationpour les moniteurs. Avec le bouton EQ/AMPASSIGN en position poussée MAIN / MON, vousavez maintenant 400 watts <strong>de</strong> puissance mono à4-ohms plus un égalisateur 9 ban<strong>de</strong>s mono pour leshaut-parleurs principaux, et 400 watts <strong>de</strong> puissance
mono à 4 ohms plus un égalisateur 9 ban<strong>de</strong>s mono pour les moniteurs. Branchez leshaut-parleurs principaux aux prises <strong>de</strong> sortie pour haut-parleurs AMP 1 et les haut-parleurspour moniteurs aux prises <strong>de</strong> sortie AMP 2. Voir la section BRANCHEMENT DESHAUT-PARLEURS dans ce <strong>manuel</strong> pour les impédances suggérées <strong>de</strong> haut-parleur.Prise <strong>de</strong> Sortie Ligne Pre & Post EQCes prises sont les sorties <strong>de</strong>s barres collectrices du mélange principal gauche & droit.Elles sont toutes au niveau <strong>de</strong> ligne (ne pas brancher <strong>de</strong>s haut-parleurs directement) etasymétriques. Les sorties pré-EQ ne sont pas affectée par l’un ou l’autre <strong>de</strong>s égalisateursgraphiques. Le mélange principal stéréo est toujours disponible à ces sorties indépendammentdu réglage du bouton EQ/AMP ASSIGN. Ces prises sont disponibles pour raccor<strong>de</strong>run mélangeur secondaire. Elles peuvent être utilisé pour une PA maison, pour la diffusionet/ou pour l’enregistrement. Ces sorties, bien qu’asymétriques, ont été conçues <strong>de</strong> façonà fournir les bénéfices <strong>de</strong> réduction <strong>de</strong> bruit associé aux sorties symétriques pourvu quel’appareil externe soit doté d’entrée (mixeur ou amplificateur) symétriques, et que vousemployez <strong>de</strong>s câbles symétrique Pointe/Bague/Corps. Les signaux aux prises <strong>de</strong> sortiePoste-EQ sont affectés par les égalisateurs graphiques. Ils sont aussi affectés par le boutonEQ/AMP ASSIGN. Avec le bouton en position sortie (L & R MAIN), ces prises reçoiventles signaux <strong>de</strong> la sortie <strong>de</strong> l’égalisateur EQ1 à la prise L MAIN et <strong>de</strong> l’égalisateur EQ2 àla prise MON R. Avec le bouton EQ/AMP ASSIGN en position poussée, (MAIN/MON),la prise L MAIN reçoit le signal mono du mélange principal (gauche & droit mélangé) <strong>de</strong>l’égalisateur EQ1 et le signal <strong>de</strong> moniteur <strong>de</strong> l’égalisateur EQ2. Les sorties Poste-EQ sontà leur meilleur lorsqu’ils acheminent le signal à un amplificateur <strong>de</strong> puissance pour systèmes<strong>de</strong> haut-parleur principal ou pour moniteur.Les Egalisateurs Graphiques EQ1 & EQ2Les fréquences <strong>de</strong>s égalisateurs 9 ban<strong>de</strong>s sont espacées selon la norme . Le facteur Qest plus grand en mo<strong>de</strong> <strong>de</strong> coupure qu’en mo<strong>de</strong> <strong>de</strong> renforcement permettant ainsi unmeilleur contrôle lorsque l’égalisateur est utilisé pour contrôler le feedback. Un renforcementou une coupure allant jusqu’à 12dB est disponible. Pour plus d’informationau sujet <strong>de</strong> leur acheminement interne, référez-vous au chapitre CONTRÔLES DROITET GAUCHE PRINCIPAUX MAITRES ET BOUTON EQ/AMP.Conseil: Comme avec tout égalisateurgraphique, <strong>de</strong>s variations minimes au-<strong>de</strong>ssus ouen <strong>de</strong>ssous du point central sont toujours recommandées.La seule exception à cette règle pourraitêtre lors <strong>de</strong> coupure dans le but d’éliminer lefeedback. Même dans cette situation, il est préférable<strong>de</strong> séparer, ou <strong>de</strong> diriger dans différentesdirections, le haut-parleur et le microphone quisont à la source du feedback. De cette façon, laréponse en fréquence naturelle du système n’estpas compromise à cause d’un microphone etd’un haut-parleur. Idéalement, un Analyseur <strong>de</strong>Fréquence temps Réel et un Bruit Rose seraientemployés avant l’arrivé <strong>de</strong> l’audience pour vouspermettre <strong>de</strong> régler l’égalisateur(s) par rapportà la salle <strong>de</strong> façon à couper les fréquencesqui pourraient vraisemblablement causer lefeedback lors <strong>de</strong> la performance. Vous pouvezobtenir un résultat vaguement similaire sans lesdispositifs mentionné ci-<strong>de</strong>ssus en augmentantsimplement le niveau du système jusqu’à ce queun <strong>de</strong>s microphones produise un feedback. Vous<strong>de</strong>vez ensuite faire les réglages nécessaires pouréliminer ce feedback avec ou sans égalisateur.Les retours <strong>de</strong> scène sont souvent à la sourcedu problème lorsqu’un feedback se produit. Unégalisateur graphique avec niveau entrée MICpeut être inséré entre le microphone et l’entrée <strong>de</strong> mixeur pour résoudre le problème <strong>de</strong> ce canalsans modifier la réponse entière <strong>de</strong> système <strong>de</strong> moniteur19
Aperce <strong>de</strong> l'Achieminement du Signal a Travers Bus d'EffetsLe bus d’effets <strong>de</strong> l’AP312 reçoit et mélange les signaux EFX SEND <strong>de</strong> tout lescanaux. Sa sortie est réglée par le contrôle MASTER EFX SEND et est intérieurementacheminée, en premier lieu à la prise EFX SEND/ FOOTSWITCH. C’est une prise <strong>de</strong>commutation qui permet normalement au signal <strong>de</strong> procé<strong>de</strong>r intérieurement au processeurd’effets interne. Mais quand une prise y est insérée, la fonction <strong>de</strong> commutationachemine la sortie <strong>de</strong> signal du bus d’effets à travers cette prise <strong>de</strong> sortie. Uncommutateur au pied, une unité externe d’effets, ou même un émetteur d’émission ouun unité d’enregistrement peuvent y être branché . Quelque soit les circonstances, lasortie du processeur d’effets numériquesinterne est acheminé au fa<strong>de</strong>r MASTEREFX et par la suite au bus LEFT & RIGHTMAIN MASTER. Elle est aussi acheminéeau EFX, au contrôle maître MON, et parla suite au bus <strong>de</strong> moniteur.Contrôle “Master EFX Send” &DEL d’ÉcretageUn réglage élevé, mais sans écrêtage, ducontrôle MASTER EFX SEND permettrad’obtenir une performance sans bruit. Avecles contrôles EFX SEND <strong>de</strong> canal réglés enposition centrale et avec signaux venant <strong>de</strong>scanaux, élevez le niveau du contrôle EFXSEND jusqu’à ce que la DEL D’ECRETAGEs’illumine. Ensuite réduisez légèrement leniveau du même contrôle <strong>de</strong> façon à cessertoute activité <strong>de</strong> la DEL d’écrêtage. Vouspouvez maintenant ré - ajuster le niveau <strong>de</strong>scontrôles EFX <strong>de</strong> chaque canal au niveaudésiré. Le MASTER EFX SEND peut maintenantêtre employé pour façonner le mélangeEFX sur tous les canaux20Le Processeur d'Effets NumériqueConçue par la firme Applied Research & Technology <strong>de</strong> Rochester, New York,le processeur interne d’effets numérique 16 bit, offre une largeur <strong>de</strong> ban<strong>de</strong> <strong>de</strong>20kHz.. Il a été spécialement programmé pour offrir 255 effets variant du reverb àl’écho et aux effets spéciaux..La sélection d’effets a été déterminé en collaboration avec un groupe d’ingénieurs en sonorisationexpérimenté dans le mixage <strong>de</strong> performance en direct. Ils avaient pour tâche <strong>de</strong>choisir <strong>de</strong>s effets d’usage courant pour les performance en direct. Le système d’effets internes’avérera plus qu’adéquat dans la plupart <strong>de</strong>s situations.La Prise EFX Footswitch/SendUn commutateur au pied standard (optionnel) branché à cette prise vous permettrad’activer ou désactiver le système d’effets interne. Cette prise peut aussi être employé pouracheminer le signal vers un processeur <strong>de</strong> signal externe. Les sorties <strong>de</strong> l’appareil peuventensuite être ramenés au AP312 par les entrées <strong>de</strong> canal, peut-être 9/10 ou 11/12 si l’unitéd’effets est stéréo. Dans ce cas, le fa<strong>de</strong>r du canal <strong>de</strong>viendrait alors le contrôle maître <strong>de</strong>seffets, et il serait donc pru<strong>de</strong>nt <strong>de</strong> régler le niveau relativement bas pour ensuite l’ajuster auniveau désiré. Assurez-vous <strong>de</strong> régler le contrôle EFX à “0” pour éviter <strong>de</strong> créer une boucleavec le signal d’effet. Assurez-vous aussi, <strong>de</strong> régler le contrôle EFX MASTER à la positionminimum.Prise Pour Casque d’Écoute, Contrôle <strong>de</strong> Niveau & SourcesLa prise PHONE accepte <strong>de</strong>s casques d’écoute stéréo ordinaires et est située dans lasuperficie supérieure droite du mixeur. Le contrôle <strong>de</strong> niveau est situé dans la superficieinférieure droite. La source <strong>de</strong> signal à la prise PHONE parvient du bus <strong>de</strong> moniteurjusqu’à ce qu’un bouton CUE soit enfoncé. Le signal présent au casque est alorscelui du canal sélectionné.
Indicateurs <strong>de</strong> NiveauLa position du bouton EQ/ASSIGN détermine ce qui apparaît sur l’indicateur <strong>de</strong>niveau. On y verra soit l’activité du bus principal ou l’activité du mélange mono <strong>de</strong>sprincipaux sur l’indicateur <strong>de</strong> niveau <strong>de</strong> gauche et celle <strong>de</strong>s moniteurs sur l’indicateur<strong>de</strong> niveau <strong>de</strong> droite. Réglez les niveaux <strong>de</strong> façon à ce que les DEL d’écrêtage au sommet<strong>de</strong> l’indicateur <strong>de</strong> niveau restent éteintes.Les Entrées Amp 1 & Amp 2Ces prises <strong>de</strong> commutation vous permettent d’accé<strong>de</strong>r directement, en les débranchant<strong>de</strong> leur fonction normale, à un ou aux <strong>de</strong>ux canaux <strong>de</strong> l’amplificateur <strong>de</strong> puissanceinterne. Cela vous permet d’insérer un égalisateur externe, un filtre séparateur(par exemple processeur élite) ou un compresseur/limiteur entre la section <strong>de</strong> sortieligne POST EQ du mixeur et les ENTREES AMP 1 & AMP 2 permettant d’accé<strong>de</strong>r auplein signal nécessaire au bon fonctionnement <strong>de</strong> telle unité.Conseil: Si vous avez un filtre séparateur électronique ou processeur/filtre séparateur,vous pouvez entraîner <strong>de</strong>s subwoofers et <strong>de</strong>s cabinets pleine gamme dans un système àdouble amplificateur avec le mixeur AP312. Le branchement se fait comme suit:1. Avec le bouton “EQ/AMP ASSIGN” en position le “MAIN/ MON,” raccor<strong>de</strong>zun câble <strong>de</strong> la prise “LINE OUT POST EQ MAIN (L) à l’entrée d’un filtreséparateur électronique/processeur2. Raccor<strong>de</strong>z ensuite un <strong>de</strong>uxième câble <strong>de</strong> la sortie pour basses fréquences ousortie subwoofer sur le filtre séparateur jusqu’à l’entrée AMP 1 du AP312 et untroisième câble <strong>de</strong> la sortie haute fréquence ou pleine gamme du filtre séparateurà l’entrée AMP 2 du AP312.3. Branchez maintenant <strong>de</strong>ux subwoofers 8 ohm ou un subwoofer 4 ohm à la prise<strong>de</strong> sortie <strong>de</strong> haut-parleur AMP 1 et <strong>de</strong>ux cabinets 8 ohm pleine gamme à la prise<strong>de</strong> sortie <strong>de</strong> haut-parleur AMP 2.4. Le système complet, à part les moniteurs, est maintenant fonctionnel. Un autrearrangement avec amplificateur externe pour les subwoofers ( <strong>de</strong>s subs amplifiéspeuvent aussi ré utilisés) sera toutefois nécessaire si vous <strong>de</strong>vez varier les niveauxcomparatif <strong>de</strong> l’ensemble subwoofer/cabinet pleine gamme. Dans ce système,AMP 1 serait pour les cabinets pleine gamme et AMP 2 serait pour les moniteurs.Autrement dit, c’est un arrangement ordinaire mais avec la sortie <strong>de</strong> ligne “LINEOUT MAIN” (L) allant à l’entrée du processeur / filtre séparateur et ensuite àun amplificateur externe pour le/les subwoofers. Vous pouvez aussi simplementdiriger le signal <strong>de</strong> la sortie <strong>de</strong> ligne “LINE OUT MAIN” (L) à l’entrée d’un subwooferactif. (Les subwoofers amplifié <strong>de</strong> <strong>Yorkville</strong> sont tous doté <strong>de</strong> filtre interne).Amplificateur <strong>de</strong> Puissance - GénéraleLe AP312est doté d’un amplificateur <strong>de</strong> puissance interne stéréo <strong>de</strong> 320 watts.Chaque canal a une sensibilité d’entrée <strong>de</strong> +4dBv (1.4 volts RMS) permettant unepleine puissance à la sortie et ils peuvent tous <strong>de</strong>ux livrer 160 watts avec une charge( H.P.) <strong>de</strong> 4 ohms. Des dissipateurs <strong>de</strong> chaleur conçu par ordinateur sont incorporésaux amplificateurs internes et un ventilateur silencieux à vitesse variable fournit lerefroidissement nécessaire. L’air frais est attiré par le <strong>de</strong>vant du mixeur, et l’air chaufféest expulsé le long du bas <strong>de</strong>rrière l’appareil. Même à pleine puissance, cette dispositionrésulte en une performance fiable, et silencieuse.NOTEZ S.V.P.: LES BOUCHES D’AÉRATION AU DEVANT ET A L’ARRIÈRE DUMIXEUR SONT ESSENTIELLES À L’OPERATION PROPRE. BLOQUER LE PASSAGEDE L’AIR LIBRE RÉSULTERA EN UN ARRÊT DU SYSTÈME DÙ AU SURCHAUFFAGE.UNE TELLE CONDITION RÉPÉTÉ PEUT TÔT OU TARD CAUSER DES DOMMAGES.S.V.P. GARDEZ LES BOUCHES D’AERATION LIBRES D’OBSTRUCTIONSLes Raccor<strong>de</strong>ments <strong>de</strong> Haut-ParleurLes <strong>de</strong>ux prises ¼ “ <strong>de</strong> sortie à chaque canal sont intérieurement branchées en parallèle.Cela permet l’utilisation <strong>de</strong> câbles <strong>de</strong> haut-parleur avec plusieurs types <strong>de</strong> prise <strong>de</strong>branchement. Nous recommandons pour les utilisations à forte puissance <strong>de</strong>s câbles àjauge élevé-grosseur 18 ou plus, peut-être même 16 ou 12.21
Branchez un ou <strong>de</strong>ux haut-parleur <strong>de</strong> 8 ohms à chaque canal.Notez bien: L’amplificateur atteindra sa pleine puissance avec une charge <strong>de</strong> 8 ohmspar canalProtection <strong>de</strong> l'Amplificateur <strong>de</strong> PuissanceL’amplificateur <strong>de</strong> la table <strong>de</strong> mixage AP312 est protégé <strong>de</strong>s dommages causés parune charge <strong>de</strong> haut-parleur qui est ouverte, court-circuitée ou trop basse. L’appareilcontinuera <strong>de</strong> fonctionner même lorsqu’une charge d’impédance générale trop basse(moins <strong>de</strong> 4 ohms) ou même un court-circuit est présent à la sortie. La puissance <strong>de</strong>sortie sera toutefois réduite <strong>de</strong> façon à permettre une température d’opération sécuritaire.Dans les pires conditions, le disjoncteur thermique du coté d’enroulement primairedu transformateur fermera l’appareil jusqu’à ce qu’il soit suffisamment refroiditConseil pratique: Le refroidissement nécessitera quelques minutes. Profitez-en pourvérifier la quantité <strong>de</strong> haut-parleur branché aux sorties. Vérifiez aussi leur impédance.(Est-ce qu’il y a plus <strong>de</strong> 2 haut-parleurs 8 ohms par canal ? ) Vérifiez aussi à l’intérieur<strong>de</strong>s prises <strong>de</strong> branchement <strong>de</strong> haut-parleur, il pourrait s’y être logées <strong>de</strong>s particules <strong>de</strong>brin <strong>de</strong> fil qui pourraient causer un court-circuit. Si nécessaire, corrigez le court-circuitou réduisez le nombre <strong>de</strong> haut-parleur branchés.L’amplificateur <strong>de</strong> puissance du AP312 est aussi doté d’une protection <strong>de</strong> hautparleuren cas <strong>de</strong> décalage DC - C’est un inci<strong>de</strong>nt qui est peu probable étant donnéle modèle d’amplificateur fondamentalement stable, mais si cela <strong>de</strong>vait se produire,la puissance <strong>de</strong> sortie est instantanément court-circuitée à la masse et les haut-parleurssont sauvegardés. Le disjoncteur CA du panneau arrière déclenchera en réponseà cette condition (entre autres). Si le disjoncteur déclenche à plus d’une reprisedans une courte pério<strong>de</strong> <strong>de</strong> temps et que le problème ne paraît pas être une surchargeCA (voire la section ci-<strong>de</strong>ssous), fermez votre AP312, débranchez le cordond’alimentation et amenez l’appareil à un technicien qualifié.Disjoncteur <strong>de</strong> Circuit <strong>de</strong> Puissance CASitué sur le panneau arrière près <strong>de</strong>s connecteurs <strong>de</strong> haut-parleur, ce disjoncteur principala pour fonction <strong>de</strong> fermer complètement le AP312 en cas d’une surcharge <strong>de</strong>puissance CA. Si, par exemple, l’appareil était acci<strong>de</strong>ntellement relié à une prise <strong>de</strong>haut voltage, ce disjoncteur déclencherait dès la mise en marche <strong>de</strong> l’appareil. Si cedisjoncteur déclenche à plusieurs reprises dans une courte pério<strong>de</strong> <strong>de</strong> temps, essayez<strong>de</strong> brancher le AP312 à une autre prise <strong>de</strong> courant. Référez-vous aussi à la section ci<strong>de</strong>ssusau sujet du décalage DC.Montage en RackPour monter le AP312 en rack, procurez-vous l’accessoire RK312 <strong>de</strong> <strong>Yorkville</strong>. Enlevezensuite les trois vis <strong>de</strong> chaque cotés qui tiennent en place les moulures et utilisez ces vispour monter les accessoires <strong>de</strong> montage en rack aux <strong>de</strong>ux côtés du mixeur.22
Instructions d’Opération Générale1. Branchez le cordon d’alimentation CA à une prise 120 Volts avec mise à la terreCA. (220 à 240 Volts pour certain pays).2. Réglez les fa<strong>de</strong>r MAIN et MONITOR MASTER en position fermée et mettezensuite l’appareil en marche.3. Branchez aux prises d’entrée à 3 tiges <strong>de</strong>s microphones à basse impédance..4. Branchez aux prise d’entrées symétriques ¼ “ les microphones à haute impédance ouautre source <strong>de</strong> signal mono niveau ligne - ex.: sortie niveau ligne d’amplificateur, lasortie d’un mixeur mono, d’un instrument électrique, etc. Ne branchez pas plus qu’unechose par canal, incluant une sortie stéréo (si vous essayez <strong>de</strong> Branchez une source stéréoà un canal mono utilisant un adaptateur Y, vous pourriez obtenir un signal écrêté).5. Branchez les sources <strong>de</strong> signal stéréo tels ceux provenant <strong>de</strong> magnétophone à cassette,lecteur <strong>de</strong> disque compact, clavier stéréo, instrument, etc. aux prises RCA ou¼ “ (symétrique) <strong>de</strong>s canaux 9/10 et 11/12 Encore fois, branchez seulement unesource <strong>de</strong> signal par canal et utilisez toujours <strong>de</strong>s câbles blindés pour branchement<strong>de</strong> pré amplificateur. Les signaux provenant <strong>de</strong> sources stéréos peuvent aussiêtre branché aux canaux <strong>de</strong> 1 à 8 en utilisant <strong>de</strong>ux canaux avec réglage du contrôlePAN pour un vers la droite et pour l’autre vers la gaucheNote A: Dans le système qui suit le bouton EQ/AMP ASSIGN est en positionpoussée (MAIN/MON). Le mélange principal est mono et est amplifié à l’ai<strong>de</strong> <strong>de</strong>l’amplificateur AMP 1 et le mélange <strong>de</strong> moniteur à l’ai<strong>de</strong> <strong>de</strong> l’amplificateur AMP 2 sibien que le système entier est propulsé par L’AP312.6. À l’ai<strong>de</strong> <strong>de</strong> câbles pour haut-parleur gran<strong>de</strong> capacité (voire la section LESRACCORDEMENTS D’HAUT-PARLEUR) reliez un ou <strong>de</strong>ux haut-parleurs principaux8 ohm aux prises <strong>de</strong> sortie AMP 1 situées au panneau arrière. Reliez ensuite un ou<strong>de</strong>ux haut-parleurs pour moniteurs 8 ohm, ou un moniteur 4 ohm à la sortie AMP 27. Positionnez vos haut-parleur principaux au <strong>de</strong>vant <strong>de</strong> la scène, en les dirigeantvers l’audience et positionnez vos haut-parleurs <strong>de</strong> moniteur sur le plancher <strong>de</strong> lascène, <strong>de</strong>vant les microphones, pointant vers l’arrière <strong>de</strong>s microphones. (pour réduirele risque <strong>de</strong> feedback, utilisez <strong>de</strong>s microphonescardioes ou unidirectionnels).8. Lors du réglage du système, alors que le groupe joue ou que les autres sources <strong>de</strong> signalont présentes à l’entrée du mixeur, commencez par régler les contrôles comme suit:a) Les contrôles d’égalisateur <strong>de</strong> canal LOW ,MID & HIGH EQ et ceux <strong>de</strong> PANou BAL en position centrale. Réglez ensuite les contrôles <strong>de</strong> “GAIN” <strong>de</strong>canal et ceux <strong>de</strong> MON et EFX au minimum. Réglez ensuite les curseurs <strong>de</strong>l’égalisateur graphique en position centrale..b) Ajustez les fa<strong>de</strong>rs “MAIN” à 0dB. Tournez le contrôle MON MASTER jusqu’à environ8, celui <strong>de</strong> MASTER EFX à environ 7 et celui <strong>de</strong> EFX TO MON à environ 5.c) Avec les fa<strong>de</strong>rs niveau toujours en position fermé, tournez les contrôles <strong>de</strong> GAIN<strong>de</strong> canal lentement jusqu’à ce que la DEL D’ECRETAGE située à côté du fa<strong>de</strong>rs <strong>de</strong>canal s’illumine légèrement. Pour chaque canal, réglez ensuite le niveau avec lefa<strong>de</strong>r jusqu’à l’obtention du niveau désiré au système <strong>de</strong> haut-parleurs principal.d) Tournez ensuite le contrôle MON <strong>de</strong> chaque canal <strong>de</strong> façon à obtenir leniveaux désirés dans les moniteurs sans risque <strong>de</strong> feedback.e) Réglez ensuite les contrôles EFX sur les canaux nécessitant une réverbérationou autres effets, habituellement sur les canaux <strong>de</strong> voix principal et harmonie.La réverbération peut aussi être employée sur les autres canaux ou sur lamusique enregistrée, mais généralement à <strong>de</strong>s niveaux réduitf) Réglez le contrôle EFX SELECT <strong>de</strong> façon à établir le type fondamental <strong>de</strong>reverb, retard ou autres effets désirés. Ensuite à l’ai<strong>de</strong> du contrôle MODIFYfaite le réglage nécessaire pour obtenir l’effet final désiré.9. Le feedback lors d’une performance est habituellement causé par un <strong>de</strong>s moniteurs.Puisque les microphones sont généralement loin <strong>de</strong>s haut-parleurs, il est improbableque le système principal soit à la source du problème. Donc, si un <strong>de</strong>s moniteurs et unmicrophone causent <strong>de</strong>s problèmes <strong>de</strong> feedback, essayez les procédures suivantes:23
tre à Q élevé, produisant le même type <strong>de</strong> sonorité qui serait obtenu en réduisantle niveau global du système pour ensuite augmenter le niveau d’une <strong>de</strong>s ban<strong>de</strong>s(par exemple 1 KHz) <strong>de</strong> l’égalisateur graphique à +12dB• C’est pourquoi le feedback <strong>de</strong> scène peut être contrôlé en coupant certainesfréquences avec l’égalisateur graphique. Cependant, tout changement à l’intérieur<strong>de</strong> la salle, (plus ou moins <strong>de</strong> gens, changement <strong>de</strong> température, nombre <strong>de</strong> personnesau plancher <strong>de</strong> danse, etc.), nécessitera une modification au réglage <strong>de</strong>l’égalisation du système. Heureusement, le Q d’un système diminue rapi<strong>de</strong>mentavec la réduction du niveau. Pour éviter l’effet <strong>de</strong> résonance professionnellement,au premier signe <strong>de</strong> feedback, réduisez le niveau d’environ 3 dB. Le niveau dusystème sera encore très élevé, mais la sonorité du système sera <strong>de</strong> beaucoupsupérieure. Idéalement, l’égalisateur graphique <strong>de</strong>vrait être employé pour nivelerla réponse générale du système, pas pour contrôler le feedback• Utilisez <strong>de</strong>s effets <strong>de</strong> réverbération <strong>de</strong> courte durée et <strong>de</strong> façon modérée. Laréverbération longue durée peut avoir pour effet <strong>de</strong> camoufler la musique et <strong>de</strong>rendre les sons discordants. Les effets <strong>de</strong> réverbération courte durée rehausseronssans diminuer la définition, la qualité du son. Vous préserverez une meilleurdynamique en utilisant les effets modérément. N’oubliez pas que la salle possè<strong>de</strong>sa propre réverbération inaudible avec un casque d’écoute.• Employez les contrôles <strong>de</strong> tonalité avec réserve. La plupart <strong>de</strong>s instrumentsproduisent une sonorité adéquate sans avoir recours à l’égalisation additionnelle.Une légère augmentation <strong>de</strong>s hautes fréquences peut parfois rendre la voix plusvibrante alors que si vous avez un micro sur la grosse caisse, vous pouvez probablementréduire le niveau <strong>de</strong>s aiguës. (Il est inutile d’amplifier <strong>de</strong>s fréquencesqui sont absentes). Rappelez vous que si vous obtenez un son plein au réglageindividuel, vous risquez d’obtenir un mélange général confus. Encore une fois,expérimentez avec réserve pour les réglages <strong>de</strong> tonalité..• Gar<strong>de</strong>z les voix en évi<strong>de</strong>nce. Les microphones ont tendance à produire un feedbackalors que le niveau instrument raccordé directement peux être réglé sanscrainte <strong>de</strong> feedback et par le fait même, ont tendance à être réglé à <strong>de</strong>s niveauxplus élevé. Prenez bien soin <strong>de</strong> ne pas masquer les voix. Une bonne balance <strong>de</strong>sniveaux ai<strong>de</strong> à rendre les chose plus agréable à l’oreille.• Parlant d’oreilles, n’oubliez pas les vôtres. Vous avez sans doute été soumis, peut êtrelors d’une arrivé tardive à un spectacle, à une sonorité agressive presque insupportable.Pourtant quelques minutes plus tard, cette même sonorité vous semblait toutà fait normal. C’est parce que l’oreille humaine, après une exposition relativementcourte à <strong>de</strong>s niveaux élevés se referme quelque peut pour apaiser la douleur, surtoutdans les ban<strong>de</strong>s médiane aiguë et les hautes fréquences où l’oreille est plus sensible.• · Ce mécanisme réduit l’inconfort immédiat, mais il y a un débat à savoir s’ilprotège l’oreille <strong>de</strong>s dommages à long terme. Il semble toutefois évi<strong>de</strong>nt qu’êtreexposé à <strong>de</strong>s niveaux <strong>de</strong> pression sonore trop élevé cause <strong>de</strong>s dommages permanent.Donc, après avoir été exposé à <strong>de</strong>s niveaux élevées trop longtemps,le technicien remarque que les aiguës semblent tamisés et réagit en modifiantl’égalisateur ou le filtre séparateur pour en augmenter le niveau (ouch!). En plusdu danger physique à long terme, une mauvaise sonorité engendrera un mécontentementpour certains membres <strong>de</strong> l’audience - surtout les nouveaux arrivées.La solution: porter <strong>de</strong>s bouchons <strong>de</strong> protection pour vos oreilles. Essayez aussi<strong>de</strong> retourner à un endroit tranquille <strong>de</strong> temps à autre pour donner une chanceau tissu endommagé du tympan <strong>de</strong> guérir. Vous pouvez revenir à votre mélangeavec <strong>de</strong>s oreilles fraîches pourvue que <strong>de</strong>s dommages sévères ou répétés n’aientpas créés un tissu cicatrisé causant <strong>de</strong>s dommages permanent. Assurez-vous <strong>de</strong>créer une atmosphère invitante avec un son fort mais agréable.• · En fait, si vous avez augmenté le niveau <strong>de</strong>s aiguës <strong>de</strong>puis le début <strong>de</strong> la soiréeet que ça semble sonner tout comme au début, prenez gar<strong>de</strong>! Ce ne sont pas lestrompes du système qui ont changé, ce n’est pas l’acoustique <strong>de</strong> la pièce non plus,mais bien le mécanisme <strong>de</strong> protection <strong>de</strong> votre oreille qui s’est enclenché. Ren<strong>de</strong>zvous (et votre audiences) un service - UTILISEZ DES BOUCHONS À OREILLE! Et sivous refusez toujours <strong>de</strong> porter les bouchons, par respect pour votre audience, laisserle niveau <strong>de</strong>s aiguës sur l’égalisateur ou le filtre séparateur à <strong>de</strong>s réglages normaux25
SpécificationsNombre <strong>de</strong> canaux 12Égalisateur <strong>de</strong> canal MonoÉgalisateur <strong>de</strong> canal stéréoEffets <strong>de</strong> canalEffet sur retourContrôle <strong>de</strong> BalanceContrôles Panoramiques(c.1 à 8) Graves, Médianes, Aiguës(c. 9/10 et 11/12) Graves, AiguësTout les canauxOuiEntrées - XLR (sym) C. 1 - 8Tout les canauxTout les canauxEntrée - 1/4-pouce C. 1 - 12Entrées - RCA (asym)DEL Clip /MuteAlimentation en DuplexVU mètreCaractéristiques <strong>de</strong> monitoring par casque d’écoute2 Ensembles StéréoTout les canaux24 V + DEL indicator2 x 5 DELRepère , VolumeEffets Internes Numérique 16 Bit; 255 EffetsEnvoi aux effets 1 InterneCommutateur au Pied Reverb / Effets OuiGain maximum à la sortie ligne –Entrée pour microphone (dB) 63Gain maximum à la sortie ligne –Entrée Ligne (dB) 45Égalisateur Principal -1 (type /Canaux /Gamme - dB) Graphique / Mono / 9 Ban<strong>de</strong>s 63 Hz - 16,000 HzÉgalisateur Principal - 2(type /Canaux /Gamme - dB) Graphique / Mono / 9 Ban<strong>de</strong>s 63 Hz - 16,000 HzSorties Principales ( Niveau Ligne) 4 , 1/4 pouce (PBM) 2 pré, 2 post EQEntrées Ampli Principal (Niveau Ligne) 2 , 1/4 pouce (PBM)Sorties <strong>de</strong> Retours (Niveau Ligne)1, 1/4 pouce (PBM)Sorties - Amp A – 1/4-pouce Jacks 2Sorties - Amp A - Speakon 4-tiges 1 (Euro seulement)Sorties - Amp B - 1/4-pouce Jacks 2Sorties - Amp B - Speakon 4-tige 1 (Euro seulement)Mixeur - DHT (Sortie Principale avec entrée -10dB) Moins que 0.05%Amp A – Puissance <strong>de</strong> Sortie @ 8 ohms (0%1"DHT, 1kHz) 160Amp A – Puissance <strong>de</strong> Sortie @ 4 ohms 100Amp B – Puissance <strong>de</strong> Sortie @ 8 ohms (0%1"DHT, 1kHz) 160Amp B – Puissance <strong>de</strong> Sortie @ 4 ohms 100DHT - 1kHz (dB) Moins que 0.03%Bruit et Bourdonnement (non / A Pondéré -dB) -90Transmodulation Typique -1 kHz (dB) -66Impédance d’Entrée - Sym/Asym (ohms) 22,000 - 12,000Sensibilité d’entrée (Vrms Sinusoïdal) 1.47 VRapport <strong>de</strong> Réjection en Mo<strong>de</strong> Commun@ 60Hz (min/typ) 54 dB / 66 dBGain Maximum <strong>de</strong> Voltage (dB) 29Consommation <strong>de</strong> Puissance (typ/max) 220 VA / 550 VAProtection Thermique / Charge / CCRefroidissement Ventilateur CC à Vitesse VariableType <strong>de</strong> transformateur ToroïdalFinition Dessus en Aluminium recouvert <strong>de</strong> Vinyle résistant aux égratignuresConstruction du Châssis MétalMontage en Rack Oui (RK812)Autres Caractéristiques Commutable stéréo principales ou mono principale et retoursDimensions (PLH, pouces) 18 x 19 x 5.5Dimensions (PLH, cm) 45.7 x 48.3 x 14Poids (livres/kg) 38 / 17.326
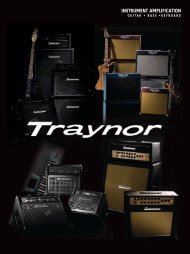
Block Diagram for AP312D E S I G N E D & M A N U FA C T U R E D B Y Y O R K V I L L E S O U N DMono Channel Input DetailsChannels 1-8Low / Mid Sweep / High-10db80 80 8k 12kGain Pot Ch. Fa<strong>de</strong>rPan Potto Mon Busto Efx BusPhantom +24VLEDPhantom PowerStereo Channel Input DetailsChannels 9/10 & 11/12Low / Mid / Highto CUE Switch (PFL)80 2.5k 12kLeftMonitorEffect SendRight80 2.5k 12kLow / Mid / HighBALLeftEFXMONEFXMONLeft MainRightRight MainMonCUEPre-Fa<strong>de</strong> Listen9/10 PFL 11/12 PFLEfxLeft BusRight BusMon BusEfx to MonitorL / MainR / MonEQ / AMP ASSIGNSWITCHMon Master EfxMaster Efx SendLED Bar DisplayL / Main R / Mon63 125 250 500 1k 2k 4k 8k 16k9 Band EQ63 125 250 500 1k 2k 4k 8k 16k9 Band EQEFXMod SelEFFECTSR / Mon400 WattL / Main400 WattAMP 1AMP 22 x 1/4" & Speakon ® +1-1SPEAKERO2 x 1/4" & Speakon ® +1-1UTPUTSPre EQ Out LPREEPre EQ Out R QOUSTEREO TL / Main Post EQ OutR / Mon Post EQ OutPOSTEQOUTAmp A InputAmp B InputAMPINEfx SendMonitorMONHP JackNC
Two&TenTwo & Ten Year WarrantyUnlimited Warranty<strong>Yorkville</strong>'s two and ten-year unlimited warranty on this product is transferableand does not require registration with <strong>Yorkville</strong> <strong>Sound</strong> or your <strong>de</strong>aler. If thisproduct should fail for any reason within two years of the original purchasedate (ten years for the woo<strong>de</strong>n enclosure), simply return it to your <strong>Yorkville</strong><strong>de</strong>aler with original proof of purchase and it will be repaired free of charge.This inclu<strong>de</strong>s all <strong>Yorkville</strong> products, except for the YSM Series studiomonitors, Coliseum Mini Series and TX Series Loudspeakers.Freight charges, consequential damages, weather damage, damage as a resultof improper installation, damages due to exposure to extreme humidity, acci<strong>de</strong>ntor natural disaster are exclu<strong>de</strong>d un<strong>de</strong>r the terms of this warranty. Warranty doesnot cover consumables such as vacuum tubes or par bulbs. See your <strong>Yorkville</strong><strong>de</strong>aler for more <strong>de</strong>tails. Warranty valid only in Canada and the United States.Garantie IllimitéeLa garantie illimitée <strong>de</strong> <strong>de</strong>ux et dix ans <strong>de</strong> ce produit est transférable. Il n`est pasnécessaire <strong>de</strong> faire enregistrer votre nom auprès <strong>de</strong> <strong>Yorkville</strong> <strong>Sound</strong> ou <strong>de</strong> votredétaillant. Si, pour une raison quelconque, ce produit <strong>de</strong>vient défectueux durantles <strong>de</strong>ux années qui suivent la date d`achat initial (dix ans pour l`ébénisterie),retournez-le simplement à votre détaillant <strong>Yorkville</strong> avec la preuve d`achat originalet il sera réparé gratuitement. Ceci inclus tous les produits <strong>Yorkville</strong> à l`exception<strong>de</strong> la série <strong>de</strong> moniteurs <strong>de</strong> studio YSM, la mini série Coliseum et <strong>de</strong> la série TX.Les frais <strong>de</strong> port et <strong>de</strong> manutention ainsi que les dommages indirects oudommages causés par désastres naturels, extrême humidité ou mauvaiseinstallation ne sont pas couverts par cette garantie. Cette garantie ne couvrepas les produits consommables tels que lampe d`amplificateur ou ampoules"PAR". Voir votre détaillant <strong>Yorkville</strong> pour plus <strong>de</strong> détails. Cette garantie n’estvali<strong>de</strong> qu’au Canada et aux États Unis d’Amérique.REAL Gear.REAL People.CanadaVoice: (905) 837-8481Fax: (905) 837-8746w w w . y o r k v i l l e . c o m<strong>Yorkville</strong> <strong>Sound</strong>550 Granite CourtPickering, OntarioL1W-3Y8 CANADAU.S.A.Voice: (716) 297-2920Fax: (716) 297-3689<strong>Yorkville</strong> <strong>Sound</strong> Inc.4625 Witmer Industrial EstateNiagara Falls, New York14305 USAPrinted in Canada
WORLD HEADQUARTERSCANADA<strong>Yorkville</strong> <strong>Sound</strong>550 Granite CourtPickering, OntarioL1W-3Y8 CANADAVoice: (905) 837-8481Fax: (905) 837-8746U.S.A.<strong>Yorkville</strong> <strong>Sound</strong> Inc.4625 Witmer Industrial EstateNiagara Falls, New York14305 USAVoice: (716) 297-2920Fax: (716) 297-3689