MODEL RPH-25,000 INDUSTRIAL PLANETARY ... - Ramsey Winch
MODEL RPH-25,000 INDUSTRIAL PLANETARY ... - Ramsey Winch
MODEL RPH-25,000 INDUSTRIAL PLANETARY ... - Ramsey Winch

Create successful ePaper yourself
Turn your PDF publications into a flip-book with our unique Google optimized e-Paper software.
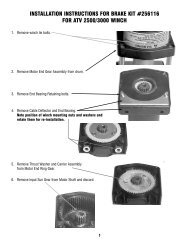
4. Remove winch from uprightmounting frame (item #1) byremoving (4) capscrews andlockwashers. Pull motor endbearing (item #8) from drumassembly (item #2).16 <strong>25</strong>17 <strong>25</strong>817 <strong>25</strong>216<strong>25</strong>195. Pull drum assembly (item #2) upward from end bearing (item #9). Remove quad-rings (item #39 & #38) from grooves indrum bushings. Remove input shaft (item #11), clutch spring (item #45) and washer (item #27) from end bearing (item#9). Examine splined ends of input shaft for signs of wear, replace if damaged.Examine drum assembly (item #2) for signs of wear. If splines inside of drum driver (332166) are damaged, drum drivermust be replaced. Remove drum driver by unscrewing (8) capscrews (414462). Place well-oiled o-ring (462053) into drumdriver groove and attach driver to drum (332165) using (8) capscrews (414462). Torque capscrews to 55 ft. lbs. each, incriss-cross pattern.Press old bushings from drum and drum driver. Remove o-rings (462055 & 462052) from grooves in drum and drumdriver-bushing (412092). Place well-oiled o-rings (462055 & 462052) into grooves in drum and outer diameter of drumdriver bushing (412092). Press new bushing (412091) into end of drum opposite drum driver and press bushing (412092)into drum driver until flange of bushings are flush against drum and driver. Secure bushings to drum and drum driver using(2) capscrews (414819).394148194620553321652412091DRUM DRIVERGROOVE41446210114046284620534620529332166412092414819DRUM ASSEMBLY 234170 (ITEM #2)8