Pro Flight Radio Panel - Saitek
Pro Flight Radio Panel - Saitek
Pro Flight Radio Panel - Saitek

Create successful ePaper yourself
Turn your PDF publications into a flip-book with our unique Google optimized e-Paper software.
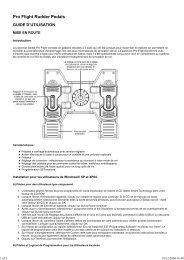
<strong>Pro</strong>_<strong>Flight</strong>_radio_panel_MP.qxd 17/04/2009 15:40 Page 2SAITEK PRO FLIGHT RADIO PANEL<strong>Radio</strong> mode selectorActive and standby frequency switchCongratulations on buying the <strong>Saitek</strong> <strong>Pro</strong> <strong>Flight</strong> <strong>Radio</strong> <strong>Panel</strong>. The radio panel interactswith Microsoft <strong>Flight</strong> Simulator X to control the cockpit radio stack communications andnavigation frequencies.Installing the <strong>Pro</strong> <strong>Flight</strong> <strong>Radio</strong> <strong>Panel</strong>Fix the radio panel to the supplied mounting bracket. Insert the screws through theholes at the corners of the panel into the bracket behind and tighten. If you alreadyown a <strong>Saitek</strong> <strong>Pro</strong> <strong>Flight</strong> Yoke System, you can mount the panel and bracket on top ofthe yoke unit using the screws provided.COM 1COM 2NAV 1NAV 2ADFDMEXPDRACTIVECOM 1COM 2NAV 1NAV 2ADFDMEXPDRSTANDBYACT/ STBYXPDRDIGITACT/ STBYXPDRDIGIT<strong>Saitek</strong>1 2 3Installation for users of Windows® XP, XP64 and Vista1. With your computer switched on, close down any programs that are currentlyrunning and plug the USB cable of your panel into one of your PC’s free USB ports.A dialogue window will open on your windows task bar saying your PC is installingdrivers. Please note that the LED screen will not light up until the panel software isinstalled.2. Insert the Installation CD into your CD or DVD drive. If the CD does not runautomatically, select Start from the Windows® Taskbar, then Run and typeD:\Setup.exe and click OK - where D:\ is letter of your disc drive. For Vista users, ifyou receive the “User Account Control” prompt, click continue.3. For XP users, when the setup wizard screen appears, click “Next” to continue. ForVista users, when prompted “Do you want to run this program from <strong>Saitek</strong>?” and“Do you always want to run this program from <strong>Saitek</strong>?”, click “Yes”. After readingthe Disclaimer, select the “I accept the terms of the Disclaimer” option and click“Next” to continue.4. The following screen will say “Driver setup is installing Direct Output”.5. Once the driver installation has finished, click “Finish” to exit the installationprocess.6. You can now run a test application by going to Windows Start/<strong>Pro</strong>grams/<strong>Saitek</strong>/<strong>Pro</strong><strong>Flight</strong> Multi <strong>Panel</strong>/ or open Microsoft FS X. When you open the test application orFS X the display of your panel will light up.Note: If you install a <strong>Saitek</strong> X52 <strong>Pro</strong> after having installed a <strong>Pro</strong> flight panel, thepanel’s Direct Output file will be overwritten. If this happens, please reinstall the panelsoftware.Using the <strong>Saitek</strong> <strong>Pro</strong> <strong>Flight</strong> <strong>Radio</strong> <strong>Panel</strong>The <strong>Saitek</strong> <strong>Pro</strong> <strong>Flight</strong> <strong>Radio</strong> <strong>Panel</strong> allows you to adjust the communications andnavigation frequencies on your aircraft’s radio stack for communicating with air trafficcontrol or selecting VOR beacons or NDBs for navigation.2 3Outer rotary adjusts standby frequency byincrements of 1, inner rotary adjusts decimals