STAGE COLOR 300 AE - Clay Paky
STAGE COLOR 300 AE - Clay Paky
STAGE COLOR 300 AE - Clay Paky
- No tags were found...

You also want an ePaper? Increase the reach of your titles
YUMPU automatically turns print PDFs into web optimized ePapers that Google loves.
®<strong>STAGE</strong> <strong>COLOR</strong> <strong>300</strong> <strong>AE</strong>HTI <strong>300</strong>W/DXHTI <strong>300</strong>W/DELFIMANUALE DI ISTRUZIONIINSTRUCTION MANUALMANUEL D'INSTRUCTIONS D BEDIENUNGSANLEITUNG E MANUAL DE INSTRUCCIONESGBFI INDICEGB INDEXSOMMAIRE D INHALT E INDICEPage2468Contenuto - Contents - Contenu - Inhalt - ContenidoInformazioni di sicurezza - Safety informationInformations de sécurité - Informationen über Sicherheit - Información de seguridadDisimballo e predisposizione - Unpacking and preparationDéballage et préparation - Auspacken und Vorbereiten - Desembalaje y preparaciónInstallazione e messa in funzione - Installation and start-upInstallation et mise en fonction - Installation und Inbetriebnahme - Instalación y puesta en funciónPannello di controllo - Control panel - Panneau de controleSteuerpult - Pannel de control<strong>STAGE</strong> <strong>COLOR</strong> <strong>300</strong><strong>AE</strong>10242729Impostazione menu - Menu setting - Sélection menu - Einstellung Menü - Programación menúFunzioni canali - Channel functions - Fonction des canaux - Kanalfunktionen - Funcion de los canalesManutenzione - Maintenance - Entretien - Wartung - MantenimientoCausa e soluzione dei problemi - Cause and solution of problems - Cause et solution des problèmesUrsachen und Abhilfe bei Betriebsstörungen - Causas y soluciones de problemas30Dati Tecnici - Technical data - Données techniques - Technische Daten - Datos técnicosIGBFDEComplimenti per aver scelto un prodotto <strong>Clay</strong> <strong>Paky</strong>! La ringraziamo per la preferenza e La informiamo che anche questo prodotto, come tutti gli altri della ricca gamma<strong>Clay</strong> <strong>Paky</strong>, è stato progettato e realizzato nel segno della qualità, per garantirLe sempre l’eccellenza delle prestazioni e rispondere meglio alle Sue aspettative ed esigenze.Leggere attentamente in tutte le sue parti il presente manuale d’istruzioni e conservarlo accuratamente per riferimenti futuri. La conoscenza delle informazioni ed il rispettodelle prescrizioni contenute in questa pubblicazione sono essenziali per garantire la correttezza e la sicurezza delle operazioni di installazione, uso e manutenzionedell’apparecchio.CLAY PAKY S.p.A. declina ogni responsabilità per danni all’apparecchio o ad altre cose o persone, derivanti da installazione, uso e manutenzione effettuate non inconformità con quanto riportato sul presente manuale di istruzioni, che deve sempre accompagnare l’apparecchio.CLAY PAKY S.p.A. si riserva la facoltà di modificare, in qualunque momento e senza preavviso, le caratteristiche menzionate nel presente manuale di istruzioni.Congratulations on choosing a <strong>Clay</strong> <strong>Paky</strong> product! We thank you for your custom. Please note that this product, as all the others in the rich <strong>Clay</strong> <strong>Paky</strong> range, has beendesigned and made with total quality to ensure excellent performance and best meet your expectations and requirements.Carefully read this instruction manual in its entirety and keep it safe for future reference. It is essential to know the information and comply with the instructions given in thismanual to ensure the fitting is installed, used and serviced correctly and safely.CLAY PAKY S.p.A. disclaims all liability for damage to the fitting or to other property or persons deriving from installation, use and maintenance that have not been carriedout in conformity with this instruction manual, which must always accompany the fitting.CLAY PAKY S.p.A. reserves the right to modify the characteristics stated in this instruction manual at any time and without prior notice.Félicitations, vous venez de choisir un produit <strong>Clay</strong> <strong>Paky</strong>! Nous vous remercions de votre préférence et vous informons que comme tous les autres produits de la vastegamme <strong>Clay</strong> <strong>Paky</strong>, ce produit a lui aussi été conçu et réalisé sous le signe de la qualité, afin de vous garantir en toutes occasions l'excellence des performances, etd'apporter une réponse plus précise à vos attentes et exigences.Lire attentivement et entièrement le présent manuel d'instructions, et le conserver soigneusement pour toutes références futures. La connaissance des informations et lerespect des prescriptions contenues dans la présente publication sont essentiels afin de garantir la correction et la sécurité des opérations d'installation, d'utilisation etd'entretien de l'appareil.CLAY PAKY S.p.A. décline toute responsabilité en cas de dommages causés à l'appareil, à des personnes ou à des choses par une installation, une utilisation ou unentretien n'ayant pas été réalisés conformément aux indications fournies dans le présent manuel d'instructions, qui doit toujours accompagner l'appareil.CLAY PAKY S.p.A. se réserve la faculté de modifier, à tout moment et sans préavis, les caractéristiques mentionnées dans le présent manuel d'instructions.Kompliment für Ihre Wahl eines Produkts von <strong>Clay</strong> <strong>Paky</strong>! Wir danken Ihnen für das entgegengebrachte Vertrauen und möchten Sie daran erinnern, dass bei der Herstellungauch dieses Produkts - wie bei allen Produkten des großen Sortiments von <strong>Clay</strong> <strong>Paky</strong> - auf erste Qualität Wert gelegt wurde, um Ihnen immer hervorragende Leistungengarantieren, und Ihre Erwartungen und Anforderungen stets bestens erfüllen zu können.Lesen Sie diese Bedienungsanleitung bitte vollständig durch und bewahren Sie sie für späteres Nachschlagen sorgfältig auf. Die Kenntnis der darin enthaltenenInformationen und die strikte Befolgung der Anweisungen ist die Voraussetzung für eine korrekte und sichere Installation, Benutzung und Wartung des Geräts.Die Firma CLAY PAKY S.p.A. lehnt jede Haftung für Schäden an dem Gerät bzw. sonstige Sach- und Personenschäden ab, die durch eine nicht mit den Anweisungendieser Bedienungsanleitung konforme Installation, Benutzung und Wartung verursacht werden. Die Bedienungsanleitung muss immer bei dem Gerät bleiben.Die Firma CLAY PAKY S.p.A. behält sich das Recht vor, die in der vorliegenden Bedienungsanleitung enthaltenen Daten jederzeit und ohne vorherige Benachrichtigung zuändern.Enhorabuena por haber elegido un artículo <strong>Clay</strong> <strong>Paky</strong> y gracias por honrarnos con su preferencia. Este producto, como todos los demás de esta marca, ha sido proyectadoy realizado con los más elevados criterios de calidad para garantizarle siempre unas prestaciones excelentes y satisfacer mejor sus expectativas y exigencias.Lea atentamente todo el manual de instrucciones y guárdelo para futuras consultas. Las informaciones e indicaciones que figuran en esta publicación son esenciales paraefectuar de modo correcto y seguro las operaciones de instalación, uso y mantenimiento del aparato.CLAY PAKY S.p.A. declina toda responsabilidad ante daños sufridos por el proyector, por personas u objetos, que puedan atribuirse a operaciones de instalación, uso omantenimiento no conformes a lo indicado en este manual, el cual debe guardarse siempre junto con el aparato.CLAY PAKY S.p.A. se reserva el derecho de modificar, en cualquier momento y sin aviso previo, las características mencionadas en el presente manual de instrucciones.1
IINFORMAZIONI DI SICUREZZAGBSAFETY INFORMATION• InstallazioneAssicurarsi che tutte le parti per il fissaggio del proiettore sianoin buona condizione. Assicurarsi della stabilità del punto diancoraggio prima di posizionare il proiettore.La fune di sicurezza, debitamente agganciata all’apparecchio efissata alla struttura di sostegno, deve essere installata in modoche, in caso di cedimento del sistema di supporto primario, siabbia la minor caduta possibile dell’apparecchio. Dopo uneventuale intervento la fune di sicurezza deve essere sostituitacon il ricambio originale.• InstallationMake sure all parts for fixing the projector are in a goodstate of repair.Make sure the point of anchorage is stable beforepositioning the projector.The safety chain must be properly hooked onto the fittingand secured to the framework, so that, if the primarysupport system fails, the fitting falls as little as possible. Ifthe safety chain gets used, it needs to be replaced with agenuine spare.HTI <strong>300</strong>W/DXHTI <strong>300</strong>W/DEL1,2• Distanza minima degli oggetti illuminatiIl proiettore deve essere posizionato in modo tale che gli oggetticolpiti dal fascio luminoso siano distanti almeno 1,2 metridall’obiettivo del proiettore stesso.• Minimum distance of illuminated objectsThe projector needs to be positioned so that the objects hitby the beam of light are at least 1,2 metres (3’ 11”) from thelens of the projector.• Distanza minima dei materiali infiammabiliIl proiettore deve essere posizionato in modo tale che i materialiinfiammabili siano distanti almeno 0,15 metri da ogni puntodella superficie dell’apparecchio.• Minimum distance from flammable materialsThe projector must be positioned so that any flammablematerials are at least 0.15 metres (6") from every point on thesurface of the fitting.• Superficie di montaggioÈ consentito il montaggio dell’apparecchio su superficinormalmente infiammabili.• Mounting surfacesIt is permissible to mount the fitting on normally flammablesurfaces.t a 35°C• Massima temperatura ambientePer un migliore e affidabile funzionamento dell’apparecchio, latemperatura ambiente non deve superare i 35°C.• Maximum ambient temperatureFor the fitting to operate well and reliably, the ambienttemperature should not exceed 35°C (95°F).IP20• Grado di protezione IP20L’apparecchio è protetto contro la penetrazione di corpi solidi didimensione superiore a 12mm (prima cifra 2), mentre teme lostillicidio, la pioggia, gli spruzzi e i getti d’acqua (seconda cifra 0).• IP20 protection ratingThe fitting is protected against penetration by solid bodies ofover 12mm (0.47”) in diameter (first digit 2), but not againstdripping water, rain, splashes or jets of water (second digit 0).• Protezione contro la scossa elettricaÈ obbligatorio effettuare il collegamento ad un impianto dialimentazione dotato di un’efficiente messa a terra(apparecchio di Classe I secondo la norma EN 60598-1).Si raccomanda, inoltre, di proteggere le linee di alimentazionedei proiettori dai contatti indiretti e/o cortocircuiti verso massatramite l’uso di interruttori differenziali opportunamentedimensionati.• Protection against electrical shockConnection must be made to a power supply system fittedwith efficient earthing (Class I appliance according tostandard EN 60598-1).It is, moreover, recommended to protect the supply lines of theprojectors from indirect contact and/or shorting to earth byusing appropriately sized residual current devices.• Collegamento alla rete di alimentazioneLe operazioni di collegamento alla rete di distribuzionedell’energia elettrica devono essere effettuate da un installatoreelettrico qualificato.Verificare che frequenza e tensione della rete corrispondanoalla frequenza ed alla tensione per cui il proiettore èpredisposto ed indicate sulla targhetta dei dati elettrici.Sulla medesima targhetta è pure indicata la potenza assorbita.Fare riferimento a quest’ultima per valutare il numero massimodi apparecchi da collegare alla linea elettrica, al fine di evitaresovraccarichi.• Hooking up to the supply mainsConnection to the electricity mains must be carried out by aqualified electrical installer.Check that the mains frequency and voltage correspond tothose for which the projector is designed as given on theelectrical data label. This label also gives the input power towhich you need to refer to evaluate the maximum number offittings to connect to the electricity line, in order to avoidoverloading.t c 120°C• Temperatura della superficie esternaLa temperatura massima raggiungibile sulla superficie esternadell’apparecchio, in condizioni di regime termico, è di 120°C .• Temperature of the external surfaceThe maximum temperature that can be reached on the externalsurface of the fitting, in a thermally steady state, is 120°C (248°F).!• ManutenzionePrima di iniziare qualsiasi operazione di manutenzione o puliziasul proiettore togliere la tensione dalla rete di alimentazione.Dopo lo spegnimento non rimuovere alcuna partedell’apparecchio per 10 minuti. Trascorso tale tempo laprobabilità di esplosione della lampada è praticamente nulla.Se è necessario sostituire la lampada, aspettare ulteriori 15minuti per evitare scottature.L’apparecchio è progettato in modo da trattenere le scheggeprodotte dall’eventuale scoppio della lampada. Le lenti devonoessere obbligatoriamente montate; devono inoltre, sevisibilmente danneggiate, essere sostituite con ricambi originali.• MaintenanceBefore starting any maintenance work or cleaning the projector,cut off power from the mains supply.After switching off, do not remove any parts of the fitting for atleast 10 minutes. After this time the likelihood of the lampexploding is virtually nill. If it is necessary to replace the lamp,wait for another 15 minutes to avoid getting burnt.The fitting is designed to hold in any splinters produced by alamp exploding. The lenses must be mounted and, if visiblydamaged, they have to be replaced with genuine spares.• LampadaL’apparecchio monta una lampada ad alta pressione cherichiede un accenditore esterno. Tale accenditore è incorporatonell’apparecchio.- Leggere attentamente le “istruzioni d’uso” fornite dalcostruttore della lampada.- Sostituire immediatamente la lampada se danneggiata odeformata dal calore.• LampThe fitting mounts a high-pressure lamp that needs an externaligniter. This igniter is fitted onto the apparatus.- Carefully read the "operating instructions" provided by thelamp manufacturer.- Immediately replace the lamp if damaged or deformed byheat.I prodotti a cui questo manuale si riferisce sono conformi alleDirettive della Comunità Europea di cui sono oggetto:• Bassa Tensione 73/23• Compatibilità Elettromagnetica 89/336The products referred to in this manual conform to theEuropean Community Directives to which they are subject:• Low Voltage 73/23• Electromagnetic Compatibility 89/3362
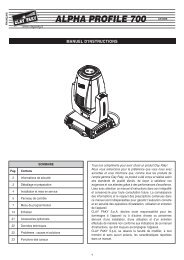
FIDISIMBALLO E PREDISPOSIZIONEUNPACKING AND PREPARATIONDEBALLAGE ET PREPARATION D AUSPACKEN UND VORBEREITEN E DESEMBALAJE Y PREPARACIONGB1105041/003 099307081962/001234UNLOCKED LOCKEDLOCKED<strong>STAGE</strong> <strong>COLOR</strong> <strong>300</strong><strong>AE</strong>UNLOCKED<strong>STAGE</strong> <strong>COLOR</strong> <strong>300</strong><strong>AE</strong>IGBFDEContenuto dell’imballo - Figura 1. Oltre al proiettore, nell’imballo sono contenuti gli accessori illustrati.Blocco e sblocco movimento PAN - Figura 2.Blocco e sblocco movimento TILT - Figura 3.Apertura e chiusura proiettore - Figura 4.ATTENZIONE: Il coperchio è montato su una parte mobile dell’apparecchio, è pertanto necessario effettuare con la massima attenzione il montaggio dello stesso perevitare un distacco accidentale. Appoggiare il coperchio facendolo ben combaciare con la parte non asportabile, serrare a fondo entrambe le viti, verificare la perfettatenuta dei filetti.Packing contents - Fig. 1. As well as the projector the pack contains the accessories illustrated.PAN Mechanism Lock and Release - Fig. 2.TILT Mechanism Lock and Release - Fig. 3.Opening/closing the projector - Fig. 4.WARNING: as the cover is fitted to a moving part of the fixture, maximum care must be taken when refitting to ensure that no accidental separation will occursubsequently. Offer the cover to the non-removable parts, checking for a clean fit, then proceed to tighten both screws, making certain the threads are securely seated.Contenu de l'emballage - Figure 1. En plus du projecteur l’emballage contient les accessoires illustrés.Blocage et Déblocage mouvement PAN - Figure 2.Blocage et Déblocage mouvement TILT - Figure 3.Ouverture et fermeture du projecteur - Figure 4.ATTENTION : Le couvercle est monté sur une partie mobile de l’appareil. Il est par conséquent nécessaire de procéder à son montage avec la plus grande attention afind’éviter un détachement accidentel. Poser le couvercle en le faisant bien correspondre avec la partie non démontable, serrer à fond les deux vis, vérifier la tenue parfaitedes filets.Packungsinhalt - Abb. 1. Außer dem Projektor sind in der Verpackung die abgebildeten Zubehörteile enthalten.Blockierung und Freigabe der PAN-Bewegung - Abb. 2.Blockieren und Freigabe der TILT-Bewegung - Abb. 3.Öffnen und Schließen des Projektors - Abb. 4.ACHTUNG: Der Deckel ist an einem beweglichen Teil des Geräts montiert, deshalb muss bei der Montage besonders sorgfältig vorgegangen werden, damit er sich nichtversehentlich lösen kann. Den Deckel aufsetzen, dabei mit dem nicht abnehmbaren Teil in Übereinstimmung bringen, beide Schrauben fest anziehen und den perfektenHalt der Gewinde überprüfen.Contenido del embalaje - Figura 1. Además del proyector el embalaje contiene los accesorios ilustrados.Bloqueo y desbloqueo del movimiento de GIRO - Figura 2.Bloqueo y desbloqueo del movimiento de INCLINACIÓN - Figura 3.Apertura y cierre del proyector - Figura 4.ATENCIÓN: la tapa va montada en una parte móvil del aparato, por lo cual es necesario colocarla con mucho cuidado para evitar que se suelte. Coloque la tapa de maneraque coincida exactamente con su apoyo y apriete a fondo los dos tornillos, verificando la retención de las tuercas.4Continua / Continue ➔
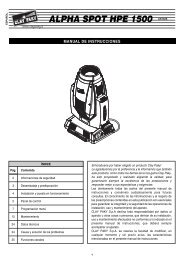
56123I<strong>STAGE</strong> <strong>COLOR</strong> <strong>300</strong><strong>AE</strong>Predisposizione etichetta avvertenze - Figura 5.Individuare sul coperchio del corpo mobile l’etichetta cambio lampada e, se necessario, sostituirla con una delle etichette opzionali multilingua poste nel vano lampada del proiettore.ATTENZIONE: Leggere con attenzione ed applicare con scrupolo quanto riportato sull’etichetta in oggetto. Accertarsi inoltre che essa non venga mai rimossa poiché contieneimportanti informazioni di sicurezza.Montaggio lampada - Figura 6.Togliere la lampada nuova dalla confezione, allentare le due ghiere laterali ed inserire la lampada negli appositi supporti. Infine riavvitare le ghiere.IMPORTANTE: per avere una distribuzione uniforme del fascio di luce, la lampada deve essere posizionata con la protuberanza, visibile sul bulbo, rivolta verso la parte posteriore delcorpo mobile.ATTENZIONE: il bulbo della lampada non deve essere toccato a mani nude. Se ciò tuttavia dovesse verificarsi, pulire il bulbo stesso con un panno imbevuto d’alcool edasciugarlo con un panno pulito e asciutto.GBFDEPreparing the warning label - Fig. 5.Find the relamping label on the cover of the movable body and, if necessary, replace it with one of the optional multilingual labels located in the projector lamp compartment.WARNING: Read carefully and meticulously apply the information and instructions given on this label. In addition, check it is never removed as it contains importantsafety information.Fitting the lamp - Fig. 6.Take the new lamp out of its package, loosen the two side ring nuts and insert the lamp in its mountings. Finally, screw on the ring nuts.IMPORTANT: to distribute the beam of light uniformly, the lamp needs to be positioned with the protrusion visible on the bulb outside the optical axis of the projector. For this purpose itis recommended to turn the protrusion towards the rear of the projector.WARNING: do not touch the lamp’s envelope with bare hands. Should this happen, clean the bulb with a cloth soaked in alcohol and dry it with a clean, dry cloth.Prédisposition de l'étiquette de recommandations - Figure 5.Identifier sur le couvercle du corps mobile l'étiquette relative au remplacement de la lampe et, si nécessaire, la remplacer par une des étiquettes en plusieurs langues en option situéesdans le logement de la lampe du projecteur.ATTENTION: Lire attentivement et appliquer scrupuleusement les indications fournies sur l'étiquette. En outre, s'assurer que cette étiquette est toujours présente sur l'appareil,car elle fournit d'importantes informations en matière de sécurité.Montage de la lampe - Figure 6.Extraire la lampee neuve de la boîte, desserrer les deux colliers latéraux et introduire la lampe dans les supports. Pour terminer, revisser les colliers.IMPORTANT: pour obtenir une distribution uniforme du faisceau lumineux, la lampe doit être placée de façon à ce que la protubérance soit visible sur le bulbe en-dehors de l'axe optiquedu projecteur. A ces fins, il est conseillé de tourner cette protubérance vers l’arrière du projecteur.ATTENTION: ne pas toucher le bulbe de la lampe avec les doigts. Si cela se produit, nettoyer le bulbe avec un chiffon imbibé d’alcool et le sécher avec un chiffon sec etpropre.Anbringung der Hinweisschilder - Abb. 5.Am Gerätedeckel das Schild des Lampenwechsels ausfindig machen und gegebenenfalls durch eines der in mehreren Sprachen verfügbaren Etiketten ersetzen, die im Lampenfachdes Projektors mitgeliefert werden.ACHTUNG: Lesen Sie die Angaben auf dem fraglichen Etikett aufmerksam durch und halten Sie sich strikt daran. Stellen Sie außerdem sicher, dass es unter keinenUmständen entfernt wird, da es wichtige Sicherheitsinformationen enthält.Montage der Lampe - Abb. 6.Die neue Lampe aus der Verpackung nehmen, die beiden seitlichen Nutmuttern lockern und die Lampe in die Halterungen einsetzen. Dann die Nutmuttern wieder festschrauben.WICHTIG: für einen gleichmäßigen Lichtstrahl muss die Lampe so positioniert werden, dass der auf dem Glaskolben sichtbare Vorsprung außerhalb der optischen Achse desProjektors liegt. Zu diesem Zweck wird empfohlen, diesen Vorsprung zur Rückseite des beweglichen Kopfes gerichtet ist.ACHTUNG: Der Lampenkolben darf nicht mit bloßen Händen berührt werden. Wenn dies dennoch passieren sollte, den Lampenkolben mit einem mit Alkohol getränktenTuch reinigen und ihn mit einem sauberen und trockenen Tuch abtrocknen.Sustitución de la etiqueta de advertencias - Figura 5.Localice en la tapa del cuerpo móvil la etiqueta de cambio de la lámpara y, si es necesario, sustitúyala por una de las etiquetas opcionales en otros idiomas que están en el compartimientode la lámpara del proyector.ATENCIÓN: lea con detenimiento las indicaciones de la etiqueta y respételas. Cerciórese de que la etiqueta no se desprenda nunca, porque contiene importantes informacionessobre la seguridad.Montaje de la lámpara - Figura 6.Saque la lámpara nueva del embalaje, afloje las dos virolas laterales y monte la lámpara en los soportes. Vuelva a apretar las virolas.IMPORTANTE: para conseguir una distribución uniforme del haz de luz, la lámpara debe ubicarse con la protuberancia del bulbo fuera del eje óptico del proyector. Se aconseja orientarlahacia la parte posterior del cuerpo proyector.ATENCIÓN: el bulbo de la lámpara no se debe tocar con las manos desnudas. En este caso, limpie el bulbo con un paño humedecido en alcohol y séquela con un pañolimpio yseco.5
FIINSTALLAZIONE E MESSA IN FUNZIONEINSTALLATION AND START-UPINSTALLATION ET MISE EN FONCTION D INSTALLATION UND INBETRIEBNAHME E INSTALACION Y PUESTA EN FUNCIONGB78<strong>STAGE</strong> <strong>COLOR</strong> <strong>300</strong><strong>AE</strong><strong>STAGE</strong> <strong>COLOR</strong> <strong>300</strong><strong>AE</strong><strong>STAGE</strong> <strong>COLOR</strong> <strong>300</strong><strong>AE</strong><strong>STAGE</strong> <strong>COLOR</strong> <strong>300</strong><strong>AE</strong>IGBFDEInstallazione proiettore - Figura 7.Il proiettore può essere installato a pavimento in appoggio sugli appositi gommini, su truss, a soffitto o a parete.Per l’installazione su truss è inoltre disponibile a richiesta la piastra (cod. C61110) con i morsetti ad aggancio/sgancio rapido.ATTENZIONE: Sfruttare tutti e 4 i fori filettati presenti sulla base dell’apparecchio, controllando nel contempo la perfetta tenuta dei filetti.Fissaggio funi di sicurezza - Figura 8.Ad eccezione di quando il proiettore è appoggiato a pavimento, il montaggio delle funi di sicurezza è obbligatorio. Queste devono essere assicurate alla struttura di sostegno delproiettore e quindi agganciate agli anelli presenti sulla base del proiettore stesso.Installing the projector - Fig. 7.The projector can be positioned at loor level standing on the special rubber, on truss, on ceiling or on the wall.A plate (code C61110) with quick-release clamps can also be supplied, on request, for truss mounting.WARNING: use all four holes in the base, checking that the threads are perfectly tight.Fitting the safety wire - Fig. 8.The projector must never be erected without the safety wire. The only exception to this rule is when the base stands directly on the floor. The wire is secured to the truss or otherstructure, then anchored to the lugs on the projector itself.Installation du projecteur - Figure 7.Le projecteur peut être monté au sol en appui sur des éléments en caoutchouc antichoc, sur truss, au plafond ou au mur.En outre, la plaque (code C61110) avec les bornes à enclenchement / déclenchement rapide pour l’installation sur truss est disponible sur demande.ATTENTION : Utiliser les 4 trous filetés présents sur la base de l’appareil, et contrôler en même temps la tenue parfaite des filets.Fixation des câbles de sécurité - Figure 8.L’installation des câbles de sécurité est obligatoire, sauf lorsque le projecteur est installé au sol. Les fixer sur la structure de soutien du projecteur puis aux anneaux présents sur labase du projecteur.Installation des Projektors - Abb. 7.Der Projektor kann direkt auf dem Fußboden auf den hierzu vorgesehenen stoßfesten Gummifüßen, auf Traversen, an der Decke oder an der Wand installiert werden.Für die Installation auf Rohrträgern ist auf Anfrage außerdem die Platte (Art. Nr. C61110) mit den Klemmen zur schnellen Befestigung/Abnahme erhältlich.ACHTUNG: Alle 4 Gewindebohrungen an der Geräteunterseite nutzen und gleichzeitig den perfekten Halt der Gewinde kontrollieren.Befestigung der Fangseile - Abb. 8.Sofern der Projektor nicht auf dem Fußboden installiert ist, ist die Montage der Fangseile zwingend vorgeschrieben. Diese müssen an der Haltestruktur des Projektors befestigt, undanschließend an den Ringen an der Unterseite des Projektors eingehakt werden.Instalación del proyector - Figura 7.El proyector puede instalarse en el suelo apoyado en los tacos de goma, en el truss, al techo o a la pared.Para el montaje en el truss está disponible la placa optional (cód. C61110) con las grapas de sujeción y desenganche rápido.ATENCIÓN: utilice todos los agujeros roscados de la base del aparato y controle que las roscas ejerzan una buena retención.Fijación de las cuerdas de seguridad - Figura 8.Salvo cuando el proyector se apoya en el suelo, el montaje de las cuerdas de seguridad es obligatorio. Asegure la cuerda a la estructura de soporte del proyector y engánchela enlos anillos que hay en la base del aparato.6Continua / Continue ➔
S ES ES ES ES ES E9{ L NMARRONE =BLU =GIALLO =VERDE =LN=BROWN =BLUE =YELLOW =GREEN =LN=SELTXDMXSELTXDMXSELTXDMXMARRON =BLEU =JAUNE =VERT =LN=BRAUN =BLAU =GELB =GRÜN =LN=MARRÒN =AZUL =AMARILLO =VERDE =LN=10DMX 5125 PIN5 14 23SCREENSIGNALSIGNALDMX 512SELTXDMXSELTXDMXSELTXDMXDMX 5123 PINSIGNALSIGNAL3 12SCREENICollegamento alla linea di alimentazione - Figura 9.Collegamento alla linea del segnale di controllo (DMX) - Figura 10.Utilizzare un cavo conforme alle specifiche EIA RS-485: bipolare intrecciato, schermato, 120Ω di impedenza caratteristica, 22-24 AWG, bassa capacità. Non utilizzare cavomicrofonico o altro cavo con caratteristiche diverse da quelle specificate. Le terminazioni devono essere effettuate con connettori maschio/femmina tipo XLR a 5 pin o a 3 pin.È necessario inserire sull’ultimo apparecchio uno spinotto terminale con una resistenza da 120Ω (minimo 1/4 W) tra i terminali 2 e 3.IMPORTANTE: I fili non devono fare contatto tra di loro o con l’involucro metallico dei connettori. L’involucro stesso deve essere collegato alla calza di schermo ed al piedino 1 deiconnettori.GBConnecting to the mains supply - Fig. 9.Connecting to the control signal line (DMX) - Fig. 10.Use a cable conforming to specifications EIA RS-485: 2-pole twisted, shielded, 120Ω characteristic impedance, 22-24 AWG, low capacity. Do not use microphone cable or other cablewith characteristics differing from those specified. The end connections must be made using XLR type 3 or 5-pin male/female connectors. A terminating plug must be inserted into thelast projector with a resistance of 120Ω (minimum 1/4 W) between terminals 2 and 3.IMPORTANT: The wires must not make contact with each other or with the metal casing of the connectors. The casing itself must be connected to the shield braid and to pin 1 of theconnectors.FBranchement au réseau d'alimentation - Figure 9.Branchement à la ligne du signal de contrôle (DMX) - Figure 10.Utiliser un câble conforme aux spécifications EIA RS-485: bipolaire tressé, blindé, 120Ω d’impédance caractéristique, 22-24 AWG, basse capacité. Ne pas utiliser un câblemicrophonique ou un autre câble ayant des caractéristiques différentes de celles spécifiées. Les terminaisons doivent être réalisées avec des connecteurs mâle/femelle du type XLR à3 ou 5 broches. Insérer sur le dernier appareil une fiche terminale, avec une résistance de 120Ω (minimum 1/4 W) entre les bornes 2 et 3.IMPORTANT: S'assurer que les fils n'entrent pas en contact entre eux ou avec l'enveloppe métallique des connecteurs. Relier l'enveloppe de la fiche/prise à la gaine de blindage et aucontact 1 des connecteurs.DAnschluss an das Stromnetz - Abb. 9.Anschluss an die Leitung der Steuersignale (DMX) - Abb. 10.Ein Kabel mit der Kennzeichnung EIA RS-485 verwenden: verdrilltes, abgeschirmtes Zweileiterkabel, 120Ω charakteristische Impedanz, 22-24 AWG, niedrige Kapazität. KeinMikrofonkabel oder sonstige Kabel mit anderen Charakteristiken als angegeben verwenden. Die Kabelabschlüsse müssen mit Steckverbindern (Steckern/Buchsen) Typ XLR 3 oder5 pin erfolgen. Ein Endstecker mit einem Widerstand 120Ω (mindestens 1/4 W) in das letzte Gerät der Reihe zwischen die Klemmen 2 und 3 einsetzen.WICHTIG: Die Leiter dürfen weder untereinander, noch mit dem Metallgehäuse der Steckverbinder Kontakt haben. Das Gehäuse muss mit dem Schirmgeflecht und dem Kontakt 1 derVerbinder verbunden werden.EConexión a la red de alimentación - Figura 9.Conexión de las señales de control (DMX) - Figura 10.Utilice un cable conforme a las normas EIA RS-485: bipolar trenzado y apantallado, 120Ω de impedancia característica, 22-24 AWG, baja capacidad. No utilice cable microfónico niotros con características distintas de las anteriormente indicadas. Las uniones deben efectuarse con conectores macho-hembra tipo XLR de 3 o 5 pin. Es necesario montar en elúltimo aparato una clavija terminal con una resistencia de 120Ω (mínimo 1/4 W) entre los terminales 2 y 3.IMPORTANTE: los cables no deben hacer contacto entre sí ni con la funda metálica de los conectores. La funda debe conectarse a la trenza de blindaje y al pin 1 de los conectores.7
FIPANNELLO DI CONTROLLOCONTROL PANELPANNEAU DE CONTROLE D STEUERPULT E PANNEL DE CONTROLGB11IGBFDEAccensione del proiettore - Figura 11.Premere l’interruttore. Il proiettore inizia la procedura di azzeramento degli effetti. Contemporaneamente sul display scorrono le seguenti informazioni:<strong>Clay</strong> <strong>Paky</strong> Stage Color <strong>300</strong> Partial lamp time xxx Total life time xxx Address xxxSul pannello di controllo (Figura 11) sono presenti il display, i led ed i pulsanti che permettono la completa programmazione e gestione del menu del proiettore. Il display può trovarsi indue condizioni: lo stato di riposo e lo stato di impostazione. Quando si trova nello stato di riposo, il display mostra l’indirizzo DMX del proiettore. Durante lo stato di impostazione delmenù,quando trascorre un tempo di attesa (circa 1 minuto) senza che venga premuto alcun tasto, la visualizzazione torna automaticamente allo stato di riposo. Si noti che al verificarsi diquesta condizione, un eventuale valore modificato ma non ancora confermato con il tasto ENTER verrà annullato.Switching on the projector - Fig. 11.Press the switch. The projector starts resetting the effects. At the same time, the following information scrolls on the display:<strong>Clay</strong> <strong>Paky</strong> Stage Color <strong>300</strong> Partial lamp time xxx Total life time xxx Address xxxThe control panel (Fig. 11) has a display, LEDs and buttons for the complete programming and management of the projector menu. The display can be in one of two conditions: reststatus and setting status. When it is in the rest status, the display shows the projector’s DMX address. During menu setting status, after a wait time (about 1 minute) without any keyhaving been pressed, the display automatically returns to rest status. It should be noted than when this condition occurs, any possible value that has been modified but not yet confirmedwith the ENTER key will be cancelled.Allumage du projecteur - Figure 11.Appuyer sur l'interrupteur. Le projecteur entame la procédure de remise à zéro des effets. En même temps les informations suivantes défilent sur l'afficheur:<strong>Clay</strong> <strong>Paky</strong> Stage Color <strong>300</strong> Partial lamp time xxx Total life time xxx Address xxxLe panneau de contrôle (Fig. 11) comprend l’afficheur, les del et les poussoirs qui permettent la programmation et la gestion complètes du menu du projecteur. L’afficheur peut setrouver en deux conditions différentes : l'état de repos et l’état de sélection. Quand l'afficheur se trouve en état de repos, il montre l’adresse DMX du projecteur. Pendant l’état desélection du menu, si un certain temps d’attente s'écoule (environ 1 minute) sans qu'on n'appuie sur aucune touche, l'affichage retourne automatiquement en état de repos. Remarquezque, si cette dernière condition se produit, toute valeur éventuellement modifiée mais pas encore confirmée par la touche ENTER sera annulée.Einschalten des Projektors - Abb. 11.Den Schalter drücken. Der Projektor beginnt den Ablauf der Nullstellung der Effekte. Gleichzeitig laufen am Display die folgenden Informationen ab.<strong>Clay</strong> <strong>Paky</strong> Stage Color <strong>300</strong> Partial lamp time xxx Total life time xxx Address xxxAuf dem Steuerpult (Abb. 11) befinden sich das Display, die Led und die Tasten, mit denen man die Programmierung und das Management des Projektormenüs vollkommen einstellenkann. Das Display kann sich in zwei Zuständen befinden: Ruhezustand und Eingabezustand. Wenn es sich im Ruhezustand befindet, zeigt das Display die DMX-Adresse des Projektors.Befindet es sich hingegen im Eingabemodus für das Menü, kehrt die Anzeige automatisch in den Ruhezustand zurück, sofern nach Ablauf einer Wartezeit von circa 1 Minute keine Tastegedrückt wurde. Wenn dieser Fall eintritt, wird ein eventuell geänderter Wert, der jedoch noch nicht durch Drücken der Taste ENTER bestätigt wurde, annulliert.Encendido del proyector - Figura 11.Presionar el interruptor. El proyector inicia el procedimiento de puesta a cero de los efectos. Al mismo tiempo, en la pantalla aparecen las siguientes informaciones:<strong>Clay</strong> <strong>Paky</strong> Stage Color <strong>300</strong> Partial lamp time xxx Total life time xxx Address xxxEn el panel de control (Figura 11) están presentes la pantalla, los led y los pulsadores que permiten la completa programación y gestión del menú del proyector. La pantalla puedeencontrarse en dos condiciones: el estado de reposo y el estado de programación. Cuando se encuentra en estado de reposo, la pantalla muestra la dirección DMX del proyector.Durante el estado de programación del menú, cuando transcurre un tiempo de espera (1 minuto aproximadamente) sin que se presione ninguna tecla, la visualización vuelveautomáticamente al estado de reposo. Al verificarse esta condición, un posible valor modificado pero todavía sin confirmar con la tecla ENTER se anulará.LEDDMXTXSELVerdeGreenVertGrünVerdeGialloYellowJauneGelbAmarilloRossoRedRougeRojoRotAcceso se il segnale DMX è presenteIs lit if the DMX signal is presentAllumé si le signal DMX est présentLeuchtet, wenn das Signal DMX vorhanden istEncendido si la señal DMX está presenteLampeggia se il segnale DMX è assenteBlinks if the DMX signal is not presentClignote si le signal DMX est présentBlinkt, wenn das Signal DMX fehltParpadea si la señal DMX no está presenteNon usatoNot usedNon utiliséNicht belegtNo utilizadaAcceso quando il display è in fase di impostazioneIs lit when the display is in the setting phaseAllumé quand l’afficheur est en phase de sélectionLeuchtet, wenn sich das Display in der Einstellphase befindetEncendido cuando la pantalla está en fase de programaciónSpento quando il display è in fase di riposoIs off when the display is in the rest modeÉteint quand l’afficheur est en état de reposIst ausgeschaltet, wenn sich das Display in Ruhestellung befindetApagado cuando la pantalla está en estado de reposo8Continua / Continue ➔
ITALIANOFunzione dei tastiSELECT• Se viene premuto in stato di riposo: Commuta ciclicamente fra lo stato di riposo, l’impostazione dell’indirizzo DMX e le impostazioni nei menu.• Se viene premuto durante l’impostazione di un menu: Sale di un livello senza modificare nulla (esce dalla funzione).DOWNDecrementa il valore visualizzato (con auto-ripetizione), oppure passa alla voce seguente di un menuPer passare rapidamente al valore minimo di un parametro, oppure alla prima voce di un menu, premere il tasto UP mentre si tiene premuto DOWN.UPIncrementa il valore visualizzato (con auto-ripetizione), oppure passa alla voce precedente di un menuPer passare rapidamente al valore massimo di un parametro, oppure all’ultima voce di un menu, premere il tasto DOWN mentre si tiene premuto UP.ENTERConferma il valore visualizzato, oppure attiva la funzione visualizzata, oppure entra nel menu successivo. Si noti che fino a quando non si preme ENTER, nessunaimpostazione viene confermata e memorizzata.Funzione di HelpIl proiettore dispone di una funzione Help che consente di visualizzare una breve descrizione di una qualsiasi voce del menu. Per attivare la funzione Help, premere e mantenere premuto il tastoENTER mentre si sta premendo UP o DOWN durante lo scorrimento, che descrive il significato della voce di menu su cui si è posizionati in quel momento. È possibile visualizzare nuovamente ilmessaggio di Help semplicemente rilasciando e premendo nuovamente il tasto ENTER.ENGLISHFunctions of the buttonsSELECT• If it is pressed to the rest mode: Switches over in cyclical movements between rest mode, DMX address setting and the settings in the menu.• If it is pressed while setting a menu: Goes to the upper level without changing anything (exits from the function).DOWNDecreases the value displayed (with auto-repetitions) or passes to the next item in the menu.For a quick access to a parameter’s minimum value or to the first item of a menu, press the UP button while holding down the DOWN button.UPIncreases the value displayed (with auto-repetitions) or passes to the next item in a menu.For a quick access to a parameter’s maximum value or to the first item of a menu, press the DOWN button while pressing the UP button.ENTERConfirms the displayed value, or activates the displayed function, or enters the successive menu. If ENTER is not pressed no settings will be confirmed.The Help functionThe projector has a Help function that can be used to display a short description of any menu item. To activate the Help function, press the ENTER key and keep it pressed while pressing UP orDOWN during scrolling. This describes the significance of the menu item on which one is positioned at that time. The Help message can be displayed again by simply releasing the ENTER keyand then pressing it again.FRANÇAISFonctions des touchesSELECT• Si la touche est appuyée en état de repos: Passe cycliquement entre l’état de repos, la sélection de l’adresse DMX et les sélections dans les menus• Si la touche est appuyée pendant la sélection du menu : Monte d’un niveau sans rien modifier (sort de la fonction).DOWNDiminue la valeur visualisée (avec répétition automatique), ou passe à la voix suivante d’un menu.Pour passer rapidement à la valeur minimum d’un paramètre, ou à la première voix d’un menu, appuyer sur la touche UP en maintenant la touche DOWN appuyée.UPAugmente la valeur visualisée (avec répétition automatique), ou passe à la voix précédente d’un menu.Pour passer rapidement à la valeur maximum d’un paramètre, ou à la dernière voix d’un menu, appuyer sur la touche UP en maintenant la touche UP appuyée.ENTERConfirme la valeur visualisée, ou active la fonction visualisée, ou entre dans le menu suivant. Remarque : avant d’appuyer sur ENTER, aucune sélection n’estconfirmée.Fonction HelpLe projecteur dispose de la fonction Help, qui permet d’afficher une brève description de n’importe quel article du menu. Pour activer la fonction Help, appuyer sur la touche ENTER et la maintenirappuyée, tout en appuyant en même temps sur les touches UP ou DOWN pendant le défilement, qui décrit la signification de l’article du menu sur lequel on est positionnés à cet instant. Il estpossible d'afficher à nouveau le message de Help, en relâchant et en appuyant simplement la touche ENTER.10Continua / Continue ➔
DEUTSCHFunktionen der TastenSELECT• Wenn man sie in Ruhestellung drückt: Wird im Zyklus zwischen Ruhestellung, Einstellung der Adresse DMX und den Einstellungen in den Menüs umgeschaltet.• Wenn man sie während der Einstellung eines Menüs drückt: Wird die nächst höhere Ebene erreicht, ohne etwas zu ändern (Austritt aus der Funktion).DOWNUPENTERVermindert den angezeigten Wert (Funktion wiederholt sich automatisch), oder geht zum nächsten Befehl eines Menüs weiter.Um schnell zum niedrigsten Wert eines Parameters zu wechseln, oder zum ersten Befehl eines Menüs, die Taste UP drücken, während man die Taste DOWNgedrückt hält.Erhöht den angezeigten Wert (Funktion wiederholt sich automatisch), oder kehrt zum vorausgehenden Befehl eines Menüs zurück.Um schnell zum höchsten Wert eines Parameters zu wechseln, oder zum letzten Befehl eines Menüs, die Taste DOWN drücken, während man die Taste UP gedrückthält.Bestätigt den angezeigten Wert, oder aktiviert die angezeigte Funktion, oder tritt in das nächste Menü ein. Es ist darauf zu achten, dass keine Einstellung bestätigtwird, solange ENTER nicht gedrückt wird.Funktion HelpDer Projektor ist mit einer Help-Funktion ausgestattet, mit der eine kurze Beschreibung jedes beliebigen Menüpunktes angezeigt werden kann. Zum Aufrufen der Help-Funktion die Taste ENTERdrücken und gedrückt halten, während beim Scrollen UP oder DOWN gedrückt werden, wo die Bedeutung des Menüpunkts beschrieben wird, auf dem man sich gerade befindet. Die Help-Meldung kann erneut angezeigt werden, wenn man einfach die Taste ENTER loslässt und erneut drückt.ESPAÑOLFunciones de las teclasSELECT• Si se pulsa en estado de reposo: Conmuta ciclicamente entre el estado de reposo, la programación de la dirección DMX y las programaciones en los menús.• Si se pulsa durante la programación de un menú: Sube un nivel sin modificar nada (sale de la función).DOWNDisminuye el valor visualizado (con autorepetición), o pasa a la voz siguiente de un menúPara pasar rápidamente al valor mínimo de un parámetro, o a la primera voz de un menú, pulsar la tecla UP mientras se mantiene presionado DOWN.UPAumenta el valor visualizado (con autorepetición), o pasa a la voz precedente de un menúPara pasar rápidamente al valor mínimo de un parámetro, o a la última voz de un menú, pulsar la tecla DOWN mientras se mantiene presionado UP.ENTERConfirma el valor visualizado, o activa la función visualizada, o entra en el menú sucesivo. Si comprueba que hasta cuando no se pulsa ENTER, ningunaprogramación se confirma.Función de HelpEl proyector dispone de una función Help que permite la visualización de una breve descripción de cualquier voz del menú. Para activar la función Help, presionar y mantener presionada la teclaENTER mientras se presionan UP o DOWN durante el desplazamiento, que describe el significado de la voz de menú en la que se ha posicionado en ese momento. Es posible visualizarnuevamente el mensaje de Help simplemente dejando y presionando nuevamente la tecla ENTER.11
IIMPOSTAZIONE MENU GB MENU SETTING F SÉLECTION MENUDEINSTELLUNG MENÜEPROGRAMACIÓN MENÚMENU NAVIGATIONWait state(red led off)DMX startadress setting(red led on)MENU(red led on)OPTIONS MENUINFORMATIONS MENUTEST FUNCTIONS MENUSERVICE MENUOptInfoTestSrvcPanCalPanTilHrPrTotlDMXCh 1TiltP-TPartCh 12DimrCyanDmxMStndRstMgntCMY16bHrLaTotlLampYelwRstMExtnRCh0PartCtrlEncPPanTiltFrstFactRDmxROffStrkTotlEncTAutoShutDimrPartFrstLonPwUpCyanDlyMgntNoVersBrd0YelwAutoBrd1LoffNoLDmxShutEncShErMemoDmaxDoffFact12Continua / Continue ➔
IGBFDEUTILIZZO DEL MENU:1) Premere due volte il tasto SELECT – sul display appare “Opt”.2) Con i tasti UP e DOWN selezionare il menu su cui si desidera operare:• Opt (Options Menu): Impostazione delle opzioni di funzionamento.• Info (Informations Menu): Lettura dei contatori,versione software ed altre informazioni.• Test (Test functions Menu): Attivazione delle funzioni di test e di controllo manuale.3) Premere il tasto ENTER per visualizzare la prima voce del menu selezionato.4) Con i tasti UP e DOWN selezionare le voci del menu.UTILIZZO DEL MENU SERVICE (Srvc):ATTENZIONE! L’accesso al Menu Service è consigliato a personale tecnico qualificato.Per abilitare il menu Srvc tenere premuto contemporaneamente per qualche secondo i tasti S ed E durante l’accensione del proiettore.1) Premere due volte il tasto SELECT – sul display appare “Opt”.2) Con i tasti UP e DOWN selezionare il menu Srvc.3) Premere il tasto ENTER per visualizzare la prima voce del menu.4) Con i tasti UP e DOWN selezionare le voci del menu.USING THE MENU:1) Press SELECT twice – “Opt” appears on the display.2) Use the UP and DOWN keys to select the menu to be used:• Opt (Options Menu): To set the operating options.• Info (Informations Menu): To read the counters, software version and other information.• Test (Test functions Menu): To trigger the test and manual control functions.3) Press ENTER to display the first item in the selected menu.4) Use the UP and DOWN keys to select the MENU items.USE OF THE SERVICE MENU (Srvc):WARNING!: Access to the Service Menu is recommended for trained technical personnel.To enable the Srvc menu press keys S and E simultaneously for a few seconds while the projector is being switched on.1) Press SELECT twice – “Opt” appears on the display.2) Use the UP and DOWN keys to select the Srvc menu.3) Press ENTER to display the first item in the menu.4) Use the UP and DOWN keys to select the menu items..UTILISATION DU MENU:1) Appuyer deux fois sur la touche SELECT – sur l’afficheur apparaît “Opt”.2) Avec les touches UP et DOWN, sélectionner le menu sur lequel on désire opérer:• Opt (Options Menu) : Programmation des options de fonctionnement.• Info (Informations Menu) : Lecture des compteurs, version du logicien et autres informations.• Test (Test functions Menu): Activation des fonctions de test et de contrôle manuel.3) Appuyer sur la touche de VALIDATION pour afficher le premier article du menu sélectionné.4) Avec les touches UP et DOWN sélectionner les articles du MENU.UTILISATION DU MENU SERVICE (Srvc) :ATTENTION ! L’accès au Menu Service est conseillé au personnel technique qualifié.Pour activer le menu Srvc, maintenir appuyées en même temps pendant quelques secondes les touches S et E pendant l’allumage du projecteur.1) Appuyer deux fois sur la touche SELECT – sur l'afficheur apparaît “Opt”.2) Avec les touches UP et DOWN, sélectionner le menu Srvc.3) Appuyer sur la touche ENTER pour afficher le premier article du menu.4) Avec les touches UP et DOWN sélectionner les articles du menu.ANLEITUNGEN ZUR BENUTZUNG DES MENÜS:1) Die Taste SELECT zweimal drücken – auf dem Display erscheint „Opt.”.2) Mit den Tasten UP und DOWN, man wähle das Menü auf dem man arbeiten möchte:• Opt. (Options Menu): Einstellung der Funktionsoptionen• Info (Informations Menu): Ablesen der Zähler, Software-Version und weitere Informationen• Test (Test functions Menu): Aktivieren der Testfunktionen und der manuellen Steuerung3) Die EINGABE-Taste (ENTER) drücken, um das erste Element des gewählten Menüs anzuzeigen.4) Mit den Tasten UP und DOWN wähle man die Stichworte des MENÜS.BENUTZUNG DER MENU SERVICE (Srvc):ACHTUNG! Der Zugriff auf das Menü Service wird nur qualifizierten Servicetechnikern empfohlen.Um das Menü Srvc zu aktivieren, müssen während dem Einschalten des Projektors für einige Sekunden gleichzeitig die Tasten S und E gedrückt werden.1) Zweimal die Taste SELECT drücken - auf dem Display erscheint „Opt“.2) Mit den Tasten UP und DOWN den Menu Srvc wählen.3) Die EINGABE-Taste (ENTER) drücken, um das erste Element des gewählten Menüs anzuzeigen.4) Mit den Tasten UP und DOWN die Menüpunkte auswählen.USO DEL MENÚ:1) Presionar dos veces la tecla SELECT – en la pantalla aparece “Opt”.2) Con las teclas UP y DOWN seleccionar el menú en el que se desea trabajar:• Opt (Options Menu): Programación de las opciones de funcionamiento.• Info (Informations Menu): Lectura de los contadores, versión software y otras informaciones.• Test (Test functions Menu): Activación de las funciones de test y de control manual.3) Presionar la tecla ENTER para visualizar la primera voz del menú seleccionado.4) Con las teclas UP y DOWN seleccionar las voces del MENÚ.USO DEL MENÚ SERVICE (Svrc):¡ATENCIÓN! El acceso al Menú Service se aconseja a personal técnico cualificado.Para habilitar el menú Srvc pulse contemporáneamente durante cualquier segundo las teclas S y E durante el encendido del proyector.1) Presione dos veces la tecla SELECT – en la pantalla aparece “Opt”.2) Con las teclas UP y DOWN seleccione el menú Srvc.3) Presione la tecla ENTER para visualizar la primera entrada del menú.4) Con las teclas UP y DOWN seleccione las entradas del menú.13Continua / Continue ➔
IMENU OPZIONIGBOPTIONS MENUP a nPan inversionPermette l’inversione del movimento Pan.1) Premere ENTER - sul display appare l’impostazione corrente(On o Off).2) Con i tasti UP e DOWN abilitare (On) o disabilitare (Off)l’inversione del movimento PAN.3) Premere ENTER per confermare la selezione (il displaylampeggia per alcuni istanti), oppure SELECT per mantenerel’impostazione corrente.Pan inversionUsed for reversing Pan movement.1) Press ENTER – the current settings appear on thedisplay (On or Off).2) Use the UP and DOWN keys to enable (On) or disable(Off) PAN inversion.3) Press ENTER to confirm the selection (the display blinksfor several seconds), or SELECT to keep currentsettings.T i lTilt inversionPermette l’inversione del movimento Tilt.1) Premere ENTER - sul display appare l’impostazione corrente(On o Off).2) Con i tasti UP e DOWN abilitare (On) o disabilitare (Off)l’inversione del movimento Tilt.3) Premere ENTER per confermare la selezione (il displaylampeggia per alcuni istanti), oppure SELECT per mantenerel’impostazione corrente.Tilt inversionUsed for reversing tilt movement.1) Press ENTER – the current settings appear on thedisplay (On or Off).2) Use the UP and DOWN keys to enable (On) or disable(Off) Tilt inversion.3) Press ENTER to confirm the selection (the display blinksfor several seconds), or SELECT to keep currentsettings.P - TDmxMC M YR s t MS t n d1 6 bE x t nR C h 0R D m xROffSwap Pan / TiltPermette di scambiare i canali Pan e Tilt (e contemporaneamentePan fine e Tilt fine).1) Premere ENTER - sul display appare l’impostazione corrente(On o Off).2) Con i tasti UP e DOWN abilitare (On) o disabilitare (Off)lo scambio dei canali Pan e Tilt.3) Premere ENTER per confermare la selezione (il displaylampeggia per alcuni istanti), oppure SELECT per mantenerel’impostazione corrente.Dmx ModalityPermette di selezionare la disposizione dei canali fra le tredisponibili.1) Premere ENTER - sul display appare l’impostazione corrente(Stnd,16b o Extn).2) Con i tasti UP e DOWN selezionare una delle seguentiimpostazioni:- Standard- 16 b- Extended3) Premere ENTER per confermare la selezione (il displaylampeggia per alcuni istanti),oppure SELECT per mantenerel’impostazione corrente.CMY Color mixingPermette l’inversione del sistema di miscelazione colori CMY.1) Premere ENTER - sul display appare l’impostazione corrente(On o Off).2) Con i tasti UP e DOWN abilitare (On) o disabilitare (Off)la modalità di miscelazione colori CMY.3) Premere ENTER per confermare la selezione (il displaylampeggia per alcuni istanti), oppure SELECT per mantenerel’impostazione corrente.Reset ModalityPermette di selezionare la modalità di reset fra le tre disponibili.1) Premere ENTER - sul display appare l’impostazione corrente(Rch0,Rdmx o Roff).2) Con i tasti UP e DOWN selezionare una delle seguentiimpostazioni:RCh0: Attivazione del reset con Il livello dmx dei canali a 0%.RDmx: Abilitazione del canale di controllo remoto del reset.ROff: Nessun tipo di reset abilitato3) Premere ENTER per confermare la selezione (il displaylampeggia per alcuni istanti),oppure SELECT per mantenerel’impostazione corrente.Swap Pan / TiltUsed for swapping Pan and Tilt channels (as well as Panfine and Tilt fine).1) Press ENTER – the current settings appear on thedisplay (On or Off).2) Use the UP and DOWN keys to enable (On) or disable(Off) Pan and Tilt channel swap.3) Press ENTER to confirm the selection (the display blinksfor several seconds), or SELECT to keep currentsettings.Dmx ModalityAllows you to select a channel arrangement from the threeavailable.1) Press ENTER – the current settings appear on the display(Stnd,16b o Extn).2) Use the UP and DOWN keys to select one of the followingsettings:- Standard- 16 b- Extended3) Press ENTER to confirm the selection (the display blinks forseveral seconds), or SELECT to keep current settings.CMY Color mixingUsed for reversing the CMY color mixing system.1) Press ENTER – the current settings appear on thedisplay (On or Off).2) Use the UP and DOWN keys to enable (On) or disable(Off) CMY color mixing mode.3) Press ENTER to confirm the selection (the display blinksfor several seconds), or SELECT to keep currentsettings.Reset ModalityAllows you to select the reset mode from the three available.1) Press ENTER – the current settings appear on the displa(Rch0,Rdmx o Roff).2) Use the UP and DOWN keys to select one of the followingsettings:RCh0 : Activate the reset with the channel dmx level at 0%.RDmx : Enable the reset remote control channel.ROff : No type of reset enabled3) Press ENTER to confirm the selection (the display blinks forseveral seconds), or SELECT to keep current settings.L o nP w U pD l yLamp on modePermette di selezionare la modalità di accensione della lampada.1) Premere ENTER - sul display appare l’impostazione corrente(PwUp, Dly, No o Auto).2) Con i tasti UP e DOWN selezionare una delle seguenti impostazioni:Power upAlimentando il proiettore la lampada si accende con un ritardofisso di 10 secondi.Power up with delayAlimentando il proiettore la lampada si accende con un ritardofisso di 10 secondi più un ritardo variabile proporzionale all’indirizzoDMX del proiettore stesso. Il ritardo variabile vale 50msper ogni canale, di conseguenza il ritardo fra l’accensione dellalampada di un proiettore ed il successivo è di circa 0.6 secondo(es: 50ms x 12chs. = 0.6sec).Lamp on modeUsed for selecting lamp lighting mode.1) Press ENTER – the current settings appear on the display(PwUp, Dly, No or Auto).2) Use the UP and DOWN keys to select one of the followingsettings:Power upWhen the projector is turned on the lamp lights with a fixed 10second delay.Power up with delayWhen the projector is turned on the lamp lights with a fixed 10second delay plus a variable delay proportionate to the projector’sDMX address. The variable delay is 50ms for each channel,consequently the delay between one projector lamp lightingand the next is about 0.6 second (i.e.: 50ms x 12chs. = 0.6sec).N oNo lamp onAlimentando il proiettore la lampada rimane spenta.No lamp onThe lamp remains off when the projector is turned on.A u t oAuto DMXLa lampada si accende quando viene collegato un segnaleDMX (sempre con il ritardo fisso di 10 secondi). Si spegne se inseguito il segnale DMX resta assente per più di 15 minuti.Auto DMXThe lamp turns on when a DMX signal is connected (alwayswith the 10 second fixed delay). It turns off if there is no DMXsignal for more than 15 minutes.3) Premere ENTER per confermare la selezione (il display lampeggiaper alcuni istanti), oppure SELECT per mantenerel’impostazione corrente.3) Press ENTER to confirm the selection (the display blinks forseveral seconds), or SELECT to keep current settings.14
FMENU DES OPTIONS D MENÜ OPTIONENEMENÚ OPCIONESPan InversionPermet l’inversion du mouvement Pan.1) Appuyer sur la touche de VALIDATION – sur l’afficheurapparaît la sélection courante (On ou Off).2) Avec les touches UP et DOWN activer (On) ou désactiver(Off) l’inversion du mouvement PAN.3) Appuyer sur la touche de VALIDATION pour confirmer la sélection(l’afficheur clignote pendant quelques instants), ou bien surla touche SELECT pour maintenir la sélection courante.Tilt InversionPermet l’inversion du mouvement Tilt.1) Appuyer sur la touche de VALIDATION – sur l’afficheurapparaît la sélection courante (On ou Off).2) Avec les touches UP et DOWN activer (On) ou désactiver(Off) l’inversion du mouvement Tilt.3) Appuyer sur la touche de VALIDATION pour confirmer la sélection(l’afficheur clignote pendant quelques instants), ou bien surla touche SELECT pour maintenir la sélection courante.Swap Pan / TiltPermet de permuter les canaux Pan et Tilt (et en même tempsPan fine et Tilt fine).1) Appuyer sur la touche de VALIDATION – sur l’afficheurapparaît la sélection courante (On ou Off).2) Avec les touches UP et DOWN activer (On) ou désactiver(Off) la permutation des canaux Pan et Tilt.3) Appuyer sur la touche de VALIDATION pour confirmer la sélection(l’afficheur clignote pendant quelques instants), ou bien surla touche SELECT pour maintenir la sélection courante.Dmx ModalityPermet de sélectionner la disposition des canaux entre lestrois qui sont disponibles.1) Appuyer sur la touche de VALIDATION – sur l’afficheurapparaît la sélection courante (Stnd,16b o Extn).2) Avec les touches UP et DOWN, sélectionner l’une des programmationssuivantes:- Standard- 16 b- Extended3) Appuyer sur la touche de VALIDATION pour confirmer la sélection(l’afficheur clignote pendant quelques instants), ou bien surla touche SELECT pour maintenir la sélection courante.CMY Color mixingPermet l’inversion du système de mélange des couleurs CMY.1) Appuyer sur la touche de VALIDATION – sur l’afficheurapparaît la sélection courante (On ou Off).2) Avec les touches UP et DOWN, activer (On) ou désactiver(Off) la modalité de mélange des couleurs CMY.3) Appuyer sur la touche de VALIDATION pour confirmer la sélection(l’afficheur clignote pendant quelques instants), ou bien surla touche SELECT pour maintenir la sélection courante.Reset ModalityPermet de sélectionner la modalité de remise à zéro parmi lestrois qui sont disponibles.1) Appuyer sur la touche de VALIDATION – sur l’afficheurapparaît la sélection courante (Rch0,Rdmx o Roff).2) Avec les touches UP et DOWN, sélectionner l’une des programmationssuivantes :RCh0: Rch0 : Activation de la remise à zéro avec le niveaudmx des canaux à 0%.RDmx: Activation du canal du contrôle à distance de la remiseà zéro.ROff: Aucun type de remise à zéro activé3) Appuyer sur la touche de VALIDATION pour confirmer la sélection(l’afficheur clignote pendant quelques instants), ou bien surla touche SELECT pour maintenir la sélection courante.Lamp on modePermet de sélectionner la modalité d’allumage de la lampe.1) Appuyer sur la touche de VALIDATION – sur l’afficheurapparaît la sélection courante (PwUp, Dly, No, ou Auto).2) Avec les touches UP et DOWN, sélectionner l’une des programmationssuivantes :Power upQuand on alimente le projecteur la lampe s’allume avec unretard fixe de 10 secondes.Power up with delayQuand on alimente le projecteur la lampe s’allume avec unretard fixe de 10 secondes, plus un retard variable proportionnelà l’adresse DMX du projecteur. Le retard variable vaut 50ms pour chaque canal, par conséquent le retard entre l’allumagede la lampe d’un projecteur et l'allumage suivant est d’environ0.6 seconde (ex : 50ms x 12chs. = 0.6sec)No lamp onSi on alimente le projecteur la lampe reste éteinte.Auto DMXLa lampe s’allume quand on connecte un signal DMX (toujoursavec le retard fixe de 10 secondes). Elle s’éteint si ensuite lesignal DMX reste absent pendant plus de 15 minutes.3) Appuyer sur la touche de VALIDATION pour confirmer la sélection(l’afficheur clignote pendant quelques instants), ou bien surla touche SELECT pour maintenir la sélection courante.Pan inversionErmöglicht die Umkehrung der Pan Bewegung.1) ENTER drücken – auf dem Display erscheint die laufendeEinstellung (On oder Off).2) Mit den Tasten UP und DOWN die Umkehrung der PANBewegung freigeben (On) oder sperren (Off).3) ENTER drücken um die Wahl zu bestätigen (das Displayblinkt einige Momente lang), oder SELECT drücken, um dielaufende Einstellung beizubehalten.Tilt inversionErmöglicht die Umkehrung der Tilt Bewegung.1) ENTER drücken – auf dem Display erscheint die laufendeEinstellung (On oder Off).2) Mit den Tasten UP und DOWN die Umkehrung der TiltBewegung freigeben (On) oder sperren (Off).3) ENTER drücken um die Wahl zu bestätigen (das Displayblinkt einige Momente lang), oder SELECT drücken, um dielaufende Einstellung beizubehalten.Swap Pan / TiltErmöglicht die Kanäle Pan und Tilt (und gleichzeitig Pan Endeund Tilt Ende) untereinander auszutauschen.1) ENTER drücken – auf dem Display erscheint die laufendeEinstellung (On oder Off).2) Mit den Tasten UP und DOWN die Umschaltung zwischenden Kanälen PAN und Tilt freigeben (On) oder sperren (Off).3) ENTER drücken um die Wahl zu bestätigen (das Displayblinkt einige Momente lang), oder SELECT drücken, um dielaufende Einstellung beizubehalten.Dmx ModalityErlaubt die Auswahl der Kanalanordnung aus den dreiverfügbaren.1) ENTER drücken – auf dem Display erscheint die laufendeEinstellung (Stnd,16b o Extn).2) Mit den Tasten UP und DOWN eine der folgendenEinstellungen wählen:- Standard- 16 b- Extended3) ENTER drücken um die Wahl zu bestätigen (das Displayblinkt einige Momente lang), oder SELECT drücken, um dielaufende Einstellung beizubehalten.CMY Color mixingErmöglicht die Umkehrung des CMY Farbmischsystems.1) ENTER drücken – auf dem Display erscheint die laufendeEinstellung (On oder Off).2) Mit den Tasten UP und DOWN die CMY Modalität derFarbmischung freigeben (On) oder sperren (Off).3) ENTER drücken um die Wahl zu bestätigen (das Displayblinkt einige Momente lang), oder SELECT drücken, um dielaufende Einstellung beizubehalten.Reset ModalityErmöglicht es den Reset-Modus unter den drei verfügbaren zuwählen.1) ENTER drücken – auf dem Display erscheint die laufendeEinstellung (Rch0,Rdmx o Roff).2) Mit den Tasten UP und DOWN eine der folgendenEinstellungen wählen:RCh0: Aktivierung des Reset mit dem dmx-Pegel der Kanäleauf 0%.RDmx: Aktivierung des Fernsteuerkanals des Reset.ROff: Kein Resettyp aktiviert3) ENTER drücken um die Wahl zu bestätigen (das Displayblinkt einige Momente lang), oder SELECT drücken, um dielaufende Einstellung beizubehalten.Lamp on modeErmöglicht die Wahl der Einschaltungsmodalität der Lampe zu wählen.1) ENTER drücken – auf dem Display erscheint die laufendeEinstellung (PwUp, Dly, No oder Auto).2) Mit den Tasten UP und DOWN eine der folgendenEinstellungen wählen:Power upDie Lampe schaltet sich mit einer fixen Verspätung von 10Sekunden ein, wenn man den Projektor versorgt.Power up with delayWenn man den Projektor versorgt, schaltet sich die Lampe miteiner fixen Verspätung von 10 Sekunden und einer variablenVerspätung ein, die im Verhältnis zur DMX Adresse desProjektors selbst ist. Die variable Verspätung gilt 50ms fürjeden Kanal, daher beträgt die Verspätung zwischen demEinschalten der Lampe eines Projektors und dem nächstencirca 0.6 Sekunde (zum Beispiel: 50ms x 12chs = 0.6Sek).No lamp onWenn man den Projektor mit Strom versorgt bleibt die Lampeausgeschaltet.Auto DMXDie Lampe schaltet sich ein, wenn ein DMX Signal angeschlossenwird (immer mit einer fixen Verspätung von 10 Sekunden).Sie schaltet sich im Nachhinein aus, wenn das DMX für mehrals 15 Minuten abwesend bleibt.3) ENTER drücken um die Wahl zu bestätigen (das Displayblinkt einige Momente lang), oder SELECT drücken, um dielaufende Einstellung beizubehalten.Pan inversionPermite la inversión del movimiento Pan.1) Presionar ENTER – en la pantalla aparece la programaciónactual (On o Off).2) Con las teclas UP y DOWN habilitar (On) o deshabilitar (Off)la inversión del movimiento PAN.3) Presionar ENTER para confirmar la selección (la pantallaparpadea durante algunos instantes) o SELECT para mantenerla programación actual.Tilt inversionPermite la inversión del movimiento Tilt.1) Presionar ENTER – en la pantalla aparece la programaciónactual (On o Off).2) Con las teclas UP y DOWN habilitar (On) o deshabilitar (Off)la inversión del movimiento Tilt.3) Presionar ENTER para confirmar la selección (la pantallaparpadea durante algunos instantes) o SELECT para mantenerla programación actual.Swap Pan / TiltPermite intercambiar los canales Pan y Tilt (y contemporáneamentePan fine y Tilt fine).1) Presionar ENTER – en la pantalla aparece la programaciónactual (On o Off).2) Con las teclas UP y DOWN habilitar (On) o deshabilitar (Off)el intercambio de los canales Pan y Tilt.3) Presionar ENTER para confirmar la selección (la pantallaparpadea durante algunos instantes) o SELECT para mantenerla programación actual.Dmx ModalityPermite seleccionar la disposición de los canales entre lastres que están disponibles.1) Presionar ENTER – en la pantalla aparece la modalidadactual (Stnd,16b o Extn).2) Con las teclas UP y DOWN seleccionar una de las siguientesmodalidades:- Standard- 16 b- Extended3) Presionar ENTER para confirmar la selección (la pantallaparpadea durante algunos instantes) o SELECT para mantenerla programación actual.CMY Color mixingPermite la inversión del sistema de mezclado de colores CMY.1) Presionar ENTER – en la pantalla aparece la programaciónactual (On o Off).2) Con las teclas UP y DOWN habilitar (On) o deshabilitar (Off)la modalidad de mezclado de colores CMY.3) Presionar ENTER para confirmar la selección (la pantallaparpadea durante algunos instantes) o SELECT para mantenerla programación actual.Reset ModalityPermite seleccionar la modalidad reset entre las tres que estándisponibles.1) Presionar ENTER – en la pantalla aparece la programaciónactual (Rch0,Rdmx o Roff).2) Con las teclas UP y DOWN seleccionar una de las siguientesmodalidades:RCh0: Activación del reset con el nivel dmx de los canalesde 0%.RDmx: Habilitación del canal de control remoto del reset.ROff: Ningún tipo de reset habilitado3) Presionar ENTER para confirmar la selección (la pantallaparpadea durante algunos instantes) o SELECT para mantenerla programación actual.Lamp on modePermite seleccionar la modalidad de encendido de la lámpara.1) Presionar ENTER – en la pantalla aparece la modalidadactual (PwUp, Dly, No o Auto ).2) Con las teclas UP y DOWN seleccionar una de las siguientesmodalidades:Power upAlimentando el proyector la lámpara se enciende con un retrasofijo de 10 segundos.Power up with delayAlimentando el proyector la lámpara se enciende con un retrasofijo de 10 segundos más un retraso variable proporcional ala dirección DMX del mismo proyector. El retraso variable vale50ms para cada canal; como consecuencia el retraso entre elencendido de la lámpara de un proyector y el sucesivo es decasi 0.6 segundo (ej: 50ms x 12chs. = 0.6seg).No lamp onAlimentando el proyector la lámpara se queda apagada.Auto DMXLa lámpara se enciende cuando se conecta una señal DMX(siempre con el retraso fijo de 10 segundos). Se apaga si, acontinuación, la señal DMX se ausenta durante más de 15minutos.3) Presionar ENTER para confirmar la selección (la pantallaparpadea durante algunos instantes) o SELECT para mantenerla programación actual.15Continua / Continue ➔
L o f fL D m xE n cS h E rM e m oD m a xD o f fF a c tLamp Off modePermette lo spegnimento automatico della lampada se lostop/strobe e/o il dimmer rimangono chiusi per un tempo superioreai 5 minuti. La lampada si riaccende all’apertura dellostop/strobe e/o dimmer.1) Premere ENTER - sul display appare l’impostazione corrente(No o Shut).2) Con i tasti UP e DOWN abilitare (Shut) o disabilitare (No) lospegnimento automatico della lampada.3) Premere ENTER per confermare la selezione (il display lampeggiaper alcuni istanti), oppure SELECT per mantenerel’impostazione corrente.Enable lamp control dmx channelPermette l’abilitazione del canale di controllo remoto della lampada.1) Premere ENTER - sul display appare l’impostazione corrente(On o Off).2) Con i tasti UP e DOWN abilitare (On) o disabilitare (Off) ilcanale di controllo remoto della lampada.3) Premere ENTER per confermare la selezione (il display lampeggiaper alcuni istanti), oppure SELECT per mantenerel’impostazione corrente.Enable encoderPermette l’abilitazione degli encoder Pan / Tilt.1) Premere ENTER - sul display appare l’impostazione corrente(On o Off).2) Con i tasti UP e DOWN abilitare (On) o disabilitare (Off) gliencoder Pan / Tilt (ad ogni nuova accensione del proiettorequesta opzione assume il valore On).3) Premere ENTER per confermare la selezione (il display lampeggiaper alcuni istanti), oppure SELECT per mantenerel’impostazione corrente.Shutter on errorPermette la chiusura automatica dello stop/strobo in caso dierrore di posizione Pan/Tilt.1) Premere ENTER - sul display appare l’impostazione corrente(On o Off).2) Con i tasti UP e DOWN abilitare (On) o disabilitare (Off) lachiusura automatica dello stop/strobo in caso di errore diposizione Pan/Tilt.3) Premere ENTER per confermare la selezione (il display lampeggiaper alcuni istanti), oppure SELECT per mantenerel’impostazione corrente.DMX levels memoryPermette la memorizzazione dei livelli attuali dei canali. I livellidei canali possono essere impostati sia tramite un controlleresterno sia tramite la funzione di controllo manuale. Questafunzione viene sempre disattivata non appena il proiettore tornaa ricevere un segnale DMX.1) Premere ENTER - sul display appare l’impostazione corrente(On o Off).2) Con i tasti UP e DOWN abilitare (On) o disabilitare (Off) lamemorizzazione dei valori DMX attuali.3) Premere ENTER per confermare la selezione (il display lampeggiaper alcuni istanti), oppure SELECT per mantenerel’impostazione corrente.Display maxPermette di visualizzare il display sempre alla massima luminosità.1) Premere ENTER - sul display appare l’impostazione corrente(On o Off).2) Con i tasti UP e DOWN abilitare (On) o disabilitare (Off) laluminosità massima del display. (Se off, dopo un tempo dicirca 20 secondi nello stato di riposo la luminosità si riducead un valore minimo).3) Premere ENTER per confermare la selezione (il display lampeggiaper alcuni istanti), oppure SELECT per mantenerel’impostazione corrente.Display OffPermette lo spegnimento automatico del display trascorso untempo di circa 20 secondi nello stato di riposo. Per la riaccensioneè sufficiente premere un qualsiasi tasto.1) Premere ENTER - sul display appare l’impostazione corrente(On o Off).2) Con i tasti UP e DOWN abilitare (On) o disabilitare (Off) lospegnimento automatico del display.3) Premere ENTER per confermare la selezione (il display lampeggiaper alcuni istanti), oppure SELECT per mantenerel’impostazione corrente.Factory settingsPermette di ripristinare i valori di default su tutte le voci delmenu opzioni e dei relativi sottomenu.1) Premere ENTER - sul display appare un messaggio di conferma(Ok?).2) Premere ENTER per confermare la selezione (il display lampeggiaper alcuni istanti), oppure SELECT per mantenerel’impostazione corrente.OptionPanTiltP – TDmxMCMYRstMLonLoffLDmxEncShErMemoDmaxDoff16DefaultOffOffOffStndOffRCh0PwUpNoOffOnOffOffOffOffLamp off modeUsed for automatically turning off the lamp if the stop/strobeand/or dimmer are shut for more than 5 minutes. The lampturns on again when the stop/strobe and/or dimmer opens.1) Press ENTER – the current settings appear on the display(No or Shut).2) Use the UP and DOWN keys to enable (Shut) or disable(No) the lamp to automatically turn off.3) Press ENTER to confirm the selection (the display blinks forseveral seconds), or SELECT to keep current settings.Enable lamp control dmx channelUsed for enabling lamp remote control channel.1) Press ENTER – the current settings appear on the display(On or Off).2) Use the UP and DOWN keys to enable (On) or disable (Off)the lamp remote control channel.3) Press ENTER to confirm the selection (the display blinks forseveral seconds), or SELECT to keep current settings.Enable encoderUsed for enabling the Pan / Tilt encoders.1) Press ENTER – the current settings appear on the display(On or Off).2) Use the UP and DOWN keys to enable (On) or disable (Off)Pan / Tilt encoders (every time the projector is turned on thisoption is set to On).3) Press ENTER to confirm the selection (the display blinks forseveral seconds), or SELECT to keep current settings.Shutter on errorUsed for automatically closing the stop/strobe in the event ofPan/Tilt position error.1) Press ENTER – the current settings appear on the display(On or Off).2) Use the UP and DOWN keys to enable (On) or disable (Off)automatic stop/strobe closing in the event of Pan/Tilt positionerror.3) Press ENTER to confirm the selection (the display blinks forseveral seconds), or SELECT to keep current settings.DMX levels memoryUsed for saving current channel levels. Channel levels can beset using both the external controller and the manual controlfunction. This function is always disabled as soon as the projectorreceives a DMX signal.1) Press ENTER – the current settings appear on the display(On or Off).2) Use the UP and DOWN keys to enable (On) or disable (Off)current DMX value saving.3) Press ENTER to confirm the selection (the display blinks forseveral seconds), or SELECT to keep current settings.Display maxUsed for displaying at maximum brightness.1) Press ENTER – the current settings appear on the display(On or Off).2) Use the UP and DOWN keys to enable (On) or disable (Off)maximum display brightness. (If off, brightness lowers tominimum after about 20 seconds in idle).3) Press ENTER to confirm the selection (the display blinks forseveral seconds), or SELECT to keep current settings.Display OffUsed for automatically turning off the display after about 20seconds in idle. Press any key to turn back on.1) Press ENTER – the current settings appear on the display(On or Off).2) Use the UP and DOWN keys to enable (On) or disable (Off)the display to turn off automatically.3) Press ENTER to confirm the selection (the display blinks forseveral seconds), or SELECT to keep current settings.Factory settingsUsed for restoring default values on all options menu items andrelevant submenus.1) Press ENTER – a confirmation message appears on thedisplay (Ok?).2) Press ENTER to confirm the selection (the display blinks forseveral seconds), or SELECT to keep current settings.OptionPanTiltP – TDmxMCMYRstMLonLoffLDmxEncShErMemoDmaxDoffDefaultOffOffOffStndOffRCh0PwUpNoOffOnOffOffOffOff
Lamp off modePermet d’éteindre automatiquement la lampe si le shutter/strobeet/ou le gradateur restent fermés pendant plus de 5 minutes.La lampe se rallume quand le shutter/strobe e/o le gradateurs'ouvrent.1) Appuyer sur la touche de VALIDATION – sur l’afficheurapparaît la sélection courante (No ou Shut).2) Avec les touches UP et DOWN activer (Shut) ou désactiver(No) l’éteinte automatique de la lampe.3) Appuyer sur la touche de VALIDATION pour confirmer la sélection(l’afficheur clignote pendant quelques instants), ou bien surla touche SELECT pour maintenir la sélection courante.Enable lamp control dmx channelPermet d’activer le canal de télécommande de la lampe.1) Appuyer sur la touche de VALIDATION – sur l’afficheurapparaît la sélection courante (On ou Off).2) Avec les touches UP et DOWN, activer (On) ou désactiver(Off) le canal de télécommande de la lampe.3) Appuyer sur la touche de VALIDATION pour confirmer la sélection(l’afficheur clignote pendant quelques instants), ou bien surla touche SELECT pour maintenir la sélection courante.Enable encoderPermet d’activer les encoders Pan / Tilt.1) Appuyer sur la touche de VALIDATION – sur l’afficheurapparaît la sélection courante (On ou Off).2) Avec les touches UP et DOWN, activer (On) ou désactiver(Off) les encoders Pan / Tilt (à chaque nouvel allumage duprojecteur cette option assume la valeur On).3) Appuyer sur la touche de VALIDATION pour confirmer la sélection(l’afficheur clignote pendant quelques instants), ou bien surla touche SELECT pour maintenir la sélection courante.Shutter on errorPermet la fermeture automatique du shutter/strobe en casd’erreur de position Pan/Tilt.1) Appuyer sur la touche de VALIDATION – sur l’afficheurapparaît la sélection courante (On ou Off).2) Avec les touches UP et DOWN, activer (On) ou désactiver(Off) la fermeture automatique du shutter/strobe en casd’erreur de position Pan/Tilt.3) Appuyer sur la touche de VALIDATION pour confirmer la sélection(l’afficheur clignote pendant quelques instants), ou bien surla touche SELECT pour maintenir la sélection courante.DMX levels memoryPermet de mémoriser les niveaux actuels des canaux. Il estpossible de programmer les niveaux des canaux soit par uncontrôleur externe soit par la fonction de contrôle manuel. Cettefonction se désactive toujours dès que le projecteur recommenceà recevoir un signal DMX.1) Appuyer sur la touche de VALIDATION – sur l’afficheurapparaît la sélection courante (On ou Off).2) Avec les touches UP et DOWN, activer (On) ou désactiver(Off) la mémorisation des valeurs DMX actuelles.3) Appuyer sur la touche de VALIDATION pour confirmer la sélection(l’afficheur clignote pendant quelques instants), ou bien surla touche SELECT pour maintenir la sélection courante.Display maxPermet de visualiser toujours l'afficheur à la luminosité maximale.1) Appuyer sur la touche de VALIDATION – sur l’afficheurapparaît la sélection courante (On ou Off).2) Avec les touches UP et DOWN, activer (On) ou désactiver(Off) la luminosité maximale de l’afficheur. (Si on sélectionneoff, après un temps d’environ 20 secondes en état de repos,la luminosité se réduit à une valeur minimale).3) Appuyer sur la touche de VALIDATION pour confirmer la sélection(l’afficheur clignote pendant quelques instants), ou bien surla touche SELECT pour maintenir la sélection courante.Display OffPermet d’éteindre automatiquement l’afficheur après un laps detemps d’environ 20 secondes en état de repos. Pour le rallumer,il suffit d’appuyer sur n’importe quelle touche.1) Appuyer sur la touche de VALIDATION – sur l’afficheurapparaît la sélection courante (On ou Off).2) Avec les touches UP et DOWN activer (On) ou désactiver(Off) l’extinction automatique de l’afficheur.3) Appuyer sur la touche de VALIDATION pour confirmer la sélection(l’afficheur clignote pendant quelques instants), ou bien surla touche SELECT pour maintenir la sélection courante.Factory settingsPermet de rétablir les valeurs par défaut sur tous les articles dumenu options et sous-menus relatifs.1) Appuyer sur la touche de VALIDATION – sur l’afficheurapparaît un message de confirmation (Ok ?).2) Appuyer sur VALIDATION pour confirmer la sélection (l’afficheurclignote pendant quelques instants), ou bien surSELECT pour maintenir la sélection courante.OptionDefaultPanOffTiltOffP – TOffDmxMStndCMYOffRstMRCh0LonPwUpLoffNoLDmxOffEncOnShErOffMemoOffDmaxOffDoffOffLamp off modeErmöglicht das automatische Ausschalten der Lampe, wenn dieStop/Strobe und/oder der Dimmer für länger als 5 Minutengeschlossen bleibt. Die Lampe schaltet sich beim Öffnen derStop/Strobe und/oder des Dimmers wieder ein.1) ENTER drücken – auf dem Display erscheint die laufendeEinstellung (No oder Shut).2) Mit den Tasten UP und DOWN das automatischeAusschalten der Lampe freigeben (Shut) oder sperren (No).3) ENTER drücken um die Wahl zu bestätigen (das Displayblinkt einige Momente lang), oder SELECT drücken, um dielaufende Einstellung beizubehalten.Enable lamp control dmx channelErmöglicht die Aktivierung des Kanals zur Fernbedienung der Lampe.1) ENTER drücken – auf dem Display erscheint die laufendeEinstellung (On oder Off).2) Mit den Tasten UP und DOWN den Kanal zurFernbedienung der Lampe freigeben (On) oder sperren (Off).3) ENTER drücken um die Wahl zu bestätigen (das Displayblinkt einige Momente lang), oder SELECT drücken, um dielaufende Einstellung beizubehalten.Enable encoderErmöglicht die Aktivierung der Pan / Tilt Encoder:1) ENTER drücken – auf dem Display erscheint die laufendeEinstellung (On oder Off).2) Mit den Tasten UP und DOWN die Encoder Pan / Tilt freigeben(On) oder sperren (Off) (bei jeder neuen Einschaltungdes Projektors nimmt diese Option den Wert On an).3) ENTER drücken um die Wahl zu bestätigen (das Displayblinkt einige Momente lang), oder SELECT drücken, um dielaufende Einstellung beizubehalten.Shutter on errorErmöglicht die automatische Schließung der Stop/Strobe imFalle eines Pan/Tilt Positionierungsfehlers.1) ENTER drücken – auf dem Display erscheint die laufendeEinstellung (On oder Off).2) Mit den Tasten UP und DOWN die automatischeVerschließung der Stop/Strobe, im Falle eines Pan/TiltPositionierungsfehlers, freigeben (On) oder sperren (Off).3) ENTER drücken um die Wahl zu bestätigen (das Displayblinkt einige Momente lang), oder SELECT drücken, um dielaufende Einstellung beizubehalten.DMX levels memoryErmöglicht die Speicherung der aktuellen Stände der Kanäle.Die Stände der Kanäle können sowohl durch einenAußensteuerschalter, als auch durch den Handbetrieb eingestelltwerden. Diese Funktion wird immer deaktiviert, sobald derProjektor ein neues DMX Signal erhält.1) ENTER drücken – auf dem Display erscheint die laufendeEinstellung (On oder Off).2) Mit den Tasten UP und DOWN die Speicherung der aktuellenDMX Werte freigeben (On) oder sperren (Off).3) ENTER drücken um die Wahl zu bestätigen (das Displayblinkt einige Momente lang), oder SELECT drücken, um dielaufende Einstellung beizubehalten.Display maxErmöglicht das Display immer mit maximaler Leuchtkraft anzuzeigen.1) ENTER drücken – auf dem Display erscheint die laufendeEinstellung (On oder Off).2) Mit den Tasten UP und DOWN die maximale Leuchtkraft desDisplays freigeben (On) oder sperren (Off). (Nach einer Zeitvon circa 20 Sekunden im Ruhezustand reduziert sich dieLeuchtkraft bei Off auf einen Mindestwert.3) ENTER drücken um die Wahl zu bestätigen (das Displayblinkt einige Momente lang), oder SELECT drücken, um dielaufende Einstellung beizubehalten.Display OffErmöglicht das automatische Ausschalten des Displays, wenn eine Zeitvon circa 20 Sekunden im Ruhezustand vergangen ist. ZumWiedereinschalten ist es ausreichend eine beliebige Taste zu betätigen.1) ENTER drücken – auf dem Display erscheint die laufendeEinstellung (On oder Off).2) Mit den Tasten UP und DOWN das automatischeAusschalten des Displays freigeben (On) oder sperren (Off).3) ENTER drücken um die Wahl zu bestätigen (das Displayblinkt einige Momente lang), oder SELECT drücken, um dielaufende Einstellung beizubehalten.Factory settingsErmöglicht die Defaultwerte auf allen Positionen des Optionsmenüund auf den jeweiligen Untermenüs wiederherzustellen.1) ENTER drücken – auf dem Display erscheint eineBestätigungsmitteilung (OK?).2) ENTER drücken um die Wahl zu bestätigen (das Displayblinkt einige Momente lang), oder SELECT drücken, um dielaufende Einstellung beizubehalten.OptionDefaultPanOffTiltOffP – TOffDmxMStndCMYOffRstMRCh0LonPwUpLoffNoLDmxOffEncOnShErOffMemoOffDmaxOffDoffOff17Lamp off modePermite el apagado automático de la lámpara si el stop/estroboy/o el dimmer permanecen cerrados durante un tiempo superiora 5 minutos. La lámpara se vuelve a encender en la aberturadel stop/estrobo y/o dimmer.1) Presionar ENTER – en la pantalla aparece la modalidadactual (No o Shut).2) Con las teclas UP y DOWN habilitar (Shut) o deshabilitar(No) el apagado automático de la lámpara.3) Presionar ENTER para confirmar la selección (la pantallaparpadea durante algunos instantes) o SELECT para mantenerla programación actual.Enable lamp control dmx channelPermite la habilitación del canal de control remoto de la lámpara.1) Presionar ENTER – en la pantalla aparece la programaciónactual (On o Off).2) Con las teclas UP y DOWN habilitar (On) o deshabilitar (Off)el canal de control remoto de la lámpara.3) Presionar ENTER para confirmar la selección (la pantallaparpadea durante algunos instantes) o SELECT para mantenerla programación actual.Enable encoderPermite la habilitación de los encoder Pan / Tilt.1) Presionar ENTER – en la pantalla aparece la programaciónactual (On o Off).2) Con las teclas UP y DOWN habilitar (On) o deshabilitar (Off)los encoder Pan / Tilt (para cada nuevo encendido delproyector esta opción asume el valor On).3) Presionar ENTER para confirmar la selección (la pantallaparpadea durante algunos instantes) o SELECT para mantenerla programación actual.Shutter on errorPermite el cierre automático del stop/estrobo en caso de errorde posición Pan/Tilt.1) Presionar ENTER – en la pantalla aparece la programaciónactual (On o Off).2) Con las teclas UP y DOWN habilitar (On) o deshabilitar (Off)el cierre automático del stop/estrobo en caso de error deposición Pan y Tilt.3) Presionar ENTER para confirmar la selección (la pantallaparpadea durante algunos instantes) o SELECT para mantenerla programación actual.DMX levels memoryPermite la memorización de los niveles actuales de los canales.Los niveles de los canales pueden programarse medianteun controler externo o mediante la función de control manual.Esta función se desactiva cuando el proyector vuelve a recibiruna señal DMX.1) Presionar ENTER – en la pantalla aparece la programaciónactual (On o Off).2) Con las teclas UP y DOWN habilitar (On) o deshabilitar (Off)la memorización de los valores DMX actuales.3) Presionar ENTER para confirmar la selección (la pantallaparpadea durante algunos instantes) o SELECT para mantenerla programación actual.Display maxPermite visualizar la pantalla siempre con la máxima luminosidad.1) Presionar ENTER – en la pantalla aparece la programaciónactual (On o Off).2) Con las teclas UP y DOWN habilitar (On) o deshabilitar (Off)la luminosidad máxima de la pantalla. (Si off, después de untiempo de casi 20 segundos en estado de reposo la luminosidadse reduce a un valor mínimo).3) Presionar ENTER para confirmar la selección (la pantallaparpadea durante algunos instantes) o SELECT para mantenerla programación actual.Display OffPermite el apagado automático de la pantalla transcurrido untiempo de casi 20 segundos en el estado de reposo. Para elreencendido basta presionar una tecla cualquiera.1) Presionar ENTER – en la pantalla aparece la programaciónactual (On o Off).2) Con las teclas UP y DOWN habilitar (On) o deshabilitar (Off)el apagado automático de la pantalla.3) Presionar ENTER para confirmar la selección (la pantallaparpadea durante algunos instantes) o SELECT para mantenerla programación actual.Factory settingsPermite el reajuste de los valores de defecto en todas lasvoces del menú opciones y de los relativos submenús.1) Pulsar ENTER – en la pantalla aparece un mensaje de confirmación(Ok?).2) Presionar ENTER para confirmar la selección (la pantallaparpadea durante algunos instantes) o SELECT para mantenerla programación actual.OptionDefaultPanOffTiltOffP – TOffDmxMStndCMYOffRstMRCh0LonPwUpLoffNoLDmxOffEncOnShErOffMemoOffDmaxOffDoffOffContinua / Continue ➔
IMENU DELLE INFORMAZIONIGBINFORMATION MENUH r P rT oPatrltHours counter for projectorPermette di visualizzare le ore di funzionamento (totali e parziali)del proiettore.1) Premere ENTER - sul display appare ”Totl”.2) Con i tasti UP e DOWN selezionare uno dei seguenti contatori.Total counterConta il numero di ore di vita del proiettore (dalla costruzionead oggi).Partial counterConta il numero di ore parziali di vita del proiettore dall’ultimoazzeramento ad oggi.3) Premere ENTER per visualizzare il numero di ore e premereSELECT per salire al livello superiore del menu.Hours counter for projectorUsed for displaying projector operating hours (total and partial).1) Press ENTER - ”Totl” appears on the display.2) Use the UP and DOWN keys to select one of the followingcounters.Total counterCounts the number of projector working life hours (frommanufacture to date).Partial counterCounts the number of partial projector working life hours sincethe last reset to date.3) Press ENTER to display the number of hours and pressSELECT to go to the top menu level.H r L aT oPatrltHours counter for lampPermette di visualizzare le ore di funzionamento (totali e parziali)della lampada.1) Premere ENTER - sul display appare ”Totl”.2) Con i tasti UP e DOWN selezionare uno dei seguenti contatori.Total counterConta il numero di ore di funzionamento del proiettore con lampadaaccesa (dalla costruzione ad oggi).Partial counterConta il numero di ore di funzionamento della lampada dall’ultimoazzeramento ad oggi.3) Premere ENTER per visualizzare il numero di ore e premereSELECT per salire al livello superiore del menu.Hours counter for lampUsed for displaying the lamp working hours (total and partial).1) Press ENTER - ”Totl” appears on the display.2) Use the UP and DOWN keys to select one of the followingcounters.Total counterCounts the number of projector working hours with the lamp on(from manufacture to date).Partial counterCounts the number of lamp working hours since the last resetto date.3) Press ENTER to display the number of hours and pressSELECT to go to the top menu level.Str kT oPatlr tLamp strikesPermette di visualizzare il numero di accensioni (totali e parziali)della lampada.1) Premere ENTER - sul display appare “Totl”.2) Con i tasti UP e DOWN selezionare uno dei seguenti contatori.Total counterConta il numero di accensioni della lampada (dalla costruzionead oggi).Partial counterConta il numero di accensioni della lampada dall’ultimo azzeramentoad oggi.3) Premere ENTER per visualizzare il numero di accensioni epremere SELECT per salire al livello superiore del menu.Lamp strikesUsed for displaying the number of times the lamp was turnedon (total and partial).1) Press ENTER - ”Totl” appears on the display.2) Use the UP and DOWN keys to select one of the followingcounters.Total counterCounts the number of times the lamp was turned on (frommanufacture to date).Partial counterCounts the number of times the lamp was turned on since thelast reset to date.3) Press ENTER to display the number of times it was turnedon and press SELECT to go to the top menu level.Ver sB r d 0B r d 1Software versionsPermette di visualizzare la versione di software di ciascunadelle schede a microprocessore installate nel proiettore.1) Premere ENTER - sul display appare “Brd0”.2) Con i tasti UP e DOWN selezionare la scheda.3) Premere ENTER per visualizzare la versione di softwareistallato. Premere SELECT per tornare al livello superiore delmenu.Software versionsUsed for displaying the software versions of eachmicroprocessor installed in the projector.1) Press ENTER - “Brd0” appears on the display.2) Use the UP and DOWN keys to select the board.3) Press ENTER to display the installed software version. PressSELECT to return to the top menu level.18
FMENU DES INFORMATIONS D MENÜ INFORMATIONENEMENÚ DE LAS INFORMACIONESHours counter for projectorPermet d’afficher les heures de fonctionnement (totales et partielles)du projecteur.1) Appuyer sur la touche de VALIDATION – sur l’afficheurapparaît ”Totl”.2) Avec les touches UP et DOWN, sélectionner l’un des compteurssuivants.Total counterCompte le nombre d’heures de vie du projecteur (de sa fabricationjusqu’à maintenant).Partial counterCompte le nombre d’heures partielles de vie du projecteur de ladernière mise à zéro jusqu’à maintenant.3) Appuyer sur la touche de VALIDATION pour afficher le nombred’heures et appuyer sur SELECT pour monter au niveausupérieur du menu.Hours counter for projectorErmöglicht die (Gesamt- und Teil-) Betriebsstunden desProjektors anzuzeigen.1) ENTER drücken – auf dem Display erscheint „Totl“.2) Mit den Tasten UP und DOWN einen der folgenden Zählerwählen.Total counterZählt die Lebensstunden des Projektors (vom Bau bis heute).Partial counterZählt die Teillebensstunden des Projektors von der letztenNullstellung bis heute.3) ENTER drücken um die Anzahl der Stunden anzuzeigen undSELECT drücken, um auf den oberen Stand des Menüsumzuschalten.Hours counter for projectorPermite visualizar las horas de funcionamiento (totales y parciales)del proyector.1) Presionar ENTER – en la pantalla aparece ”Totl”.2) Con las teclas UP y DOWN seleccionar uno de los siguientescontadores:Total counterCuenta el número de horas de vida del proyector (desde laconstrucción hasta el momento).Partial counterCuenta el número de horas parciales de vida del proyectordesde la última puesta a cero hasta el momento.3) Presionar ENTER para visualizar el número de horas y presionarSELECT para subir al nivel superior del menú.Hours counter for lampPermet d’afficher les heures de fonctionnement (totales et partielles)de la lampe.1) Appuyer sur la touche de VALIDATION – sur l’afficheurapparaît ”Totl”.2) Avec les touches UP et DOWN, sélectionner un des compteurssuivants.Total counterCompte le nombre d’heures de fonctionnement du projecteuravec la lampe allumée (de sa fabrication jusqu’à maintenant).Partial counterCompte le nombre d’heures de fonctionnement de la lampe dela dernière mise à zéro jusqu’à maintenant.3) Appuyer sur la touche de VALIDATION pour afficher le nombred’heures et appuyer sur SELECT pour monter au niveausupérieur du menu.Hours counter for lampErmöglicht die (Gesamt- und Teil-) Betriebsstunden der Lampeanzuzeigen.1) ENTER drücken – auf dem Display erscheint „Totl”.2) Mit den Tasten UP und DOWN einen der folgenden Zählerwählen.Total counterZählt die Anzahl der Betriebsstunden des Projektors mit eingeschalteterLampe (vom Bau bis heute).Partial counterZählt die Betriebsstunden der Lampe von der letztenNullstellung bis heute.3) ENTER drücken um die Anzahl der Stunden anzuzeigen undSELECT drücken, um auf den oberen Stand des Menüsumzuschalten.Hours counter for lampPermite visualizar las horas de funcionamiento (totales y parciales)de la lámpara.1) Presionar ENTER – en la pantalla aparece ”Totl”.2) Con las teclas UP y DOWN seleccionar uno de los siguientescontadores:Total counterCuenta el número de horas de funcionamiento del proyectorcon la lámpara encendida (desde la construcción hasta elmomento).Partial counterCuenta el número de horas de funcionamiento de la lámparadesde la última puesta a cero hasta el momento.3) Presionar ENTER para visualizar el número de horas y presionarSELECT para subir al nivel superior del menú.Lamp strikesPermet d’afficher le nombre d’allumages (totaux et partiels) dela lampe.1) Appuyer sur la touche de VALIDATION – sur l’afficheurapparaît ”Totl”.2) Avec les touches UP et DOWN, sélectionner l’un des compteurssuivants.Total counterCompte le nombre d’allumages de la lampe (de sa fabricationjusqu’à maintenant).Partial counterCompte le nombre d’allumages de la lampe de la dernière miseà zéro jusqu’à maintenant.3) Appuyer sur la touche de VALIDATION pour afficher le nombred’allumages et appuyer sur SELECT pour monter auniveau supérieur du menu.Lamp strikesErmöglicht die (Gesamt- und Teil-) Anzahl der Einschaltungender Lampe anzuzeigen.1) ENTER drücken – auf dem Display erscheint „Totl”.2) Mit den Tasten UP und DOWN einen der folgenden Zählerwählen.Total counterZählt die Anzahl der Einschaltungen der Lampe (vom Bau bisheute).Partial counterZählt die Anzahl der Einschaltungen der Lampe von der letztenNullstellung bis heute.3) ENTER drücken, um die Anzahl der Einschaltungen anzuzeigenund SELECT drücken, um auf den oberen Stand desMenüs umzuschalten.Lamp strikesPermite visualizar el número de encendidos (totales y parciales)de la lámpara.1) Presionar ENTER – en la pantalla aparece ”Totl”.2) Con las teclas UP y DOWN seleccionar uno de los siguientescontadores:Total counterCuenta el número de encendidos de la lámpara (desde la construcciónhasta el momento).Partial counterCuenta el número de encendidos de la lámpara desde la últimapuesta a cero hasta el momento.3) Presionar ENTER para visualizar el número de encendidos ypresionar SELECT para subir al nivel superior del menú.Software versionsPermet d’afficher la version du logicien de chacune des cartesmicroprocesseur qui sont installées dans le projecteur.1) Appuyer sur la touche de VALIDATION – sur l’afficheurapparaît ” Brd0”.2) Avec les touches UP et DOWN, sélectionner la carte.3) Appuyer sur la touche de VALIDATION pour afficher la versiondu logicien installé. Appuyer sur SELECT pour retournerau niveau supérieur du menu.Software versionsErmöglicht die Softwareversion jeder Mikroprozessorkarte, dieim Projektor installiert wurde anzuzeigen.1) ENTER drücken – auf dem Display erscheint „Brd0”.2) Mit den Tasten UP und DOWN die Karte wählen.3) ENTER drücken, um die installierte Softwareversion anzuzeigen.SELECT drücken, um zum oberen Stand des Menüszurückzukehren.Software versionsPermite visualizar la versión de software de cada una de lastarjetas con microprocesor instaladas en el proyector.1) Presionar ENTER – en la pantalla aparece ” Brd0”.2) Con las teclas UP y DOWN seleccionar la tarjeta3) Presionar ENTER para visualizar la versión de softwareinstalado. Presionar SELECT para volver al nivel superiordel menú.19Continua / Continue ➔
IMENU DELLE FUNZIONI DI TESTGBTEST FUNCTIONS MENUDmxCh1C h 12Dmx monitorPermette di visualizzare il livello dei canali DMX del proiettore.Il canale indicato con Ch1 corrisponde al primo canale a partiredall’indirizzo impostato.1) Premere ENTER - sul display appare il primo canale (Ch1).2) Con i tasti UP e DOWN selezionare il canale.3) Premere ENTER per visualizzare il livello del canale (valorefra 0 e 255) - Premere SELECT per tornare al livello superioredel menu.Dmx monitorUsed for displaying the projector DMX channel level. Thechannel indicated with Ch1 corresponds to the first channelfrom the set address.1) Press ENTER – the first channel appears on the display(Ch1).2) Use the UP and DOWN keys to select the channel.3) Press ENTER to display the channel level (value between 0and 255) - Press SELECT to return to the top menu level.RstReset projectorPermette di eseguire il reset del proiettore.1) Premere ENTER - sul display appare un messaggio di conferma(Ok?).2) Premere ENTER per eseguire il reset (il display lampeggiaper alcuni istanti), oppure SELECT per tornare al livellosuperiore senza eseguire l’operazione.Reset projectorUsed for resetting the projector.1) Press ENTER – a confirmation message appears on thedisplay (Ok?).2) Press ENTER to reset (the display blinks for severalseconds), or SELECT to return to the top level withoutresetting.Lam pLamp ON / OFFPermette l’accensione o lo spegnimento della lampada dal pannellocomandi del proiettore.1) Premere ENTER - sul display appare l’impostazione corrente(On o Off).2) Con i tasti UP e DOWN accendere (On) o spegnere (Off) lalampada – sul display appare un messaggio di conferma(Ok?)3) Premere ENTER per confermare la selezione (il display lampeggiaper alcuni istanti), oppure SELECT per mantenerel’impostazione corrente e tornare al livello superiore.Lamp ON / OFFUsed for turning lamp on and off from the projector controlpanel.1) Press ENTER – the current settings appear on the display(On or Off).2) Use the UP and DOWN keys to turn the lamp on (On) or off(Off) – a confirmation message appears on the display (Ok?)3) Press ENTER to confirm the selection (the display blinks forseveral seconds), or SELECT to keep current settings andreturn to the top level.Ctr lManual controlPermette di impostare il livello dei canali dal pannello comandidel proiettore.1) Premere ENTER - sul display appare il primo canale (Pan).2) Con i tasti UP e DOWN selezionare il canale desiderato.3) Premere ENTER e con i tasti UP e DOWN selezionare illivello DMX desiderato (valore tra 0 e 255).4) Premere SELECT per tornare al livello superiore.Manual controlUsed for setting channel levels from the projector control panel.1) Press ENTER – the first channel appears on the display(Pan).2) Use the UP and DOWN keys to select the required channel.3) Press ENTER and use the UP and DOWN keys to select therequired DMX level (value between 0 and 255).4) Press SELECT to return to the top menu level.E nE nA uc Pc TtoEncoder PanPermette di visualizzare la posizione dell’encoder del Pan.1) Premere ENTER - sul display appare il valore dell’encoderdel Pan.2) Premere SELECT per tornare al livello superiore.Encoder TiltPermette di visualizzare la posizione dell’encoder del Tilt.1) Premere ENTER - sul display appare il valore dell’encoderdel Tilt.2) Premere SELECT per tornare al livello superiore.AutotestPermette di verificare il corretto funzionamento degli effetti.1) Premere ENTER - sul display appare l’impostazione corrente(On o Off).2) Con i tasti UP e DOWN attivare (On) o disattivare (Off) lafunzione Auto Test.3) Premere ENTER per confermare la selezione (il display lampeggiaper alcuni istanti), oppure SELECT per mantenerel’impostazione corrente.Encoder PanUsed for displaying the Pan encoder position.1) Press ENTER – the Pan encoder value appears on thedisplay.2) Press SELECT to return to the top menu level.Encoder TiltUsed for displaying the Tilt encoder position.1) Press ENTER – the Tilt encoder value appears on thedisplay.2) Press SELECT to return to the top menu level.AutotestAllows you to check the proper functioning of effects.1) Press ENTER – the current setting appears on the display(On or Off).2) Use the UP and DOWN keys to enable (On) or disable (Off)the Auto Test function.3) Press ENTER to confirm the selection (the display blinks forseveral seconds), or SELECT to keep current settings.Sequenza di test:PanTiltCyanMagentaYellowStop/StrobeDimmerFrostTest sequence:PanTiltCyanMagentaYellowStop/StrobeDimmerFrost20
FMENU DES FONCTIONS DE TEST D MENÜ DER TESTFUNKTIONENEMENÚ DE LAS FUNCIONES DE TESTDmx monitorPermet d’afficher le niveau des canaux DMX du projecteur. Lecanal indiqué par Ch1 correspond au premier canal à partir del’adresse programmée.1) Appuyer sur la touche de VALIDATION – sur l’afficheurapparaît le premier canal (Ch1).2) Avec les touches UP et DOWN, sélectionner le canal.3) Appuyer sur la touche de VALIDATION pour afficher leniveau du canal (valeur entre 0 et 255) - Appuyer surSELECT pour retourner au niveau supérieur du menu.Reset projectorPermet d’exécuter la remise à zéro du projecteur.1) Appuyer sur la touche de VALIDATION – sur l’afficheurapparaît un message de confirmation (Ok ?).2) Appuyer sur la touche de VALIDATION pour exécuter laremise à zéro (l’afficheur clignote pendant quelquesinstants), ou bien sur SELECT pour retourner au niveausupérieur sans exécuter l’opération.Lamp ON / OFFPermet d’allumer ou d’éteindre la lampe à partir du panneau decommandes du projecteur.1) Appuyer sur la touche de VALIDATION – sur l’afficheurapparaît la sélection courante (On ou Off).2) Avec les touches UP et DOWN, allumer (On) ou éteindre(Off) la lampe - sur l’afficheur apparaît un message de confirmation(Ok ?).3) Appuyer sur la touche de VALIDATION pour confirmer lasélection (l’afficheur clignote pendant quelques instants), oubien sur la touche SELECT pour maintenir la sélection couranteet retourner au niveau supérieur.Manual controlPermet de programmer le niveau des canaux à partir du panneaude commandes du projecteur.1) Appuyer sur la touche de VALIDATION – sur l’afficheurapparaît le premier canal (Pan).2) Avec les touches UP et DOWN, sélectionner le canal désiré.3) Appuyer sur la touche de VALIDATION, et avec les touchesUP et DOWN sélectionner le niveau DMX désiré (valeurentre 0 et 255).4) Appuyer sur SELECT pour retourner au niveau supérieur.Encoder PanPermet d’afficher la position de l’encodeur du Pan.1) Appuyer sur la touche de VALIDATION – sur l’afficheurapparaît la valeur de l’encodeur du Pan.2) Appuyer sur SELECT pour retourner au niveau supérieur.Encoder TiltPermet d’afficher la position de l’encodeur du Tilt.1) Appuyer sur la touche de VALIDATION – sur l’afficheurapparaît la valeur de l’encodeur du Tilt.2) Appuyer sur SELECT pour retourner au niveau supérieur.AutotestPermet de vérifier le fonctionnement correct des effets.1) Appuyer sur la touche de VALIDATION – sur l’afficheurapparaît la sélection courante (On ou Off).2) Avec les touches UP et DOWN, activer (On) ou désactiver(Off) la fonction Auto Test.3) Appuyer sur VALIDATION pour confirmer la sélection (l’afficheurclignote pendant quelques instants), ou bien surSELECT pour maintenir la sélection courante.Séquence de test :PanTiltCyanMagentaYellowStop/StrobeDimmerFrostDmx monitorErmöglicht den Stand der DMX Kanäle des Projektors anzuzeigen.Der, mit Ch1, angezeigte Kanal stimmt mit dem erstenKanal ab der eingestellten Adresse überein.1) ENTER drücken – auf dem Display erscheint der erste Kanal(Ch1).2) Mit den Tasten UP und DOWN den Kanal wählen.3) ENTER drücken, um den Stand des Kanals anzuzeigen(Wert zwischen 0 und 255) – SELECT drücken, um zumoberen Stand des Menüs zurückzukehren.Reset projectorErmöglicht die Nullstellung des Projektors durchzuführen.1) ENTER drücken – auf dem Display erscheint eineBestätigungsmitteilung (OK?).2) ENTER drücken, um Reset durchzuführen (das Displayblinkt einige Momente lang), oder SELECT drücken um aufden oberen Stand zurückzukehren, ohne die Operation durchzuführen.Lamp ON / OFFErmöglicht das Ein- oder das Ausschalten der Lampe von derSchalttafel des Projektors aus.1) ENTER drücken – auf dem Display erscheint die laufendeEinstellung (On oder Off).2) Mit den Tasten UP und DOWN die Lampe ein- (On) oderausschalten (Off) – auf dem Display erscheint eineBestätigungsmitteilung (Ok?)3) ENTER drücken, um die Wahl zu bestätigen (das Displayblinkt einige Momente lang), oder SELECT drücken, um dielaufende Einstellung beizubehalten und zum oberen Standzurückzukehren.Manual controlErmöglicht den Stand der Kanäle von der Schalttafel desProjektors aus einzustellen.1) ENTER drücken – auf dem Display erscheint der erste Kanal(Pan).2) Mit den Tasten UP und DOWN den gewünschten Kanalwählen.3) ENTER drücken und mit den Tasten UP und DOWN dengewünschten DMX Stand wählen (Wert zwischen 0 und 255).4) SELECT drücken, um zum oberen Stand zurückzukehren.Encoder PanErmöglicht die Position des Pan Encoders anzuzeigen.1) ENTER drücken – auf dem Display erscheint der Wert desPan Encoders.2) SELECT drücken, um zum oberen Stand zurückzukehren.Encoder TiltErmöglicht die Position des Tilt Encoders anzuzeigen.1) ENTER drücken – auf dem Display erscheint der Wert desTilt Encoders.2) SELECT drücken, um zum oberen Stand zurückzukehren.AutotestErmöglicht es den korrekten Betrieb der Effekte zu überprüfen.1) ENTER drücken – auf dem Display erscheint die laufendeEinstellung (On oder Off).2) Mit den UP und DOWN Tasten aktiviere (On) oder deaktiviere(Off) man die Auto Test Funktion.3) ENTER drücken um die Wahl zu bestätigen (das Displayblinkt einige Momente lang), oder SELECT drücken, um dielaufende Einstellung beizubehalten.Testsequenz:PanTiltCyanMagentaYellowStop/StrobeDimmerFrostDmx monitorPermite visualizar el nivel de los canales DMX del proyector. Elcanal indicado con Ch1 corresponde al primer canal a partir dela dirección programada.1) Presionar ENTER – en la pantalla aparece el primer canal(Ch1).2) Con las teclas UP y DOWN seleccionar el canal.3) Presionar ENTER para visualizar el nivel del canal (valorentre 0 y 255) - Presionar SELECT para volver al nivel superiordel menú.Reset projectorPermite llevar a cabo el reset del proyector1) Pulsar ENTER – en la pantalla aparece un mensaje de confirmación(Ok?).2) Presionar ENTER para efectuar el reset (la pantalla parpadeadurante algunos instantes) o SELECT para volver alnivel superior sin realizar la operación.Lamp ON / OFFPermite el encendido o el apagado de la lámpara desde elpanel de mandos del proyector.1) Presionar ENTER – en la pantalla aparece la programaciónactual (On o Off).2) Con las teclas UP y DOWN encender (On) o apagar (Off) lalámpara – en la pantalla aparece un mensaje de confirmación(Ok?)3) Presionar ENTER para confirmar la selección (la pantallaparpadea durante algunos instantes) o SELECT para mantenerla programación actual y volver al nivel superior.Manual controlPermite programar el nivel de los canales del panel de mandosdel proyector.1) Presionar ENTER – en la pantalla aparece el primer canal(Pan).2) Con las teclas UP y DOWN seleccionar el canal deseado.3) Presionar ENTER y con las teclas Up y DOWN seleccionarel nivel DMX deseado (valor entre 0 y 255).4) Presionar SELECT para volver al nivel superior.Encoder PanPermite visualizar la posición del encoder del Pan.1) Presionar ENTER – en la pantalla aparece el valor del encoderdel Pan.2) Presionar SELECT para volver al nivel superior.Encoder TiltPermite visualizar la posición del encoder del Tilt.1) Presionar ENTER – en la pantalla aparece el valor del encoderdel Tilt.2) Presionar SELECT para volver al nivel superior.AutotestPermite comprobar el correcto funcionamiento de los efectos.1) Presionar ENTER – en la pantalla aparece la programaciónactual (On o Off).2) Con las teclas UP y DOWN activar (On) o desactivar (Off) lafunción Auto Test.3) Presionar ENTER para confirmar la selección (la pantallaparpadea durante algunos instantes) o SELECT para mantenerla programación actual.Secuencia de test:PanTiltCyanMagentaYellowStop/StrobeDimmerFrost21Continua / Continue ➔
IMENU SERVICEGBSERVICE MENUC a lCalibration:Permette di eseguire tramite pannello comandi delle piccoleregolazioni meccaniche di alcuni effetti per ottenere una perfettauniformità tra i proiettori.Calibration:Allows you to adjust effects from the control panel to obtain perfectuniformity between the projectors.P a nT i l tD i mrC y a nMgn tY e l wF r s t1) Premere ENTER - sul display appare “Pan”.2) Con i tasti UP e DOWN selezionare l’effetto sul quale si desideraeseguire la regolazione.PanTiltDimrCyanMgntYelwFrstPanTiltDimmerCyan filterMagenta filterYellow filterFrost3) Premere ENTER e con i tasti UP e DOWN eseguire la calibrazioneimpostando un valore fra 0 e 255.4) Premere ENTER per confermare la scelta (il display lampeggiaper alcuni istanti),oppure SELECT per mantenere l’impostazionecorrente e tornare al livello superiore.1) Press ENTER - “Pan” appears on the display.2) Using the UP and DOWN buttons, select the effect you wishto regulate.PanTiltDimrCyanMgntYelwFrstPanTiltDimmerCyan filterMagenta filterYellow filterFrost3) Press ENTER and use the UP and DOWN buttons to makethe adjustment by setting a value between 0 and 255.4) Press ENTER to confirm the selection (the display blinks forseveral seconds), or SELECT to keep current settings andreturn to the top level.Fac tFactory settings (Fact):Permette di ripristinare i valori di default del Pan (128) e del Tilt(128).1) Premere ENTER - sul display appare un messaggio di conferma“Ok?”.2) Premere ENTER per confermare la selezione (il display lampeggiaper alcuni istanti),oppure SELECT per mantenerel’impostazione corrente.Factory settings (Fact):Allows you to restore default values of Pan (128) and Tilt (128).1) Press ENTER – a confirmation message appears on thedisplay (Ok?).2) Press ENTER to confirm the selection (the display blinks forseveral seconds), or SELECT to keep current settings.22
FMENU SERVICE D MENU SERVICEEMENU SERVICECalibration:Permet d’exécuter, avec le panneau des commandes, de petitsréglages mécaniques de certains effets pour obtenir une parfaiteuniformité entre les projecteurs.1) Appuyer sur la touche de VALIDATION – sur l’afficheurapparaît ”Pan”.2) Avec les touches UP et DOWN sélectionner l’effet sur lequelon désire exécuter le réglage.Calibration:Erlaubt kleine mechanische Einstellungen bestimmter Effekteüber das Bedienpult, um eine Einheitlichkeit der Projektoren zuerhalten.1) ENTER drücken – auf dem Display erscheint „Pan”.2) Mit den Tasten UP und DOWN den Effekt auswählen, dereingestellt werden soll.Calibration:Permite llevar a cabo mediante el panel de mandos pequeñosajustes mecánicos de algunos efectos para obtener una perfectauniformidad entre los proyectores.1) Presionar ENTER – en la pantalla aparece ”Pan ”.2) Con las teclas UP y DOWN seleccione el efecto sobre elcual desea efectuar el ajuste.PanTiltDimrCyanMgntYelwFrstPanTiltDimmerCyan filterMagenta filterYellow filterFrostPanTiltDimrCyanMgntYelwFrstPanTiltDimmerCyan filterMagenta filterYellow filterFrostPanTiltDimrCyanMgntYelwFrstPanTiltDimmerCyan filterMagenta filterYellow filterFrost3) Appuyer sur ENTER et avec les touches UP et DOWN exécuterla calibration en programmant une valeur entre 0 et255.4) Appuyer sur la touche de VALIDATION pour confirmer lasélection (l’afficheur clignote pendant quelques instants), oubien sur la touche SELECT pour maintenir la sélection couranteet retourner au niveau supérieur.3) ENTER drücken und mit den Tasten UP und DOWN einenWert zwischen 0 und 255 einstellen, und die Kalibrierungausführen.4) ENTER drücken, um die Wahl zu bestätigen (das Displayblinkt einige Momente lang), oder SELECT drücken, um dielaufende Einstellung beizubehalten und zum oberen Standzurückzukehren.3) Presione ENTER y con las teclas UP y DOWN lleve a caboel ajuste programando un valor entre 0 y 255.4) Presionar ENTER para confirmar la selección (la pantallaparpadea durante algunos instantes) o SELECT para mantenerla programación actual y volver al nivel superior.Factory settings (Fact):Permet de rétablir les valeurs par défaut du Pan (128) et du Tilt(128).1) Appuyer sur la touche de VALIDATION – sur l’afficheurapparaît un message de confirmation (Ok ?).2) Appuyer sur VALIDATION pour confirmer la sélection (l’afficheurclignote pendant quelques instants), ou bien surSELECT pour maintenir la sélection courante.Factory settings (Fact):Ermöglicht es die Defaultwerte Pan (128) und Tilt (128) wiederherzustellen.1) ENTER drücken – auf dem Display erscheint eineBestätigungsmitteilung (OK?).2) ENTER drücken um die Wahl zu bestätigen (das Displayblinkt einige Momente lang), oder SELECT drücken, um dielaufende Einstellung beizubehalten.Factory settings (Fact):Permite el reajuste de los valores de defecto del Pan (128) ydel Tilt (128).1) Pulsar ENTER – en la pantalla aparece un mensaje de confirmación(Ok?).2) Presione ENTER para confirmar la selección (la pantallaparpadea durante algunos instantes), o SELECT para mantenerla programación actual.23
IFUNZIONE CANALI GB CHANNEL FUNCTION F FONCTION DES CANAUXDKANALFUNKTIONENEFUNCION DE LOS CANALES<strong>STAGE</strong> <strong>COLOR</strong> <strong>300</strong> <strong>AE</strong>CHANNELDmx MODALITYOption Stnd Option 16 b Option Extn1CYANCyanCYANCyanCYANCyan2MAGENTAMgntMAGENTAMgntMAGENTAMgnt3YELLOWYe l wYELLOWYe l wYELLOWYe l w4STOPPER/STROBES h u tSTOPPER/STROBES h u tSTOPPER/STROBES h u t5PANPanPANPanPANPan6TILTT iltTILTT iltPAN FINE7DIMMERDimrDIMMERDimrTILTT ilt8FROSTF r s tFROSTF r s tTILT FINE9RESET (only with option RDmx)PAN FINEDIMMERDimr10LAMP ON-OFF (with option LDmx ON)TILT FINEFROSTF r s t1112RESET (only with option RDmx)LAMP ON-OFF (with option LDmx ON)RESET (only with option RDmx)LAMP ON-OFF (with option LDmx ON)24
SELTXDMXSELTXDMXSELTXDMXSSSSELTXDMXSELTXDMXSELTXDMXSSSEEEEEE• COLOUR MIXING - channel 1 - 2 - 3Operation with option CMY Off• PAN - channel 5Operation with option Pan Off(Tilt conventionally represented at 15% and option TilOff)CHANNEL 1CHANNEL 2CHANNEL 3BIT % EFFECT255 100 COLOUR OUTBIT %255 100CYANMAGENTAYELLOW0 0.0 COLOUR IN0 0.0Operation with option Pan On(Tilt conventionally represented at 15% and option TilOff)Operation with option CMY OnBIT %255 100CHANNEL 1CHANNEL 2 CHANNEL 3BIT % EFFECT255 100 <strong>COLOR</strong> IN0 0.0CYANMAGENTAYELLOW0 0.0 <strong>COLOR</strong> OUT• TILT - channel: 6 (Stnd) - 6 (16b) - 7 (Extn)Operation with option Til Off(Pan conventionally represented at 20% and option PanOff)• STOPPER / STROBE - channel 4BIT %255 100BIT % EFFECT231 - 255 90.5 - 100 OPEN230 90.0 FAST STROBE(11 flash/sec)128 50.00 0.026 10.0 SLOW STROBE(1 flash/sec)0 - 25 0.0 - 9.7 CLOSEDOperation with option Til On(Pan conventionally represented at 20% and option PanOff)BIT %255 100128 50.00 0.025Continua / Continue ➔
SELTXDMXSELTXDMXSSSELTXDMXSELTXDMXSSEEEE• DIMMER - channel: 7 (Stnd) - 7 (16b) - 9 (Extn)BIT % EFFECT255 100 DIMMER OPEN• PAN FINE - channel: 9 (16b) - 6 (Extn)Operation with option Pan Off(Tilt conventionally represented at 15% and option TilOff)BIT %255 1000 0.0 DIMMER CLOSED0 0.0• FROST - channel: 8 (Stnd) - 8 (16b) - 10 (Extn)BIT %255 100Operation with option Pan On(Tilt conventionally represented at 15% and option TilOff)BIT %255 1000 0.00 0.0RESET (Only with option Rdmx) - channel: 9 (Stnd) - 11 (16 b) - 11 (Extn)BIT % EFFECT255 100• TILT FINE - channel: 10 (16b) - 8 (Extn)Operation with option Til Off(Pan conventionally represented at 20% and option PanOff)BIT %255 100RESET (The function isactivated after 5s)128 50127 49.7—0 0.00 0.0Lamp control (only with option Ldmx On) - channel: 10 (Stnd) - 12 (16 b) - 12 (Extn)IMPORTANT: Stage Color <strong>300</strong> <strong>AE</strong> is not provided with hot restrike igniterOperation with option Til On(Pan conventionally represented at 20% and option PanOff)ONBIT % EFFECT255 100LAMP ONBIT %255 100The function is activatedstaying 5 s in Lamp ON levels.ON180 70.5179 70.0LAMP ONUNUSED RANGE 2OFFOFF101 39.5100 39.0 LAMP OFFThe function is activatedpassing throug the unusedrange 1 and staying 5s inLamp OFF levels.26 10.0 LAMP OFF25 9.7UNUSED RANGE 10 0.00 0.026
FIMANUTENZIONEMAINTENANCEENTRETIEN D WARTUNG E MANTENIMIENTOGB14IAzzeramento dei contatori parziali - Figura 14.Per azzerare il conteggio parziale delle ore di funzionamento del proiettore o della lampada eseguire le seguenti operazioni.1. Selezionare il contatore parziale dal menu Info.2. Tenere premuti contemporaneamente i tasti UP e DOWN per circa 5 secondi – sul display appare “Rst?”3. Premere ENTER (il display lampeggia per alcuni istanti) per azzerare il contatore; oppure SELECT per mantenere il conteggio corrente.4. Premere SELECT per tornare al livello superiore del menu.Il conteggio parziale del numero di accensioni della lampada si azzera automaticamente azzerando il contatore parziale delle ore di funzionamento della lampada.Blocco e sblocco movimenti Pan e Tilt - Consultare le istruzioni al paragrafo DISIMBALLO E PREDISPOSIZIONE.Apertura e chiusura proiettore - Consultare le istruzioni al paragrafo DISIMBALLO E PREDISPOSIZIONE.Sostituzione lampada - Consultare le istruzioni al paragrafo DISIMBALLO E PREDISPOSIZIONE.GBResetting the partial counters - Fig. 14.Proceed as follows to reset the partial counts of the operating time of the projector or the lamp.1. Select the partial counter from the Info menu.2. Keep the UP and DOWN keys pressed simultaneously for about 5 seconds – “Rst?” appears on the display.3. Press ENTER (the display will blink for a few seconds) to reset the counter or SELECT to retain the current count.4. Press SELECT to return to the top menu level.The partial count of the number of times the lamp has been switched on is reset automatically when the partial counter of lamp operating hours is reset.Locking and releasing Pan and Tilt movements - Refer to the instructions in the UNPACKING AND PREPARATION section.Opening/closing the projector - Refer to the instructions in the UNPACKING AND PREPARATION section.Lamp change - Refer to the instructions in the UNPACKING AND PREPARATION section.FRemise à zéro des compteurs partiels - Figure 14.Pour remettre à zéro le comptage partiel des heures de fonctionnement du projecteur ou de la lampe, effectuer les opérations suivantes.1. Dans le menu Info sélectionner le compteur partiel.2. Maintenir appuyées en même temps les touches UP et DOWN pour environ 5 secondes - « Rst ? » apparaît sur l'afficheur.3. Appuyer sur ENTER (l’afficheur va clignoter pour quelques instants) pour remettre à zéro le compteur ou sur SELECT pour maintenir le comptage actuel.4. Appuyer sur la touche SELECT pour revenir niveau supérieur du menu.Le comptage partiel du nombre d’allumages de la lampe se remet automatiquement à zéro quand on remet à zéro le compteur partiel des heures de fonctionnement de la lampe.Blocage et déblocage mouvements Pan et Tilt - Consulter les instructions reportées dans le paragraphe DÉBALLAGE ET PRÉPARATION.Ouverture et fermeture du projecteur - Consulter les instructions reportées dans le paragraphe DÉBALLAGE ET PRÉPARATION.Remplacement lampe - Consulter les instructions reportées dans le paragraphe DÉBALLAGE ET PRÉPARATION.DNullstellung der Teilzähler - Abb. 14.Um die Teilzählung der Betriebsstunden des Projektors oder der Lampe Null zu setzen, gehen Sie folgendermaßen vor:1. Den Teilzähler vom Menü Info aus anwählen.2. Gleichzeitig die Taste UP und DOWN circa 5 Sekunden lang gedrückt halten – auf dem Display erscheint “Rst?”3. ENTER drücken (das Display blinkt einige Augenblicke lang), um den Zähler Null zu setzen, oder aber SELECT, um die augenblickliche Zählung beizubehalten.4. Um zum Menü auf der darüber liegenden Ebene zurückzukehren, die Taste SELECT drücken.Die Teilzählung der Anzahl von Einschaltvorgängen der Lampe wird automatisch Null gesetzt, wenn der Teilzähler der Betriebsstunden der Lampe Null gesetzt wird.Sperren und Entsperren der Bewegungen Pan und Tilt - Siehe die Anweisungen im Abschnitt AUSPACKEN UND VORBEREITEN.Öffnen und Schließen des Projektors - Siehe die Anweisungen im Abschnitt AUSPACKEN UND VORBEREITEN.Lampenwechsel - Siehe die Anweisungen im Abschnitt AUSPACKEN UND VORBEREITEN.EPuesta a cero de los contadores parciales - Figura 14.Para poner a cero el recuento parcial de las horas de funcionamiento del proyector o de la lámpara realizar las siguientes operaciones.1. Seleccionar el contador parcial del menú Info.2. Mantener presionadas contemporáneamente las teclas UP y DOWN durante unos 5 segundos – en la pantalla aparece “Rst?”3. Presionar ENTER (la pantalla parpadea durante algunos instantes) para poner a cero el contador; o SELECT para mantener el recuento actual.4. Presionar SELECT para volver al nivel superior del menú.El recuento parcial del número de encendidos de la lámpara se pone a cero automáticamente poniendo a cero el contador parcial de las horas de funcionamiento de la lámpara.Bloqueo y desbloqueo de los movimientos Pan y Tilt - Consulte las instrucciones el punto DESEMBALAJE Y PREPARACION.Apertura y cierre del proyector - Consulte las instrucciones el punto DESEMBALAJE Y PREPARACION.Cambio de la lámpara - Consulte las instrucciones el punto DESEMBALAJE Y PREPARACION.27Continua / Continue ➔
15Parti che necessitano di una pulizia frequente.Parts requiring frequent cleaning.Pièces qui doivent être nettoyées fréquemment.Teile, die häufig gereinigt werden müssen.Partes que necesitan limpieza frecuente.<strong>STAGE</strong> <strong>COLOR</strong> <strong>300</strong><strong>AE</strong>Parti la cui pulizia deve essere effettuatada personale tecnico qualificato.Parts requiring cleaningby qualified technical staff.Pièces qui doivent être nettoyéespar du personnel technique qualifié.Teile, die von qualifiziertem Fachpersonalzu reinigen sind.Partes cuya limpieza se debe efectuarpor personal técnico cualificado.IGBFDEPulizia periodica - Figura 15Per mantenere funzionalità e rendimento ottimali per lungo tempo è indispensabile effettuare una pulizia periodica delle parti soggette all’accumulo di polveri e grassi. La frequenzacon la quale effettuare le operazioni sotto indicate dipende da diversi fattori, quali la quantità di movimenti degli effetti e la qualità dell’ambiente di lavoro (umidità dell’aria, presenza dipolvere, salsedine, ecc.). Per rimuovere lo sporco dal riflettore, dalle lenti e dai filtri usare un panno morbido inumidito di un qualsiasi liquido detergente per la pulizia del vetro.Annualmente si consiglia di sottoporre il proiettore a personale tecnico qualificato per una manutenzione straordinaria consistente almeno nelle seguenti operazioni:• Pulizia generale delle parti interne.• Ripristino della lubrificazione di tutte le parti soggette ad attrito tramite l’utilizzo di lubrificanti appositamente forniti da <strong>Clay</strong> <strong>Paky</strong>.• Controllo visivo generale di componenti interni, cablaggio, parti meccaniche, ecc.• Controlli elettrici, fotometrici e funzionali; eventuali riparazioni.Periodical cleaning - Fig. 15To ensure optimal operation and performance for a long time it is essential to periodically clean the parts subject to dust and grease deposits. The frequency with which the followingoperations are to be carried out depends on various factors, such as the amount of the effects and the quality of the working environment (air humidity, presence of dust, salinity, etc.).Use a soft cloth dampened with any detergent liquid for cleaning glass to remove the dirt from the reflectors, from the lenses and filters. It is recommended that the projector undergoesan annual service by a qualified technician for special maintenance involving at least the following operations:• General cleaning of internal parts.• Restoring lubrication of all parts subject to friction, using lubricants specifically supplied by <strong>Clay</strong> <strong>Paky</strong>.• General visual check of the internal components, cabling, mechanical parts, etc.• Electrical, photometric and functional checks; eventual repairs.Nettoyage périodique - Figure 15Pour ne pas compromettre le bon fonctionnement et le rendement de l'appareil, nettoyer régulièrement les parties sur lesquelles la poussière et la graisse ont tendance à s'accumuler. Lafréquence avec laquelle il faut effectuer les opérations indiquées ci-après dépend de plusieurs facteurs comme la quantité de mouvements des effets et la qualité du lieu d’installation(humidité de l’air, présence de poussière, salinité, etc.). Pour enlever la saleté du réflecteur, des lentilles et des filtres, utiliser un chiffon doux imbibé d’un liquide détergent pour le nettoyagedes vitres. Il est conseillé de confier une fois par an le projecteur à du personnel technique qualifié pour un entretien extraordinaire qui devra comporter au moins les opérations suivantes:• Nettoyage général des parties internes.• Rétablissement de la lubrification de toutes les parties sujettes à un frottement à l'aide de lubrifiants spécialement fournis par <strong>Clay</strong> <strong>Paky</strong>.• Contrôle visuel général des composants internes, du câblage, des pièces mécaniques, etc..• Contrôles électriques, photométriques et fonctionnels; éventuelles réparations.Regelmäßige Reinigung - Abb. 15Um die optimale Funktionalität und Leistung des Geräts für lange Zeit zu bewahren, ist eine regelmäßige Reinigung der Teile, an denen sich leicht Staub und Fett ansammeln,unverzichtbar. Die Häufigkeit, mit der die nachstehenden Vorgänge durchzuführen sind, hängt von verschiedenen Faktoren ab, wie die Menge Bewegungen der Effektmodule und dieBeschaffenheit der Arbeitsumgebung (Luftfeuchtigkeit, Staub- und Salzhaltigkeit usw.). Zum Reinigen des Reflektors, den Linsen und der Filter ein weiches Tuch verwenden, das miteinem gängigen Glasreinigungsmittel angefeuchtet ist. Einmal jährlich sollte der Projektor außerdem qualifiziertem Fachpersonal übergeben werden, um ihn einer außerordentlichenWartung zu unterziehen, die mindestens folgende Arbeiten umfasst:• Allgemeine Reinigung der Innenteile.• Nachschmierung aller Teile, die ständiger Reibung ausgesetzt sind, mit den von <strong>Clay</strong> <strong>Paky</strong> gelieferten speziellen Schmiermitteln.• Allgemeine Sichtkontrolle der inneren Bauteile, Verdrahtungen, mechanischen Teile usw.• Elektrische, fotometrische und funktionelle Kontrollen; eventuelle Reparaturen.Limpieza periódica - Figura 15Para conservar las prestaciones y el rendimiento del proyector durante mucho tiempo, es indispensable limpiar periódicamente las partes donde se depositan polvos y grasas. Lafrecuencia de la limpieza depende de varios factores, como la cantidad de movimientos de los efectos y las características del ambiente de trabajo (humedad del aire, presencia depolvo, salinidad, etc.). Para limpiar el reflector, las lentes y los filtros, utilice un paño suave humedecido en cualquier limpiacristales no corrosivo. Se aconseja hacer revisar elproyector una vez al año par personal técnico cualificado para que realice un mantenimiento extraordinario consistente, como mínimo, en las siguientes operaciones:• Limpieza general de las partes internas.• Lubricación de todas las partes sujetas a fricción, con los productos suministrados por <strong>Clay</strong> <strong>Paky</strong>.• Control visual general de componentes internos, cableado, partes mecánicas, etc.• Controles eléctricos, fotométricos y de funcionamiento; posibles reparaciones.28
FICAUSA E SOLUZIONE DEI PROBLEMICAUSE AND SOLUTION OF PROBLEMSCAUSE ET SOLUTION DES PROBLEMES D URSACHEN UND ABHILFE BEI BETRIEBSSTÖRUNGEN E CAUSAS Y SOLUCIONES DE PROBLEMASGBIIL PROIETTORE NON SI ACCENDEL’ELETTRONICA NON FUNZIONAPROIEZIONE DIFETTOSALUMINOSITÀ RIDOTTAPOSSIBILI CAUSEMancanza di alimentazione di rete.Lampada esaurita o difettosa.Cavo di trasmissione dei segnali guasto o scollegato.Indirizzamento errato.Difetto nei circuiti elettronici.Rottura lenti o riflettore.Deposito di polveri o grasso.CONTROLLI E RIMEDIVerificare la presenza della tensione alimentazione.Sostituire lampada (vedi istruzioni).Sostituire cavi.Verificare indirizzi (vedi istruzioni).Interpellare tecnico autorizzato.Interpellare tecnico autorizzato.Procedere alla pulizia (vedi istruzioni).ANOMALIEGBTHE PROJECTOR WILL NOT SWITCH ONELECTRONICS NON-OPERATIONALDEFECTIVE PROJECTIONREDUCED LUMINOSITYPOSSIBLE CAUSESNo mains supply.Lamp exhausted or defective.Signal transmission cable faulty or disconnected.Incorrect addressing.Fault in the electronic circuits.Reflector brokenDust or grease deposited.Check the power supply voltage.Replace the lamp. (See instructions).Replace the cables.Check addresses (see instructions).Call an authorised technician.Call an authorised technician.Clean (see instructions).CHECKS AND REMEDIESPROBLEMSFLE PROJECTEUR NE S'ALLUME PASL'ELECTRONIQUE NE FONCTIONNE PASPROJECTION DEFECTUEUSEREDUCTION DE LA LUMINOSITECAUSES POSSIBLESAbsence de courant.Lampe déchargée ou défectueuse.Câble de transmiss. des signaux en panne ou déconnecté.Adressage erroné.Problèmes sur les circuits électroniques.Rupture du réflecteur.Dépôt de poussière ou de graisse.Vérifier la présence de la tension d’alimentation.Remplacer la lampe (voir instructions).Remplacer les câbles.Vérifier adresses (voir instructions).Faire appel à un technicien autorisé.Faire appel à un technicien autorisé.Nettoyer (voir instructions).CONTROLES ET REMEDESANOMALIESDDER PROJEKTOR SCHALTET SICH NICHT EINELEKTRONIK FUNKTIONIERT NICHTFEHLERHAFTE PROJEKTIONVERRINGERTE LEUCHTKRAFTMÖGLICHE URSACHEKeine Stromversorgung.Lampe erschöpft oder defekt.Übertragungskabel der Signale defekt oder nicht verbunden.Fehlerhafte Adressierung.Defekt in den Elektronikschaltungen.Bruch des Reflektors.Ablagerungen von Staub oder Fett.KONTROLLEN UND ABHILFEDas Vorhandensein der Versorgungsspannung.Lampe ersetzen (siehe Anweisungen).Kabel ersetzen.Codierung überprüfen (siehe Anweisungen).Einen autorisierten Techniker anfordern.Einen autorisierten Techniker anfordern.Reinigen (siehe Anweisungen).STÖRUNGENEEL PROYECTOR NO SE ENCIENDEEL SISTEMA ELECTRÓNICO NO FUNCIONAPROYECCIÓN DEFECTUOSAPOCA LUMINOSIDADCAUSAS POSIBLESFalta de alimentación de la red.Lámpara agotada o defectuosa.Cable de transmisión de las señales averiado o desconectado.Direccionamiento erróneo.Fallo de los circuitos electrónicos.Rotura del reflector.Acumulación de polvo o grasa.CONTROLES Y SOLUCIONESANOMALIASCompruebe la presencia de la tensión de alimentación y/o conductividad del fusible.Sustituya la lámpara según las instrucciones.Sustituya el cable.Controlar direcciones (véanse instrucciones).Consulte a un técnico autorizado.Consulte a un técnico autorizado.Limpie según las instrucciones.29
IDATI TECNICIGBTECHNICAL INFORMATION230V 50Hz240V 50Hz208V 60Hz200V 50Hz200V 60Hz120V 60Hz100V 50Hz100V 60HzAlimentazione- 230V 50Hz - 120V 60Hz- 240V 50Hz - 100V 50Hz- 208V 60Hz - 100V 60Hz- 200V 50Hz- 200V 60HzIl proiettore è predisposto per il funzionamento a tensione efrequenza indicate sull’etichetta dei dati elettrici.Potenza assorbita• Versioni 200-240V 50/60Hz: 600VA a 230V 50Hz(Rifasamento 35µF Standard)• Versioni 100-120V 50/60Hz: 900VA a 120V 60HzLampadaA ioduri metallici alimentata tramite speciale alimentatoreincorporato.• Tipo HTI <strong>300</strong>W/DX- Attacco SFc 10-4- Temperatura colore 6500 K- Flusso luminoso 22000 lm- Vita media 750 h- Posizione di lavoro qualsiasi• Tipo HTI <strong>300</strong>W/DEL- Attacco SFc 10-4- Temperatura colore 5700 K- Flusso luminoso 20000 lm- Vita media <strong>300</strong>0 h- Posizione di lavoro qualsiasi (per proiettori a corpo mobile)Power supplies available- 230V 50Hz - 120V 60Hz- 240V 50Hz - 100V 50Hz- 208V 60Hz - 100V 60Hz- 200V 50Hz- 200V 60HzThe projector is designed to operate at the mains frequencyand voltage given on the electrical data label.Input power• 200-240V 50/60Hz versions: 600VA a 230V 50Hz(p.f. correction 35µF standard).• 100-120V 50/60Hz versions: 900VA a 120V 60HzLampMetal halide type with special built-in power supply unit.• Type of lamp HTI <strong>300</strong>W/DX- fitting SFc 10-4- colour temperature 6500 K- luminous flux 22000 lm- average life 750 h- Operation in any position• Type of lamp HMD <strong>300</strong>W/DEL- fitting SFc 10-4- colour temperature 5700 K- luminous flux 20000 lm- average life <strong>300</strong>0 h- Operation in any position (moving body projectors)MotoriN. 9 motori passo-passo, funzionanti a micropassi, totalmentecontrollati da microprocessore.Motors9 stepper motors, operating with microsteps, totally microprocessorcontrolled.Gruppo ottico• Riflettore ellittico ad elevata resa luminosa.• Lente Fresnel: diametro 152 mm, focale 100 mm.Optical unit• Elliptic reflector with high luminous efficiency.• Fresnel lens: diameter 152 mm, focal length 100 mm.CanaliN. 12 canali di controllo.Channels12 control channels.Ingressi• DMX 512Inputs• DMX 512Corpo mobile• Movimento tramite due motori a micropassi, controllati damicroprocessore.• Riposizionamento automatico di PAN e TILT in seguito aspostamenti accidentali non comandati da centralina.• Escursione:- PAN = 450°- TILT = 252°• Velocità massime:- PAN = 2.4 sec (360°)- TILT = 2.0 sec (252°)• Risoluzione:- PAN = ±1.76°- PAN FINE = ±0.007°- TILT = ±0.98°- TILT FINE = ±0.004°Movable body•Movement by means two stepper motors, controlled bymicroprocessor.• Automatic repositioning of PAN and TILT following accidentalmovements not piloted by controller.• Travel:- PAN = 450°- TILT = 252°• Maximum speeds:- PAN = 2.4 sec (360°)- TILT = 2.0 sec (252°)• Resolution:- PAN = ±1.76°- PAN FINE = ±0.007°- TILT = ±0.98°- TILT FINE = ±0.004°<strong>STAGE</strong> <strong>COLOR</strong> <strong>300</strong><strong>AE</strong>(18.90'')480Grado di protezione IP20• Protetto contro la penetrazione di corpi solidi di dimensionesuperiore a 12mm.• Nessuna protezione contro la penetrazione di liquidi.IP20 protection rating• Protected against the entry of solid bodies larger than 12mm(0.47”).• No protection against the entry of liquids.(15.75'')400(11.89'')<strong>300</strong>Marcatura CEConforme alle Direttive dell’Unione Europea di BassaTensione 73/23 e Compatibilità Elettromagnetica 89/336.Dispositivi di sicurezza• Interruttore automatico bipolare a protezione termica.• Interruzione automatica dell’alimentazione in caso di surriscaldamentoo di mancato funzionamento del sistema di raffreddamento.• Disinserimento automatico dell’alimentazione all’aperturadel coperchio.• Due punti di fissaggio per fune di sicurezza.CE MarkingIn conformity with the European Union Low Voltage Directive73/23 and Electromagnetic compatibility Directive 89/336.Safety Devices• Automatic two pole thermal cutout.• Automatic break in power supply in case of overheating orfailed operation of cooling system• Power supply cut off automatically on opening the cover.• Two fixing points for safety wire.RaffreddamentoA ventilazione forzata tramite ventole assiali.CoolingForced ventilation cooling system using axial flow fans.<strong>STAGE</strong> <strong>COLOR</strong> <strong>300</strong><strong>AE</strong>(20.47'')520Corpo• In alluminio pressofuso ed acciaio.• Verniciatura a polveri epossidiche.• Due maniglie laterali per il trasporto.• Dispositivo di bloccaggio dei movimenti PAN e TILT per trasportoe manutenzione.Posizione di lavoroFunzionamento in qualsiasi posizione.Body• In die-cast aluminium and steel.• Epoxy powder painting.• Two side handles for transportation.• Device locking PAN and TILT mechanisms for transportationand maintenance.Working positionFunctioning in any position.(15.75'')400(11.89'')<strong>300</strong>Pesi e dimensioni• Versioni 200-240V: 22,4 kg.• Versioni 100-120V: 23,5 kgWeights and dimensions• 200-240V versions: 22,4 kg (49 lbs 8 ozs).• 100-120V versions: 23,5 kg (51 lbs 15 ozs).30
FDONNEES TECHNIQUES D TECHNISCHE DATENEDATOS TÉCNICOSAlimentations disponibles- 230V 50Hz - 120V 60Hz- 240V 50Hz - 100V 50Hz- 208V 60Hz - 100V 60Hz- 200V 50Hz- 200V 60HzLe projecteur est prédisposé pour le fonctionnement auxvaleurs de tension et de fréquence indiquées sur l'étiquettedes données électriques.Puissance absorbée• Versions 200-240V 50/60Hz: 600VA à 230V 50Hz(Rephasage 35µF en standard).• Versions 100-120V 50/60Hz: 900VA à 120V 60Hz.LampeA iodures métalliques, alimentée par un dispositif spécialincorporé dans l'appareil.• Type HTI <strong>300</strong>W/DX- Culot SFc 10-4- Température couleur 6500 K- Flux lumineux 22000 lm- Durée de Vie moyenne 750 h- Toutes les positions de travail• Type HTI <strong>300</strong>W/DEL- Culot SFc 10-4- Température couleur 5700 K- Flux lumineux 20000 lm- Durée de Vie moyenne <strong>300</strong>0 h- Positions de travail p45MoteursN. 9 moteurs pas-à-pas, fonctionnant par micropas,totalement contrôlés par microprocesseur.Groupe optique• Réflecteur elliptique à haut rendement lumineux.• Lentille Fresnel: diamètre 152 mm, focale 100 mm.Canaux12 canaux de contrôleEntrées• DMX 512Corps mobile• Mouvement fourni par deux moteurs à micropascommandés par micro-processeur.• Remise en position automatique de PAN et TILT après desdéplacements accidentels non commandés par la centrale.• Excursion:- PAN = 450°- TILT = 252°• Vitesses maximum:- PAN = 2.4 sec (360°)- TILT = 2.0 sec (252°)• Résolution:- PAN = ±1.76°- PAN FINE = ±0.007°- TILT = ±0.98°- TILT FINE = ±0.004°Degré de protection IP20• Protégé contre la pénétration de corps solides ayant unedimension supérieure à 12mm.• Aucune protection contre la pénétration de liquides.Marquage CEConforme aux Directives de l’Union Européenne BasseTension 73/23 et Compatibilité Electromagnétique 89/336.Dispositifs de sécurité• Interrupteur automatique bipolaire à protection thermique.• Coupure automatique de l'alimentation en cas de surchauffeou de panne du système de refroidissement.• Coupure automatique de l'alimentation lorsque le couvercles’ ouvre.• Deux points de fixation pour câble de sécurité.RefroidissementA ventilation forcée par ventilateurs axiaux.Corps• En aluminium moulé sous pression et acier.• Peint aux poudres époxy.• Deux poignées latérales pour le transport.• Dispositif de blocage des mouvements PAN et TILT pourtransport et entretien.Position de travailFonctionne dans toutes les positions.Poids et dimensions• Versions 200-240V: 22,4 kg.• Versions 100-120V: 23,5 kg.Vorhandene Netzversorgung- 230V 50Hz - 120V 60Hz- 240V 50Hz - 100V 50Hz- 208V 60Hz - 100V 60Hz- 200V 50Hz- 200V 60HzDer Projektor ist für den Betrieb bei der auf dem Typenschildan angegebenen Spannung und Frequenz ausgelegt.Leistungsaufnahme• Versionen 200-240V 50/60Hz: 600VA bei 230V 50Hz(Blindstromkompensation 35µF Standard)• Versionen 100-120V 50/60Hz: 900VA bei 120V 60Hz.LampeJodid-Metalldampflampen, Versorgung mit speziellem, in dasGerät eingebautem orschaltgerät.• Typ HTI <strong>300</strong>W/DX- Sockel SFc 10-4- Farbtemperatur 6500 K- Lichtfluss 22000 lm- Durchschnittliche Lebensdauer 750 h- Beliebige Einbauposition• Typ HTI <strong>300</strong>W/DEL- Sockel SFc 10-4- Farbtemperatur 5700 K- Lichtfluss 20000 lm- Durchschnittliche Lebensdauer <strong>300</strong>0 h- Einbaustellung p45Motoren9 Mikro-Schrittmotoren, vollständig mikroprozessorgesteuert.Optikgruppe• Elliptischer Reflektor mit hoher Lichtausbeute.• Fresnel-Linse: Durchmesser 152 mm, Brennweite 100 mm.Kanäle12 Steuerkanäle.Eingänge• DMX 512Beweglicher Kopf• Bewegung durch zwei mikroprozes-sorgesteuerte Mikro-Schrittmotoren.• Automatische Rückpositionierung von PAN und TILT nachunbeabsichtigten, nicht vom Regiepult betätigtenBewegungen.• Aktionsradius:- PAN = 450°- TILT = 252°• Höchstgeschwindigkeit:- PAN = 2.4 sec (360°)- TILT = 2.0 sec (252°)• Auflösung:- PAN = ±1.76°- PAN FINE = ±0.007°- TILT = ±0.98°- TILT FINE = ±0.004°Schutzklasse IP20• Schutz gegen das Eindringen fester Körper, die größer sindals 12mm.• Kein Schutz gegen das Eindringen von Flüssigkeiten.CE-KennzeichnungEntspricht den Richtlinien der Europäischen Union(Niederspannungsrichtlinie 73/23; elektromagnetischeVerträglichkeit 89/336).Sicherheitsvorrichtungen• Zweipoliger Wärmeschutz-Sicherheitsschalter.• Automatische Abschaltung der Stromzufuhr bei Überhitzungoder Ausfall des Kühlsystems.• Automatische Abschaltung bei Öffnung der Serviceluke.• Zwei Befestigungsösen für Fangseil.KühlungKühlsystem mit Zwangslüftung durch Axiallüfter.Gehäuse• Druckgussaluminium und Stahl.• Epoxydpulverbeschichtung.• Zwei seitliche Tragegriffe.• PAN- und TILT-Arretierung für Transport und Wartung.EinbaupositionBeliebige Einbauposition, Einschrän-kung je nachCharakteristiken der verwendeten Lampe.Maße und Gewichte• Versionen 200-240V: 22,4 kg.• Versionen 100-120V: 23,5 kg.Alimentaciones disponibles- 230V 50Hz - 120V 60Hz- 240V 50Hz - 100V 50Hz- 208V 60Hz - 100V 60Hz- 200V 50Hz- 200V 60HzEl proyector está preparado para funcionar a la tensión yfrecuencia indicadas.Potencia absorbida• Versión 200-240V 50/60Hz: 600VA a 230V 50Hz(ajuste de fase 35µF de serie)• Versión 100-120V 50/60Hz: 900VA a 120V 60Hz.LámparaDe yoduros metálicos, abastecida por un alimentadorespecial incorporado en el aparato.• Tipo HTI <strong>300</strong>W/DX- Casquillo SFc 10-4- Temperatura de color 6500 K- Flujo luminoso 22000 lm- Vida media 750 h- Posición de trabajo: cualquiera• Tipo HTI <strong>300</strong>W/DEL- Casquillo SFc 10-4- Temperatura de color 5700 K- Flujo luminoso 20000 lm- Vida media <strong>300</strong>0 h- Posición de trabajo p45MotoresN. 9 motores de micropasos totalmente controlados pormicroprocesador.Grupo óptico• Reflector elíptico de elevado rendimiento luminoso.• Lente de Fresnel: diámetro 152 mm, focal 100 mm.Canales12 canales de controlEntradas• DMX 512Cuerpo móvil• Movimiento mediante dos motores de micropasoscontrolados por microprocesador.• Reposicionamiento automático de giro e inclinación trasdesplazamientos accidentales no accionados desde laconsola.• Excursión:- GIRO = 450°- INCLINACIÓN = 252°• Velocidades máximas:- GIRO = 2.4 sec (360°)- INCLINACIÓN = 2.0 sec (252°)• Resolución:- GIRO = ±1.76°- GIRO FINO = ±0.007°- INCLINACIÓN = ±0.98°- INCLINACIÓN FINA = ±0.004°Grado de protección IP20• Protegido contra la entrada de cuerpos sólidos dedimensiones superiores a 12 mm.• Ninguna protección contra la entrada de agua..Marcado CEConforme a las Directrices de la Unión Europea de BajaTensión 73/23 y Compatibilidad Electromagnética 89/336.Dispositivos de seguridad• Interruptor automático bipolar con protección térmica.• Desconexión automática de la alimentación en caso derecalentamiento o de fallo del sistema de enfriamiento.• Desconexión automática de la alimentación al abrirse latapa.• Dos puntos de fijación para cuerda de seguridad.EnfriamientoPor ventilación forzada con ventiladores axiales.Cuerpo• De aluminio moldeado a presión y extrusionado.• Pintado con resina epoxi en polvo.• Dos asas laterales para el transporte.• Bloqueo de los movimientos de giro e inclinación paratransporte y mantenimiento.Posición de trabajoFunciona en cualquier posición.Pesos y medidas• Versiones 200-240V: 22,4 kg.• Versiónes 100-120V: 23,5 kg.31
CLAY PAKY S.p.A. - Via Pastrengo, 3/b - 24068 Seriate (BG) Italy - Tel. +39-035-654311- Fax +39-035-301876 - www.claypaky.itRev. 0 01/06 studioCod. 099307