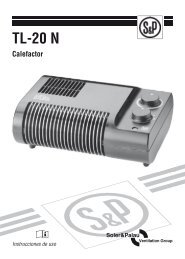
TLS-401 TLS-403 Turbo - Soler & Palau
TLS-401 TLS-403 Turbo - Soler & Palau
TLS-401 TLS-403 Turbo - Soler & Palau
- No tags were found...

You also want an ePaper? Increase the reach of your titles
YUMPU automatically turns print PDFs into web optimized ePapers that Google loves.
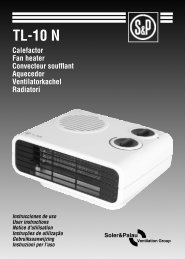
1- Termostato automático / Automatic thermostat / Thermostat automatiqueTermóstato automático / Automatische thermostaat / Termostato automatico2- Luces piloto / Pilot lights / Voyant lumineux / Luzes piloto / Signaallampje / Spie luminose3- Selector de potencias / Power selector / Sélecteur de puissances / Selector de potênciasVermogenkeuzeschakelaar / Selettore delle potenze4- Asa para transporte / Carry handle / Anse de transport / Asa para transporteHandvat voor het transport / Maniglia per il trasporto5- Pie / Base / Pied / Pé / Voet / Piedino6- Interruptor ventilador / Fan switch / Interrupteur ventilateur / Interruptor ventiladorVentilatorschakelaar / Interruttore del ventilatore2
maged, it should only be replacedin one of our Repair Workshopsor by qualified staff in orderto avoid a dangerous situation.- Inflammable objects must not beleft within 50 cm of the hot aircircuit (curtains, etc.).- If the convector is installed permanently,the minimum distancesindicated in Fig. 1 must berespected.- On no account must any switch/ button be accessible by peoplein the shower or in the bathtub.- Whenever it is installed permanently,the convector must besituated so that the plug is accessible.WARNING!! Before starting theconvector, ensure that the base isfitted correctly.- Always keep the air inlet andoutlet grilles clean. Make surethe convector is disconnectedwhen cleaning is carried out.- Do not place the convector nextto a wall made of combustiblematerials (wood, plastic, etc.).- This appliance is not intendedfor use by persons, includingchildren, with reduced physical,sensory or mental capabilities,or lack of experience andknowledge, unless they havebeen given supervision or instructionconcerning use of theappliance by a person responsiblefor their safety.9- Children must be under watch toavoid that they could play withthe product.- This appliance must not be usedconnected to a programmer, timeror another device that controlsheater connection automatically.INSTALLATIONBefore starting the convector, thebase must be fitted or the devicemust be mounted on the wall.FITTING THE BASEFit the base supports to the sides(Fig. 3) and secure each one withthree screws. To remove the basesupports, loosen the screws and pullthe supports outwards.WALL MOUNTINGWall mounting is only possible whenthe base supports are not fitted.Once you have chosen the location,before fixing the convector to thewall, make sure that the minimumdistances are respected (Fig. 1).Proceed to mark and fix the upper supportsto the wall (Fig. 4, C). Once theconvector is mounted, immobilise itwith the lower support (Fig. 4, D and E).SWITCHING ON AND OPERATIONOnce you have checked that themains voltage coincides with thevoltage indicated on the name plate,connect the convector.
1- Select the power using the powerselector (Fig. 2).2- To achieve a specific temperaturein the room, turn the thermostat control(Fig. 2) clockwise to the maximumposition.3- Once the room has reached thedesired temperature, turn the thermostatcontrol anticlockwise untilyou hear a slight click. When thethermostat control is in this position,the convector will connect and disconnectautomatically to keep thepre-selected temperature constant.Do not use this convector in roomswith areas of less than 4 m 2 . Donot place the convector in draughtyareas, as this could interfere withits correct operation. Do not use theconvector to dry clothes.ANTI-FREEZE PROTECTIONThe S&P convectors incorporate ananti-freeze device which triggers theconvector when the room temperaturedrops below +5ºC.To activate this device just connectthe convector to the mains, place thepower selector in any of the activepositions and the thermostat controlin the “*” position (Fig. 2).The convector will remain disconnecteduntil the room temperaturedrops below +5ºC when it will startautomatically to ensure the temperatureis maintained over +5ºC.This device is particularly useful inplaces where low temperatures are10common and the water pipes arelikely to freeze, etc.COMBINED OPERATION(<strong>TLS</strong>-<strong>403</strong> <strong>Turbo</strong>)To accelerate the heating of the roomyou can also connect the fan by pressingthe fan switch. In this positionthe switch will light up.PROTECTION AGAINST OVERHEA-TINGIf any operating trouble is produced,the overheating disconnection systemwill automatically disconnectthe convector.If this occurs:-Place the power switch in the “0”position.-Disconnect the convector from themains.-Let the convector cool down for 15minutes.-Check that the air inlet and outletgrilles are not blocked. If necessary,clean them with a vacuum cleaner.-If the convector still does not worknormally after these checks, pleasecontact the extensive network ofS&P Official Services.MAINTENANCEThe S&P convectors do not requireany special maintenance. Before cleaningdo not forget to disconnect theconvector from the mains.Wait for the body to cool down and
clean with a soft cloth. Use a vacuumcleaner to clean the air inlet and outletgrilles.Under no circumstances must theconvector be submerged in water orplaced under a running tap.If the convector is not used for a longperiod of time, it must be protectedfrom dust particles.TECHNICAL ASSISTANCEThe extensive network of S&P OfficialServices guarantees good technicalassistance all over Spain. Ifyou observe any anomalies in theconvector, please contact any of theabovementioned Services, whereyou will be correctly attended.Any manipulation carried out by personsoutside of the S&P Official Serviceswill force us to cancel the guarantee(S&P reserves the right to makemodifications without prior warning).REMOVAL FROM SERVICE, DISPO-SAL AND RECYCLING- EU regulations and our commitmentto future generations oblige us to recycleused materials; pleaseremember to dispose of all unwantedpackaging materials at the appropriaterecycling points, and todrop off obsolete equipment at thenearest waste management point.230V ~ 50 Hz 2.000 W11FMode d’emploiLire attentivement ces instructionsavant d’utiliser l’appareilLes convecteurs <strong>TLS</strong>-<strong>401</strong> (modèlestatique) et <strong>TLS</strong>-<strong>403</strong> <strong>Turbo</strong> (modèledynamique avec ventilateursoufflant) sont conformes aux normeseuropéennes. Ils sont destinésà un usage domestique et ne doiventpas être utilisés dans un milieu oùseraient présent des gaz inflammablesou explosifs.Vérifier, dès l’avoir sorti de son emballage,le parfait état de l’appareilainsi que son fonctionnement, étantdonné que tout éventuel défautd’origine est couvert par la garantieRECOMMANDATIONS DE SECURITE- Ne pas installer le convecteurdirectement en dessous d’uneprise de courant.- Ne pas utiliser dans un localcontenant une baignoire, unedouche ou une piscine.- Ne pas faire passer le câbled’alimentation électrique devantla grille de sortie d’air chaud, nile mettre en contact avec les paroisquand le convecteur est enfonctionnement.- Ce symbole signifie: “NEPAS COUVRIR” l’appareilde chauffage avec desobjets ou du linge empêchantla libre circulation de l’air. Si
12l’appareil de chauffage est recouvertil existe un risque desurchauffe.- Ne jamais toucher l’appareil avecles mains mouillées ou humides- Ne pas installer les convecteursprès d’un mur fabriqué en matériauxcombustibles (bois, plastique,etc..)- Ne pas placer d’objets inflammablesà moins de 50 cm du fluxd’air chaud (rideaux...)- Maintenir les grilles d’entrée etde sortie d’air, propres. Avanttoutes opérations d’entretiendébrancher l’appareil.- Si le câble souple d’alimentationest abîmé il doit être remplacéuniquement par un câble ayantles mêmes caractéristiques etpar un professionnel compétent.- En cas d’installation fixe, l’appareildevra être monté de tellefaçon que la prise soit toujoursaccessible.- En cas d’installation fixe, respecterles distances minimalesindiquées fig.1- En aucun cas les interrupteurs/boutons ne doivent être accessiblesà une personne sous unedouche ou dans une baignoire.ATTENTION: monter les piedsavant de mettre en marche le convecteur- Cet appareil ne doit pas être utilisépar des enfants ou des personnesprésentant des diminutionsphysiques, sensorielles oumentales, ou avec une expérienceou connaissance inadéquate,s’ils ne sont pas surveillés parune personne responsable afind’assurer qu’ils utilisent le produiten toute sécurité.- Les jeunes enfants doivent êtresurveillés pour s’assurer qu’ilsne jouent pas avec l’appareil.- Cet appareil de chauffage ne doitpas être raccordé à un programmateurou autre type de dispositifpermettant la mise en marcheautomatique de l’appareil.INSTALLATIONAvant de mettre en marche le convecteuril est indispensable qu’il ait lespieds montés ou qu’il soit fixé au mur.MONTAGE DES PIEDSEmboîter les pieds dans les latéraux(Fig.3). Fixer chacun d’eux avec troisvis. Pour retirer les pieds, desserrerles vis et tirer vers l’extérieur.MONTAGE AU MURCe montage est à réaliser sans lespieds. Une fois choisi l’emplacementet avant montage, vérifier le respectdes distances minimales indiquéesfig.1. Marquer et placer les supportssupérieurs (C fig.4). Accrocherl’appareil, marquer la position du supportinférieur puis fixer l’ensemble(D et E fig.4)
MISE EN MARCHE ET FONCTION-NEMENTVérifier que la tension du réseau estcompatible avec celle indiquée sur laplaque caractéristique de l’appareil.1- Sélectionner la puissance dechauffage par l’intermédiaire du sélecteurde puissances (fig.2).2- Tourner la commande du thermostat(fig.3) dans le sens des aiguillesd’une montre, jusqu’à sa positionmaximale.3- Quand la température dans lapièce à chauffer a atteint le niveaudésiré, tourner la commande duthermostat, dans le sens inversedes aiguilles d’une montre, jusqu’àce que s’entende un léger “clic”. Enlaissant le thermostat sur cette position,le convecteur soufflant maintiendrala température présélectionnéeen se mettant en marche et ens’arrêtant automatiquement.Ne pas utiliser le convecteur dansdes pièces de moins de 4 m2. Ne pasplacer l’appareil dans les courantsd’air, car ils pourraient perturber sonfonctionnement. Ne pas utiliser leconvecteur pour sécher le linge.DISPOSITIF “HORS GEL”Les convecteurs S&P incorporent undispositif « hors gel ». Ce dispositifmet en marche automatiquementle convecteur quand la températureambiante chute en dessous de +5ºC.En conservant l’appareil brancher auréseau, sélectionner la puissance de13chauffage et placer la commande duthermostat sur la position “*” (fig.2).Cette fonction est très utile pour leslieux que l’on désire préserver dugel.FONCTIONNEMENT DU VENTILA-TEUR(<strong>TLS</strong>-<strong>403</strong> <strong>Turbo</strong>)Pour accélérer la mise en températured’une pièce, le <strong>TLS</strong> -<strong>403</strong> <strong>Turbo</strong>dispose d’un ventilateur qui se meten marche par un l’intermédiaire del’interrupteur situé en façade et quis’allumera en cas d’utilisation.PROTECTION THERMIQUELes convecteurs mobiles <strong>TLS</strong> sontéquipés d’une protection thermiquearrêtant automatiquement l’appareilen cas de surchauffe.Au cas où cela se produirait:- Placer le sélecteur de puissancesur la position “0”- Débrancher l’appareil du réseauélectrique- Laisser le refroidir 15 minutes- Vérifier que les grilles d’entrée etde sortie ne sont pas obstruées. Sinécessaire les nettoyer avec un aspirateur.- Si le problème persiste, mettezvousen contact avec votre distributeur.
MAINTENANCELes convecteurs S&P ne requièrentpas de maintenance particulière.Avant de procéder au nettoyage, nepas oublier de débrancher l’appareildu secteur.Attendre que le châssis refroidisse etle nettoyer avec un linge. Utiliser unaspirateur pour nettoyer les grillesd’entrée et de sortie d’air.Ne plonger, en aucun cas, l’appareildans l’eau ni sous le robinet.Si l’appareil n’est pas utilisé durantune période prolongée, le ranger àl’abri de la poussière.MISE HORS SERVICE ET RECYCLA-GE- La norme de la CEE et l’engagementque nous devons maintenir enversles futures générationsnous obligent à recycler le matériel; nous vous prions de ne pas oublierde déposer tous les élémentsrestants de l’emballage dans lescontainers correspondants de recyclage,et d’emmener les appareilsremplacés au Gestionnaire de Déchetsle plus proche.ENTRETIENDébrancher le convecteur soufflantavant toutes opérations d’entretien.Nettoyer l’appareil que lorsqu’il esttotalement froid, avec un chiffondoux. Ne pas utiliser de produitsabrasifs ni de dissolvants.Contrôler périodiquement que lesgrilles d’entrée et de sortie ne sontpas obstruées par la poussière; lesnettoyer avec un aspirateur.Ne jamais immerger le convecteur, nile passer sous l’eau.En cas d’inutilisation prolongée duconvecteur. le ranger à l’abri despoussières.Ne pas démonter l’appareil, toutesmanipulations effectuées par unepersonne non autorisée, entraîneraientl’annulation de la garantie.14230V ~ 50 Hz 2.000 W
PInstruções de utilizaçãoAgradecemos que leia atentamenteestas instruções antes de colocarem funcionamento o aparelho. Estasdar-lhe-ão informações importantesacerca da segurança e para a utilizaçãocorrecta do mesmo.Os convectores <strong>TLS</strong>-<strong>401</strong> e <strong>TLS</strong>-<strong>403</strong><strong>Turbo</strong> cumprem as normas de homologaçãoeuropeias.Agradecemos que verifique o perfeitoestado do aparelho ao desembalá-lopois qualquer defeito de origemque apresente estará ao abrigo dagarantia S&P.ADVERTÊNCIAS DE SEGURANÇA- O convector não deve estar situadopor baixo de uma tomadade corrente.- Não utilize este aparelho de aquecimentonas imediações de umabanheira, duche ou de uma piscina.- Enquanto o convector estiver afuncionar, o cabo não deverá estarem contacto com a zona quentedo aparelho.- Não use o convector para secarroupa.- Não manipule o convector comas mãos molhadas.- Este símbolo significa:“NÃO CUBRIR” o aparelhocom objectos ou roupaque impeça a livre circulaçãodo ar: Se cubrir-mos o aquecedorexiste o riso de sobreaquecimento.- Se o cabo flexível de alimentaçãoestiver danificado, apenaspode ser substituído numa dasnossas Oficinas de Reparaçãoou por pessoal similar qualificadocom a finalidade de evitarperigos.- Não devem ficar objectos inflamáveisa menos de 50 cm do circuitode ar quente (cortinas, etc.)- Se o aparelho se instalar de formafixa deverão ser respeitadasas distâncias mínimas indicadasna Fig. 1.- Os comandos de regulação nãodevem ser acessíveis em nenhumcaso por parte de pessoasque estejam no banho.- Sempre que se instale de formafixa, ao aparelho deverá estar situadode forma a que a cavilhaesteja acessível.ATENÇÃO!! Antes de colocar emfuncionamento o aparelho, monteos apoios do mesmo.- Mantenha sempre limpas asgrelhas de entrada e saída dear. Sempre que faça a limpezatenha a precaução de desligar oaparelho.- Não coloque o aparelho ao ladode uma parede construída commateriais combustíveis (madeira,plástico, etc.).15
- Este produto nao deve ser utilizadopor pessoas, crianças incluídas,com diminuições físicas,sensoriais ou mentais, ou comexperiencia inadequada e conhecimento,senão sob a supervisãode uma pessoam responsáveladequadamente instruídapara a utilização do aparelho.- As crianças devem estar sempresob supervisão para nos assegurarmosque não brincam como aparelho.- Não podemos utilizar o aparelholigado a um progamador, temporizadorou outro dispositivo quecontrole a ligação do aquecedorautomáticamente.INSTALÇÃOAntes de colocar o aparelho em funcionamento,é indispensável ter osapoios montados ou que esteja fixoà parede.MONTAGEM DOS APOIOSEncaixar os apoios nas laterais(Fig.3). Fixar cada um deles com trêsparafusos. Para retirar os apoios,soltar os parafusos e puxar para fora.MONTAGEM NA PAREDEA montagem na parede só é possívelsem os apoios.Depois de escolhida a localização eantes de fixar o aparelho, verificar sesão respeitadas as distâncias mínimas(Fig.1)Proceder à marcação e seguidamenteà fixação dos suportes superiores(C Fig.4). Depois de pendurado oaparelho, imobilizá-lo através do suporteinferior (D e E Fig.4).ENTRADA EM FUNCIONAMENTODepois de verificada se a tensão darede coincide com a indicada na placade características, ligue o aparelho.1- Seleccione a potência através doselector de potências (Fig.2).2- Para obter uma determinada temperaturana sala, gire o comando dotermóstato (Fig.2) no sentido dosponteiro do relógio até à sua posiçãomáxima.3- Depois da divisão alcançar a temperaturadesejada, gire o comandodo termóstato no sentido contrárioao dos ponteiros do relógio, até ouvirum suave “clic”. Quando o comandodo termóstato estiver nesta posição,o aparelho ligará e desligará automaticamentepara manter constantea temperatura pré-seleccionada.Não utilize este aparelho em divisõescom área inferior a 4 m2. Não coloqueo aparelho onde haja correntede ar, porque podem perturbar o seubom funcionamento. Não utilize oaparelho para secar roupa.PROTECÇÃO ANTI-GEADASOs convectores S&P têm um disposi-16
tivo anti-geadas que fazem com queo aparelho entre em funcionamentoquando a temperatura ambientedesce de +5ºC.Para accionar este dispositivo apenasdeve ligar o aparelho à rede,colocar o selector de potências emqualquer uma das suas posiçõesactivas e o comando termóstato naposição “*” (Fig. 2).O aparelho ficará desligado, mas sea temperatura ambiente baixar de+5ºC, automaticamente entrará emfuncionamento mantendo uma temperaturaambiente acima dos +5ºC.Este dispositivo é especialmentebenéfico em locais onde se alcancembaixas temperaturas e for fácilo congelamento da água das tubagens,etc.FUNCIONAMENTO COMBINADO(<strong>TLS</strong>-<strong>403</strong> <strong>Turbo</strong>)Para acelerar o aquecimento da salapode-se ligar adicionalmente o ventiladoraccionando o interruptor domesmo. Nesta posição o interruptoriluminar-se-á.PROTECÇÃO CONTRA SOBREA-QUECIMENTOSe ocorrer alguma perturbação, osistema de desligação por sobreaquecimentodesliga automaticamenteo aparelho.Se isto acontecer:-Coloque o interruptor de potências17na posição “0”.-Desligue o aparelho da rede.-Deixe arrefecer o aparelho duranteuns 15 minutos.-Reveja se as grelhas de entrada ede saída de ar não estão obstruídas.Se for necessário, limpe-as com umaspirador.-Se depois deste controlo o aparelhonão funcionar normalmente, pedimos-lheque contacte a ampla redede Serviços Oficiais S&P.MANUTENÇÃOOs convectores S&P não necessitamde uma manutenção especial. Antesde proceder à sua limpeza não seesqueça de desligar o aparelho darede.Espere até que a carcaça arrefeça elimpe-a com um pano suave. Utilizeum aspirador para limpar as grelhasde entrada e saída de ar.Sob conceito algum deve o aparelhoser submerso nem colocado debaixode uma torneira.Se o aparelho não for utilizado duranteum longo período de tempo,guarde-o protegido de partículas depó.ASSISTÊNCIA TÉCNICAA rede de Serviços Oficiais S&P garanteuma adequada assistênciatécnica. Em caso de observar algumaanomalia no aparelho, solicita-
mos que contacte qualquer um dosServiços mencionados, onde serádevidamente atendido.Qualquer manipulação efectuada porpessoas alheias aos Serviços OficiaisS&P obrigaria ao cancelamento dasua garantia (S&P reserva-se o direitoa modificações sem aviso prévio)PARAGEM DE UTILIZAÇÃO E RECI-CLAGEM- A normativa da CE e o nosso compromissocom as gerações futurasobriganos à reciclagem dos materiais;agradecemos que deposite todos oselementos sobrantes da embalagemem contentores própriosde reciclagem, e que leve os seusaparelhos que está a substituir aoGestor de Resíduos mais próximo.230V ~ 50 Hz 2.000 W18NDGebruiksaanwijzingenWij verzoeken u deze instructiesaandachtig te lezen alvorens hetapparaat in werking te stellen. Dezeinstructies bevatten belangrijk informatieover de veiligheid en het juistgebruik.De convectors <strong>TLS</strong>-<strong>401</strong> en <strong>TLS</strong>-<strong>403</strong><strong>Turbo</strong> voldoen aan de Europese goedkeuringsnormen.U wordt aangeraden de goede staaten de werking te controleren van hetapparaat bij het uitpakken. Elk oorspronkelijkdefect valt onder de S&Pgarantie.VEILIGHEIDSWAARSCHUWINGEN- De verwarming mag niet juistonder een stopcontact wordengeplaatst.- Gebruik dit apparaat niet in deomgeving van een bad, een doucheof een zwembad.- Terwijl de verwarming werkt,mag de kabel geen contactmaken met het warme gedeeltevan het apparaat.- Gebruik de convector niet omkleren te drogen.- Manipuleer het apparaat nietmet natte handen.- “Niet afdekken” Dezeverwarmer dient een vrijeluchtcirculatie te hebben.Afdekking kan tot oververhitting
leiden en is BRAND gevaarlijk.- Wanneer de voedingskabel beschadigdis, moet deze vervangenworden in één van onze Reparatiedienstenof door gekwalificeerdpersoneel om zo gevaarlijkesituaties te voorkomen.- Brandgevoelige objecten (gordijnen,etc.) moeten zich op tenminste50 cm afstand bevindenvan het warmeluchtcircuit.- Als het apparaat vast wordtgeïnstalleerd dan moeten de minimaleafstanden, aangegeven inde Fig. 1, worden gerespecteerd.- De bedieningsknoppen dienennooit binnen handbereik te zijnvan personen die zich in bad ofin de douche bevinden.- Wanneer het apparaat vast wordtgeïnstalleerd dan moet deschakelaar of de stekker altijdbereikbaar zijn.OPGELET! Breng de voorziene voetaan alvorens het apparaat in werkingte stellen.- Houd de roostertjes voor in- enuitgaande lucht altijd schoon. Bijhet schoonmaken van het apparaatmoet u steeds uit voorzorgde stekker uittrekken.- Plaats het apparaat niet tegen eenwand die bestaat uit brandbarematerialen (hout, plastic, etc.).- Dit apparaat is niet geschiktvoor gebruik door personen dieniet geheel zelfstandig, fysiek19of psychisch, in staat zijn dit tebedienen, zonder supervisie vanandere personen die daar weltoe in staat zijn.- Kinderen dienen te alle tijdenonder toezicht dit product te gebruiken.- Dit apparaat dient gebruikt teworden met Programmaschakelaar,Tijdschakelaar of Thermostaatdie voor automatische uitschakelingzorgdraagt.INSTALLATIEHet is noodzakelijk dat de voorzienevoeten gemonteerd zijn of dat hetapparaat is bevestigd aan de wandalvorens het wordt in werking gesteld.MONTAGE VAN DE VOETENPas de voeten in de zijpanelen(Fig.3). Bevestig iedere voet met drieschroeven. Om de voeten te verwijderen,moet u de schroeven losmakenen naar buiten trekken.MONTAGE TEGEN DE WANDDe montage tegen de wand is enkelmogelijk zonder de voeten.Bij het uitzoeken van de bevestigingsplaats,en alvorens de bevestiginguit te voeren, moet u controlerenof de minimale afstanden gerespecteerdzijn (Fig.1).Markeer de bevestigingsplaats enbevestig de bovenste steunen (Cin Fig.4). Na het ophangen van het
-Verbreek de verbinding met het elektrischenet.-Laat het apparaat gedurende 15minuten afkoelen.-Controleer of de roostertjes voorin- en uitgaande lucht vrij zijn. Maakdeze zonodig schoon met een stofzuiger.-Als na deze controles het apparaatnog steeds niet normaal werkt, verzoekenwij u zich te wenden tot hetnetwerk van Erkende Herstellers vanS&P.ONDERHOUDDe S&P-convectors vereisen geenspeciaal onderhoud. Vergeet niet destekker uit te trekken vooraleer tebeginnen met het schoonmaken vanhet apparaatLaat de kast afkoelen en maak dezevervolgens schoon met een zachtedoek. Maak de roostertjes voor inenuitgaande lucht schoon met eenstofzuiger.In geen enkele situatie mag hetapparaat in water worden ondergedompeldof onder de waterkraanworden gehouden.Bij langdurig niet-gebruik moet u hetapparaat tegen stof beschermen.elke plaats in Spanje. Mocht u eenstoring vaststellen in de werking vanhet apparaat dan verzoeken wij ucontact op te nemen met een van devermelde servicepunten.Elke manipulatie in het apparaat dieniet is uitgevoerd door de OfficiëleS&P-Klantenservice doet de garantievervallen (S&P behoudt zich het rechtvoor wijzigingen aan te brengen zondervoorafgaande waarschuwing.).BUITENBEDRIJFSTELLING EN HER-GEBRUIK- De CEE richtlijnen en onze betrokkenheidmet de toekomstigegeneraties, verplichten ons tot hethergebruik van de materialen. Wijvragen u niet te vergeten alle overtolligeverpakkingsresten in de juisterecyclingcontainers te deponeren,alsook afgedankte apparaten naarhet dichtstbijzijnde inzamelpunt tebrengen.TECHNISCHE DIENSTHet uitgebreide netwerk van OfficiëleS&P-Klantenservice garandeert degepaste technische assistentie op21230V ~ 50 Hz 2.000 W
IIstruzioni per l’usoSi prega di leggere attentamente lepresenti istruzioni prima di metterein funzione l’apparecchio. Nelle istruzionisono infatti riportate informazioniimportanti per la sicurezza eper il corretto uso dell’apparecchio.I convettori <strong>TLS</strong>-<strong>401</strong> e <strong>TLS</strong>-<strong>403</strong> <strong>Turbo</strong>sono conformi alle norme di omologazioneeuropee.Si prega di verificare il perfetto statodell’apparecchio mentre viene disimballato,dato che qualsiasi difettod’origine è coperto dalla garanzia S&P.AVVERTENZE RELATIVE ALLA SI-CUREZZA- Il convettore non deve esseresistemato sotto una presa di corrente.- Non usare questo apparecchio diriscaldamento vicino alla vascada bagno, alla doccia o ad unapiscina.- Mentre il convettore è in funzione,il cavo non deve essere acontatto con la zona riscaldatadell’apparecchio.- Non usare il convettore per asciugarecapi di vestiario.- Non usare l’apparecchio con lemani bagnate.- Questo simbolo significa:“NON COPRIRE” l’apparecchiocon oggetti o indumentiche possano impedire lalibera circolazione dell’aria. Sesi copre l’apparecchio c’è il rischiodi sovrariscaldamento.- Se il cavo flessibile di alimentazioneè danneggiato, lo stessodeve essere sostituito esclusivamentepresso uno dei nostricentri di Assistenza Tecnica o comunqueda personale qualificato.- Non lasciare oggetti infiammabilia meno di 50 cm dal circuitodell’aria calda (tendaggi, ecc.)- Se l’apparecchio viene installatofisso, si devono rispettare ledistanze minime indicate nellaFig. 1.- I pulsanti di regolazione non devonoin nessun caso essere accessibilida parte di persone chesiano all’interno della vasca dabagno o della doccia.- Se l’installazione è fissa,l’apparecchio deve essere sistematoin modo tale che la siasiano accessibili.ATTENZIONE!! Prima di mettere infunzione l’apparecchio, montare ipiedini dello stesso.- Mantenere sempre pulite legriglie di entrata e di uscitadell’aria. Prima di effettuarne lapulizia, disinserire l’apparecchiodalla presa di corrente.- Non sistemare l’apparecchio accantoad una parete costruitacon materiali combustibili (legno,plastica, ecc.).22
- Questo prodotto non deve essereutilizzato da persone, bambiniinclusi, con handicap o menomazionifisiche, psicologicheo mentali, o con una esperienzae conoscenza inadeguata, senon sotto la supervisione di unapersona responsabile adeguatamenteistruita per l’utilizzodell’apparecchiatura.- Assicurarsi che i bambini nongiochino con l’apparecchio.- Non è possibile utilizzare l’appa–recchio collegato ad un programmatore,temporizzatore o altrodispositivo che attivi il riscaldatoreautomaticamente.INSTALLAZIONEPrima di mettere in funzionel’apparecchio, è indispensabile montarei piedini o fissarlo alla parete.MONTAGGIO DEI PIEDINIIncastrare i piedini ai lati (Fig. 3). Fissareciascuno di essi con tre viti. Perrimuovere i piedini, allentare le vitied estrarre gli stessi.23MONTAGGIO A PARETEIl montaggio a parete è possibile solosenza i piedini.Una volta scelta la posizione definitivae prima di fissare l’apparecchio,verificare di aver rispettato le distanzeminime (Fig. 1).Segnare la posizione e quindi fissarei supporti superiori (C Fig. 4). Unavolta appeso l’apparecchio, immobilizzarlotramite il supporto inferiore(D ed E Fig. 4).ACCENSIONE E FUNZIONAMENTODopo aver accertato che la tensionedella rete di alimentazione coincidacon quella riportata sulla targhettadelle caratteristiche, inserire la spinadell’apparecchio nella presa.1- Selezionare la potenza tramitel’apposito selettore (Fig. 2).2- Per ottenere la temperatura richiestanel locale, girare il termostato(Fig. 2) in senso orario fino allaposizione massima.3- Una volta raggiunta la temperaturarichiesta, girare il termostatoin senso antiorario, fino a sentireun leggero “clic”. Quando il comandodel termostato si trova in questaposizione, l’apparecchio si accendee si spegne automaticamente permantenere costante la temperaturaimpostata.Non usare questo apparecchio in localila cui area sia inferiore a 4 m2.Non sistemare l’apparecchio in unazona con corrente d’aria dato che nepotrebbe pregiudicare il corretto funzionamento.Non usare il convettoreper asciugare capi di vestiario.PROTEZIONE ANTIGELOI convettori S&P dispongono di undispositivo antigelo incorporato chefa sì che l’apparecchio si metta infunzione quando la temperatura am-
iente è inferiore a +5º C.Per azionare questo dispositivo, bastacollegare l’apparecchio alla retedi alimentazione, girare il selettoredelle potenze fino ad una qualsiasidelle posizioni attive e quindi il termostatosulla posizione “*” (Fig. 2).L’apparecchio resta disinserito, mase la temperatura ambiente è inferiorea +5º C, si mette automaticamentein funzione mantenendo latemperatura ambiente al di sopra di+5º C.Questo dispositivo è particolarmenteutile nei luoghi in cui si raggiungonotemperature molto basse e l’acquadelle tubature, ecc. si può congelarefacilmente.FUNZIONAMENTO COMBINATO(<strong>TLS</strong>-<strong>403</strong> <strong>Turbo</strong>)Per accelerare il riscaldamentodel locale, si può inserire addizionalmenteil ventilatore azionandol’interruttore dello stesso che rimaneilluminato.PROTEZIONE CONTRO IL SURRIS-CALDAMENTOSe si verifica qualche anomalia, ildispositivo di protezione contro il surriscaldamentodisinserisce automaticamentel’apparecchio.In tal caso:- Girare il selettore delle potenze sullaposizione “0”.24- Disinserire la spina dell’apparecchiodalla presa di corrente.- Lasciare raffreddare l’apparecchioper circa 15 minuti.- Controllare che le griglie di entratae di uscita dell’aria non siano ostruite.In caso necessario, pulire con unaspirapolvere.- Se dopo questo controllol’apparecchio non funziona normalmente,rivolgersi al Servizio di AssistenzaTecnica S&P più vicino.MANUTENZIONEI convettori S&P non richiedono unamanutenzione speciale. Prima dieffettuarne la pulizia, non dimenticaredi disinserire l’apparecchio dallarete di alimentazione.Attendere che l’apparecchio si raffreddie pulire l’esterno con un pannomorbido. Usare un aspirapolvereper pulire le griglie di entrata e diuscita dell’aria.Non immergere mai l’apparecchio inacqua né metterlo sotto il rubinetto.Se l’apparecchio non viene usato perun periodo di tempo prolungato, custoditelocon cura dopo averlo protettodalla polvere.ASSISTENZA TECNICALa vasta rete di Servizi di AssistenzaTecnica ufficiali S&P garantisceun’assistenza adeguata.Se si rilevasse qualche anomalianell’apparecchio, mettersi in contatto
con il Servizio di Assistenza Tecnicapiù vicino dove l’apparecchio potràessere riparato adeguatamente.Qualsiasi manomissione effettuatada persone non addette ai Servizidi Assistenza Tecnica ufficiali S&Pcomporta l’annullamento della garanziadell’apparecchio (S&P si riservail diritto di apportare modifichesenza preavviso).MESSA FUORI SERVIZIO E RICI-CLAGGIO- La norma CEE e l’impegno assuntocon le generazioni future ci obbliganoal riciclaggio dei materiali;la preghiamo di gettare tutti i residuidell’imballaggio nei contenitori corrispondentie di depositare gliapparecchi non più utilizzabili pressoil Gestore Ambientale più vicino.230V ~ 50 Hz 2.000 W25
C/Llevant,4Polígono Industrial Llevant08150 Parets del Vallès(Barcelona) ESPAÑATel. 93 571 93 00Fax. 93 571 93 01Tel. int. +34 93 571 93 00Fax. int. +34 93 571 93 11http://www.solerpalau.comconsultas@solerpalau.comRef.: 1431186/2