18AVVERTENZA IMPORTANTE:Le operazioni sotto elencatedevono essere eseguite soloda personale specializzato edin possesso dei requisiti professionaliper effettuare questotipo di lavoro.MISE EN GARDE IMPORTANTE:Les opérations ci-dessous doiventêtre effectuées seulementpar un personnel spécialisé etspécialement formé pour ce typede travail.IMPORTANT:The procedures described belowmust only be done by qualifiedpersonnel and who have the professionalknowledge required forsuch a job.WICHTIGER HINWEIS:Die nachstehend beschriebenenArbeitsgänge sind ausschließlichFachpersonal vorbehalten, dasdie nötigen Kenntnisse zur Ausführungdieser Arbeit besitzt.ADVERTENCIA IMPORTANTE:Las operaciones que se describena continuación deben ser efectuadasúnica y exclusivamentepor personal especializado y conlos requisitos profesionales paraefectuar este tipo de trabajo.ISTRUZIONI PER LA SCONNESSIONEDELLA LINEA FLESSIBILENel caso di installazione a parete (Ø da 50 a 60mm), la linea flessibile può venir separata dallaunità interna. La suddetta linea è compostadai seguenti particolari scollegabili:• cavo di collegamento elettrico per ilmotore del ventilatore dell'unità esterna;• tubo in gomma tra la pompa ed ilcondensatore dell'unità esterna;• due linee di collegamento per refrigeranteche si aprono e chiudonoautomaticamente.AVVERTENZA:TOGLIERE LA SPINA DI ALIMENTAZIONEELETTRICA PRIMA DI INIZIARE L'OPERA-ZIONE DI SCONNESSIONE DELLA LINEAFLESSIBILE. I DUE RACCORDI RAPIDIDELLA LINEA FLESSIBILE DEVONO ES-SERE MANTENUTI IN STATO DI ASSOLUTAPULIZIA. PER QUESTO MOTIVO, QUANDOVENGONO FATTI PASSARE ATTRAVERSOUN'APERTURA, OCCORRE PROTEGGERLICON GLI APPOSITI TAPPI DATI IN DOTA-ZIONE. SE I RACCORDI RAPIDI SONOSPORCHI POSSONO PORTARE AD UNACATTIVA TENUTA CON CONSEGUENTEPERDITA DI GAS REFRIGERANTE.IMPORTANTE:NON ALIMENTATE MAI ELETTRICAMENTE- MEDIANTE L'INSERIMENTO DELLA SPINAIN UNA PRESA DI CORRENTE - IL CLIMA-TIZZATORE QUANDO LE LINEE SONOSCOLLEGATE. SE LO STESSO VIENEINAVVERTITAMENTE ACCESO CON LELINEE STACCATE METTERESTE A SERIORISCHIO LA VS. SICUREZZA ED INOLTREDANNEGGERESTE IRREPARABILMENTEL'APPARECCHIATURA.INSTRUCTIONS POUR LADECONNEXION ET LARECONNEXION DE LA LIGNE FLEXIBLEDans le cas de montage au mur (allant de 50à 60 mm), la ligne flexible peut etre séparéede l'unité interieure. La ligne se compose despièces détachables suivantes:• câble de connexion électrique pour le moteurdu ventilateur de l'unité exterieure;• tuyau en caoutchouc entre la pompe et'unité extérieure;• deux lignes de connexion pour le réfrigérant quis'ouvrent et se ferment automatiquement.ATTENTION:DÉBRANCHER LA FICHE D'ALIMENTATIONÉLECTRIQUE AVANT DE COMMENCER LADÉCONNEXION DE LA LIGNE FLEXIBLE. LESDEUX RACCORDS RAPIDES DE LA LIGNEFLEXIBLE DOIVENT ÊTRE MAINTENUSPARFAITEMENT PROPRES. DANSCE BUT,LORSQU'ILS DOIVENT PASSER À TRAVERSUNE OUVERTURE, IL FAUT LES PROTÉGERAU MOYEN DES BOUCHONS SPÉCIAUXFOURNIS EN DOTATION. SI LES RACCORDSRAPIDES SONT SALES, ILS PEUVENTENTRAINER UNE MAUVAISE ÉTANCHEITÉET PAR CONSÉQUENT, UNE PERTE DUGAZ RÉFRIGÉRANT.IMPORTANT:NE JAMAIS ALIMENTER LE CLIMATISEURÉLECTRIQUEMENT EN BRANCHANTUNE FICHE DANS UNE PRISE DECOURANT LORSQUE LES LIGNES SONTDÉCONNECTÉES. SI LE CLIMATISEUR ESTALLMUMÉ PAR INADVERTANCE LORSQUELES LIGNES SONT DÉCONNECTÉES, VOUSRISQUEZ DE METTRE VOTRE SÉCURITÉ ENDANGER ET, EN PLUS, D'ENDOMMAGERIRREMEDIABLEMENT L'APPAREIL.DISCONNECTING THE FLEXIBLELINEFor wall installation (from 50 to 60 mm),the flexible line can be separated fromthe inside unit. This line is composedof the following parts that can be disconnected:• electrical connection cable for theoutside unit fan motor;• rubber hose between the pump andthe condenser of the outside unit;• two connection lines for coolant,that open and close automatically.CAUTION:ALWAYS REMOVE THE ELECTRICALPLUG FROM THE SOCKET BEFOREDISCONNECTING THE FLEXIBLELINE. THE TWO QUICK COUPLINGSOF THE FLEXIBLE LINE MUST BEKEPT PERFECTLY CLEAN. FORTHIS REASON, THEY NEED TO BEPROTECTED WHEN THEY ARE RUNTHROUGH AN OPENING USING THESPECIAL PLUGS PROVIDED. IF THEQUICK COUPLINGS ARE DIRTY, THISCAN ALSO LEAD TO POOR SEALINGAND THUS A LOSS OF COOLANTGAS.WARNING:NEVER SUPPLY CURRENT TO THEAIR CONDITIONER BY PLUGGINGTHE PLUG INTO AN ELECTRICALSOCKET WHILE THE LINES AREDISCONNECTED. IF THE UNIT ISACCIDENTALLY SUPPLIED WITHTHE LINES DISCONNECTED, IT ISNOT ONLY A SERIOUS RISK TOYOUR SAFETY BUT ALSO CAUSESPERMANENT DAMAGE TO THE AIRCONDITIONER.T R E N N U N G D E S V E R B I N -DUNGSCHLAUCHANSCHLUSSESFür eine Wanddurchführung (Ø 50 bis 60 mm)kann der Verbindungsschlauch am Innenteilgetrennt werden. Der Verbindungsschlauchbesteht aus folgenden trennbaren Teilen:• Elektroverbindungsleitung für denVentilatormotor im Außenteil;• Schlauch von der Pumpe zum Verflüssigerim Außenteil;• Zwei sich automatisch schließende undöffnende Kältemittelverbindungs leitungen.HINWEIS:V O R D E M T R E N N E N D E RFUNKTIONSLEITUNG NETZ-STECKER AUSDER STECKDOSE ZIEHEN. GERÄT NICHTIM GETRENNTEN ZUSTAND BETREIBEN.DIE ZWEI SCHNELLANSCHLÜSSE DESVERBINDUNGSSCHLAUCHES MÜSSENABSOLUT SAUBER GEHALTEN WERDEN.AUS DIESEM GRUNDE SIND SIE VORDER DURCHFÜHRUNG DURCH ÖFFNUN-GEN IMMER MIT DEN DAZUGE-HÖRIGENKAPPEN ABZUDECKEN. VERSCHMUTZTESCHNELLANSCH-LÜSSE KÖNNEN ZUEINER MANGE-LHAFTEN DICHTIGKEITUND SOMIT ZUM VERLUST VON KÄLTEMIT-TELGAS FÜHREN.WICHTIG:B E I N I C H T A N G E S C H L O S S E N E NLEITUNGEN IST DAS KLIMAGERÄTNIEMALS DURCH EINSTECKEN DESSTECKERS IN DIE STECKDOSE ANDAS STROMNETZ ANZUSCHLIESSEN.WÜRDE DAS GERÄT VERSEHENTLICHBEI UNANGESCHLOSSENEN LEITUNGENANGESCHALTET WERDEN, SO WÄREIHRE PERSÖNLICHE SICHERHEITSTARK GEFÄHRDET UND DAS GERÄTUNERSETZLICH BESCHÄDIGT.INSTRUCCIONES PARA LA DESCONEXIONY CONEXION DE LA LINEA FLEXIBLEEn el caso de instalación de pared (Ø de50 a 60 mm), la línea flexible puede estarseparada de la unidad interna. Dicha líneaestá compuesta por los siguientes elementosque pueden desconectarse:• cable de conexión eléctrica para el motordel ventilador de la unidad externa;• tubo de goma entre la bomba y elcondensador de la unidad externa;• 2 líneas de conexión para el refrigerador,que se abren y cierran automáticamente.OBSERVACIONES:QUITAR EL ENCHUFE DE ALIMENTACIÓNELÉCTRICA ANTES DE COMENZAR LAOPERACIÓN DE DESCONEXIÓN DE LALÍNEA FLEXIBLE. LOS DOS EMPALMESRÁPIDOS DE LA LÍNEA FLEXIBLE TIENENQUE SER MANTENIDOS EN ESTADO DEABSOLUTA LIMPIEZA. POR ESTE MOTIVO,CUANDO SE HACEN PASAR A TRAVÉSDE UNA ABERTURA, ES NECESSARIOPROTEGERLOS CON LOS TAPONESESPECIALES QUE SE ENTREGAN DESERIE. SI LOS EMPALMES RÁPIDOS ESTÁNSUCIOS PUEDEN CAUSAR UNA MALAESTANQUEIDAD CON LA CONSIGUIENTEPÉRDIDA DEL GAS DE REFRIGERACIÓN.IMPORTANTE:CON LAS LÍNEAS DESCONECTADAS,EL ACONDICIONAR NO TIENE QUEESTAR ALIMENTADO ELÉCTRICAMENTENUNCA, ES DECIR NO TIENE QUEESTAR ENCHUFADO. SI, POR DESCUIDO,LO ENCENDIERA CON LAS LÍNEASDESCONECTADAS, PONDRÍA EN PELIGROSU PROPIA SEGURIDAD Y ADEMÁSDAÑARÍA IRREPARABLEMENTE ELAPARATO.
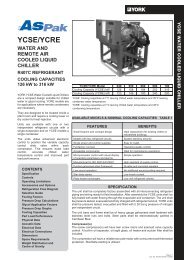
19643C15ABDFig. 112Fig. 12OPERAZIONI PER LA SCONNES-SIONE (v. Fig. 11 e 12)☞ Togliere le viti che bloccano losportello (1) allo schienale del climatizzatore.☞Estrarre dalla sede lo sportello.☞ Staccare dall'apposito portagomma(2) il tubo di trasferimentoacqua di condensa.☞ Sconnettere - facendo pressionesulle due linguette esterne - il connettoreelettrico (3).☞ Allentare la fascetta metallica (6)che fissa la linea flessibile.☞ Svitare i due raccordi rapidi (4) e(5) agendo come descritto di seguito.Durante la separazione dei raccordirapidi fare attenzione a che gli stessi,mentre vengono allentati, non siinclinino, causando fuoriuscita delgas refrigerante. Osservare le normedi sicurezza per le "operazioni conrefrigeranti".OPERATIONS A EXECUTER POUR LADECONNEXION (v. Fig. 11 et 12)☞ Oter la vis qui bloque la protection(1) au dos du climatiseur.☞Extraire le volet de son logement.☞ Débrancher le tuyau d' évacuationde l'eau de condensation du porte-tuyau(2).☞ Débrancher le connecteur électrique(3) en exercant une pression sur les deuxlanguettes extérieures.☞ Desserrer le collier métallique (6)de fixation du tuyau flexible.☞ Dévisser les deux raccords rapides(4) et (5) en agissant de la manièredécrite cidessous. Lors de la séparationdes raccords rapides, faire bien attentionà ce que ces derniers ne s'inclinent paspendant leur déssérage pour ne pasprovoquer de fuite du gaz réfrigérant.Respecter les normes de sécurité pourles "opérations avec réfrigérants".DISCONNECTING THE FLEXIBLELINE (s. Fig. 11 and 12)☞ Remove the screw that secures theguard (1) to the back of the air conditioner.☞ Remove the door from its housing.☞ Take the moisture transfer hose outof the hose-holder (2).☞ Pressing on the two outside tabs,remove the electrical connector (3).☞ Loosen the metal clamp (6) whichsecures the hose.☞ Loosen the two quick couplings(4) and (5) as described below. Whenseparating the quick couplings, makesure that they do not tilt, allowing thecoolant gas to leak out. Observe allsafety rules for carrying out operationswith coolants.TRENNUNGSVORGANG (s. Fig. 11u. 12)☞ Abdeckplatte auf der Rückseiteentfernen (1 Schraube).☞Die Klappe aus ihrem Sitz ziehen.☞ Den Kondenswasserschlauch vonseinem Schlauchhalter (2) abnehmen.☞ Den Elektroanschluß (3) durchdrücken der beiden äußeren Federntrennen.☞ Die den Schlauch befestigendeMetallschelle (6) lockern.☞ Die beiden Schnellanschlüsse(4) und (5) gemäß nachstehenderAnleitungen abschrauben.ACHTUNG:Vorhte Halteschelle (6) lösen oderentfernen.O P E R A C I O N E S PA R A L ADESCONEXION (V. Fig. 11 y 12)☞ Quitar el tornillo que fija la protección(1) a la parte trasera del climatizador.☞ Extraer de su alojamiento la portezuela.☞ Separar del porta manguera (2),el tubo de conducción del agua decondensación.☞ Desconectar - ejerciendo presiónsobre las leugüetas externas - elconector eléctrico (3).☞ Aflojar la abrazadera metálica (6)que fija el tubo flexible.☞ Desatornillar los dos empalmesrápidos (4) y (5), actuando de la siguientemanera: durante la separación de losempalmes rápidos tener cuidado de quelos mismos, mientras se aflojan, no seinclinen, causando la salida del gas derefrigeración. Respetar las normas deseguridad para las "operaciones coneste tipo de gases".