Aqua Jet Water Pressure Systems - Johnson Pump
Aqua Jet Water Pressure Systems - Johnson Pump
Aqua Jet Water Pressure Systems - Johnson Pump
- No tags were found...

Create successful ePaper yourself
Turn your PDF publications into a flip-book with our unique Google optimized e-Paper software.
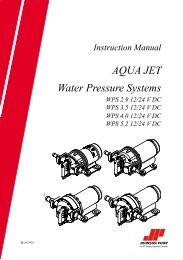
EnglishStart-up procedureAfter pump installation, the systemcan be started by using the followingprocedure:• Fill water tank• Open one tap• Turn on pump• Close tap once water begins flowing• Open each additional tap until all airhas been purged from system• <strong>Pump</strong> will shut off after taps areclosed and pressure builds to thesetpoint of the pressure switchSelf-primingThe pump is self-priming up to 2m forWPS 2.9 and WPS 4.0, 2,5m for WPS5.2 and 2m for WPS 3.5. The inlet pipemust be airtight to ensure self-priming.Dry running<strong>Pump</strong> will not be damaged by shorterperiod of dry running. It will, however,unnecessary reduce your battery power.CautionDo not use pump for any other liquidsthan fresh-water and sea-water.TemperatureMax liquid temperature: +50°C/+120°FMax ambient temperature:+60°C/+140°FWinterizingIf water is not drained from the systemduring freezing temperatures, damageis likely to be sustained in the plumbingand in the pump. To prevent damagefollow the instructions beneath:1. Drain water storage tank.2. Open all taps.3. Run pump until remaining water isexpelled.4. Disconnect inlet and outlet tubes.5. Run pump briefly to confirm thatwater has been expelled.6. Taps shall remain open and pumpfittings shall remain disconnecteduntil temperatures are above freezingOriginal instructionsNever start a frozen pump. Even if it isdrained it might contain a small amountof frozen water that locks the rotor.Service instructions(see page 42-47)Change of Switch (pos A) WPS2.9/3.51. Remove the cables from the powersource.2. Remove the screws (27) and thenremove the complete switch includingdiaphragm (18).3. Cut the connection to the motor(red).4. Locate the new diaphragm (18) andthen the new complete switch.5. Take the new switch and attach thecables to motor and power source.Use the attached jointing sleeve toconnect the motor cable.Change of Switch (pos A)WPS4.0/5.2 1.Remove the cables from the powersource.2. Remove the screws (28) and thenremove the complete switch includingdiaphragm (19).3. Cut the connection to the motor(red).4. Locate the new diaphragm (19) andthen the new complete switch.5. Take the new switch and attach thecables to motor and power source.Use the attached jointing sleeve toconnect the motor cable.Accessories(See page 41)11