panneau en ciment HardieBacker - James Hardie
panneau en ciment HardieBacker - James Hardie
panneau en ciment HardieBacker - James Hardie

Create successful ePaper yourself
Turn your PDF publications into a flip-book with our unique Google optimized e-Paper software.
with MoldBlock Technologyavec technologie MoldBlock MCInstallation GuideGuide d’installationCem<strong>en</strong>t Backerboard for Walls,Floors and Countertops90% Premium Portland Cem<strong>en</strong>t and sandBacked by a Limited Lifetime WarrantyPanneau d’appui <strong>en</strong> cim<strong>en</strong>t pour lesmurs, les planchers et les comptoirsFait d’un mélange de 90 % de cim<strong>en</strong>tPortland et de sableAssorti d’une garantie à vie limitée
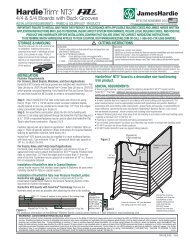
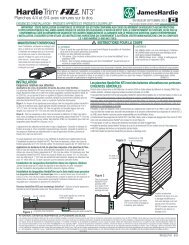
Cutting <strong><strong>Hardie</strong>Backer</strong> ® Board• Use a straight edge as a guide to score the board’s face and snap upward along the scoreline. We recomm<strong>en</strong>d using a carbide-tipped scoring knife, but a utility knife may also beused. The use of shears (manual, electric or pneumatic) is also acceptable.• For cutouts and small holes, score around perimeter and break out from the face sidewith hammer.• NEVER use high-speed power tools (e.g. saws, grinders, etc.) to cut <strong>James</strong> <strong>Hardie</strong> ®products indoors as they may g<strong>en</strong>erate excessive silica dust.• NEVER dry sweep – Use wet suppression methods or HEPA vacuum for clean-up.• To further limit respirable silica exposures, wear a properly-fitted, NIOSH-approved dustmask or respirator (e.g. N-95) in accordance with applicable governm<strong>en</strong>t regulations andmanufacturer instructions.Countertop Installation1. Ensure cabinets are level and secure• Use minimum 1/2” exterior grade plywood or equival<strong>en</strong>t, positioned across the woodcabinet. Space betwe<strong>en</strong> plywood supports is not to exceed 16” on c<strong>en</strong>ter.2. Determine layout of <strong><strong>Hardie</strong>Backer</strong> ® cem<strong>en</strong>t board• Do not align <strong><strong>Hardie</strong>Backer</strong> cem<strong>en</strong>t board with plywood joints.• Score and snap boards to required sizes and make necessary cutouts.• We recomm<strong>en</strong>d an 1/8” gap from board edges.• If receiving tiles, it is recomm<strong>en</strong>ded that the grid side faces out, but either is acceptable.3. Attach <strong><strong>Hardie</strong>Backer</strong> cem<strong>en</strong>t board to countertop• Apply a supporting bed of dry-set mortar or modified thinset to plywood with a 1/4” squar<strong>en</strong>otchedtrowel. Mastic can also be used with a 5/32” V-notched trowel.• Use the fast<strong>en</strong>er pattern as a guide. Fast<strong>en</strong> <strong><strong>Hardie</strong>Backer</strong> cem<strong>en</strong>t board with specifiednails or screws (as listed in “Materials Required”) every 8” over the <strong>en</strong>tire surface. Keepfast<strong>en</strong>ers 3/8” from board edges and 2” in from board corners.4. Tape joints prior to tiling • Prior to setting the tile, fill all joints with the same mortar used to set the tiles.• Embed 2” wide high-str<strong>en</strong>gth alkali-resistant glass fiber tape in the mortar and level.Floor InstallationWe recomm<strong>en</strong>d 1/4” <strong><strong>Hardie</strong>Backer</strong> board for floor applications, unless 1/2” thickness isneeded for transition.1. Ensure subfloor is structurally soundOn existing structures:• Ensure subfloor is not damaged. Replace any loose, warped, unev<strong>en</strong> or damaged sections of floor.• Make certain subfloor is a clean and flat surface.For all floors:• Use minimum 5/8 exterior grade plywood or 23/32 OSB with Exposure 1 classification orbetter, complying with local building codes and ANSI A108.11.• Joist spacing not to exceed 24” on c<strong>en</strong>ter.• The floor must be <strong>en</strong>gineered not to exceed the L/360 deflection criteria (L/720 for naturalstone), including live and dead design loads, for the specific joist spacing used.2. Determine layout of <strong><strong>Hardie</strong>Backer</strong> ® cem<strong>en</strong>t board• Stagger all <strong><strong>Hardie</strong>Backer</strong> cem<strong>en</strong>t board joints. Do not align with subfloor joints.• Never allow all four corners of boards to meet at one point.• We recomm<strong>en</strong>d an 1/8” gap betwe<strong>en</strong> board edges.• Keep sheet edges 1/8” back from walls and cabinet bases.• Score and snap boards to required sizes and make necessary cutouts.• It is recomm<strong>en</strong>ded to install the grid side facing up, but either is acceptable.3. Attach <strong><strong>Hardie</strong>Backer</strong> cem<strong>en</strong>t board to subfloor• Apply a supporting bed of mortar or modified thinset to subfloor using a 1/4” square-notched trowel.• Embed <strong><strong>Hardie</strong>Backer</strong> cem<strong>en</strong>t board firmly and ev<strong>en</strong>ly in the wet mortar.• Use the fast<strong>en</strong>er pattern as a guide. Fast<strong>en</strong> <strong><strong>Hardie</strong>Backer</strong> cem<strong>en</strong>t board with specified nails orscrews (as listed in “Materials Required”) every 8” over the <strong>en</strong>tire surface. Keep fast<strong>en</strong>ers 3/8”from board edges and 2” in from board corners.• Set fast<strong>en</strong>er heads flush with the surface without overdriving.4. Tape joints prior to tiling • Prior to setting the tile, fill all joints with the same mortar used to set the tiles.• Embed 2” wide high-str<strong>en</strong>gth alkali-resistant glass fiber tape in the mortar and level.Wall Installation1. Ensure framing is structurally sound• Must comply with local building codes and ANSI A108.11.• Use a minimum of 2” x 4” wood studs or 20-gauge metal studs, which must be straight, properlyaligned and spaced a maximum of 16” on c<strong>en</strong>ter.• In tub and shower <strong>en</strong>closures, <strong>en</strong>sure that the framing is adequately reinforced at the corners.2. Determine layout of <strong><strong>Hardie</strong>Backer</strong> cem<strong>en</strong>t board• Boards may be installed vertically or horizontally.• Edges of the board parallel to framing must be supported by a structural framing member.• Score and snap boards to required sizes and make necessary cutouts.• If receiving paint, install the board with the smooth side facing out.• If receiving tiles, it is recomm<strong>en</strong>ded that the grid side faces out, but either is acceptable.3. Attach <strong><strong>Hardie</strong>Backer</strong> cem<strong>en</strong>t board to framing• See applicable building codes regarding vapor barrier requirem<strong>en</strong>ts.• Install boards 1/4” above floor, tub or shower pan and caulk accordingly.• Fast<strong>en</strong> cem<strong>en</strong>t board with specified nails or screws (as listed in “Materials Required”) amaximum of 8” on c<strong>en</strong>ter at all supports.• Keep fast<strong>en</strong>ers 3/8” from board edges and 2” in from sheet corners.• Set fast<strong>en</strong>er heads flush with the surface, without overdriving.4. Tape joints prior to tiling• Fill all joints with mortar (see “Materials Required”).• Embed 2” wide high-str<strong>en</strong>gth alkali-resistant glass fiber tape in the mortar and level.
<strong><strong>Hardie</strong>Backer</strong> board deliversmore compressive andflexural str<strong>en</strong>gth than anyboard on the market.Finishing with Tile1. Refer to ANSI A108 and the mortar and tile manufacturers’ published application guidelinesfor complete tiling instructions.2. Wipe the surface of <strong><strong>Hardie</strong>Backer</strong> ® cem<strong>en</strong>t board clean with a damp sponge just prior toadding mastic or mortar.3. Spread the mastic or mortar with a notched trowel (Note: Please see “Materials Required” to seewhich setting material is required for your application.)4. Twist or press and beat in tiles complying with ANSI A137.1.5. Allow a minimum of 24 hours curing set time before grouting.Finishing with Natural StoneNatural stone oft<strong>en</strong> has hidd<strong>en</strong> weaknesses which can result in surface cracks in finished floors.To reduce the risk of job failures, always consult The Marble Institute of America Handbook.In addition to the steps outlined under “Floor Installation,” the following is required:• Always follow the recomm<strong>en</strong>dations of the flooring material manufacturer.• Marble and natural stones must have suffici<strong>en</strong>t flexural str<strong>en</strong>gth for use in flooring systems.*Where the quality and str<strong>en</strong>gth of the stone is unknown, the floor must be <strong>en</strong>gineered notto exceed the L/720 deflection criteria, including live and dead design loads, for the specificjoist spacing used. The str<strong>en</strong>gth of your natural stone will have an impact on the ultimateperformance of your flooring system.* Testing has shown that a minimum 2900 psi is preferable for flooring application.Finishing with Paint, Wallpaper or Texture1. Painting or WallpaperingAlign the board so the smooth side is facing out. Apply a drywall primer suitable for highmoistureareas, as recomm<strong>en</strong>ded by the paint manufacturer. Paint <strong><strong>Hardie</strong>Backer</strong> ® boardas you would drywall. If wallpapering, prime surface of <strong><strong>Hardie</strong>Backer</strong> board with a primersuitable for high-moisture areas as recomm<strong>en</strong>ded by the wallpaper manufacturer.2. TexturingTexture can be applied to <strong><strong>Hardie</strong>Backer</strong> board in the same way as drywall.Steam Room Application<strong><strong>Hardie</strong>Backer</strong> board is recognized for use in resid<strong>en</strong>tial steam rooms wh<strong>en</strong> installed overconv<strong>en</strong>tional framing and in accordance with <strong><strong>Hardie</strong>Backer</strong> board printed installationinstructions, TCNA guidelines (Tile Council of North America Handbook, www.tileusa.com), andlocal building codes. Questions and concerns regarding design and construction should bedirected to a knowledgeable professional.Vinyl and Resili<strong>en</strong>t FlooringMaterials Required1. Fast<strong>en</strong>ers• Minimum 7/8” long galvanized or polymer-coated 18-gauge chisel point staples with 1/4”crown.• Minimum 7/8” long galvanized ring shanked underlaym<strong>en</strong>t flooring nails.• Fast<strong>en</strong>ers should be long <strong>en</strong>ough to reach the bottom of the subfloor, but not p<strong>en</strong>etrate it.• Avoid using resin, rosin or cem<strong>en</strong>t-coated fast<strong>en</strong>ers that can discolor vinyl flooring.2. Patch• Use the cem<strong>en</strong>t-based, rapid-setting patching compound recomm<strong>en</strong>ded by the floorcovering manufacturer.• Do not use a gypsum-based patch. Follow the patch manufacturer’s instructions.Preparation for Underlaym<strong>en</strong>t1. Ensure subfloor is structurally sound and properly installedOn existing floors:• <strong><strong>Hardie</strong>Backer</strong> ® cem<strong>en</strong>t board may be installed under or over Vinyl Composition Tile (VCT)and other resili<strong>en</strong>t flooring. For best results, remove existing floor covering, especially if it isin poor condition.• If installing <strong><strong>Hardie</strong>Backer</strong> cem<strong>en</strong>t board over existing floor, <strong>en</strong>sure the floor is flat and floorcovering is thoroughly adhered to the subfloor.On all floors:• Ensure subfloor is not damaged. Replace any loose, warped, unev<strong>en</strong> or damaged sections of floor.• Make sure subfloor is dry, level and fast<strong>en</strong>ed correctly. All fast<strong>en</strong>ers must be countersunk orflush with the subfloor. All seams or other areas that are not level must be sanded flat.• Subfloor must be free of all debris, oil, grease, paint or other foreign substances.2. Basem<strong>en</strong>ts and crawl spaces• Crawl spaces must be well v<strong>en</strong>tilated with a minimum of 18” betwe<strong>en</strong> the ground and joists.A vapor barrier over the ground is required.Underlaym<strong>en</strong>t Installation1. Determine layout of <strong><strong>Hardie</strong>Backer</strong> ® cem<strong>en</strong>t board• Install smooth side up.• Install <strong><strong>Hardie</strong>Backer</strong> boards perp<strong>en</strong>dicular to subfloor panels.• Stagger all <strong><strong>Hardie</strong>Backer</strong> board joints. Do not align <strong><strong>Hardie</strong>Backer</strong> board joints with subfloor joints• Never allow all four corners of boards to meet at one point.• Lightly butt the board joints. Do not leave a gap or force edges together.• Join factory-cut edges together in the body of the floor.• Keep board edges 1/8” back from walls and cabinet bases.2. Attach <strong><strong>Hardie</strong>Backer</strong> boards to subfloor• Fast<strong>en</strong> one board at a time. <strong><strong>Hardie</strong>Backer</strong> boards must be flush with subfloor during installation.• Begin the fast<strong>en</strong>ing pattern in a corner of the board, th<strong>en</strong> fast<strong>en</strong> the two adjac<strong>en</strong>t edges.Return to the corner and fast<strong>en</strong> in a diagonal pattern from that corner until the board iscompletely fast<strong>en</strong>ed.• Place fast<strong>en</strong>ers in a random, staggered pattern across <strong><strong>Hardie</strong>Backer</strong> board. Avoid fast<strong>en</strong>ing ina straight line.• Fast<strong>en</strong> <strong><strong>Hardie</strong>Backer</strong> boards with proper fast<strong>en</strong>ers (as listed in “Materials Required”) amaximum of 3” on c<strong>en</strong>ter around the perimeter and 6” on c<strong>en</strong>ter in the field.• Keep fast<strong>en</strong>ers betwe<strong>en</strong> 3/8” and 3/4” from board edges and 2” in from board corners.• Fast<strong>en</strong>er heads/crowns must be flush with or slightly countersunk a maximum of 1/16” belowthe surface.
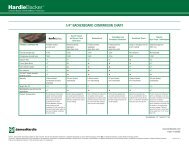
3. Finishing surface and joints (not necessary for carpet or wood flooring)• If necessary, lightly hand-sandseams to achieve a smooth transition betwe<strong>en</strong> boards. Avoidover-sanding. Sanding will g<strong>en</strong>erate significant respirable silica dust and those in theimmediate area must wear NIOSH-approved respiratory protection (e.g. N95) in accordancewith applicable governm<strong>en</strong>t regulations.• Thoroughly clean <strong><strong>Hardie</strong>Backer</strong> ® board surface to remove all debris prior to patching.• Using a wide flat trowel, apply a skim coat of patch (as listed in “Materials Required”) to allseams, sanded areas, hammer ind<strong>en</strong>tations, holes, gaps, gouges, chips and voids to achievea smooth surface. Avoid building a ridge over the seams by feathering the patch out severalinches on both sides of the seams.• Obtaining a perfectly smooth surface may require more than one coat of patch.• After the patch has thoroughly dried, lightly sand or scrape off any surface imperfectionscaused by the patch to achieve a smooth surface.• Wait until patch is thoroughly dry before installing the floor covering.4. Flooring installation• Prepared <strong><strong>Hardie</strong>Backer</strong> ® cem<strong>en</strong>t board surface must be free of all debris, oil, paint, caulk,joint compound and other foreign substances.• Do not install floor covering seams directly over the <strong><strong>Hardie</strong>Backer</strong> board seams.• Install floor covering according to the adhesive and floor covering manufacturers’ instructions.Basic Composition90% Portland cem<strong>en</strong>t and sand with selected additives. Contains no asbestos, formaldehyde,gypsum, paper facing, or abrasive aggregate.1/4” <strong><strong>Hardie</strong>Backer</strong> ® cem<strong>en</strong>t board:Sheet size: 3’ x 5’ (EZ Grid ® board) and 4’ x 8’Thickness: 1/4” Weight: 1.9 lbs. psf (9.3 kg/m2) Complies with ASTM C1288 & ANSI A118.9<strong><strong>Hardie</strong>Backer</strong> ® Pro Grid cem<strong>en</strong>t board:Sheet sizes: 3’ x 5’ and 4’ x 8’Thickness: .42” Weight: 2.6 lbs. psf (12.7 kg/m2) Complies with ASTM C1288 & ANSI A118.9Contractors and do-it-yourselfers trust <strong><strong>Hardie</strong>Backer</strong> ® cem<strong>en</strong>tboard with MoldBlock technology to deliver superior moistureand mold protection. <strong><strong>Hardie</strong>Backer</strong> ® board doesn’t contain anyglass mesh or gypsum and its proprietary cem<strong>en</strong>t formulationdelivers the ultimate in durabilty. <strong><strong>Hardie</strong>Backer</strong> board’sdim<strong>en</strong>sional stability, exceptional bonding surface, and moistureresistance make it the Total Wet Area Solution .Exclusive MoldBlock TechnologyMold protection is integrated throughout<strong><strong>Hardie</strong>Backer</strong> cem<strong>en</strong>t board. It passes bothASTM mold tests with a perfect score.Ultimate in DurabilityProprietary 90% cem<strong>en</strong>t and sand formulationprotects against water damage.Exceptional WorkabilityJust score one side and snap upward.Cuts cleanly and fast<strong>en</strong>s with common tools.Lightest cem<strong>en</strong>t board available.Materials Required1. MortarFor floors:• Latex or acrylic modified thinset(complying with ANSI A118.4).• Dry-set mortar for use betwe<strong>en</strong> subfloorand cem<strong>en</strong>t board only (complying withANSI A118.1).For walls and countertops:• Latex or acrylic modified thinset(complying with ANSI A118.4).• Type 1 mastic (complying with ANSIA136.1).2. Tape• 2” wide high-str<strong>en</strong>gth alkali-resistantglass fiber tape.3. Fast<strong>en</strong>ersFor floors and walls:• Minimum 1-1/4” long corrosion-resistantroofing nails.• Minimum 1-1/4” long No. 8 x 0.375” HDself-drilling corrosion-resistant ribbedwaferhead screws.• If compliance with ANSI A108.11 is notrequired, minimum 1” long No. 8 x 0.323”HD self-drilling corrosion-resistant ribbedbuglehead screws may be used for floors.• If applying <strong><strong>Hardie</strong>Backer</strong> Pro Grid cem<strong>en</strong>tboard over gypsum, use minimum 1-3/4”long corrosion-resistant roofing nails.For countertops:• Minimum 3/4” long corrosion-resistantroofing nails.• Minimum 3/4” long ribbed countersinking corrosion-resistant screws.• 18-gauge corrosion-resistant polymercoated 3/4” staples with a 1/4” crown.• For <strong><strong>Hardie</strong>Backer</strong> Pro Grid cem<strong>en</strong>tboard, use minimum 1-1/4” longcorrosion-resistant roofing nails orribbed countersinking screws.For vinyl and resili<strong>en</strong>t flooring:• Minimum 7/8” long galvanized or polymercoated18-gauge chisel point staples with1/4” crown.• Minimum 7/8” long galvanized ringshanked nails.• Fast<strong>en</strong>ers should be long <strong>en</strong>ough toreach the bottom of the subfloor, butnot p<strong>en</strong>etrate it.• Avoid using resin, rosin or cem<strong>en</strong>t-coatedfast<strong>en</strong>ers that can discolor vinyl flooring.Superior Tile Bond Str<strong>en</strong>gthExceeds industry specifications in ASTMtests for tile adhesion.No Special Handling RequiredUnlike fiber gypsum board, <strong><strong>Hardie</strong>Backer</strong>board does not have to acclimate to job sitetemperature and humidity prior to installation.WARNING AVOID BREATHING SILICA DUST: <strong>James</strong> <strong>Hardie</strong> ® products contain respirable crystalline silica,which is known to the State of California to cause cancer and is considered by IARC and NIOSH to bea cause of cancer from some occupational sources. Breathing excessive amounts of respirable silicadust can also cause a disabling and pot<strong>en</strong>tially fatal lung disease called silicosis, and has be<strong>en</strong> linkedwith other diseases. Some studies suggest smoking may increase these risks. During installation, usefiber cem<strong>en</strong>t shears for cutting or, use score & snap technique. During clean-up, use HEPA vacuums orwet cleanup methods—never dry sweep. For further information, refer to our installation instructionsand Material Safety Data Sheet available at www.jameshardie.com or by calling 1-800-9HARDIE(1-800-942-7343). FAILURE TO ADHERE TO OUR WARNINGS, MSDS, AND INSTALLATION INSTRUCTIONSMAY LEAD TO SERIOUS PERSONAL INJURY OR DEATH.
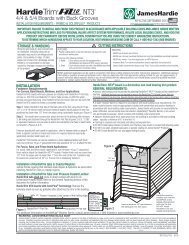
MD<strong><strong>Hardie</strong>Backer</strong>Coupe des <strong>panneau</strong>x <strong><strong>Hardie</strong>Backer</strong> MD• En utilisant une règle droite comme guide, <strong>en</strong>taillez la surface du <strong>panneau</strong> au moy<strong>en</strong> d’untranche-fils à pointe au carbure ou d’un couteau universel, et cassez le <strong>panneau</strong> le long du traitde coupe <strong>en</strong> appuyant vers le haut. Vous pouvez égalem<strong>en</strong>t utiliser des cisailles à fibrocim<strong>en</strong>t(manuelles, électriques ou pneumatiques).• Dans le cas des <strong>en</strong>tailles et des petits trous, faites un trait autour du périmètre et tapez la pièceà partir de la face du <strong>panneau</strong> avec un marteau.• N’utilisez JAMAIS d’outils électriques à haute vitesse (p. ex. des scies ou des meuleuses)pour couper les produits <strong>James</strong> <strong>Hardie</strong> MD à l’intérieur, car cela pourrait produire une quantitéexcessive de poussière de silice.• Ne balayez JAMAIS à sec. Utilisez un aspirateur HEPA ou une méthode de nettoyage par voie humide.• Dans le but de réduire au minimum les risques d’exposition à la poussière de silice inhalable,portez un masque antipoussières ou un respirateur (p. ex. N95) homologué NIOSH bi<strong>en</strong> ajustéet conforme aux instructions du fabricant et aux règlem<strong>en</strong>ts gouvernem<strong>en</strong>taux applicables.Installation sur un comptoir1. Assurez-vous que les armoires sont droites et solides.• Placez un contreplaqué extérieur (ou l’équival<strong>en</strong>t) d’au moins 1/2 po contre l’armoire <strong>en</strong> bois.L’espacem<strong>en</strong>t <strong>en</strong>tre les appuis du contreplaqué ne doit pas dépasser 16 po c<strong>en</strong>tre <strong>en</strong> c<strong>en</strong>tre.2. Déterminez la disposition des <strong>panneau</strong>x <strong><strong>Hardie</strong>Backer</strong> MD .• Les joints des <strong>panneau</strong>x <strong><strong>Hardie</strong>Backer</strong>MD ne doiv<strong>en</strong>t pas être alignés sur les joints du contreplaqué.• Entaillez et cassez les <strong>panneau</strong>x selon les dim<strong>en</strong>sions requises, et faites les découpes nécessaires.• Nous vous recommandons de laisser un espace de 1/8 po <strong>en</strong>tre les rives des <strong>panneau</strong>x.• If receiving tiles, it is recomm<strong>en</strong>ded that the grid side faces out, but either is acceptable.3. Fixez les <strong>panneau</strong>x <strong><strong>Hardie</strong>Backer</strong> MD au comptoir.• À l’aide d’une truelle à <strong>en</strong>coches carrées de 1/4 po, appliquez une couche de mortier à séchagerapide ou de mortier mince modifié sur le contreplaqué. Vous pouvez aussi utiliser une truelle à<strong>en</strong>coches <strong>en</strong> V de 5/32 po pour appliquer du mastic.• Suivez le guide de clouage sur le <strong>panneau</strong>. À l’aide des clous et des vis spécifiés (voir« Matériaux requis »), fixez les <strong>panneau</strong>x <strong><strong>Hardie</strong>Backer</strong> MD à intervalles de 8 po sur toute lasurface. Fixez les attaches à au moins 3/8 po des rives et 2 po des coins des <strong>panneau</strong>x.4. Mettez un ruban sur les joints avant de poser les carreaux.• Avant de poser les carreaux, remplissez tous les joints avec le même type de mortier utilisé pourcoller les carreaux.• Enfouissez dans le mortier un ruban de r<strong>en</strong>fort résistant aux alcalins avec liant <strong>en</strong> fibre de verrede 2 po de largeur. Ensuite, nivelez la surface.Installation sur un plancherÀ moins que des <strong>panneau</strong>x de 1/2 po soi<strong>en</strong>t requis pour la transition, nous vousrecommandons d’utiliser des <strong>panneau</strong>x <strong><strong>Hardie</strong>Backer</strong> MD de 1/4 po pour les applications deplancher.1. Assurez-vous que la structure du sous-plancher est solide.Sur une structure existante :• Assurez-vous que le sous-plancher n’est pas <strong>en</strong>dommagé. Remplacez les parties duplancher qui sont décollées, gauchies, inégales ou <strong>en</strong>dommagées.• Assurez-vous que la surface du sous-plancher est propre et plane.Pour tous les planchers :• Utilisez un contreplaqué extérieur d’au moins 5/8 po ou un <strong>panneau</strong> <strong>en</strong> OSB d’au moins 23/32po de classe 1 (durée d’exposition) qui est conforme au code du bâtim<strong>en</strong>t <strong>en</strong> vigueur et à lanorme ANSI A108.11.• L’espacem<strong>en</strong>t des solives ne doit pas dépasser 24 po c<strong>en</strong>tre <strong>en</strong> c<strong>en</strong>tre.• Le plancher doit être conçu de façon à ne pas excéder le critère de flèche L/360 (L/720 pourla pierre naturelle), y compris les surcharges et les charges perman<strong>en</strong>tes, t<strong>en</strong>ant compte del’espacem<strong>en</strong>t des solives.2. Déterminez la disposition des <strong>panneau</strong>x <strong><strong>Hardie</strong>Backer</strong> MD .• Décalez tous les joints des <strong>panneau</strong>x <strong><strong>Hardie</strong>Backer</strong> MD . Les joints ne doiv<strong>en</strong>t pas être alignés surles joints des <strong>panneau</strong>x de sous-plancher.• Les quatre coins des <strong>panneau</strong>x ne doiv<strong>en</strong>t jamais se r<strong>en</strong>contrer au même point.• Nous recommandons de laisser un espace de 1/8 po <strong>en</strong>tre les rives des <strong>panneau</strong>x.• Gardez un espace de 1/8 po <strong>en</strong>tre les rives des <strong>panneau</strong>x et les murs ou la base des armoires.• Entaillez et cassez les <strong>panneau</strong>x selon les dim<strong>en</strong>sions requises, et faites les découpes nécessaires.3. Fixez les <strong>panneau</strong>x <strong><strong>Hardie</strong>Backer</strong> MD au sous-plancher.• À l’aide d’une truelle à <strong>en</strong>coches carrées de 1/4 po, appliquez une couche de mortier ou demortier mince modifié sur le sous-plancher.• Installez fermem<strong>en</strong>t et égalem<strong>en</strong>t les <strong>panneau</strong>x <strong><strong>Hardie</strong>Backer</strong> MD sur la couche de mortier humide.• Suivez le guide de clouage sur le <strong>panneau</strong>. À l’aide des clous et des vis spécifiés (voir« Matériaux requis »), fixez les <strong>panneau</strong>x <strong><strong>Hardie</strong>Backer</strong> MD à intervalles de 8 po sur toute lasurface. Fixez les attaches à au moins 3/8 po des rives et 2 po des coins des <strong>panneau</strong>x.• Les têtes des attaches doiv<strong>en</strong>t affleurer la surface des <strong>panneau</strong>x. Évitez de trop <strong>en</strong>foncer les attaches.4. Mettez un ruban sur les joints avant de poser les carreaux.• Avant de poser les carreaux, remplissez tous les joints avec le même type de mortier utilisépour coller les carreaux.• Enfouissez dans le mortier un ruban de r<strong>en</strong>fort résistant aux alcalins avec liant <strong>en</strong> fibre deverre de 2 po de largeur. Ensuite, nivelez la surface.Installation sur un mur1. Assurez-vous que l’ossature est solide.• L’ossature doit être conforme aux exig<strong>en</strong>ces du code du bâtim<strong>en</strong>t <strong>en</strong> vigueur et de la norme ANSIA108.11.• Utilisez des montants <strong>en</strong> bois d’au moins 2’’ x 4’’ ou des montants <strong>en</strong> acier de calibre 20 quisont droits, bi<strong>en</strong> alignés et espacés à 16 po c<strong>en</strong>tre <strong>en</strong> c<strong>en</strong>tre au maximum.• Dans les <strong>en</strong>ceintes de douche ou de baignoire, assurez-vous que les coins de l’ossature sontr<strong>en</strong>forcés de façon adéquate.2. Déterminez la disposition des <strong>panneau</strong>x <strong><strong>Hardie</strong>Backer</strong>.• Les <strong>panneau</strong>x peuv<strong>en</strong>t être installés verticalem<strong>en</strong>t ou horizontalem<strong>en</strong>t.• Les rives des <strong>panneau</strong>x parallèles à l’ossature doiv<strong>en</strong>t être supportées par un élém<strong>en</strong>td’ossature.• Entaillez et cassez les <strong>panneau</strong>x selon les dim<strong>en</strong>sions requises, et faites les découpes nécessaires.3. Fixez les <strong>panneau</strong>x <strong><strong>Hardie</strong>Backer</strong> à l’ossature.• Consultez le code du bâtim<strong>en</strong>t <strong>en</strong> vigueur pour ce qui est de l’utilisation d’un pare-vapeur.• Laissez un espace de 1/4 po <strong>en</strong>tre les <strong>panneau</strong>x et le plancher, la baignoire ou le receveur dedouche, et appliquez un calfeutrage.• À l’aide des clous ou des vis spécifiés (voir « Matériaux requis »), fixez les <strong>panneau</strong>x à intervallesde 8 po au maximum sur tous les appuis.• Fixez les attaches à au moins 3/8 po des rives et 2 po des coins des <strong>panneau</strong>x.• Les têtes des attaches doiv<strong>en</strong>t affleurer la surface des <strong>panneau</strong>x. Évitez de trop <strong>en</strong>foncer les attaches.4. Mettez un ruban sur les joints avant de poser les carreaux.• Remplissez tous les joints avec du mortier (voir « Matériaux requis »).• Enfouissez dans le mortier un ruban de r<strong>en</strong>fort résistant aux alcalins avec liant <strong>en</strong> fibre deverre de 2 po de largeur. Ensuite, nivelez la surface.Finition avec des carreaux1. Pour savoir comm<strong>en</strong>t procéder pour le carrelage, consultez la norme ANSI A108, ainsi quela docum<strong>en</strong>tation publiée par les fabricants de carreaux et de mortier.2. Juste avant d’appliquer le mastic ou le mortier, essuyez la surface des <strong>panneau</strong>x<strong><strong>Hardie</strong>Backer</strong> MD avec une éponge humide.
MD<strong><strong>Hardie</strong>Backer</strong>•.Vous devrez probablem<strong>en</strong>t appliquer plus d’une couche de produit de ragréage pour obt<strong>en</strong>irune surface parfaitem<strong>en</strong>t lisse.• Une fois que le produit de ragréage est bi<strong>en</strong> sec, poncez légèrem<strong>en</strong>t ou <strong>en</strong>levez lesimperfections <strong>en</strong> grattant pour obt<strong>en</strong>ir une surface lisse.• Att<strong>en</strong>dez que le produit de ragréage soit complètem<strong>en</strong>t sec avant d’installer le revêtem<strong>en</strong>t de sol.4. Installation du revêtem<strong>en</strong>t de sol• La surface des <strong>panneau</strong>x <strong>en</strong> cim<strong>en</strong>t <strong><strong>Hardie</strong>Backer</strong>MD doit être exempte de débris, d’huile,de peinture, de mastic, de pâte à joint ou de toute autre matière étrangère.• Les joints du revêtem<strong>en</strong>t de sol ne doiv<strong>en</strong>t pas être alignés sur les joints des <strong>panneau</strong>x <strong><strong>Hardie</strong>Backer</strong>.• Installez le revêtem<strong>en</strong>t de sol <strong>en</strong> suivant les instructions du fabricant de l’adhésif et durevêtem<strong>en</strong>t de sol.Composition du produit90 % de cim<strong>en</strong>t Portland et de sable avec certains additifs. Ne conti<strong>en</strong>t pas d’amiante, deformaldéhyde, de gypse, de revêtem<strong>en</strong>t de papier ou d’agrégats abrasifs.Panneau <strong>en</strong> cim<strong>en</strong>t <strong><strong>Hardie</strong>Backer</strong> MD 1/4 po :Dim<strong>en</strong>sions du <strong>panneau</strong> : 3 pi x 5 pi(<strong>panneau</strong> EZ Grid MD ) et 4 pi x 8 piÉpaisseur : 1/4 poPoids : 1,9 lb/pi² (9,3 kg/m²)Conforme aux normes ASTM C1288 et ANSIA118.9Panneau <strong>en</strong> cim<strong>en</strong>t <strong><strong>Hardie</strong>Backer</strong> MDPro Grid :Dim<strong>en</strong>sions du <strong>panneau</strong> : 3 pi x 5 pi et4 pi x 8 piÉpaisseur : 0,42 poPoids : 2,6 lb/pi² (12,7 kg/m²)Conforme aux normes ASTM C1288 et ANSIA118.9Matériaux requis1. MortierPour les planchers :• Mortier mince modifié latex ou acrylique (conforme à la norme ANSI A118.4).• Mortier à séchage rapide, seulem<strong>en</strong>t pour utilisation <strong>en</strong>tre le sous-plancher et les <strong>panneau</strong>x <strong>en</strong> cim<strong>en</strong>t(conforme à la norme ANSI A118.1).Pour les murs et les comptoirs :• Mortier mince modifié latex ou acrylique (conforme à la norme ANSI A118.4).• Mastic de type 1 (conforme à la norme ANSI A136.1).2. Ruban• Ruban de r<strong>en</strong>fort résistant aux alcalins avec liant <strong>en</strong> fibre de verre de 2 po de largeur.3. AttachesPour les planchers et les murs :• Clous à toiture résistants à la corrosion d’au moins 1-1/4 po de long.• Vis nervurées à tête mince autoperceuses résistantes à la corrosion no 8 x 0,375 po HD d’aumoins 1-1/4 po de long.• Si vous n’êtes pas t<strong>en</strong>u de vous conformer aux exig<strong>en</strong>ces de la norme ANSI A108.11, vouspouvez utiliser des vis nervurées à tête évasée autoperceuses résistantes à la corrosion no 8x 0,323 po HD d’au moins 1 po de long pour les planchers.• Si vous appliquez des <strong>panneau</strong>x <strong>en</strong> cim<strong>en</strong>t <strong><strong>Hardie</strong>Backer</strong> MD Pro Grid sur du gypse, utilisez desclous à toiture résistants à la corrosion d’au moins 1-3/4 po de long.Pour les comptoirs :• Clous à toiture résistants à la corrosion d’au moins 3/4 po de long.• Vis nervurées à tête fraisée résistantes à la corrosion d’au moins 3/4 po de long.• Agrafes de calibre 18 <strong>en</strong>duites de polymères et résistantes à la corrosion de 3/4 po de longavec couronne de 1/4 po.• Pour les <strong>panneau</strong>x <strong>en</strong> cim<strong>en</strong>t <strong><strong>Hardie</strong>Backer</strong> Pro Grid, utilisez des vis nervurées à tête fraisée oudes clous à toiture résistants à la corrosion d’au moins 1-1/4 po de long.Pour les revêtem<strong>en</strong>ts de sol résili<strong>en</strong>ts / <strong>en</strong> vinyle :• Agrafes à biseau galvanisées ou <strong>en</strong>duites de polymères de calibre 18 d’au moins 7/8 po delong avec couronne de 1/4 po.• Clous annelés galvanisés d’au moins 7/8 po de long.• Les attaches doiv<strong>en</strong>t être assez longues pour atteindre le fond du sous-plancher sans le traverser.• Évitez d’utiliser des attaches <strong>en</strong>duites de résine, de colophane ou de cim<strong>en</strong>t qui risquerai<strong>en</strong>t dedécolorer le revêtem<strong>en</strong>t de sol <strong>en</strong> vinyle.Les <strong>en</strong>trepr<strong>en</strong>eurs et les bricoleurs se fi<strong>en</strong>t aux <strong>panneau</strong>x <strong>en</strong> cim<strong>en</strong>t<strong><strong>Hardie</strong>Backer</strong> MD avec technologie MoldBlock MC pour obt<strong>en</strong>ir uneprotection accrue contre l’humidité et la moisissure. Les <strong>panneau</strong>x<strong><strong>Hardie</strong>Backer</strong> MD ne conti<strong>en</strong>n<strong>en</strong>t pas de gypse ou de fibre de verre.En raison de leur formulation de cim<strong>en</strong>t brevetée, ces <strong>panneau</strong>xsont d’une durabilité incomparable. Les <strong>panneau</strong>x <strong><strong>Hardie</strong>Backer</strong> MDconstitu<strong>en</strong>t la solution idéale pour des applications dans des pièceshumides grâce à leur stabilité dim<strong>en</strong>sionnelle, leur excell<strong>en</strong>tesurface d’adhér<strong>en</strong>ce et leur résistance supérieure à l’humidité.Technologie MoldBlock MC exclusiveLa protection contre les moisissures est intégréepartout dans le <strong>panneau</strong>. Le <strong>panneau</strong> <strong>en</strong> cim<strong>en</strong>t<strong><strong>Hardie</strong>Backer</strong> a obt<strong>en</strong>u une note parfaite lors desdeux essais sur la moisissure de l’ASTM.Durabilité incomparableLa formulation brevetée de 90 % de cim<strong>en</strong>tet de sable offre une protection contre lesdommages causés par l’eau.Ouvrabilité exceptionnelleOn n’a qu’à <strong>en</strong>tailler et à casser le <strong>panneau</strong> <strong>en</strong>appuyant vers le haut. Il est facile à couper et àfixer avec des outils ordinaires. C’est le <strong>panneau</strong><strong>en</strong> cim<strong>en</strong>t le plus léger sur le marché.Meilleure capacité d’adhér<strong>en</strong>cedes carreauxLes résultats des essais d’adhér<strong>en</strong>ce des carreaux del’ASTM excèd<strong>en</strong>t les spécifications de l’industrie.Aucune manut<strong>en</strong>tion spéciale requiseÀ la différ<strong>en</strong>ce des <strong>panneau</strong>x <strong>en</strong> fibres de gypse,il n’est pas nécessaire d’acclimater les <strong>panneau</strong>x<strong><strong>Hardie</strong>Backer</strong> MD aux conditions de température etd’humidité sur le chantier avant l’installation.MISE EN GARDE : ÉVITEZ D’INHALER DE LA POUSSIÈRE DE SILICE : Les produits <strong>James</strong> <strong>Hardie</strong> MDconti<strong>en</strong>n<strong>en</strong>t de la silice cristalline inhalable, un produit chimique reconnu par l’État de la Californie commeayant des effets cancérigènes, et par le CIRC et NIOSH comme étant une cause de cancer au travail.L’inhalation de quantités excessives de poussière de silice inhalable peut <strong>en</strong>traîner la silicose – uneaffection pulmonaire invalidante et pot<strong>en</strong>tiellem<strong>en</strong>t mortelle – ou d’autres maladies Certaines étudesrévèl<strong>en</strong>t que l’usage du tabac peut augm<strong>en</strong>ter ces risques. Pour la coupe des <strong>panneau</strong>x, utilisez descisailles pour fibrocim<strong>en</strong>t ou employez la méthode « <strong>en</strong>tailler et casser ». Pour le nettoyage, utilisez unaspirateur HEPA ou une méthode de nettoyage par voie humide. Ne balayez JAMAIS les débris à sec. Pourde plus amples r<strong>en</strong>seignem<strong>en</strong>ts, consultez les instructions d’installation et les fiches signalétiques <strong>en</strong>ligne sur le site www.jameshardie.com ou composez le 1-800-9HARDIE (1-800-942-7343). L’OMISSIONDE RESPECTER NOS MISES EN GARDE, NOS FICHES SIGNALÉTIQUES ET NOS INSTRUCTIONSD’INSTALLATION PEUT ENTRAÎNER DES MALADIES GRAVES ET POTENTIELLEMENT MORTELLES.
Environm<strong>en</strong>tal Considerations<strong><strong>Hardie</strong>Backer</strong> ® board’s proprietary cem<strong>en</strong>t formulation and MoldBlock Technology provide a moistureand mold-resistant wallboard and tile backer substrate that stands tough over time, reducing the needfor product replacem<strong>en</strong>t. <strong>James</strong> <strong>Hardie</strong> has demonstrated a commitm<strong>en</strong>t to reducing <strong>en</strong>ergyconsumption, while improving process effici<strong>en</strong>cies and waste managem<strong>en</strong>t. It avoids the use of<strong>en</strong>vironm<strong>en</strong>tally damaging materials and uses r<strong>en</strong>ewable resources that are abundant in themanufacture of <strong><strong>Hardie</strong>Backer</strong> ® cem<strong>en</strong>t board. <strong><strong>Hardie</strong>Backer</strong> ® cem<strong>en</strong>t board does not contain anyglass fibers, gypsum, asbestos or formaldehyde. The company also focuses on water conservationand attempts to recycle water and waste product as much as possible during the manufacturingprocess.Considérations <strong>en</strong>vironnem<strong>en</strong>talesEn raison de la formulation de cim<strong>en</strong>t brevetée et de la technologie MoldBlock MC , les <strong>panneau</strong>x<strong><strong>Hardie</strong>Backer</strong> MD sont des <strong>panneau</strong>x muraux résistants à la moisissure et des <strong>panneau</strong>x d’appuipour carreaux extrêmem<strong>en</strong>t durables, réduisant ainsi la nécessité de les remplacer avec letemps. <strong>James</strong> <strong>Hardie</strong> a démontré son <strong>en</strong>gagem<strong>en</strong>t à réduire sa consommation d’énergie, tout<strong>en</strong> améliorant l’efficacité de ses processus et de la gestion des déchets. Durant la fabricationdes <strong>panneau</strong>x <strong>en</strong> cim<strong>en</strong>t <strong><strong>Hardie</strong>Backer</strong> MD , <strong>James</strong> <strong>Hardie</strong> utilise des ressources r<strong>en</strong>ouvelablesabondantes et évite d’utiliser des matériaux qui sont dommageables pour l’<strong>en</strong>vironnem<strong>en</strong>t. Les<strong>panneau</strong>x <strong><strong>Hardie</strong>Backer</strong> MD ne conti<strong>en</strong>n<strong>en</strong>t pas de fibre de verre, de gypse, d’amiante ou deformaldéhyde. En outre, la société met l’acc<strong>en</strong>t sur la conservation de l’eau <strong>en</strong> essayant autantque possible de recycler l’eau et les résidus durant le processus de fabrication.Recognitions<strong><strong>Hardie</strong>Backer</strong> cem<strong>en</strong>t board is recognized as aninterior substrate by the following:• International Code Council Evaluation ServiceLegacy Report NER-405• City of Los Angeles Research Report No. 24862• HUD Materials Release Nos. 1263d and 1268c• City of New York MEA No. 223-93M• IBC 2509.2• IRC R702.4.2Consult these docum<strong>en</strong>ts for additional informationconcerning conditions for use in applicablejurisdictions.*Cem<strong>en</strong>titious Backer Unit/Fiber-Cem<strong>en</strong>tUnderlaym<strong>en</strong>tCompressive Str<strong>en</strong>gth Compressive Str<strong>en</strong>gth atEquilibrium Moisture Cont<strong>en</strong>t (ASTM D2394)1/4” <strong><strong>Hardie</strong>Backer</strong> cem<strong>en</strong>t board and 1/4”<strong><strong>Hardie</strong>Backer</strong> EZ Grid ® cem<strong>en</strong>t board:7000 psi (48 MPa)<strong><strong>Hardie</strong>Backer</strong> Pro Grid cem<strong>en</strong>t board: 6500 psi(45 MPa)Non-Combustibility <strong><strong>Hardie</strong>Backer</strong> cem<strong>en</strong>t boardis recognized as non-combustible in accordancewith ASTM E136.Surface Burning Characteristics Wh<strong>en</strong> tested inaccordance with ASTM method E-84: Flame Spread– 0, Fuel Contributed – 0, Smoke Developed – 5.Fire Rated Assemblies <strong><strong>Hardie</strong>Backer</strong> cem<strong>en</strong>t boardmay be used as a compon<strong>en</strong>t in one-hour fireresistivewall construction; consult NER-405 andIntertek-ETLSemko website listings for recognizedassemblies, or contact <strong>James</strong> <strong>Hardie</strong>’s TechnicalServices at 1-800-9HARDIE (1-800-942-7343).Warranty Copies are available from <strong>James</strong> <strong>Hardie</strong>Building Products or wherever <strong>James</strong> <strong>Hardie</strong> ®products are sold. Limited lifetime warranty includesmaterial and labor Please visit www.hardiebacker.omfor more details.1-800-9HARDIEwww.hardiebacker.com26300 La Alameda Suite 400Mission Viejo, CA 92691© 2008 <strong>James</strong> <strong>Hardie</strong> Technology Limited. All rights reserved. TM, SM,and ® d<strong>en</strong>ote trademarks or registered trademarks of <strong>James</strong> <strong>Hardie</strong>Technology Limited. is a registered trademark of <strong>James</strong> <strong>Hardie</strong>Technology Limited.HomologationsLe <strong>panneau</strong> <strong>en</strong> cim<strong>en</strong>t <strong><strong>Hardie</strong>Backer</strong> est reconnucomme substrat intérieur selon :• le rapport existant NER-405 de l’ InternationalCode Council Evaluation Service ;• le rapport de recherche no 24862 de la ville deLos Angeles ;• le rapport de libération des matériaux no 1263det no 1268c de HUD ;• le MEA no 223-93M de la ville de New York ;• le rapport no 2509.2 de l’IBC ;• le rapport no R702.4.2 de l’IRC.Consultez ces docum<strong>en</strong>ts pour <strong>en</strong> savoir davantagesur les conditions d’utilisation du produit dans larégion qui vous concerne.*Panneau d’appui cim<strong>en</strong>taire/sous-couche<strong>en</strong> fibrocim<strong>en</strong>tRésistance à la compression : Résistance àla compression au degré d’humidité d’équilibre(ASTM D2394)Panneau <strong>en</strong> cim<strong>en</strong>t <strong><strong>Hardie</strong>Backer</strong> 1/4 po et<strong>panneau</strong> <strong><strong>Hardie</strong>Backer</strong> <strong>en</strong> cim<strong>en</strong>t EZ GridMD1/4 po : 7 000 psi (48 MPa)Panneau <strong>en</strong> cim<strong>en</strong>t <strong><strong>Hardie</strong>Backer</strong> Pro Grid : 6500psi (45 MPa)Incombustibilité : Le <strong>panneau</strong> <strong>en</strong> cim<strong>en</strong>t<strong><strong>Hardie</strong>Backer</strong>MD est reconnu comme étant noncombustible selon la norme ASTM E136.Caractéristiques de brûlage <strong>en</strong> surface : Résultatsselon des essais conformes à la méthode ASTME-84 : propagation du feu – 0, apport combustible– 0, pouvoir fumigène – 5.Assemblages classés résistants au feu : Onpeut utiliser les <strong>panneau</strong>x <strong>en</strong> cim<strong>en</strong>t <strong><strong>Hardie</strong>Backer</strong>comme composantes pour la construction de mursavec résistance au feu d’une heure. Consulter lerapport NER-405 et l’information sur le site Web deIntertek-ETLSemko pour connaître les assemblagesqui sont reconnus, ou contacter le service desouti<strong>en</strong> technique <strong>James</strong> <strong>Hardie</strong> <strong>en</strong> composant le1-800-9HARDIE (1-800-942-7343).On peut obt<strong>en</strong>ir un exemplaire de la garantiechez <strong>James</strong> <strong>Hardie</strong> Building Products ou chez undistributeur de produits <strong>James</strong> <strong>Hardie</strong> MD . La garantieà vie limitée couvre les frais des matériaux et de lamain-d’œuvre. Pour de plus amples r<strong>en</strong>seignem<strong>en</strong>ts,visiter www.hardiebacker.com.© 2009 <strong>James</strong> <strong>Hardie</strong> Technology Limited. Tous droits réservés.MC, SM et MD indiqu<strong>en</strong>t des marques de commerce et des marquesdéposées de <strong>James</strong> <strong>Hardie</strong> Technology Limited. est une marquedéposée de <strong>James</strong> <strong>Hardie</strong> Technology Limited.HB0901 12/2009