DualBrite® Motion Sensing Coach Light
DualBrite® Motion Sensing Coach Light
DualBrite® Motion Sensing Coach Light
- No tags were found...

You also want an ePaper? Increase the reach of your titles
YUMPU automatically turns print PDFs into web optimized ePapers that Google loves.
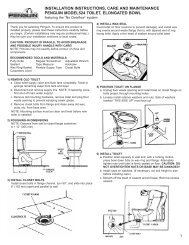
INSTALLATIONWARNING: Turn power off at circuitbreaker or fuse.For best performance, mount the fixture about 6feet (1.8 m) above the ground.1. Remove two decorative nuts.2. Remove mounting plate.3. Tighten mounting screws finger tight.4. Set sensitivity control on back of fixture tomid-position.5. Attach mounting plate to junction box.Mounting ScrewMountingPlateThis fixture comes with a universal mountingbracket. It is pre-assembled on the fixture to fitthe majority of junction box applications.However, if the slots on the mounting plate do notline up with the junction box screw holes:1. Remove the fixture mounting screws fromthe mounting plate. Note: Do not remove theground screw.2. Attach ground wire “pigtail” to ground screw onmounting plate (See Recommended GroundingMethod for additional information).3. Flip the mounting plate over.4. Rotate the mounting plate so the wire pathis on the upper right. Note: The wire path onthe mounting plate must be located as shownbelow to allow the wires on the back of thefixture to pass through.5. Reinstall the fixture mounting screws and attachthe mounting plate to the junction boxas shown.SENSWire PathGround ScrewWire PathDecorative NutMINMAXGround ScrewJunctionBoxFixture ScrewsWire PathAs ShippedFlipped andRotatedBracketMountingScrewsMounting PlateNote: We recommend having an assistant help holdthe lantern assembly during the wiring process.2 200254-02