bedienungsanleitung operation instructions mode d ... - Umarex
bedienungsanleitung operation instructions mode d ... - Umarex
bedienungsanleitung operation instructions mode d ... - Umarex

You also want an ePaper? Increase the reach of your titles
YUMPU automatically turns print PDFs into web optimized ePapers that Google loves.
BEDIENUNGSANLEITUNG<br />
OPERATION INSTRUCTIONS<br />
MODE D´EMPLOI<br />
MANUAL DE INSTRUCCIONES<br />
Pressluftgewehr | Air rifle<br />
Carabine à air comprimé | Carabina de aire comprimido
ACHTUNG | CAUTION | ATTENTION | ATENCIÓN<br />
Diese Waffe ist frei erwerbbar ab 18 Jahre. Zu Ihrer eigenen und zur Sicherheit Anderer<br />
lesen Sie bitte die Bedienungsanleitung vollständig und sorgfältig durch, bevor Sie mit der<br />
Waffe das erste Mal schießen. Käufer und Besitzer haben die Pflicht, alle Regeln über den<br />
Gebrauch und den Besitz von Pressluft-Gewehren zu befolgen.<br />
For sale to persons over 18 years of age. For your own safety and that of others, read the<br />
user’s manual carefully before shooting the weapon for the first time. Both sellers and<br />
buyers must respect the regulations on use and ownership of air rifles.<br />
En vente libre aux personnes âgées de plus de 18 ans. Pour votre sécurité et celle d’autrui,<br />
lisez attentivement et intégralement la notice d’emploi avant d’utiliser l‘arme pour la<br />
première fois. Les vendeurs, tout comme les acheteurs, ont l’obligation de respecter les<br />
normes relatives à l’utilisation et à la possession carabine à air comprimé.<br />
De venta libre a mayores de 18 años. Para su propia seguridad y para la de los demás, lea<br />
íntegra y detenidamente las instrucciones de uso antes de disparar el arma por primera vez.<br />
Tanto los vendedores como los compradores tienen la obligación de respetar las normas<br />
relativas al uso y posesión de carabinas de aire comprimido.<br />
INHALT<br />
CONTENTS<br />
CONTENU<br />
CONTENIDO<br />
1<br />
2<br />
3<br />
4<br />
Benennung<br />
Description<br />
Designation<br />
Designación<br />
Bedienung<br />
Operation<br />
Emploi<br />
Reglaje<br />
Pflege<br />
Care<br />
Entretien<br />
Mantenimiento<br />
Sicherheitshinweise<br />
Safety <strong>instructions</strong><br />
Consignes de<br />
sécurité<br />
Instrucciones de<br />
seguridad
1.1<br />
1250 DOMINATOR<br />
! ACHTUNG: Dieses Symbol markiert Sicherheitshinweise in dieser Gebrauchsanleitung. Wenn Sie dieses Symbol sehen, seien Sie bitte<br />
besonders achtsam und lesen Sie den markierten Abschnitt sorgfältig. Zu Ihrer Eigenen und zur Sicherheit anderer lesen<br />
Sie die Gebrauchsanleitung vollständig und aufmerksam durch. Laden Sie die Diabolos erst unmittelbar vor dem Schießen.<br />
Wenn Sie Ihre Waffe geladen haben und sich entscheiden, nicht zu schießen, entladen Sie wie nachstehend beschrieben.<br />
Eine gesicherte, ungeladene Waffe ist am sichersten. Unfälle passieren schnell und können zu Verletzungen oder sogar zum<br />
Tod führen. Bitte seien Sie beim Schießen besonders vorsichtig!<br />
Das Kapitel „Sicher zielen und schießen“ in dieser Anleitung behandelt<br />
die Regeln zum sicheren Schießen. LESEN SIE DIESES KAPITEL. Folgen<br />
Sie diesen Regeln und vergewissern Sie sich, dass jeder, der mit der<br />
Waffe umgeht, mit der Handhabung und den Sicherheitsregeln vertraut<br />
ist. Lesen Sie auch das Kapitel „Sicherer Umgang mit Waffen“, um<br />
Unfälle zu vermeiden.<br />
Ihr neues Pressluft-Gewehr sollte mit Vorsicht und Respekt behandelt<br />
werden. Denken Sie immer daran, dass der erste und wichtigste<br />
Sicherheitsaspekt einer jeden Waffe der Schütze ist. Alle Sicherungen<br />
sind mechanisch und der Schütze ist der einzige, der die Waffe sichert<br />
oder entsichert. VERLASSEN SIE SICH NICHT AUF MECHANISCHE<br />
SICHERUNGEN - denken Sie vorausschauend und vermeiden Sie<br />
Situationen, die zu einem Unfall führen könnten! Waffen unterscheiden<br />
sich in ihrer Handhabung. Sie sollten niemals mit einer Waffe schießen,<br />
bevor Sie sich mit ihr vertraut gemacht haben. Lesen Sie die folgende<br />
Gebrauchsanleitung und üben Sie die Handhabung, OHNE DIE WAFFE<br />
GELADEN ZU HABEN (Trockenübung auf ein sicheres Ziel), damit Sie in<br />
der Lage sind, die Waffe richtig und sicher zu bedienen.<br />
D<br />
! ACHTUNG: Niemals eine geladene Waffe liegen lassen!<br />
Aufbewahrung und Lagerung Ihrer Waffe<br />
sollten nur in ungeladenem Zustand erfolgen.<br />
Sicherung auf „gesichert“ (S) stellen, sorgfältig<br />
darauf achten, dass sich kein Geschoss im<br />
Lauf befindet und keine Diabolos mehr in der<br />
Trommel sind. Waffe für Kinder und ungeübte<br />
Benutzer unzugänglich aufbewahren.<br />
Diabolos und Pressluft-Behälter von dem<br />
Gewehr getrennt aufbewahren, um diese<br />
von ungeübten Benutzern und unbefugten<br />
Personen fern zu halten.<br />
3 |
1.1<br />
8<br />
| 4<br />
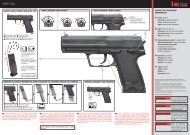
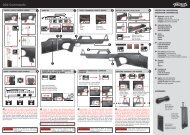
EINZELTEILE IHRES NEUEN PRESSLUFT-GEWEHRS<br />
1 2 3 4 5<br />
9<br />
10<br />
Das Einprägen der Bezeichnungen der Einzelteile Ihres neuen Gewehrs<br />
wird Ihnen helfen, die Gebrauchsanleitung zu verstehen. Lesen Sie<br />
dieses Handbuch, um mehr Freude an Ihrer neuen Waffe zu haben.<br />
7<br />
1<br />
2<br />
3<br />
4<br />
5<br />
6<br />
Mündung<br />
Korn<br />
Kimme<br />
Trommelmagazin<br />
Sicherung<br />
Schaft<br />
11<br />
7 Abzug<br />
8<br />
9<br />
10<br />
11<br />
6<br />
Schaftkappe<br />
Schaftbacke<br />
Kammerstengel<br />
Pressluft-<br />
Behälter
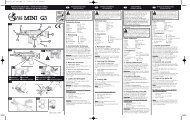
2.1<br />
HANDHABUNG DER SICHERUNG<br />
Bei jedem Repetiervorgang wird die Waffe automatisch gesichert!<br />
• Um die Waffe manuell zu sichern, ziehen Sie die Sicherung wie in<br />
Bild 1.a dargestellt nach hinten, bis sie einrastet (rote Markierung<br />
ist verdeckt).<br />
• Sie sollten nur mit der Waffe hantieren, wenn diese gesichert ist.<br />
Bitte darauf achten, dass die Mündung immer in eine sichere<br />
Richtung zeigt.<br />
• Das Gewehr ist mit einer 2-Wege Sicherung ausgestattet. Um sie<br />
zu entsichern, muss 1. der Rasthebel nach unten und 2. der<br />
Sicherungsschieber nach vorne gedrückt werden (Bild 1.b).<br />
Die rote Markierung ist sichtbar und die Waffe ist feuerbereit<br />
(Bild 1.c).<br />
! VORSICHT:<br />
Machen Sie es sich zur Gewohnheit, die Waffe<br />
stets entspannt und gesichert zu lassen, bis<br />
geschossen werden soll.<br />
Bild 1.a gesichert Bild 1.b Bild 1.c feuerbereit<br />
1.<br />
2.<br />
5 |
2.2<br />
Hinweis: Bitte verwenden Sie nur Zubehör von Walther, um die sichere<br />
Funktion zu gewährleisten!<br />
Setzen Sie den neuen Pressluftbehälter mit der Öffnung zuerst in den<br />
Schaft ein (Bild 2a) und schrauben Sie ihn fest. Das Gewehr steht<br />
jetzt unter Druck. Um zu prüfen, ob der Pressluftbehälter korrekt<br />
aufgeschraubt ist, vergewissern Sie sich, dass die Waffe nicht geladen<br />
ist und schießen Sie in eine sichere Richtung. Wenn das Gewehr nicht<br />
schießt, prüfen Sie die Punkte in Kapitel 4 „Probleme“.<br />
Fig. 2.a<br />
Fig. 2.b<br />
| 6<br />
HANDHABUNG DES PRESSLUFTBEHÄLTERS<br />
! ACHTUNG: Der Druckluftbehälter steht auch nach dem<br />
Abschrauben von dem Gewehr unter Druck.<br />
! ACHTUNG: Um das Gewehr voll zu entlasten, schrauben Sie<br />
den Pressluftbehälter ab, entnehmen Sie das<br />
Trommelmagazin und schießen Sie in eine sichere<br />
Richtung, bis sich kein Schuss mehr löst.<br />
Füllvorgang<br />
Der Pressluftbehälter kann jederzeit, auch ohne leergeschossen zu<br />
sein nachgefüllt werden. Füllvorgänge sind unter Beachtung der<br />
Technische Regeln Druckgase (TRG) durchzuführen. Der max. zulässige<br />
Fülldruck beträgt 300 bar und ist unbedingt einzuhalten. Beim<br />
Nachfüllen müssen die gesetzlichen Bestimmungen des jeweiligen<br />
Landes berücksichtigt werden. Undichte und/oder sonst gefährliche<br />
unsichere Pressluftbehälter dürfen nicht befüllt werden und sind<br />
gefahrlos zu entleerren. Adapter auf Nachfüllflasche aufschrauben und<br />
festziehen. Anschließend Pressluftbehälter auf den Adapter aufdrehen<br />
und handfest anziehen. Nun das Flaschenventil für etwa 5 s öffnen,<br />
danach wieder schließen. Pressluftbehälter abnehmen und wieder an<br />
die Waffe aufschrauben. Pressluftbehälter dürfen in keinem Fall mit<br />
mehr als maximaler Füllung benutzt oder gelagert werden.<br />
! VORSICHT:<br />
! VORSICHT:<br />
Beim Aufschrauben eines Pressluftbehälters<br />
ist unbedingt darauf zu achten, dass die Waffe<br />
gesichert ist und die Mündung in eine sichere<br />
Richtung zeigt.<br />
Die zu verwendende Luft muss DIN 2188<br />
(Atemluft) entsprechen.<br />
! ACHTUNG: Machen Sie niemals den Versuch, einen<br />
Pressluftbehälter mit Gewalt einzusetzen.<br />
! ACHTUNG: Pressluftbehälter nicht bei Temperaturen über<br />
50°C lagern.
2.3<br />
LADEN DES<br />
TROMMELMAGAZINS<br />
• Sichern Sie Ihre Waffe (siehe Kap. 2.1 „Handhabung der<br />
Sicherung“).<br />
• Ziehen Sie den Kammerstengel und den Entriegelungsschieber<br />
zurück (Reihenfolge s. Bild 4.a).<br />
• Entnehmen Sie die Trommel aus der Waffe (Bild 4.b).<br />
• Laden Sie das Trommelmagazin, indem Sie die Diabolos ins<br />
Geschosslager stecken (Bild 3.a).<br />
Durch einen O-Ring werden die Diabolos gehalten.<br />
• Ihre neue Waffe wurde mit allen Diabolos aus dem Zubehör auf<br />
einwandfreie Funktion getestet. Es können Diabolos bis zu einer<br />
Gesamtlänge von 10 mm geladen werden.<br />
2.4<br />
LADEN DES GEWEHRS<br />
• Sichern Sie Ihre Waffe (siehe Kap. 2.1 „Handhabung der<br />
Sicherung“).<br />
• Ziehen Sie den Kammerstengel und den Entriegelungsschieber<br />
zurück (Reihenfolge siehe Bild 4.a).<br />
• Platzieren Sie die Trommel in der Waffe (Bild 4.b).<br />
• Betätigen Sie den Entriegelungsschieber.<br />
• Schieben Sie den Kammerstengel wieder in die vordere Position und<br />
verriegeln Sie ihn.<br />
ACHTUNG: Durch den Verriegelungsvorgang wird automatisch ein<br />
Diabolo in den Lauf geladen!<br />
! ACHTUNG: Verwenden Sie keine Stahlrundkugeln (so<br />
genannte BBs), Federbolzen oder ähnlich<br />
ungeeignete Geschosse.<br />
Bild 3.a<br />
! ACHTUNG: Niemals die Hand vor die Laufmündung<br />
halten! Finger weg vom Abzug! Vergewissern<br />
Sie sich, dass die Mündung immer in eine<br />
sichere Richtung zeigt. Richten Sie die Waffe<br />
niemals auf Menschen oder Tiere.<br />
3.<br />
2.<br />
Bild 4.a Bild 4.b<br />
1.<br />
7 |
2.5<br />
• Sichern Sie Ihre Waffe wie beschrieben<br />
(siehe Kap. 2. 1 „Handhabung der Sicherung“).<br />
• Entriegeln Sie die Trommel, indem Sie zuerst den Kammerstengel<br />
zurückziehen und anschließend den Entriegelungsschieber<br />
zurückziehen (Bild 4.a).<br />
• Entnehmen Sie das Trommelmagazin (Bild 4.b).<br />
• Wenn ein Diabolo im Lauf ist, entfernen Sie dieses mit einer<br />
Reinigungsbürste, oder verfahren Sie wie in Kapitel<br />
„Ladehemmung“ beschrieben.<br />
• Versuchen Sie nicht, ein gebrauchtes Diabolo noch einmal zu<br />
verschießen. Trommel und Lauf könnten beschädigt werden.<br />
• Drücken Sie die Diabolos mit einem spitzen Gegenstand aus dem<br />
Trommelmagazin.<br />
• Vergewissern Sie sich, dass das Gewehr komplett entladen ist.<br />
• Setzen Sie das leere Trommelmagazin wieder ein.<br />
• Führen Sie den Kammerstengel nach vorne.<br />
• Halten Sie das Gewehr in eine sichere Richtung.<br />
• Entsichern Sie und entspannen Sie die Waffe durch Betätigen des<br />
Abzugs.<br />
• Sichern Sie das Gewehr anschließend wieder!<br />
2.6<br />
Vergewissern Sie sich, dass Ihre Waffe gesichert ist. Setzen Sie den<br />
Pressluftbehälter ein und laden Sie das Gewehr wie beschrieben. Als<br />
erfahrener und auf Sicherheit bedachter Schütze haben Sie natürlich<br />
bei jedem Schuss das korrekte Visierbild vor Augen.<br />
| 8<br />
ENTLADEN DES GEWEHRES<br />
SICHER ZIELEN UND<br />
SCHIESSEN<br />
! ACHTUNG: Wenn Sie ein im Lauf befindliches Diabolo<br />
mit Hilfe einer Reinigungsbürste entfernen,<br />
legen Sie das Gewehr auf die Seite (siehe<br />
Kapitel Ladehemmung). Halten Sie das<br />
Gewehr nicht senkrecht, da das Diabolo sonst<br />
in den Systemschacht fallen und dadurch<br />
Funktionsstörungen hervorrufen könnte!<br />
! ACHTUNG: Benutzen Sie niemals einen scharfen<br />
Metallgegenstand, um die Diabolos aus dem<br />
Trommelmagazin oder der Waffe zu entfernen!<br />
Beschädigungen der Trommel oder des Laufes<br />
führen zu Funktionsstörungen.<br />
! VORSICHT:<br />
Wegen der hohen Leistung dieser Waffe seien<br />
Sie bitte besonders vor- und umsichtig bei der<br />
Auswahl eines sicheren Zieles. Wählen Sie nur<br />
Ziele, die nicht durchdrungen werden können<br />
bzw. die - wegen ihrer harten Oberfläche -<br />
keine Abpraller verursachen können. Schießen<br />
Sie niemals auf Wasserflächen!<br />
! ACHTUNG: Sorgen Sie dafür, dass der Lauf der Waffe stets<br />
in eine sichere Richtung gehalten wird.<br />
Niemals auf Menschen oder Tiere zielen.<br />
Behandeln Sie die Waffe immer so, als wäre<br />
sie geladen und schussbereit.
REPETIEREN (LADEVORGANG)<br />
Nachdem Sie die Waffe wie beschrieben geladen haben, vergewissern<br />
Sie sich, dass Ziel, Kugelfang und Umgebungsbereich sicher sind.<br />
Bei jedem Repetiervorgang wird die Trommel eine Position weiter<br />
transportiert. Repetieren Sie, indem Sie den Kammerstengel entriegeln,<br />
einmal ganz nach hinten und wieder nach vorne bewegen, bis er wieder<br />
eingerastet ist (Bild 5.a). Entsichern Sie die Waffe wie beschrieben, das<br />
Gewehr ist nun schussbereit. 1.<br />
SCHUSSKAPAZITÄT<br />
Der Pressluftbehälter und die damit noch zur Verfügung stehende<br />
Schusszahl kann an dem inm Pressluftbehälter integrierten Manometer<br />
abgelesen werden. Fällt der Druck auf etwa 70 bar (Variante 7<br />
Joule / 16 Joule) bzw. 140 bar (Variante 28 Joule / 40 Joule) ab<br />
muss der Behälter neu befüllt werden (s. Kap. 2.2 Handhabung des<br />
Pressluftbehälters).<br />
2.7<br />
VORZUGWEG DES ABZUGS<br />
EINSTELLEN<br />
Sichern Sie die Waffe. Entladen Sie das Gewehr wie in Kap. 2.5<br />
„Entladen des Gewehrs“ beschrieben.<br />
Stellen Sie mit einem Schraubendreher durch eine leichte<br />
Drehbewegung an der Schraube am Abzug (Bild 6.a) Ihren individuellen<br />
Vorzugweg ein.<br />
Bild 5.a<br />
50<br />
100<br />
Bild 6.a<br />
0<br />
150<br />
200<br />
250<br />
2.<br />
50<br />
100<br />
300<br />
315 0<br />
150<br />
200<br />
300<br />
315<br />
Variante 7 Joule / 16 Joule Variante 28 Joule / 40 Joule<br />
250<br />
9 |
2.8<br />
| 10<br />
LADEHEMMUNG<br />
VORSICHT! Das Schießen mit einem Gewehr mit zu geringem Pressluft-<br />
Druck kann dazu führen, dass ein Diabolo im Lauf stecken bleibt.<br />
• Füllen Sie die Pressluftbehälter, entnehmen Sie die Trommel,<br />
schließen Sie den Kammerstengel und schießen Sie ohne<br />
Trommelmagazin.<br />
• Das festsitzende Diabolo wird dann verschossen.<br />
• Wird das Problem durch diesen Vorgang nicht behoben, drücken<br />
Sie das festsitzende Diabolo vorsichtig mit einer Reinigungsbürste<br />
(Putzstock) zurück.<br />
Bild 7.a<br />
! ACHTUNG: Eine Ladehemmung ist ein gefährlicher<br />
Zustand!<br />
! ACHTUNG: Wenn die Waffe kein Geschoss verschießt,<br />
darf man niemals annehmen, dass das<br />
Trommelmagazin kein Geschoss mehr enthält.<br />
! ACHTUNG: Wenn Sie ein im Lauf befindliches Diabolo mit<br />
Hilfe einer Reinigungsbürste entfernen, legen<br />
Sie das Gewehr auf die Seite (siehe Bild 7.a).<br />
Halten Sie das Gewehr nicht senkrecht, da<br />
das Diabolo sonst in den Systemschacht fallen<br />
und dadurch Funktionsstörungen hervorrufen<br />
könnte!
2.9<br />
VISIEREINSTELLUNGEN<br />
Visieren Sie ein sicheres Ziel an:<br />
Halten Sie die Waffe so, dass Sie Kimme (hinterer Visierteil) und Korn<br />
(vorderer Visierteil) gleichzeitig im Blick haben. Das Korn muss genau<br />
in der Mitte des Ausschnitts in der Kimme sitzen. Jetzt heben Sie<br />
die Waffe so weit, dass der Mittelpunkt der Zielscheibe mit seinem<br />
unteren Rand auf dem Korn aufsitzt. Oberkante Kimme, Oberkante<br />
Korn, Unterkante Zielpunkt müssen dabei in einer Linie liegen (Bild 8.a,<br />
Visierbild). Die Treffpunktlage kann wie unten beschrieben reguliert<br />
werden. Die Waffe ist auf 10 m ab Werk eingeschossen.<br />
Die Höhenverstellung erfolgt am Visier. Durch leichtes Lösen der<br />
Schraube lässt sich das Visier verschieben (Bild 8.b):<br />
Bei zu hohem Schuss: Visier nach hinten schieben<br />
Bei zu niedrigem Schuss: Visier nach vorne schieben<br />
Anschließend muss die Schraube wieder angezogen werden.<br />
Bild 8.b Bild 8.c<br />
Bild 8.a<br />
zu hoch zu tief richtig<br />
Die Seitenverstellung der Visierung erfolgt durch Verschieben des<br />
Kornes. (Bild 8.c):<br />
Bei Rechtsschuss: Korn nach rechts schieben<br />
Bei Linksschuss: Korn nach links schieben<br />
11 |
2.10<br />
| 12<br />
AUFBEWAHRUNG<br />
Aufbewahrung und Lagerung Ihrer Waffe sollten nur in ungeladenem<br />
und gesichertem Zustand geschehen. Sorgfältig darauf achten, dass<br />
sich kein Geschoss im Lauf befindet und keine Diabolos in der<br />
Trommel sind. Waffe für Kinder und ungeübte Benutzer unzugänglich<br />
aufbewahren! Diabolos von dem Gewehr getrennt aufbewahren.<br />
3<br />
PFLEGE<br />
Bei entsprechender Pflege und sorgfältiger Behandlung werden Sie<br />
viele Jahre Freude an Ihrer Waffe haben.<br />
Die äußeren Metallteile müssen gelegentlich gereinigt werden. Dabei<br />
ist ein weiches Tuch zu verwenden, das zuvor leicht mit einem<br />
Waffenöl benetzt wurde. Um eine dauerhafte Funktion Ihrer Waffe zu<br />
gewährleisten, sprühen Sie hin und wieder 2 bis 3 Tropfen Waffenöl an<br />
den Zubringerstift und durch den leeren Trommelschacht in die Waffe<br />
(siehe Bild 9.a). Benutzen Sie niemals Schnellreinigungspfropfen,<br />
sonst könnte die Waffe beschädigt werden!<br />
! ACHTUNG: Niemals eine geladene Waffe liegen lassen!<br />
! ACHTUNG: Versuchen Sie nicht, die Waffe zu reinigen, ohne<br />
sie vorher zu sichern, den Pressluftbehälter<br />
und dieTrommel herauszunehmen und zu<br />
überprüfen, dass sich kein Geschoss mehr im<br />
Lauf befindet.<br />
Bild 9.a
4<br />
Probleme<br />
Waffe schießt nicht<br />
Schlechte Schussleistung<br />
Geringe Geschossgeschwindigkeit<br />
SICHERHEITSHINWEISE<br />
Waffe gesichert<br />
Pressluftbehälter leer<br />
Lauf verschmutzt<br />
Mögliche Gründe<br />
Pressluftbehälter nicht<br />
richtig aufgeschraubt<br />
extreme Temperaturen<br />
falsche Munition<br />
Diabolos falsch geladen<br />
13 |
HINWEISE ZUR VERWENDUNG VON PRESSLUFT-BEHÄLTERN<br />
Es kann vorkommen, dass eine pressluftbetriebene Luftdruckwaffe<br />
besonderen Bedingungen unterworfen ist, die die guten Leistungen<br />
der Waffe nachteilig beeinflussen können. Hierzu gehören auch der<br />
Gebrauch und/oder die Aufbewahrung oder Lagerung der Waffe bei<br />
Temperaturen, die beträchtlich höher oder niedriger sein können als<br />
die normalen Außentemperaturen (15 - 21°C).<br />
Hohe Temperaturen können in dem Pressluft-Behälter wie auch<br />
in der Waffe selbst einen Druck erzeugen, der erheblich höher ist<br />
als der normale Betriebsdruck. Ein solcher Überdruck kann die<br />
Schussabgabe verhindern und zu bleibenden Schäden führen. Die<br />
maximale Temperatur für die Lagerung oder den Gebrauch dieser Waffe<br />
sollte nicht über 50°C liegen.<br />
Pressluftbehälter, die undicht, beschädigt oder älter als zehn Jahre<br />
sind, sind gefahrlos zu entleeren und dürfen nicht mehr benutzt<br />
und / oder befüllt werden. Nach zehn Jahren an Herstelldatum muss der<br />
Pressluftbehälter erneut durch den Hersteller kostenpflichtig geprüft /<br />
ersetzt werden. Das Herstelldatum ist auf dem Pressluftbehälter<br />
angegeben.<br />
VERÄNDERUNGEN AN DER WAFFE<br />
| 14<br />
Die zu verwendende Atemluft muss DIN 3188 (Atemluft) entsprechen.<br />
Der maximale Betriebsdruck des Pressluftbehälters (300 bar) darf in<br />
keinem Fall überschritten werden.<br />
! VORSICHT:<br />
Das Schießen mit einem Gewehr mit zu geringem<br />
Pressluftdruck kann dazu führen, dass<br />
ein Diabolo im Lauf stecken bleibt. Beachten<br />
Sie die Hinweise bei Ladehemmungen.<br />
! ACHTUNG: Die einzelnen Bauteile dieser Waffe wurden so konstruiert und hergestellt, dass jederzeit ein Optimum an Funktion und<br />
Leistung gewährleistet wird. Jede Änderung der Konstruktion oder Leistungstuning können zu fehlerhafter Funktion führen<br />
und den Gebrauch der Waffe unsicher machen. Die Gewährleistungsansprüche erlöschen mit jeder unbefugten Änderung<br />
der Waffe.
SERVICE BEI WALTHER WAFFEN<br />
ACHTUNG! Eine Waffe, die nicht einwandfrei funktioniert, ist gefährlich.<br />
Sie sollte sicher aufbewahrt werden, damit sie niemand benutzt, bevor<br />
sie repariert wurde. Es ist schwierig, eine Waffe selbst zu reparieren,<br />
und falscher Zusammenbau kann zu gefährlichen Funktionsstörungen<br />
führen.<br />
GEWÄHRLEISTUNG BEI WALTHER WAFFEN<br />
Innerhalb der gesetzlichen Gewährleistungsfrist ab Kaufdatum repariert<br />
oder ersetzt Ihnen die Fa. Walther Ihre Waffe kostenlos, falls der Defekt<br />
auf eine fehlerhafte Fertigung zurückzuführen ist. Bitte übergeben<br />
Sie die Waffe einem autorisierten Händler, beschreiben Sie ihm das<br />
Problem und fügen Sie den entsprechenden Kaufbeleg bei.<br />
Auch Waffen unterliegen einem gewissen Verschleiß. Bei intensivem<br />
Gebrauch können sich Abnutzungserscheinungen einstellen, die in der<br />
Regel nicht zu Funktionsstörungen führen. Die Trommelmagazine zur<br />
Aufnahme der Diabolos werden besonders beansprucht und müssen<br />
gegebenenfalls erneuert werden (siehe Kapitel Sonderzubehör).<br />
! ACHTUNG: Lassen Sie die Waffe nur von einem autorisierten<br />
Fachhändler/Büchsenmacher überprüfen<br />
und reparieren!<br />
! WICHTIG:<br />
Wenn Sie Ihre Waffe transportieren, vergewissern<br />
Sie sich, dass die Waffe gesichert und<br />
entladen ist.<br />
15 |
SICHERER UMGANG MIT WAFFEN<br />
Sie sollten mit der richtigen, sicheren Handhabung Ihrer Waffe<br />
vertraut sein. Der Aspekt, dass Ihre neue Waffe eine sehr hohe<br />
Geschossgeschwindigkeit hat, erfordert besondere Vorsicht. Im Hinblick<br />
auf die Grundregeln zum sicheren Schießen bedenken Sie, dass jede<br />
Berührung der Waffe als Handhabung verstanden wird.<br />
• Die Waffe sollte nur zur Schussabgabe entsichert werden und nach<br />
dem Beenden der Schussübung sofort wieder gesichert werden.<br />
• Behandeln Sie jede Waffe so, als wäre sie geladen.<br />
• Die Waffe vor dem Laden stets sichern, so dass sich kein Schuss<br />
ungewollt lösen kann. Finger immer außerhalb des<br />
Abzugbügels halten und nur zum Schuss an den Abzug legen.<br />
• Verwenden Sie nur für diese Waffe vorgesehene Munition sowie<br />
Pressluftbehälter.<br />
• Halten Sie die Mündung stets in eine sichere Richtung.<br />
• Das Schießen ist nur in der eigenen Wohnung, auf polizeilich<br />
zugelassenen Schießständen und im befriedeten Besitztum erlaubt,<br />
wenn das Geschoss dieses beim Schuss nicht verlassen kann.<br />
Maximale Reichweite des Geschosses beachten (ca. 850 m).<br />
• Transportieren Sie niemals eine geladene Waffe. Laden Sie die Waffe<br />
nur, wenn Sie schießen möchten.<br />
• Waffe niemals auf Menschen oder Tiere richten. Vermeiden Sie<br />
Querschläger. Schießen Sie niemals auf glatte, harte Oberflächen<br />
oder auf Wasserflächen.<br />
• Vergewissern Sie sich vor dem Schuss, dass Ziel und<br />
Umgebungsbereich sicher sind.<br />
• Kontrollieren Sie immer, ob die Waffe gesichert und ungeladen<br />
ist, wenn Sie diese transportieren oder von einer anderen Person<br />
übernehmen.<br />
• Vergewissern Sie sich, dass Sie auch beim Stolpern oder Stürzen die<br />
Richtung der Mündung kontrollieren können.<br />
| 16<br />
• Aus Sicherheitsgründen sollte beim Schießen eine Schutzbrille<br />
getragen werden.<br />
• Aufbewahrung der Waffe stets gesichert, ungeladen und sicher vor<br />
unerlaubtem Zugriff Unbefugter (ungeschulte Personen, Kinder,<br />
Personen unter 18 Jahre) und getrennt von der Munition.<br />
• Weitergabe dieser Waffe mit der Bedienungsanleitung nur an<br />
Personen über 18 Jahre, die mit der Handhabung dieser Waffe<br />
genauestens vertraut sind. Die Versionen über 7.5 Joule sind in<br />
Deutschland WBK-pflichtig.<br />
• Jegliche Veränderungen oder Reparaturen von Waffen sollten nur<br />
von fachkundigen Firmen oder vom Büchsenmacher durchgeführt<br />
werden.<br />
• Legen Sie niemals eine geladene Waffe aus der Hand.<br />
• Entladen Sie Ihre Waffe, bevor Sie diese an andere Personen<br />
weitergeben.
TECHNISCHE DATEN<br />
7.5 Joule 16 Joule 28 Joule 40 Joule<br />
Kaliber 4.5 mm 5.5 mm<br />
Magazinkapazität 8 Schuss<br />
Gesamtlänge 1040 mm<br />
Gewicht 3610 g<br />
Mündungsgeschwindigkeit (Energie) bis 170 m/s bis 250 m/s bis 370 m/s bis 290 m/s<br />
Lauflänge 600mm<br />
Antrieb Pressluft<br />
Sicherung automatische Abzugsicherung<br />
! ACHTUNG: Die von Firma Carl Walther GmbH Sportwaffen hergestellten Pressluftwaffen werden gemäß den Zulassungsvorschriften<br />
der Physikalisch-Technischer Bundesanstalt (PTB), dem Bundesgesetz, den CIP-Vorschriften und dem waffentechnischen<br />
Know-how der Firma Carl Walther GmbH Sportwaffen hergestellt.<br />
Somit übernehmen wir keine Haftung, falls diese Ware nach dem Export ins Ausland nicht den dort geltenden<br />
Rechtsvorschriften entsprechen sollte und dem Besitzer/Käufer juristische Schwierigkeiten und Konsequenzen daraus<br />
entstehen sollten.<br />
17 |
ZUBEHÖR FÜR WALTHER 1250 DOMINATOR<br />
| 18<br />
Mehrschusstrommel<br />
2 Stück,<br />
auch für Spitzkugeln geeignet<br />
Art.-Nr. 465.102<br />
Picatinny-Adapterschiene<br />
mit wenigen Handgriffen auf das vorhandene<br />
System aufschraubbar<br />
Art.-Nr. 465.104<br />
Füllschlauch 300 bar<br />
ermöglicht das schnelle Nachfüllen<br />
ohne Abnahme der Kartusche,<br />
mit Quick-Fill-Adapter<br />
Art.-Nr. 465.109<br />
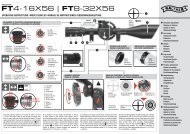
Walther FT 8-32x56<br />
Parallaxeausgleich mit großem<br />
Schnellstellrad, großer und breiter<br />
Verstellbereich des Absehens durch<br />
hohe Türme, angewinkeltes Objektiv<br />
für ein reflektionsfreies Zielbild<br />
Art.-Nr. 2.1525<br />
Schalldämpfer / Kompensator<br />
Unkomplizierte Montage durch einfaches<br />
Aufstecken und Fixierung mit Schrauben.<br />
Reduziert den Mündungsknall beim Schießen.<br />
(Gesetzliche Bestimmung beachten!)<br />
Schalldämpfer Art.-Nr. 465.105<br />
Kompensator Art.-Nr. 465.106<br />
Stahl-Pressluftkartusche 300 bar<br />
267 cm, 930 g, mit Manometer<br />
und Quick-Fill-Adapter<br />
zum schnellen Befüllen im Feld<br />
Art.-Nr. 465.108<br />
Pressluftflasche 300 bar<br />
Inhalt 6l, TÜV geprüft, mit<br />
Kombi Trage - Schutzbügel<br />
Art.-Nr. 465.110<br />
Schießbrille<br />
Diese Schießbrille aus hochfestem<br />
Polycarbonat ist aus Sicherheitsgründen<br />
ein absolutes Muss beim<br />
„Action-Schießen“.<br />
gelb Art.-Nr. 2.5013
Übungssilhouette - Eichhörnchen<br />
Art.-Nr. 465.111-1<br />
Diabolo Match Diabolo Spitz Finale Match 850 Air Magnum<br />
Pellets<br />
10 x 500 Stk.<br />
cal. 4.5 mm<br />
Art.-Nr. 4.1951<br />
10 x 500 Stk.<br />
cal. 4.5 mm<br />
Art.-Nr. 4.1952<br />
Klappsilhouette - Taube<br />
Art.-Nr. 465.112-3<br />
Walther Gewehrfutteral<br />
Zwei große, abgetrennte Taschen, Viele<br />
Innenfächer, Drei verschiedene Tragemöglichkeiten,<br />
Wasserabweisendes<br />
PVC-Material Gummierter,<br />
wasserdichter, verstärkter Boden<br />
Art.-Nr. 5.8048<br />
10 x 500 Stk.<br />
cal. 4.5 mm<br />
Art.-Nr. 4.1930<br />
500 Stk.<br />
cal. 4.5 mm<br />
Art.-Nr. 4.1627<br />
Übungssilhouette - Rabe<br />
Art.-Nr. 465.111-4<br />
Klappsilhouette - Ratte<br />
Art.-Nr. 465.112-5<br />
Diabolo Diabolo Diabolo<br />
500 Stk.<br />
cal. 4.5 mm<br />
Art.-Nr. 4.1623<br />
500 Stk.<br />
cal. 4.5 mm<br />
Art.-Nr. 4.1624<br />
Reinigungsset<br />
3-teiliger Reinigungsstock,<br />
Haarbürste, Messingdrahtbürste,<br />
Wollwischer.<br />
für Cal. 4.5 mm Art.-Nr.: 3.2050<br />
für Cal. 5.5 mm Art.-Nr.: 3.2051<br />
500 Stk.<br />
cal. 4.5 mm<br />
Art.-Nr. 4.1625<br />
Diabolo<br />
250 Stk.<br />
cal. 5.5 mm<br />
Art.-Nr. 4.1626<br />
19 |
DAS ZIEL<br />
Die Field-Targets sind Klappfiguren aus Plattenstahl. Die meist<br />
lebensgrossen Abbildungen von Kleintieren (Ratte, Hase, Eichhörnchen,<br />
Taube, Rabe) haben in der Blattschuss-Region eine runde Öffnung<br />
(Killzone). Diese ist variabel und kann manuell von 40 mm bis auf 15<br />
mm verkleinert werden.<br />
Field-Target zum Training<br />
(Art.-Nr. 465.111-1 – Art.-Nr. 465.111-5):<br />
Die 30 cm lange Stange des Targets wird in den Boden gesteckt.<br />
Durch einen Treffer in der Killzone fällt das Paddel um. Durch einen<br />
zweiten Schuss auf den Reset-Paddel wird das Killzone-Paddel wieder<br />
aufgerichtet. Ausführung: Ratte, Hase, Eichhörnchen, Taube, Rabe.<br />
Silhouetten<br />
Übungssilhouette - Eichhörnchen Art.-Nr. 465.111-1<br />
Übungssilhouette - Hase Art.-Nr. 465.111-2<br />
Übungssilhouette - Taube Art.-Nr. 465.111-3<br />
Übungssilhouette - Rabe Art.-Nr. 465.111-4<br />
Übungssilhouette - Ratte Art.-Nr. 465.111-5<br />
Klappsilhouette - Eichhörnchen Art.-Nr. 465.112-1<br />
Klappsilhouette - Hase Art.-Nr. 465.112-2<br />
Klappsilhouette - Taube Art.-Nr. 465.112-3<br />
Klappsilhouette - Rabe Art.-Nr. 465.112-4<br />
Klappsilhouette - Ratte Art.-Nr. 465.112-5<br />
| 20<br />
Field-Target am Boden für Wettkampf<br />
(Art.-Nr. 465.112-1 – Art.-Nr. 465.112-5):<br />
Das Target wird mit Stahlnägeln am Boden befestigt und mit einer<br />
Leine wieder aufgerichtet. Ausführung: Ratte, Hase, Eichhörnchen,<br />
Taube, Rabe.<br />
Killzone:<br />
Der Durchmesser<br />
ist verstellbar.<br />
Befestigungsöse:<br />
Das Target wird mit einer<br />
Leine wieder aufgerichtet.<br />
Halterung:<br />
Target wird am<br />
Boden befestigt.
1.1<br />
1250 DOMINATOR<br />
! CAUTION: This symbol indicates the presence of safety directions in the operating <strong>instructions</strong>. When you see this symbol, pay<br />
attention and read the corresponding section carefully. For your own safety and that of others, read all the operating<br />
<strong>instructions</strong> provided. Do not load the diabolo pellets until you are ready to shoot. If you have loaded the rifle and decide not<br />
to shoot, unload it as described below. To guarantee maximum safety, keep the rifle unloaded with the safety on. Accidents<br />
always happen unexpectedly and may cause injuries and even death. Pay special attention when you are shooting<br />
The chapter "Point and shoot safely" of these <strong>instructions</strong> deals with<br />
the rules for shooting safely. READ THIS CHAPTER. Follow these rules<br />
and make sure that all those who handle the weapon are familiarized<br />
with its handling and the safety rules. Also read the chapter “Safe<br />
weapon handling” to avoid accidents.<br />
Your new air rifle must be used with care and respect. Always<br />
remember that the operator of a weapon is the greatest safety<br />
measure. All of the safety devices are mechanical and it is only the<br />
person shooting who sets or releases the safety. DO NOT PLACE FULL<br />
TRUST IN THE MECHANICAL SAFETIES: Be wise and avoid situations<br />
that might cause an accident.<br />
Each weapon handles differently. For this reason, never fire a weapon<br />
until you are familiar with it. Read the following usage <strong>instructions</strong> and<br />
become familiar with the handling of the weapon WITHOUT LOADING<br />
IT (aiming at a safe target) until you feel comfortable using the weapon<br />
correctly and safely.<br />
GB<br />
! CAUTION: Never leave the weapon loaded.<br />
Always store the weapon unloaded. Activate<br />
the safety (position S) and carefully make sure<br />
that there is no pellet in the barrel or diabolo<br />
pellets in the drum.<br />
Keep the weapon out of the reach of children<br />
and those who are unfamiliar with its use.<br />
Store diabolos and compressed air cylinders<br />
in a separate location and keep them<br />
out of reach of non-familiarized users or<br />
unauthorized persons.<br />
21 |
1.2<br />
| 22<br />
THE PARTS OF YOUR NEW AIR RIFLE<br />
1 2 3 4 5<br />
8 9 10<br />
If you memorize the names of the different parts of your new rifle, it will<br />
help you to more easily understand the usage <strong>instructions</strong>. Read this<br />
manual carefully to gain full enjoyment from your new weapon.<br />
1<br />
2<br />
3<br />
4<br />
5<br />
6<br />
7<br />
Muzzle<br />
Front sight<br />
Sight<br />
Drum magazine<br />
Safety<br />
Stock<br />
11<br />
7 Trigger<br />
8<br />
9<br />
10<br />
11<br />
6<br />
Stock end pad<br />
Cheek piece<br />
Bolt lever<br />
Compressed air<br />
cylinder
2.1<br />
HANDLING THE SAFETY<br />
After each shot, the weapon will automatically have the safety in<br />
place.<br />
• To set the safety manually, pull the safety back, as shown in<br />
illustration 1.a, until it is in position (the red mark is hidden).<br />
• Handle the weapon only with the safety in place. Always point the<br />
barrel of the weapon in a safe direction.<br />
• The rifle is fitted with a double safety system. To deactivate it, you<br />
must: 1. press the fixing lever down and 2. push the safety button<br />
forward (illustration 1.b)<br />
The red mark is visible and the weapon is ready for shooting<br />
(illustration 1.c).<br />
! WARNING:<br />
Get used to leaving the weapon uncocked and<br />
the safety activated until it is time to shoot.<br />
Illustration 1.a safety activated Illustration 1.b Illustration 1.c ready for shooting<br />
1.<br />
2.<br />
23 |
2.2<br />
Note: To guarantee good <strong>operation</strong>, make sure you use only <strong>Umarex</strong><br />
accessories.<br />
Insert the new compressed air cylinder into the shaft first (Fig. 2.a)<br />
and screw it tight. The gun is now under pressure. To test whether the<br />
cylinder has been screwed in correctly, make sure the gun is not loaded<br />
and shoot in a safe direction. If the gun doesn’t fire, check the items in<br />
Section 4 "Problems".<br />
Fig. 2.a<br />
Fig. 2.b<br />
| 24<br />
HANDLING THE COMPRESSED AIR CYLINDER<br />
! CAUTION: The gun remains under pressure even after<br />
removal of the compressed air cylinder.<br />
! CAUTION: To release all the pressure, unscrew the<br />
compressed air cylinder, remove the drum<br />
magazine and shoot in a safe direction until<br />
the gun can no longer fire.<br />
Filling procedure<br />
The compressed air cylinder can be refilled at any time, even if it<br />
is not yet empty. When filling, observe the provisions of the TRG<br />
(technical regulations relating to pressurized gas). The maximum<br />
permissible filling pressure of 300 bars must not be exceeded under<br />
any circumstances. Observe applicable national statutory regulations<br />
for refilling. Cylinders which are leaky or otherwise unsafe must not<br />
be refilled. Empty them in a safe manner. Screw the adapter onto the<br />
refill cylinder and tighten it. Then screw the compressed air cylinder<br />
onto the adapter and tighten it securely. Open the cylinder valve for<br />
approx. 5 s and then close it. Remove the cylinder and screw it back<br />
onto the gun. Compressed air cylinders must never be used or stored<br />
above maximum pressure.<br />
! WARNING:<br />
! WARNING:<br />
Never try to use force when inserting a compressed<br />
air cylinder.<br />
Do not store compressed air cylinders at temperatures<br />
above 50°C (122 °C).<br />
! CAUTION: When you pierce a compressed air cylinder,<br />
make sure the weapon has the safety activated<br />
and that the barrel is pointing in a safe<br />
direction.<br />
! CAUTION: The air used must comply with DIN 3188<br />
(breathing air).
LOADING THE DRUM<br />
Do not use steel pellets (the so-called BBs),<br />
! 2.3 WARNING:<br />
MAGAZINE<br />
darts or similar unsuitable ammunition.<br />
• Activate the safety (see chap. 2.1 "Handling the safety").<br />
• Pull back the bolt lever of the lock and the retainer of the drum<br />
(see the sequence in illustration 4.a).<br />
• Remove the drum from the weapon (illustration 4.b).<br />
• Load the drum magazine by inserting diabolo pellets in its holes<br />
(illustration 3.a).<br />
The diabolo pellets are held in place by an o-ring that traps them.<br />
• Your new weapon has been tested for faults with all the diabolo<br />
pellets described in the accessories section. Diabolo pellets with a<br />
maximum total length of 10 mm may be loaded.<br />
2.4<br />
LOADING THE RIFLE<br />
• Activate the safety (see chap. 2.1 "Handling the safety").<br />
• Pull back the bolt lever of the lock and the drum retainer<br />
(see the sequence in illustration 4.a).<br />
• Place the drum in the weapon (illustration 4.b).<br />
• Push the retainer of the drum.<br />
• Push the lever of the lock forward and lower it.<br />
WARNING: A diabolo pellet is automatically loaded in the barrel during<br />
the locking process.<br />
Illustration 3.a<br />
! WARNING:<br />
3.<br />
Do not put your hand in front of the barrel. Do<br />
not put your finger on the trigger.<br />
Caution: Always point the barrel of the weapon<br />
in a safe direction. Do not point the weapon at<br />
people or animals.<br />
2.<br />
Illustration 4.a Illustration 4.b<br />
1.<br />
25 |
2.5<br />
• Activate the safety as described<br />
(see chap. 2.1 "Handling the safety").<br />
• Pull back the bolt lever and then the drum retainer (illustration 4.a)<br />
to be able to remove the drum.<br />
• Remove the drum magazine (illustration 4.b).<br />
• If there is a pellet in the barrel, remove it with a cleaning brush or<br />
proceed as described in chapter "Jams".<br />
• Do not try to shoot a used diabolo pellet. It might damage the drum<br />
and the barrel.<br />
• Remove the pellets from the drum magazine by pressing with a<br />
sharp object.<br />
• Make sure the gun is completely unloaded.<br />
• Put the empty drum back into the weapon.<br />
• Push the bolt lever forward.<br />
2.6<br />
| 26<br />
UNLOADING THE RIFLE<br />
POINT AND SHOOT SAFELY<br />
Make sure the weapon has the safety in place. Insert a compressed air<br />
cylinder and load the weapon as described. Make sure that your target<br />
is safe before shooting.<br />
• Hold the weapon pointing in a safe direction.<br />
• Release the safety and uncock by pulling the trigger and making a<br />
blank shot.<br />
! WARNING:<br />
! WARNING:<br />
! WARNING:<br />
! WARNING:<br />
When removing any Diabolo pellet from the<br />
barrel with a cleaning brush, place the rifle<br />
horizontally (see chapter “Jams”). Do not<br />
hold the weapon in a vertical position, as<br />
the pellet could fall into the mechanism and<br />
cause damage.<br />
Never use sharp metal objects to remove<br />
diabolo pellets from the drum magazine or the<br />
weapon. Any damage to the drum or the barrel<br />
could cause faulty <strong>operation</strong>.<br />
Make sure that the weapon always points<br />
in a safe direction. Never point at people or<br />
animals. Always handle the weapon as if it<br />
were loaded and ready to fire.<br />
Due to this weapon’s high shooting capacity,<br />
take particular care and caution in choosing a<br />
safe target. Only choose targets that cannot<br />
be pierced and that do not have a hard<br />
surface that can cause ricochets. Never shoot<br />
at liquid surfaces.
REPEATING (LOADING PROCESS)<br />
After loading the weapon as described, make sure that the target,<br />
the pellet trap and the surrounding area are safe. In each repeating<br />
process, the drum moves forward one position. Activate the repeating<br />
by pulling the lock lever back and then pushing it forward once more to<br />
its original position (illustration 5.a). Disengage the safety as previously<br />
described. Your weapon is ready to fire now.<br />
FIRING CAPACITY<br />
The capacity of the compressed air cylinder and thus the number of<br />
remaining shots can be read off the integrated pressure gauge. When<br />
the pressure falls to about 70 bars (7-joule and 16-joule variants) or<br />
140 bars (28-joule and 40-joule variants), refill the cylinder (see chap.<br />
2.2 “Handling the compressed air cylinder”).<br />
2.7<br />
ADJUSTING THE TRIGGER<br />
TRAVEL<br />
Activate the safety.<br />
Unload the weapon as described in point 2.5 "Unloading the rifle".<br />
Adjust your customized trigger travel by using a screwdriver to give a<br />
slight turn to the screw on the trigger (illustration 6.a).<br />
Illustration 5.a<br />
50<br />
100<br />
0<br />
150<br />
Illustration 6.a<br />
200<br />
250<br />
2.<br />
50<br />
100<br />
300<br />
315 0<br />
150<br />
200<br />
300<br />
315<br />
7-joule and 16-joule variants 28-joule and 40-joule variants<br />
250<br />
1.<br />
27 |
2.8<br />
| 28<br />
JAMS<br />
CAUTION: Shooting with insufficient pressure can cause a diabolo<br />
pellet to lodge in the barrel.<br />
• Insert a new compressed air cylinder, remove the magazine,<br />
close the bolt lever and shoot without the drum magazine.<br />
• The blocked pellet will fire.<br />
• If this procedure fails to resolve the problem, remove the magazine<br />
and carefully press out the blocked pellet with a cleaning brush<br />
(cleaning rod).<br />
Illustration 7.a<br />
! WARNING:<br />
! WARNING:<br />
! WARNING:<br />
A jam is a dangerous situation.<br />
If the weapon fails to shoot, we must never<br />
assume that there is no ammunition left in the<br />
drum magazine.<br />
When removing any diabolo pellet from the<br />
barrel with a cleaning brush, place the rifle<br />
horizontally. Do not hold the weapon in a<br />
vertical position, as the pellet could fall into<br />
the mechanism and cause damage.
2.9<br />
ADJUSTING THE SIGHT<br />
Aim at a secure target:<br />
Hold the weapon so that the rear sight is lined up with the front sight<br />
at the same time. The front sight should be exactly in the center of the<br />
notch of the rear sight. Next raise the gun so that the lower part of the<br />
bull‘s eye meets the front sight. The upper part of the rear sight, the<br />
upper part of the front sight and the lower part of the target should<br />
be in line (illustration 8.a, sight image). The point of impact can be<br />
adjusted as follows. The rifle is adjusted by the factory to shoot from<br />
a distance of 10 m.<br />
To adjust the elevation of the sight, move the sight by slightly<br />
loosening the screw (illustration 8.b).<br />
With excessively high shots: Move the sight back.<br />
With excessively low shots: Move the sight forward.<br />
Then retighten the screw.<br />
Illustration 8.b Illustration 8.c<br />
Illustration<br />
8.a<br />
too high too low right<br />
To adjust the windage of the sight, it is necessary to move the front<br />
sight (Illustration 8.c):<br />
If the gun shoots to the right: Move the front sight to the right.<br />
If the gun shoots to the left: Move the front sight to the left.<br />
29 |
2.10<br />
| 30<br />
STORAGE<br />
Always store the weapon with the ammunition removed and the safety<br />
on. Carefully check that there is no ammunition in the barrel and<br />
remove the diabolo pellets from the drum. Before storing it, also remove<br />
the compressed air cylinder.<br />
Keep the weapon out of the reach of children and users not<br />
familiarized with its use. Store the weapon separately from the pellets<br />
and the compressed air cylinder.<br />
3<br />
CARE<br />
If you maintain and care for your weapon properly, you will be able to<br />
enjoy its use for many years.<br />
Occasionally clean the exterior metal parts of the weapon. Use a soft<br />
cloth slightly dampened with special oil for weapons. To guarantee<br />
lasting <strong>operation</strong>, apply 2 or 3 drops of oil for weapons in the feeder and<br />
also in the weapon through the empty magazine (see illustration 9.a).<br />
Never use fast cleaning pellets, as they can damage the weapon.<br />
! WARNING:<br />
! WARNING:<br />
Never leave the weapon loaded.<br />
Do not try to clean the weapon without<br />
applying the safety first, removing the<br />
compressed air cylinder and the drum, and<br />
making sure there is no pellet in the barrel<br />
Illustration 9.a
4<br />
Problems<br />
The weapon doesn’t shoot<br />
Faulty shooting direction<br />
Low shooting speed<br />
SAFETY INSTRUCTIONS<br />
Safety activated<br />
Cylinder is empty<br />
Dirty barrel<br />
Possible causes<br />
Cylinder not correctly<br />
screwed on<br />
High temperatures<br />
Unsuitable ammunition<br />
Diabolo pellets badly<br />
loaded<br />
31 |
INSTRUCTIONS ON THE USE OF COMPRESSED AIR CYLINDERS<br />
Sometimes the performance of an air gun is adversely affected by<br />
special factors. Among these conditions we find usage, maintenance<br />
and storage at certain temperatures higher or lower than normal<br />
outdoors (from 15 to 21 °C).<br />
High temperatures can create a pressure in the compressed air cylinder<br />
and the gun itself which considerably exceeds the normal operating<br />
pressure. This excessive pressure might prevent firing and cause<br />
permanent damage to the weapon. Maximum temperature of storage<br />
or <strong>operation</strong> should never exceed 50 °C.<br />
Compressed air cylinders which are leaky, damaged or more than<br />
10 years old should be emptied in a safe manner and not used or<br />
filled again. Ten years after the manufacturing date, the compressed<br />
air cylinder must be tested at the owner’s expense or replaced. The<br />
manufacturing date is recorded on the cylinder.<br />
MODIFICATIONS IN THE WEAPON<br />
| 32<br />
! WARNING:<br />
The air used must comply with DIN 3188 (breathing air).<br />
The maximum operating pressure of the compressed air cylinder (300<br />
bars) must never be exceeded.<br />
! WARNING:<br />
Shooting with insufficient pressure can cause<br />
a diabolo pellet to lodge in the barrel. See the<br />
<strong>instructions</strong> on jams.<br />
The different components of this weapon have been designed and manufactured to guarantee optimal function and performance<br />
at all times. Any modification in the design or adjustment in the performance may cause malfunction, and with it, the<br />
weapon could become unsafe. The warranty shall not be applicable if the rifle has been modified without authorization.
WARRANTY FOR WALTHER WEAPONS<br />
WARNING: A weapon that malfunctions may be dangerous. Therefore,<br />
you should store it in a safe place so no one uses it before it is repaired.<br />
It is complicated to repair a weapon on your own. In addition, incorrect<br />
assembly can lead to dangerous malfunctions.<br />
WARRANTY FOR WALTHER WEAPONS<br />
If the problem is a result of a manufacturing defect, Walther will repair<br />
or replace the weapon at no cost, as long as it is under the legal<br />
warranty which begins on the date of purchase. Give the weapon to an<br />
authorized distributor and describe the problem to him, providing the<br />
proper proof of purchase.<br />
Weapons also suffer from wear and tear. If they are used intensively,<br />
usage marks may appear which generally are not indicative of<br />
malfunctions. The drum magazines where the diabolo pellets are<br />
inserted suffer from special wear and tear, and therefore should be<br />
replaced when necessary (see chapter on special accessories).<br />
! WARNING:<br />
! IMPORTANT:<br />
Make sure the rifle is examined and repaired<br />
only by authorized, specialized personnel or by<br />
a weapons specialist.<br />
Before transporting your gun, make sure you<br />
have put on the safety and unloaded it.<br />
33 |
SAFE WEAPON HANDLING<br />
You should be familiar with the safe and proper handling of your<br />
weapon. Because your new weapon has a high shooting capacity,<br />
careful attention is advised. Regarding the basic rules to shoot safely,<br />
consider every contact you have with your weapon as part of its<br />
handling.<br />
• Deactivate the weapon safety only when you are ready to shoot, and<br />
when you are done, activate it again immediately.<br />
• Always handle the weapon as if it were loaded.<br />
• Always apply the safety before loading, to ensure that no involuntary<br />
shots are made. Only put your finger on the trigger and pull it when<br />
you are going to shoot.<br />
• Use only ammunition and compressed air cylinders designed for<br />
this weapon.<br />
• Always keep the barrel of the rifle pointed in a safe direction.<br />
• This weapon may only be shot on the owner’s property or at<br />
shooting ranges allowed by the police, as long as the<br />
ammunition does not travel further than the shooting area. Bear in<br />
mind the maximum range of the pellet (approximately 300 m).<br />
• Never transport the weapon when it is loaded. Only load it when you<br />
intend to shoot it.<br />
• Never point the weapon at people or animals. Avoid shots where the<br />
ammunition could ricochet. Do not aim at hard, smooth objects or<br />
water. Pellets could ricochet.<br />
• Before shooting, make sure the target and your surroundings are<br />
secure.<br />
• Always confirm that the weapon is not loaded and that the safety is<br />
on when you carry it or give it to another person.<br />
• Make sure the area toward which you are pointing the weapon is<br />
secure, including if you were to trip or the weapon were to fall.<br />
• For safety reasons, wear protective glasses when you shoot.<br />
| 34<br />
• Always store the weapon unloaded, with the safety on. Keep<br />
the ammunition and the compressed air cylinder out of reach of<br />
unauthorized persons (those who have not been instructed on its<br />
use, children, persons under 18). Store ammunition separately.<br />
• Give this weapon along with usage <strong>instructions</strong> only to those over<br />
18, and make sure that they are as familiar as possible with its<br />
handling. In Germany a Weapons Possession Card (WBK) is required<br />
for versions above 7.5 joules muzzle energy.<br />
• Any modification or repair of the weapon should be carried out by a<br />
specialized company or weapons store.<br />
• Never leave the weapon loaded if it is out of your reach.<br />
• Unload the weapon before giving it to someone else.
TECHNICAL DATA<br />
7.5 joules 16 joules 28 joules 40 joules<br />
Caliber 4.5 mm (.177) 5.5 mm (0.22)<br />
Magazine capacity 8 shots<br />
Length 40.94 in<br />
Weight 91.71 oz<br />
Muzzle speed (energy) Up to 185 yd/s Up to 275 yd/s Up to 405 yd/s Up to 320 yd/s<br />
Barrel length 23.62 in<br />
Action compressed air<br />
Safety Automatic trigger safety<br />
! CAUTION: Carl Walther GmbH Sportwaffen air guns are made according to the regulations of the PTB (Physikalisch-Technischer<br />
Bundesanstalt) federal institute, German federal law, the regulations established in the CIP center and the broad experience<br />
in arms manufacture of Carl Walther GmbH Sportwaffen.<br />
Therefore, we assume no liability if our products fail to meet the corresponding legal regulations when exported, or if the<br />
purchaser or owner might have legal difficulties or consequences in this respect.<br />
35 |
ACCESSORIES FOR WALTHER 1250 DOMINATOR<br />
| 36<br />
Rotary clips<br />
pack of 2 pcs.,<br />
also suitable for pointed pellets<br />
Item No. 465.102<br />
Picatinny Rail<br />
easy to assemble to existing system<br />
Item No. 2.1525<br />
Filling tube 300 bar<br />
for quick refilling without removing<br />
the cylinder, with quick fill adapter<br />
Item No. 465.109<br />
Walther FT 8-32x56<br />
Parallax adjustment with large side<br />
wheel, target turrets offering a large<br />
range for graduated adjustment<br />
(windage and elevation), angled<br />
objective for reflection-free aiming<br />
Item No. 2.1525<br />
Silencer / Compensator<br />
Simple bolt-fixing assembly. Reduces<br />
detonation at muzzle when shooting.<br />
(Consult the corresponding legislation).<br />
Silencer Item No. 465.105<br />
Compensator Item No. 465.106<br />
Steel compressed air cylinder<br />
300 bar<br />
267 cm, 930 g,<br />
with pressure gauge<br />
and Quick-Fill adapter<br />
Item No. 465.108<br />
Compressed air bottle 300 bar<br />
Capacity 6l, TÜV approved, with<br />
combined<br />
carry-protection device<br />
Item No. 465.110<br />
Shooting glasses<br />
These high-strength polycarbonate<br />
shooting glasses are absolutely<br />
essential for safety in action shooting.<br />
yellow Item No. 2.5013
Training target - squirrel<br />
Item No. 465.111-1<br />
Folding target - pigeon<br />
Item No. 465.112-3<br />
Walther weapon case<br />
Two large separate bags, numerous interior<br />
compartments, three carrying options,<br />
rubber water-repellent PVC material,<br />
water-proof, strengthened base.<br />
Item No. 5.8048<br />
Diabolo Match Diabolo Spitz Finale Match 850 Air Magnum<br />
Pellets<br />
10 x 500 units<br />
cal. 4.5 mm (.177)<br />
Item No. 4.1951<br />
10 x 500 units 10 x 500 units<br />
cal. 4.5 mm (.177) cal. 4.5 mm (.177)<br />
Item No. 4.1952 Item No. 4.1930<br />
500 units<br />
cal. 4.5 mm (.177)<br />
Item No. 4.1627<br />
Training target - crow<br />
Item No. 465.111-4<br />
Folding target - rat<br />
Item No. 465.112-5<br />
Cleaning Set<br />
A 3-part cleaning rod, hair brush, copper<br />
wire brush, wool cloth.<br />
.177 Item No.: 3.2050<br />
.22 Item No.: 3.2051<br />
Diabolo Diabolo Diabolo Diabolo<br />
500 units<br />
cal. 4.5 mm (.177)<br />
Item No. 4.1623<br />
500 units<br />
cal. 4.5 mm (.177)<br />
Item No. 4.1624<br />
500 units<br />
cal. 4.5 mm (.177)<br />
Item No. 4.1625<br />
250 units<br />
cal. 5.5 mm (.216)<br />
Item No. 4.1626<br />
37 |
THE TARGET<br />
The field targets are folding figures made of steel plate. Usually they are<br />
life-size representations of small animals (rat, rabbit, squirrel, pigeon,<br />
crow) and have a round hole in the chest region (kill zone). The hole is<br />
variable and can be manually reduced from 40 mm to 15 mm.<br />
Field target for training<br />
(Item No. 465.111-1 – Item No. 465.111-5):<br />
The 30-cm-long rod on the target is inserted into the ground. If a shot<br />
hits in the kill zone, the paddle falls over. A hit on the reset paddle sets<br />
the kill zone paddle back up. Types: rat, rabbit, squirrel, pigeon, crow.<br />
Silhouettes<br />
01 training target - squirrel Item No. 465.111-1<br />
02 training target - rabbit Item No. 465.111-2<br />
03 training target - pigeon Item No. 465.111-3<br />
04 training target - crow Item No. 465.111-4<br />
05 training target - rat Item No. 465.111-5<br />
06 folding target - squirrel Item No. 465.112-1<br />
07 folding target - rabbit Item No. 465.112-2<br />
08 folding target - pigeon Item No. 465.112-3<br />
09 folding target - crow Item No. 465.112-4<br />
10 folding target - rat Item No. 465.112-5<br />
| 38<br />
Ground field target for matches<br />
(Item No. 465.112-1 – Item No. 465.112-5):<br />
The target is anchored with steel nails. It is set back up with a cord.<br />
Types: rat, rabbit, squirrel, pigeon, crow.<br />
Kill zone:<br />
Adjustable diameter<br />
Attachment eyelet:<br />
The target is<br />
set back up with<br />
a cord.<br />
Support:<br />
The target is<br />
anchored to<br />
the ground.
1.1<br />
1250 DOMINATOR<br />
! ATTENTION : Ce symbole signale les <strong>instructions</strong> de sécurité de ce <strong>mode</strong> d’emploi. Lorsque vous le voyez, redoublez d’attention et lisez<br />
attentivement le paragraphe concerné. Pour votre sécurité et celle d’autrui, lisez attentivement toutes les <strong>instructions</strong><br />
d’utilisation données. Ne chargez les billes Diabolo que lorsque vous vous apprêtez à tirer. Si vous avez chargé l’arme et<br />
décidez de ne pas tirer, déchargez-la en suivant les <strong>instructions</strong> données ci-après. Afin de garantir un maximum de sécurité,<br />
déchargez l’arme et mettez la sûreté lorsque vous ne l’utilisez pas. Les accidents se produisent toujours de manière<br />
inattendue et peuvent causer des blessures, voire entraîner la mort. Soyez particulièrement vigilent au moment de tirer.<br />
Dans le chapitre « Viser et tirer en toute sécurité » de ce <strong>mode</strong><br />
d’’emploi figurent les normes permettant de tirer en toute sécurité.<br />
LISEZ CE CHAPITRE. Suivez ces règles et assurez-vous que tous ceux<br />
qui manipulent l’arme sont formés à son maniement et connaissent<br />
les normes de sécurité. Lisez également le chapitre « Maniement des<br />
armes en toute sécurité » afin d’éviter tout accident.<br />
Votre nouvelle carabine à air comprimé doit être utilisée avec soin et<br />
attention. Rappelez-vous toujours que la principale mesure de sécurité<br />
d’une arme et la plus importante est votre comportement. Toutes<br />
les sûretés sont mécaniques et seul le tireur peut mettre ou enlever<br />
la sûreté. NE FAITES PAS PLEINEMENT CONFIANCE AUX SÛRETÉS<br />
MÉCANIQUES : soyez prudent et évitez les situations pouvant provoquer<br />
un accident.<br />
Le maniement diffère d’une arme à l’autre. Pour cette raison, vous ne<br />
devez jamais tirer avec une arme que vous ne connaissez pas bien.<br />
Consultez la notice d’emploi suivante et entraînez-vous à manier l’arme<br />
SANS LA CHARGER (en visant une cible ne comportant aucun danger<br />
pour votre entourage) jusqu’à ce que vous soyez capable de l’utiliser<br />
correctement et sans danger.<br />
F<br />
! ATTENTION : Ne laissez jamais l’arme chargée.<br />
Déchargez toujours l’arme avant de la ranger.<br />
Mettez la sûreté (position S), vérifiez bien qu’il<br />
ne reste aucun projectile dans le canon et<br />
aucune bille Diabolo dans le tambour.<br />
Tenez l’arme hors de portée des enfants ou<br />
des personnes non formées à son maniement.<br />
Ranger les diabolos et le réservoir d’air<br />
comprimé séparément de la carabine et<br />
maintenez-les hors de portée des utilisateurs<br />
non formés ou des personnes non autorisées.<br />
39 |
1.2<br />
| 40<br />
PIÈCES CONSTITUANT VOTRE NOUVELLE CARABINE À AIR COMPRIMÉ<br />
1 2 3 4 5<br />
8 9 10<br />
Le fait de mémoriser le nom des différents éléments de votre<br />
nouvelle carabine vous permettra de mieux comprendre les <strong>instructions</strong><br />
d’utilisation. Lisez attentivement ce <strong>mode</strong> d‘emploi afin de pouvoir<br />
profiter pleinement de votre nouvelle arme.<br />
1<br />
2<br />
3<br />
4<br />
5<br />
6<br />
7<br />
Bouche<br />
Guidon<br />
Hausse<br />
Chargeur à<br />
barillet<br />
Sûreté<br />
Crosse<br />
11<br />
7 Détente<br />
8<br />
9<br />
10<br />
11<br />
6<br />
Plaque de couche<br />
de crosse<br />
Crosse de joue<br />
Levier de verrou<br />
Réservoir d‘air<br />
comprimé
2.1<br />
MANIEMENT DE LA SÛRETÉ<br />
Après chaque tir, la sûreté de l’arme se met automatiquement.<br />
• Pour mettre la sûreté de l’arme manuellement, tirez la sûreté vers<br />
l’arrière, comme indiqué sur l’illustration 1.a, jusqu’à ce qu’elle<br />
reste en position (la marque rouge est cachée).<br />
• Mettez toujours la sûreté avant de manipuler l’arme. Assurez-<br />
vous que la bouche est toujours orientée dans une direction non<br />
dangereuse.<br />
• La carabine est équipée d’un double système de sûreté. Pour le<br />
désactiver, il faut : 1. appuyer sur le levier de verrouillage<br />
2. appuyer sur le bouton de sécurité et le faire glisser vers l’avant<br />
(illustration 1.b).<br />
La marque rouge est visible et l’arme est prête à effectuer un tir<br />
(illustration 1.c).<br />
! ATTENTION :<br />
Prenez l’habitude de toujours désarmer l’arme<br />
et de mettre la sûreté jusqu’à ce que vous<br />
tiriez.<br />
Illustration 1.a sûreté mise Illustration 1.b Illustration 1.c prête pour le tir<br />
1.<br />
2.<br />
41 |
2.2<br />
Remarque : veuillez utiliser seulement des accessoires de Walther pour<br />
garantir un fonctionnement sûr !<br />
Mettez en place le nouveau réservoir d’air comprimé dans la crosse<br />
(fig. 2.b) et vissez-le à fond. La carabine est maintenant sous pression.<br />
Pour vérifier si le réservoir d’air comprimé est correctement vissé,<br />
assurez-vous que l’arme n’est pas chargée et tirez dans une direction<br />
sûre. Si la carabine ne tire pas, vérifiez les points énumérés au chapitre<br />
4 « causes possibles ».<br />
Illustration 2.a<br />
Illustration 2.b<br />
| 42<br />
MANIPULATION DU RÉSERVOIR D’AIR COMPRIMÉ<br />
! ATTENTION : Le réservoir reste sous pression même une fois<br />
qu‘il a été dévissé de la carabine !<br />
! ATTENTION : Pour évacuer entièrement la pression de la<br />
carabine, dévissez le réservoir d’air comprimé,<br />
retirez le chargeur et tirez dans une direction<br />
sûre jusqu’à ce que la carabine ne tire plus.<br />
Remplissage<br />
Le réservoir d’air comprimé peut être rempli à tout moment, même<br />
sans avoir été totalement vidé auparavant. Les prescriptions des TRG<br />
(règlements techniques concernant les gaz sous pression) doivent<br />
être respectées lors du remplissage. La pression de remplissage<br />
maximale s’élève à 300 bar et doit impérativement être respectée.<br />
Les dispositions légales du pays concerné doivent également être<br />
respectées lors du remplissage. Les récipients d’air comprimé non<br />
hermétiques et/ou présentant un danger potentiel ne doivent pas être<br />
remplis et doivent être vidés en respectant les consignes de sécurité.<br />
Visser à fond l’adaptateur sur la bouteille de remplissage puis le<br />
réservoir d’air comprimé sur l’adaptateur. Ouvrir ensuite la soupape<br />
de la bouteille pendant environ 5 secondes puis la refermer. Retirer le<br />
réservoir d’air comprimé et le revisser sur l’arme. Les récipients d’air<br />
comprimé ne doivent en aucun cas être utilisés ou rangés avec un<br />
remplissage supérieur à celui autorisé.<br />
! ATTENTION :<br />
! ATTENTION :<br />
! ATTENTION :<br />
! ATTENTION :<br />
Lors de la mise en place d‘un réservoir d‘air<br />
comprimé, il est impératif de veiller à ce que<br />
la sûreté de l‘arme soit enclenchée et la bouche<br />
pointée dans une direction sûre.<br />
L’air à utiliser doit être conforme à DIN 2188<br />
(air pouvant être inhalé).<br />
Ne faites jamais usage de la force pour mettre<br />
en place un réservoir d’air comprimé.<br />
Ne pas stocker les réservoirs d’air comprimé<br />
à des températures dépassant les 50 °C.
CHARGER LE CHARGEUR À<br />
2.3 !<br />
BARILLET<br />
ATTENTION :<br />
• Mettez la sûreté de l’arme (voir chap. 2.1 « Maniement de la<br />
sûreté »).<br />
• Tirez le levier de verrou et le bouton de retenue du barillet vers<br />
l’arrière (voir la séquence sur l’illustration 4.a).<br />
• Retirez le chargeur de l’arme (illustration 4.b).<br />
• Chargez le barillet en insérant les billes Diabolo dans<br />
les orifices de celui-ci (illustration 3.a).Les billes Diabolo restent en<br />
place grâce à un joint torique qui les maintient.<br />
• Votre nouvelle arme a été soumise à des tests avec toutes les<br />
billes Diabolo mentionnées dans la partie consacrée aux<br />
accessoires afin de rechercher d’éventuels défauts. Il est possible<br />
de charger des billes Diabolo ayant une longueur totale<br />
maximale de 10 mm.<br />
2.4<br />
CHARGER LA CARABINE<br />
• Mettez la sûreté de l’arme (voir chap. 2.1 « Maniement de la<br />
sûreté »).<br />
• Tirez le levier de verrou et le bouton de retenue du barillet vers<br />
l’arrière (voir la séquence sur l’illustration 4.a).<br />
• Placez le barillet dans l’arme (illustration 4.b).<br />
• Actionnez le bouton de retenue du barillet.<br />
• Poussez le levier de verrou au maximum vers l’avant et baissez-le.<br />
ATTENTION : Pendant le processus de verrouillage, une bille Diabolo<br />
est automatiquement chargée dans le canon.<br />
Illustration 3.a<br />
! ATTENTION :<br />
3.<br />
1.<br />
N’utilisez pas de billes en acier (les billes<br />
BB), de fléchettes ni de munitions similaires<br />
inadaptées.<br />
Ne mettez pas la main devant la bouche du<br />
canon. Ne mettez pas le doigt sur la détente.<br />
Précaution : Assurez-vous que la bouche<br />
est toujours orientée vers une direction<br />
sans danger. Ne pointez pas l’arme vers des<br />
personnes ni des animaux.<br />
2.<br />
Illustration 4.a Illustration 4.b<br />
43 |
2.5<br />
• Mettez la sûreté de l’arme comme indiqué (voir chap. 2.1<br />
« Maniement de la sûreté »).<br />
• Tirez le levier de verrou vers l’arrière, puis le bouton de retenue du<br />
barillet (illustration 4.a) pour pouvoir retirer le barillet.<br />
• Retirez le chargeur à barillet (illustration 4.b).<br />
• S’il reste une bille dans le canon, retirez-la à l’aide d’une brosse de<br />
nettoyage ou procédez de la manière indiquée dans le chapitre 8<br />
« Billes coincées ».<br />
• N’essayez pas de tirer à nouveau une bille Diabolo usagée. Cela<br />
pourrait endommager le barillet et le canon.<br />
• Extrayez les billes du chargeur à barillet en appuyant avec un<br />
objet pointu.<br />
• Vérifiez que le fusil est complètement déchargé.<br />
• Introduisez à nouveau le chargeur à barillet vide.<br />
• Déplacez le levier de verrou vers l’avant.<br />
• Tenez l’arme en pointant le canon dans une direction ne présentant<br />
pas de danger.<br />
• Enlevez la sûreté et déchargez l’arme en appuyant sur la détente<br />
pour effectuer un tir à vide.<br />
• Puis, remettez la sûreté du fusil.<br />
2.6<br />
| 44<br />
DÉCHARGER LA CARABINE<br />
VISER ET TIRER EN TOUTE<br />
SÉCURITÉ<br />
Vérifiez que la sûreté de l’arme est mise. Mettez en place le réservoir<br />
d’air comprimé et chargez l’arme comme indiqué. Assurez-vous que la<br />
cible se situe devant le guidon avant de tirer.<br />
! ATTENTION :<br />
! ATTENTION :<br />
! ATTENTION :<br />
! ATTENTION :<br />
Pour retirer une bille Diabolo restée dans le<br />
canon, à l’aide d’une brosse de nettoyage,<br />
placez la carabine en position horizontale (voir<br />
chapitre 8 « Billes coincées »). Ne tenez pas<br />
l’arme en position verticale car la bille pourrait<br />
tomber dans le mécanisme et provoquer des<br />
pannes.<br />
N’utilisez jamais un objet métallique pointu<br />
pour extraire les billes Diabolo du chargeur à<br />
barillet ou de l’arme. Des dommages au niveau<br />
du barillet ou du canon peuvent entraîner des<br />
dysfonctionnements.<br />
Faites en sorte de toujours pointer le canon de<br />
l’arme dans une direction ne présentant pas<br />
de danger. Ne visez jamais de personnes ni<br />
d’animaux. Maniez toujours l’arme comme si<br />
elle était chargée et prête à tirer.<br />
En raison de la grande capacité de tir de cette<br />
arme, soyez particulièrement vigilent et prudent<br />
lors du choix de l’objectif. Celui-ci ne doit pas<br />
présenter de danger. Choisissez toujours des<br />
cibles ne pouvant pas être transpercées et ne<br />
pouvant pas faire ricocher le projectile à cause<br />
de la dureté de leur surface. Ne tirez jamais<br />
sur des surfaces liquides.
RÉPÉTITION (PROCESSUS DE CHARGEMENT)<br />
Après avoir chargé l’arme de la manière indiquée, assurez-vous que<br />
la cible, le porte-cible à récupération de billes et les alentours ne<br />
présentent pas de danger. A chaque processus de répétition, le barillet<br />
avance d’une position. Activez le processus de répétition en tirant le<br />
levier de verrou vers l’arrière, puis en le ramenant vers l’avant jusqu’à<br />
ce qu’il retrouve sa position originale (illustration 5.a). Enlevez la sûreté<br />
de l’arme de la manière indiquée précédemment, votre arme est prête<br />
à tirer maintenant.<br />
CAPACITÉ DE TIR<br />
Le nombre de tirs pouvant être effectué avec le réservoir d’air<br />
comprimé peut être lu sur le manomètre intégré dans le réservoir<br />
d’air comprimé. Si la pression tombe à environ 70 bar (versions 7<br />
joules / 16 joules) ou 140 bar (version 28 joules / 40 joules), il faut<br />
remplir à nouveau le réservoir (voir 2.2 « Manipulation du réservoir<br />
d’air comprimé »).<br />
2.7<br />
RÉGLER LA COURSE DE<br />
DÉTENTE<br />
Enclenchez la sûreté de l‘arme.<br />
Déchargez l’arme comme indiqué au point 2.5 « Décharger la<br />
carabine ».<br />
Réglez sa course personnelle à l’aide d’un tournevis, en faisant tourner<br />
légèrement la vis de la détente (illustration 6.a).<br />
Illustration 5.a<br />
50<br />
100<br />
0<br />
150<br />
Illustration 6.a<br />
200<br />
250<br />
2.<br />
50<br />
100<br />
300<br />
315 0<br />
150<br />
200<br />
300<br />
315<br />
versions 7 joules / 16 joules versions 28 joules / 40 joules<br />
250<br />
1.<br />
45 |
2.8<br />
| 46<br />
BILLES COINCÉES<br />
ATTENTION : Lorsque vous tirez avec une arme dont la pression d’air<br />
comprimé est insuffisante, une bille Diabolo peut rester coincée dans<br />
le canon.<br />
• Introduisez la pression d’air comprimé , retirez le chargeur, mettez<br />
le levier de verrou en position fermée et tirez sans chargeur à<br />
barillet.<br />
• La bille coincée est tirée.<br />
• Si cette action ne permet pas de résoudre le problème, faites<br />
doucement pression sur la bille coincée à l’aide d’une brosse de<br />
nettoyage (baguette de nettoyage).<br />
Illustration 7.a<br />
! ATTENTION :<br />
! ATTENTION :<br />
! ATTENTION :<br />
Une bille coincée représente une situation<br />
dangereuse.<br />
Si l’arme n’effectue aucun tir, il ne faut jamais<br />
supposer que le chargeur à barillet ne contient<br />
plus de munitions.<br />
Pour retirer une bille Diabolo restée dans le<br />
canon, à l’aide d’une brosse de nettoyage,<br />
placez l’arme en position horizontale. Ne tenez<br />
pas l’arme en position verticale car la bille<br />
pourrait tomber dans le mécanisme et provoquer<br />
des pannes.
2.9<br />
RÉGLAGE DE LA LUNETTE DE VISÉE<br />
Visez une cible ne présentant aucun danger pour autrui :<br />
Tenez l’arme de manière à ce que le guidon (partie avant du viseur)<br />
soit dans l’alignement de l’œilleton (partie arrière du viseur). Le guidon<br />
doit se trouver exactement au centre de l’œilleton. Ensuite, levez<br />
l’arme jusqu’à ce que la marge inférieure du point central de la cible<br />
coïncide avec le guidon. L’extrémité supérieure de l’œilleton, l’extrémité<br />
supérieure du guidon et l’extrémité inférieure de la cible devront<br />
être alignées (illustration 8.a, image de la lunette de visée). Le point<br />
d’impact peut être réglé comme indiqué ci-après. L’arme est réglée à<br />
la fabrication pour tirer à une distance de 10 m.<br />
Pour le réglage en hauteur du système de visée, déplacez l’œilleton en<br />
desserrant légèrement la vis (illustration 8.b).<br />
Pour des tirs trop hauts : déplacer l’œilleton vers l’arrière.<br />
Pour des tirs trop bas : déplacer l’œilleton vers l’avant.<br />
Resserrez ensuite la vis.<br />
Illustration 8.b Illustration 8.c<br />
Illustration<br />
8.a<br />
trop haut trop bas correct<br />
Pour le réglage latéral du système de visée, il faut déplacer le guidon.<br />
(illustration 8.c) :<br />
Pour des tirs trop à droite : déplacer le guidon vers la droite.<br />
Pour des tirs trop à gauche : déplacer le guidon vers la gauche.<br />
47 |
2.10<br />
| 48<br />
RANGEMENT<br />
Veillez à ce que la sûreté soit toujours mise et à ce que l’arme soit<br />
déchargée avant de la ranger. Vérifiez bien qu’il ne reste aucun<br />
projectile dans le canon et extrayez les billes Diabolo du barillet.<br />
Avant de ranger l’arme, retirez également le réservoir d’air comprimé.<br />
Maintenez l’arme hors de portée des enfants et des utilisateurs non<br />
formés à son maniement. Rangez l’arme, les billes et la réservoir d’air<br />
comprimé séparément.<br />
3<br />
ENTRETIEN<br />
En entretenant correctement votre arme et en la manipulant<br />
soigneusement, vous pourrez en profiter de nombreuses années.<br />
Nettoyez de temps en temps les parties métalliques externes de<br />
l’arme. Pour cela, utilisez un chiffon doux légèrement imbibé d’une<br />
huile spéciale pour armes. Afin de garantir un fonctionnement durable,<br />
appliquez 2 ou 3 gouttes d’huile pour armes dans le dispositif<br />
d’alimentation et, par l’intermédiaire du chargeur vide, dans l’arme<br />
(voir illustration 9.a). N’utilisez jamais de tampons de nettoyage<br />
rapide car cela pourrait endommager l’arme.<br />
! ATTENTION :<br />
! ATTENTION :<br />
Ne laissez jamais l’arme chargée !<br />
Ne nettoyez pas l’arme sans avoir au préalable<br />
mis la sûreté, extrait le réservoir d’air comprimé<br />
et le barillet, et vérifié qu’il ne reste aucun<br />
projectile dans le canon.<br />
Bild 9.a
4<br />
Problèmes<br />
L’arme n’effectue pas de tir<br />
Direction de tir déficiente<br />
Vitesse de tir faible<br />
CONSIGNES DE SÉCURITÉ<br />
Sûreté mise<br />
Réservoir d’air<br />
comprimé vide<br />
Canon sale<br />
Causes possibles<br />
Réservoir<br />
d’aircomprimé mal<br />
vissé<br />
Températures extrêmes<br />
Munitions non adaptées<br />
Billes Diabolo mal<br />
chargées<br />
49 |
REMARQUES RELATIVES À L’UTILISATION DE RÉSERVOIRS À AIR COMPRIMÉ<br />
Il est possible qu’une arme fonctionnant à l’air comprimé soit soumise<br />
à des conditions spéciales pouvant affecter négativement sa puissance<br />
originale. Parmi ces conditions, citons l’utilisation, l’entretien et le<br />
rangement de l’arme à des températures considérablement plus hautes<br />
ou basses que la température extérieure normale (de 15 à 21 °C).<br />
Les températures élevées peuvent produire une pression dans le<br />
réservoir d’air comprimé tout comme dans l’arme elle-même qui<br />
peut s’avérer sensiblement supérieure à la pression normale de<br />
fonctionnement. Cet excès de pression pourrait empêcher le tir et<br />
endommager l’arme de manière définitive. La température maximale<br />
de rangement ou d’utilisation de cette arme ne doit jamais dépasser<br />
50 °C.<br />
Les réservoirs d’air comprimé non hermétiques, endommagés ou qui<br />
ont plus de 10 ans doivent être vidés en respectant les consignes de<br />
sécurité et ne doivent plus être utilisés et/ou remplis. Passé dix ans<br />
à compter de la date de fabrication, le réservoir d’air comprimé doit<br />
une nouvelle fois être contrôlé ou éventuellement remplacé au frais<br />
de l’acheteur. La date de fabrication est indiquée sur le réservoir d’air<br />
comprimé.<br />
MODIFICATIONS DE L’ARME<br />
| 50<br />
! ATTENTION :<br />
L’air à utiliser doit être conforme à DIN 3188 (air pouvant être inhalé).<br />
La pression de service maximale du réservoir d’air comprimé (300 bar)<br />
ne doit en aucun cas être dépassée.<br />
! ATTENTION :<br />
Tirer avec une carabine disposant d’une pression<br />
d’air comprimé trop faible peut avoir<br />
pour conséquence qu’un diabolo reste coincé<br />
dans le canon. Tenez compte des indications<br />
relatives aux billes coincées.<br />
Les différentes pièces de cette arme ont été conçues et fabriquées de façon à garantir un fonctionnement et un rendement<br />
optimaux à chaque instant. Toute modification de la conception de l’arme ou du réglage du rendement pourrait provoquer<br />
des défauts de fonctionnement et diminuer la sécurité lors de l’utilisation de l’arme. En cas de modification non autorisée<br />
de l’arme, la garantie ne sera plus valable.
ENTRETIEN DES ARMES WALTHER<br />
ATTENTION : Une arme défectueuse peut s’avérer dangereuse. C’est<br />
la raison pour laquelle elle doit être rangée dans un endroit sûr pour<br />
que personne ne l’utilise avant qu’elle ne soit réparée. Il est difficile de<br />
réparer soi-même une arme. De plus, un montage incorrect pourrait<br />
entraîner des dysfonctionnements qui pourraient être dangereux.<br />
GARANTIE DES ARMES WALTHER<br />
Si le problème est dû à un défaut de fabrication, Walther réparera ou<br />
remplacera l’arme sans frais, à condition que la période de garantie<br />
légale, qui commence à la date d’achat, n’ait pas expiré. Remettez<br />
l’arme et le justificatif d’achat à un distributeur agréé, et expliquez-lui<br />
le problème.<br />
D’autre part, les armes s’usent. Si vous en faites une utilisation<br />
intensive, des marques d’usure peuvent apparaître, qui en règle<br />
générale n‘entraînent cependant pas de dysfonctionnements. Les<br />
chargeurs à barillet, dans lesquels les billes Diabolo sont insérées, sont<br />
particulièrement sujets à l’usure. Il faut donc les changer lorsque cela<br />
est nécessaire (voir partie intitulée « Accessoires »).<br />
! IMPORTANT<br />
! IMPORTANT<br />
Ne faites réviser et réparer l’arme que par<br />
du personnel spécialisé, agréé ou par un<br />
armurier.<br />
Si vous voulez transporter votre arme, assurez-vous<br />
que celle-ci est déchargée et que la<br />
sûreté est enclenchée.<br />
51 |
MANIEMENT DES ARMES EN TOUTE SÉCURITÉ<br />
Vous devez vous familiariser avec votre arme afin de la manier<br />
correctement et sans danger. Votre nouvelle arme étant dotée d’une<br />
très grande capacité de tir, il vous faudra redoubler de précautions.<br />
Dans le cadre des règles de sécurité fondamentales de tir, considérez<br />
que chaque contact avec l’arme fait partie de son maniement.<br />
• N’enlevez la sûreté de l’arme que lorsque vous vous apprêtez à tirer<br />
et remettez-la dès que vous avez terminé.<br />
• Considérez toujours que l’arme est chargée.<br />
• Mettez toujours la sûreté avant de procéder au chargement pour<br />
éviter tout tir involontaire. Gardez votre index toujours éloigné de la<br />
détente et ne l’y placez que lorsque vous vous apprêtez à tirer.<br />
• N‘utilisez que les munitions et le réservoir d‘air comprimé prévus<br />
pour cette arme.<br />
• Pointez toujours le canon de l’arme dans une direction non<br />
dangereuse.<br />
• L’utilisation de l’arme est autorisée uniquement sur le lieu de<br />
résidence du propriétaire ou dans les zones de tir autorisées par la<br />
police, à condition que le projectile ne sorte pas de la zone de tir.<br />
Gardez en mémoire la portée maximale du projectile<br />
(850 m environ).<br />
• Ne transportez jamais l’arme chargée. Ne la chargez que lorsque<br />
vous avez l’intention de tirer.<br />
• Ne pointez jamais l’arme vers des personnes ou des animaux. Évitez<br />
de tirer sur des surfaces qui pourraient faire ricocher le projectile.<br />
Ne tirez jamais sur des surfaces planes et dures, ni sur la surface<br />
d’une étendue d’eau car les projectiles pourraient ricocher.<br />
• Avant de tirer, assurez-vous qu’il n’y a personne près de la cible ni<br />
dans les environs.<br />
| 52<br />
• Assurez-vous toujours que l’arme est bien déchargée et que la<br />
sûreté est mise avant de la transporter ou de la prêter à autrui.<br />
• Assurez-vous de toujours contrôler dans quelle direction vous<br />
pointez le canon de l’arme, même si vous tombez ou laissez tomber<br />
l’arme.<br />
• Pour des raisons de sécurité, portez des lunettes de protection<br />
lorsque vous tirez.<br />
• Lors du rangement de la carabine, veillez à ce que la sûreté soit<br />
mise, à ce que l’arme soit toujours déchargée, séparée des munitions<br />
et hors de portée des personnes n’ayant pas le droit d’y accéder<br />
(personnes non formées, enfants ou personnes de moins de 18<br />
ans).<br />
• Ne remettez cette arme, avec la notice d’emploi, qu’à des personnes<br />
de plus de 18 ans, bien formées à son maniement.<br />
En Allemagne, une carte de détention d’arme (WBK) est<br />
obligatoire pour les versions au-dessus de 7,5 joules.<br />
• Toute modification ou réparation de l’arme devra être effectuée par<br />
une entreprise spécialisée ou un armurier.<br />
• Ne laissez jamais l’arme chargée si elle se trouve hors de votre<br />
portée.<br />
• Déchargez l’arme avant de la remettre à une autre personne.
CARACTÉRISTIQUES TECHNIQUES<br />
7.5 joules 16 joules 28 joules 40 joules<br />
Calibre 4,5 mm (.177) 5,5 mm (.22)<br />
Capacité du chargeur 8 billes<br />
Longueur totale 1040 mm<br />
Poids 3610 g<br />
Vitesse de sortie de canon (énergie) Jusqu’à 170 m/s Jusqu’à 250 m/s Jusqu’à 370 m/s Jusqu’à 290 m/s<br />
Longueur du canon 600 mm<br />
Propulsion air comprimé<br />
Sûreté Sûreté de détente automatique<br />
! ATTENTION :<br />
Les armes à air comprimé de l’entreprise Carl Walther GmbH Sportwaffen sont fabriquées conformément à la réglementation<br />
de l’institut fédéral PTB (Physikalisch-Technischen Bundesanstalt), la loi fédérale allemande, la réglementation établie<br />
par le centre CIP et la grande expérience dont bénéficie Carl Walther GmbH Sportwaffen dans la fabrication d’armes.<br />
Par conséquent, nous dégageons toute responsabilité dans le cas où nos produits ne seraient pas conformes à la réglementation<br />
correspondante en vigueur après leur exportation à l’étranger, ou si l’acquéreur ou le propriétaire connaissait des<br />
difficultés ou des problèmes juridiques liés à l’arme.<br />
53 |
ACCESSOIRES POUR WALTHER 1250 DOMINATOR<br />
| 54<br />
Chargeur à barillet<br />
2 pièces<br />
Adapté également aux projectiles<br />
pointus<br />
Nº ref.: 465.102<br />
Rails Picatinny<br />
Idéal pour monter des mires<br />
télescopiques de type Picatinny.<br />
Nº ref.: 2.1525<br />
Tuyau de remplissage 300 bar<br />
Permet un remplissage rapide sans<br />
enlever la cartouche, avec adaptateur<br />
de remplissage rapide.<br />
Nº ref.: 465.109<br />
Walther FT 8-32x56<br />
Correction de parallaxe avec grande<br />
rondelle d‘ajustement, de hautes<br />
tourelles offrent une grande plage de<br />
réglage du réticule en hauteur et en<br />
largeur, objectif grand angle pour une<br />
perception de la cible sans réflexion.<br />
Nº ref.: 2.1525<br />
Silencieux / compensateur<br />
Montage simple et sans complications grâce<br />
à la fixation par vis. Réduit la détonation dans<br />
la bouche au moment du tir. (Consultez la<br />
réglementation correspondante).<br />
Silencieux Nº ref.: 465.105<br />
Compensateur Nº ref.: 465.106<br />
Cartouche à air comprimé en acier<br />
300 bar<br />
267 cm, 930 g, avec manomètre et<br />
adaptateur de remplissage rapide<br />
pour remplir la cartouche sur place.<br />
Nº ref.: 465.108<br />
Bouteille d’air comprimé 300 bar<br />
Capacité 6 l, certifié TÜV, avec<br />
élément de protection combiné pour<br />
le transport.<br />
Nº ref.: 465.110<br />
Lunettes de tir<br />
Pour des raisons de sécurité, ces lunettes<br />
de tir en polycarbonate hautement<br />
résistantes sont absolument indispensables<br />
pour le tir d’action.<br />
Jaunes Nº ref.: 2.5013
Cible d’entraînement - écureuil<br />
Nº ref.: 465.111-1<br />
Cible articulée - Pigeon<br />
Nº ref.: 465.112-3<br />
Housse pour armes Walther<br />
Deux grandes poches séparées, de<br />
nombreux compartiments intérieurs, trois<br />
options de transport, en PVC gomme hydrofuge,<br />
imperméable, fond renforcé<br />
Nº ref.: 5.8048<br />
Diabolo Match Diabolo Spitz Finale Match 850 Air Magnum<br />
Pellets<br />
10 x 500 unités<br />
cal. 4.5 mm<br />
Nº ref.: 4.1951<br />
10 x 500 unités<br />
cal. 4.5 mm<br />
Nº ref.: 4.1952<br />
10 x 500 unités<br />
cal. 4.5 mm<br />
Nº ref.: 4.1930<br />
500 unités<br />
cal. 4.5 mm<br />
Nº ref.: 4.1627<br />
Cible d’entraînement - corbeau<br />
Nº ref.: 465.111-4<br />
Cible articulée – Rat<br />
Nº ref.: 465.112-5<br />
Set de nettoyage<br />
Baguette de nettoyage 3 pièces,<br />
brosse avec poils, brosse à poils en<br />
laiton, chiffon en laine.<br />
pour 4,5 mm Nº réf. : 3.2050<br />
pour 5,5 mm Nº réf. : 3.2051<br />
Diabolo Diabolo Diabolo Diabolo<br />
500 unités<br />
cal. 4.5 mm<br />
Nº ref.: 4.1623<br />
500 unités<br />
cal. 4.5 mm<br />
Nº ref.: 4.1624<br />
500 unités<br />
cal. 4.5 mm<br />
Nº ref.: 4.1625<br />
250 unités<br />
cal. 5.5 mm<br />
Nº ref.: 4.1626<br />
55 |
LA CIBLE<br />
Les cibles sont des figurines articulées en plaque d‘acier. Ces figurines<br />
représentant pour la plupart d’entre elles des petits animaux à taille<br />
réelle (rat, lièvre, pigeon, corbeau) ont au niveau de la poitrine une<br />
ouverture ronde (zone mortelle). Cette ouverture est variable et peut<br />
être réduite manuellement de 40 à 15 mm.<br />
Cibles d’entraînement<br />
(Nº ref.: 465.111-1 – Nº ref.: 465.111-5):<br />
La tige de 30 cm de la cible est enfoncée dans le sol. Un tir dans la<br />
zone mortelle fait tomber le panneau. Un autre tir dans le panneau<br />
de réinitialisation remet le panneau de la zone mortelle en place.<br />
Différentes versions : rat, lièvre, écureuil, pigeon, corbeau.<br />
Cibles<br />
Figurines d’entraînement - écureuil Nº ref.: 465.111-1<br />
Figurines d’entraînement - lièvre Nº ref.: 465.111-2<br />
Figurines d’entraînement - pigeon Nº ref.: 465.111-3<br />
Figurines d’entraînement - corbeau Nº ref.: 465.111-4<br />
Figurines d’entraînement - rat Nº ref.: 465.111-5<br />
Figurines articulées - écureuil Nº ref.: 465.112-1<br />
Figurines articulées - lièvre Nº ref.: 465.112-2<br />
Figurines articulées - pigeon Nº ref.: 465.112-3<br />
Figurines articulées - corbeau Nº ref.: 465.112-4<br />
Figurines articulées - rat Nº ref.: 465.112-5<br />
| 56<br />
Cible sur sol pour concours<br />
(Nº ref.: 465.112-1 – Nº ref.: 465.112-5):<br />
La cible est fixée au sol avec des clous en acier et redressée à<br />
l’aide d’une ficelle. Différentes versions : rat, lièvre, écureuil, pigeon,<br />
corbeau.<br />
Zone mortelle :<br />
Le diamètre est<br />
réglable.<br />
Œillet de fixation :<br />
La cible est redressée avec<br />
une ficelle.<br />
Support :<br />
La cible est ancrée<br />
dans le sol.
1.1<br />
1250 DOMINATOR<br />
! ATENCIÓN: Este símbolo indica la presencia de indicaciones de seguridad dentro de las instrucciones de uso. Cuando vea este símbolo,<br />
preste atención y lea detenidamente el apartado correspondiente. Para su propia seguridad y para la de los demás, lea<br />
con atención todas las instrucciones de uso suministradas. No cargue los balines Diabolo hasta que no esté a punto de<br />
disparar. Si ha cargado el arma y decide no disparar, descárguela tal como se describe a continuación. Para garantizar la<br />
máxima seguridad, mantenga el arma descargada y con el seguro activado. Los accidentes se producen siempre de forma<br />
inesperada y pueden implicar heridas o incluso la muerte. Preste especial atención en el momento de disparar.<br />
En el capítulo "Apuntar y disparar con seguridad" de estas instrucciones<br />
se tratan las normas para disparar con seguridad. LEA ESE CAPÍTULO.<br />
Siga esas reglas y asegúrese de que todo aquel que maneje el arma<br />
está familiarizado con el manejo y las normas de seguridad. Lea<br />
también el capítulo "Manejo seguro de armas" para evitar accidentes.<br />
Su nueva carabina de aire comprimido debe utilizarse con cuidado y<br />
respeto. Recuerde siempre que la principal medida de seguridad de<br />
un arma y la más importante es uno mismo. Todos los seguros son<br />
mecánicos y el propio tirador es el único que pone o quita el seguro. NO<br />
CONFÍE ÚNICAMENTE EN LOS SEGUROS MECÁNICOS: Sea precavido<br />
y evite las situaciones que puedan provocar un accidente. El manejo<br />
de cada arma es distinto. Por este motivo, no dispare nunca con un<br />
arma hasta que no esté familiarizado con ella. Consulte las siguientes<br />
instrucciones de uso y familiarícese con su manejo SIN CARGAR EL<br />
ARMA (apuntando a un blanco seguro) hasta que se encuentre en<br />
disposición de utilizar el arma de una forma correcta y segura.<br />
! ATENCIÓN:<br />
E<br />
No deje nunca el arma cargada.<br />
Conserve y guarde el arma siempre descargada.<br />
Active el seguro (posición S), compruebe<br />
cuidadosamente que no queda ningún<br />
proyectil en el cañón ni balines Diabolo en el<br />
tambor. Mantenga el arma fuera del alcance<br />
de niños y de usuarios no familiarizados con<br />
su manejo. Guarde los balines Diábolo y los<br />
cartuchos de aire comprimido en lugares<br />
separados y manténgalas fuera del alcance<br />
de usuarios no familiarizados o personas no<br />
autorizadas.<br />
57 |
1.2<br />
| 58<br />
LOS COMPONENTES DE SU NUEVA CARABINA DE AIRE COMPRIMIDO<br />
1 2 3 4 5<br />
8 9 10<br />
Si memoriza el nombre de los distintos componentes de su nueva<br />
carabina, podrá comprender con más facilidad las instrucciones de uso.<br />
Lea detenidamente este manual para poder disfrutar completamente<br />
de su nueva arma.<br />
1<br />
2<br />
3<br />
4<br />
5<br />
6<br />
7<br />
Boca<br />
Punto de mira<br />
Mira<br />
Cargador de<br />
tambor<br />
Seguro<br />
Culata<br />
11<br />
7 Gatillo<br />
8<br />
9<br />
10<br />
11<br />
6<br />
Cantonera de la<br />
culata<br />
Carrillera<br />
Palanca del<br />
cerrojo<br />
Cartucho de aire<br />
comprimido
2.1<br />
MANEJO DEL SEGURO<br />
Después de cada disparo el arma quedará automáticamente con el<br />
seguro puesto.<br />
• Para poner el seguro del arma manualmente, tire del seguro hacia<br />
atrás, como se muestra en la ilustración 1.a, hasta que quede en<br />
posición (la marca roja queda oculta).<br />
• Manipule el arma únicamente mientras tenga el seguro puesto.<br />
Procure que la boca apunte siempre en una dirección segura.<br />
• La carabina está equipada con un doble sistema de seguro. Para<br />
desactivarlo, debe: 1. presionar la palanca de encastre hacia abajo<br />
y 2. el pulsador de seguridad hacia delante (ilustración 1.b).<br />
La marca roja queda visible y el arma, lista para disparar<br />
(ilustración 1.c).<br />
! ATENCIÓN:<br />
Acostúmbrese a dejar siempre el arma desamartillada<br />
y con el seguro activado hasta el<br />
momento de disparar.<br />
Ilustración 1.a seguro activado Ilustración 1.b Ilustración 1.c lista para disparar<br />
1.<br />
2.<br />
59 |
2.2<br />
NOTA: Procure utilizar sólo accesorios de Walther para garantizar un<br />
buen funcionamiento.<br />
Coloque el nuevo cartucho de aire comprimido en la empuñadura (figura 2.a) y<br />
atorníllelo. Ahora la carabina está bajo presión. Para comprobar si el cartucho<br />
de aire comprimido está bien enrósquelo, asegúrese de que el arma no está<br />
cargada y dispare en una dirección segura. En el caso de que la carabina no<br />
dispare, controle los puntos que se indican en el capítulo 4 "Problemas".<br />
Ilustración 2.a<br />
Ilustración 2.b<br />
| 60<br />
! ATENCIÓN:<br />
! ATENCIÓN:<br />
MANIPULACIÓN DEL CARTUCHO DE AIRE COMPRIMIDO<br />
La carabina continúa estando bajo presión<br />
incluso en el caso de que haya desenroscado<br />
el cartucho de aire comprimido.<br />
Para descargar completamente la carabina, desenrosquee<br />
el cartucho de aire comprimido, elimine el<br />
cargador de tambor y dispare en una dirección segura<br />
hasta que la carabina ya no suelte ningún tiro.<br />
Procedimiento de llenado<br />
El cartucho de aire comprimido puede rellenarse en todo momento, incluso en el<br />
caso de que todavía no esté vacío. El procedimiento de llenado debe realizarse<br />
teniendo en cuenta las prescripciones TRG (reglamento técnico relativo a<br />
gases bajo presión). La presión de relleno máxima es de 300 bares y debe<br />
respetarse bajo cualquier circunstancia. Deben observarse las disposiciones<br />
legales relativas al relleno de cartuchos de gas a presión del país respectivo.<br />
Los cartuchos de aire comprimido no estancos y/o que representen un peligro<br />
potencial de cualquier otro tipo nunca deberán rellenarse, debiéndose vaciar de<br />
forma segura. Atornillar el adaptador sobre la bombona de recarga y apretar. A<br />
continuación deberá abrir la válvula de la bombona durante aprox. 5 segundos,<br />
cerrándola transcurrido este tiempo. Elimine el cartucho y vuelva a colocarlo en<br />
la carabina. Los cartuchos de aire comprimido nunca deberán ser utilizados o<br />
almacenados con una presión superior a la máxima permisible.<br />
! ATENCIÓN:<br />
! PRECAUCIÓN:<br />
! ATENCIÓN:<br />
! ATENCIÓN:<br />
Antes de enroscar un cartucho de aire comprimido<br />
comprimido, asegúrese de que el arma<br />
tiene el seguro activado y de que la la boca<br />
está orientada en una dirección segura.<br />
El aire utilizado debe cumplir la norma DIN<br />
3188 (aire apto para inhalar).<br />
Nunca utilice la fuerza a la hora de insertar un<br />
cartucho de aire comprimido.<br />
Nunca deberá guardar cartuchos de aire<br />
comprimido a temperaturas superiores a<br />
los 50 °C.
CARGAR EL CARGADOR DE<br />
! 2.3 ATENCIÓN:<br />
TAMBOR<br />
• Active el seguro del arma (véase cap. 2.1 “Manipulación del<br />
seguro”).<br />
• Tire de la palanca del cerrojo y del pestillo de retén del tambor<br />
hacia atrás (véase la secuencia en la ilustración 4.a).<br />
• Extraiga el tambor del arma (ilustración 4.b).<br />
• Cargue el cargador de tambor insertando los balines Diábolo en<br />
los orificios del mismo (ilustración 3.a).<br />
Los balines Diábolo quedan sujetos por medio de una junta tórica<br />
que los aprisiona.<br />
• Su nueva arma se ha probado con todos los balines Diábolo<br />
detallados en el apartado de accesorios en busca de defectos. Se<br />
pueden cargar balines Diábolo con una longitud total máxima de<br />
10 mm.<br />
2.4<br />
CARGAR LA CARABINA<br />
• Active el seguro de su arma (véase cap. 2.1 “Manipulación del<br />
seguro”).<br />
• Tire de la palanca del cerrojo y del pestillo de retén del<br />
tambor hacia atrás (véase la secuencia en la ilustración 4.a).<br />
• Coloque el tambor en el arma (ilustración 4.b).<br />
• Accione el pestillo de retén del tambor.<br />
• Empuje la palanca del cerrojo a su posición anterior y acerrójela.<br />
ATENCIÓN: Durante el proceso de acerrojamiento se carga<br />
automáticamente un balín Diábolo en el cañón.<br />
Ilustración 3.a<br />
! ATENCIÓN:<br />
3.<br />
No utilice bolas de acero (las denominadas<br />
BB), dardos o munición inapropiada similar.<br />
No ponga la mano delante de la boca del<br />
cañón. No ponga el dedo en el gatillo.<br />
Precaución: Asegúrese de que la boca apunte<br />
siempre en una dirección segura. No apunte<br />
nunca con el arma a personas o animales.<br />
2.<br />
Ilustración 4.a Ilustración 4.b<br />
1.<br />
61 |
2.5<br />
• Active el seguro del arma tal como se describe (véase cap. 2.1<br />
"Manipulación del seguro").<br />
• Tire hacia atrás de la palanca del cerrojo y, a continuación, del<br />
pestillo de retén del tambor (ilustración 4.a) para poder<br />
retirar el tambor.<br />
• Extraiga el cargador de tambor (ilustración 4.b).<br />
• Si hubiera un balín en el cañón, retírelo con un cepillo de limpieza o<br />
proceda como se describe en el capítulo "Atascos".<br />
• No intente volver a disparar un balín Diábolo en utilizado. Podría<br />
dañarse el tambor y el cañón.<br />
• Extraiga los balines Diábolo del cargador de tambor presionando<br />
con un objeto puntiagudo.<br />
• Compruebe que el fusil esté completamente descargado.<br />
• Vuelva a introducir el cargador de tambor vacío.<br />
• Desplace la palanca del cerrojo hacia delante.<br />
• Sujete el arma apuntando hacia una dirección segura.<br />
• Desactive el seguro y desamartille el arma accionando el gatillo el<br />
gatillo.<br />
• A continuación, vuelva a activar el seguro del fusil.<br />
2.6<br />
| 62<br />
DESCARGAR LA CARABINA<br />
APUNTAR Y DISPARAR CON<br />
SEGURIDAD<br />
Compruebe que el arma tiene el seguro puesto. Coloque el cartucho<br />
de aire comprimido y cargue el arma tal como se describe. Asegúrese,<br />
gracias a su experiencia, de tener de tener el blanco asegurado ante el<br />
punto de mira antes de disparar.<br />
! ATENCIÓN:<br />
! ATENCIÓN:<br />
! ATENCIÓN:<br />
! ATENCIÓN:<br />
Al retirar un balín Diabolo que pudiera<br />
encontrarse en el cañón con ayuda de un<br />
cepillo de limpieza, coloque la carabina<br />
en posición horizontal (véase el capítulo<br />
"Atascos"). No sujete el arma en posición<br />
vertical, pues el Diábolo podría caer dentro<br />
del mecanismo y, por consiguiente, provocar<br />
averías.<br />
Nunca utilice un objeto metálico objeto<br />
metálico afilado para extraer los balines<br />
Diábolo del cargador de tambor o del arma.<br />
Los daños del tambor o del cañón pueden<br />
producir fallos en el funcionamiento.<br />
Debido a la elevada capacidad de tiro de<br />
esta arma, sea especialmente cuidadoso y<br />
prudente en la elección de un objetivo seguro.<br />
Elija exclusivamente blancos que no puedan<br />
ser atravesados o que no puedan rebotar por<br />
la dureza de su superficie. No dispare nunca a<br />
superficies líquidas.<br />
Procure mantener siempre el cañón del<br />
arma en una dirección segura. No apunte<br />
nunca a personas o animales. Trate el arma<br />
siempre como si estuviera cargada y lista<br />
para disparar.
REPETICIÓN (PROCESO DE CARGA)<br />
Tras haber cargado el arma de la forma descrita, asegúrese de que el<br />
blanco, la diana cazabalines y el entorno son seguros. En cada proceso<br />
de repetición el tambor avanza una posición. Accione la repetición<br />
tirando de la palanca del cerrojo hacia atrás y luego empujando hacia<br />
delante hasta que vuelva a estar en su posición original (ilustración<br />
5.a). Desactive el seguro del arma de la forma descrita anteriormente.<br />
El arma está lista para disparar. 1.<br />
CAPACIDAD DE TIRO<br />
El número de disparos que pueden realizarse con el aire contenido en<br />
el cartucho de aire comprimido puede consultarse en el manómetro<br />
integrado en éste. En el caso de que la presión baje por debajo de<br />
los 70 bares (variante 7 julios/16 julios) ó 140 bares (variante 28<br />
julios/40 julios), el cartucho deberá rellenarse (véase apartado 2.2<br />
"Manipulación del cartucho de aire comprimido").<br />
2.7<br />
AJUSTAR EL RECORRIDO<br />
DEL GATILLO<br />
Ponga el seguro del arma. Descargue el arma como se describe en el<br />
punto 2.5 "Descargar la carabina".<br />
Ajuste su recorrido personal con un destornillador mediante un ligero<br />
giro del tornillo del gatillo (ilustración 6.a).<br />
Ilustración 5.a<br />
50<br />
100<br />
0<br />
150<br />
Ilustración 6.a<br />
200<br />
250<br />
2.<br />
50<br />
100<br />
300<br />
315 0<br />
150<br />
200<br />
300<br />
315<br />
variante 7 julios/16 julios variante 28 julios/40 julios<br />
250<br />
63 |
2.8<br />
| 64<br />
ATASCOS<br />
PRECAUCIÓN: Disparar con una carabina con presión de aire<br />
insuficiente puede causar el atasco del balín Diábolo en el cañón.<br />
• Introduzca un nuevo cartucho de aire comprimido, extraiga el<br />
cargador, cierre la palanca del cerrojo y dispare sin cargador de<br />
tambor.<br />
• El balín Diábolo atascado se disparará.<br />
• Si no se resuelve el problema mediante este proceso,<br />
presione el balín atascado cuidadosamente con un<br />
cepillo de limpieza (baqueta de limpieza).<br />
Ilustración 7.a<br />
! ATENCIÓN:<br />
! ATENCIÓN:<br />
! ATENCIÓN:<br />
Un atasco es una situación peligrosa.<br />
Si el arma no realiza ningún disparo, no<br />
debemos suponer nunca que al cargador del<br />
tambor no le queda munición.<br />
Al retirar un balín Diábolo que pueda encontrarse<br />
en el cañón con ayuda de un cepillo de<br />
limpieza, coloque el arma en posición horizontal<br />
(véase ilustración 7.a). No sujete el arma en<br />
posición vertical pues el balín Diábolo podría<br />
caer dentro del mecanismo y, por consiguiente,<br />
provocar averías.
2.9<br />
AJUSTES DE LA MIRA<br />
Apunte a un blanco seguro:<br />
Sujete el arma de tal manera que tenga alineados la mira trasera (parte<br />
trasera del alza) y el punto de mira (parte delantera) a la vez. El punto<br />
de mira debe encontrarse exactamente en el centro del hueco de la<br />
mira. A continuación, levante el arma hasta que el margen inferior del<br />
punto central del blanco coincida con el punto de mira. El extremo<br />
superior de la mira trasera, el extremo superior del punto de mira y<br />
el extremo inferior del blanco deberán estar dispuestos en una línea<br />
recta (ilustración 8.a, imagen de la mira). El punto de impacto puede<br />
regularse como se indica a continuación. El arma está ajustada de<br />
fábrica para disparar a una distancia de 10 m.<br />
Para el ajuste en alza de la mira, desplace la mira aflojando<br />
ligeramente el tornillo (ilustración 8.b):<br />
Con disparos demasiado elevados: desplazar la mira hacia atrás.<br />
Con disparos demasiado bajos: desplazar la mira hacia delante.<br />
A continuación, vuelva a apretar el tornillo.<br />
Ilustración 8.b Ilustración 8.c<br />
Ilustración<br />
8.a<br />
demasiado<br />
alto<br />
demasiado bajo correcto<br />
Para el ajuste en deriva del sistema de mira, es necesario desplazar<br />
el punto de mira. (Ilustración 8.c):<br />
Con disparos hacia la derecha: desplazar el punto de mira hacia la<br />
derecha.<br />
Para disparos hacia la izquierda: desplazar el punto de mira hacia la<br />
izquierda.<br />
65 |
2.10<br />
| 66<br />
ALMACENAMIENTO<br />
Conserve y guarde su arma siempre descargada y con el seguro<br />
puesto. Compruebe cuidadosamente que no queda ningún proyectil en<br />
el cañón y retire los balines Diábolo del tambor. Mantenga el arma fuera<br />
del alcance de niños y de usuarios no familiarizados con su manejo.<br />
Guarde el arma separada de los balines Diábolo.<br />
3<br />
MANTENIMIENTO<br />
Si lleva a cabo el mantenimiento correspondiente y trata su arma con<br />
cuidado, podrá disfrutar de ella durante muchos años.<br />
Limpie ocasionalmente las partes metálicas exteriores del arma. Para<br />
ello, utilice un paño suave ligeramente humedecido con aceite especial<br />
para armas. Para garantizar un funcionamiento duradero, aplique 2 ó 3<br />
gotas de aceite para armas en el alimentador y, a través del cargador<br />
vacío, también en el arma (véase la ilustración 9.a). Nunca utilice<br />
tapones de limpieza rápida, pues podrían dañar el arma.<br />
! ATENCIÓN:<br />
! ATENCIÓN:<br />
No deje nunca el arma cargada.<br />
No intente limpiar el arma sin activar el seguro<br />
primero, extraer el cartucho de aire comprimido<br />
y el tambor, y comprobar que no queda<br />
ningún proyectil en el cañón.<br />
Ilustración 9.a
4<br />
Problemas<br />
El arma no dispara<br />
Capacidad de disparo deficiente<br />
Escasa velocidad de disparo<br />
INSTRUCCIONES DE SEGURIDAD<br />
Seguro activado<br />
Cartucho de aire<br />
comprimido vacío<br />
Cañón sucio<br />
Posibles causas<br />
Cartucho de aire<br />
comprimido mal<br />
enroscado<br />
Temperaturas extremas<br />
Munición no adecuada<br />
Balines Diábolo mal<br />
cargados<br />
67 |
INDICACIONES SOBRE LA UTILIZACIÓN DE CARTUCHOS DE AIRE COMPRIMIDO<br />
Es posible que en ocasiones un arma de aire comprimido vea<br />
mermadas sus buenas cualidades por factores especiales. Entre estas<br />
condiciones se incluye el uso y/o mantenimiento o almacenamiento<br />
del arma a temperaturas considerablemente más altas o bajas que la<br />
temperatura exterior normal (de 15 a 21 °C).<br />
Las temperaturas elevadas pueden generar una presión que exceda<br />
considerablemente la presión normal de funcionamiento en el cartucho<br />
de aire comprimido o en el arma misma. Este exceso de presión<br />
podría impedir el disparo y provocar daños permanentes en el arma.<br />
La temperatura máxima de almacenamiento o de uso de este arma no<br />
deberá superar nunca los 50 °C.<br />
Los cartuchos de aire comprimido no estancos, dañados o que superen<br />
los diez años de antigüedad deberán vaciarse de forma segura, no<br />
debiendo utilizarse y/o rellenarse más. Después de diez años a partir<br />
de la fecha de fabricación, el cartucho de aire comprimido deberá ser<br />
inspeccionado/reemplazado por el fabricante (sujeto a costes). La fecha<br />
de fabricación figura en el cartucho de aire comprimido.<br />
MODIFICACIONES DEL ARMA<br />
| 68<br />
! ATENCIÓN:<br />
El aire utilizado debe cumplir la norma DIN 3188 (aire apto para<br />
inhalar).<br />
La presión de servicio máxima del cartucho de aire comprimido (300<br />
bares) no debe excederse bajo ningún concepto.<br />
! PRECAUCIÓN:<br />
Disparar con una carabina con presión de<br />
aire insuficiente puede causar el atasco del<br />
balín Diábolo en el cañón. Tenga en cuenta las<br />
indicaciones para atascos.<br />
Los distintos componentes de este arma se han diseñado y fabricado para garantizar en todo momento un funcionamiento<br />
y rendimiento óptimos. Cualquier modificación del diseño o ajuste del rendimiento podría provocar fallos de funcionamiento<br />
y con ello un uso inseguro del arma. En caso de modificación no autorizada del arma, quedará anulada la garantía.
MANTENIMIENTO PARA ARMAS WALTHER<br />
ATENCIÓN: Un arma que funcione con problemas puede resultar<br />
peligrosa. Por ello, deberá guardarse en un lugar seguro para que nadie<br />
la utilice antes de su reparación. Resulta complicado reparar un arma<br />
por cuenta propia; además, un montaje inadecuado podría provocar<br />
fallos de funcionamiento que podrían acabar siendo peligrosos.<br />
GARANTÍA PARA ARMAS WALTHER<br />
Si el problema proviene de un defecto de fabricación, la empresa<br />
Walther le reparará o reemplazará su arma sin coste alguno, siempre<br />
que se encuentre dentro del período de garantía legal a contar a partir<br />
de la fecha de compra. Entregue el arma a un distribuidor autorizado<br />
y descríbale el problema, adjuntando el comprobante de compra<br />
correspondiente.<br />
También las armas sufren un cierto desgaste. Si se hace un uso<br />
intensivo, pueden aparecer marcas de desgaste que, por lo general, no<br />
comportan fallos de funcionamiento. Los cargadores de tambor, en los<br />
que se insertan los balines Diábolo, sufren un desgaste especial, por<br />
lo que deberán sustituirse cuando sea necesario (consulte el capítulo<br />
"Accesorios especiales").<br />
! ATENCIÓN:<br />
! IMPORTANTE:<br />
Haga que el arma sea revisada y reparada<br />
únicamente por personal especializado o por<br />
un armero, que estén autorizados.<br />
En el caso de que transporte su arma,<br />
asegúrese de que ésta tenga el seguro puesto<br />
y esté descargada.<br />
69 |
MANEJO SEGURO DE ARMAS<br />
Deberá estar familiarizado con el manejo correcto y seguro de su arma.<br />
El hecho de que su nueva arma cuente con una muy alta velocidad de<br />
disparo exige extremar las precauciones. Con respecto a las reglas<br />
básicas para disparar con seguridad, considere cada contacto con el<br />
arma como parte de su manejo.<br />
• Desactive el seguro del arma sólo cuando se disponga a disparar y,<br />
cuando haya terminado, actívelo de nuevo inmediatamente.<br />
• Trate cada arma siempre como si estuviera cargada.<br />
• Active siempre el seguro antes de cargar el arma para evitar que<br />
se produzcan disparos involuntarios. Mantenga el dedo siempre<br />
fuera del gatillo y colóquelo allí solamente cuando vaya a disparar.<br />
• Utilice únicamente la munición y los cartuchos de aire comprimido<br />
diseñados para este arma.<br />
• Mantenga la boca del arma apuntando siempre hacia una dirección<br />
segura.<br />
• Sólo se permite disparar el arma en la vivienda del propietario,<br />
en las zonas en las zonas de tiro permitidas por lapolicía o<br />
en una propiedad vallada, siempre y cuando y cuando el<br />
proyectil no pueda llegar más allá del área de tiro. Tenga en cuenta<br />
el alcance máximo del proyectil (aprox. 850 m).<br />
• No transporte nunca un arma cargada. Cárguela solamente cuando<br />
tenga intención de disparar.<br />
• No dirija el arma nunca hacia personas o animales. Evite los<br />
disparos en los que el proyectil pueda rebotar. No dispare nunca a<br />
superficies líquidas.<br />
• Antes de disparar, asegúrese de que el objetivo y el entorno sean<br />
seguros.<br />
• Compruebe siempre que el arma está descargada y tiene el seguro<br />
activado cuando la transporte o la entregue a otra persona.<br />
| 70<br />
• Asegúrese de tener controlada la dirección hacia la que apunta la<br />
boca del arma, incluso si tropezara o se le cayera ésta.<br />
• Por motivos de seguridad, lleve puestas gafas protectoras cuando<br />
dispare.<br />
• Guarde el arma siempre con el seguro activado, descargada,<br />
separada de la munición y de forma segura para evitar que<br />
personas no autorizadas (personas no instruidas, niños o menores<br />
de 18 años) puedan acceder a ella.<br />
• Entregue este arma junto con las instrucciones de uso sólo a<br />
personas mayores de 18 años y que estén lo más familiarizadas<br />
posible con el manejo de la misma. Las versiones con más de<br />
7,5 julios están sujetas a la normativa WBK en Alemania.<br />
• Cualquier modificación o reparación del arma deberá llevarla a cabo<br />
una empresa especializada o un armero.<br />
• No deje nunca el arma cargada si está fuera de su alcance.<br />
• Descargue el arma antes de entregarla a otra persona.
ESPECIFICACIONES TÉCNICAS<br />
7.5 julios 16 julios 28 julios 40 julios<br />
Calibre 4,5 mm (.177) 5,5 mm (.22)<br />
Capacidad del cargador 8 disparos<br />
Longitud total 1040 mm<br />
Peso 3610 g<br />
Velocidad en boca (energía) hasta 170 m/s hasta 250 m/s hasta 370 m/s hasta 290 m/s<br />
Longitud del cañón 600 mm<br />
Accionamiento aire comprimido<br />
Seguro seguro de gatillo automático<br />
! ATENCIÓN:<br />
Las armas de aire comprimido de la empresa Carl Walther GmbH Sportwaffen se fabrican de conformidad con la normativa<br />
del instituto federal PTB (Physikalisch-Technische Bundesanstalt), la ley federal alemana, la normativa que establece el<br />
centro CIP y la amplia experiencia en fabricación de armamento de Carl Walther GmbH Sportwaffen.<br />
Por consiguiente, no asumimos ninguna responsabilidad en el caso de que nuestros productos no cumplan con la<br />
normativa legal correspondiente tras su exportación al extranjero, o de que el comprador o dueño se encuentre con<br />
dificultades o consecuencias jurídicas al respecto.<br />
71 |
ACCESORIOS PARA WALTHER 1250 DOMINATOR<br />
| 72<br />
Cargador rotatorio<br />
Juego para 2 unidades,<br />
también apto para balines de punta.<br />
Nº ref.: 465.102<br />
Raíles Picatinny<br />
Adecuado para montar miras<br />
telescópicas de tipo Picatinny.<br />
Nº ref.: 2.1525<br />
Tubo para rellenar (300 bares)<br />
Para rellenar rápidamente el cilindro sin<br />
retirarlo, incluye adaptador de rellenado<br />
rápido.<br />
Nº ref.: 465.109<br />
Walther FT 8-32x56<br />
Corrección de paralaje con rueda<br />
lateral de gran tamaño, visores con<br />
amplias posibilidades de graduación<br />
(contraviento y elevación), objetivo en<br />
ángulo para apuntar sin reflejos.<br />
Nº ref.: 2.1525<br />
Silenciador / Compensador<br />
Montaje sencillo y sin complicaciones<br />
mediante fijación con tornillos. Reduce<br />
la detonación en la boca al disparar.<br />
(Consulte la legislación correspondiente)<br />
Silenciador Nº ref.: 465.105<br />
Compensador Nº ref.: 465.106<br />
Cilindro de aire comprimido<br />
(300 bares) fabricado en acero<br />
267 cm, 930 g, con indicador de presión<br />
y adaptador de rellenado rápido<br />
Nº ref.: 465.108<br />
Botella de aire comprimido<br />
(300 bares)<br />
Capacidad 6 l, certificación TÜV, con<br />
dispositivo de protección durante el<br />
transporte<br />
Nº ref.: 465.110<br />
Gafas de tiro<br />
Estas gafas de tiro de policarbonato<br />
de alta resistencia son absolutamente<br />
imprescindibles por motivos de<br />
seguridad en el tiro de acción.<br />
amarillas Nº ref.: 2.5013
Blanco de prácticas: ardilla<br />
Nº ref.: 465.111-1<br />
Blanco plegable - paloma<br />
Nº ref.: 465.112-3<br />
Funda de armas Walther<br />
Dos grandes bolsillos separados, numerosos<br />
compartimentos interiores, tres<br />
opciones de transporte, material de PVC<br />
engomado repelente al agua, impermeable,<br />
fondo reforzado.<br />
Nº ref.: 5.8048<br />
Diabolo Match Diabolo Spitz Finale Match 850 Air Magnum<br />
Pellets<br />
10 x 500 unités<br />
cal. 4.5 mm<br />
Nº ref.: 4.1951<br />
10 x 500 unités<br />
cal. 4.5 mm<br />
Nº ref.: 4.1952<br />
10 x 500 unités<br />
cal. 4.5 mm<br />
Nº ref.: 4.1930<br />
500 unités<br />
cal. 4.5 mm<br />
Nº ref.: 4.1627<br />
Blanco de prácticas: cuervo<br />
Nº ref.: 465.111-4<br />
Blanco plegable - rata<br />
Nº ref.: 465.112-5<br />
Conjunto de limpieza<br />
Baqueta de limpieza de 3 piezas,<br />
cepillo de pelo, cepillo de alambre<br />
de latón, paño de lana.<br />
para 4,5 mm Nº ref.: 3.2050<br />
para 5,5 mm Nº ref.: 3.2051<br />
Diabolo Diabolo Diabolo Diabolo<br />
500 unités<br />
cal. 4.5 mm<br />
Nº ref.: 4.1623<br />
500 unités<br />
cal. 4.5 mm<br />
Nº ref.: 4.1624<br />
500 unités<br />
cal. 4.5 mm<br />
Nº ref.: 4.1625<br />
250 unités<br />
cal. 5.5 mm<br />
Nº ref.: 4.1626<br />
73 |
EL BLANCO<br />
Los blancos de campo son figuras plegables fabricadas en acero<br />
laminado. Normalmente son representaciones en tamaño real de<br />
pequeños animales (ratas, conejos, ardillas, palomas, cuervos) y tienen<br />
un agujero circular en la zona del pecho (zona letal). El tamaño del<br />
agujero es variable y puede reducirse manualmente de 40 a 15 mm.<br />
Blancos de campo para prácticas<br />
(Nº ref.: 465.111-1 – Nº ref.: 465.111-5):<br />
Se clava en la tierra la varilla del blanco, que tiene unos 30 cm de<br />
longitud. Si el disparo alcanza la zona letal, la placa cae. Al poner de<br />
pie la placa, reaparece también la placa de la zona letal. Tipos: rata,<br />
conejo, ardilla, paloma, cuervo.<br />
Siluetas<br />
Blanco de prácticas - ardilla Nº ref.: 465.111-1<br />
Blanco de prácticas - conejo Nº ref.: 465.111-2<br />
Blanco de prácticas - paloma Nº ref.: 465.111-3<br />
Blanco de prácticas - cuervo Nº ref.: 465.111-4<br />
Blanco de prácticas - rata Nº ref.: 465.111-5<br />
Blanco plegable - ardilla Nº ref.: 465.112-1<br />
Blanco plegable - conejo Nº ref.: 465.112-2<br />
Blanco plegable - paloma Nº ref.: 465.112-3<br />
Blanco plegable - cuervo Nº ref.: 465.112-4<br />
Blanco plegable - rata Nº ref.: 465.112-5<br />
| 74<br />
Blanco de suelo para competiciones en el campo<br />
(Nº ref.: 465.112-1 – Nº ref.: 465.112-5):<br />
Este blanco se fija con clavos de acero y se vuelve a colocar con una<br />
cuerda. Tipos: rata, conejo, ardilla, paloma, cuervo.<br />
Zona letal:<br />
Diámetro ajustable.<br />
Cuerpo adjunto:<br />
El blanco se vuelve a<br />
colocar con una cuerda.<br />
Fijación:<br />
El blanco se fija<br />
al suelo.
75 |
Carl WALTHER GmbH - Sportwaffen<br />
Marketing | Vertrieb<br />
Postfach 2740D - 59717 Arnsberg<br />
Donnerfeld 2, D - 59757 Arnsberg<br />
Tel. 0 29 32 / 63 81 00<br />
Fax 0 29 32 / 63 81 49<br />
Technik | Service<br />
Postfach 4325, D - 89033 Ulm<br />
Im Lehrer Feld 1, D - 89081 Ulm<br />
Tel. 07 31 / 15 39 0<br />
Fax 07 31 / 15 39 109<br />
8.465.83.03 | 05-07