Bauplanmappe Ord.No. 2600 - Vario Helicopter
Bauplanmappe Ord.No. 2600 - Vario Helicopter
Bauplanmappe Ord.No. 2600 - Vario Helicopter

You also want an ePaper? Increase the reach of your titles
YUMPU automatically turns print PDFs into web optimized ePapers that Google loves.
<strong>Bauplanmappe</strong><br />
<strong>Ord</strong>.<strong>No</strong>. <strong>2600</strong><br />
für Benzin Motor<br />
VARIO <strong>Helicopter</strong> Uli Streich GmbH & Co. KG • Geschäftsführer Kirsten Zodtner<br />
Seewiesenstraße 7 • 97782 Gräfendorf • GERMANY<br />
Tel. 09357 • 9710-0 • Fax 09357 • 397<br />
www.vario-helicopter.de • info@vario-helicopter.de • www.vario-helicopter.biz<br />
10/09
Sehr geehrter Kunde,<br />
der von Ihnen erworbene Bausatz enthält entsprechende Teile zur Erstellung eines funktionsfähigen<br />
Flugmodells.<br />
Auf Zusammenbau, Einstellungen und Inbetriebnahme haben wir keinen Einfluß und weisen daher noch<br />
ausdrücklich darauf hin, daß Ihre individuelle Vorgehensweise einzig und allein auf Ihrem Kenntnisstand<br />
und Beurteilungsvermögen beruht.<br />
Die <strong>Bauplanmappe</strong> dient dabei als entsprechende Orientierung, jedoch nicht als maßgeblicher Weg:<br />
Unterschiedliche Vorgehensweisen können zum Ziel führen.<br />
Prüfen Sie vor jedem Bauabschnitt sorgfältig Ihr Vorhaben und entscheiden Sie eigenverantwortlich über<br />
Ihren persönlichen Weg.<br />
Dear customer,<br />
The kit you have purchased contains the components required to build a model aircraft which is capable<br />
of flying.<br />
We have no influence over the methods you use to assemble, set up and operate the model, and for this<br />
reason we are obliged expressly to point out to you that the methods you use rely solely on your own<br />
knowledge, experience and analytical ability.<br />
The Plan Folder is designed to help you in this undertaking, but it does not represent a unique way of<br />
proceeding:<br />
There are more ways than one to reach a particular destination.<br />
Before you start each stage of construction, check carefully what you intend to do, and accept the<br />
responsibility to decide on your own personal method.<br />
Spettabile cliente,<br />
la scatola di montaggio da voi acquistata contiene le parti necessarie per la costruzione di un modello<br />
funzionante, in grado di volare.<br />
Per quanto riguarda i metodi per il montaggio, la messa a punto e la messa in funzione noi non abbiamo<br />
nessuna influenza e vogliamo sottolineare esplicitamente che il vostro modo d’agire dipende soltanto dal<br />
vostro livello di conoscenza e dalla vostra capacità di valutazione. Le istruzioni di montaggio servono solo<br />
per un migliore orientamento e non rappresentano l’unico modo di procedere:<br />
diversi sono i modi di procedere che possono dare l’effetto desiderato.<br />
Prima di realizzare ogni fase di lavoro verificate attentamente il vostro progetto e scegliete in maniera<br />
responsabile il vostro obiettivo.<br />
Cher Client,<br />
La boîte de construction que vous avez acquise, comprend tous les composants nécessaires pour la<br />
réalisation d’un modèle d’hélicoptère fonctionnel.<br />
<strong>No</strong>us n’avons pas d’influence sur la manière dont vous assemblez, ajustez, et mettez en service ces<br />
composants. <strong>No</strong>us vous informons donc expressément que votre façon de procéder dépend uniquement<br />
et exclusivement de vos connaissances, compétences et jugements. Le cahier de plans sert de guide<br />
d’orientation, mais ne trace pas un chemin exclusif:<br />
Différentes méthodes d’opération peuvent mener au même résultat. Vérifiez avant chaque stade de<br />
construction le but à atteindre et choisissez le chemin qui vous semble le plus approprié.<br />
Geachte klant,<br />
De door uw gekochte bouwdoos bevat alle onderdelen om een functionerend vliegmodel te maken.<br />
Op het bouwen, afstellen en het in gebruik nemen van uw model hebben wij geen invloed, en wij wijzen er<br />
nadrukkelijk op, dat uw individuele zienswijze alleen op uw kennis en beoordelingsvermogen berust.<br />
De bouwtekening dient daarbij alleen als een oriëntering, echter niet als een dwingend advies.<br />
Verschillende bouwconstructies kunnen tot hetzelfde doel leiden.<br />
Test elke bouwfase zorgvuldig, en beslis over uw eigen verantwoordelijkheid m.b.t. het in gebruik nehmen<br />
van uw model.
Die Modelle mit VR-22 Mechanik, XLV-Mechanik und Lama mit Turbinenantrieb sind ausschließlich zur<br />
Realisierung vorbildgetreuer Flugleistung konzipiert und dürfen nicht für Kunstflug verwendet werden.<br />
Insbesondere in Verbindung mit leistungsstarkem Turbinenantrieb verführen die bis zu 20 kg schweren Modelle<br />
zu übermütigen Flugmanövern, die deren Belastungsgrenzen überschreiten und zur Zerstörung im Flug führen<br />
können.<br />
Erlegen Sie sich deshalb selbst strenge Grenzen für den Flugbetrieb auf, und lassen Sie sich insbesondere vor<br />
Publikum niemals zum Überschreiten dieser Grenzen bewegen.<br />
D<br />
Models fitted with VR-22 mechanics, XLV mechanics and the turbine-powered Lama are intended exclusively for<br />
realistic scale-like flying; they must not be used for aerobatics.<br />
These models may weigh up to 20 kg, and when they are fitted with a high-power turbine power system pilots<br />
may be seduced into reckless flight manoeuvres which exceed their load limits, and may cause structural failure<br />
of the helicopter in the air.<br />
For this reason it is essential that you set yourself strict limits when flying these models, and never be tempted to<br />
exceed those limits, especially when onlookers are present.<br />
E<br />
F<br />
Les modèles avec des mécaniques VR-22, XLV ou des Lama avec un réacteur sont exclusivement conçus pour<br />
effectuer des vols réalistes. Ils ne doivent en aucun cas être modifiés pour effectuer des vols acrobatiques.<br />
C'est notamment en utilisant des puissants réacteurs, que ces modèles allant jusqu'à 20 kg peuvent vous inciter à<br />
réaliser des figures de vol osées, dépassant les limites mécaniques et structurelles ce qui pourra se traduire par<br />
une perte du modèle.<br />
Fixez-vous des limites très strictes et ne vous laissez jamais tenter par le public de les dépasser.<br />
H<br />
De modellen met VR-22 mechaniek, XLV-mechaniek en Lama met turbineaandrijving, zijn uitsluitend bestemd<br />
voor het schaalvliegen, gelijk het grote voorbeeld, en mogen dus absoluut niet voor kunstvlucht gebruikt worden!<br />
Laat U vooral niet verleiden om in combinatie met de krachtige prestaties van de turbineaandrijving overmoedige<br />
vliegmanoeuvres te maken met deze tot 20 Kg zware modellen, waardoor de belastinggrenzen overschreden<br />
worden die tot grote schade tijdens de vlucht kunnen leiden.<br />
Neem goede nota van het geheel, en stel voor uwzelf strenge grenzen c.q. eisen vast voor het vliegen, en laat u<br />
zich niet verleiden om voor publiek deze grenzen te overschrijden.<br />
I modelli dotati della meccanica VR-22, della meccanica XLV nonché il "Lama" con propulsore a turbina sono stati<br />
studiati esclusivamente a fini di realizzare prestazioni di volo molto simili a quelli del grande elicottero, e pertanto<br />
essi non devono venir utilizzate per il volo acrobatico.<br />
In particolare quando si tratta di modelli con il potente propulsore a turbina i modelli, il cui peso può raggiungere<br />
fino a 20 kg, seducono il pilota ad effettuare delle sfrenate manovre e figure di volo, che facilmente vanno a finire<br />
al di là dei limiti di carico, provocando avarie in fase di volo.<br />
Pertanto il nostro appello a tutti i piloti: imponetevi autocontrollo ossia fissate dei rigidi limiti per i volo; soprattutto<br />
in presenza di pubblico non lasciatevi mai tentare a superare tali limiti.<br />
Los modelos con mecánica VR-22, mecánica XLV y Lama con propulsión por turbina están concebidos<br />
exclusivamente para la realización de unas prestaciones de vuelo fieles al modelo y no pueden ser utilizados<br />
para acrobacia aérea.<br />
Relacionado especialmente con la potente propulsión por turbina, los modelos de hasta 20 kg de peso inducen a<br />
realizar temerarias maniobras de vuelo que sobrepasan los límites de carga de aquella y que pueden conducir a<br />
una destrucción en vuelo.<br />
Impóngase, por lo tanto, usted mismo severas limitaciones para el régimen de vuelo y, sobre todo, no se deje<br />
arrastrar nunca por el público para sobrepasar dichas limitaciones.<br />
I<br />
S
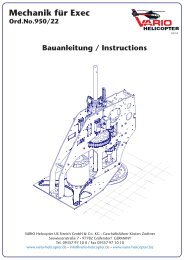
Sollte es bei einer vormontierten Baugruppe Beanstandungen geben, darf<br />
die Baugruppe nicht zerlegt , sondern muß - im Originallieferzustand -<br />
zurückgegeben werden. Nach Zerlegen kann eine Beanstandung nicht<br />
mehr nachvollzogen bzw. anerkannt werden. Mit dem Auseinandernehmen<br />
der Teile erlischt jeglicher Garantieanspruch.<br />
<strong>Ord</strong>.<strong>No</strong>.11/6<br />
<strong>Ord</strong>.<strong>No</strong>.11/5<br />
Ø 8mm<br />
<strong>Ord</strong>.<strong>No</strong>. 11/81<br />
<strong>Ord</strong>.<strong>No</strong>.11/4<br />
<strong>Ord</strong>.<strong>No</strong>.11/3<br />
<strong>Ord</strong>.<strong>No</strong>.11/2<br />
If you are dissatisfied with any factory-built assembly it is essential that you<br />
return the whole assembly, in its original state as supplied, rather than<br />
dismantle it. Once you have dismantled the assembly we are unable to<br />
acknowledge or meet any claim or complaint. If you dismantled any<br />
assembly you render your guarantee invalid.<br />
Ø 3,2mm<br />
<strong>Ord</strong>.<strong>No</strong>. 11/88<br />
Made M3 SW 1,5<br />
Ø 2,8mm<br />
<strong>Ord</strong>.<strong>No</strong>. 11/73<br />
M 2,5<br />
Made M 4 SW 2<br />
M 3<br />
SW 2,5<br />
M 4<br />
SW 3<br />
M 5<br />
SW 4<br />
En cas de constat d'anomalies sur un ensemble prémonté, ne pas<br />
démonter celui-ci, mais le retourner dans son état d'origine de livraison.<br />
Après démontage, nous ne pouvons plus constater les raison du problème<br />
ni le prendre en compte. Le démontage de ces ensembles exclut toute<br />
prestation de garantie.<br />
Ø 2,5mm<br />
<strong>Ord</strong>.<strong>No</strong>. 11/72<br />
Ø 1,8mm<br />
<strong>Ord</strong>.<strong>No</strong>. 11/87<br />
M 2 <strong>Ord</strong>.<strong>No</strong>.11/19 SW 4<br />
<strong>Ord</strong>.<strong>No</strong>.11/18 SW 5,5<br />
M 3<br />
Qualora un gruppo di montaggio già prefabbricato dovesse dar luogo a<br />
reclami, esso in nessun caso deve essere smontato, bensì va restituito nel<br />
suo stato originale. Una volta smontato il gruppo, risulta impossibile,<br />
ovviamente, comprendere e riconoscere il causale del reclamo. Pertanto<br />
ogni e qualsia garanzia cessa con lo smontaggio.<br />
<strong>Ord</strong>.<strong>No</strong>.11/17 SW 7<br />
M 4<br />
<strong>Ord</strong>.<strong>No</strong>.11/62<br />
SW 13 Ø 8mm<br />
<strong>Ord</strong>.<strong>No</strong>.11/26<br />
En caso de reclamación de un componente premontado, no se puede<br />
devolver el componente desmontado sino sólo en su estado original en el<br />
momento de la entrega. Después de desmontar el componente no es<br />
posible reproducir o aceptar la reclamación.Con el desmontaje de las<br />
piezas prescribe el derecho de garantía.<br />
<strong>Ord</strong>.<strong>No</strong>.11/66<br />
SW 10 Ø 6,34mm<br />
<strong>Ord</strong>.<strong>No</strong>.11/52<br />
SW 2,5<br />
SW 4<br />
ca. 300 g<br />
Zouden er bij een voorgemonteerd bouwdeel sprake zijn van klachten en/of<br />
bezwaren, dan mag dit bouwdeel in geen geval uit elkaar worden gehaald,<br />
echter moet in de orginele afgeleverde toestand worden geretourneerd.<br />
Indien dit bouwdeel toch uit elkaar gehaald wordt, kan een bezwaar niet<br />
meer in behandeling worden genomen, cq. erkent worden. Met het uit<br />
elkaar halen vervalt elke aanspraak op garantie.<br />
<strong>Ord</strong>.<strong>No</strong>.11/44<br />
<strong>Ord</strong>.<strong>No</strong>.11/51<br />
<strong>Ord</strong>.<strong>No</strong>.622<br />
Skulle der være reklamation, på en formonteret byggegruppe, må denne<br />
ikke skilles ad, men skal returneres i originaltilstanden. Efter afmontering af<br />
en defekt byggegruppe, kan reclamationen ikke tages til følge. Ved<br />
aftermontering af delene forsvinder al form for garanti.<br />
<strong>Ord</strong>.<strong>No</strong>.11/29<br />
Widia-Trennscheibe für GFK<br />
<strong>Ord</strong>.<strong>No</strong>.11/79<br />
M4<br />
Poxan-622<br />
<strong>Ord</strong>.<strong>No</strong>.11/78<br />
M3<br />
<strong>Ord</strong>.<strong>No</strong>.11/77<br />
M2,5<br />
Silicon<br />
<strong>Ord</strong>.<strong>No</strong>.11/76<br />
M2<br />
VARIO <strong>Helicopter</strong> • Seewiese 7 • D-97782 Gräfendorf<br />
Tel 09357 • 9710-0 Fax 09357 • 397<br />
<strong>Ord</strong>.<strong>No</strong>.10/11
mit "<strong>Ord</strong>.<strong>No</strong>." versehene Teile sind NICHT im<br />
Bausatz enthalten!<br />
!<br />
!<br />
S<br />
Parts whose <strong>Ord</strong>.<strong>No</strong>. is stated in full, e.g.<br />
(<strong>Ord</strong>.<strong>No</strong>. 47/11) are not included in the kit.<br />
(S)<br />
<strong>Ord</strong>.<strong>No</strong>.10/24<br />
(S)<br />
Schraubensicherung mittelfest<br />
<strong>Ord</strong>.<strong>No</strong>. 5156<br />
5-6 Servos<br />
Receiver<br />
Sh<br />
<strong>Ord</strong>.<strong>No</strong>.3868<br />
5-9 Kanal<br />
<strong>Ord</strong>.<strong>No</strong>.10/23<br />
(Sh)<br />
!<br />
(Sh)<br />
Schraubensicherung hochfest<br />
<strong>Ord</strong>.<strong>No</strong>.10/36<br />
Fett<br />
<strong>Ord</strong>.<strong>No</strong>.755/26<br />
<strong>Ord</strong>.<strong>No</strong>. 8065<br />
<strong>Ord</strong>.<strong>No</strong>. 1201<br />
(F)<br />
Gyro<br />
<strong>Ord</strong>.<strong>No</strong>.742/40<br />
Oberfläche<br />
muß angerauht sein!<br />
<strong>Ord</strong>.<strong>No</strong>.1401<br />
Oberfläche<br />
muß angerauht sein!<br />
Surface has to be rough!<br />
K<br />
Surface has to be rough!<br />
Sekundenkleber / Cyano glue<br />
dünnflüssig / low viscosity<br />
<strong>Ord</strong>.<strong>No</strong>.10/127<br />
dickflüssig / high viscosity<br />
<strong>Ord</strong>.<strong>No</strong>.10/125<br />
Sk<br />
<strong>Ord</strong>.<strong>No</strong>.10/27<br />
<strong>Ord</strong>.<strong>No</strong>.10/34<br />
4,8 Volt<br />
1,8Ah<br />
(K)<br />
<strong>Ord</strong>.<strong>No</strong>.3202<br />
<strong>Ord</strong>.<strong>No</strong>.10/66<br />
OIL<br />
<strong>Ord</strong>.<strong>No</strong>.10/37
!<br />
<strong>Ord</strong>.<strong>No</strong>. 11/36<br />
134 mm<br />
<strong>Ord</strong>.<strong>No</strong>. 10/36<br />
8 mm<br />
Fett<br />
Ø12,5<br />
Ø12,0<br />
90081<br />
M3x14 (S)<br />
!<br />
90389<br />
M5x10 (S)<br />
55/6<br />
12x21x5<br />
54/14<br />
39/2<br />
10x22x6<br />
830/54<br />
722/54<br />
6x 90075 (S)<br />
M3x12<br />
260/36<br />
<strong>Ord</strong>.<strong>No</strong>. 722/35<br />
55/7<br />
90389<br />
M5x10 (S)<br />
1<br />
!<br />
260/70<br />
4x 060/9 (S)<br />
M 3,5 9mm<br />
3x 060/23 (S)<br />
M 3,5 5mm<br />
722/51<br />
832/68<br />
90095 (S)<br />
M3x20<br />
90095 (S)<br />
M3x20<br />
90030 (S)<br />
M2,5x8<br />
55/6<br />
12x21x5<br />
722/53<br />
55/6<br />
12x21x5<br />
(S) <strong>Ord</strong>.<strong>No</strong>. 10/24<br />
52/20<br />
68/8 (S)<br />
M 3,5
90387 (S)<br />
M4x6<br />
722/18<br />
!<br />
90387 (S)<br />
M4x6<br />
90385 (S)<br />
M4x4<br />
722/49<br />
55/2<br />
8x19x6<br />
!<br />
830/55<br />
722/54<br />
!<br />
90385 (S)<br />
M4x4<br />
830/55<br />
55/5<br />
10x21x5<br />
55/2<br />
8x19x6<br />
90980<br />
8x14x0,3<br />
54/9<br />
!<br />
90081<br />
M3x14 (S)<br />
90387 (S)<br />
M4x6<br />
90387 (S)<br />
M4x6<br />
722/17<br />
2<br />
722/20<br />
90387 (S)<br />
M4x6<br />
722/18<br />
54/9<br />
90081<br />
M3x14 (S)<br />
871/37<br />
10x15,5x3,8<br />
!<br />
90387 (S)<br />
M4x6<br />
39/2<br />
10x22x6<br />
830/54<br />
(S) <strong>Ord</strong>.<strong>No</strong>. 10/24<br />
722/15
!<br />
4x 90295<br />
M2,5x14<br />
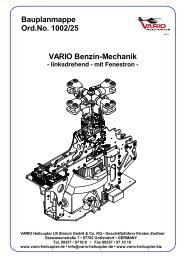
Die einwandfreie Funktion ist mit den Servos Futaba S 9206<br />
sichergestellt und ausgiebig erprobt worden. Bei<br />
Verwendung anderer Servotypen ( insbesondere<br />
Hochleistungs- Digitalservos ) kommt es nach unseren<br />
Erfahrungen immer wieder zu Schwierigkeiten mit der<br />
Rotorkopfsteuerung.<br />
We have extensively tested Futaba 9206 servos on this<br />
application, and they have performed flawlessly in all<br />
instances. Using a different kind of servo, especially high<br />
performance digital servos, can lead to poor performance of<br />
the rotor head, and unexpected flight characteristics.<br />
4x 90541<br />
2,5x5,8<br />
3942<br />
12x 90055<br />
M3x8(S)<br />
<strong>Ord</strong>.<strong>No</strong>. 5156<br />
Futaba S9206<br />
260/50<br />
4x 90295<br />
M2,5x14<br />
3942<br />
4x 90541<br />
2,5x5,8<br />
830/54<br />
260/62<br />
2x 90065<br />
M3x10(S)<br />
3<br />
90527<br />
M2,5<br />
8x 90527<br />
M2,5<br />
260/61<br />
rechts<br />
right<br />
060/7<br />
M2,5x5<br />
<strong>Ord</strong>.<strong>No</strong>. 11/72<br />
Ø 2,5 mm<br />
<strong>Ord</strong>.<strong>No</strong>. 5156<br />
Futaba S9206<br />
90560<br />
4,3x9<br />
90150<br />
M4x14<br />
830/55
!<br />
6x 90055<br />
M3x8(S)<br />
4<br />
4x 90055<br />
M3x8(S)
260/37<br />
90075<br />
M3x12<br />
90545<br />
3,2x9<br />
90530<br />
M3<br />
260/53<br />
90530<br />
M3<br />
90080<br />
M3x14<br />
90545<br />
3,2x9<br />
90530<br />
M3<br />
90080<br />
M3x14<br />
90545<br />
3,2x9<br />
722/37<br />
90530<br />
M3<br />
90075<br />
M3x12<br />
90545<br />
3,2x9<br />
5<br />
4x 90065<br />
M3x10 (S)<br />
8x 90065<br />
M3x10 (S)
<strong>Ord</strong>.<strong>No</strong>. 060/7<br />
M2,5x5<br />
<strong>Ord</strong>.<strong>No</strong>. 90527<br />
M2,5<br />
<strong>Ord</strong>.<strong>No</strong>. 3941/40 (JR-Servo)<br />
<strong>Ord</strong>.<strong>No</strong>. 3941/45 (Futaba)<br />
<strong>Ord</strong>.<strong>No</strong>. 11/72<br />
Ø2,5mm<br />
4x 90036<br />
M2,5x12<br />
060/7<br />
M2,5x5<br />
90527<br />
M2,5<br />
4x 90541<br />
2,5x5,8<br />
2x 90530<br />
M3<br />
min. 68 Ncm für<br />
<strong>Ord</strong>.<strong>No</strong>. 5156<br />
Futaba S 9206<br />
!<br />
Heckrotor<br />
2x 860/25<br />
use servo with<br />
min.68 Ncm for<br />
tail rotor<br />
907/2<br />
2x 90095<br />
M3x20(S)<br />
90150<br />
M4x14<br />
4x 90527<br />
M2,5<br />
90560<br />
4,3x9<br />
260/61<br />
90065<br />
M3x10(S)<br />
6<br />
260/62<br />
4x 90541<br />
2,5x5,8<br />
8x 90295<br />
M2,5x14<br />
<strong>Ord</strong>.<strong>No</strong>. 5156<br />
Futaba S9206<br />
3942<br />
22x 90055<br />
M3x8 (S)<br />
4x 90541<br />
2,5x5,8<br />
260/50<br />
4x 90527<br />
M2,5<br />
3942<br />
4x 90527<br />
M2,5<br />
4x 90541<br />
2,5x5,8<br />
(S) <strong>Ord</strong>.<strong>No</strong>. 10/24
(S)<br />
(S)<br />
7<br />
(S)<br />
!<br />
(S)<br />
(S)<br />
(S)<br />
(S) <strong>Ord</strong>.<strong>No</strong>. 10/24
90055<br />
M3x8 (S)<br />
260/32<br />
(K)<br />
3/3<br />
90055<br />
M3x8 (S)<br />
90055<br />
M3x8 (S) 90330<br />
2,2x6,5<br />
(K)<br />
260/1<br />
<strong>Ord</strong>.<strong>No</strong>. 11/87<br />
Ø1,8mm<br />
3/3<br />
260/32<br />
722/2<br />
8<br />
90055<br />
M3x8 (S)<br />
110<br />
(K)<br />
90330<br />
2,2x6,5<br />
<strong>Ord</strong>.<strong>No</strong>. 11/87<br />
Ø1,8mm<br />
3/3<br />
722/2<br />
(K)<br />
3/3<br />
(S) <strong>Ord</strong>.<strong>No</strong>. 10/24
90150<br />
M4x14 (S)<br />
90565<br />
4,3x12<br />
90565<br />
4,3x12<br />
90530<br />
M3<br />
90545<br />
3,2x9<br />
260/31<br />
260/14<br />
90530<br />
M3<br />
90545<br />
3,2x9<br />
90160<br />
M4x18 (S)<br />
260/31<br />
060/30<br />
90545<br />
3,2x9<br />
90565<br />
4,3x12<br />
2x<br />
9<br />
107/31<br />
90120<br />
M3x40<br />
90535<br />
M4<br />
90160<br />
M4x18 (S)<br />
70/142<br />
M3x142<br />
90565<br />
4,3x12<br />
107/27<br />
<strong>Ord</strong>.<strong>No</strong>. 11/73<br />
Ø2,8mm<br />
(S) <strong>Ord</strong>.<strong>No</strong>. 10/24
<strong>Ord</strong>.<strong>No</strong>.1023<br />
260/56<br />
Tan k<br />
3x 90387<br />
M4x6 (S)<br />
(S)<br />
64/57<br />
260/83<br />
90880<br />
4x8x0,5<br />
90880<br />
4x8x0,5<br />
830/64<br />
10<br />
40<br />
4x13x5<br />
40<br />
4x13x5<br />
830/65<br />
71/8<br />
!<br />
71/8<br />
33/9<br />
4x6x13,9<br />
830/8<br />
33/9<br />
4x6x13,9<br />
830/7<br />
260/54<br />
260/54<br />
64/69<br />
40<br />
4x13x5<br />
40<br />
4x13x5<br />
90610<br />
6mm<br />
90192<br />
M4x45(S)<br />
90192<br />
M4x45(S)<br />
90210<br />
M6x40<br />
(S) <strong>Ord</strong>.<strong>No</strong>. 10/24
2x 90530<br />
M3<br />
4x 9 0566<br />
5,3 x10<br />
4x 9 0605<br />
5m m<br />
4x 9 0200<br />
M5 x16<br />
4x 90036<br />
M2,5x12<br />
907/2<br />
2x 90065<br />
M3x10<br />
11<br />
<strong>Ord</strong>.<strong>No</strong>. 90370<br />
M3x4 (S)<br />
in <strong>Ord</strong>.<strong>No</strong>. 1023<br />
<strong>Ord</strong>.<strong>No</strong>.107/35<br />
in <strong>Ord</strong>.<strong>No</strong>. 1023<br />
Ta nk<br />
90525<br />
M2 (S)<br />
4x90541<br />
2,5mm<br />
(S) <strong>Ord</strong>.<strong>No</strong>. 10/24<br />
4x 90527<br />
M2,5<br />
107/17<br />
70/100<br />
060<br />
M2x5
90175<br />
M4x25<br />
90085<br />
M3x16<br />
260/31<br />
Ø3,1mm<br />
10/90<br />
90175<br />
M4x25<br />
90560<br />
4,3x9<br />
90560<br />
4,3x9<br />
260/39<br />
Ø4,1mm<br />
90085<br />
M3x16<br />
260/60<br />
90530<br />
M3<br />
10 mm<br />
3/4<br />
260/39<br />
Ø4,1mm<br />
260/31<br />
Ø3,1mm<br />
90530<br />
M3<br />
10/90<br />
722/39<br />
90165<br />
M4x20<br />
90600<br />
4mm<br />
12<br />
90560<br />
4,3x9<br />
90560<br />
4,3x9<br />
90560<br />
4,3x9<br />
90535<br />
M4<br />
90535<br />
M4<br />
260/120
2x 90055<br />
M3x8 (S)<br />
2x 90545<br />
3,2x9<br />
90065<br />
M3x10<br />
13<br />
90545<br />
3,2x9<br />
2x 90545<br />
3,2x9<br />
2x 90055<br />
M3x8 (S)<br />
90065<br />
M3x10<br />
90530<br />
M3<br />
2x 90545<br />
3,2x9<br />
90530<br />
M3<br />
90065<br />
M3x10
<strong>Ord</strong>.<strong>No</strong>. 11/87<br />
Ø1,8mm<br />
90330<br />
2,2x6,5<br />
(K)<br />
90545<br />
3,2x9<br />
90065<br />
M3x10<br />
260/38<br />
14<br />
2x 90530<br />
M3<br />
90530<br />
M3<br />
90545<br />
3,2x9<br />
90545<br />
3,2x9<br />
90065<br />
M3x10<br />
890/12<br />
90545<br />
3,2x9<br />
(S) <strong>Ord</strong>.<strong>No</strong>. 10/24<br />
(K) <strong>Ord</strong>.<strong>No</strong>. 10/27<br />
90105<br />
M3x22
90860<br />
4x8x0,2<br />
2x 90155 (S)<br />
M4x16<br />
35/13<br />
4x9x4<br />
90105 (S)<br />
M3x25<br />
832/70<br />
35/13<br />
4x9x4<br />
90860<br />
4x8x0,2<br />
35/13<br />
4x9x4<br />
060/18 (S)<br />
M3x3<br />
!<br />
!<br />
90845<br />
4x7x0,5<br />
832/69<br />
35/13<br />
4x9x4<br />
90105 (S)<br />
M3x25<br />
90845<br />
4x7x0,5<br />
832/71<br />
15<br />
107/31<br />
90845<br />
4x7x0,5<br />
832/70<br />
35/13<br />
4x9x4<br />
832/69<br />
90845<br />
4x7x0,5<br />
060/18 (S)<br />
M3x3<br />
35/13<br />
4x9x4<br />
35/13<br />
4x9x4<br />
107/31<br />
35/13<br />
4x9x4<br />
2x 90155 (S)<br />
M4x16<br />
(S) <strong>Ord</strong>.<strong>No</strong>. 10/24
91/50 (S)<br />
832/87<br />
056<br />
060/18 (S)<br />
M3x3<br />
832/66<br />
832/80<br />
91/55<br />
90387 (S)<br />
M4x6<br />
90387 (S)<br />
M4x6<br />
90387 (S)<br />
M4x6<br />
832/66<br />
056<br />
90387 (S)<br />
M4x6<br />
060/18 (S)<br />
M3x3<br />
35/13<br />
4x9x4<br />
832/78<br />
832/87<br />
79/30<br />
0-0,3mm<br />
90890<br />
90910 5x10x0,1<br />
5x10x0,3<br />
90900<br />
5x10x0,2<br />
060/30 (S)<br />
M4x6<br />
85/1<br />
4x6x1,5<br />
91/55<br />
35/13<br />
4x9x4<br />
94/5<br />
91/50 (S)<br />
060/30 (S)<br />
M4x6<br />
38/2<br />
5/16/5<br />
832/82<br />
90150 (S)<br />
M4x14<br />
90890<br />
5x10x0,1<br />
0-0,3mm<br />
90910<br />
0,2-0,5mm<br />
90860<br />
4x8x0,2<br />
5x10x0,3<br />
90900<br />
5x10x0,2<br />
94/5<br />
38/2<br />
5/16/5<br />
90040 (S)<br />
M3x4<br />
90150 (S)<br />
M4x14<br />
90870<br />
4x8x0,3<br />
060/30 (S)<br />
M4x6<br />
16<br />
40<br />
4x13x5<br />
90145 (S)<br />
M4x10<br />
90545<br />
3,2x9<br />
90145 (S)<br />
M4x10<br />
35/13<br />
4x9x4<br />
85/1<br />
4x6x1,5<br />
90207<br />
M6x20 (S)<br />
40<br />
4x13x5<br />
90860 0,2-0,5mm<br />
4x8x0,2<br />
060/30 (S)<br />
M4x6<br />
832/78<br />
35/13<br />
4x9x4<br />
832/72<br />
2x 832/74<br />
soft<br />
832/77<br />
90870<br />
4x8x0,3<br />
832/73<br />
90545<br />
3,2x9<br />
117/3<br />
<strong>Ord</strong>.<strong>No</strong>.10/36<br />
052<br />
90040 (S)<br />
M3x4<br />
832/47<br />
hard<br />
75/1<br />
10,0mm<br />
832/75<br />
Fett<br />
117/2<br />
832/54<br />
11,0mm<br />
75/1<br />
90147 (S)<br />
M4x12<br />
832/76<br />
Fett<br />
<strong>Ord</strong>.<strong>No</strong>.10/36<br />
75/1<br />
Fett<br />
832/75<br />
11,0mm<br />
<strong>Ord</strong>.<strong>No</strong>.10/36<br />
10,0mm<br />
832/76<br />
75/1<br />
2x832/74<br />
soft<br />
832/77<br />
117/2<br />
(S) <strong>Ord</strong>.<strong>No</strong>.10/24<br />
117/3<br />
832/47<br />
hard<br />
90207<br />
M6x20 (S)
!<br />
A<br />
A<br />
B B<br />
16.1<br />
0<br />
0
4x<br />
<strong>Ord</strong>.<strong>No</strong>. 11/73<br />
Ø2,8 mm<br />
107/17<br />
70/172<br />
Ø3x172<br />
107/17<br />
ca. 186mm<br />
90385M<br />
4x4 (S)<br />
2x 832/56<br />
Ø3x40<br />
17<br />
832/55<br />
90370<br />
M3x4 (S)<br />
90370<br />
M3x4 (S)<br />
90385M<br />
4x4 (S)<br />
(S) <strong>Ord</strong>.<strong>No</strong>. 10/24
107/31<br />
3m m<br />
70/142<br />
Ø3x142<br />
107/31<br />
3m m<br />
ca.162mm<br />
ca. 156mm<br />
89/7<br />
Ø3<br />
107/31<br />
3m m<br />
107/31<br />
3m m<br />
18<br />
<strong>Ord</strong>.<strong>No</strong>. 416<br />
70/142<br />
Ø3x142<br />
107/31<br />
3m m<br />
107/31<br />
3m m<br />
107/31<br />
3m m<br />
ca. 156mm<br />
107/31<br />
3m m<br />
89/7<br />
Ø3<br />
ca.162mm
<strong>Ord</strong>.<strong>No</strong>.10/36<br />
92/36<br />
17/22<br />
6x13x5<br />
4x 90010<br />
M2x6<br />
Fett<br />
4x 90010<br />
M2x6<br />
92/37<br />
91310<br />
3x 90810<br />
3x5x0,5<br />
90365<br />
M3x3 (Sh)<br />
2x 90365<br />
M3x3(Sh)<br />
71/11<br />
3x7x3<br />
94/4<br />
90525<br />
M2<br />
95/5<br />
95/6<br />
96/1<br />
5x13x5<br />
90890<br />
5x10x0,1<br />
ca. 0-0,6mm<br />
0...0,6mm<br />
97/10<br />
97/7<br />
!<br />
90930<br />
6x12x0,1<br />
ca. 0-0,6mm<br />
ca. 0-0,6mm<br />
97/12<br />
71/11<br />
3x7x3<br />
90900<br />
5x10x0,2<br />
90910<br />
5x10x0,3<br />
90940<br />
6x12x0,2<br />
90950<br />
6x12x0,3<br />
! !<br />
2x 10⁷/12<br />
2x4,8<br />
94/16<br />
92/30<br />
0...0,6mm<br />
90425<br />
M3x20 (S)<br />
96/1<br />
5x13x5<br />
0...0,6mm<br />
90022<br />
M2x14<br />
91310<br />
6,3x7,8x0,18<br />
49/12<br />
90020<br />
M2x10<br />
90010<br />
M2x6<br />
92/36<br />
17/22<br />
6x13x5<br />
90062<br />
M3,5x8 (S)<br />
94/27<br />
7x13x3<br />
<strong>Ord</strong>.<strong>No</strong>.10/36<br />
4x 900010<br />
M2x6<br />
90548<br />
3,7x11<br />
Fett<br />
Ø7,0<br />
19<br />
91320<br />
7,3x8,8x0,18<br />
Ø7,2<br />
64/16<br />
8x12x3,5<br />
99/6<br />
98/16<br />
94/17<br />
90020<br />
M2x10<br />
90385<br />
M4x4 (S)<br />
64/16<br />
8x12x3,5<br />
<strong>Ord</strong>.<strong>No</strong>.10/37<br />
OIL<br />
103/6<br />
107/24<br />
2x5x2,3<br />
107/22<br />
90530<br />
M3<br />
94/27<br />
7x13x3<br />
90538<br />
2x4x1<br />
107/12<br />
94/27<br />
7x13x3<br />
100/6<br />
101/26<br />
90250<br />
M2x6 (S)<br />
103/6<br />
107/22<br />
(S)<br />
90385<br />
M4x4 (S)<br />
107/24<br />
2x5x2,3<br />
Ø7,2<br />
90538<br />
2x4x1<br />
Linksgewinde<br />
counterclockwise<br />
053<br />
M3x24<br />
90530<br />
M3<br />
Ø7,0<br />
94/27<br />
7x13x3<br />
90020<br />
M2x10<br />
!<br />
053<br />
M3x24<br />
94/17<br />
91320<br />
7,3x8,8x0,18<br />
90062<br />
M3,5x8 (S)<br />
34/36<br />
90548<br />
3,7x11<br />
(S) <strong>Ord</strong>.<strong>No</strong>. 10/24<br />
(Sh) <strong>Ord</strong>.<strong>No</strong>. 10/23
<strong>Ord</strong>.<strong>No</strong>.10/36<br />
Fett<br />
808/15<br />
722/14<br />
260/17<br />
55/2<br />
8x19x6<br />
90410<br />
2,2x6<br />
A<br />
260/7<br />
90350<br />
2,9x13<br />
A A + 10mm A A - 10mm<br />
20<br />
90350<br />
2,9x13<br />
830/49<br />
38/2<br />
5x16x5<br />
2x 90385<br />
M4x4 (S)<br />
2x 90145<br />
M4x10(S)<br />
331<br />
17/8 (Sh)<br />
38/2<br />
5x16x5<br />
722/47<br />
3x 90144<br />
M4x8 (S)<br />
2x 90385<br />
M4x4 (S)<br />
49/18<br />
49/8<br />
2x 90145<br />
M4x10(S)<br />
4x <strong>Ord</strong>.<strong>No</strong>. 11/89<br />
Ø4,0mm<br />
(S) <strong>Ord</strong>.<strong>No</strong>. 10/24
Ansicht Z<br />
0°<br />
0°<br />
260/11<br />
0°<br />
4x 90160<br />
M4x18<br />
<strong>Ord</strong>.<strong>No</strong>. 11/72<br />
Ø2,5mm<br />
<strong>Ord</strong>.<strong>No</strong>.10/27<br />
Ansicht Z<br />
260/3<br />
4x 90565<br />
4,3x12<br />
!<br />
21<br />
<strong>Ord</strong>.<strong>No</strong>. 11/72<br />
Ø2,5mm<br />
2x 260/2<br />
90355<br />
2,9x16<br />
2x 90175<br />
M4x25<br />
90175<br />
M4x25<br />
260/2<br />
ca. 340mm<br />
90175<br />
M4x25
0,5mm<br />
0,5mm<br />
722/14<br />
3x 90385<br />
M4x4 (S)<br />
17/8 (Sh)<br />
49/18<br />
0 2<br />
2x 90385<br />
M4x4 (S)<br />
22<br />
49/8<br />
4 6<br />
0 2 4 6<br />
M + 1 mm<br />
M
<strong>Ord</strong>.<strong>No</strong>. 11/89<br />
Ø4,0mm<br />
links und rechts<br />
left and right<br />
2x 90165<br />
M4x20<br />
260/10<br />
2x 90565<br />
4,3x12<br />
<strong>Ord</strong>.<strong>No</strong>. 11/89<br />
Ø4,0mm<br />
2x 90565<br />
4,3x12<br />
260/15<br />
90150<br />
M4x16<br />
260/11<br />
2x 90150<br />
M4x14(S)<br />
90565<br />
4,3x12<br />
90105<br />
M3x25<br />
90565<br />
4,3x12<br />
260/10<br />
23<br />
260/15<br />
90545<br />
3,2x9<br />
90105<br />
M3x25<br />
90150<br />
M4x16<br />
890/12<br />
90355<br />
2,9x16<br />
260/10<br />
90545<br />
3,2x9<br />
<strong>Ord</strong>.<strong>No</strong>. 11/72<br />
Ø2,5mm<br />
260/15<br />
890/12<br />
90530<br />
M3<br />
(S) <strong>Ord</strong>.<strong>No</strong>. 10/24<br />
90530<br />
M3
!<br />
21/5<br />
90362<br />
M2,5x16<br />
107/17<br />
2,5mm<br />
21/5<br />
90362<br />
M2,5x16<br />
<strong>Ord</strong>.<strong>No</strong>.10/26<br />
107/17<br />
2,5mm<br />
!<br />
24<br />
<strong>Ord</strong>.<strong>No</strong>.10/26<br />
21/5<br />
!
830/26<br />
a Betanken<br />
filler line<br />
remplissage<br />
b Vergaserleitung carburettor fuel feed line vers carburateur<br />
c Entlüftung vent line<br />
prise d'air<br />
<strong>Ord</strong>.<strong>No</strong>.26/30<br />
a<br />
c<br />
b<br />
<strong>Ord</strong>.<strong>No</strong>.830/83<br />
400/16<br />
a<br />
b<br />
c<br />
<strong>Ord</strong>.<strong>No</strong>.830/68<br />
ca.100mm<br />
25<br />
9/20
Schalldämpferanlage XLV Benzin<br />
<strong>Ord</strong>.<strong>No</strong>. 260/16<br />
90145<br />
M4x10<br />
90565<br />
4,3x12<br />
310/18<br />
90565<br />
4,3x12<br />
116/2<br />
26<br />
115/11<br />
90535<br />
M4<br />
90145<br />
M4x10<br />
90565<br />
4,3x12<br />
2x 90565<br />
4,3x12<br />
260/57<br />
2x 90180<br />
M4x30<br />
90155<br />
M4x16<br />
940/80<br />
115/29<br />
90200<br />
M5x16<br />
2x 90605<br />
5mm
800/32<br />
M4<br />
10/90<br />
10/90<br />
<strong>Ord</strong>.<strong>No</strong>.11/29<br />
10/90<br />
400/14<br />
<strong>Ord</strong>.<strong>No</strong>. 11/68<br />
Ø6,0mm<br />
10/90<br />
<strong>Ord</strong>.<strong>No</strong>.11/29<br />
260/9<br />
800/32<br />
M4<br />
10/90<br />
800/32<br />
M4<br />
10/90<br />
<strong>Ord</strong>.<strong>No</strong>. 11/29<br />
27<br />
10/90<br />
10/90<br />
<strong>Ord</strong>.<strong>No</strong>.11/29<br />
<strong>Ord</strong>.<strong>No</strong>. 11/68<br />
Ø6,0mm<br />
10/90<br />
800/32<br />
M4<br />
(S) <strong>Ord</strong>.<strong>No</strong>. 10/24
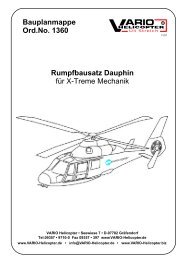
0°<br />
+4°<br />
Ø 2500mm<br />
!<br />
800- max. 850 U/min<br />
800- max. 850 Rpm<br />
28<br />
<strong>Ord</strong>.<strong>No</strong>. 68/17<br />
!
Inbetriebnahme • Operating • Mise en service • Come far funzionare • Ingebruikname<br />
Inbetriebnahme eines Modellhubschraubers<br />
Auch wenn Sie schon „alles“ über Modellhubschrauber wissen sollten Sie folgenden Text lesen :<br />
Prüfen Sie vor der Inbetriebnahme<br />
- Steuerrichtungen (auch Gasfunktion!), Ausschlaggrößen<br />
- Wirkrichtung des Kreisels und senderseitig programmierte Mischfunktionen<br />
- Pitchweg (linearer Verlauf -2/-3° bis +9/+10°) ab Rotorkreis Ø 2000 mm 0° bis +10°<br />
- Servowege können reduziert werden, aber nicht unterhalb des 60%-Wertes (dann mechanische<br />
Veränderung vornehmen) und nur weitgehend symmetrisch<br />
- Pitch min. / Pitch max. und gesamter Roll- und Nickanschlag gleichzeitig in alle Richtungen, dabei<br />
Rotorkopf drehen und prüfen, ob es im Extremausschlag zu einem mechanischen Anlaufen der<br />
Komponenten des Rotorkopfes kommt und der Führungsstift des Pitchkompensators nicht auf die<br />
Taumelscheibe schlägt<br />
- Bei Rotorköpfen mit Taumelscheibenmitnehmer vor jedem (!) Start Funktion und sicheren Sitz des<br />
Kugelgelenkes prüfen<br />
- Autorotationsschalter muß zugeordnet und leicht erreichbar sein!<br />
bei AR: Gasposition auf „Aus“ und alle Steuerrichtungen und Ausschlaggrößen wie im <strong>No</strong>rmalflug,<br />
Heckrotor auf 0 Grad = Festwert<br />
- Verwenden Sie den Heckrotorkreisel vorerst nicht im „heading-lock Modus“<br />
- entgegen manchem Hinweis der Kreiselhersteller benötigen größere Hubschrauber aufgrund ihrer<br />
Massenträgheit doch die Unterstützung durch die senderseitige Heckrotormischfunktionen im<br />
<strong>No</strong>rmalmodus<br />
- Heckrotorposition bei Pitch min 0° - bei Pitch max. haben die im Blatthalter zusammengeklappten<br />
HR-Blätter an den Blattspitzen ca. 50 - 60 mm Abstand<br />
- Stellen Sie den Motor zweifelsfrei „fett“ ein und setzen Sie die Gaskurve sehr niedrig an: die<br />
Gaskurve wird dann in kleinen Schritten angehoben und der Motor vorsichtig „magerer“ gestellt bis<br />
das entsprechende Drehzahlniveau erreicht ist; d.h. von „unten herantasten“!!!<br />
- Die ersten Tankfüllungen sollten nur in Bodennähe bis Höhe ca. 1 m geflogen werden, bis sicher<br />
ist, daß keine Fehler vorhanden sind und alles einwandfrei funktioniert:<br />
- Achten Sie dabei kritisch (!) auf ungewöhnliche Geräusche und Vibrationen und gehen Sie jedem<br />
Zweifel nach!<br />
- Lassen Sie sich nicht durch umstehende Personen zu unnötiger Eile antreiben<br />
- Vermeiden Sie Schwebeflüge außerhalb des Bodeneffektes (ca. 1 m beim Modell, bzw. halber<br />
Rotorkreisdurchmesser als Schwebeflughöhe): sie benötigen sehr hohe Leistung und führen zur<br />
vollständigen Abhängigkeit vom Triebwerk: Modellhubschrauber haben im Gegensatz zu den<br />
meisten Großhubschraubern nur einen (!) Motor<br />
Für die ersten Rundflüge: Im Bodeneffekt auf mittlere Geschwindigkeit beschleunigen und erst dann<br />
den Steigflug einleiten (nur so ist es möglich, jederzeit bei Ausfall der Antriebsleistung sicher zu<br />
landen), stets zügig Vorwärtsfahrt halten und für den Anflug immer gleichmäßigen Sinkflug (ca. 45°)<br />
gegen den Wind zum Landeplatz durchführen und erst im Bodeneffekt zum Stillstand kommen.<br />
� Auch wenn eigentlich alles funktioniert, kann es im Sinkflug trotzdem - und gerade beim<br />
Hochtouren der Systemdrehzahl (Gasvorwahl zu hoch !) - zum Aufschwingen des Hubschraubers<br />
kommen. Für diesen Fall gibt es nur zwei Lösungen: sofort das Pitch auf Schwebeflugposition<br />
bringen und weiteren Sinkflug nur über die Nickfunktion ausführen (d.h. mit geringer Sinkrate<br />
Kreise zum Abbau der Höhe fliegen) oder sofort Autorotation einleiten.
� Sofort bedeutet innerhalb der ersten Sekunde.<br />
� Trainieren Sie vorab gedanklich, was Sie in besonderen Situationen tun müssen.<br />
� Sollte in Ihrem Modell wiederholt ein gleicher technischer Defekt auftreten so wird der erneute<br />
Austausch der Komponente nicht die Lösung sein solange sich an den Betriebsbedingungen<br />
nichts ändert.<br />
� Eine Bitte noch zum Abschluß:<br />
Schätzen Sie Ihre fliegerischen Fähigkeiten realistisch ein. Dazu paßt folgender Vergleich: Wer<br />
nicht schwimmen kann und trotzdem ins tiefe Wasser geht, wird voraussichtlich ertrinken.<br />
Operating a model helicopter for the first time<br />
Even if you already know „all there is to know" about model helicopters please read the following<br />
notes carefully:<br />
Before operating the model check the following points:<br />
- The direction of servo rotation (including the throttle function) and travels.<br />
- The direction of effect of the gyro, and the transmitter mixer functions you have programmed.<br />
- Collective pitch travel (linear travel -2/-3° to +9/+10°); rotor diameter 2000 mm Ø plus: 0° to +10°<br />
- It is permissible to reduce servo travels, but not below 60% (in this case adjust the mechanical<br />
linkage); travels should be primarily symmetrical.<br />
- Apply collective pitch min. / collective pitch max. and full roll and pitch-axis commands<br />
simultaneously in all directions; rotate the rotor head at the same time, and check that at the<br />
extremes of travel no part of the rotor head is obstructed, and the collective pitch compensator<br />
guide pin does not foul the swashplate.<br />
- Check the safe connection of the ball link of the swashplate driver before each flight, if the rotor<br />
head is using one.<br />
- The auto-rotation switch must be assigned, and within easy reach!<br />
- When auto-rotation is selected: throttle position to off, all directions of control and travels as in<br />
normal flight, tail rotor to 0° = fixed value.<br />
- Do not set the tail rotor gyro to work in „heading-lock mode" initially.<br />
- Contrary to the information supplied by many gyro manufacturers, the greater inertia of larger<br />
helicopters means that they do need the support of tail rotor mixer functions in normal mode.<br />
- Tail rotor position 0° at collective pitch min.; at collective pitch max. the tail rotor blade tips should<br />
be about 50 - 60 mm apart when the blades are folded together in the blade holders.<br />
- Set the motor distinctly „rich", and set the throttle curve very low: the throttle curve should then be<br />
raised gradually in small increments, and the motor cautiously „leaned out" until the correct rotor<br />
speed level is reached; i.e. work „upwards" towards the correct speed!<br />
- The first few tankfuls should be flown with the model close to the ground, i.e. no more than about 1<br />
m altitude, until you are confident that there are no defects or errors, and that everything is working<br />
faultlessly:<br />
- Use your ears critically (!), listening for unusual sounds and vibration, and seek out the problem if<br />
you are in any doubt at all!<br />
- Don’t listen to anyone standing close by if they try to hurry you into flying the model.<br />
- Avoid hovering outside ground effect (hover altitude with a model: approx. 1 m, or half the rotor<br />
disc diameter):<br />
- Hovering requires very high power, and you are completely dependent on the motor: in contrast to<br />
most full-size helicopters, model helicopters have only one (!) power plant.
- If your rotor head features a swashplate driver, check that the ball-link is secured properly and<br />
functioning correctly before every (!) flight.<br />
For the first few circuits: starting from ground effect, accelerate to a moderate speed in level flight,<br />
and only then initiate a climb (this is the only way to ensure that you can land safely at any time if the<br />
motor fails); always keep the model flying at a brisk forward speed; on the landing approach always<br />
descend towards the landing area at a steady angle (around 45°) directly into wind, and don’t bring<br />
the model to a halt until it is in ground effect again.<br />
� Even if everything is actually working properly, you may still find that the helicopter balloons up on<br />
the descent - especially if the system rotational speed is allowed to rise (idle-up set too high !). If<br />
this happens, there are two solutions available to you: immediately move collective pitch to the<br />
hover position, and resume the descent using the pitch-axis function only (i.e. reduce height by<br />
flying circles at a low rate of descent); the alternative is to carry out an auto-rotation landing<br />
immediately.<br />
� Immediately means within the first second.<br />
� Before flying you should deliberately practise mentally what you need to do in particular situations.<br />
� If one particular technical fault keeps recurring in your model, replacing the component concerned<br />
will not solve the problem unless you change some other aspect of the operating conditions.<br />
� And one final request:<br />
Please be realistic when assessing your piloting skills. Keep this comparison in mind: if you can’t<br />
swim and you dive into deep water, the chances are that you will drown.<br />
Mise en service d’un hélicoptère modèle réduit<br />
Même si vous savez “tout” en ce qui concerne les modèles d’hélicoptères vous devriez lire le texte<br />
suivant:<br />
Vérifiez avant la mise en service<br />
- Sens des commandes (y compris fonction des gaz), débattements.<br />
- Sens de réaction du gyroscope et des fonctions de mixage programmables depuis l’émetteur.<br />
- Course de Pas (courbe linéaire de -2/-3° jusqu’à +9/+10°), et à partir d’un diamètre de rotor de Ø<br />
2000 mm de 0° à +10°<br />
- Les courses de servo peuvent être réduites, mais pas en dessous d’une valeur de 60% (procéder<br />
dans ce cas à un ajustage mécanique), préférez les débattements symétriques.<br />
- Bougez Pas mini / Pas maxi et les butées de roulis et de tangage dans toutes les directions.<br />
Tournez la tête de rotor et vérifiez qu’il n’y ait pas de problème mécanique avec les composants<br />
de la tête de rotor, et que la tige de guidage de la bague de serrage ne heurte pas le plateau<br />
cyclique.<br />
- Dans le cas de têtes de rotor avec entraîneur de plateau cyclique, vérifier la bonne tenue de la<br />
chape avant chaque (!) démarrage.<br />
- L’interrupteur d’autorotation doit être attribué et accessible!<br />
En autorotation: postion de la voie des gaz sur "coupé" et toutes les commandes et débattements<br />
comme en vol normal, rotor d’anticouple sur une valeur fixe de 0°<br />
En autorotation: moteur au ralenti et toutes les commandes et débattements comme en vol<br />
normal, rotor d’anticouple sur une valeur fixe de 0°<br />
- Utilisez le gyroscope d’abord en mode normal, pas en "verrouillage de cap".<br />
- Contraire à certains conseils des fabricants de gyroscopes, des hélicoptères de grande taille<br />
nécessitent malgré tout un mixage Pas/anticouple pour compenser la dérive.<br />
- Position du rotor d’anticouple à Pas mini = 0°; en Pas maxi, les pales d’anticouple repliées dans<br />
les porte-pales, affichent une distance de 50 – 60 mm en bout des pales.
- En cas de doute, réglez le mélange du moteur plutôt “gras” et programmez une courbe des gaz<br />
relativement plate: cette courbe sera augmenté par petits pas et les réglages du moteur ajusté<br />
doucement dans le sens “pauvre” jusqu’à ce que le régime souhaité est obtenu; on s’approche<br />
donc à petit pas depuis le bas!<br />
- Pendant les premiers réservoirs, il est conseillé d’évoluer à une hauteur maximale de 1 mètre,<br />
jusqu’à ce qu’on soit sur qu’il n’y ait plus d’erreur et que tout fonctionne parfaitement bien.<br />
- Surveillez de façon critique (!) tout bruit ou vibration suspects et cherchez la raison de chacun de<br />
vos doutes.<br />
- Ne vous laissez pas presser par des personnes de votre entourage.<br />
- Evitez des vols stationnaires en dehors de l’effet de sol (env. 1 m en fonction du modèle, sinon<br />
prenez la moitié du diamètre du rotor comme hauteur de vol): ils nécessitent une très grande<br />
puissance et vous mettent en dépendance totale du moteur: les modèles d’hélicoptères ont –<br />
contrairement aux exemples grandeur, dans la plupart de cas qu’un seul moteur!<br />
Pour les premiers vols: Accélérez dans l’effet de sol sur une vitesse moyenne et commencez le vols<br />
ascensionnel qu’à ce moment précis (c’est le seul moyen d’atterrir sans difficulté dans le cas d’une<br />
défaillance du moteur). Gardez toujours une vitesse de translation correcte et efforcez-vous de<br />
réaliser l’approche dans une descente homogène (env. 45°), face au vent, et avec un arrêt dans<br />
l’effet de sol.<br />
� Même si tout va bien, il se peut que dans la descente – et notamment lorsque le système de rotor<br />
prend des tours (régime moteur trop élevé) vous provoquez une oscillation de l’hélicoptère. Dans<br />
ce cas, il n’existe que deux solutions: remettre immédiatement le Pas en position vol stationnaire<br />
et continuer la descente en se servant uniquement de la fonction du tangage (réaliser une<br />
descente en cercles avec une pente très faible) ou passer en mode autorotation.<br />
� Immédiatement veut dire en moins d’une seconde.<br />
� Réfléchissez à ce genre de scénario avant d’entamer le vol.<br />
� Si vous rencontrez une même défaillance technique à plusieurs reprises, le remplacement du<br />
composant n’est donc pas forcément la bonne solution, tant que les conditions d’exploitation ne<br />
changent pas.<br />
� Un conseil pour la fin:<br />
Ne surestimez pas vos qualités de pilote. Prenez l’exemple suivant :Celui qui ne sait pas nager et<br />
qui s’aventure malgré tout dans des eaux profondes, risque fortement de se noyer.<br />
Come far funzionare un elimodello per la prima volta<br />
Anche se pensate di sapere già “tutto” sugli elimodelli leggete attentamente le seguenti istruzioni:<br />
Prima di mettere in moto il modello controllate:<br />
- la direzione della rotazione del servo e del carburatore (anche il funzionamento dell’ acceleratore!)<br />
e le relative lunghezze di corsa<br />
- la direzione d’azione del giroscopio e le funzioni miscelatore programmate dal trasmettitore<br />
- il movimento passo da –2/-3° a +9/+10°. <strong>No</strong>n superare i 10° per rotori inferiori a diametro 2000 mm<br />
- i movimenti del servo possono essere ridotti, ma solo in modo simmetrico e non al di sotto del 60%<br />
(in questo caso regolate i collegamenti meccanici)<br />
- sistemate il passo min./ il passo max. e tutte le posizione nick e roll contemporaneamente in tutte<br />
le direzioni, ruotate nello stesso momento la testa rotore e verificare che nelle lunghezze di corsa<br />
estreme nessuna parte della testa rotore sia ostruita, e che il perno di comando del compensatore<br />
di passo non tocchi il piatto oscillante<br />
- nelle teste rotore con trascinatore piatto oscillante controllate prima (!) di ogni decollo che gli<br />
uniball siano fissati bene
- per quanto riguarda le teste rotore con trascinatore del piatto oscillante controllate prima (!) di ogni<br />
decollo che lo snodo sferico sia fissato bene<br />
- sul trasmettitore l’interruttore dell’autorotazione deve essere posizionato bene e deve essere<br />
facilmente raggiungibile!<br />
- In caso di autorotazione: l’acceleratore deve essere in posizione “off” (spento), tutte le direzioni di<br />
comando e lunghezze di corsa come nel volo normale, rotore di coda su 0 gradi = valore fisso<br />
- all’inizio non utilizzate il giroscopio rotore di coda nel “heading-lock mode”<br />
- contrariamente ad alcuni suggerimenti dei produttori di giroscopi gli elicotteri grandi, a causa della<br />
loro inerzia, necessitano il sostegno delle funzioni miscelatore rotore di coda programmate dalla<br />
trasmittente nel modo normale<br />
- posizione rotore di coda 0° con passo min. - con passo max. le estremità delle pale testa rotore<br />
devono essere distanti circa 50-60 mm quando le pale sono piegate nel portapale<br />
- regolate il motore “grasso” e mettete la curva gas molto bassa: la curva gas aumenterà un po’ alla<br />
volta e il motore diventerà pian piano “magro” finché non viene raggiunto il livello di numero di giri<br />
corrispondente; ciò significa “avvicinarsi lentamente ” alla velocità corretta!!!<br />
- i primi voli devono avvenire volando in prossimità del suolo, a un’altezza di circa 1 m, finché si è<br />
sicuri che non esistono difetti e che tutto funziona perfettamente:<br />
- fate attenzione inoltre, con orecchio critico(!) a rumori insoliti e a vibrazioni e verificate ogni dubbio!<br />
- non fatevi mettere fretta dalle persone che vi circondano, non ascoltate gli incompetenti e fidatevi<br />
solo di un “elicotterista” esperto.<br />
- evitate figure acrobatiche in prossimità del suolo (oltre il metro o la metà del diametro rotore): gli<br />
hovering necessitano di una prestazione più elevata e della massima sicurezza di funzionamento<br />
del motore: gli elimodelli rispetto alla maggior parte degli elicotteri veri hanno solo un(!) motore<br />
Per il primo volo: nell’effetto suolo accelerare a una velocità media e solo dopo iniziare la salita (in<br />
questo modo è possibile atterrare sempre in modo sicuro nel caso di un guasto al motore), tenere<br />
sempre costantemente la marcia avanti e per l’atterraggio effettuare sempre un volo in discesa<br />
costante (ca. 45°) controvento fino al terreno d’atterraggio e arrestarsi solo nell’effetto suolo.<br />
� nella discesa, anche se in realtà tutto funziona, nel caso di eccessivo aumento di rotazione del<br />
motore (selezione gas troppo elevata!) l’elicottero cambia la sua traiettoria di discesa. In questo<br />
caso ci sono due soluzioni: portare il passo in posizione di equilibrio e effettuare la discesa solo<br />
con la funzione nick (ciò significa ridurre l’altezza volando in cerchio a bassa quota di discesa)<br />
oppure iniziare l’autorotazione.<br />
� subito significa entro il primo secondo<br />
� esercitatevi mentalmente prima di volare, su come dovete comportarvi in particolari situazioni<br />
� se nel vostro modello si dovesse presentare ripetutamente uno stesso difetto tecnico, la<br />
sostituzione del componente non sarebbe la soluzione: occorre verificare il funzionamento di tutto<br />
il meccanismo.<br />
� ancora una cortesia prima di concludere:<br />
valutate in modo realistico le vostre capacità di volo. E ricordatevi questo paragone: chi non sa<br />
nuotare e ciononostante va nell’acqua alta, con ogni probabilità morirà annegato.<br />
Ingebruikname van een modelhelicopter.<br />
Ook wanneer U “alles” over modelhelicopters weet moet U de volgende tekst lezen:<br />
Controleer voor het in gebruik nemen;<br />
- De stuurrichtingen (ook de gasfunctie), en de grootte van de uitslagen.<br />
- Werkrichting van de gyro en van de in de zender geprogrammeerde mixfuncties.<br />
- Pitchweg (lineair verloop –2/-3° tot +9/+10°) vanaf rotordiameter Ø 2000mm 0° tot + 10°<br />
- Servoweg kan verminderd worden, maar niet meer dan 60% van de eigenlijke waarde,
(in geval van grotere waarden dan alleen mechanisch dit instellen) en zoveel mogelijk symetrisch<br />
Pitch min. / Pitch max. en zowel de rol- en nickuitslag tegelijkertijd in alle richtingen bewegen,<br />
daarbij de rotorkop draaien en controleren of bij de maximum uitslagen er geen mechanisch<br />
vastlopen van de rotorkopkomponenten ontstaat en de geleidingsstift van de pitchcompensator<br />
niet op de tuimelschijf kan slaan.<br />
- Bij rotorkoppen met een tuimelschijfmeenemer voor elke ! startprocedure de kogellinks op de juiste<br />
montagepositie controleren.<br />
- De autorotatieschakelaar moet aangesloten en gemakkelijk te bedienen zijn! (instelling bij<br />
autorotatie; motor op positie „uit“ en alle stuurrichtingen en uitslagen zoals bij normaal vliegen,)<br />
staartrotor op 0 graden = vaste waarde.<br />
- Gebruik de gyro voor de staartrotor vooralsnog niet in de “heading-lock modus”.<br />
- In tegenstelling tot wat menige gyro-fabrikanten voorschrijven, hebben grotere helicopters op<br />
grond van hun massa-traagheid een instelling op de zender van staartrotormixing in de<br />
normaalmode nodig.<br />
- Staartrotorpositie bij pitch min 0° - bij pitch max. hebben de in de bladhouder samengeklapte<br />
staartrotor-bladen een afstand tussen de bladeinden van ca 50 – 60 mm<br />
- Stelt U de motor in het begin “vet” af , en stel de gaskurve laag in: de gaskurve wordt dan in kleine<br />
stappen omhoog gebracht en de motor wordt dan voorzichtig “mager” ingesteld totdat het juiste<br />
toerentalniveau bereikt is; d.w.z. van onderaan opbouwen!<br />
- De eerste tankvulling moet alleen op een hoogte van ca 1 mtr gevlogen worden, totdat het zeker<br />
is, dat er geen problemen zijn en alles storingsvrij functioneert:<br />
- Let U daarbij kritisch ( ! ) op ongewone geluiden en vibraties en in voorkomend geval dit eerst<br />
verhelpen!<br />
- Laat U niet door omstanders “opjutten“.<br />
- Vermijd zweefvlucht behalve bij het z.g. bodem-effect (ca 1 mtr bij model, d.w.z. halve<br />
rotordiameter als zweefvluchthoogte): Het kost n.l. veel vermogen en U bent afhankelijk van de<br />
motor: Modelhelicopters hebben in tegenstelling tot de meeste “echte” helicopters maar de<br />
beschikking over een ! motor.<br />
Voor de eerste rondvluchten: In bodemeffect tot gemiddelde snelheid opvoeren om pas dan omhoog<br />
te gaan (alleen zo is het mogelijk wanneer de motor uitvalt altijd veilig te landen) ; hou steeds een<br />
voorwaarstvlucht aan en voor de landing altijd een gelijkmatige daalvlucht (ca 45 °) tegen de wind in<br />
tot de landingsplek, om dan eerst in het z.g. bodemeffect tot stilstand te komen.<br />
� Ook wanneer alles eigenlijk goed functioneert, kan het toch voorkomen dat in daalvlucht het<br />
toerental te hoog oploopt (Idle up te hoog !) wat enorme trillingen aan de helicopter kan<br />
veroorzaken. In dat geval zijn er maar twee oplossingen: direct de pitch naar zweefvluchtpostitie<br />
brengen, en verdere daalvlucht alleen via de nickfunctie uitvoeren. (d.w.z. met geringe<br />
daalsnelheid bochten vliegen om zo de hoogte te verminderen) of direct een autorotatie uitvoeren.<br />
� Direct betekent binnen de eerste seconde.<br />
� Traint U zich vooraf in gedachten, wat U in zo’n bijzondere situatie moet doen.<br />
� Wanneer in uw model steeds weer dezelfde storing / technisch defect optreedt ook na venieuwing<br />
van de onderdelen is het duidelijk dat dit niet de oplossing van het probleem is, zolang er niets aan<br />
de instellingen van de helicopter wordt veranderd.<br />
Een opmerking nog ter afsluiting:<br />
Schat uw vliegervaring realistisch in: daartoe past de volgende vergelijking: wie niet zwemmen kan<br />
en toch in het diepe water springt, zal zeker verdrinken!