Ramsey Winch Company
Ramsey Winch Company
Ramsey Winch Company
- No tags were found...

You also want an ePaper? Increase the reach of your titles
YUMPU automatically turns print PDFs into web optimized ePapers that Google loves.
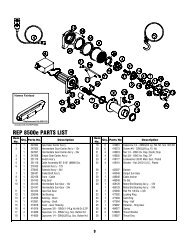
Operating InstructionsThe winch clutch allows rapid unspooling of the wirerope for hooking onto the load or anchor point. Theclutch is operated by the shifter knob located on the gearhousing end of the winch as follows:1. To disengage the clutch, move the clutch shifter knobto the “OUT” position. Wire rope may now befreespooled off the drum.2. To engage the clutch, move the clutch shifter knobinto the “IN” position. The winch is now ready forpulling.Electrical Connections and OperationsSee the installation instructions for the Safety On/OffSwitch, Part No. 282062, supplied with the winch, toinstall the On/Off switch.For normal self-recovery work, your existing electricalsystem is adequate. Your battery must be kept in goodcondition. A fully charged battery and proper connectionsare essential. Run the vehicle engine duringwinching operations to keep battery charged.Route battery cables up to battery.CAUTION: BE SURE BATTERY CABLES ARE NOT DRAWN TAUTACROSS ANY SURFACES WHICH COULD POSSIBLY DAMAGETHEM.Connect red cable to positive (+) battery terminal.Connect black ground cable to negative (-) terminal ofbattery (See Figure 1).The remote control switch is water proof. It has pushbuttons on either side. Make sure the motor has stoppedfully before reversing. To actuate winch simply plugremote control switch into receptacle in cover of winch.Run winch forward and reverse to check directions.Snap appropriate “IN” and “OUT” disc into proper thumbcavity. Do not leave switch plugged in when winch isnot in use.MaintenanceAll moving parts are permanently lubricated with hightemperature lithium grease at the time of assembly.Under normal conditions factory lubrication will suffice.Lubricate cable periodically using light penetrating oil.Inspect the cable for broken strands and replace if necessary.If the cable becomes worn or damaged, it mustbe replaced.Corrosion on electrical connections will reduce performanceor may cause a short. Clean all connectionsespecially in remote control switch and receptacle. Insalty environments use a silicone sealer to protect fromcorrosion.To minimize corrosion of the internal motor componentsthat may occur due to condensation, power the winch inor out periodically. Energizing the motor will generateheat, which will help dissipate any moisture buildup inthe motor. This should be performed at periodic intervals(such as with each oil change of your vehicle). Note:Refer to the Troubleshooting Guide if the motor has beensubmerged.Cable Installation1. Unwind the new cable by rolling it out along theground to prevent kinking.2. Remove old cable and observe the manner in which itis attached to the cable drum flange.3. Before installing the new cable assembly, securelywrap the end of the cable with plastic tape or similartape to prevent fraying.4. Position the cable drum so that the large 13/32”diameter hole in the motor end drum flange is approximatelyon the top.5. Form a short bend (approximately 1/2” long) in theend of the cable. Insert the bend into the 13/32” holein the drum flange and then carefully run the winch inthe “reel in” direction approximately 3/4 revolutionuntil the 1/4” diameter threaded hole in the drumflange is on top.6. Secure the cable to the drum flange using cableanchor and capscrew shown in the parts drawing onpage 7 (Item nos. 20 and 30). Securely tighten thecapscrew, but do not over-tighten.7. Wind 5 wraps of cable onto the drum. Wind on therest of the cable by pulling in a light load to keep thetension constant. Allow the cable to swivel by using alength of chain or a swivel block between the cablehook and the load.5